• Skip to primary navigation
  • Skip to main content
  • Skip to primary sidebar
  • Skip to footer

FlashRouters Support Portal

Prioritizing Privacy

  • SETUP GUIDES
    • Privacy Hero Router Setup Guide
    • ASUS-WRT Router Setup Guide
    • AsusWRT-Merlin Router Setup Guide
    • DD-WRT Router Setup Guide
    • ExpressVPN Router Setup Guide
    • GL.iNet Router Setup Guide
    • Roqos Core Router Setup Guide
  • TROUBLESHOOTING
    • Router Access
    • WiFi Connectivity
    • Internet Connection Issues
    • General VPN Issues
    • DD-WRT Firmware
    • TeamViewer Remote Support
  • FAQs
    • Router FAQs
    • VPN FAQs
    • Warranty and Returns FAQs
    • Sales FAQs
    • Shipping FAQs
    • Service Plan FAQs
  • Show Search
Hide Search

Search Results for: 000 3.

VPN Router Setup Guides & FAQs | FlashRouters Help Center

Support Guides

Select your router type

Privacy hero Routers

Router Models

Privacy Hero, Privacy Hero 2

PRIVACY HERO SETUP GUIDE
Asus Merlin Router Support Guides

Router Models

ASUS
  • RT Series: RT-AC68U, RT-AC88U, RT-AC3100, RT-AC5300, RT-AC86U, RT-AX56U, RT-AX58U, RT-AX68U, RT-AX86U. RT-AX86U-PRO, RT-AX88U, RT-AX88U-PRO, RT-BE86U, RT-BE88U, RT-BE92U, RT-BE96U
  • GT Series: GT-AC2900, GT-AX6000, GT-AX11000, GT-AXE11000,GT-AXE11000-PRO,  GT-AXE16000, GT-BE98_PRO
  • ZenWiFi Pro XT12
MERLIN SETUP GUIDE

Router Models

WR3000, M1800, M3000
CUDY SETUP GUIDE
Asus WRT Router Support Guides

Router Models

GT series: GT6, GT-AXE16000, GT-AX11000 Pro, GT-AXE11000, GT-AX6000, GT-AX11000, GS-AX5400, GS-AX3000
ZenWiFi: ZenWiFi Pro XT12, ZenWiFi Pro ET12, ZenWiFi XT9, ZenWiFi AX (XT8), ZenWiFi ET8, ZenWiFi XD6, ZenWiFi XD5
RT series: RT-AXE7800, RT-AX88U Pro, RT-AX88U, RT-AX86U Pro, RT-AX86U, RT-AX86S, RT-AX68U, RT-AX82U, RT-AX58U, RT-AX3000, RT-AX59U, RT-AX92U
TUF series: TUF-AX5400, TUF-AX3000_V2, TUF-AX3000, TUF Gaming AX6000, TUF Gaming AX4200
ASUS-WRT SETUP GUIDE
TP-Link Router Support Guides

Router Models

Archer AX10000, Archer AX1100, Archer AX21, Archer AX3000, Archer AX3000 Pro, Archer AX3200, Archer AX4400, Archer AX5400 Pro, Archer AX55, Archer AX55 Pro
Archer AX6000, Archer AX72 Pro, Archer AX73, Archer AX75, Archer AX80, Archer AX90
Archer AXE300, Archer AXE5400, Archer AXE75, Archer AXE95
Archer BE550, Archer BE800, Archer BE900, Archer BE9300, Archer GE80, Archer GX90
TP-LINK SETUP GUIDE
gl.iNet Router Setup Guides

Router Models

Flint 2 GL-MT6000, Flint GL-AX1800, Slate GL-AXT1800, Beryl GL-MT3000, Marble GL-B3000

GL.iNet SETUP GUIDE
Roqos Router Support Guides

Router Models

Roqos Core Router, Roqos SASE Appliance

ROQOS SETUP GUIDE
DD-wrt Router Support Guides

Router Models

NETGEAR

AC1450, R6220, R6230, R6250, R6260, R6300 V1, R6300 V2, R6400 V1, R6400 V2, R6700 V1, R6700 V2, R6700 V3, R7000, R7000P, R7800, R8000, R9000, XR500

ASUS

RT-AC56U/R, RT-AC68U V1, RT-AC68U V2, RT-AC1900P, RT-AC87U, RT-AC3100, RT-AC5300

LINKSYS

WRT1200AC, WRT1900AC V1, WRT1900AC V2, WRT1900ACS V1, WRT1900ACS V2, WRT32X, WRT3200ACM

DD-WRT SETUP GUIDE
ExpressVPN Routers

Router Models

ExpressVPN Aircove, Aircove Go

NETGEAR

R6300 V2, R6400 V2, R6700 V3, R7000, R7000P

ASUS

RT-AC56U, RT-AC56R, RT-AC56S, RT-AC68U V3, RT-AC87U

LINKSYS

EA6200, WRT1200AC, WRT1900AC V1, WRT1900AC V2, WRT1900ACS V1, WRT1900ACS V2, WRT32X, WRT3200ACM

EXPRESSVPN SETUP GUIDE

Search Support Articles

Top Router Questions

  • How do I upgrade the DD-WRT firmware of my FlashRouter?
  • Roqos VPN Connected, but my device IP is unchanged
  • How do I access my Roqos device settings?
  • Why can’t I access router settings?
  • How do I reset and reconfigure my ExpressVPN/Aircove FlashRouter?
  • How do I reset and reconfigure my FlashRouter?
  • How do I change my Wireless Password?
  • My 2.4GHz network is not showing up
  • My 5.0GHz network is not showing up
  • My WiFi password is not working
  • Why can’t I connect to WiFi using the WPS button feature?
  • Access FlashRouter DD-WRT firmware settings

More Ways to Get Help

GET IN TOUCH

BUY SUPPORT
BROWSE FAQs

ASUS-WRT Router Setup Guide

ASUSWRT Routers

Quick Start Guide for ASUS-WRT FlashRouters

Find setup guides, FAQs and troubleshooting tips for ASUSWRT configured FlashRouters.

VIEW SUPPORTED ROUTER MODELS

Asus Logo
  • ROG series: GT-BE98 Pro
  • GT series: GT6, GT-AXE16000, GT-AX11000 Pro, GT-AXE11000, GT-AX6000, GT-AX11000, GS-AX5400, GS-AX3000
  • ZenWiFi: ZenWiFi Pro XT12, ZenWiFi Pro ET12, ZenWiFi XT9, ZenWiFi AX (XT8), ZenWiFi ET8, ZenWiFi XD6, ZenWiFi XD5
  • RT series: RT-BE96U, RT-BE88U, RT-BE58U, RT-AXE7800, RT-AX88U Pro, RT-AX88U, RT-AX86U Pro, RT-AX86U, RT-AX86S, RT-AX68U, RT-AX82U, RT-AX58U, RT-AX3000, RT-AX59U, RT-AX92U
  • TUF series: TUF-AX5400, TUF-AX3000_V2, TUF-AX3000, TUF Gaming AX6000, TUF Gaming AX4200

Internet Setup

  • How to Access Your AsusWRT FlashRouter Settings

WiFi Setup

  • Change WiFi name and password on Asus

VPN Setup

  • CyberGhost AsusWRT OpenVPN Setup
  • Surfshark AsusWRT WireGuard Setup
  • NordVPN Setup for AsusWRT Firmware Routers
  • IPVanish AsusWRT OpenVPN Setup
  • PrivateInternetAccess (PIA) AsusWRT OpenVPN Setup
  • ExpressVPN Setup for AsusWRT Firmware Routers
  • PrivateInternetAccess (PIA) Asus AX1800S OpenVPN Setup
  • IPVanish Asus AX1800S OpenVPN Setup
  • ExpressVPN Asus AX1800S OpenVPN Setup
  • NordVPN Asus AX1800S OpenVPN Setup

Asus-WRT Features

Search Support Articles

Troubleshooting

More Ways to Get Help

GET IN TOUCH

BUY SUPPORT
BROWSE FAQs

TP-Link Router Setup Guide

TP-Link Router Support Guides

Quick Start Guide for TP-Link FlashRouters

Find setup guides, FAQs and troubleshooting tips for TP-Link configured FlashRouters.

VIEW SUPPORTED ROUTER MODELS

Archer AX10000, Archer AX1100, Archer AX21, Archer AX3000, Archer AX3000 Pro, Archer AX3200, Archer AX4400, Archer AX5400 Pro, Archer AX55, Archer AX55 Pro
Archer AX6000, Archer AX72 Pro, Archer AX73, Archer AX75, Archer AX80, Archer AX90
Archer AXE300, Archer AXE5400, Archer AXE75, Archer AXE95
Archer BE550, Archer BE800, Archer BE900, Archer BE9300, Archer GE80, Archer GX90

Internet Setup

  • TP-Link Internet Setup
  • TP-Link Access Router Settings

WiFi Setup

  • TP-Link Merge or Separate 2.4GHz and 5GHz Wi-Fi
  • TP-Link Change Wireless Channel
  • TP-Link Change Wi-Fi name and password

VPN Setup

  • ProtonVPN TP-Link WireGuard Setup
  • Surfshark TP-Link OpenVPN Setup
  • Surfshark TP-Link WireGuard Setup
  • IPVanish TP-Link OpenVPN Setup
  • PrivateInternetAccess (PIA) TP-Link OpenVPN Setup
  • NordVPN TP-Link OpenVPN Setup
  • ExpressVPN TP-Link OpenVPN Setup

TP-Link Features

Search Support Articles

Troubleshooting

More Ways to Get Help

GET IN TOUCH

BUY SUPPORT
BROWSE FAQs

Cudy Router Setup Guide

Quick Start Guide for Cudy FlashRouters

Find setup guides, FAQs and troubleshooting tips for Cudy configured FlashRouters.

VIEW SUPPORTED ROUTER MODELS

WR3000, M1800, M3000

Internet Setup

  • Cudy Access Router Settings
  • Cudy Internet Setup

WiFi Setup

  • Cudy Change Wi-Fi name and password

VPN Setup

  • PrivateInternetAccess (PIA) Cudy OpenVPN Setup
  • IPVanish Cudy OpenVPN Setup
  • ExpressVPN Cudy OpenVPN Setup
  • NordVPN Cudy OpenVPN Setup

Cudy Features

Search Support Articles

Troubleshooting

More Ways to Get Help

GET IN TOUCH

BUY SUPPORT
BROWSE FAQs

Netgear R9000 Nighthawk X10 DD-WRT WiFi Settings

Dave · Mar 5, 2019 ·

Recommended DD-WRT WiFi settings for the Netgear R9000 are based on extensive testing by FlashRouters. Please note that optimal settings may vary depending on external factors such as home size, interference, and the types of WiFi devices you are connecting in your network.

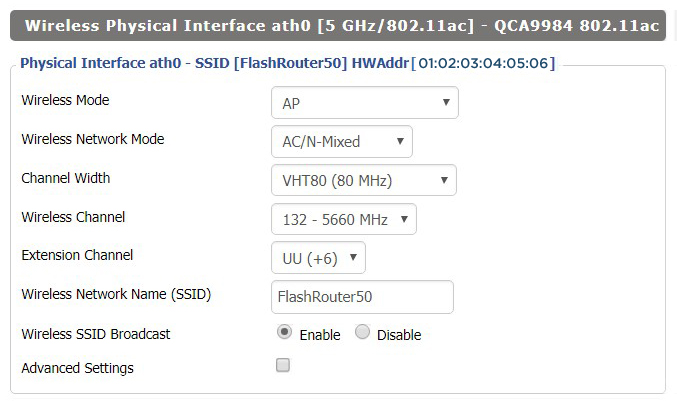
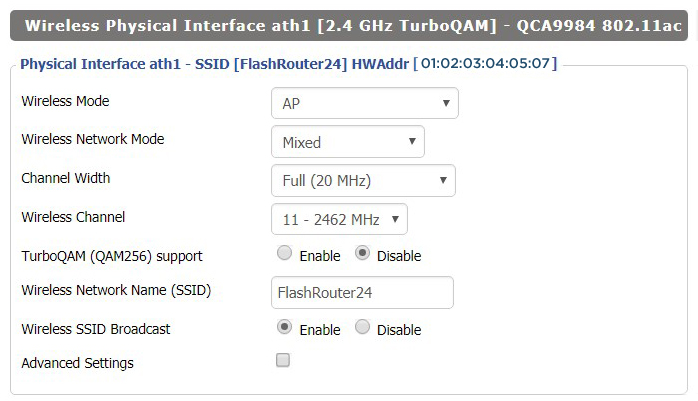
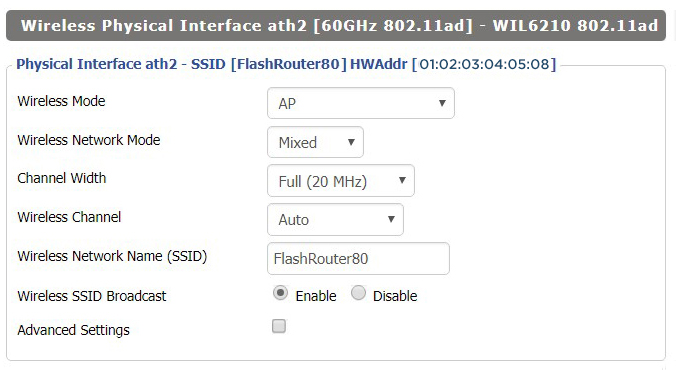
Screenshots below provide a visual display of recommended WiFi and encryption settings exactly as they appear in the Netgear R9000 with DD-WRT firmware.

Navigate to the Wireless > Basic Settings to view or edit WiFi network settings.

5.0 GHz - Wireless-AC

View R9000 DD-WRT FlashRouter 5GHz Settings

2.4 GHz - Wireless-N

View R9000 DD-WRT FlashRouter 2.4GHz Settings

5.0 GHz - Wireless-AD

Additional DD-WRT WiFi Information

Intimidated by all the available WiFi settings? The DD-WRT website provides extensive information about all of the available configuration options in the firmware. Learn about everything from Wireless channels to channel widths and more in the Basic Wireless Settings – DD-WRT Wiki.

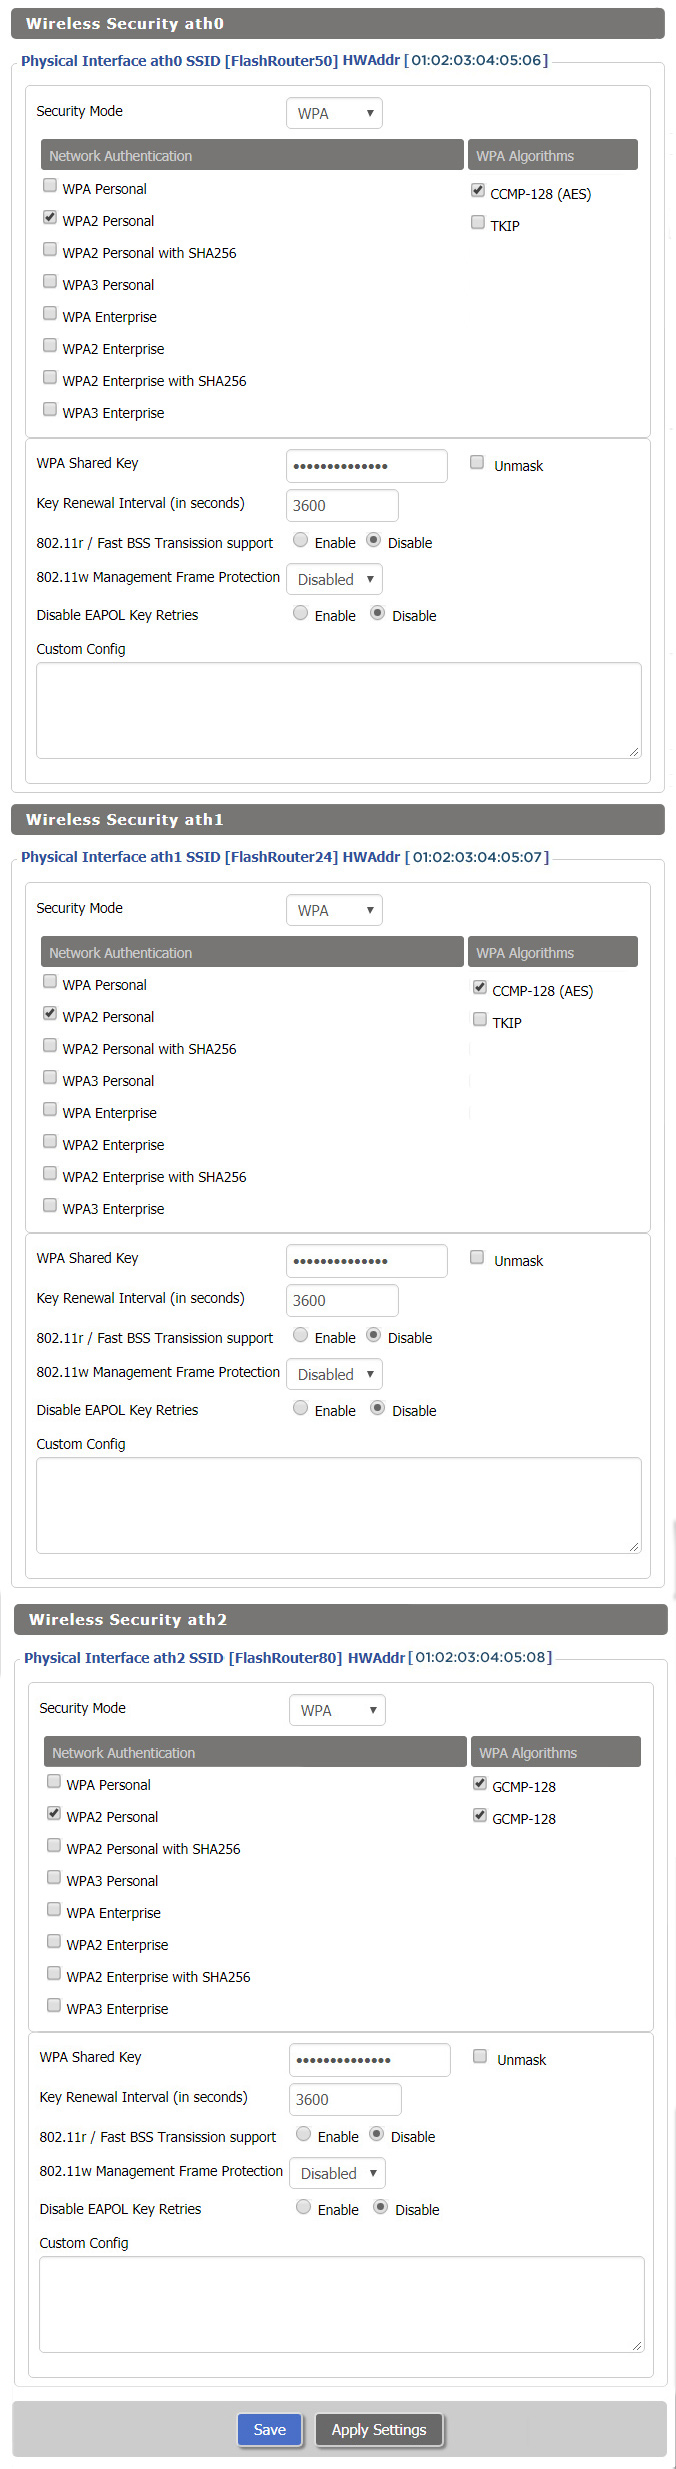
R9000 DD-WRT Wireless Security

The preset R9000 FlashRouter WiFi password is Wireless#[First 5 characters of your router MAC]. The router MAC can be found on the bottom of your router. For e.g. if your MAC is 1459C07E70A8 then your WiFi password is Wireless#1459C

Navigate to the Wireless > Wireless Security to view or edit WiFi passwords.

TROUBLESHOOTING

Trouble with your Netgear R9000 WiFi? Visit the Wireless troubleshooting section.

Troubleshoot Here

Netgear R7000 Nighthawk DD-WRT WiFi Settings

Dave · Feb 25, 2019 ·

Recommended DD-WRT WiFi settings for the Netgear R7000 are based on extensive testing by FlashRouters. Please note that optimal settings may vary depending on external factors such as home size, interference, and the types of WiFi devices you are connecting in your network.

Screenshots below provide a visual display of recommended WiFi and encryption settings exactly as they appear in the Netgear R7000 with DD-WRT firmware.

Navigate to the Wireless > Basic Settings to view or edit WiFi network settings.

2.4 GHz - Wireless-N

View R7000 DD-WRT FlashRouter 2.4GHz Settings

5.0 GHz - Wireless-AC

View R7000 DD-WRT FlashRouter 5GHz Settings

Additional DD-WRT WiFi Information

Intimidated by all the available WiFi settings? The DD-WRT website provides extensive information about all of the available configuration options in the firmware. Learn about everything from Wireless channels to channel widths and more in the Basic Wireless Settings – DD-WRT Wiki.

R7000 DD-WRT Wireless Security

The preset R7000 FlashRouter WiFi password is Wireless#[First 5 characters of your router MAC]. The router MAC can be found on the bottom of your router. For e.g. if your MAC is 1459C07E70A8 then your WiFi password is Wireless#1459C

Navigate to the Wireless > Wireless Security to view or edit WiFi passwords.

View R7000 DD-WRT FlashRouter WiFi Security Settings

TROUBLESHOOTING

Trouble with your Netgear R7000 WiFi? Visit the Wireless troubleshooting section.

Troubleshoot Here

GL.iNet Router Setup Guide

Quick Start Guide for GL.iNet FlashRouters

Find setup guides, FAQs and troubleshooting tips for GL.iNet FlashRouters.

VIEW SUPPORTED ROUTER MODELS

  • Slate: GL-AX1800, GL-AXT1800, GL-BE3600
  • Flint: GL-MT6000
  • Other: Beryl GL-MT3000, Velica GL-B2200, Marble GL-B3000
Flint GLinet Router Support

Internet Setup

  • How to Access Your GL.iNet FlashRouter Settings
  • Flint/Slate GL.iNet Repeater Setup
  • Flint/Slate GL.iNet Internet Setup

WiFi Setup

  • Flint/Slate GL.iNet Guest Network Setup
  • Flint/Slate GL.iNet Disable Wi-Fi
  • Flint/Slate GL.iNet Change Wi-Fi name and password

VPN Setup

  • Flint/Slate GL.iNet PureVPN WireGuard Setup
  • ProtonVPN Setup Guide for GL.iNet Routers
  • NordVPN Setup for GL.iNet Routers
  • Flint/Slate GL.iNet ExpressVPN OpenVPN Setup

GL.iNet Features

  • Flint/Slate GL.iNet Repeater Setup
  • GL.iNet Access Router Settings and Firmware Upgrade

Search Support Articles

Troubleshooting

More Ways to Get Help

GET IN TOUCH

BUY SUPPORT
BROWSE FAQs

DD-WRT Router Setup Guide

DD-WRT Router Setup Guide

Quick Start Guide for DD-WRT FlashRouters

Find setup guides, FAQs and troubleshooting tips for DD-WRT configured FlashRouters.

VIEW SUPPORTED ROUTER MODELS

AC1450, R6220, R6230, R6250, R6260, R6300 V1, R6300 V2, R6400 V1, R6400 V2, R6700 V1, R6700 V2, R6700 V3, R7000, R7000P, R7800, R8000, R9000, XR500

Asus Logo

RT-AC56U/R, RT-AC68U V1, RT-AC68U V2, RT-AC1900P, RT-AC87U, RT-AC3100, RT-AC5300

WRT1200AC, WRT1900AC V1, WRT1900AC V2, WRT1900ACS V1, WRT1900ACS V2, WRT32X, WRT3200ACM

Internet Setup

  • Connect FlashRouter to Internet
  • Access FlashRouter DD-WRT firmware settings
  • What are some extra steps I can take to secure my network?
  • IPv6 Internet Setup
  • PPPoE Internet Setup

WiFi Setup

VPN Setup

DD-WRT Features

  • How do I set a Static IP for my device in DD-WRT?
  • How do I upgrade the DD-WRT firmware of my FlashRouter?
  • How do I save and load a backup file?
  • How do I schedule a reboot of my FlashRouter?
  • How do I change the DHCP range of my FlashRouter?

Search Support Articles

Troubleshooting

  • Why can’t I send emails while connected to VPN?
  • What is a DNS leak and how can I prevent a DNS leak in my router?
  • My VPN stopped working on my FlashRouter.
  • Why is my connection speed slower?
  • Why are streaming services blocked while connected to VPN?
  • How do I find my router local IP address?
  • How do I reset and reconfigure my FlashRouter?
  • How do I check for static network settings on my devices?
  • Why is my router not connecting to internet?
  • How to fix an Unidentified Network or Limited Connection.
  • Why are some of my devices not connecting to the internet?
  • Why is the internet LED red on my router?
  • Why is the power light on my FlashRouter blinking?
  • My 2.4GHz network is not showing up
  • My 5.0GHz network is not showing up
  • My WiFi password is not working
  • Why did my WiFi SSID change to ‘dd-wrt’?
  • Why are devices disconnecting from Wireless?
  • Why is my WiFi signal weak?

More Ways to Get Help

GET IN TOUCH

BUY SUPPORT
BROWSE FAQs

AsusWRT-Merlin Router Setup Guide

Asus-Merlin Router Setup

Quick Start Guide for AsusWRT-Merlin FlashRouters

Find setup guides, FAQs and troubleshooting tips for Asus-Merlin configured FlashRouters.

VIEW SUPPORTED ROUTER MODELS

Asus Logo
  • RT-BE88U (BE7200), RT-AC68U, RT-AC88U, RT-AC3100, RT-AC5300, RT-AC86U, RT-AX56U, RT-AX58U, RT-AX68U, RT-AX86U. RT-AX86U-PRO, RT-AX88U, RT-AX88U-PRO
  • GT-AC2900, GT-AX6000, GT-AX11000, GT-AXE11000,GT-AXE11000-PRO,  GT-AXE16000
  • ZenWiFi Pro XT12

Internet Setup

  • Internet and Wifi Setup on Asus Merlin Firmware
  • DNS Setup for Asus Merlin

WiFi Setup

  • Change WiFi name and password on Merlin
  • Separate your WiFi 2.4GHz and 5GHz Merlin networks

VPN Setup

  • Connecting to OpenVPN on Asus Merlin Firmware
  • PureVPN Merlin WireGuard Setup
  • Surfshark Merlin WireGuard Setup
  • ProtonVPN Merlin WireGuard Setup
  • IPVanish Merlin OpenVPN Setup
  • PrivateInternetAccess (PIA) Merlin OpenVPN Setup
  • NordVPN Merlin OpenVPN Setup
  • ExpressVPN Merlin OpenVPN Setup
  • CyberGhost Merlin OpenVPN Setup

AsusWRT-Merlin Features

  • VPN Director for Asus Merlin
  • VPN Killswitch for Asus Merlin

Search Support Articles

Troubleshooting

  • How do I find my router local IP address?

More Ways to Get Help

GET IN TOUCH

BUY SUPPORT
BROWSE FAQs

ExpressVPN Router Setup Guide

Quick Start Guide for ExpressVPN FlashRouters

Find setup guides, FAQs and troubleshooting tips for ExpressVPN configured FlashRouters.

VIEW SUPPORTED ROUTER MODELS

Aircove

R6300 V2, R6400 V2, R6700 V3, R7000, R7000P

Asus Logo

RT-AC56U, RT-AC56R, RT-AC56S, RT-AC68U V3, RT-AC87U

EA6200, WRT1200AC, WRT1900AC V1, WRT1900AC V2, WRT1900ACS V1, WRT1900ACS V2, WRT32X, WRT3200ACM

Internet Setup

  • ExpressVPN Asus Quick Start Guide
  • ExpressVPN Netgear Quick Start Guide
  • ExpressVPN Linksys Quick Start Guide
  • ExpressVPN/Aircove FlashRouter Internet Setup and Activation
  • How do I reset and reconfigure my ExpressVPN/Aircove FlashRouter?

WiFi Setup

  • Separate 2.4GHz and 5GHz Wi-Fi bands on ExpressVPN/Aircove firmware
  • Change Wireless Channels on ExpressVPN/Aircove firmware

VPN Setup

  • Change server locations on ExpressVPN/Aircove firmware
  • Using Device Groups to connect to multiple VPN locations on ExpressVPN/Aircove firmware
  • Using Device Groups to bypass VPN on ExpressVPN/Aircove firmware
  • Change VPN Protocols on ExpressVPN/Aircove firmware
  • ExpressVPN TP-Link OpenVPN Setup
  • ExpressVPN Cudy OpenVPN Setup
  • ExpressVPN Asus AX1800S OpenVPN Setup
  • Flint/Slate GL.iNet ExpressVPN OpenVPN Setup
  • ExpressVPN Merlin OpenVPN Setup

ExpressVPN Features

  • ExpressVPN MediaStreamer SmartDNS Setup
  • ExpressVPN Router App Support

Search Support Articles

Troubleshooting

  • Separate 2.4GHz and 5GHz Wi-Fi bands on ExpressVPN/Aircove firmware
  • Change Wireless Channels on ExpressVPN/Aircove firmware
  • How do I reset and reconfigure my ExpressVPN/Aircove FlashRouter?

More Ways to Get Help

GET IN TOUCH

BUY SUPPORT
BROWSE FAQs

Cudy Internet Setup

TeamFlashRouters · Feb 26, 2024 ·

Follow this article when you receive your new Cudy FlashRouter to connect it to the Internet.

1. Connect the ethernet cable that came with the router from an open LAN ethernet port on your ISP modem or other router to the WAN port if you purchased a Cudy AX3000 or to ethernet port #1 of the device marked Primary if you purchased a Cudy M1800 or Cudy M3000.

Cudy Mesh internet wiring

2. Connect the power to the router and wait about 2 minutes for the router to fully boot up.

3. Connect your computer, phone, or tablet to the Cudy router via wireless (FlashRouter24 / FlashRouter50) or via ethernet cable to one of the LAN ports on the router.

The FlashRouter WiFi password is printed on the sheet that came with the router and is set to Wireless#[First 5 characters of your router MAC]. The router MAC can be found on the bottom of your router if you cannot locate the sheet. For e.g. if your MAC is 1459C07E70A8 then your WiFi password is Wireless#1459C

Be sure to capitalize the W.

4. Once connected via wireless or ethernet on your device open your browser and go to 192.168.10.1

Cudy local IP access

5. Enter openwrt as the admin password to access the Cudy firmware settings.

Cudy router access

6. Verify that your Cudy FlashRouter is reporting as Internet and WAN Connected.

Cudy Verify Internet

6. Verify that your Cudy FlashRouter is reporting as Internet and WAN Connected.

7. If you purchased a Cudy M1800 or Cudy M3000 mesh package you can now take the unit labeled Node to the location you want it connecting from and power it up. It will connect to the Primary network that was just setup automatically. You will then see the Mesh Units number increase according to the number that you have purchased shortly.

Cudy Verify Mesh connection

TROUBLESHOOTING

Still having issues? Visit the VPN Troubleshooting section.

Troubleshoot Here

How do I upgrade the DD-WRT firmware of my FlashRouter?

TeamFlashRouters · May 30, 2019 ·

The following DD-WRT builds are from 11/24/2024 r58699. Keep in mind that these builds are for upgrading routers that already have DD-WRT firmware flashed. To flash a stock firmware router with DD-WRT firmware see our Flash My Router plan!

Download an updated DD-WRT firmware build for your specific FlashRouter model below. Contact support@flashrouters.com if you are uncertain about your router model or your router model is not available below.

  • Asus RT-AC5300
  • Asus RT-AC56U
  • Asus RT-AC66U
  • Asus RT-AC68U
  • Asus RT-AC87U
  • Linksys WRT1200AC
  • Linksys WRT1900AC
  • Linksys WRT1900ACv2
  • Linksys WRT1900ACS
  • Linksys WRT1900ACSv2
  • Linksys WRT3200ACM
  • Linksys WRT32X
  • Netgear R6300v2
  • Netgear R6400
  • Netgear R6400v2
  • Netgear R6700
  • Netgear R6700v2
  • Netgear R6700v3
  • Netgear R7000
  • Netgear R7000P
  • Netgear R7450
  • Netgear R7800
  • Netgear R8000
  • Netgear R8500
  • Netgear R9000

Please be aware that FlashRouters is not responsible for any DIY firmware flashing updates. If you have questions or concerns contact FlashRouters Support or check out the DD-WRT Community for additional helpful resources.

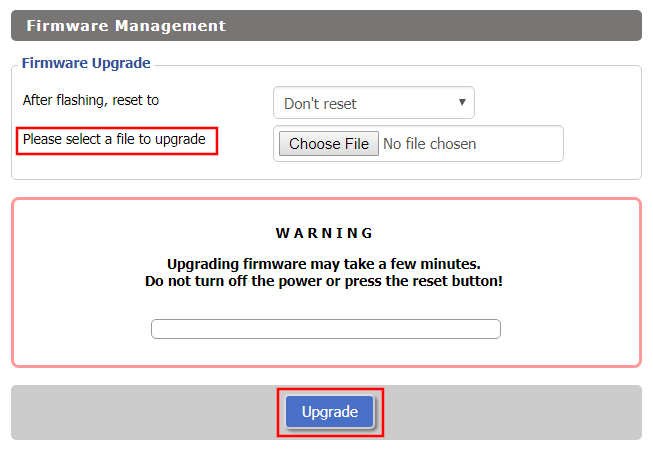
Make sure you are following the directions below to load the firmware file into the router settings and not trying to open the firmware file on its own.

Access the FlashRouter via wired connection. It is possible to upgrade firmware via WiFi, but this is not recommended unless you are unable to wire directly to the router.

Navigate to Administration > Firmware Upgrade

Firmware Upgrade page in FlashRouter DD-WRT settings
  1. Do NOT select Reset to Default Settings in the dropdown menu as this will erase all of your FlashRouter settings.
    NOTE: If you are updating from an older DD-WRT build you may be required to reset the router after a firmware update for new features and UI to properly load. You will then be required to setup the administration username and password along with your WiFi and VPN network settings.
  2. Click Choose File and select the file you have downloaded.
  3. Click Upgrade.

Privacy Hero Router Setup Guide

Privacy Hero Routers

Quick Start Guide for Privacy Hero FlashRouters

Find setup guides, FAQs and troubleshooting tips for Privacy Hero FlashRouters.

Privacy Hero 2

Internet Setup

  • Privacy Hero Activation and Setup
  • Privacy Hero Access Router Settings
  • Privacy Hero Creating User Profiles and Adding Devices to Profiles

WiFi Setup

  • Privacy Hero Activation and Setup
  • Privacy Hero Change Wi-Fi Name and Password
  • Privacy Hero Change Wireless Channel
  • Privacy Hero Disable Wi-Fi

VPN Setup

  • NordVPN Setup Guide for Privacy Hero
  • Surfshark VPN Setup Guide for Privacy Hero
  • IPVanish VPN Setup Guide for Privacy Hero
  • ProtonVPN Setup Guide for Privacy Hero
  • ExpressVPN Setup Guide for Privacy Hero
  • Private Internet Access VPN Setup Guide for Privacy Hero
  • Privacy Hero VPN Setup Guide for Privacy Hero
  • Privacy Hero VPN Kill Switch Setup

Privacy Hero Features

  • Privacy Hero Activation and Setup
  • Privacy Hero VPN Kill Switch Setup
  • Privacy Hero Bypass certain devices from VPN
  • Privacy Hero Streaming Relocation
  • Privacy Hero Adblocking Malware and Phishing Prevention Setup
  • Privacy Hero Creating User Profiles and Adding Devices to Profiles
  • Privacy Hero Safe Surf
  • Privacy Hero Bedtime Settings (Internet Scheduler)

Search Support Articles

Troubleshooting

  • Privacy Hero Change VPN Providers

More Ways to Get Help

GET IN TOUCH

BUY SUPPORT
BROWSE FAQs

IVPN WireGuard Setup

TeamFlashRouters · Oct 13, 2021 ·

Preparing for IVPN WireGuard Setup

Verify your IVPN login information

If you are not already a IVPN user Sign Up Now.

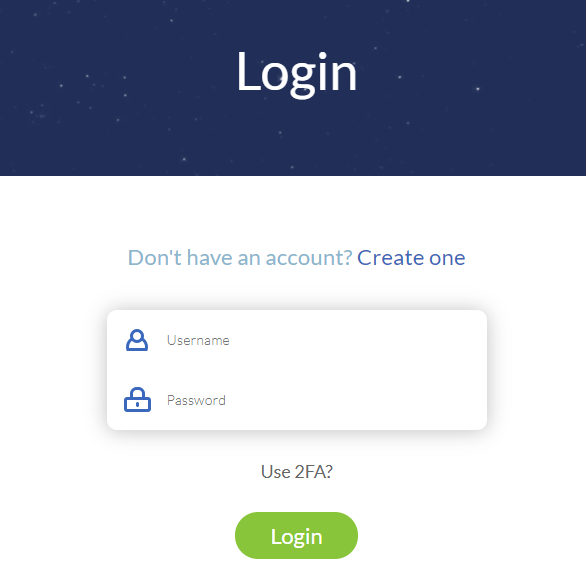
Log in to your account on the IVPN website.

IVPN website login

DD-WRT Router Setup for IVPN WireGuard

Navigate to Setup > Tunnels 

Enter IVPN WireGuard settings

1. Click Add Tunnel.

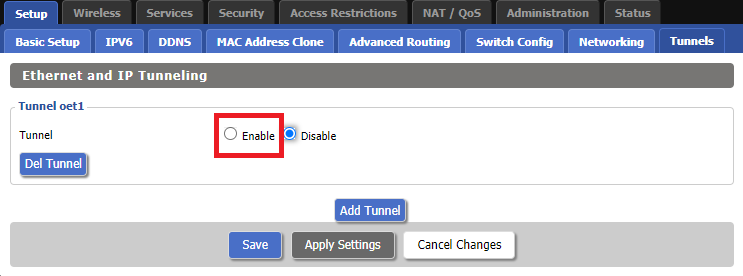
2. Set Tunnel to Enable.

Setup - Tunnel - Enable Tunnel

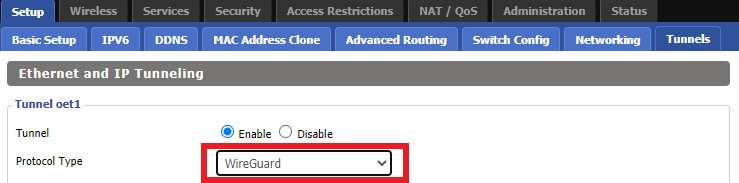
3. Select Wireguard from the dropdown.

Setup - Tunnel - Select Wireguard

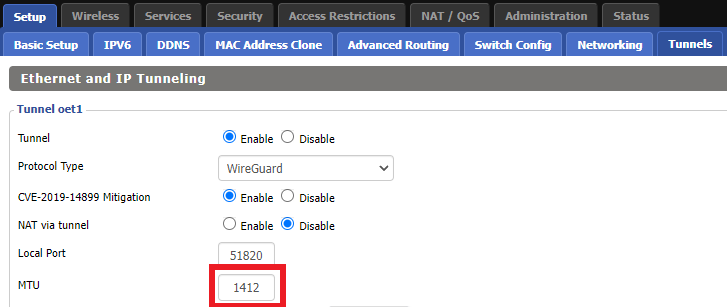
3. Set MTU to 1412.

IVPN Wireguard MTU setting

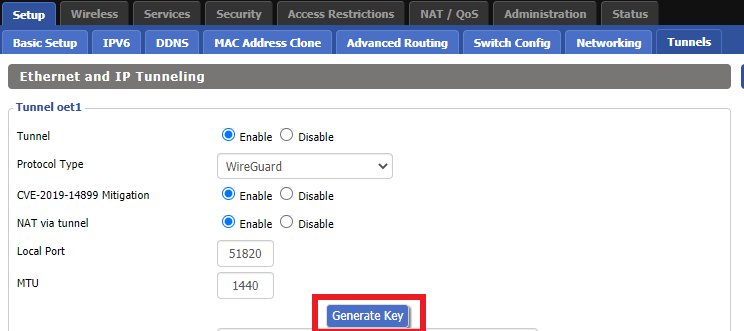
4. Click Generate Key.

Setup - Tunnel - Generate Key

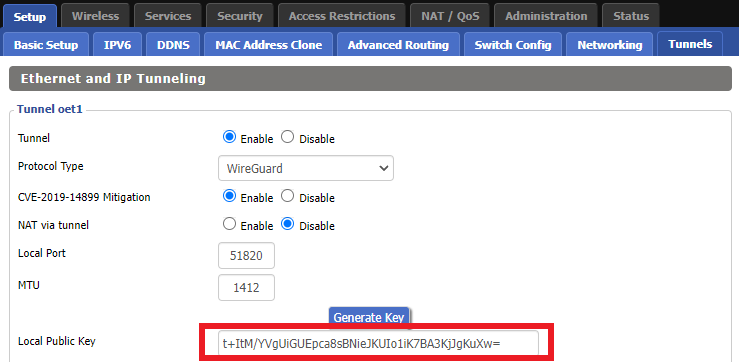
9. Copy the Local Public Key.

IVPN Wireguard Local Public Key

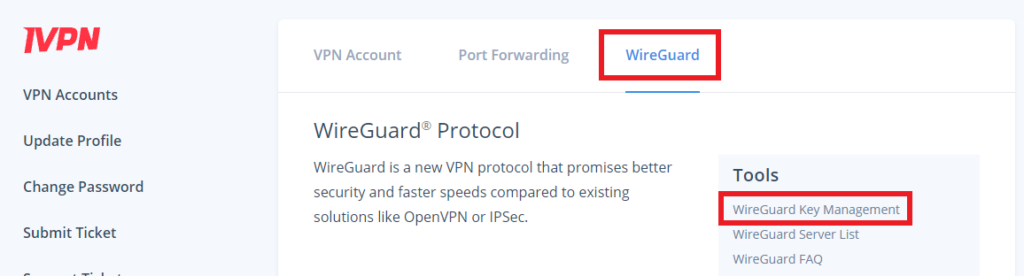
10. In a new tab (leave the DD-WRT settings opened), go to your IVPN Account and click WireGuard and then click WireGuard Key Management.

IVPN Wireguard Key Management

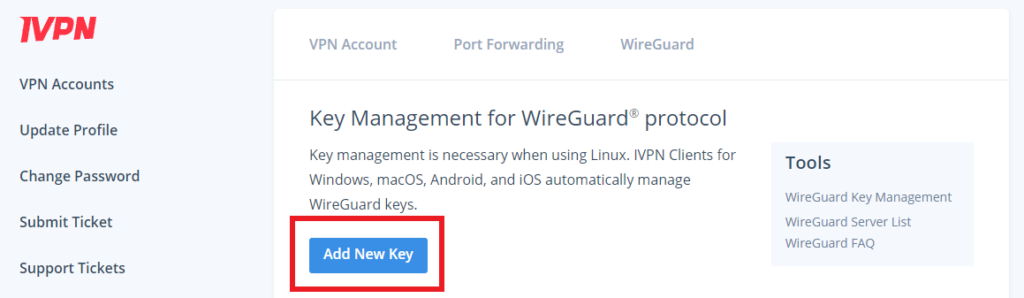
11. Click Add New Key.

IVPN Wireguard Add New Key

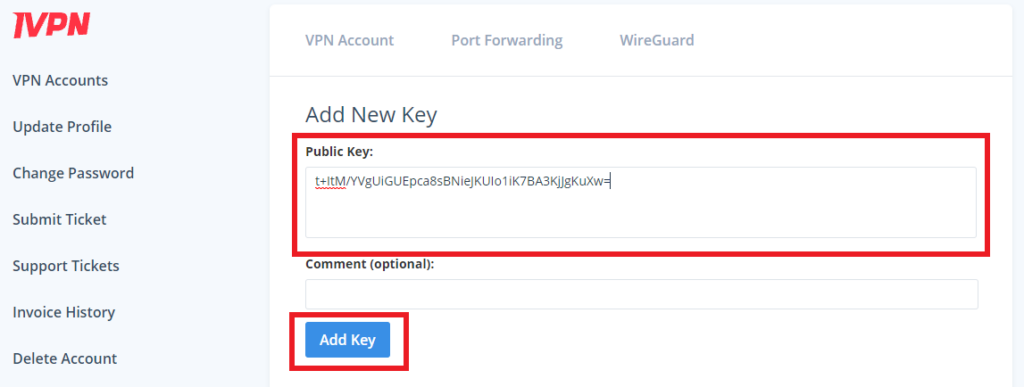
12. Paste the copied Local Public key to the Public Key field and click Add Key.

IVPN Wireguard Paste Public Key

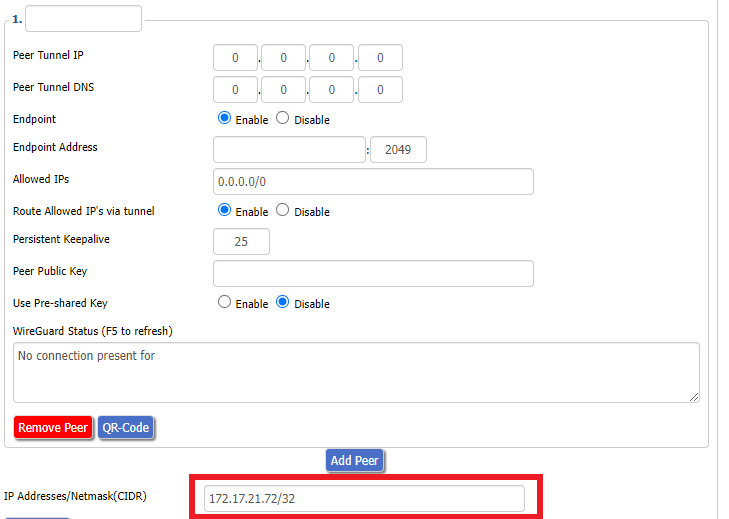
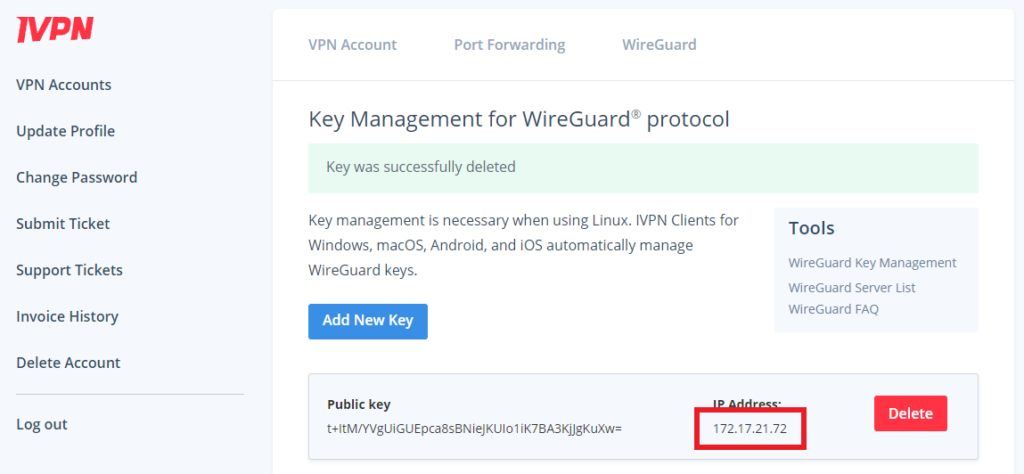
13.Copy the IP Address assigned to your public key and add it to the IP Addresses/Netmask(CIDR) field followed by a /32 subnet mask.

IVPN Wireguard copy IP Address
IVPN Wireguard paste IP Address

Certain DD-WRT builds will show two separate fields here: IP Address and Subnet Mask. If that is the case set the IP Address field to the Address without the /32 added and set the Subnet Mask to 255.255.255.255

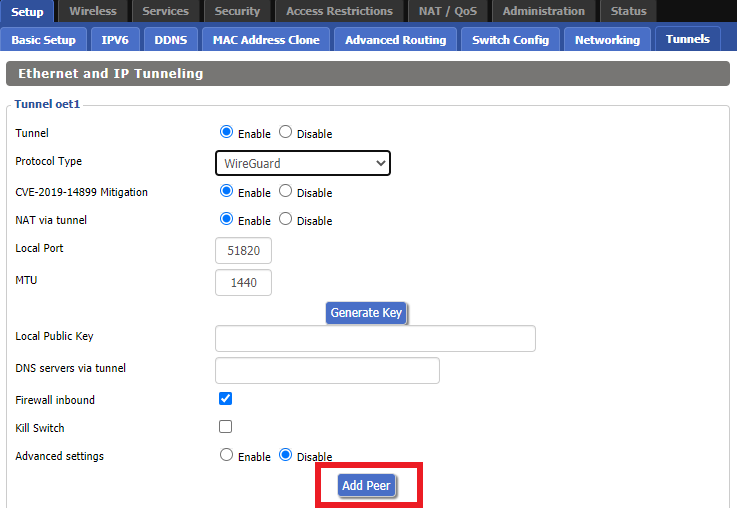
14. Click Add Peer.

Setup - Tunnel - Add Peer

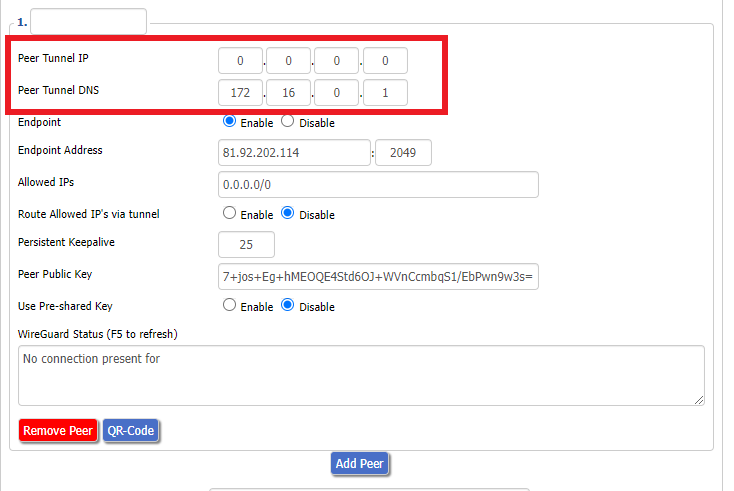
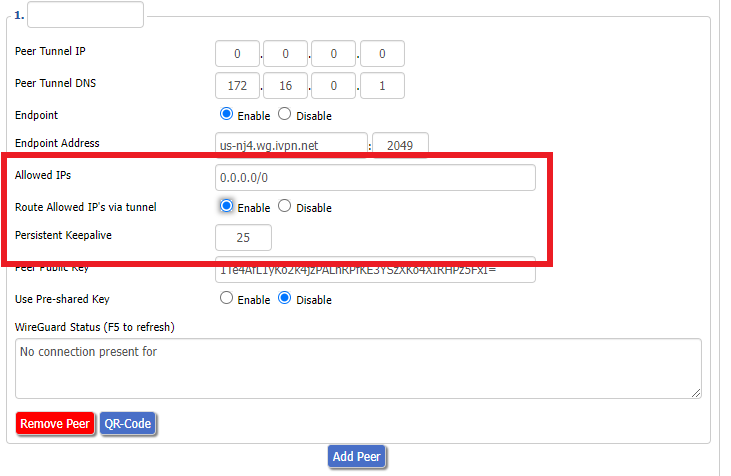
15. Set the Peer Tunnel IP to 0.0.0.0. Set Peer Tunnel DNS to 172.16.0.1

IVPN Wireguard Peer Tunnel IP and DNS

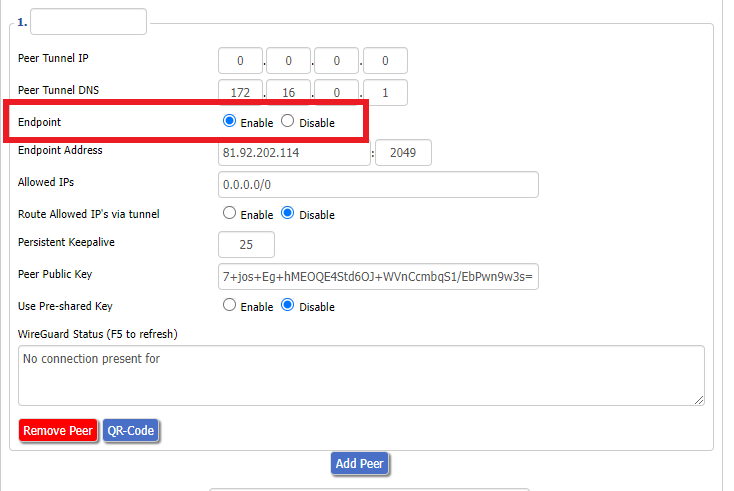
16. Set Endpoint to Enable.

IVPN Wireguard Enable Endpoint

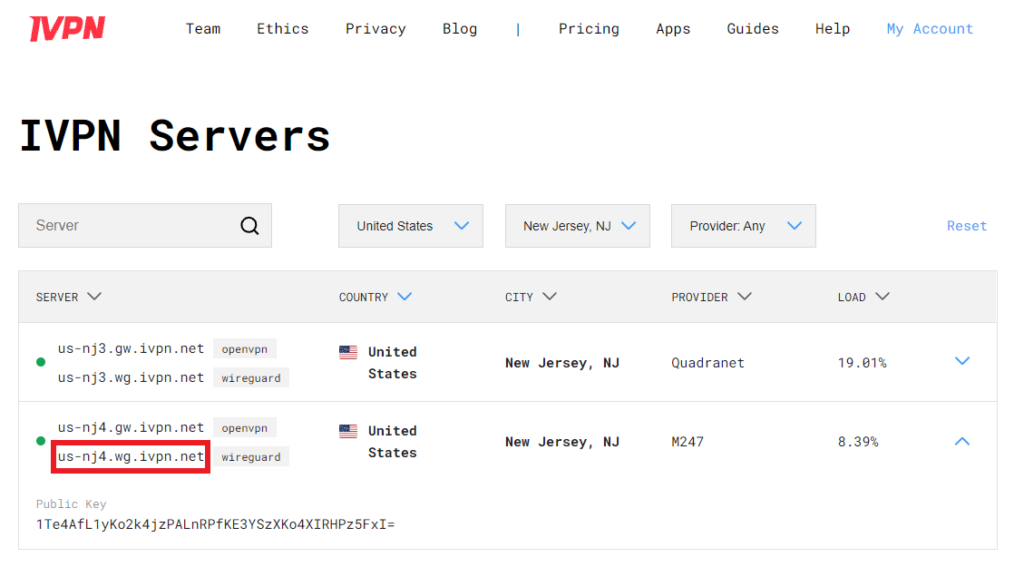
17. Go to the IVPN Server Status page and copy the server name for the WireGuard server location you want to connect to.

IVPN Wireguard Endpoint server

Be sure to copy the WireGuard server address and not the OpenVPN server address.

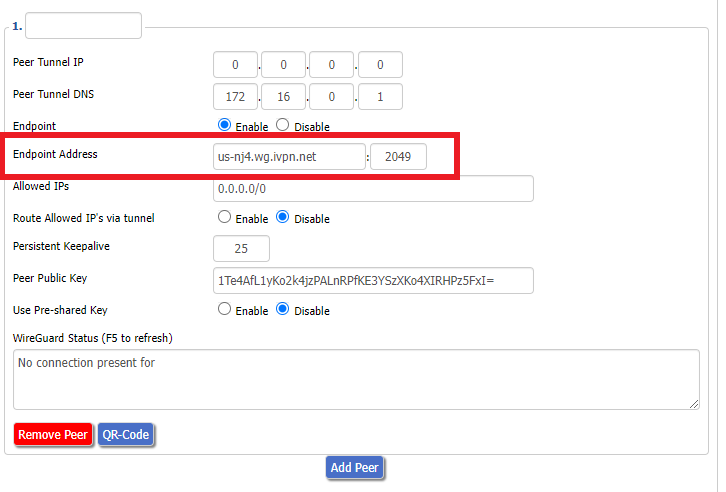
18. Paste the server name you copied into the Endpoint Address field and set the Port to 2049.

IVPN Wireguard Endpoint Address

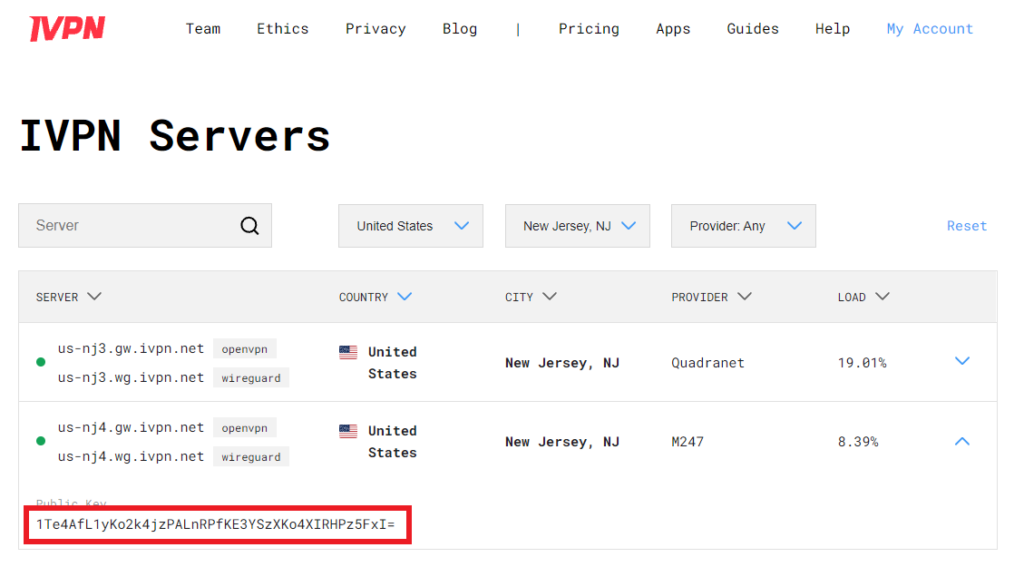
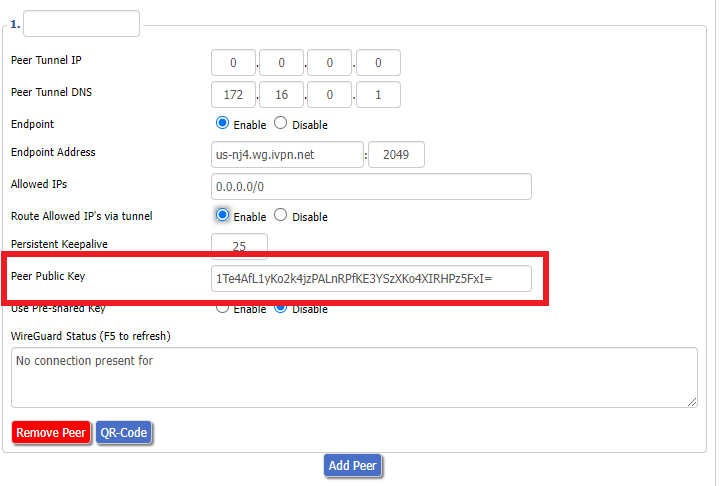
19. On the IVPN Server Status page copy the Public Key of the server location you entered. Paste the Public Key into the Peer Public Key field.

IVPN Wireguard copy server Public Key
IVPN Wireguard enter Peer Public Key

20. Leave Allowed IPs as 0.0.0.0/0. Set Router Allowed IP’s via tunnel to Enable. Set Persistent Keep Alive to 25.

IVPN Wireguard Peer settings

21. At the bottom of the page click Save and then click Apply Settings.

Set IVPN DNS servers

Navigate to Setup > Basic Setup

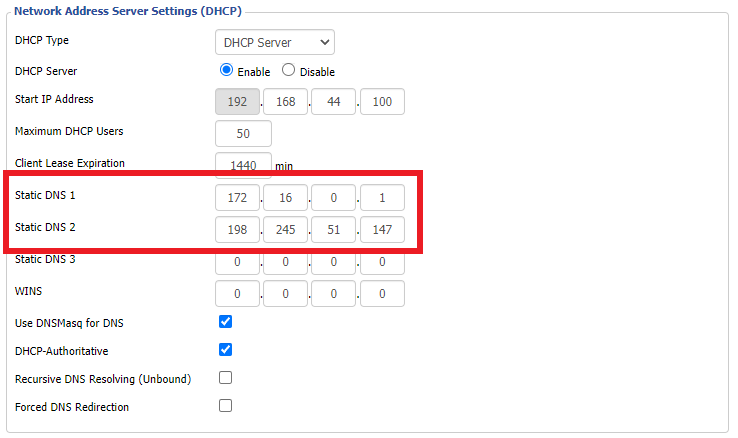
Set Static DNS 1 to 172.16.0.1

Set Static DNS 2 to 198.245.51.147

IVPN Wireguard Static DNS

Click Apply Settings.

Reboot the FlashRouter

Navigate to Administration > Management

Scroll to the bottom of the page and click the red Reboot Router button. Wait for the FlashRouter to reboot and then reconnect.

Verify a successful IVPN connection

Navigate to Setup > Tunnels

  1. You should Endpoint, Latest handshake, and Transfer in the WireGuard status area.
  2. Visit IVPN’s website to verify your status as using IVPN.

Back up your settings

Navigate to Administration > Backup

  1. Click the Backup button.
  2. A file named nvrambak.bin will be saved to your computer.
  3. You can load nvrambak.bin to restore your settings in the event of a reset.

TROUBLESHOOTING

Still having issues? Visit the VPN Troubleshooting section.

Troubleshoot Here

Windscribe WireGuard Setup

TeamFlashRouters · Oct 13, 2021 ·

Preparing for Windscribe WireGuard Setup

Verify your Windscribe login information

If you are not already a Windscribe user Sign Up Now.

Log in to your account on the Windscribe website.

Windscribe Login

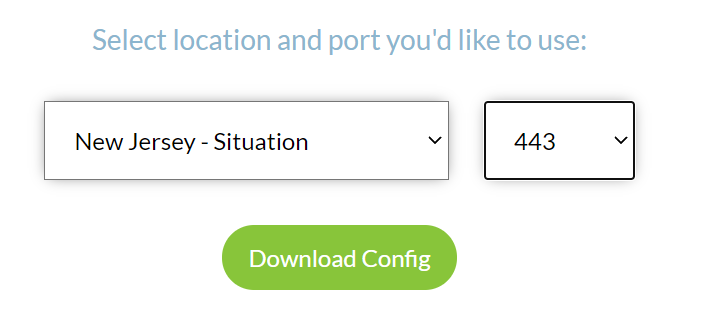
Go to the Windscribe WireGuard config generator page and select the Server location and Port you would like to use. Click Download Config.

Windscribe Wireguard select server location

Open the .conf file that is downloaded using Notepad in Windows or TextEdit in Mac.

DD-WRT Router Setup for Windscribe WireGuard

Navigate to Setup > Tunnels 

Enter Winscribe WireGuard settings

1. Click Add Tunnel.

2. Set Tunnel to Enable.

Setup - Tunnel - Enable Tunnel

3. Select Wireguard from the dropdown.

Setup - Tunnel - Select Wireguard

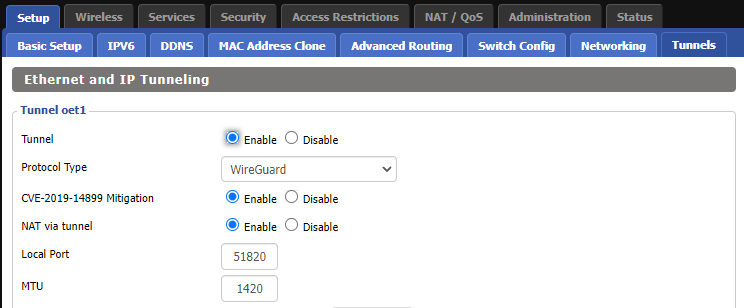
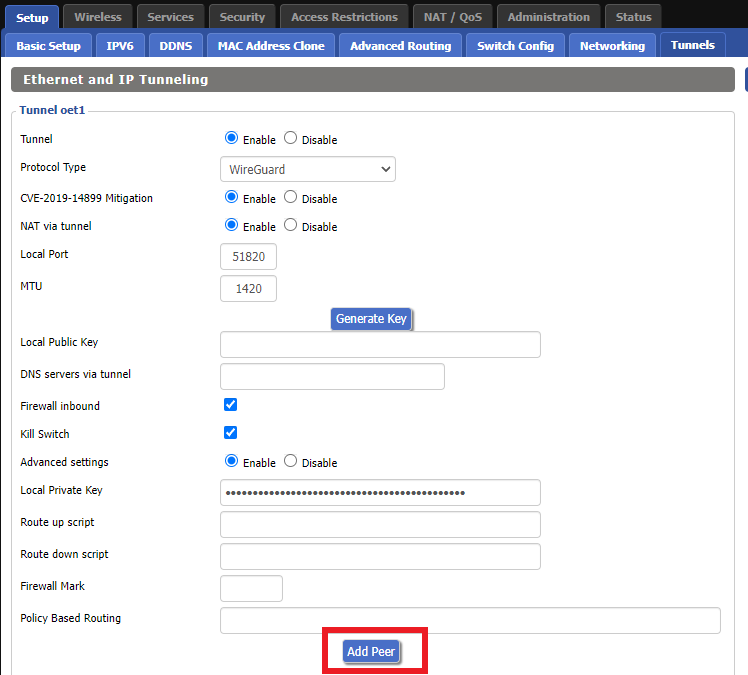
3. Set CVE-2019-14899 Mitigation to Enable. Set NAT via Tunnel to Enable. Set Local Port to 51820. Set MTU to 1420.

Windscribe Wireguard Basic Settings

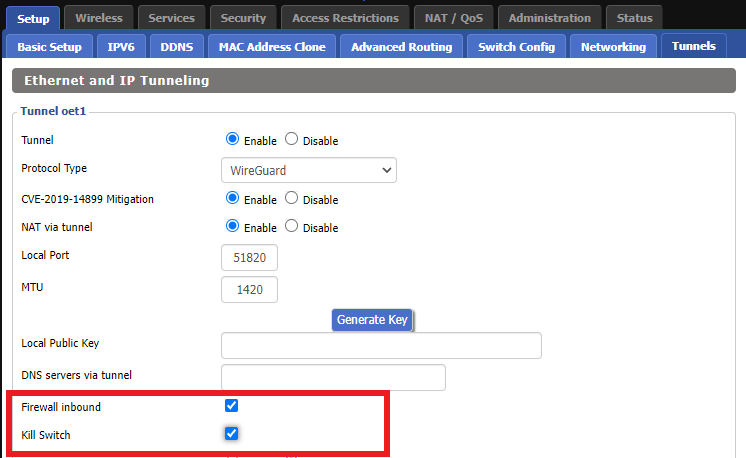
4. Check Firewall inbound and Kill Switch.

Windscribe Wireguard enable Firewall and Kill Switch

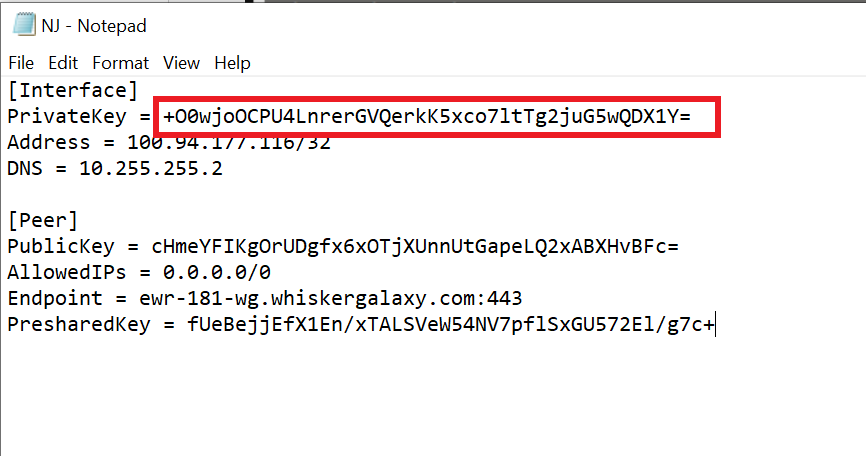
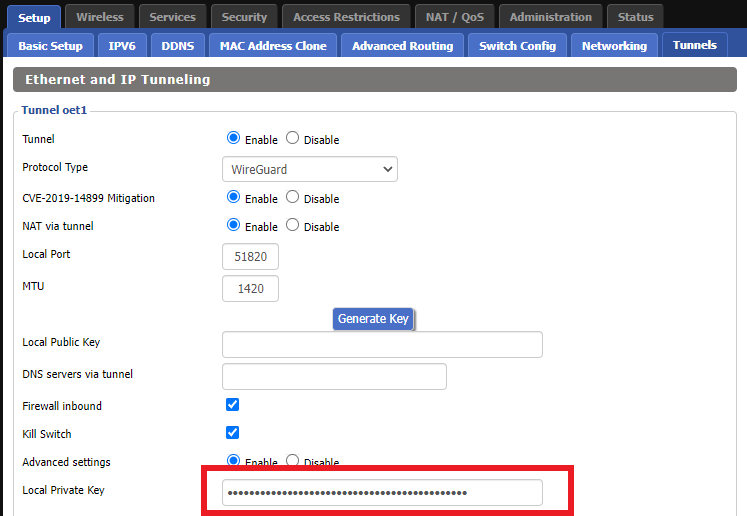
5. Set Advanced Settings to Enable and copy the PrivateKey from the .conf file and paste it into the Local Private Key field.

Windscribe Wireguard conf file PrivateKey
Windscribe Wireguard Local Private Key

6. Click Add Peer.

Windscribe Wireguard Add Peer

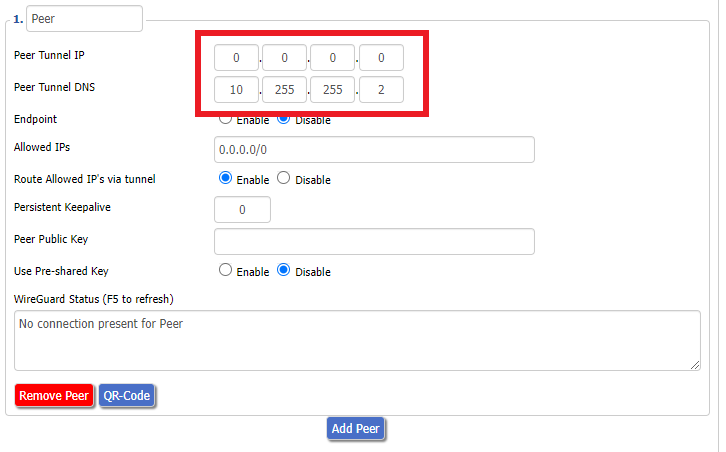
7. Set Peer Tunnel IP to 0.0.0.0. Set Peer Tunnel DNS to the DNS found in the .conf file.

Windscribe Wireguard Peer Tunnel IP and DNS

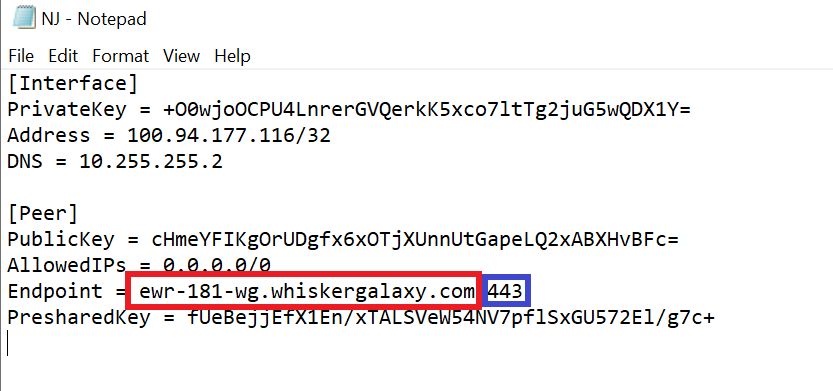
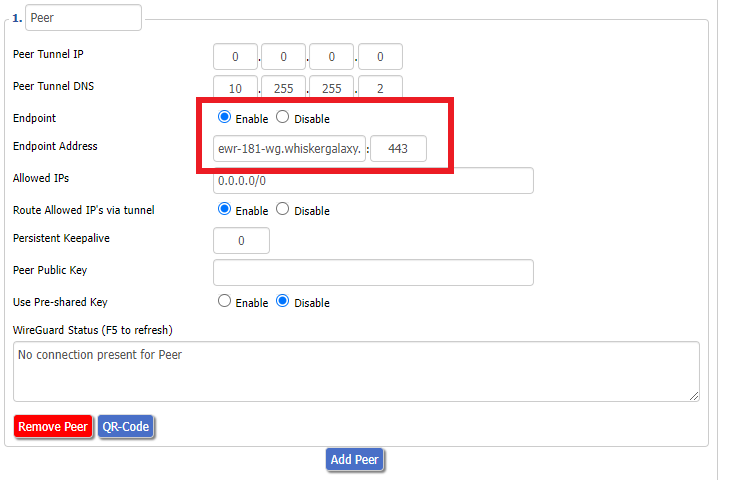
8. Set Endpoint to Enable. Copy and Paste the Endpoint from the .conf file and paste it into the Endpoint Address field. Enter the same Port that appears next to the Endpoint.

Windscribe Wireguard conf file Endpoint
Windscribe Wireguard paste Endpoint

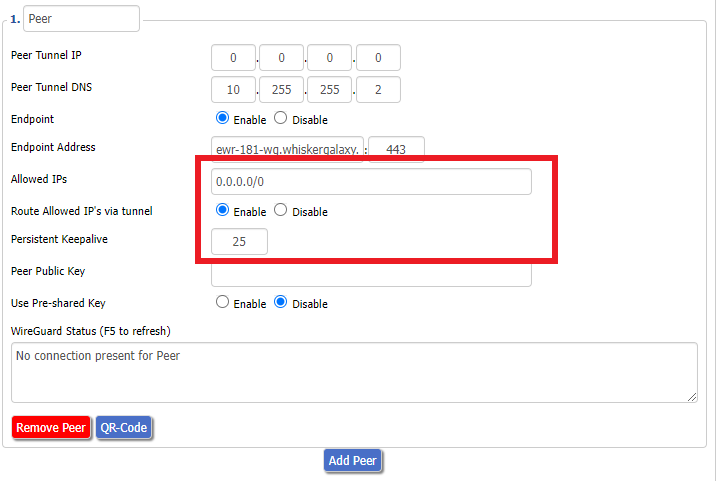
9. Leave Allowed IPs as 0.0.0.0/0. Set Router Allowed IP’s via tunnel to Enable. Set Persistent Keep Alive to 25.

Windscribe Wireguard settings

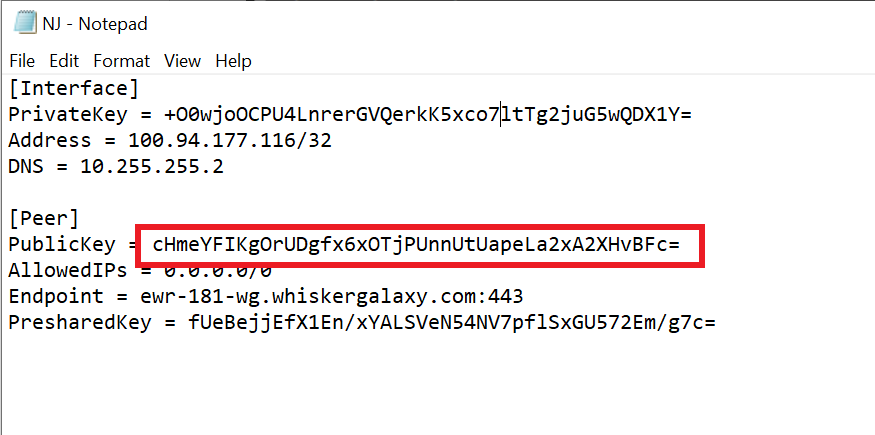
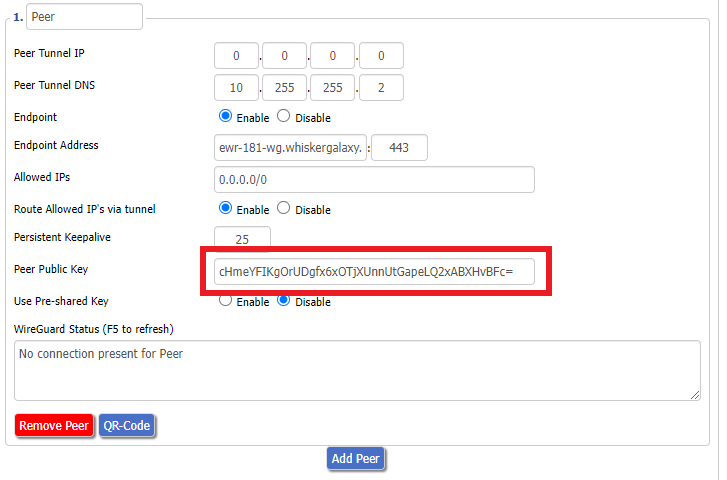
10. Copy and Paste the PublicKey from the .conf file and paste it into the Peer Public Key field.

Windscribe Wireguard conf file PublicKey
Windscribe Wireguard Peer Public Key

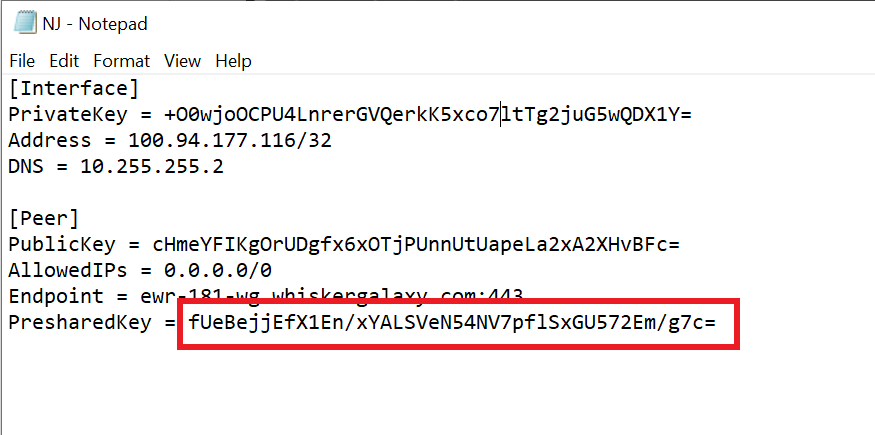
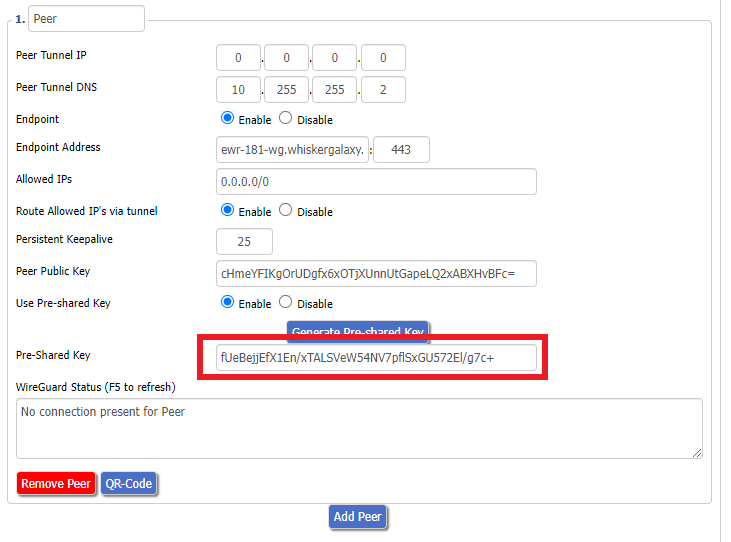
11. Set Use Pre-shared Key to Enable. Copy and Paste the Presharedkey from the .conf file and paste it into the Pre-Shared Key field.

Windscribe Wireguard conf file PresharedKey
Windscribe Wireguard Pre-shared Key

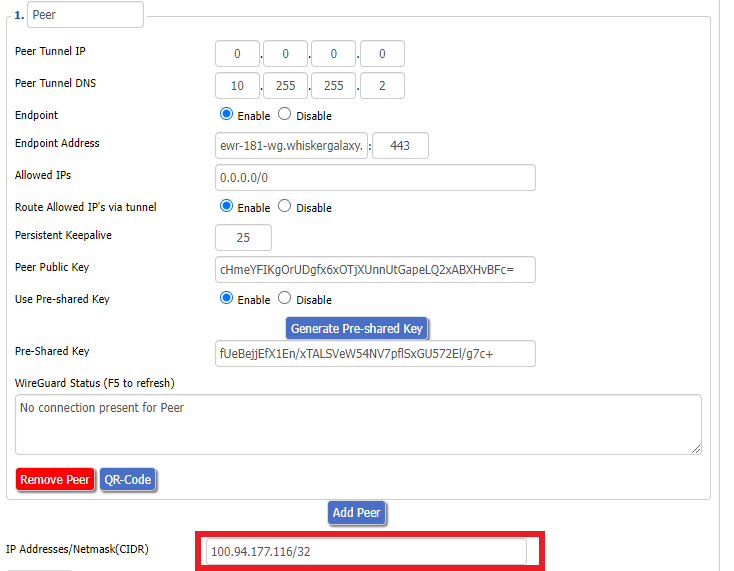
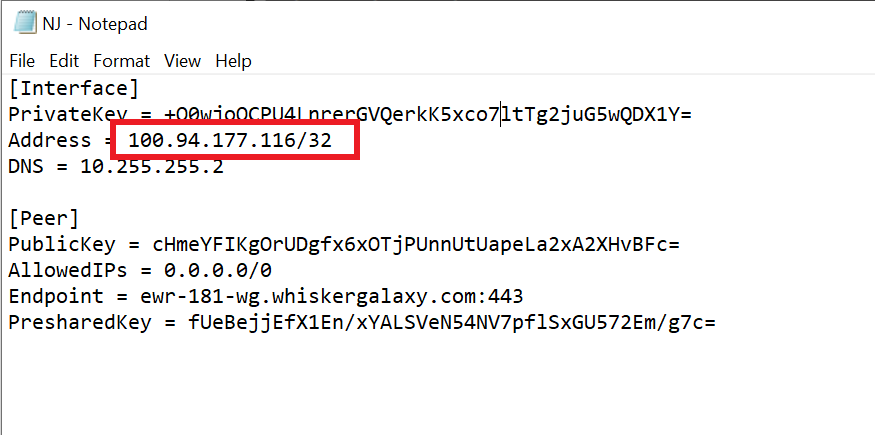
12. Copy the Address from the .conf file and paste it into the IP Addresses/Netmask(CIDR) field.

Windscribe Wireguard IP Address
Windscribe Wireguard conf file Address

Certain DD-WRT builds will show two separate fields here: IP Address and Subnet Mask. If that is the case set the IP Address field to the Address without the /32 added and set the Subnet Mask to 255.255.255.255

21. At the bottom of the page click Save and then click Apply Settings.

Verify a successful Winscribe connection

Navigate to Setup > Tunnels

  1. You should Endpoint, Latest handshake, and Transfer in the WireGuard status area.
  2. Visit whatismyipaddress.com to verify your status as using Winscribe.

Back up your settings

Navigate to Administration > Backup

  1. Click the Backup button.
  2. A file named nvrambak.bin will be saved to your computer.
  3. You can load nvrambak.bin to restore your settings in the event of a reset.

TROUBLESHOOTING

Still having issues? Visit the VPN Troubleshooting section.

Troubleshoot Here

How do I boost my Wireless Transmission power?

Dave · Apr 29, 2019 ·

Boost the wireless transmission power if you need to increase the wireless range of the FlashRouter.

Important Information

We recommend reading the entry in the DD-WRT Wiki to familiarize yourself with what TX Power values represent.

Broadcom routers

  • Netgear R8500
  • Netgear R7000
  • Netgear R6400 V2
  • Netgear R6300 V2
  • Asus RT-AC5300
  • Asus RT-AC66U
  • Asus RT-AC56U

Navigate to Wireless > WL# or ath# Advanced

  1. Set the TX Power to the desired value.
  2. Click Apply Settings.
Boost TX Power in DD-WRT Advanced Wireless Settings page to Increase Wireless Transmission

Atheros routers

  • Netgear R9000
  • Netgear R7800
  • Linksys WRT3200ACM
  • LinksysWRT32X
  • Linksys WRT1900AC/v2/ACS
  • LinksysWRT1200AC

Navigate to Wireless > Basic Settings

  1. Check Advanced Settings under the wireless interface you would like to boost.
  2. Set the TX Power to the desired value.
  3. Click Apply Settings.
Boost TX Power in DD-WRT Advanced Wireless Settings page to Increase Wireless Transmission

We advise to proceed with caution when setting the TX Power. This has been known to negatively effect the hardware if set too high.

StrongVPN WireGuard Setup

TeamFlashRouters · Jan 8, 2021 ·

DD-WRT Router Setup for StrongVPN WireGuard

StrongVPN Wireguard DD-WRT setup is now officially supported by FlashRouters. Follow the steps below to gather all the required information to complete your Wireguard router setup.

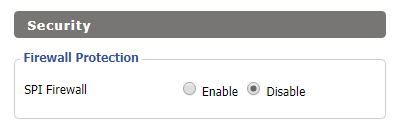
Navigate to Security > Firewall

Set SPI Firewall to Disable.

Wireless Client Bridge Setup on FlashRouter DD-WRT - Disable Firewall

Click Save at the bottom of the page.

Select your actual time zone for you physical location from the dropdown and enter 1.pool.ntp.org in the Server IP/Name dropdown.

WireGuard for StrongVPN DD-WRT set Time Zone

Click Apply Settings at the bottom of the page.

Preparing for StrongVPN WireGuard Setup

Obtain your StrongVPN WireGuard Information

If you are not already a StrongVPN user Sign Up Now.

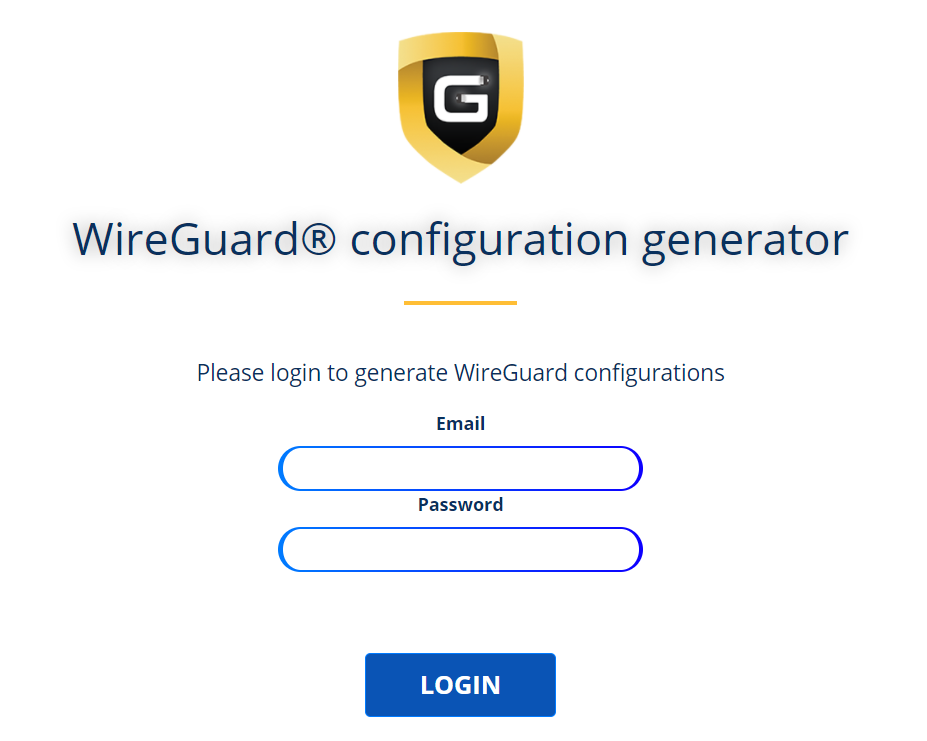
1. Log in to your account on the StrongVPN website.

WireGuard for StrongVPN account login

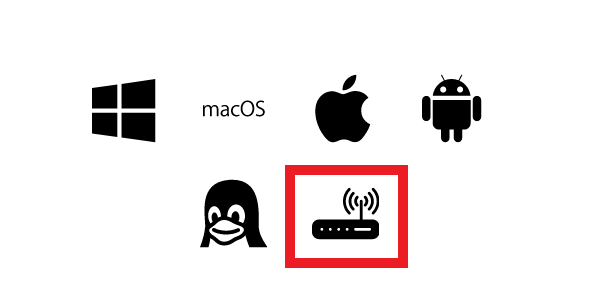
2. Select Router icon as the Platform

Select Router for StrongVPN WireGuard Platform

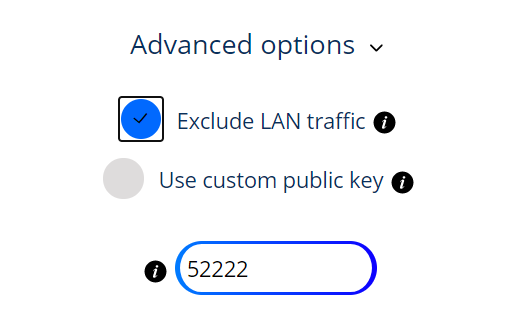
3. Select the Advanced Options dropdown and then check Exclude LAN Traffic and set any value between 52000 and 60000 in the Custom Port field.

WireGuard for StrongVPN set Custom Port

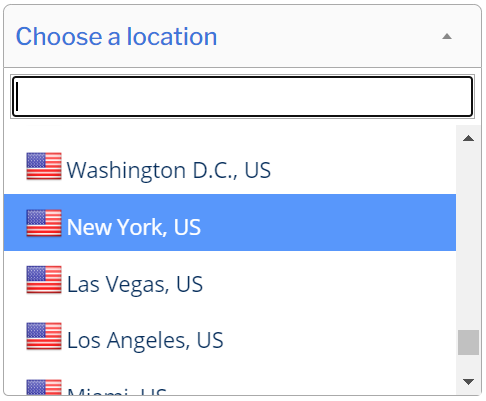
4. Select the Server Location from the dropdown that you would like to connect to.

Select the StrongVPN Wireguard server location

5. Select the Generate at the bottom of the page.

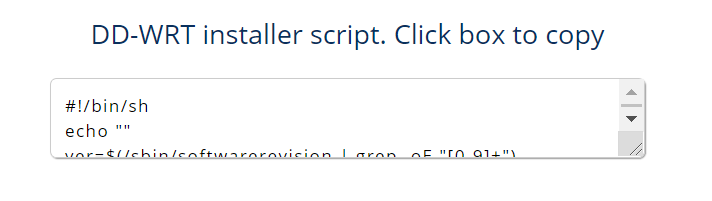
6. Click the DD-WRT installer script box to copy.

DD-WRT installer script WireGuard for StrongVPN

Enter StrongVPN WireGuard Script

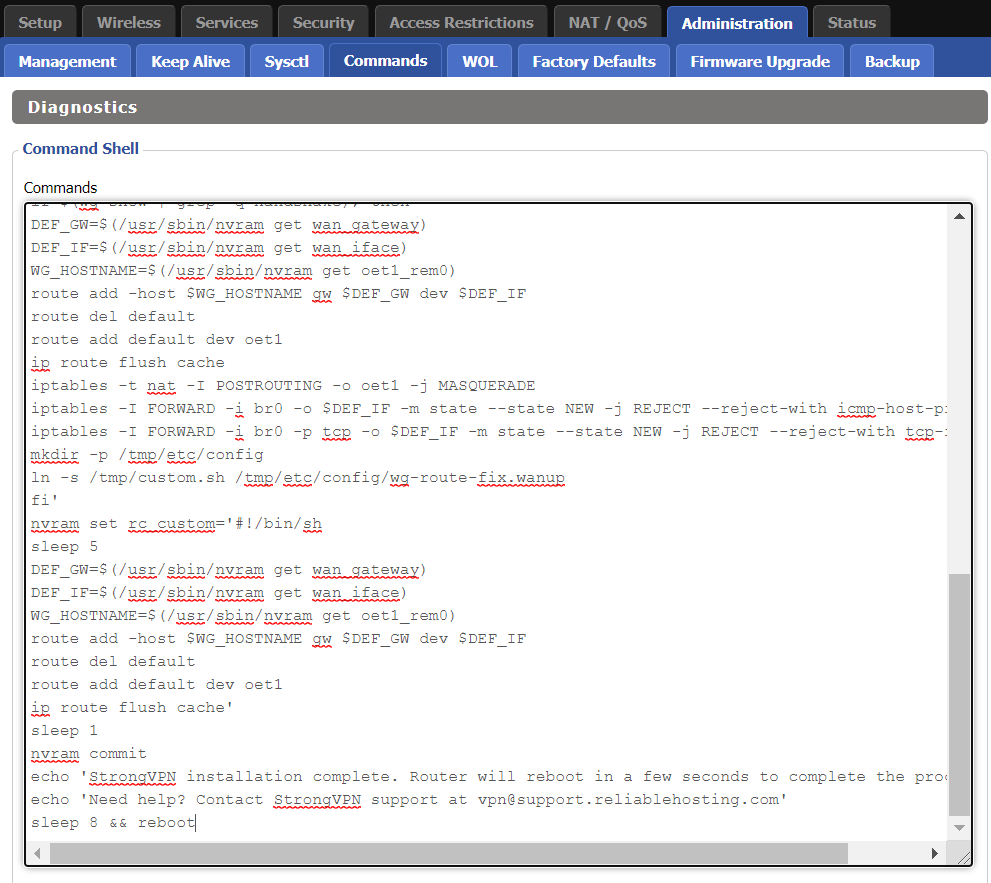
Navigate to Administration > Commands

Paste the StrongVPN Script that was copied in the empty Commands Shell.

WireGuard for StrongVPN install script

Delete the very last line sleep 8 && reboot.

Click Save Custom (or Save Custom Script may appear depending on your firmware build, they are the same thing)

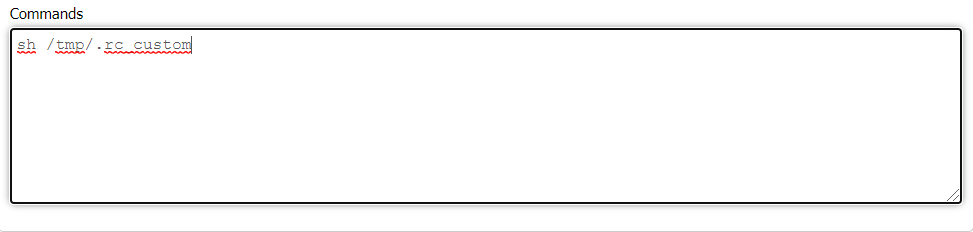
Copy the line below and paste into the empty Commands Shell.

WireGuard for StrongVPN script 2
sh /tmp/.rc_custom

Click Run Commands.

Wait two minutes and then power the FlashRouter off and back on. Reconnect to the FlashRouter’s network when it has booted back up.

Verify a successful StrongVPN WireGuard connection

Navigate to Setup > Tunnels

  1. You should now see that page filled in with WireGuard info.
  2. Visit StrongVPN’s IP Check to verify your new IP address and virtual location.

Back up your settings

Navigate to Administration > Backup

  1. Click the Backup button.
  2. A file named nvrambak.bin will be saved to your computer.
  3. You can load nvrambak.bin to restore your settings in the event of a reset.

TROUBLESHOOTING

Still having issues? Visit the VPN Troubleshooting section.

Troubleshoot Here

OpenWRT Setup Guide

Quick Start Guide for OpenWRT Routers

Find setup guides, FAQs and troubleshooting tips for the FlashRouters OpenWRT Routers.

VIEW SUPPORTED ROUTER MODELS

Flint WiFi 6 AX1800 VPN Router

Internet Setup

WiFi Setup

VPN Setup

OpenWRT Features

Search Support Articles

Troubleshooting

More Ways to Get Help

GET IN TOUCH

BUY SUPPORT
BROWSE FAQs

Wireless Repeater Setup

TeamFlashRouters · Apr 16, 2019 ·

If you need to extend your wireless and wired connection capabilities, you can setup a FlashRouter as a Wireless Repeater. In Wireless Repeater mode the FlashRouter connects to your main router via WiFi and then creates a completely separate network segment for you. This new “repeater” network then transmits your internet signal via FlashRouter LAN ports for wired internet access while also creating a new Wireless Extender network that will expand your wireless network range throughout your home or office just like a mesh network.

Preparing for Wireless Repeater Setup

Verify your wireless information

To connect your FlashRouter wirelessly to your existing wireless network you will need the Wireless Network Name (SSID) and Wireless Password of the existing wireless network that you will repeat. Verify and note this information.

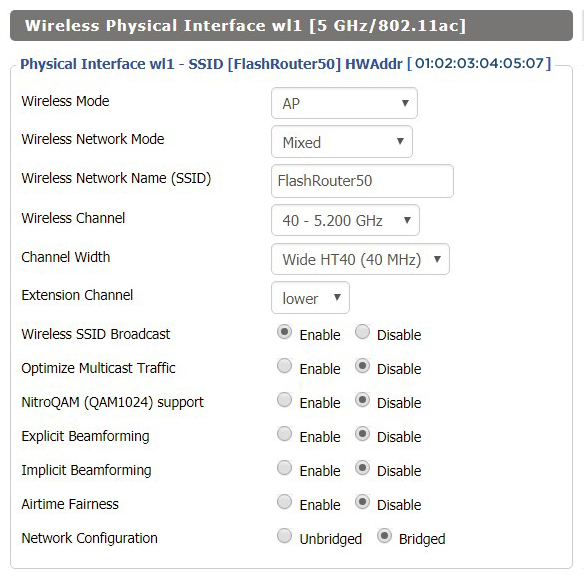
We recommend using a 2.4GHz network to repeat as this network will have more range. Be sure to click Add under the 2.4GHz settings and not the 5GHz settings.

DD-WRT Router Setup for Wireless Repeater

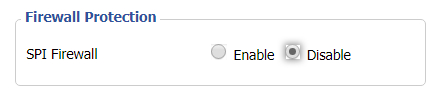
Disable Firewall

Navigate to Security > Firewall

Wireless Repeater Setup on DD-WRT FlashRouter - Disable SPI Firewall
  1. Set SPI Firewall to Disable.
  2. Click Save.

Enter Wireless settings

Navigate to Wireless > Basic Settings

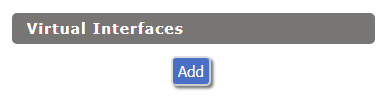
Select Add in the Virtual Interface area.

Wireless Repeater Setup on DD-WRT FlashRouter - Add Virtual Interface

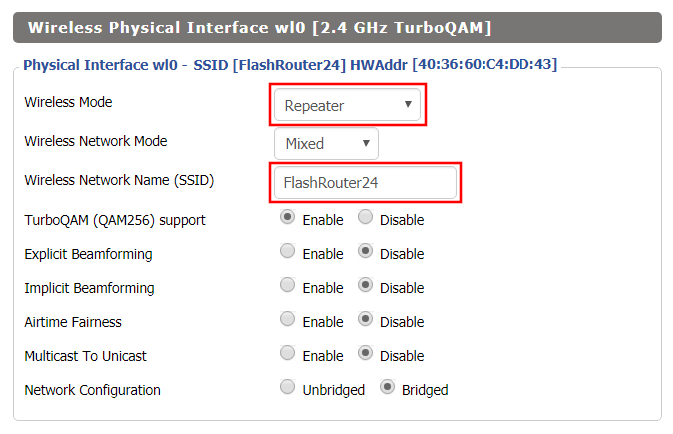
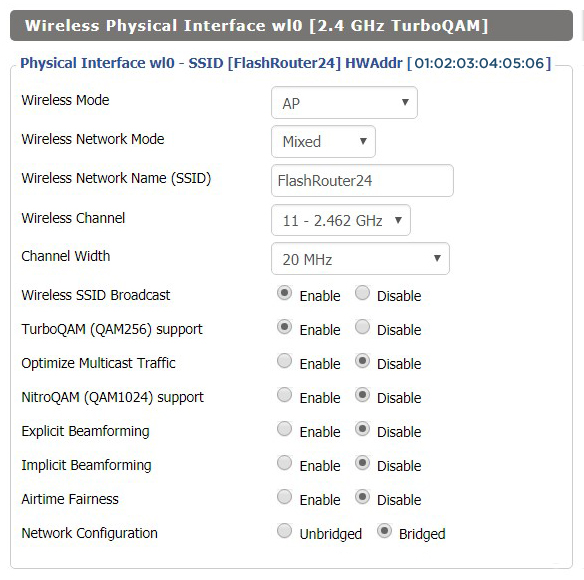
In the Wireless Physical Interface settings for the 2.4GHz network set the Wireless Mode to Repeater.
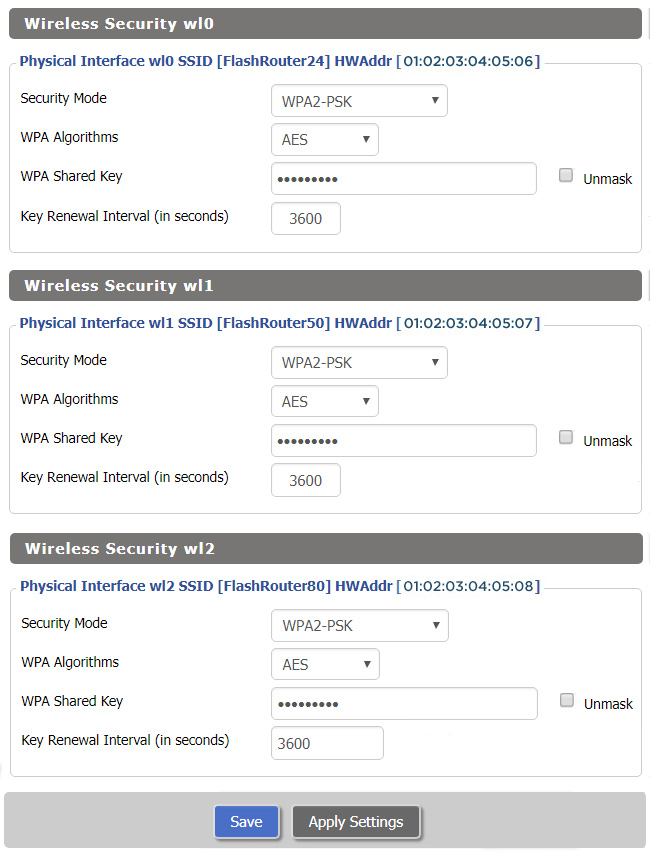
FlashRouters with a Broadcom chipset will have Repeater as an option in the dropdown but FlashRouters with an Atheroes chipset will not. Select Client or Client (Routed) if Repeater is not listed for your FlashRouter.

Change the Wireless Network Name (SSID) to match exactly with the Wireless Network Name of the network that you will repeat.

Wireless Repeater Setup on DD-WRT FlashRouter - Set Wireless Mode to Repeater

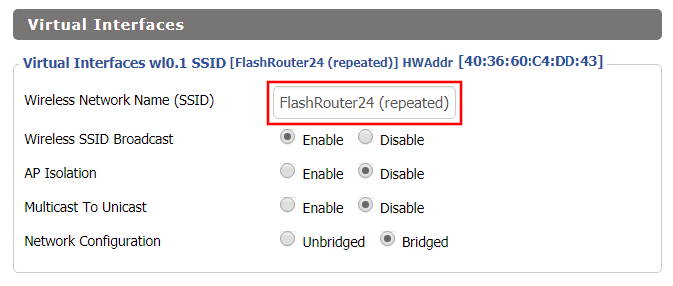
In the Virtual Interfaces settings change the Wireless Network Name (SSID) to FlashRouter24 or any other unique SSID.
Wireless Repeater Setup on DD-WRT FlashRouter - Set SSID for Repeated Band

CLICK SAVE

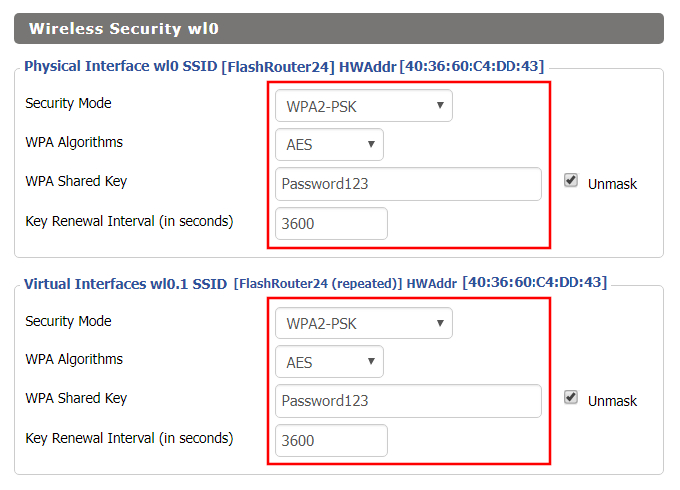
Enter Wireless Security settings
Navigate to Wireless > Wireless Security

Wireless Repeater Setup on DD-WRT FlashRouter - Set Wireless Password
  1. Duplicate the wireless security settings that are set for the other bands for the newly created virtual interface.
  2. Change the WPA Shared Key to match exactly with the Wireless Password of the network that you will repeat.
  3. Click Apply Settings.

Verify the Internet Connection

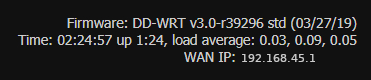
In the top right hand corner of the DD-WRT you should see the WAN IP change from 0.0.0.0 to an actual IP Address. Once this changes navigate to any website to test your Internet connection.

Wireless Repeater Setup on DD-WRT FlashRouter - Verify WAN Connection

Back up your settings
Navigate to the Administration > Backup page.

  1. Click the Backup button.
  2. A file named nvrambak.bin will be saved to your computer.
  3. You can load nvrambak.bin to restore your settings in the event of a reset.
TROUBLESHOOTING

Still having issues? Visit our Troubleshooting section to diagnose common problems here.

Troubleshoot Here

ExpressVPN Router App Support

TeamFlashRouters · Jul 16, 2019 ·

ExpressVPN Router App Setup Guides

Asus RT-AC68U, RT-AC87U, RT-AC56R, RT-AC56S, RT-AC56U

How to set up the ExpressVPN router app for Asus RT-AC68U, RT-AC87U, RT-AC56R, RT-AC56S, and RT-AC56U

ExpressVPN router app with MediaStreamer

How to use MediaStreamer on the ExpressVPN router app

Linksys EA6200

How to configure the ExpressVPN router app for Linksys EA6200

Linksys WRT1200AC

How to configure the ExpressVPN router app for Linksys WRT1200AC

Linksys WRT1900AC(S or V2)

How to configure the ExpressVPN router app for Linksys WRT1900AC(S)

Linksys WRT3200ACM

How to configure the ExpressVPN router app for Linksys WRT3200ACM

Netgear R6300v2, Netgear R6700v3, Netgear Nighthawk R7000, and Netgear Nighthawk R7000P

How to set up the ExpressVPN router app for Netgear R6300v2, Netgear R6700v3, Netgear Nighthawk R7000, and Netgear Nighthawk R7000P

Set up ExpressVPN app on existing Linksys router

Set up the ExpressVPN app for router on your existing Linksys router

ExpressVPN Router App Troubleshooting

Bridge devices to your network via an ExpressVPN router

How to bridge devices to your wireless network via an ExpressVPN router

ExpressVPN router app FAQs

ExpressVPN router app FAQs

ExpressVPN router app setting changes

Additional ExpressVPN router app setting changes

Finding the default passwords for the ExpressVPN router app

Finding the default passwords for the ExpressVPN Router App

Identify which Linksys router you have

How to identify which Linksys router you have

NOT connected to the ExpressVPN router correctly

Seeing the “NOT connected to the ExpressVPN router correctly” page

Reflash Linksys router back to factory image

How to reflash your Linksys router back to factory image

Reset your ExpressVPN router to the original firmware

How to reset your ExpressVPN routers to the original firmware

Set up remote access for your router

How to use port forwarding to remotely access your router

Share a USB drive over your router’s network

How to share a USB drive over your router’s network

Upgrade the ExpressVPN router firmware

How to upgrade the ExpressVPN router firmware

Roqos Core Router Setup Guide

Roqos Core Router Setup Guide

Quick Start Guide for Roqos Core Routers

Find setup guides, FAQs and troubleshooting tips for the FlashRouters Roqos Core Router.

Internet Setup

  • Roqos Core Quick Start Guide
  • How do I access my Roqos device settings?
  • Roqos Core Internet Setup and Activation

WiFi Setup

  • Setting up a Guest WiFi Network on Roqos
  • Change WiFi name and password on Roqos

VPN Setup

  • NordVPN Setup on Roqos
  • PrivateInternetAccess (PIA) Setup on Roqos
  • ExpressVPN Setup on Roqos
  • Roqos VPN Connected, but my device IP is unchanged

Roqos Core Features

  • Set a Static IP for your connected devices on Roqos
  • VPN Kill Switch on Roqos
  • Managing User Profiles on Roqos
  • Cybersecurity and Intrusion Prevention on Roqos
  • Block Websites by Country on Roqos
  • Ad blocking on Roqos
  • Parental Controls on Roqos
  • Wireless Repeater – WiFi as WAN on Roqos
  • What do the lights on my Roqos Core mean?

Search Support Articles

Troubleshooting

  • Roqos VPN Connected, but my device IP is unchanged
  • How do I access my Roqos device settings?
  • What do the lights on my Roqos Core mean?

More Ways to Get Help

GET IN TOUCH

BUY SUPPORT
BROWSE FAQs

Why is my router not connecting to internet?

Dave · May 2, 2019 ·

Router not connecting to the internet? Follow these simple steps!

  1. Make sure that you are not setting a WAN IP of 0.0.0.0 in the top right corner of your FlashRouter DD-WRT settings. If you do, then make sure your FlashRouter is wired correctly for Internet.
  2. Try power cycling your ISP modem, FlashRouter and any other router that may be in the setup. Power the modem back on first, wait for it to boot up fully, and then power the FlashRouter back on.
  3. Make sure you do not have Global Kill Switch enabled in the FlashRouters Privacy App and if you do make sure your VPN status is Connected.

Asus RT-AC5300 DD-WRT WiFi Settings
Dave · Mar 4, 2019 ·

Recommended DD-WRT WiFi settings for the Asus RT-AC5300 are based on extensive testing by FlashRouters. Please note that optimal settings may vary depending on external factors such as home size, interference, and the types of WiFi devices you are connecting in your network.
Screenshots below provide a visual display of recommended WiFi and encryption settings exactly as they appear in the Asus RT-AC5300 with DD-WRT firmware.
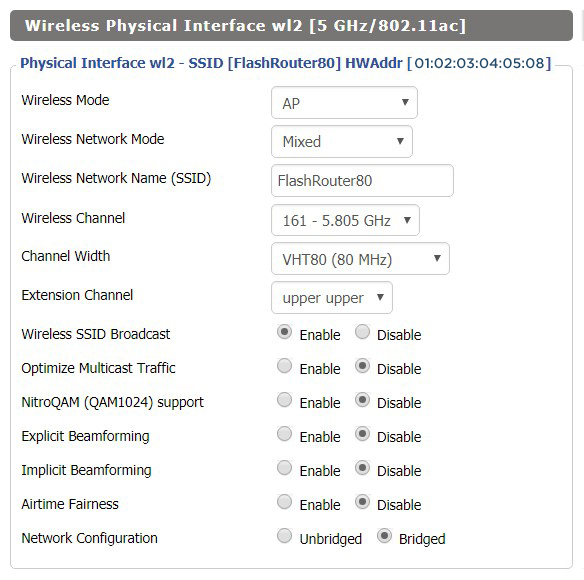
Navigate to the Wireless > Basic Settings to view or edit WiFi network settings.
2.4 GHz - Wireless-N

View AC5300 DD-WRT FlashRouter 2.4GHz Settings
5.0 GHz - Wireless-AC #1

View AC5300 DD-WRT FlashRouter 5GHz #1 Settings
5.0 GHz - Wireless-AC #2

View AC5300 DD-WRT FlashRouter 5GHz #2 Settings

Additional DD-WRT WiFi Information

Intimidated by all the available WiFi settings? The DD-WRT website provides extensive information about all of the available configuration options in the firmware. Learn about everything from Wireless channels to channel widths and more in the Basic Wireless Settings – DD-WRT Wiki.

RT-AC5300 DD-WRT Wireless Security

The preset Asus RT-AC5300 FlashRouter WiFi password is Wireless#[First 5 characters of your router MAC]. The router MAC can be found on the bottom of your router. For e.g. if your MAC is 1459C07E70A8 then your WiFi password is Wireless#1459C

Navigate to the Wireless > Wireless Security to view or edit WiFi passwords.

View RT-AC5300 DD-WRT FlashRouter WiFi Seucirty Settings

TROUBLESHOOTING

Trouble with your Asus RT-AC5300 WiFi? Visit the Wireless troubleshooting section.

Troubleshoot Here

Number test

admin · Oct 23, 2019 ·

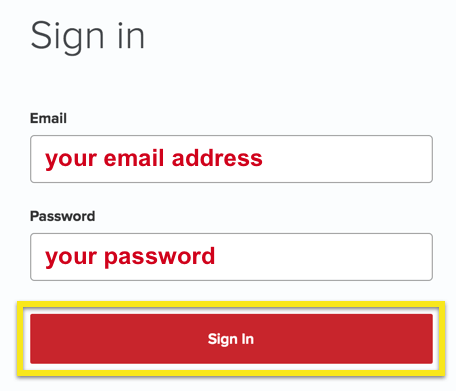
  1. Visit ExpressVPN’s website login page
    ExpressVPN on FlashRouters Privacy App Setup - Sign Into ExpressVPN Dashboard
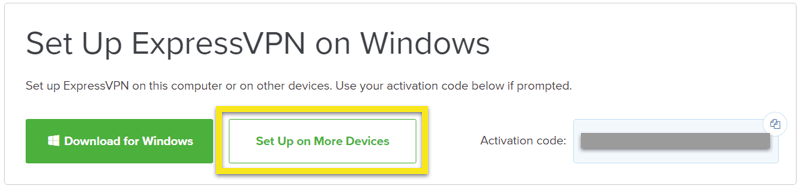
  2. Successfully log in with your account information. Select Setup on More Devices.
    ExpressVPN on FlashRouters Privacy App Setup - Setup On More Devices
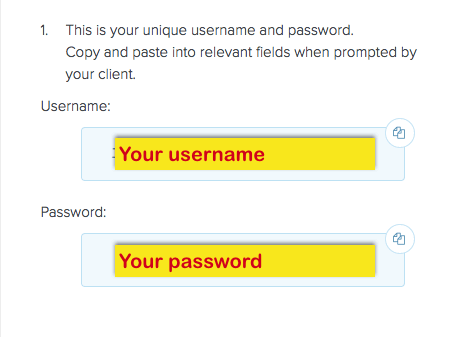
  3. Select Manual Config and copy the Username and Password that are displayed on the right hand side of the screen.
    ExpressVPN on FlashRouters Privacy App Setup - OpenVPN Specific Username and Password

Primary Sidebar

  • Troubleshooting
  • Router Access
  • Internet Connection Issues
  • WiFi Connectivity
  • General VPN Issues
  • TeamViewer Remote Support
  • DD-WRT Firmware
  • Facebook
  • Twitter
  • Instagram
  • Pinterest
  • YouTube

Footer