Privacy Hero supports NordVPN using both NordLynx and OpenVPN.
NordLynx is recommended for most users. OpenVPN is also available and may be required for NordVPN Dedicated IP connections. Some Dedicated IP configurations require a private OpenVPN file imported as a Custom VPN.
Privacy Hero is cloud-managed, so you can complete the setup from any device with an internet connection. You do not need to be connected to Privacy Hero WiFi to change these settings.
NordVPN NordLynx Setup
NordLynx uses a NordVPN access token, not your regular NordVPN website email and password.
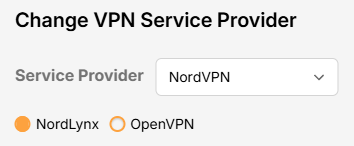
Open Privacy Hero and Select NordLynx
- From a computer, smartphone, or tablet, open app.privacyhero.com.
- Sign in with your Privacy Hero account email and password.
- Open the VPN section.
- Click Change and select NordVPN.
- Choose NordLynx.
Generate Your NordVPN Access Token
- In another browser tab, open NordVPN Access Tokens and sign in to your NordVPN account.
- Complete any account or email verification requested by NordVPN.
- Select Generate new token; choose Doesn’t expire if available, then copy the token.
Important: Treat your NordVPN token as a password. Do not share it publicly.
Connect Privacy Hero to NordVPN
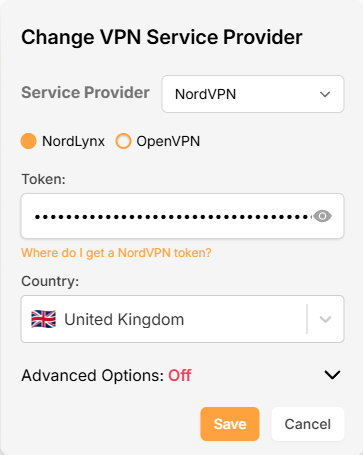
- Return to Privacy Hero, paste the token into the NordLynx token field, and click Save. The default country selection automatically chooses an available NordVPN server for that location.
- Wait for the VPN status to show Connected.
NordVPN OpenVPN Setup
Use OpenVPN if you prefer the OpenVPN protocol or if your configuration requires it. OpenVPN requires NordVPN Manual Service Credentials, which are different from your website login email and password.
Select OpenVPN in Privacy Hero
- Open app.privacyhero.com and sign in.
- Open the VPN section.
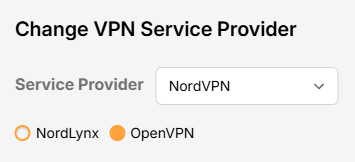
- Click Change and select NordVPN.
- Select OpenVPN.
Get Your Manual Service Credentials
- Open NordVPN Manual Service Credentials and sign in.
- Complete NordVPN’s verification if prompted, then copy the current Service Username and Service Password.
Important: Do not enter your normal NordVPN website email and password into Privacy Hero’s OpenVPN fields.
Save Your OpenVPN Connection
- Return to Privacy Hero and enter the manual service username and password in the OpenVPN credential fields. Click Save.
- Confirm Privacy Hero shows the connection as Connected.
Choose a NordVPN Country or Specific Server
Privacy Hero can select a NordVPN server automatically, or you can choose a country or specify a server hostname.
Choose a Country
- Open your NordVPN connection in Privacy Hero.
- Open the Country dropdown.
- Search for and select your preferred country.
- Click Save. Privacy Hero will use an available NordVPN server for the selected country.
Use a Specific NordVPN Server
- Open your NordVPN connection in Privacy Hero.
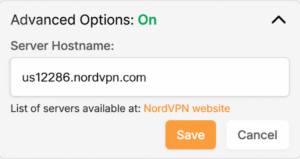
- Open Advanced Options.
- Enter the NordVPN server hostname, for example us12286.nordvpn.com.
- Click Save.
Use NordVPN’s server recommendation tool if you need a hostname. NordVPN servers can be retired or taken offline for maintenance; if your specific server stops working, choose another server or return to country selection.
NordVPN Dedicated IP Setup
NordVPN Dedicated IP can require either the regular NordVPN OpenVPN connection or a private .ovpn file imported as a Custom VPN.
Method 1: OpenVPN Advanced Options
Try this first if your Dedicated IP works with the standard NordVPN OpenVPN setup.
- Set up NordVPN → OpenVPN using your NordVPN Manual Service Credentials as described above.
- Open Advanced Options.
- Enter the Dedicated IP server hostname assigned to your account.
- Click Save and check whether the VPN connects.
- Verify that your public IP matches your assigned Dedicated IP.
If connected and the public IP matches, no additional configuration is needed.
Method 2: Custom VPN With a Private OpenVPN File
Some Dedicated IP servers require a private OpenVPN configuration file. If Method 1 does not connect, follow NordVPN’s Manual Dedicated IP Server Setup instructions.
Download Your Dedicated IP Configuration
- Sign in to the NordVPN account associated with the Dedicated IP.
- Locate your assigned Dedicated IP server using NordVPN’s manual setup instructions.
- Download its OpenVPN UDP configuration file.
- Save the .ovpn file to your computer or device.
Important: Use the private configuration file for your actual Dedicated IP, not a public NordVPN server file.
Upload the File as a Custom VPN
- Open app.privacyhero.com and select VPN → Change.
- Select Custom from the VPN provider dropdown, not NordVPN.
- Upload your Dedicated IP UDP .ovpn file.
- Enter your NordVPN Manual Service Username and Password.
- Save the configuration, enable the VPN, and wait for Connected.
- Verify the public IP matches your NordVPN Dedicated IP.
These are NordVPN’s separate manual service credentials, not your regular website login.
Verify Your NordVPN Connection
- Connect your testing device to the Privacy Hero WiFi.
- Disconnect any NordVPN or other VPN app running directly on that device.
- Open a fresh private/incognito browser window.
- Visit NordVPN What Is My IP.
- Confirm the public IP and location match your selected NordVPN server (or assigned Dedicated IP).
Running a VPN application directly on the device at the same time as the router VPN can produce double-VPN conflicts and unexpected IP or location results.
Streaming Relocation and VPN Location
If Streaming Relocation is enabled for a supported service, that service may use the Streaming Relocation region instead of your VPN server region. See Privacy Hero Streaming Relocation.
NordVPN Not Connecting?
If the VPN displays Failed, Connecting, or a timeout error, check for:
- A server undergoing maintenance or no longer available.
- An expired, revoked, or outdated NordLynx access token.
- Incorrect or changed OpenVPN Manual Service Credentials.
- Recent account changes or an inactive NordVPN subscription.
- A protocol-specific issue.
- A Dedicated IP that requires a private .ovpn file and Custom provider selection.
Follow Privacy Hero NordVPN Not Connecting or Showing Timeout Errors for troubleshooting.
No Internet After NordVPN Disconnects?
If internet access stops when the VPN disconnects, the VPN Kill Switch may be blocking normal traffic as intended. See Privacy Hero VPN Kill Switch: No Internet or WiFi Troubleshooting.
VPN Connected, but One Device Shows the Wrong IP?
If other devices show the correct VPN IP, check the affected device’s VPN apps, Private Relay, Private DNS, antivirus, and browser settings. See Device Settings That Can Interfere With Your Router VPN.