Use this guide to manage the WiFi settings on your ASUS FlashRouter: change a wireless network name (SSID) or password, choose 2.4 GHz and 5 GHz networks, turn a WiFi radio on or off, and adjust wireless channels when a device has trouble connecting.
ASUS has different menus on newer and classic AsusWRT firmware. Follow the menu path that matches your router. These settings apply to your router’s local WiFi network and do not change your VPN subscription or VPN configuration.
Step 1: Access Your ASUS FlashRouter Settings
- Connect a computer to your ASUS FlashRouter using its current WiFi connection or an Ethernet cable connected to a LAN port. Ethernet is recommended for turning WiFi off or making major wireless changes.
- Open a web browser and enter
http://www.asusrouter.comor your router’s local LAN IP address, commonlyhttp://192.168.50.1. These are local router addresses, not public websites. - Sign in with your ASUS router administrator username and password. The administrator password is separate from the WiFi password.
Step 2: Find the Wireless Settings Menu
Choose the interface matching your firmware. Screens and available options may differ by ASUS model, region, and software version.
Newer ASUS firmware: Network > Main Network Profile
- Open Network in the ASUS router administration interface.
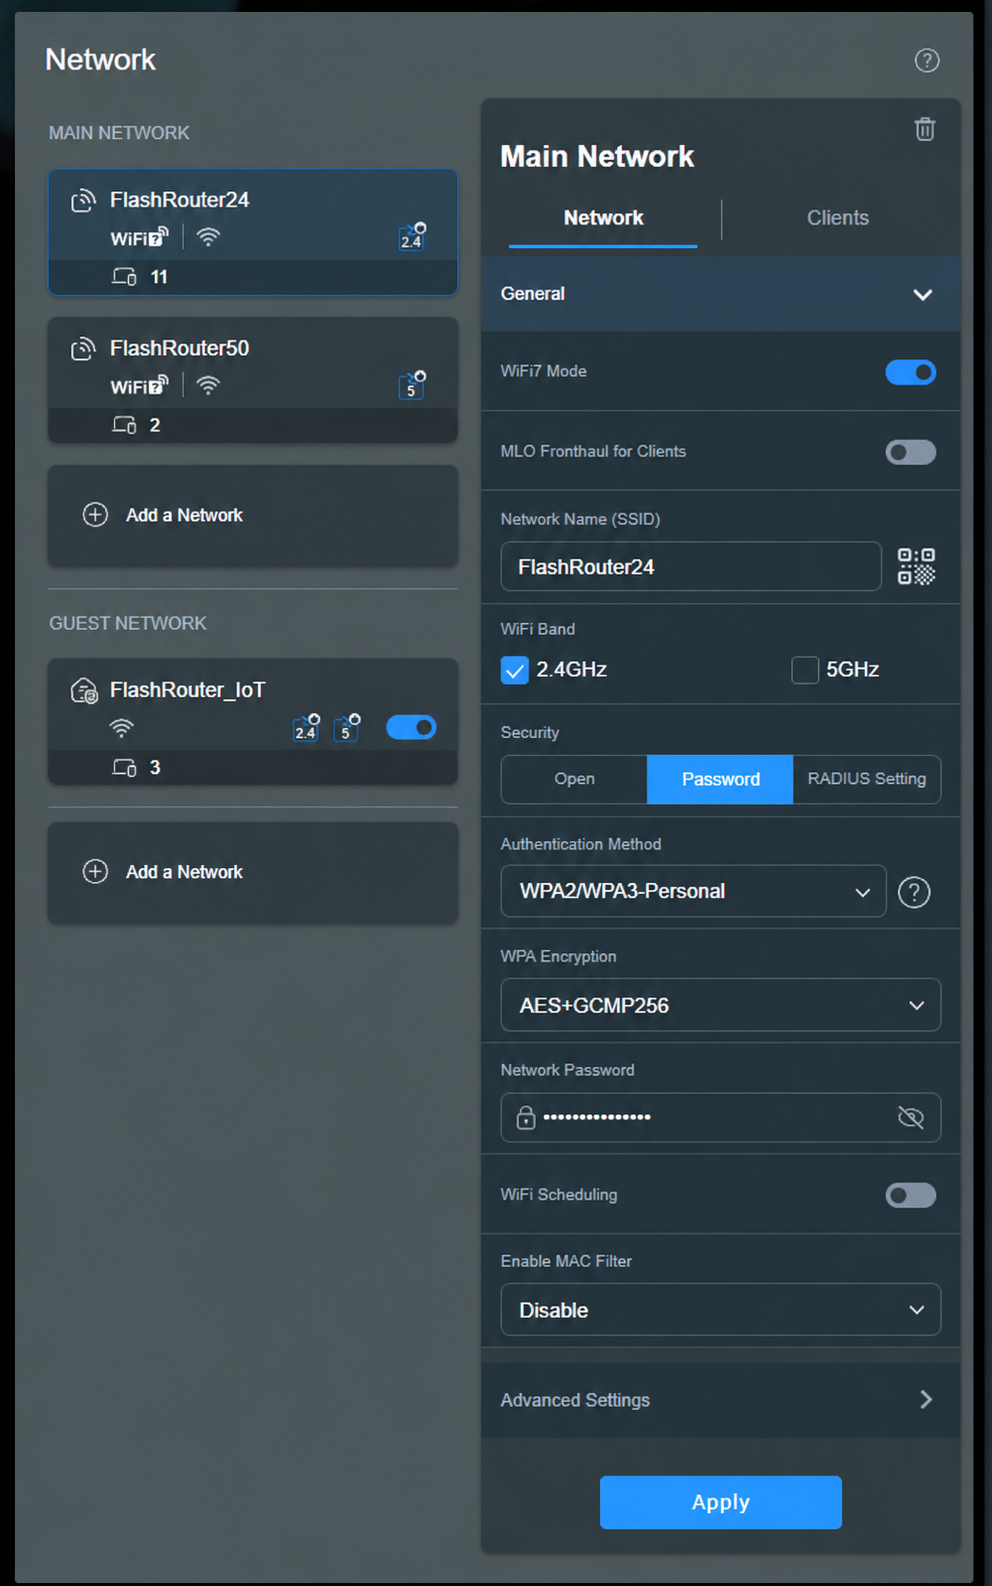
- Under Main Network, select the profile you want to edit. You may see separate networks such as FlashRouter24 (2.4 GHz) and FlashRouter50 (5 GHz). These are example names and may be different on your router.
- Under Network or General, locate Network Name (SSID), Security, Network Password, and the WiFi Band selection. Make your changes and click Apply.
Classic AsusWRT: Wireless > General
- Open Wireless > General in the ASUS administration interface.
- Use the available Band setting to choose the 2.4 GHz, 5 GHz, or other supported band. On some firmware, band settings appear in separate sections.
- Find Network Name (SSID) and WPA-PSK Key (or the equivalent wireless password field). These control your WiFi name and password.
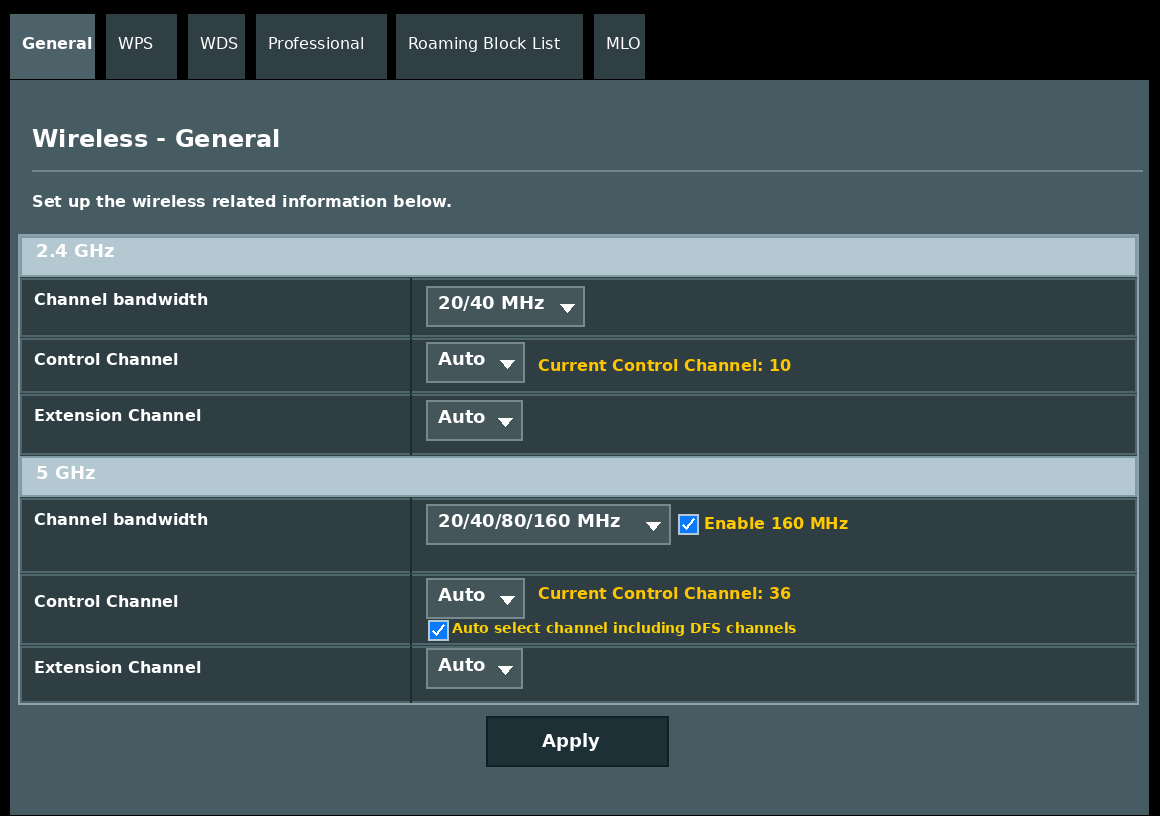
Some older routers also provide SSID and password controls in General > Network Map. Use whichever screen actually exposes those fields. The classic Wireless > General channel screenshot appears in the channel section below.
Step 3: Change the WiFi Name and Password
- Under Network Name (SSID), enter the WiFi name you want people to see when connecting. For example, FlashRouter24 for the 2.4 GHz network or FlashRouter50 for the 5 GHz network.
- Under Network Password, WPA-PSK Key, or the corresponding password field, enter a strong, unique wireless password. For typical WPA2/WPA3 personal networks, use at least 8 characters; a longer password is preferable.
- Keep wireless authentication and encryption on a secure setting supported by your devices. WPA2-Personal or a compatible WPA2/WPA3-Personal mode may be more suitable than WPA3-only for older streaming and smart-home devices. Avoid open or outdated WEP security for the main network.
- If you use more than one wireless band or main-network profile, make any desired updates to each profile. When several bands intentionally share the same SSID, keep their passwords and security configuration consistent.
- Click Apply and give the router time to save the changes.
Choose 2.4 GHz, 5 GHz, and Shared WiFi Settings
Separate WiFi names: easier to choose a specific band
Use distinct names such as FlashRouter24 and FlashRouter50. This is useful when you want to choose the band for a TV, wireless printer, or smart-home device rather than letting the router and device decide automatically.
- 2.4 GHz generally offers better range and compatibility with many IoT or older devices but is often more congested.
- 5 GHz often provides higher performance at shorter distances and works well for compatible computers and streaming devices near the router.
- 6 GHz is available only on compatible ASUS routers and client devices, with model- and region-specific settings.
Shared WiFi name: simpler everyday connections
A single network name across supported bands is also valid. With Smart Connect or an equivalent combined-band configuration, the router and devices can select an appropriate supported band. If band-specific device setup becomes difficult, temporarily separating the names can make troubleshooting easier.
Guest and IoT networks are separate profiles
On supported firmware, Guest Network or an IoT network can have its own SSID and password, such as FlashRouter_IoT in the example screenshot. Changing FlashRouter24 does not necessarily rename or change the password of those separate networks. Edit their profiles individually if needed.
For a dedicated WiFi network that uses the VPN or bypasses it, see ASUS Guest WiFi With or Without VPN: Setup Guide.
Turn ASUS WiFi On or Off
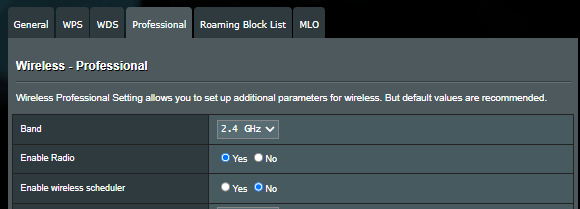
On classic AsusWRT, the Enable Radio option controls whether a selected WiFi band broadcasts and accepts wireless connections. Use an Ethernet connection before disabling any radio, especially if it is the only active WiFi band.
- Go to Wireless > Professional.
- Under Band, select the band to control, such as 2.4 GHz or 5 GHz.
- Find Enable Radio and select No to turn that band’s WiFi radio off, or Yes to turn it on.
- Click Apply to save. Repeat for another band only if you intend to control that band as well.
Schedule when WiFi is active
If your router offers Enable wireless scheduler or WiFi Scheduling, use it to schedule the selected network or radio. Check the schedule and router time settings if WiFi disappears at certain hours. Scheduling and radio controls vary by model and firmware.
Adjust ASUS WiFi Channels and Channel Bandwidth
For most homes, leave Control Channel and channel bandwidth on their default Auto or automatic settings unless you are troubleshooting interference, unstable connections, or compatibility with a device.
- In classic AsusWRT, open Wireless > General. Select the appropriate band or the 2.4 GHz or 5 GHz section. Newer firmware may show the same controls in a different wireless configuration area.
- For Control Channel, keep Auto for normal use, or choose an available channel to test if you suspect interference. Available channel numbers vary by country and router.
- For Channel bandwidth, start with the router’s default. If a 2.4 GHz device is unstable, testing 20 MHz may improve compatibility in a crowded environment. Higher 5 GHz bandwidth can increase throughput but is not always the most stable choice.
- On 5 GHz, if a device intermittently loses the network, consider whether a DFS channel is involved. Test a permitted non-DFS channel if your router and region offer one.
- Click Apply, allow WiFi to restart if necessary, and test the affected devices. If performance worsens, restore the previous setting or Auto.
Reconnect Devices After WiFi Changes
- On each phone, computer, TV, streaming box, or smart device, open its WiFi network list.
- Select your updated WiFi network name and enter the new password.
- If the device keeps trying the old password, use Forget Network, remove the saved WiFi profile, and connect again.
- Repeat for other connected devices, including printers, doorbells and smart-home equipment. If a device only supports 2.4 GHz, connect it to a 2.4 GHz SSID.
A WiFi name or password update normally does not require changing VPN Fusion profiles. Device-to-VPN routing still depends on the ASUS VPN Fusion settings and the identity of connected clients.
ASUS WiFi Troubleshooting
WiFi network disappeared
- Wait for Apply to finish and refresh the available WiFi network list on your device.
- Confirm the correct network profile, SSID, and band are active; if you disabled a radio, turn it back on through Wireless > Professional > Enable Radio using Ethernet.
- Check for an active WiFi schedule, unsupported band, or a recent channel change. Return the channel to Auto to isolate a channel-related issue.
Device sees WiFi but cannot join
- Forget the saved network and reconnect with the latest WiFi password, checking capitalization.
- For older smart-home products, use a separate 2.4 GHz network and verify that your security mode is supported by the device. Some devices cannot join WPA3-only networks.
- If a specific channel or bandwidth was changed recently, return to the previous value or Auto, apply, and retest.
Cannot open the router settings after changing WiFi
- Connect to the renamed WiFi network with the new password, or connect a computer to the router by Ethernet.
- Open
http://www.asusrouter.comor the router’s current LAN address. - Sign in with the router administrator credentials, which are separate from the WiFi password.
Upgrade your ASUS router
Explore the Latest WiFi 7 ASUS FlashRouters
Looking for a newer ASUS router? Browse available WiFi 7 ASUS FlashRouters and compare coverage, speed, and supported features for your home or office.