• Skip to primary navigation
  • Skip to main content
  • Skip to primary sidebar
  • Skip to footer

FlashRouters Support Portal

Prioritizing Privacy

  • SETUP GUIDES
    • Privacy Hero Router Setup Guide
    • ASUS-WRT Router Setup Guide
    • AsusWRT-Merlin Router Setup Guide
    • DD-WRT Router Setup Guide
    • ExpressVPN Router Setup Guide
    • GL.iNet Router Setup Guide
    • Roqos Core Router Setup Guide
  • TROUBLESHOOTING
    • Router Access
    • WiFi Connectivity
    • Internet Connection Issues
    • General VPN Issues
    • DD-WRT Firmware
    • TeamViewer Remote Support
  • FAQs
    • Router FAQs
    • VPN FAQs
    • Warranty and Returns FAQs
    • Sales FAQs
    • Shipping FAQs
    • Service Plan FAQs
  • Show Search
Hide Search

Search Results for: position

Cudy Router Setup Guide

Quick Start Guide for Cudy FlashRouters

Find setup guides, FAQs and troubleshooting tips for Cudy configured FlashRouters.

VIEW SUPPORTED ROUTER MODELS

WR3000, M1800, M3000

Internet Setup

  • Cudy Access Router Settings
  • Cudy Internet Setup

WiFi Setup

  • Cudy Change Wi-Fi name and password

VPN Setup

  • PrivateInternetAccess (PIA) Cudy OpenVPN Setup
  • IPVanish Cudy OpenVPN Setup
  • ExpressVPN Cudy OpenVPN Setup
  • NordVPN Cudy OpenVPN Setup

Cudy Features

Search Support Articles

Troubleshooting

More Ways to Get Help

GET IN TOUCH

BUY SUPPORT
BROWSE FAQs

GL.iNet Router Setup Guide

Quick Start Guide for GL.iNet FlashRouters

Find setup guides, FAQs and troubleshooting tips for GL.iNet FlashRouters.

VIEW SUPPORTED ROUTER MODELS

  • Slate: GL-AX1800, GL-AXT1800, GL-BE3600
  • Flint: GL-MT6000
  • Other: Beryl GL-MT3000, Velica GL-B2200, Marble GL-B3000
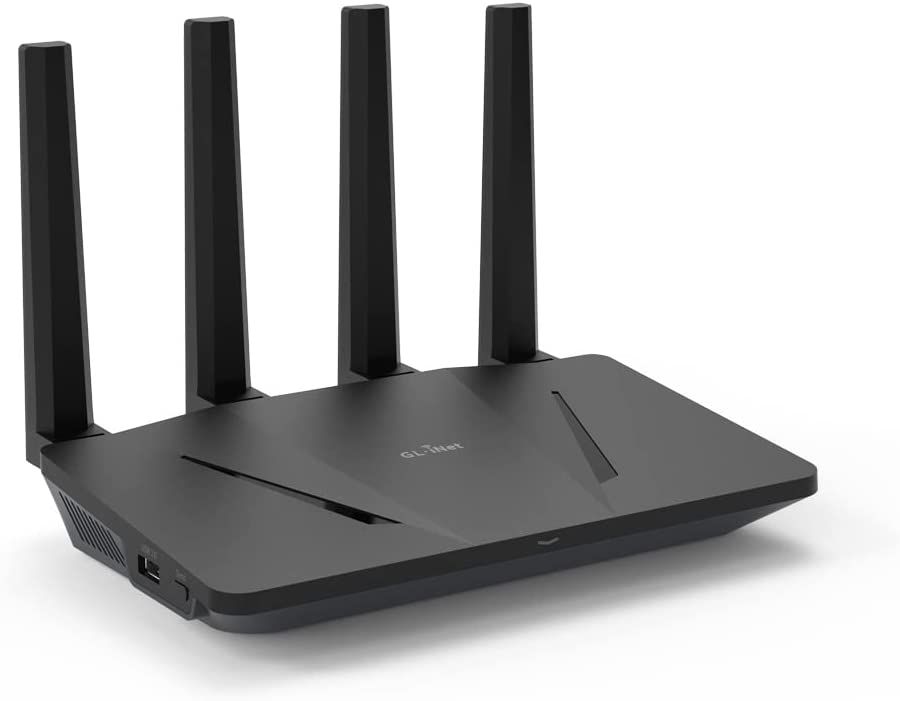
Flint GLinet Router Support

Internet Setup

  • How to Access Your GL.iNet FlashRouter Settings
  • Flint/Slate GL.iNet Repeater Setup
  • Flint/Slate GL.iNet Internet Setup

WiFi Setup

  • Flint/Slate GL.iNet Guest Network Setup
  • Flint/Slate GL.iNet Disable Wi-Fi
  • Flint/Slate GL.iNet Change Wi-Fi name and password

VPN Setup

  • Flint/Slate GL.iNet PureVPN WireGuard Setup
  • ProtonVPN Setup Guide for GL.iNet Routers
  • NordVPN Setup for GL.iNet Routers
  • Flint/Slate GL.iNet ExpressVPN OpenVPN Setup

GL.iNet Features

  • Flint/Slate GL.iNet Repeater Setup
  • GL.iNet Access Router Settings and Firmware Upgrade

Search Support Articles

Troubleshooting

More Ways to Get Help

GET IN TOUCH

BUY SUPPORT
BROWSE FAQs

TP-Link Router Setup Guide

TP-Link Router Support Guides

Quick Start Guide for TP-Link FlashRouters

Find setup guides, FAQs and troubleshooting tips for TP-Link configured FlashRouters.

VIEW SUPPORTED ROUTER MODELS

Archer AX10000, Archer AX1100, Archer AX21, Archer AX3000, Archer AX3000 Pro, Archer AX3200, Archer AX4400, Archer AX5400 Pro, Archer AX55, Archer AX55 Pro
Archer AX6000, Archer AX72 Pro, Archer AX73, Archer AX75, Archer AX80, Archer AX90
Archer AXE300, Archer AXE5400, Archer AXE75, Archer AXE95
Archer BE550, Archer BE800, Archer BE900, Archer BE9300, Archer GE80, Archer GX90

Internet Setup

  • TP-Link Internet Setup
  • TP-Link Access Router Settings

WiFi Setup

  • TP-Link Merge or Separate 2.4GHz and 5GHz Wi-Fi
  • TP-Link Change Wireless Channel
  • TP-Link Change Wi-Fi name and password

VPN Setup

  • ProtonVPN TP-Link WireGuard Setup
  • Surfshark TP-Link OpenVPN Setup
  • Surfshark TP-Link WireGuard Setup
  • IPVanish TP-Link OpenVPN Setup
  • PrivateInternetAccess (PIA) TP-Link OpenVPN Setup
  • NordVPN TP-Link OpenVPN Setup
  • ExpressVPN TP-Link OpenVPN Setup

TP-Link Features

Search Support Articles

Troubleshooting

More Ways to Get Help

GET IN TOUCH

BUY SUPPORT
BROWSE FAQs

ASUS-WRT Router Setup Guide

ASUSWRT Routers

Quick Start Guide for ASUS-WRT FlashRouters

Find setup guides, FAQs and troubleshooting tips for ASUSWRT configured FlashRouters.

VIEW SUPPORTED ROUTER MODELS

Asus Logo
  • ROG series: GT-BE98 Pro
  • GT series: GT6, GT-AXE16000, GT-AX11000 Pro, GT-AXE11000, GT-AX6000, GT-AX11000, GS-AX5400, GS-AX3000
  • ZenWiFi: ZenWiFi Pro XT12, ZenWiFi Pro ET12, ZenWiFi XT9, ZenWiFi AX (XT8), ZenWiFi ET8, ZenWiFi XD6, ZenWiFi XD5
  • RT series: RT-BE96U, RT-BE88U, RT-BE58U, RT-AXE7800, RT-AX88U Pro, RT-AX88U, RT-AX86U Pro, RT-AX86U, RT-AX86S, RT-AX68U, RT-AX82U, RT-AX58U, RT-AX3000, RT-AX59U, RT-AX92U
  • TUF series: TUF-AX5400, TUF-AX3000_V2, TUF-AX3000, TUF Gaming AX6000, TUF Gaming AX4200

Internet Setup

  • How to Access Your AsusWRT FlashRouter Settings

WiFi Setup

  • Change WiFi name and password on Asus

VPN Setup

  • CyberGhost AsusWRT OpenVPN Setup
  • Surfshark AsusWRT WireGuard Setup
  • NordVPN Setup for AsusWRT Firmware Routers
  • IPVanish AsusWRT OpenVPN Setup
  • PrivateInternetAccess (PIA) AsusWRT OpenVPN Setup
  • ExpressVPN Setup for AsusWRT Firmware Routers
  • PrivateInternetAccess (PIA) Asus AX1800S OpenVPN Setup
  • IPVanish Asus AX1800S OpenVPN Setup
  • ExpressVPN Asus AX1800S OpenVPN Setup
  • NordVPN Asus AX1800S OpenVPN Setup

Asus-WRT Features

Search Support Articles

Troubleshooting

More Ways to Get Help

GET IN TOUCH

BUY SUPPORT
BROWSE FAQs

DD-WRT Router Setup Guide

DD-WRT Router Setup Guide

Quick Start Guide for DD-WRT FlashRouters

Find setup guides, FAQs and troubleshooting tips for DD-WRT configured FlashRouters.

VIEW SUPPORTED ROUTER MODELS

AC1450, R6220, R6230, R6250, R6260, R6300 V1, R6300 V2, R6400 V1, R6400 V2, R6700 V1, R6700 V2, R6700 V3, R7000, R7000P, R7800, R8000, R9000, XR500

Asus Logo

RT-AC56U/R, RT-AC68U V1, RT-AC68U V2, RT-AC1900P, RT-AC87U, RT-AC3100, RT-AC5300

WRT1200AC, WRT1900AC V1, WRT1900AC V2, WRT1900ACS V1, WRT1900ACS V2, WRT32X, WRT3200ACM

Internet Setup

  • Connect FlashRouter to Internet
  • Access FlashRouter DD-WRT firmware settings
  • What are some extra steps I can take to secure my network?
  • IPv6 Internet Setup
  • PPPoE Internet Setup

WiFi Setup

VPN Setup

DD-WRT Features

  • How do I set a Static IP for my device in DD-WRT?
  • How do I upgrade the DD-WRT firmware of my FlashRouter?
  • How do I save and load a backup file?
  • How do I schedule a reboot of my FlashRouter?
  • How do I change the DHCP range of my FlashRouter?

Search Support Articles

Troubleshooting

  • Why can’t I send emails while connected to VPN?
  • What is a DNS leak and how can I prevent a DNS leak in my router?
  • My VPN stopped working on my FlashRouter.
  • Why is my connection speed slower?
  • Why are streaming services blocked while connected to VPN?
  • How do I find my router local IP address?
  • How do I reset and reconfigure my FlashRouter?
  • How do I check for static network settings on my devices?
  • Why is my router not connecting to internet?
  • How to fix an Unidentified Network or Limited Connection.
  • Why are some of my devices not connecting to the internet?
  • Why is the internet LED red on my router?
  • Why is the power light on my FlashRouter blinking?
  • My 2.4GHz network is not showing up
  • My 5.0GHz network is not showing up
  • My WiFi password is not working
  • Why did my WiFi SSID change to ‘dd-wrt’?
  • Why are devices disconnecting from Wireless?
  • Why is my WiFi signal weak?

More Ways to Get Help

GET IN TOUCH

BUY SUPPORT
BROWSE FAQs

Privacy Hero Router Setup Guide

Privacy Hero Routers

Quick Start Guide for Privacy Hero FlashRouters

Find setup guides, FAQs and troubleshooting tips for Privacy Hero FlashRouters.

Privacy Hero 2

Internet Setup

  • Privacy Hero Activation and Setup
  • Privacy Hero Access Router Settings
  • Privacy Hero Creating User Profiles and Adding Devices to Profiles

WiFi Setup

  • Privacy Hero Activation and Setup
  • Privacy Hero Change Wi-Fi Name and Password
  • Privacy Hero Change Wireless Channel
  • Privacy Hero Disable Wi-Fi

VPN Setup

  • NordVPN Setup Guide for Privacy Hero
  • Surfshark VPN Setup Guide for Privacy Hero
  • IPVanish VPN Setup Guide for Privacy Hero
  • ProtonVPN Setup Guide for Privacy Hero
  • ExpressVPN Setup Guide for Privacy Hero
  • Private Internet Access VPN Setup Guide for Privacy Hero
  • Privacy Hero VPN Setup Guide for Privacy Hero
  • Privacy Hero VPN Kill Switch Setup

Privacy Hero Features

  • Privacy Hero Activation and Setup
  • Privacy Hero VPN Kill Switch Setup
  • Privacy Hero Bypass certain devices from VPN
  • Privacy Hero Streaming Relocation
  • Privacy Hero Adblocking Malware and Phishing Prevention Setup
  • Privacy Hero Creating User Profiles and Adding Devices to Profiles
  • Privacy Hero Safe Surf
  • Privacy Hero Bedtime Settings (Internet Scheduler)

Search Support Articles

Troubleshooting

  • Privacy Hero Change VPN Providers

More Ways to Get Help

GET IN TOUCH

BUY SUPPORT
BROWSE FAQs

ExpressVPN Router Setup Guide

Quick Start Guide for ExpressVPN FlashRouters

Find setup guides, FAQs and troubleshooting tips for ExpressVPN configured FlashRouters.

VIEW SUPPORTED ROUTER MODELS

Aircove

R6300 V2, R6400 V2, R6700 V3, R7000, R7000P

Asus Logo

RT-AC56U, RT-AC56R, RT-AC56S, RT-AC68U V3, RT-AC87U

EA6200, WRT1200AC, WRT1900AC V1, WRT1900AC V2, WRT1900ACS V1, WRT1900ACS V2, WRT32X, WRT3200ACM

Internet Setup

  • ExpressVPN Asus Quick Start Guide
  • ExpressVPN Netgear Quick Start Guide
  • ExpressVPN Linksys Quick Start Guide
  • ExpressVPN/Aircove FlashRouter Internet Setup and Activation
  • How do I reset and reconfigure my ExpressVPN/Aircove FlashRouter?

WiFi Setup

  • Separate 2.4GHz and 5GHz Wi-Fi bands on ExpressVPN/Aircove firmware
  • Change Wireless Channels on ExpressVPN/Aircove firmware

VPN Setup

  • Change server locations on ExpressVPN/Aircove firmware
  • Using Device Groups to connect to multiple VPN locations on ExpressVPN/Aircove firmware
  • Using Device Groups to bypass VPN on ExpressVPN/Aircove firmware
  • Change VPN Protocols on ExpressVPN/Aircove firmware
  • ExpressVPN TP-Link OpenVPN Setup
  • ExpressVPN Cudy OpenVPN Setup
  • ExpressVPN Asus AX1800S OpenVPN Setup
  • Flint/Slate GL.iNet ExpressVPN OpenVPN Setup
  • ExpressVPN Merlin OpenVPN Setup

ExpressVPN Features

  • ExpressVPN MediaStreamer SmartDNS Setup
  • ExpressVPN Router App Support

Search Support Articles

Troubleshooting

  • Separate 2.4GHz and 5GHz Wi-Fi bands on ExpressVPN/Aircove firmware
  • Change Wireless Channels on ExpressVPN/Aircove firmware
  • How do I reset and reconfigure my ExpressVPN/Aircove FlashRouter?

More Ways to Get Help

GET IN TOUCH

BUY SUPPORT
BROWSE FAQs

AsusWRT-Merlin Router Setup Guide

Asus-Merlin Router Setup

Quick Start Guide for AsusWRT-Merlin FlashRouters

Find setup guides, FAQs and troubleshooting tips for Asus-Merlin configured FlashRouters.

VIEW SUPPORTED ROUTER MODELS

Asus Logo
  • RT-BE88U (BE7200), RT-AC68U, RT-AC88U, RT-AC3100, RT-AC5300, RT-AC86U, RT-AX56U, RT-AX58U, RT-AX68U, RT-AX86U. RT-AX86U-PRO, RT-AX88U, RT-AX88U-PRO
  • GT-AC2900, GT-AX6000, GT-AX11000, GT-AXE11000,GT-AXE11000-PRO,  GT-AXE16000
  • ZenWiFi Pro XT12

Internet Setup

  • Internet and Wifi Setup on Asus Merlin Firmware
  • DNS Setup for Asus Merlin

WiFi Setup

  • Change WiFi name and password on Merlin
  • Separate your WiFi 2.4GHz and 5GHz Merlin networks

VPN Setup

  • Connecting to OpenVPN on Asus Merlin Firmware
  • PureVPN Merlin WireGuard Setup
  • Surfshark Merlin WireGuard Setup
  • ProtonVPN Merlin WireGuard Setup
  • IPVanish Merlin OpenVPN Setup
  • PrivateInternetAccess (PIA) Merlin OpenVPN Setup
  • NordVPN Merlin OpenVPN Setup
  • ExpressVPN Merlin OpenVPN Setup
  • CyberGhost Merlin OpenVPN Setup

AsusWRT-Merlin Features

  • VPN Director for Asus Merlin
  • VPN Killswitch for Asus Merlin

Search Support Articles

Troubleshooting

  • How do I find my router local IP address?

More Ways to Get Help

GET IN TOUCH

BUY SUPPORT
BROWSE FAQs

OpenWRT Setup Guide

Quick Start Guide for OpenWRT Routers

Find setup guides, FAQs and troubleshooting tips for the FlashRouters OpenWRT Routers.

VIEW SUPPORTED ROUTER MODELS

Flint WiFi 6 AX1800 VPN Router

Internet Setup

WiFi Setup

VPN Setup

OpenWRT Features

Search Support Articles

Troubleshooting

More Ways to Get Help

GET IN TOUCH

BUY SUPPORT
BROWSE FAQs

Roqos Core Router Setup Guide

Roqos Core Router Setup Guide

Quick Start Guide for Roqos Core Routers

Find setup guides, FAQs and troubleshooting tips for the FlashRouters Roqos Core Router.

Internet Setup

  • Roqos Core Quick Start Guide
  • How do I access my Roqos device settings?
  • Roqos Core Internet Setup and Activation

WiFi Setup

  • Setting up a Guest WiFi Network on Roqos
  • Change WiFi name and password on Roqos

VPN Setup

  • NordVPN Setup on Roqos
  • PrivateInternetAccess (PIA) Setup on Roqos
  • ExpressVPN Setup on Roqos
  • Roqos VPN Connected, but my device IP is unchanged

Roqos Core Features

  • Set a Static IP for your connected devices on Roqos
  • VPN Kill Switch on Roqos
  • Managing User Profiles on Roqos
  • Cybersecurity and Intrusion Prevention on Roqos
  • Block Websites by Country on Roqos
  • Ad blocking on Roqos
  • Parental Controls on Roqos
  • Wireless Repeater – WiFi as WAN on Roqos
  • What do the lights on my Roqos Core mean?

Search Support Articles

Troubleshooting

  • Roqos VPN Connected, but my device IP is unchanged
  • How do I access my Roqos device settings?
  • What do the lights on my Roqos Core mean?

More Ways to Get Help

GET IN TOUCH

BUY SUPPORT
BROWSE FAQs

VPN Router Setup Guides & FAQs | FlashRouters Help Center

Support Guides

Select your router type

Privacy hero Routers

Router Models

Privacy Hero, Privacy Hero 2

PRIVACY HERO SETUP GUIDE
Asus Merlin Router Support Guides

Router Models

ASUS
  • RT Series: RT-AC68U, RT-AC88U, RT-AC3100, RT-AC5300, RT-AC86U, RT-AX56U, RT-AX58U, RT-AX68U, RT-AX86U. RT-AX86U-PRO, RT-AX88U, RT-AX88U-PRO, RT-BE86U, RT-BE88U, RT-BE92U, RT-BE96U
  • GT Series: GT-AC2900, GT-AX6000, GT-AX11000, GT-AXE11000,GT-AXE11000-PRO,  GT-AXE16000, GT-BE98_PRO
  • ZenWiFi Pro XT12
MERLIN SETUP GUIDE

Router Models

WR3000, M1800, M3000
CUDY SETUP GUIDE
Asus WRT Router Support Guides

Router Models

GT series: GT6, GT-AXE16000, GT-AX11000 Pro, GT-AXE11000, GT-AX6000, GT-AX11000, GS-AX5400, GS-AX3000
ZenWiFi: ZenWiFi Pro XT12, ZenWiFi Pro ET12, ZenWiFi XT9, ZenWiFi AX (XT8), ZenWiFi ET8, ZenWiFi XD6, ZenWiFi XD5
RT series: RT-AXE7800, RT-AX88U Pro, RT-AX88U, RT-AX86U Pro, RT-AX86U, RT-AX86S, RT-AX68U, RT-AX82U, RT-AX58U, RT-AX3000, RT-AX59U, RT-AX92U
TUF series: TUF-AX5400, TUF-AX3000_V2, TUF-AX3000, TUF Gaming AX6000, TUF Gaming AX4200
ASUS-WRT SETUP GUIDE
TP-Link Router Support Guides

Router Models

Archer AX10000, Archer AX1100, Archer AX21, Archer AX3000, Archer AX3000 Pro, Archer AX3200, Archer AX4400, Archer AX5400 Pro, Archer AX55, Archer AX55 Pro
Archer AX6000, Archer AX72 Pro, Archer AX73, Archer AX75, Archer AX80, Archer AX90
Archer AXE300, Archer AXE5400, Archer AXE75, Archer AXE95
Archer BE550, Archer BE800, Archer BE900, Archer BE9300, Archer GE80, Archer GX90
TP-LINK SETUP GUIDE
gl.iNet Router Setup Guides

Router Models

Flint 2 GL-MT6000, Flint GL-AX1800, Slate GL-AXT1800, Beryl GL-MT3000, Marble GL-B3000

GL.iNet SETUP GUIDE
Roqos Router Support Guides

Router Models

Roqos Core Router, Roqos SASE Appliance

ROQOS SETUP GUIDE
DD-wrt Router Support Guides

Router Models

NETGEAR

AC1450, R6220, R6230, R6250, R6260, R6300 V1, R6300 V2, R6400 V1, R6400 V2, R6700 V1, R6700 V2, R6700 V3, R7000, R7000P, R7800, R8000, R9000, XR500

ASUS

RT-AC56U/R, RT-AC68U V1, RT-AC68U V2, RT-AC1900P, RT-AC87U, RT-AC3100, RT-AC5300

LINKSYS

WRT1200AC, WRT1900AC V1, WRT1900AC V2, WRT1900ACS V1, WRT1900ACS V2, WRT32X, WRT3200ACM

DD-WRT SETUP GUIDE
ExpressVPN Routers

Router Models

ExpressVPN Aircove, Aircove Go

NETGEAR

R6300 V2, R6400 V2, R6700 V3, R7000, R7000P

ASUS

RT-AC56U, RT-AC56R, RT-AC56S, RT-AC68U V3, RT-AC87U

LINKSYS

EA6200, WRT1200AC, WRT1900AC V1, WRT1900AC V2, WRT1900ACS V1, WRT1900ACS V2, WRT32X, WRT3200ACM

EXPRESSVPN SETUP GUIDE

Search Support Articles

Top Router Questions

  • How do I upgrade the DD-WRT firmware of my FlashRouter?
  • Roqos VPN Connected, but my device IP is unchanged
  • How do I access my Roqos device settings?
  • Why can’t I access router settings?
  • How do I reset and reconfigure my ExpressVPN/Aircove FlashRouter?
  • How do I reset and reconfigure my FlashRouter?
  • How do I change my Wireless Password?
  • My 2.4GHz network is not showing up
  • My 5.0GHz network is not showing up
  • My WiFi password is not working
  • Why can’t I connect to WiFi using the WPS button feature?
  • Access FlashRouter DD-WRT firmware settings

More Ways to Get Help

GET IN TOUCH

BUY SUPPORT
BROWSE FAQs

Getting Started With Your FlashRouter

Getting Started With Your FlashRouter

  1. Connect FlashRouter to Internet
  2. Access FlashRouter DD-WRT firmware settings
  3. Connect FlashRouter to VPN 
VIEW ALL SETUP GUIDES
TROUBLESHOOTING
FAQS

Setting Up Your VPN Service

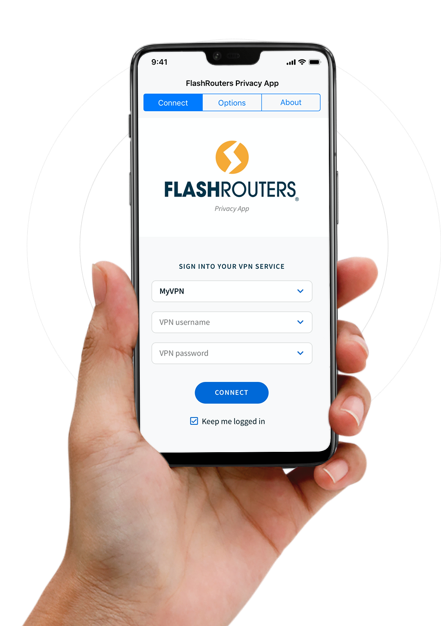
Select your operating system below to setup the FlashRouters Privacy App on your router, the easiest way to connect to the best VPN services.  For ExpressVPN FlashRouter users, please view the following section for setting up the ExpressVPN app.
Windows

Mac

Android

iPhone

ExpressVPN NETGEAR ROUTERS
ExpressVPN LINKSYS ROUTERS

More Ways to Get Help

Can’t find the answer you are looking for? Open a support ticket and our support team will be there to assist you.

Flint/Slate GL.iNet Disable Wi-Fi

TeamFlashRouters · Apr 20, 2023 ·

Follow this guide to disable Wi-Fi network on your GL.iNet FlashRouter.

1. Connect your computer, phone, or tablet to the GL.iNet router via wireless (FlashRouter24 / FlashRouter50) or via ethernet cable to one of the LAN ports on the router.

The FlashRouter WiFi password is printed on the sheet that came with the router and is set to Wireless#[First 5 characters of your router MAC]. The router MAC can be found on the bottom of your router if you cannot locate the sheet. For e.g. if your MAC is 1459C07E70A8 then your WiFi password is Wireless#1459C

Be sure to capitalize the W.

2. Once connected via wireless or ethernet on your device open your browser and go to 192.168.8.1
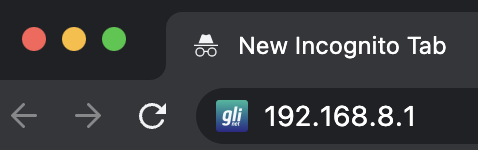
GL.iNet router access

3. Enter openwrt as the admin password to access the GL.iNet firmware settings.
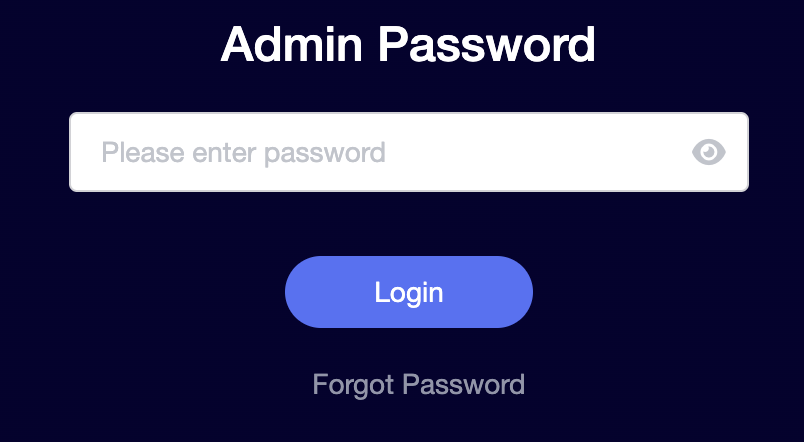
GL.iNet admin password enter

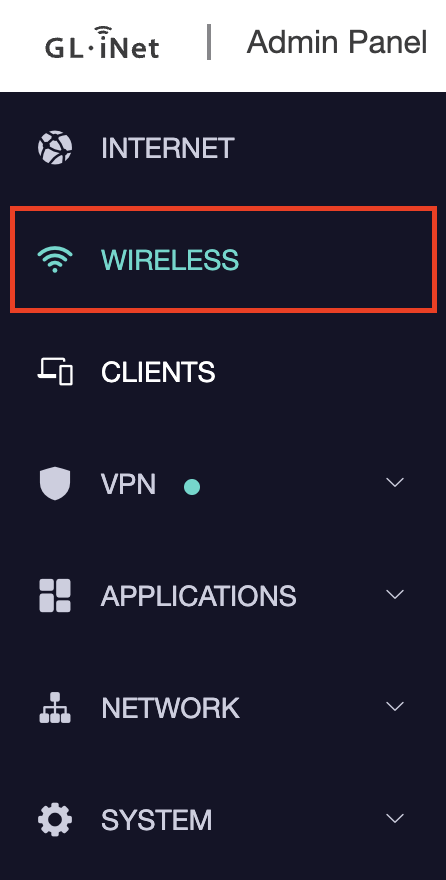
4. Click Wireless.

GL.iNet Click Wireless

5. Click Modify under the 5GHz or 2.4GHz band.
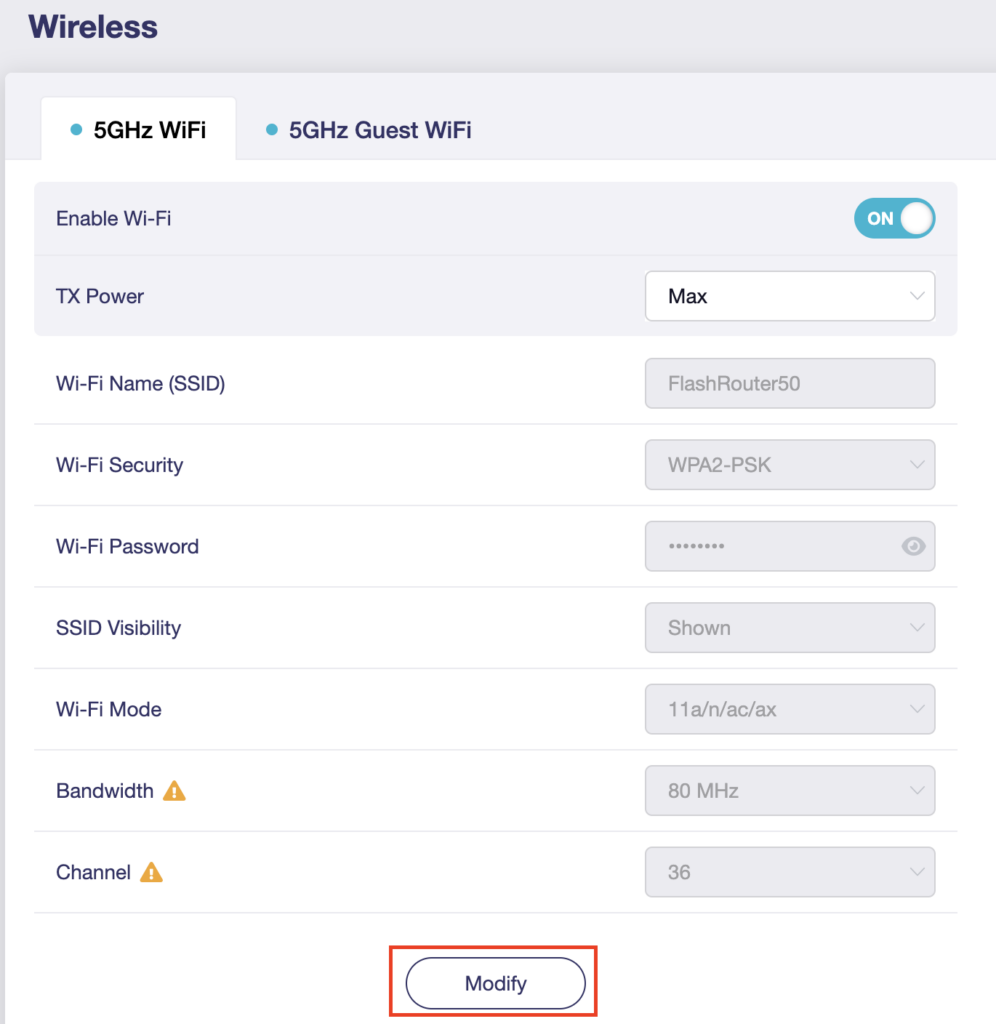
GL.iNet Modify Wifi

The 5GHz and 2.4GHz bands must be disabled at separate times. Keep in mind that if you are connected to wireless when disabling one band you may need to reconnect with the other band to disable it. Also make sure you have a device that has ethernet capabilities so you can still access the settings with wireless disabled.

6. Set the Enable Wi-Fi toggle to the OFF position and click Apply.
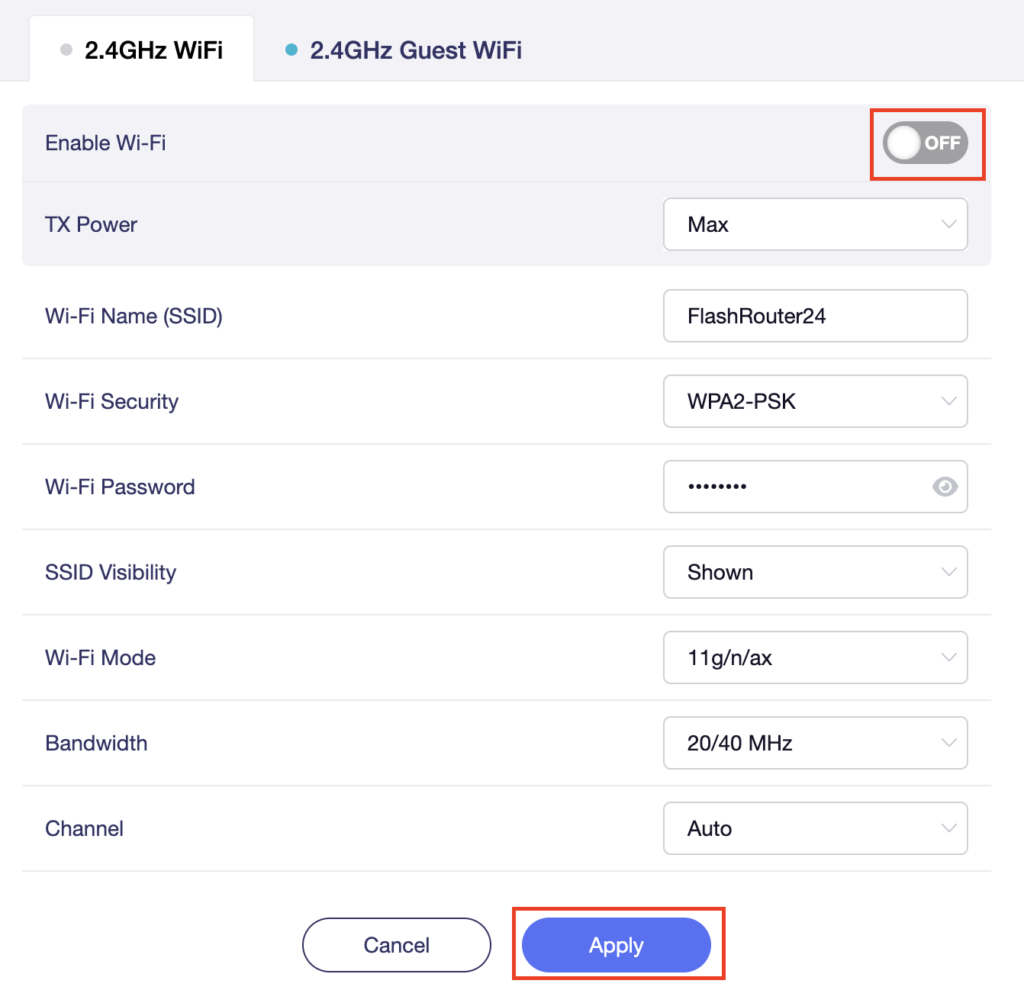
GL.iNet Disable Wifi

TROUBLESHOOTING

Still having issues? Visit the VPN Troubleshooting section.

Troubleshoot Here

Flint/Slate GL.iNet Guest Network Setup

TeamFlashRouters · Apr 20, 2023 ·

Follow this guide to setup a Guest Network on your GL.iNet FlashRouter. Devices connected to the guest network will be on a separate subnet and will not have access to the router settings or be able to talk to devices on the main network.

1. Connect your computer, phone, or tablet to the GL.iNet router via wireless (FlashRouter24 / FlashRouter50) or via ethernet cable to one of the LAN ports on the router.

The FlashRouter WiFi password is printed on the sheet that came with the router and is set to Wireless#[First 5 characters of your router MAC]. The router MAC can be found on the bottom of your router if you cannot locate the sheet. For e.g. if your MAC is 1459C07E70A8 then your WiFi password is Wireless#1459C

Be sure to capitalize the W.

2. Once connected via wireless or ethernet on your device open your browser and go to 192.168.8.1

GL.iNet router access

3. Enter openwrt as the admin password to access the GL.iNet firmware settings.

GL.iNet admin password enter

4. Click Wireless.

GL.iNet Click Wireless

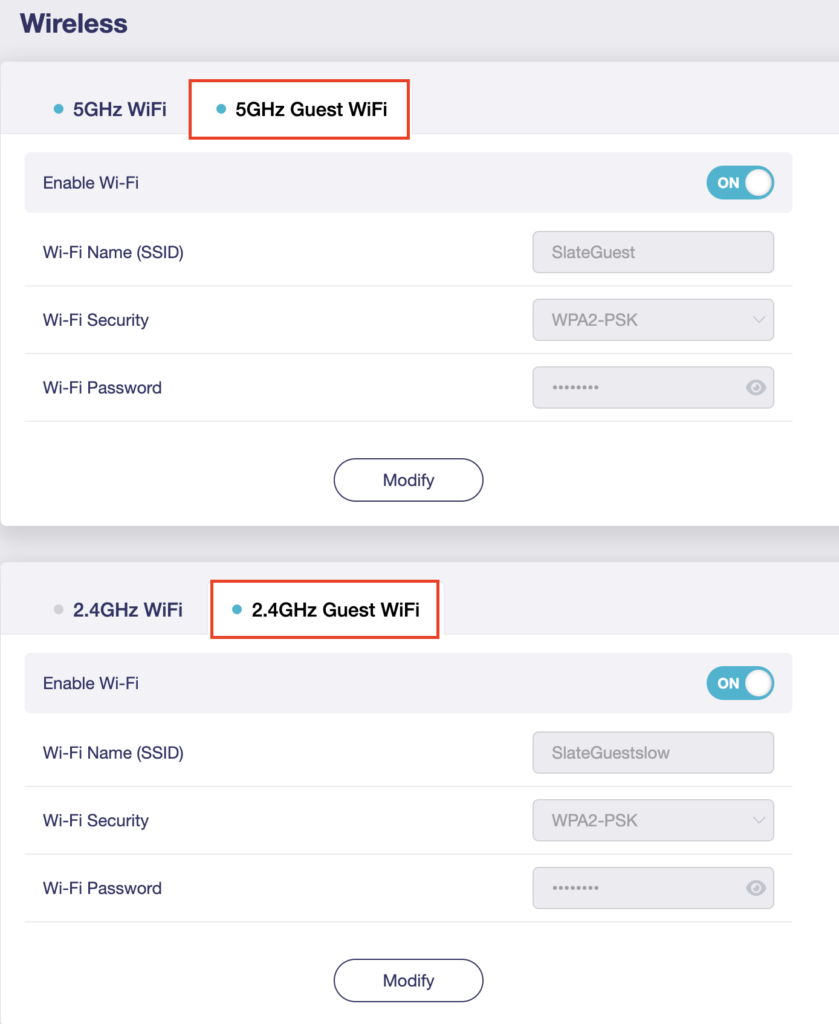
5. Click 5GHz Guest Wi-Fi or 2.4GHz Guest Wi-Fi.
GL.iNet Select Guest Wifi

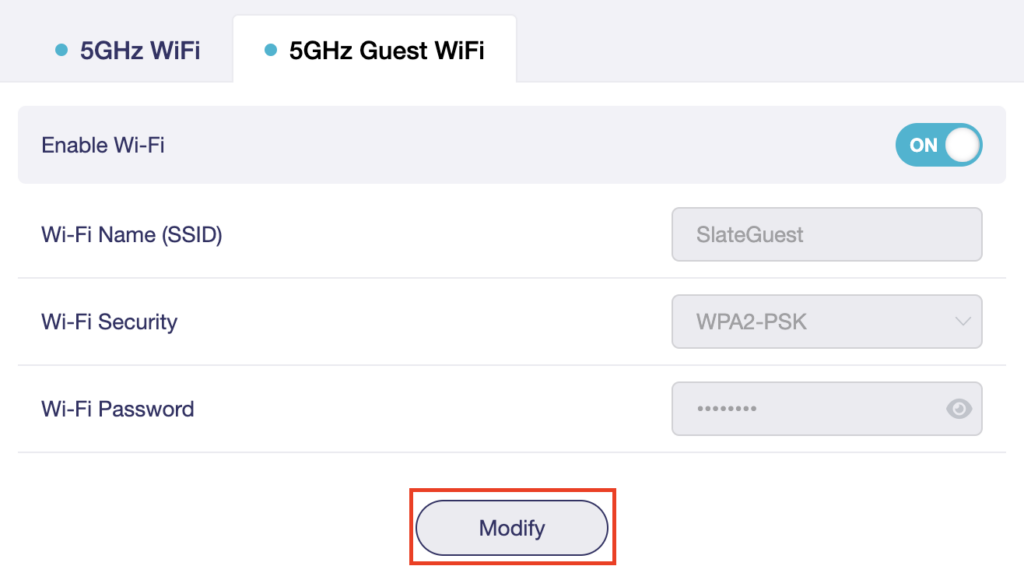
6. Click Modify.

GL.iNet Guest Modify

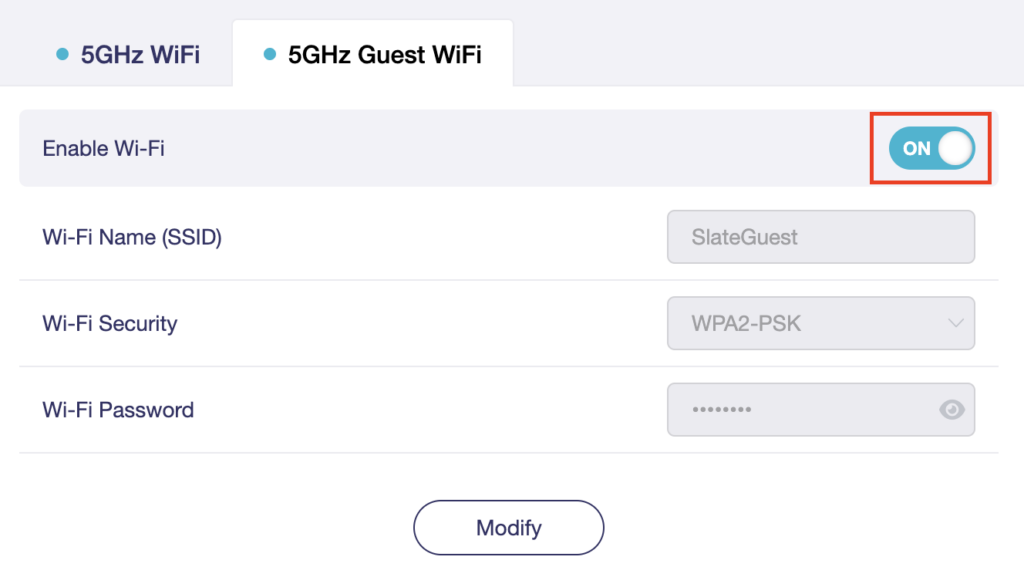
7. Set the Enable Wi-Fi toggle to the ON position.
GL.iNet Enable Guest Wifi

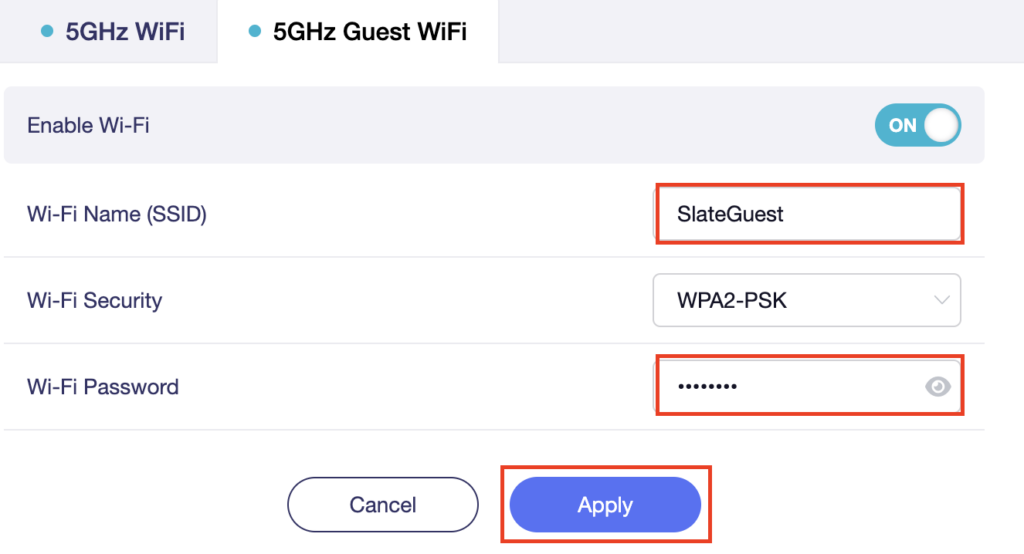
8. Change the Wi-Fi Name (SSID) and Wi-Fi Password fields to what you want to use. The SSID should be unique and NOT a duplicate of an existing network. Click Apply.
GL.iNet Guest change wifi name and pass

9. Connect your devices to the new guest wireless network.

TROUBLESHOOTING

Still having issues? Visit the VPN Troubleshooting section.

Troubleshoot Here

Privacy Hero Disable Wi-Fi

TeamFlashRouters · Feb 8, 2023 ·

Your Privacy Hero router uses Cloud Based router management which means you can access the router settings from anywhere on any device that has an internet connection. You can follow these steps while connected to your phone, other Wi-Fi network, or the Privacy Hero network.

Use these steps to disable your Privacy Hero Wi-Fi so only ethernet connections are active. This is not a required step just a preference.

1. From any device that has a browser such as a computer, smartphone, or tablet visit app.privacyhero.com

App.PrivacyHero.com

2. Enter your Privacy Hero account email and password. Click Login.

Privacy Hero Access Settings

If you have not created your Privacy Hero account yet please follow these instructions.

3. Click the Wi-Fi symbol.
Privacy Hero Select Wifi

4. Set the toggle switches to the off position for the Wi-Fi bands you want to disable.
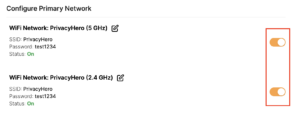
Privacy Hero Disable Wifi

TROUBLESHOOTING

Still having issues? Visit the VPN Troubleshooting section.

Troubleshoot Here

How do I reset and reconfigure my FlashRouter?

Dave · May 3, 2019 ·

When is a router reset needed?

A reset of the FlashRouter should only be performed in the following instances:

  • You have exhausted all other troubleshooting methods and cannot access your router settings.
  • A backup file was saved of your previously working settings.
  • Username and password to access the FlashRouter’s settings are not working.
  • Power light on the router is blinking steadily.
  • Firmware upgrade was performed with Reset to Default settings selected.

Reset Router

Asus FlashRouters:

  1. While the router is powered off press and hold the WPS button on the back or side of the router. Power up the router while continuing to hold the WPS. Continue to hold for 15 seconds as the router powers on (note this could be up to 45 seconds on some models before lights flash).
  2. You will see the lights on the router flashing steadily and this is how you know you have reset the router.
  3. Let the router sit for about a minute and then reboot the router.

Linksys and Netgear FlashRouters:

  1. While the router is plugged in, find the reset button located on the back of the router. You will need a pin or pencil to hold down the button for 15 seconds.
  2. You will see the lights on the back of the router flash simultaneously and this is how you know you have reset the router.
  3. Let the router sit for about a minute and then reboot the router.

Access Router Settings

1. Connect to the FlashRouter’s network via ethernet cable or wireless.

The wireless network will appear as “dd-wrt” and will likely not require a password to join. If it does require a password to join the password will be the default wireless password found on the bottom of the router.

2. Open your web browser and enter 192.168.1.1 in the URL.
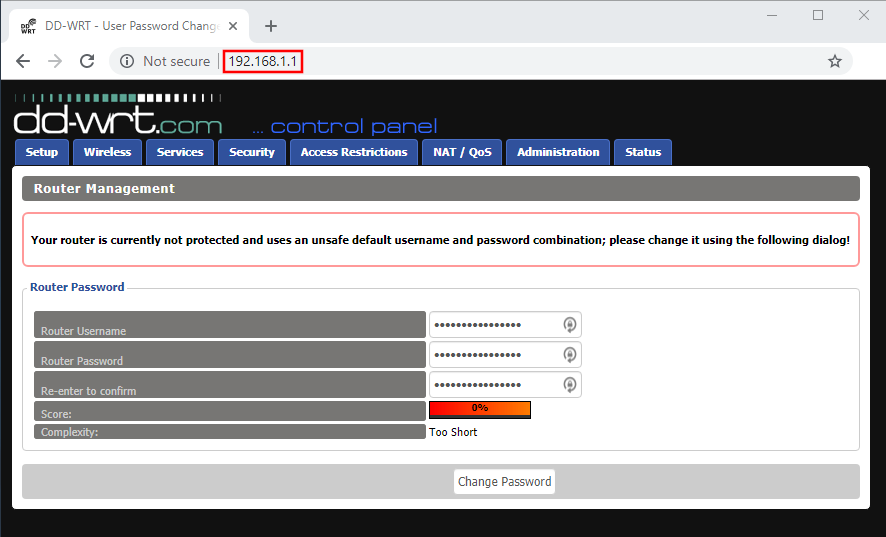
Reset FlashRouters DD-WRT Settings Back to Default Settings

3. Delete the dots and enter the new administration login in the Router Username, Router Password, and Re-enter to confirm fields.

TYPE CAREFULLY when setting the administration login as a typo will result in needing to reset the router again.

Change Local IP Address and DNS

Navigate to Setup > Basic Setup

1. Set the Local IP Address to 192.168.11.1

2. Set the Static DNS 1 to 8.8.8.8

3. Set the Static DNS 2 to 8.8.4.4

4. Set the Static DNS 3 to 208.67.220.220
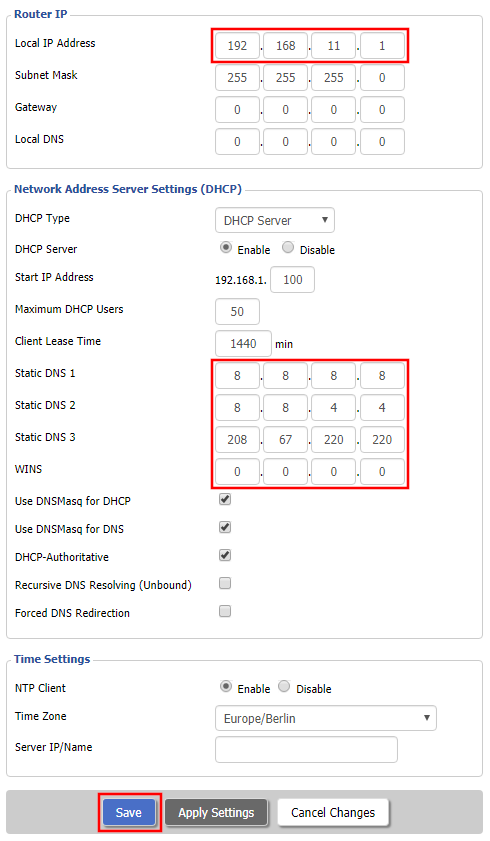
Enter New Local IP Address and DNS Servers After FlashRouter DD-WRT Reset

CLICK SAVE

Setup WiFi

Navigate to Wireless > Basic Settings

Find your FlashRouter model in the WiFi Setup section and replicate the wireless settings on this page.

CLICK APPLY SETTINGS

REBOOT ROUTER

Connect to the FlashRouter's network

You will be able to connect to the newly setup wireless network using the details you set. The router will now be accessible at 192.168.11.1

Back up your settings

  1. Click the Backup button.
  2. A file named nvrambak.bin will be saved to your computer.
  3. You can load nvrambak.bin to restore your settings in the event of a reset.

How do I reset and reconfigure my ExpressVPN/Aircove FlashRouter?

TeamFlashRouters · Mar 16, 2022 ·

When is a router reset needed?

A reset of the FlashRouter should only be performed in the following instances:

  • You have exhausted all other troubleshooting methods and cannot access your router settings.
  • Password to access the FlashRouter’s settings are not working.
  • Power light on the router is blinking steadily.
  • Router is not accessible after upgrading the firmware

Reset Router

Asus FlashRouters:

  1. While the router is powered off press and hold the WPS button on the back or side of the router. Power up the router while continuing to hold the WPS. Continue to hold for 15 seconds as the router powers on (note this could be up to 45 seconds on some models before lights flash).
  2. You will see the lights on the router flashing steadily and this is how you know you have reset the router.
  3. Let the router sit for about a minute and then reboot the router.

Aircove, Linksys and Netgear FlashRouters:

  1. While the router is plugged in, find the reset button located on the back of the router. You will need a pin or pencil to hold down the button for 15 seconds.
  2. You will see the lights on the back of the router flash simultaneously and this is how you know you have reset the router.
  3. Let the router sit for about a minute and then reboot the router.

Access Router Settings

1. Connect to the FlashRouter’s network via ethernet cable or wireless.

The wireless network will appear as “Aircove”, “Linksys##”, “Netgear##”, or “Asus” and the password to join the network will be the default wireless password printed on the bottom of the router.

2. Open your web browser and enter expressvpnrouter.com or 192.168.132.1 in the URL.

ExpressVPNrouter.com
192.168.132.1

3. Click Get Started on the ExpressVPN page that is displayed.

ExpressVPN Get Started

4a. If your FlashRouter is wired to the Internet correctly then you will be prompted to enter your ExpressVPN Activation Code found in your ExpressVPN account. Paste that in and click Sign in to ExpressVPN.

ExpressVPN Activation Code

4b. If your FlashRouter is not wired correctly or is not receiving Internet properly make sure you are wired as detailed in the diagram that appears. If you are stuck at this screen we recommend powering off your ISP modem and any other router that the ExpressVPN FlashRouter is wired to and then powering them back up one by one.

Proceed with step “4a” above once the router is receiving Internet and you are prompted to enter the Activation Code.

ExpressVPN Wiring

5. Select if you want to share anonymous crash report data with ExpressVPN to help them improve the firmware for future releases.

ExpressVPN Share Crash Report

6. Set the WiFi name and password your wireless devices will use to connect to the FlashRouter’s network. Make sure the WiFi name is unique and not a duplicate of an existing WiFi name if you change it. You can also leave it as the default information if you like. Click Continue.

ExpressVPN Set WiFi Name and Password

7. Enter the admin password you will use to access the ExpressVPN router settings. Be sure to TYPE CAREFULLY when setting the admin password as a typo will result in needing to reset the router again. Note this password in a secure location or commit it to memory.

ExpressVPN admin password

8. Your ExpressVPN FlashRouter is now fully setup!

ExpressVPN Connected

ExpressVPN/Aircove FlashRouter Internet Setup and Activation

TeamFlashRouters · Mar 16, 2022 ·

Follow this article when you receive your new ExpressVPN FlashRouter to connect your FlashRouter to the Internet via ExpressVPN and customize your network so it is ready to use.

Obtain your ExpressVPN Activation Code

If you are not already an ExpressVPN user Sign Up Now.

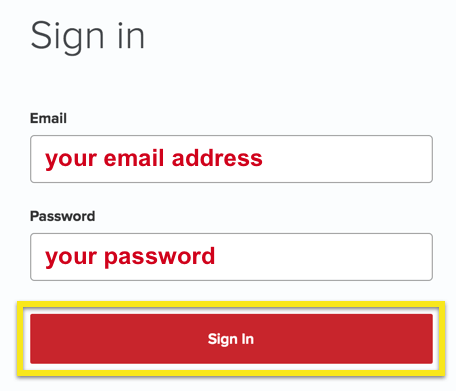
1. Visit ExpressVPN’s website login page.

ExpressVPN on FlashRouters Privacy App Setup - Sign Into ExpressVPN Dashboard

2. Copy your ExpressVPN Activation code and paste it into a document or leave this page open while you proceed with the instructions.

Access Router Settings

1. Connect to the FlashRouter’s network via ethernet cable or wireless.

The wireless network will appear as “Aircove”, “Linksys##”, “Netgear##”, or “Asus” and the password to join the network will be the default wireless password printed on the bottom of the router.

2. Open your web browser and enter expressvpnrouter.com or 192.168.132.1 in the URL.

ExpressVPNrouter.com
192.168.132.1

3. Click Get Started on the ExpressVPN page that is displayed.
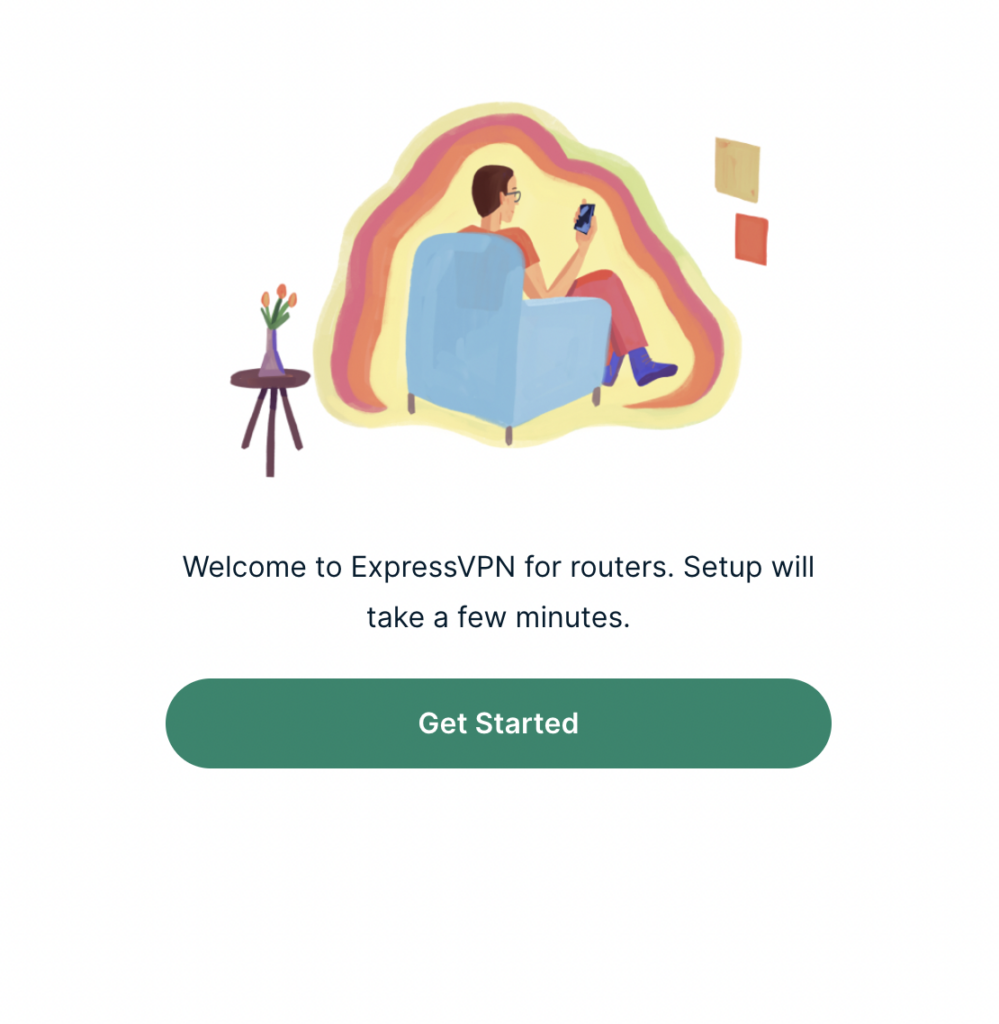
ExpressVPN Get Started

4a. If your FlashRouter is wired to the Internet correctly then you will be prompted to enter your ExpressVPN Activation Code found in your ExpressVPN account. Paste that in and click Sign in to ExpressVPN.
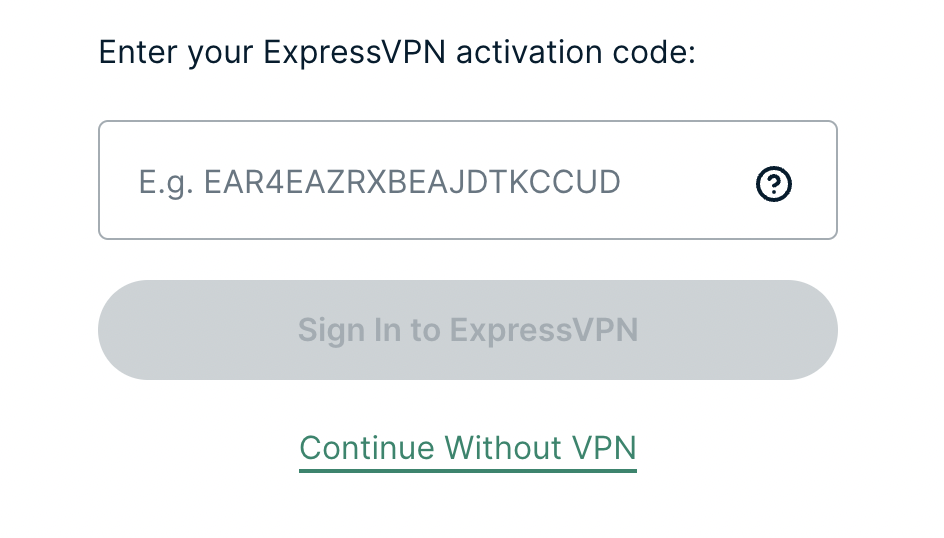
ExpressVPN Activation Code

4b. If your FlashRouter is not wired correctly or is not receiving Internet properly make sure you are wired as detailed in the diagram that appears. If you are stuck at this screen we recommend powering off your ISP modem and any other router that the ExpressVPN FlashRouter is wired to and then powering them back up one by one.

Proceed with step “4a” above once the router is receiving Internet and you are prompted to enter the Activation Code.
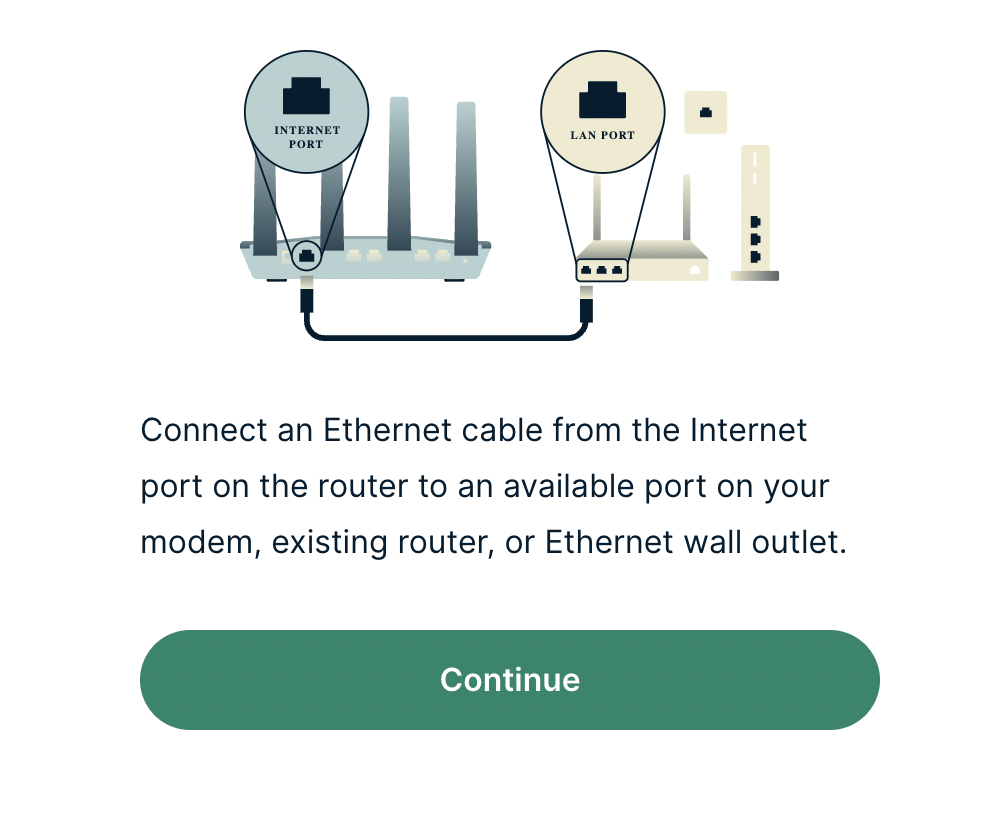
ExpressVPN Wiring

5. Select if you want to share anonymous crash report data with ExpressVPN to help them improve the firmware for future releases.
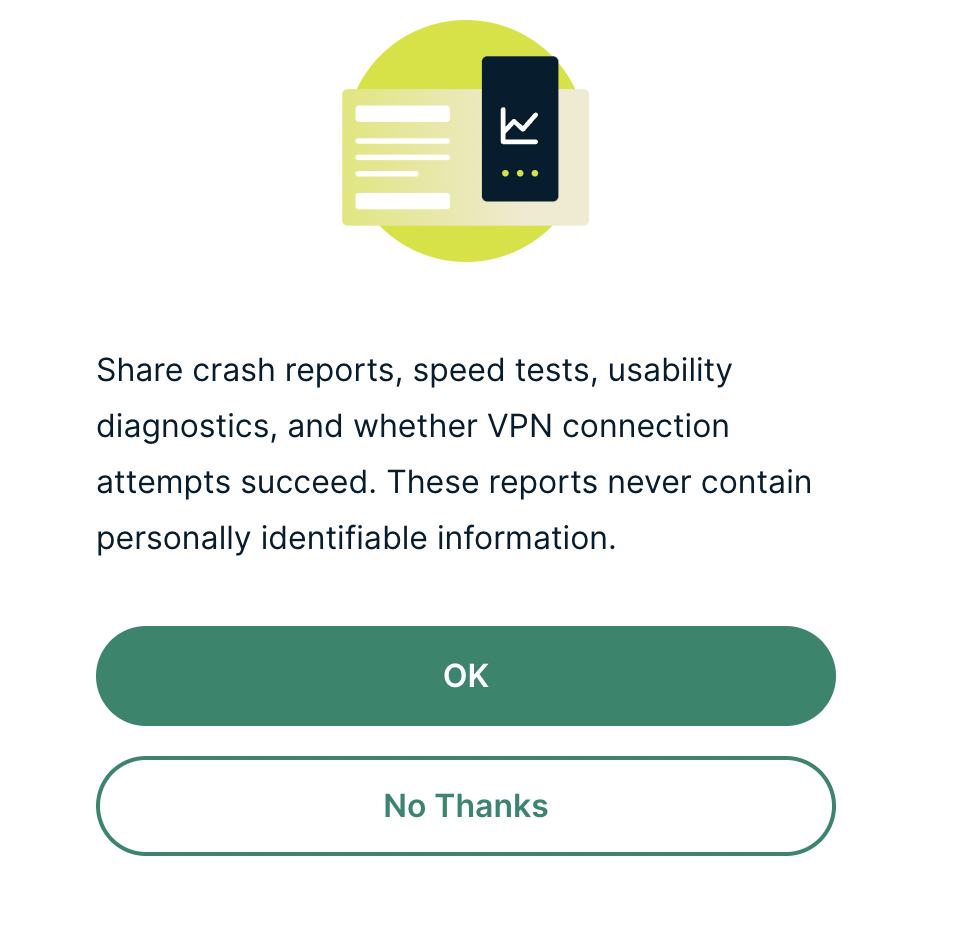
ExpressVPN Share Crash Report

6. Set the WiFi name and password your wireless devices will use to connect to the FlashRouter’s network. Make sure the WiFi name is unique and not a duplicate of an existing WiFi name if you change it. You can also leave it as the default information if you like. Click Continue.
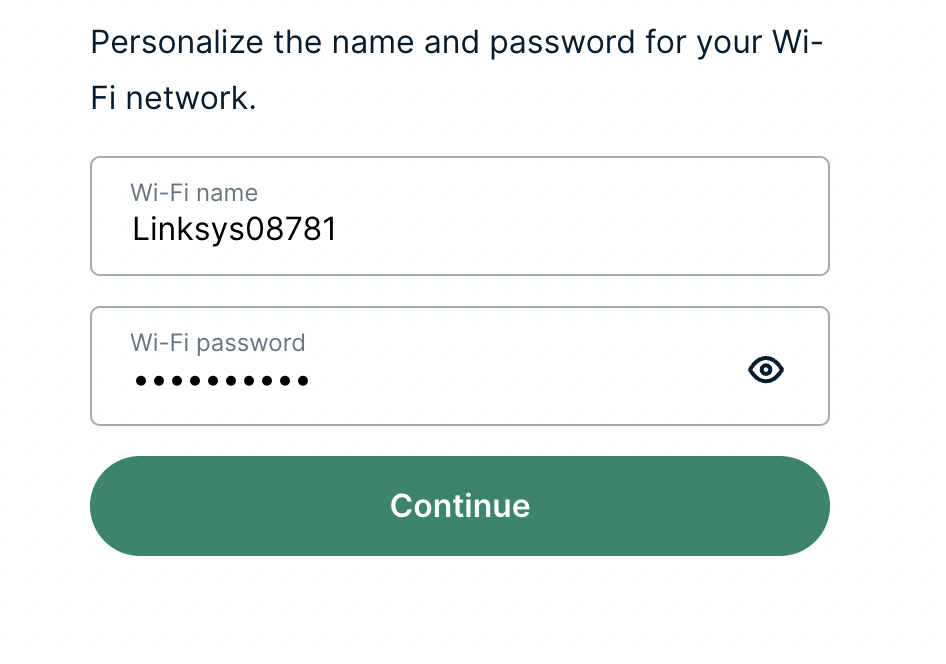
ExpressVPN Set WiFi Name and Password

7. Enter the admin password you will use to access the ExpressVPN router settings. Be sure to TYPE CAREFULLY when setting the admin password as a typo will result in needing to reset the router again. Note this password in a secure location or commit it to memory.
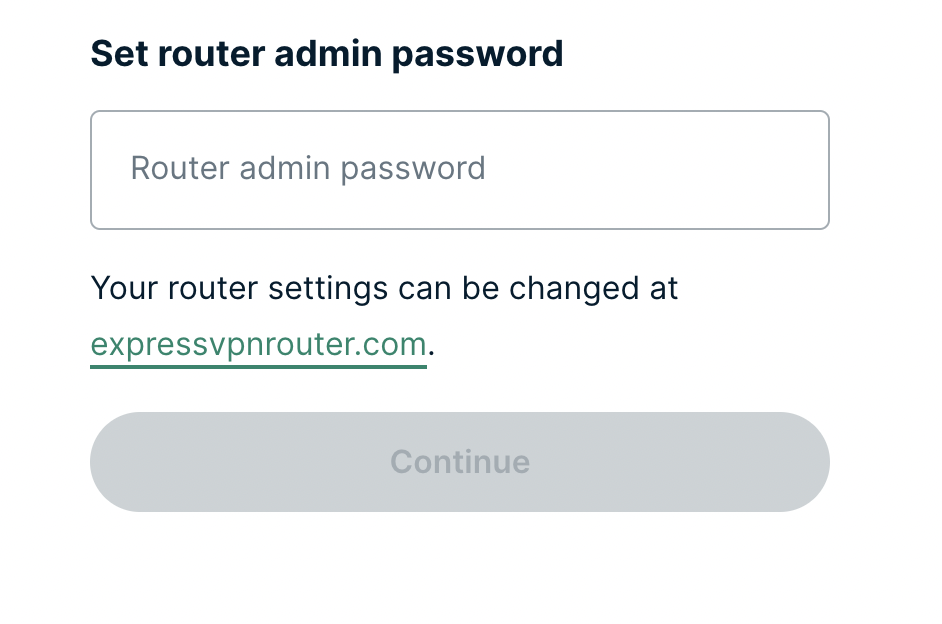
ExpressVPN admin password

8. Your ExpressVPN FlashRouter is now fully setup!
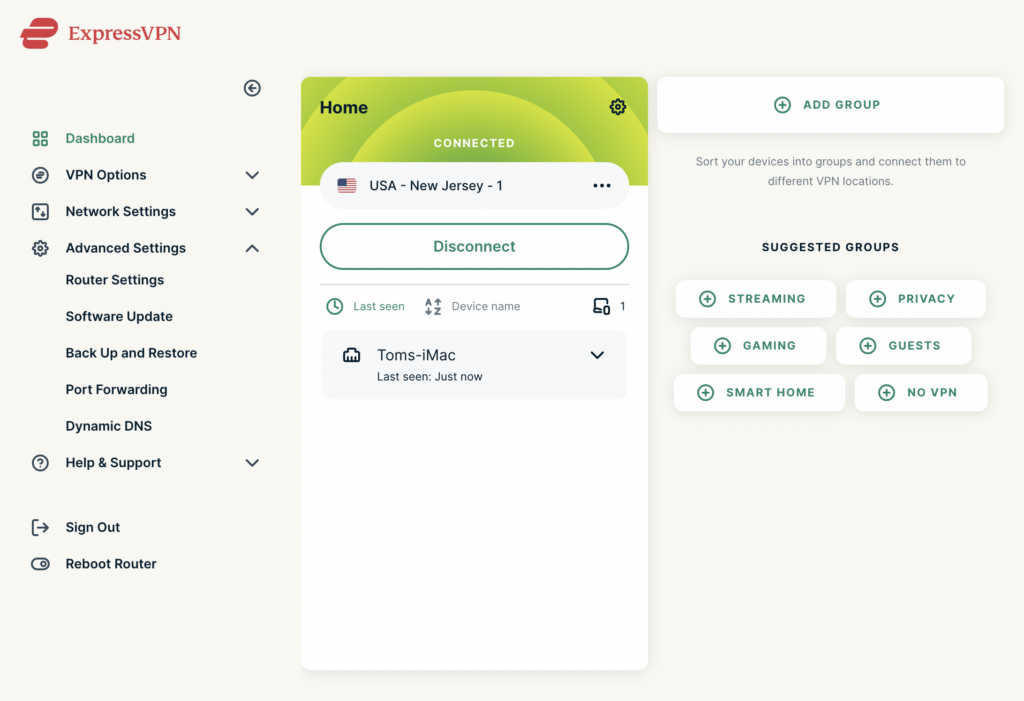
ExpressVPN Connected

Change VPN Protocols on ExpressVPN/Aircove firmware

TeamFlashRouters · Mar 16, 2022 ·

Changing the VPN protocol your ExpressVPN FlashRouter is using can help with obtaining faster speeds while connected to VPN and connectivity issues in some regions of the world. A great advantage of using ExpressVPN firmware is the ability to use multiple protocols such as OpenVPN, IKEv2, and ExpressVPN’s own protocol Lightway.

1. Connect to the FlashRouter’s network via ethernet cable or wireless.

2. Open your web browser and enter expressvpnrouter.com or 192.168.132.1 in the URL.

ExpressVPNrouter.com
192.168.132.1

3. Login with your ExpressVPN FlashRouter admin password.
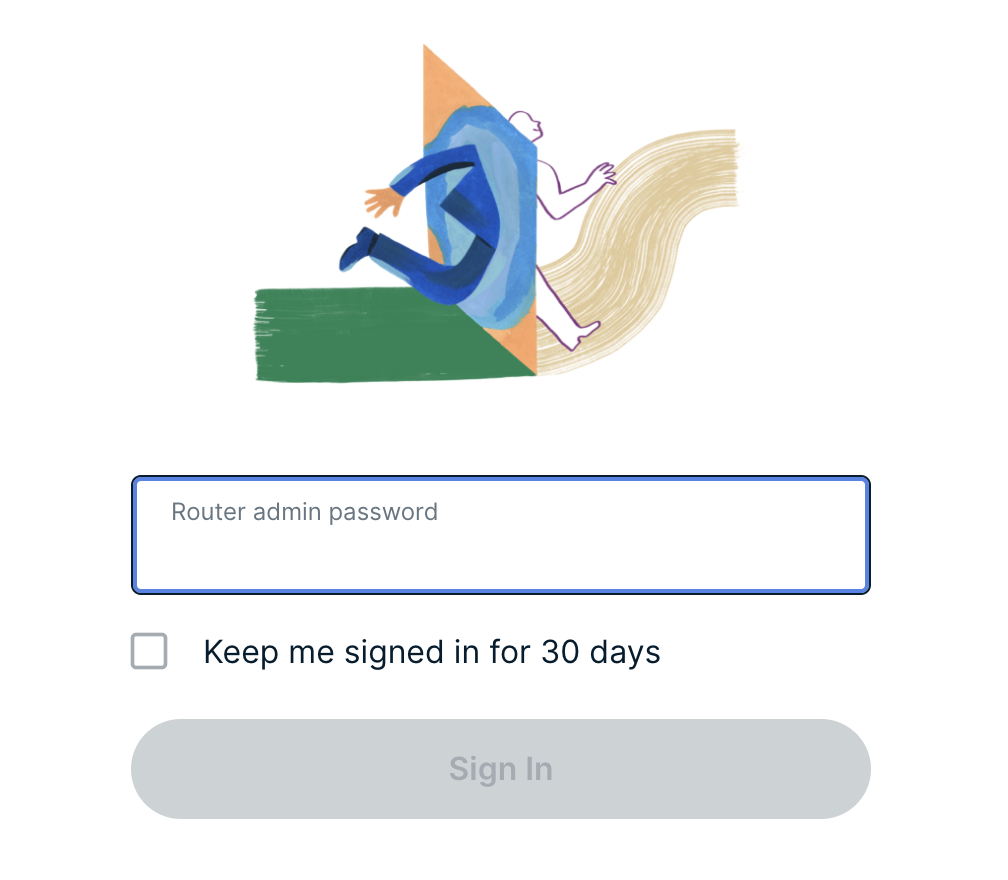
ExpressVPN Router admin login

4. Select VPN Options on the left hand side of the menu.
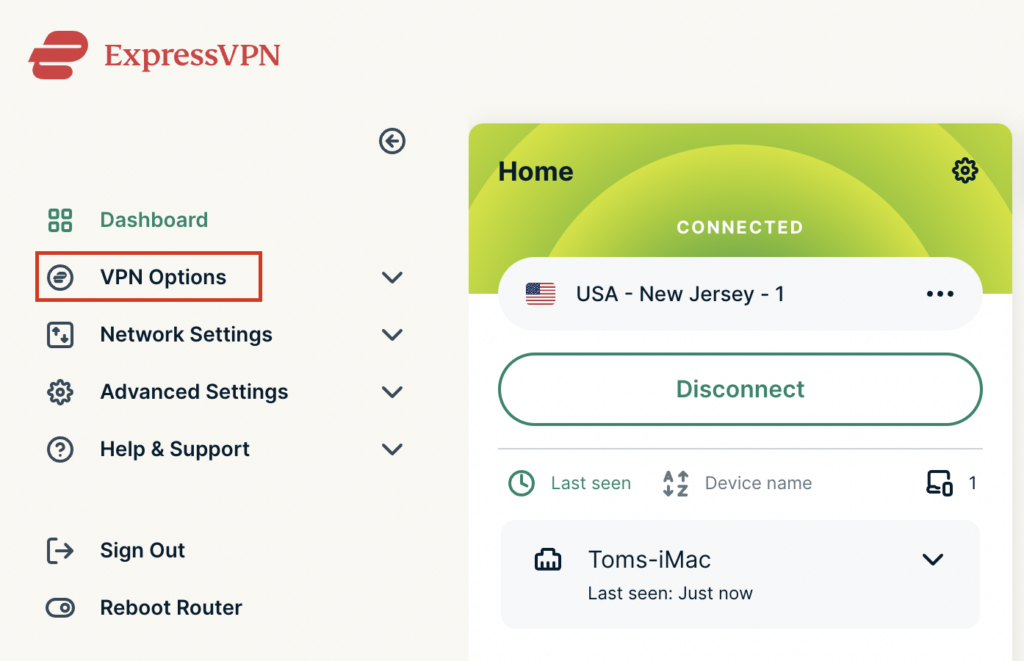
ExpressVPN VPN Options

5. Select VPN Preferences on the left hand side of the menu.
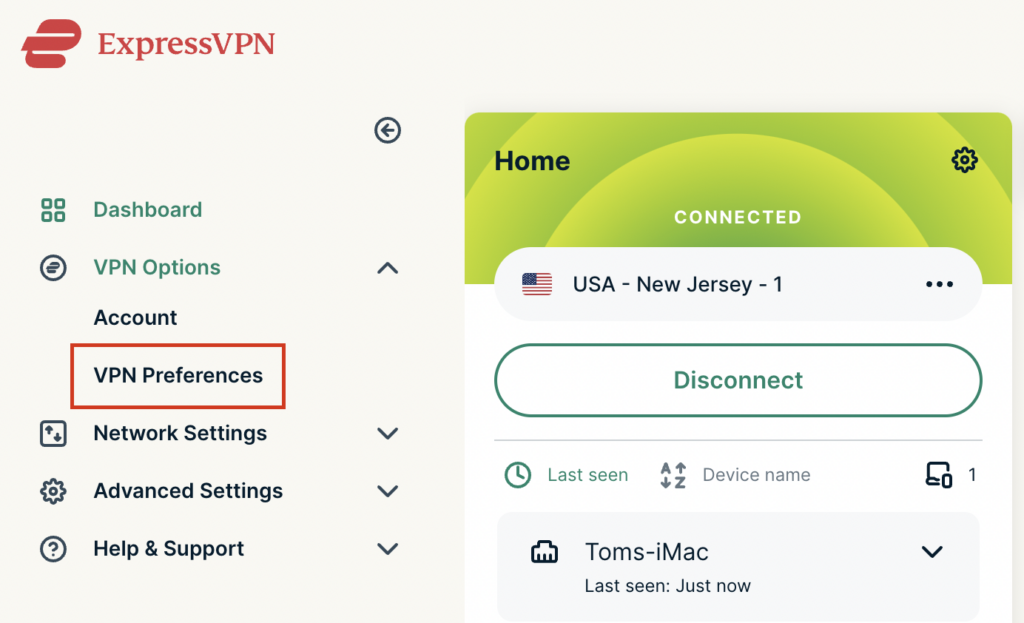
ExpressVPN VPN Preferences

6. Choose the VPN protocol that best suits your needs. We typically see the fastest speeds while using the Lightway – UDP or IKEv2 protocols. Click Save.
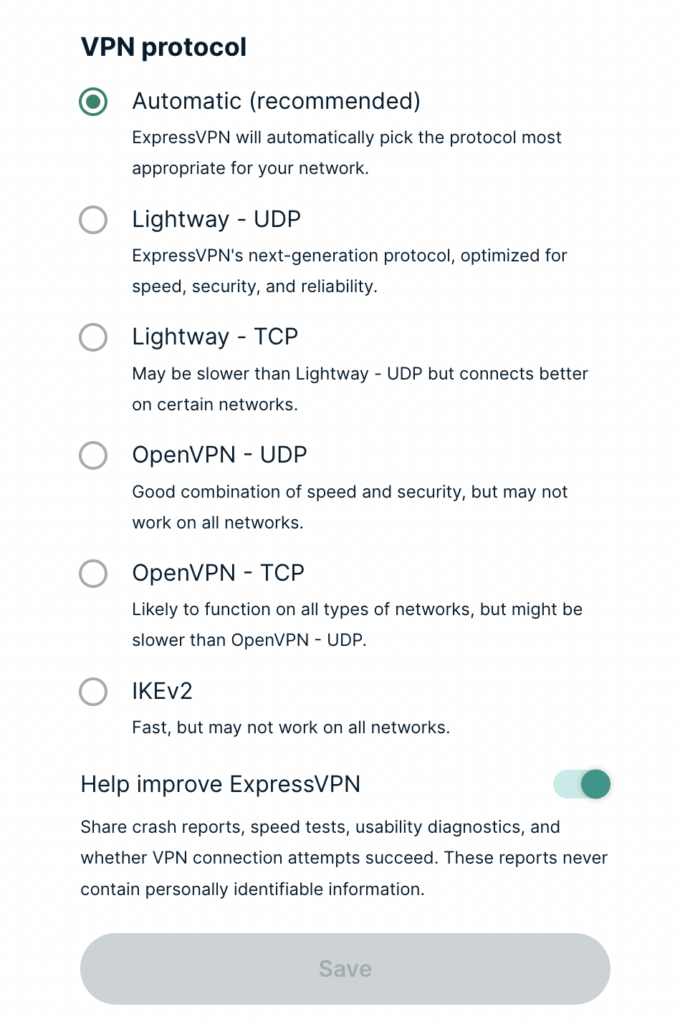
ExpressVPN Protocols

7. Click OK and then select Dashboard.
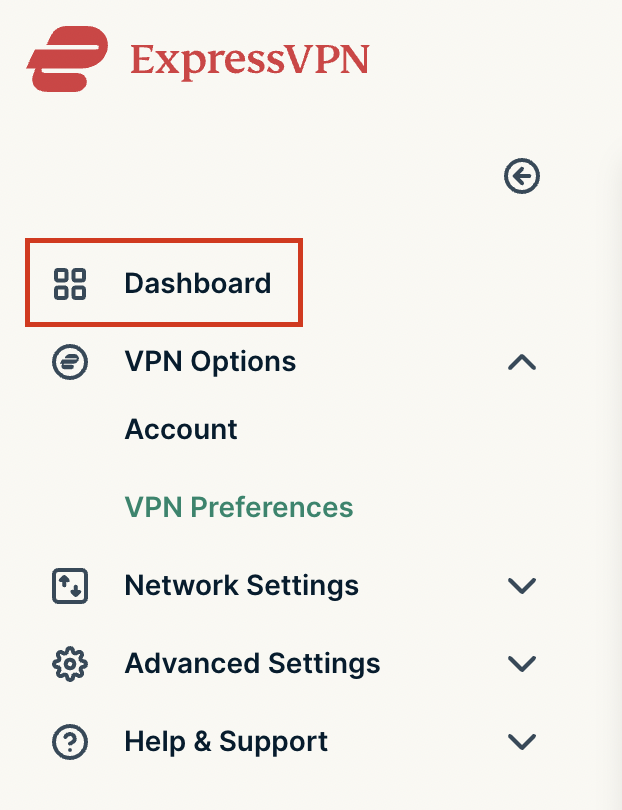
ExpressVPN Dashboard

8. Click Disconnect to turn the VPN connection off.
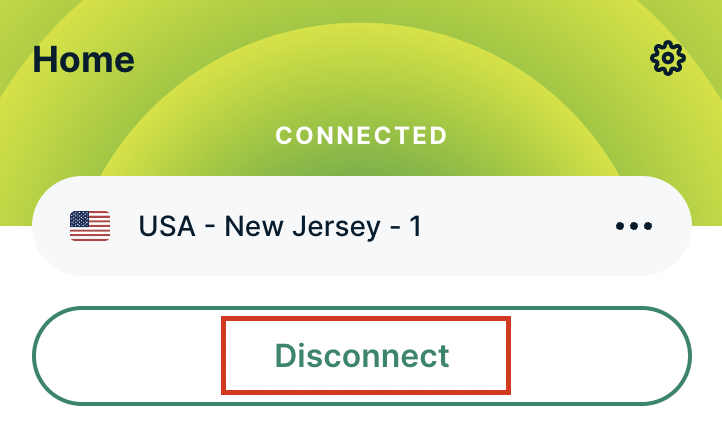
ExpressVPN Disconnect

9. Click Connect to turn the VPN connection back on so it is using the new Protocol you selected.
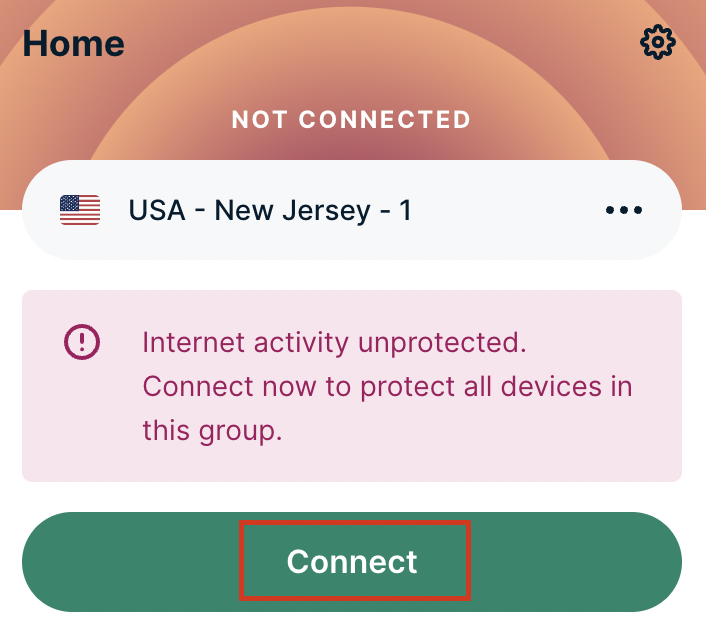
ExpressVPN Connect

Change Wireless Channels on ExpressVPN/Aircove firmware

TeamFlashRouters · Mar 16, 2022 ·

Changing the wireless channel on your ExpressVPN FlashRouter can help with WiFi stability and allows you to use a wireless channel with less traffic in your local environment.

1. Connect to the FlashRouter’s network via ethernet cable or wireless.

2. Open your web browser and enter expressvpnrouter.com or 192.168.132.1 in the URL.

ExpressVPNrouter.com
192.168.132.1

3. Login with your ExpressVPN FlashRouter admin password.

ExpressVPN Router admin login

4. Select Network Settings on the left hand side of the menu.

ExpressVPN Network Settings

5. Select Wi-Fi Settings on the left hand side of the menu.

ExpressVPN WiFi Settings

6. Select Advanced Settings.

ExpressVPN WiFi Advanced Settings

7. Select the Channel Width and Main Channel you want your ExpressVPN FlashRouter to use. Note that higher 5GHz Wi-Fi channels will not be compatible with older devices. Click Save. Click Continue.

ExpressVPN WiFi Channels

Separate 2.4GHz and 5GHz Wi-Fi bands on ExpressVPN/Aircove firmware

TeamFlashRouters · Mar 16, 2022 ·

By default ExpressVPN firmware bonds the 2.4GHz and 5GHz wireless networks to a single wireless network name. Your device will automatically choose which one will provide the best connection. You can separate these networks to have unique Wi-Fi names so you can control which network your devices will use.

1. Connect to the FlashRouter’s network via ethernet cable or wireless.

2. Open your web browser and enter expressvpnrouter.com or 192.168.132.1 in the URL.

ExpressVPNrouter.com
192.168.132.1

3. Login with your ExpressVPN FlashRouter admin password.

ExpressVPN Router admin login

4. Select Network Settings on the left hand side of the menu.

ExpressVPN Network Settings

5. Select Wi-Fi Settings on the left hand side of the menu.

ExpressVPN WiFi Settings

6. Click the toggle for Separate 2.4GHz and 5GHz Wi-Fi.

ExpressVPN Separate 2.4GHz and 5GHz

7. Separate Wi-Fi details for the 5GHz band will now display. You can change the name and password if you so choose or leave it with the default name and password with “-5GHz” added to the name. Click Save. Click Continue.

ExpressVPN 5GHz added

Using Device Groups to bypass VPN on ExpressVPN/Aircove firmware

TeamFlashRouters · May 12, 2022 ·

Bypassing the ExpressVPN tunnel on certain devices allows you to have multiple IP Addresses while connected to the same router. This feature is very helpful with certain websites where VPN is blocked such as streaming services and banking information.

1. Connect to the FlashRouter’s network via ethernet cable or wireless.

2. Open your web browser and enter expressvpnrouter.com or 192.168.132.1 in the URL.

ExpressVPNrouter.com
192.168.132.1

3. Login with your ExpressVPN FlashRouter admin password.

ExpressVPN Router admin login

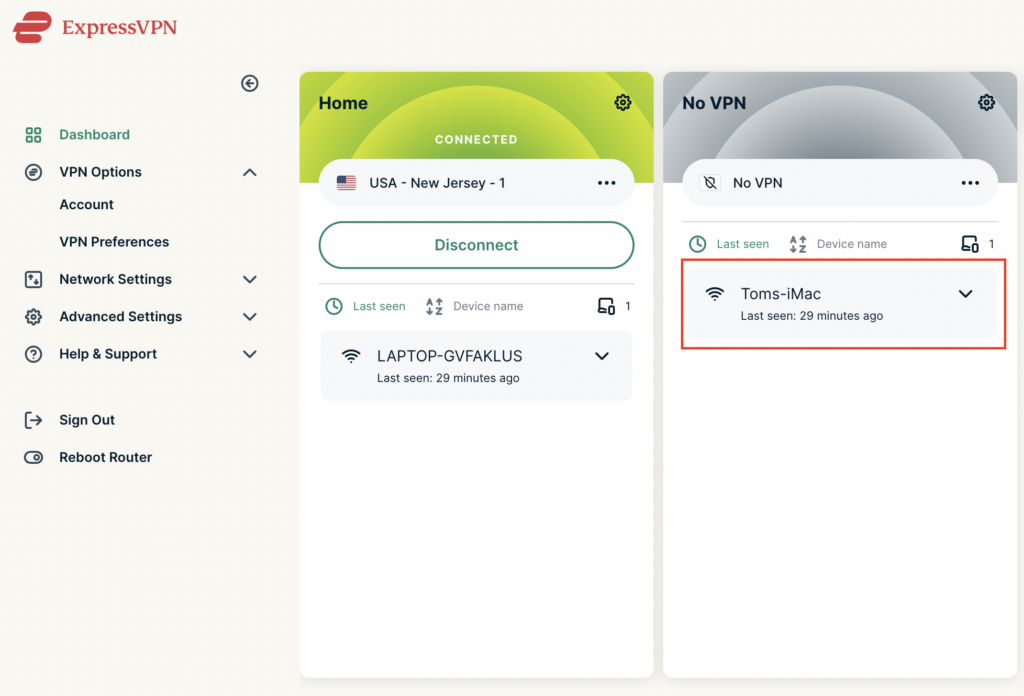
4. Select VPN Off on the right hand side of the menu.
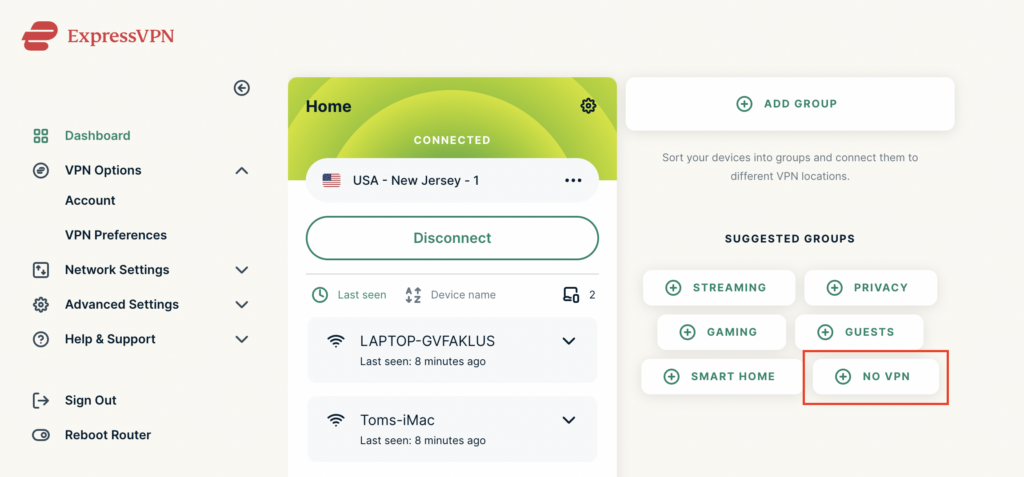
ExpressVPN select No VPN

5. Click and drag the device that you want to bypass the VPN tunnel to the No VPN area.
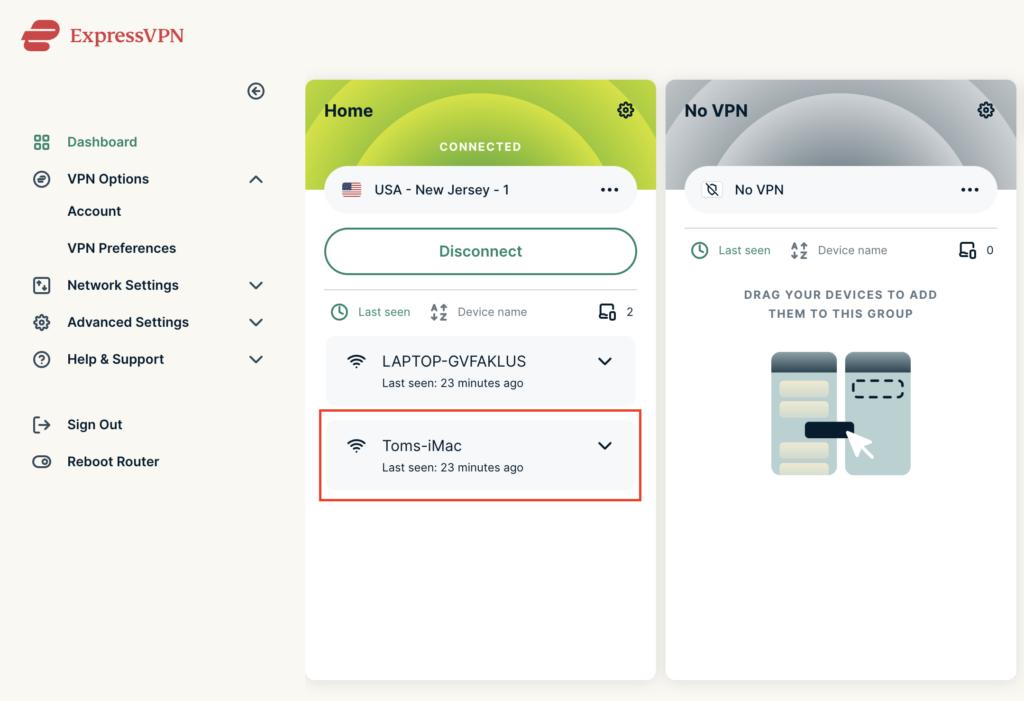
ExpressVPN No VPN select device
ExpressVPN No VPN select device 2

The devices assigned to No VPN will now correct directly to your ISP internet while the devices in the VPN group will remain connected to the VPN server.

Using Device Groups to connect to multiple VPN locations on ExpressVPN/Aircove firmware

TeamFlashRouters · May 12, 2022 ·

ExpressVPN offers a great feature of connecting the FlashRouter to multiple ExpressVPN servers at the same time. You can then assign your devices to the location that you wish.

1. Connect to the FlashRouter’s network via ethernet cable or wireless.

2. Open your web browser and enter expressvpnrouter.com or 192.168.132.1 in the URL.

ExpressVPNrouter.com
192.168.132.1

3. Login with your ExpressVPN FlashRouter admin password.

ExpressVPN Router admin login

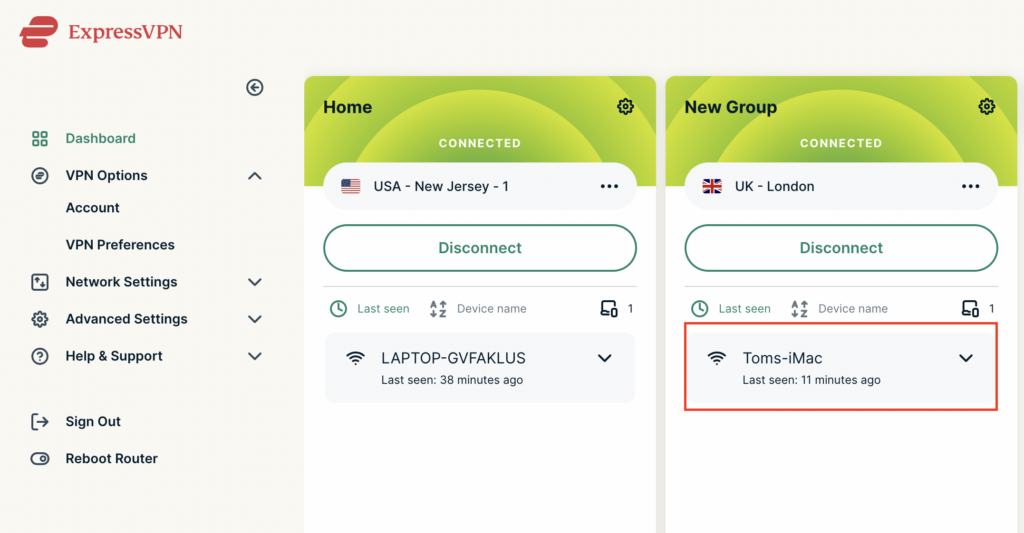
4. Select Add Group and name the new group or select one of the pre-named groups below.
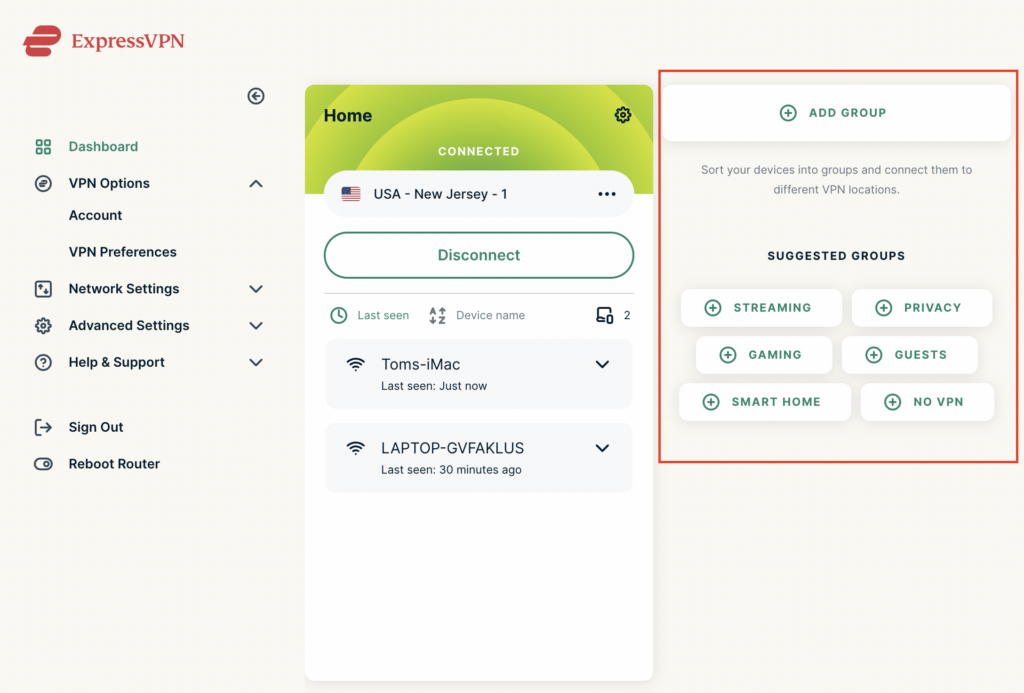
ExpressVPN Add Group

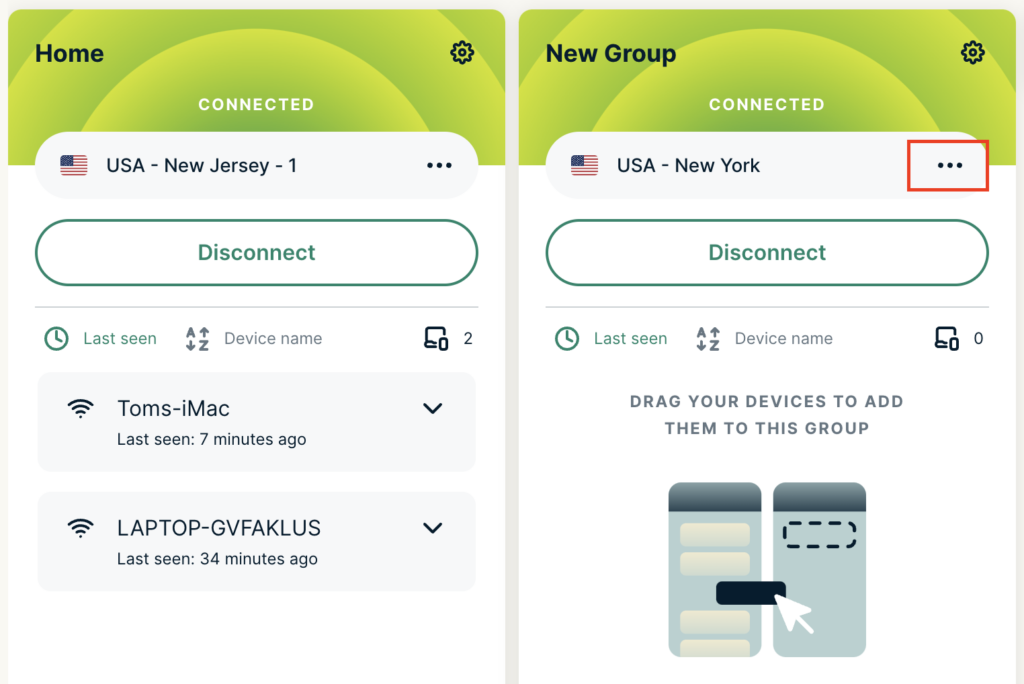
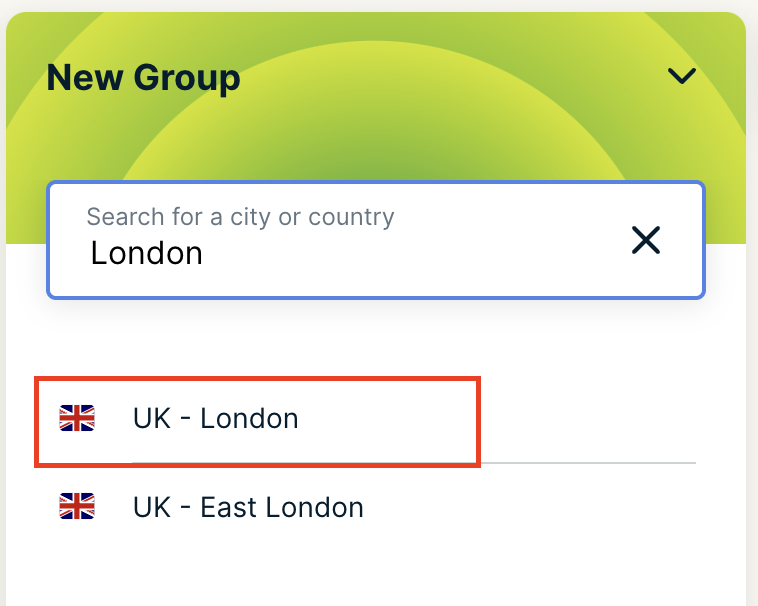
5. Click the three dots next to the new server location and type in the location you want to connect to. Click the new location to connect.
ExpressVPN Change server
ExpressVPN select new server

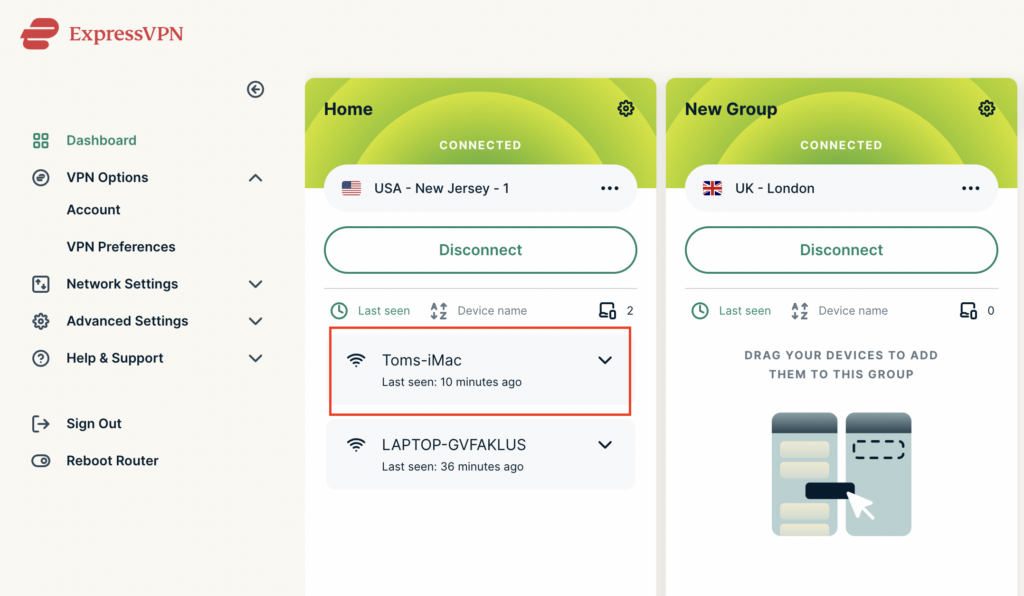
5. Click and drag the device that you want assigned to the VPN New Group.
ExpressVPN select device
ExpressVPN device assigned

The devices assigned to new group will now connect to that location while the devices in the first VPN group will remain connected to the VPN server selected in that area.

Change server locations on ExpressVPN/Aircove firmware

TeamFlashRouters · May 12, 2022 ·

You can change the ExpressVPN server location at any time so your Internet connection appears as originating from that location.

1. Connect to the FlashRouter’s network via ethernet cable or wireless.

2. Open your web browser and enter expressvpnrouter.com or 192.168.132.1 in the URL.

ExpressVPNrouter.com
192.168.132.1

3. Login with your ExpressVPN FlashRouter admin password.

ExpressVPN Router admin login

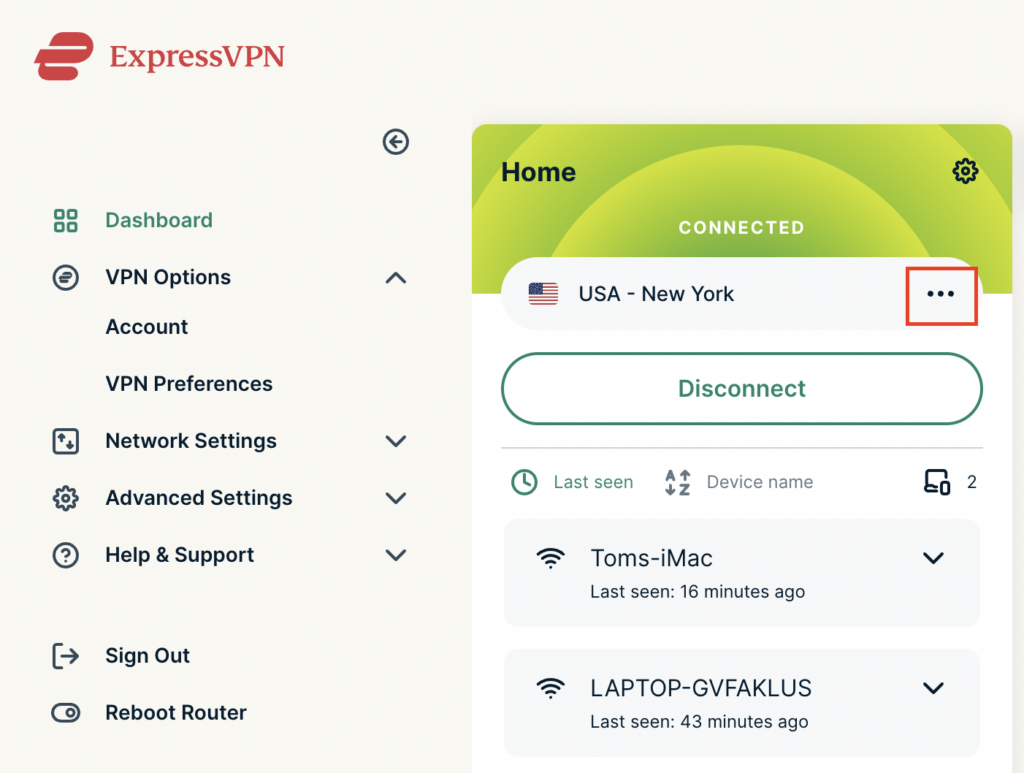
4. Click the three dots next to the server location.
ExpressVPN change server 1

5. Type in the location you want to connect to. Click the new location to connect.
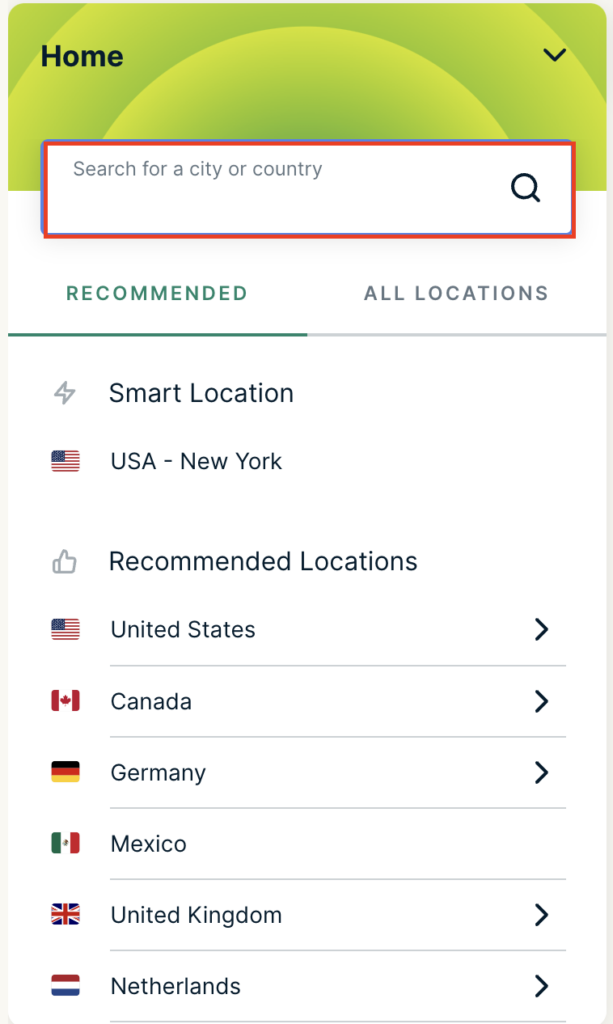
ExpressVPN change server 2

6. You are now connected to the new server location.
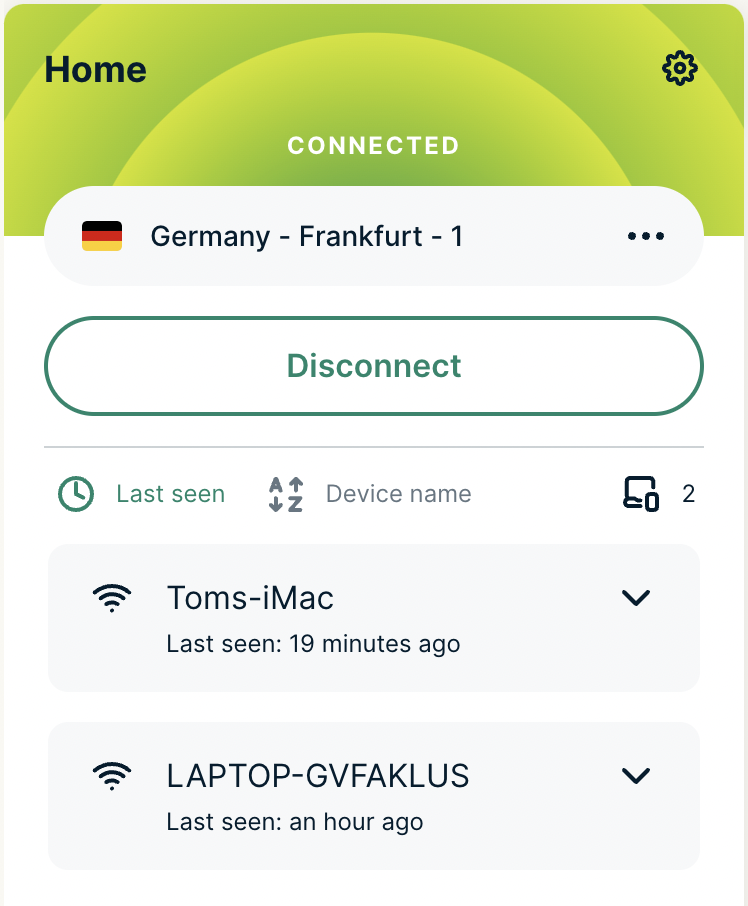
ExpressVPN change server 3

ExpressVPN offers servers in locations all over the world. Typically for speeds it is best to connect to the server closest to your actual location. Clicking a country instead of a city will connect you to the ideal city in that country.

Open Ticket

OPEN SUPPORT TICKET

Please fill out the form below and be sure to use the same e-mail on file so we can streamline our diagnoses of your issue.

[zendesk_request_form]

Primary Sidebar

  • Troubleshooting
  • Router Access
  • Internet Connection Issues
  • WiFi Connectivity
  • General VPN Issues
  • TeamViewer Remote Support
  • DD-WRT Firmware
  • Facebook
  • Twitter
  • Instagram
  • Pinterest
  • YouTube

Footer