• Skip to primary navigation
  • Skip to main content
  • Skip to primary sidebar
  • Skip to footer

FlashRouters Support Portal

Prioritizing Privacy

  • SETUP GUIDES
    • Privacy Hero Router Setup Guide
    • ASUS-WRT Router Setup Guide
    • AsusWRT-Merlin Router Setup Guide
    • DD-WRT Router Setup Guide
    • ExpressVPN Router Setup Guide
    • GL.iNet Router Setup Guide
    • Roqos Core Router Setup Guide
  • TROUBLESHOOTING
    • Router Access
    • WiFi Connectivity
    • Internet Connection Issues
    • General VPN Issues
    • DD-WRT Firmware
    • TeamViewer Remote Support
  • FAQs
    • Router FAQs
    • VPN FAQs
    • Warranty and Returns FAQs
    • Sales FAQs
    • Shipping FAQs
    • Service Plan FAQs
  • Show Search
Hide Search

Search Results for: your name de qu

How do I read my Wireless status?

Dave · Apr 29, 2019 ·

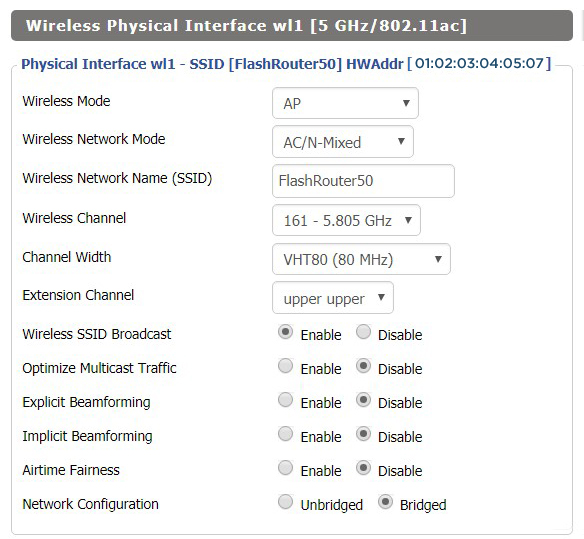
The wireless status page is very helpful in diagnosing where a wireless issue stems from. Make sure the settings displayed on this page match the actual settings you have set in the DD-WRT Wireless settings. Review our recommended wireless settings for your FlashRouter if you are not getting accurate readouts.

Navigate to Status > Wireless

Interface

Select from the wireless interface that you want to view the readouts for.

MAC Address

Used to identify the wireless interface.

Chipset

Displays the wireless hardware that your FlashRouter uses.

Radio

Should always be set to Radio is On unless you have intentionally disabled the wireless on the FlashRouter. If this is displaying Radio is Off for certain wireless interfaces we recommend adjusting the Wireless Channel on the Wireless > Basic Settings page.

Mode

This should read as AP unless you are using an Advanced Wireless setup such as a Repeater, Client, or Repeater Bridge.

Network

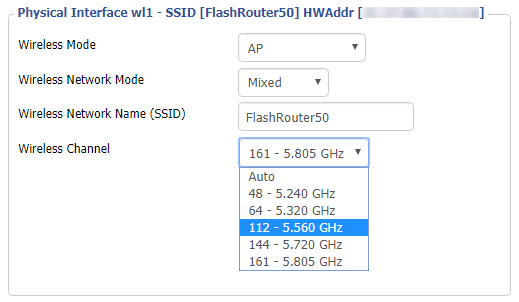
Displays the wireless network mode that you have set for a specific wireless interface.

SSID

Displays the wireless network name that you have set for a specific wireless interface.

Channel

Displays the channel that you have set for a specific wireless interface. If this reads as Unknown it is best to select a new wireless channel or reboot the FlashRouter and check again.

TX Power

Displays the wireless transmit power that you have set for a specific wireless interface. If this reads as Unknown it is best reboot the FlashRouter and check again.

Rate

Displays an approximation of the max wireless speed available on a wireless band.

ACK Timing

Displays the ACK Timing that you have set for a specific wireless interface. If this reads as Unknown it is best reboot the FlashRouter and check again.

Encryption

Should always read as Enabled, WPA2 Personal.

Received (RX)

If this appears as 0% and there are no errors then it means that no devices have connected to the wireless interface yet. If this appears as 0% and the errors match the amount of OK packets you will need to adjust the wireless settings on the Wireless > Basic Settings page.

Transmitted (TX)

If this appears as 0% you will need to adjust the wireless settings on the Wireless > Basic Settings page.

Roqos Core Quick Start Guide

Dave · Mar 3, 2022 ·

Roqos Quick Start Guide

Still having issues?

Feel free to submit a ticket or click on the live chat button for additional assistance. We are available Monday – Friday, from 10AM – 6PM EDT and Saturday and Sunday, from 12PM – 6PM EDT

Roqos VPN Connected, but my device IP is unchanged

TeamFlashRouters · Mar 8, 2022 ·

If your VPN Out page in your Roqos settings is reporting that you are Connected to your VPN provider but your IP Address and location have not changed when you visit What is my IP address? follow the below checklist.

Double check that your device is connected to the Roqos network

Since the Roqos UI is being accessed securely via the cloud you can change the settings while your device is not connected to the Roqos network. This would result in your IP Address not updating when you connect to VPN.

Make sure that you are connected to your Roqos WiFi network or from an ethernet port on the back of the Roqos directly to your device and not another network.

Assign Devices To Connect To VPN in the Roqos

By default there are no devices assigned to the VPN tunnel. To assign devices to the Roqos’ VPN connection.

1. Login to your Roqos UI.

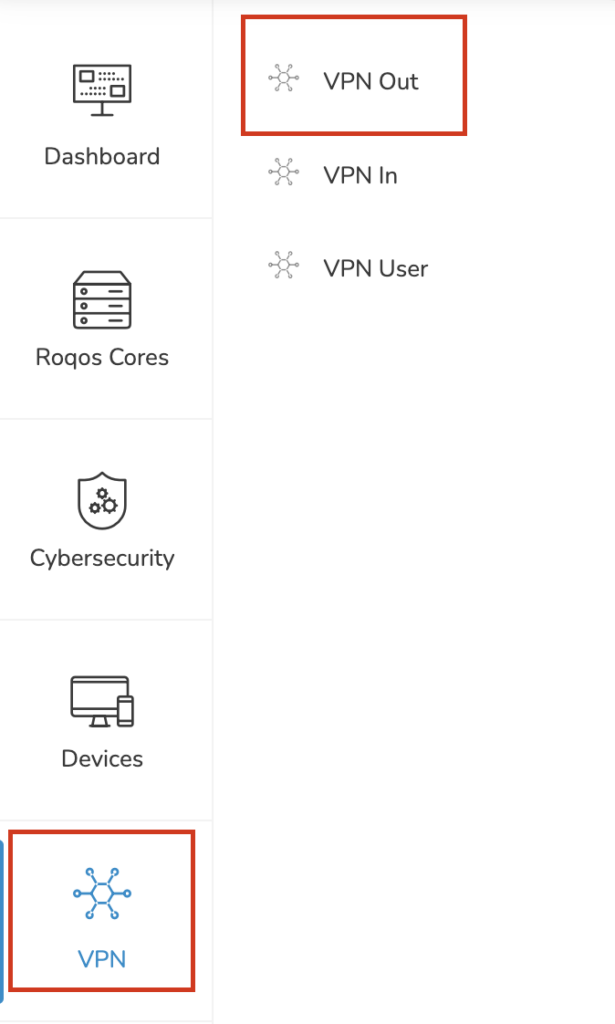
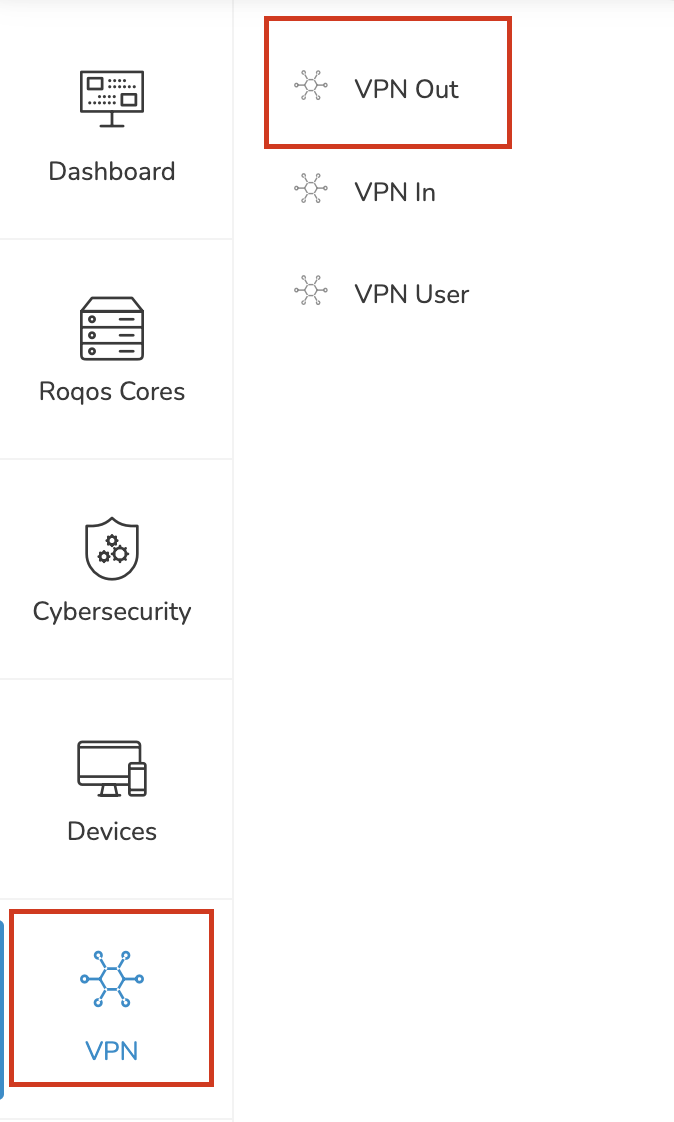
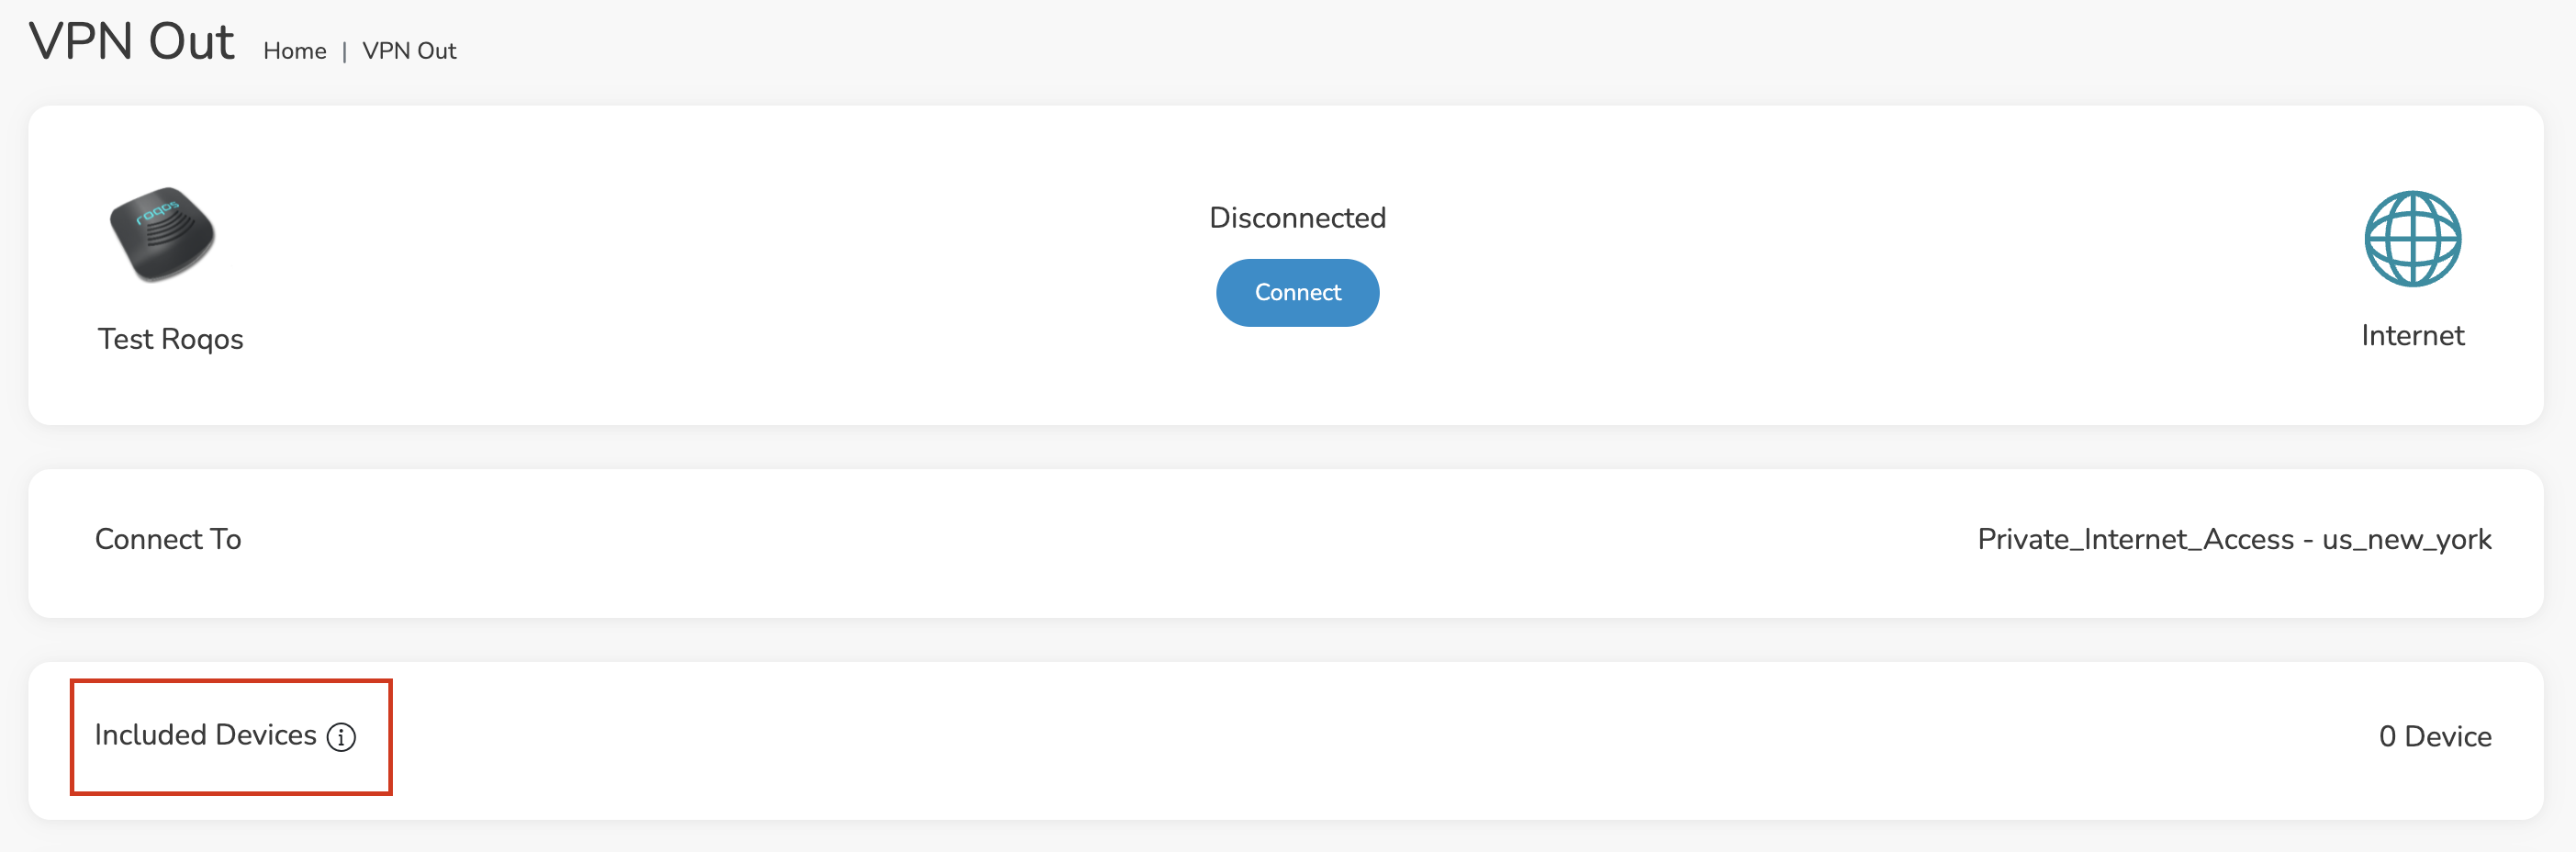
2. Select the VPN tab on the left hand menu and select VPN Out.

Roqos VPN Out

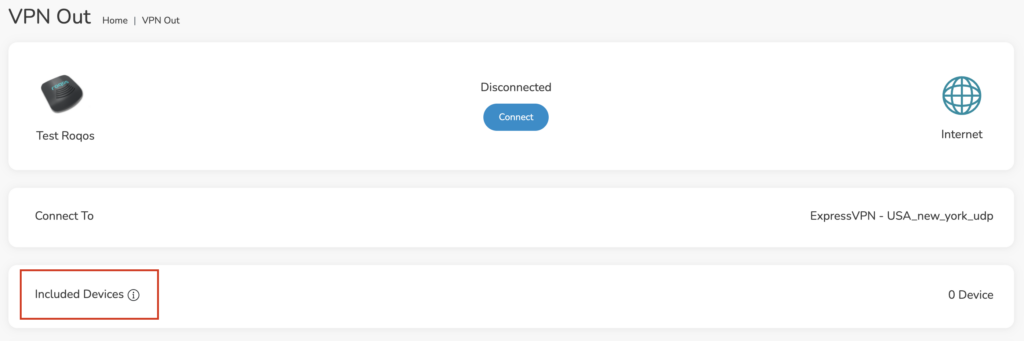
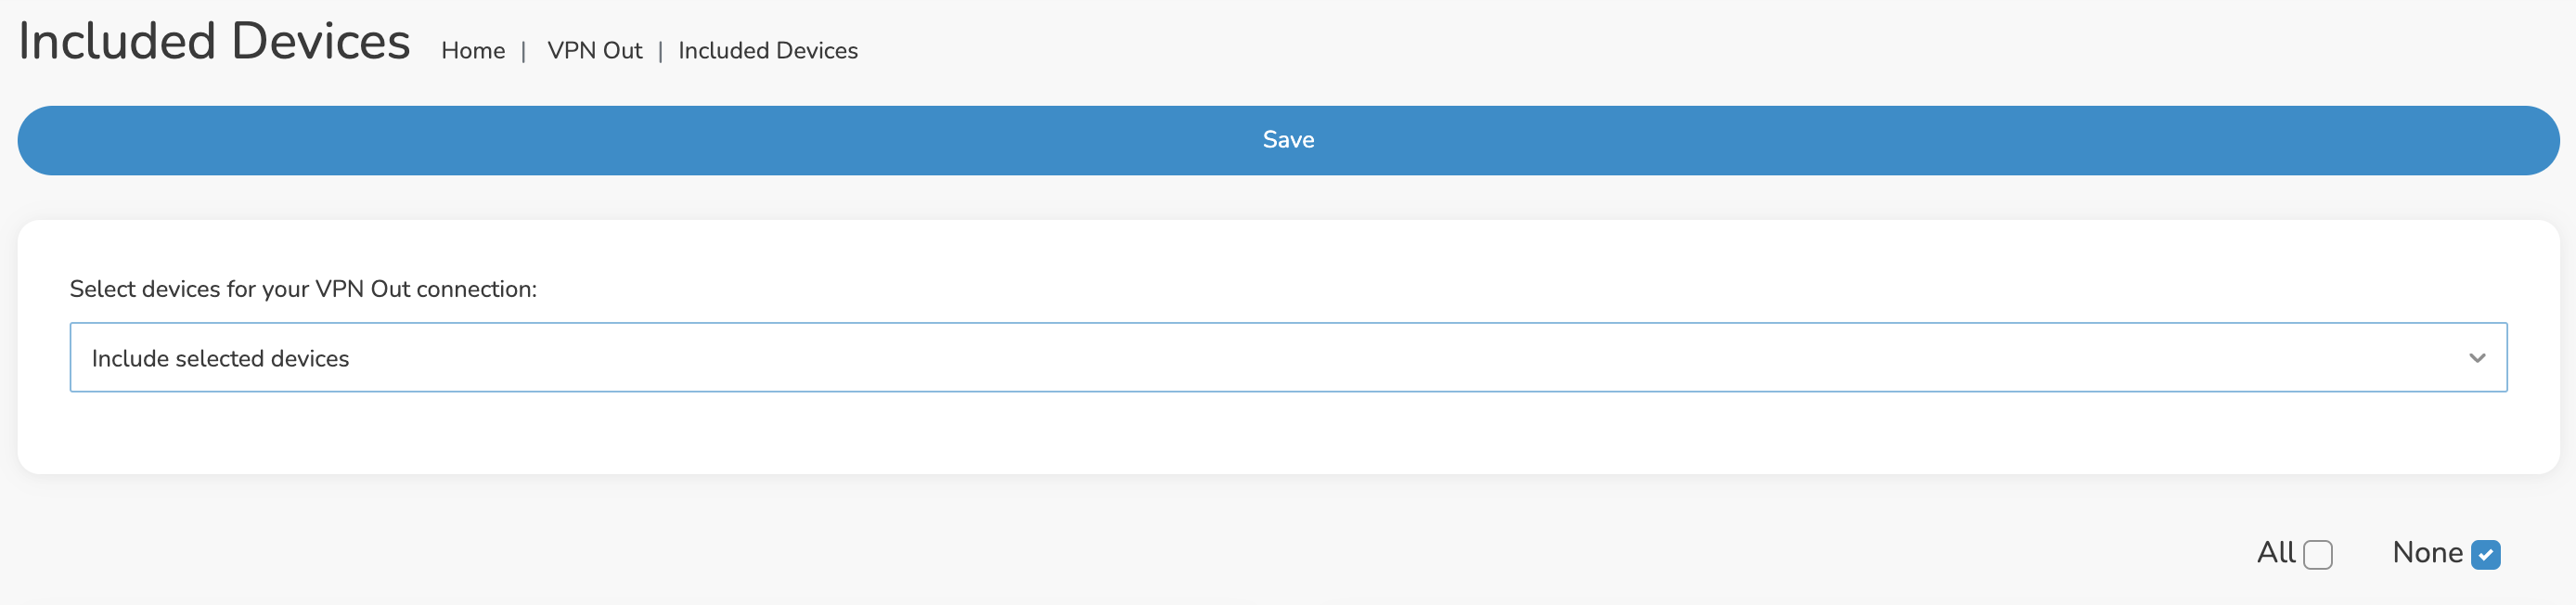
3. Click Included Devices. From this page you can choose if all devices should connect to VPN or only certain devices.

Roqos VPN Included Devices

4. From the dropdown select Include all devices if you want every device that connects to the Roqos to connect to VPN or if you only want specific devices to connect to VPN while others bypass the VPN connection select Include selected devices from the dropdown and then toggle the sliders for the devices you want connected to VPN. Click Save.

Turn off VPN device applications

Connecting to VPN via a device application or browser extension at the same time while connecting via your Roqos is not recommended. Doubling up on VPN connections can cause issues with speeds and stability.

When you are connected to the Roqos VPN network at home you should leave all VPN applications and extensions disconnected and unopened.

Flint/Slate GL.iNet ExpressVPN OpenVPN Setup

TeamFlashRouters · May 29, 2023 ·

Preparing for ExpressVPN GL.iNet Setup

Obtain your ExpressVPN OpenVPN Information

If you are not already an ExpressVPN user Sign Up Now.

1. Log in to your account on the ExpressVPN website.

ExpressVPN login page

2. Successfully log in with your account information. Select More.

3. Select Manual Configuration and copy the Username and Password that are displayed on the right hand side of the screen.

ExpressVPN Manual Configuration
ExpressVPN username and password

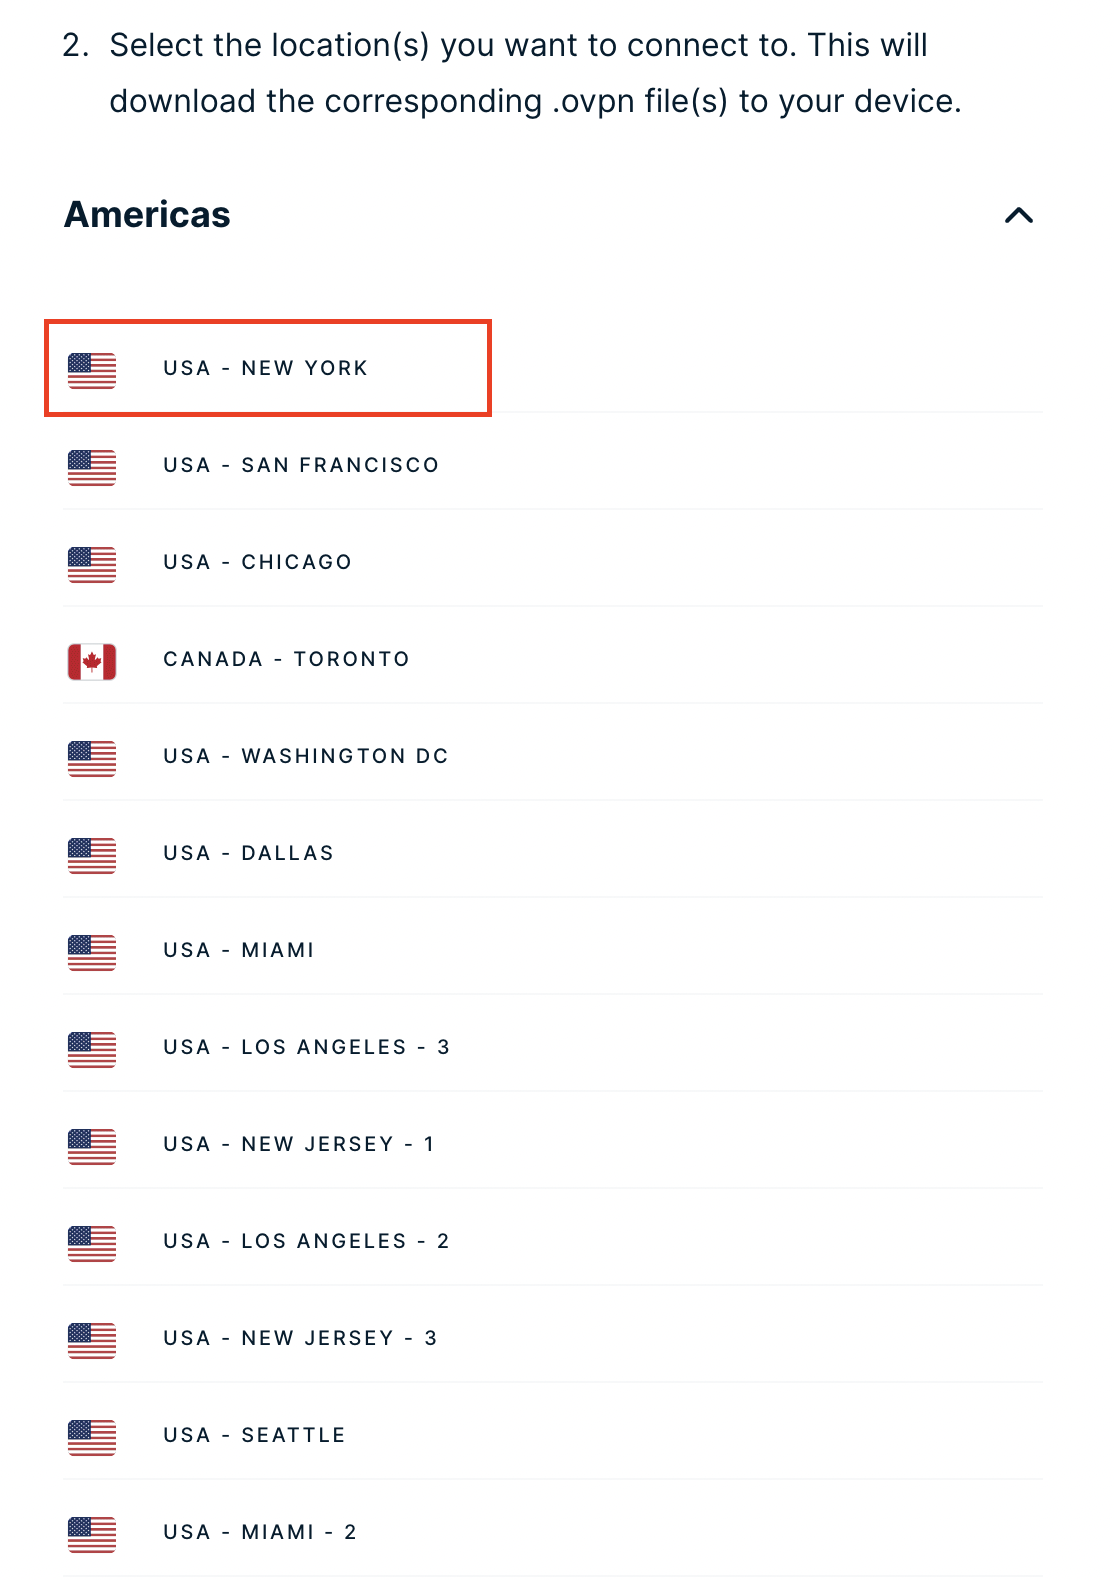
4. Click the Server Location(s) that you want to connect to. This will download a .ovpn file to your computer that we will use later on. There is no need to open the file. For this example I have selected New York but feel free to select any server listed there or multiple servers.

ExpressVPN Download .ovpn file

GL.iNet Router Setup for ExpressVPN

Login to GL.iNet firmware settings in a browser on any computer or smart device connected to the GL.iNet FlashRouter’s network. For more instructions on how to access the firmware settings view our guide here.

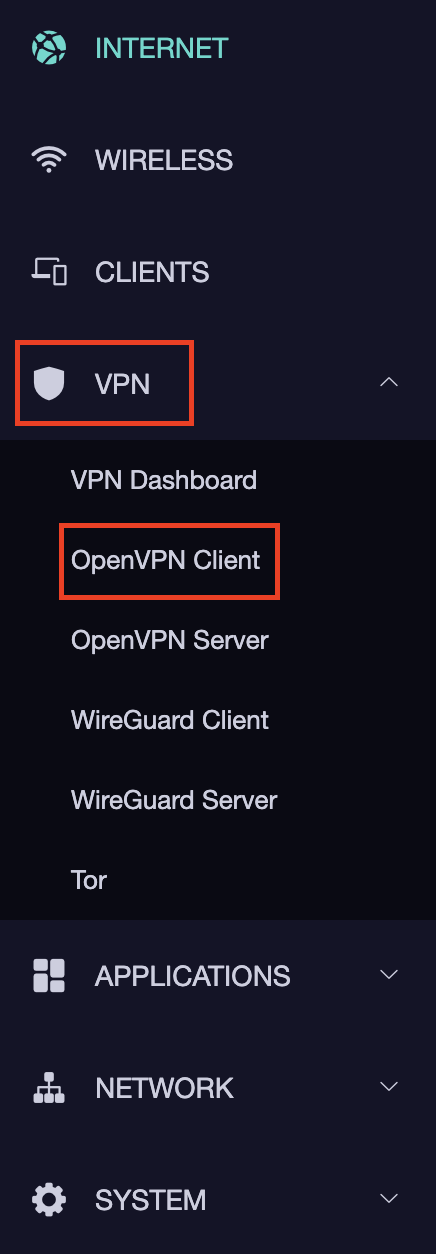
1. Navigate to the VPN tab and select OpenVPN Client.

GL.iNet VPN OpenVPN Client

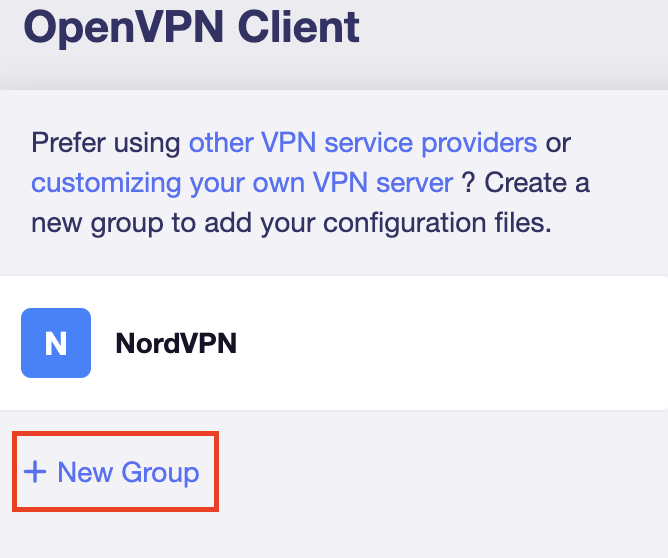
2. Click New Group.

GL.iNet New OpenVPN Client Group

3. Enter ExpressVPN and click the check mark.

GL.iNet ExpressVPN

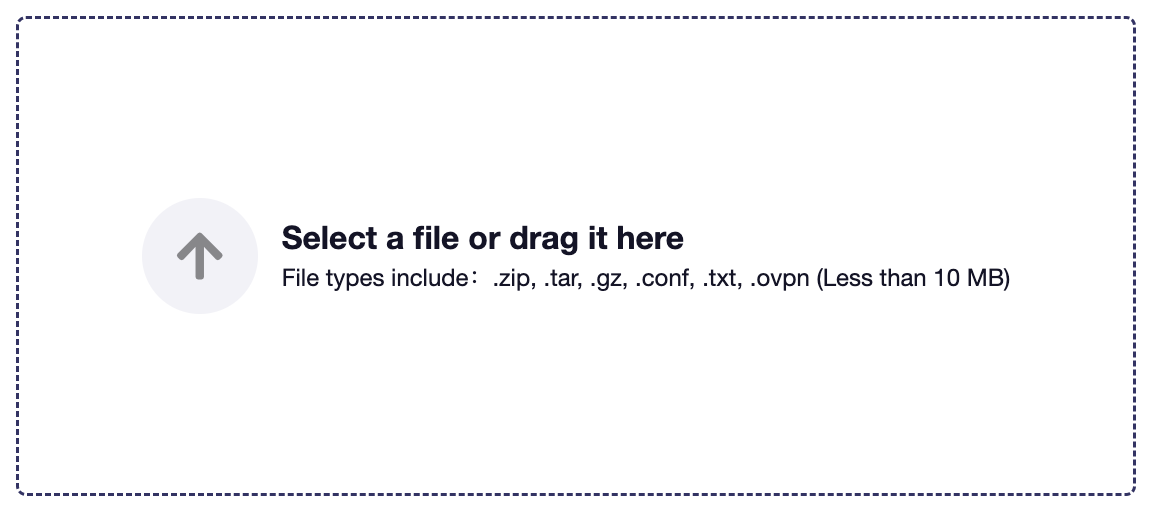
4. Select the .ovpn file(s) you downloaded earlier and upload them here.

GL.iNet VPN select file

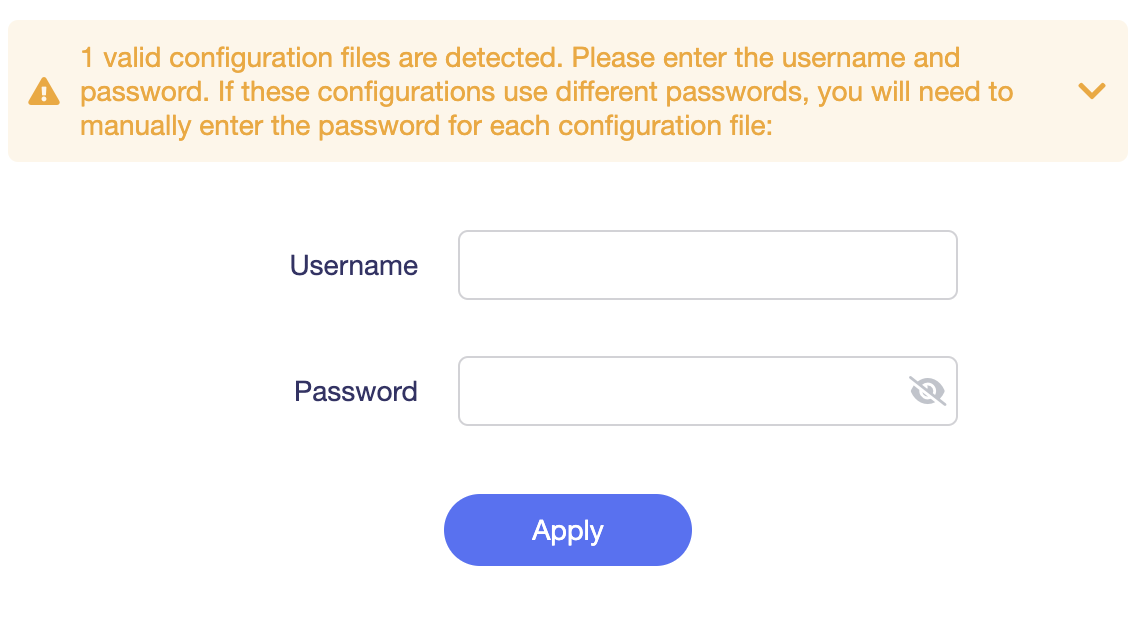
5. Enter in the ExpressVPN username and password that you obtained earlier. Do NOT enter your ExpressVPN account email and password login. Click Apply.

GL.iNet VPN username and password

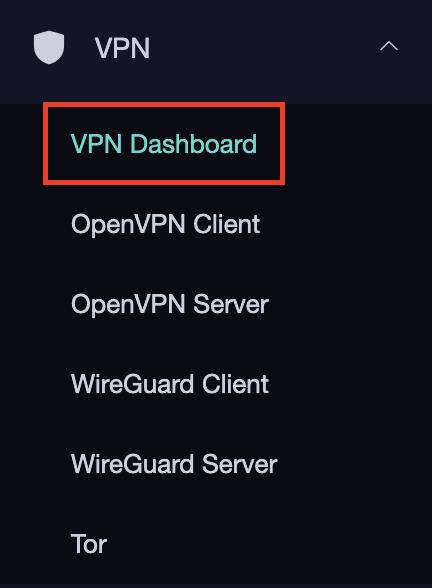
6. Select VPN Dashboard.

GL.iNet VPN Dashboard

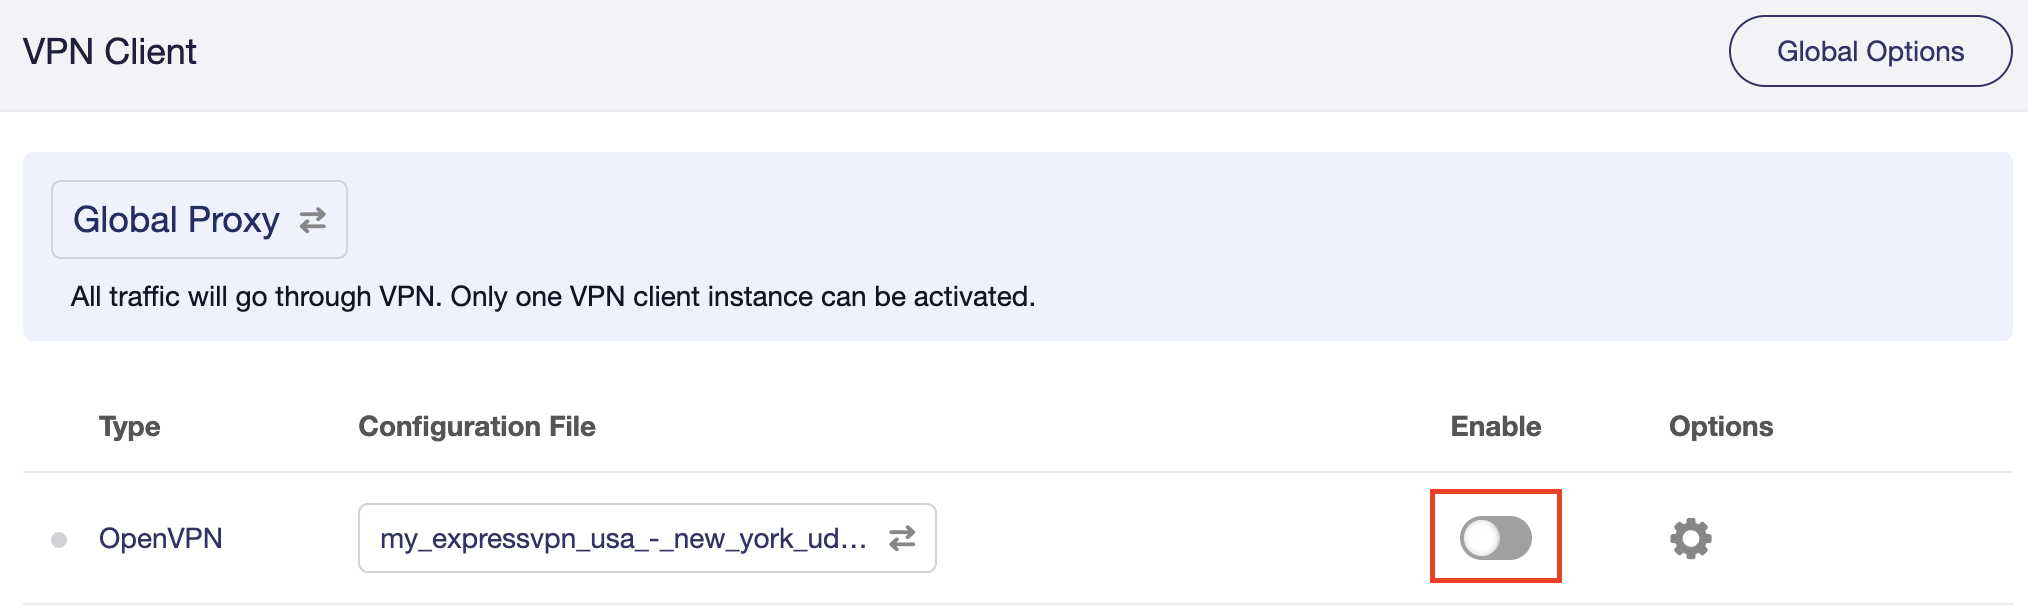
7. Set the Enable toggle to On to begin the ExpressVPN connection.

GL.iNet ExpressVPN enable switch

Verify a successful ExpressVPN connection

  1. You should now see information appear in the Server Address, Server Listen Port, Traffic Statistics, and Client Virtual IP areas.
  2. Visit ExpressVPN’s IP Check to verify your new IP address and virtual location.

In some cases you may notice that the location is not showing the same location as the server you have input in your router settings; this is because geo tracking tools are often tricked by VPN connections. As long as you see an IP address that is not the same as your normal Internet IP address then you are indeed connected to ExpressVPN.

How to change the ExpressVPN server

  1. Download a new .ovpn file location as detailed above.
  2. In the ExpressVPN Group on the OpenVPN Client area click Upload Configuration File and select the new .ovpn file.
  3. Click VPN Dashboard and then click the Configuration File area and select the new location that you added.
  4. Click Apply.

TROUBLESHOOTING

Still having issues? Visit the VPN Troubleshooting section.

Troubleshoot Here

Flint/Slate GL.iNet PureVPN WireGuard Setup

TeamFlashRouters · May 30, 2023 ·

Preparing for PureVPN GL.iNet Setup

Obtain PureVPN WireGuard file

If you are not already an PureVPN user Sign Up Now.

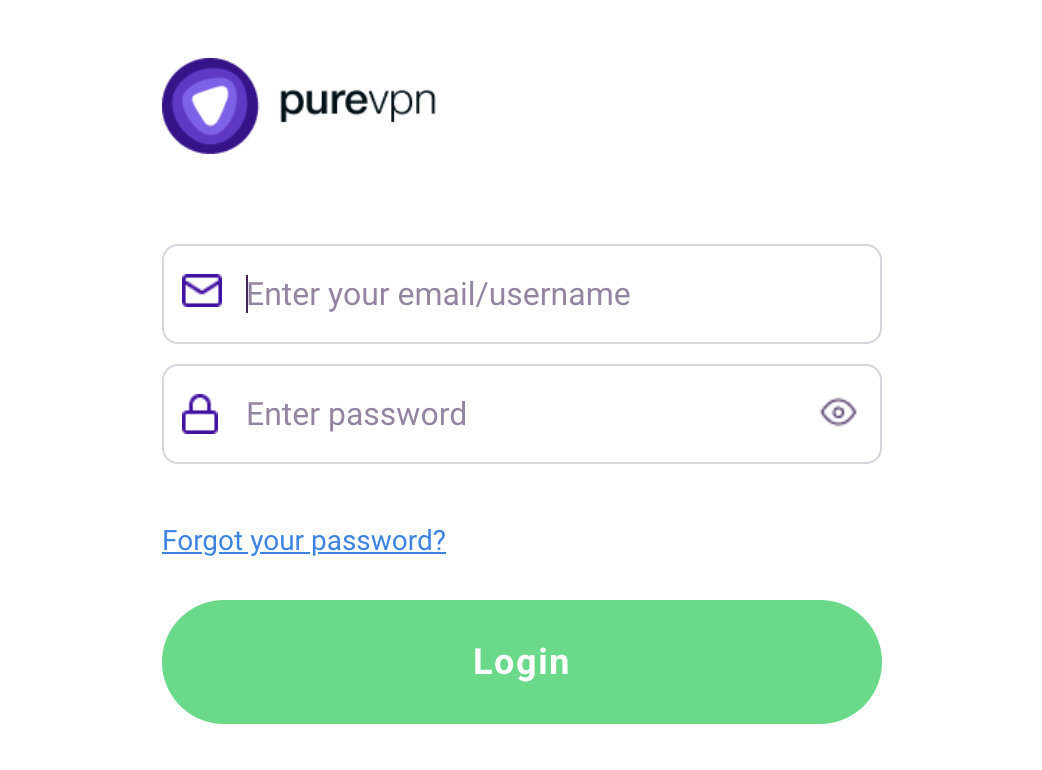
1. Log in to your account on the PureVPN website.

PureVPN Login

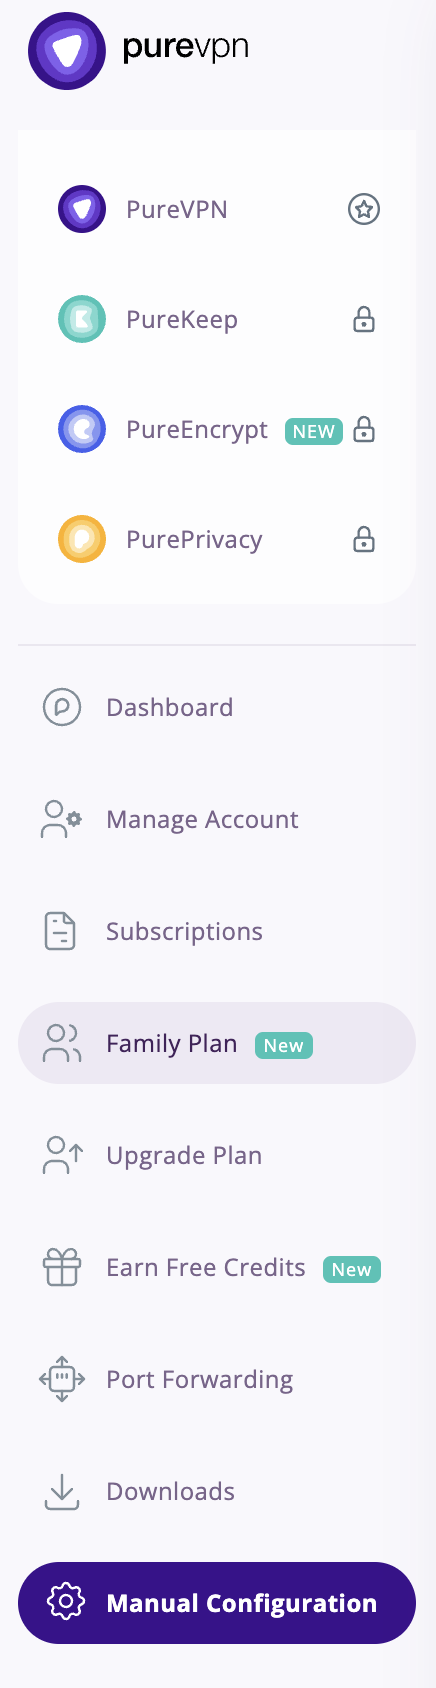
2. Select Manual Configuration.

PureVPN Manual Configuration

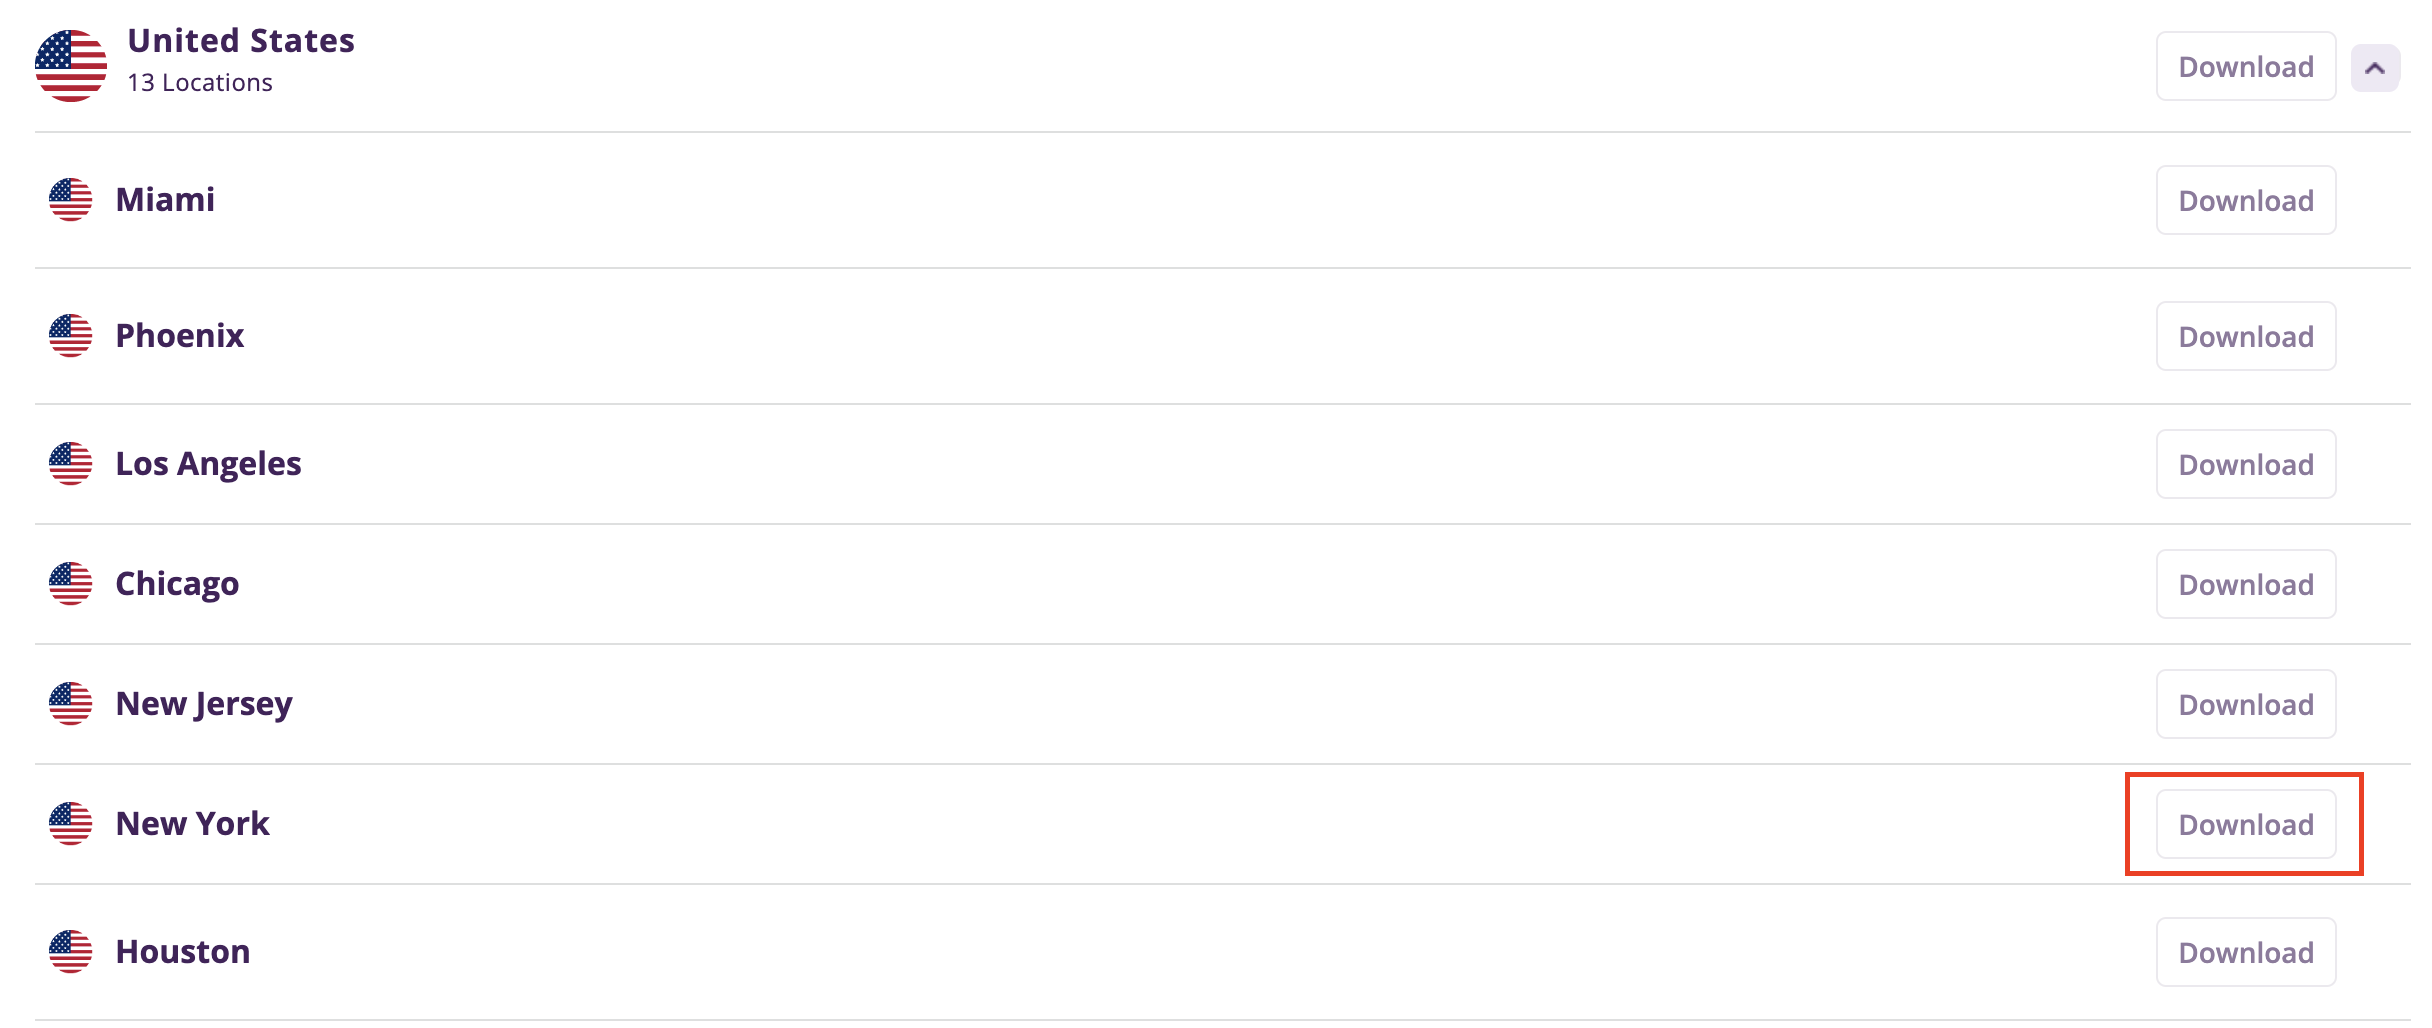
3. Select the Server Location you want to connect to and then click Download.

PureVPN select server location

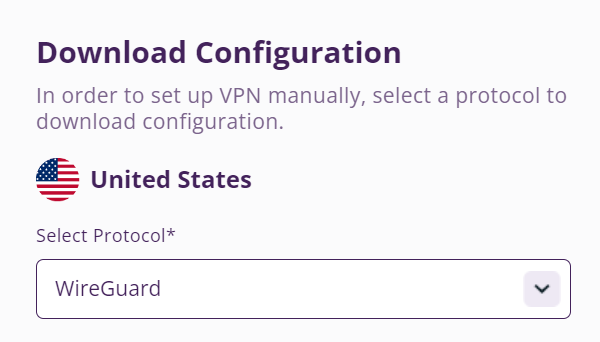
4. In the Select Protocol dropdown choose WireGuard.

PureVPN WireGuard

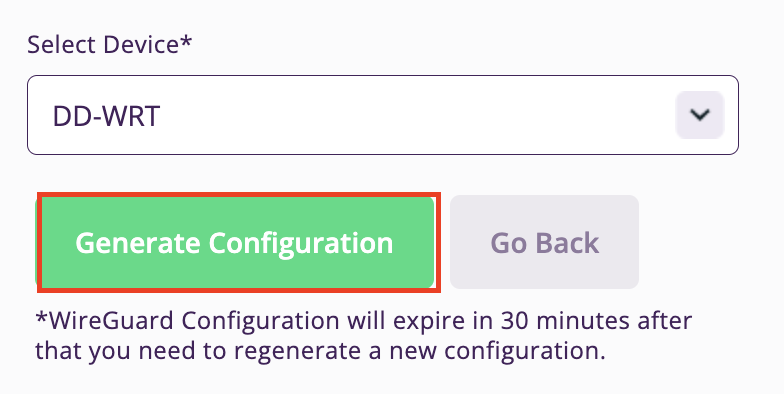
5. In the Select Device dropdown choose DD-WRT. Then click Generate Configuration. This will save a .conf file to your computer.

PureVPN Generate Config

GL.iNet Router Setup for PureVPN

Login to GL.iNet firmware settings in a browser on any computer or smart device connected to the GL.iNet FlashRouter’s network. For more instructions on how to access the firmware settings view our guide here.

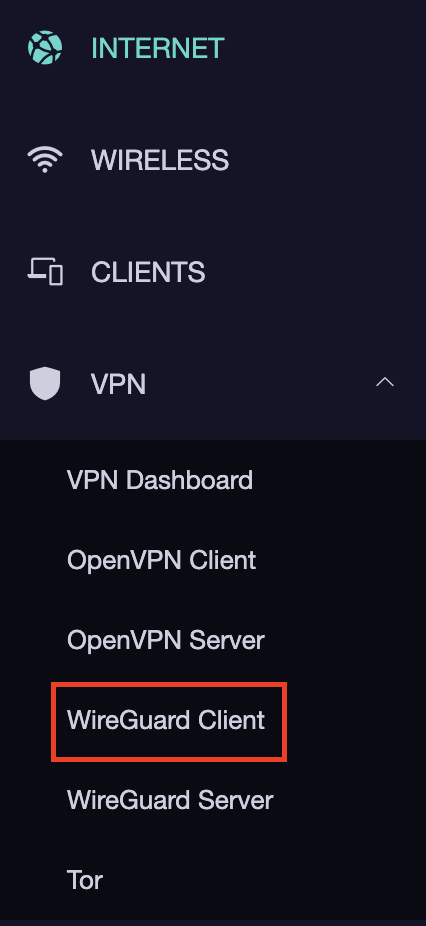
1. Navigate to the VPN tab and select WireGuard Client.

GL.iNet VPN WireGuard Client

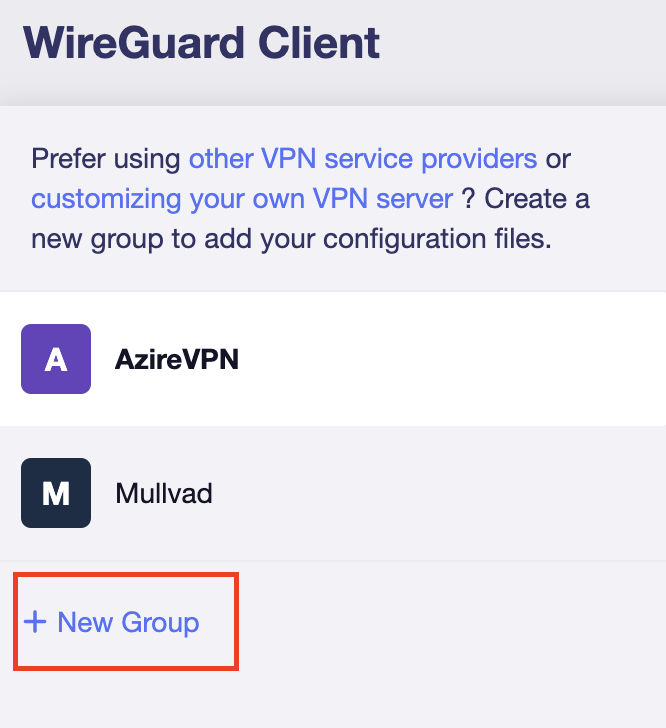
2. Click New Group.

GL.iNet WireGuard New Group

3. Enter PureVPN and click the check mark.

GL.iNet PureVPN group name

4. Select the .conf file you downloaded earlier and upload it here.

GL.iNet VPN select file

5. Click Apply.

6. Select VPN Dashboard.

GL.iNet VPN Dashboard

7. Set the Enable toggle to On to begin the PureVPN connection.

GL.iNet PureVPN WireGuard enable

Verify a successful PureVPN connection

  1. You should now see information appear in the Server Address, Server Listen Port, Traffic Statistics, and Client Virtual IP areas.
  2. Visit PureVPN’s IP Check to verify your new IP address and virtual location.

In some cases you may notice that the location is not showing the same location as the server you have input in your router settings; this is because geo tracking tools are often tricked by VPN connections. As long as you see an IP address that is not the same as your normal Internet IP address then you are indeed connected to PureVPN.

How to change the PureVPN server

Replicate the steps above with a new location.

TROUBLESHOOTING

Still having issues? Visit the VPN Troubleshooting section.

Troubleshoot Here

DNS Setup for Asus Merlin

TeamFlashRouters · Jan 19, 2022 ·

Enter custom DNS servers in your Asus Merlin firmware to avoid using your ISP DNS, which will steal and collect your browsing data.

Login to Asus Merlin firmware settings in a browser on any computer or smart device.

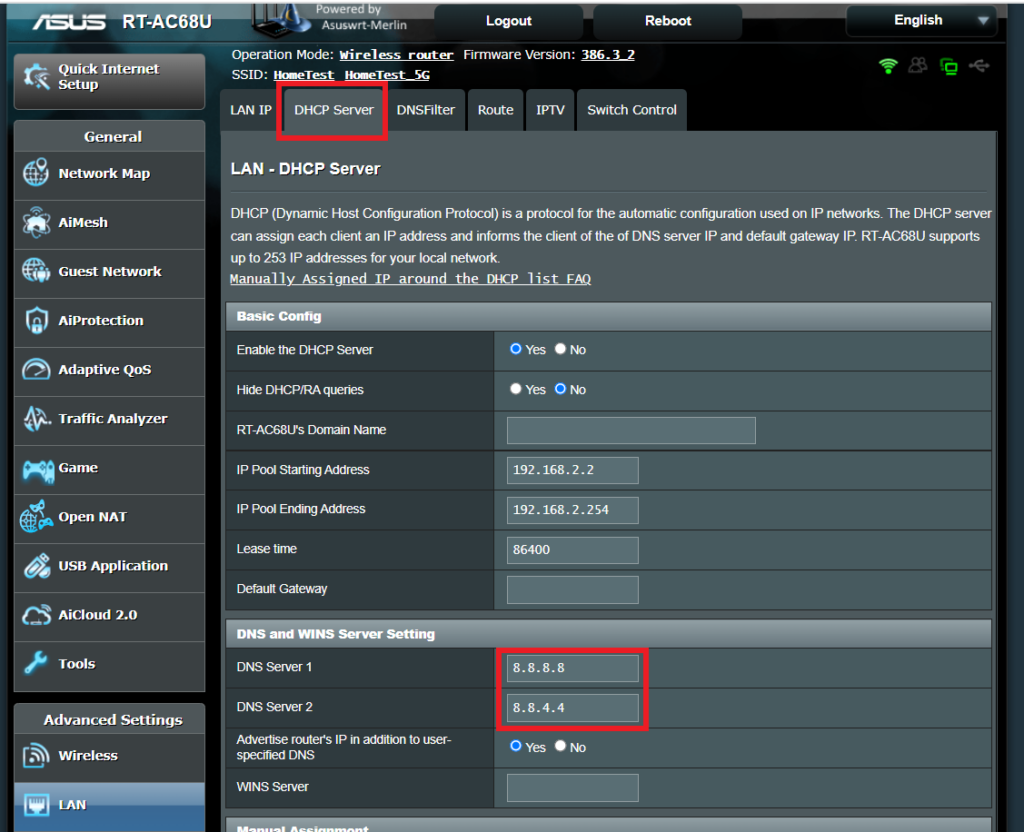
1. Under Advanced Settings select LAN.

2. Click the DHCP Server tab.

3. In the DNS Server 1 and DNS Server 2 fields enter the DNS server that you wish to use.

Merlin DNS Setup

4. Click Apply and then reboot the router and reconnect to the network.

Why is my Time Zone set to Europe/Berlin?

TeamFlashRouters · May 30, 2019 ·

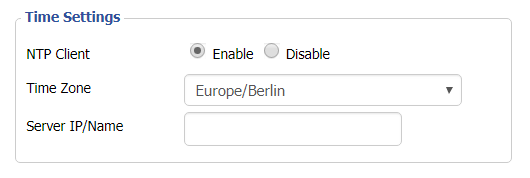
Europe/Berlin is the default Time Zone setting for DD-WRT firmware.

To change this to your location’s actual Time Zone do the following.

Navigate to Setup > Basic Setup

Select your actual Time Zone from the dropdown field. Leave the Server IP/Name field blank.

CLICK APPLY SETTINGS

The network may reboot for a moment. Simply reconnect when it is back up.

Disabling the NTP Client setting will result in the VPN connection not working so we ask that you please leave it enabled at all times.

What is a DNS leak and how can I prevent a DNS leak in my router?

TeamFlashRouters · Jun 11, 2019 ·

What is a DNS leak?

A DNS Leak is an instance where your ISP receives DNS requests despite being connected to a VPN tunnel.

How do I check if my DNS is leaking?

  1. Perform the extended test on DNSLeakTest.com. Be sure to do so on multiple web browsers for best accuracy.
  2. Here you should only find one server and your ISP should not be listed as your actual ISP.
  3. If your actual ISP is not listed there is no DNS leak.

How can I prevent a DNS leak in DD-WRT?

Check your device's browser settings

Updates to web browsers have added DNS settings capabilities, while this often makes your browsing experience more secure it can also effect the results of a DNS leak test. You can go into your browser’s settings and search for “DNS” and disable the DNS of the browser for more accurate DNS leak test results.

A simple web search for “DNS settings [browser name]” should return helpful information for finding the setting in your browser.

Adjust DD-WRT settings

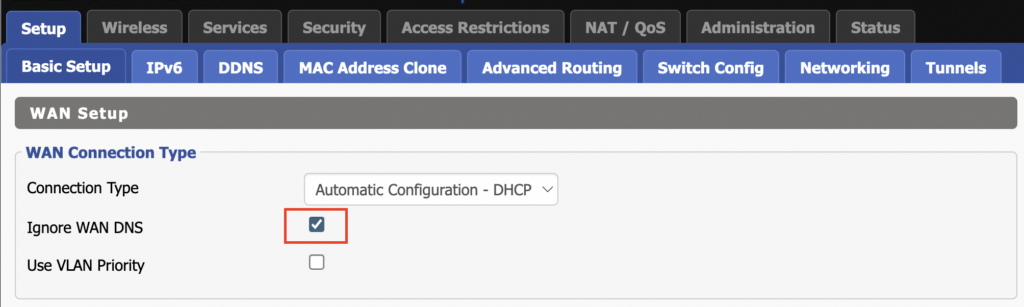
1. On the Setup > Basic Setup page of the DD-WRT settings check the Ignore WAN DNS box.

This setting may not appear in older DD-WRT firmware builds. If it is not appearing for you, upgrade your DD-WRT firmware.

DD-WRT Check Ignore WAN DNS

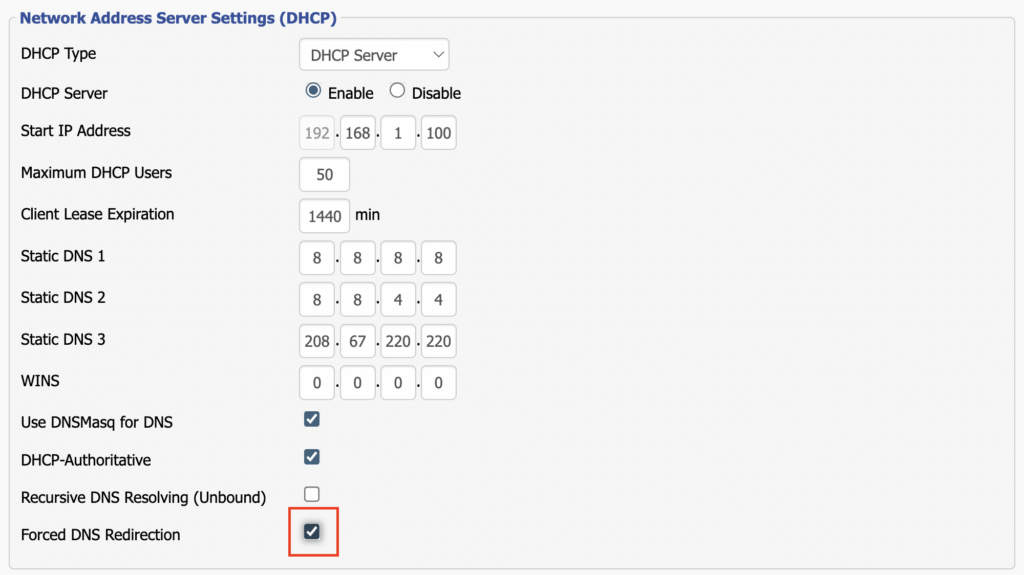
2. Lower on the same page check the Forced DNS Redirection box.

DD-WRT Check Forced DNS Redirection

3. Click Apply Settings at the bottom of the page and then wait a full minute and power the FlashRouter off and back on. Reconnect to the FlashRouter’s network once it boots back up and then make sure you are connected to VPN by going to https://whatismyipaddress.com then perform the DNS leak test again.

Adding your VPN provider’s DNS servers to the router’s configuration can be helpful as well. The DNS servers are typically found on the VPN provider’s website or you can reach out to their team for a recommendation of what DNS servers to enter.

AsusWRT-Merlin Router Setup Guide

Asus-Merlin Router Setup

Quick Start Guide for AsusWRT-Merlin FlashRouters

Find setup guides, FAQs and troubleshooting tips for Asus-Merlin configured FlashRouters.

VIEW SUPPORTED ROUTER MODELS

Asus Logo
  • RT-BE88U (BE7200), RT-AC68U, RT-AC88U, RT-AC3100, RT-AC5300, RT-AC86U, RT-AX56U, RT-AX58U, RT-AX68U, RT-AX86U. RT-AX86U-PRO, RT-AX88U, RT-AX88U-PRO
  • GT-AC2900, GT-AX6000, GT-AX11000, GT-AXE11000,GT-AXE11000-PRO,  GT-AXE16000
  • ZenWiFi Pro XT12

Internet Setup

  • Internet and Wifi Setup on Asus Merlin Firmware
  • DNS Setup for Asus Merlin

WiFi Setup

  • Change WiFi name and password on Merlin
  • Separate your WiFi 2.4GHz and 5GHz Merlin networks

VPN Setup

  • Connecting to OpenVPN on Asus Merlin Firmware
  • PureVPN Merlin WireGuard Setup
  • Surfshark Merlin WireGuard Setup
  • ProtonVPN Merlin WireGuard Setup
  • IPVanish Merlin OpenVPN Setup
  • PrivateInternetAccess (PIA) Merlin OpenVPN Setup
  • NordVPN Merlin OpenVPN Setup
  • ExpressVPN Merlin OpenVPN Setup
  • CyberGhost Merlin OpenVPN Setup

AsusWRT-Merlin Features

  • VPN Director for Asus Merlin
  • VPN Killswitch for Asus Merlin

Search Support Articles

Troubleshooting

  • How do I find my router local IP address?

More Ways to Get Help

GET IN TOUCH

BUY SUPPORT
BROWSE FAQs

Service Plan FAQs

admin · May 25, 2021 ·

Service Plan FAQs

Is the service plan a one time purchase or does it renew?

All FR service plans automatically renew on a quarterly or annual basis based on the term initially purchased. A reminder e-mail will be sent one week prior to renewal. In your FlashRouter account panel, you can cancel the plan at any time to stop any further renewals.

What is included with a FlashRouter?

  • On-demand Installation of enhanced firmware and our exclusive FlashRouters VPN Privacy App.
  • Custom setup guide.
  • Power cord and an ethernet cable.
  • Individual VPN Account Setup/Pre-configuration (On Request)
  • 1 year open source hardware warranty.
  • 30 day satisfaction guarantee.
  • Initial basic setup assistance via e-mail. For any advanced setups/configurations, live chat or remote assistance, a service plan purchase is required.

Does the service plan include a VPN subscription?

A subscription to a VPN does not come with a FlashRouter or Service plan. If you are planning to use a VPN, you would need to sign up for one separately, directly from a provider.

Need assistance in finding a VPN Provider? Please visit our recent VPN Provider Best Seller List.

Plug and Play VPN Support

Unlike other VPN Router providers, FlashRouters is proud to offer free VPN service integration with any purchase.

To receive a plug and play with VPN device, you will need to provide our team with the credentials from your VPN provider subscription.

IMPORTANT NOTE: This is not required but recommended for users who wish to have the simplest, most seamless experience when the FlashRouter arrives. You can always change the password when the device arrives if you wish as well.

Shows what to look for when you want to preconfigure your router.

To have your router VPN pre-configured:

  1. Select Yes from the “Want Your Router Preconfigured?” on the Payment Page during check out.
  2. Select your VPN provider. If you don’t see your VPN listed select “Other” and you will see an additional field to input who your provider is.
  3. Enter your your VPN username and password
  4. For ExpressVPN Firmware Routers there will be an additional box for your activation code.

Please note:  If you do not enter a server location request in “Order Comments”, we will automatically start the device with the closest/optimal server for the location we are shipping the device by default. A location has to be added to the initial configuration for plug and play encryption security to occur on the device.

Do I have to buy a service plan?

Our routers are priced for the custom upgrades performed at our warehouse, testing expenses and keeping the FlashRouter App update to date.

Our service plan has three levels as an optional add-on with your purchase to get continued direct assistance from our team. This is especially useful to customers who are less tech savvy and want direct access to our support team to make sure their network is running exactly how they desire. Here is how these plans differ

Bronze – Basic E-mail Support
Silver – E-mail and Live Chat Support.
Gold – E-mail, Live Chat, and Remote One-on-One Sessions

Each situation and user has different needs and expertise. Our team of US-based support agents are highly trained specialists in VPN and DD-WRT router setup. From firmware updates to networking configuration/troubleshooting,solutions, the purpose of our Service Plans is to help our customers in whatever level they deem necessary.

Does FlashRouters offer phone support?

At this time, we do not provide phone support with our service plans. We have tested phone support for networking troubleshooting in the past but have found that on average caused us to help less customers in a less efficient manner. However, with a purchase of a Gold Service Plan, customers can schedule 1-on-1 remote support sessions via Teamviewer with our engineers and they will provide a hands-on, personal solution, to any problems you may be facing.

Do I need a Service Plan for a firmware upgrade?

Firmware upgrades are free of charge to any FlashRouter customer!

You can visit our support center and select your specific router model to upgrade your firmware based on the recommendations provided.

If you want the help of our Support Team to assist in this upgrade, you can always sign up for our Gold Service Plan and schedule a 1-on-1 Teamviewer session in which our trained engineers will take care of the upgrade for you!

What does the warranty cover?

Our complimentary 1-year hardware warranty does not include tech support outside. If your router suffers hardware failure within 365 days from the date you received the unit, then we will gladly replace your router with another fully tested one. For more information regarding our warranty and return policy, please check out our warranty and return section.

Can I purchase a router without a service plan and subscribe later?

Yes, you may purchase a service plan at any time. However, we can’t guarantee any pricing, or apply any previously offered discounts or specific features at that later date.

How do I connect a Wireless Extender to my FlashRouter network?

Dave · Apr 29, 2019 ·

The settings of your FlashRouter do not need to change to connect an extender to the FlashRouter’s network. Simply access the settings of the extender device and enter the FlashRouter’s wireless network name and the correct wireless password.

The extender will then connect via wireless to the FlashRouter and add wireless range to your network.

To use a DD-WRT router as an extender follow our Advanced Wireless Setup Guides.

It is also easy to setup a Mesh system like Orbi or Velop and send your entire Mesh network through the FlashRouter VPN Network, for a VPN connected Mesh Network.

Simply connect from an open LAN port on your FlashRouter to the WAN port on your Mesh base station and then use your Mesh smart apps to complete the setup from there.

What do the lights on my Roqos Core mean?

TeamFlashRouters · Mar 3, 2022 ·

  1. White (looks blueish white on Teal colored Roqos Cores): System startup
  2. Solid Red: System is up, but there is no internet connection. Roqos Core cannot detect a network link either.
  3. Flashing Red: System is up and there is an ethernet cable connected to Internet port, however Roqos Core is unable to reach the internet. Usually happens with bad ethernet cable, or cable modem/ISP modem not giving IP address to Roqos Core due to ISP provisioning issues, or some other type of network setting blocking Roqos Core’s access to the internet. First thing to try in this scenario is to reboot the ISP router/modem upstream of Roqos Core.
  4. Flashing Blue: Roqos Core is up and connected to the internet, but it is not yet activated. Brand new Roqos Cores, or Roqos Cores that are factory reset will show this behavior when they are ready to be activated again.
  5. Blue (deep blue color, different from #1): Roqos Core is up and activated, everything is normal.

IPv6 Internet Setup

TeamFlashRouters · Apr 3, 2019 ·

Most ISPs only support IPv4. Unless your ISP supports IPv6 then enabling it on the FlashRouter will not enable it across your network.

For most VPN users IPv6 should remain disabled as the VPN connection was designed to operate under IPv4 addresses only. Enabling IPv6 in this instance may compromise the security of the VPN tunnel.

We typically only recommend enabling IPv6 if you are not using VPN or if your VPN provider requires that IPv6 be enabled.

Enable IPv6

Navigate to Setup > IPv6

Access FlashRouters DD-WRT Admin Settings and Disable Remote Access
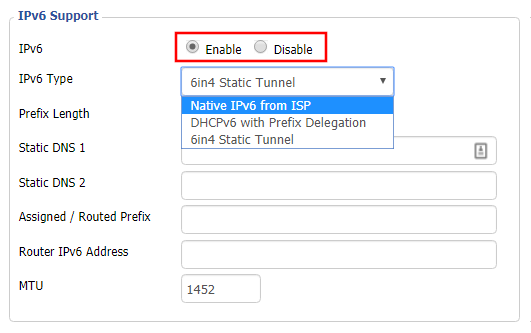
  1. Set IPv6 to Enable.
  2. Select Native IPv6 from ISP in the dropdown.
  3. If you have specific IPv6 DNS servers you would like to add you can add them in the Static DNS fields or leave those fields blank.
  4. Click Apply Settings.

Power cycle your FlashRouter

Power your FlashRouter off and then power it back on by unplugging and then plugging it back in or using the button on the back of the FlashRouter.

Verify a successful IPv6 connection

Once the FlashRouter is finished powering back up, connect one of your devices to the FlashRouter via Ethernet or Wireless.

Visit  http://ipv6-test.com/ where you should see Supported under IPv6 connectivity if your ISP supports IPv6 and your modem is setup to passthrough IPv6.

Please be aware that we can not replicate ISP specific IPv6 issues, which makes them challenging to troubleshoot. We recommend contacting your ISP as the first step of troubleshooting.

How do I access my Roqos device settings?

TeamFlashRouters · Mar 8, 2022 ·

Your Roqos Core’s settings or UI (User Interface) is accessible via a secure cloud based connection rather than the typical local access of other routers. This means that you can manage your Roqos from anywhere in the world not just at home.

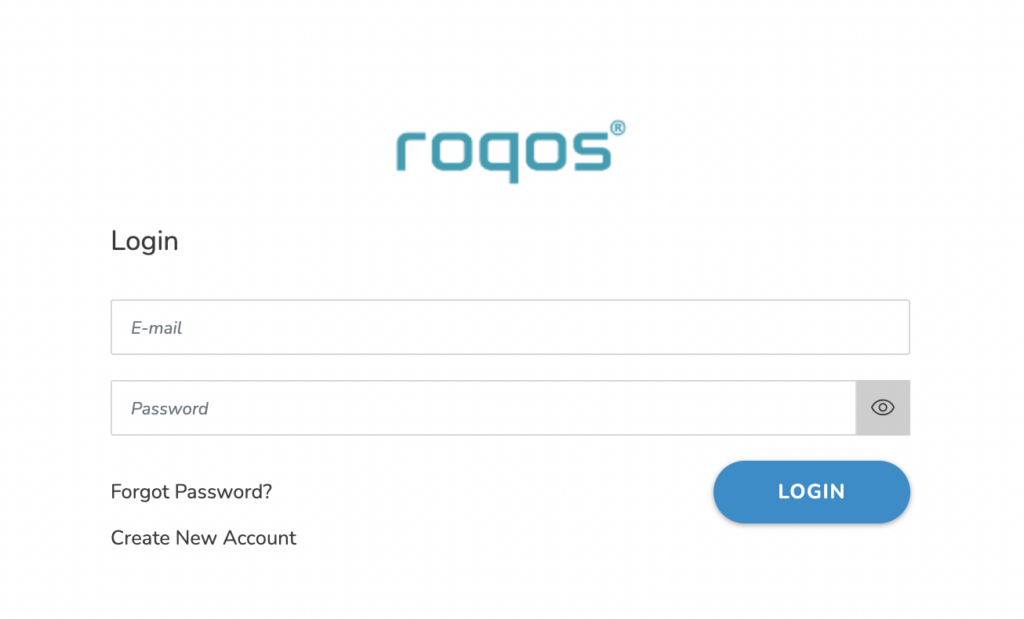
Visit the Roqos Login URL

From any device that has a browser such as a computer, smartphone, or tablet visit login.roqos.com

Roqos Login URL

Login with your Roqos account

Enter in the email and password that you set when your Roqos was initially setup. If you still need to create your Roqos account and activate your Roqos follow our Activate and Connect Roqos to Internet guide.

Roqos UI Login

Proceed with making the changes to the settings you desire

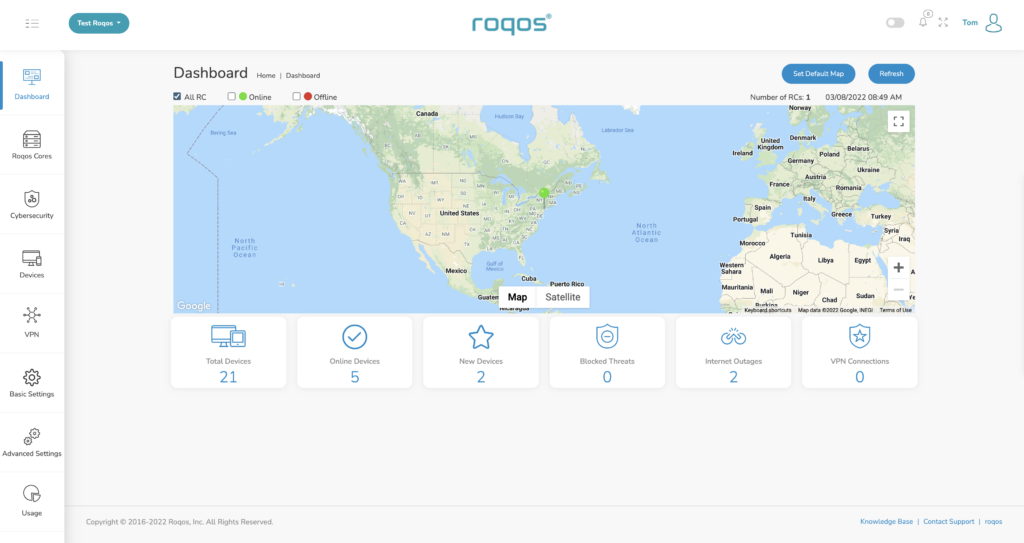
Now that you are logged in to your Roqos UI you adjust any settings as you see fit for your network. For guides on how to make specific changes to your Roqos view our Roqos Setup Guide area.

Roqos UI Logged in

How do I save and load a backup file?

TeamFlashRouters · Jun 4, 2019 ·

Why should I save a backup file?

Save a backup file of your correctly configured DD-WRT settings to ensure you can load the working settings in a few simple clicks instead of manually configuring each setting in the event of a reset.

Save a backup file

Navigate to Administration > Backup

  1. Click Backup and save / download the file.
  2. Name the backup file “FlashRouter Backup”

Load a backup file

Navigate to Administration > Backup

  1. Click Choose File and find the backup file you previously saved.
  2. Click Restore.
How to Load a Backup File in DD-WRT FlashRouter

My 5.0GHz network is not showing up

TeamFlashRouters · May 2, 2019 ·

Verify the device supports 5GHz

5.0GHz networks are not compatible with all devices so first make sure that you device’s wireless adapter supports 5GHz wireless frequencies.

If you are not sure, find out if your device support 5 GHz via Google search or by looking in the wireless hardware details in the device’s network settings. If you see Wireless a/b/g/n support then you have a compatible device. If you are missing the Wireless a then this means there is no 5 GHz support.

Enter the recommended wireless settings

Our team has tested the wireless functionality for each FlashRouter that we offer and shared our recommended wireless settings in our Wifi Setup area. Replicate the settings for your FlashRouter model found on that page.

Lower the wireless channel

Some devices do support 5.0GHz connections but not the higher channels that DD-WRT firmware offers.

Navigate to Wireless > Basic Settings

Lower the wireless channel setting for the 5.0GHz band that is not showing. Based on our tests the most broadly compatible channels are 36, 48 and 161.

CLICK APPLY SETTINGS

Refresh your device's network adapter

The easiest way to accomplish this is by rebooting your device as the settings to reset your adapter may vary on all types of internet connected devices.

Review wireless Status

Navigate to Status > Wireless

The readouts on this page can help tell if there are errors with the FlashRouter’s wireless. View our article on how to read the Wireless Status page for more information.

ASUS-WRT Router Setup Guide

ASUSWRT Routers

Quick Start Guide for ASUS-WRT FlashRouters

Find setup guides, FAQs and troubleshooting tips for ASUSWRT configured FlashRouters.

VIEW SUPPORTED ROUTER MODELS

Asus Logo
  • ROG series: GT-BE98 Pro
  • GT series: GT6, GT-AXE16000, GT-AX11000 Pro, GT-AXE11000, GT-AX6000, GT-AX11000, GS-AX5400, GS-AX3000
  • ZenWiFi: ZenWiFi Pro XT12, ZenWiFi Pro ET12, ZenWiFi XT9, ZenWiFi AX (XT8), ZenWiFi ET8, ZenWiFi XD6, ZenWiFi XD5
  • RT series: RT-BE96U, RT-BE88U, RT-BE58U, RT-AXE7800, RT-AX88U Pro, RT-AX88U, RT-AX86U Pro, RT-AX86U, RT-AX86S, RT-AX68U, RT-AX82U, RT-AX58U, RT-AX3000, RT-AX59U, RT-AX92U
  • TUF series: TUF-AX5400, TUF-AX3000_V2, TUF-AX3000, TUF Gaming AX6000, TUF Gaming AX4200

Internet Setup

  • How to Access Your AsusWRT FlashRouter Settings

WiFi Setup

  • Change WiFi name and password on Asus

VPN Setup

  • CyberGhost AsusWRT OpenVPN Setup
  • Surfshark AsusWRT WireGuard Setup
  • NordVPN Setup for AsusWRT Firmware Routers
  • IPVanish AsusWRT OpenVPN Setup
  • PrivateInternetAccess (PIA) AsusWRT OpenVPN Setup
  • ExpressVPN Setup for AsusWRT Firmware Routers
  • PrivateInternetAccess (PIA) Asus AX1800S OpenVPN Setup
  • IPVanish Asus AX1800S OpenVPN Setup
  • ExpressVPN Asus AX1800S OpenVPN Setup
  • NordVPN Asus AX1800S OpenVPN Setup

Asus-WRT Features

Search Support Articles

Troubleshooting

More Ways to Get Help

GET IN TOUCH

BUY SUPPORT
BROWSE FAQs
GL.iNet Router Setup Guide

Quick Start Guide for GL.iNet FlashRouters

Find setup guides, FAQs and troubleshooting tips for GL.iNet FlashRouters.
VIEW SUPPORTED ROUTER MODELS

  • Slate: GL-AX1800, GL-AXT1800, GL-BE3600
  • Flint: GL-MT6000
  • Other: Beryl GL-MT3000, Velica GL-B2200, Marble GL-B3000
Flint GLinet Router Support

Internet Setup

  • How to Access Your GL.iNet FlashRouter Settings
  • Flint/Slate GL.iNet Repeater Setup
  • Flint/Slate GL.iNet Internet Setup

WiFi Setup

  • Flint/Slate GL.iNet Guest Network Setup
  • Flint/Slate GL.iNet Disable Wi-Fi
  • Flint/Slate GL.iNet Change Wi-Fi name and password

VPN Setup

  • Flint/Slate GL.iNet PureVPN WireGuard Setup
  • ProtonVPN Setup Guide for GL.iNet Routers
  • NordVPN Setup for GL.iNet Routers
  • Flint/Slate GL.iNet ExpressVPN OpenVPN Setup

GL.iNet Features

  • Flint/Slate GL.iNet Repeater Setup
  • GL.iNet Access Router Settings and Firmware Upgrade

Search Support Articles

Troubleshooting

More Ways to Get Help

GET IN TOUCH

BUY SUPPORT
BROWSE FAQs
Privacy Hero Router Setup Guide

Privacy Hero Routers
Quick Start Guide for Privacy Hero FlashRouters

Find setup guides, FAQs and troubleshooting tips for Privacy Hero FlashRouters.

Privacy Hero 2

Internet Setup

  • Privacy Hero Activation and Setup
  • Privacy Hero Access Router Settings
  • Privacy Hero Creating User Profiles and Adding Devices to Profiles

WiFi Setup

  • Privacy Hero Activation and Setup
  • Privacy Hero Change Wi-Fi Name and Password
  • Privacy Hero Change Wireless Channel
  • Privacy Hero Disable Wi-Fi

VPN Setup

  • NordVPN Setup Guide for Privacy Hero
  • Surfshark VPN Setup Guide for Privacy Hero
  • IPVanish VPN Setup Guide for Privacy Hero
  • ProtonVPN Setup Guide for Privacy Hero
  • ExpressVPN Setup Guide for Privacy Hero
  • Private Internet Access VPN Setup Guide for Privacy Hero
  • Privacy Hero VPN Setup Guide for Privacy Hero
  • Privacy Hero VPN Kill Switch Setup

Privacy Hero Features

  • Privacy Hero Activation and Setup
  • Privacy Hero VPN Kill Switch Setup
  • Privacy Hero Bypass certain devices from VPN
  • Privacy Hero Streaming Relocation
  • Privacy Hero Adblocking Malware and Phishing Prevention Setup
  • Privacy Hero Creating User Profiles and Adding Devices to Profiles
  • Privacy Hero Safe Surf
  • Privacy Hero Bedtime Settings (Internet Scheduler)

Search Support Articles

Troubleshooting

  • Privacy Hero Change VPN Providers

More Ways to Get Help

GET IN TOUCH

BUY SUPPORT
BROWSE FAQs

Roqos Core Router Setup Guide

Roqos Core Router Setup Guide

Quick Start Guide for Roqos Core Routers

Find setup guides, FAQs and troubleshooting tips for the FlashRouters Roqos Core Router.

Internet Setup

  • Roqos Core Quick Start Guide
  • How do I access my Roqos device settings?
  • Roqos Core Internet Setup and Activation

WiFi Setup

  • Setting up a Guest WiFi Network on Roqos
  • Change WiFi name and password on Roqos

VPN Setup

  • NordVPN Setup on Roqos
  • PrivateInternetAccess (PIA) Setup on Roqos
  • ExpressVPN Setup on Roqos
  • Roqos VPN Connected, but my device IP is unchanged

Roqos Core Features

  • Set a Static IP for your connected devices on Roqos
  • VPN Kill Switch on Roqos
  • Managing User Profiles on Roqos
  • Cybersecurity and Intrusion Prevention on Roqos
  • Block Websites by Country on Roqos
  • Ad blocking on Roqos
  • Parental Controls on Roqos
  • Wireless Repeater – WiFi as WAN on Roqos
  • What do the lights on my Roqos Core mean?

Search Support Articles

Troubleshooting

  • Roqos VPN Connected, but my device IP is unchanged
  • How do I access my Roqos device settings?
  • What do the lights on my Roqos Core mean?

More Ways to Get Help

GET IN TOUCH

BUY SUPPORT
BROWSE FAQs

Cudy Router Setup Guide

Quick Start Guide for Cudy FlashRouters

Find setup guides, FAQs and troubleshooting tips for Cudy configured FlashRouters.

VIEW SUPPORTED ROUTER MODELS

WR3000, M1800, M3000

Internet Setup

  • Cudy Access Router Settings
  • Cudy Internet Setup

WiFi Setup

  • Cudy Change Wi-Fi name and password

VPN Setup

  • PrivateInternetAccess (PIA) Cudy OpenVPN Setup
  • IPVanish Cudy OpenVPN Setup
  • ExpressVPN Cudy OpenVPN Setup
  • NordVPN Cudy OpenVPN Setup

Cudy Features

Search Support Articles

Troubleshooting

More Ways to Get Help

GET IN TOUCH

BUY SUPPORT
BROWSE FAQs

Internet and Wifi Setup on Asus Merlin Firmware

TeamFlashRouters · Sep 29, 2021 ·

Listed below are important links to setup instructions for connecting an Asus Merlin firmware router to the internet and WiFi.

How to set up ASUS Wi-Fi router via ASUS Router App? (QIS, Quick Internet Setup)

How to set up an Internet Connection?

How to enter the router setting page(Web GUI) (ASUSWRT)?

How do I upgrade the Asus Merlin firmware of my FlashRouter?

TeamFlashRouters · Dec 8, 2021 ·

Download the latest AsusWRT Merlin firmware build for your specific FlashRouter model at the Asus Merlin download website. Contact support@flashrouters.com if you are uncertain about your router model or your router model is not available. Click your router model and then select the Release folder.

Make sure you are following the directions below to load the firmware file into the router settings and not trying to open the firmware file on its own.

Access the FlashRouter via wired connection. It is possible to upgrade firmware via WiFi, but this is not recommended unless you are unable to wire directly to the router.

Navigate to Administration > Firmware Upgrade

AsusWRT Merlin Firmware Upgrade

How do I set a Static IP for my device in DD-WRT?

TeamFlashRouters · May 30, 2019 ·

It can be very useful to setup static local IP addresses for devices on your FlashRouter network. By assigning specific IP’s to specific devices you can better control and manage how your network and the internet interacts with each device.

Once you setup a static IP you can set access restrictions, monitor and control bandwidth, as well as bypass a router VPN connection or setup a device specific Kill Switch. Without a static IP assignment you may lose device specific settings when the DHCP lease to the router expires.

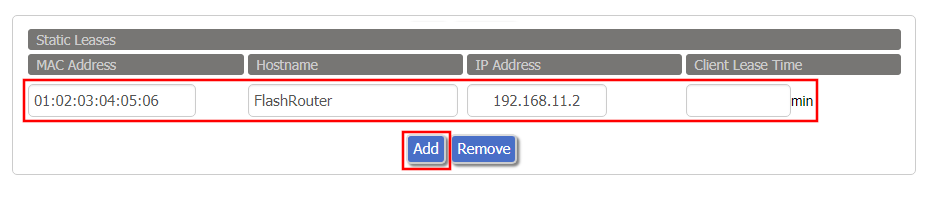
Navigate to Services > Services

Set Static IP by Device MAC Address in FlashRouter DD-WRT Settings
  1. Under Static Leases click Add once.
  2. Fill in the newly appeared fields.
    • MAC Address: Enter the device’s MAC address which can be found on the device itself or on the Status > LAN page.
    • Hostame: Enter a name for the device. Make sure that there are no spaces.
    • IP Address: Enter the desired static IP Address of the device. It should be on the same subnet as the FlashRouter (192.168.11.x)
    • Client Lease Time: Leave this field blank.
  3. Click Apply Settings
  4. Repeat the steps above for each individual static IP address you would like to setup. If you click Add before clicking Apply Settings you will lose the configuration.

If a device has wireless and ethernet capabilities the MAC Addresses will be different for a wireless connection and an ethernet connection. Make sure to set a static IP for both MAC Addresses in this case.

NordVPN Setup on Roqos

TeamFlashRouters · Dec 24, 2021 ·

Preparing for NordVPN Setup

Obtain your NordVPN manual Username and Password

If you are not already a NordVPN user Sign Up Now.

1. Log in to your account on the NordVPN website.

NordVPN login

2. Click NordVPN on the left hand side and then click Setup NordVPN manually.

NordVPN setup manually

3. Enter in the verification code that was sent to your email.

NordVPN verify code

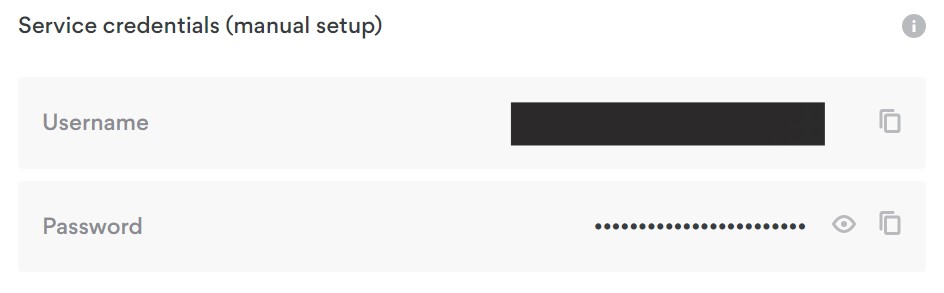
4. Copy and paste your NordVPN manual username and password to a secure location. This is the username and password you will enter into the router settings to connect to NordVPN.

NordVPN credentials

Connecting to NordVPN in the Roqos Core

Access the Roqos Core UI

1. Login to the Roqos Core web app in a browser on any computer or smart device.

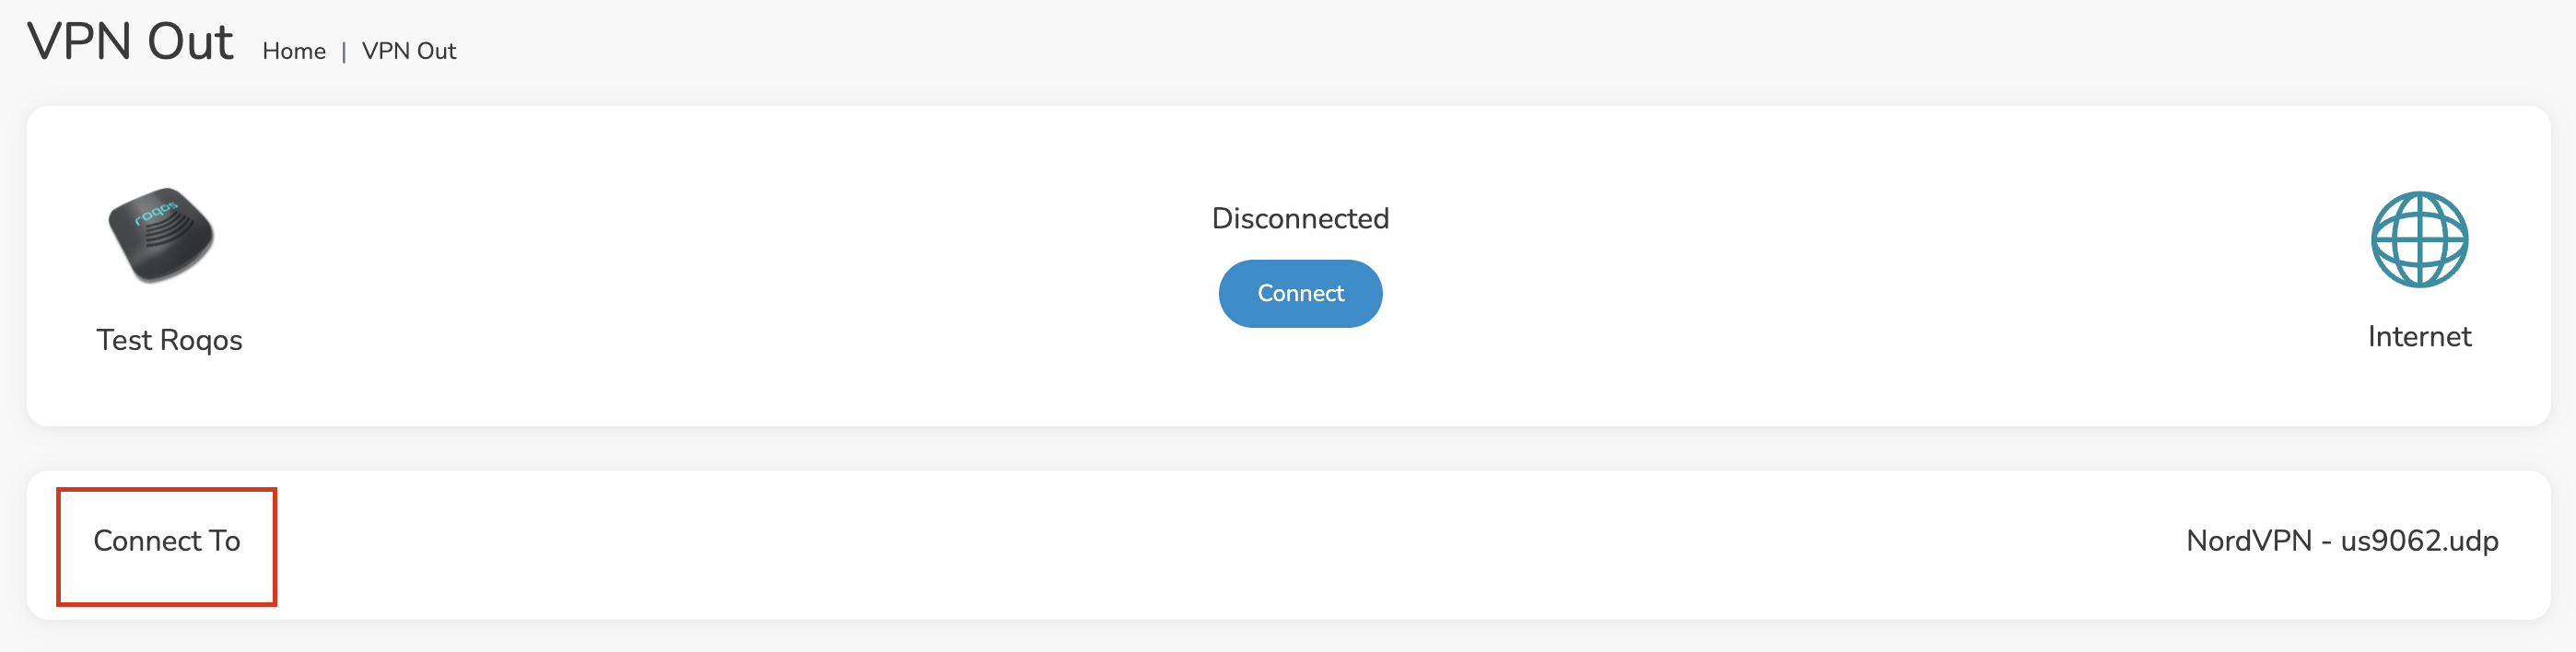
2. Click VPN from the navigation menu and then click VPN OUT.

Roqos VPN Out

3. Click the Connect to box.

Roqos NordVPN Connect to

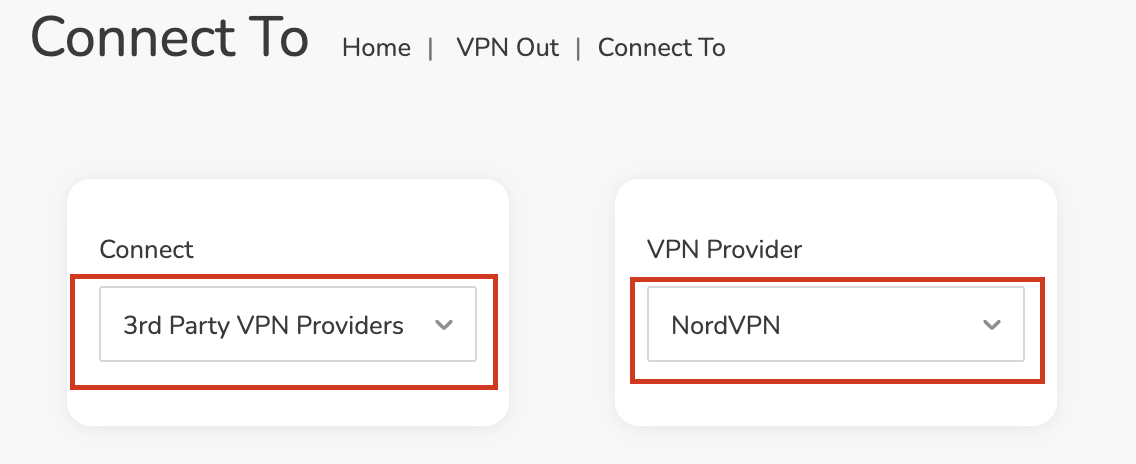
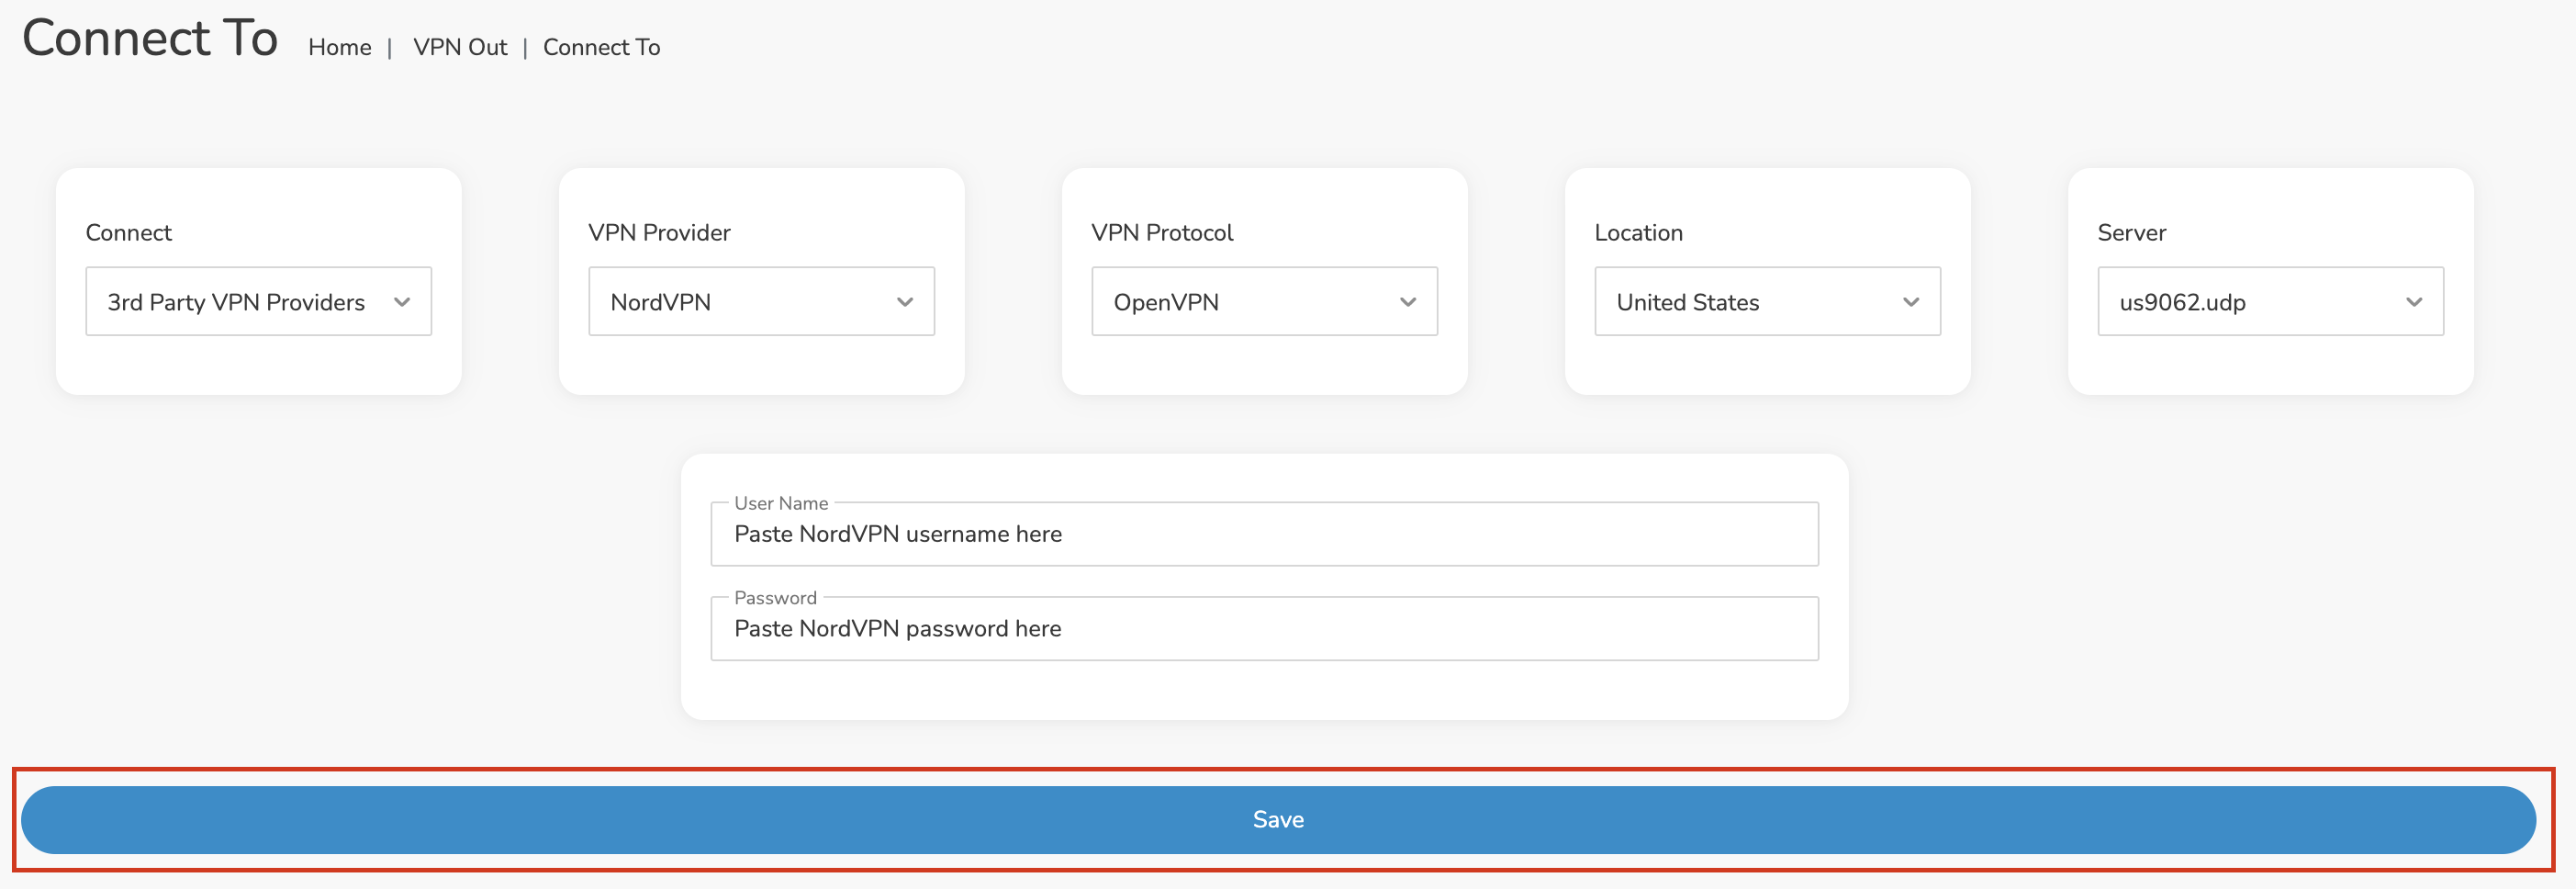
4. In the Connect dropdown choose 3rd Party VPN Providers and for the VPN Provider dropdown choose NordVPN.

Roqos NordVPN select provider

Enter your NordVPN information

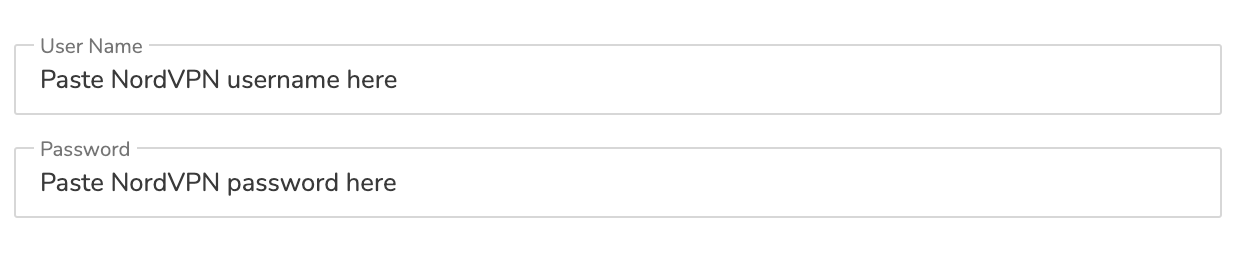
In the Username and Password field enter the NordVPN OpenVPN Username and Password that you obtained.

NordVPN credentials
Roqos NordVPN enter username and password

Select a NordVPN server

Navigate to NordVPN server recommendation page. Click Recommended server and select the country you want to connect to and note the server number that appears.

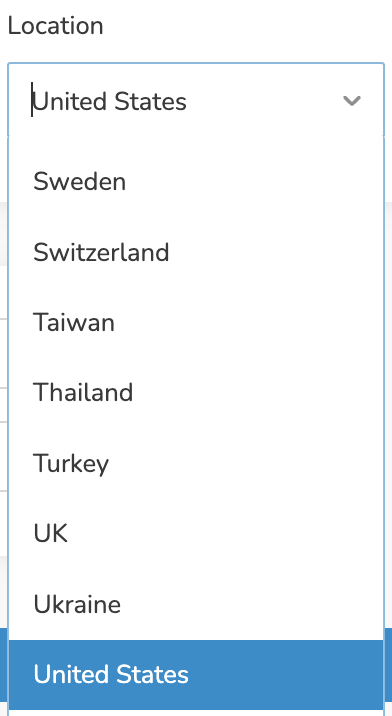
Click the Location dropdown and type in or scroll to the preferred server country.

Roqos NordVPN Select Location

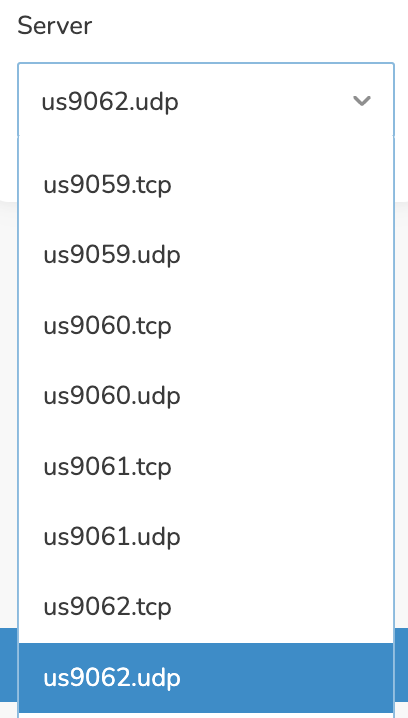
Click the Server dropdown and type in or scroll to the server number that was recommended. Select the UDP version of the server.

Roqos NordVPN select server number

Click the Save button.

Roqos NordVPN Save Settings

Connect to NordVPN

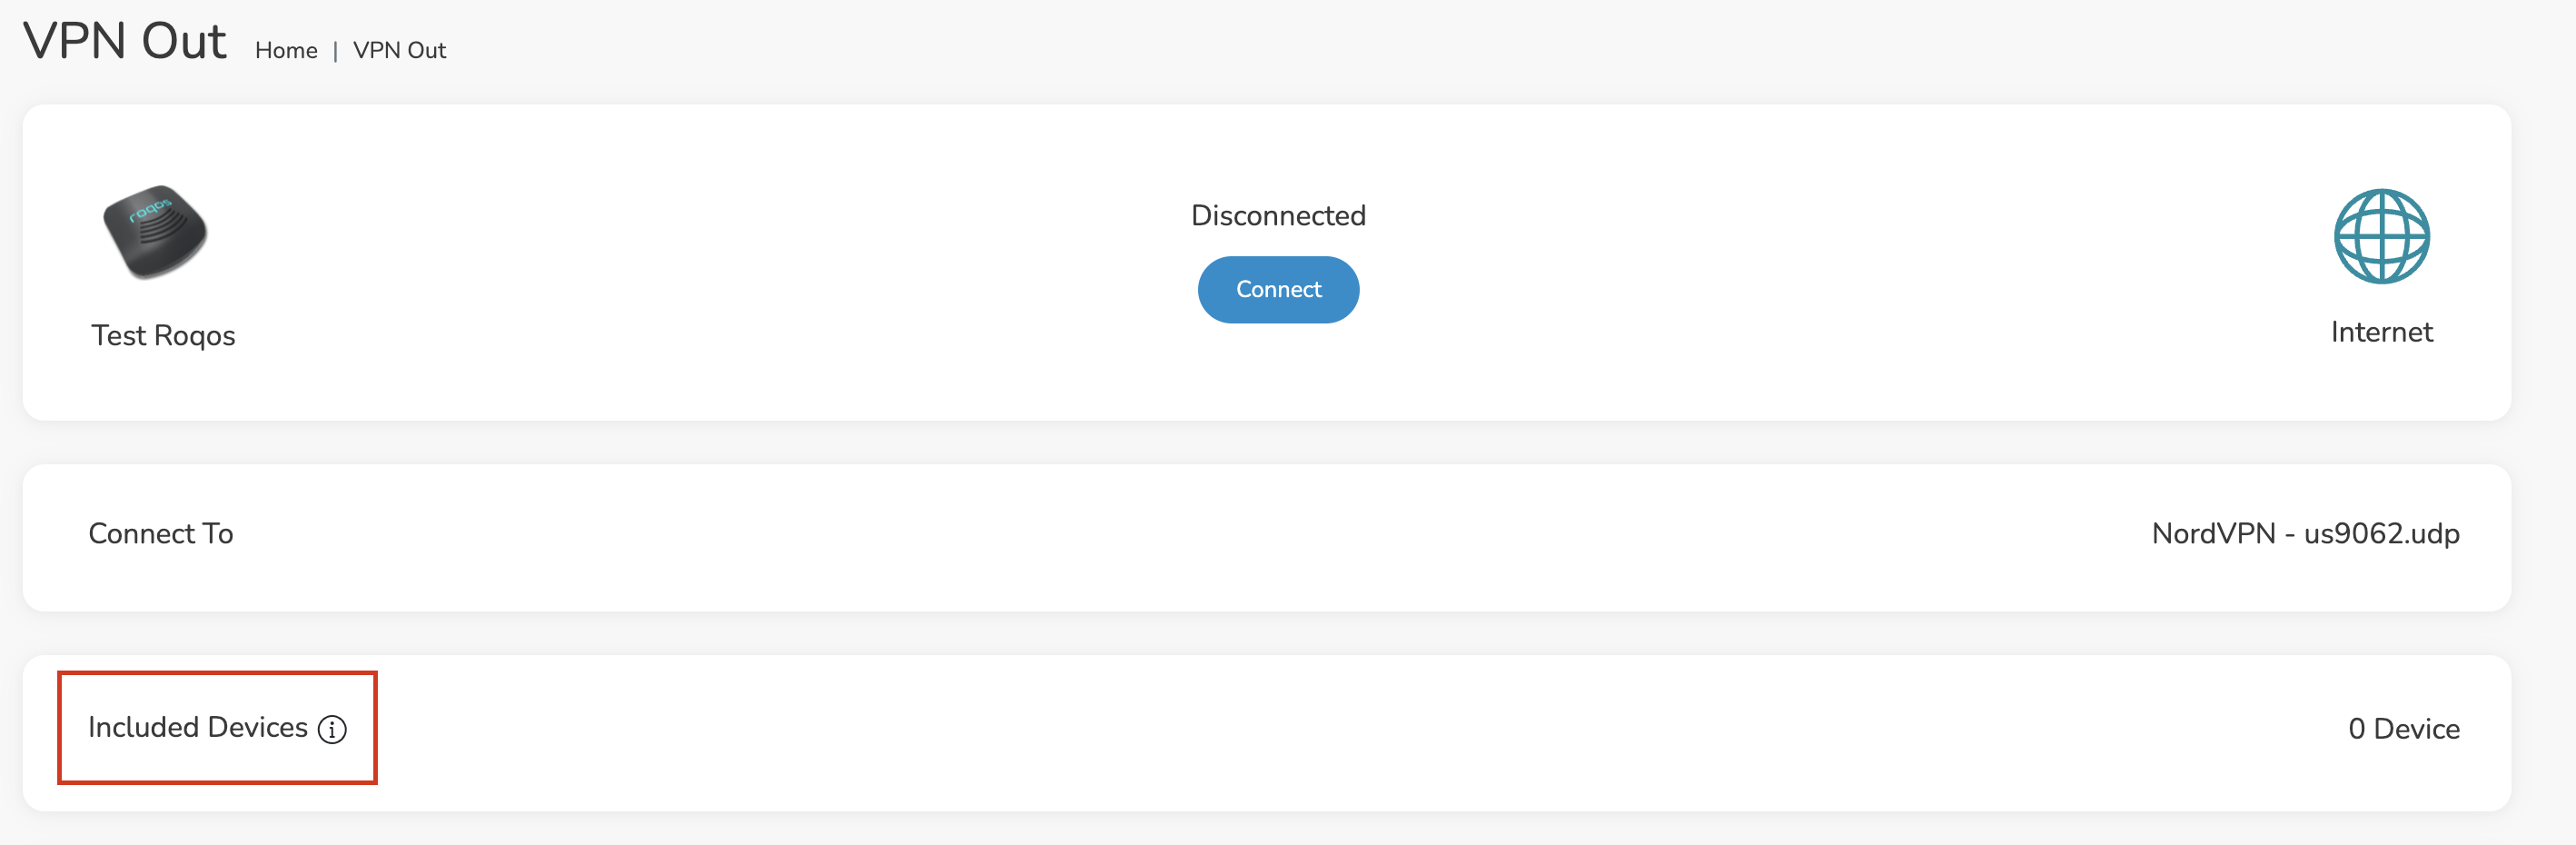
Once you click Save you will be returned to the VPN OUT menu.

Click the Connect button to start your NordVPN connection. Please be patient as the router connects your entire network through VPN.

Roqos VPN Connect

Assign devices to connect to VPN

By default there are no devices assigned to the VPN tunnel. Click Included Devices. From this page you can choose if all devices should connect to NordVPN or only certain devices.

Roqos NordVPN Included Devices

From the dropdown select Include all devices if you want every device that connects to the Roqos to connect to NordVPN. Then click Save.

Roqos VPN Include All Devices

If you only want specific devices to connect to NordVPN while others bypass the VPN connection select Include selected devices from the dropdown and then toggle the sliders for the devices you want connected to VPN. Click Save.

Roqos VPN Include Selected devices

Verify a successful NordVPN connection

Make sure you are connected to the Roqos network via WiFi or ethernet connection on your device.

Visit NordVPN’s website to verify your new IP Address and Protected Status at the top of the page.

You should see Connected at the top of the page underneath NordVPN.

Connect to a different NordVPN server

To change your server click Disconnect on the VPN OUT page then return to the Connect To section to select a new server from the Server dropdown and click Save. Now click Connect once again on the VPN Out page.

Disconnect from NordVPN

To disconnect from NordVPN click the Disconnect button.

TROUBLESHOOTING

Still having issues? Visit the FR Privacy App Troubleshooting section.

Troubleshoot Here

Open Ticket

OPEN SUPPORT TICKET

Please fill out the form below and be sure to use the same e-mail on file so we can streamline our diagnoses of your issue.

[zendesk_request_form]

PrivateInternetAccess (PIA) Setup on Roqos

TeamFlashRouters · Dec 24, 2021 ·

Preparing for PIA Setup

Obtain your PIA login information

If you are not already an PIA user Sign Up Now.

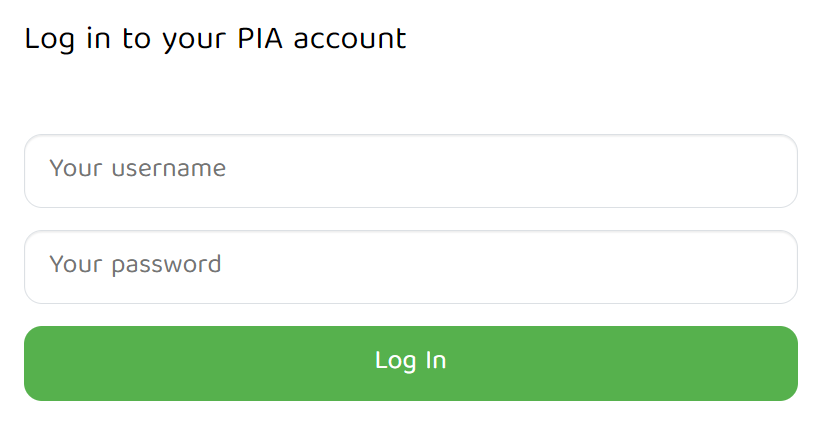
1. Visit PIA’s website login page.

PIA login

2. Successfully log in with your account information.

Connecting to PIA in the Roqos Core

Access the Roqos Core UI

1. Login to the Roqos Core web app in a browser on any computer or smart device.

2. Click VPN from the navigation menu and then click VPN OUT.

Roqos VPN Out

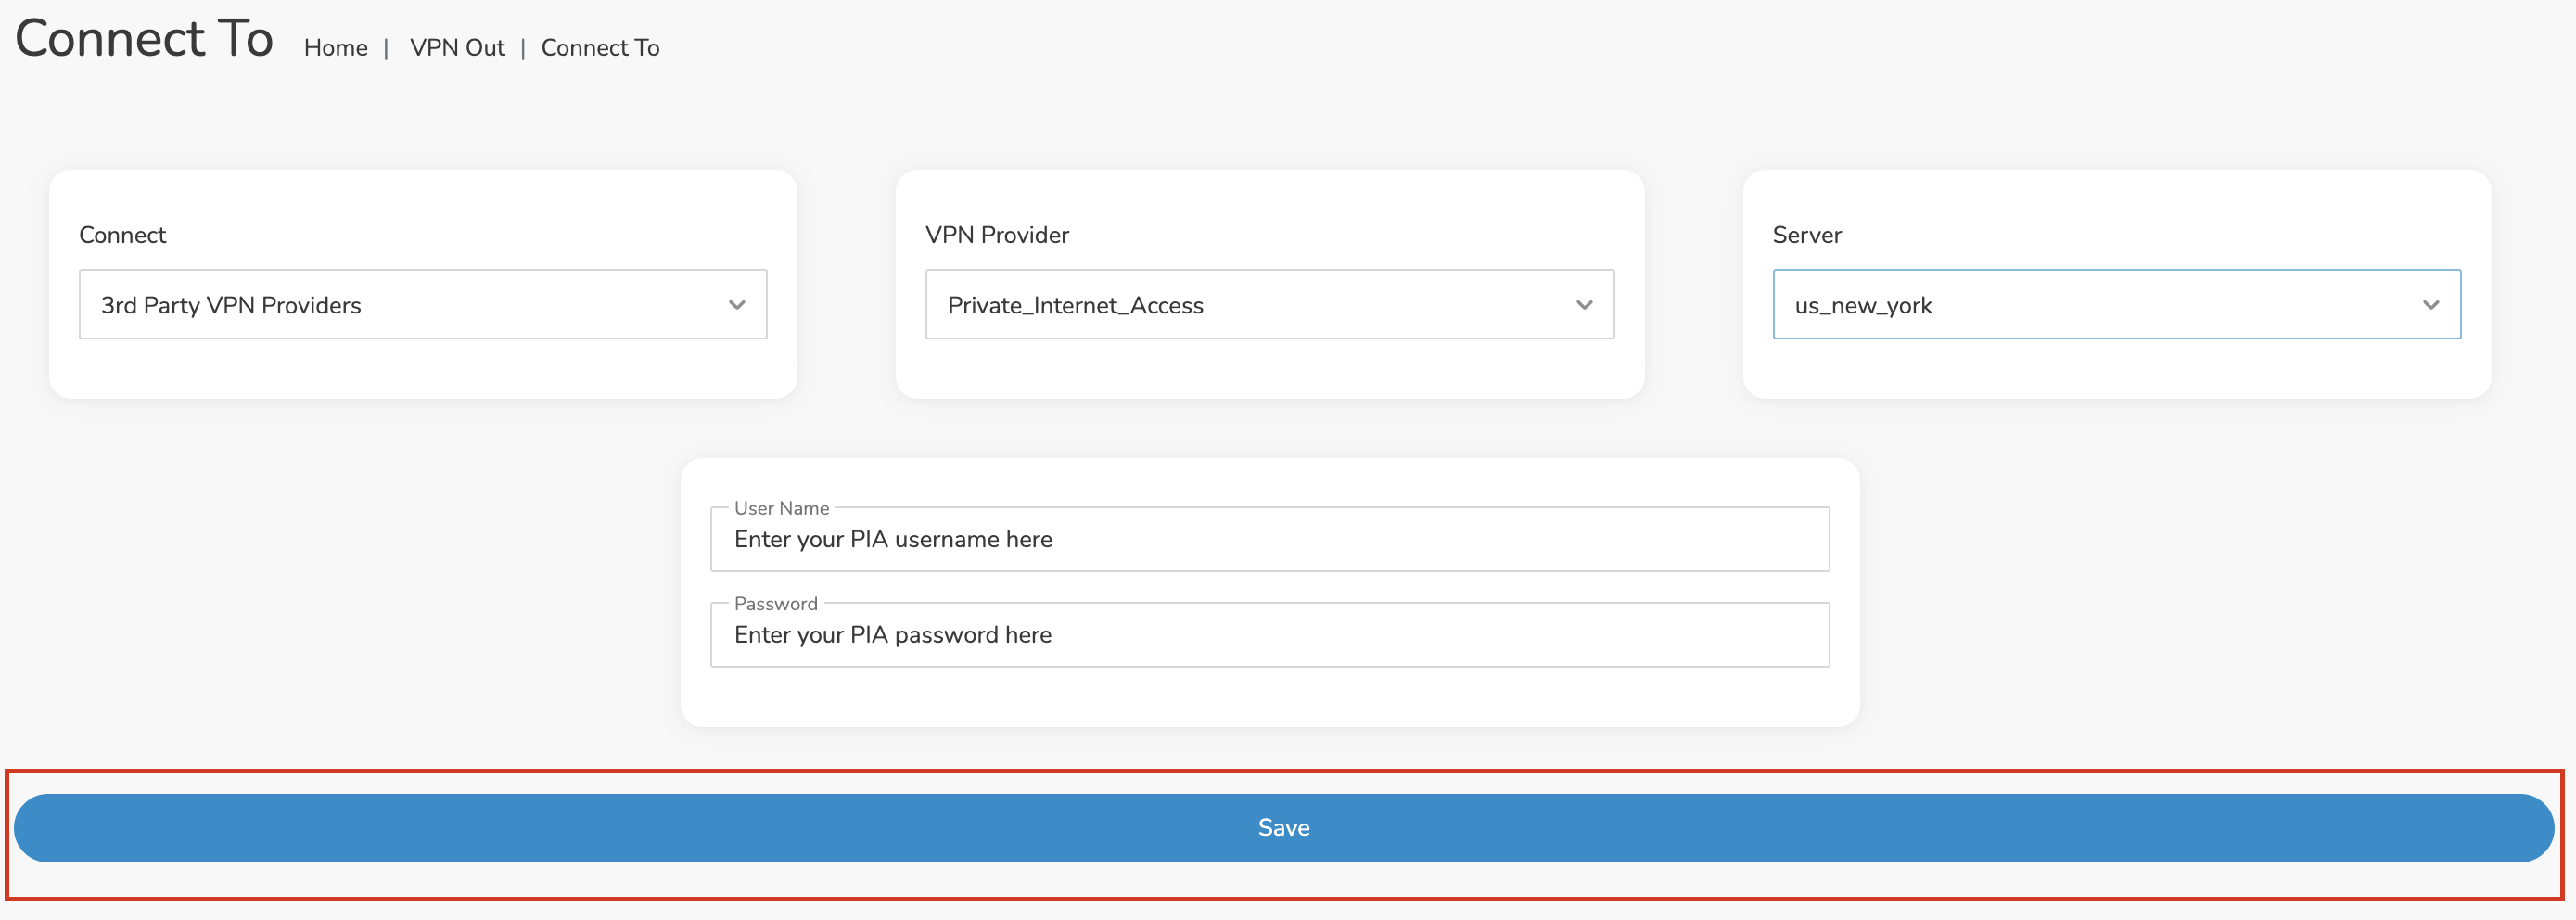
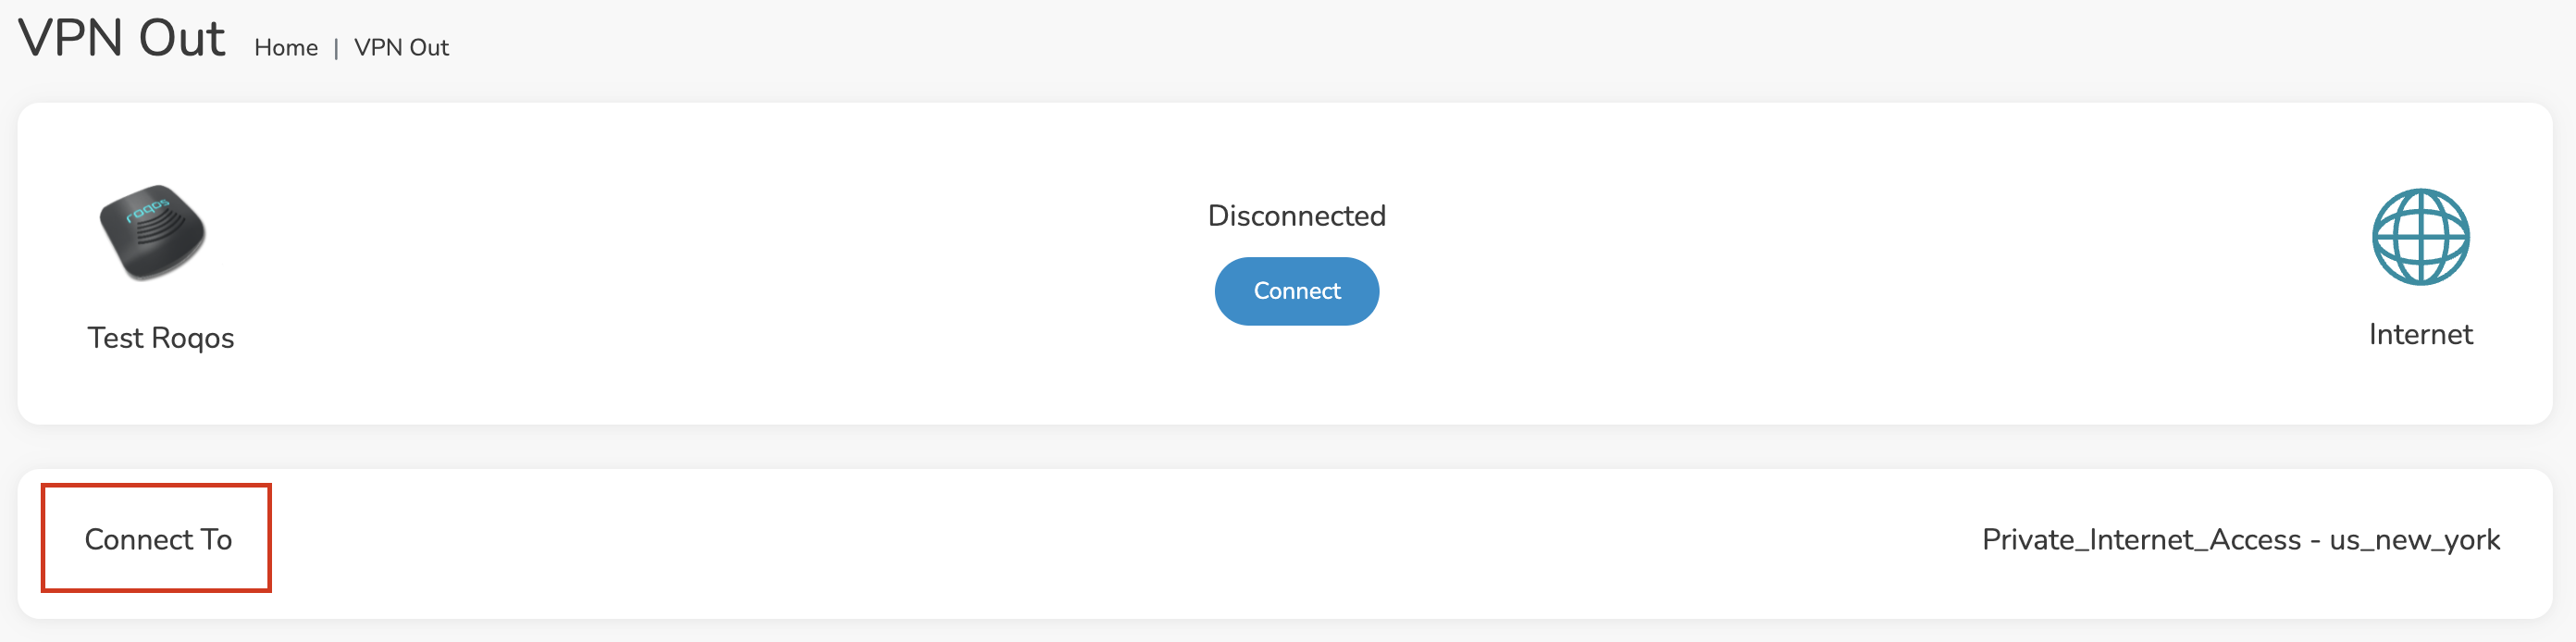
3. Click the Connect to box.

Roqos PIA Connect to

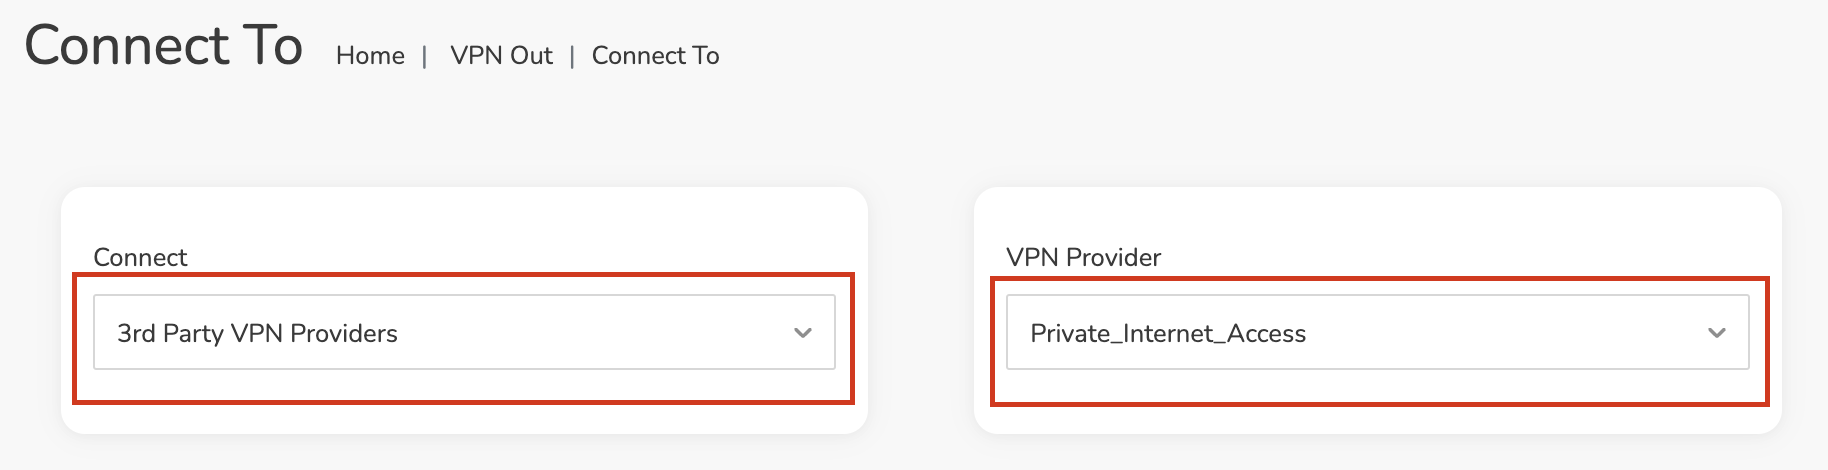
4. In the Connect dropdown choose 3rd Party VPN Providers and for the VPN Provider dropdown choose Private_Internet_Access.

Roqos PIA select provider

Enter your PIA information

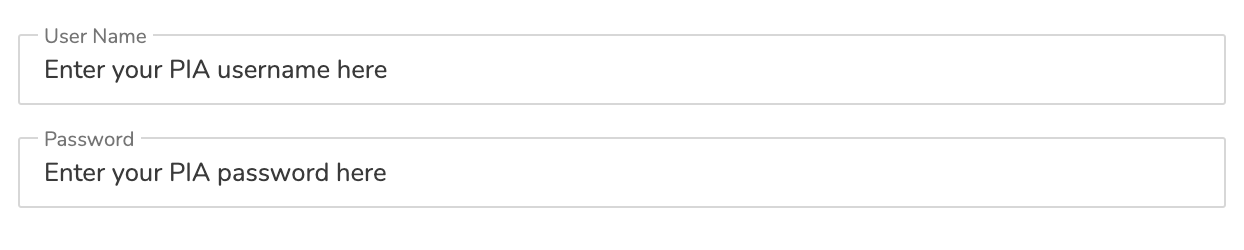
In the Username and Password field enter the PIA Username and Password that you logged in with.

Roqos PIA enter username and password

Select a PIA server

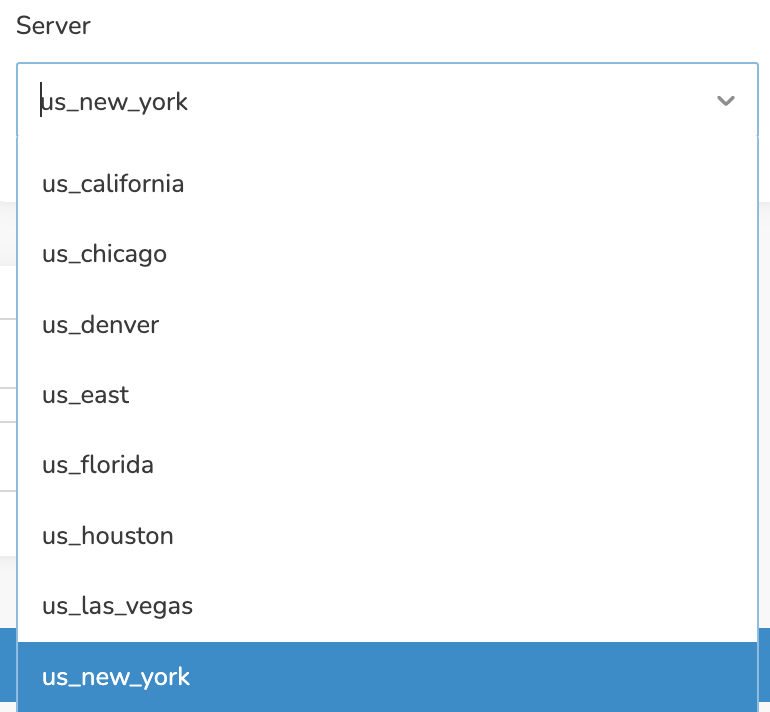
Click the Server dropdown and type in or scroll to your preferred server location.

Roqos PIA server select

Click the Save button.

Roqos PIA Save Settings

Connect to PIA

Once you click Save you will be returned to the VPN OUT menu.

Click the Connect button to start your PIA connection. Please be patient as the router connects your entire network through VPN.

Roqos VPN Connect

Assign devices to connect to VPN

By default there are no devices assigned to the VPN tunnel. Click Included Devices. From this page you can choose if all devices should connect to PIA or only certain devices.

Roqos PIA Included Devices

From the dropdown select Include all devices if you want every device that connects to the Roqos to connect to PIA. Then click Save.

Roqos VPN Include All Devices

If you only want specific devices to connect to PIA while others bypass the VPN connection select Include selected devices from the dropdown and then toggle the sliders for the devices you want connected to VPN. Click Save.

Roqos VPN Include Selected devices

Verify a successful PIA connection

Make sure you are connected to the Roqos network via WiFi or ethernet connection on your device.

Visit PIA’s IP Check to verify your new IP Address and virtual location.

You should see Connected at the top of the page underneath Private_Internet_Access.

Connect to a different PIA server

To change your server click Disconnect on the VPN OUT page then return to the Connect To section to select a new server from the Server dropdown and click Save. Now click Connect once again on the VPN Out page.

Disconnect from PIA

To disconnect from PIA click the Disconnect button.

TROUBLESHOOTING

Still having issues? Visit the FR Privacy App Troubleshooting section.

Troubleshoot Here

Private Internet Access VPN Setup Guide for Privacy Hero

TeamFlashRouters · Apr 3, 2023 ·

Your Privacy Hero router uses Cloud Based router management which means you can access the router settings from anywhere on any device that has an internet connection. You can follow these steps while connected to your phone, other Wi-Fi network, or the Privacy Hero network

Private Internet Access (PIA) Wireguard Setup for Privacy Hero (recommended)

1. From any device that has a browser such as a computer, smartphone, or tablet visit app.privacyhero.com.

App.PrivacyHero.com

2. Enter your Privacy Hero account email and password. Click Login.

Privacy Hero Access Settings

3. Click the VPN symbol.

Privacy Hero Setup VPN

4. Click the Change button and select Private Internet Access from the dropdown.

Privacy Hero Change VPN Providers

5. Enter your correct PIA account login username and password and click Save.

Privacy Hero select Private Internet Access
Privacy Hero Private Internet Access enter login

6. Click Save if you want to automatically connect to the ideal server location as recommended by Private Internet Access.

Or, connect to a specific server location click Advanced Options and then type in the PIA server name you would like to use. (All server names are noted below).

Then click Save.

Privacy Hero Private Internet Access enter VPN location

North America

bahamas.privacy.network
ca-ontario.privacy.network
ca-toronto.privacy.network
ca-vancouver.privacy.network
ca-montreal.privacy.network
greenland.privacy.network
gt-guatemala-pf.privacy.network
mexico.privacy.network
panama.privacy.network
sanjose.privacy.network
us-alabama-pf.privacy.network
us-alaska-pf.privacy.network
us-arkansas-pf.privacy.network
us-atlanta.privacy.network
us-california.privacy.network
us-chicago.privacy.network
us-connecticut-pf.privacy.network
us-denver.privacy.network
us-florida.privacy.network
us-houston.privacy.network
us-idaho-pf.privacy.network
us-indiana-pf.privacy.network
us-iowa-pf.privacy.network
us-kansas-pf.privacy.network
us-kentucky-pf.privacy.network
us-lasvegas.privacy.network
us-louisiana-pf.privacy.network
us-maine-pf.privacy.network
us-massachusetts-pf.privacy.network
us-michigan-pf.privacy.network
us-minnesota-pf.privacy.network
us-mississippi-pf.privacy.network
us-missouri-pf.privacy.network
us-montana-pf.privacy.network
us-nebraska-pf.privacy.network
us-new-hampshire-pf.privacy.network
us-new-mexico-pf.privacy.network
us-newyorkcity.privacy.network
us-north-carolina-pf.privacy.network
us-north-dakota-pf.privacy.network
us-ohio-pf.privacy.network
us-oklahoma-pf.privacy.network
us-oregon-pf.privacy.network
us-pennsylvania-pf.privacy.network
us-rhode-island-pf.privacy.network
us-seattle.privacy.network
us-siliconvalley.privacy.network
us-south-carolina-pf.privacy.network
us-south-dakota-pf.privacy.network
us-texas.privacy.network
us-tennessee-pf.privacy.network
us-vermont-pf.privacy.network
us-virginia-pf.privacy.network
us-washingtondc.privacy.network
us-west-virginia-pf.privacy.network
us-wisconsin-pf.privacy.network
us-wyoming-pf.privacy.network
us3.privacy.network
us-baltimore.privacy.network
us-honolulu.privacy.network
us-newjersey.privacy.network
us-saltlakecity.privacy.network
us-streaming-2.privacy.network
us-streaming.privacy.network
us-wilmington.privacy.network

South America

ar.privacy.network
bo-bolivia-pf.privacy.network
bogota.privacy.network
br.privacy.network
ec-ecuador-pf.privacy.network
pe-peru-pf.privacy.network
santiago.privacy.network
uy-uruguay-pf.privacy.network
venezuela.privacy.network

Europe

al.privacy.network
ad.privacy.network
austria.privacy.network
brussels.privacy.network
ba.privacy.network
sofia.privacy.network
zagreb.privacy.network
czech.privacy.network
de-berlin.privacy.network
de-frankfurt.privacy.network
denmark.privacy.network
denmark-2.privacy.network
spain.privacy.network
es-valencia.privacy.network
ee.privacy.network
fi.privacy.network
fi-2.privacy.network
france.privacy.network
gr.privacy.network
hungary.privacy.network
italy.privacy.network
italy-2.privacy.network
is.privacy.network
ireland.privacy.network
man.privacy.network
lv.privacy.network
liechtenstein.privacy.network
lt.privacy.network
lu.privacy.network
malta.privacy.network
md.privacy.network
monaco.privacy.network
montenegro.privacy.network
nl-amsterdam.privacy.network
mk.privacy.network
no.privacy.network
poland.privacy.network
pt.privacy.network
ro.privacy.network
sweden.privacy.network
sweden-2.privacy.network
rs.privacy.network
sk.privacy.network
slovenia.privacy.network
swiss.privacy.network
tr.privacy.network
uk-london.privacy.network
uk-manchester.privacy.network
uk-southampton.privacy.network
uk-2.privacy.network
ua.privacy.network

Asia

ae.privacy.network
bangladesh.privacy.network
cambodia.privacy.network
china.privacy.network
cyprus.privacy.network
georgia.privacy.network
hk.privacy.network
in.privacy.network
israel.privacy.network
jakarta.privacy.network
japan.privacy.network
japan-2.privacy.network
kazakhstan.privacy.network
kr-south-korea-pf.privacy.network
kualalumpur.privacy.network
macau.privacy.network
mongolia.privacy.network
np-nepal-pf.privacy.network
philippines.privacy.network
qatar.privacy.network
saudiarabia.privacy.network
sg.privacy.network
srilanka.privacy.network
taiwan.privacy.network
vietnam.privacy.network
yerevan.privacy.network

Oceania

au-adelaide-pf.privacy.network
au-australia-so.privacy.network
au-brisbane-pf.privacy.network
aus-melbourne.privacy.network
aus-perth.privacy.network
au-sydney.privacy.network
nz.privacy.network

Africa

dz.privacy.network
egypt.privacy.network
morocco.privacy.network
nigeria.privacy.network
za.privacy.network

8. Your Privacy Hero settings should now show a Connected message, indicating you have successfully signed in to your PIA VPN server!

Private Internet Access (PIA) OpenVPN Setup for Privacy Hero

1. From any device that has a browser such as a computer, smartphone, or tablet visit app.privacyhero.com.

App.PrivacyHero.com

2. Enter your Privacy Hero account email and password. Click Login.

Privacy Hero Access Settings

3. Click the VPN symbol.

Privacy Hero Setup VPN

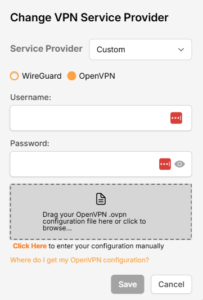
4. Click the Change button and select Custom from the dropdown and choose the OpenVPN option.

5. Enter your PIA Account login as the Username and Password.

6. Now log in to your PIA Account page.

7. Go to the Downloads section.

8. Scroll down to the bottom of the page, and go to OpenVPN Configuration Generator.

9. Choose OpenVPN 2.4 or newer and Linux.

10. From the Select Port section, choose UDP/1198 AES-128-CBC for a faster connection or choose UDP/1197 AES-256-CBC for stronger security as shown in the image below then Click Generate to download the server configuration file.

11. Drag and drop or click to Upload the server file into the Custom box on your Privacy Hero settings page then click Save.

12. Your Privacy Hero settings should now show a Connected message, indicating you have successfully signed in to your PIA VPN server!

Privacy Hero’s cloud based router settings access makes it so you can change settings while not connected to the Privacy Hero network. Visit the Private Internet Access IP Check to verify your VPN IP address. If it has not changed be sure to double check that you are indeed connected to the Privacy Hero network.

Keep in mind that the VPN connection will not change the location of the streaming services listed in the Streaming Relocation area of the Privacy Hero settings.

TROUBLESHOOTING

Still having issues? Visit the VPN Troubleshooting section.

Troubleshoot Here

Netgear R6700V3 Nighthawk DD-WRT WiFi Settings

Dave · Jun 5, 2020 ·

Recommended DD-WRT WiFi settings for the Netgear R6700V3 are based on extensive testing by FlashRouters. Please note that optimal settings may vary depending on external factors such as home size, interference, and the types of WiFi devices you are connecting in your network.

Screenshots below provide a visual display of recommended WiFi and encryption settings exactly as they appear in the Netgear R6700V3 with DD-WRT firmware.

Navigate to the Wireless > Basic Settings to view or edit WiFi network settings.

2.4 GHz - Wireless-N

View R6700V3 DD-WRT FlashRouter 2.4GHz Settings

5.0 GHz - Wireless-AC

View R6700V3 DD-WRT FlashRouter 5GHz Settings

Additional DD-WRT WiFi Information

Intimidated by all the available WiFi settings? The DD-WRT website provides extensive information about all of the available configuration options in the firmware. Learn about everything from Wireless channels to channel widths and more in the Basic Wireless Settings – DD-WRT Wiki.

R6700V3 DD-WRT Wireless Security

The preset R6700V3 FlashRouter WiFi password is Wireless#[First 5 characters of your router MAC]. The router MAC can be found on the bottom of your router. For e.g. if your MAC is 1459C07E70A8 then your WiFi password is Wireless#1459C

Navigate to the Wireless > Wireless Security to view or edit WiFi passwords.

View R6700V3 DD-WRT FlashRouter WiFi Security Settings

TROUBLESHOOTING

Trouble with your Netgear R6700V3 WiFi? Visit the Wireless troubleshooting section.

Troubleshoot Here

Asus RT-AC68U B1 / C1 / AC1900 DD-WRT WiFi Settings

Dave · Feb 25, 2019 ·

Recommended DD-WRT WiFi settings for the Asus RT-AC68U are based on extensive testing by FlashRouters. Please note that optimal settings may vary depending on external factors such as home size, interference, and the types of WiFi devices you are connecting in your network.

Screenshots below provide a visual display of recommended WiFi and encryption settings exactly as they appear in the Asus RT-AC68U with DD-WRT firmware.

Navigate to the Wireless > Basic Settings to view or edit WiFi network settings.

2.4 GHz - Wireless-N

View AC68U DD-WRT FlashRouter 2.4GHz Settings

5.0 GHz - Wireless-AC

View AC68U DD-WRT FlashRouter 5GHz Settings

Additional DD-WRT WiFi Information

Intimidated by all the available WiFi settings? The DD-WRT website provides extensive information about all of the available configuration options in the firmware. Learn about everything from Wireless channels to channel widths and more in the Basic Wireless Settings – DD-WRT Wiki.

RT-AC68U DD-WRT Wireless Security

The preset RT-AC68U FlashRouter WiFi password is Wireless#[First 5 characters of your router MAC]. The router MAC can be found on the bottom of your router. For e.g. if your MAC is 1459C07E70A8 then your WiFi password is Wireless#1459C

Navigate to the Wireless > Wireless Security to view or edit WiFi passwords.

View AC68U DD-WRT FlashRouter WiFi Security Settings

TROUBLESHOOTING

Trouble with your Asus RT-AC68U WiFi? Visit the Wireless troubleshooting section.

Troubleshoot Here
« Previous Page
Next Page »

Primary Sidebar

  • Troubleshooting
  • Router Access
  • Internet Connection Issues
  • WiFi Connectivity
  • General VPN Issues
  • TeamViewer Remote Support
  • DD-WRT Firmware
  • Facebook
  • Twitter
  • Instagram
  • Pinterest
  • YouTube

Footer