• Skip to primary navigation
  • Skip to main content
  • Skip to primary sidebar
  • Skip to footer

FlashRouters Support Portal

Prioritizing Privacy

  • SETUP GUIDES
    • Privacy Hero Router Setup Guide
    • ASUS-WRT Router Setup Guide
    • AsusWRT-Merlin Router Setup Guide
    • DD-WRT Router Setup Guide
    • ExpressVPN Router Setup Guide
    • GL.iNet Router Setup Guide
    • Roqos Core Router Setup Guide
  • TROUBLESHOOTING
    • Router Access
    • WiFi Connectivity
    • Internet Connection Issues
    • General VPN Issues
    • DD-WRT Firmware
    • TeamViewer Remote Support
  • FAQs
    • Router FAQs
    • VPN FAQs
    • Warranty and Returns FAQs
    • Sales FAQs
    • Shipping FAQs
    • Service Plan FAQs
  • Show Search
Hide Search

Search Results for: tool box set sa

NordVPN Setup for GL.iNet Routers

TeamFlashRouters · May 29, 2023 ·

You can connect to NordVPN on your GL.iNet router using NordLynx, OpenVPN, or a Dedicated IP.

Quick Options

  • NordLynx: Choose your preferred city or country from NordVPN’s server list

  • OpenVPN: Choose your preferred city or country from NordVPN’s server list.

  • Dedicated IP (optional): Enter your unique configuration file if you’ve been assigned a static NordVPN IP.

:point_right: If you are not already a NordVPN user Sign Up Now.

NordVPN NordLynx Setup for GLiNet

1. Get your NordVPN Access Token for NordLynx connections. Log in to your NordVPN account and select NordVPN from your list of Services.
NordVPN Services Section

2. At the bottom of the page click Get Access token and you will receive a code via email. Enter this code to proceed.

NordVPN Access Token

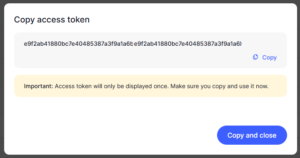
3. After you enter the email code select Generate new token and set it to Doesn’t expire. Copy this token.
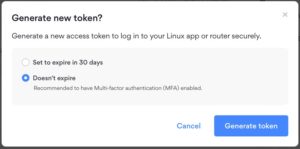
NordVPN Generate new token
NordVPN Copy Token

4. Login to GL.iNet firmware settings (usually 192.168.8.1) in a browser on any computer or smart device connected to the GL.iNet FlashRouter’s network.

View our guide for more instructions on how to access GL.iNet firmware settings.

5. Navigate to the VPN tab and select Wireguard Client then choose NordVPN. Enter your Token then click Save and Continue
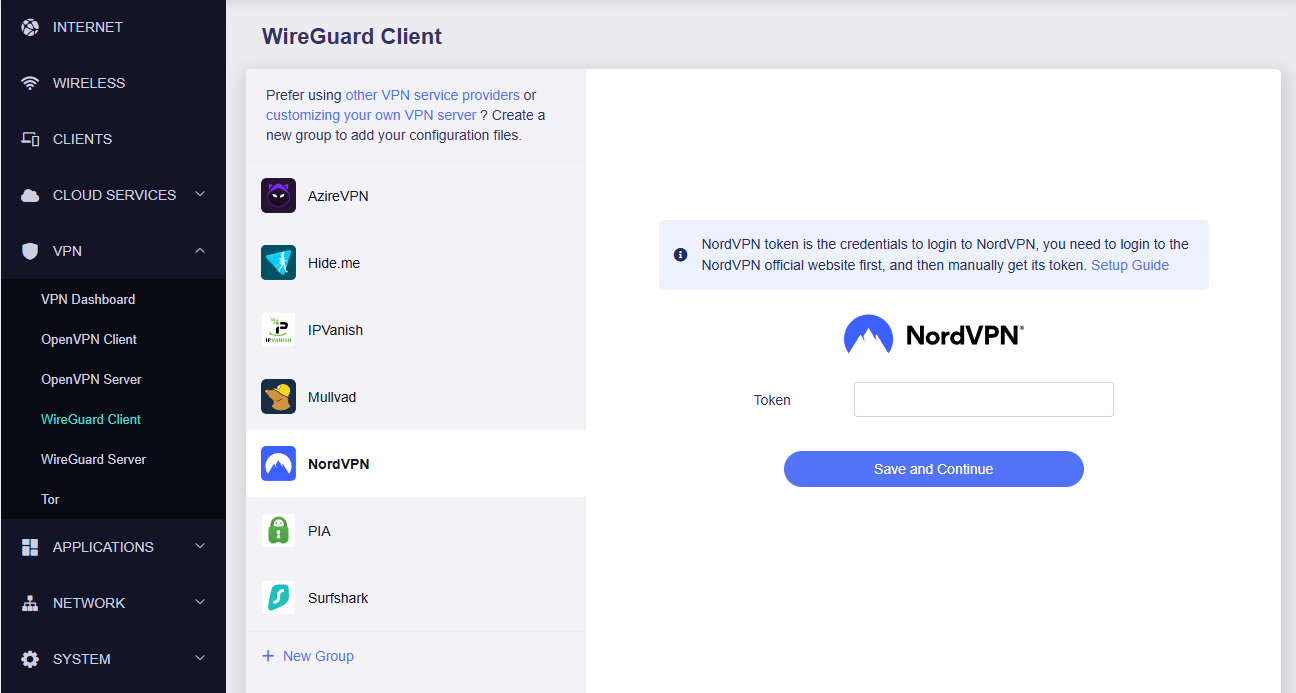
GLiNet NordVPN Wireguard

6. Select your preferred server locations, and click Apply.
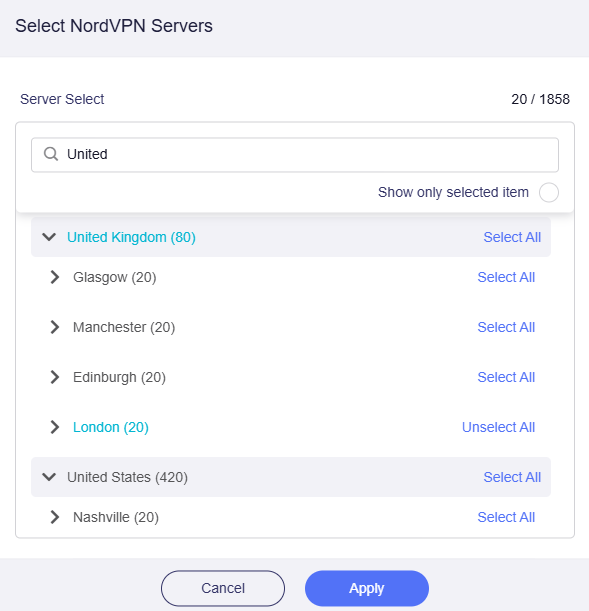
GLiNet Select NordLynx Servers

7. Start a connection by clicking the 3 dots (…) > Start next to your chosen server.
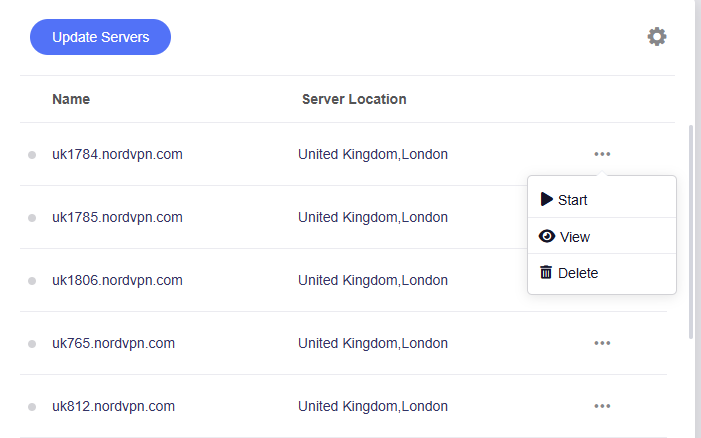
GLiNet NordLynx Start

8. A green dot confirms success. You can also switch between Global Mode or Policy Mode for routing in the VPN Dashboard.
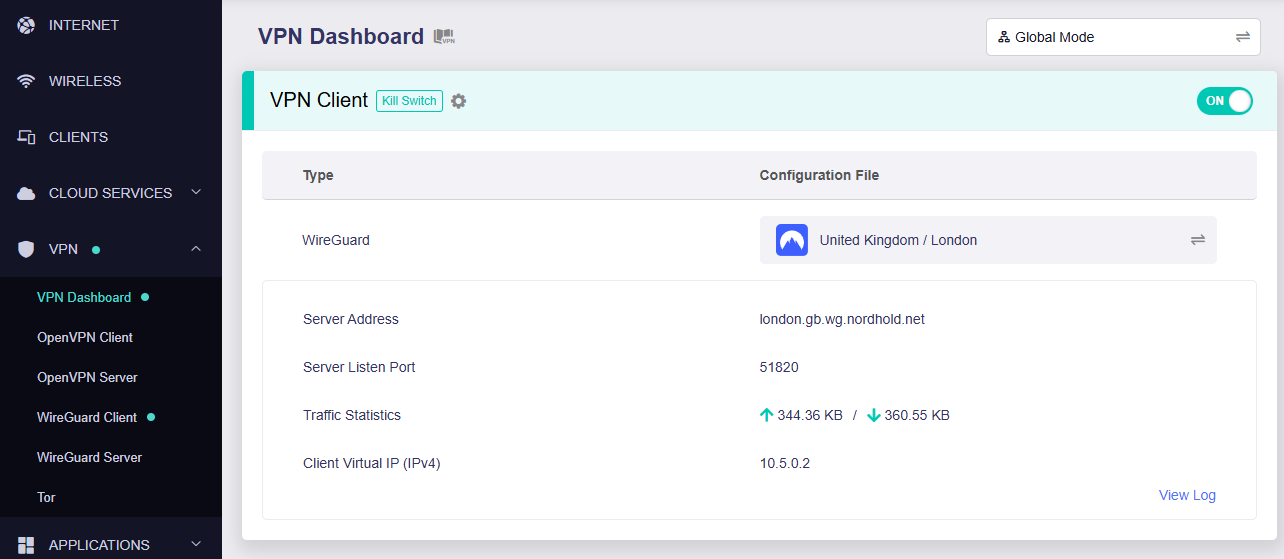
GLiNet NordLynx Connected

NordVPN OpenVPN Setup for GLiNet

1. Get your NordVPN manual service credentials for OpenVPN connections. Log in to your NordVPN account and select NordVPN from your list of Services.
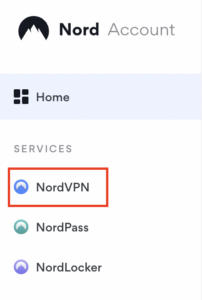
NordVPN Service

2. At the bottom of the page in the Manual Setup section click Setup NordVPN manually then under the Configuration section go to Service credentials. Click Verify email to receive a code via email and enter the code to view and copy your credentials.

NordVPN Manual OpenVPN
NordVPN Service Credentials

3. Login to GL.iNet firmware settings (usually 192.168.8.1) in a browser on any computer or smart device connected to the GL.iNet FlashRouter’s network.

View our guide for more instructions on how to access GL.iNet firmware settings.

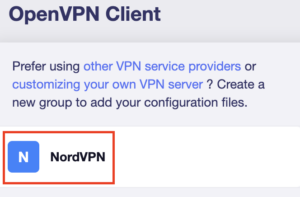
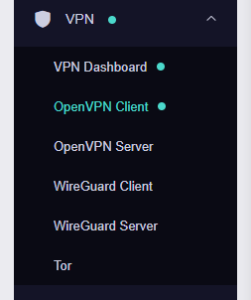
4. Navigate to the VPN tab and select OpenVPN Client.

GL.iNet VPN OpenVPN Client

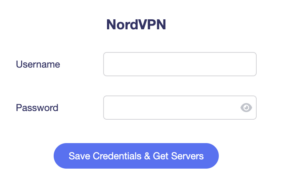
5. Select the NordVPN group, enter your manual credentials, then click Save Credentials & Get Servers.

GL.iNet NordVPN Group
GL.iNet NordVPN Login

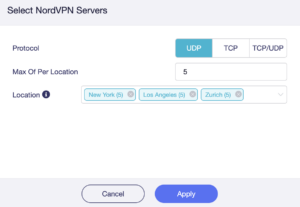
6. Choose UDP (recommended), select your preferred server locations, and click Apply.

GL.iNet NordVPN select servers

7. Start a connection by clicking the 3 dots (…) > Start next to your chosen server.

NordVPN GLiNet OpenVPN Start

8. A green dot confirms success. You can also switch between Global Mode or Policy Mode for routing in the VPN Dashboard.

GLiNet VPN Dashboard

NordVPN Dedicated IP Setup for GLiNet

1. Get your NordVPN manual service credentials for OpenVPN connections. Log in to your NordVPN account and select NordVPN from your list of Services.

NordVPN Service

2. At the bottom of the page in the Manual Setup section click Setup NordVPN manually then under the Configuration section go to Service credentials. Click Verify email to receive a code via email and enter the code to view and copy your credentials.
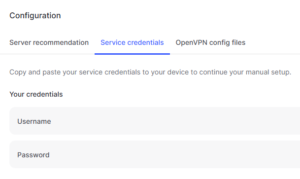
NordVPN Manual OpenVPN
NordVPN Service Credentials

3. Login to GL.iNet firmware settings (usually 192.168.8.1) in a browser on any computer or smart device connected to the GL.iNet FlashRouter’s network.

View our guide for more instructions on how to access GL.iNet firmware settings.

4. Navigate to the VPN tab and select OpenVPN Client.
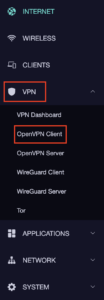
GLiNet VPN Dashboard

5. Download your Dedicated IP configuration file from the NordVPN website.

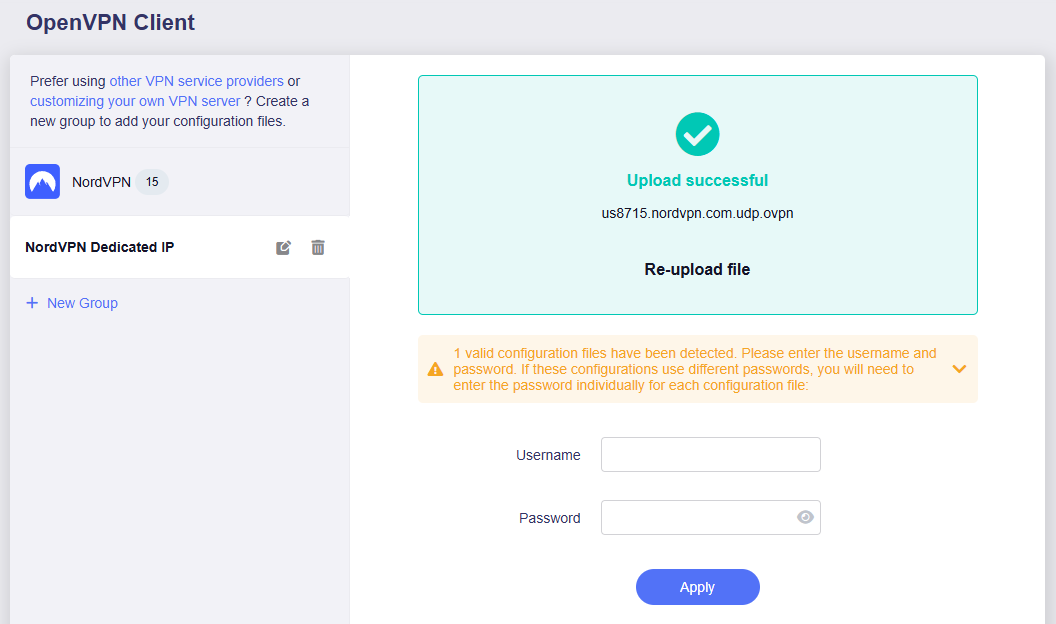
6. Click +New Group and name your NordVPN Dedicated IP connection, then upload the configuration file, enter your manual service credentials and click Apply.

GLiNet Dedicated IP Address Load

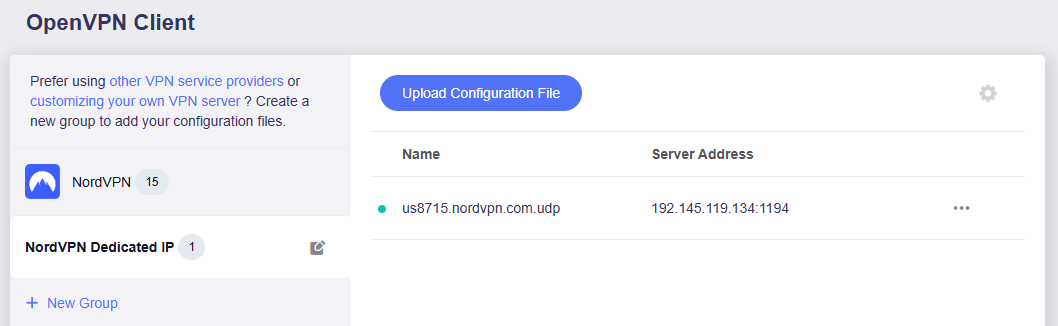
7. Start a connection by clicking the 3 dots (…) > Start next to your chosen server.
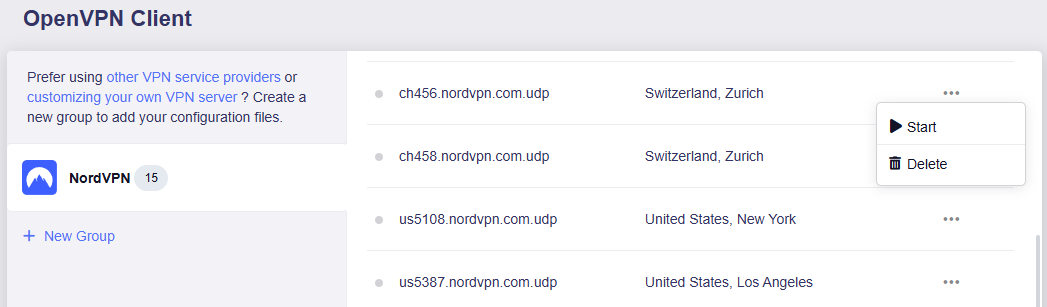
GLiNet Dedicated IP

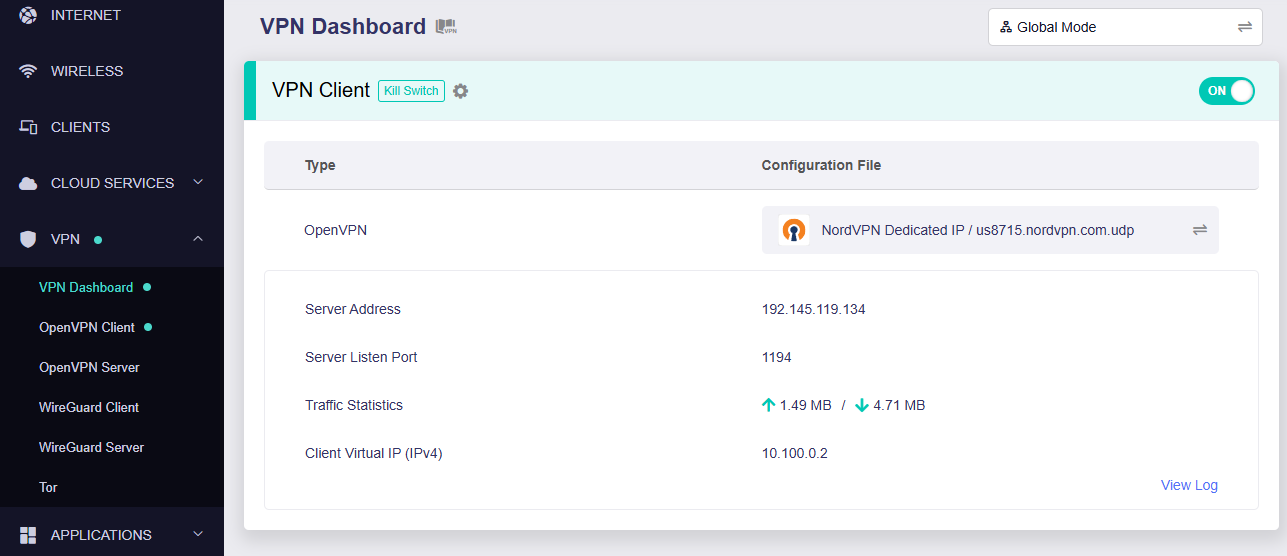
8. A green dot confirms success. You can also switch between Global Mode or Policy Mode for routing in the VPN Dashboard.
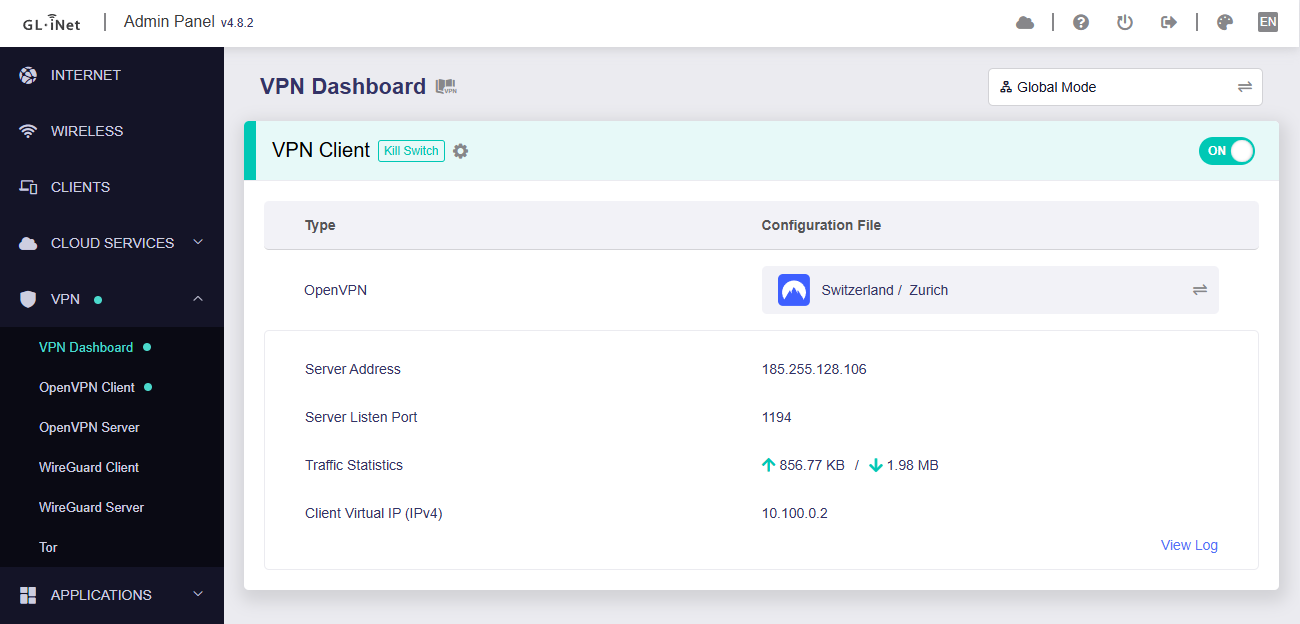
GLiNet Dedicated IP Dashboard
  1. You should now see information appear in the Server Address, Server Listen Port, Traffic Statistics, and Client Virtual IP areas.
  2. Visit NordVPN’s IP Check to verify your new IP address and virtual location.

In some cases you may notice that the location is not showing the same location as the server you have input in your router settings; this is because geo tracking tools are often tricked by VPN connections. As long as you see an IP address that is not the same as your normal Internet IP address then you are indeed connected to NordVPN.

🚫📱Do not run NordVPN apps on devices connected to your NordVPN router. Using the app at the same time as the router VPN may cause conflicts and connection issues.

Still having issues?

Feel free to submit a ticket and we will get back to you as soon as possible.

Cudy Access Router Settings

TeamFlashRouters · Feb 26, 2024 ·

Follow this guide to access the router settings of your Cudy FlashRouter.

1. Connect your computer, phone, or tablet to the Cudy router via wireless (FlashRouter24 / FlashRouter50) or via ethernet cable to one of the LAN ports on the router.

The FlashRouter WiFi password is printed on the sheet that came with the router and is set to Wireless#[First 5 characters of your router MAC]. The router MAC can be found on the bottom of your router if you cannot locate the sheet. For e.g. if your MAC is 1459C07E70A8 then your WiFi password is Wireless#1459C

Be sure to capitalize the W.

2. Once connected via wireless or ethernet on your device open your browser and go to 192.168.10.1

Cudy local IP access

3. Enter openwrt1 or openwrt as the admin password to access the Cudy firmware settings.

Cudy router access

TROUBLESHOOTING

Still having issues? Visit the VPN Troubleshooting section.

Troubleshoot Here

Cudy Change Wi-Fi name and password

TeamFlashRouters · Feb 26, 2024 ·

Follow this guide to change the Wi-Fi name and password on your Cudy FlashRouter.

1. Connect your computer, phone, or tablet to the Cudy router via wireless (FlashRouter24 / FlashRouter50) or via ethernet cable to one of the LAN ports on the router.

The FlashRouter WiFi password is printed on the sheet that came with the router and is set to Wireless#[First 5 characters of your router MAC]. The router MAC can be found on the bottom of your router if you cannot locate the sheet. For e.g. if your MAC is 1459C07E70A8 then your WiFi password is Wireless#1459C

Be sure to capitalize the W.

2. Once connected via wireless or ethernet on your device open your browser and go to 192.168.10.1

Cudy local IP access

3. Enter openwrt as the admin password to access the Cudy firmware settings.

Cudy router access

3. Click General Settings.

Cudy General Settings

4. Click Wireless.

Cudy Wireless tab

5. Change the SSID and Password fields for both 2.4GHz and 5GHz bands.The SSIDs should be unique and NOT a duplicate of an existing network. Click Save & Apply.

Cudy Change Wifi Name and password

TROUBLESHOOTING

Still having issues? Visit the VPN Troubleshooting section.

Troubleshoot Here

Flint/Slate GL.iNet PureVPN WireGuard Setup

TeamFlashRouters · May 30, 2023 ·

Preparing for PureVPN GL.iNet Setup

Obtain PureVPN WireGuard file

If you are not already an PureVPN user Sign Up Now.

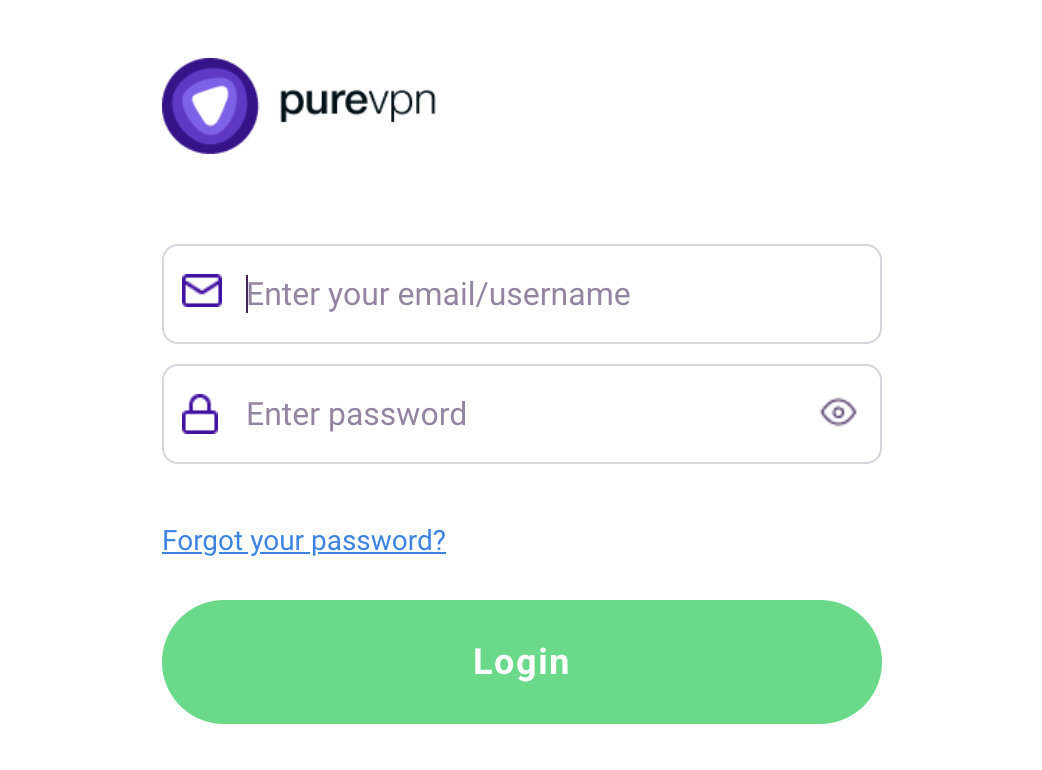
1. Log in to your account on the PureVPN website.

PureVPN Login

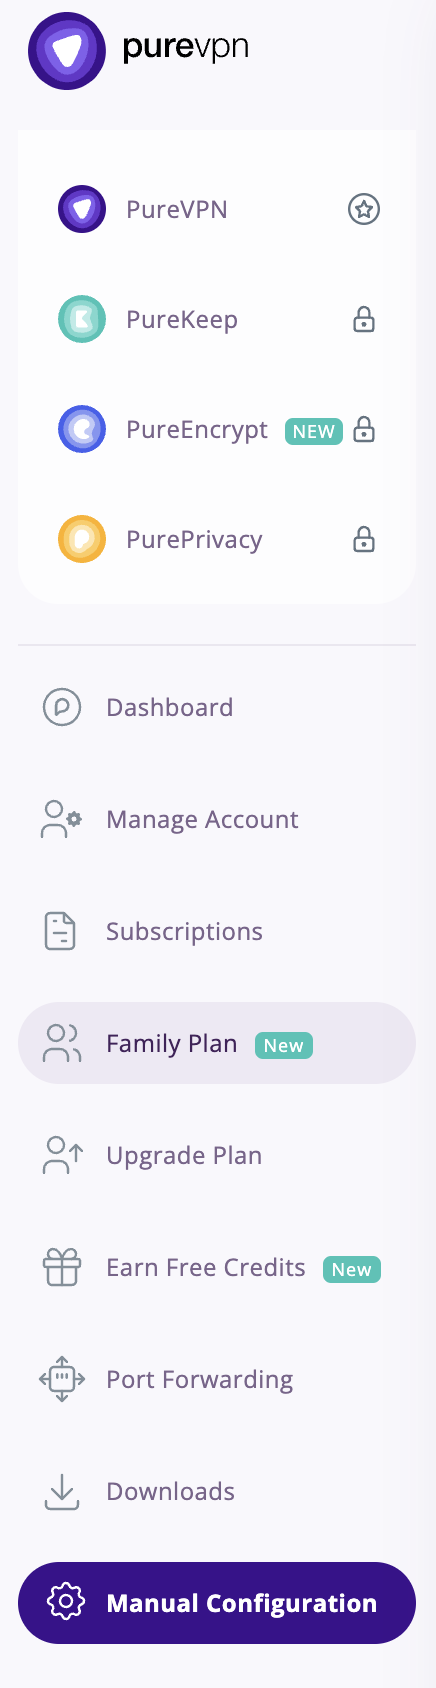
2. Select Manual Configuration.

PureVPN Manual Configuration

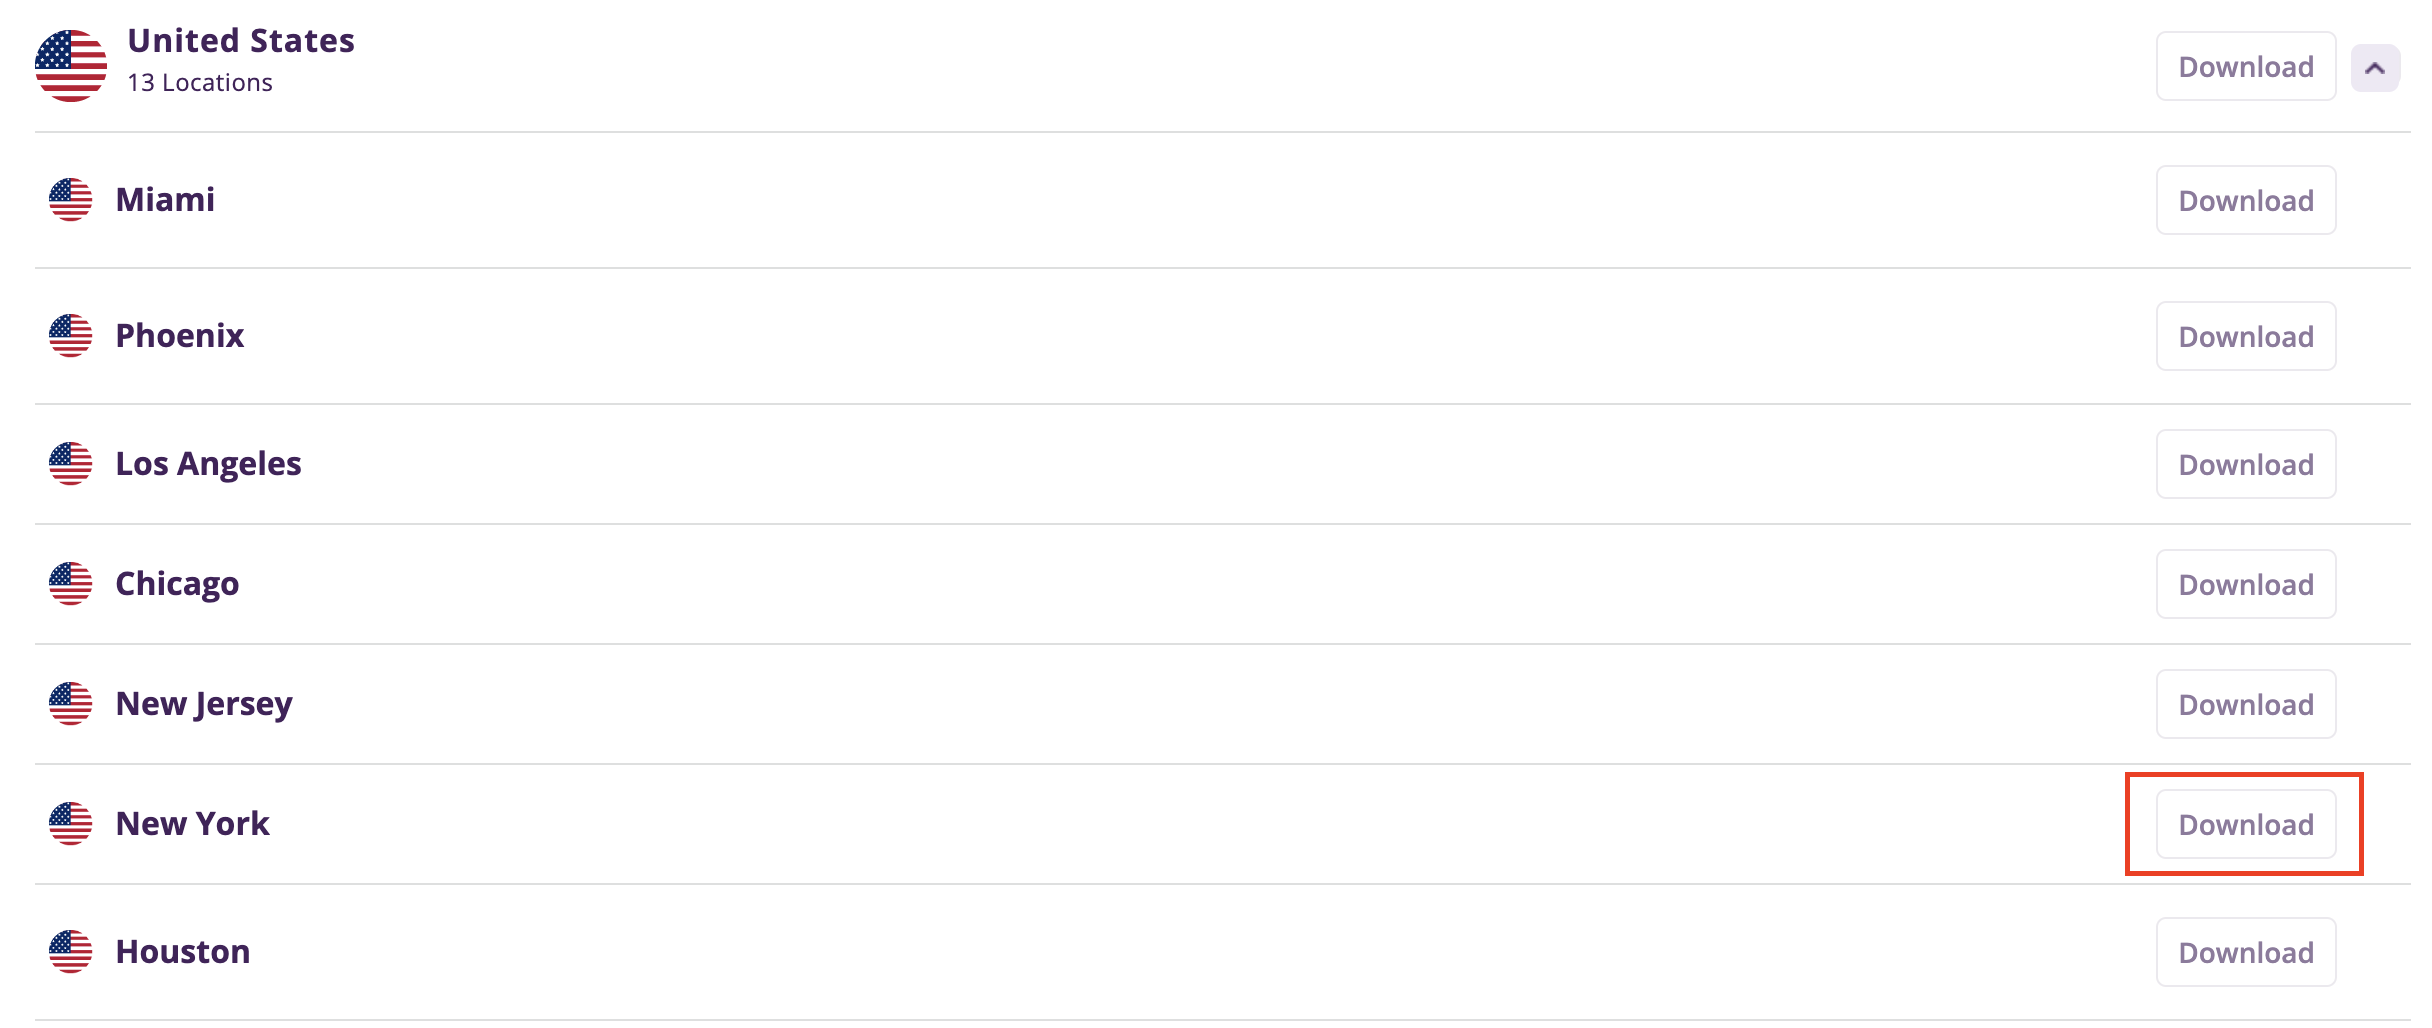
3. Select the Server Location you want to connect to and then click Download.

PureVPN select server location

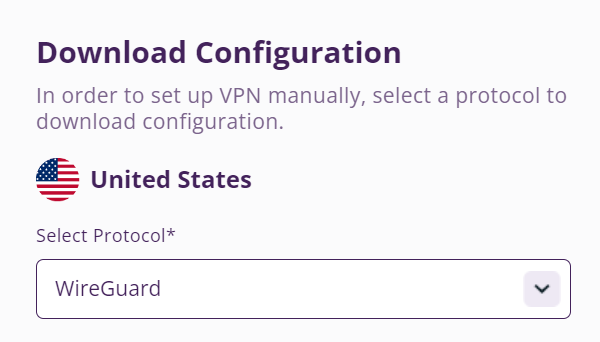
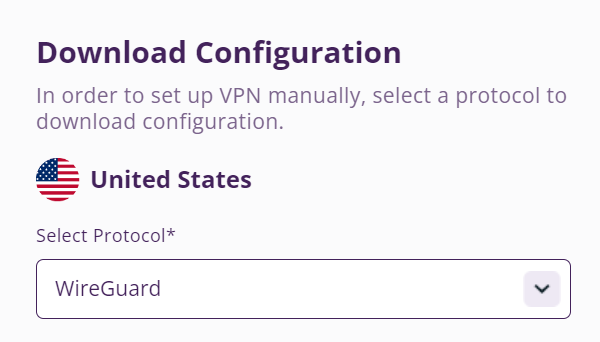
4. In the Select Protocol dropdown choose WireGuard.

PureVPN WireGuard

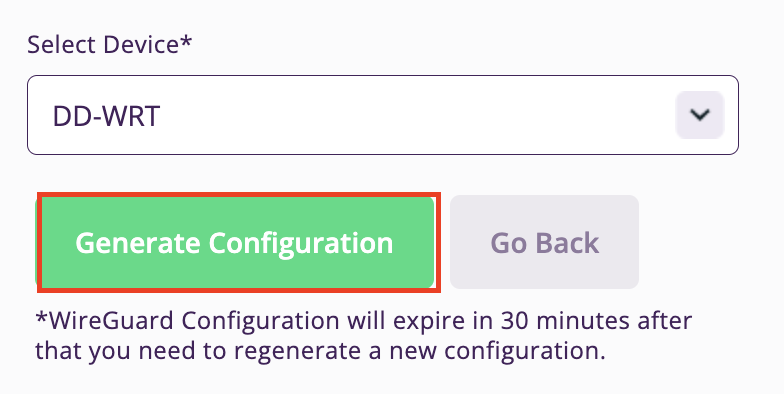
5. In the Select Device dropdown choose DD-WRT. Then click Generate Configuration. This will save a .conf file to your computer.

PureVPN Generate Config

GL.iNet Router Setup for PureVPN

Login to GL.iNet firmware settings in a browser on any computer or smart device connected to the GL.iNet FlashRouter’s network. For more instructions on how to access the firmware settings view our guide here.

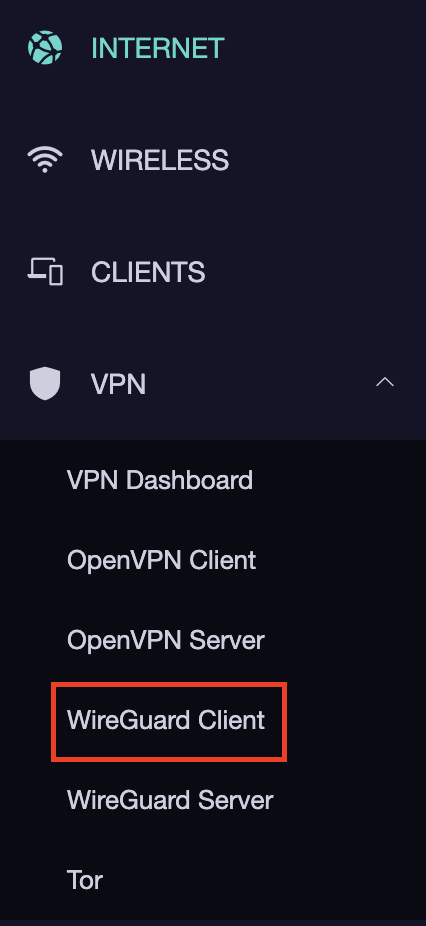
1. Navigate to the VPN tab and select WireGuard Client.

GL.iNet VPN WireGuard Client

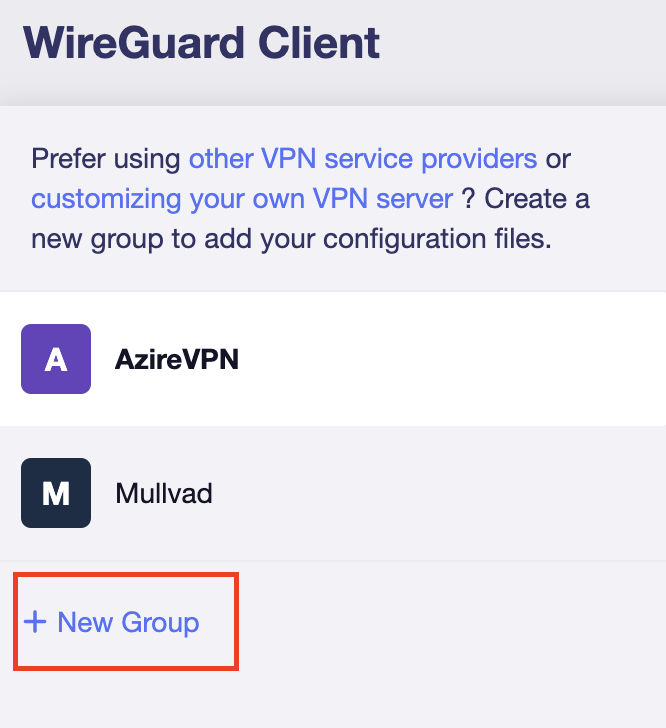
2. Click New Group.

GL.iNet WireGuard New Group

3. Enter PureVPN and click the check mark.

GL.iNet PureVPN group name

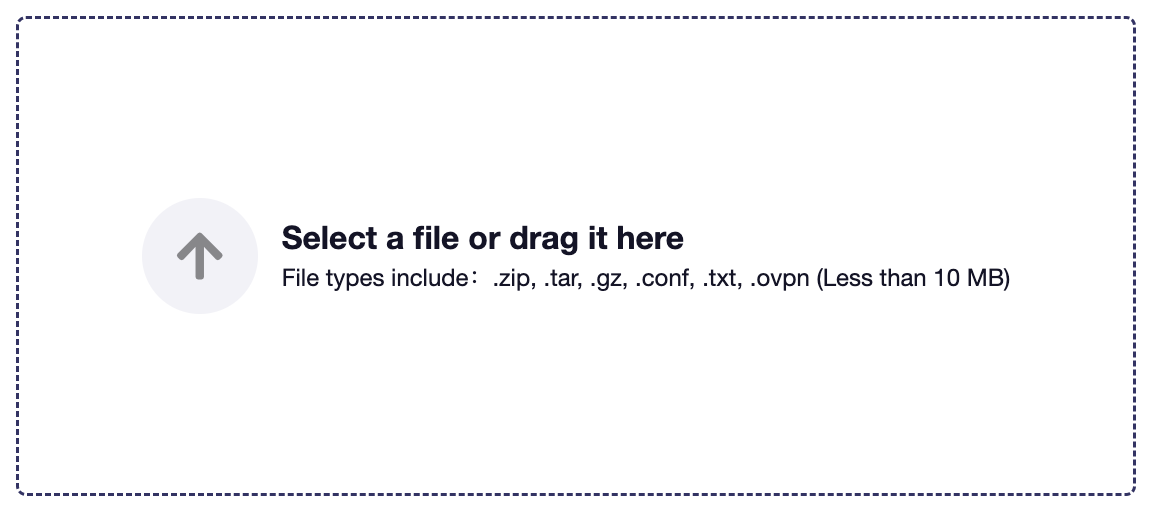
4. Select the .conf file you downloaded earlier and upload it here.

GL.iNet VPN select file

5. Click Apply.

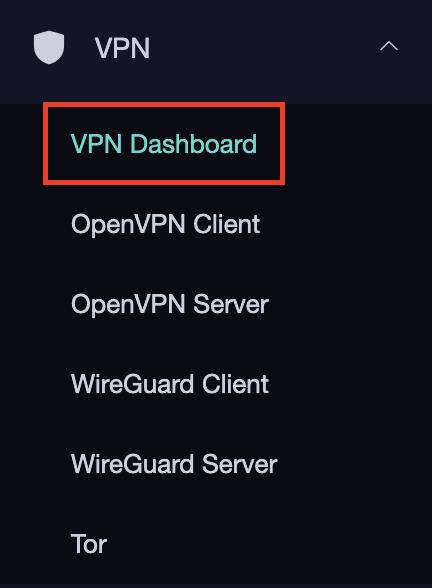
6. Select VPN Dashboard.

GL.iNet VPN Dashboard

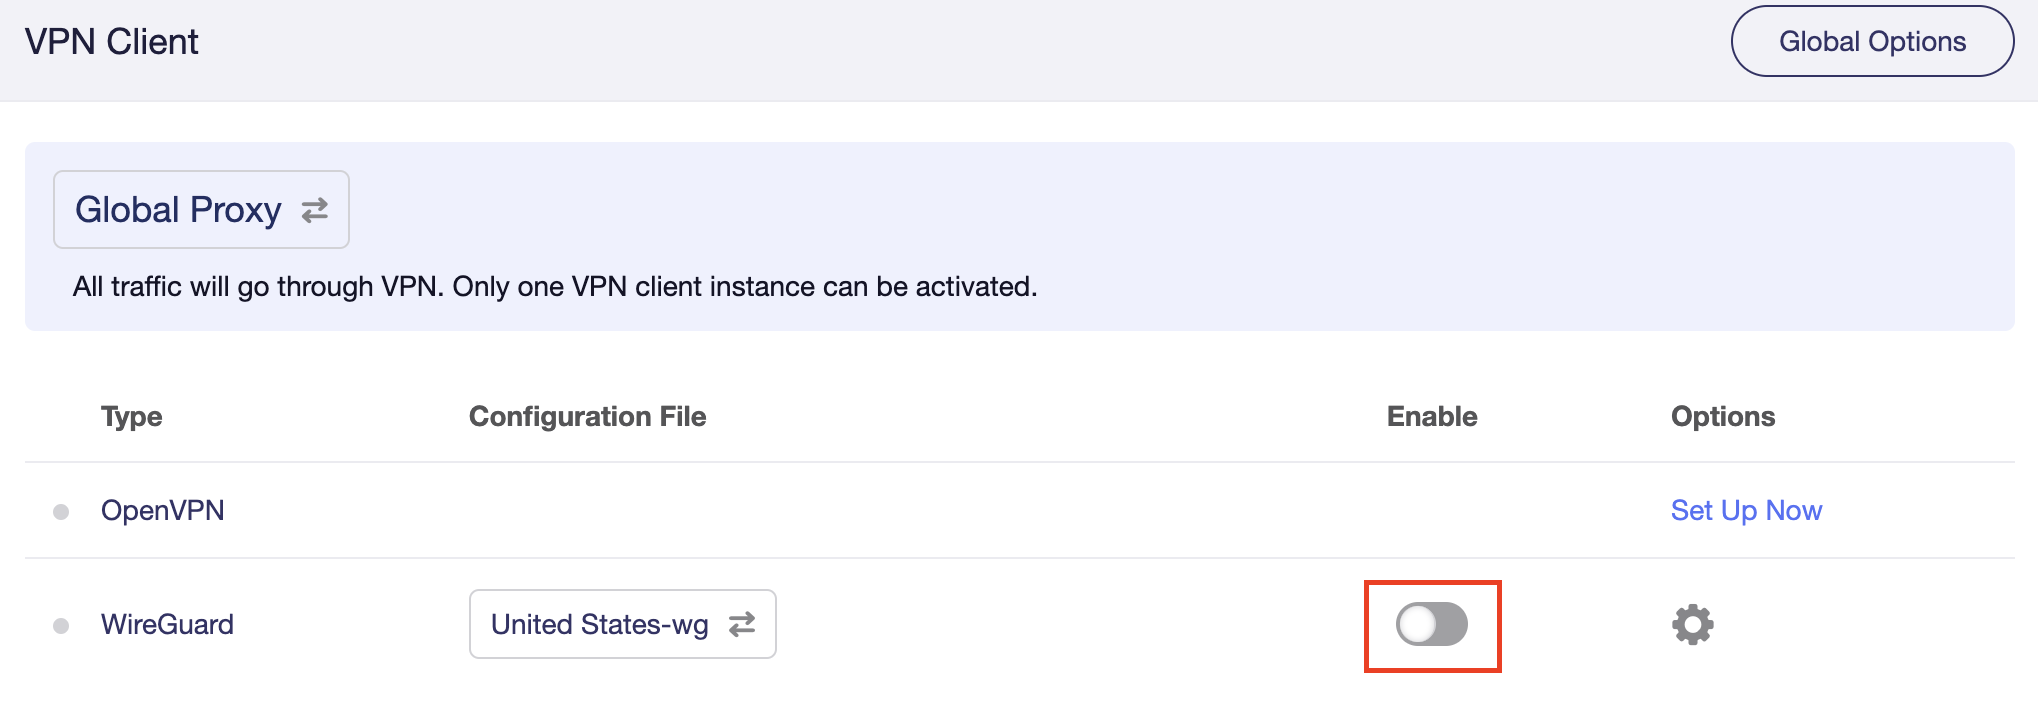
7. Set the Enable toggle to On to begin the PureVPN connection.

GL.iNet PureVPN WireGuard enable

Verify a successful PureVPN connection

  1. You should now see information appear in the Server Address, Server Listen Port, Traffic Statistics, and Client Virtual IP areas.
  2. Visit PureVPN’s IP Check to verify your new IP address and virtual location.

In some cases you may notice that the location is not showing the same location as the server you have input in your router settings; this is because geo tracking tools are often tricked by VPN connections. As long as you see an IP address that is not the same as your normal Internet IP address then you are indeed connected to PureVPN.

How to change the PureVPN server

Replicate the steps above with a new location.

TROUBLESHOOTING

Still having issues? Visit the VPN Troubleshooting section.

Troubleshoot Here

Roqos Core Router Setup Guide

Roqos Core Router Setup Guide

Quick Start Guide for Roqos Core Routers

Find setup guides, FAQs and troubleshooting tips for the FlashRouters Roqos Core Router.

Internet Setup

  • Roqos Core Quick Start Guide
  • How do I access my Roqos device settings?
  • Roqos Core Internet Setup and Activation

WiFi Setup

  • Setting up a Guest WiFi Network on Roqos
  • Change WiFi name and password on Roqos

VPN Setup

  • NordVPN Setup on Roqos
  • PrivateInternetAccess (PIA) Setup on Roqos
  • ExpressVPN Setup on Roqos
  • Roqos VPN Connected, but my device IP is unchanged

Roqos Core Features

  • Set a Static IP for your connected devices on Roqos
  • VPN Kill Switch on Roqos
  • Managing User Profiles on Roqos
  • Cybersecurity and Intrusion Prevention on Roqos
  • Block Websites by Country on Roqos
  • Ad blocking on Roqos
  • Parental Controls on Roqos
  • Wireless Repeater – WiFi as WAN on Roqos
  • What do the lights on my Roqos Core mean?

Search Support Articles

Troubleshooting

  • Roqos VPN Connected, but my device IP is unchanged
  • How do I access my Roqos device settings?
  • What do the lights on my Roqos Core mean?

More Ways to Get Help

GET IN TOUCH

BUY SUPPORT
BROWSE FAQs

ProtonVPN Merlin WireGuard Setup

TeamFlashRouters · Mar 30, 2023 ·

Preparing for ProtonVPN Merlin Setup

Download your ProtonVPN .conf file

If you are not already an ProtonVPN user Sign Up Now.

1. Log in to your account on the ProtonVPN website.

ProtonVPN Account Sign in

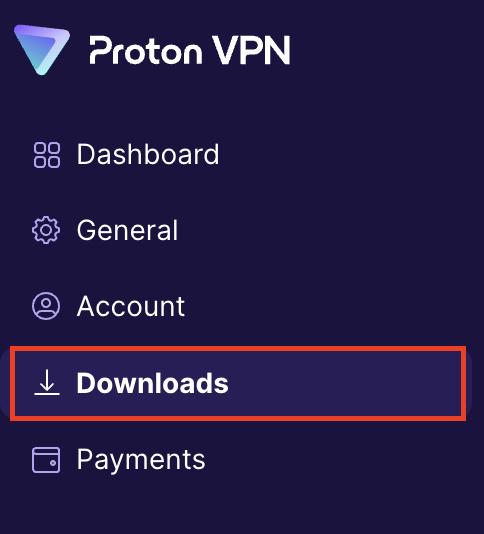
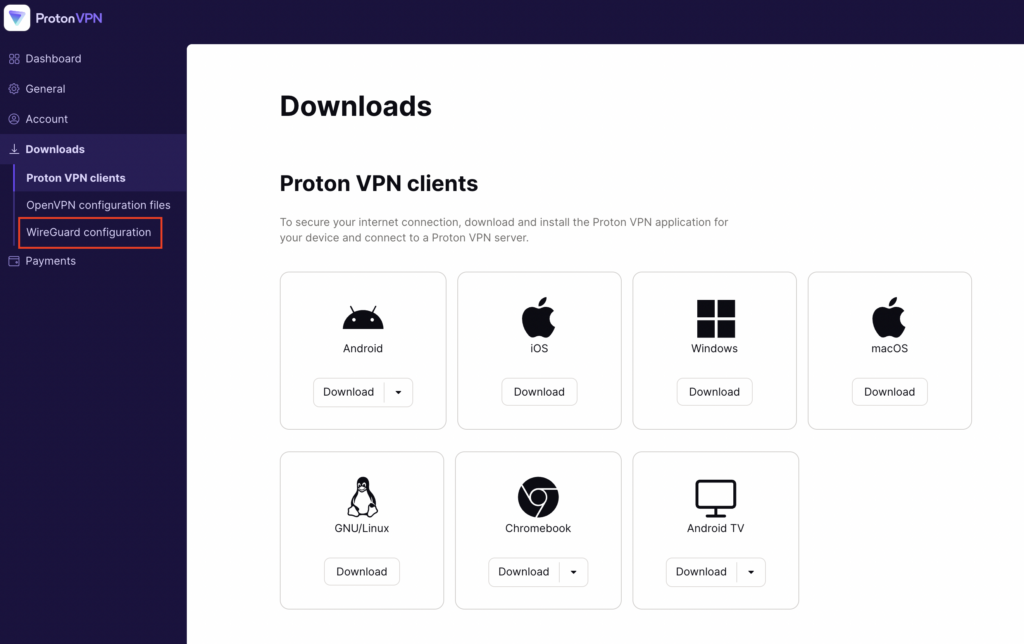
2. Click Downloads.

ProtonVPN Downloads

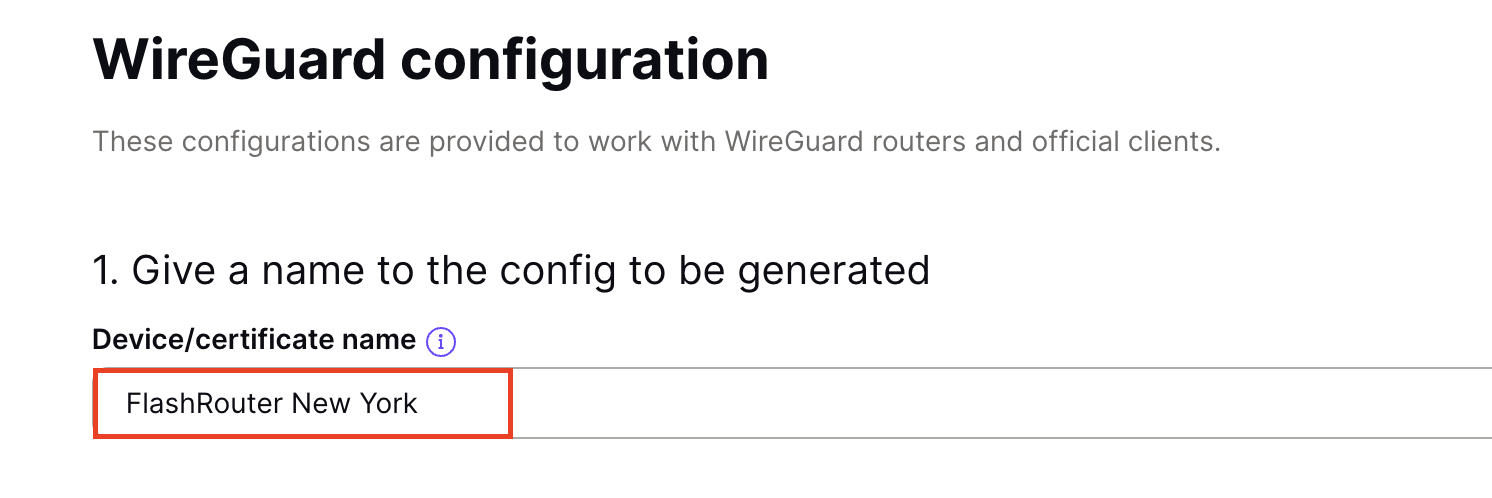
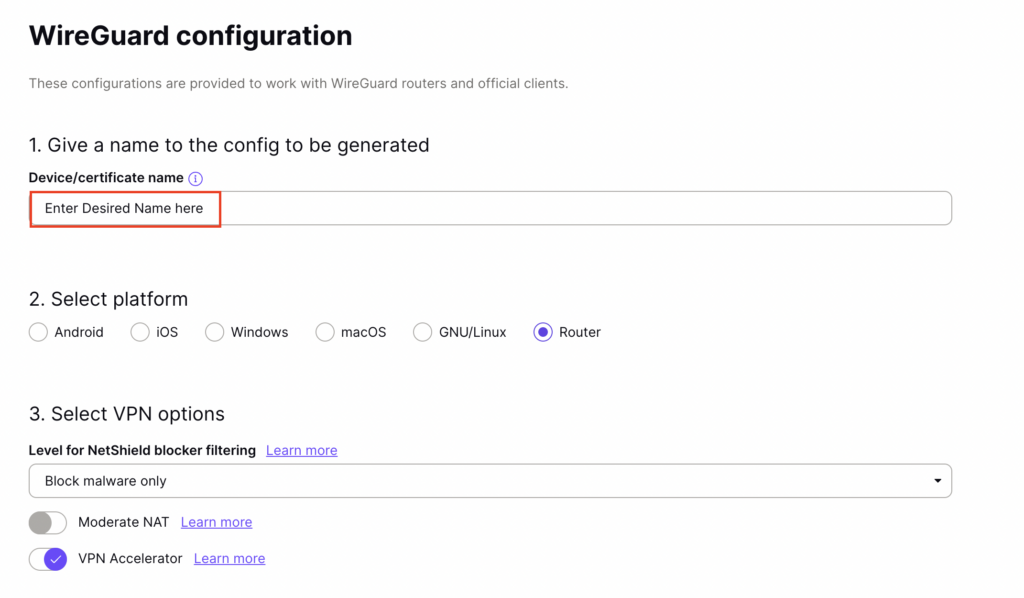
3. Scroll down to WireGuard configuration and name the device FlashRouter.

ProtonVPN WireGuard Configuration Name

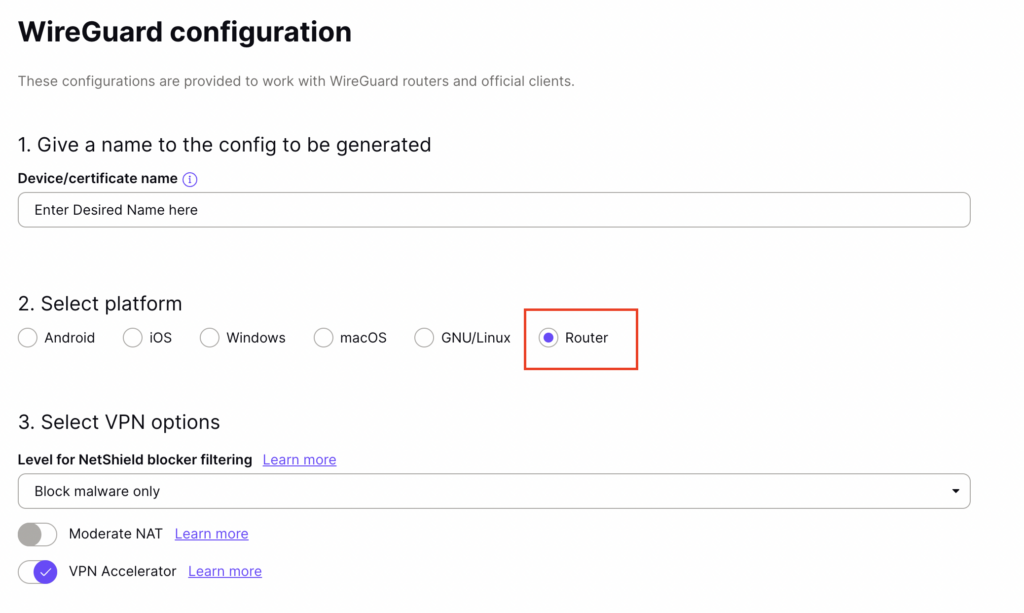
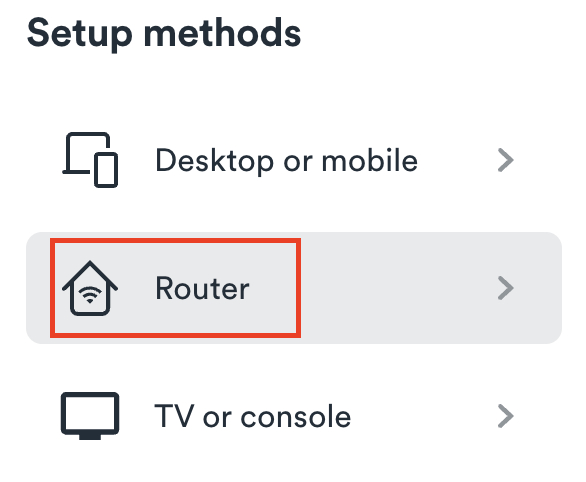
4. Select Router as the platform.

ProtonVPN WireGuard select Platform

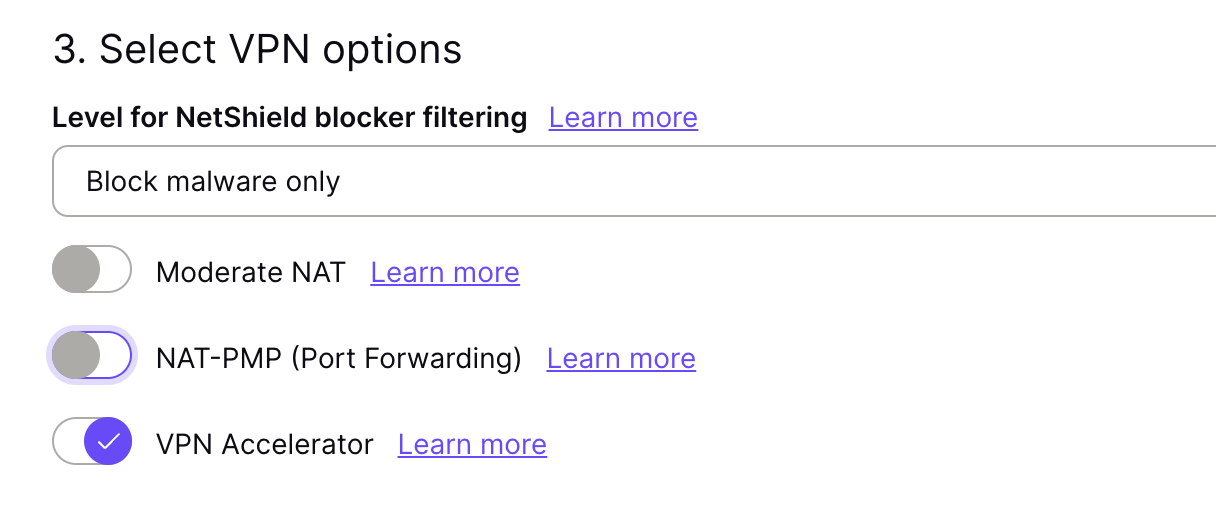
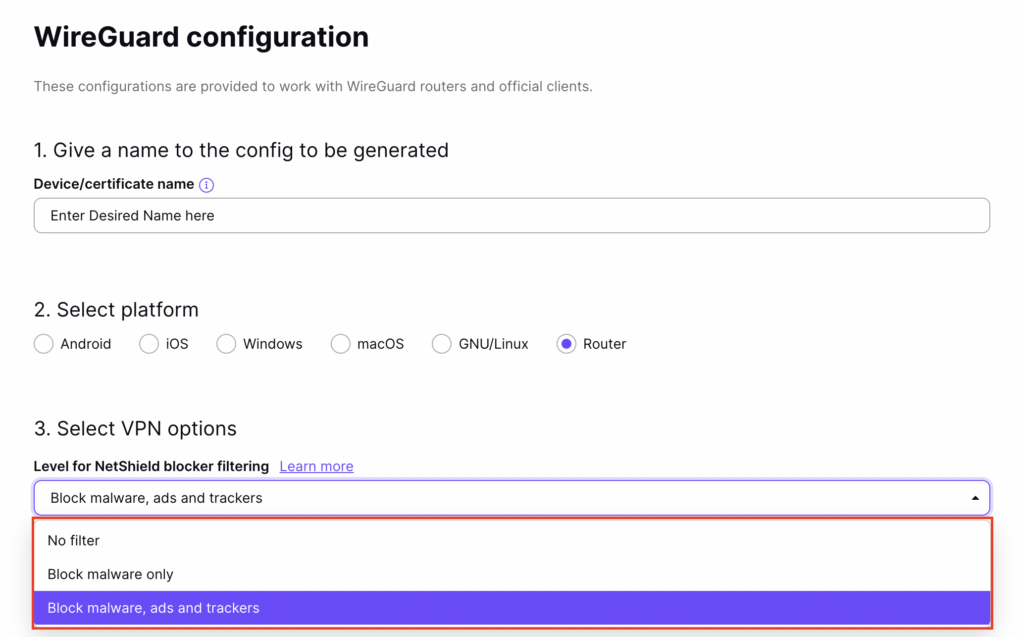
5. Select the VPN options that best fit your needs. We typically use the settings as seen in the screenshot here if you are unsure.

ProtonVPN WireGuard VPN options

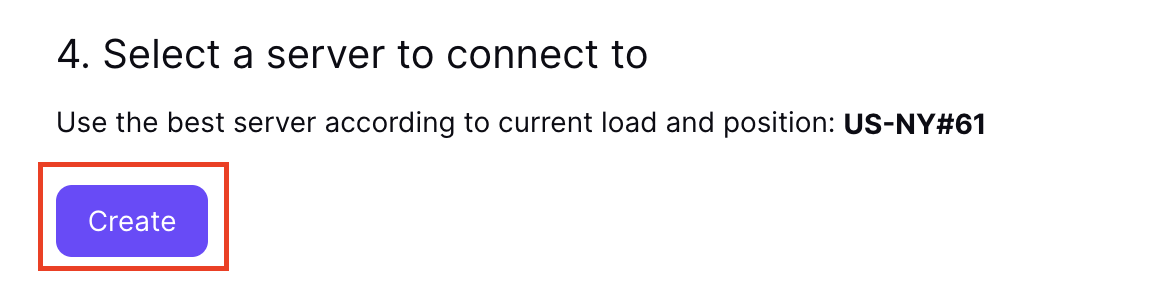
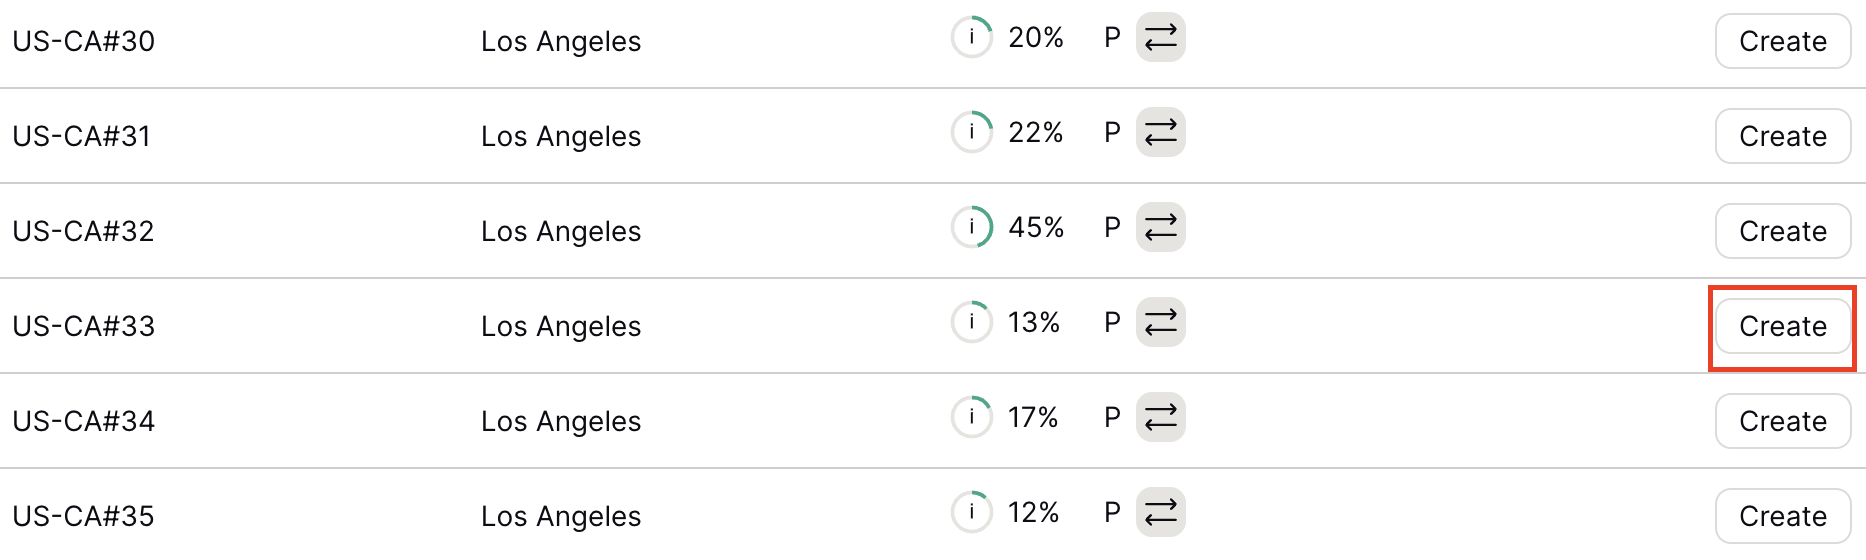
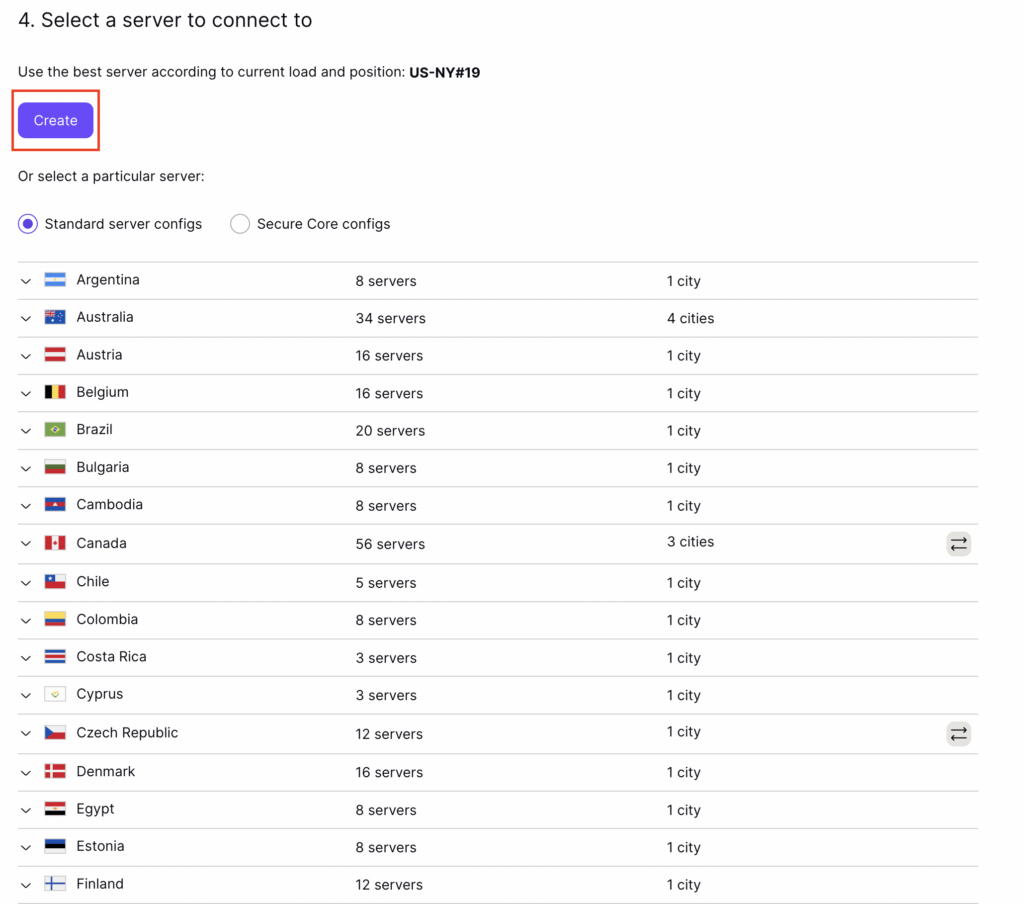
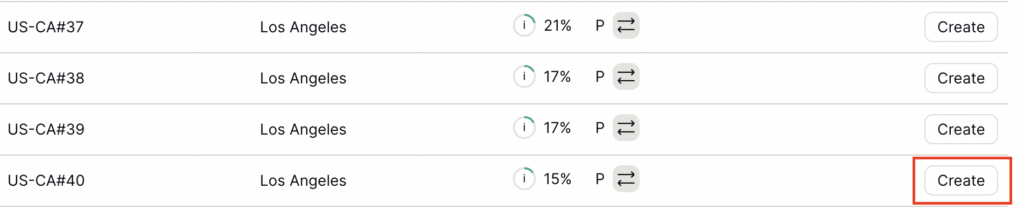
6. Next select the server that you would like to connect to and click Create. At the top of the page you’ll see ProtonVPN’s recommended server which we recommend using unless you need to connect to a specific location.

If you need a specific server location find it in the list and click Create.

ProtonVPN WireGuard recommended server
ProtonVPN WireGuard specific server

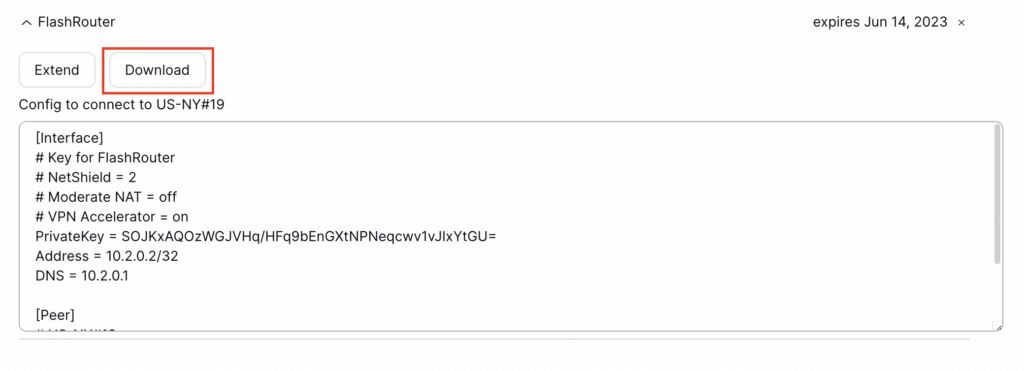
7. After clicking Create a new window will appear. Click Download to download the .conf file to your computer.

Merlin Router Setup for ProtonVPN

Login to Asus Merlin firmware settings in a browser on any computer or smart device connected to the Merlin FlashRouter’s network.

1. Navigate to the VPN tab.

Merlin VPN Tab

2. Navigate to the VPN Client tab.

Merlin VPN Client Tab

3. Select WireGuard as the VPN Protocol.

Merlin VPN Client WireGuard

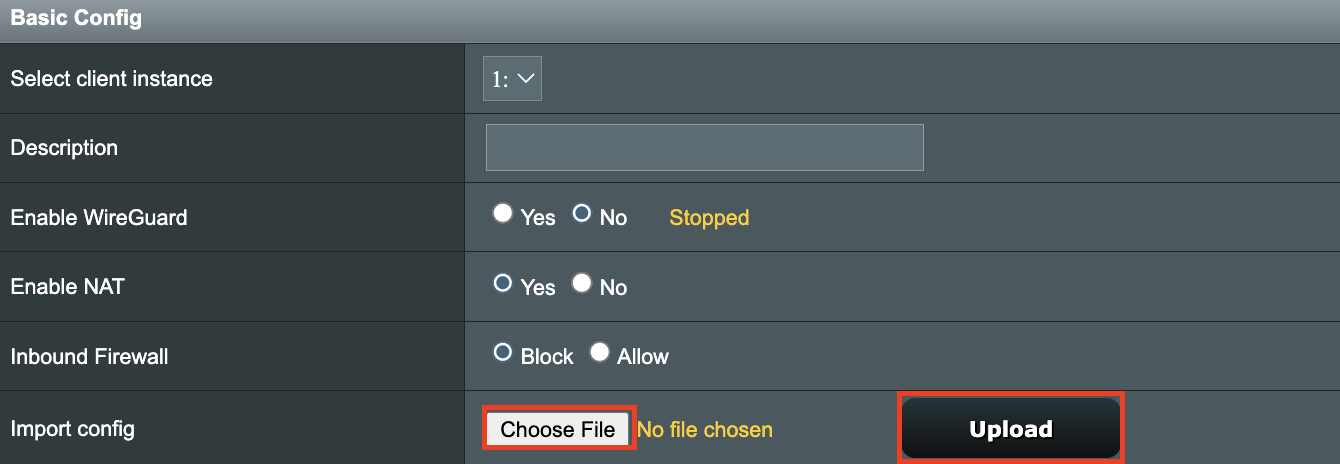
4. Click Choose file and select the .conf file you downloaded earlier. Then click Upload.

Merlin WireGuard Choose File Upload

5. In the Description field enter in the name you’d like to use for this WireGuard Client profile. We typically advise entering in the location here. Our example server was in US-NY#61 so I have entered in ProtonVPN NY-61.

Merlin WireGuard ProtonVPN Description

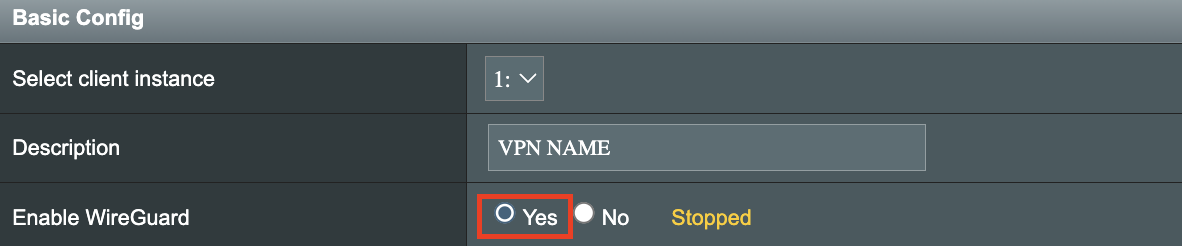
6. Set Enable WireGuard to Yes.

Merlin Enable WireGuard

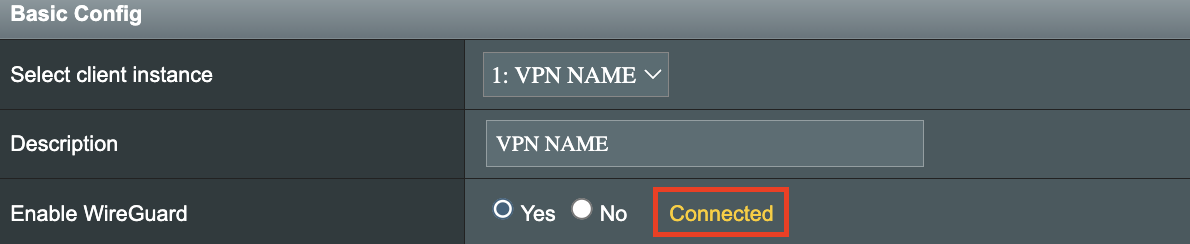
7. Click Apply at the bottom of the page and you should then see a Connected message appear.

Merlin WireGuard Connected

8. By default no devices are assigned to the new active WireGuard connection profile. Click the VPN Director tab to assign specific devices to the new WireGuard profile. Your IP will not be changed on your devices yet.

WireGuard select VPN Director

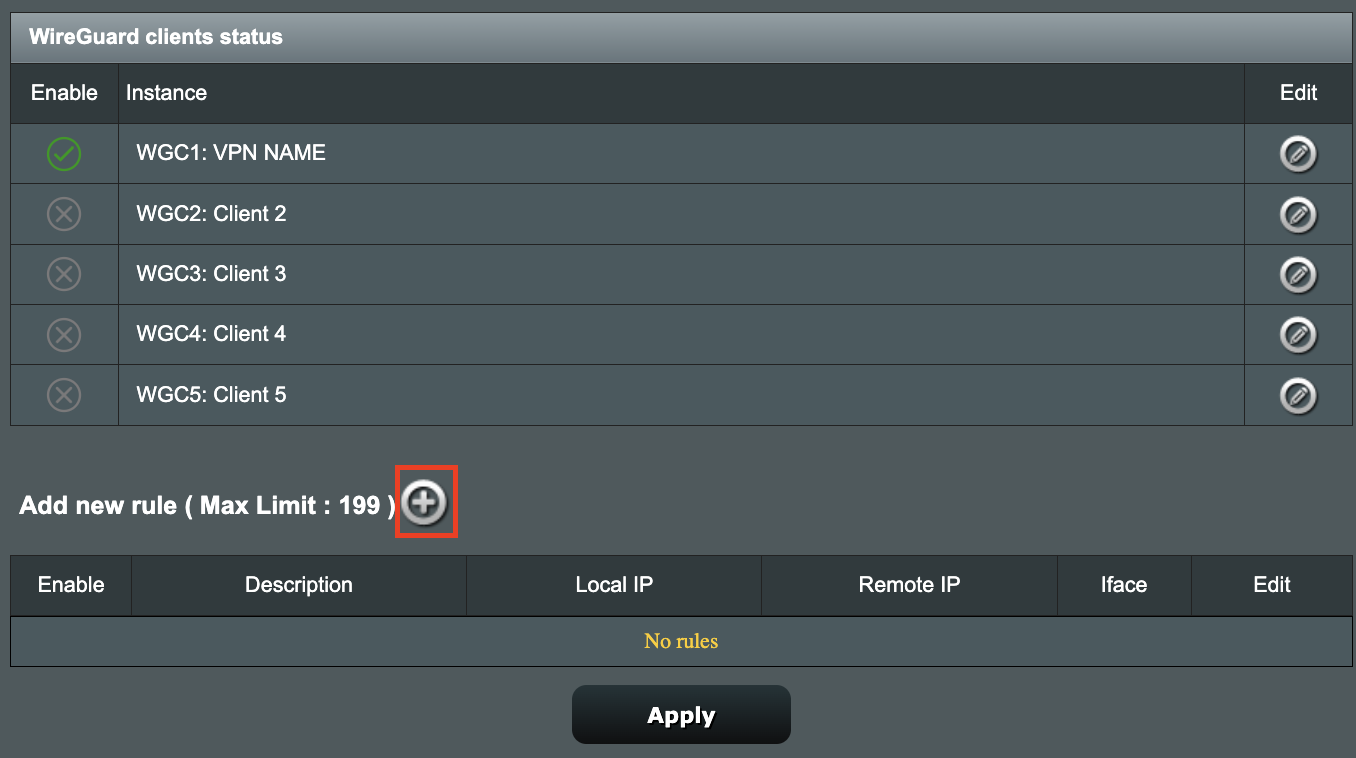
9. On the VPN Director page click the + symbol next to Add new rule.

WireGuard VPN Director Add new rule

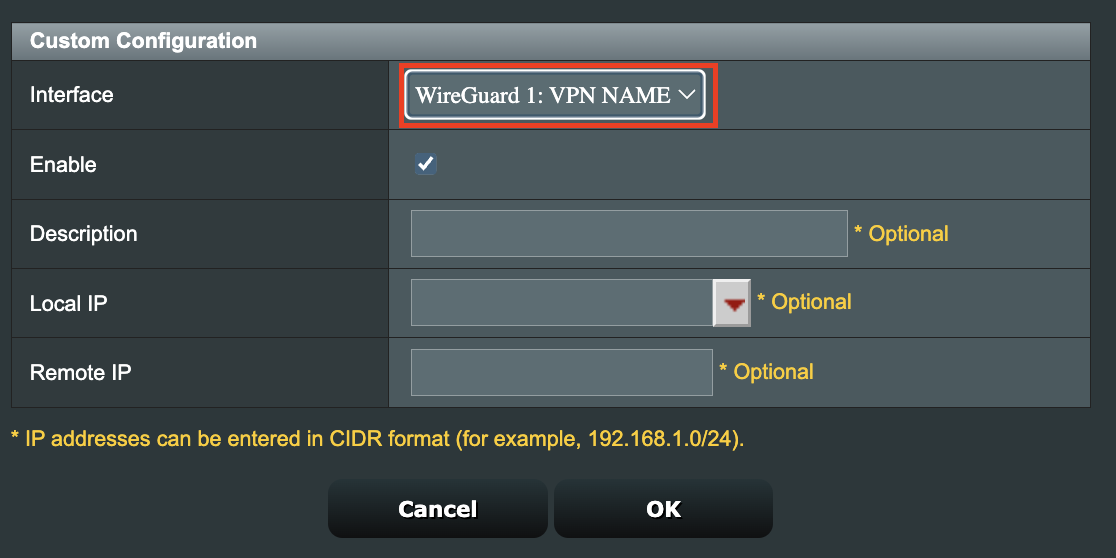
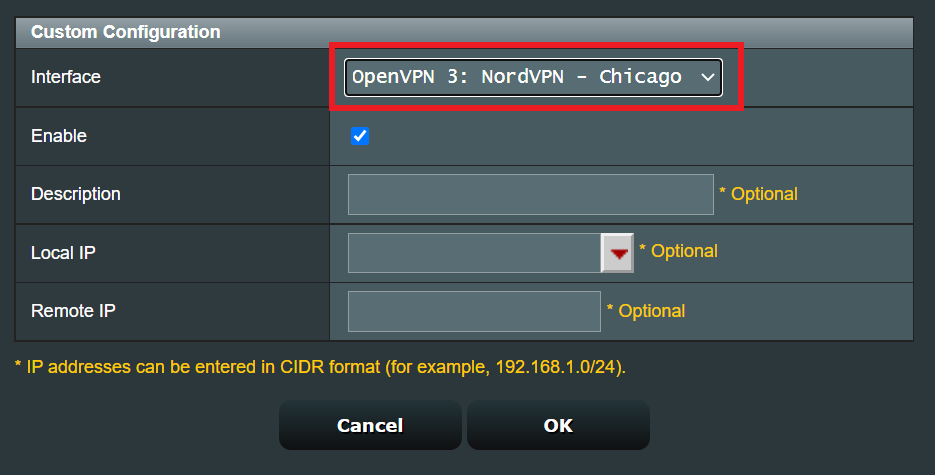
10. Select the new WireGuard profile in the Interface dropdown.

WireGuard VPN Director select Interface

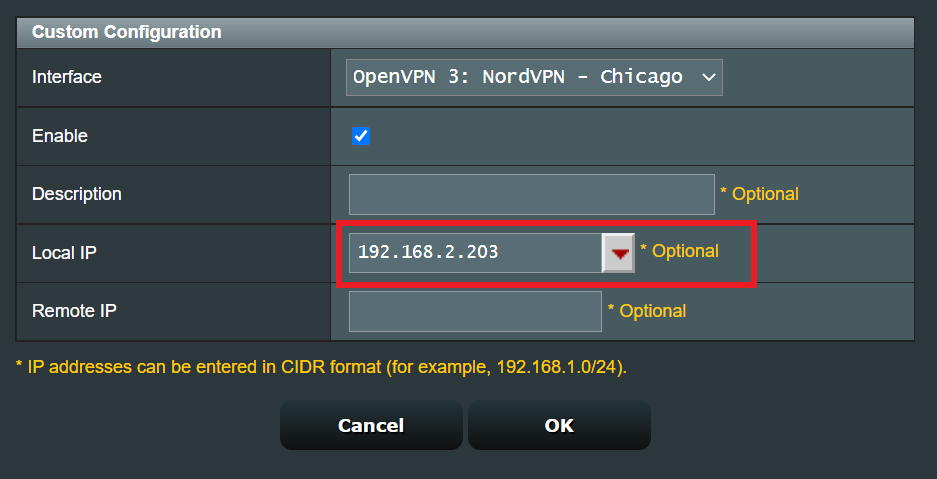
11. In the Local IP field enter in 192.168.50.0/24 if you want ALL devices connected to the FlashRouter’s network to use the WireGuard VPN connection. Click OK.

If you only want certain devices to connect to the WireGuard Client profile you have setting up instead of all the devices connected to the FlashRouter’s network please complete the instructions on our VPN Director guide.

12. Then click Apply at the bottom of the page.

Verify a successful ProtonVPN connection

Visit ProtonVPN’s IP Check from a private/incognito browsing window to verify your new IP address and virtual location.

In some cases you may notice that the location is not showing the same location as the server you have input in your router settings; this is because geo tracking tools are often tricked by VPN connections. As long as you see an IP address that is not the same as your normal Internet IP address then you are indeed connected to ProtonVPN.

How to change the ProtonVPN server

  1. Follow the steps at the top of the page to obtain a new .conf file.
  2. Then proceed with the settings same as initial setup.

TROUBLESHOOTING

Still having issues? Visit the VPN Troubleshooting section.

Troubleshoot Here

Surfshark Merlin WireGuard Setup

TeamFlashRouters · Mar 30, 2023 ·

Preparing for Surfshark Merlin Setup

Download your Surfshark .conf file

If you are not already a Surfshark user Sign Up Now.

1. Log in to your account on the Surfshark website.

Surfshark Account Login

2. Click VPN Manual Setup.

Surfshark VPN Manual Setup

3. Select Router as the Setup Method.

Surfshark setup method Router

4. Select WireGuard as the Protocol.

Surfshark select WireGuard

5. Select I don’t have a key pair.

Surfshark No Key Pair

6. Enter FlashRouter as the name of the connection and click Next.

Surfshark Connection Name

7. Click Generate a new key pair.

Surfshark Generate new Key Pair

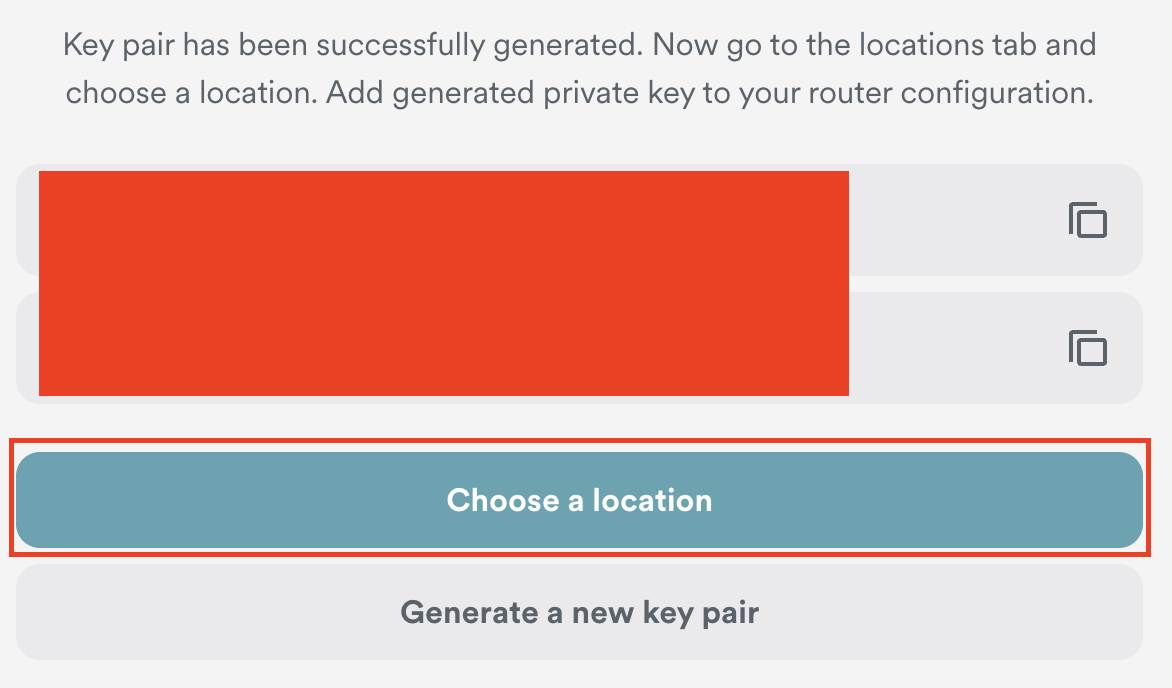
8. Click Choose a location.

Surfshark Choose a Location

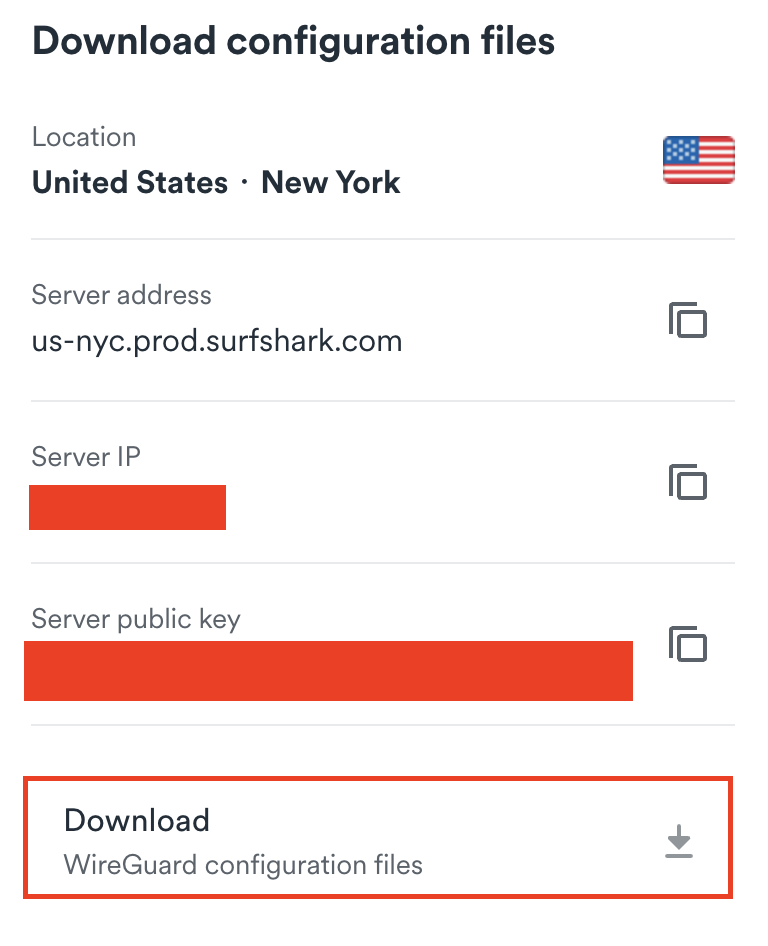
9. Select the server location you want to connect to. Unless you need a specific location we recommend using Surfshark’s recommended Fastest server. Click Download to download the .conf file for this Surfshark server location.

Surfshark download conf file

Merlin Router Setup for Surfshark

Login to Asus Merlin firmware settings in a browser on any computer or smart device connected to the Merlin FlashRouter’s network.

1. Navigate to the VPN tab.

Merlin VPN Tab

2. Navigate to the VPN Client tab.

Merlin VPN Client Tab

3. Select WireGuard as the VPN Protocol.

Merlin VPN Client WireGuard

4. Click Choose file and select the .conf file you downloaded earlier. Then click Upload.

Merlin WireGuard Choose File Upload

5. In the Description field enter in the name you’d like to use for this WireGuard Client profile. We typically advise entering in the location here. Our example server was in New York so I have entered in Surfshark New York.

Merlin WireGuard ProtonVPN Description

6. Set Enable WireGuard to Yes.

Merlin Enable WireGuard

7. Click Apply at the bottom of the page and you should then see a Connected message appear.

Merlin WireGuard Connected

8. By default no devices are assigned to the new active WireGuard connection profile. Click the VPN Director tab to assign specific devices to the new WireGuard profile. Your IP will not be changed on your devices yet.

WireGuard select VPN Director

9. On the VPN Director page click the + symbol next to Add new rule.

WireGuard VPN Director Add new rule

10. Select the new WireGuard profile in the Interface dropdown.

WireGuard VPN Director select Interface

11. In the Local IP field enter in 192.168.50.0/24 if you want ALL devices connected to the FlashRouter’s network to use the WireGuard VPN connection. Click OK.

If you only want certain devices to connect to the WireGuard Client profile you have setting up instead of all the devices connected to the FlashRouter’s network please complete the instructions on our VPN Director guide.

12. Then click Apply at the bottom of the page.

Verify a successful Surfshark connection

Visit Surfshark’s IP Check from a private/incognito browsing window to verify your new IP address and virtual location.

In some cases you may notice that the location is not showing the same location as the server you have input in your router settings; this is because geo tracking tools are often tricked by VPN connections. As long as you see an IP address that is not the same as your normal Internet IP address then you are indeed connected to Surfshark.

How to change the Surfshark server

  1. Follow the steps at the top of the page to obtain a new .conf file.
  2. Then proceed with the settings same as initial setup.

TROUBLESHOOTING

Still having issues? Visit the VPN Troubleshooting section.

Troubleshoot Here

ExpressVPN Manual OpenVPN Setup

admin · Feb 19, 2019 ·

Preparing for Manual ExpressVPN Setup

Obtain your ExpressVPN OpenVPN Information

If you are not already an ExpressVPN user Sign Up Now.

1. Log in to your account on the ExpressVPN website.

ExpressVPN login page

2. Successfully log in with your account information. Select More.

3. Select Manual Configuration and copy the Username and Password that are displayed on the right hand side of the screen.

ExpressVPN Manual Configuration
ExpressVPN username and password

ExpressVPN Server Addresses

Americas

usa-atlanta-ca-version-2.expressnetw.com
usa-boston-ca-version-2.expressnetw.com
usa-chicago-ca-version-2.expressnetw.com
usa-dallas-ca-version-2.expressnetw.com
usa-dallas-2-ca-version-2.expressnetw.com
usa-denver-ca-version-2.expressnetw.com
usa-kansascity-ca-version-2.expressnetw.com
usa-losangeles-ca-version-2.expressnetw.com
usa-losangeles-1-ca-version-2.expressnetw.com
usa-losangeles-2-ca-version-2.expressnetw.com
usa-losangeles-3-ca-version-2.expressnetw.com
usa-los-angeles-4-ca-version-2.expressnetw.com
usa-miami-ca-version-2.expressnetw.com
usa-miami-2-ca-version-2.expressnetw.com
usa-minneapolis-ca-version-2.expressnetw.com
usa-newjersey-1-ca-version-2.expressnetw.com
usa-newjersey-3-ca-version-2.expressnetw.com
usa-newyork-ca-version-2.expressnetw.com
us-new-york-2-ca-version-2.expressnetw.com
usa-phoenix-ca-version-2.expressnetw.com
usa-saltlakecity-ca-version-2.expressnetw.com
usa-sanfrancisco-ca-version-2.expressnetw.com
usa-sanjose-ca-version-2.expressnetw.com
usa-seattle-ca-version-2.expressnetw.com
usa-tampa-1-ca-version-2.expressnetw.com
usa-virginia-ca-version-2.expressnetw.com
usa-washingtondc-ca-version-2.expressnetw.com
usa-washingtondc-2-ca-version-2.expressnetw.com
canada-montreal-ca-version-2.expressnetw.com
canada-toronto-ca-version-2.expressnetw.com
canada-toronto-2-ca-version-2.expressnetw.com
canada-vancouver-ca-version-2.expressnetw.com
mexico-ca-version-2.expressnetw.com
argentina-ca-version-2.expressnetw.com
brazil-ca-version-2.expressnetw.com
brazil-2-ca-version-2.expressnetw.com
chile-ca-version-2.expressnetw.com
colombia-ca-version-2.expressnetw.com
costarica-ca-version-2.expressnetw.com
ecuador-ca-version-2.expressnetw.com
guatemala-ca-version-2.expressnetw.com
panama-ca-version-2.expressnetw.com
peru-ca-version-2.expressnetw.com
uruguay-ca-version-2.expressnetw.com
venezuela-ca-version-2.expressnetw.com

Europe

uk-berkshire-ca-version-2.expressnetw.com
uk-berkshire-2-ca-version-2.expressnetw.com
uk-docklands-ca-version-2.expressnetw.com
uk-east-london-ca-version-2.expressnetw.com
uk-kent-ca-version-2.expressnetw.com
uk-london-ca-version-2.expressnetw.com
france-paris-1-ca-version-2.expressnetw.com
france-paris-2-ca-version-2.expressnetw.com
france-strasbourg-ca-version-2.expressnetw.com
germany-darmstadt-ca-version-2.expressnetw.com
germany-frankfurt-1-ca-version-2.expressnetw.com
germany-frankfurt-2-ca-version-2.expressnetw.com
germany-nuremberg-ca-version-2.expressnetw.com
italy-cosenza-ca-version-2.expressnetw.com
italy-milan-ca-version-2.expressnetw.com
netherlands-amsterdam-ca-version-2.expressnetw.com
netherlands-rotterdam-ca-version-2.expressnetw.com
netherlands-thehague-ca-version-2.expressnetw.com
spain-barcelona-ca-version-2.expressnetw.com
spain-ca-version-2.expressnetw.com
sweden-ca-version-2.expressnetw.com
sweden-2-ca-version-2.expressnetw.com
switzerland-ca-version-2.expressnetw.com
switzerland-2-ca-version-2.expressnetw.com
albania-ca-version-2.expressnetw.com
andorra-ca-version-2.expressnetw.com
armenia-ca-version-2.expressnetw.com
austria-ca-version-2.expressnetw.com
azerbaijan-ca-version-2.expressnetw.com
belarus-ca-version-2.expressnetw.com
belgium-ca-version-2.expressnetw.com
bosniaandherzegovina-ca-version-2.expressnetw.com
bulgaria-ca-version-2.expressnetw.com
croatia-ca-version-2.expressnetw.com
cyprus-ca-version-2.expressnetw.com
czechrepublic-ca-version-2.expressnetw.com
denmark-ca-version-2.expressnetw.com
estonia-ca-version-2.expressnetw.com
finland-ca-version-2.expressnetw.com
georgia-ca-version-2.expressnetw.com
greece-ca-version-2.expressnetw.com
hungary-ca-version-2.expressnetw.com
iceland-ca-version-2.expressnetw.com
ireland-ca-version-2.expressnetw.com
isleofman-ca-version-2.expressnetw.com
jersey-ca-version-2.expressnetw.com
latvia-ca-version-2.expressnetw.com
liechtenstein-ca-version-2.expressnetw.com
lithuania-ca-version-2.expressnetw.com
luxembourg-ca-version-2.expressnetw.com
macedonia-ca-version-2.expressnetw.com
malta-ca-version-2.expressnetw.com
moldova-ca-version-2.expressnetw.com
monaco-ca-version-2.expressnetw.com
montenegro-ca-version-2.expressnetw.com
norway-ca-version-2.expressnetw.com
poland-ca-version-2.expressnetw.com
portugal-ca-version-2.expressnetw.com
romania-ca-version-2.expressnetw.com
serbia-ca-version-2.expressnetw.com
slovakia-ca-version-2.expressnetw.com
slovenia-ca-version-2.expressnetw.com
ukraine-ca-version-2.expressnetw.com

Asia Pacific

australia-brisbane-ca-version-2.expressnetw.com
australia-melbourne-ca-version-2.expressnetw.com
australia-perth-ca-version-2.expressnetw.com
australia-sydney-ca-version-2.expressnetw.com
australia-sydney-2-ca-version-2.expressnetw.com
australia-sydney-3-ca-version-2.expressnetw.com
hongkong-2-ca-version-2.expressnetw.com
hongkong4-ca-version-2.expressnetw.com
hongkong-1-ca-version-2.expressnetw.com
japan-tokyo-1-ca-version-2.expressnetw.com
japan-tokyo-2-ca-version-2.expressnetw.com
india-chennai-ca-version-2.expressnetw.com
india-mumbai-1-ca-version-2.expressnetw.com
singapore-cbd-ca-version-2.expressnetw.com
singapore-jurong-ca-version-2.expressnetw.com
southkorea-ca-version-2.expressnetw.com
southkorea2-ca-version-2.expressnetw.com
bangladesh-ca-version-2.expressnetw.com
bhutan-ca-version-2.expressnetw.com
brunei-ca-version-2.expressnetw.com
cambodia-ca-version-2.expressnetw.com
indonesia-ca-version-2.expressnetw.com
kazakhstan-ca-version-2.expressnetw.com
kyrgyzstan-ca-version-2.expressnetw.com
laos-ca-version-2.expressnetw.com
macau-ca-version-2.expressnetw.com
malaysia-ca-version-2.expressnetw.com
mongolia-ca-version-2.expressnetw.com
myanmar-ca-version-2.expressnetw.com
nepal-ca-version-2.expressnetw.com
newzealand-ca-version-2.expressnetw.com
pakistan-ca-version-2.expressnetw.com
ph-via-sing-ca-version-2.expressnetw.com
srilanka-ca-version-2.expressnetw.com
taiwan-3-ca-version-2.expressnetw.com
thailand-ca-version-2.expressnetw.com
vietnam-ca-version-2.expressnetw.com

Middle East and Africa

algeria-ca-version-2.expressnetw.com
israel-ca-version-2.expressnetw.com
kenya-ca-version-2.expressnetw.com
southafrica-ca-version-2.expressnetw.com

DD-WRT Router Setup for ExpressVPN

Navigate to Services > VPN

Enter ExpressVPN settings

OpenVPN Client

Start OpenVPN Client

If you wish to disable your VPN connection simply set this to Disable at any time and click Apply Settings.

Server IP/Name

Copy and paste the server you would like to connect to from the server list above. Be sure there are no extra spaces or characters.

If you wish to change ExpressVPN connection locations, THE ONLY SETTING YOU NEED TO CHANGE IS THE EXPRESSVPN SERVER ADDRESS.*

Port

1195

Tunnel Device

TUN

Tunnel Protocol

UDP

Encryption cipher

AES-256-CBC

Hash Algorithm

SHA512

User Pass Authentication

Enable

Username

Enter the Username you found in the Manual Config section.

Password

Enter the Password you found in the Manual Config section.

Advanced Options

Enable

TLS Cipher

None

LZO Compression

Adaptive

NAT

Enable

Firewall Protection

Enable

nsCertType verification

Checked

TLS Auth Key

-----BEGIN OpenVPN Static key V1-----
48d9999bd71095b10649c7cb471c1051
b1afdece597cea06909b99303a18c674
01597b12c04a787e98cdb619ee960d90
a0165529dc650f3a5c6fbe77c91c137d
cf55d863fcbe314df5f0b45dbe974d9b
de33ef5b4803c3985531c6c23ca6906d
6cd028efc8585d1b9e71003566bd7891
b9cc9212bcba510109922eed87f5c8e6
6d8e59cbd82575261f02777372b2cd4c
a5214c4a6513ff26dd568f574fd40d6c
d450fc788160ff68434ce2bf6afb00e7
10a3198538f14c4d45d84ab42637872e
778a6b35a124e700920879f1d003ba93
dccdb953cdf32bea03f365760b0ed800
2098d4ce20d045b45a83a8432cc73767
7aed27125592a7148d25c87fdbe0a3f6
-----END OpenVPN Static key V1-----

Additional Config

persist-key
persist-tun
fragment 1300
mssfix 1450
keysize 256

Policy Based Routing

This field can be used for split VPN and Dual Gateway routing.

CA Cert

-----BEGIN CERTIFICATE-----
MIIF+DCCA+CgAwIBAgIBATANBgkqhkiG9w0BAQ0FADCBhDELMAkGA1UEBhMCVkcx
DDAKBgNVBAgMA0JWSTETMBEGA1UECgwKRXhwcmVzc1ZQTjETMBEGA1UECwwKRXhw
cmVzc1ZQTjEWMBQGA1UEAwwNRXhwcmVzc1ZQTiBDQTElMCMGCSqGSIb3DQEJARYW
c3VwcG9ydEBleHByZXNzdnBuLmNvbTAeFw0xNTEwMjEwMDAwMDBaFw0yNjA0MDEy
MTEyMDBaMIGEMQswCQYDVQQGEwJWRzEMMAoGA1UECAwDQlZJMRMwEQYDVQQKDApF
eHByZXNzVlBOMRMwEQYDVQQLDApFeHByZXNzVlBOMRYwFAYDVQQDDA1FeHByZXNz
VlBOIENBMSUwIwYJKoZIhvcNAQkBFhZzdXBwb3J0QGV4cHJlc3N2cG4uY29tMIIC
IjANBgkqhkiG9w0BAQEFAAOCAg8AMIICCgKCAgEAxzXvHZ25OsESKRMQFINHJNqE
9kVRLWJS50oVB2jxobudPhCsWvJSApvar8CB2RrqkVMhXu2HT3FBtDL91INg070q
AyjjRpzEbDPWqQ1+G0tk0sjiJt2mXPJK2IlNFnhe6rTs09Pkpcp8qRhfZay/dIlm
agohQAr4JvYL1Ajg9A3sLb8JkY03H6GhOF8EKYTqhrEppCcg4sQKQhNSytRoQAm8
Ta+tnTYIedwWpqjUXP9YXFOvljPaixfYug24eAkpTjeuWTcELSyfnuiBeK+z9+5O
YunhqFt2QZMq33kLFZGMN2gHRCzngxxphurypsPRo7jiFgQI1yLt8uZsEZ+otGEK
91jjKfOC+g9TBy2RUtxk1neWcQ6syXDuc3rBNrGA8iM0ZoEqQ1BC8xWr3NYlSjqN
+1mgpTAX3/Dxze4GzHd7AmYaYJV8xnKBVNphlMlg1giCAu5QXjMxPbfCgZiEFq/u
q0SOKQJeT3AI/uVPSvwCMWByjyMbDpKKAK8Hy3UT5m4bCNu8J7bxj+vdnq0A2HPw
tF0FwBl/TIM3zNsyFrZZ0j6jLRT50mFsgDBKcD4L/J5rjdCsKPu5rodhxe38rCx2
GknP1Zkov4yoVCcR48+CQwg3oBkq0/EflvWUvcYApzs9SomUM/g+8Q/V0WOfJmFW
uxN9YntZlnzHRSRjrvMCAwEAAaNzMHEwHQYDVR0OBBYEFIzmQGj8xS+0LLklwqHD
45VVOZRJMB8GA1UdIwQYMBaAFIzmQGj8xS+0LLklwqHD45VVOZRJMA8GA1UdEwEB
/wQFMAMBAf8wCwYDVR0PBAQDAgEGMBEGCWCGSAGG+EIBAQQEAwIBFjANBgkqhkiG
9w0BAQ0FAAOCAgEAbHfuMKtojm1NgX7qSU2Rm2B5L8G0FuFP0L40dj8O5WHt45j2
z8coMK90vrUnQEZNQmRzot7v3XjVzVlxBWYSsCEApTsSDNi/4BNFP8H/BUUtJuy2
GFTO4wDVJnqNkZOHBmyVD75s1Y+W8a+zB4jkMeDEhOHZdwQ0l1fJDDgXal5f1UT5
F5WH6/RwHmWTwX4GxuCiIVtx70CjkXqhM8yZtTp1UtHLRNYcNSIes0vrAPHPgoA5
z9B8UvsOjuP+mfcjzi0LGGrY+2pJu0BKO2dRnarIZZABETIisI3FokoTszx5jpRP
yxyUTuRDKWHrvi0PPtOmC8nFahfugWFUi6uBsqCaSeuex+ahnTPCq0b1l0Ozpg0Y
eE8CW1TL9Y92b01up2c+PP6wZOIm3JyTH+L5smDFbh80V42dKyGNdPXMg5IcJhj3
YfAy4k8h/qbWY57KFcIzKx40bFsoI7PeydbGtT/dIoFLSZRLW5bleXNgG9mXZp27
0UeEC6CpATCS6uVl8LVT1I02uulHUpFaRmTEOrmMxsXGt6UAwYTY55K/B8uuID34
1xKbeC0kzhuN2gsL5UJaocBHyWK/AqwbeBttdhOCLwoaj7+nSViPxICObKrg3qav
GNCvtwy/fEegK9X/wlp2e2CFlIhFbadeXOBr9Fn8ypYPP17mTqe98OJYM04=
-----END CERTIFICATE-----

Public Client Cert

-----BEGIN CERTIFICATE-----
MIIDTjCCAregAwIBAgIDKzZvMA0GCSqGSIb3DQEBCwUAMIGFMQswCQYDVQQGEwJV
UzELMAkGA1UECBMCQ0ExFTATBgNVBAcTDFNhbkZyYW5jaXNjbzEVMBMGA1UEChMM
Rm9ydC1GdW5zdG9uMRgwFgYDVQQDEw9Gb3J0LUZ1bnN0b24gQ0ExITAfBgkqhkiG
9w0BCQEWEm1lQG15aG9zdC5teWRvbWFpbjAgFw0xNjExMDMwMzA2MThaGA8yMDY2
MTEwMzAzMDYxOFowgYoxCzAJBgNVBAYTAlZHMQwwCgYDVQQIDANCVkkxEzARBgNV
BAoMCkV4cHJlc3NWUE4xEzARBgNVBAsMCkV4cHJlc3NWUE4xHDAaBgNVBAMME2V4
cHJlc3N2cG5fY3VzdG9tZXIxJTAjBgkqhkiG9w0BCQEWFnN1cHBvcnRAZXhwcmVz
c3Zwbi5jb20wggEiMA0GCSqGSIb3DQEBAQUAA4IBDwAwggEKAoIBAQCrOYt/KOi2
uMDGev3pXg8j1SO4J/4EVWDF7vJcKr2jrZlqD/zuAFx2W1YWvwumPO6PKH4PU962
1aNdiumaUkv/RplCfznnnxqobhJuTE2oA+rS1bOq+9OhHwF9jgNXNVk+XX4d0toS
T5uGE6Z3OdmPBur8o5AlCf78PDSAwpFOw5HrgLqOEU4hTweC1/czX2VsvsHv22HR
I6JMZgP8gGQii/p9iukqfaJvGdPciL5p1QRBUQIi8P8pNvEp1pVIpxYj7/LOUqb2
DxFvgmp2v1IQ0Yu88SWsFk84+xAYHzfkLyS31Sqj5uLRBnJqx3fIlOihQ50GI72f
wPMwo+OippvVAgMBAAGjPzA9MAwGA1UdEwEB/wQCMAAwDgYDVR0PAQH/BAQDAgSw
MB0GA1UdDgQWBBSkBM1TCX9kBgFsv2RmOzudMXa9njANBgkqhkiG9w0BAQsFAAOB
gQA+2e4b+33zFmA+1ZQ46kWkfiB+fEeDyMwMLeYYyDS2d8mZhNZKdOw7dy4Ifz9V
qzp4aKuQ6j61c6k1UaQQL0tskqWVzslSFvs9NZyUAJLLdGUc5TT2MiLwiXQwd4Uv
H6bGeePdhvB4+ZbW7VMD7TE8hZhjhAL4F6yAP1EQvg3LDA==
-----END CERTIFICATE-----

Private Client Key

-----BEGIN RSA PRIVATE KEY-----
MIIEpAIBAAKCAQEAqzmLfyjotrjAxnr96V4PI9UjuCf+BFVgxe7yXCq9o62Zag/8
7gBcdltWFr8Lpjzujyh+D1PettWjXYrpmlJL/0aZQn85558aqG4SbkxNqAPq0tWz
qvvToR8BfY4DVzVZPl1+HdLaEk+bhhOmdznZjwbq/KOQJQn+/Dw0gMKRTsOR64C6
jhFOIU8Hgtf3M19lbL7B79th0SOiTGYD/IBkIov6fYrpKn2ibxnT3Ii+adUEQVEC
IvD/KTbxKdaVSKcWI+/yzlKm9g8Rb4Jqdr9SENGLvPElrBZPOPsQGB835C8kt9Uq
o+bi0QZyasd3yJTooUOdBiO9n8DzMKPjoqab1QIDAQABAoIBAHgsekC0SKi+AOcN
OZqJ3pxqophE0V7fQX2KWGXhxZnUZMFxGTc936deMYzjZ1y0lUa6x8cgOUcfqHol
3hDmw9oWBckLHGv5Wi9umdb6DOLoZO62+FQATSdfaJ9jheq2Ub2YxsRN0apaXzB6
KDKz0oM0+sZ4Udn9Kw6DfuIELRIWwEx4w0v3gKW7YLC4Jkc4AwLkPK03xEA/qImf
kCmaMPLhrgVQt+IFfP8bXzL7CCC04rNU/IS8pyjex+iUolnQZlbXntF7Bm4V2mz0
827ZVqrgAb/hEQRlsTW3rRkVh+rrdoUE7BCZRTFmRCbLoShjN6XuSf4sAus8ch4U
EN12gN0CgYEA4o/tSvij1iPaXLmt4KOEuxqmSGB8MLKhFde8lBbNdrDgxiIH9bH7
khKx15XRTX0qLDbs8b2/UJygZG0Aa1kIBqZTXTgeMAuxPRTesALJPdqQ/ROnbJcd
FkI7gllrAG8VB0fH4wTRsRd0vWEB6YlCdE107u6LEsLAHxOj9Q5819cCgYEAwXjx
9RkQ2qITBx5Ewib8YsltA0n3cmRomPicLlsnKV5DfvyCLpFIsZ1h3f9dUpfxRLwz
p8wcoLiq9cCoOGdu1udw/yBTqmhaXWhUK/g77f9Ze2ZB1OEhuyKLYJ1vW/h/Z/a1
aPCMxZqsDTPCePsuO8Cez5gqs8LjM3W7EyzRxDMCgYEAvhHrDFt975fSiLoJgo0M
PIAGAnBXn+8sLwv3m/FpW+rWF8LTFK/Fku12H5wDpNOdvswxijkauIE+GiJMGMLv
dcyx4WHECaC1h73reJRNykOEIZ0Md5BrCZJ1JEzp9Mo8RQhWTEFtvfkkqgApP4g0
pSeaMx0StaGG1kt+4IbP+68CgYBrZdQKlquAck/Vt7u7eyDHRcE5/ilaWtqlb/xi
zz7h++3D5C/v4b5UumTFcyg+3RGVclPKZcfOgDSGzzeSd/hTW46iUTOgeOUQzQVM
kzPRXdoyYgVRQtgSpY5xR3O1vjAbahwx8LZ0SvQPMBhYSDbV/Isr+fBacWjl/Aip
EEwxeQKBgQDdrAEnVlOFoCLw4sUjsPoxkLjhTAgI7CYk5NNxX67Rnj0tp+Y49+sG
Uhl5sCGfMKkLShiON5P2oxZa+B0aPtQjsdnsFPa1uaZkK4c++SS6AetzYRpVDLmL
p7/1CulE0z3O0sBekpwiuaqLJ9ZccC81g4+2j8j6c50rIAct3hxIxw==
-----END RSA PRIVATE KEY-----

CLICK APPLY SETTINGS

Leave all settings not mentioned above as their default setting.

Verify a successful ExpressVPN connection

Navigate to Status > OpenVPN.

  1. You should now see a CONNECTED SUCCESS message.
  2. Visit ExpressVPN’s IP Check to verify your new IP address and virtual location.

In some cases you may notice that the location is not showing the same location as the server you have input in your router settings; this is because geo tracking tools are often tricked by VPN connections. As long as you see an IP address that is not the same as your normal Internet IP address then you are indeed connected to ExpressVPN.

Back up your settings

Navigate to Administration > Backup

  1. Click the Backup button.
  2. A file named nvrambak.bin will be saved to your computer.
  3. You can load nvrambak.bin to restore your settings in the event of a reset.

How to change the ExpressVPN server

  1. Copy the new ExpressVPN server address from the above server list.
  2. Paste the server into the Server IP/Name field.
  3. Click Apply Settings.

TROUBLESHOOTING

Still having issues? Visit the VPN Troubleshooting section.

Troubleshoot Here

TP-Link Access Router Settings

TeamFlashRouters · Apr 11, 2024 ·

Follow this guide to access the router settings of your TP-Link FlashRouter.

1. Connect your computer, phone, or tablet to the TP-Link router via wireless (FlashRouter24 / FlashRouter50) or via ethernet cable to one of the LAN ports on the router.

The FlashRouter WiFi password is printed on the sheet that came with the router and is set to Wireless#[First 5 characters of your router MAC]. The router MAC can be found on the bottom of your router if you cannot locate the sheet. For e.g. if your MAC is 1459C07E70A8 then your WiFi password is Wireless#1459C

Be sure to capitalize the W.

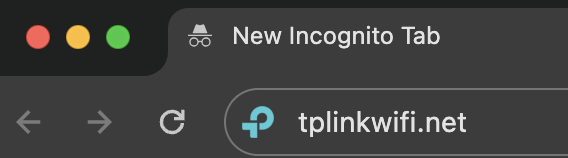
2. Once connected via wireless or ethernet on your device open your browser and go to tplinkwifi.net

TP-Link URL Access

3. Enter tp-link as the admin password to access the TP-Link firmware settings.

TP-Link admin password

TROUBLESHOOTING

Still having issues? Visit the VPN Troubleshooting section.

Troubleshoot Here

TP-Link Internet Setup

TeamFlashRouters · Apr 11, 2024 ·

Follow this article when you receive your new TP-Link FlashRouter to connect it to the Internet.

1. Connect the ethernet cable that came with the router from an open LAN ethernet port on your ISP modem or other router to the WAN port of the TP-Link.

2. Connect the power to the router and wait about 2 minutes for the router to fully boot up.

3. Connect your computer, phone, or tablet to the TP-Link router via wireless (FlashRouter24 / FlashRouter50) or via ethernet cable to one of the LAN ports on the router.

The FlashRouter WiFi password is printed on the sheet that came with the router and is set to Wireless#[First 5 characters of your router MAC]. The router MAC can be found on the bottom of your router if you cannot locate the sheet. For e.g. if your MAC is 1459C07E70A8 then your WiFi password is Wireless#1459C

Be sure to capitalize the W.

4. Once connected via wireless or ethernet on your device open your browser and go to tplinkwifi.net

TP-Link URL Access

5. Enter tp-link as the admin password to access the TP-Link firmware settings.

TP-Link admin password

6. Verify that your TP-Link FlashRouter is reporting as Internet and WAN Connected.

TP-Link Internet Connected

TROUBLESHOOTING

Still having issues? Visit the VPN Troubleshooting section.

Troubleshoot Here

Why are some of my devices not connecting to the internet?

Dave · May 2, 2019 ·

  1. Make sure you are not using any device VPN device application or proxy on devices that are connected to the FlashRouter’s network as this can cause a conflict. Make sure the FlashRouter’s VPN connection is the only active VPN connection in your network.
  2. Check that static settings are not configured on your device.
  3. Certain devices require port forwarding rules to be properly setup before full connectivity. This may apply to devices like VOIP or smart cameras. If this is the case you may need to contact the manufacturer for more specific information.
  4. Check that the FR Privacy App feature for a device specific Kill Switch is not set for the device, and if kill switch is setup, then make sure the VPN connection is active.

VPN Killswitch for Asus Merlin

TeamFlashRouters · Jan 19, 2022 ·

Once you have OpenVPN connected on your Merlin FlashRouter you can enable the VPN Killswitch so that no internet traffic passes through your router that is not encrypted by the VPN tunnel.

Login to Asus Merlin firmware settings in a browser on any computer or smart device.

1. Under Advanced Settings select VPN.

2. Click the VPN Client tab.

3. Set Killswitch – Block routed clients if tunnel goes down to Yes.

Merlin Accept DNS configuration Redirect Internet and Kill Switch

4. Click Apply.

VPN Director for Asus Merlin

TeamFlashRouters · Jan 19, 2022 ·

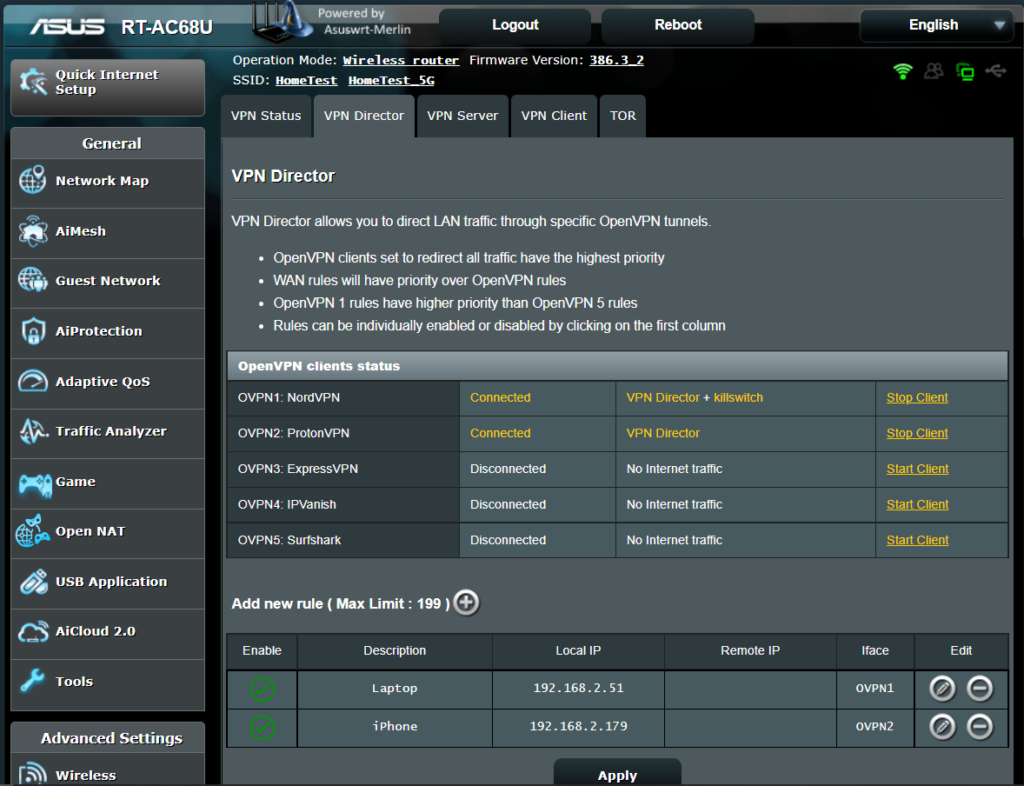
Once you have OpenVPN connected on your Merlin FlashRouter you can manage your VPN connections by device or by VPN servers or even VPN providers. This is a major advantage of Asus Merlin firmware as it allows up to 5 VPN connections at the same.

Login to Asus Merlin firmware settings in a browser on any computer or smart device.

Setup multiple VPN clients

1. Under Advanced Settings select VPN.

2. Click the VPN Client tab.

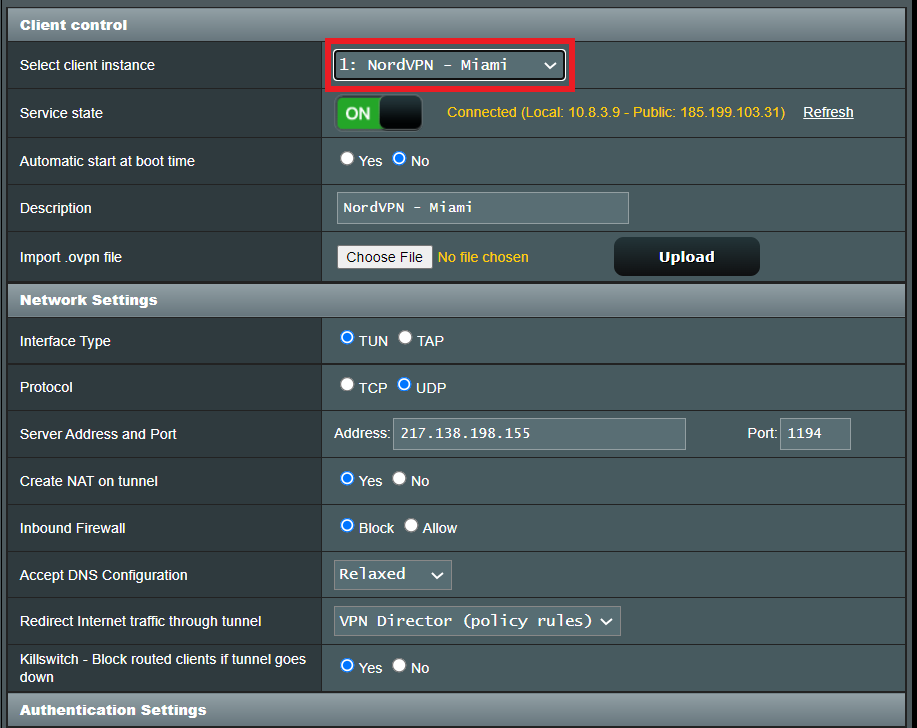
3. In the Select Client instance dropdown select a new client instance to setup and follow your VPN providers setup guide.

VPN Director select client instance

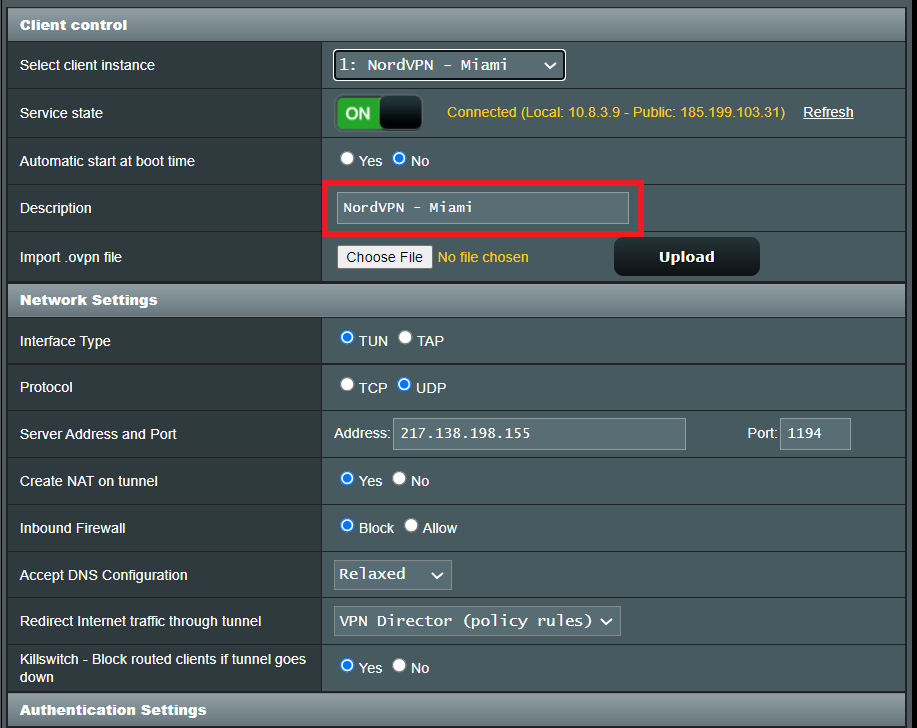
4. Name the client in the Description field for more clarity for which server or provider is being setup.

VPN Director Description

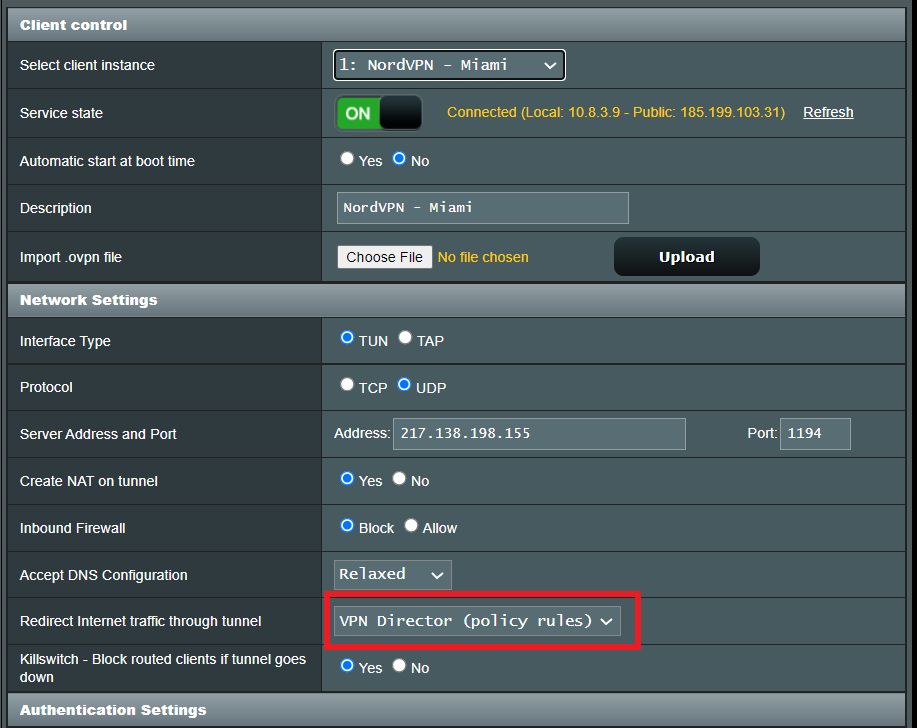
5. Set the Redirect Internet traffic through tunnel dropdown to VPN Director.

VPN Director Policy

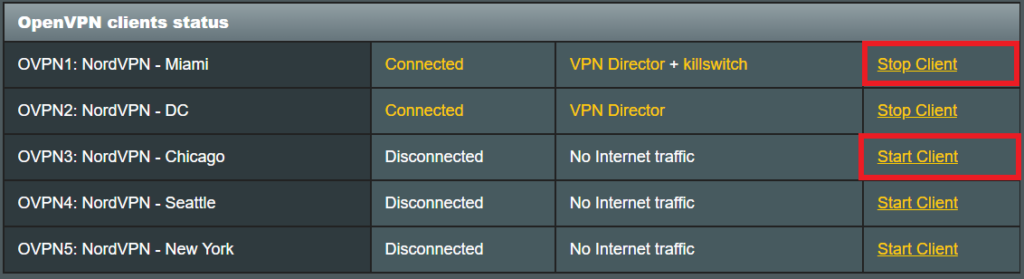
Start or Stop VPN Client

1. Under Advanced Settings select VPN.

2. Click the VPN Director tab.

Merlin VPN Director

3. With multiple VPN clients connected you can start and stop them as needed from this page.

VPN Director

Assign a device to a specific VPN client

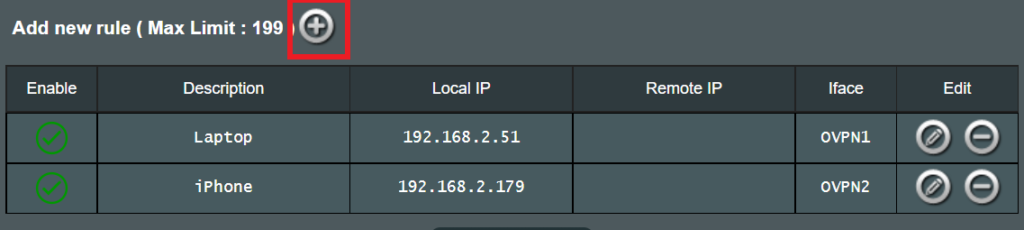
1. On the VPN Director page click the + symbol next to Add new rule.

VPN direct add new rule

2. Select the Interface that you want to add the device to.

VPN director select interface

3. Click the Local IP dropdown and a full list of devices connected to the Merlin FlashRouter should appear. Select the device you want to assign to this VPN client.

VPN director select device

4. Click OK and click Apply.

Privacy Hero VPN Setup Guide for Privacy Hero

TeamFlashRouters · Apr 3, 2023 ·

Your Privacy Hero router uses Cloud Based router management which means you can access the router settings from anywhere on any device that has an internet connection. You can follow these steps while connected to your phone, other Wi-Fi network, or the Privacy Hero network.

Use these steps to connect to Privacy Hero’s own WireGuard VPN servers. You will automatically be connected to the ideal USA or Canada server based on your location.

1. From any device that has a browser such as a computer, smartphone, or tablet visit app.privacyhero.com

App.PrivacyHero.com

2. Enter your Privacy Hero account email and password. Click Login.

Privacy Hero Access Settings

If you have not created your Privacy Hero account yet please follow these instructions.

3. Click the VPN symbol.

Privacy Hero Setup VPN

4. Set the VPN toggle to On.

Privacy Hero Enable VPN

5. Connect to the Privacy Hero’s via wireless or ethernet connection on your device and visit What is my IP Address from a private/incognito browser to verify your new IP address and virtual location.

Privacy Hero’s cloud based router settings access makes it so you can change settings while not connected to the Privacy Hero network so if your IP Address has not changed be sure to double check that you are indeed connected to the Privacy Hero network on the device you are checking your IP from.

Keep in mind that the VPN connection will not change the location of the streaming services listed in the Streaming Relocation area of the Privacy Hero settings.

TROUBLESHOOTING

Still having issues? Visit the VPN Troubleshooting section.

Troubleshoot Here

PureVPN Merlin WireGuard Setup

TeamFlashRouters · Jul 20, 2023 ·

Preparing for PureVPN Merlin Setup

Download your PureVPN .conf file

If you are not already an PureVPN user Sign Up Now.

1. Log in to your account on the PureVPN website.

PureVPN Login

2. Select Manual Configuration.

PureVPN Manual Configuration

3. Select the Server Location you want to connect to and then click Download.

PureVPN select server location

4. In the Select Protocol dropdown choose WireGuard.

PureVPN WireGuard

5. In the Select Device dropdown choose DD-WRT. Then click Generate Configuration. This will save a .conf file to your computer.

PureVPN Generate Config

Merlin Router Setup for PureVPN

Login to Asus Merlin firmware settings in a browser on any computer or smart device connected to the Merlin FlashRouter’s network.

1. Navigate to the VPN tab.

Merlin VPN Tab

2. Navigate to the VPN Client tab.

Merlin VPN Client Tab

3. Select WireGuard as the VPN Protocol.

Merlin VPN Client WireGuard

4. Click Choose file and select the .conf file you downloaded earlier. Then click Upload.

Merlin WireGuard Choose File Upload

5. In the Description field enter in the name you’d like to use for this WireGuard Client profile. We typically advise entering in the location here.

Merlin WireGuard ProtonVPN Description

6. Set Enable WireGuard to Yes.

Merlin Enable WireGuard

7. Click Apply at the bottom of the page and you should then see a Connected message appear.

Merlin WireGuard Connected

8. By default no devices are assigned to the new active WireGuard connection profile. Click the VPN Director tab to assign specific devices to the new WireGuard profile. Your IP will not be changed on your devices yet.

WireGuard select VPN Director

9. On the VPN Director page click the + symbol next to Add new rule.

WireGuard VPN Director Add new rule

10. Select the new WireGuard profile in the Interface dropdown.

WireGuard VPN Director select Interface

11. In the Local IP field enter in 192.168.50.0/24 if you want ALL devices connected to the FlashRouter’s network to use the WireGuard VPN connection. Click OK.

If you only want certain devices to connect to the WireGuard Client profile you have setting up instead of all the devices connected to the FlashRouter’s network please complete the instructions on our VPN Director guide.

12. Then click Apply at the bottom of the page.

Verify a successful PureVPN connection

Visit PureVPN’s IP Check to verify your new IP address and virtual location.

In some cases you may notice that the location is not showing the same location as the server you have input in your router settings; this is because geo tracking tools are often tricked by VPN connections. As long as you see an IP address that is not the same as your normal Internet IP address then you are indeed connected to PureVPN.

How to change the PureVPN server

  1. Follow the steps at the top of the page to obtain a new .conf file.
  2. Then proceed with the settings same as initial setup.

TROUBLESHOOTING

Still having issues? Visit the VPN Troubleshooting section.

Troubleshoot Here

TP-Link Change Wi-Fi name and password

TeamFlashRouters · Apr 16, 2024 ·

Follow this guide to change the Wi-Fi name and password on your TP-Link FlashRouter.

1. Connect your computer, phone, or tablet to the TP-Link router via wireless (FlashRouter24 / FlashRouter50) or via ethernet cable to one of the LAN ports on the router.

The FlashRouter WiFi password is printed on the sheet that came with the router and is set to Wireless#[First 5 characters of your router MAC]. The router MAC can be found on the bottom of your router if you cannot locate the sheet. For e.g. if your MAC is 1459C07E70A8 then your WiFi password is Wireless#1459C

Be sure to capitalize the W.

2. Once connected via wireless or ethernet on your device open your browser and go to the TP-Link firmware settings.

TP-Link URL Access

3. Enter tp-link as the admin password to access the TP-Link firmware settings.

TP-Link admin password

4. Click Wireless.

TP-Link Wireless tab

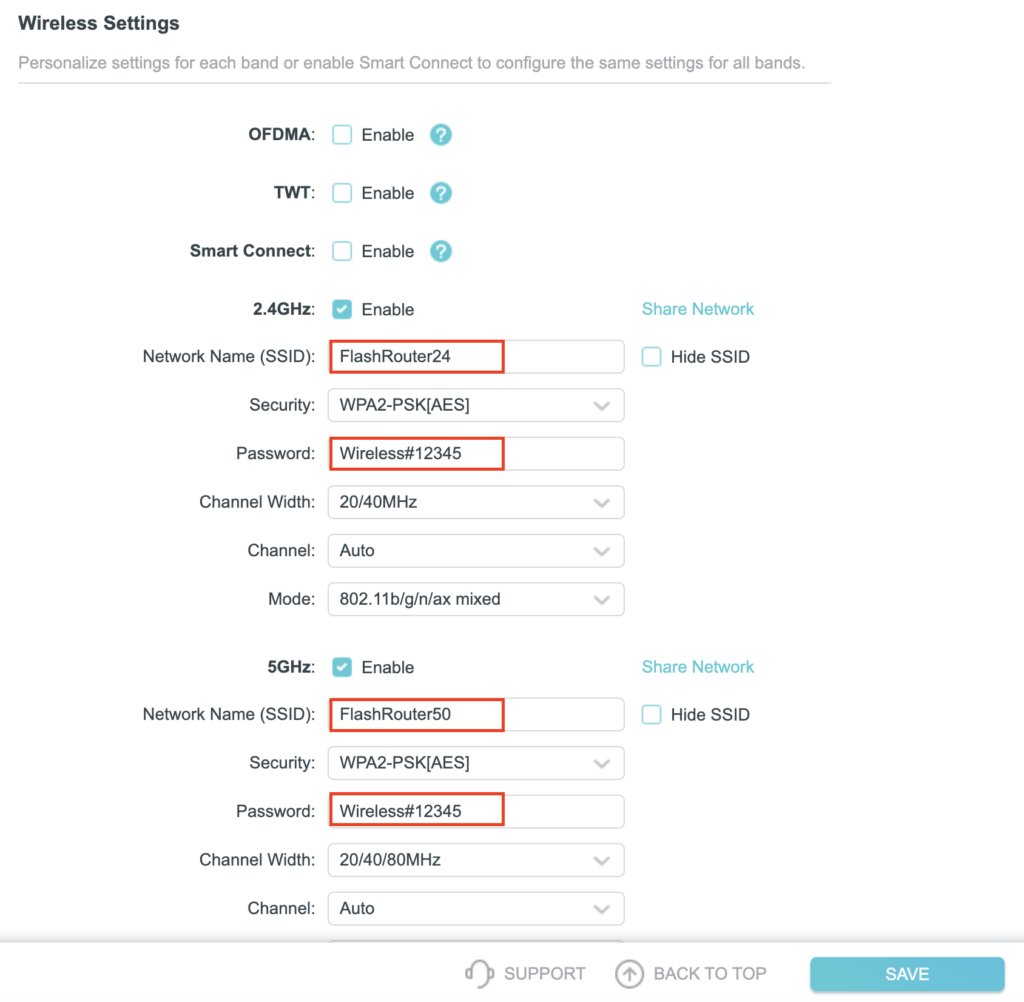
5. Change the Network Name (SSID) and Password fields to what you want to use. The SSID should be unique and NOT a duplicate of an existing network. Click Save.

TP-Link Change Wireless name and password

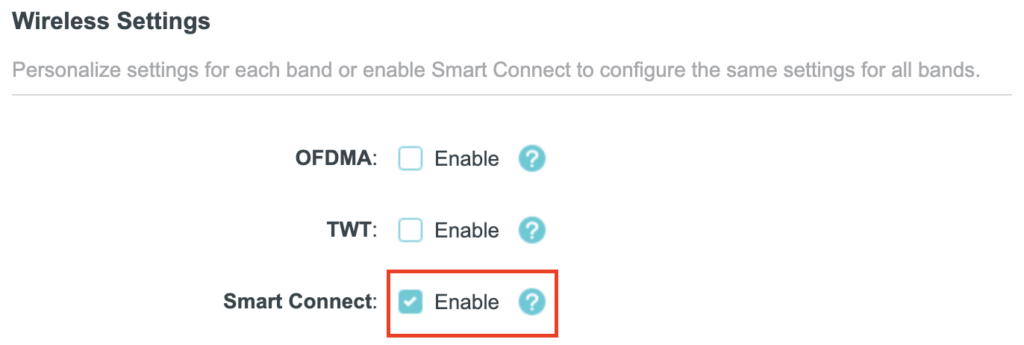
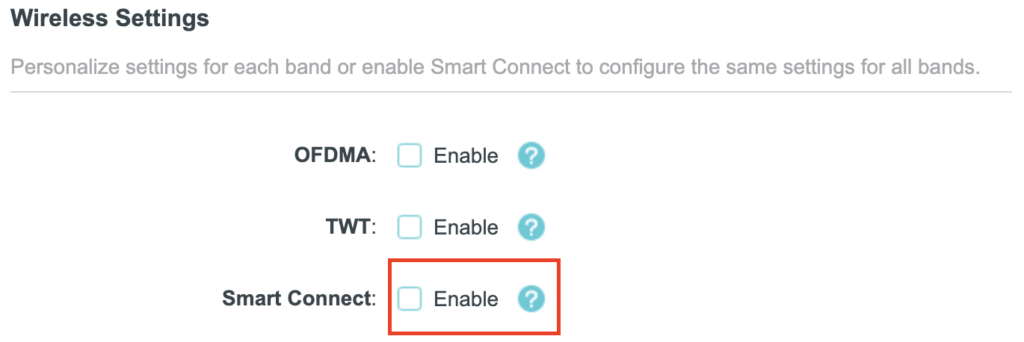
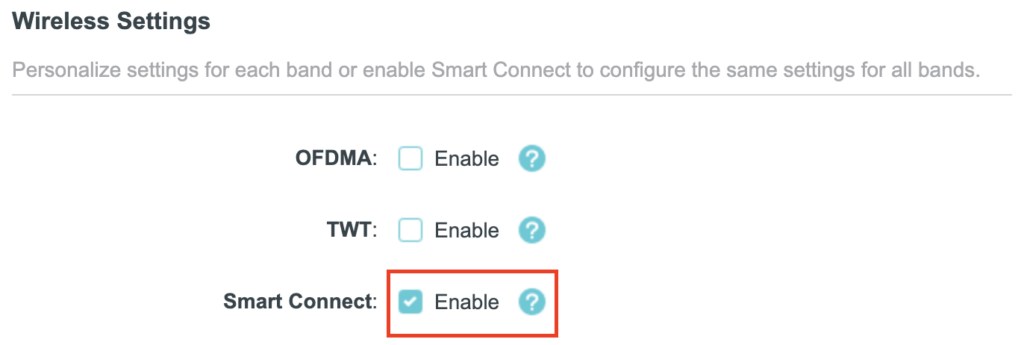
If you want both 2.4GHz and 5GHz networks to be bonded and have the same name click the Smart Connect checkbox.

TP-Link Separate Wifi

6. Connect your devices to the new wireless network.

TROUBLESHOOTING

Still having issues? Visit the VPN Troubleshooting section.

Troubleshoot Here

Router FAQs

admin · Jan 29, 2019 ·

Router FAQs

What is an IP Address?

An IP (Internet Protocol) Address is a numerical assignment for each device (cell phone, iPad, laptop computer, printer etc) inside a network that uses the Internet Protocol for communication. Internet Protocol is responsible for routing information packets across network boundaries. It is the main protocol establishing the Internet.

An IP address serves two predominant functions. First is to host or network interface identification. Second, it provides location addressing. To put it bluntly, an IP address tells wherever you are connecting, to whom you are visiting, and where you are located.

What is DNS?

DNS (Domain Name System) is a protocol within the TCP/IP protocol that uses a set of standards for how computers exchange data on the Internet and on many private networks.

The basic job of DNS is to convert a user-friendly domain name into an IP address that computers use to identify one another. Think of DNS like your cellphone contact list; you tap the name and the phone contacts to a phone number.

It is easier to remember flashrouters.com, rather than its IP address. Imagine if you had to remember all of the IP addresses of your favorite websites!

What is DNSMasq?

DNSMasq is a local DNS server that speeds up host-name searches from your computer/Internet connection after pressing enter.

Basically, DNSMasq gives the router some advanced enterprise functionality – caching DNS records locally so you have a faster browsing experience. Your computer only has to go to the router instead of repeatedly scouring the web for a commonly visited site.

What is Throughput and How Do I Improve it?

Throughput is the average rate of successful delivery of messages through a network. Simply put, throughput measures the speed of message delivery inside a network. If you think about it in relationship to networks and Internet connections, throughput defines the user experience. The key to a pleasing user experience is uninterrupted service and smooth data transfer.

In order to improve throughput,  you should get a router with more memory. If you notice that your network is running slowly due to congestion, you could probably benefit by upgrading your router to one with more memory. FlashMemory and RAM on a router add more room to prevent network congestion and improve throughput.

Most of FlashRouters‘ high-end units come with at least 8 MB of Flash memory and 64 MB of RAM which should be more than capable for providing for the average home users’ or small business will need in the future.

What is PPPoE?

PPPoE stands for Point-to-Point Protocol over Ethernet, a network protocol for encapsulating Point-to-Point Protocol (PPP) frames inside Ethernet frames. It is used mainly with DSL services where individual users connect to a DSL modem over Ethernet.

With PPPoE, users virtually “dial” from one machine to another over an Ethernet network, establish a point-to-point connection and then data packets are securely transported through the connection.

PPPoE offers an Internet service provider (ISP) an easier way to track exactly how much bandwidth you are using in case they want to charge for it in the future.

What is the Difference Between VPN Encryption and Wireless Network Security?

VPN Encryption: If you are connected to the VPN on your home network, then any data that flows over the Internet is entirely encrypted whether you are connected to the Internet either wired or wirelessly. This means that if your Local ISP was trying to see what you are browsing or downloading, they would not be able to see your data.

Wireless Network Security: If you leave your wireless network open or insecure, it does not matter whether Internet traffic is encrypted, because someone can directly see what you are doing on your network, or even worse, can go in and put a wireless password on your network, locking you out. They may also be able to access folders and files on your computer without your control.

Best thing to do is protect your wireless network with a WPA secured password along with your VPN connection.

Are FlashRouters Affected By the Shellshock Bug?

No.

According to our in-house testing and multiple DD-WRT community reports, we have found that the Shellshock vulnerability will not work on with DD-WRT or TomatoUSB installed router. The vulnerability is based on a shell called BASH (Bourne Again Shell) but DD-WRT & Tomato firmware use BusyBox which is confirmed to not have this issue.

Please be advised that if you are using Optware on your DD-WRT router there is a chance that implementation is BASH based. Only used trusted optware on your router.

TP-Link Change Wireless Channel

TeamFlashRouters · Apr 16, 2024 ·

Follow this guide to change the Wireless channel on your TP-Link FlashRouter.

1. Connect your computer, phone, or tablet to the TP-Link router via wireless (FlashRouter24 / FlashRouter50) or via ethernet cable to one of the LAN ports on the router.

The FlashRouter WiFi password is printed on the sheet that came with the router and is set to Wireless#[First 5 characters of your router MAC]. The router MAC can be found on the bottom of your router if you cannot locate the sheet. For e.g. if your MAC is 1459C07E70A8 then your WiFi password is Wireless#1459C

Be sure to capitalize the W.

2. Once connected via wireless or ethernet on your device open your browser and go to the TP-Link firmware settings.

TP-Link URL Access

3. Enter tp-link as the admin password to access the TP-Link firmware settings.

TP-Link admin password

4. Click Wireless.

TP-Link Wireless tab

5. Change the Channel setting to the number that you want to use. Click Save.

TP-Link Change Wireless Channel

6. Connect your devices to the wireless network again as they may have been disconnected when making this change.

TROUBLESHOOTING

Still having issues? Visit the VPN Troubleshooting section.

Troubleshoot Here

TP-Link Merge or Separate 2.4GHz and 5GHz Wi-Fi

TeamFlashRouters · Apr 17, 2024 ·

Your TP-Link router broadcasts a 2.4GHz and a 5GHz Wi-Fi network. These can be separated to allow you to assign your devices to the network that best suits them or merged into a single network so your devices automatically select the best band to use. Follow this guide to separate or merge your Wi-Fi bands.

1. Connect your computer, phone, or tablet to the TP-Link router via wireless (FlashRouter24 / FlashRouter50) or via ethernet cable to one of the LAN ports on the router.

The FlashRouter WiFi password is printed on the sheet that came with the router and is set to Wireless#[First 5 characters of your router MAC]. The router MAC can be found on the bottom of your router if you cannot locate the sheet. For e.g. if your MAC is 1459C07E70A8 then your WiFi password is Wireless#1459C

Be sure to capitalize the W.

2. Once connected via wireless or ethernet on your device open your browser and go to the TP-Link firmware settings.

TP-Link URL Access

3. Enter tp-link as the admin password to access the TP-Link firmware settings.

TP-Link admin password

4. Click Wireless.

TP-Link Wireless tab

5. Check the Smart Connect checkbox to merge the two Wi-Fi bands. Uncheck the Smart Connect checkbox to separate the two Wi-Fi bands. If you have the two Wi-Fi bands separated make sure the Network Name (SSID) fields have different names for 2.4GHz and 5GHz bands. Click Save.

TP-Link Merge Wifi
TP-Link Separate Wifi

6. Connect your devices to the new wireless network.

TROUBLESHOOTING

Still having issues? Visit the VPN Troubleshooting section.

Troubleshoot Here

VPN FAQs

admin · Jan 29, 2019 ·

VPN FAQs
General VPN FAQ Answers

What is a VPN?

VPN is an acronym for ‘Virtual Private Network’, historically used by private organizations to seamlessly link geographically diverse locations via the Internet. A VPN ‘tunnels’ traffic between two devices by transmitting it over a secure network. There are also clearly identifiable benefits to individual Internet users accessing a VPN.

  • A VPN provides you with top-level security and privacy for all your Internet downloading, streaming and browsing. As long as you are signed into your VPN account, all data you transmit over the Internet is encrypted.
  • A VPN encrypts your device by hiding the IP address assigned by your Internet Service Provider (ISP) and replacing it with the IP address of your choosing from the list of server locations belonging to your VPN provider. This masks your identity when visiting sites that geo-restricted content, and helps you avoid devious local Internet marketing and advertising schemes that track you through your IP address.

Will a FlashRouter with a built-in VPN client speed up my connection?

FlashRouters are relatively new models that may enhance data transfers across your home network or extend the range of your Wireless signal. However, the speed at which you download or stream content can not exceed the speed of the connection you pay for through your ISP. Purchasing a FlashRouter or signing up for VPN service WILL NOT transform your regular connection into a high-speed broadband connection.

At the same time, if you do have a broadband connection, a FlashRouter with a VPN connection may slow down your transfer speeds due to the processor encrypting all of your data. In certain cases a FlashRouter with a VPN can also prevent throttling by an ISP of specific service like Netflix or Amazon Video.

Which VPN provider should I use?

Our routers have been tested to perform with many of the most popular VPN providers such as ExpressVPN, NordVPN, IPVanish, PrivateInternetAccess & CyberGhost among 50+ VPN providers so that subscribers can get the maximum benefit from their VPN service. If you prefer another provider, that is not an issue at all. You can still use a DD-WRT VPN FlashRouter with any VPN provider that offers DD-WRT router integration support. Contact our team for further information about using our routers with your VPN service of choice or if you need a VPN provider recommendation based on your location.

Should my FlashRouter replace my old router?

A FlashRouter will work as a standalone router by connecting your modem to its Wide Area Network (WAN) port, or using it in a Dual Router Network by connecting it to your existing router through a Local Area Network (LAN)/Ethernet port. Either way a FlashRouter can be configured to tunnel all traffic through the VPN server of your choosing.

If you would like to set up your Home Network so that some devices are being tunneled through a VPN server, and others are connecting to your Internet Service Provider (ISP) within your home country, then using your FlashRouter as an auxiliary device is recommended.

VPN Security FAQ Answers

Can I change my IP address to one in another country?

YES! The countries that you can change your IP address to depend on the offerings of your specific VPN providers. Prices and server locations vary across all VPN providers.

If you choose to purchase a FlashRouter then you will not have to install any VPN client software on your computer to change your IP address; the VPN will already be configured within the router. Therefore, any device you plug into this FlashRouter is automatically assigned the IP address of your selected VPN server.

When is my connection secure?

As long as the VPN account preset into your FlashRouter is active, any device that is connected to the Internet through this router has its network traffic encrypted, and IP address masked. With a FlashRouter you never have to physically login to your VPN account, as the settings have been stored in the router’s DD-WRT firmware.

Don’t worry though! If you are not at home, and using Wi-Fi in a public location, you can still use your VPN account on a laptop or mobile device through various other methods.

How can I be sure my connection is safe and encrypted?

In order to make sure that the connection on your FlashRouter is being rerouted appropriately through your VPN service, visit What is my IP address and make sure the location listed is the one you have chosen in your VPN settings, NOT your actual location.

If you wish, there is an Internet Kill Switch available as well for your router which will block the internet whenever you disconnect from VPN.

What VPN connection standards are supported on a FlashRouter?

Currently we support the OpenVPN protocol for VPN client connections. PPTP VPN has been deemed as insecure by the privacy community and so we no longer offer support for PPTP VPN connections.

Technical VPN FAQ Answers

What operating systems do you support?

A FlashRouter can be used with any operating system, be it Windows, Mac OS or Linux. A FlashRouter can also be used as a wireless access point for iPhones, iPads, and Android devices.

Our routers also work in conjunction with any other brand of router of ADSL or DSL modem/router combo from ISPs across the world.

Can I set up a VPN on a PS4, Xbox One, Kindle Fire, Roku, AppleTV or other devices without native VPN support?

THAT’S WHAT WE ARE HERE FOR!

If you purchase one of our FlashRouters loaded with DD-WRT firmware, you can run the client VPN connection from your router. Once you do this every device connected to the router will tunnel through the VPN.

Now you can stream content like Netflix, BBC iPlayer, Pandora Hulu, or Amazon Instant to your TV through any of these devices, instead of being constrained to streaming content on your computer!

If you need a recommendation for a VPN service with a specific streaming platform do not hesitate to contact our support team.

DD-WRT Router Setup Guide

DD-WRT Router Setup Guide

Quick Start Guide for DD-WRT FlashRouters

Find setup guides, FAQs and troubleshooting tips for DD-WRT configured FlashRouters.
VIEW SUPPORTED ROUTER MODELS

AC1450, R6220, R6230, R6250, R6260, R6300 V1, R6300 V2, R6400 V1, R6400 V2, R6700 V1, R6700 V2, R6700 V3, R7000, R7000P, R7800, R8000, R9000, XR500

Asus Logo

RT-AC56U/R, RT-AC68U V1, RT-AC68U V2, RT-AC1900P, RT-AC87U, RT-AC3100, RT-AC5300

WRT1200AC, WRT1900AC V1, WRT1900AC V2, WRT1900ACS V1, WRT1900ACS V2, WRT32X, WRT3200ACM

Internet Setup

  • Connect FlashRouter to Internet
  • Access FlashRouter DD-WRT firmware settings
  • What are some extra steps I can take to secure my network?
  • IPv6 Internet Setup
  • PPPoE Internet Setup

WiFi Setup

VPN Setup

DD-WRT Features

  • How do I set a Static IP for my device in DD-WRT?
  • How do I upgrade the DD-WRT firmware of my FlashRouter?
  • How do I save and load a backup file?
  • How do I schedule a reboot of my FlashRouter?
  • How do I change the DHCP range of my FlashRouter?

Search Support Articles

Troubleshooting

  • Why can’t I send emails while connected to VPN?
  • What is a DNS leak and how can I prevent a DNS leak in my router?
  • My VPN stopped working on my FlashRouter.
  • Why is my connection speed slower?
  • Why are streaming services blocked while connected to VPN?
  • How do I find my router local IP address?
  • How do I reset and reconfigure my FlashRouter?
  • How do I check for static network settings on my devices?
  • Why is my router not connecting to internet?
  • How to fix an Unidentified Network or Limited Connection.
  • Why are some of my devices not connecting to the internet?
  • Why is the internet LED red on my router?
  • Why is the power light on my FlashRouter blinking?
  • My 2.4GHz network is not showing up
  • My 5.0GHz network is not showing up
  • My WiFi password is not working
  • Why did my WiFi SSID change to ‘dd-wrt’?
  • Why are devices disconnecting from Wireless?
  • Why is my WiFi signal weak?

More Ways to Get Help

GET IN TOUCH

BUY SUPPORT
BROWSE FAQs
Change WiFi name and password on Roqos
TeamFlashRouters · Nov 14, 2021 ·

Change your Roqos’ WiFi Network Name and Password to anything you like. Make sure it is not a duplicate of an existing WiFi name.

Login to Roqos Core UI web app in a browser on any computer or smart device.

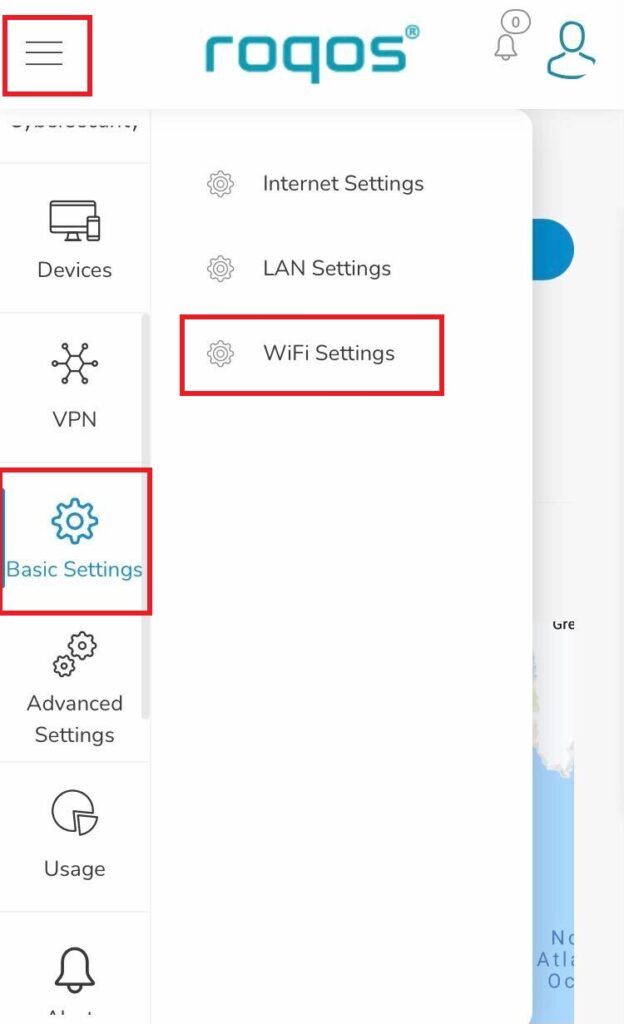
1. Click the navigation menu and select Basic Settings > WiFi Settings.

Roqos Basic Settings - WiFi Settings

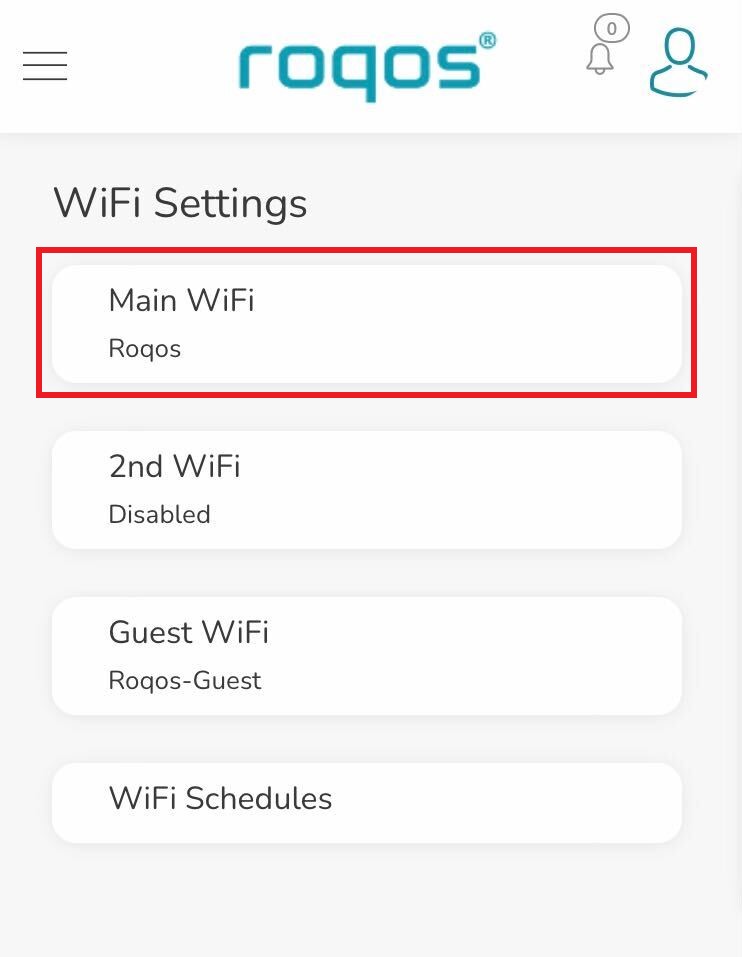
2. Click Main WiFi.

Roqos WiFi Settings - Main WiFi

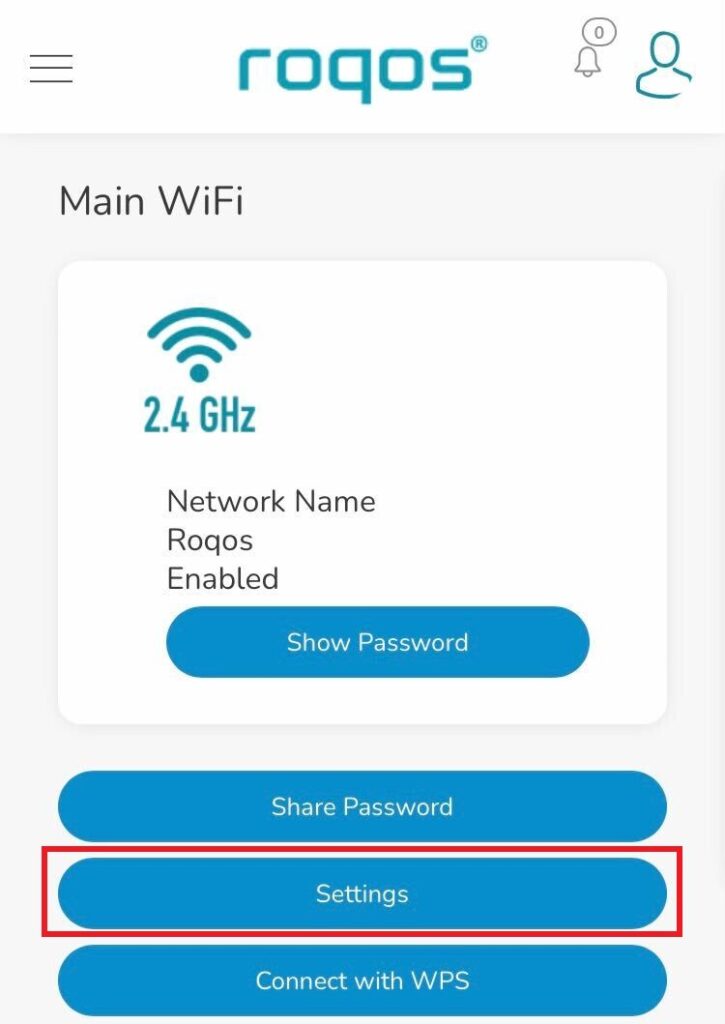
3. Click Settings.

Roqos WiFi Settings - Settings

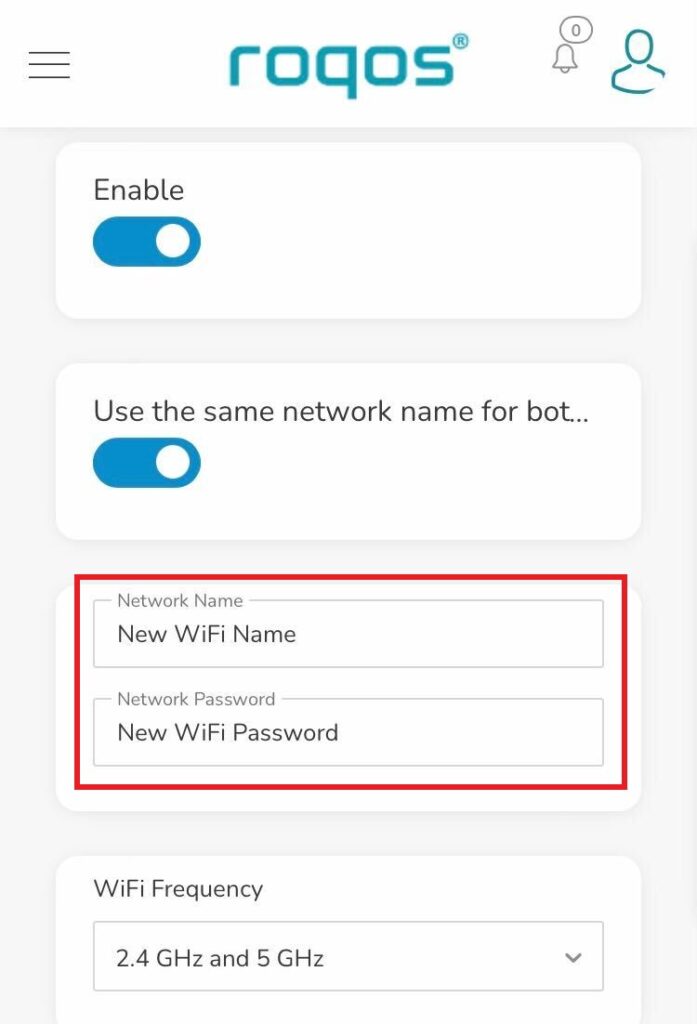
4. Enter the new Network Name and Network Password. Click Save.

Roqos WiFi Settings - Enter new name and password

5. Reconnect your WiFi devices to the new network with the password you just set.

Wireless Guest Network Setup – Unbridged (Recommended)

TeamFlashRouters · Jun 12, 2019 ·

If you would like to prevent visitors from connecting to your main WiFi network then you can create a separate Guest Network that will prevent access to the main router. This setup also allows you to create different rules for different WiFi SSID’s in your home ranging from QoS controls, access restrictions, VPN network segmentation, and more.

Preparing for Wireless Guest Network Setup

If you have a Dual-band or Tri-Band router you can setup a WiFi Guest Network, creating a separate VLAN (virtual local area network) for your visitors, or in order to segment your VPN networks on any band you like. We recommend using the 2.4GHz network for your DD-WRT Guest Wireless Network so it is compatible with the most possible WiFi devices. Setting up a guest network for visitors in your home allows you to keep them off of your main WiFi network.

We recommend performing this setup while connected to the FlashRouter via ethernet cable. If your computer does not have an ethernet port and you must proceed via wireless connection to the FlashRouter. Be sure to pay attention to the wireless connection as you may need to rejoin the FlashRouter’s network after making changes.

DD-WRT Router Setup for Wireless Guest Network

Enter Wireless settings

Navigate to Wireless > Basic Settings

FlashRouter DD-WRT Wireless Guest Network Settings Unbridged

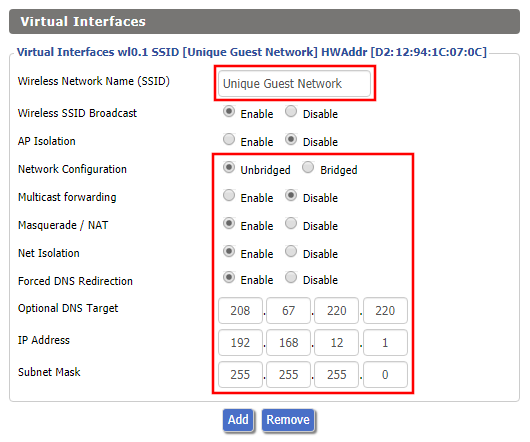
Under the 2.4GHz or 5GHz Interface click the Add button.

Wireless Network Name (SSID)

Enter the a unique network name for the guest network.

Network Configuration

Unbridged

Force DNS Redirection

Enable

Optional DNS Target

208.67.220.220

IP Address

192.168.12.1

Subnet Mask

255.255.255.0

CLICK SAVE

Enter Wireless Security settings

Navigate to Wireless > Wireless Security

Wireless Guest Network Setup on DD-WRT FlashRouter Unbridged
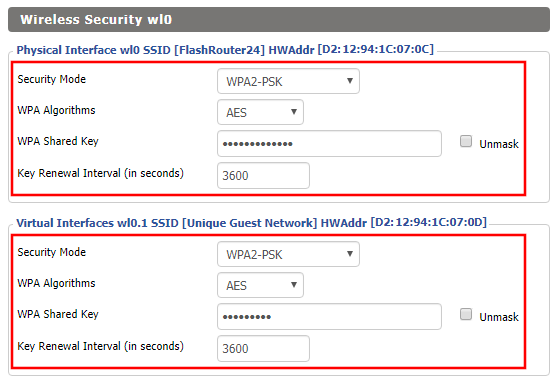
  1. Duplicate the wireless security settings that are set for the other bands for the newly created virtual interface.
  2. Click Apply Settings.
  3. Reboot your router.

Enable DHCP for Guest Network

Navigate to Setup > Networking

Wireless Guest Network Setup on DD-WRT FlashRouter Unbridged Setting DHCP Server
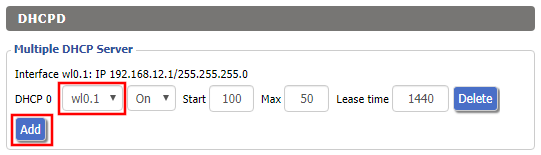
  1. Scroll to the very bottom of the page and under DHCPD click Add.
  2. Select wl0.1 or ath1.1 depending on your router model.
  3. Click Apply Settings.
  4. Reboot your router.

Depending on the router model and WiFi band you are using, the wireless interfaces will be labelled differently.

This setting can be labelled wl1.1, ath0.1, wl2.1, and so on. Make sure when you get up to the bridge assignment section that you are using the correct guest network Virtual Interface.

Back up your settings

Navigate to Administration > Backup

  1. Click the Backup button.
  2. A file named nvrambak.bin will be saved to your computer.
  3. You can load nvrambak.bin to restore your settings in the event of a reset.

TROUBLESHOOTING

Still having issues? Visit our Troubleshooting section to diagnose common problems here.

Troubleshoot Here

ProtonVPN WireGuard Setup

TeamFlashRouters · Jun 15, 2022 ·

Preparing for ProtonVPN WireGuard Setup

Verify your ProtonVPN login information

If you are not already a ProtonVPN user Sign Up Now.

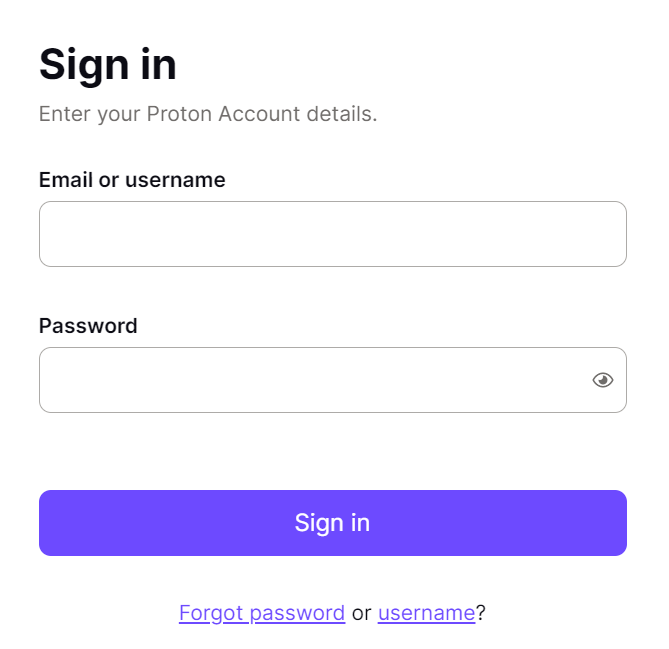
Log in to your account on the ProtonVPN website.

ProtonVPN Account login

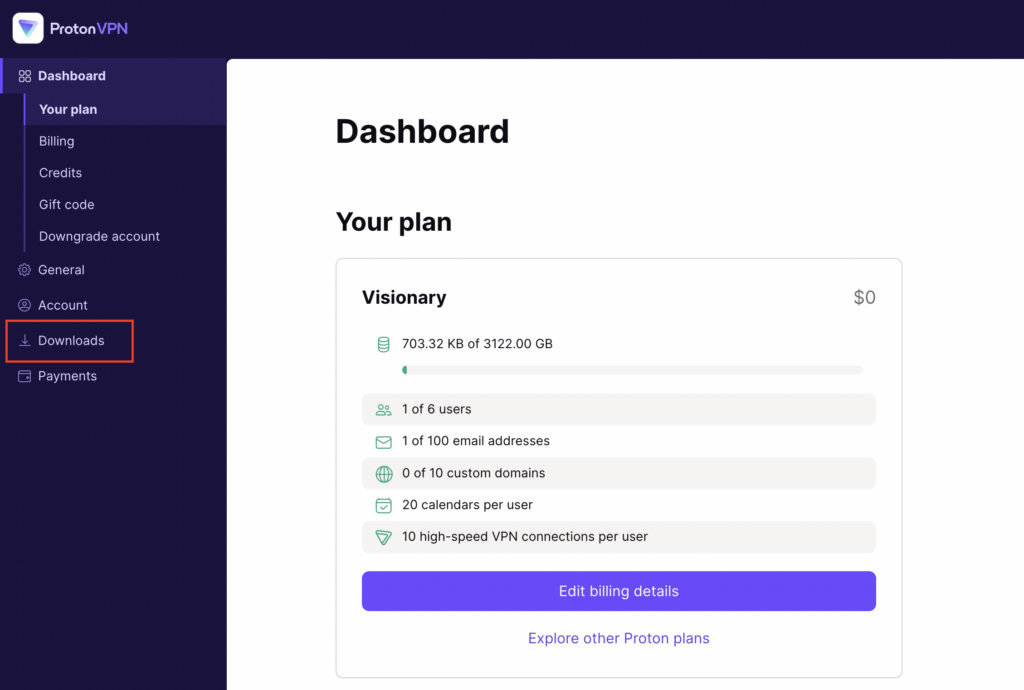
1. On the left hand side select Downloads.

ProtonVPN Downloads

2. Then select WireGuard Configuration.

ProtonVPN WireGuard Configuration

3. Enter the Device Name to assign the FlashRouter to identify it among your ProtonVPN connections.

ProtonVPN WireGuard Desired Name

4. Set the Device platform as Router.

ProtonVPN WireGuard select Router

5. Select the VPN Options that you would like to connect with.

ProtonVPN WireGuard VPN Options

6. ProtonVPN will recommend the ideal server for you to connect to based on your location. Click Create or scroll down and select the server you wish to connect to and click Create next to the server number.

ProtonVPN WireGuard select server
ProtonVPN WireGuard select servers

7. Click Download to download the .conf file of the server you selected.

ProtonVPN WireGuard download configuration

DD-WRT Router Setup for ProtonVPN WireGuard

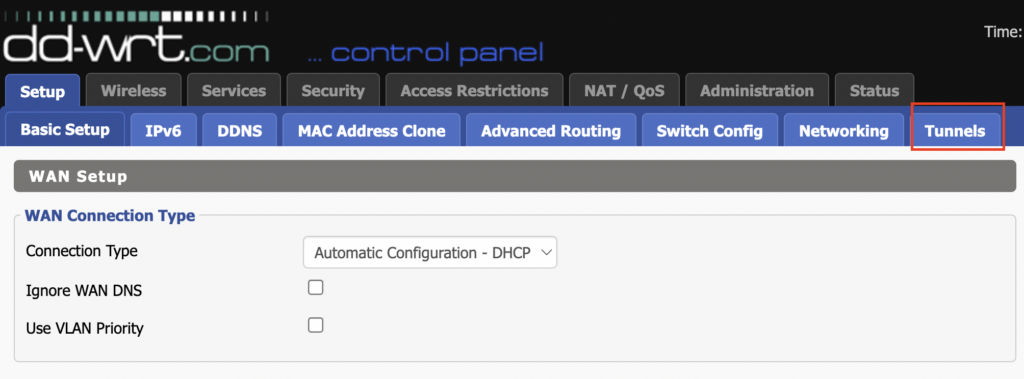
Navigate to Setup > Tunnels 

ProtonVPN WireGuard DD-WRT Tunnels

Enter ProtonVPN WireGuard settings

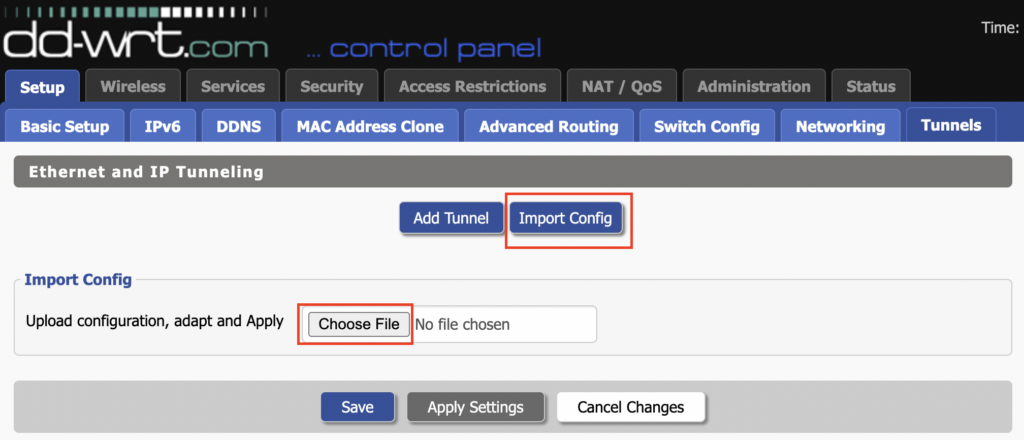
1. Click Import Config and then select Choose file. Select the .conf file that was downloaded earlier.

ProtonVPN WireGuard Import Config and Choose File

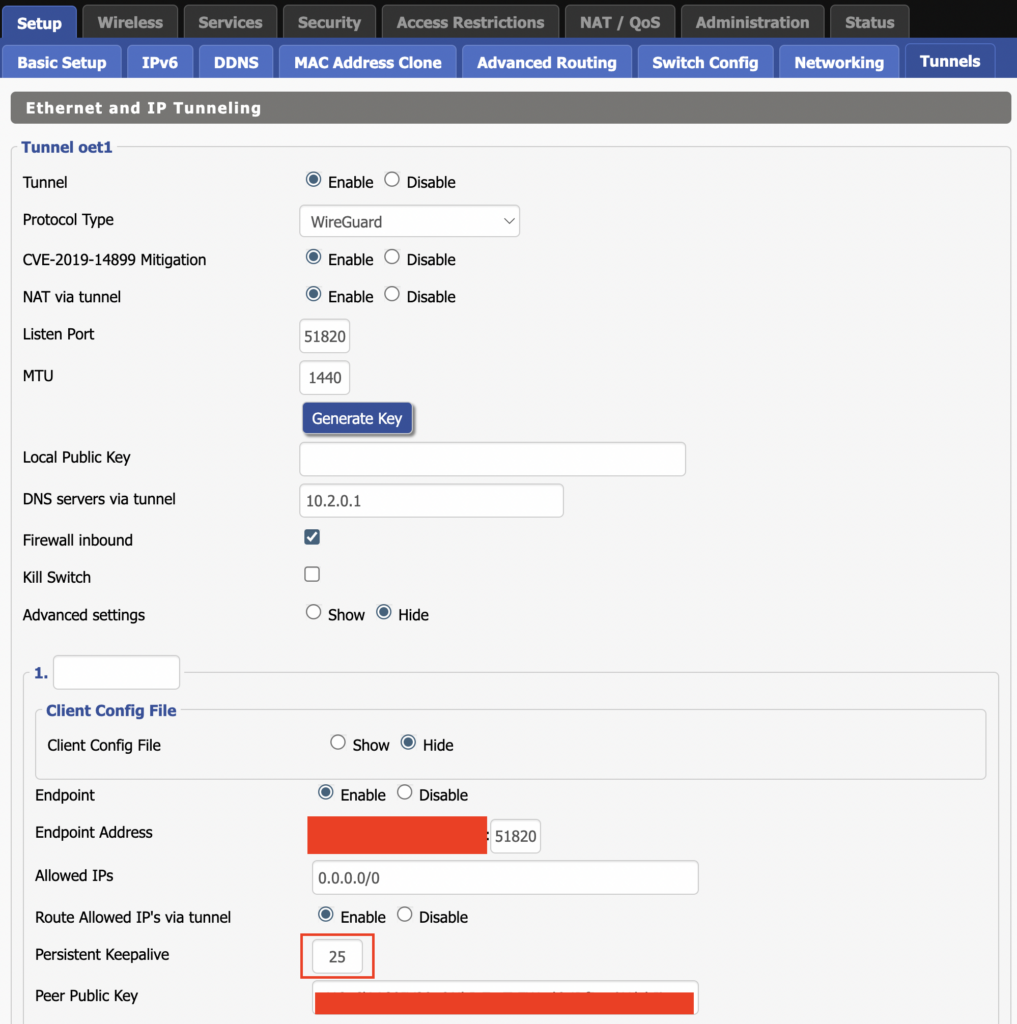
2. All settings will be loaded into the DD-WRT firmware the only field that needs to be adjusted is setting Persistent Keepalive to 25.

ProtonVPN WireGuard Persistent Keep Alive

3. Click Apply Settings at the bottom of the page.

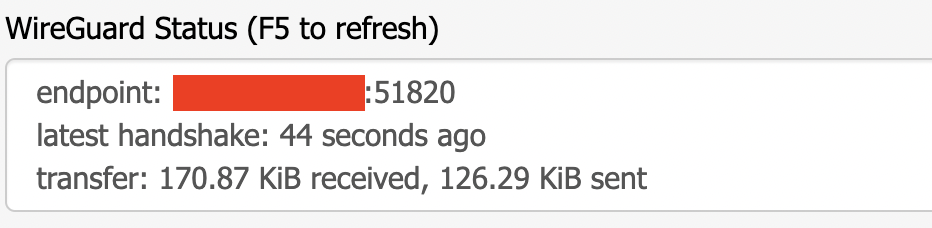
4. After 30 seconds or so refresh the page until you see the WireGuard Status on the page is populated as seen below.

ProtonVPN WireGuard Status

Verify a successful ProtonVPN connection

Navigate to Setup > Tunnels

  1. You should Endpoint, Latest handshake, and Transfer in the WireGuard status area.
  2. Visit whatismyipaddress.com to verify your status as using ProtonVPN.

Back up your settings

Navigate to Administration > Backup

  1. Click the Backup button.
  2. A file named nvrambak.bin will be saved to your computer.
  3. You can load nvrambak.bin to restore your settings in the event of a reset.

TROUBLESHOOTING

Still having issues? Visit the VPN Troubleshooting section.

Troubleshoot Here

PrivateInternetAccess (PIA) AsusWRT OpenVPN Setup

TeamFlashRouters · Apr 29, 2024 ·

Preparing for PIA AsusWRT Setup

Download your PIA .ovpn file

If you are not already a PIA user Sign Up Now.

1. Log in to your account on the PIA website.

PIA login

2. Successfully log in with your account information then go to PIA’s OpenVPN Config Generator.

3. On the OpenVPN Configuration Generator select the following:

OpenVPN Version: OpenVPN 2.4 or newer

Select Platform: Linux

Select Region: Choose the server location you’d like to connect to

Select Port: Typically we recommend UDP/1198 RSA-2048 AES-128-CBC SHA1 for best speeds but feel free to select the one you want to use.

4. Click Generate to download the .ovpn file. Do not open this file once it is downloaded.

PIA Generate .ovpn file

AsusWRT Router Setup for PIA

Login to AsusWRT firmware settings in a browser on any computer or smart device connected to the AsusWRT FlashRouter’s network.

1. Navigate to the VPN tab.

Merlin VPN Tab

2. Navigate to the VPN Fusion tab.

Asus VPN Fusion

3. Click Add profile.

Asus Add profile

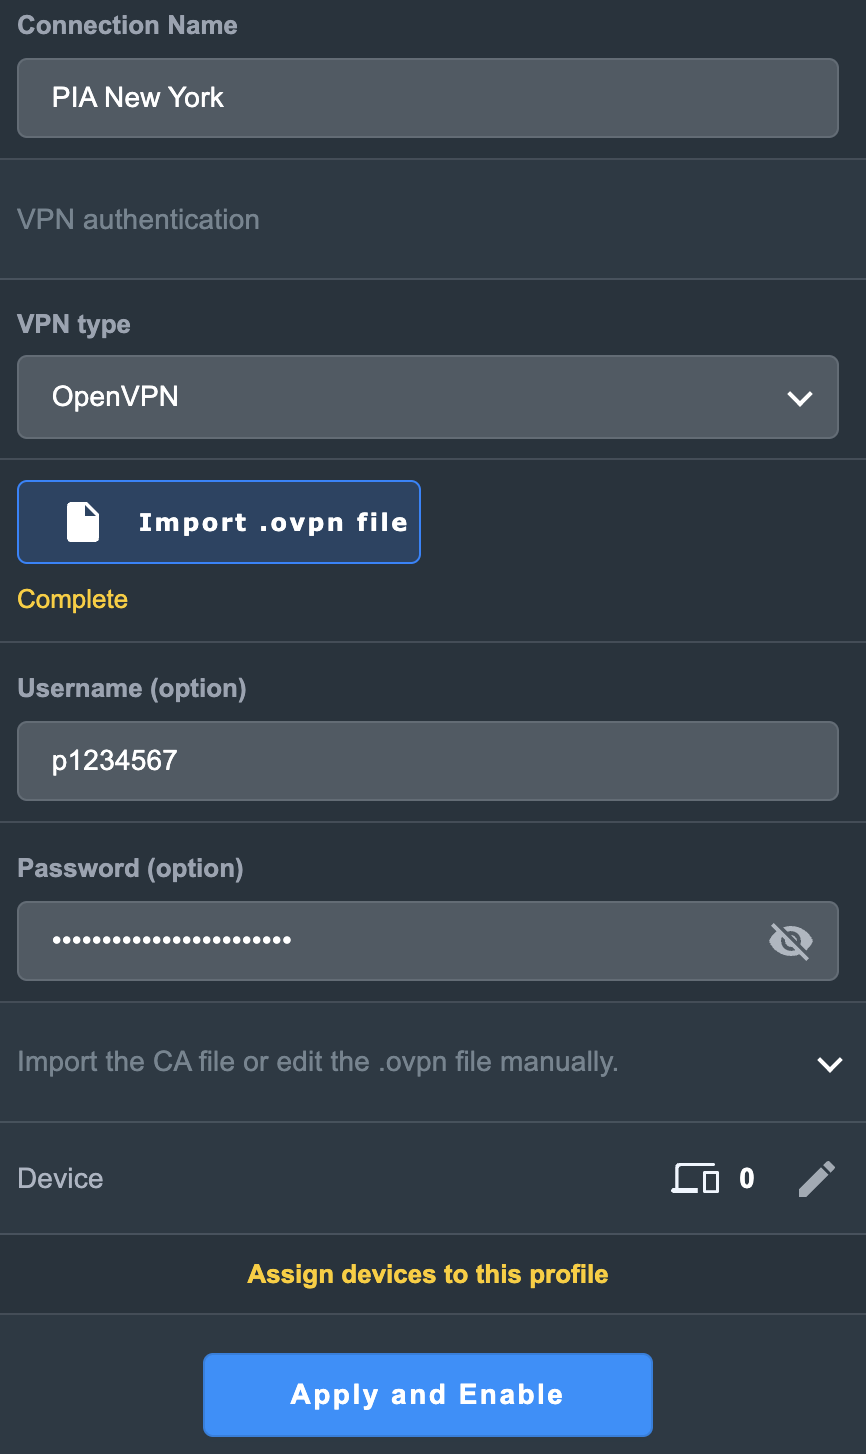
4. In the Connection Name field enter in the name you’d like to use for this OpenVPN Client profile. We typically advise entering in the location or server number here. Our example server was in New York so I have entered in PIA New York.

5. In the VPN Type dropdown select OpenVPN.

6. Click Import .ovpn file and select the .ovpn file you downloaded earlier. Then click Upload.

7. In the Username and Password fields paste in the PIA username and password you use to successfully login to your PIA website account.

8. Click Apply and Enable at the bottom of the page.

Asus PIA profile

If you only want certain devices to connect to the OpenVPN Client profile you are setting up instead of all the devices connected to the FlashRouter’s network click into the profile and disable Apply to all devices. Then click Devices and select the devices that you want to connect to VPN.

Asus VPN devices
Asus VPN select devices

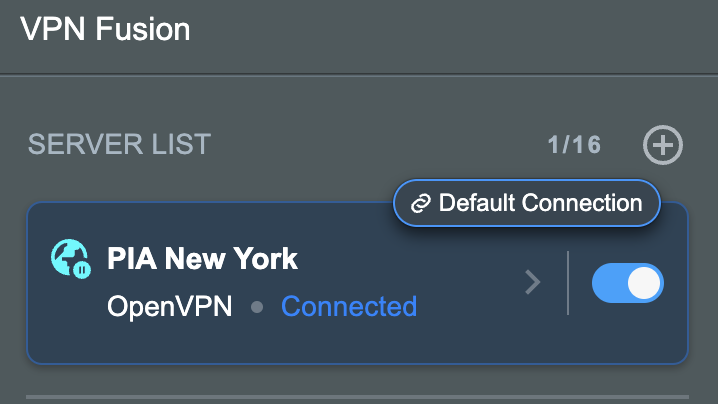
9. At the top of the page set the Service State toggle to ON to activate the VPN connection.

Asus PIA Connected

Verify a successful PIA connection

  1. You should now see a CONNECTED message.
  2. Visit PIA’s IP Check to verify your new IP address and virtual location.

In some cases you may notice that the location is not showing the same location as the server you have input in your router settings; this is because geo tracking tools are often tricked by VPN connections. As long as you see an IP address that is not the same as your normal Internet IP address then you are indeed connected to PIA.

How to change the PIA server

  1. Follow the steps at the top of the page to obtain a new .ovpn file.
  2. Then proceed with the settings same as initial setup.

TROUBLESHOOTING

Still having issues? Visit the VPN Troubleshooting section.

Troubleshoot Here

Change VPN Protocols on ExpressVPN/Aircove firmware

TeamFlashRouters · Mar 16, 2022 ·

Changing the VPN protocol your ExpressVPN FlashRouter is using can help with obtaining faster speeds while connected to VPN and connectivity issues in some regions of the world. A great advantage of using ExpressVPN firmware is the ability to use multiple protocols such as OpenVPN, IKEv2, and ExpressVPN’s own protocol Lightway.

1. Connect to the FlashRouter’s network via ethernet cable or wireless.

2. Open your web browser and enter expressvpnrouter.com or 192.168.132.1 in the URL.

ExpressVPNrouter.com
192.168.132.1

3. Login with your ExpressVPN FlashRouter admin password.

ExpressVPN Router admin login

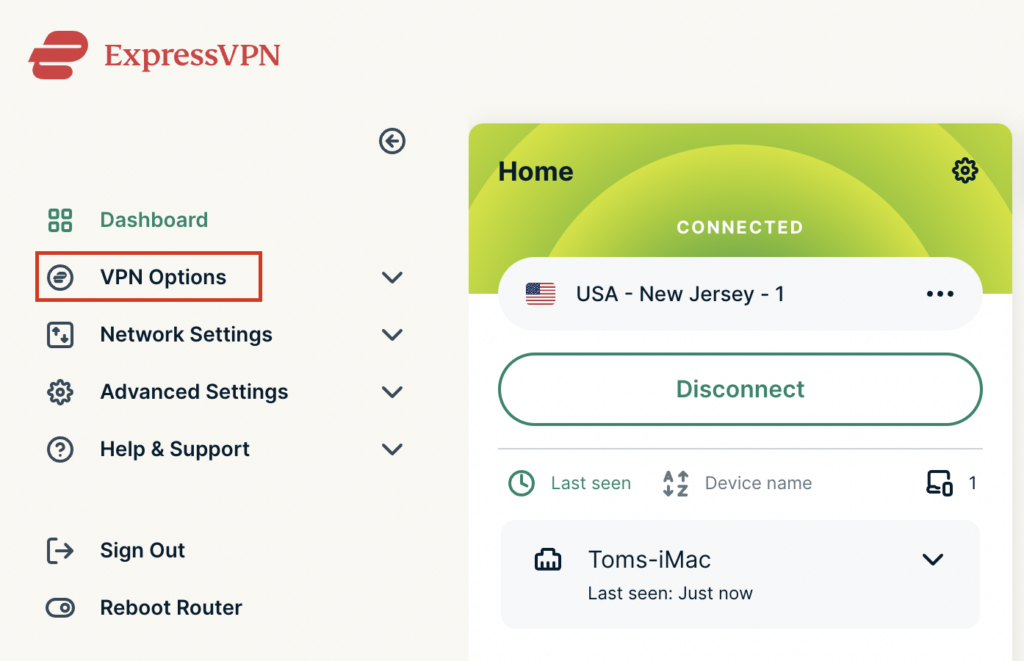
4. Select VPN Options on the left hand side of the menu.

ExpressVPN VPN Options

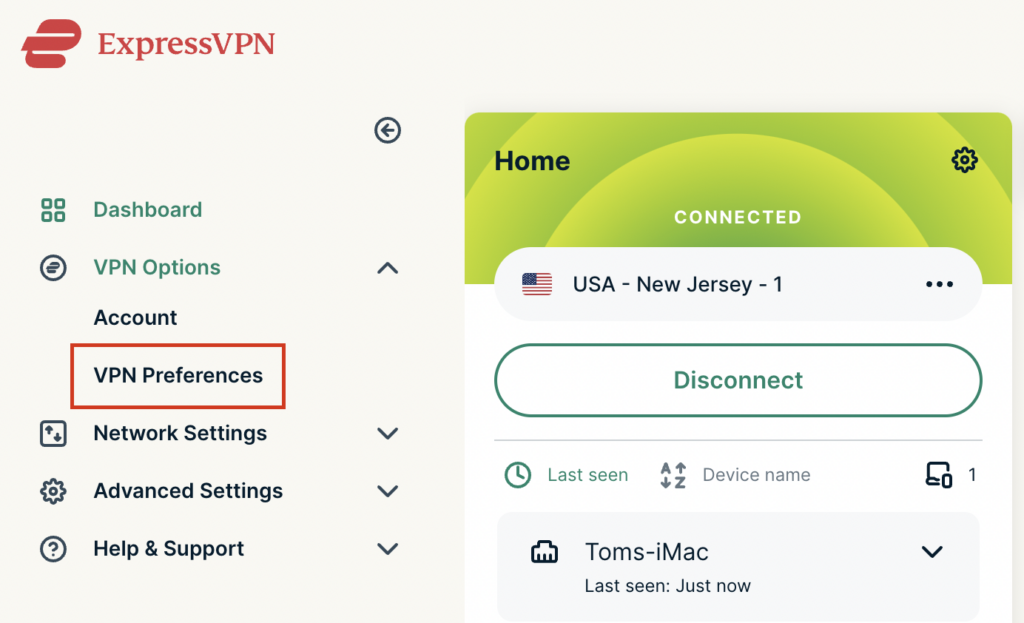
5. Select VPN Preferences on the left hand side of the menu.

ExpressVPN VPN Preferences

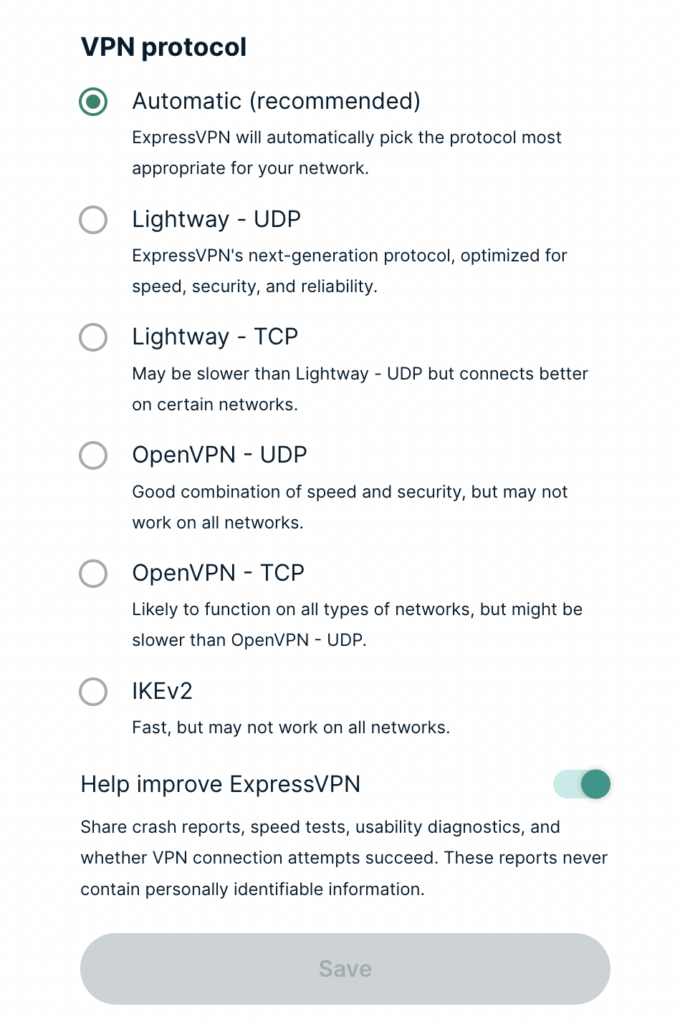
6. Choose the VPN protocol that best suits your needs. We typically see the fastest speeds while using the Lightway – UDP or IKEv2 protocols. Click Save.

ExpressVPN Protocols

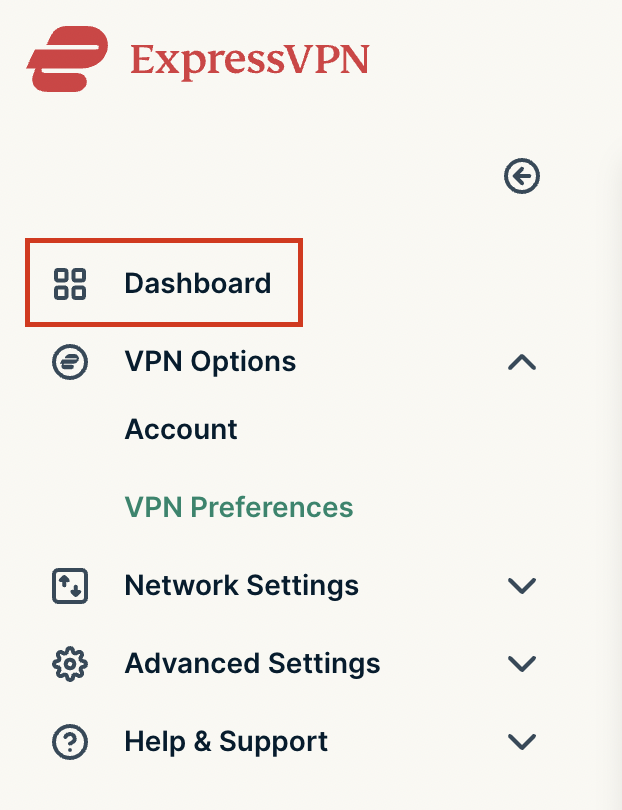
7. Click OK and then select Dashboard.

ExpressVPN Dashboard

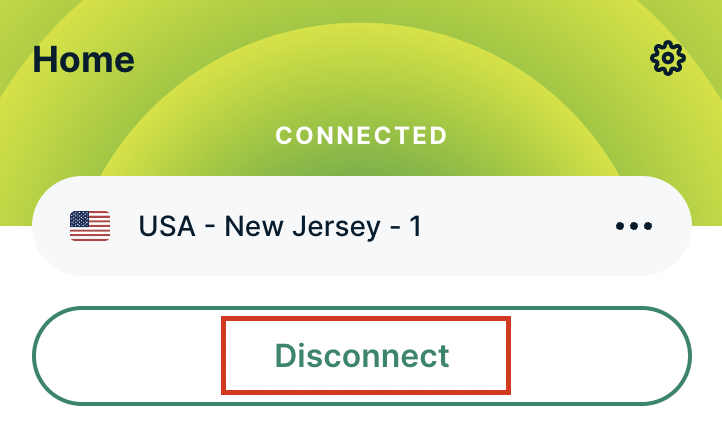
8. Click Disconnect to turn the VPN connection off.

ExpressVPN Disconnect

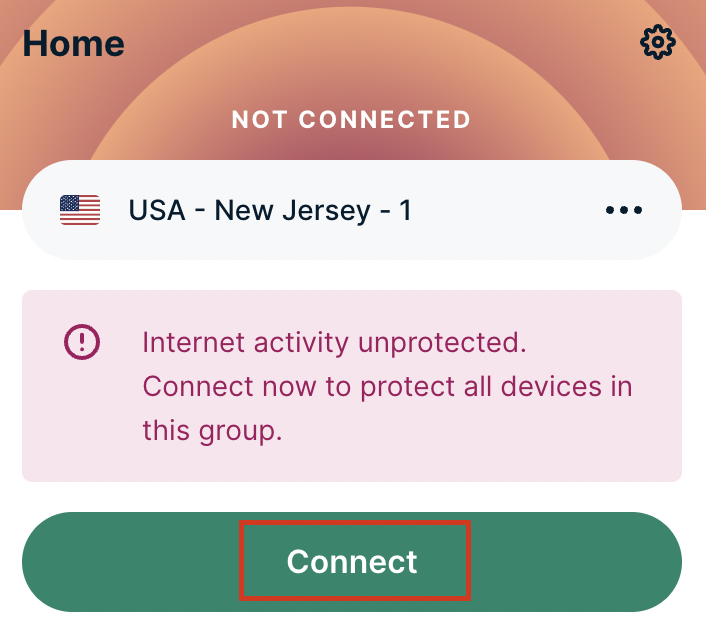
9. Click Connect to turn the VPN connection back on so it is using the new Protocol you selected.

ExpressVPN Connect

Change Wireless Channels on ExpressVPN/Aircove firmware

TeamFlashRouters · Mar 16, 2022 ·

Changing the wireless channel on your ExpressVPN FlashRouter can help with WiFi stability and allows you to use a wireless channel with less traffic in your local environment.

1. Connect to the FlashRouter’s network via ethernet cable or wireless.

2. Open your web browser and enter expressvpnrouter.com or 192.168.132.1 in the URL.

ExpressVPNrouter.com
192.168.132.1

3. Login with your ExpressVPN FlashRouter admin password.

ExpressVPN Router admin login

4. Select Network Settings on the left hand side of the menu.

ExpressVPN Network Settings

5. Select Wi-Fi Settings on the left hand side of the menu.

ExpressVPN WiFi Settings

6. Select Advanced Settings.

ExpressVPN WiFi Advanced Settings

7. Select the Channel Width and Main Channel you want your ExpressVPN FlashRouter to use. Note that higher 5GHz Wi-Fi channels will not be compatible with older devices. Click Save. Click Continue.

ExpressVPN WiFi Channels

Separate 2.4GHz and 5GHz Wi-Fi bands on ExpressVPN/Aircove firmware

TeamFlashRouters · Mar 16, 2022 ·

By default ExpressVPN firmware bonds the 2.4GHz and 5GHz wireless networks to a single wireless network name. Your device will automatically choose which one will provide the best connection. You can separate these networks to have unique Wi-Fi names so you can control which network your devices will use.

1. Connect to the FlashRouter’s network via ethernet cable or wireless.

2. Open your web browser and enter expressvpnrouter.com or 192.168.132.1 in the URL.

ExpressVPNrouter.com
192.168.132.1

3. Login with your ExpressVPN FlashRouter admin password.

ExpressVPN Router admin login

4. Select Network Settings on the left hand side of the menu.

ExpressVPN Network Settings

5. Select Wi-Fi Settings on the left hand side of the menu.

ExpressVPN WiFi Settings

6. Click the toggle for Separate 2.4GHz and 5GHz Wi-Fi.

ExpressVPN Separate 2.4GHz and 5GHz

7. Separate Wi-Fi details for the 5GHz band will now display. You can change the name and password if you so choose or leave it with the default name and password with “-5GHz” added to the name. Click Save. Click Continue.

ExpressVPN 5GHz added

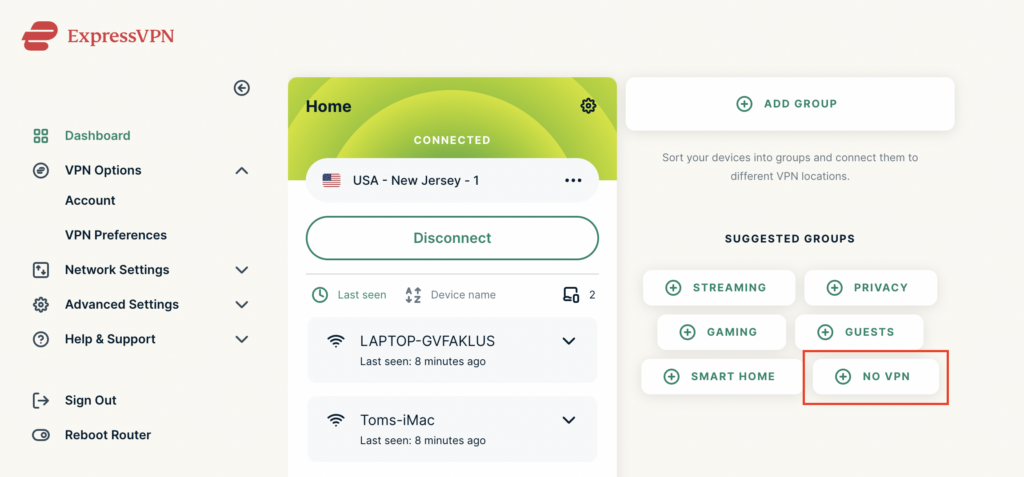
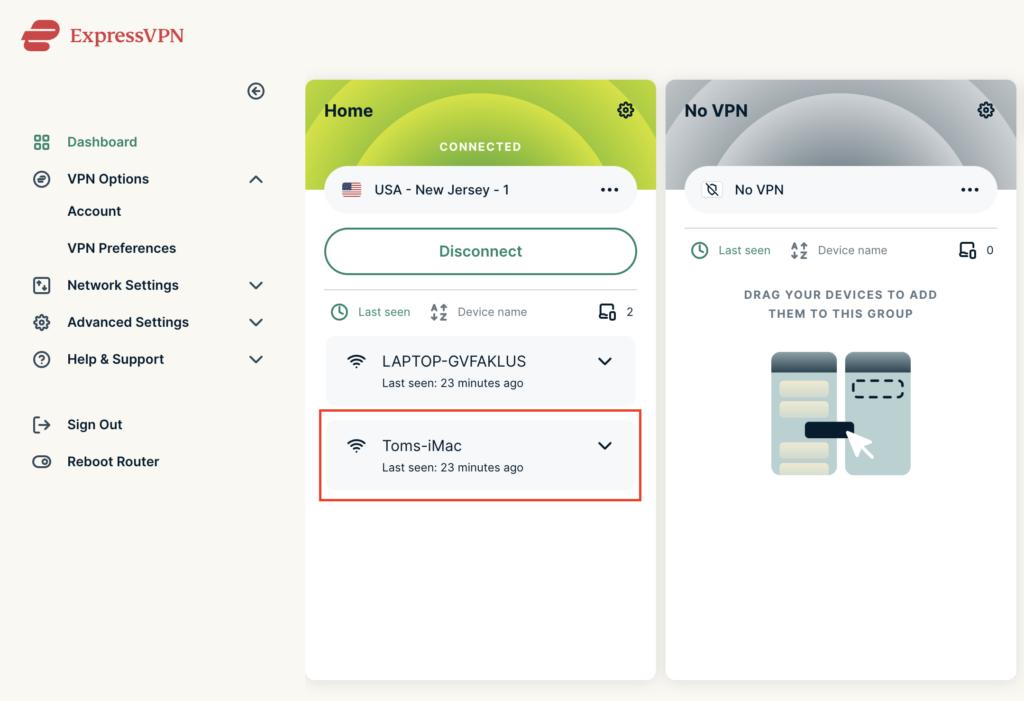
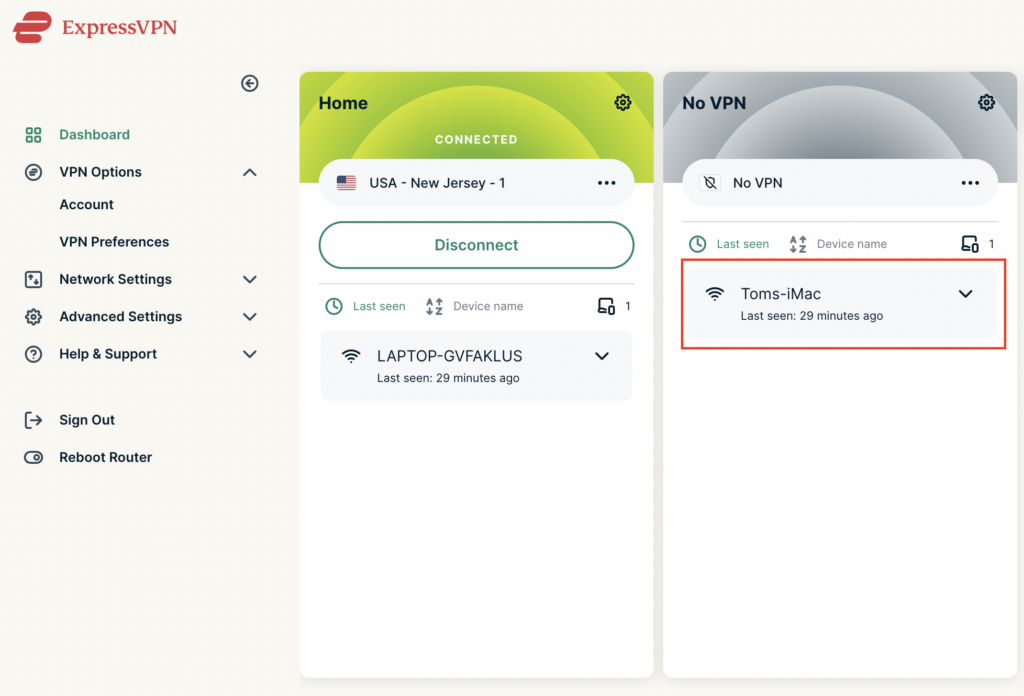
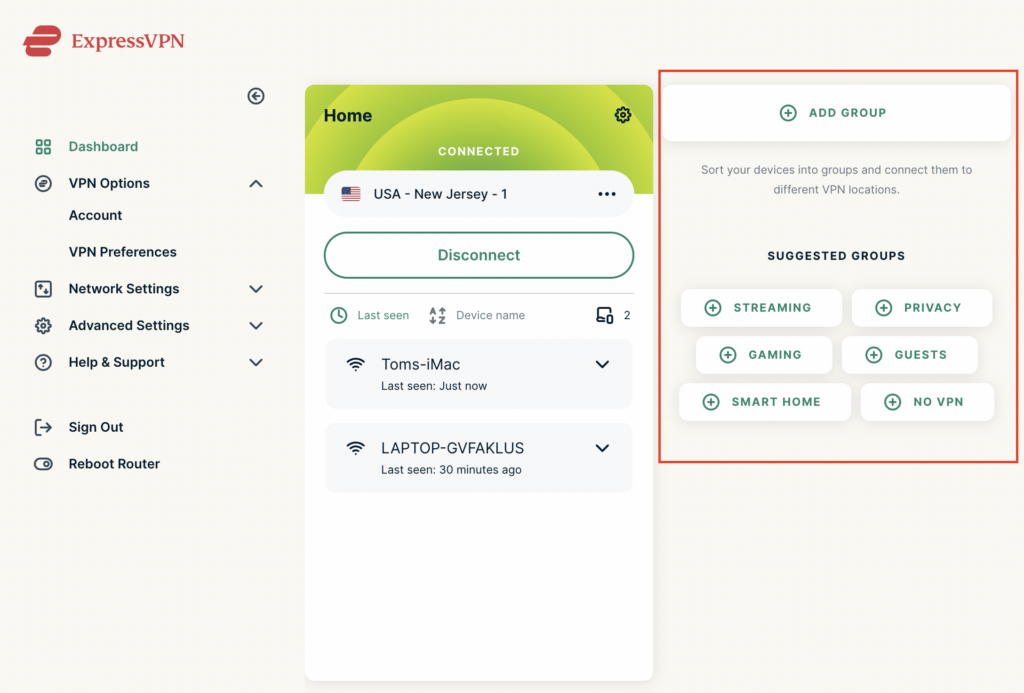
Using Device Groups to bypass VPN on ExpressVPN/Aircove firmware

TeamFlashRouters · May 12, 2022 ·

Bypassing the ExpressVPN tunnel on certain devices allows you to have multiple IP Addresses while connected to the same router. This feature is very helpful with certain websites where VPN is blocked such as streaming services and banking information.

1. Connect to the FlashRouter’s network via ethernet cable or wireless.

2. Open your web browser and enter expressvpnrouter.com or 192.168.132.1 in the URL.

ExpressVPNrouter.com
192.168.132.1

3. Login with your ExpressVPN FlashRouter admin password.

ExpressVPN Router admin login

4. Select VPN Off on the right hand side of the menu.

ExpressVPN select No VPN

5. Click and drag the device that you want to bypass the VPN tunnel to the No VPN area.

ExpressVPN No VPN select device
ExpressVPN No VPN select device 2

The devices assigned to No VPN will now correct directly to your ISP internet while the devices in the VPN group will remain connected to the VPN server.

Using Device Groups to connect to multiple VPN locations on ExpressVPN/Aircove firmware

TeamFlashRouters · May 12, 2022 ·

ExpressVPN offers a great feature of connecting the FlashRouter to multiple ExpressVPN servers at the same time. You can then assign your devices to the location that you wish.

1. Connect to the FlashRouter’s network via ethernet cable or wireless.

2. Open your web browser and enter expressvpnrouter.com or 192.168.132.1 in the URL.

ExpressVPNrouter.com
192.168.132.1

3. Login with your ExpressVPN FlashRouter admin password.

ExpressVPN Router admin login

4. Select Add Group and name the new group or select one of the pre-named groups below.

ExpressVPN Add Group

5. Click the three dots next to the new server location and type in the location you want to connect to. Click the new location to connect.

ExpressVPN Change server
ExpressVPN select new server

5. Click and drag the device that you want assigned to the VPN New Group.

ExpressVPN select device
ExpressVPN device assigned

The devices assigned to new group will now connect to that location while the devices in the first VPN group will remain connected to the VPN server selected in that area.

« Previous Page
Next Page »

Primary Sidebar

  • Troubleshooting
  • Router Access
  • Internet Connection Issues
  • WiFi Connectivity
  • General VPN Issues
  • TeamViewer Remote Support
  • DD-WRT Firmware
  • Facebook
  • Twitter
  • Instagram
  • Pinterest
  • YouTube

Footer