• Skip to primary navigation
  • Skip to main content
  • Skip to primary sidebar
  • Skip to footer

FlashRouters Support Portal

Prioritizing Privacy

  • SETUP GUIDES
    • Privacy Hero Router Setup Guide
    • ASUS-WRT Router Setup Guide
    • AsusWRT-Merlin Router Setup Guide
    • DD-WRT Router Setup Guide
    • ExpressVPN Router Setup Guide
    • GL.iNet Router Setup Guide
    • Roqos Core Router Setup Guide
  • TROUBLESHOOTING
    • Router Access
    • WiFi Connectivity
    • Internet Connection Issues
    • General VPN Issues
    • DD-WRT Firmware
    • TeamViewer Remote Support
  • FAQs
    • Router FAQs
    • VPN FAQs
    • Warranty and Returns FAQs
    • Sales FAQs
    • Shipping FAQs
    • Service Plan FAQs
  • Show Search
Hide Search

Search Results for: default+wifi+st

How to Access Your AsusWRT FlashRouter Settings

TeamFlashRouters · Oct 16, 2025 ·

This quick guide will walk you through connecting to your AsusWRT FlashRouter and logging into the admin settings page. You’ll use either WiFi or an Ethernet cable, then access the router dashboard through your browser.

Step 1. Connect Your Device to the Router

You can connect by WiFi or Ethernet:

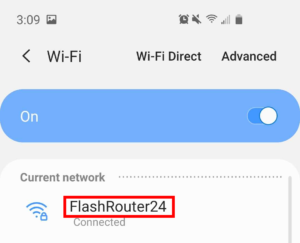
  • WiFi: Look for a network name like FlashRouter24 or FlashRouter50.
    • The WiFi password is set to: Wireless#[First 5 characters of your router’s MAC]
    • Example: If your MAC is CC28A07E70A8, your WiFi password is Wireless#CC28A.
    • ⚠️ Be sure to capitalize the “W” in Wireless.
  • Ethernet: Plug an Ethernet cable from your computer into one of the router’s LAN ports (usually marked or color-coded differently from the WAN port).

👉 Pro tip: Disconnect from any other WiFi networks during setup.

Step 2. Open the Router Login Page

  1. Open a web browser (Chrome, Safari, Firefox, Edge).
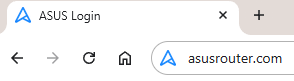
  2. In the address bar, type: 192.168.50.1 or go to asusrouter.com
  3. Press Enter.
Access Asus Router

This is the local router dashboard address (not a public website). If the page doesn’t load:

  • Try a different browser.
  • Clear your cache.
  • Ensure your device is connected to the FlashRouter network.

Step 3. Log In to the Router Settings

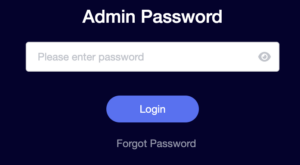
  • Default username: flashrouter
  • Default password: asuswrt-admin1
  • Some older devices may use: asuswrt1 or asuswrt
  • This is the factory default for AsusWRT routers shipped by FlashRouters.
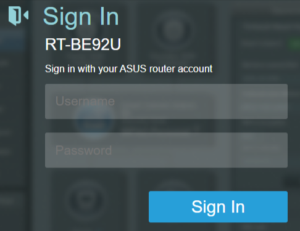
Asus Router Login

💡 Once you’re in, you can update your admin password in the settings for extra security.

Next Steps

Now that you’ve accessed your AsusWRT FlashRouter, you can:

  • Set up your VPN service
  • Customize your WiFi name and password
  • Adjust device controls and security settings

Check our support library for your specific VPN setup guide.
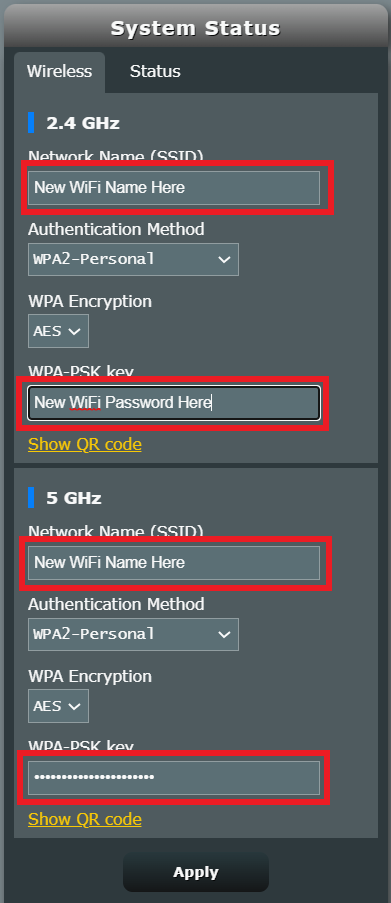
Change WiFi name and password on Asus

TeamFlashRouters · Feb 26, 2024 ·

Set a custom WiFi network name and password for your devices to join the Asus FlashRouter’s network.

View our guide for more instructions on how to access AsusWRT firmware settings.

1. Under General select Network Map.

Merlin Wifi change name and pass

2. In the Network name (SSID) field enter the name you want your Asus WiFi to appear as. This can be the same or different for both 2.4GHz and 5GHz bands. We typically advise setting different names for each so you can connect your streaming devices to the 5GHz band as that is the faster WiFi band.

3. In the WPA-PSK key field enter the password you want to join your devices to the Asus WiFi network. If your WiFi names are the same for 2.4GHz and 5GHz make sure they have the exact same wireless password set.

4. Click Apply and then rejoin the new wireless network.

Change WiFi name and password on Merlin

TeamFlashRouters · Jan 19, 2022 ·

Set a custom WiFi network name and password for your devices to join the Merlin FlashRouter’s network.

Login to Asus Merlin firmware settings in a browser on any computer or smart device.

1. Under General select Network Map.

Merlin Wifi change name and pass

2. In the Network name (SSID) field enter the name you want your Asus WiFi to appear as. This can be the same or different for both 2.4GHz and 5GHz bands. We typically advise setting different names for each so you can connect your streaming devices to the 5GHz band as that is the faster WiFi band.

3. In the WPA-PSK key field enter the password you want to join your devices to the Merlin WiFi network. If your WiFi names are the same for 2.4GHz and 5GHz make sure they have the exact same wireless password set.

4. Click Apply and then rejoin the new wireless network.

How to Access Your GL.iNet FlashRouter Settings

TeamFlashRouters · Feb 26, 2024 ·

This quick guide walk you through connecting to your GL.iNet FlashRouter (Flint, Slate, Beryl, or Marble) and logging into the admin settings page. You’ll use either WiFi or an Ethernet cable, then access the router dashboard through your browser.

Step 1. Connect Your Device to the Router

You can connect by WiFi or Ethernet:

  • WiFi: Look for a network name like FlashRouter24 or FlashRouter50
    • The WiFi password has been set to: Wireless#9483C
    • ⚠️ Be sure to capitalize the “W” in
  • Ethernet: Plug an Ethernet cable from your computer into one of the router’s LAN ports (usually marked or color-coded differently from the WAN port).

👉 Pro tip: Disconnect from any other WiFi networks during setup.

Step 2. Open the Router Login Page

  1. Open a web browser (Chrome, Safari, Firefox, Edge).
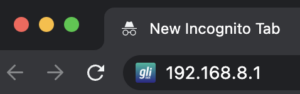
  2. In the address bar, type: 192.168.8.1
  3. Press Enter.
GL.iNet router access

This is the local router dashboard address (not a public website). If the page doesn’t load:

  • Try a different browser.
  • Clear your cache.
  • Ensure your device is connected to the FlashRouter network.

Step 3. Log In to the Router Settings

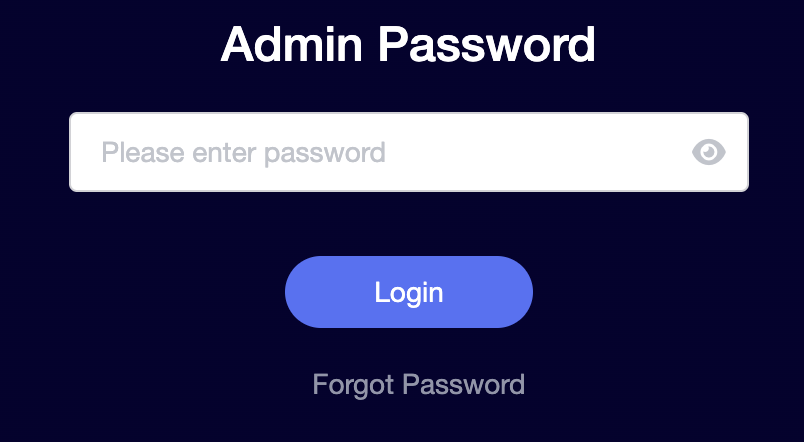
  • Default password: glopenwrt1 or openwrt
  • This is the factory default for all GL.iNet routers shipped by FlashRouters.
GL.iNet admin password enter

💡 Once you’re in, you can update your admin password in the settings for extra security.

Next Steps

Now that you’ve accessed your GL.iNet FlashRouter, you can:

  • Set up your VPN service
  • Customize your WiFi name and password
  • Adjust device controls and security settings

Check our support library for your specific VPN setup guide.
Sales FAQs
admin · Jan 29, 2019 ·

Sales FAQs
Can My Router Be Preconfigured With My VPN Information?

Plug and Play VPN Support

Yes you can!

To receive a plug and play with VPN device, you will need to provide our team with the credentials from your VPN provider subscription.

IMPORTANT NOTE: This is not required but recommended for users who wish to have the simplest, most seamless experience when the FlashRouter arrives. You can always change the password when the device arrives if you wish as well.


To have your router VPN preconfigured:

  1. Check the “Connect To VPN For Me” box under VPN – Preconfiguration on the Product Page during check out.
  2. Select your VPN provider. If you don’t see your VPN listed select “Other” and you will see an additional field to input who your provider is.
  3. You’ll receive an email after purchase with detailed instructions. If you have any questions our team is happy to help!
Please note:  If you do give a server location, we will automatically start the device with the closest/optimal server for the location we are shipping the device by default. A location has to be added to the initial configuration for plug and play encryption security to occur on the device.


Privacy Hero 2 Only:

While our team isn’t able to pre-configure the Privacy Hero 2 VPN Router before shipping it out since you’ll have to make a Privacy Hero user account and register your router, we can assist you with the VPN set up process once you receive the router and create your Privacy Hero user account via 1-on-1 remote session, email, or live chat on our site.

You can also use our step-by-step Privacy Hero VPN Router Setup Guide to complete the process.

Can I Use My Dedicated IP Address With A FlashRouter?

Dedicated IP Addresses from NordVPN, SurfShark, & TorGuard are supported on almost all of our FlashRouter options.

Check out our Dedicated IP Addresses Blog Post for more details!

Can I Use A FlashRouter With My Current Mesh System?

Yes!

You will be able to connect the FlashRouter of your choosing to your current mesh router via ethernet port as shown below:

ISP Modem/Router —- FlashRouter (VPN) —- Main Mesh Router (VPN from FlashRouter) 

This setup will allow you to keep your mesh network with added VPN protection, as well as add the FlashRouter wireless network for your devices.

You can disable the wifi on the FlashRouter also if you only wanted to use the mesh network for wifi.

Can You Flash My Router and Connect me to VPN?

At FlashRouters, we offer expert router flashing and VPN configuration services through our Flash My Router plans. Whether your router needs custom firmware flashing or just a VPN configuration, we ensure it’s set up for maximum security, privacy, and streaming performance with your chosen VPN provider.

The appointment will take place via remote software. During the appointment, our team will also answer any questions you may have about using the VPN on the router. Flashing is done out of the East Coast of the United States – we will do our best to accommodate your time zone difference if you are located in another part of the United States or another country.

👉 Explore our Flash My Router plans:
🔗 Flash My Router Plans


🔹 How It Works

✅ Flashing vs. Configuration: Some routers require custom firmware (flashing) to enable VPN, while others can be configured without flashing.
✅ Fully Optimized: Our team ensures your router is ready to securely connect to your VPN, block ISP tracking, and enhance your streaming experience.
✅ Remote Assistance Available: Get expert help setting up your VPN connection remotely if needed.


Flashing vs. Configuration: Router Compatibility

At FlashRouters, we handle VPN setup differently based on your router brand and model. Some routers require flashing custom firmware (like DD-WRT or AsusWRT-Merlin), while others can be configured without flashing.

🛠 Router Setup Types by Brand

🔹 Flashing Required (Custom Firmware Installation)

These routers require firmware flashing (DD-WRT or AsusWRT-Merlin) to enable VPN compatibility.

  • Asus – Flashed with AsusWRT-Merlin or updated to the latest AsusWRT build. Some models only require configuration.
  • Linksys – Flashed with DD-WRT firmware.
  • Netgear – Flashed with DD-WRT firmware.

🔹 Configuration Only (No Flashing Required)

These routers have built-in VPN support and only require proper setup.

  • TP-Link – Configured without flashing.
  • GL.iNet – Configured without flashing.
  • Cudy – Configured without flashing.

📌 Other brands are not supported at this time. If you have a different router, we recommend checking out our pre-flashed router options.


✅ Supported VPN Providers

We work with a wide range of VPN providers, including:

  • NordVPN
  • ExpressVPN
  • Surfshark
  • CyberGhost
  • IPVanish
  • Private Internet Access (PIA)
  • VyprVPN
  • ProtonVPN
  • PureVPN
  • Windscribe
  • IVPN
  • Mullvad
  • StrongVPN
  • AzireVPN
  • AstrillVPN
  • HotspotShield VPN

(If your provider isn’t listed, reach out – we may still be able to support it!)


🔗 Get Started Today!

👉 Explore our Flash My Router plans:
🔗 Flash My Router Plans

🔹 Need help selecting the right option? Contact our support team! We’re happy to assist.

How Can I Add The 1 Year NordVPN Service From My FlashRouters.com Order To My Current NordVPN Account?

You can easily combine the free 1 year of NordVPN included with your FlashRouter purchase once you receive the NordVPN Activation Code Email from FlashRouters.com. The email is typically received within 24 hours of order completion and will contain a link as well as an activation code.

This code can be entered at nordvpn.com/activate with the email address associated with your current NordVPN account to add the 1 year of free service to your existing service.


Privacy Hero 2 Only:

You can easily combine the free 1 year of NordVPN included with the Privacy Hero 2 VPN Router during the router activation process.

After activating the router, you’ll receive a NordVPN activation code within your privacy hero account dashboard. This code can be entered at nordvpn.com/activate with the email address associated with your current NordVPN account to add the 1 year of free service to your existing service.

What Are the Differences Between New, Recertified, And Open Box FlashRouters?

New

  • Direct from manufacturer, in new box.
  • Custom flashed on demand at time of the order.
  • 30 Day Satisfaction Guarantee / 1 Year Warranty.

Recertified (RM)

  • Direct from manufacturer/reseller, may be reboxed.
  • Custom flashed on demand at time of the order.
  • Specialists tested to guarantee same functionality as NEW routers.
  • 30 Day Satisfaction Guarantee / 1 Year Warranty.

Open Box

  • Limited quantity, discount items reboxed that may have cosmetic imperfections.
  • Same testing and functionality level and New and RM.
  • 30 Day Satisfaction Guarantee / No Warranty.

Will a FlashRouter Work With My Internet Service Provider?

US Customers (Single Router Solution):

Almost all Internet Service Providers(ISPs) require a modem in place to establish a connection to their service, however a modem by itself doesn’t provide the wifi connectivity needed in the home or office. A FlashRouter can connect directly to all known modems provided by major ISPs to create a wireless network so long as there is an Ethernet port on the modem to connect to the FlashRouter Internet port. 

US Customers (Dual Router Solution): 

Yes, FlashRouters are compatible with your ISP in what is called a Dual Router Set Up.

For this type of setup, you would use your current router or modem router to connect to your local ISP while using a FlashRouter to connect to your VPN. This is recommended as you will not overhaul your network with a new router, and you will be able to use your selected VPN service on the devices you wish to use it with.

This set up would result in the creation of two networks, which can be seen as the “Local Network” and the “FlashRouter Network”. All devices connected to the FlashRouter Network will go through the VPN service. 

For any device you would prefer to use without a VPN, you can connect to the local network. The chain of devices would be connected from LAN ton your modem or modem/router to WAN on the FlashRouter, with your current router connected to the FlashRouter via Ethernet cable. 


International Customers (Single Router Solution):

Almost all Internet Service Providers (ISPs) require a modem in place to establish a connection to their service, however a modem by itself doesn’t provide the wifi connectivity needed in the home or office. A FlashRouter can connect directly to all known modems provided by major ISPs to create a wireless network so long as there is an Ethernet port on the modem to connect to the FlashRouter Internet port. 

International Customers (Dual Router Solution):

ISPs should all be compatible. Some providers require VLAN tagging/VID settings when wiring directly from modem to FlashRouter. 

For this type of setup, you would use your current router or modem router to connect to your local ISP while using a FlashRouter to connect to your VPN. This is recommended as you will not overhaul your network with a new router, and you will be able to use your selected VPN service on the devices you wish to use it with.

This set up would result in the creation of two networks, which can be seen as the “Local Network” and the “FlashRouter Network”. All devices connected to the FlashRouter Network will go through the VPN service. 

For any device you would prefer to use without a VPN, you can connect to the local network. The chain of devices would be connected from LAN ton your modem or modem/router to WAN on the FlashRouter, with your current router connected to the FlashRouter via Ethernet cable. 

What Stock Firmware Features Will I Lose If I Flash My Router

Open Source firmware like DD-WRT or Assu Merlin has many features equivalent to what stock firmware has, in addition to adding new features to a router. However, some features are lost from the stock firmware when a router is flashed.

These are typically features that are put into the stock firmware by the manufacturers themselves. Things like the Linksys App and the NetGear Genie are examples of what would not be available or compatible on the router after flashing.

Most routers also have a WPS button. By default, the WPS button’s functionality is disabled when a router is flashed as it can be vulnerable and a security risk. It can be re-enabled by following this guide but we do not recommend it.

Does a FlashRouter or Service Plan Purchase Include a VPN Subscription?

A subscription to a VPN does not come with a FlashRouter or Service plan. If you are planning to use a VPN, you would need to sign up for one separately, directly from a provider.

Need assistance in finding a VPN Provider? Please visit our recent VPN Provider Best Seller List.

Plug and Play VPN Support

Unlike other VPN Router providers, FlashRouters is proud to offer free VPN service integration with any purchase.

To receive a plug and play with VPN device, you will need to provide our team with the credentials from your VPN provider subscription.

IMPORTANT NOTE: This is not required but recommended for users who wish to have the simplest, most seamless experience when the FlashRouter arrives. You can always change the password when the device arrives if you wish as well.

Shows what to look for when you want to preconfigure your router.

To have your router VPN pre-configured:

  1. Select Yes from the “Want Your Router Preconfigured?” on the Payment Page during checkout.
  2. Select your VPN provider. If you don’t see your VPN listed select “Other” and you will see an additional field to input who your provider is.
  3. Enter your your VPN username and password
  4. For ExpressVPN Firmware Routers there will be an additional box for your activation code.

Please note:  If you do not enter a server location request in “Order Comments”, we will automatically start the device with the closest/optimal server for the location we are shipping the device by default. A location has to be added to the initial configuration for plug and play encryption security to occur on the device.

Can I Use A FlashRouter To Work From Home?

Yes! A large number of our customers use their FlashRouters to “work from home” no matter where your travels take you. Check out our Working Remotely Blog Post for more details.

What is the Difference Between Business VPNs and VPN Services?

Location: VPN Services offer many server locations to encrypt your traffic through. They are located in several countries worldwide for creating a private VPN tunnel for your online activities. A business VPN connects to specific central servers for data or directly to your office, creating a direct tunnel for accessing sensitive work documents and information.

Logging: Most VPN services offer log-free connections for total anonymity and security when connected (it is important to check out their terms of service and privacy policy for full details). A business VPN is monitored and maintained by employers such as corporations, hospitals or universities.

Protection: VPN services secure your family’s personal data while using computers, SmartTVs and various Internet of Things devices. Business VPNs protect the data of the company while you are tunneling into work.

Are There VPN Service Providers That Offer VPN for Business?

There are in fact several trusted VPN providers that have services specially tailored for business use. NordVPN Teams and VyprVPN for Business offer a full suite of solutions like user management tools, dedicated IPs, personal product managers, global server access, business pricing, and more.

These solutions allow you to quickly deploy a safe and secure corporate network without building and maintaining your own servers. If you are a small business looking to quickly secure remote workers as they shift to work from home, and you do not have an in-house IT expert, then you should consider NordVPN Teams or VyprVPN for Business.

Even better, when choosing a business VPN provider like NordVPN or VyprVPN, employees can use routers with direct NordVPN and VyprVPN integration already included through the FR Privacy App. Meaning that a full network kill switch, routing by device, automatic connections, and more are all included as features with your business VPN connection.

Can I use a VPN on a FlashRouter With My Work/Corporate VPN?

Many of our customers have found that they can connect to both their corporate and personal VPN, however due to the variables beyond our control, we cannot guarantee this for every unique situation.

Using two VPNs at once can lead to unpredictable results. Bouncing your network traffic to multiple servers before finally arriving at it’s intended destination can sometimes introduce speed and connection issues.

Please consider that some employers and agencies are more vigilant regarding third party VPN use than others. There are tools readily available that detect the use of VPN services.

While these tools cannot decrypt and view your network traffic, they can tell your employer that you are potentially using a VPN, which can be against company policy.

If your corporate and personal VPN do not work together, then you can always set the computer using your work VPN to bypass the FlashRouter’s VPN tunnel by accessing the router admin panel for your device.

This way, your computer would only use the work VPN. Keep in mind however, your location would appear as your actual location to your work.

Every FlashRouter also comes with a 30 Day Satisfaction Guarantee.

If in the event you determine the FlashRouter is not working out for you, you can return the device within the first 30 Days. A $25 restocking fee does apply.

Can I Use a FlashRouter to Connect to a Dedicated Business VPN Network?

Of course! If you have an OpenVPN server running on a local machine or hosted on a cloud provider like Amazon Web Services (AWS), FlashRouters can create a custom router client configuration to connect the entire router and all connected devices to your OpenVPN server. Instead of employees connecting device-by-device, a router-based VPN connection allows for always-on secure VPN tunneling.

Our service team is here to work with you to test and ensure compatibility before purchasing. Interested in a router based custom client VPN solution for your remote workers? Please do not hesitate to contact us.

And, if you’re looking for a specific router, take a look at some of our most popular options!

How can I Reset the Password for My FlashRouters.com Customer Account?

To reset your password, you’ll want to click the “Account” icon in the upper right hand corner on our main website (Flashrouters.com). Once clicked, a menu will open where you can enter your login information, or select the “Forgot Password” button to trigger a reset email.

If you’re still having issues accessing your FlashRouters.com customer account after attempting a password reset, please reach out to us at support@flashrouters.com for further assistance.

What Payment Methods does FlashRouters Accept?

We accept Apple Pay, Google Pay, and all major cred/debit card providers on our payment method options page during checkout.


If you’d like to complete a purchase using PayPal as a payment method, please contact our team at support@flashrouters.com to request an invoice.

Can I Make Change/Update/Cancel My Order?

We strive to process and ship all orders within one business day. If you wish to make changes or cancellations, please contact us within 24 hours of placing your order at support@flashrouters.com with your order number and the changes you’d like to make.

While we will do our best to accommodate your request, please note that we cannot guarantee changes or cancellations.

Please note that if you need to update the shipping address, the order will require reapproval through our fraud prevention system with the new address.

Trouble Checking Out

Some customers have found that trying the methods below have helped solve any checkout errors they may have encountered:

⚡️Clearing cache
⚡️Refreshing web page
⚡️Switching web browsers
⚡️Using an incognito/private window
⚡️Confirming all billing information is accurate
⚡️Disable VPN if one is enabled
⚡️Disable Ad & Script Blockers if enabled
⚡️If you’re using a mobile device, switching to a computer or laptop would be ideal.

How do I check for static network settings on my devices?

TeamFlashRouters · May 8, 2019 ·

Static network settings set on a device from a previous connection will interfere with the FlashRouter’s network. Typically the FlashRouter’s network performs best when connected devices are set to automatically use the FlashRouter’s IP Address and DNS.

Make sure you are connected to the FlashRouter’s network via ethernet or WiFi. Keep in mind these instructions may vary based on your current software version.

Check for Static IP Address in Windows

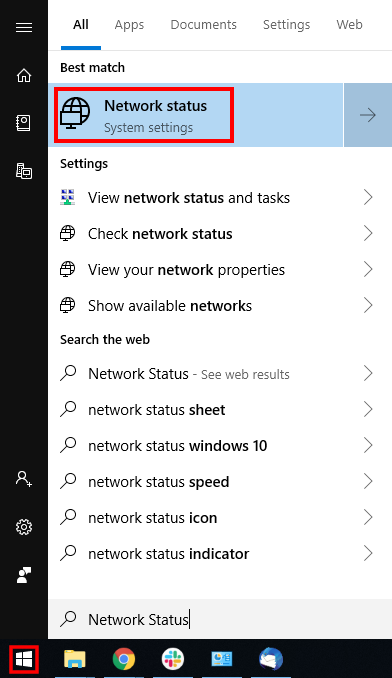
1.  Open the Window search box, and search “Network Status”

Find Static DNS settings for FlashRouter DD-WRT in Windows Computer

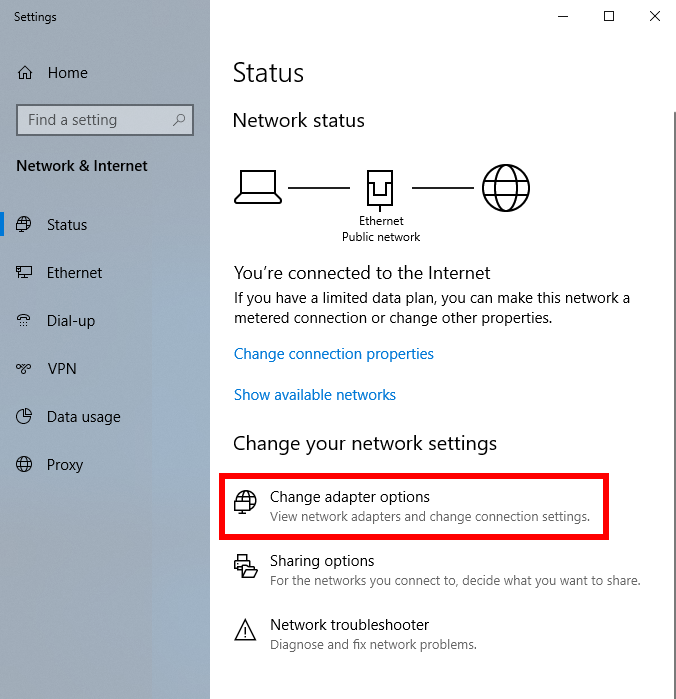
2. Select “Change adapter optons”

Find Static DNS settings for FlashRouter DD-WRT in Windows Computer 2

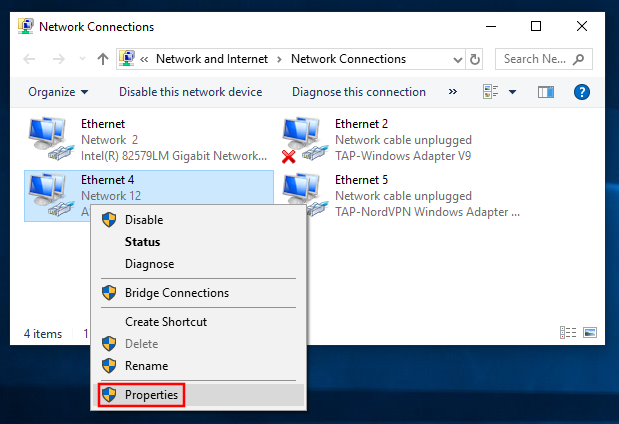
3. Right click on the WiFi and/or ethernet adapter and select Properties.

Find Static DNS settings for FlashRouter DD-WRT in Windows Computer 3

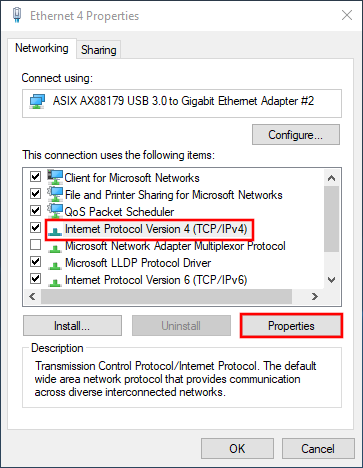
4. Highlight Internet Protocol Version 4 (TCP/IPv4) and click Properties.

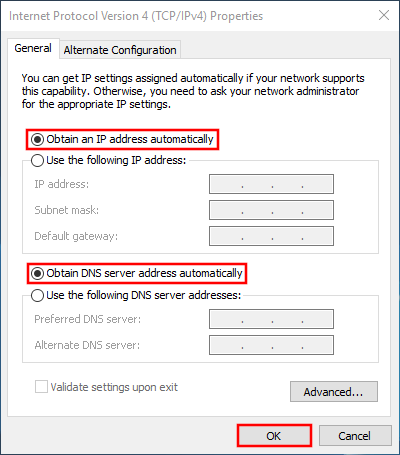
5. Delete the values entered for IP address, Subnet mask, Default gateway, Preferred DNS server, and Alternate DNS server.

6. Select Obtain an IP address automatically and Obtain DNS server address automatically.

7. Click OK.

Find Static DNS settings for FlashRouter DD-WRT in Windows Computer 4

Check for Static IP Address in Apple / Mac

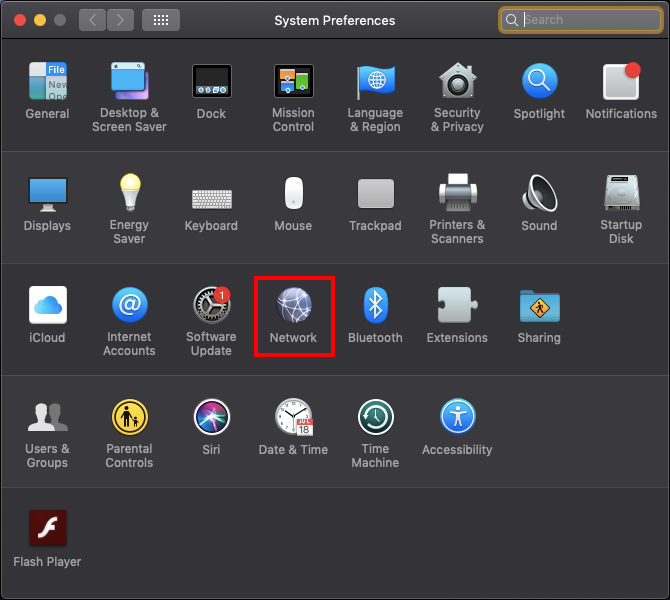
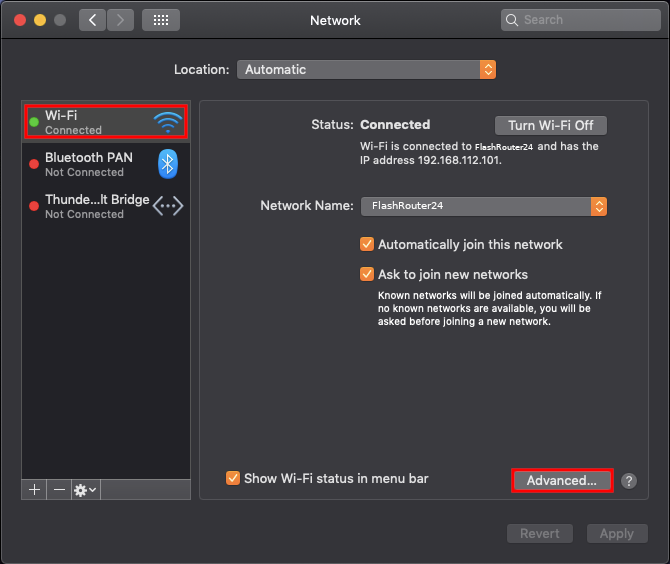
1. Open System Preferences, and select Network.

Find Static DNS settings for FlashRouter DD-WRT Using a MAC Computer

2. Select the adapter that is connected via ethernet or wireless. This will vary based on your current connection.

3. Select Advanced.

Find Static DNS settings for FlashRouter DD-WRT Using a MAC Computer 2

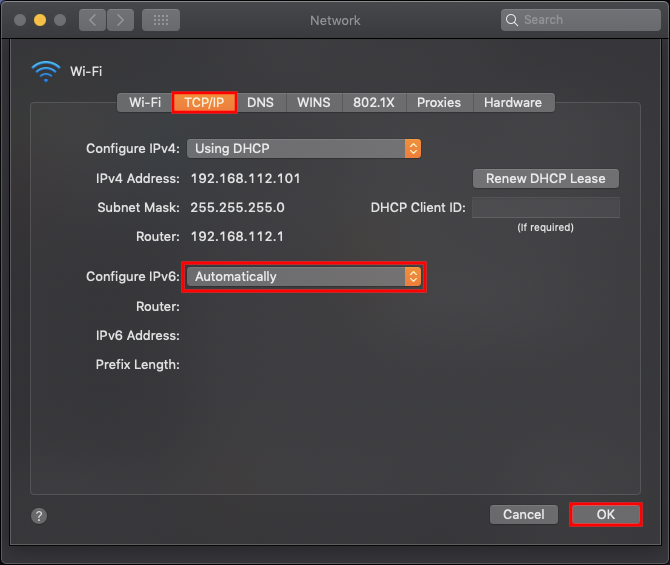
4. Select the TCP/IP tab.

5. Set Configure IPv4 to Automatically.

Find Static DNS settings for FlashRouter DD-WRT Using a MAC Computer 4

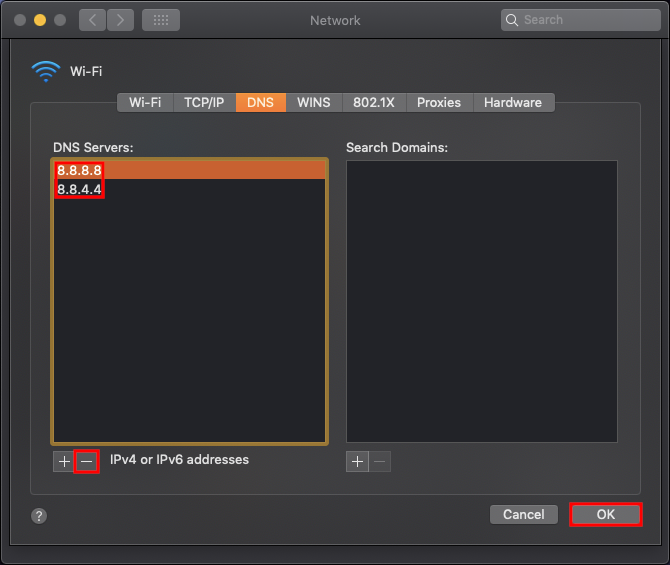
6. Select the DNS field and highlight any DNS servers you see there. If they can be removed you should click the minus symbol below.

Find Static DNS settings for FlashRouter DD-WRT Using a MAC Computer 5

7. Click OK.

8. Click Apply.

Check for Static IP Address in iOS

1.  Open Settings

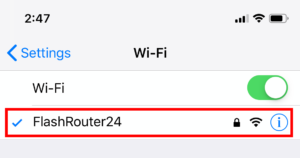
2. Select WiFi, and select the blue icon next to your current connection.

Select FlashRouters DD-WRT Wireless Network in order to Check Static IP Network Settings on iOS Mobile Device

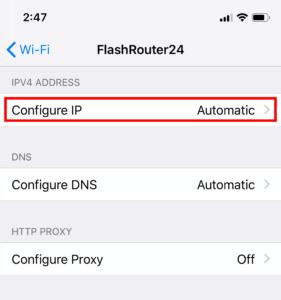
3. Make sure Configure IP is set to Automatically.

Check Static IP Network Settings on iOS Mobile Device and set Configure IP to Automatic

Check for Static IP Address in Android

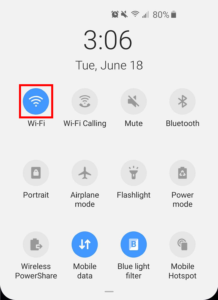
1. From the top of the screen, swipe down to display settings.

2. Select WiFi.

WiFi Icon and Settings in Android Mobile Device

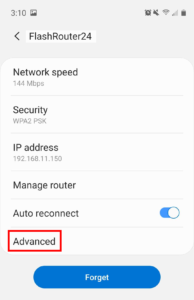
3. Select your current network.

4. Select Advanced.

Advanced Settings Button in Android Mobile Device

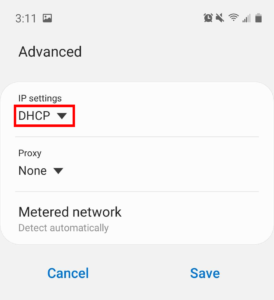
5. Make sure that IP settings is set to DHCP.

Check Static IP DHCP Network Settings in Android Mobile Device

How do I reset and reconfigure my ExpressVPN/Aircove FlashRouter?

TeamFlashRouters · Mar 16, 2022 ·

When is a router reset needed?

A reset of the FlashRouter should only be performed in the following instances:

  • You have exhausted all other troubleshooting methods and cannot access your router settings.
  • Password to access the FlashRouter’s settings are not working.
  • Power light on the router is blinking steadily.
  • Router is not accessible after upgrading the firmware

Reset Router

Asus FlashRouters:

  1. While the router is powered off press and hold the WPS button on the back or side of the router. Power up the router while continuing to hold the WPS. Continue to hold for 15 seconds as the router powers on (note this could be up to 45 seconds on some models before lights flash).
  2. You will see the lights on the router flashing steadily and this is how you know you have reset the router.
  3. Let the router sit for about a minute and then reboot the router.

Aircove, Linksys and Netgear FlashRouters:

  1. While the router is plugged in, find the reset button located on the back of the router. You will need a pin or pencil to hold down the button for 15 seconds.
  2. You will see the lights on the back of the router flash simultaneously and this is how you know you have reset the router.
  3. Let the router sit for about a minute and then reboot the router.

Access Router Settings

1. Connect to the FlashRouter’s network via ethernet cable or wireless.

The wireless network will appear as “Aircove”, “Linksys##”, “Netgear##”, or “Asus” and the password to join the network will be the default wireless password printed on the bottom of the router.

2. Open your web browser and enter expressvpnrouter.com or 192.168.132.1 in the URL.

ExpressVPNrouter.com
192.168.132.1

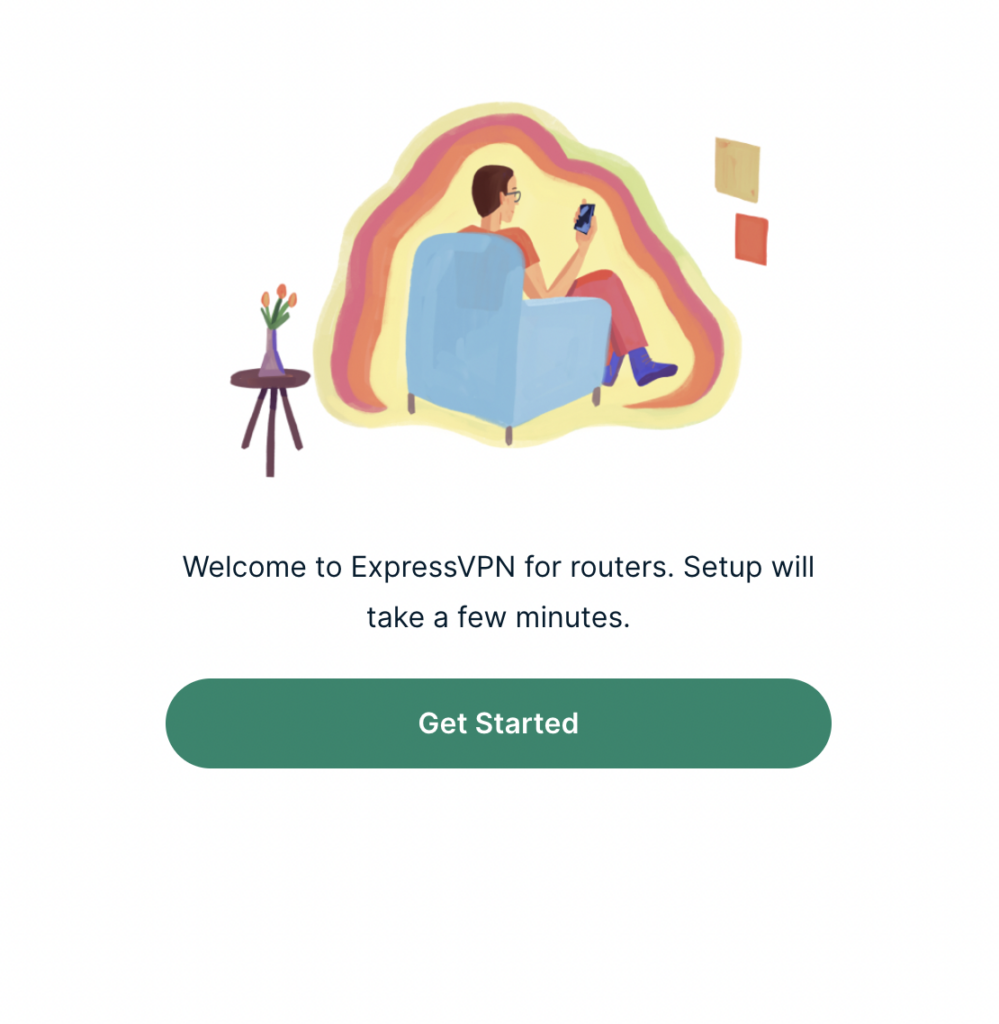
3. Click Get Started on the ExpressVPN page that is displayed.

ExpressVPN Get Started

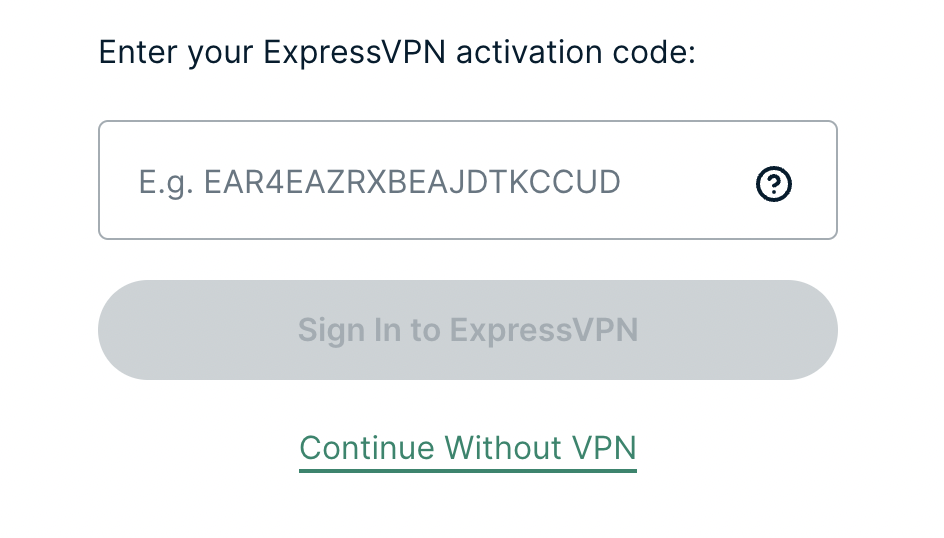
4a. If your FlashRouter is wired to the Internet correctly then you will be prompted to enter your ExpressVPN Activation Code found in your ExpressVPN account. Paste that in and click Sign in to ExpressVPN.

ExpressVPN Activation Code

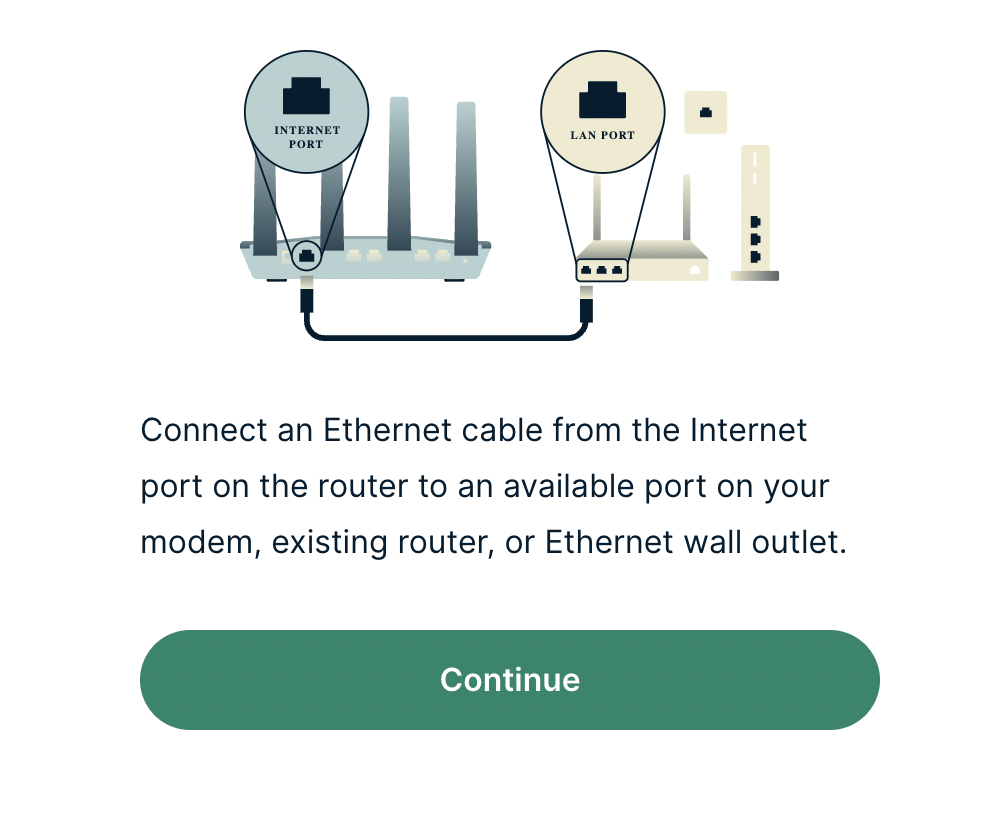
4b. If your FlashRouter is not wired correctly or is not receiving Internet properly make sure you are wired as detailed in the diagram that appears. If you are stuck at this screen we recommend powering off your ISP modem and any other router that the ExpressVPN FlashRouter is wired to and then powering them back up one by one.

Proceed with step “4a” above once the router is receiving Internet and you are prompted to enter the Activation Code.

ExpressVPN Wiring

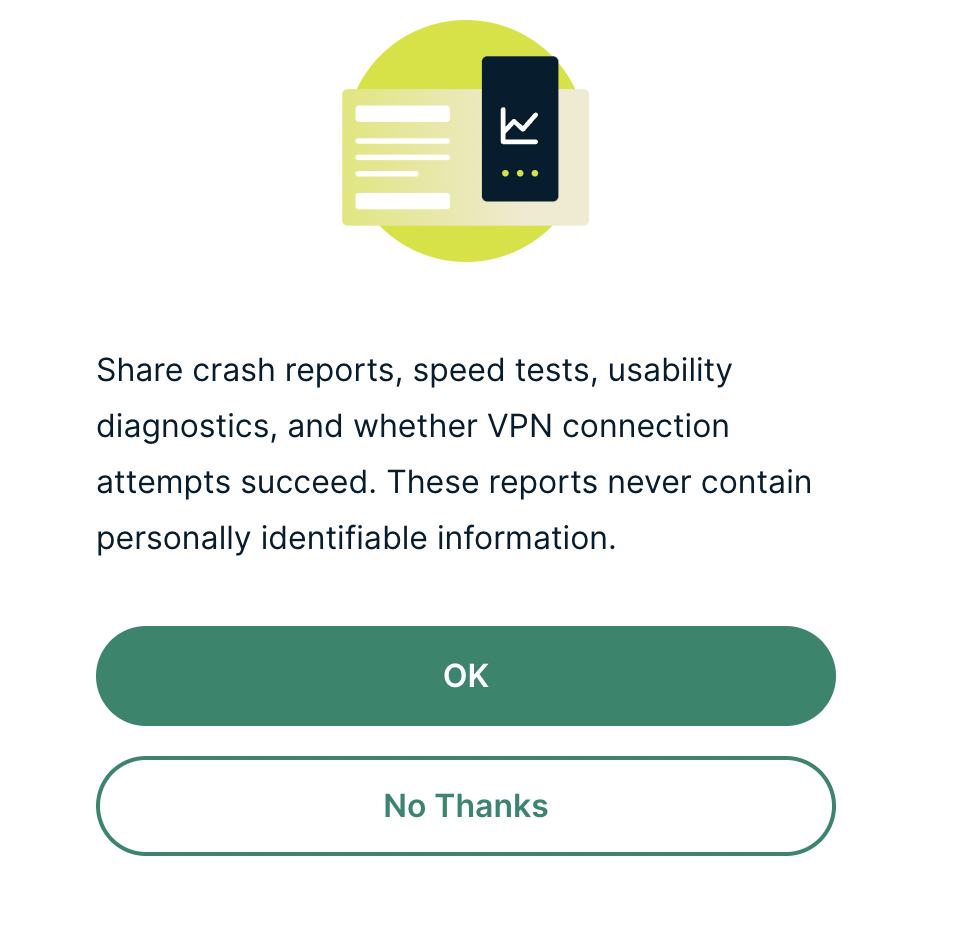
5. Select if you want to share anonymous crash report data with ExpressVPN to help them improve the firmware for future releases.

ExpressVPN Share Crash Report

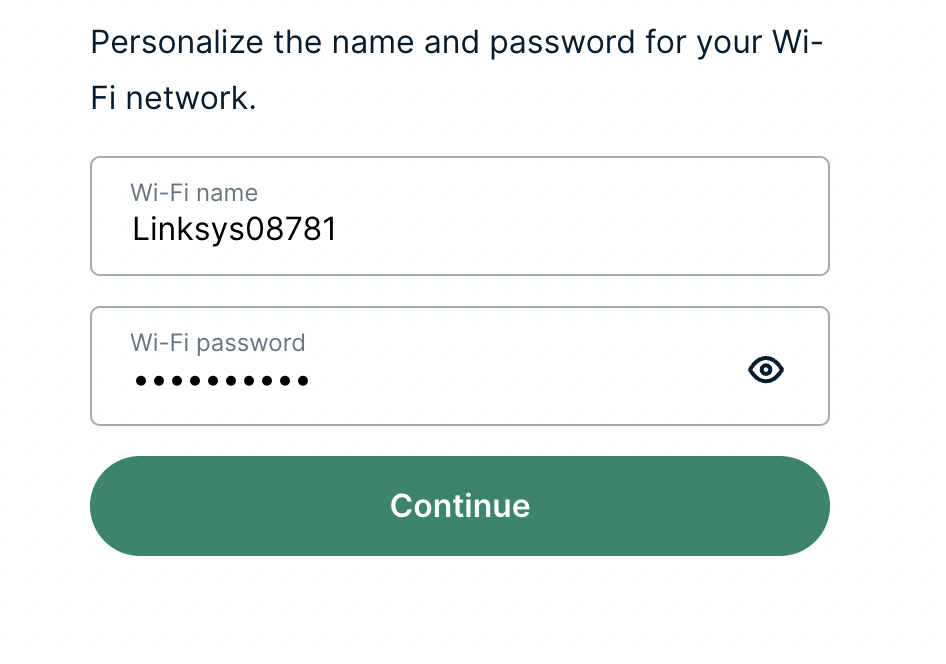
6. Set the WiFi name and password your wireless devices will use to connect to the FlashRouter’s network. Make sure the WiFi name is unique and not a duplicate of an existing WiFi name if you change it. You can also leave it as the default information if you like. Click Continue.

ExpressVPN Set WiFi Name and Password

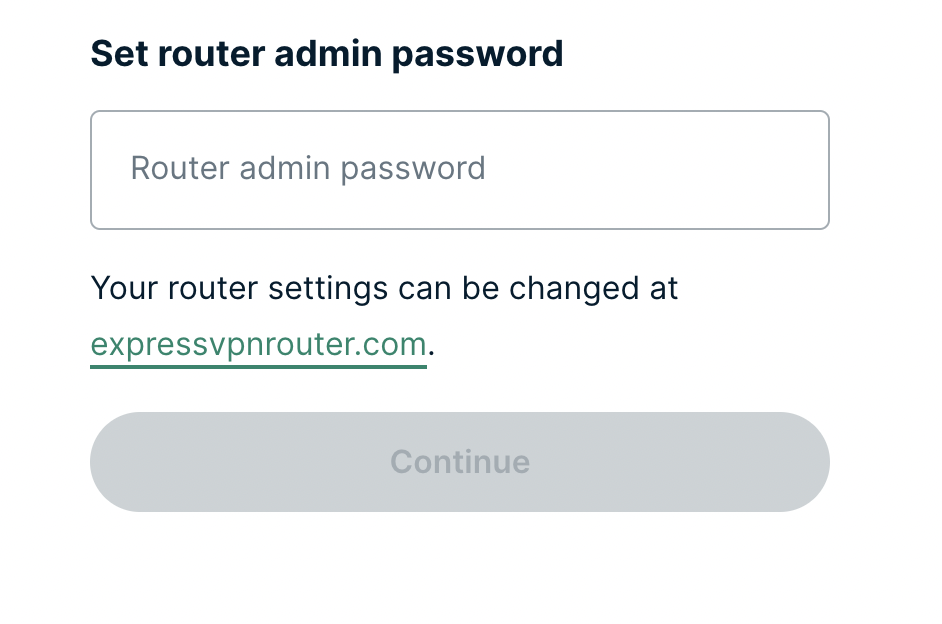
7. Enter the admin password you will use to access the ExpressVPN router settings. Be sure to TYPE CAREFULLY when setting the admin password as a typo will result in needing to reset the router again. Note this password in a secure location or commit it to memory.

ExpressVPN admin password

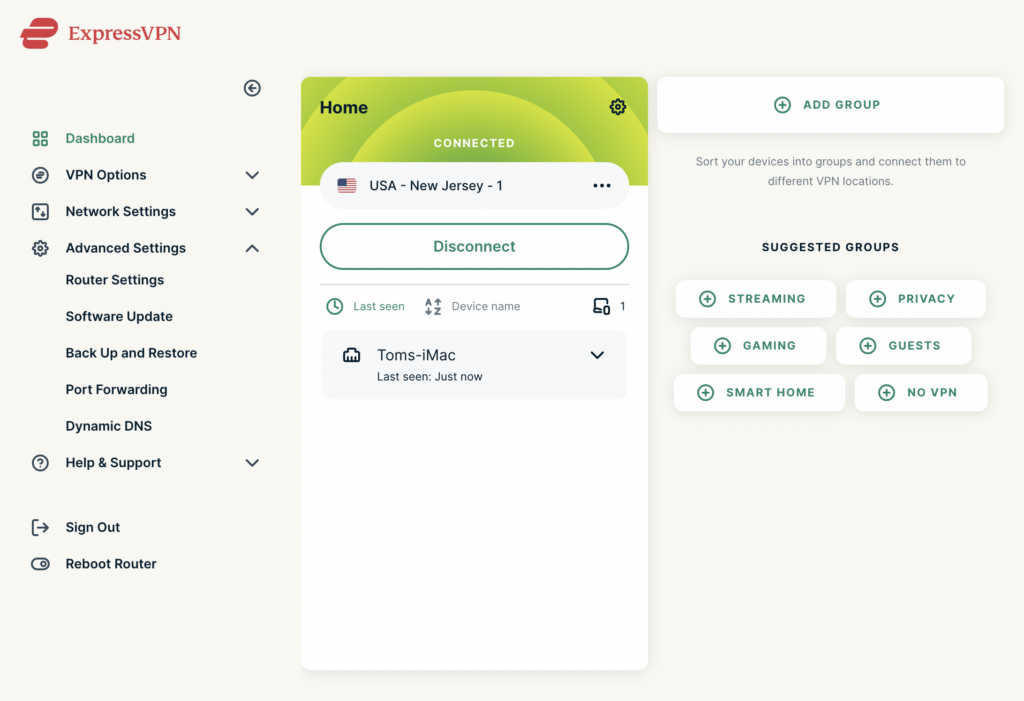
8. Your ExpressVPN FlashRouter is now fully setup!

ExpressVPN Connected

ExpressVPN/Aircove FlashRouter Internet Setup and Activation

TeamFlashRouters · Mar 16, 2022 ·

Follow this article when you receive your new ExpressVPN FlashRouter to connect your FlashRouter to the Internet via ExpressVPN and customize your network so it is ready to use.

Obtain your ExpressVPN Activation Code

If you are not already an ExpressVPN user Sign Up Now.

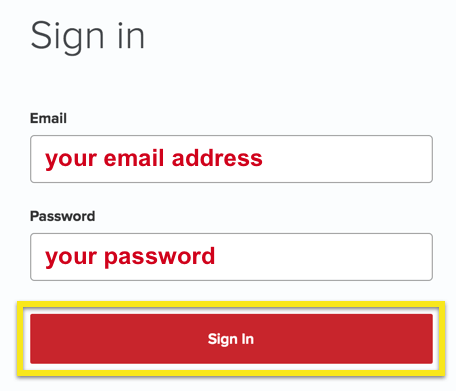
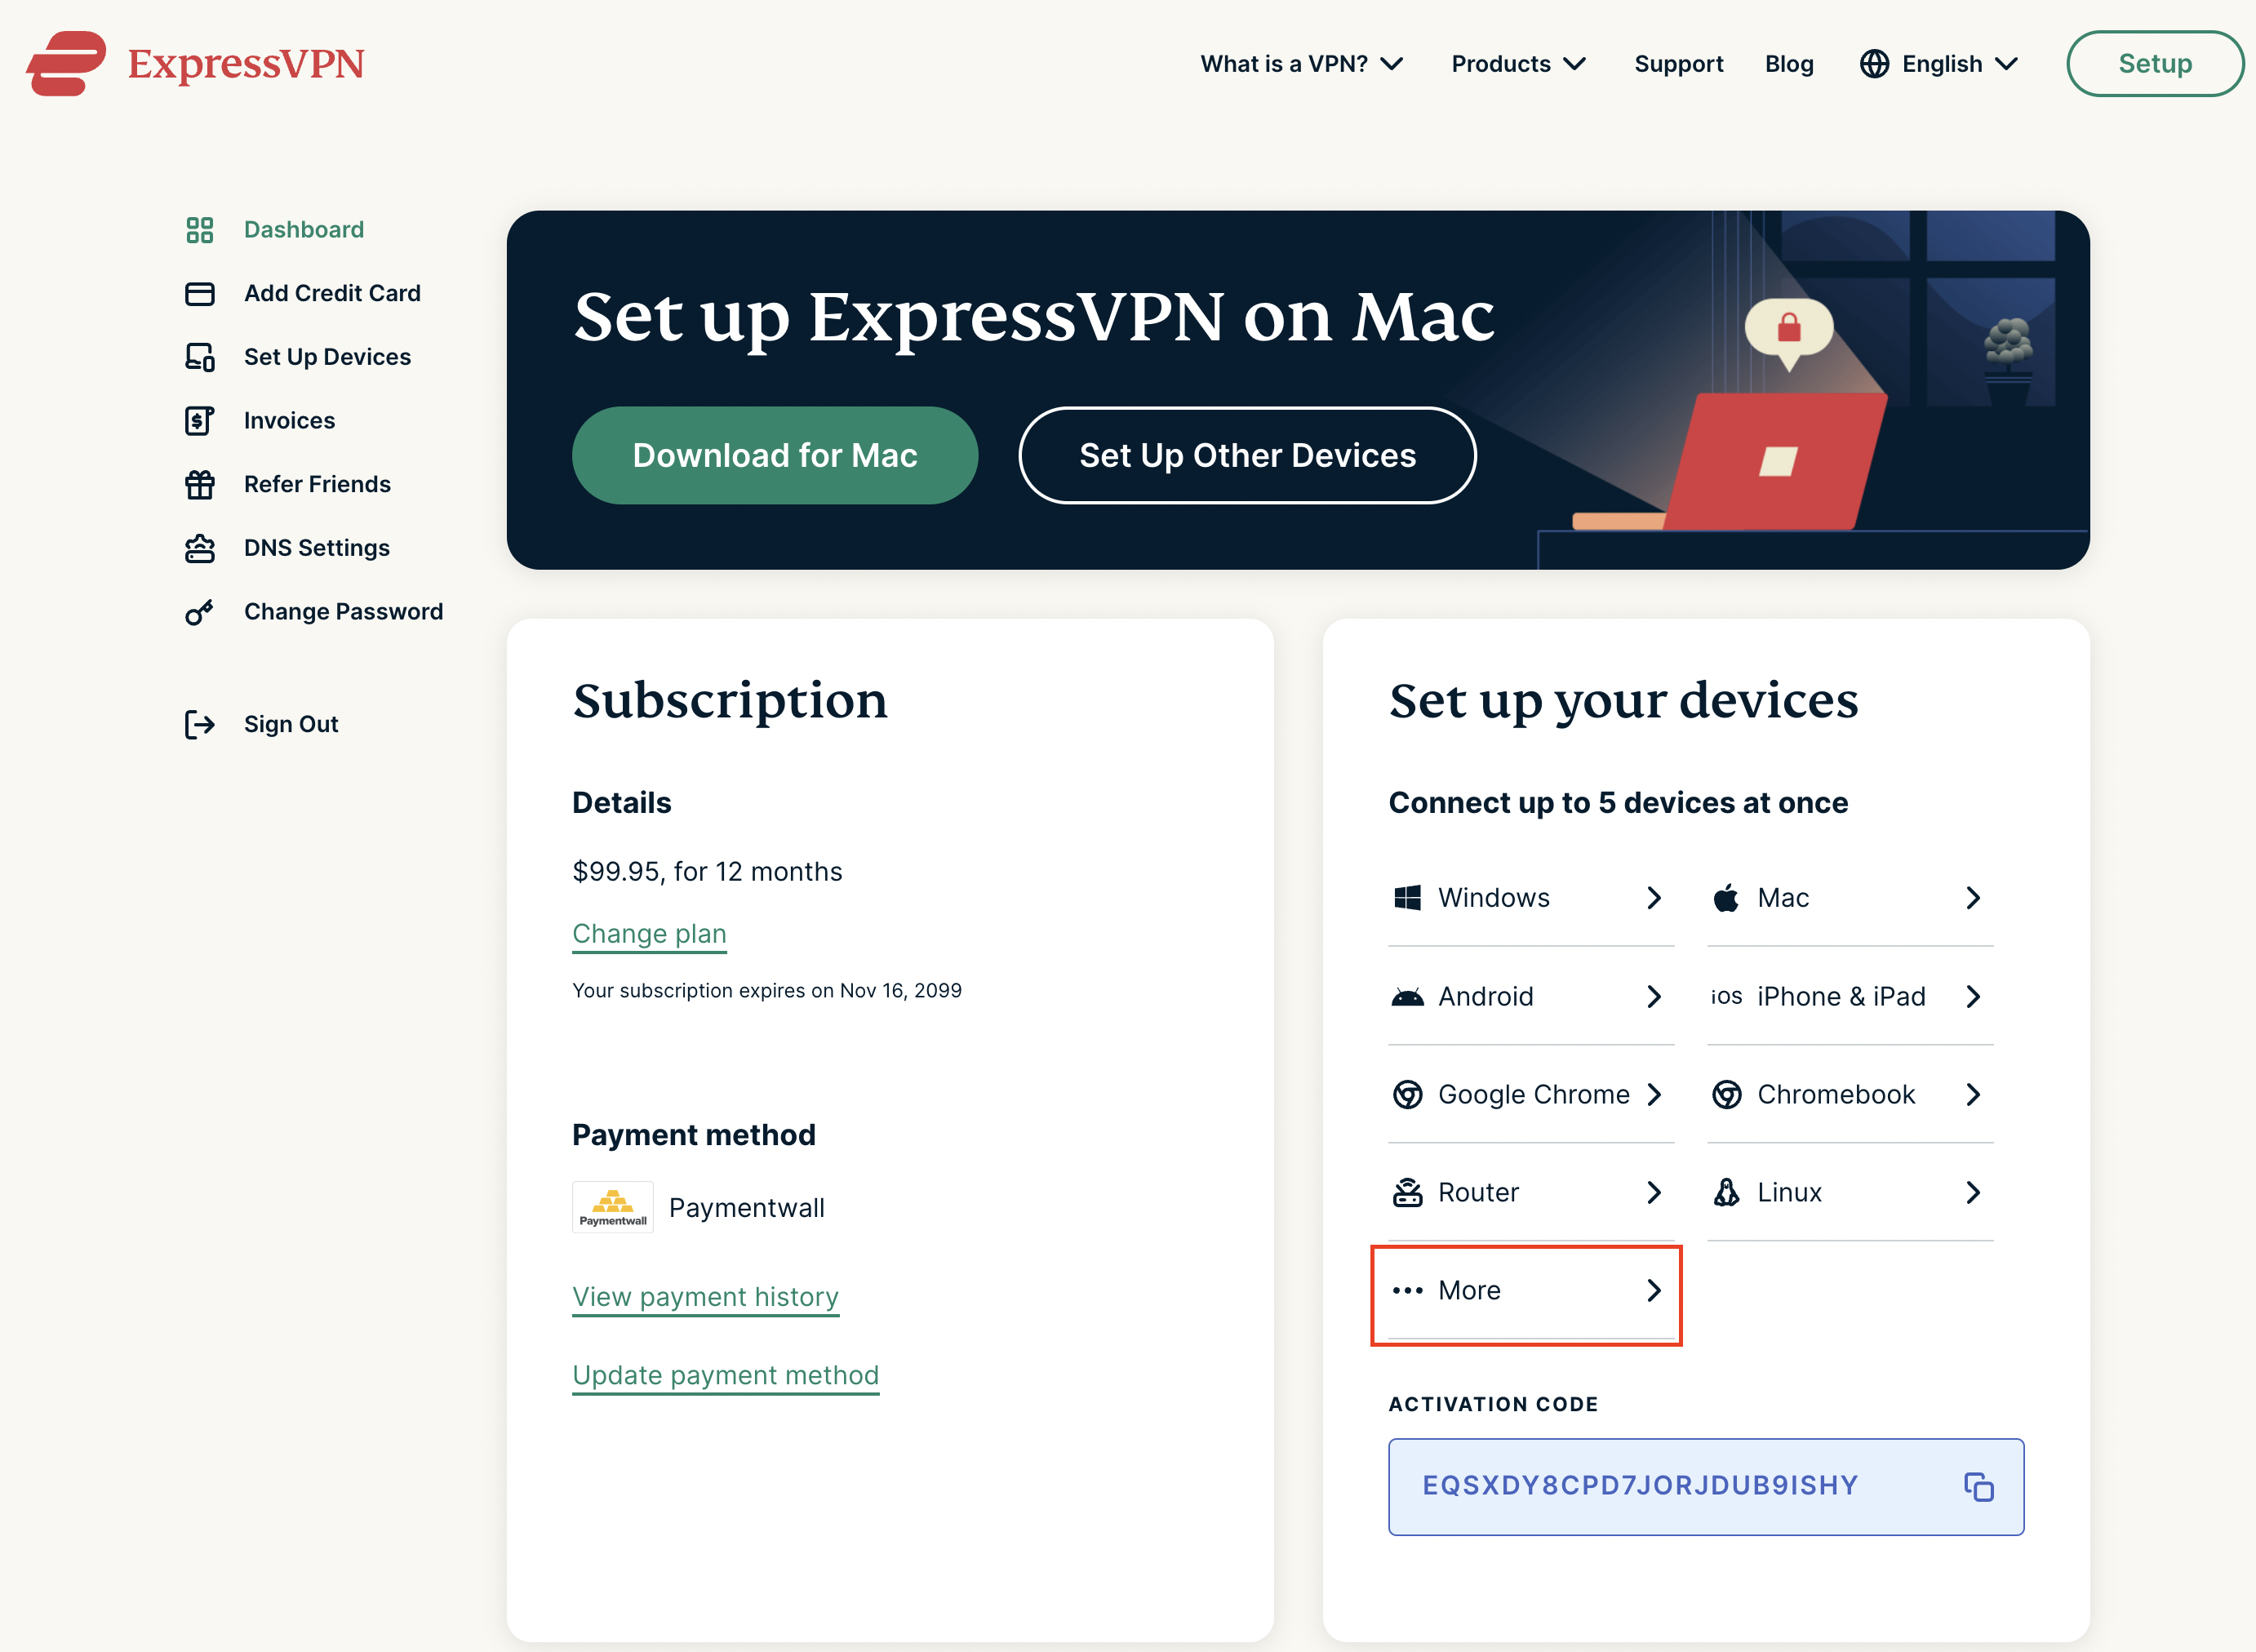
1. Visit ExpressVPN’s website login page.

ExpressVPN on FlashRouters Privacy App Setup - Sign Into ExpressVPN Dashboard

2. Copy your ExpressVPN Activation code and paste it into a document or leave this page open while you proceed with the instructions.

Access Router Settings

1. Connect to the FlashRouter’s network via ethernet cable or wireless.

The wireless network will appear as “Aircove”, “Linksys##”, “Netgear##”, or “Asus” and the password to join the network will be the default wireless password printed on the bottom of the router.

2. Open your web browser and enter expressvpnrouter.com or 192.168.132.1 in the URL.

ExpressVPNrouter.com
192.168.132.1

3. Click Get Started on the ExpressVPN page that is displayed.

ExpressVPN Get Started

4a. If your FlashRouter is wired to the Internet correctly then you will be prompted to enter your ExpressVPN Activation Code found in your ExpressVPN account. Paste that in and click Sign in to ExpressVPN.

ExpressVPN Activation Code

4b. If your FlashRouter is not wired correctly or is not receiving Internet properly make sure you are wired as detailed in the diagram that appears. If you are stuck at this screen we recommend powering off your ISP modem and any other router that the ExpressVPN FlashRouter is wired to and then powering them back up one by one.

Proceed with step “4a” above once the router is receiving Internet and you are prompted to enter the Activation Code.

ExpressVPN Wiring

5. Select if you want to share anonymous crash report data with ExpressVPN to help them improve the firmware for future releases.

ExpressVPN Share Crash Report

6. Set the WiFi name and password your wireless devices will use to connect to the FlashRouter’s network. Make sure the WiFi name is unique and not a duplicate of an existing WiFi name if you change it. You can also leave it as the default information if you like. Click Continue.

ExpressVPN Set WiFi Name and Password

7. Enter the admin password you will use to access the ExpressVPN router settings. Be sure to TYPE CAREFULLY when setting the admin password as a typo will result in needing to reset the router again. Note this password in a secure location or commit it to memory.

ExpressVPN admin password

8. Your ExpressVPN FlashRouter is now fully setup!

ExpressVPN Connected

DD-WRT Wifi Setup

DD-WRT Router WiFi Setup

Access FlashRouter DD-WRT firmware settings

TeamFlashRouters · Mar 22, 2019 ·

You must be connected to the FlashRouter network via ethernet or WiFi connection on your device in order to be able to access the FlashRouter’s firmware settings.

Why do I need to access my FlashRouter's settings?

It is important to understand how to access your router if you want to:
  • Change WiFi or admin passwords
  • Switch VPN server locations
  • Attempt custom setups
  • Troubleshoot your network

Connect your device to the FlashRouter network

We recommend using a computer, tablet, or phone to access your FlashRouter firmware settings. You can connect your device to the FlashRouter via Ethernet Cable or Wireless connection.

Please note, you will NOT be able access the firmware settings unless you connect your device to the FlashRouter Network.

via Ethernet

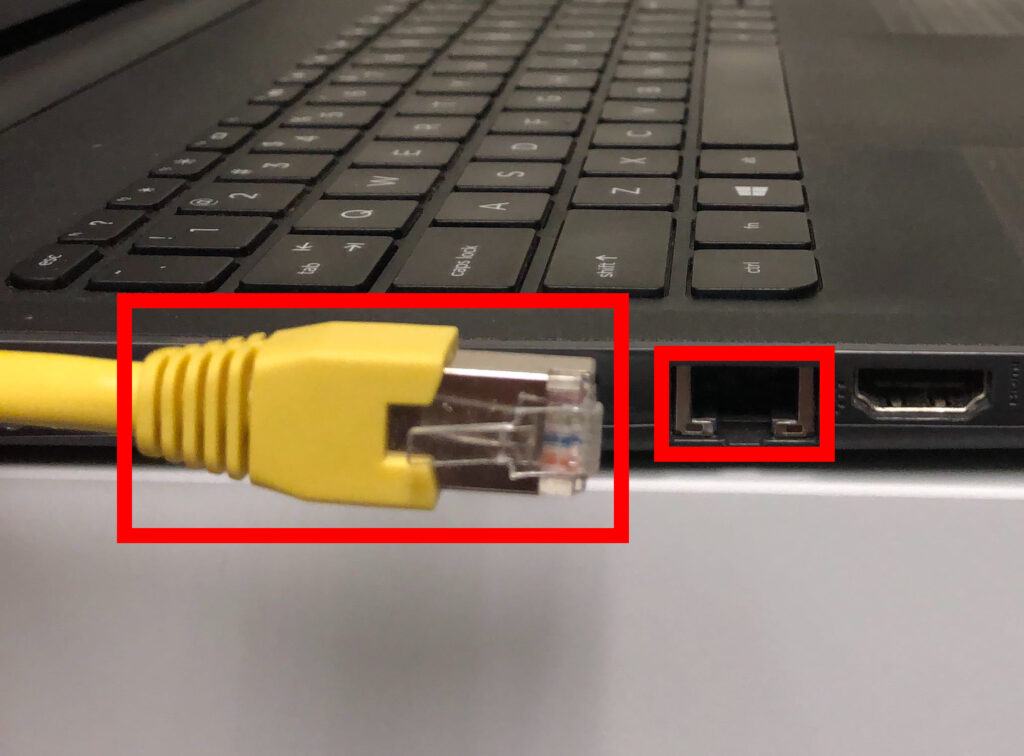
Connect an Ethernet cable to your device’s Ethernet port.

Access FlashRouters DD-WRT Admin Settings via Ethernet Connection 1

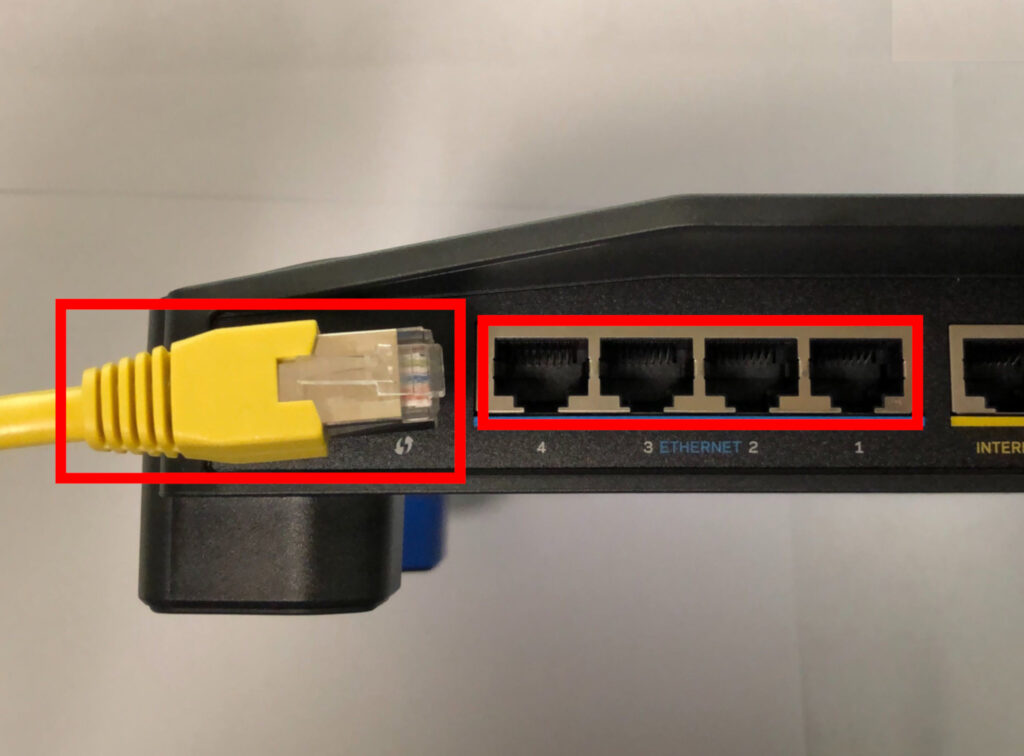
Connect the other end of that Ethernet cable to a FlashRouter LAN/numbered port.

Access FlashRouters DD-WRT Admin Settings via Ethernet Connection 2

Be sure NOT to connect your device to the WAN/internet port of the FlashRouter. Please use the LAN/numbered ports to connect your devices.

via Wireless

Navigate to the available wireless networks in your device network settings and join any of the available FlashRouter networks – FlashRouter24, FlashRouter50, or FlashRouter80 (if you have a tri-band router).

Access the FlashRouter settings

We recommend using a Google Chrome or Mozilla Firefox incognito/private browsing window to access the FlashRouter firmware settings. You can access the main DD-WRT firmware GUI or you can go directly into the FlashRouters Privacy App settings to manage your basic router settings and VPN connection settings right away.

Please note, after accessing the FlashRouter Settings at the Local IP Address, you will be prompted to enter an admin username and password. You can find this information in the subsections below.

DD-WRT - Firmware GUI

Local IP Address: 192.168.11.1

Username: flashrouter

Password: ddwrt

Keep in mind that if you enable HTTPS and disable HTTP access you will need to add https:// in front of the Local IP Address to access your FlashRouter’s firmware settings.

If your router has been reset for any reason then you can access the router at a local IP address of 192.168.1.1.

Please note you will be required to set the administration username and password as well as your WiFi and VPN network settings after a reset.

TROUBLESHOOTING

Still having issues? Visit our Troubleshooting section to diagnose common problems here.

Troubleshoot Here

How do I find my router local IP address?

Dave · May 3, 2019 ·

The Local IP Address is the address that you can use to access a router’s firmware settings. Use the below instructions to find the local IP Address of the router you are connected to.

Make sure you are connected to the FlashRouter’s network via ethernet or WiFi. Keep in mind these instructions may vary based on your current software version.

Find IP Address in Windows

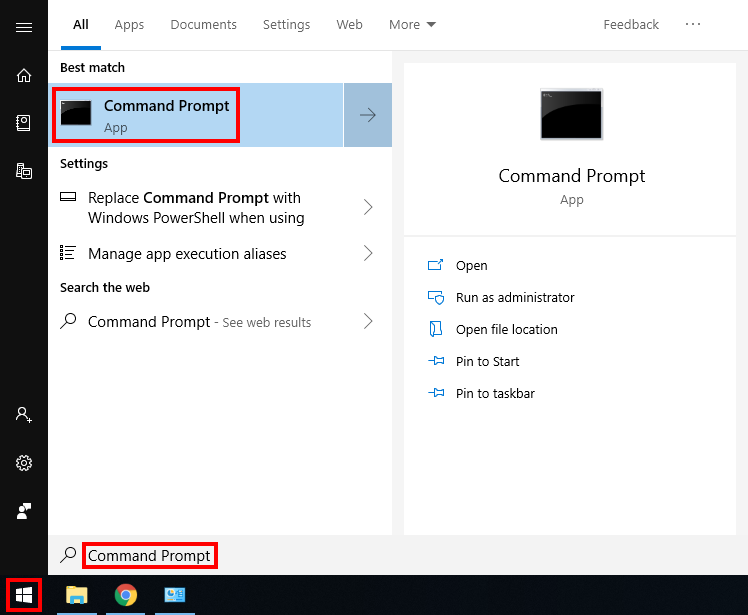
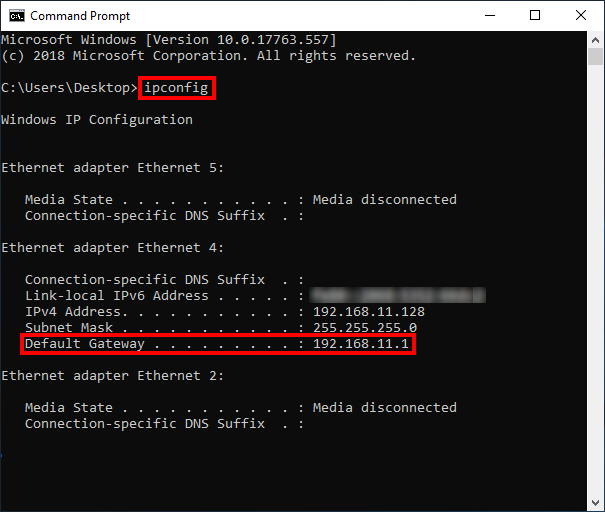
1.  Open the Window search box, and search “command prompt”

How to Find IP Address using Windows Command Prompt

2. Type “ipconfig” and press Enter.

3. Your router’s local IP address will be listed next to Default Gateway.

How to Find IP Address using Windows Command Prompt 2

Find IP Address in Apple / Mac

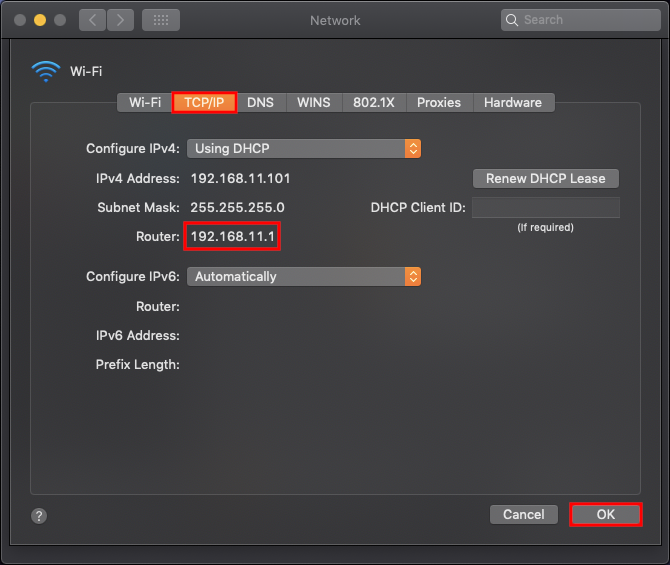
1. Open System Preferences, and select Network.

Find Static DNS settings for FlashRouter DD-WRT Using a MAC Computer

2. Select the adapter that is connected via ethernet or wireless. This will vary based on your current connection.

3. Select Advanced.

How to Find IP Address using a MAC Computer 2

4. Select the TCP/IP tab.

5. Your router’s local IP address will be listed next to Router.

Find IP Address in iOS

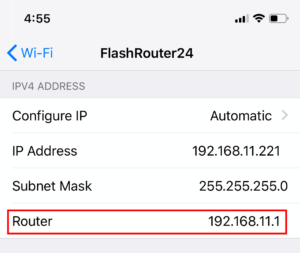
1.  Open Settings

2. Select WiFi, and select the blue icon next to your current connection.

Select FlashRouters DD-WRT Wireless Network in order to Check Static IP Network Settings on iOS Mobile Device

3. Your router’s local IP address will be listed next to Router.

How to Find IP Address on IOS 2

Find IP Address in Android

1. From the top of the screen, swipe down to display settings.

2. Select WiFi.

WiFi Icon and Settings in Android Mobile Device

3. Select your current network.

How to Find IP Address on Android Device

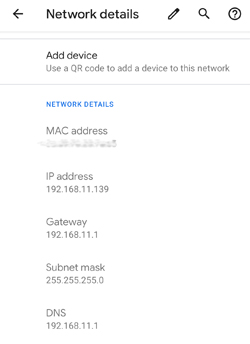
4. Click on the gear next to Network Name (note this may be different on varying Android devices)
5. Click Advanced
6. Your router’s local IP address will be listed as the Gateway under Network Details.

Find Router IP on Android

Once you have followed these instructions to find the Local IP Address of the router you can enter the Local IP address in your web browsers URL to access the router’s firmware settings.

Why can’t I access router settings?

Dave · May 3, 2019 ·

Be sure to first try the preset details to access your FlashRouter’s settings.

First time setup

Are you connected to the FlashRouter's network?

In order to access the FlashRouter’s settings you need to be connected to the FlashRouter’s network via ethernet or WiFi.

It is possible that if you are connected to the FlashRouter’s network you device might have static IP settings from a previous connection preventing it from being read correctly. Check your device’s static IP settings before proceeding.

Is your FlashRouter wired correctly?

Your FlashRouter should be wired as detailed in our Connect FlashRouter to the Internet setup.

A common mistake is to connect from your modem or other router to a LAN/numbered port of the FlashRouter instead of the WAN/Internet port of the FlashRouter as it should be. Doing so results in no access to the FlashRouter’s settings.

Lost access

How to find you FlashRouter's Local IP Address?

It is possible that your Local IP Address was changed at some point. Your Local IP Address is the address that you can access the FlashRouter’s settings with. We recommend finding the Local IP Address of the FlashRouter.

Was your FlashRouter reset?

If your FlashRouter is showing a local IP Address of 192.168.1.1 and you are seeing ‘dd-wrt’ as an available network in your wireless networks, your FlashRouter was reset. Reconfigure your FlashRouter.

Keep in mind that seeing a Local IP Address of 192.168.1.1 can also mean your are wired incorrectly and the router has not been reset. Be sure to check your wireless networks for ‘dd-wrt’. If the FlashRouter’s wireless network name appears as it was set then your FlashRouter was not reset and you should see the above section.

Tried updating firmware

Why can't I access my FlashRouter after a firmware upgrade?

When performing a firmware upgrade there is a dropdown that has Don’t Reset or Reset to Default settings as options.

If you accidentally selected Reset to Default settings you will need to reconfigure your FlashRouter.

If you had Don’t Reset selected and are still unable to connect to the FlashRouter’s network after a firmware upgrade, first make sure you are connected to the FlashRouter’s network as WiFi can disconnect during an upgrade, and then Reboot the FlashRouter.

AsusWRT-Merlin Router Setup Guide

Asus-Merlin Router Setup

Quick Start Guide for AsusWRT-Merlin FlashRouters

Find setup guides, FAQs and troubleshooting tips for Asus-Merlin configured FlashRouters.

VIEW SUPPORTED ROUTER MODELS

Asus Logo
  • RT-BE88U (BE7200), RT-AC68U, RT-AC88U, RT-AC3100, RT-AC5300, RT-AC86U, RT-AX56U, RT-AX58U, RT-AX68U, RT-AX86U. RT-AX86U-PRO, RT-AX88U, RT-AX88U-PRO
  • GT-AC2900, GT-AX6000, GT-AX11000, GT-AXE11000,GT-AXE11000-PRO,  GT-AXE16000
  • ZenWiFi Pro XT12

Internet Setup

  • Internet and Wifi Setup on Asus Merlin Firmware
  • DNS Setup for Asus Merlin

WiFi Setup

  • Change WiFi name and password on Merlin
  • Separate your WiFi 2.4GHz and 5GHz Merlin networks

VPN Setup

  • Connecting to OpenVPN on Asus Merlin Firmware
  • PureVPN Merlin WireGuard Setup
  • Surfshark Merlin WireGuard Setup
  • ProtonVPN Merlin WireGuard Setup
  • IPVanish Merlin OpenVPN Setup
  • PrivateInternetAccess (PIA) Merlin OpenVPN Setup
  • NordVPN Merlin OpenVPN Setup
  • ExpressVPN Merlin OpenVPN Setup
  • CyberGhost Merlin OpenVPN Setup

AsusWRT-Merlin Features

  • VPN Director for Asus Merlin
  • VPN Killswitch for Asus Merlin

Search Support Articles

Troubleshooting

  • How do I find my router local IP address?

More Ways to Get Help

GET IN TOUCH

BUY SUPPORT
BROWSE FAQs

Roqos Core Router Setup Guide

Roqos Core Router Setup Guide

Quick Start Guide for Roqos Core Routers

Find setup guides, FAQs and troubleshooting tips for the FlashRouters Roqos Core Router.

Internet Setup

  • Roqos Core Quick Start Guide
  • How do I access my Roqos device settings?
  • Roqos Core Internet Setup and Activation

WiFi Setup

  • Setting up a Guest WiFi Network on Roqos
  • Change WiFi name and password on Roqos

VPN Setup

  • NordVPN Setup on Roqos
  • PrivateInternetAccess (PIA) Setup on Roqos
  • ExpressVPN Setup on Roqos
  • Roqos VPN Connected, but my device IP is unchanged

Roqos Core Features

  • Set a Static IP for your connected devices on Roqos
  • VPN Kill Switch on Roqos
  • Managing User Profiles on Roqos
  • Cybersecurity and Intrusion Prevention on Roqos
  • Block Websites by Country on Roqos
  • Ad blocking on Roqos
  • Parental Controls on Roqos
  • Wireless Repeater – WiFi as WAN on Roqos
  • What do the lights on my Roqos Core mean?

Search Support Articles

Troubleshooting

  • Roqos VPN Connected, but my device IP is unchanged
  • How do I access my Roqos device settings?
  • What do the lights on my Roqos Core mean?

More Ways to Get Help

GET IN TOUCH

BUY SUPPORT
BROWSE FAQs

NordVPN Setup for AsusWRT Firmware Routers

TeamFlashRouters · Oct 15, 2025 ·

You can connect to NordVPN on your AsusWRT router using NordLynx, OpenVPN, or a Dedicated IP.

Quick Options

  • NordLynx: Choose your preferred country from NordVPN’s server list

  • OpenVPN: Choose your preferred city or country from NordVPN’s server list.

  • Dedicated IP (optional): Enter your unique configuration file if you’ve been assigned a static NordVPN IP.

:point_right: If you are not already a NordVPN user Sign Up Now.

NordVPN NordLynx Setup for AsusWRT

1. Get your NordVPN Access Token for NordLynx connections. Log in to your NordVPN account and select NordVPN from your list of Services.

NordVPN Services Section

2. At the bottom of the page click Get Access token and you will receive a code via email. Enter this code to proceed.

NordVPN Access Token

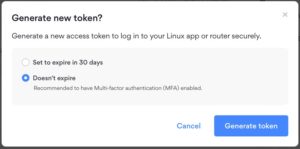
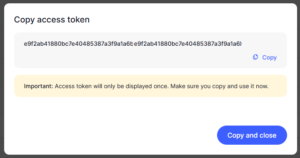
3. After you enter the email code select Generate new token and set it to Doesn’t expire. Copy this token.

NordVPN Generate new token
NordVPN Copy Token

4. Log in to the Asus settings page by connecting to the Asus router’s WiFi (or wired LAN) on your computer. Then, enter 192.168.50.1 or asusrouter.com in the browser.

View our guide for more instructions on how to access AsusWRT firmware settings.

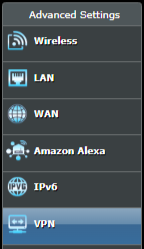
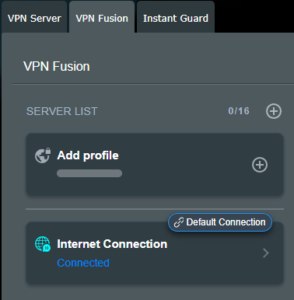
5. Navigate to the VPN tab and then select the VPN Fusion tab, then click Add profile.

Click the VPN Button
VPN Fusion Add Profile

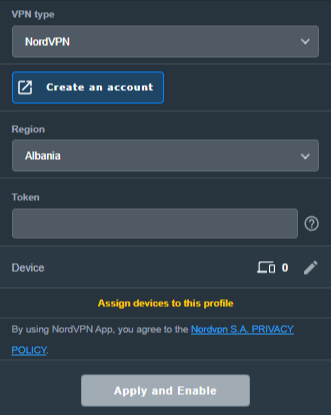
6. Fill in your NordVPN information, then click Apply and Enable.

  • Connection Name: Choose a name for your NordLynx connection.
  • VPN Type: Select NordVPN
  • Region: Choose your VPN server location
  • Token: Copy and paste your NordVPN token.
Apply NordLynx Settings

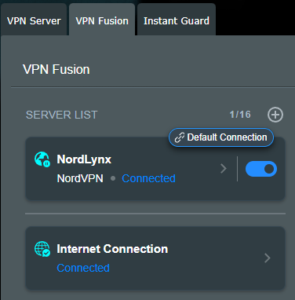
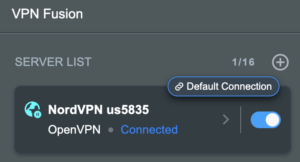
6. You should now see the Profile say Connected, indicating that the NordVPN server is successfully connected to your router!

VPN Fusion NordLynx Connected

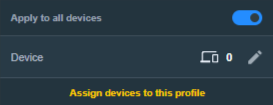
7. The VPN connection is automatically set to Apply to all devices.

If you only want certain devices to connect to the VPN, then turn off the VPN connection and switch off Apply to all devices.

Now click the pencil next to the Device section and select the devices (computer, phone, etc.) that you want to connect to VPN. Click OK and then click Apply all settings.

Apply VPN by Device

NordVPN OpenVPN Setup for AsusWRT

1. Get your NordVPN manual service credentials for OpenVPN connections. Log in to your NordVPN account and select NordVPN from your list of Services.

NordVPN Services Section

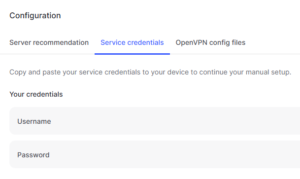
2. At the bottom of the page in the Manual Setup section click Setup NordVPN manually then under the Configuration section go to Service credentials. Click Verify email to receive a code via email and enter the code to view and copy your credentials.

NordVPN Manual OpenVPN
NordVPN Service Credentials

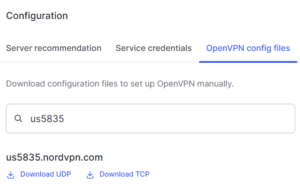
3. Click on OpenVPN config files. Search and download the server file for your preferred NordVPN location, UDP is recommended.

NordVPN OpenVPN Config Files

4. Log in to the Asus settings page by connecting to the Asus router’s WiFi (or wired LAN) on your computer. Then, enter 192.168.50.1 or asusrouter.com in the browser.

View our guide for more instructions on how to access AsusWRT firmware settings.

5. Navigate to the VPN tab and then click on the VPN Fusion tab, then click Add Profile.

Click the VPN Button
VPN Fusion Add Profile

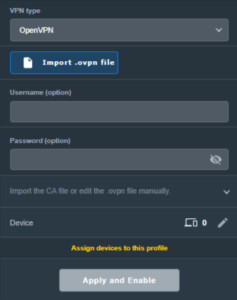
6. Fill in your NordVPN information then click Apply and Enable.

  • Connection Name: Choose a name for your NordVPN OpenVPN connection.
  • VPN Type: Select OpenVPN
  • Import .ovpn File: Upload the OpenVPN file that you downloaded.
  • Username and Password: Copy and paste your NordVPN manual service credentials.
AsusWRT OpenVPN Connection File Load

6. You should now see the Profile say Connected, indicating that the NordVPN server is successfully connected to your router!

Asus NordVPN Connected

7. The VPN connection is automatically set to Apply to all devices.

If you only want certain devices to connect to the VPN, then turn off the VPN connection and switch off Apply to all devices.

Now click the pencil next to the Device section and select the devices (computer, phone, etc.) that you want to connect to VPN. Click OK and then click Apply all settings.

Apply VPN by Device

NordVPN Dedicated IP Setup for AsusWRT

1. Get your NordVPN manual service credentials for OpenVPN connections. Log in to your NordVPN account and select NordVPN from your list of Services.

NordVPN Services Section

2. At the bottom of the page in the Manual Setup section click Setup NordVPN manually then under the Configuration section go to Service credentials. Click Verify email to receive a code via email and enter the code to view and copy your credentials.

NordVPN Manual OpenVPN
NordVPN Service Credentials

3. Now download your Dedicated IP configuration file from the NordVPN website.

4. Log in to the Asus settings page by connecting to the Asus router’s WiFi (or wired LAN) on your computer. Then, enter 192.168.50.1 or asusrouter.com in the browser.

View our guide for more instructions on how to access AsusWRT firmware settings.

5. Navigate to the VPN tab then click on the VPN Fusion tab, then click Add Profile.

Click the VPN Button
VPN Fusion Add Profile

6. Fill in your NordVPN information then click Apply and Enable.

  • Connection Name: Choose a name for your NordVPN Dedicated IP connection.
  • VPN Type: Select OpenVPN
  • Import .ovpn File: Upload the Dedicated IP OpenVPN file that you downloaded.
  • Username and Password: Copy and paste your NordVPN manual service credentials.
AsusWRT OpenVPN Connection File Load

6. You should now see the Profile say Connected, indicating that the NordVPN server is successfully connected to your router!

Asus NordVPN Connected

7. The VPN connection is automatically set to Apply to all devices.

If you only want certain devices to connect to the VPN, then turn off the VPN connection and switch off Apply to all devices.

Now click the pencil next to the Device section and select the devices (computer, phone, etc.) that you want to connect to VPN. Click OK and then click Apply all settings.

Apply VPN by Device
  1. Connect your devices to the Asus router network and visit the NordVPN website, at the top it should display Your Status: Protected.
  2. Visit NordVPN’s IP Check to verify your new IP address and virtual location.

🚫📱Do not run NordVPN apps on devices connected to your NordVPN router. Using the app at the same time as the router VPN may cause conflicts and connection issues.

Still having issues?

Feel free to submit a ticket and we will get back to you as soon as possible.

Why did my WiFi SSID change to ‘dd-wrt’?

Dave · May 3, 2019 ·

If you are seeing ‘dd-wrt’ in your available wireless networks instead of your regular FlashRouter24 and FlashRouter50 wireless network names (SSID) this means the router has been reset to default DD-WRT firmware settings.

Follow our instructions for Resetting and Reconfiguring your FlashRouter to get setup again.

Do not confuse your SSID being replaced by ‘dd-wrt’ with ‘dd-wrt vap’ appearing alongside your regular wireless network names.

If you are seeing ‘dd-wrt vap’ it likely means you did not rename your network when attempting to setup a guest network.

How do I upgrade the DD-WRT firmware of my FlashRouter?

TeamFlashRouters · May 30, 2019 ·

The following DD-WRT builds are from 11/24/2024 r58699. Keep in mind that these builds are for upgrading routers that already have DD-WRT firmware flashed. To flash a stock firmware router with DD-WRT firmware see our Flash My Router plan!

Download an updated DD-WRT firmware build for your specific FlashRouter model below. Contact support@flashrouters.com if you are uncertain about your router model or your router model is not available below.

  • Asus RT-AC5300
  • Asus RT-AC56U
  • Asus RT-AC66U
  • Asus RT-AC68U
  • Asus RT-AC87U
  • Linksys WRT1200AC
  • Linksys WRT1900AC
  • Linksys WRT1900ACv2
  • Linksys WRT1900ACS
  • Linksys WRT1900ACSv2
  • Linksys WRT3200ACM
  • Linksys WRT32X
  • Netgear R6300v2
  • Netgear R6400
  • Netgear R6400v2
  • Netgear R6700
  • Netgear R6700v2
  • Netgear R6700v3
  • Netgear R7000
  • Netgear R7000P
  • Netgear R7450
  • Netgear R7800
  • Netgear R8000
  • Netgear R8500
  • Netgear R9000

Please be aware that FlashRouters is not responsible for any DIY firmware flashing updates. If you have questions or concerns contact FlashRouters Support or check out the DD-WRT Community for additional helpful resources.

Make sure you are following the directions below to load the firmware file into the router settings and not trying to open the firmware file on its own.

Access the FlashRouter via wired connection. It is possible to upgrade firmware via WiFi, but this is not recommended unless you are unable to wire directly to the router.

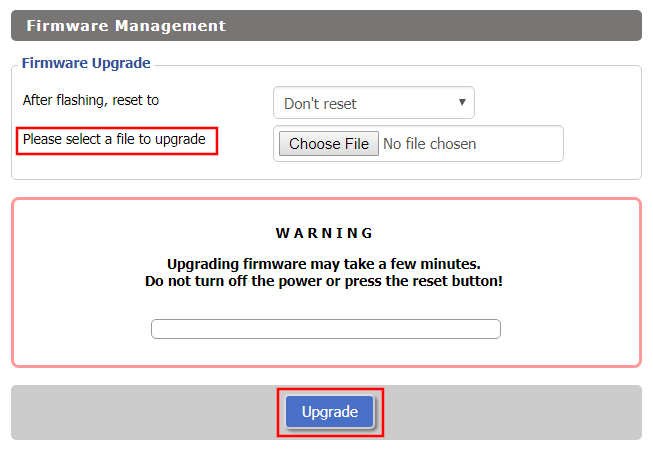
Navigate to Administration > Firmware Upgrade

Firmware Upgrade page in FlashRouter DD-WRT settings
  1. Do NOT select Reset to Default Settings in the dropdown menu as this will erase all of your FlashRouter settings.
    NOTE: If you are updating from an older DD-WRT build you may be required to reset the router after a firmware update for new features and UI to properly load. You will then be required to setup the administration username and password along with your WiFi and VPN network settings.
  2. Click Choose File and select the file you have downloaded.
  3. Click Upgrade.

How do I reset and reconfigure my FlashRouter?

Dave · May 3, 2019 ·

When is a router reset needed?

A reset of the FlashRouter should only be performed in the following instances:

  • You have exhausted all other troubleshooting methods and cannot access your router settings.
  • A backup file was saved of your previously working settings.
  • Username and password to access the FlashRouter’s settings are not working.
  • Power light on the router is blinking steadily.
  • Firmware upgrade was performed with Reset to Default settings selected.

Reset Router

Asus FlashRouters:

  1. While the router is powered off press and hold the WPS button on the back or side of the router. Power up the router while continuing to hold the WPS. Continue to hold for 15 seconds as the router powers on (note this could be up to 45 seconds on some models before lights flash).
  2. You will see the lights on the router flashing steadily and this is how you know you have reset the router.
  3. Let the router sit for about a minute and then reboot the router.

Linksys and Netgear FlashRouters:

  1. While the router is plugged in, find the reset button located on the back of the router. You will need a pin or pencil to hold down the button for 15 seconds.
  2. You will see the lights on the back of the router flash simultaneously and this is how you know you have reset the router.
  3. Let the router sit for about a minute and then reboot the router.

Access Router Settings

1. Connect to the FlashRouter’s network via ethernet cable or wireless.

The wireless network will appear as “dd-wrt” and will likely not require a password to join. If it does require a password to join the password will be the default wireless password found on the bottom of the router.

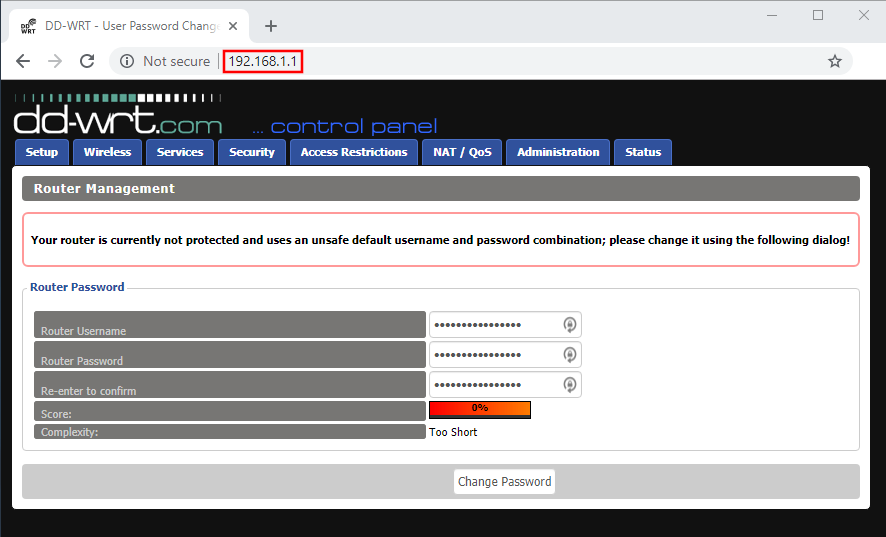
2. Open your web browser and enter 192.168.1.1 in the URL.

Reset FlashRouters DD-WRT Settings Back to Default Settings

3. Delete the dots and enter the new administration login in the Router Username, Router Password, and Re-enter to confirm fields.

TYPE CAREFULLY when setting the administration login as a typo will result in needing to reset the router again.

Change Local IP Address and DNS

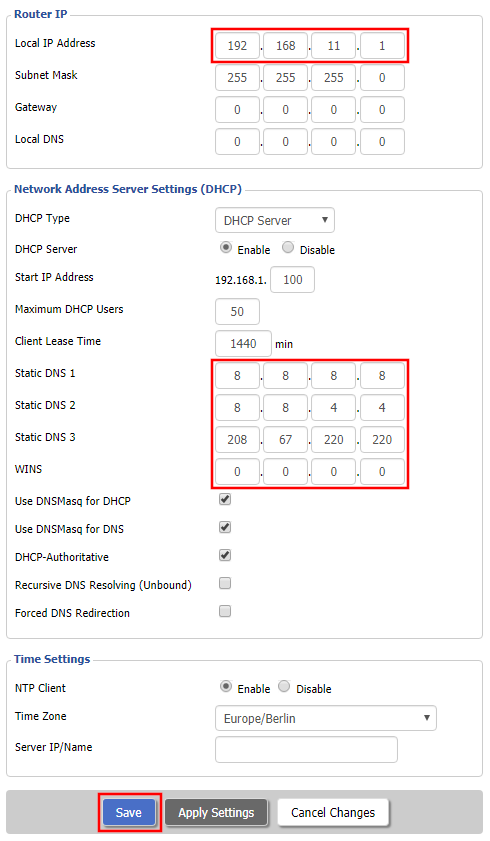
Navigate to Setup > Basic Setup

1. Set the Local IP Address to 192.168.11.1

2. Set the Static DNS 1 to 8.8.8.8

3. Set the Static DNS 2 to 8.8.4.4

4. Set the Static DNS 3 to 208.67.220.220

Enter New Local IP Address and DNS Servers After FlashRouter DD-WRT Reset

CLICK SAVE

Setup WiFi

Navigate to Wireless > Basic Settings

Find your FlashRouter model in the WiFi Setup section and replicate the wireless settings on this page.

CLICK APPLY SETTINGS

REBOOT ROUTER

Connect to the FlashRouter's network

You will be able to connect to the newly setup wireless network using the details you set. The router will now be accessible at 192.168.11.1

Back up your settings

  1. Click the Backup button.
  2. A file named nvrambak.bin will be saved to your computer.
  3. You can load nvrambak.bin to restore your settings in the event of a reset.

VPN Router Setup Guides & FAQs | FlashRouters Help Center

Support Guides

Select your router type

Privacy hero Routers

Router Models

Privacy Hero, Privacy Hero 2

PRIVACY HERO SETUP GUIDE
Asus Merlin Router Support Guides

Router Models

ASUS
  • RT Series: RT-AC68U, RT-AC88U, RT-AC3100, RT-AC5300, RT-AC86U, RT-AX56U, RT-AX58U, RT-AX68U, RT-AX86U. RT-AX86U-PRO, RT-AX88U, RT-AX88U-PRO, RT-BE86U, RT-BE88U, RT-BE92U, RT-BE96U
  • GT Series: GT-AC2900, GT-AX6000, GT-AX11000, GT-AXE11000,GT-AXE11000-PRO,  GT-AXE16000, GT-BE98_PRO
  • ZenWiFi Pro XT12
MERLIN SETUP GUIDE

Router Models

WR3000, M1800, M3000
CUDY SETUP GUIDE
Asus WRT Router Support Guides

Router Models

GT series: GT6, GT-AXE16000, GT-AX11000 Pro, GT-AXE11000, GT-AX6000, GT-AX11000, GS-AX5400, GS-AX3000
ZenWiFi: ZenWiFi Pro XT12, ZenWiFi Pro ET12, ZenWiFi XT9, ZenWiFi AX (XT8), ZenWiFi ET8, ZenWiFi XD6, ZenWiFi XD5
RT series: RT-AXE7800, RT-AX88U Pro, RT-AX88U, RT-AX86U Pro, RT-AX86U, RT-AX86S, RT-AX68U, RT-AX82U, RT-AX58U, RT-AX3000, RT-AX59U, RT-AX92U
TUF series: TUF-AX5400, TUF-AX3000_V2, TUF-AX3000, TUF Gaming AX6000, TUF Gaming AX4200
ASUS-WRT SETUP GUIDE
TP-Link Router Support Guides

Router Models

Archer AX10000, Archer AX1100, Archer AX21, Archer AX3000, Archer AX3000 Pro, Archer AX3200, Archer AX4400, Archer AX5400 Pro, Archer AX55, Archer AX55 Pro
Archer AX6000, Archer AX72 Pro, Archer AX73, Archer AX75, Archer AX80, Archer AX90
Archer AXE300, Archer AXE5400, Archer AXE75, Archer AXE95
Archer BE550, Archer BE800, Archer BE900, Archer BE9300, Archer GE80, Archer GX90
TP-LINK SETUP GUIDE
gl.iNet Router Setup Guides

Router Models

Flint 2 GL-MT6000, Flint GL-AX1800, Slate GL-AXT1800, Beryl GL-MT3000, Marble GL-B3000

GL.iNet SETUP GUIDE
Roqos Router Support Guides

Router Models

Roqos Core Router, Roqos SASE Appliance

ROQOS SETUP GUIDE
DD-wrt Router Support Guides

Router Models

NETGEAR

AC1450, R6220, R6230, R6250, R6260, R6300 V1, R6300 V2, R6400 V1, R6400 V2, R6700 V1, R6700 V2, R6700 V3, R7000, R7000P, R7800, R8000, R9000, XR500

ASUS

RT-AC56U/R, RT-AC68U V1, RT-AC68U V2, RT-AC1900P, RT-AC87U, RT-AC3100, RT-AC5300

LINKSYS

WRT1200AC, WRT1900AC V1, WRT1900AC V2, WRT1900ACS V1, WRT1900ACS V2, WRT32X, WRT3200ACM

DD-WRT SETUP GUIDE
ExpressVPN Routers

Router Models

ExpressVPN Aircove, Aircove Go

NETGEAR

R6300 V2, R6400 V2, R6700 V3, R7000, R7000P

ASUS

RT-AC56U, RT-AC56R, RT-AC56S, RT-AC68U V3, RT-AC87U

LINKSYS

EA6200, WRT1200AC, WRT1900AC V1, WRT1900AC V2, WRT1900ACS V1, WRT1900ACS V2, WRT32X, WRT3200ACM

EXPRESSVPN SETUP GUIDE

Search Support Articles

Top Router Questions

  • How do I upgrade the DD-WRT firmware of my FlashRouter?
  • Roqos VPN Connected, but my device IP is unchanged
  • How do I access my Roqos device settings?
  • Why can’t I access router settings?
  • How do I reset and reconfigure my ExpressVPN/Aircove FlashRouter?
  • How do I reset and reconfigure my FlashRouter?
  • How do I change my Wireless Password?
  • My 2.4GHz network is not showing up
  • My 5.0GHz network is not showing up
  • My WiFi password is not working
  • Why can’t I connect to WiFi using the WPS button feature?
  • Access FlashRouter DD-WRT firmware settings

More Ways to Get Help

GET IN TOUCH

BUY SUPPORT
BROWSE FAQs

GL.iNet Access Router Settings and Firmware Upgrade

TeamFlashRouters · Apr 3, 2023 ·

Follow this guide to upgrade the firmware of your GL.iNet FlashRouter.

1. Connect your computer, phone, or tablet to the GL.iNet router via wireless (FlashRouter24 / FlashRouter50) or via ethernet cable to one of the LAN ports on the router.

The FlashRouter WiFi password is printed on the sheet that came with the router and is set to Wireless#[First 5 characters of your router MAC]. The router MAC can be found on the bottom of your router if you cannot locate the sheet. For e.g. if your MAC is 9483C07E70A8 then your WiFi password is Wireless#9483C

Be sure to capitalize the W.

2. Once connected via wireless or ethernet on your device open your browser and go to 192.168.8.1

GL.iNet router access

3. Enter openwrt as the admin password to access the GL.iNet firmware settings. Newer devices may have a different admin password set as openwrt1 or glopenwrt1

GL.iNet admin password enter

3. If a new firmware upgrade is available the router settings will either display a banner when you first access the router or a header. Click Install or the Upgrade arrow depending on which appears for you.

GL.iNet Firmware Upgrade Banner
GL.iNet Firmware Upgrade Header

4. Make sure the Keep Settings toggle is pushed to the right so your router does not get reset. Click the Install button to begin the firmware upgrade.

GL.iNet Install Firmware Upgrade

5. The firmware update should take about 2-3 minutes. You may need to reconnect your wireless devices after the network comes back up in your available networks.

TROUBLESHOOTING

Still having issues? Visit the VPN Troubleshooting section.

Troubleshoot Here

Cudy Internet Setup

TeamFlashRouters · Feb 26, 2024 ·

Follow this article when you receive your new Cudy FlashRouter to connect it to the Internet.

1. Connect the ethernet cable that came with the router from an open LAN ethernet port on your ISP modem or other router to the WAN port if you purchased a Cudy AX3000 or to ethernet port #1 of the device marked Primary if you purchased a Cudy M1800 or Cudy M3000.

Cudy Mesh internet wiring

2. Connect the power to the router and wait about 2 minutes for the router to fully boot up.

3. Connect your computer, phone, or tablet to the Cudy router via wireless (FlashRouter24 / FlashRouter50) or via ethernet cable to one of the LAN ports on the router.

The FlashRouter WiFi password is printed on the sheet that came with the router and is set to Wireless#[First 5 characters of your router MAC]. The router MAC can be found on the bottom of your router if you cannot locate the sheet. For e.g. if your MAC is 1459C07E70A8 then your WiFi password is Wireless#1459C

Be sure to capitalize the W.

4. Once connected via wireless or ethernet on your device open your browser and go to 192.168.10.1

Cudy local IP access

5. Enter openwrt as the admin password to access the Cudy firmware settings.

Cudy router access

6. Verify that your Cudy FlashRouter is reporting as Internet and WAN Connected.

Cudy Verify Internet

6. Verify that your Cudy FlashRouter is reporting as Internet and WAN Connected.

7. If you purchased a Cudy M1800 or Cudy M3000 mesh package you can now take the unit labeled Node to the location you want it connecting from and power it up. It will connect to the Primary network that was just setup automatically. You will then see the Mesh Units number increase according to the number that you have purchased shortly.

Cudy Verify Mesh connection

TROUBLESHOOTING

Still having issues? Visit the VPN Troubleshooting section.

Troubleshoot Here

Cudy Access Router Settings

TeamFlashRouters · Feb 26, 2024 ·

Follow this guide to access the router settings of your Cudy FlashRouter.

1. Connect your computer, phone, or tablet to the Cudy router via wireless (FlashRouter24 / FlashRouter50) or via ethernet cable to one of the LAN ports on the router.

The FlashRouter WiFi password is printed on the sheet that came with the router and is set to Wireless#[First 5 characters of your router MAC]. The router MAC can be found on the bottom of your router if you cannot locate the sheet. For e.g. if your MAC is 1459C07E70A8 then your WiFi password is Wireless#1459C

Be sure to capitalize the W.

2. Once connected via wireless or ethernet on your device open your browser and go to 192.168.10.1

Cudy local IP access

3. Enter openwrt1 or openwrt as the admin password to access the Cudy firmware settings.

Cudy router access

TROUBLESHOOTING

Still having issues? Visit the VPN Troubleshooting section.

Troubleshoot Here

Cudy Change Wi-Fi name and password

TeamFlashRouters · Feb 26, 2024 ·

Follow this guide to change the Wi-Fi name and password on your Cudy FlashRouter.

1. Connect your computer, phone, or tablet to the Cudy router via wireless (FlashRouter24 / FlashRouter50) or via ethernet cable to one of the LAN ports on the router.

The FlashRouter WiFi password is printed on the sheet that came with the router and is set to Wireless#[First 5 characters of your router MAC]. The router MAC can be found on the bottom of your router if you cannot locate the sheet. For e.g. if your MAC is 1459C07E70A8 then your WiFi password is Wireless#1459C

Be sure to capitalize the W.

2. Once connected via wireless or ethernet on your device open your browser and go to 192.168.10.1

Cudy local IP access

3. Enter openwrt as the admin password to access the Cudy firmware settings.

Cudy router access

3. Click General Settings.

Cudy General Settings

4. Click Wireless.

Cudy Wireless tab

5. Change the SSID and Password fields for both 2.4GHz and 5GHz bands.The SSIDs should be unique and NOT a duplicate of an existing network. Click Save & Apply.

Cudy Change Wifi Name and password

TROUBLESHOOTING

Still having issues? Visit the VPN Troubleshooting section.

Troubleshoot Here

TP-Link Access Router Settings

TeamFlashRouters · Apr 11, 2024 ·

Follow this guide to access the router settings of your TP-Link FlashRouter.

1. Connect your computer, phone, or tablet to the TP-Link router via wireless (FlashRouter24 / FlashRouter50) or via ethernet cable to one of the LAN ports on the router.

The FlashRouter WiFi password is printed on the sheet that came with the router and is set to Wireless#[First 5 characters of your router MAC]. The router MAC can be found on the bottom of your router if you cannot locate the sheet. For e.g. if your MAC is 1459C07E70A8 then your WiFi password is Wireless#1459C

Be sure to capitalize the W.

2. Once connected via wireless or ethernet on your device open your browser and go to tplinkwifi.net

TP-Link URL Access

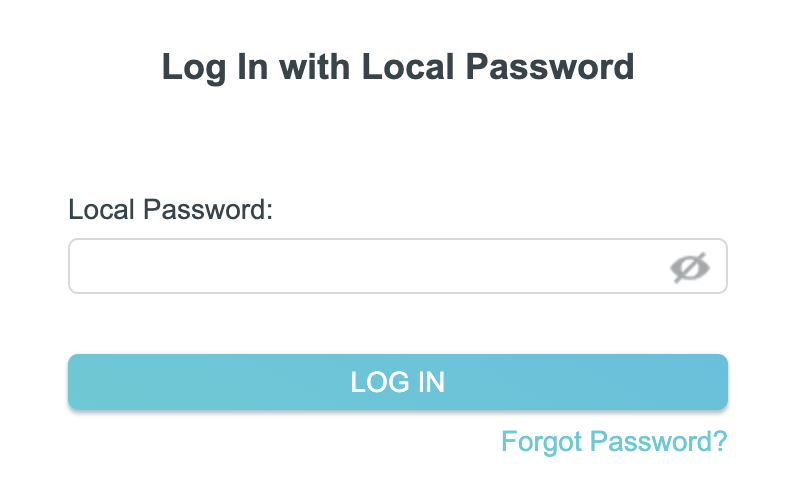
3. Enter tp-link as the admin password to access the TP-Link firmware settings.

TP-Link admin password

TROUBLESHOOTING

Still having issues? Visit the VPN Troubleshooting section.

Troubleshoot Here

TP-Link Internet Setup

TeamFlashRouters · Apr 11, 2024 ·

Follow this article when you receive your new TP-Link FlashRouter to connect it to the Internet.

1. Connect the ethernet cable that came with the router from an open LAN ethernet port on your ISP modem or other router to the WAN port of the TP-Link.

2. Connect the power to the router and wait about 2 minutes for the router to fully boot up.

3. Connect your computer, phone, or tablet to the TP-Link router via wireless (FlashRouter24 / FlashRouter50) or via ethernet cable to one of the LAN ports on the router.

The FlashRouter WiFi password is printed on the sheet that came with the router and is set to Wireless#[First 5 characters of your router MAC]. The router MAC can be found on the bottom of your router if you cannot locate the sheet. For e.g. if your MAC is 1459C07E70A8 then your WiFi password is Wireless#1459C

Be sure to capitalize the W.

4. Once connected via wireless or ethernet on your device open your browser and go to tplinkwifi.net

TP-Link URL Access

5. Enter tp-link as the admin password to access the TP-Link firmware settings.

TP-Link admin password

6. Verify that your TP-Link FlashRouter is reporting as Internet and WAN Connected.

TP-Link Internet Connected

TROUBLESHOOTING

Still having issues? Visit the VPN Troubleshooting section.

Troubleshoot Here

TP-Link Change Wi-Fi name and password

TeamFlashRouters · Apr 16, 2024 ·

Follow this guide to change the Wi-Fi name and password on your TP-Link FlashRouter.

1. Connect your computer, phone, or tablet to the TP-Link router via wireless (FlashRouter24 / FlashRouter50) or via ethernet cable to one of the LAN ports on the router.

The FlashRouter WiFi password is printed on the sheet that came with the router and is set to Wireless#[First 5 characters of your router MAC]. The router MAC can be found on the bottom of your router if you cannot locate the sheet. For e.g. if your MAC is 1459C07E70A8 then your WiFi password is Wireless#1459C

Be sure to capitalize the W.

2. Once connected via wireless or ethernet on your device open your browser and go to the TP-Link firmware settings.

TP-Link URL Access

3. Enter tp-link as the admin password to access the TP-Link firmware settings.

TP-Link admin password

4. Click Wireless.

TP-Link Wireless tab

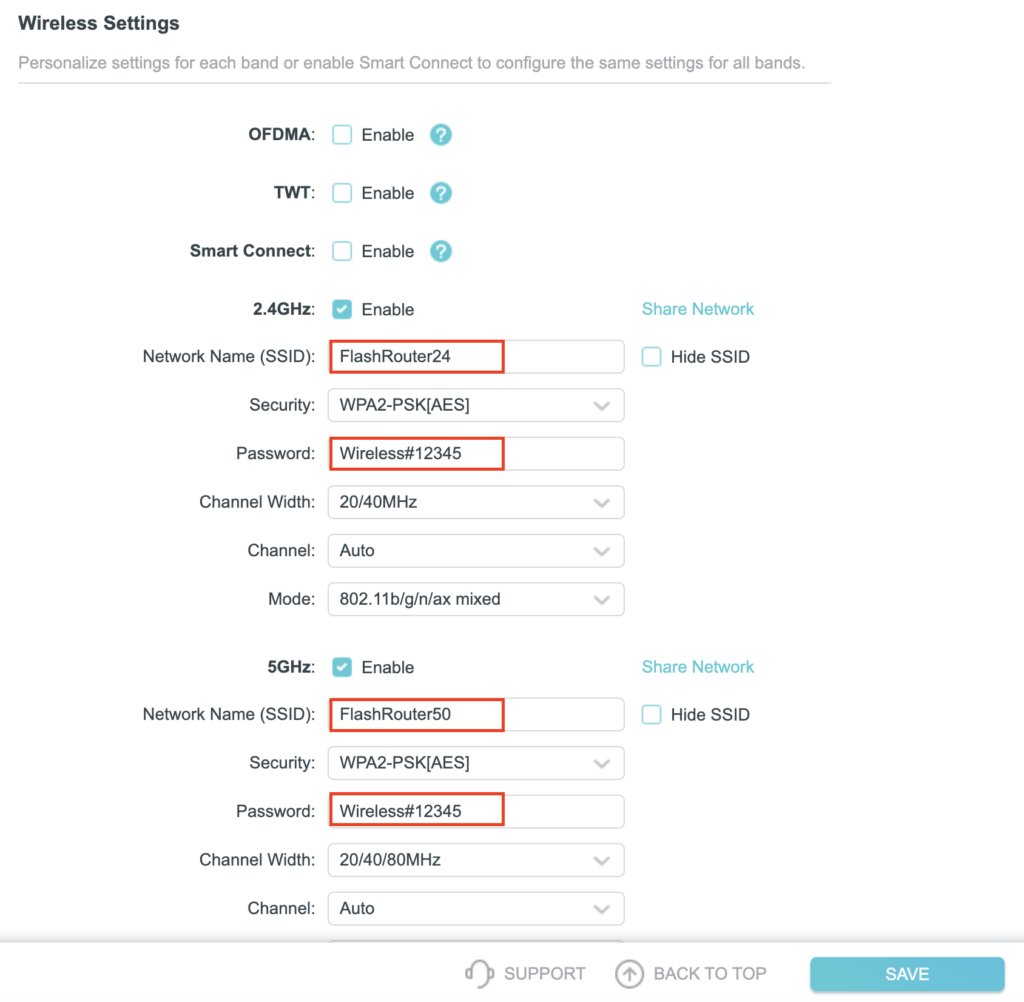
5. Change the Network Name (SSID) and Password fields to what you want to use. The SSID should be unique and NOT a duplicate of an existing network. Click Save.

TP-Link Change Wireless name and password

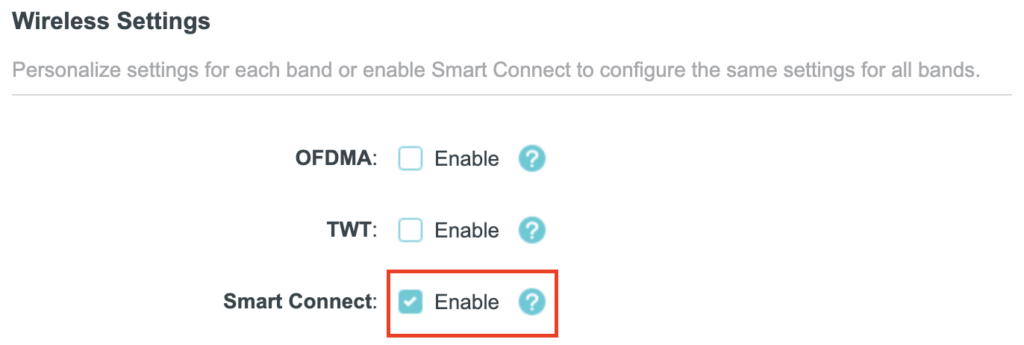
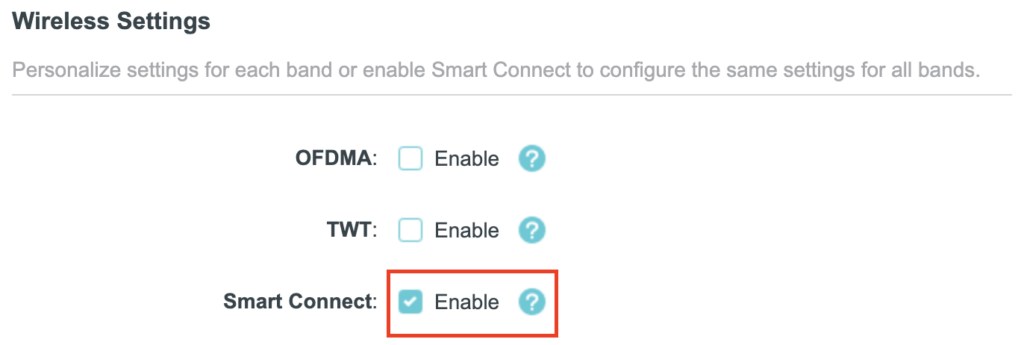
If you want both 2.4GHz and 5GHz networks to be bonded and have the same name click the Smart Connect checkbox.

TP-Link Separate Wifi

6. Connect your devices to the new wireless network.

TROUBLESHOOTING

Still having issues? Visit the VPN Troubleshooting section.

Troubleshoot Here

TP-Link Change Wireless Channel

TeamFlashRouters · Apr 16, 2024 ·

Follow this guide to change the Wireless channel on your TP-Link FlashRouter.

1. Connect your computer, phone, or tablet to the TP-Link router via wireless (FlashRouter24 / FlashRouter50) or via ethernet cable to one of the LAN ports on the router.

The FlashRouter WiFi password is printed on the sheet that came with the router and is set to Wireless#[First 5 characters of your router MAC]. The router MAC can be found on the bottom of your router if you cannot locate the sheet. For e.g. if your MAC is 1459C07E70A8 then your WiFi password is Wireless#1459C

Be sure to capitalize the W.

2. Once connected via wireless or ethernet on your device open your browser and go to the TP-Link firmware settings.

TP-Link URL Access

3. Enter tp-link as the admin password to access the TP-Link firmware settings.

TP-Link admin password

4. Click Wireless.

TP-Link Wireless tab

5. Change the Channel setting to the number that you want to use. Click Save.

TP-Link Change Wireless Channel

6. Connect your devices to the wireless network again as they may have been disconnected when making this change.

TROUBLESHOOTING

Still having issues? Visit the VPN Troubleshooting section.

Troubleshoot Here

TP-Link Merge or Separate 2.4GHz and 5GHz Wi-Fi

TeamFlashRouters · Apr 17, 2024 ·

Your TP-Link router broadcasts a 2.4GHz and a 5GHz Wi-Fi network. These can be separated to allow you to assign your devices to the network that best suits them or merged into a single network so your devices automatically select the best band to use. Follow this guide to separate or merge your Wi-Fi bands.

1. Connect your computer, phone, or tablet to the TP-Link router via wireless (FlashRouter24 / FlashRouter50) or via ethernet cable to one of the LAN ports on the router.

The FlashRouter WiFi password is printed on the sheet that came with the router and is set to Wireless#[First 5 characters of your router MAC]. The router MAC can be found on the bottom of your router if you cannot locate the sheet. For e.g. if your MAC is 1459C07E70A8 then your WiFi password is Wireless#1459C

Be sure to capitalize the W.

2. Once connected via wireless or ethernet on your device open your browser and go to the TP-Link firmware settings.

TP-Link URL Access

3. Enter tp-link as the admin password to access the TP-Link firmware settings.

TP-Link admin password

4. Click Wireless.

TP-Link Wireless tab

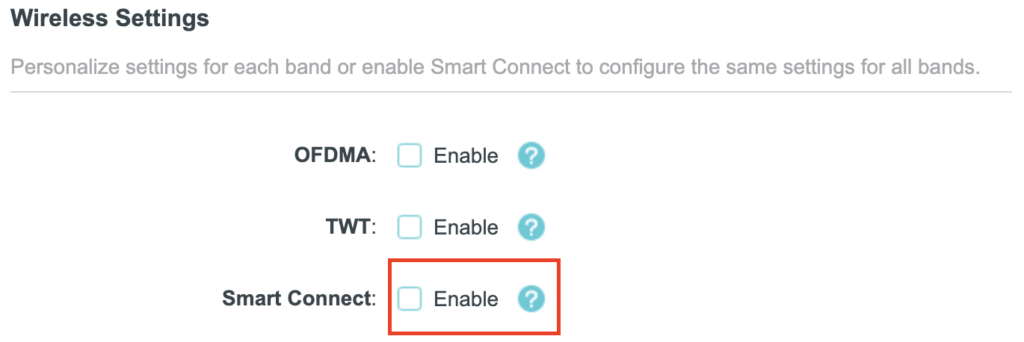
5. Check the Smart Connect checkbox to merge the two Wi-Fi bands. Uncheck the Smart Connect checkbox to separate the two Wi-Fi bands. If you have the two Wi-Fi bands separated make sure the Network Name (SSID) fields have different names for 2.4GHz and 5GHz bands. Click Save.

TP-Link Merge Wifi
TP-Link Separate Wifi

6. Connect your devices to the new wireless network.

TROUBLESHOOTING

Still having issues? Visit the VPN Troubleshooting section.

Troubleshoot Here

Warranty and Returns FAQs
admin · Jan 29, 2019 ·

Warranty and Returns FAQs

At FlashRouters, we are confident that every router sold will function as advertised. We open, inspect, upgrade, configure, and then test all FlashRouters before they get shipped out. That is why we guarantee you will receive a working unit and offer our own 1-Year Hardware Warranty included with all New and Refurbished routers purchased from the FlashRouters website.

If you would like to extend the warranty coverage period to 2 years, the option is available during the FlashRouters checkout process.

Since we are so certain you will be happy with your upgraded and super secure network, all routers purchased from FlashRouters.com also come with a 30-day satisfaction guarantee.

Please read the warranty and return section in detail before placing an order or requesting an RMA. Our goal is to make the return process as smooth and transparent as possible for all customers. If the router you purchased does not work out for your needs we still want you to be satisfied with your purchasing experience.

Hardware Warranty and Return Policy

Requesting an RMA

Automated Return Merchant Authorization (RMA) requests are available from within your customer account panel. If you are eligible for a return then your RMA request will be approved. If your RMA request is not valid then it will be denied and you must e-mail FlashRouters Support for any additional information or actions. RMAs are valid for 7 days from the day they are issued. 

The following are the available options when submitting an RMA request. Continue reading for more information on all available RMA options and conditions. 

  1. Hardware Guarantee – available for 7 days after receiving your FlashRouter.
  2. Satisfaction Guarantee – available for 30 days after receiving your FlashRouter.
  3. Hardware Warranty – available for 1 year, or 2 years if upgraded when purchasing a FlashRouter.
  4. Hardware Repair – Anyone with a valid FlashRouters Support subscription is eligible for free Hardware Repair. 

Please note we can only provide prepaid labels for approved Hardware Warranty returns within the USA. Prepaid labels are not available for international customers. All return shipping for 30 Day Satisfaction refunds is paid for by the customer.

Hardware Guarantee

In the rare case you receive a faulty router, you can open a ticket to contact FlashRouter Support for an RMA or request an RMA in your customer account panel and we will work to rectify the situation immediately. If it is determined that the power supply you received was faulty, and not the router itself, our team will immediately ship you out a tested power supply at no additional cost.

Rest assured that we individually test and inspect every FlashRouter with great detail before shipment. BUT… if router gremlins (yes they do exist) snuck into your router during the shipping process and it no longer powers on, our team will supply you with a prepaid shipping label to return the unit back to our offices. As soon as we receive verified tracking on your return shipment we will ship out another thoroughly tested unit to you at no additional cost.

You must contact us within 7 days from when you received your FlashRouter to be eligible for a Hardware Guarantee prepaid shipping label from FlashRouters.

30-Day Satisfaction Guarantee

If you are not satisfied with the performance of your router after trying it out for up to 30 days, you can open a ticket to contact FlashRouter Support for an RMA or request an RMA in your customer account panel. Once the RMA is approved, you will then have the option to ship the unit back to FlashRouters.

Once we receive the return, our team inspects and refunds accordingly based on the original purchase price of your FlashRouter. Please note there is a $25 restocking fee and refunds do not include any initial shipping costs associated with your order. All restocking fees are returned as Store Credit. This means if you make another purchase at FlashRouters then your fee is refunded.

The item must also be fully functional and have no signs of cosmetic damage for you to receive the maximum refund. If you do not include the original boxing, or any router accessories you may also be charged an additional fee as indicated.

Ethernet Cable: $5

Power Source: $10 

Antennas: $5 per antenna

Router Stand: $10

Box: $10

Cosmetic Damage: Up to $25

What is covered under the 30-Day Satisfaction Guarantee?

If the VPN speeds or WiFi network speeds are not what you had hoped, if the setup is too complicated, or you just decided on another solution; these are all covered under the 30-Day Satisfaction Guarantee. 

We will not accept any returns of working routers after 30 days from the date you received your router. After 30 days, router returns/replacements will only be processed under the Hardware Warranty. 

Can I get the restocking fee waived?

If you place a new order for a different FlashRouter unit before returning your initial purchase, then we will waive the restocking fee. Otherwise the $25 restocking fee will be applied to your customer account as a store credit. You can then use this $25 store credit on any future FlashRouter purchase.

Rewards Points refunds

If you return your FlashRouter under the 30 day satisfaction guarantee then you will lose any reward points received for your initial purchase.

Hardware Warranty

A 1-year Hardware Warranty is included with the purchase of all New and Refurbished FlashRouters. If your router suffers hardware failure within 365 days from the date you received the unit then we will replace your router with another fully tested unit. You must pay for return shipping of the faulty unit back to our offices located in New Jersey, USA and our team will ship out your replacement at no additional cost.

You must contact the FlashRouter support team for an RMA number or request an RMA from your customer account panel before returning a router for warranty replacement. If you do not receive approval for a return then you will not be eligible for a replacement unit.

There are 2 options for receiving a Hardware Warranty replacement unit:

Option #1: Process another order for immediate shipping and as soon as we receive the returned device back in our offices we will issue you a refund for the initial purchase.

Option #2: Ship your faulty router back to our office, and as soon as we receive the unit our returns department will have a replacement unit shipped out to you at no extra cost.

How long do I have before my RMA expires?

RMA’s are good for 7 days from the date they are issued.

What if I upgraded to a 2 year Hardware Warranty at checkout?

All refund, replacement, RMA details, and options covered by the 1-year Warranty apply in the exact same manner for 2 year warranties over each respective warranty coverage period.

If for any reason the router you purchased is no longer in stock or discontinued then you have the option to replace your router with one of equal value or receive a refund. Hardware warranties are only eligible for refunds if we are unable to provide a replacement unit for you.

What should I do if my router is out of warranty coverage?

If your FlashRouter is out of the warranty coverage period, we are first and foremost apologetic for the passing of your router. Be sure to contact our sales team though and you can receive a special coupon as a return customer for a shiny new wireless networking centerpiece.

What is not covered with a FlashRouter Warranty?

Items that have been clearly damaged either by the customer or during the return process are not eligible for a full refund. This includes routers that have visible dents, scratches, or moving parts inside the router.
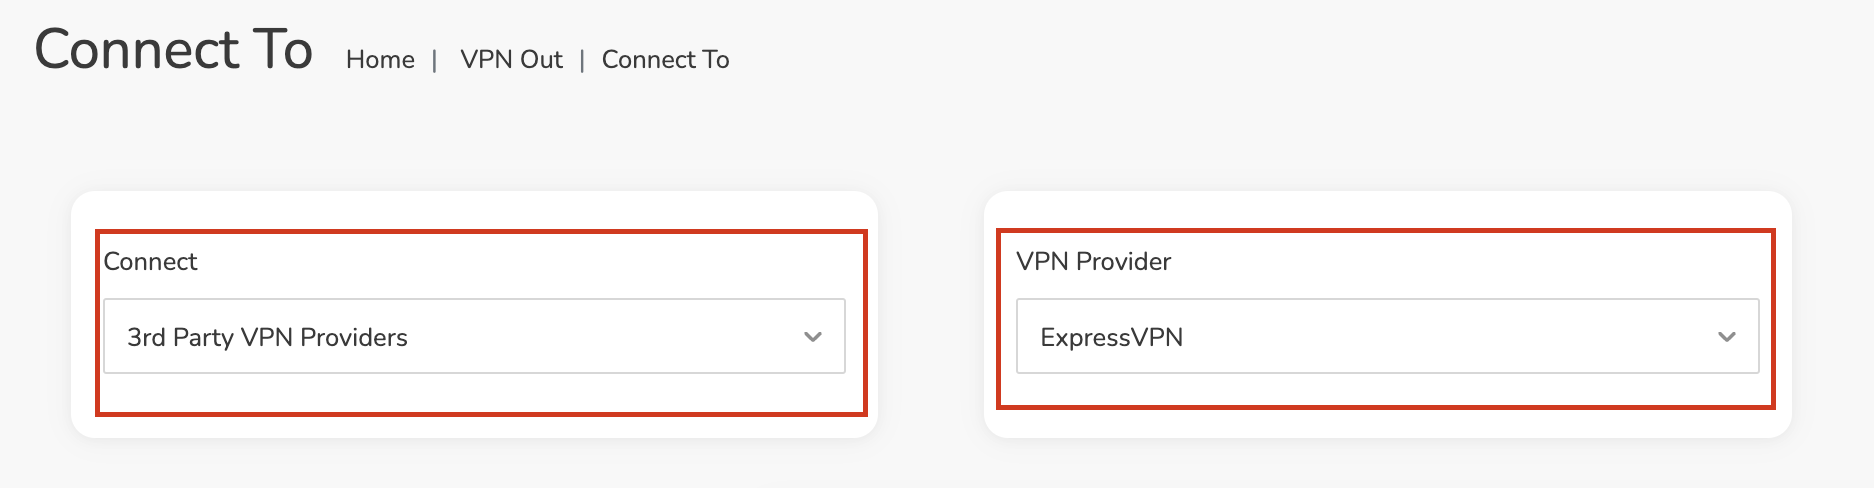
Can I upgrade to a 2 year warranty after my FlashRouter purchase?

2 year warranty upgrades are only available at the time of your FlashRouter purchase. Upgrades are not available once a FlashRouter order has been shipped. 
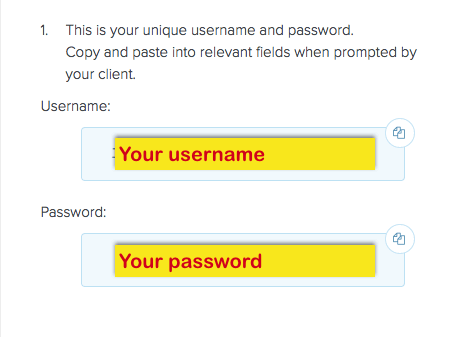
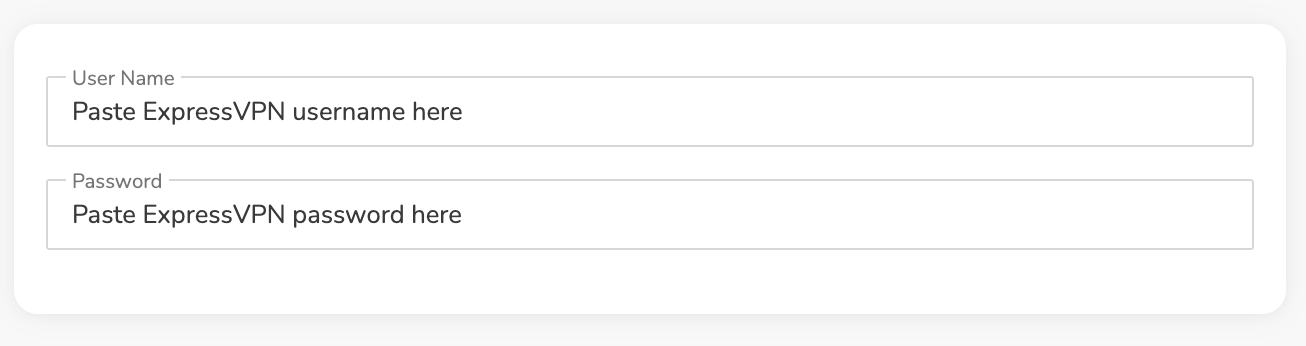
Can I get a Warranty on my router if I purchased a “Flash My Router” plan from FlashRouters?

Routers that have been “flashed” and configured by our support specialists for anyone who has purchased a Flash My Router Plan are not eligible for warranty coverage from FlashRouters. Only routers purchased through the FlashRouters.com website are eligible for warranty replacements or refunds.

Hardware Repair

FlashRouters is proud to offer a free repair and upgrade service for anyone with an active Silver or Gold Service Plan subscription. Any and all shipment costs associated with FlashRouter repairs or upgrade requests are the burden of the customer and will not be paid for by FlashRouters. However, the repair and upgrade service itself is FREE.

If you do choose to ship your router back to our office for repair, then you should include a prepaid shipping label in your package back to your home or office, so our team can send the router back to you whether we are able to repair the unit or not. Router accessories like power supplies, ethernet cable, or antennas do not need to be included when shipping back a unit for repair.

If our team is not able to resurrect your router from a power failure, faulty firmware upgrade, or any other reason then we can return the faulty unit back to you using the return shipping label included with your return package. Alternatively, we can destroy the unit and refund the return shipping costs if that is your preference.

Open Box Routers

What is an Open Box Router?

Open Box routers are fully functional units that have cosmetic flaws and are sold at heavy discounts. These units come with the same Support Plan options as New or RM units, which means you get the same support service with extremely discounted hardware.

Open Box routers are covered under the FlashRouter 30-Day Satisfaction Guarantee BUT come with no Hardware Warranty. We take every measure possible to ensure complete functionality and our team fully load tests these devices before shipment, but you should be very aware that you buy these discounted “open box” devices at your own risk without any Hardware Warranty.

What is the Open Box Router return policy?

Open Box Routers can only be returned within 30 days from the date you received your router. Returns will not be accepted on open box routers after 30-Day Satisfaction Guarantee window has expired. Please note that Open Box Router return shipping costs are not covered by FlashRouters and initial shipping costs are not included in any refunds. 

Accessories Warranty

All Accessories come with manufacturer warranties as listed on the respective product pages. 

FlashRouters will accept returns for refund or replacement of accessories only within 30 days from the date you received your order. After 30 days you must contact the manufacturer for any warranty replacements.

Accessories must be returned with all original packaging and with no cosmetic damage to receive a full refund. A missing box or damage to an item will result in a restocking fee per our discretion.

"Flash My Router" Refund Policy

The “Flash My Router” product offered by FlashRouters is a virtual service provided by the FlashRouters support team. This product includes a remote support session where our support team will flash your router and then complete your internet, WiFi, and VPN setup, and in certain cases support additional router features. 

Once your remote support session is completed there are absolutely no refunds on “Flash My Router” purchases. In the case we are unable to successfully flash your router we will offer a full refund for your “Flash My Router” purchase. “Flash My Router” purchases are fully refundable if you decide you would no longer like to use the service after your purchase is completed.

Service Plan Subscription Refund Policy

All FlashRouter router purchases include a recurring FlashRouters Service Plan subscription. There are 3 levels of support to choose from as either a quarterly or yearly recurring billing plan.

30-Day Satisfaction Guarantee

If you choose to return your FlashRouter under the 30-Day Satisfaction Guarantee, then you are eligible for a full refund on any Service Plan purchased with your FlashRouter.

Cancellation Policy

You may cancel your recurring billing at any time and you will not be charged again. Please note you will not be refunded for unused time from the initial billing/service period of your support plan subscription.

If you choose to cancel your 3 month FlashRouter support plan then you will retain support until the end of the 3 month period. If you choose to cancel your 1 year FlashRouter support plan then you will retain support until the end of the 1 year period. You will not lose time from your existing service plan if you cancel when a plan is active.

There is a 7-day grace period after Service Plan renewals have been charged, where you may request an immediate cancellation and full refund.

How do I change my FlashRouter Support subscription level?

How do I Upgrade my Service Plan?

You can upgrade a Service Plan at any time during a billing cycle. You must e-mail or live chat our support team and request an upgrade. Our team will then issue you store credit for any unused time on your existing Service Plan, which will then be immediately applied to your new upgraded Service Plan purchase. Your recurring billing will then continue at the new Service Plan level. Your 3 months or 1 year of upgrade service will start again from the date of the upgrade purchase. 

How do I switch from a Quarterly to a Yearly Service Plan?

If you would like to switch to a Yearly plan from a Quarterly plan of the same service level, then you must e-mail or live chat our support team and request an upgrade. Our team will then issue you store credit for any unused time on your existing Quarterly Service Plan, which will then be immediately applied to your new Yearly Service Plan purchase. Your recurring billing will then continue at the Yearly Service Plan level. Your 1 year of service will start again from the date of the upgrade purchase. 

How do I Downgrade my Service Plan?

If you are subscribed a Service Plan, but would like to switch to a lower level Service Plan then you can request that our support team cancel your recurring billing at any time. As soon your existing Service Plan is expired you can make a new purchase for the new Service Plan of your choice.

How do I switch from a Yearly to a Quarterly Service Plan?

If you would like to change the billing cycle from yearly to quarterly, you may cancel your existing subscription plan and then once your year of service has expired, you may purchase a Quarterly Service Plan instead.

If you just purchased a FlashRouter, there is a 7-day grace period from when you receive your unit if you would like an immediate change from Yearly to a Quarterly Service Plan.

How do I cancel my subscription?

You may request a Service Plan subscription cancellation by e-mailing support@flashrouters.com or from within your customer account panel at any time. You will be notified of a successful cancellation and your payment method will not be billed again.

Please note there are no refunds when cancelling your subscription. Cancellation means you will not be billed again for your Service Plan, there are no partial refunds for cancelled Service Plans.

ExpressVPN Setup on Roqos

Dave · Dec 16, 2021 ·

Preparing for ExpressVPN Setup

Obtain your ExpressVPN login information

If you are not already an ExpressVPN user Sign Up Now.

1. Visit ExpressVPN’s website login page.

ExpressVPN login page

2. Successfully log in with your account information. Select More.

ExpressVPN account page

3. Select Manual Configuration and copy the Username and Password that are displayed on the right hand side of the screen.

ExpressVPN Manual Configuration
ExpressVPN username and password

Connecting to ExpressVPN in the Roqos Core

Access the Roqos Core UI

1. Login to the Roqos Core web app in a browser on any computer or smart device.

2. Click VPN from the navigation menu and then click VPN OUT.

Roqos VPN Out

3. Click the Connect to box.

Roqos VPN Connect to

4. In the Connect dropdown choose 3rd Party VPN Providers and for the VPN Provider dropdown choose ExpressVPN.

Roqos ExpressVPN select provider

Enter your ExpressVPN information

In the Username and Password field enter the ExpressVPN OpenVPN Username and Password that you obtained.

ExpressVPN on FlashRouters Privacy App Setup - OpenVPN Specific Username and Password
Roqos VPN ExpressVPN enter username and password

Select an ExpressVPN server

Click the Server dropdown and type in or scroll to your preferred server location.

Roqos VPN ExpressVPN select server

Click the Save button.

Roqos VPN Save Settings

Connect to ExpressVPN

Once you click Save you will be returned to the VPN OUT menu.

Click the Connect button to start your ExpressVPN connection. Please be patient as the router connects your entire network through VPN.

Roqos VPN Connect

Assign devices to connect to VPN

By default there are no devices assigned to the VPN tunnel. Click Included Devices. From this page you can choose if all devices should connect to ExpressVPN or only certain devices.

Roqos VPN Included Devices

From the dropdown select Include all devices if you want every device that connects to the Roqos to connect to ExpressVPN. Then click Save.

Roqos VPN Include All Devices

If you only want specific devices to connect to ExpressVPN while others bypass the VPN connection select Include selected devices from the dropdown and then toggle the sliders for the devices you want connected to VPN. Click Save.

Roqos VPN Include Selected devices

Verify a successful ExpressVPN connection

Make sure you are connected to the Roqos network via WiFi or ethernet connection on your device.

Visit ExpressVPN’s IP Check to verify your new IP Address and virtual location.

You should see Connected at the top of the page underneath ExpressVPN.

Connect to a different ExpressVPN server

To change your server click Disconnect on the VPN OUT page then return to the Connect To section to select a new server from the Server dropdown and click Save. Now click Connect once again on the VPN Out page.

Disconnect from ExpressVPN

To disconnect from ExpressVPN click the Disconnect button.

TROUBLESHOOTING

Still having issues? Visit the FR Privacy App Troubleshooting section.

Troubleshoot Here
Next Page »

Primary Sidebar

  • Troubleshooting
  • Router Access
  • Internet Connection Issues
  • WiFi Connectivity
  • General VPN Issues
  • TeamViewer Remote Support
  • DD-WRT Firmware
  • Facebook
  • Twitter
  • Instagram
  • Pinterest
  • YouTube

Footer