• Skip to primary navigation
  • Skip to main content
  • Skip to primary sidebar
  • Skip to footer

FlashRouters Support Portal

Prioritizing Privacy

  • SETUP GUIDES
    • Privacy Hero Router Setup Guide
    • ASUS-WRT Router Setup Guide
    • AsusWRT-Merlin Router Setup Guide
    • DD-WRT Router Setup Guide
    • ExpressVPN Router Setup Guide
    • GL.iNet Router Setup Guide
    • Roqos Core Router Setup Guide
  • TROUBLESHOOTING
    • Router Access
    • WiFi Connectivity
    • Internet Connection Issues
    • General VPN Issues
    • DD-WRT Firmware
    • TeamViewer Remote Support
  • FAQs
    • Router FAQs
    • VPN FAQs
    • Warranty and Returns FAQs
    • Sales FAQs
    • Shipping FAQs
    • Service Plan FAQs
  • Show Search
Hide Search

Search Results for: cisco any connect

Wireless Guest Network Setup – Unbridged (Recommended)

TeamFlashRouters · Jun 12, 2019 ·

If you would like to prevent visitors from connecting to your main WiFi network then you can create a separate Guest Network that will prevent access to the main router. This setup also allows you to create different rules for different WiFi SSID’s in your home ranging from QoS controls, access restrictions, VPN network segmentation, and more.

Preparing for Wireless Guest Network Setup

If you have a Dual-band or Tri-Band router you can setup a WiFi Guest Network, creating a separate VLAN (virtual local area network) for your visitors, or in order to segment your VPN networks on any band you like. We recommend using the 2.4GHz network for your DD-WRT Guest Wireless Network so it is compatible with the most possible WiFi devices. Setting up a guest network for visitors in your home allows you to keep them off of your main WiFi network.

We recommend performing this setup while connected to the FlashRouter via ethernet cable. If your computer does not have an ethernet port and you must proceed via wireless connection to the FlashRouter. Be sure to pay attention to the wireless connection as you may need to rejoin the FlashRouter’s network after making changes.

DD-WRT Router Setup for Wireless Guest Network

Enter Wireless settings

Navigate to Wireless > Basic Settings
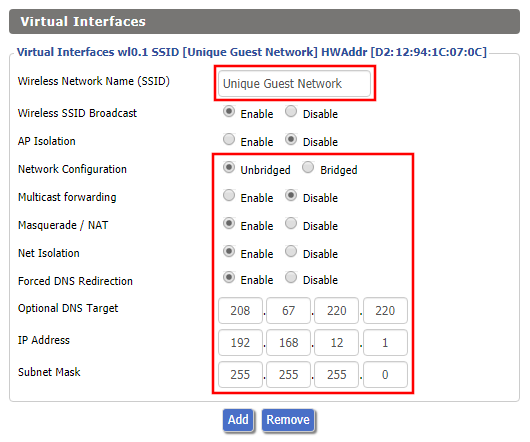
FlashRouter DD-WRT Wireless Guest Network Settings Unbridged

Under the 2.4GHz or 5GHz Interface click the Add button.

Wireless Network Name (SSID)

Enter the a unique network name for the guest network.

Network Configuration

Unbridged

Force DNS Redirection

Enable

Optional DNS Target

208.67.220.220

IP Address

192.168.12.1

Subnet Mask

255.255.255.0

CLICK SAVE

Enter Wireless Security settings

Navigate to Wireless > Wireless Security
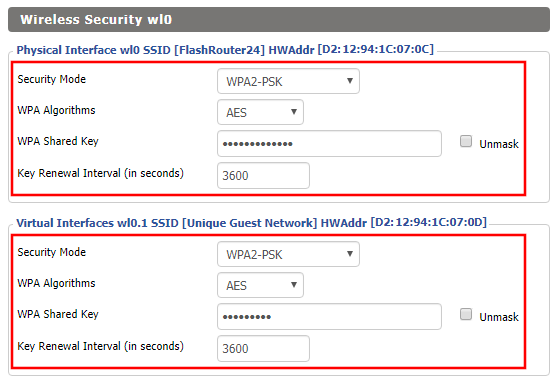
Wireless Guest Network Setup on DD-WRT FlashRouter Unbridged
  1. Duplicate the wireless security settings that are set for the other bands for the newly created virtual interface.
  2. Click Apply Settings.
  3. Reboot your router.

Enable DHCP for Guest Network

Navigate to Setup > Networking
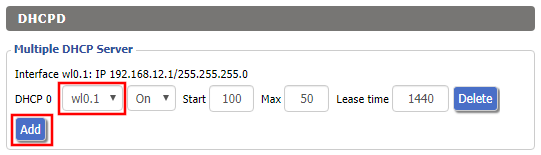
Wireless Guest Network Setup on DD-WRT FlashRouter Unbridged Setting DHCP Server
  1. Scroll to the very bottom of the page and under DHCPD click Add.
  2. Select wl0.1 or ath1.1 depending on your router model.
  3. Click Apply Settings.
  4. Reboot your router.

Depending on the router model and WiFi band you are using, the wireless interfaces will be labelled differently.

This setting can be labelled wl1.1, ath0.1, wl2.1, and so on. Make sure when you get up to the bridge assignment section that you are using the correct guest network Virtual Interface.

Back up your settings

Navigate to Administration > Backup

  1. Click the Backup button.
  2. A file named nvrambak.bin will be saved to your computer.
  3. You can load nvrambak.bin to restore your settings in the event of a reset.

TROUBLESHOOTING

Still having issues? Visit our Troubleshooting section to diagnose common problems here.

Troubleshoot Here

VPN Router Setup Guides & FAQs | FlashRouters Help Center

Support Guides

Select your router type

Privacy hero Routers

Router Models

Privacy Hero, Privacy Hero 2

PRIVACY HERO SETUP GUIDE
Asus Merlin Router Support Guides

Router Models

ASUS
  • RT Series: RT-AC68U, RT-AC88U, RT-AC3100, RT-AC5300, RT-AC86U, RT-AX56U, RT-AX58U, RT-AX68U, RT-AX86U. RT-AX86U-PRO, RT-AX88U, RT-AX88U-PRO, RT-BE86U, RT-BE88U, RT-BE92U, RT-BE96U
  • GT Series: GT-AC2900, GT-AX6000, GT-AX11000, GT-AXE11000,GT-AXE11000-PRO,  GT-AXE16000, GT-BE98_PRO
  • ZenWiFi Pro XT12
MERLIN SETUP GUIDE

Router Models

WR3000, M1800, M3000
CUDY SETUP GUIDE
Asus WRT Router Support Guides

Router Models

GT series: GT6, GT-AXE16000, GT-AX11000 Pro, GT-AXE11000, GT-AX6000, GT-AX11000, GS-AX5400, GS-AX3000
ZenWiFi: ZenWiFi Pro XT12, ZenWiFi Pro ET12, ZenWiFi XT9, ZenWiFi AX (XT8), ZenWiFi ET8, ZenWiFi XD6, ZenWiFi XD5
RT series: RT-AXE7800, RT-AX88U Pro, RT-AX88U, RT-AX86U Pro, RT-AX86U, RT-AX86S, RT-AX68U, RT-AX82U, RT-AX58U, RT-AX3000, RT-AX59U, RT-AX92U
TUF series: TUF-AX5400, TUF-AX3000_V2, TUF-AX3000, TUF Gaming AX6000, TUF Gaming AX4200
ASUS-WRT SETUP GUIDE
TP-Link Router Support Guides

Router Models

Archer AX10000, Archer AX1100, Archer AX21, Archer AX3000, Archer AX3000 Pro, Archer AX3200, Archer AX4400, Archer AX5400 Pro, Archer AX55, Archer AX55 Pro
Archer AX6000, Archer AX72 Pro, Archer AX73, Archer AX75, Archer AX80, Archer AX90
Archer AXE300, Archer AXE5400, Archer AXE75, Archer AXE95
Archer BE550, Archer BE800, Archer BE900, Archer BE9300, Archer GE80, Archer GX90
TP-LINK SETUP GUIDE
gl.iNet Router Setup Guides

Router Models

Flint 2 GL-MT6000, Flint GL-AX1800, Slate GL-AXT1800, Beryl GL-MT3000, Marble GL-B3000

GL.iNet SETUP GUIDE
Roqos Router Support Guides

Router Models

Roqos Core Router, Roqos SASE Appliance

ROQOS SETUP GUIDE
DD-wrt Router Support Guides

Router Models

NETGEAR

AC1450, R6220, R6230, R6250, R6260, R6300 V1, R6300 V2, R6400 V1, R6400 V2, R6700 V1, R6700 V2, R6700 V3, R7000, R7000P, R7800, R8000, R9000, XR500

ASUS

RT-AC56U/R, RT-AC68U V1, RT-AC68U V2, RT-AC1900P, RT-AC87U, RT-AC3100, RT-AC5300

LINKSYS

WRT1200AC, WRT1900AC V1, WRT1900AC V2, WRT1900ACS V1, WRT1900ACS V2, WRT32X, WRT3200ACM

DD-WRT SETUP GUIDE
ExpressVPN Routers

Router Models

ExpressVPN Aircove, Aircove Go

NETGEAR

R6300 V2, R6400 V2, R6700 V3, R7000, R7000P

ASUS

RT-AC56U, RT-AC56R, RT-AC56S, RT-AC68U V3, RT-AC87U

LINKSYS

EA6200, WRT1200AC, WRT1900AC V1, WRT1900AC V2, WRT1900ACS V1, WRT1900ACS V2, WRT32X, WRT3200ACM

EXPRESSVPN SETUP GUIDE

Search Support Articles

Top Router Questions
  • How do I upgrade the DD-WRT firmware of my FlashRouter?
  • Roqos VPN Connected, but my device IP is unchanged
  • How do I access my Roqos device settings?
  • Why can’t I access router settings?
  • How do I reset and reconfigure my ExpressVPN/Aircove FlashRouter?
  • How do I reset and reconfigure my FlashRouter?
  • How do I change my Wireless Password?
  • My 2.4GHz network is not showing up
  • My 5.0GHz network is not showing up
  • My WiFi password is not working
  • Why can’t I connect to WiFi using the WPS button feature?
  • Access FlashRouter DD-WRT firmware settings

More Ways to Get Help

GET IN TOUCH

BUY SUPPORT
BROWSE FAQs

GL.iNet Access Router Settings and Firmware Upgrade

TeamFlashRouters · Apr 3, 2023 ·

Follow this guide to upgrade the firmware of your GL.iNet FlashRouter.

1. Connect your computer, phone, or tablet to the GL.iNet router via wireless (FlashRouter24 / FlashRouter50) or via ethernet cable to one of the LAN ports on the router.

The FlashRouter WiFi password is printed on the sheet that came with the router and is set to Wireless#[First 5 characters of your router MAC]. The router MAC can be found on the bottom of your router if you cannot locate the sheet. For e.g. if your MAC is 9483C07E70A8 then your WiFi password is Wireless#9483C

Be sure to capitalize the W.

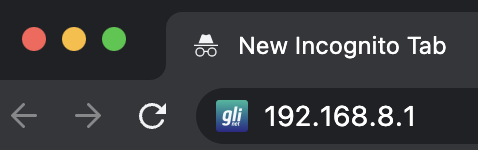
2. Once connected via wireless or ethernet on your device open your browser and go to 192.168.8.1

GL.iNet router access

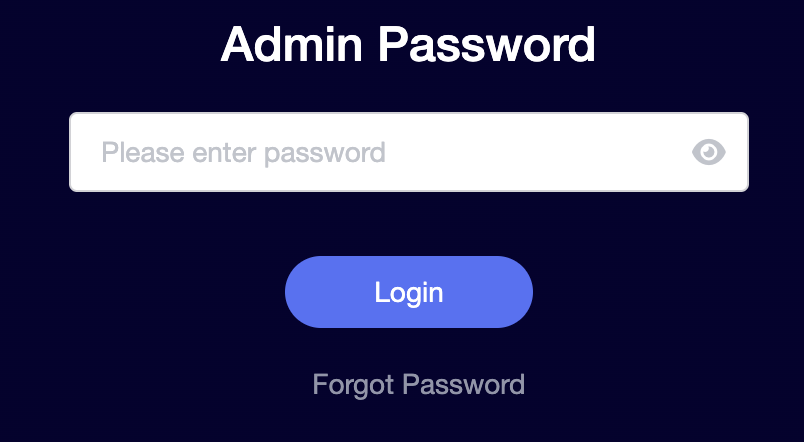
3. Enter openwrt as the admin password to access the GL.iNet firmware settings. Newer devices may have a different admin password set as openwrt1 or glopenwrt1

GL.iNet admin password enter

3. If a new firmware upgrade is available the router settings will either display a banner when you first access the router or a header. Click Install or the Upgrade arrow depending on which appears for you.

GL.iNet Firmware Upgrade Banner
GL.iNet Firmware Upgrade Header

4. Make sure the Keep Settings toggle is pushed to the right so your router does not get reset. Click the Install button to begin the firmware upgrade.

GL.iNet Install Firmware Upgrade

5. The firmware update should take about 2-3 minutes. You may need to reconnect your wireless devices after the network comes back up in your available networks.

TROUBLESHOOTING

Still having issues? Visit the VPN Troubleshooting section.

Troubleshoot Here

Flint/Slate GL.iNet Disable Wi-Fi

TeamFlashRouters · Apr 20, 2023 ·

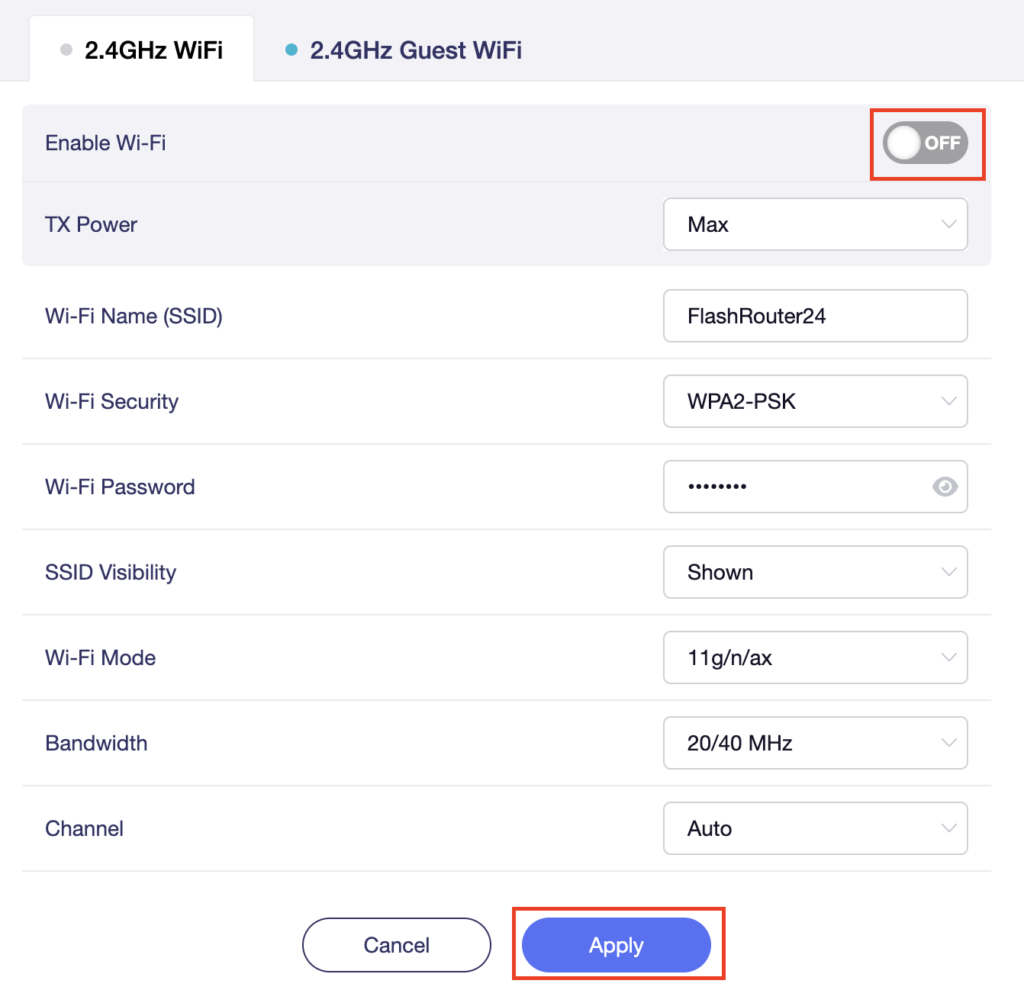
Follow this guide to disable Wi-Fi network on your GL.iNet FlashRouter.

1. Connect your computer, phone, or tablet to the GL.iNet router via wireless (FlashRouter24 / FlashRouter50) or via ethernet cable to one of the LAN ports on the router.

The FlashRouter WiFi password is printed on the sheet that came with the router and is set to Wireless#[First 5 characters of your router MAC]. The router MAC can be found on the bottom of your router if you cannot locate the sheet. For e.g. if your MAC is 1459C07E70A8 then your WiFi password is Wireless#1459C

Be sure to capitalize the W.

2. Once connected via wireless or ethernet on your device open your browser and go to 192.168.8.1

GL.iNet router access

3. Enter openwrt as the admin password to access the GL.iNet firmware settings.

GL.iNet admin password enter

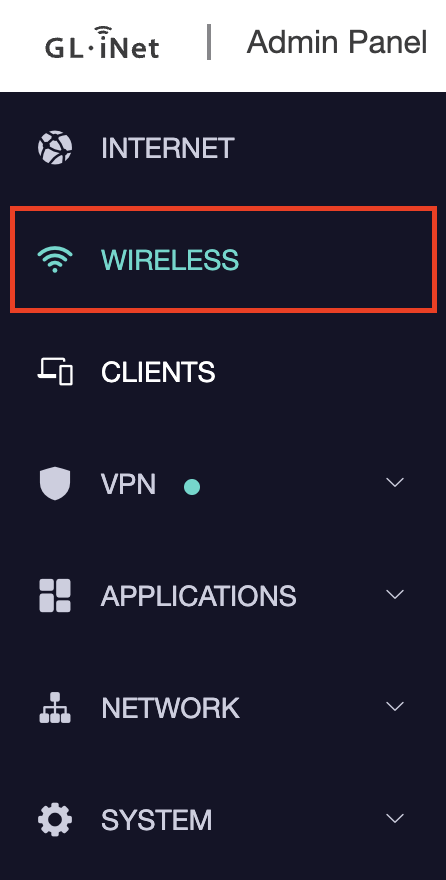
4. Click Wireless.

GL.iNet Click Wireless

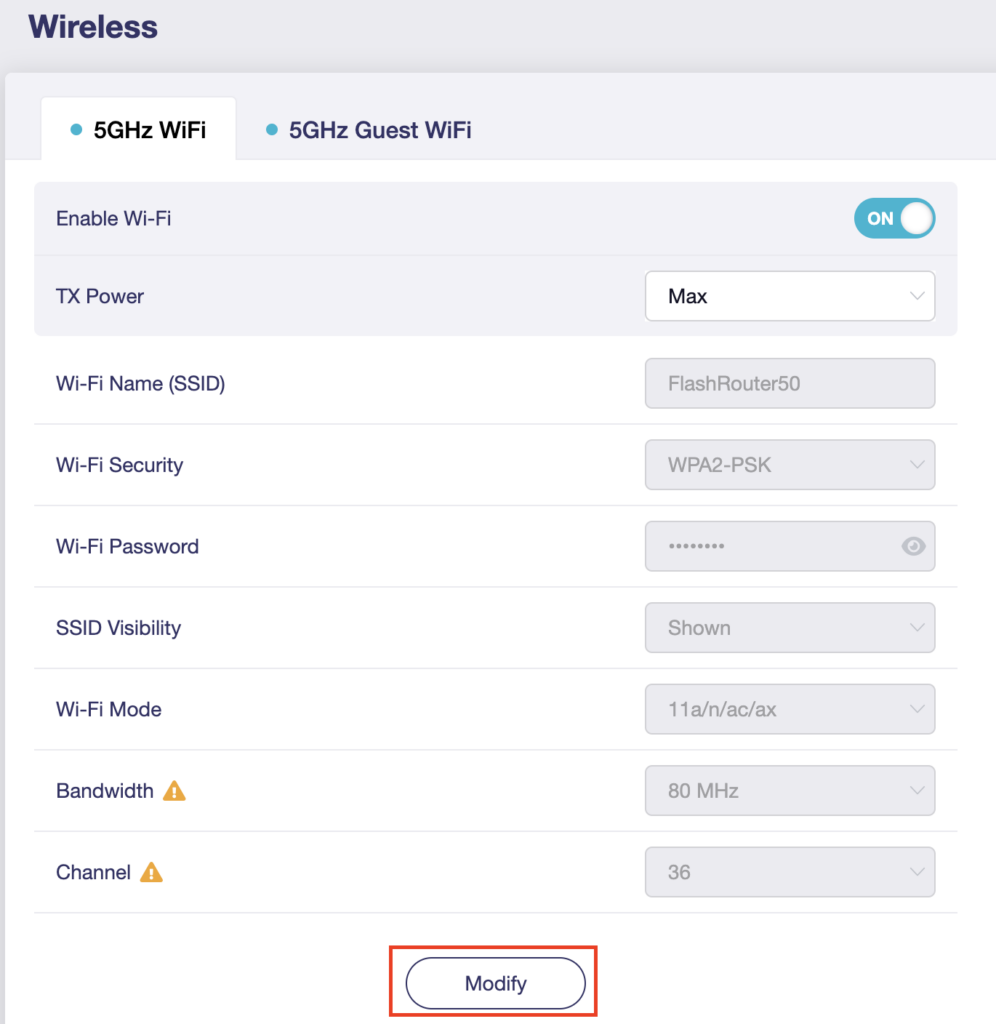
5. Click Modify under the 5GHz or 2.4GHz band.

GL.iNet Modify Wifi

The 5GHz and 2.4GHz bands must be disabled at separate times. Keep in mind that if you are connected to wireless when disabling one band you may need to reconnect with the other band to disable it. Also make sure you have a device that has ethernet capabilities so you can still access the settings with wireless disabled.

6. Set the Enable Wi-Fi toggle to the OFF position and click Apply.

GL.iNet Disable Wifi

TROUBLESHOOTING

Still having issues? Visit the VPN Troubleshooting section.

Troubleshoot Here

IPv6 Internet Setup

TeamFlashRouters · Apr 3, 2019 ·

Most ISPs only support IPv4. Unless your ISP supports IPv6 then enabling it on the FlashRouter will not enable it across your network.

For most VPN users IPv6 should remain disabled as the VPN connection was designed to operate under IPv4 addresses only. Enabling IPv6 in this instance may compromise the security of the VPN tunnel.

We typically only recommend enabling IPv6 if you are not using VPN or if your VPN provider requires that IPv6 be enabled.

Enable IPv6

Navigate to Setup > IPv6

Access FlashRouters DD-WRT Admin Settings and Disable Remote Access
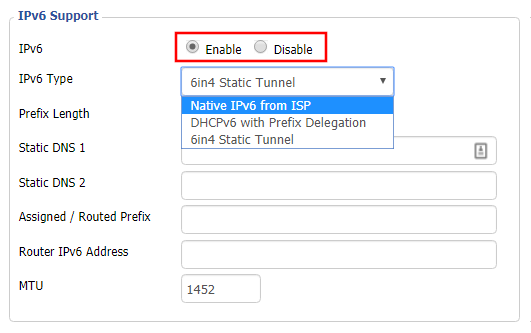
  1. Set IPv6 to Enable.
  2. Select Native IPv6 from ISP in the dropdown.
  3. If you have specific IPv6 DNS servers you would like to add you can add them in the Static DNS fields or leave those fields blank.
  4. Click Apply Settings.

Power cycle your FlashRouter

Power your FlashRouter off and then power it back on by unplugging and then plugging it back in or using the button on the back of the FlashRouter.

Verify a successful IPv6 connection

Once the FlashRouter is finished powering back up, connect one of your devices to the FlashRouter via Ethernet or Wireless.

Visit  http://ipv6-test.com/ where you should see Supported under IPv6 connectivity if your ISP supports IPv6 and your modem is setup to passthrough IPv6.

Please be aware that we can not replicate ISP specific IPv6 issues, which makes them challenging to troubleshoot. We recommend contacting your ISP as the first step of troubleshooting.

Why is my connection speed slower?

TeamFlashRouters · Jun 4, 2019 ·

The encryption provided by a VPN connection almost always results in slower connection speed. In some cases you may have noticed that your computer or tablet was working faster when running a VPN client application or program, that is because a computer has a processor that is normally about 4-6x times as strong as a the processor on a router, and that is for managing a single VPN connection. A router has a smaller processor and is managing an entire network of devices. Encrypting an entire network does take considerable processing power.

Speed test results while connected to VPN are never going to be accurate. A speed test measures the rate at which a data packet travels from one server to another, however when you are connecting to VPN the data packets travel to an extra server where they are encrypted and then sent back into the route. We strongly recommend disabling the FlashRouter’s VPN connection when testing speeds to make sure there isn’t and issue with the router.

Connection Types

Ethernet: Wired ethernet connections will almost always be the most stable and reliable connection. To speed up your internet connection, use an ethernet cable to wire your devices to the FlashRouter.

Wireless (5.0GHz): The 5.0GHz WiFi frequency has less range than the standard 2.4GHz WiFi, but also transmits your internet connection at a significantly faster speed. If you were previously using the 2.4GHz network and experiencing slow speeds please connect to the 5GHz wireless network which should improve your speed.

Connect to the closest VPN server

Our supported VPN providers offer many servers in different countries and regions. If a server has slower connection speed we recommend connecting to the server closest to your actual location.

The process for changing servers is detailed in your provider’s setup instructions.

FlashRouters Privacy App

DD-WRT Manual VPN Configuration

Select a UDP server

UDP servers do not authenticate every data packets the way TCP servers do which results in faster connection speeds.

VPN provider server recommendation

Contact your VPN provider for a server recommendation that should provide the fastest speeds for you.

Change WiFi name and password on Asus

TeamFlashRouters · Feb 26, 2024 ·

Set a custom WiFi network name and password for your devices to join the Asus FlashRouter’s network.

View our guide for more instructions on how to access AsusWRT firmware settings.

1. Under General select Network Map.

Merlin Wifi change name and pass

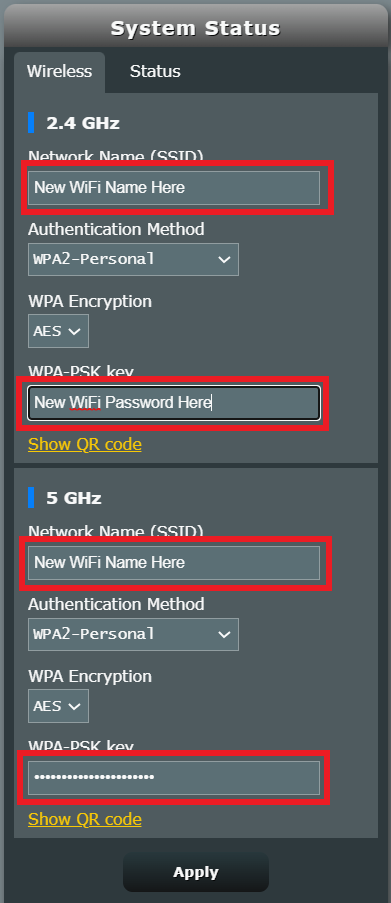
2. In the Network name (SSID) field enter the name you want your Asus WiFi to appear as. This can be the same or different for both 2.4GHz and 5GHz bands. We typically advise setting different names for each so you can connect your streaming devices to the 5GHz band as that is the faster WiFi band.

3. In the WPA-PSK key field enter the password you want to join your devices to the Asus WiFi network. If your WiFi names are the same for 2.4GHz and 5GHz make sure they have the exact same wireless password set.

4. Click Apply and then rejoin the new wireless network.

Wireless Access Point Setup

TeamFlashRouters · Apr 23, 2019 ·

A Wireless Access Point is a setup that has the FlashRouter using an existing network’s DHCP instead of assigning its own. The FlashRouter’s WAN/Internet port should be not be connected to your modem or other router while performing this setup.

Preparing for Wireless Access Point Setup

Locate the Local IP Address of the existing wireless network

Locate the Local IP Address of the existing router that the FlashRouter will be bridged to.

DD-WRT Router Setup for Wireless Access Point

Disable Firewall

Navigate to Security > Firewall

Wireless Client Bridge Setup on FlashRouter DD-WRT - Disable Firewall
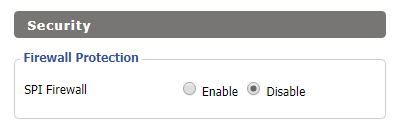
  1. Set SPI Firewall to Disable.
  2. Click Save.

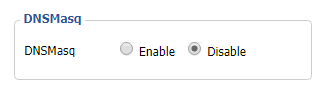
Disable DNSmasq

Navigate to Services > Services

Wireless Repeater Bridge Setup on FlashRouter DD-WRT - Disable DNSMasqButton
  1. Set DNSmasq to Disable.
  2. Click Save.

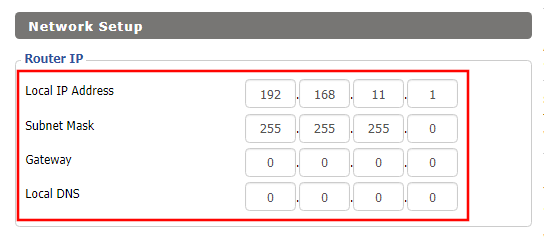
Change the FlashRouter's Local IP Address

Navigate to Setup > Basic Setup

Wireless Client Bridge Setup on FlashRouter DD-WRT - Set Local IP
  1. Set the Local IP Address to a different address on the same subnet as the existing network that you noted early. (example: if the existing network is 192.168.1.1 then set the Local IP Address to 192.168.1.2)
  2. Set the Gateway to the Local IP Address of the existing network. (example: 192.168.1.1)
  3. Set the Local DNS to the Local IP Address of the existing network. (example: 192.168.1.1)
  4. Click Save.

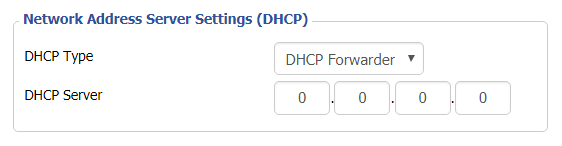
Change the FlashRouter's DHCP settings

DHCP Forwarder Setup for DD-WRT
  1. Set the DHCP Type to DHCP Forwarder.
  2. Click Save.

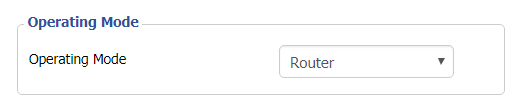
Change the FlashRouter's Operating Mode

Navigate to Setup > Advanced Routing

DHCP Forwarder Setup for DD-WRT
  1. Set the Operating Mode to Router.
  2. Click Apply Settings.

Reboot your FlashRouter

  • Power off the FlashRouter for 30 seconds and connect from the other router’s LAN port to one of the FlashRouter’s LAN port then power it back on.  When it boots back up you will be able to access the FlashRouter’s settings at the new Local IP Address that you set.

Back up your settings

Navigate to the Administration > Backup page.

  1. Click the Backup button.
  2. A file named nvrambak.bin will be saved to your computer.
  3. You can load nvrambak.bin to restore your settings in the event of a reset.

TROUBLESHOOTING

Still having issues? Visit our Troubleshooting section to diagnose common problems here.

Troubleshoot Here

Cudy Access Router Settings

TeamFlashRouters · Feb 26, 2024 ·

Follow this guide to access the router settings of your Cudy FlashRouter.

1. Connect your computer, phone, or tablet to the Cudy router via wireless (FlashRouter24 / FlashRouter50) or via ethernet cable to one of the LAN ports on the router.

The FlashRouter WiFi password is printed on the sheet that came with the router and is set to Wireless#[First 5 characters of your router MAC]. The router MAC can be found on the bottom of your router if you cannot locate the sheet. For e.g. if your MAC is 1459C07E70A8 then your WiFi password is Wireless#1459C

Be sure to capitalize the W.

2. Once connected via wireless or ethernet on your device open your browser and go to 192.168.10.1

Cudy local IP access

3. Enter openwrt1 or openwrt as the admin password to access the Cudy firmware settings.

Cudy router access

TROUBLESHOOTING

Still having issues? Visit the VPN Troubleshooting section.

Troubleshoot Here

Cudy Change Wi-Fi name and password

TeamFlashRouters · Feb 26, 2024 ·

Follow this guide to change the Wi-Fi name and password on your Cudy FlashRouter.

1. Connect your computer, phone, or tablet to the Cudy router via wireless (FlashRouter24 / FlashRouter50) or via ethernet cable to one of the LAN ports on the router.

The FlashRouter WiFi password is printed on the sheet that came with the router and is set to Wireless#[First 5 characters of your router MAC]. The router MAC can be found on the bottom of your router if you cannot locate the sheet. For e.g. if your MAC is 1459C07E70A8 then your WiFi password is Wireless#1459C

Be sure to capitalize the W.

2. Once connected via wireless or ethernet on your device open your browser and go to 192.168.10.1

Cudy local IP access

3. Enter openwrt as the admin password to access the Cudy firmware settings.

Cudy router access

3. Click General Settings.

Cudy General Settings

4. Click Wireless.

Cudy Wireless tab

5. Change the SSID and Password fields for both 2.4GHz and 5GHz bands.The SSIDs should be unique and NOT a duplicate of an existing network. Click Save & Apply.

Cudy Change Wifi Name and password

TROUBLESHOOTING

Still having issues? Visit the VPN Troubleshooting section.

Troubleshoot Here

ExpressVPN Router Setup Guide

Quick Start Guide for ExpressVPN FlashRouters

Find setup guides, FAQs and troubleshooting tips for ExpressVPN configured FlashRouters.

VIEW SUPPORTED ROUTER MODELS

Aircove

R6300 V2, R6400 V2, R6700 V3, R7000, R7000P

Asus Logo

RT-AC56U, RT-AC56R, RT-AC56S, RT-AC68U V3, RT-AC87U

EA6200, WRT1200AC, WRT1900AC V1, WRT1900AC V2, WRT1900ACS V1, WRT1900ACS V2, WRT32X, WRT3200ACM

Internet Setup

  • ExpressVPN Asus Quick Start Guide
  • ExpressVPN Netgear Quick Start Guide
  • ExpressVPN Linksys Quick Start Guide
  • ExpressVPN/Aircove FlashRouter Internet Setup and Activation
  • How do I reset and reconfigure my ExpressVPN/Aircove FlashRouter?

WiFi Setup

  • Separate 2.4GHz and 5GHz Wi-Fi bands on ExpressVPN/Aircove firmware
  • Change Wireless Channels on ExpressVPN/Aircove firmware

VPN Setup

  • Change server locations on ExpressVPN/Aircove firmware
  • Using Device Groups to connect to multiple VPN locations on ExpressVPN/Aircove firmware
  • Using Device Groups to bypass VPN on ExpressVPN/Aircove firmware
  • Change VPN Protocols on ExpressVPN/Aircove firmware
  • ExpressVPN TP-Link OpenVPN Setup
  • ExpressVPN Cudy OpenVPN Setup
  • ExpressVPN Asus AX1800S OpenVPN Setup
  • Flint/Slate GL.iNet ExpressVPN OpenVPN Setup
  • ExpressVPN Merlin OpenVPN Setup

ExpressVPN Features

  • ExpressVPN MediaStreamer SmartDNS Setup
  • ExpressVPN Router App Support

Search Support Articles

Troubleshooting

  • Separate 2.4GHz and 5GHz Wi-Fi bands on ExpressVPN/Aircove firmware
  • Change Wireless Channels on ExpressVPN/Aircove firmware
  • How do I reset and reconfigure my ExpressVPN/Aircove FlashRouter?

More Ways to Get Help

GET IN TOUCH

BUY SUPPORT
BROWSE FAQs

TP-Link Access Router Settings

TeamFlashRouters · Apr 11, 2024 ·

Follow this guide to access the router settings of your TP-Link FlashRouter.

1. Connect your computer, phone, or tablet to the TP-Link router via wireless (FlashRouter24 / FlashRouter50) or via ethernet cable to one of the LAN ports on the router.

The FlashRouter WiFi password is printed on the sheet that came with the router and is set to Wireless#[First 5 characters of your router MAC]. The router MAC can be found on the bottom of your router if you cannot locate the sheet. For e.g. if your MAC is 1459C07E70A8 then your WiFi password is Wireless#1459C

Be sure to capitalize the W.

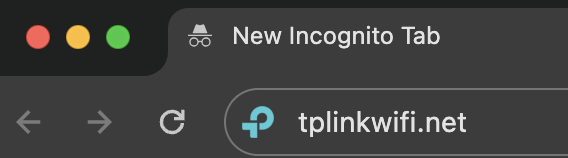
2. Once connected via wireless or ethernet on your device open your browser and go to tplinkwifi.net

TP-Link URL Access

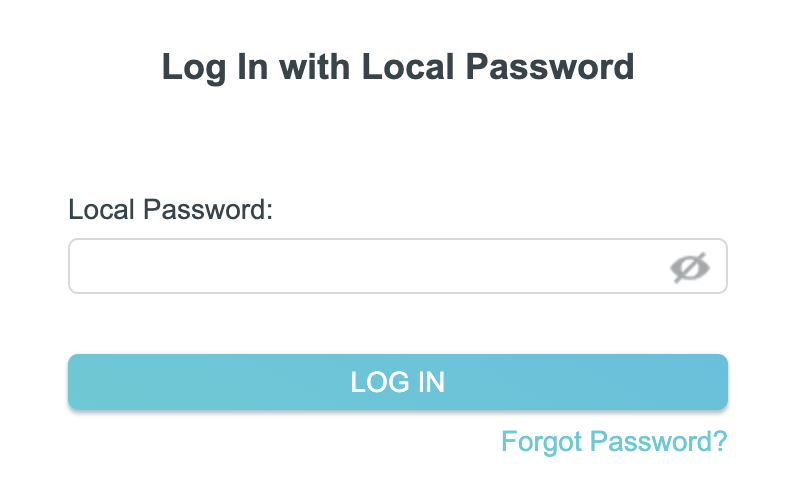
3. Enter tp-link as the admin password to access the TP-Link firmware settings.

TP-Link admin password

TROUBLESHOOTING

Still having issues? Visit the VPN Troubleshooting section.

Troubleshoot Here

Change Wireless Channels on ExpressVPN/Aircove firmware

TeamFlashRouters · Mar 16, 2022 ·

Changing the wireless channel on your ExpressVPN FlashRouter can help with WiFi stability and allows you to use a wireless channel with less traffic in your local environment.

1. Connect to the FlashRouter’s network via ethernet cable or wireless.

2. Open your web browser and enter expressvpnrouter.com or 192.168.132.1 in the URL.

ExpressVPNrouter.com
192.168.132.1

3. Login with your ExpressVPN FlashRouter admin password.

ExpressVPN Router admin login

4. Select Network Settings on the left hand side of the menu.

ExpressVPN Network Settings

5. Select Wi-Fi Settings on the left hand side of the menu.

ExpressVPN WiFi Settings

6. Select Advanced Settings.

ExpressVPN WiFi Advanced Settings

7. Select the Channel Width and Main Channel you want your ExpressVPN FlashRouter to use. Note that higher 5GHz Wi-Fi channels will not be compatible with older devices. Click Save. Click Continue.

ExpressVPN WiFi Channels

DD-WRT Router Setup Guide

DD-WRT Router Setup Guide

Quick Start Guide for DD-WRT FlashRouters

Find setup guides, FAQs and troubleshooting tips for DD-WRT configured FlashRouters.

VIEW SUPPORTED ROUTER MODELS

AC1450, R6220, R6230, R6250, R6260, R6300 V1, R6300 V2, R6400 V1, R6400 V2, R6700 V1, R6700 V2, R6700 V3, R7000, R7000P, R7800, R8000, R9000, XR500

Asus Logo

RT-AC56U/R, RT-AC68U V1, RT-AC68U V2, RT-AC1900P, RT-AC87U, RT-AC3100, RT-AC5300

WRT1200AC, WRT1900AC V1, WRT1900AC V2, WRT1900ACS V1, WRT1900ACS V2, WRT32X, WRT3200ACM

Internet Setup

  • Connect FlashRouter to Internet
  • Access FlashRouter DD-WRT firmware settings
  • What are some extra steps I can take to secure my network?
  • IPv6 Internet Setup
  • PPPoE Internet Setup

WiFi Setup

VPN Setup

DD-WRT Features

  • How do I set a Static IP for my device in DD-WRT?
  • How do I upgrade the DD-WRT firmware of my FlashRouter?
  • How do I save and load a backup file?
  • How do I schedule a reboot of my FlashRouter?
  • How do I change the DHCP range of my FlashRouter?

Search Support Articles

Troubleshooting

  • Why can’t I send emails while connected to VPN?
  • What is a DNS leak and how can I prevent a DNS leak in my router?
  • My VPN stopped working on my FlashRouter.
  • Why is my connection speed slower?
  • Why are streaming services blocked while connected to VPN?
  • How do I find my router local IP address?
  • How do I reset and reconfigure my FlashRouter?
  • How do I check for static network settings on my devices?
  • Why is my router not connecting to internet?
  • How to fix an Unidentified Network or Limited Connection.
  • Why are some of my devices not connecting to the internet?
  • Why is the internet LED red on my router?
  • Why is the power light on my FlashRouter blinking?
  • My 2.4GHz network is not showing up
  • My 5.0GHz network is not showing up
  • My WiFi password is not working
  • Why did my WiFi SSID change to ‘dd-wrt’?
  • Why are devices disconnecting from Wireless?
  • Why is my WiFi signal weak?

More Ways to Get Help

GET IN TOUCH

BUY SUPPORT
BROWSE FAQs

HMA VPN Manual OpenVPN Setup

TeamFlashRouters · Apr 11, 2019 ·

Please note: HMA no longer allows router based integration, please visit our top recommended VPNs.

TROUBLESHOOTING

Still having issues? Visit the VPN Troubleshooting section.

Troubleshoot Here

Windscribe WireGuard Setup

TeamFlashRouters · Oct 13, 2021 ·

Preparing for Windscribe WireGuard Setup

Verify your Windscribe login information

If you are not already a Windscribe user Sign Up Now.

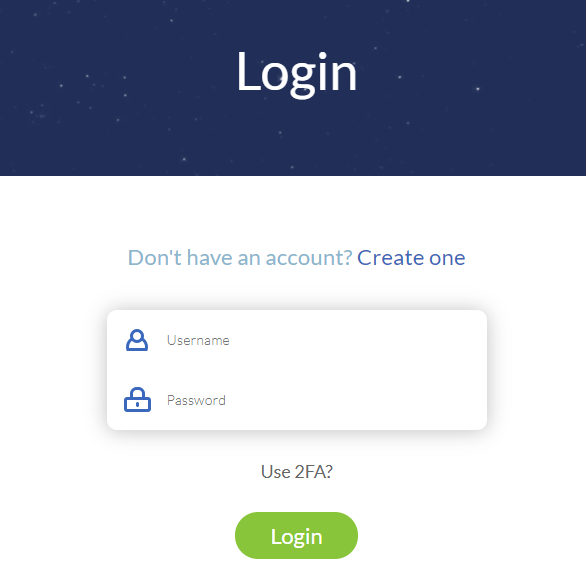
Log in to your account on the Windscribe website.

Windscribe Login

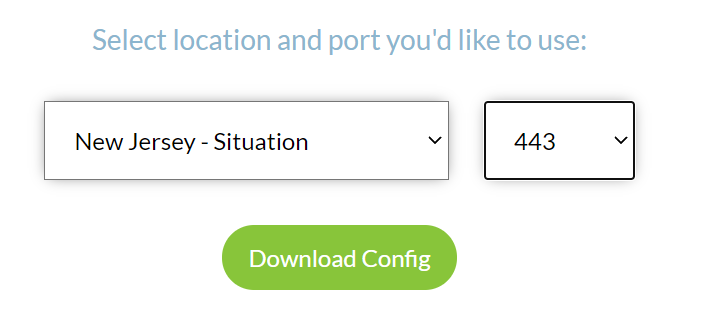
Go to the Windscribe WireGuard config generator page and select the Server location and Port you would like to use. Click Download Config.

Windscribe Wireguard select server location

Open the .conf file that is downloaded using Notepad in Windows or TextEdit in Mac.

DD-WRT Router Setup for Windscribe WireGuard

Navigate to Setup > Tunnels 

Enter Winscribe WireGuard settings

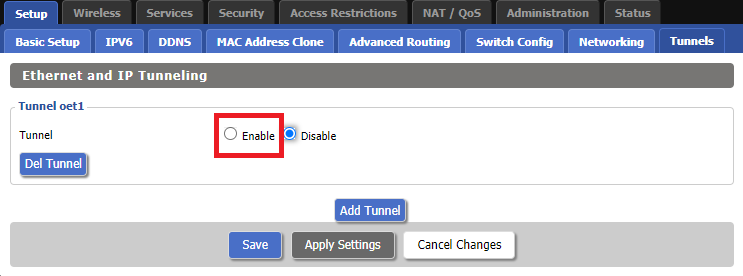
1. Click Add Tunnel.

2. Set Tunnel to Enable.

Setup - Tunnel - Enable Tunnel

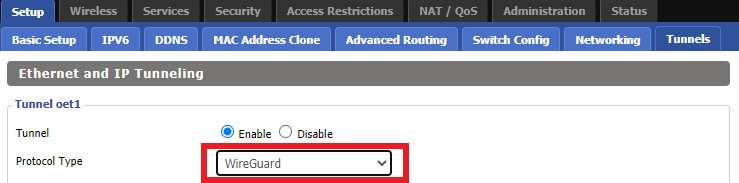
3. Select Wireguard from the dropdown.

Setup - Tunnel - Select Wireguard

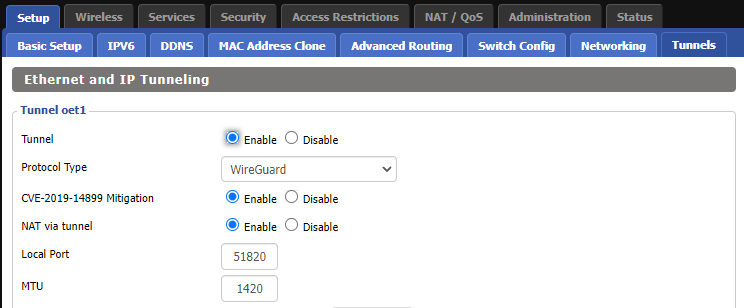
3. Set CVE-2019-14899 Mitigation to Enable. Set NAT via Tunnel to Enable. Set Local Port to 51820. Set MTU to 1420.

Windscribe Wireguard Basic Settings

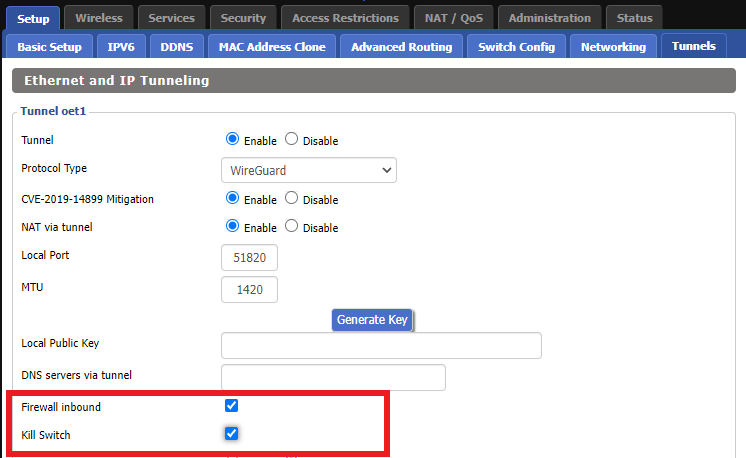
4. Check Firewall inbound and Kill Switch.

Windscribe Wireguard enable Firewall and Kill Switch

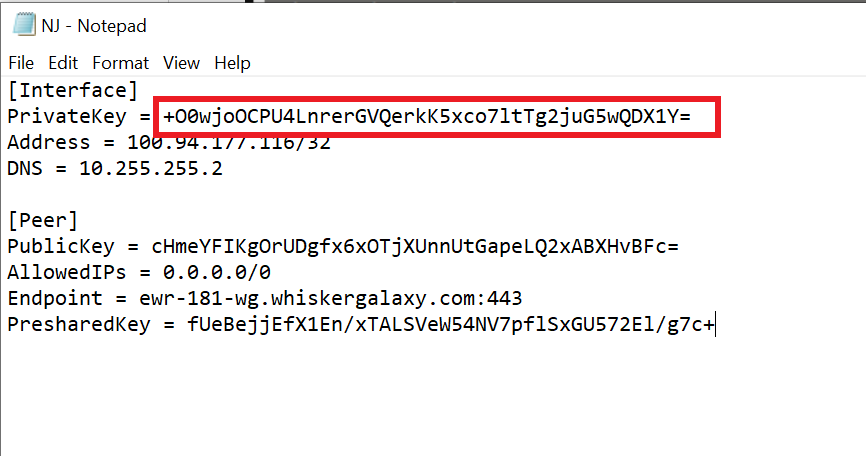
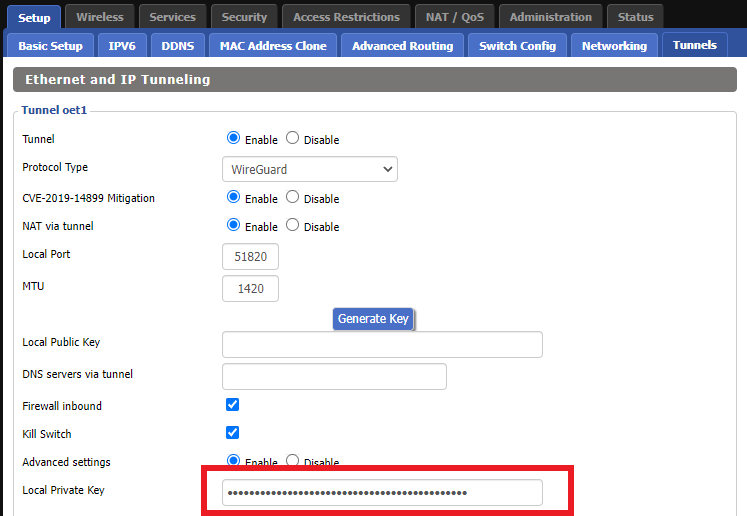
5. Set Advanced Settings to Enable and copy the PrivateKey from the .conf file and paste it into the Local Private Key field.

Windscribe Wireguard conf file PrivateKey
Windscribe Wireguard Local Private Key

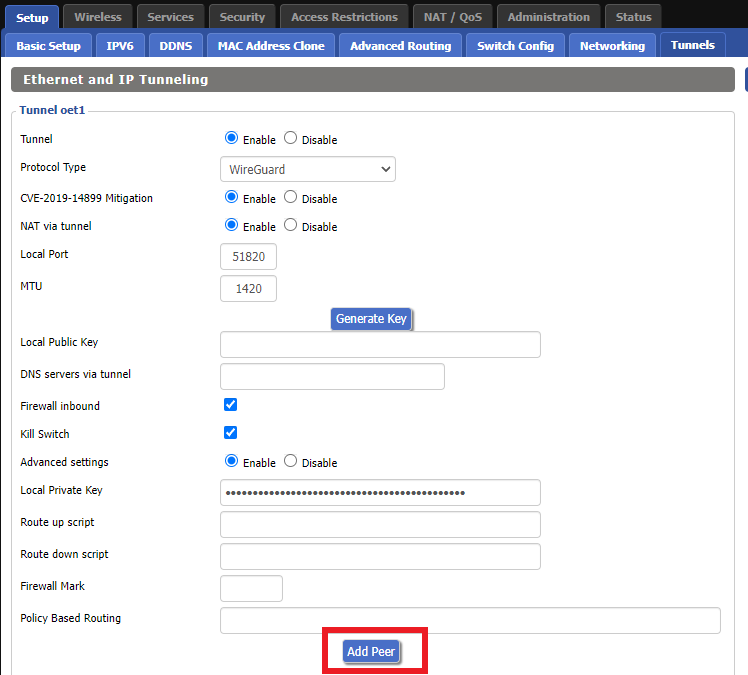
6. Click Add Peer.

Windscribe Wireguard Add Peer

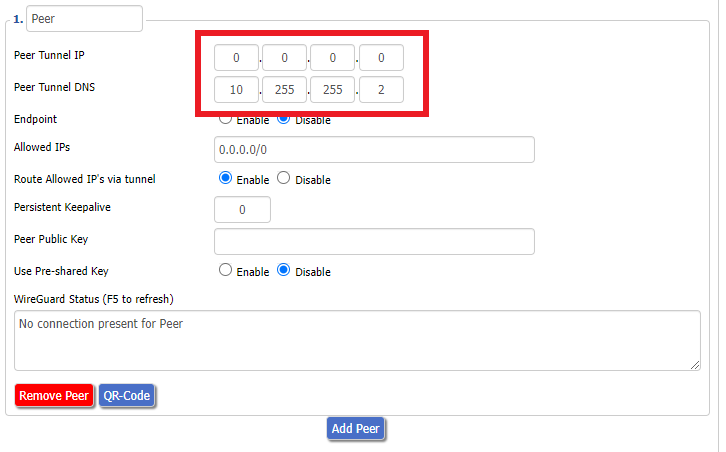
7. Set Peer Tunnel IP to 0.0.0.0. Set Peer Tunnel DNS to the DNS found in the .conf file.

Windscribe Wireguard Peer Tunnel IP and DNS

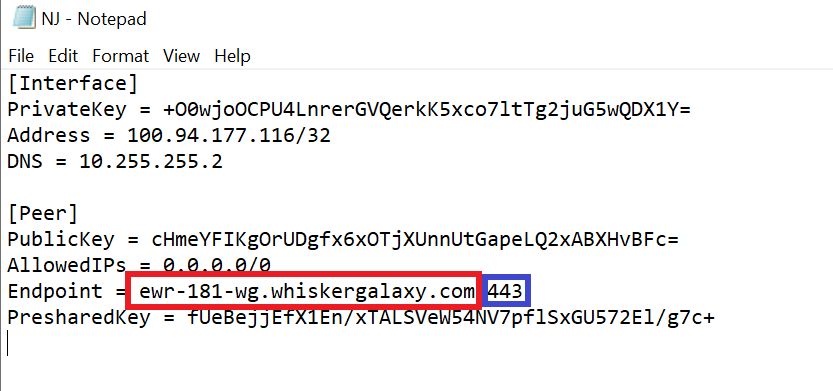
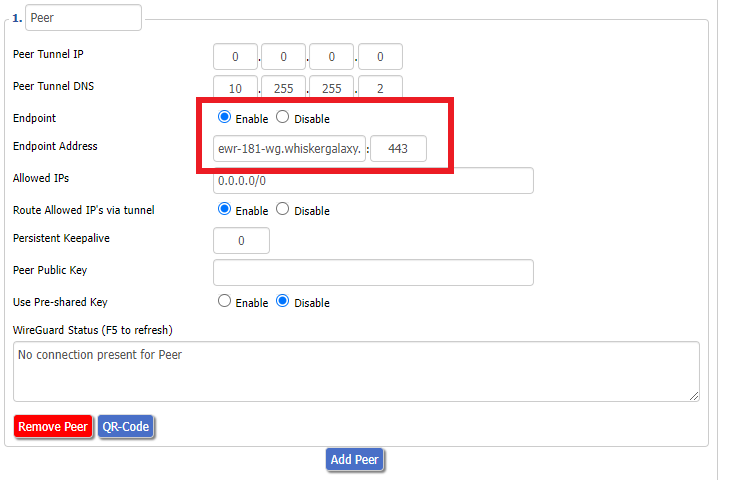
8. Set Endpoint to Enable. Copy and Paste the Endpoint from the .conf file and paste it into the Endpoint Address field. Enter the same Port that appears next to the Endpoint.

Windscribe Wireguard conf file Endpoint
Windscribe Wireguard paste Endpoint

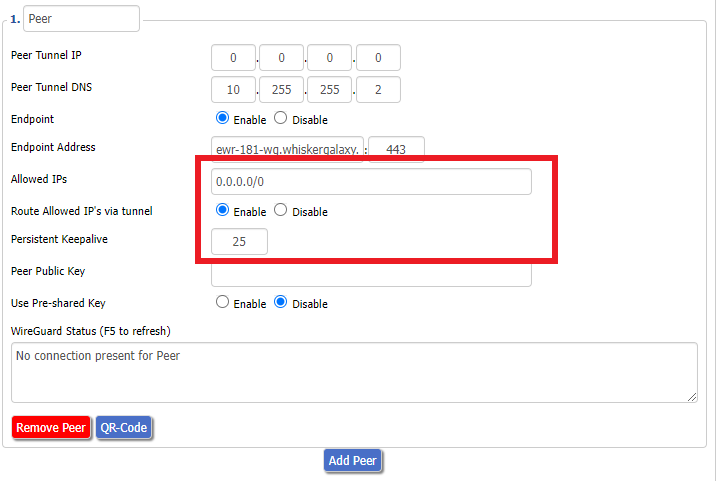
9. Leave Allowed IPs as 0.0.0.0/0. Set Router Allowed IP’s via tunnel to Enable. Set Persistent Keep Alive to 25.

Windscribe Wireguard settings

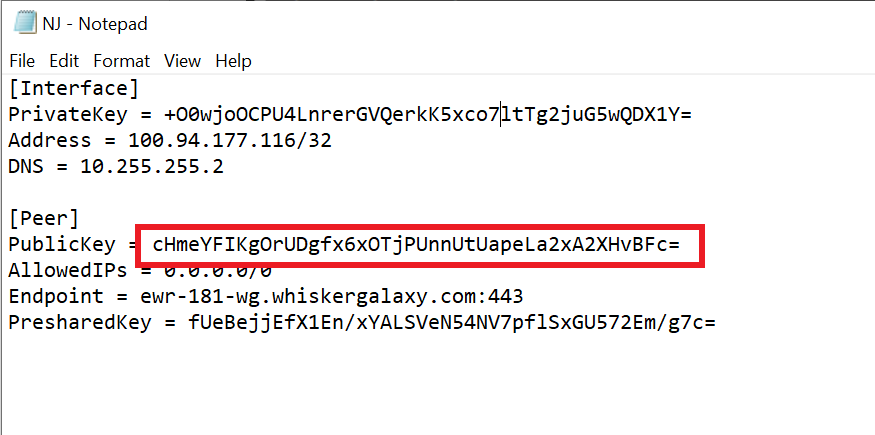
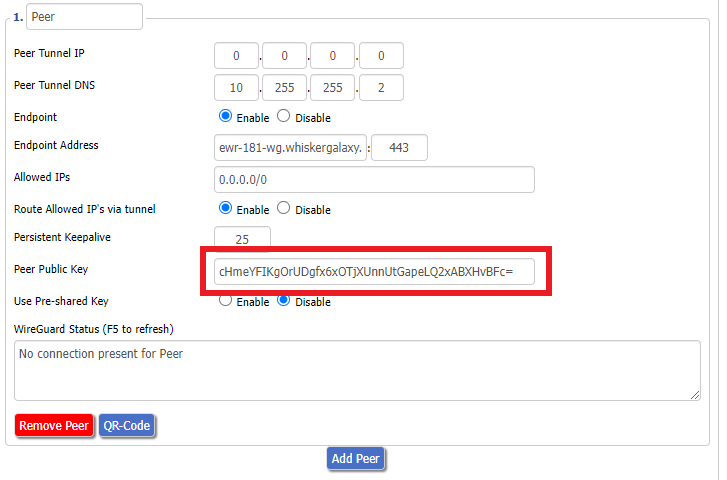
10. Copy and Paste the PublicKey from the .conf file and paste it into the Peer Public Key field.

Windscribe Wireguard conf file PublicKey
Windscribe Wireguard Peer Public Key

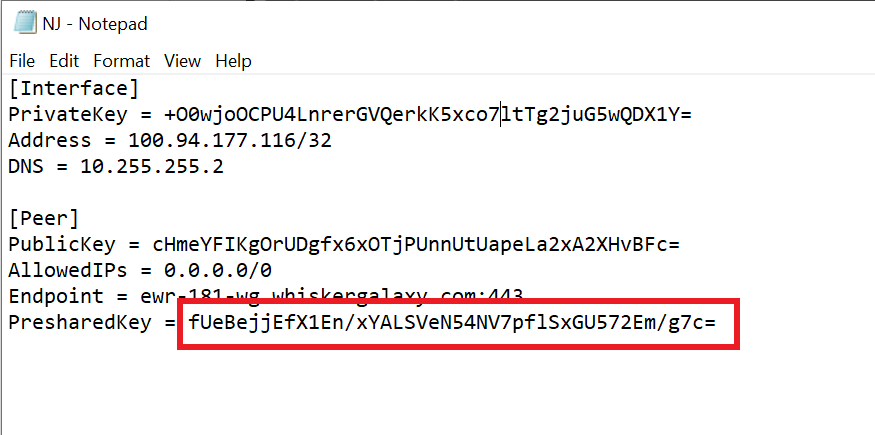
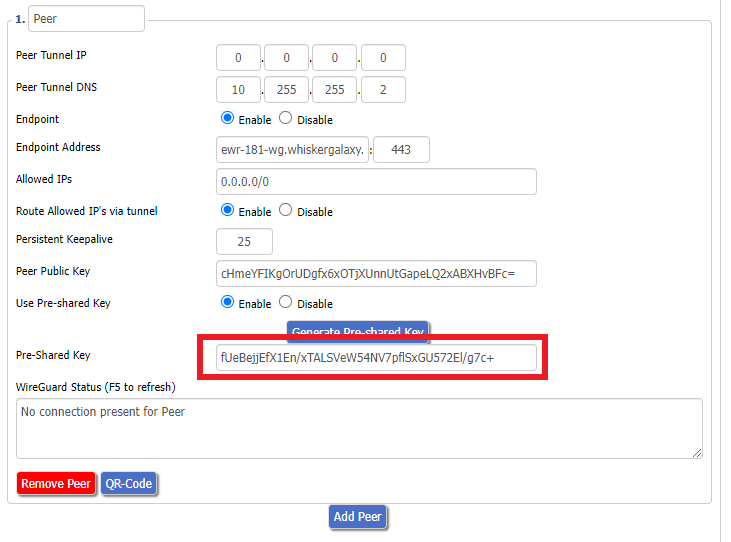
11. Set Use Pre-shared Key to Enable. Copy and Paste the Presharedkey from the .conf file and paste it into the Pre-Shared Key field.

Windscribe Wireguard conf file PresharedKey
Windscribe Wireguard Pre-shared Key

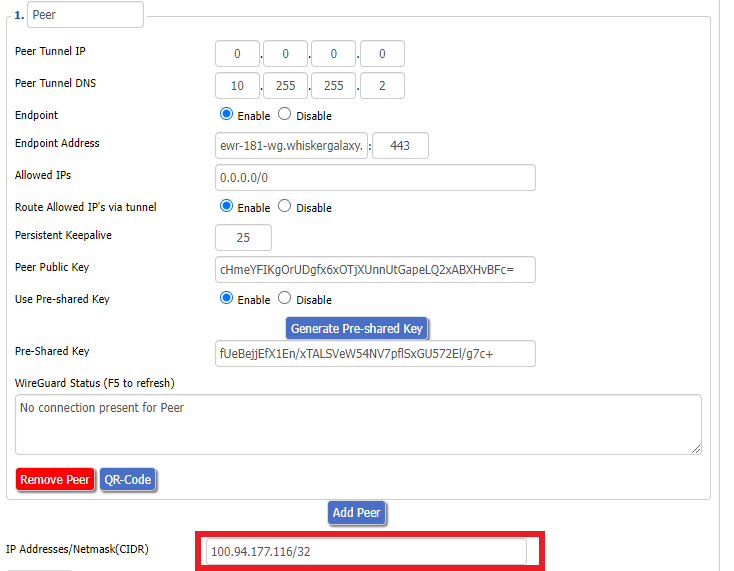
12. Copy the Address from the .conf file and paste it into the IP Addresses/Netmask(CIDR) field.

Windscribe Wireguard IP Address
Windscribe Wireguard conf file Address

Certain DD-WRT builds will show two separate fields here: IP Address and Subnet Mask. If that is the case set the IP Address field to the Address without the /32 added and set the Subnet Mask to 255.255.255.255

21. At the bottom of the page click Save and then click Apply Settings.

Verify a successful Winscribe connection

Navigate to Setup > Tunnels

  1. You should Endpoint, Latest handshake, and Transfer in the WireGuard status area.
  2. Visit whatismyipaddress.com to verify your status as using Winscribe.

Back up your settings

Navigate to Administration > Backup

  1. Click the Backup button.
  2. A file named nvrambak.bin will be saved to your computer.
  3. You can load nvrambak.bin to restore your settings in the event of a reset.

TROUBLESHOOTING

Still having issues? Visit the VPN Troubleshooting section.

Troubleshoot Here
« Previous Page

Primary Sidebar

  • Troubleshooting
  • Router Access
  • Internet Connection Issues
  • WiFi Connectivity
  • General VPN Issues
  • TeamViewer Remote Support
  • DD-WRT Firmware
  • Facebook
  • Twitter
  • Instagram
  • Pinterest
  • YouTube

Footer