• Skip to primary navigation
  • Skip to main content
  • Skip to primary sidebar
  • Skip to footer

FlashRouters Support Portal

Prioritizing Privacy

  • SETUP GUIDES
    • Privacy Hero Router Setup Guide
    • ASUS-WRT Router Setup Guide
    • AsusWRT-Merlin Router Setup Guide
    • DD-WRT Router Setup Guide
    • ExpressVPN Router Setup Guide
    • GL.iNet Router Setup Guide
    • Roqos Core Router Setup Guide
  • TROUBLESHOOTING
    • Router Access
    • WiFi Connectivity
    • Internet Connection Issues
    • General VPN Issues
    • DD-WRT Firmware
    • TeamViewer Remote Support
  • FAQs
    • Router FAQs
    • VPN FAQs
    • Warranty and Returns FAQs
    • Sales FAQs
    • Shipping FAQs
    • Service Plan FAQs
  • Show Search
Hide Search

Search Results for: devices

Privacy Hero Bedtime Settings (Internet Scheduler)

TeamFlashRouters · Apr 3, 2023 ·

Your Privacy Hero router uses Cloud Based router management which means you can access the router settings from anywhere on any device that has an internet connection. You can follow these steps while connected to your phone, other Wi-Fi network, or the Privacy Hero network.

The Bedtime settings feature allows users to schedule when internet access will be turned off for specific user profiles. All devices assigned to this profile will have these rules applied.

1. From any device that has a browser such as a computer, smartphone, or tablet visit app.privacyhero.com

App.PrivacyHero.com

2. Enter your Privacy Hero account email and password. Click Login.

Privacy Hero Access Settings

If you have not created your Privacy Hero account yet please follow these instructions.

3. Click the Profiles symbol.

Privacy Hero Profiles

4. Click the name of the User Profile.
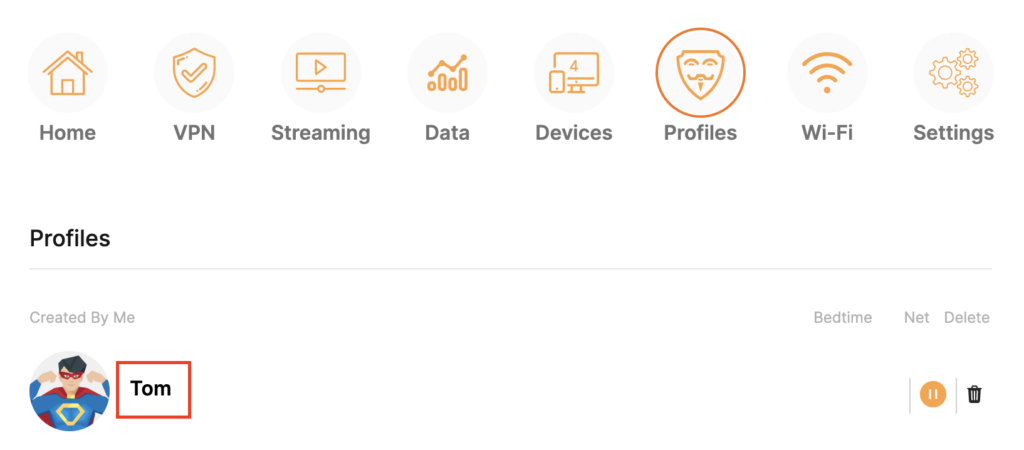
Privacy Hero Select Profile

5. Click Schoolnights or Weekends depending on which you need to set rules for.

Privacy Hero Bedtime School Nights Weekends

6. Select the time that you want the Internet to turn off and the days you want this rule to apply to. Click Save.

Privacy Hero Set Bedtime

7. Set the Bedtime toggle to On.
Privacy Hero Enable Bedtime

TROUBLESHOOTING

Still having issues? Visit the VPN Troubleshooting section.

Troubleshoot Here

Setting up a Guest WiFi Network on Roqos

TeamFlashRouters · Nov 14, 2021 ·

Create a Guest WiFi network on your Roqos to segment certain devices from the main network and set custom content filters as you see fit. Note that this is only for 2.4GHz wireless.
Login to Roqos Core UI web app in a browser on any computer or smart device.

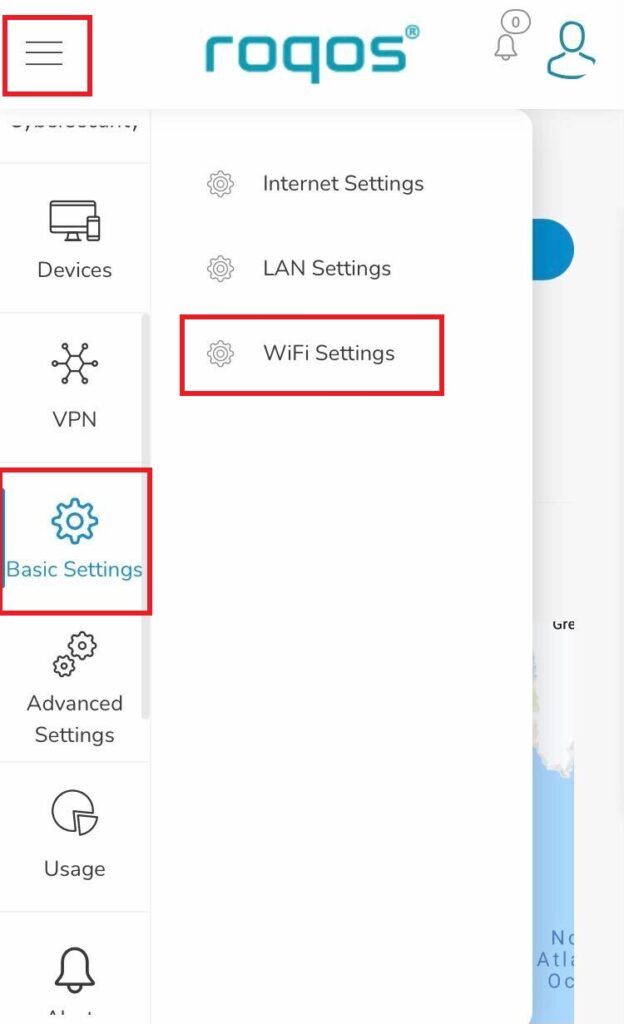
1. Click the navigation menu and select Basic Settings > WiFi Settings.

Roqos Basic Settings - WiFi Settings

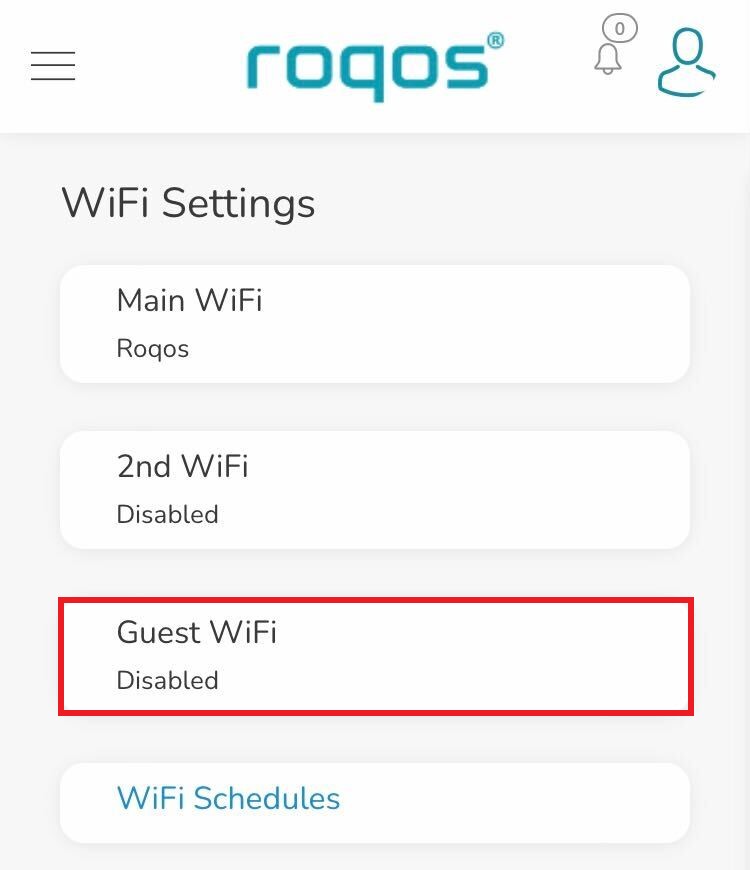
2. Click Guest WiFi.

Roqos WiFi Settings - Guest Wifi

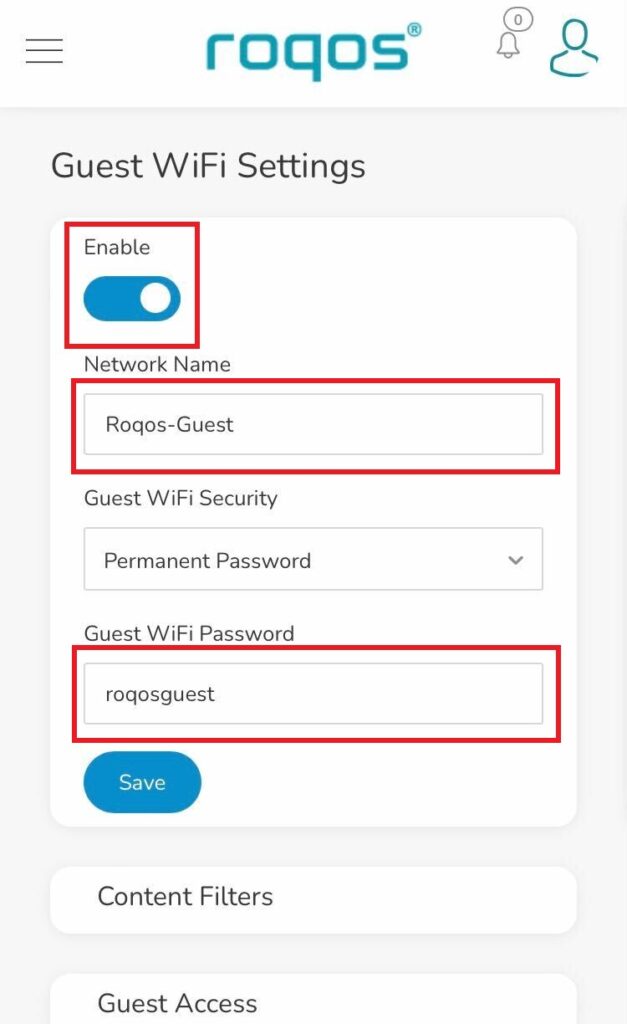
3. Toggle the Enable slider and set the Network Name and Guest WiFi Password. Click Save.

Roqos WiFi Settings - Guest Wifi name and password

4. Optional: If you wish to set specific Content Filters for the Guest Network and set the Filters that you see fit.

Wireless Guest Network Setup – Bridged (Advanced)

TeamFlashRouters · Jun 12, 2019 ·

If you would like to prevent visitors from connecting to your main WiFi network then you can create a Bridged Guest Network that will prevent access to the main router. This setup also allows you to create different rules for different WiFi SSID’s in your home ranging from QoS controls, access restrictions, VPN network segmentation, and more.

Preparing for Wireless Guest Network Setup

If you have a Dual-band or Tri-Band router you can setup a WiFi Guest Network, creating a separate VLAN (virtual local area network) for your visitors, or in order to segment your VPN networks on any band you like. We recommend using the 2.4GHz network for your DD-WRT Guest Wireless Network so it is compatible with the most possible WiFi devices. Setting up a guest network for visitors in your home allows you to keep them off of your main WiFi network.

We recommend performing this setup while connected to the FlashRouter via ethernet cable. If your computer does not have an ethernet port and you must proceed via wireless connection to the FlashRouter pay attention to the wireless connection as you may need to rejoin the FlashRouter’s network after making changes.

DD-WRT Router Setup for Wireless Guest Network

Enter Wireless settings

Navigate to Wireless > Basic Settings

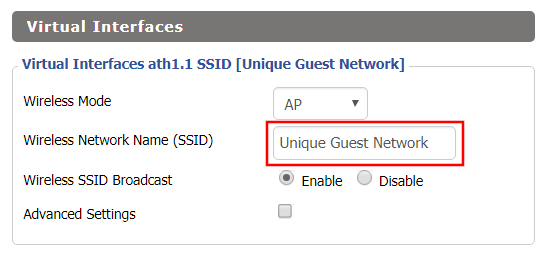
Bridged Wireless Guest Network Setup on DD-WRT FlashRouter – Setting SSID for Guest Network
  1. Under the 2.4GHz or 5GHz Interface click the Add button.
  2. In the Wireless Network Name (SSID) field enter the unique network name of the guest network.
  3. Click Save.

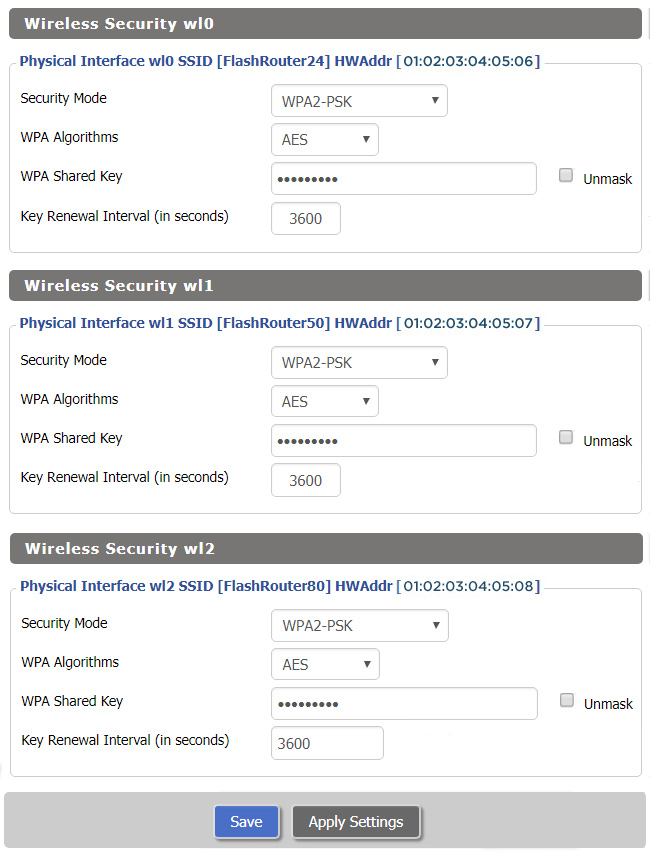
Enter Wireless Security settings

Navigate to Wireless > Wireless Security

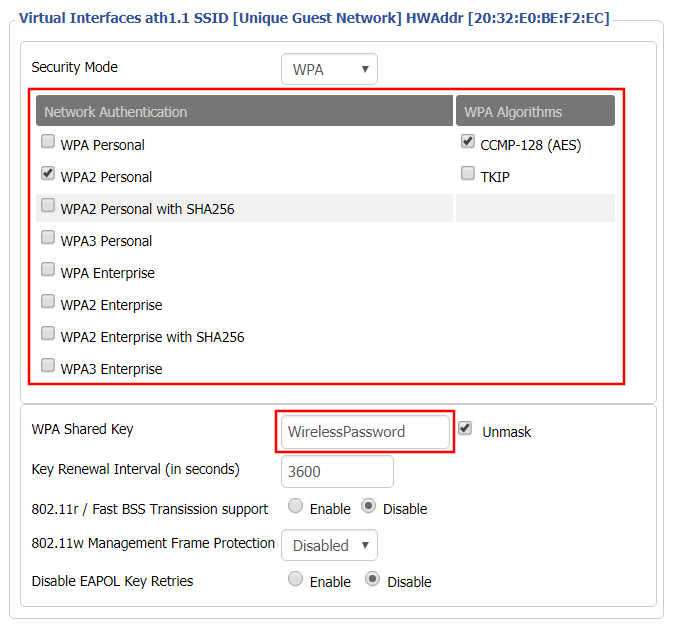
Bridged Wireless Guest Network Setup on DD-WRT FlashRouter – Setting Guest Network Wireless Password
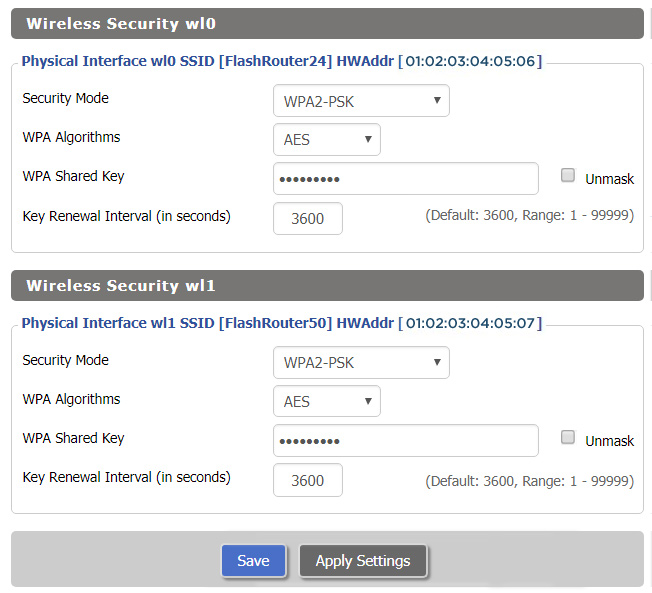
  1. Duplicate the wireless security settings that are set for the other bands for the newly created virtual interface.
  2. Click Apply Settings.
  3. Reboot your router.

Create Bridge

Navigate to Setup > Networking

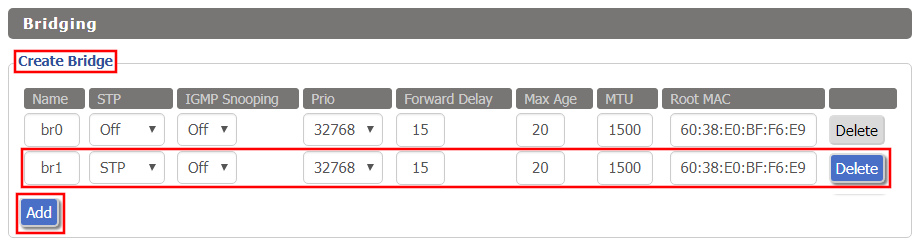
Bridged Wireless Guest Network Setup on DD-WRT FlashRouter – Create Bridge
  1. Under Create Bridge click Add. Name the newly created bridge br1.
  2. Click Apply Settings

Assign to Bridge

Bridged Wireless Guest Network Setup on DD-WRT FlashRouter – Assign Bridge
  1. Under Assign to Bridge select br1 from the Assignment dropdown. Select wl1.1 or ath1.1 depending on your router model.
  2. Click Apply Settings.

Depending on the router model and WiFi band you are using, the wireless interfaces will be labelled differently.

This setting can be labelled wl1.1, ath0.1, wl2.1, and so on. Make sure when you get up to the bridge assignment section that you are using the correct guest network Virtual Interface.

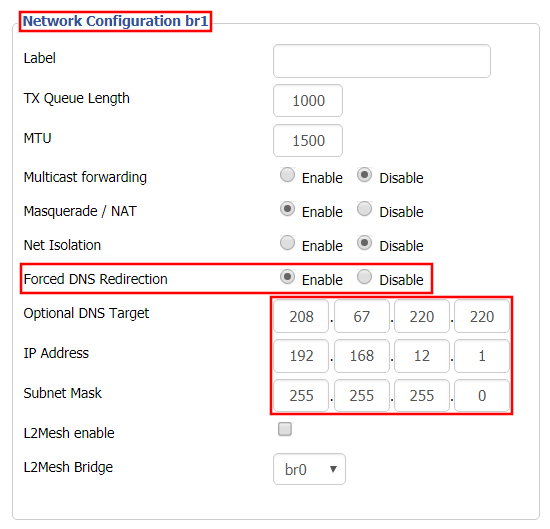
Network Configuration br1

Bridged Wireless Guest Network Setup on DD-WRT FlashRouter – Configure Bridge DNS Redirection
  1. Under Network Configuration br1 select Enable for Forced DNS Redirection.
  2. Set Optional DNS Target to 208.67.220.220
  3. Set IP Address to 192.168.12.1
  4. Set Subnet Mask to 255.255.255.0
  5. Click Apply Settings.

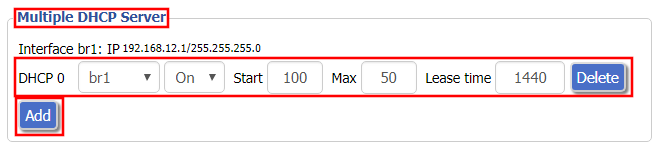
Multiple DHCP Server

Bridged Wireless Guest Network Setup on DD-WRT FlashRouter – Configure DHCP Server Settings
  1. Under Multiple DHCP Server click Add.
  2. Set the first dropdown to br1.
  3. Click Apply Settings.
  4. Reboot your router.

Firewall Rules

Navigate to Administration > Commands

  1. Copy the fire script from below and paste into the empty Commands shell
  2. Click Save Firewall.
  3. Wait one minute and then reboot your router.

iptables -I FORWARD -i br1 -o br0 -m state –state NEW -j DROP
iptables -I FORWARD -i br0 -o br1 -m state –state NEW -j DROP
iptables -I INPUT -i br1 -p tcp –dport telnet -j REJECT –reject-with tcp-reset
iptables -I INPUT -i br1 -p tcp –dport ssh -j REJECT –reject-with tcp-reset
iptables -I INPUT -i br1 -p tcp –dport www -j REJECT –reject-with tcp-reset
iptables -I INPUT -i br1 -p tcp –dport https -j REJECT –reject-with tcp-reset

You will now have a working Bridged Guest Network on the FlashRouter. By inputting the firewall rules, this will also prevent any guests on your network from gaining access to your router settings.

Back up your settings

Navigate to Administration > Backup

  1. Click the Backup button.
  2. A file named nvrambak.bin will be saved to your computer.
  3. You can load nvrambak.bin to restore your settings in the event of a reset.

TROUBLESHOOTING

Still having issues? Visit our Troubleshooting section to diagnose common problems here.

Troubleshoot Here

How to Access Your AsusWRT FlashRouter Settings

TeamFlashRouters · Oct 16, 2025 ·

This quick guide will walk you through connecting to your AsusWRT FlashRouter and logging into the admin settings page. You’ll use either WiFi or an Ethernet cable, then access the router dashboard through your browser.

Step 1. Connect Your Device to the Router

You can connect by WiFi or Ethernet:

  • WiFi: Look for a network name like FlashRouter24 or FlashRouter50.
    • The WiFi password is set to: Wireless#[First 5 characters of your router’s MAC]
    • Example: If your MAC is CC28A07E70A8, your WiFi password is Wireless#CC28A.
    • ⚠️ Be sure to capitalize the “W” in Wireless.
  • Ethernet: Plug an Ethernet cable from your computer into one of the router’s LAN ports (usually marked or color-coded differently from the WAN port).

👉 Pro tip: Disconnect from any other WiFi networks during setup.

Step 2. Open the Router Login Page

  1. Open a web browser (Chrome, Safari, Firefox, Edge).
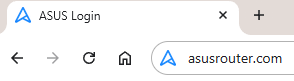
  2. In the address bar, type: 192.168.50.1 or go to asusrouter.com
  3. Press Enter.
Access Asus Router

This is the local router dashboard address (not a public website). If the page doesn’t load:

  • Try a different browser.
  • Clear your cache.
  • Ensure your device is connected to the FlashRouter network.

Step 3. Log In to the Router Settings

  • Default username: flashrouter
  • Default password: asuswrt-admin1
  • Some older devices may use: asuswrt1 or asuswrt
  • This is the factory default for AsusWRT routers shipped by FlashRouters.
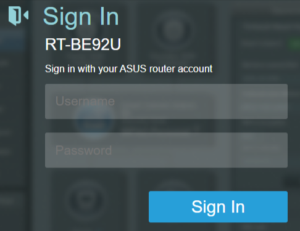
Asus Router Login

💡 Once you’re in, you can update your admin password in the settings for extra security.

Next Steps

Now that you’ve accessed your AsusWRT FlashRouter, you can:

  • Set up your VPN service
  • Customize your WiFi name and password
  • Adjust device controls and security settings

Check our support library for your specific VPN setup guide.

Asus RT-AC5300 DD-WRT WiFi Settings

Dave · Mar 4, 2019 ·

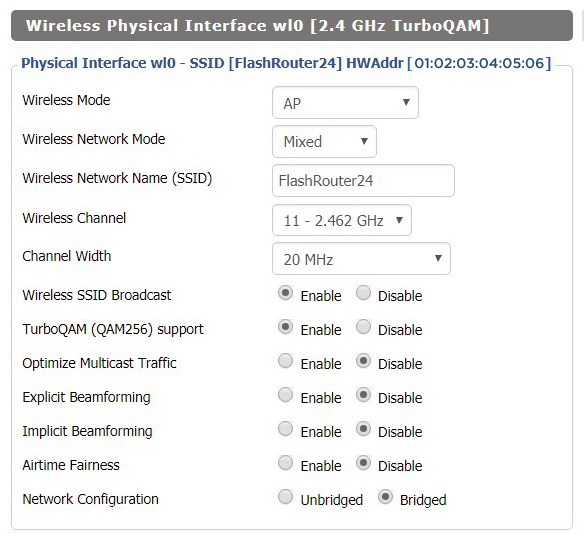
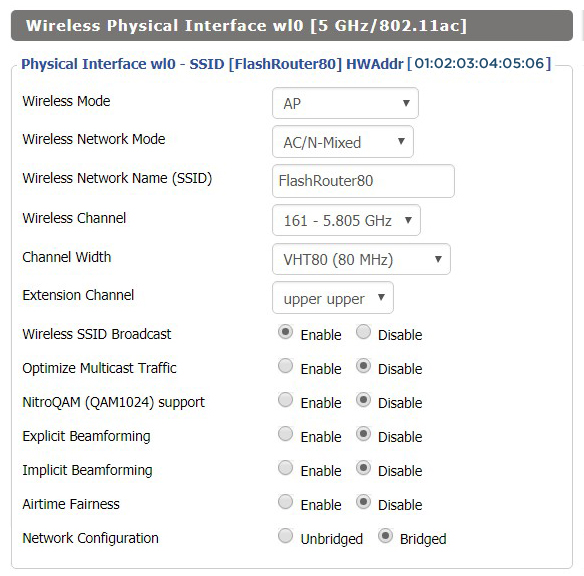
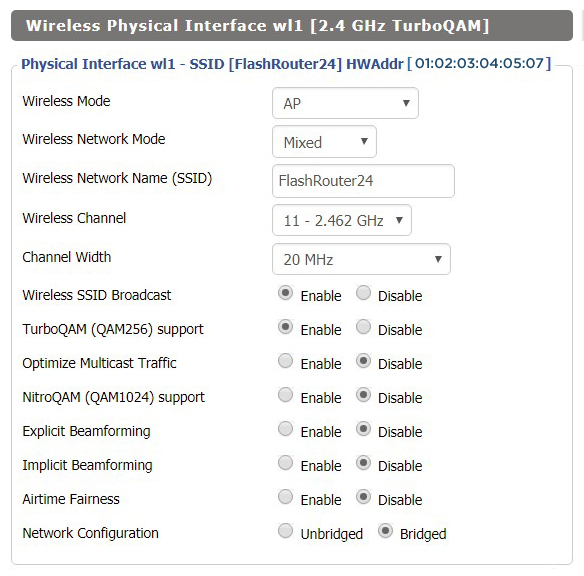
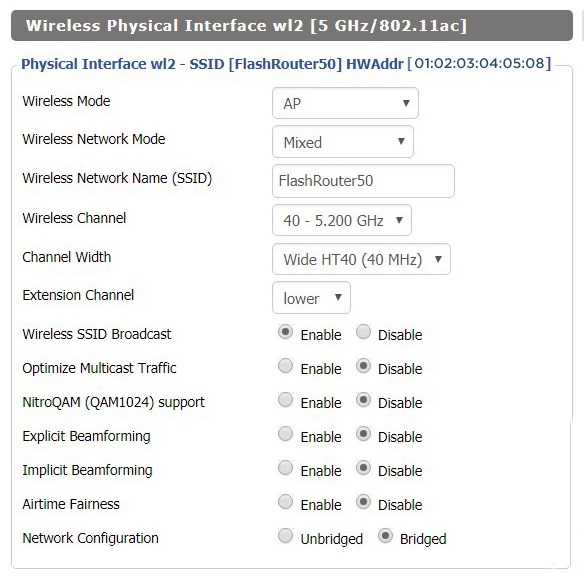
Recommended DD-WRT WiFi settings for the Asus RT-AC5300 are based on extensive testing by FlashRouters. Please note that optimal settings may vary depending on external factors such as home size, interference, and the types of WiFi devices you are connecting in your network.

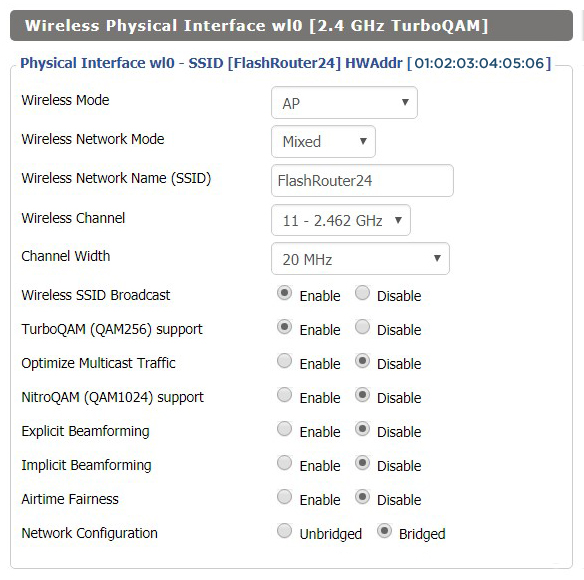
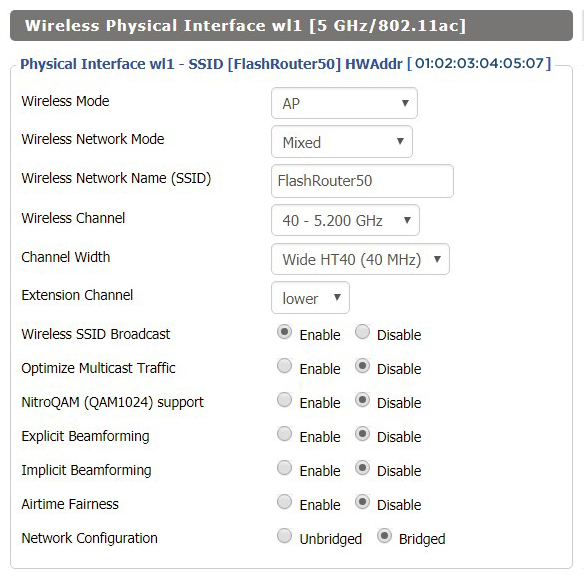
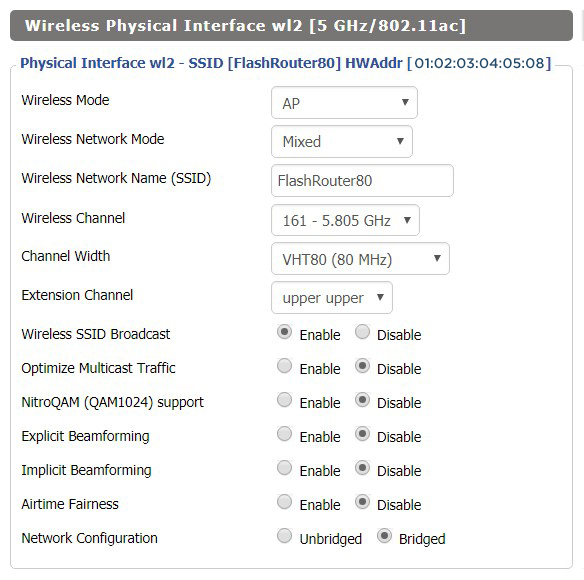
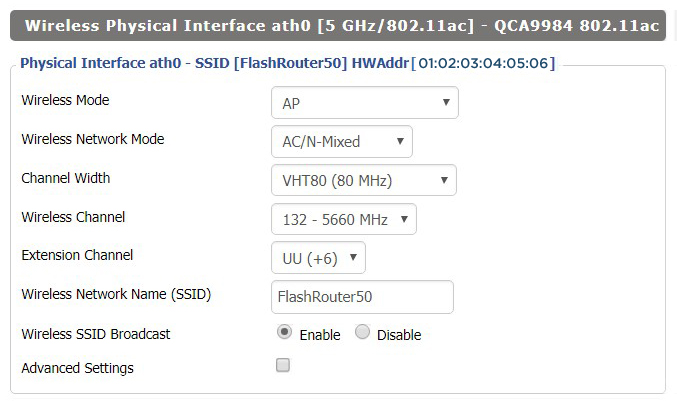
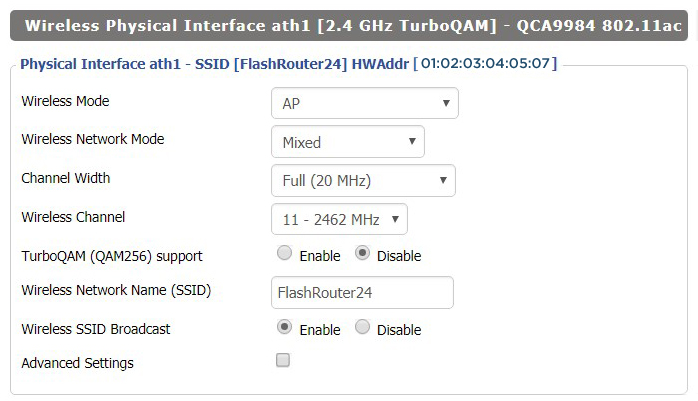
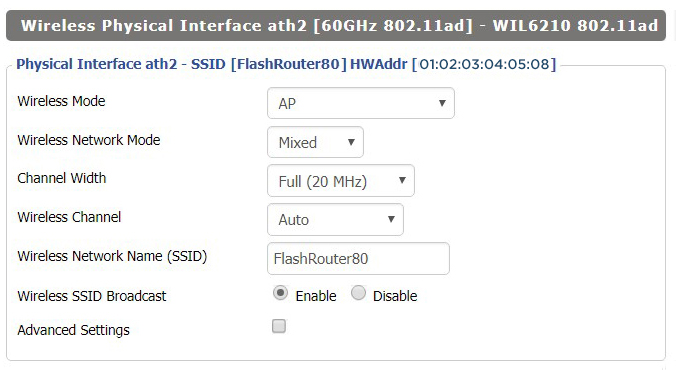
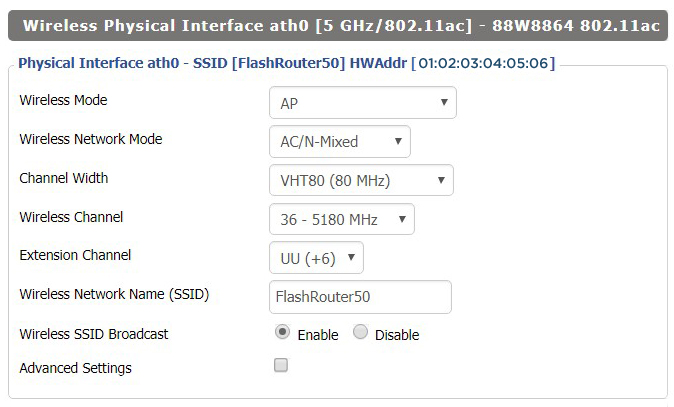
Screenshots below provide a visual display of recommended WiFi and encryption settings exactly as they appear in the Asus RT-AC5300 with DD-WRT firmware.

Navigate to the Wireless > Basic Settings to view or edit WiFi network settings.

2.4 GHz - Wireless-N

View AC5300 DD-WRT FlashRouter 2.4GHz Settings

5.0 GHz - Wireless-AC #1

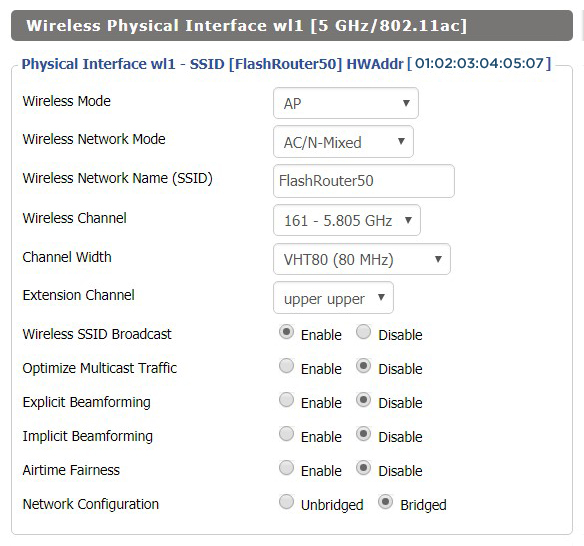
View AC5300 DD-WRT FlashRouter 5GHz #1 Settings

5.0 GHz - Wireless-AC #2

View AC5300 DD-WRT FlashRouter 5GHz #2 Settings

Additional DD-WRT WiFi Information

Intimidated by all the available WiFi settings? The DD-WRT website provides extensive information about all of the available configuration options in the firmware. Learn about everything from Wireless channels to channel widths and more in the Basic Wireless Settings – DD-WRT Wiki.

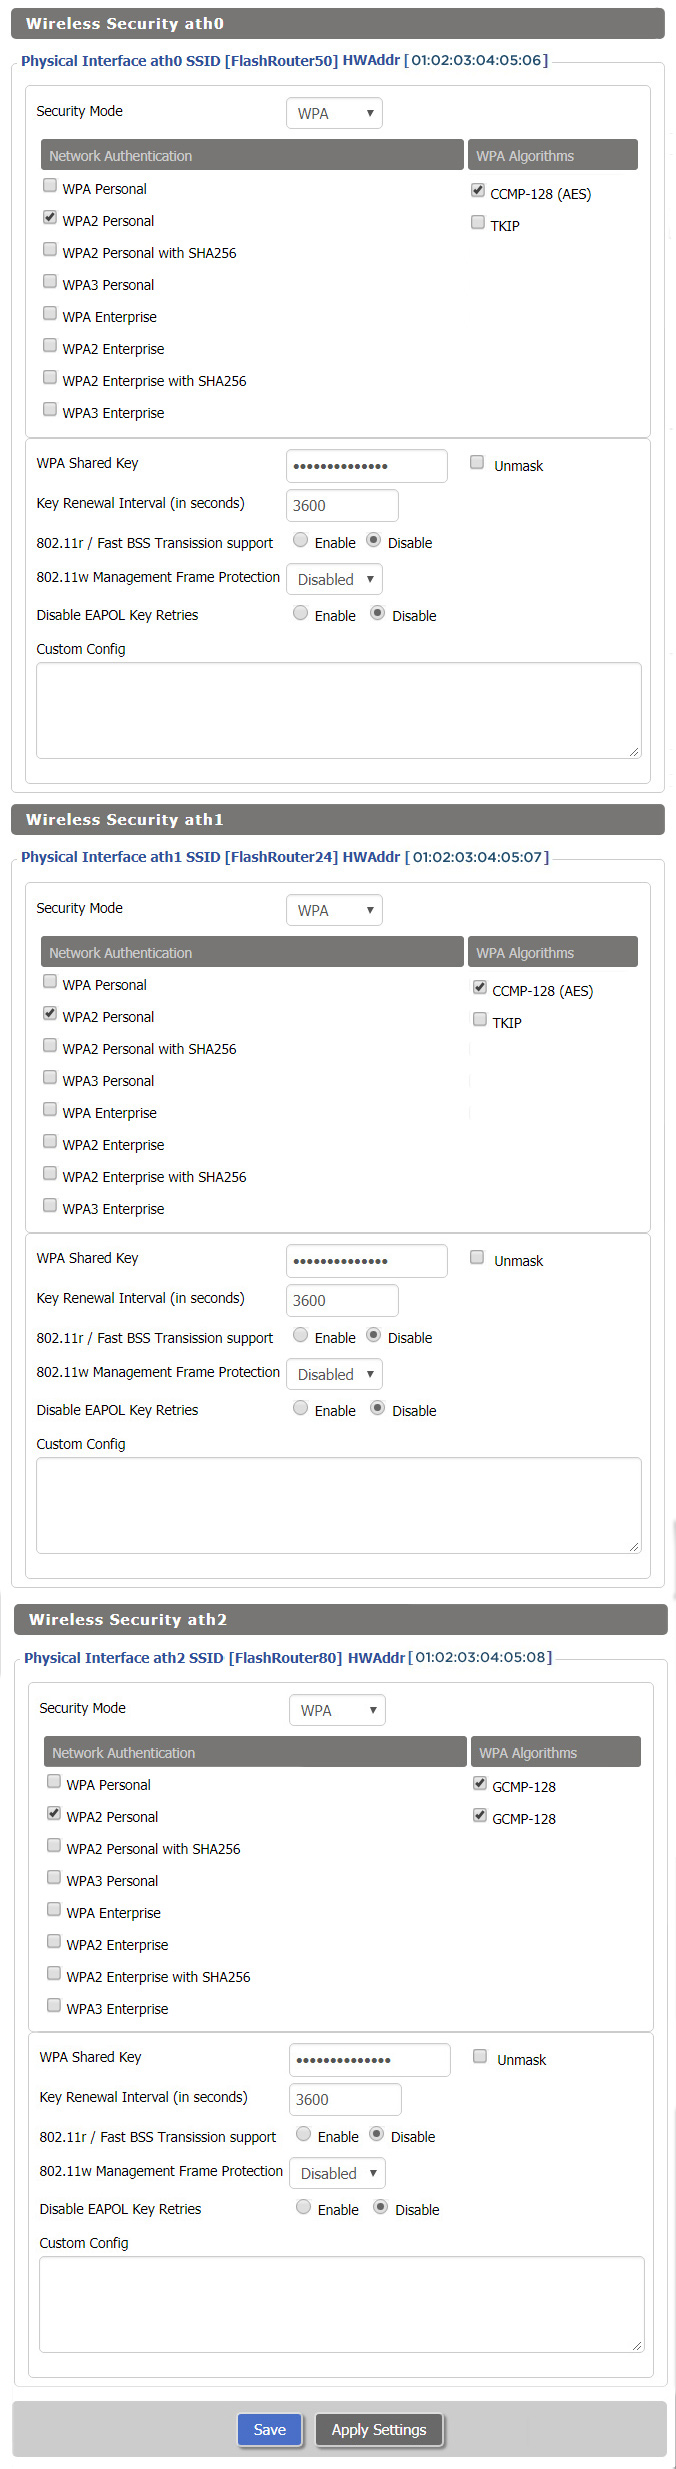
RT-AC5300 DD-WRT Wireless Security

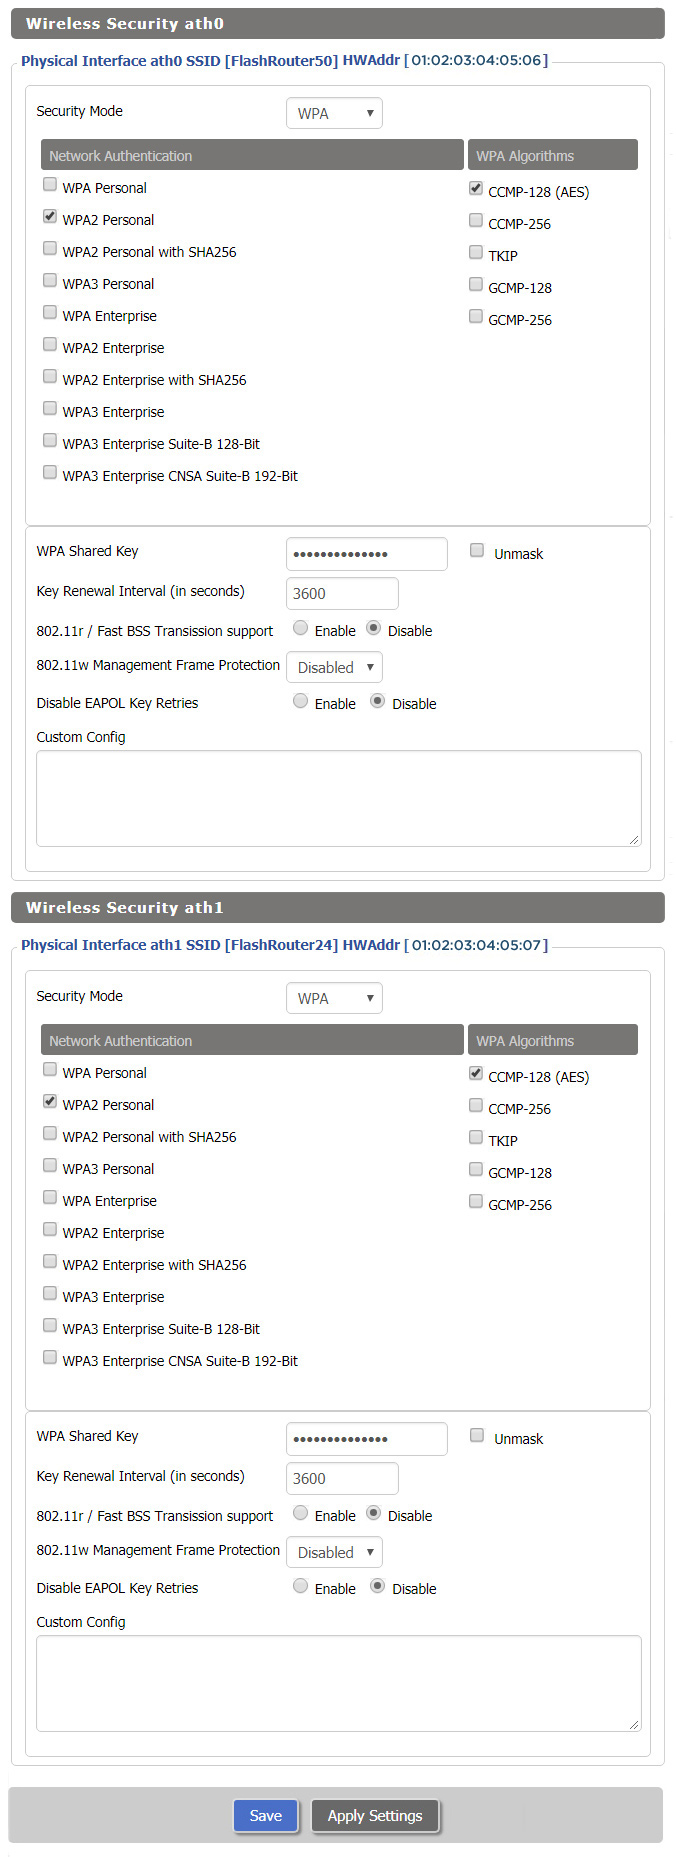
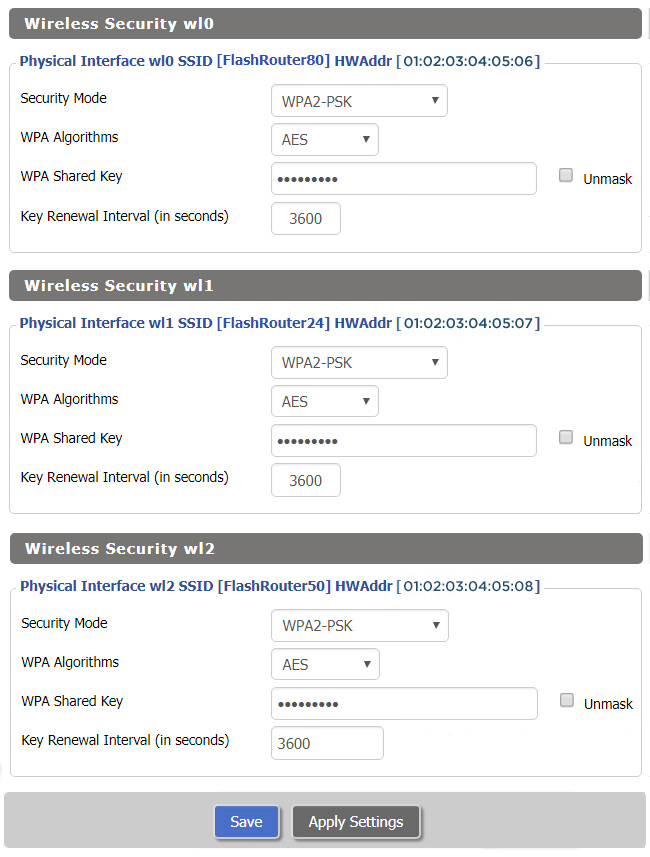
The preset Asus RT-AC5300 FlashRouter WiFi password is Wireless#[First 5 characters of your router MAC]. The router MAC can be found on the bottom of your router. For e.g. if your MAC is 1459C07E70A8 then your WiFi password is Wireless#1459C

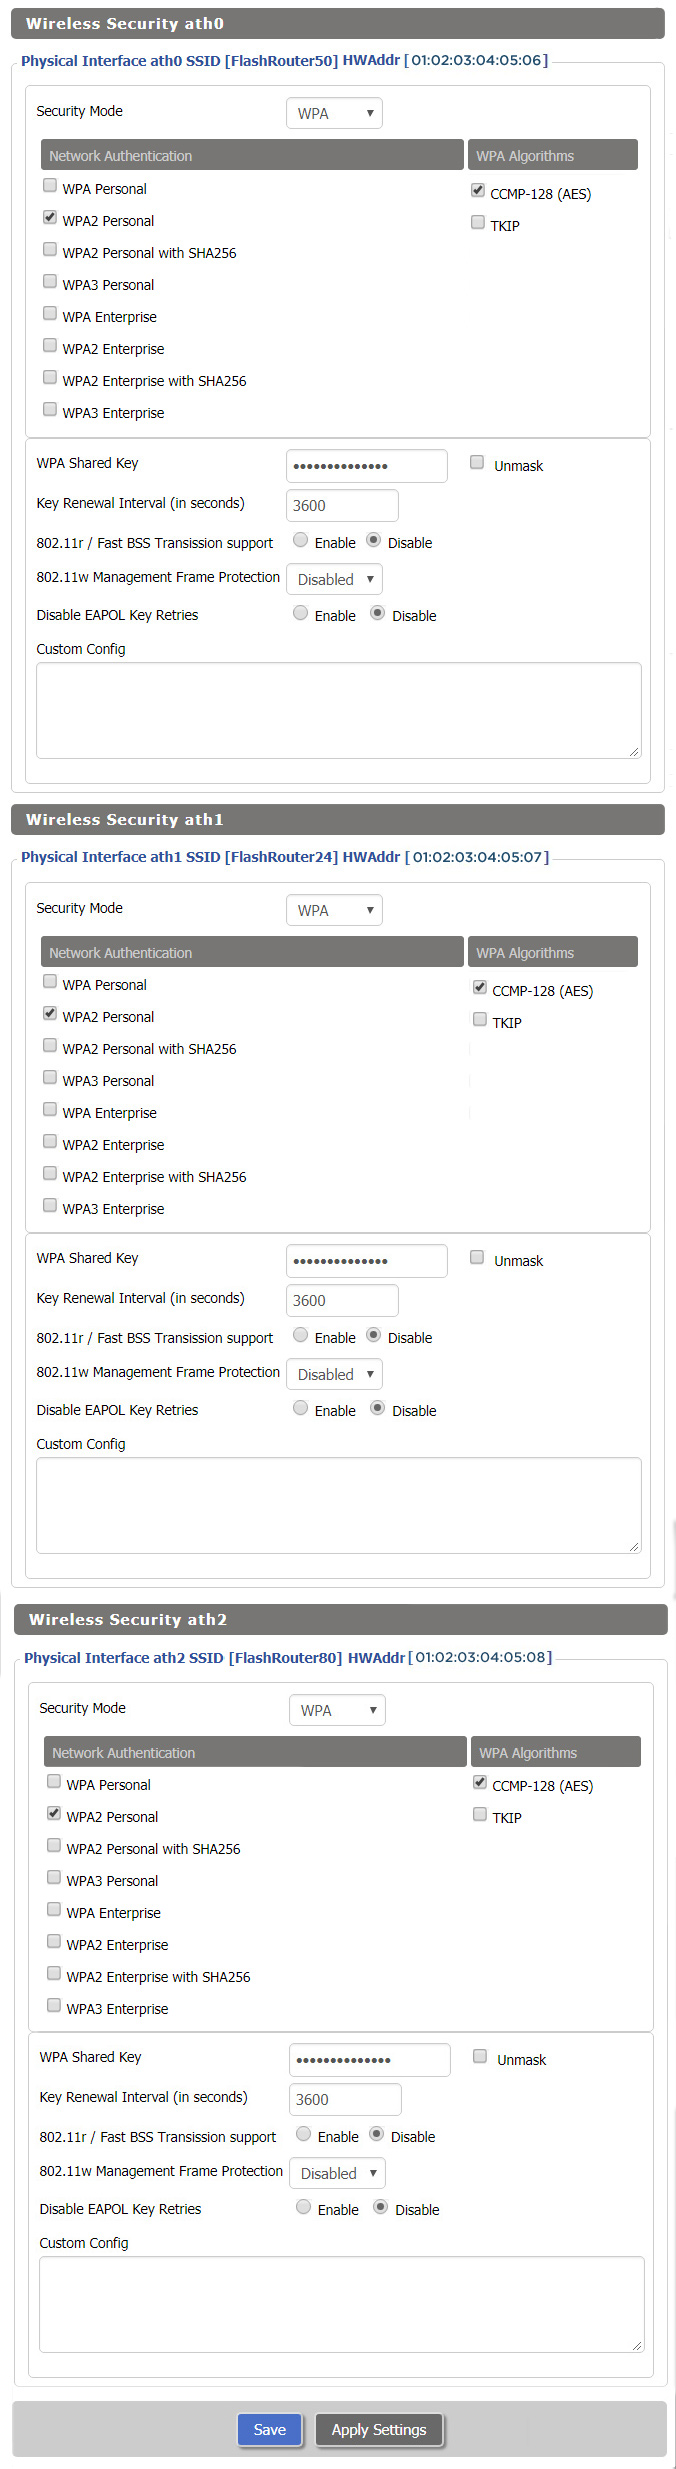
Navigate to the Wireless > Wireless Security to view or edit WiFi passwords.

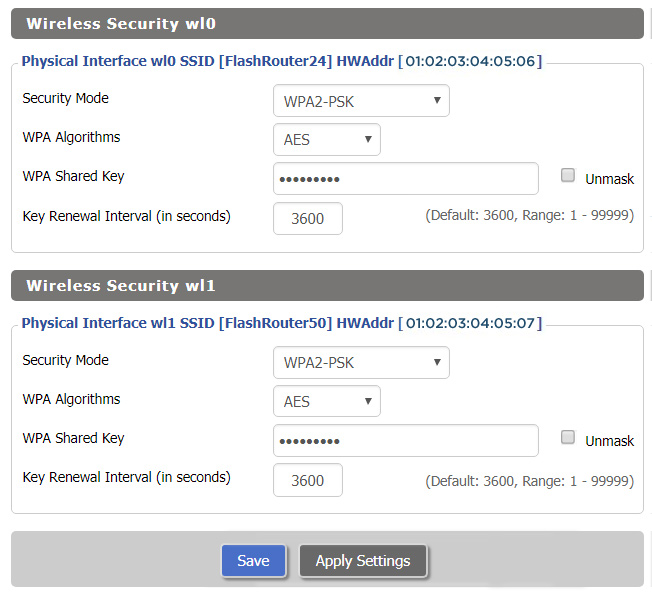
View RT-AC5300 DD-WRT FlashRouter WiFi Seucirty Settings

TROUBLESHOOTING

Trouble with your Asus RT-AC5300 WiFi? Visit the Wireless troubleshooting section.

Troubleshoot Here

Wireless Guest Network Setup – Unbridged (Recommended)

TeamFlashRouters · Jun 12, 2019 ·

If you would like to prevent visitors from connecting to your main WiFi network then you can create a separate Guest Network that will prevent access to the main router. This setup also allows you to create different rules for different WiFi SSID’s in your home ranging from QoS controls, access restrictions, VPN network segmentation, and more.

Preparing for Wireless Guest Network Setup

If you have a Dual-band or Tri-Band router you can setup a WiFi Guest Network, creating a separate VLAN (virtual local area network) for your visitors, or in order to segment your VPN networks on any band you like. We recommend using the 2.4GHz network for your DD-WRT Guest Wireless Network so it is compatible with the most possible WiFi devices. Setting up a guest network for visitors in your home allows you to keep them off of your main WiFi network.

We recommend performing this setup while connected to the FlashRouter via ethernet cable. If your computer does not have an ethernet port and you must proceed via wireless connection to the FlashRouter. Be sure to pay attention to the wireless connection as you may need to rejoin the FlashRouter’s network after making changes.

DD-WRT Router Setup for Wireless Guest Network

Enter Wireless settings

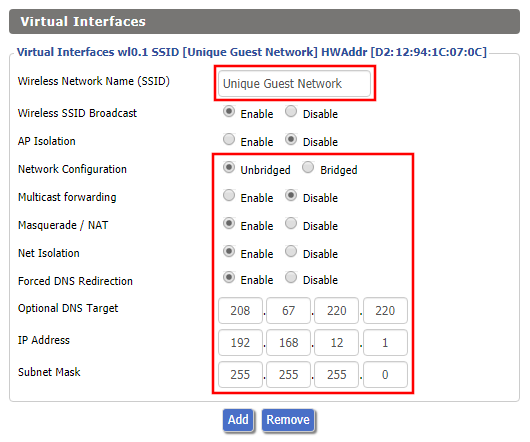
Navigate to Wireless > Basic Settings

FlashRouter DD-WRT Wireless Guest Network Settings Unbridged

Under the 2.4GHz or 5GHz Interface click the Add button.

Wireless Network Name (SSID)

Enter the a unique network name for the guest network.

Network Configuration

Unbridged

Force DNS Redirection

Enable

Optional DNS Target

208.67.220.220

IP Address

192.168.12.1

Subnet Mask

255.255.255.0

CLICK SAVE

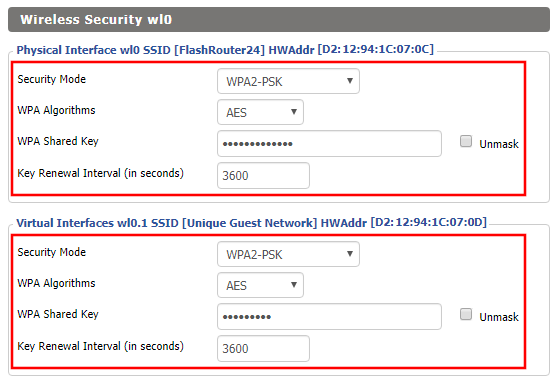
Enter Wireless Security settings

Navigate to Wireless > Wireless Security

Wireless Guest Network Setup on DD-WRT FlashRouter Unbridged
  1. Duplicate the wireless security settings that are set for the other bands for the newly created virtual interface.
  2. Click Apply Settings.
  3. Reboot your router.

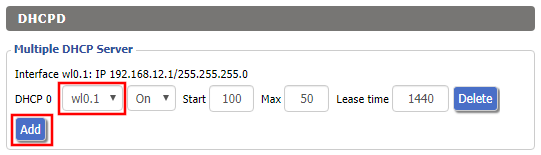
Enable DHCP for Guest Network

Navigate to Setup > Networking

Wireless Guest Network Setup on DD-WRT FlashRouter Unbridged Setting DHCP Server
  1. Scroll to the very bottom of the page and under DHCPD click Add.
  2. Select wl0.1 or ath1.1 depending on your router model.
  3. Click Apply Settings.
  4. Reboot your router.

Depending on the router model and WiFi band you are using, the wireless interfaces will be labelled differently.

This setting can be labelled wl1.1, ath0.1, wl2.1, and so on. Make sure when you get up to the bridge assignment section that you are using the correct guest network Virtual Interface.

Back up your settings

Navigate to Administration > Backup

  1. Click the Backup button.
  2. A file named nvrambak.bin will be saved to your computer.
  3. You can load nvrambak.bin to restore your settings in the event of a reset.

TROUBLESHOOTING

Still having issues? Visit our Troubleshooting section to diagnose common problems here.

Troubleshoot Here

Linksys WRT3200ACM DD-WRT WiFi Settings

Dave · Feb 25, 2019 ·

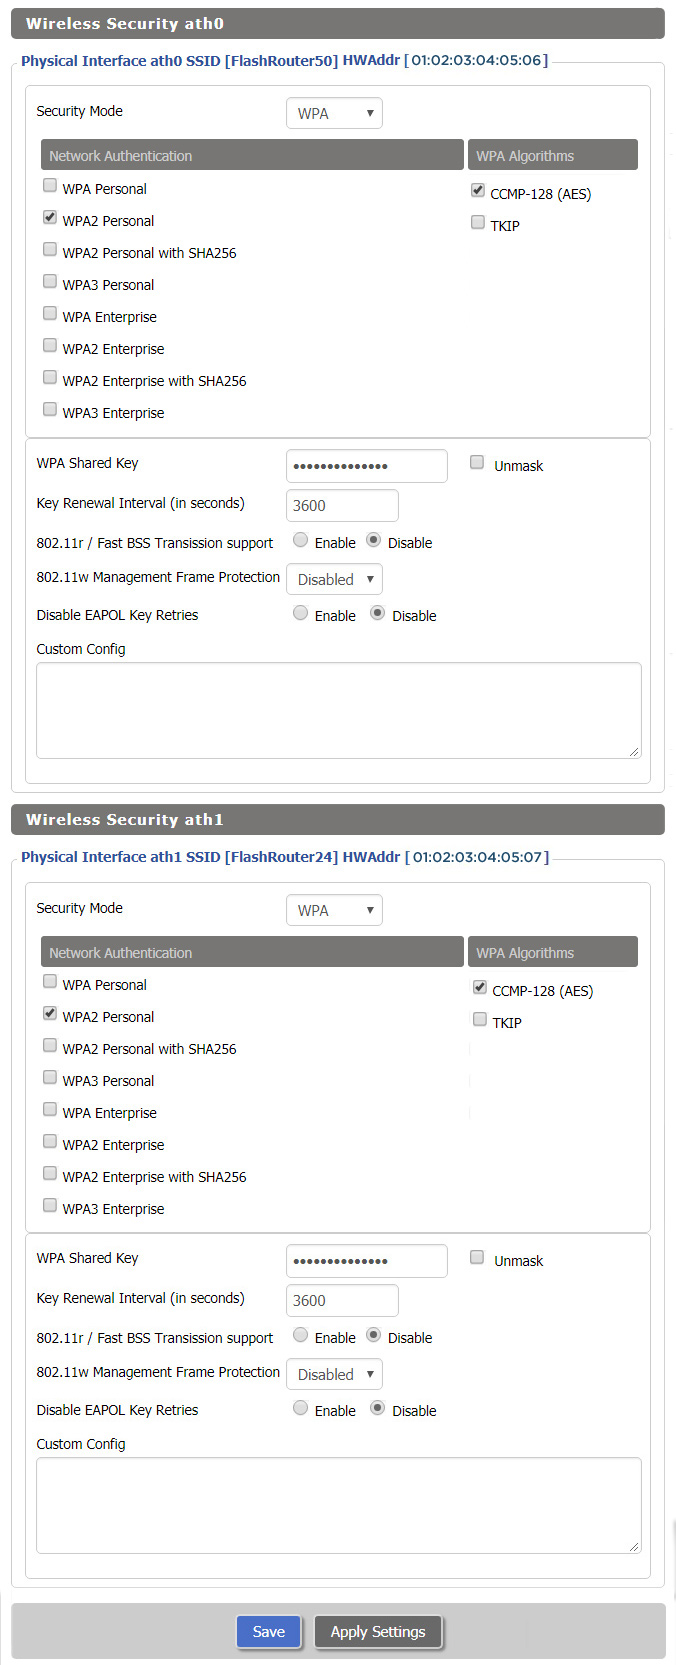
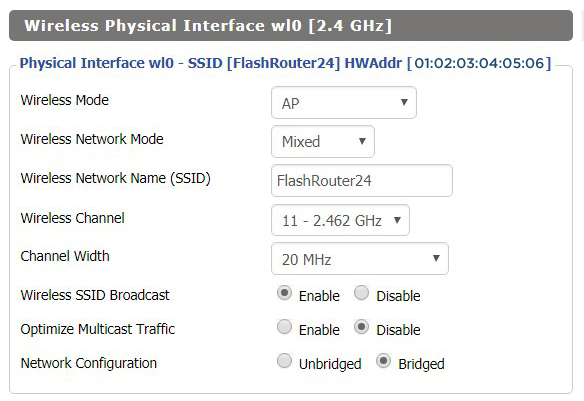
Recommended DD-WRT WiFi settings for the Linksys WRT3200ACM are based on extensive testing by FlashRouters. Please note that optimal settings may vary depending on external factors such as home size, interference, and the types of WiFi devices you are connecting in your network.

Screenshots below provide a visual display of recommended WiFi and encryption settings exactly as they appear in the Linksys WRT3200ACM with DD-WRT firmware.

Navigate to the Wireless > Basic Settings to view or edit WiFi network settings.

5.0 GHz - Wireless-AC

View WRT3200ACM DD-WRT FlashRouter 5GHz #1 Settings

2.4 GHz - Wireless-N

View WRT3200ACM DD-WRT FlashRouter 2.4GHz Settings

Additional DD-WRT WiFi Information

Intimidated by all the available WiFi settings? The DD-WRT website provides extensive information about all of the available configuration options in the firmware. Learn about everything from Wireless channels to channel widths and more in the Basic Wireless Settings – DD-WRT Wiki.

WRT3200ACM DD-WRT Wireless Security

The preset WRT3200ACM FlashRouter WiFi password is Wireless#[First 5 characters of your router MAC]. The router MAC can be found on the bottom of your router. For e.g. if your MAC is 1459C07E70A8 then your WiFi password is Wireless#1459C

Navigate to the Wireless > Wireless Security to view or edit WiFi passwords.

TROUBLESHOOTING

Trouble with your Linksys WRT3200ACM WiFi? Visit the Wireless troubleshooting section.

Troubleshoot Here

Netgear R9000 Nighthawk X10 DD-WRT WiFi Settings

Dave · Mar 5, 2019 ·

Recommended DD-WRT WiFi settings for the Netgear R9000 are based on extensive testing by FlashRouters. Please note that optimal settings may vary depending on external factors such as home size, interference, and the types of WiFi devices you are connecting in your network.

Screenshots below provide a visual display of recommended WiFi and encryption settings exactly as they appear in the Netgear R9000 with DD-WRT firmware.

Navigate to the Wireless > Basic Settings to view or edit WiFi network settings.

5.0 GHz - Wireless-AC

View R9000 DD-WRT FlashRouter 5GHz Settings

2.4 GHz - Wireless-N

View R9000 DD-WRT FlashRouter 2.4GHz Settings

5.0 GHz - Wireless-AD

Additional DD-WRT WiFi Information

Intimidated by all the available WiFi settings? The DD-WRT website provides extensive information about all of the available configuration options in the firmware. Learn about everything from Wireless channels to channel widths and more in the Basic Wireless Settings – DD-WRT Wiki.

R9000 DD-WRT Wireless Security

The preset R9000 FlashRouter WiFi password is Wireless#[First 5 characters of your router MAC]. The router MAC can be found on the bottom of your router. For e.g. if your MAC is 1459C07E70A8 then your WiFi password is Wireless#1459C

Navigate to the Wireless > Wireless Security to view or edit WiFi passwords.

TROUBLESHOOTING

Trouble with your Netgear R9000 WiFi? Visit the Wireless troubleshooting section.

Troubleshoot Here

Linksys WRT1900ACS / ACV2 / ACV1 DD-WRT WiFi Settings

Dave · Mar 5, 2019 ·

Recommended DD-WRT WiFi settings for the Linksys WRT1900AC are based on extensive testing by FlashRouters. Please note that optimal settings may vary depending on external factors such as home size, interference, and the types of WiFi devices you are connecting in your network.

Screenshots below provide a visual display of recommended WiFi and encryption settings exactly as they appear in the Linksys WRT1900AC with DD-WRT firmware.

Please note there are many versions of the WRT1900AC with the same recommended settings, including WRT1900ACv1, WRT1900ACv2, WRT1900ACS, and WRT1900ACSv2.

Navigate to the Wireless > Basic Settings to view or edit WiFi network settings.

5.0 GHz - Wireless-AC

View WRT1900ACS DD-WRT FlashRouter 5GHz Settings

2.4 GHz - Wireless-N

View WRT1900ACS DD-WRT FlashRouter 2.4GHz Settings

Additional DD-WRT WiFi Information

Intimidated by all the available WiFi settings? The DD-WRT website provides extensive information about all of the available configuration options in the firmware. Learn about everything from Wireless channels to channel widths and more in the Basic Wireless Settings – DD-WRT Wiki.

WRT1900AC DD-WRT Wireless Security

The preset WRT1900AC FlashRouter WiFi password is Wireless#[First 5 characters of your router MAC]. The router MAC can be found on the bottom of your router. For e.g. if your MAC is 6038E07E70A8 then your WiFi password is Wireless#6038E

Navigate to the Wireless > Wireless Security to view or edit WiFi passwords.

View WRT1900AC DD-WRT FlashRouter WiFi Security Settings

TROUBLESHOOTING

Trouble with your Linksys WRT1900ACS WiFi? Visit the Wireless troubleshooting section.

Troubleshoot Here

Netgear R6300V2 DD-WRT WiFi Settings

Dave · Mar 5, 2019 ·

Recommended DD-WRT WiFi settings for the Netgear R6300V2 are based on extensive testing by FlashRouters. Please note that optimal settings may vary depending on external factors such as home size, interference, and the types of WiFi devices you are connecting in your network.

Screenshots below provide a visual display of recommended WiFi and encryption settings exactly as they appear in the Netgear R6300V2 with DD-WRT firmware.

Navigate to the Wireless > Basic Settings to view or edit WiFi network settings.

2.4 GHz - Wireless-N

View R6300 DD-WRT FlashRouter 2.4GHz Settings

5.0 GHz - Wireless-AC

View R6300 DD-WRT FlashRouter 5GHz Settings

Additional DD-WRT WiFi Information

Intimidated by all the available WiFi settings? The DD-WRT website provides extensive information about all of the available configuration options in the firmware. Learn about everything from Wireless channels to channel widths and more in the Basic Wireless Settings – DD-WRT Wiki.

R6300V2 DD-WRT Wireless Security

The preset R6300V2 FlashRouter WiFi password is Wireless#[First 5 characters of your router MAC]. The router MAC can be found on the bottom of your router. For e.g. if your MAC is 1459C07E70A8 then your WiFi password is Wireless#1459C

Navigate to the Wireless > Wireless Security to view or edit WiFi passwords.

View R6300 DD-WRT FlashRouter WiFi Security Settings

TROUBLESHOOTING

Trouble with your Netgear R6300 V2 WiFi? Visit the Wireless troubleshooting section.

Troubleshoot Here

Privacy Hero Safe Surf

TeamFlashRouters · Apr 3, 2023 ·

Your Privacy Hero router uses Cloud Based router management which means you can access the router settings from anywhere on any device that has an internet connection. You can follow these steps while connected to your phone, other Wi-Fi network, or the Privacy Hero network.

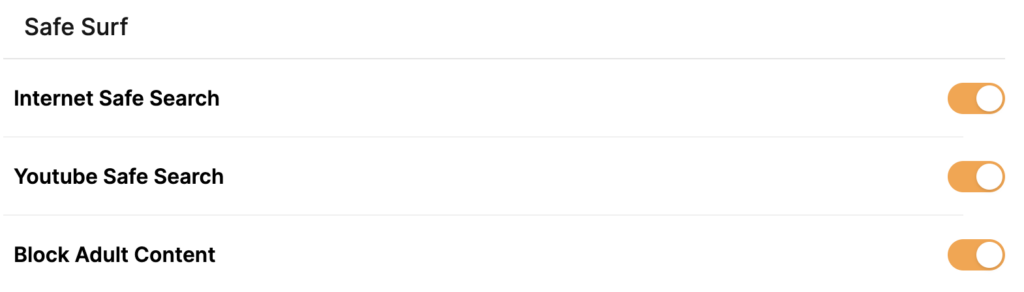
The Safe Surf settings feature allows users to block inappropriate search results, YouTube videos, and adult content. All devices assigned to this profile will have these rules applied.

1. From any device that has a browser such as a computer, smartphone, or tablet visit app.privacyhero.com

App.PrivacyHero.com

2. Enter your Privacy Hero account email and password. Click Login.

Privacy Hero Access Settings

If you have not created your Privacy Hero account yet please follow these instructions.

3. Click the Profiles symbol.

Privacy Hero Profiles

4. Click the name of the User Profile.

Privacy Hero Select Profile

5. Toggle On the settings for Internet Safe Search, YouTube Safe Search, and Block Adult Content as needed.

Privacy Hero Safe Search

TROUBLESHOOTING

Still having issues? Visit the VPN Troubleshooting section.

Troubleshoot Here

Netgear R7800 Nighthawk X4S DD-WRT WiFi Settings

Dave · Mar 4, 2019 ·

Recommended DD-WRT WiFi settings for the Netgear R7800 are based on extensive testing by FlashRouters. Please note that optimal settings may vary depending on external factors such as home size, interference, and the types of WiFi devices you are connecting in your network.

Screenshots below provide a visual display of recommended WiFi and encryption settings exactly as they appear in the Netgear R7800 with DD-WRT firmware.

Navigate to the Wireless > Basic Settings to view or edit WiFi network settings.

5.0 GHz - Wireless-AC

View R7800 DD-WRT FlashRouter 5GHz Settings

2.4 GHz - Wireless-N

View R7800 DD-WRT FlashRouter 2.4GHz Settings

Additional DD-WRT WiFi Information

Intimidated by all the available WiFi settings? The DD-WRT website provides extensive information about all of the available configuration options in the firmware. Learn about everything from Wireless channels to channel widths and more in the Basic Wireless Settings – DD-WRT Wiki.

R7800 DD-WRT Wireless Security

The preset R7800 FlashRouter WiFi password is Wireless#[First 5 characters of your router MAC]. The router MAC can be found on the bottom of your router. For e.g. if your MAC is 1459C07E70A8 then your WiFi password is Wireless#1459C

Navigate to the Wireless > Wireless Security to view or edit WiFi passwords.

View R7800 DD-WRT FlashRouter WiFi SecuritySettings

TROUBLESHOOTING

Trouble with your Netgear R7800 WiFi? Visit the Wireless troubleshooting section.

Troubleshoot Here

Netgear R7000 Nighthawk DD-WRT WiFi Settings

Dave · Feb 25, 2019 ·

Recommended DD-WRT WiFi settings for the Netgear R7000 are based on extensive testing by FlashRouters. Please note that optimal settings may vary depending on external factors such as home size, interference, and the types of WiFi devices you are connecting in your network.

Screenshots below provide a visual display of recommended WiFi and encryption settings exactly as they appear in the Netgear R7000 with DD-WRT firmware.

Navigate to the Wireless > Basic Settings to view or edit WiFi network settings.

2.4 GHz - Wireless-N

View R7000 DD-WRT FlashRouter 2.4GHz Settings

5.0 GHz - Wireless-AC

View R7000 DD-WRT FlashRouter 5GHz Settings

Additional DD-WRT WiFi Information

Intimidated by all the available WiFi settings? The DD-WRT website provides extensive information about all of the available configuration options in the firmware. Learn about everything from Wireless channels to channel widths and more in the Basic Wireless Settings – DD-WRT Wiki.

R7000 DD-WRT Wireless Security

The preset R7000 FlashRouter WiFi password is Wireless#[First 5 characters of your router MAC]. The router MAC can be found on the bottom of your router. For e.g. if your MAC is 1459C07E70A8 then your WiFi password is Wireless#1459C

Navigate to the Wireless > Wireless Security to view or edit WiFi passwords.

View R7000 DD-WRT FlashRouter WiFi Security Settings

TROUBLESHOOTING

Trouble with your Netgear R7000 WiFi? Visit the Wireless troubleshooting section.

Troubleshoot Here

Netgear R8500 Nighthawk X8 DD-WRT WiFi Settings

Dave · Mar 5, 2019 ·

Recommended DD-WRT WiFi settings for the Netgear R8500 are based on extensive testing by FlashRouters. Please note that optimal settings may vary depending on external factors such as home size, interference, and the types of WiFi devices you are connecting in your network.

Screenshots below provide a visual display of recommended WiFi and encryption settings exactly as they appear in the Netgear R8500 with DD-WRT firmware.

Navigate to the Wireless > Basic Settings to view or edit WiFi network settings.

5.0 GHz - Wireless-AC #1

View R8500 DD-WRT FlashRouter 5GHz #1 Settings

2.4 GHz - Wireless-N

View R8500 DD-WRT FlashRouter 2.4GHz Settings

5.0 GHz - Wireless-AC #2

View R8500 DD-WRT FlashRouter 5GHz #2 Settings

Additional DD-WRT WiFi Information

Intimidated by all the available WiFi settings? The DD-WRT website provides extensive information about all of the available configuration options in the firmware. Learn about everything from Wireless channels to channel widths and more in the Basic Wireless Settings – DD-WRT Wiki.

R8500 DD-WRT Wireless Security

The preset Netgear R8500 FlashRouter WiFi password is Wireless#[First 5 characters of your router MAC]. The router MAC can be found on the bottom of your router. For e.g. if your MAC is 1459C07E70A8 then your WiFi password is Wireless#1459C

Navigate to the Wireless > Wireless Security to view or edit WiFi passwords.

TROUBLESHOOTING

Trouble with your Netgear R8500 WiFi? Visit the Wireless troubleshooting section.

Troubleshoot Here

Roqos Core Router Setup Guide

Roqos Core Router Setup Guide

Quick Start Guide for Roqos Core Routers

Find setup guides, FAQs and troubleshooting tips for the FlashRouters Roqos Core Router.

Internet Setup

  • Roqos Core Quick Start Guide
  • How do I access my Roqos device settings?
  • Roqos Core Internet Setup and Activation

WiFi Setup

  • Setting up a Guest WiFi Network on Roqos
  • Change WiFi name and password on Roqos

VPN Setup

  • NordVPN Setup on Roqos
  • PrivateInternetAccess (PIA) Setup on Roqos
  • ExpressVPN Setup on Roqos
  • Roqos VPN Connected, but my device IP is unchanged

Roqos Core Features

  • Set a Static IP for your connected devices on Roqos
  • VPN Kill Switch on Roqos
  • Managing User Profiles on Roqos
  • Cybersecurity and Intrusion Prevention on Roqos
  • Block Websites by Country on Roqos
  • Ad blocking on Roqos
  • Parental Controls on Roqos
  • Wireless Repeater – WiFi as WAN on Roqos
  • What do the lights on my Roqos Core mean?

Search Support Articles

Troubleshooting

  • Roqos VPN Connected, but my device IP is unchanged
  • How do I access my Roqos device settings?
  • What do the lights on my Roqos Core mean?

More Ways to Get Help

GET IN TOUCH

BUY SUPPORT
BROWSE FAQs

Change server locations on ExpressVPN/Aircove firmware

TeamFlashRouters · May 12, 2022 ·

You can change the ExpressVPN server location at any time so your Internet connection appears as originating from that location.

1. Connect to the FlashRouter’s network via ethernet cable or wireless.

2. Open your web browser and enter expressvpnrouter.com or 192.168.132.1 in the URL.

ExpressVPNrouter.com
192.168.132.1

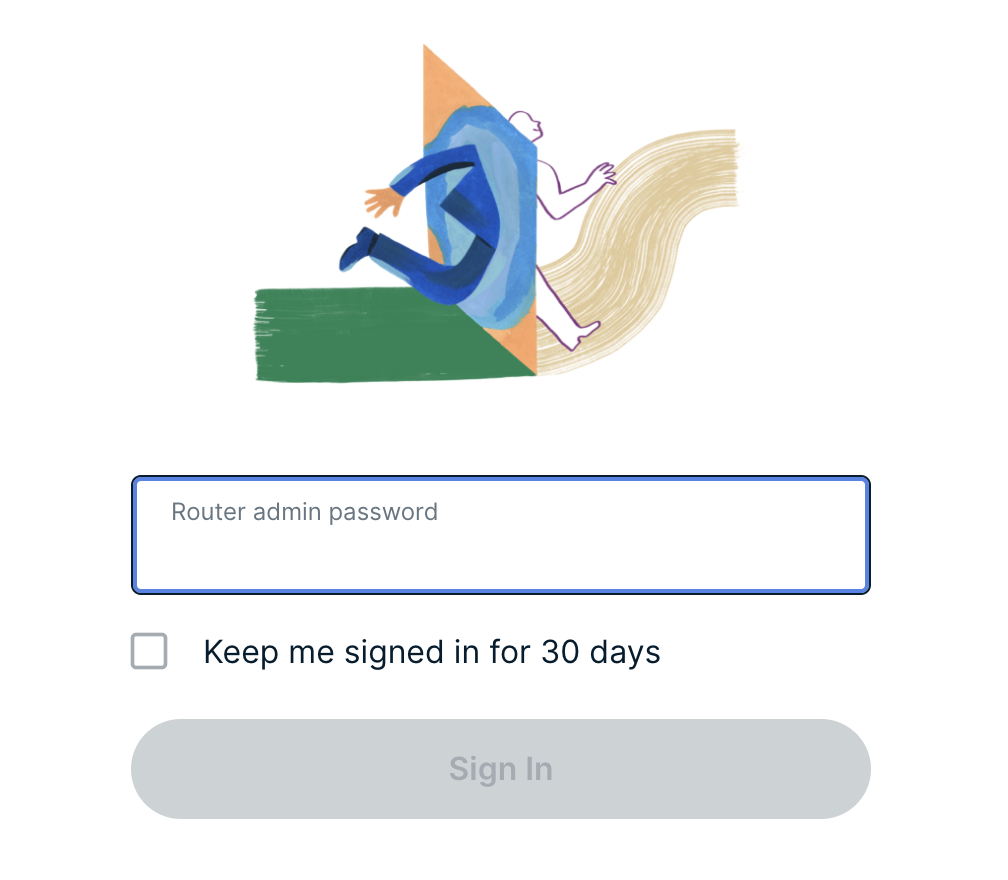
3. Login with your ExpressVPN FlashRouter admin password.

ExpressVPN Router admin login

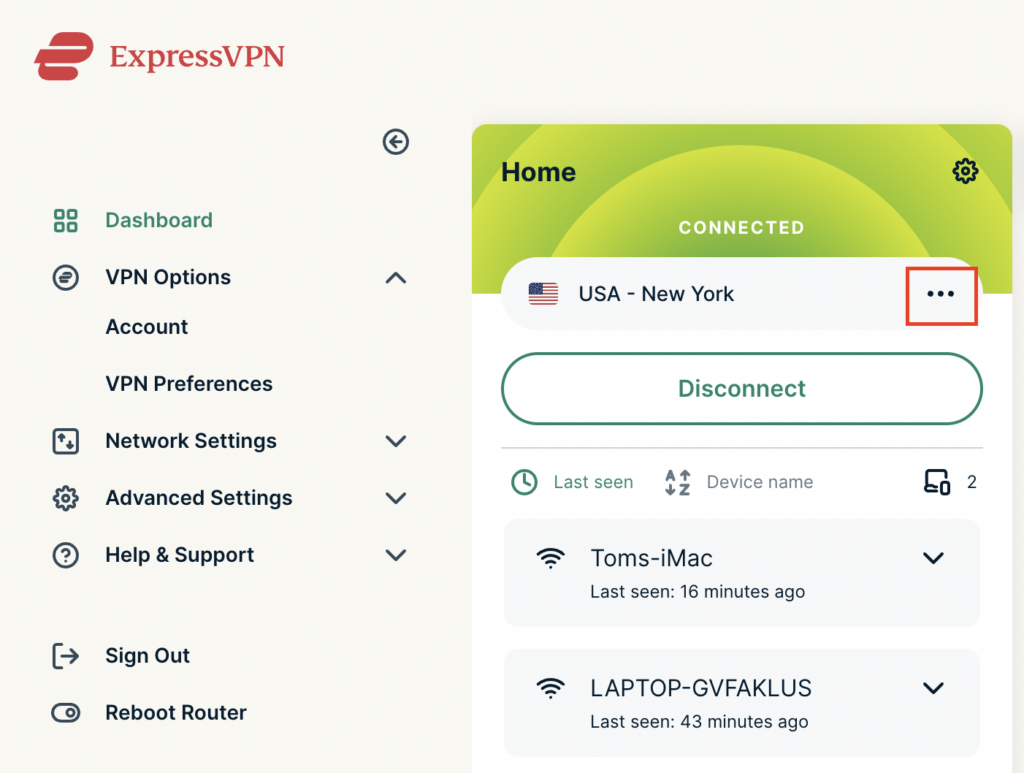
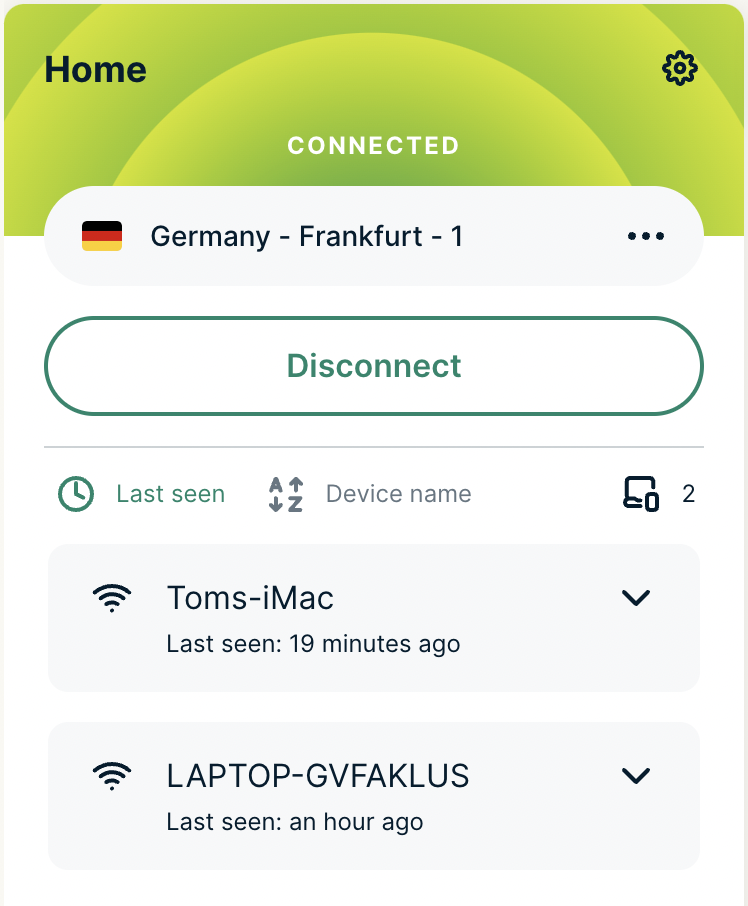
4. Click the three dots next to the server location.

ExpressVPN change server 1

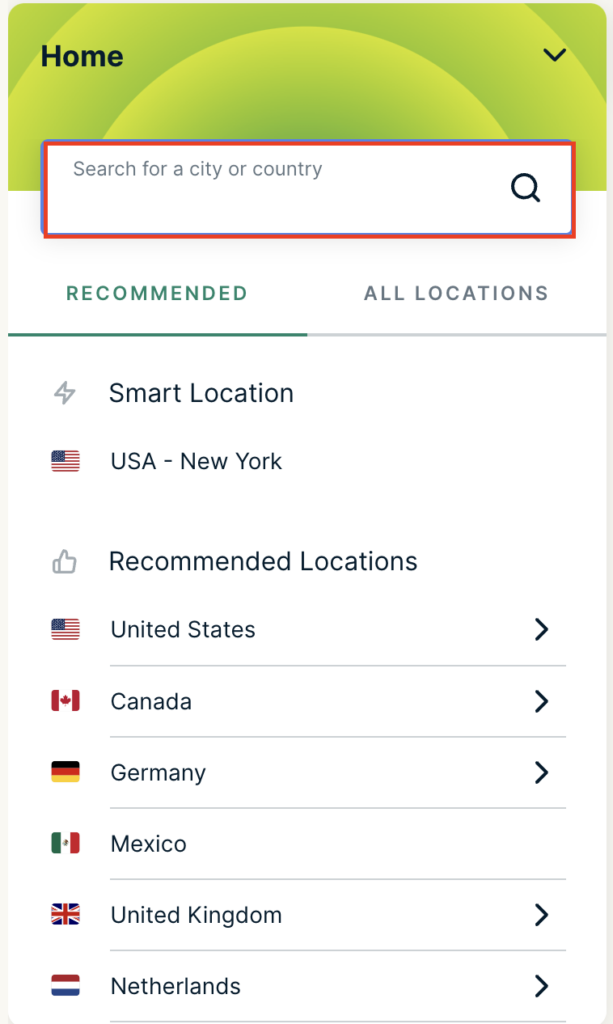
5. Type in the location you want to connect to. Click the new location to connect.

ExpressVPN change server 2

6. You are now connected to the new server location.

ExpressVPN change server 3

ExpressVPN offers servers in locations all over the world. Typically for speeds it is best to connect to the server closest to your actual location. Clicking a country instead of a city will connect you to the ideal city in that country.

« Previous Page

Primary Sidebar

  • Troubleshooting
  • Router Access
  • Internet Connection Issues
  • WiFi Connectivity
  • General VPN Issues
  • TeamViewer Remote Support
  • DD-WRT Firmware
  • Facebook
  • Twitter
  • Instagram
  • Pinterest
  • YouTube

Footer