• Skip to primary navigation
  • Skip to main content
  • Skip to primary sidebar
  • Skip to footer

FlashRouters Support Portal

Prioritizing Privacy

  • SETUP GUIDES
    • Privacy Hero Router Setup Guide
    • ASUS-WRT Router Setup Guide
    • AsusWRT-Merlin Router Setup Guide
    • DD-WRT Router Setup Guide
    • ExpressVPN Router Setup Guide
    • GL.iNet Router Setup Guide
    • Roqos Core Router Setup Guide
  • TROUBLESHOOTING
    • Router Access
    • WiFi Connectivity
    • Internet Connection Issues
    • General VPN Issues
    • DD-WRT Firmware
    • TeamViewer Remote Support
  • FAQs
    • Router FAQs
    • VPN FAQs
    • Warranty and Returns FAQs
    • Sales FAQs
    • Shipping FAQs
    • Service Plan FAQs
  • Show Search
Hide Search

Search Results for: that for sure

Surfshark VPN Setup Guide for Privacy Hero

TeamFlashRouters · Sep 23, 2025 ·

Your Privacy Hero NordVPN Router uses cloud-based management, which means you can securely access and adjust your router settings from anywhere, on any device with an internet connection. Whether you’re connected through your phone, another Wi-Fi network, or directly to the Privacy Hero network, setup and management are always within reach.

Follow the steps below to connect your Privacy Hero to Surfshark WireGuard® or OpenVPN servers.

:point_right: Don’t have a Privacy Hero yet? Get your Privacy Hero Router for Surfshark here

Surfshark Wireguard Setup for Privacy Hero (recommended)

1. From any device that has a browser such as a computer, smartphone, or tablet visit app.privacyhero.com.

App.PrivacyHero.com

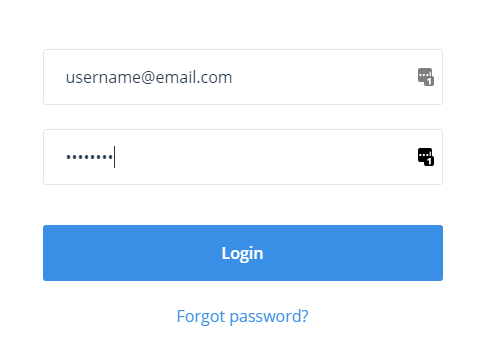
2. Enter your Privacy Hero account email and password. Click Login.

Privacy Hero Access Settings

3. Click the VPN symbol.

Privacy Hero Setup VPN

4. Click the Change button and select Custom from the dropdown and choose the Wireguard option.

Privacy Hero Change VPN Providers

5. In a new tab login to your Surfshark account.

6. Navigate to the VPN > Manual Setup tab.

7. Now choose Wireguard and go to the Router section.

8. Now go to Locations, and click on the server location you wish to use. Then, download the server file.

9. Drag and drop or click to Upload the server file into the Custom box on your Privacy Hero settings page. Then press Save.

10. Your Privacy Hero settings should now show a Connected message, indicating you have successfully signed in to your Surfshark VPN server!

Surfshark OpenVPN Setup for Privacy Hero

1. From any device that has a browser such as a computer, smartphone, or tablet visit app.privacyhero.com.

App.PrivacyHero.com

2. Enter your Privacy Hero account email and password. Click Login.

Privacy Hero Access Settings

3. Click the VPN symbol.

Privacy Hero Setup VPN

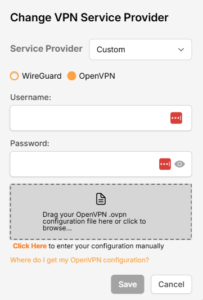
4. Click the Change button and select Custom from the dropdown and choose the OpenVPN option.

Privacy Hero Change VPN Providers

5. In a new tab login to your Surfshark account.

6. Navigate to the VPN > Manual Setup tab.

7. Now choose OpenVPN and go to the Router section.

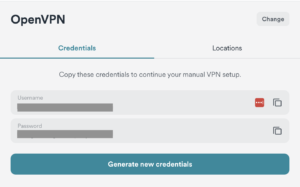
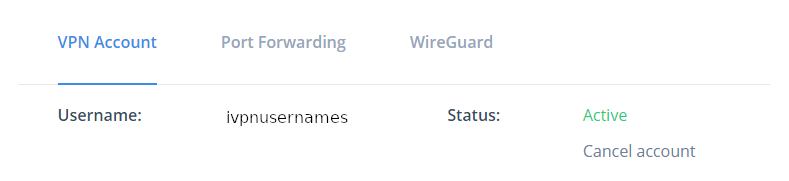
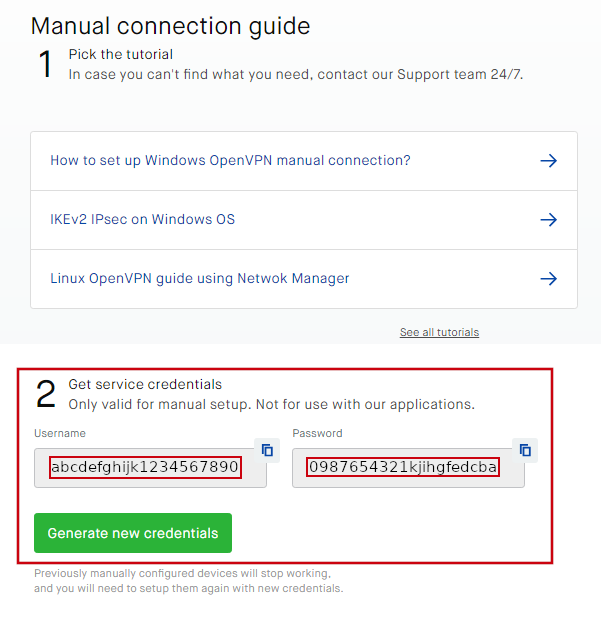
8. Now go to Credentials and find your OpenVPN specific Username and Password.

9. Copy and paste the username and password from previous step into the Custom box on your Privacy Hero settings page.

10. Now go back to the Surfshark account page, and press Locations. 

11. Click on the country name that you want to choose, and Download any of the available server files from the list. (We recommend download the UDP version of the server file).

12. Drag and drop or click to Upload the server file into the Custom box on your Privacy Hero settings page. Then press Save.

13. Your Privacy Hero settings should now show a Connected message, indicating you have successfully signed in to your Surfshark VPN server!

Privacy Hero’s cloud based router settings access makes it so you can change settings while not connected to the Privacy Hero network. Visit the Surfshark IP Check to verify your VPN IP address. If it has not changed be sure to double check that you are indeed connected to the Privacy Hero network.

Keep in mind that the VPN connection will not change the location of the streaming services listed in the Streaming Relocation area of the Privacy Hero settings if the Streaming Relocation feature is Enabled.

TROUBLESHOOTING

Still having issues? Visit the VPN Troubleshooting section.

Troubleshoot Here

Flint/Slate GL.iNet Internet Setup

TeamFlashRouters · Apr 3, 2023 ·

Follow this article when you receive your new Flint or Slate GL.iNet router to connect it to the Internet.

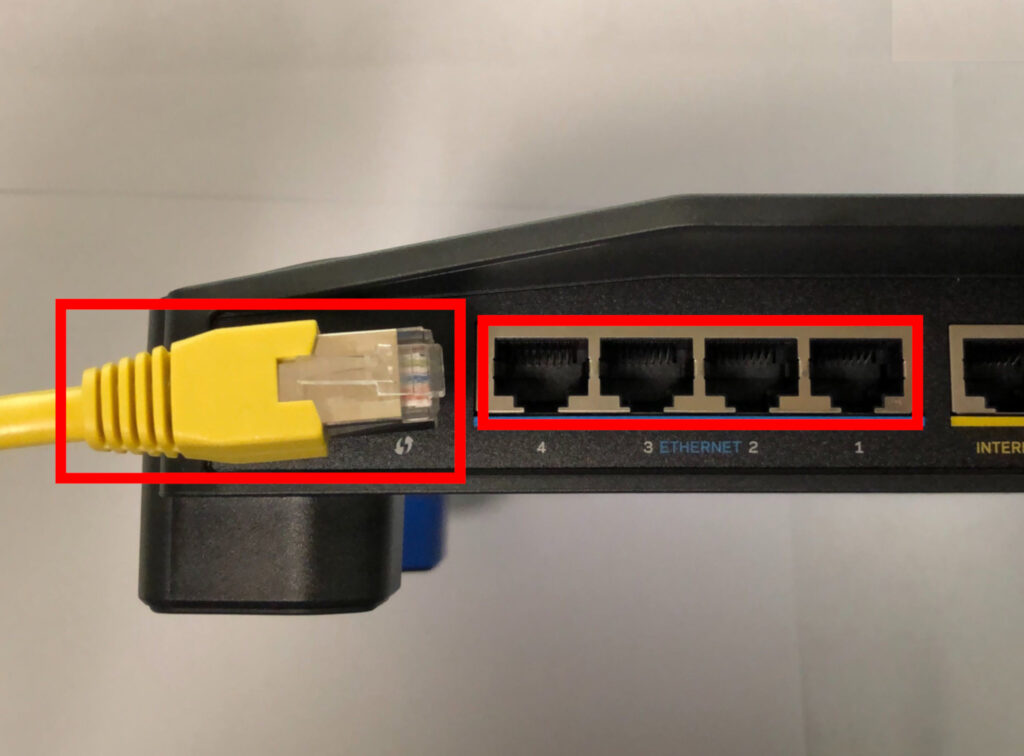
1. Connect the ethernet cable that came with the router from an open LAN ethernet port on your ISP modem or other router to the WAN port of the Flint or Slate GL.iNet router.

Flint Internet
Slate Internet

2. Connect the power to the router and wait about 2 minutes for the router to fully boot up.

3. Connect your computer, phone, or tablet to the GL.iNet router via wireless (FlashRouter24 / FlashRouter50) or via ethernet cable to one of the LAN ports on the router.

The FlashRouter WiFi password is printed on the sheet that came with the router and is set to Wireless#[First 5 characters of your router MAC]. The router MAC can be found on the bottom of your router if you cannot locate the sheet. For e.g. if your MAC is 1459C07E70A8 then your WiFi password is Wireless#1459C

Be sure to capitalize the W.

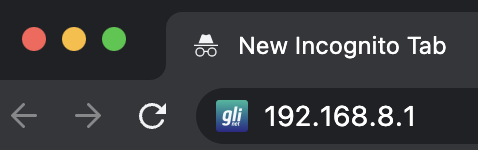
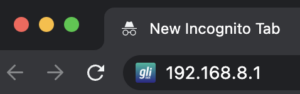
4. Once connected via wireless or ethernet on your device open your browser and go to 192.168.8.1

GL.iNet router access

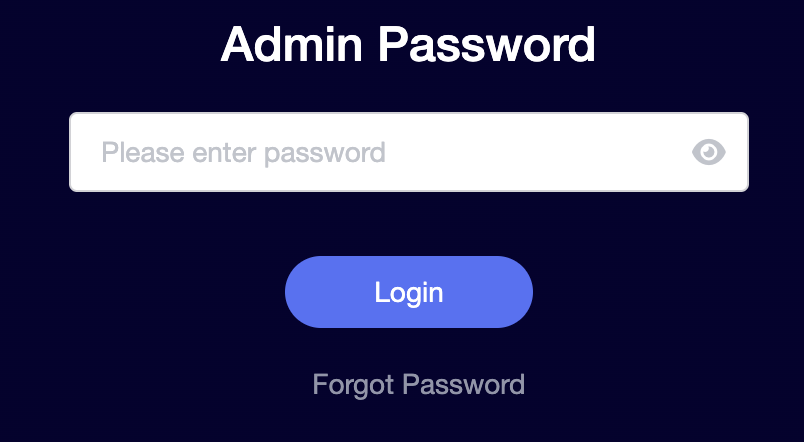
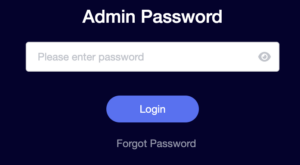
5. Enter openwrt as the admin password to access the GL.iNet firmware settings.

GL.iNet admin password enter

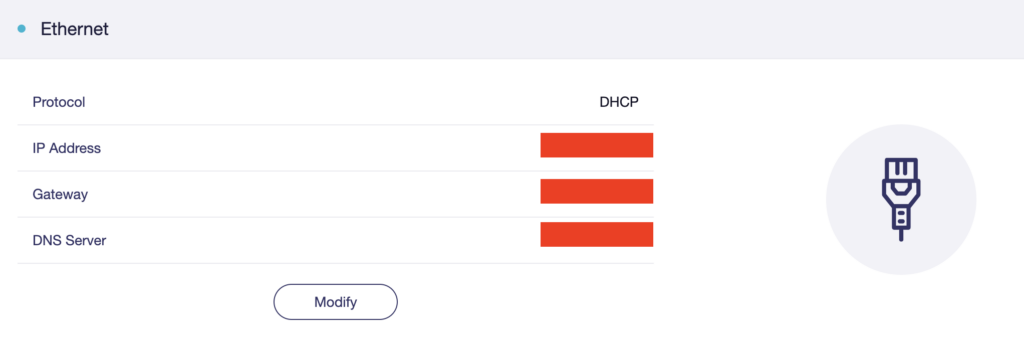
6. Verify that your Flint/Slate GL.iNet router is receiving a WAN IP Address and webpages are loading while connected to its network.

GL.iNet WAN Settings

TROUBLESHOOTING

Still having issues? Visit the VPN Troubleshooting section.

Troubleshoot Here

How do I find my router local IP address?

Dave · May 3, 2019 ·

The Local IP Address is the address that you can use to access a router’s firmware settings. Use the below instructions to find the local IP Address of the router you are connected to.

Make sure you are connected to the FlashRouter’s network via ethernet or WiFi. Keep in mind these instructions may vary based on your current software version.

Find IP Address in Windows

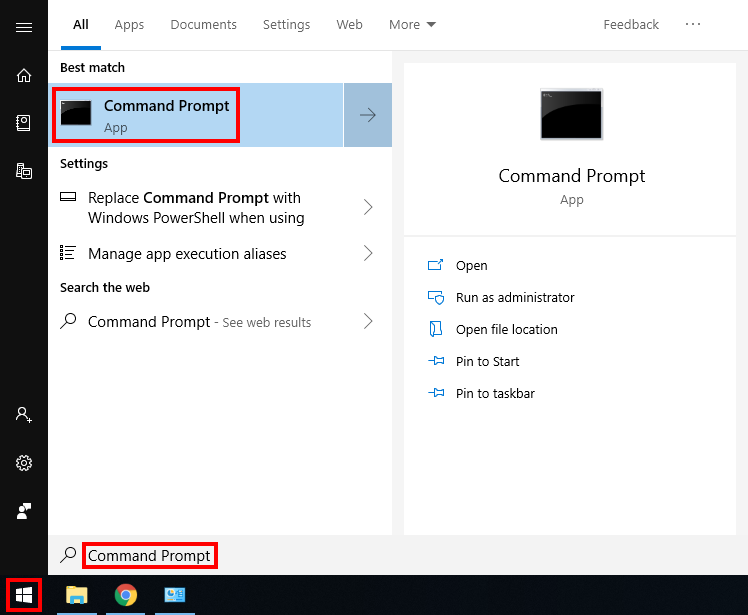
1.  Open the Window search box, and search “command prompt”

How to Find IP Address using Windows Command Prompt

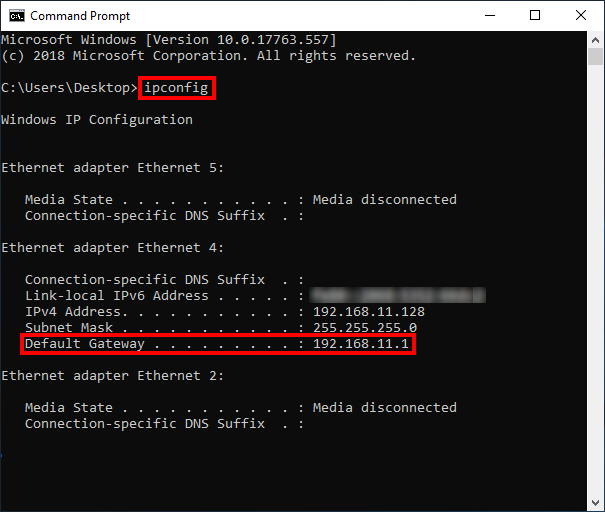
2. Type “ipconfig” and press Enter.

3. Your router’s local IP address will be listed next to Default Gateway.

How to Find IP Address using Windows Command Prompt 2

Find IP Address in Apple / Mac

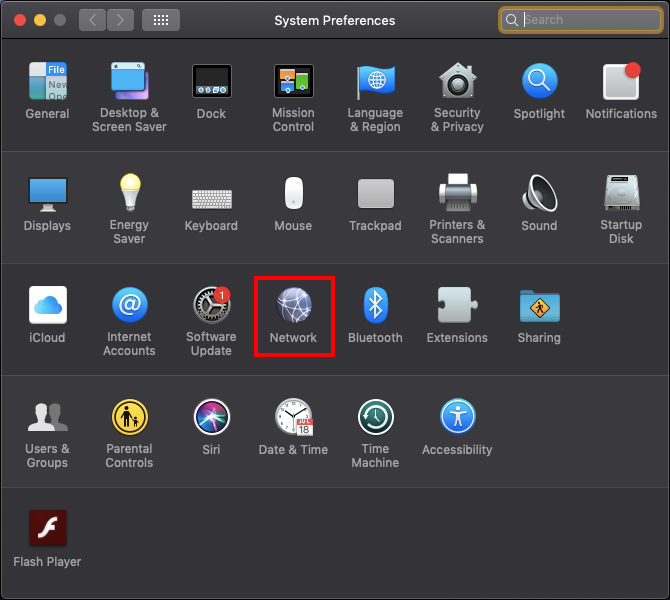
1. Open System Preferences, and select Network.

Find Static DNS settings for FlashRouter DD-WRT Using a MAC Computer

2. Select the adapter that is connected via ethernet or wireless. This will vary based on your current connection.

3. Select Advanced.

How to Find IP Address using a MAC Computer 2

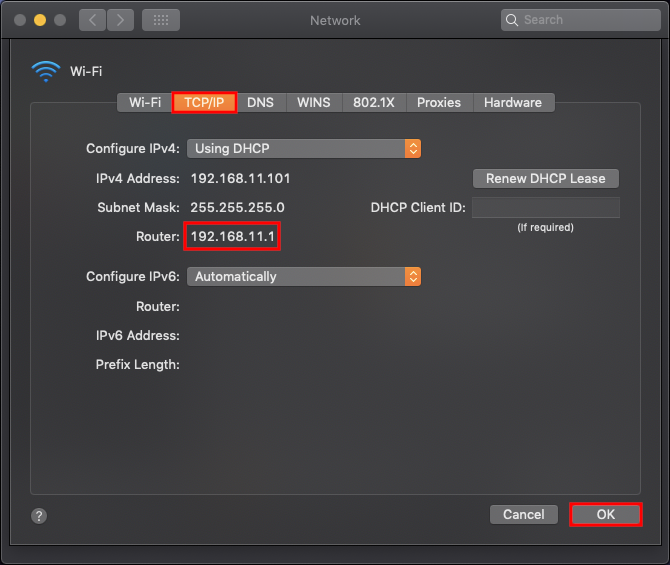
4. Select the TCP/IP tab.

5. Your router’s local IP address will be listed next to Router.

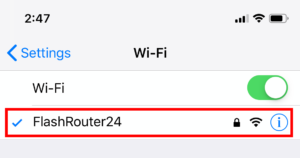
Find IP Address in iOS

1.  Open Settings

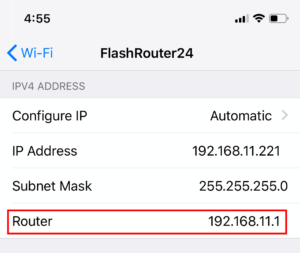
2. Select WiFi, and select the blue icon next to your current connection.

Select FlashRouters DD-WRT Wireless Network in order to Check Static IP Network Settings on iOS Mobile Device

3. Your router’s local IP address will be listed next to Router.

How to Find IP Address on IOS 2

Find IP Address in Android

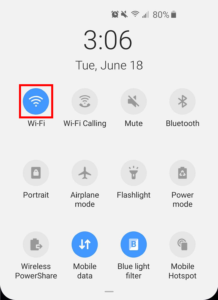
1. From the top of the screen, swipe down to display settings.

2. Select WiFi.

WiFi Icon and Settings in Android Mobile Device

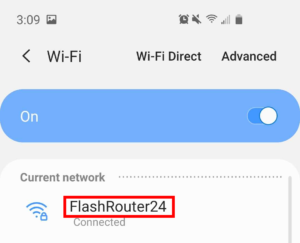
3. Select your current network.

How to Find IP Address on Android Device

4. Click on the gear next to Network Name (note this may be different on varying Android devices)
5. Click Advanced
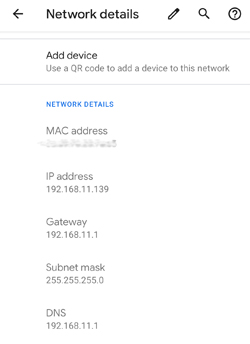
6. Your router’s local IP address will be listed as the Gateway under Network Details.

Find Router IP on Android

Once you have followed these instructions to find the Local IP Address of the router you can enter the Local IP address in your web browsers URL to access the router’s firmware settings.

Service Plan FAQs

admin · May 25, 2021 ·

Service Plan FAQs

Is the service plan a one time purchase or does it renew?

All FR service plans automatically renew on a quarterly or annual basis based on the term initially purchased. A reminder e-mail will be sent one week prior to renewal. In your FlashRouter account panel, you can cancel the plan at any time to stop any further renewals.

What is included with a FlashRouter?

  • On-demand Installation of enhanced firmware and our exclusive FlashRouters VPN Privacy App.
  • Custom setup guide.
  • Power cord and an ethernet cable.
  • Individual VPN Account Setup/Pre-configuration (On Request)
  • 1 year open source hardware warranty.
  • 30 day satisfaction guarantee.
  • Initial basic setup assistance via e-mail. For any advanced setups/configurations, live chat or remote assistance, a service plan purchase is required.

Does the service plan include a VPN subscription?

A subscription to a VPN does not come with a FlashRouter or Service plan. If you are planning to use a VPN, you would need to sign up for one separately, directly from a provider.

Need assistance in finding a VPN Provider? Please visit our recent VPN Provider Best Seller List.

Plug and Play VPN Support

Unlike other VPN Router providers, FlashRouters is proud to offer free VPN service integration with any purchase.

To receive a plug and play with VPN device, you will need to provide our team with the credentials from your VPN provider subscription.

IMPORTANT NOTE: This is not required but recommended for users who wish to have the simplest, most seamless experience when the FlashRouter arrives. You can always change the password when the device arrives if you wish as well.

Shows what to look for when you want to preconfigure your router.

To have your router VPN pre-configured:

  1. Select Yes from the “Want Your Router Preconfigured?” on the Payment Page during check out.
  2. Select your VPN provider. If you don’t see your VPN listed select “Other” and you will see an additional field to input who your provider is.
  3. Enter your your VPN username and password
  4. For ExpressVPN Firmware Routers there will be an additional box for your activation code.

Please note:  If you do not enter a server location request in “Order Comments”, we will automatically start the device with the closest/optimal server for the location we are shipping the device by default. A location has to be added to the initial configuration for plug and play encryption security to occur on the device.

Do I have to buy a service plan?

Our routers are priced for the custom upgrades performed at our warehouse, testing expenses and keeping the FlashRouter App update to date.

Our service plan has three levels as an optional add-on with your purchase to get continued direct assistance from our team. This is especially useful to customers who are less tech savvy and want direct access to our support team to make sure their network is running exactly how they desire. Here is how these plans differ

Bronze – Basic E-mail Support
Silver – E-mail and Live Chat Support.
Gold – E-mail, Live Chat, and Remote One-on-One Sessions

Each situation and user has different needs and expertise. Our team of US-based support agents are highly trained specialists in VPN and DD-WRT router setup. From firmware updates to networking configuration/troubleshooting,solutions, the purpose of our Service Plans is to help our customers in whatever level they deem necessary.

Does FlashRouters offer phone support?

At this time, we do not provide phone support with our service plans. We have tested phone support for networking troubleshooting in the past but have found that on average caused us to help less customers in a less efficient manner. However, with a purchase of a Gold Service Plan, customers can schedule 1-on-1 remote support sessions via Teamviewer with our engineers and they will provide a hands-on, personal solution, to any problems you may be facing.

Do I need a Service Plan for a firmware upgrade?

Firmware upgrades are free of charge to any FlashRouter customer!

You can visit our support center and select your specific router model to upgrade your firmware based on the recommendations provided.

If you want the help of our Support Team to assist in this upgrade, you can always sign up for our Gold Service Plan and schedule a 1-on-1 Teamviewer session in which our trained engineers will take care of the upgrade for you!

What does the warranty cover?

Our complimentary 1-year hardware warranty does not include tech support outside. If your router suffers hardware failure within 365 days from the date you received the unit, then we will gladly replace your router with another fully tested one. For more information regarding our warranty and return policy, please check out our warranty and return section.

Can I purchase a router without a service plan and subscribe later?

Yes, you may purchase a service plan at any time. However, we can’t guarantee any pricing, or apply any previously offered discounts or specific features at that later date.

SaferVPN Manual OpenVPN Setup

TeamFlashRouters · Apr 15, 2019 ·

Preparing for Manual SaferVPN Setup

Verify your SaferVPN login information

If you are not already an SaferVPN user Sign Up Now.

Log in to your account on the SaferVPN website.

FlashRouters Privacy App - SaferVPN Login

SaferVPN Server Addresses

View a full list of SaferVPN servers.

America

East Coast:
us1.safervpn.net

West Coast:
us2.safervpn.net

United Kingdom

uk1.safervpn.net

DD-WRT Router Setup for SaferVPN

Navigate to Services > VPN

Enter SaferVPN settings

OpenVPN Client

Start OpenVPN Client

If you wish to disable your VPN connection simply set this to Disable at any time and click Apply Settings.

Server IP/Name

Copy and paste the server you would like to connect to from the server list above. Be sure there are no extra spaces or characters.

If you wish to change SaferVPN connection locations, THIS IS THE ONLY FIELD YOU NEED TO CHANGE.

Port

1194

Tunnel Device

TUN

Tunnel Protocol

UDP

Encryption cipher

AES-256-CBC

Hash Algorithm

SHA1

User Pass Authentication

Enable

Username

Enter the Username you successfully logged in to your SaferVPN account with.

Password

Enter the Password you successfully logged in to your SaferVPN account with.

Advanced Options

Enable

TLS Cipher

None

LZO Compression

Adaptive

NAT

Enable

Additional Config

persist-key
persist-tun
tun-mtu-extra 32
mssfix 1450

Policy Based Routing

This field can be used for split VPN and Dual Gateway routing.

CA Cert

-----BEGIN CERTIFICATE-----
MIIE1jCCA76gAwIBAgIJAOnRq4FWsZgYMA0GCSqGSIb3DQEBCwUAMIGiMQswCQYD
VQQGEwJVUzELMAkGA1UECBMCQ0ExFTATBgNVBAcTDFNhbkZyYW5jaXNjbzERMA8G
A1UEChMIU2FmZXJWUE4xETAPBgNVBAsTCFNhZmVyVlBOMREwDwYDVQQDEwhTYWZl
clZQTjERMA8GA1UEKRMIU2FmZXJWUE4xIzAhBgkqhkiG9w0BCQEWFHN1cHBvcnRA
c2FmZXJ2cG4uY29tMB4XDTE3MDgzMTA5NDEyM1oXDTI3MDgyOTA5NDEyM1owgaIx
CzAJBgNVBAYTAlVTMQswCQYDVQQIEwJDQTEVMBMGA1UEBxMMU2FuRnJhbmNpc2Nv
MREwDwYDVQQKEwhTYWZlclZQTjERMA8GA1UECxMIU2FmZXJWUE4xETAPBgNVBAMT
CFNhZmVyVlBOMREwDwYDVQQpEwhTYWZlclZQTjEjMCEGCSqGSIb3DQEJARYUc3Vw
cG9ydEBzYWZlcnZwbi5jb20wggEiMA0GCSqGSIb3DQEBAQUAA4IBDwAwggEKAoIB
AQCqNV7oJZrUqD/mBSWlKi/sGRE2y3Yphs5m/vmmS4GPrc8lyaI1idhv44MGZ0i1
XCkJFZmaVQk7NUz5npz9hcnxN3MiZd/5Kv8Vo4aQkL0xQ7euto71LIgTqbJvTJjW
kowsVVgartGK2ewfCd+KV6k5oBImlDdSnLW1pq82Kg+YcnXxdaFc8RpNWdBbdxBe
tb4k6JcoZHuk9Zq5gi5Nnhtjc6lheCRzTGZ2hslDfJ58yMpR0jTMC3Rd+G+sM0q3
/gEEEW34ckUgCb5j6Kq35LUlnuonnViBnEzFR/MTizMARFj7VYkzOpxSsxJ6Epan
JP8Zgbz81z4A822hosakl7kTAgMBAAGjggELMIIBBzAdBgNVHQ4EFgQUKSnUrJLQ
omrGvdncxKkKT7Rxrj8wgdcGA1UdIwSBzzCBzIAUKSnUrJLQomrGvdncxKkKT7Rx
rj+hgaikgaUwgaIxCzAJBgNVBAYTAlVTMQswCQYDVQQIEwJDQTEVMBMGA1UEBxMM
U2FuRnJhbmNpc2NvMREwDwYDVQQKEwhTYWZlclZQTjERMA8GA1UECxMIU2FmZXJW
UE4xETAPBgNVBAMTCFNhZmVyVlBOMREwDwYDVQQpEwhTYWZlclZQTjEjMCEGCSqG
SIb3DQEJARYUc3VwcG9ydEBzYWZlcnZwbi5jb22CCQDp0auBVrGYGDAMBgNVHRME
BTADAQH/MA0GCSqGSIb3DQEBCwUAA4IBAQB704c0nixfDuJ7OiFBUmkhmDUFEIhl
D35wxlthKYRs8tBzetZEipFGdyUOwuWiuwG/BuOwuP7fPS9uP4u4EPKjA5kL/Z/V
E743q50PS4L/kT3ZFyUrcisUKajAr5Gu+o6rzA6F4+QYu26iBbKewNrrb+riF1wR
GKthc6W++Awt+oVyKtVNyS2QokuBFcSu5IiVsfGqJ8TmffvFBqKUUjWopmP+qiYR
8+0qwHing/S/C9S72ZxhM9DF3et1dXFuHf/69YL8/u36tyKMqy/JVhByAlc87cRI
tcRGaviUttBeSw4j1Y6XrycVkhn4LzizWrqrmfCikhx26MrIeWK5JxYL
-----END CERTIFICATE-----

CLICK APPLY SETTINGS

Leave all settings not mentioned above as their default setting.

Verify a successful SaferVPN connection

Navigate to Status > OpenVPN

  1. You should now see a CONNECTED SUCCESS message.
  2. Visit SaferVPN’s IP Check to verify your new IP address and virtual location.

In some cases you may notice that the location is not showing the same location as the server you have input in your router settings; this is because geo tracking tools are often tricked by VPN connections. As long as you see an IP address that is not the same as your normal Internet IP address then you are indeed connected to SaferVPN.

Back up your settings

Navigate to Administration > Backup

  1. Click the Backup button.
  2. A file named nvrambak.bin will be saved to your computer.
  3. You can load nvrambak.bin to restore your settings in the event of a reset.

How to change the SaferVPN server

  1. Copy the new SaferVPN server address from the above server list.
  2. Paste the server into the Server IP/Name field.
  3. Click Apply Settings.

TROUBLESHOOTING

Still having issues? Visit the VPN Troubleshooting section.

Troubleshoot Here

Flint/Slate GL.iNet Change Wi-Fi name and password

TeamFlashRouters · Apr 20, 2023 ·

Follow this guide to change the Wi-Fi name and password on your GL.iNet FlashRouter.

1. Connect your computer, phone, or tablet to the GL.iNet router via wireless (FlashRouter24 / FlashRouter50) or via ethernet cable to one of the LAN ports on the router.

The FlashRouter WiFi password is printed on the sheet that came with the router and is set to Wireless#[First 5 characters of your router MAC]. The router MAC can be found on the bottom of your router if you cannot locate the sheet. For e.g. if your MAC is 1459C07E70A8 then your WiFi password is Wireless#1459C

Be sure to capitalize the W.

2. Once connected via wireless or ethernet on your device open your browser and go to 192.168.8.1

GL.iNet router access

3. Enter openwrt as the admin password to access the GL.iNet firmware settings.

GL.iNet admin password enter

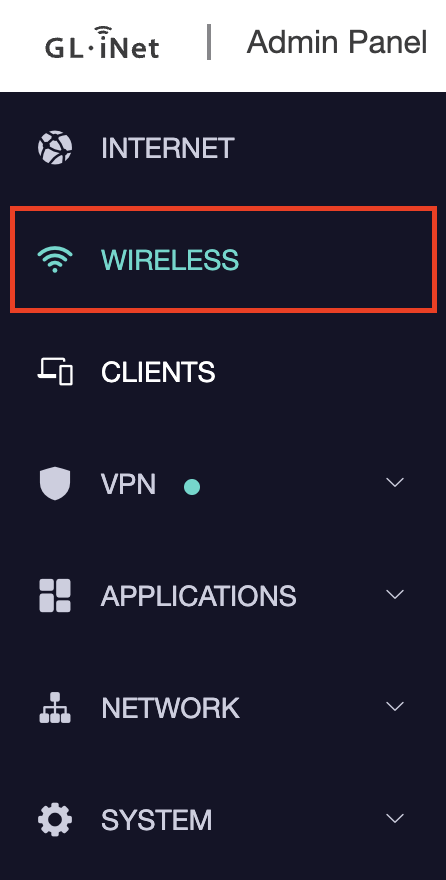
4. Click Wireless.

GL.iNet Click Wireless

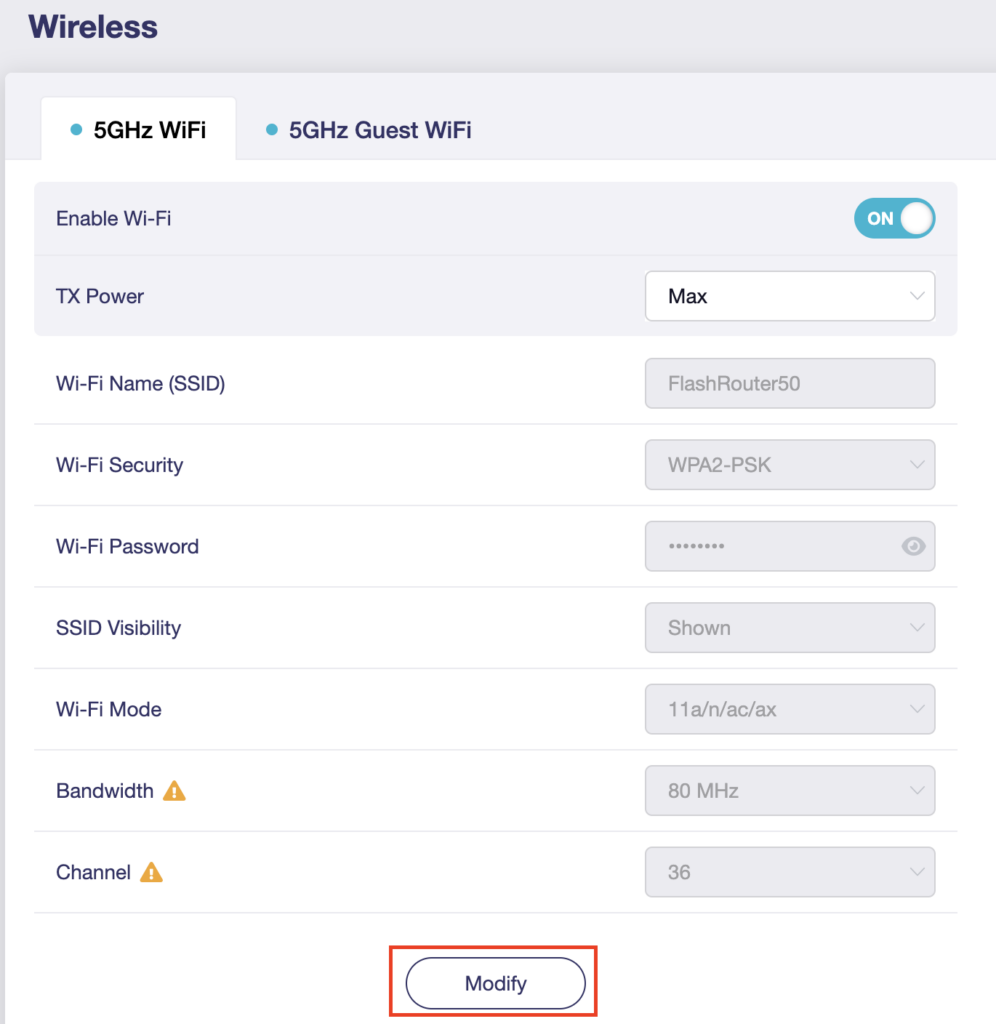
5. Click Modify under the 5GHz or 2.4GHz band.

GL.iNet Modify Wifi

The 5GHz and 2.4GHz information must be changed at separate times. Keep in mind that if you are connected to wireless when changing one band you may need to reconnect with the new info you set to be on the network again to make changes to the other band.

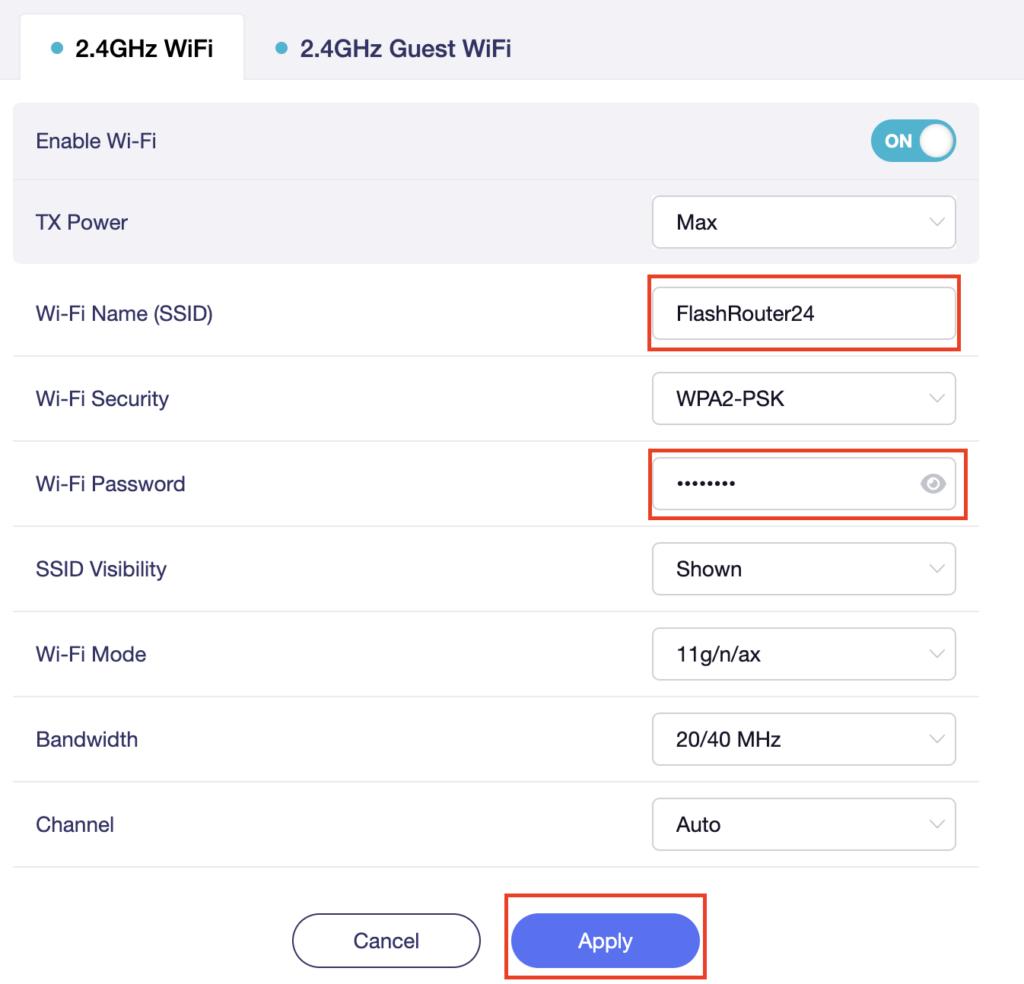
6. Change the Wi-Fi Name (SSID) and Wi-Fi Password fields to what you want to use. The SSID should be unique and NOT a duplicate of an existing network. Click Apply.

GL.iNet change Wifi name and password

7. Connect your devices to the new wireless network.

TROUBLESHOOTING

Still having issues? Visit the VPN Troubleshooting section.

Troubleshoot Here

PPPoE Internet Setup

TeamFlashRouters · Mar 21, 2019 ·

Most ISPs do not require PPPoE credentials. If you are certain this is an ISP requirement in your setup, we kindly ask that you get in touch with your ISP to verify that they do in fact require PPPoE authentication and to provide you with the correct credentials to enter into your FlashRouter.

Before you enter your PPPoE credentials, you should have already setup your FlashRouter in a Single Router Setup with correct wiring. Once you enter PPPoE credentials you should then be able to connect to the internet.

If you are using a Dual Router Setup there is no need to enter PPPoE credentials if they are already entered in the existing router. You can disregard this article.

Enter your PPPoE credentials

DD-WRT Firmware

Navigate to Setup > Basic Setup

Access FlashRouters DD-WRT Admin Settings - Enter PPPOE Username and Password
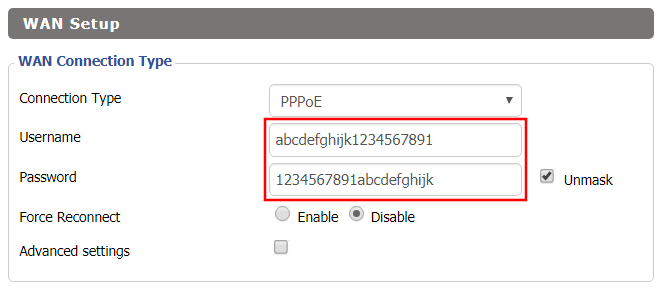
  1. Set the Connection Type dropdown to PPPoE.
  2. Enter your ISP assigned PPPoE username and password.
  3. Click Apply Settings.

Power cycle your network devices

  1. Power off your ISP modem and the FlashRouter.
  2. Power on the ISP modem and wait for it to fully boot up.
  3. Power on the FlashRouter.

Verify a successful Internet connection

Once the FlashRouter is booted up connect one of your devices to the FlashRouter via Ethernet or Wireless.

Visit any website and make sure the page fully loads. Once you have verified a successful Internet connection, begin connecting your network devices to the FlashRouter via wired or WiFi.

Please be aware that our support is not able to replicate PPPoE issues on our end, which makes them challenging to troubleshoot. In the event of an issue we recommend using a Dual Router Setup.

IPVanish VPN Setup Guide for Privacy Hero

TeamFlashRouters · Sep 23, 2025 ·

Your Privacy Hero router uses Cloud Based router management which means you can access the router settings from anywhere on any device that has an internet connection. You can follow these steps while connected to your phone, other Wi-Fi network, or the Privacy Hero network.

IPVanish Wireguard Setup for Privacy Hero (recommended)

1. From any device that has a browser such as a computer, smartphone, or tablet visit app.privacyhero.com.

App.PrivacyHero.com

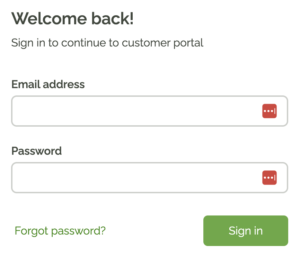
2. Enter your Privacy Hero account email and password. Click Login.

Privacy Hero Access Settings

3. Click the VPN symbol.

Privacy Hero Setup VPN

4. Click the Change button and select Custom from the dropdown and choose the Wireguard option.

Privacy Hero Change VPN Providers

5. In a new tab login to your IPVanish account.

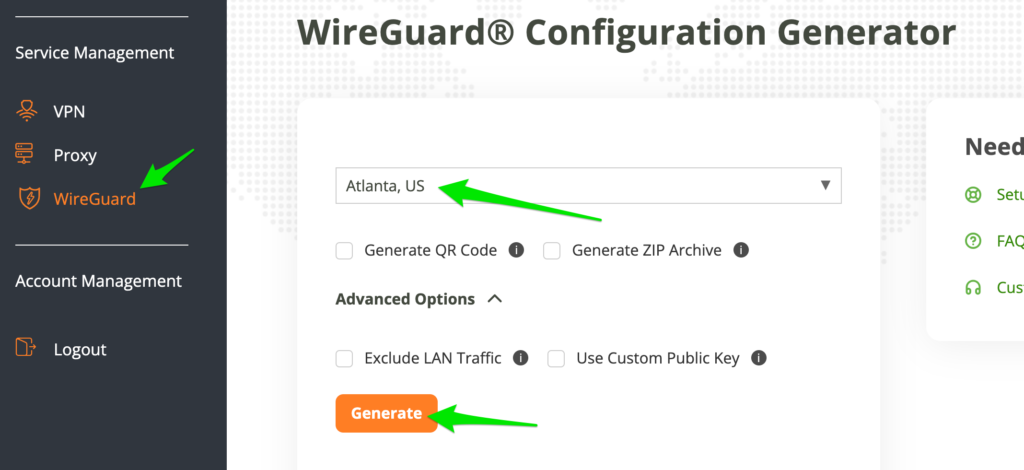
6. Click WireGuard on the left menu to access the WireGuard Configuration Generator.

Then select the server location and click Generate to download the WireGuard configuration file.

7. Drag and drop or click to Upload the server file into the Custom box on your Privacy Hero settings page. Then press Save.

8. Your Privacy Hero settings should now show a Connected message, indicating you have successfully signed in to your IPVanish VPN server!

IPVanish OpenVPN Setup for Privacy Hero

1. From any device that has a browser such as a computer, smartphone, or tablet visit app.privacyhero.com.

App.PrivacyHero.com

2. Enter your Privacy Hero account email and password. Click Login.

Privacy Hero Access Settings

3. Click the VPN symbol.

Privacy Hero Setup VPN

4. Click the Change button and select Custom from the dropdown and choose the OpenVPN option.
Privacy Hero Change VPN Providers

5. Download an .ovpn file from the IPVanish server list.

6. Drag and drop or click to Upload the server file into the Custom box on your Privacy Hero settings page.

7. Enter your IPVanish account login as the Username and Password. Then press Save.

8. Your Privacy Hero settings should now show a Connected message, indicating you have successfully signed in to your IPVanish VPN server!

Privacy Hero’s cloud based router settings access makes it so you can change settings while not connected to the Privacy Hero network. Visit the IPVanish IP Check to verify your VPN IP address. If it has not changed be sure to double check that you are indeed connected to the Privacy Hero network.

Keep in mind that the VPN connection will not change the location of the streaming services listed in the Streaming Relocation area of the Privacy Hero settings if the Streaming Relocation feature is Enabled.
TROUBLESHOOTING

Still having issues? Visit the VPN Troubleshooting section.

Troubleshoot Here

PureVPN Manual OpenVPN Setup

TeamFlashRouters · Apr 16, 2019 ·

Preparing for Manual PureVPN Setup

Verify your PureVPN login information

If you are not already an PureVPN user Sign Up Now.

Log in to your account on the PureVPN website.

PureVPN Website Login

Navigate to the Home page and note the VPN username on this page. You will need this specific username later on in the configuration process.
Ex: purevpn0s1234567

PureVPN Server Addresses

View a full list of PureVPN servers.

United States

Miami:
usfl1-ovpn-udp.pointtoserver.com

Seattle:
ussa-ovpn-udp.pointtoserver.com

Houston
:
ustx1-ovpn-tcp.pointtoserver.com

Georgia
:
usga1-ovpn-udp.pointtoserver.com

New Jersey
:
usnj1-ovpn-udp.pointtoserver.com

Washington
:
uswdc1-ovpn-udp.pointtoserver.com

Chicago
:
usil1-ovpn-udp.pointtoserver.com

Phoenix
:
usphx1-ovpn-udp.pointtoserver.com

Los Angeles
:
usla1-ovpn-udp.pointtoserver.com

Virginia
:
vlbr-usvc1-ovpn-udp.pointtoserver.com

San Francisco
:
vlsa-ussf1-ovpn-udp.pointtoserver.com

New York
:
usny1-ovpn-udp.pointtoserver.com

Ohio
:
vleu-usoh1-ovpn-udp.pointtoserver.com

United Kingdom

London:
ukl1-ovpn-udp.pointtoserver.com

Gosport:
ukg1-ovpn-udp.pointtoserver.com

Maidenhead:
ukm1-ovpn-udp.pointtoserver.com

Manchester
:
vlus-uk-man1-ovpn-udp.pointtoserver.com

Leicester
:
vlap-ukle1-ovpn-udp.pointtoserver.com

DD-WRT Router Setup for PureVPN

Navigate to Services > VPN

Enter PureVPN settings

OpenVPN Client

Start OpenVPN Client

If you wish to disable your VPN connection simply set this to Disable at any time and click Apply Settings.

Server IP/Name

Copy and paste the server you would like to connect to from the server list above. Be sure there are no extra spaces or characters.

If you wish to change PureVPN connection locations, THIS IS THE ONLY FIELD YOU NEED TO CHANGE.

Port

53

Tunnel Device

TUN

Tunnel Protocol

UDP

Encryption cipher

AES-256-CBC

Hash Algorithm

SHA1

Userpass Authentication

Enable

Username

Enter the Username you noted from the Home page above.
Ex: purevpn0s1234567

Password

Enter the Password you successfully logged in to your PureVPN account with.

Advanced Options

Enable

TLS Cipher

None

LZO Compression

Adaptive

NAT

Enable

Firewall Protection

Enable

TLS Auth Key

-----BEGIN OpenVPN Static key V1-----
e30af995f56d07426d9ba1f824730521
d4283db4b4d0cdda9c6e8759a3799dcb
7939b6a5989160c9660de0f6125cbb1f
585b41c074b2fe88ecfcf17eab9a33be
1352379cdf74952b588fb161a93e13df
9135b2b29038231e02d657a6225705e6
868ccb0c384ed11614690a1894bfbeb2
74cebf1fe9c2329bdd5c8a40fe882062
4d2ea7540cd79ab76892db51fc371a3a
c5fc9573afecb3fffe3281e61d72e915
79d9b03d8cbf7909b3aebf4d90850321
ee6b7d0a7846d15c27d8290e031e951e
19438a4654663cad975e138f5bc5af89
c737ad822f27e19057731f41e1e254cc
9c95b7175c622422cde9f1f2cfd3510a
dd94498b4d7133d3729dd214a16b27fb
-----END OpenVPN Static key V1-----

Additional Config

tls-cipher “DEFAULT:@SECLEVEL=0”

Policy Based Routing

This field can be used for split VPN and Dual Gateway routing.

CA Cert

-----BEGIN CERTIFICATE-----
MIIEoTCCA4mgAwIBAgIJANysBdFD6U2oMA0GCSqGSIb3DQEBBQUAMIGRMQswCQYD
VQQGEwJISzELMAkGA1UECBMCSEsxETAPBgNVBAcTCEhvbmdLb25nMRAwDgYDVQQK
EwdQdXJlVlBOMQswCQYDVQQLEwJJVDEQMA4GA1UEAxMHUHVyZVZQTjEQMA4GA1UE
KRMHUHVyZVZQTjEfMB0GCSqGSIb3DQEJARYQbWFpbEBob3N0LmRvbWFpbjAeFw0x
NDA0MTAwNzI5NDlaFw0yNDA0MDcwNzI5NDlaMIGRMQswCQYDVQQGEwJISzELMAkG
A1UECBMCSEsxETAPBgNVBAcTCEhvbmdLb25nMRAwDgYDVQQKEwdQdXJlVlBOMQsw
CQYDVQQLEwJJVDEQMA4GA1UEAxMHUHVyZVZQTjEQMA4GA1UEKRMHUHVyZVZQTjEf
MB0GCSqGSIb3DQEJARYQbWFpbEBob3N0LmRvbWFpbjCCASIwDQYJKoZIhvcNAQEB
BQADggEPADCCAQoCggEBAJYqtUkQTlf/pHcGXuuII8S3pfI0fwFbs7l/1RP3nX3n
v1vyuvLi7h0jWsgJU0XM7LJywiRFJ8zsMLH7KZnIg7bscb50GY75WIq7C2NnWnnS
7zzyCCm2XD/2xZPym2lVRytpnWJbpemSS6Hdz7xI3q2FmixuBa1t5FeKsXfeaGGg
+ohwLvamnGHJYUYu3Nu0EWVzzy5wgT0c2C5jleGxl3kxRimD8FpnlAVdqyt0ib/f
f9XanaotSopIHUZmpYjT+udRC2+harlNKvOXYgDRl1mpimCvlzEWpZAo8dyBCxWl
xlBIT8OA8rimGi1XviknuOlWu2cGi13Ug8mCG0MjOQ0CAwEAAaOB+TCB9jAdBgNV
HQ4EFgQUt+1vJ2X2ho12PUDhdo2CsSHYXbYwgcYGA1UdIwSBvjCBu4AUt+1vJ2X2
ho12PUDhdo2CsSHYXbahgZekgZQwgZExCzAJBgNVBAYTAkhLMQswCQYDVQQIEwJI
SzERMA8GA1UEBxMISG9uZ0tvbmcxEDAOBgNVBAoTB1B1cmVWUE4xCzAJBgNVBAsT
AklUMRAwDgYDVQQDEwdQdXJlVlBOMRAwDgYDVQQpEwdQdXJlVlBOMR8wHQYJKoZI
hvcNAQkBFhBtYWlsQGhvc3QuZG9tYWluggkA3KwF0UPpTagwDAYDVR0TBAUwAwEB
/zANBgkqhkiG9w0BAQUFAAOCAQEAAhLQQmkKWJdyGqgMSKOWXSKN2WXTDjIdb9bK
Q8uHeq0LYCcPoRh8VYJg2X4UWR/KO9pKaG+iZJw4Jqz4GQJjjJLKHfsWwj790ay0
7U5KT08qmxFaxZUYn663H9b0+Zud1spTsTJjVe1eoRk6IDbbB4OMUzN9zyWEn6er
xi6llIAjQX1qtlBQasmTAbRtbSsCsZAxL2kXysULIdLrQP0iTgMQqqkv5zvpdEKN
3ciKCd8OHEhHOlAwA0/DNy3dg3Et0F2hNMDJhqMpxXsbKtGJ/rzGXQF2geEVzLZA
o42I1wBOSZLTX1fO1gl3gAGS9aYg5o31rrpBKzQewitJgIuc+Q==
-----END CERTIFICATE-----

CLICK APPLY SETTINGS

Leave all settings not mentioned above as their default setting.

Verify a successful PureVPN connection

Navigate to Status > OpenVPN

  1. You should now see a CONNECTED SUCCESS message.
  2. Visit PureVPN’s website to verify your new IP address, virtual location, and status as Protected at the top of the page.

In some cases you may notice that the location is not showing the same location as the server you have input in your router settings; this is because geo tracking tools are often tricked by VPN connections. As long as you see an IP address that is not the same as your normal Internet IP address then you are indeed connected to PureVPN.

Back up your settings

Navigate to Administration > Backup

  1. Click the Backup button.
  2. A file named nvrambak.bin will be saved to your computer.
  3. You can load nvrambak.bin to restore your settings in the event of a reset.

How to change the PureVPN server

  1. Copy the new PureVPN server address from the above server list.
  2. Paste the server into the Server IP/Name field.
  3. Click Apply Settings.

TROUBLESHOOTING

Still having issues? Visit the VPN Troubleshooting section.

Troubleshoot Here

Wireless Repeater Setup

TeamFlashRouters · Apr 16, 2019 ·

If you need to extend your wireless and wired connection capabilities, you can setup a FlashRouter as a Wireless Repeater. In Wireless Repeater mode the FlashRouter connects to your main router via WiFi and then creates a completely separate network segment for you. This new “repeater” network then transmits your internet signal via FlashRouter LAN ports for wired internet access while also creating a new Wireless Extender network that will expand your wireless network range throughout your home or office just like a mesh network.

Preparing for Wireless Repeater Setup

Verify your wireless information

To connect your FlashRouter wirelessly to your existing wireless network you will need the Wireless Network Name (SSID) and Wireless Password of the existing wireless network that you will repeat. Verify and note this information.

We recommend using a 2.4GHz network to repeat as this network will have more range. Be sure to click Add under the 2.4GHz settings and not the 5GHz settings.

DD-WRT Router Setup for Wireless Repeater

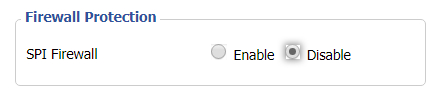
Disable Firewall

Navigate to Security > Firewall

Wireless Repeater Setup on DD-WRT FlashRouter - Disable SPI Firewall
  1. Set SPI Firewall to Disable.
  2. Click Save.

Enter Wireless settings

Navigate to Wireless > Basic Settings

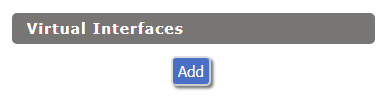
Select Add in the Virtual Interface area.

Wireless Repeater Setup on DD-WRT FlashRouter - Add Virtual Interface

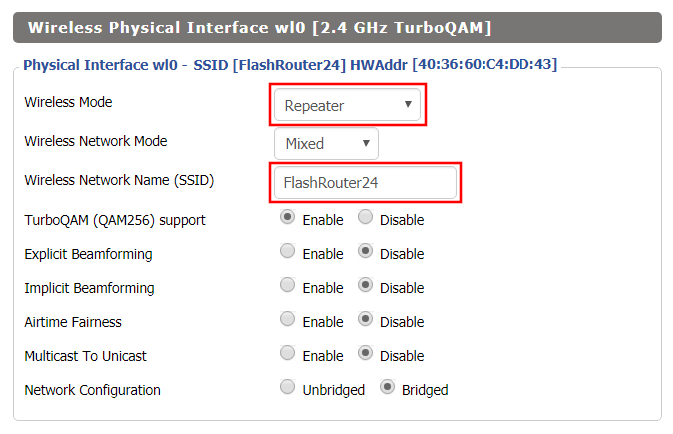
In the Wireless Physical Interface settings for the 2.4GHz network set the Wireless Mode to Repeater.

FlashRouters with a Broadcom chipset will have Repeater as an option in the dropdown but FlashRouters with an Atheroes chipset will not. Select Client or Client (Routed) if Repeater is not listed for your FlashRouter.

Change the Wireless Network Name (SSID) to match exactly with the Wireless Network Name of the network that you will repeat.

Wireless Repeater Setup on DD-WRT FlashRouter - Set Wireless Mode to Repeater

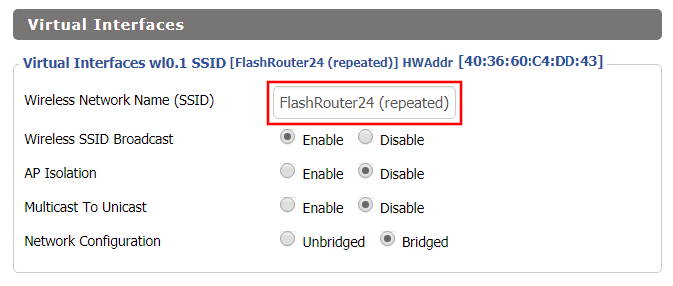
In the Virtual Interfaces settings change the Wireless Network Name (SSID) to FlashRouter24 or any other unique SSID.

Wireless Repeater Setup on DD-WRT FlashRouter - Set SSID for Repeated Band

CLICK SAVE

Enter Wireless Security settings

Navigate to Wireless > Wireless Security

Wireless Repeater Setup on DD-WRT FlashRouter - Set Wireless Password
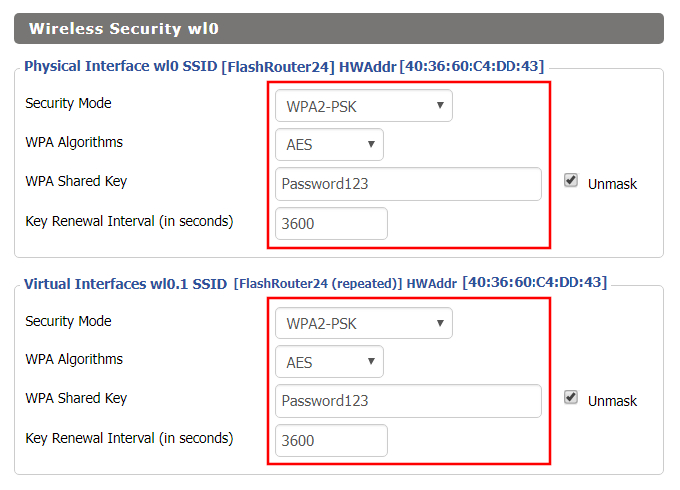
  1. Duplicate the wireless security settings that are set for the other bands for the newly created virtual interface.
  2. Change the WPA Shared Key to match exactly with the Wireless Password of the network that you will repeat.
  3. Click Apply Settings.

Verify the Internet Connection

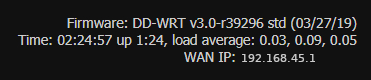
In the top right hand corner of the DD-WRT you should see the WAN IP change from 0.0.0.0 to an actual IP Address. Once this changes navigate to any website to test your Internet connection.

Wireless Repeater Setup on DD-WRT FlashRouter - Verify WAN Connection

Back up your settings

Navigate to the Administration > Backup page.

  1. Click the Backup button.
  2. A file named nvrambak.bin will be saved to your computer.
  3. You can load nvrambak.bin to restore your settings in the event of a reset.

TROUBLESHOOTING

Still having issues? Visit our Troubleshooting section to diagnose common problems here.

Troubleshoot Here

Flint/Slate GL.iNet Guest Network Setup

TeamFlashRouters · Apr 20, 2023 ·

Follow this guide to setup a Guest Network on your GL.iNet FlashRouter. Devices connected to the guest network will be on a separate subnet and will not have access to the router settings or be able to talk to devices on the main network.

1. Connect your computer, phone, or tablet to the GL.iNet router via wireless (FlashRouter24 / FlashRouter50) or via ethernet cable to one of the LAN ports on the router.

The FlashRouter WiFi password is printed on the sheet that came with the router and is set to Wireless#[First 5 characters of your router MAC]. The router MAC can be found on the bottom of your router if you cannot locate the sheet. For e.g. if your MAC is 1459C07E70A8 then your WiFi password is Wireless#1459C

Be sure to capitalize the W.

2. Once connected via wireless or ethernet on your device open your browser and go to 192.168.8.1

GL.iNet router access

3. Enter openwrt as the admin password to access the GL.iNet firmware settings.

GL.iNet admin password enter

4. Click Wireless.

GL.iNet Click Wireless

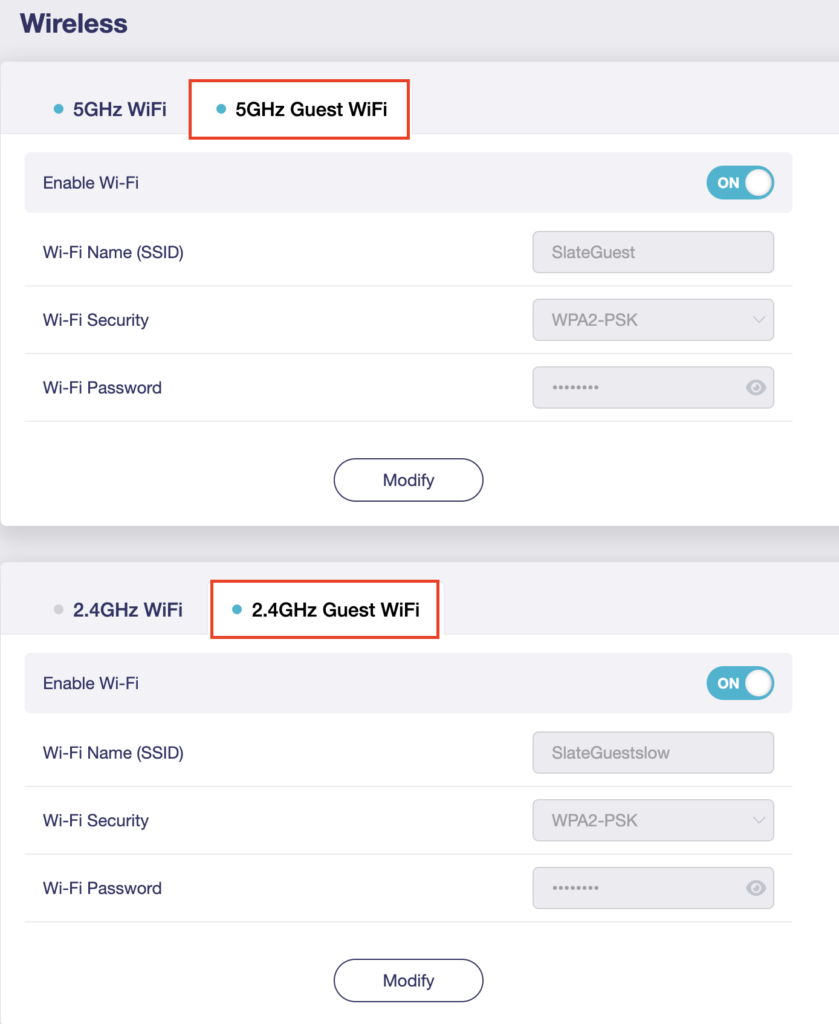
5. Click 5GHz Guest Wi-Fi or 2.4GHz Guest Wi-Fi.

GL.iNet Select Guest Wifi

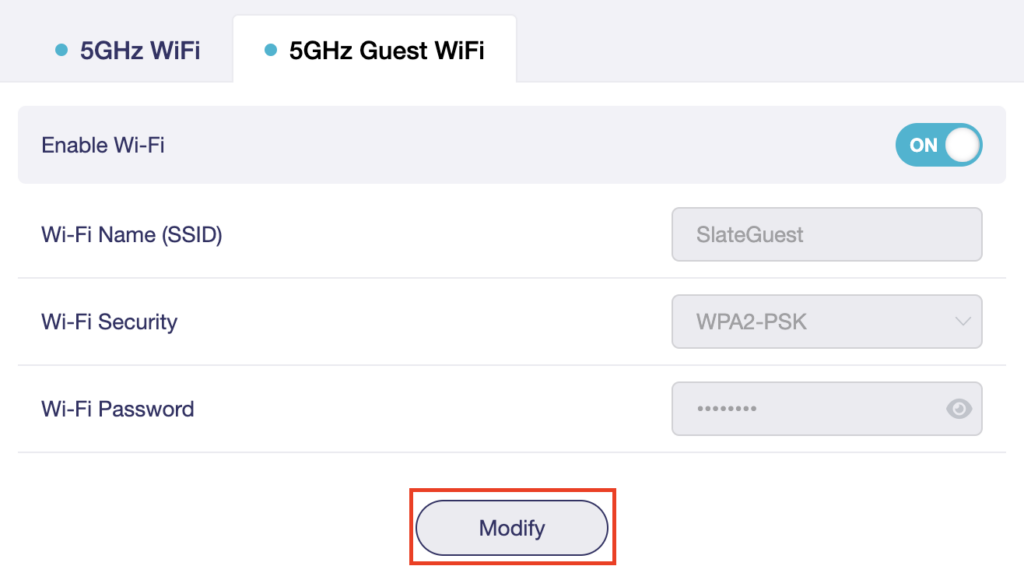
6. Click Modify.

GL.iNet Guest Modify

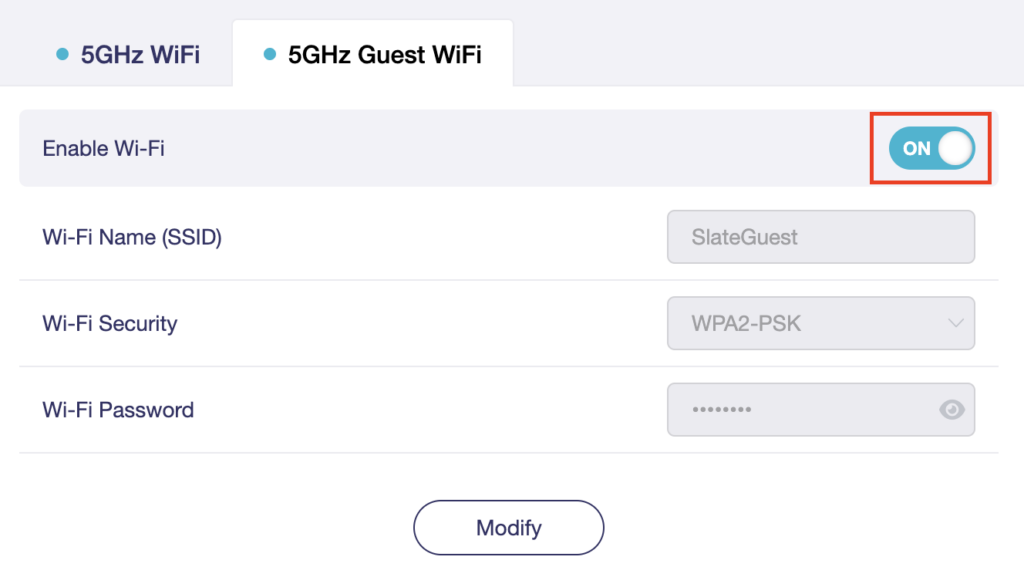
7. Set the Enable Wi-Fi toggle to the ON position.

GL.iNet Enable Guest Wifi

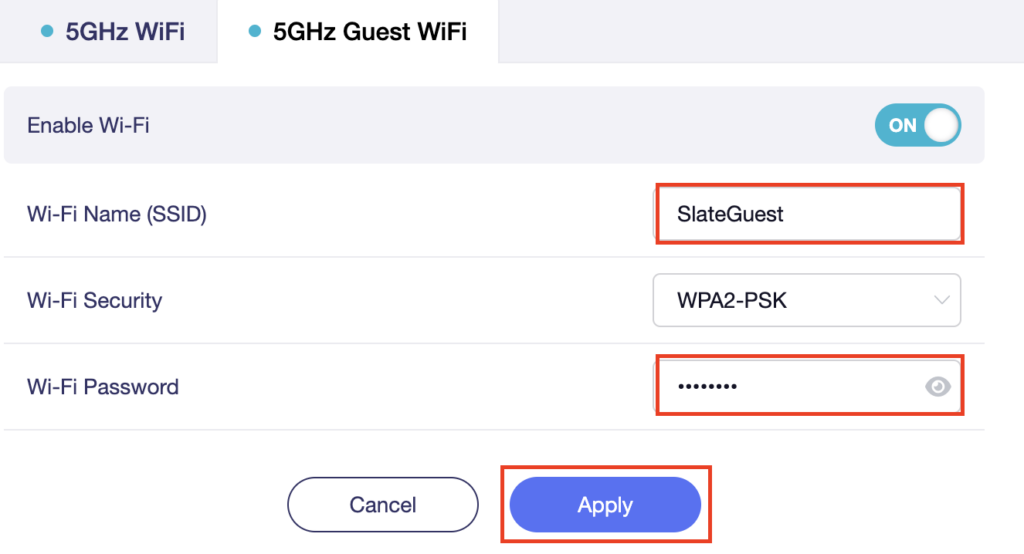
8. Change the Wi-Fi Name (SSID) and Wi-Fi Password fields to what you want to use. The SSID should be unique and NOT a duplicate of an existing network. Click Apply.

GL.iNet Guest change wifi name and pass

9. Connect your devices to the new guest wireless network.

TROUBLESHOOTING

Still having issues? Visit the VPN Troubleshooting section.

Troubleshoot Here

Access FlashRouter DD-WRT firmware settings

TeamFlashRouters · Mar 22, 2019 ·

You must be connected to the FlashRouter network via ethernet or WiFi connection on your device in order to be able to access the FlashRouter’s firmware settings.

Why do I need to access my FlashRouter's settings?

It is important to understand how to access your router if you want to:
  • Change WiFi or admin passwords
  • Switch VPN server locations
  • Attempt custom setups
  • Troubleshoot your network

Connect your device to the FlashRouter network

We recommend using a computer, tablet, or phone to access your FlashRouter firmware settings. You can connect your device to the FlashRouter via Ethernet Cable or Wireless connection.

Please note, you will NOT be able access the firmware settings unless you connect your device to the FlashRouter Network.

via Ethernet

Connect an Ethernet cable to your device’s Ethernet port.

Access FlashRouters DD-WRT Admin Settings via Ethernet Connection 1

Connect the other end of that Ethernet cable to a FlashRouter LAN/numbered port.

Access FlashRouters DD-WRT Admin Settings via Ethernet Connection 2

Be sure NOT to connect your device to the WAN/internet port of the FlashRouter. Please use the LAN/numbered ports to connect your devices.

via Wireless

Navigate to the available wireless networks in your device network settings and join any of the available FlashRouter networks – FlashRouter24, FlashRouter50, or FlashRouter80 (if you have a tri-band router).

Access the FlashRouter settings

We recommend using a Google Chrome or Mozilla Firefox incognito/private browsing window to access the FlashRouter firmware settings. You can access the main DD-WRT firmware GUI or you can go directly into the FlashRouters Privacy App settings to manage your basic router settings and VPN connection settings right away.

Please note, after accessing the FlashRouter Settings at the Local IP Address, you will be prompted to enter an admin username and password. You can find this information in the subsections below.

DD-WRT - Firmware GUI

Local IP Address: 192.168.11.1

Username: flashrouter

Password: ddwrt

Keep in mind that if you enable HTTPS and disable HTTP access you will need to add https:// in front of the Local IP Address to access your FlashRouter’s firmware settings.

If your router has been reset for any reason then you can access the router at a local IP address of 192.168.1.1.

Please note you will be required to set the administration username and password as well as your WiFi and VPN network settings after a reset.

TROUBLESHOOTING

Still having issues? Visit our Troubleshooting section to diagnose common problems here.

Troubleshoot Here

Why are devices disconnecting from Wireless?

Dave · Apr 29, 2019 ·

If you find that wireless devices are routinely disconnecting from the FlashRouter’s network we recommend that you do the following:

  1. On the Wireless > Wireless Security page make sure you are using WPA2 Personal / AES as your security settings.
  2. On the Wireless > Basic Settings adjust the Wireless Channel. Select a wireless channel with less interference. The best channel will depend on your wireless environment.

IVPN Manual OpenVPN Setup

TeamFlashRouters · Apr 16, 2019 ·

Preparing for Manual IVPN Setup

Verify your IVPN login information

If you are not already an IVPN user Sign Up Now.

Log in to your account on the IVPN website.

FlashRouter Privacy App - IVPN Login

Locate and Copy the Username displayed on the VPN Accounts page.

FlashRouters DD-WRT Privacy APP IVPN OpenVPN Specific Username and Password

IVPN Server Addresses

View a full list of IVPN servers.

United States

Atlanta:
us-ga.gw.ivpn.net

Dallas:
us-tx.gw.ivpn.net

Los Angeles
:
us-ca.gw.ivpn.net

Miami
:
us-fl.gw.ivpn.net

New Jersey
:
us-nj.gw.ivpn.net

Salt Lake City
:
us-ut.gw.ivpn.net

DD-WRT Router Setup for IVPN

Navigate to Services > VPN

Enter IVPN settings

OpenVPN Client

Start OpenVPN Client

If you wish to disable your VPN connection simply set this to Disable at any time and click Apply Settings.

Server IP/Name

Copy and paste the server you would like to connect to from the server list above. Be sure there are no extra spaces or characters.

If you wish to change PureVPN connection locations, THIS IS THE ONLY FIELD YOU NEED TO CHANGE.

Port

443 for TCP
2049 for UDP

Tunnel Device

TUN

Tunnel Protocol

TCP or UDP

Encryption cipher

AES-256-CBC

Hash Algorithm

SHA1

User Pass Authentication

Enable

Username

Enter the Username you noted from the Home page above.
eg. ivpn1234567

Password

Enter the Password you successfully logged in to your IVPN account with.

Advanced Options

Enable

TLS Cipher

None

LZO Compression

Adaptive

NAT

Enable

Firewall Protection

Enable

TLS Auth Key

-----BEGIN OpenVPN Static key V1-----
ac470c93ff9f5602a8aab37dee84a528
14d10f20490ad23c47d5d82120c1bf85
9e93d0696b455d4a1b8d55d40c2685c4
1ca1d0aef29a3efd27274c4ef09020a3
978fe45784b335da6df2d12db97bbb83
8416515f2a96f04715fd28949c6fe296
a925cfada3f8b8928ed7fc963c156327
2f5cf46e5e1d9c845d7703ca881497b7
e6564a9d1dea9358adffd435295479f4
7d5298fabf5359613ff5992cb57ff081
a04dfb81a26513a6b44a9b5490ad265f
8a02384832a59cc3e075ad545461060b
7bcab49bac815163cb80983dd51d5b1f
d76170ffd904d8291071e96efc3fb777
856c717b148d08a510f5687b8a8285dc
ffe737b98916dd15ef6235dee4266d3b
-----END OpenVPN Static key V1-----

Additional Config

tls-client
tls-cipher TLS-DHE-RSA-WITH-AES-256-CBC-SHA
resolv-retry infinite
keepalive 10 60
nobind
persist-key
persist-tun
persist-remote-ip
verb 3

Policy Based Routing

This field can be used for split VPN and Dual Gateway routing.

CA Cert

-----BEGIN CERTIFICATE-----
MIIGoDCCBIigAwIBAgIJAJjvUclXmxtnMA0GCSqGSIb3DQEBCwUAMIGMMQswCQYD
VQQGEwJDSDEPMA0GA1UECAwGWnVyaWNoMQ8wDQYDVQQHDAZadXJpY2gxETAPBgNV
BAoMCElWUE4ubmV0MQ0wCwYDVQQLDARJVlBOMRgwFgYDVQQDDA9JVlBOIFJvb3Qg
Q0EgdjIxHzAdBgkqhkiG9w0BCQEWEHN1cHBvcnRAaXZwbi5uZXQwHhcNMjAwMjI2
MTA1MjI5WhcNNDAwMjIxMTA1MjI5WjCBjDELMAkGA1UEBhMCQ0gxDzANBgNVBAgM
Blp1cmljaDEPMA0GA1UEBwwGWnVyaWNoMREwDwYDVQQKDAhJVlBOLm5ldDENMAsG
A1UECwwESVZQTjEYMBYGA1UEAwwPSVZQTiBSb290IENBIHYyMR8wHQYJKoZIhvcN
AQkBFhBzdXBwb3J0QGl2cG4ubmV0MIICIjANBgkqhkiG9w0BAQEFAAOCAg8AMIIC
CgKCAgEAxHVeaQN3nYCLnGoEg6cY44AExbQ3W6XGKYwC9vI+HJbb1o0tAv56ryvc
6eS6BdG5q9M8fHaHEE/jw9rtznioiXPwIEmqMqFPA9k1oRIQTGX73m+zHGtRpt9P
4tGYhkvbqnN0OGI0H+j9R6cwKi7KpWIoTVibtyI7uuwgzC2nvDzVkLi63uvnCKRX
cGy3VWC06uWFbqI9+QDrHHgdJA1F0wRfg0Iac7TE75yXItBMvNLbdZpge9SmplYW
FQ2rVPG+n75KepJ+KW7PYfTP4Mh3R8A7h3/WRm03o3spf2aYw71t44voZ6agvslv
wqGyczDytsLUny0U2zR7/mfEAyVbL8jqcWr2Df0m3TA0WxwdWvA51/RflVk9G96L
ncUkoxuBT56QSMtdjbMSqRgLfz1iPsglQEaCzUSqHfQExvONhXtNgy+Pr2+wGrEu
SlLMee7aUEMTFEX/vHPZanCrUVYf5Vs8vDOirZjQSHJfgZfwj3nL5VLtIq6ekDhS
AdrqCTILP3V2HbgdZGWPVQxl4YmQPKo0IJpse5Kb6TF2o0i90KhORcKg7qZA40sE
bYLEwqTM7VBs1FahTXsOPAoMa7xZWV1TnigF5pdVS1l51dy5S8L4ErHFEnAp242B
DuTClSLVnWDdofW0EZ0OkK7V9zKyVl75dlBgxMIS0y5MsK7IWicCAwEAAaOCAQEw
gf4wHQYDVR0OBBYEFHUDcMOMo35yg2A/v0uYfkDE11CXMIHBBgNVHSMEgbkwgbaA
FHUDcMOMo35yg2A/v0uYfkDE11CXoYGSpIGPMIGMMQswCQYDVQQGEwJDSDEPMA0G
A1UECAwGWnVyaWNoMQ8wDQYDVQQHDAZadXJpY2gxETAPBgNVBAoMCElWUE4ubmV0
MQ0wCwYDVQQLDARJVlBOMRgwFgYDVQQDDA9JVlBOIFJvb3QgQ0EgdjIxHzAdBgkq
hkiG9w0BCQEWEHN1cHBvcnRAaXZwbi5uZXSCCQCY71HJV5sbZzAMBgNVHRMEBTAD
AQH/MAsGA1UdDwQEAwIBBjANBgkqhkiG9w0BAQsFAAOCAgEAABAjRMJy+mXFLezA
Z8iUgxOjNtSqkCv1aU78K1XkYUzbwNNrSIVGKfP9cqOEiComXY6nniws7QEV2IWi
lcdPKm0x57recrr9TExGGOTVGB/WdmsFfn0g/HgmxNvXypzG3qulBk4qQTymICds
l9vIPb1l9FSjKw1KgUVuCPaYq7xiXbZ/kZdZX49xeKtoDBrXKKhXVYoWus/S+k2I
S8iCxvcp599y7LQJg5DOGlbaxFhsW4R+kfGOaegyhPvpaznguv02i7NLd99XqJhp
v2jTUF5F3T23Z4KkL/wTo4zxz09DKOlELrE4ai++ilCt/mXWECXNOSNXzgszpe6W
As0h9R++sH+AzJyhBfIGgPUTxHHHvxBVLj3k6VCgF7mRP2Y+rTWa6d8AGI2+Raey
V9DVVH9UeSoU0Hv2JHiZL6dRERnyg8dyzKeTCke8poLIjXF+gyvI+22/xsL8jcNH
i9Kji3Vpc3i0Mxzx3gu2N+PL71CwJilgqBgxj0firr3k8sFcWVSGos6RJ3IvFvTh
xYx0p255WrWM01fR9TktPYEfjDT9qpIJ8OrGlNOhWhYj+a45qibXDpaDdb/uBEmf
2sSXNifjSeUyqu6cKfZvMqB7pS3l/AhuAOTT80E4sXLEoDxkFD4C78swZ8wyWRKw
sWGIGABGAHwXEAoDiZ/jjFrEZT0=
-----END CERTIFICATE-----

CLICK APPLY SETTINGS

Leave all settings not mentioned above as their default setting.

Verify a successful IVPN connection

Navigate to Status > OpenVPN

  1. You should now see a CONNECTED SUCCESS message.
  2. Visit WhatIsMyIPAddress to verify your new IP address, virtual location, and status as Protected at the top of the page.

In some cases you may notice that the location is not showing the same location as the server you have input in your router settings; this is because geo tracking tools are often tricked by VPN connections. As long as you see an IP address that is not the same as your normal Internet IP address then you are indeed connected to IVPN.

Back up your settings

Navigate to Administration > Backup

  1. Click the Backup button.
  2. A file named nvrambak.bin will be saved to your computer.
  3. You can load nvrambak.bin to restore your settings in the event of a reset.

How to change the IVPN server

  1. Copy the new IVPN server address from the above server list.
  2. Paste the server into the Server IP/Name field.
  3. Click Apply Settings.

TROUBLESHOOTING

Still having issues? Visit the VPN Troubleshooting section.

Troubleshoot Here

Flint/Slate GL.iNet Repeater Setup

TeamFlashRouters · May 29, 2023 ·

If you want to connect your FlashRouter to the Internet via Wi-Fi instead of an ethernet cable you can setup a FlashRouter as a Wireless Repeater. In Wireless Repeater mode the FlashRouter connects to an available network via WiFi and then creates a completely separate network segment for you.

1. Connect your computer, phone, or tablet to the GL.iNet router via wireless (FlashRouter24 / FlashRouter50) or via ethernet cable to one of the LAN ports on the router.

The FlashRouter WiFi password is printed on the sheet that came with the router and is set to Wireless#[First 5 characters of your router MAC]. The router MAC can be found on the bottom of your router if you cannot locate the sheet. For e.g. if your MAC is 1459C07E70A8 then your WiFi password is Wireless#1459C

Be sure to capitalize the W.

2. Once connected via wireless or ethernet on your device open your browser and go to 192.168.8.1

GL.iNet router access

3. Enter openwrt as the admin password to access the GL.iNet firmware settings.

GL.iNet admin password enter

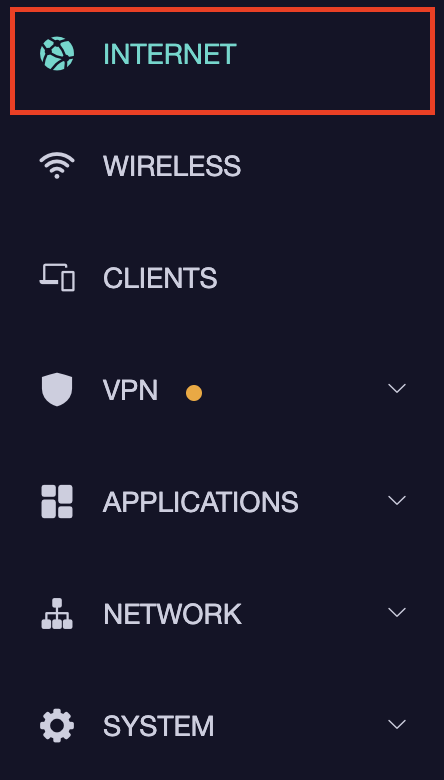
4. Select the Internet tab.

GL.iNet Internet tab

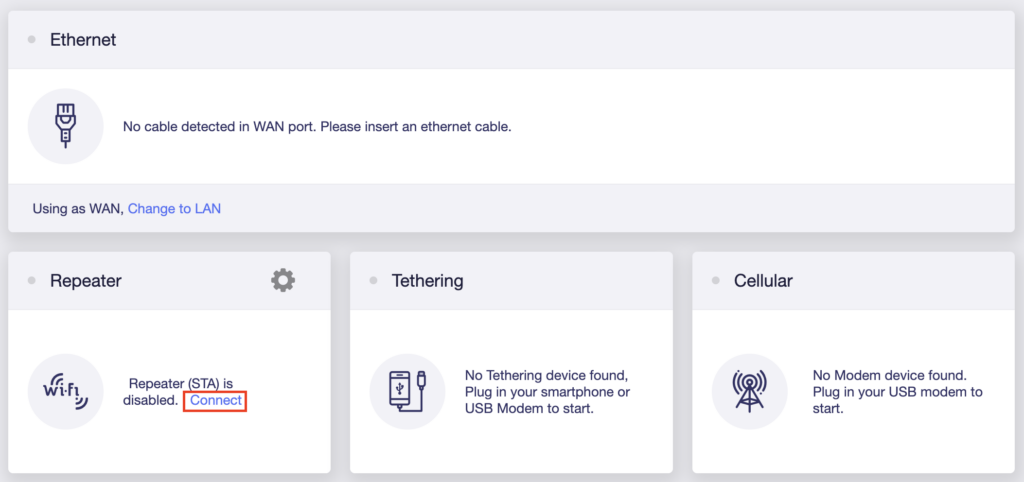
5. In the Repeater area select Connect.

GL.iNet Repeater Connect

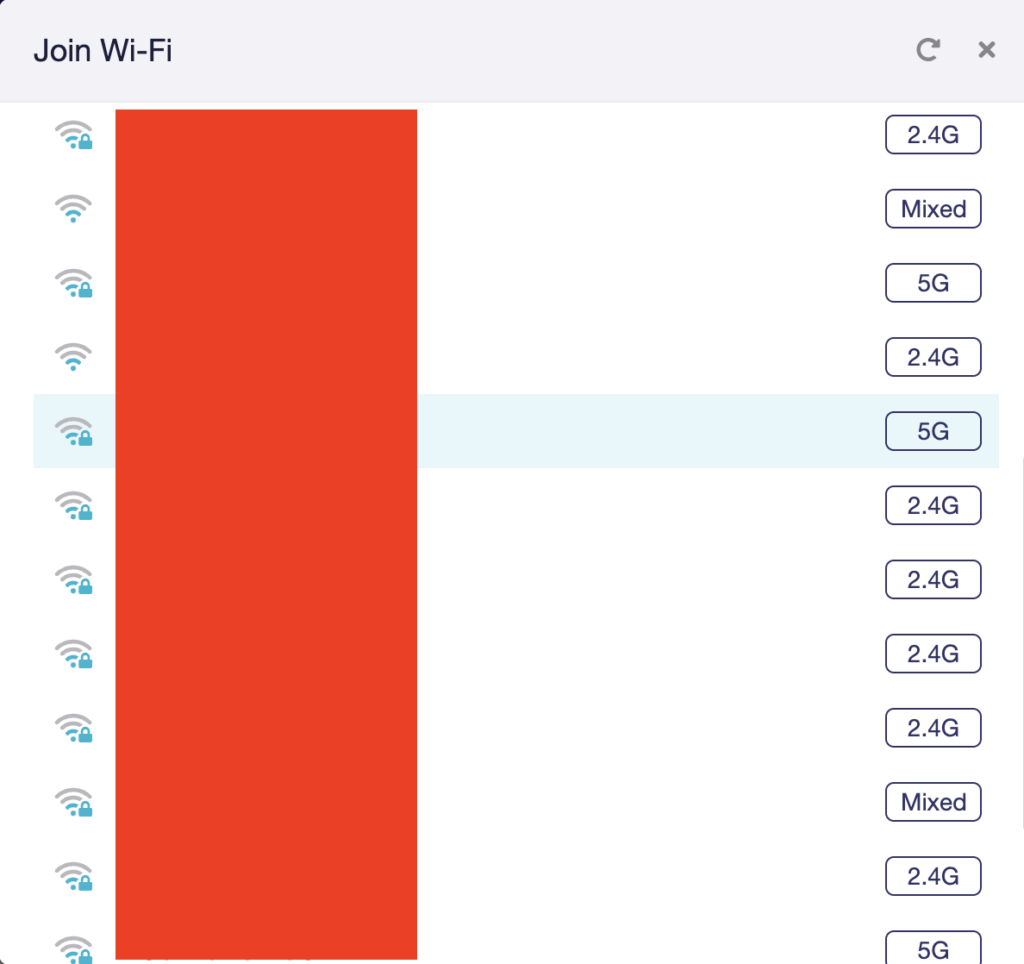
6. Select the available Wi-Fi network you want the FlashRouter to use for Internet from the list. You can use a 2.4GHz and/or 5GHz network to connect.

GL.iNet Repeater select Wi-Fi

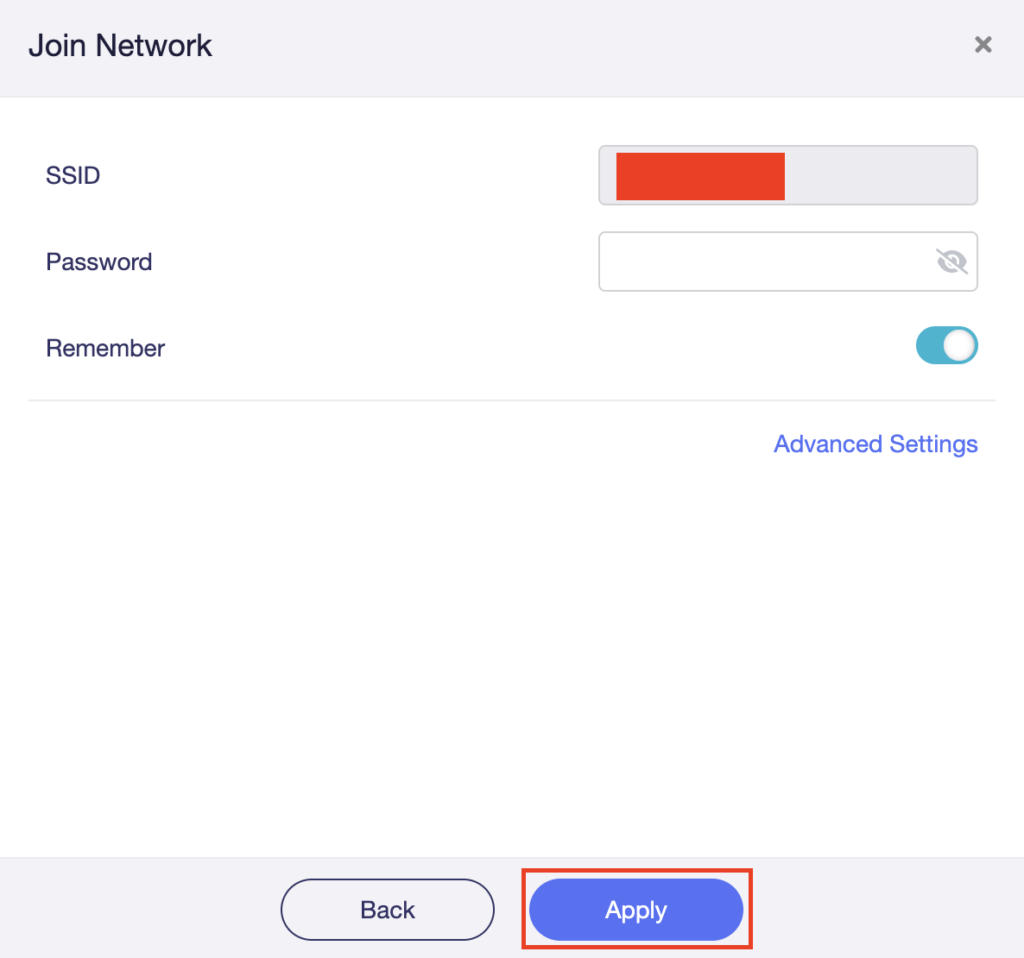
7. Enter the correct Wi-Fi password in the Password field for the network you selected. Then click Apply.

GL.iNet Repeater enter Wi-Fi password

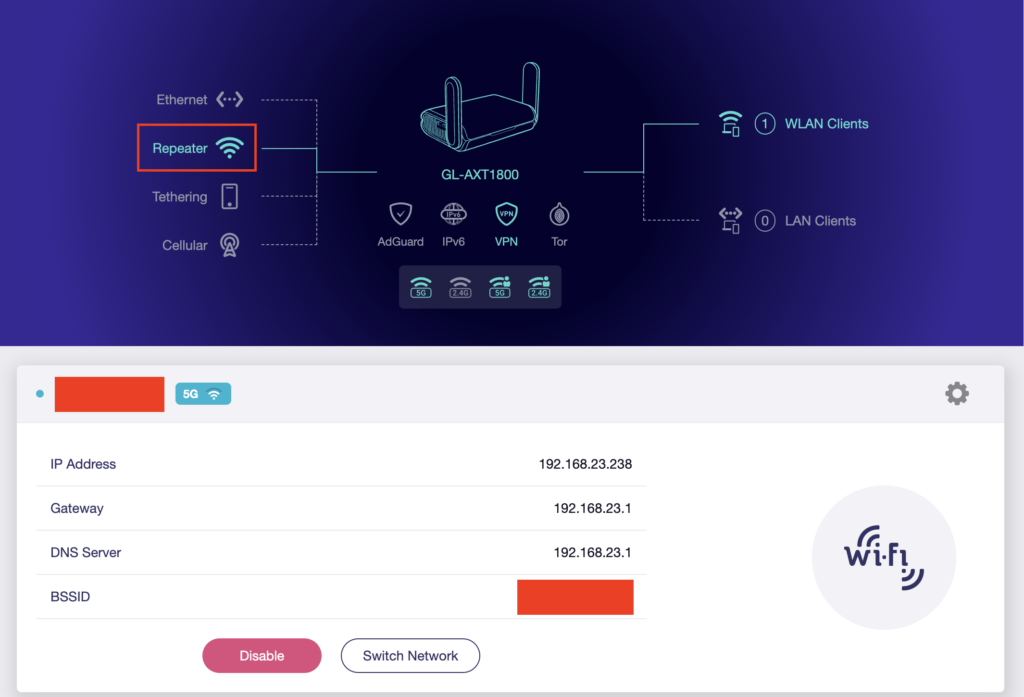
8. You are now setup with the GL.iNet FlashRouter receiving Internet via Wi-Fi. The Repeater area should now be filled in with the network information of the connection as shown below.

GL.iNet Repeater Setup complete

TROUBLESHOOTING

Still having issues? Visit the VPN Troubleshooting section.

Troubleshoot Here

ExpressVPN Setup on Roqos

Dave · Dec 16, 2021 ·

Preparing for ExpressVPN Setup

Obtain your ExpressVPN login information

If you are not already an ExpressVPN user Sign Up Now.

1. Visit ExpressVPN’s website login page.

ExpressVPN login page

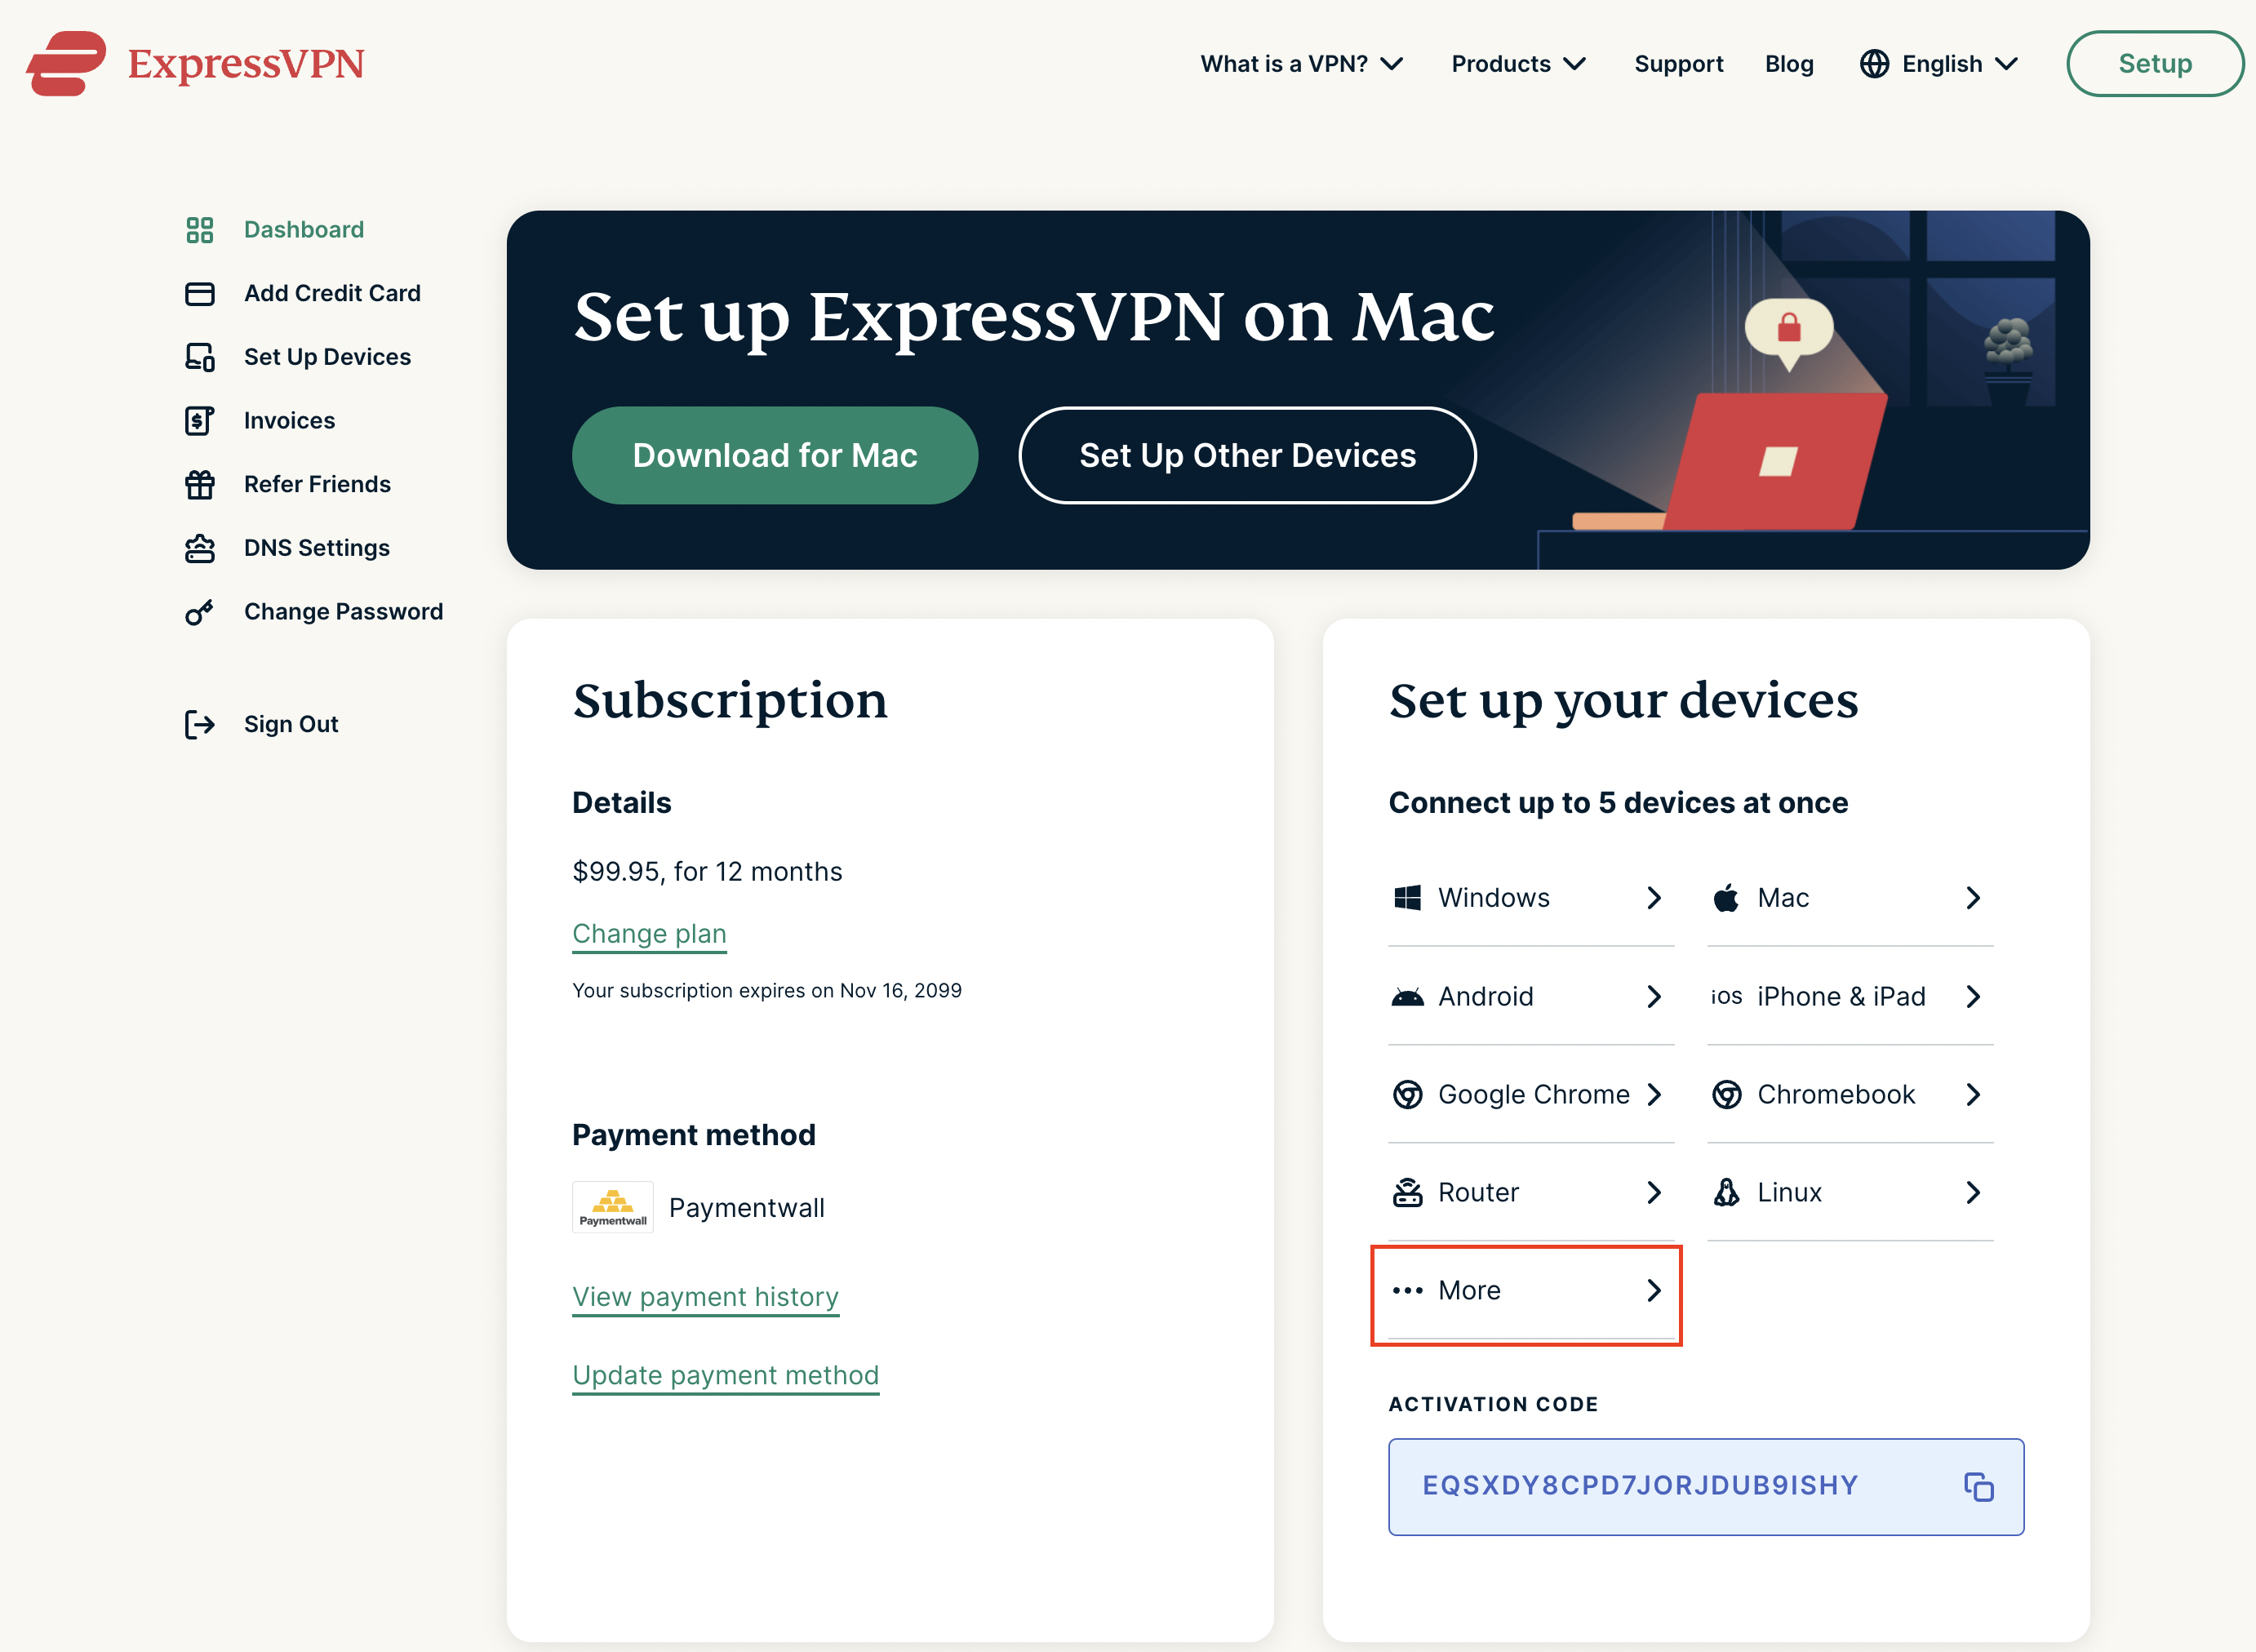
2. Successfully log in with your account information. Select More.

ExpressVPN account page

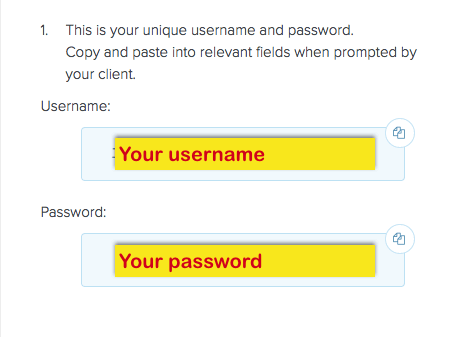
3. Select Manual Configuration and copy the Username and Password that are displayed on the right hand side of the screen.

ExpressVPN Manual Configuration
ExpressVPN username and password

Connecting to ExpressVPN in the Roqos Core

Access the Roqos Core UI

1. Login to the Roqos Core web app in a browser on any computer or smart device.

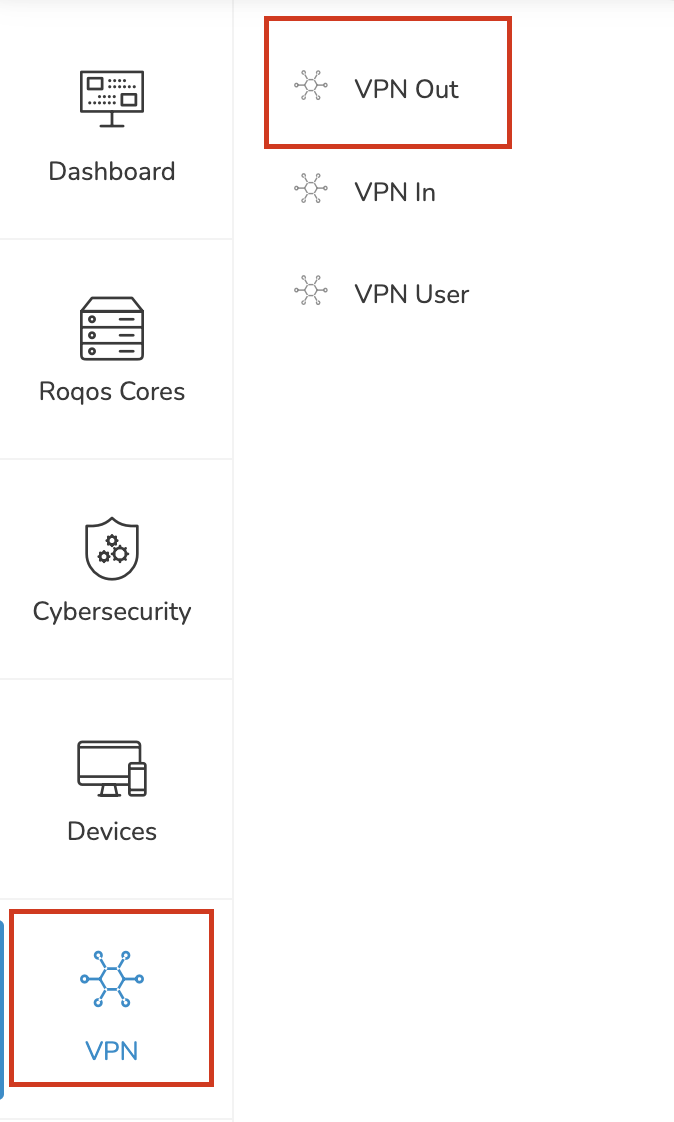
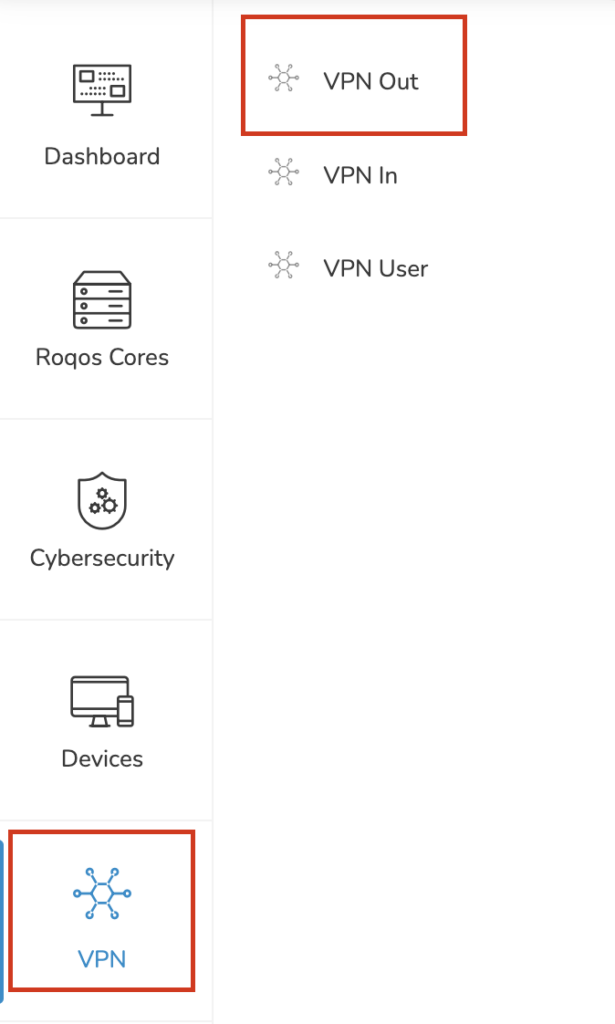
2. Click VPN from the navigation menu and then click VPN OUT.

Roqos VPN Out

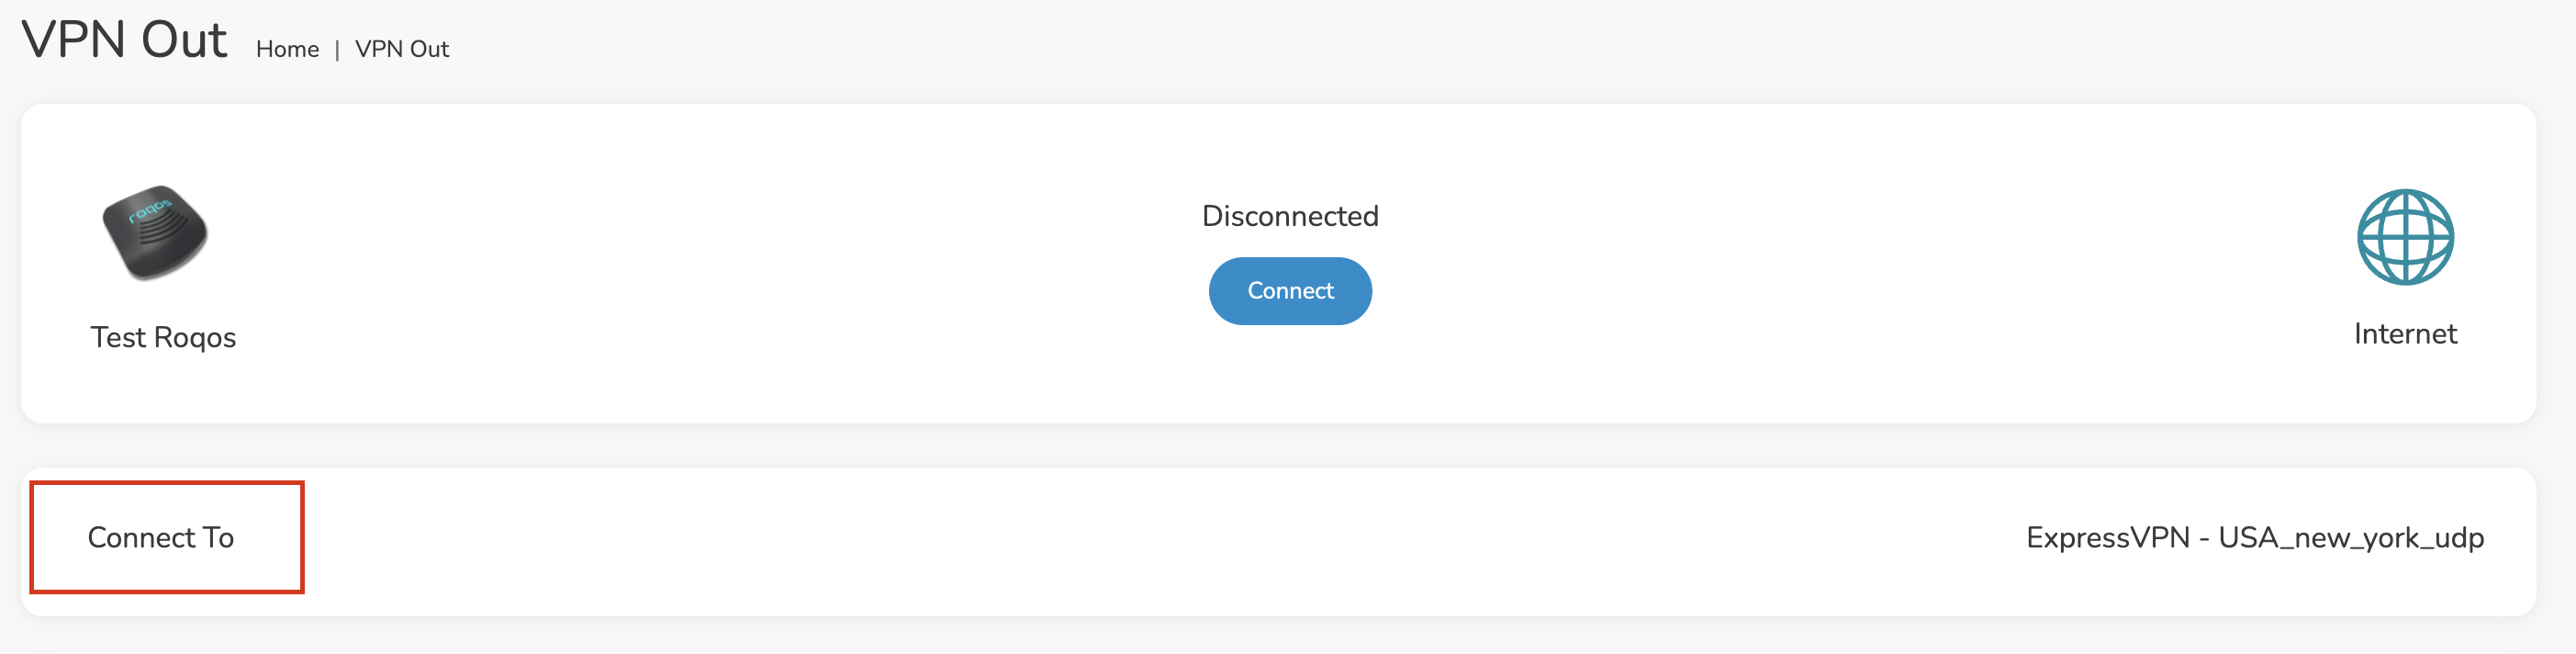
3. Click the Connect to box.

Roqos VPN Connect to

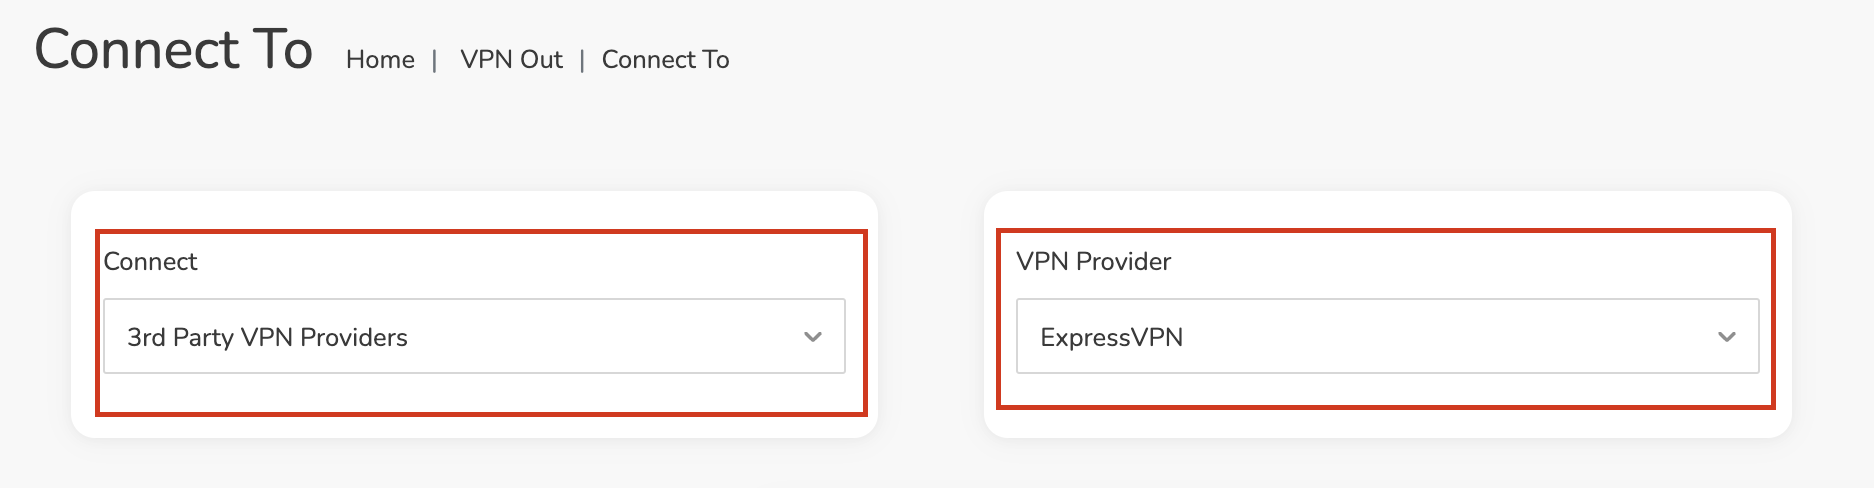
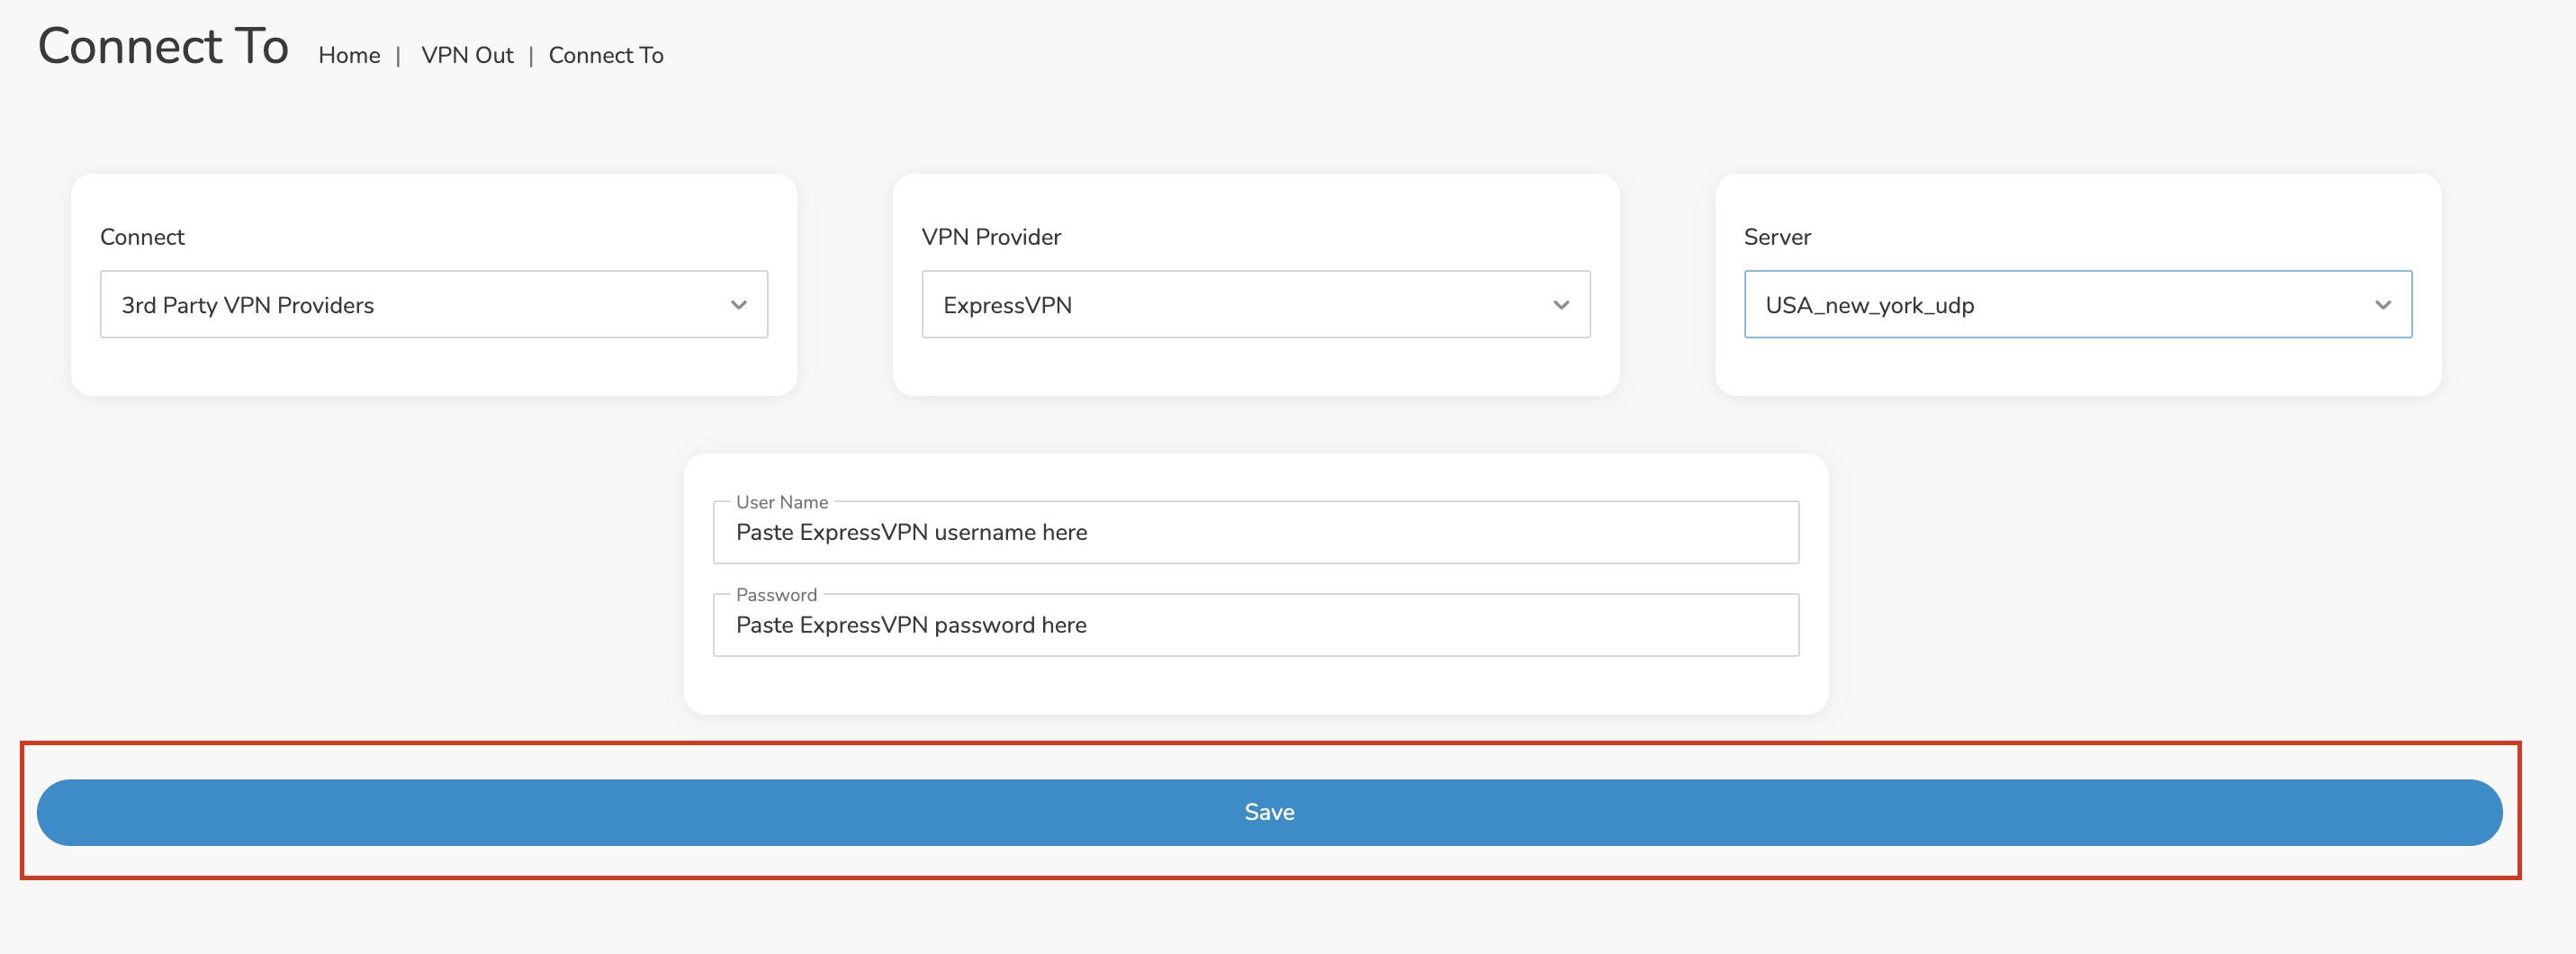
4. In the Connect dropdown choose 3rd Party VPN Providers and for the VPN Provider dropdown choose ExpressVPN.

Roqos ExpressVPN select provider

Enter your ExpressVPN information

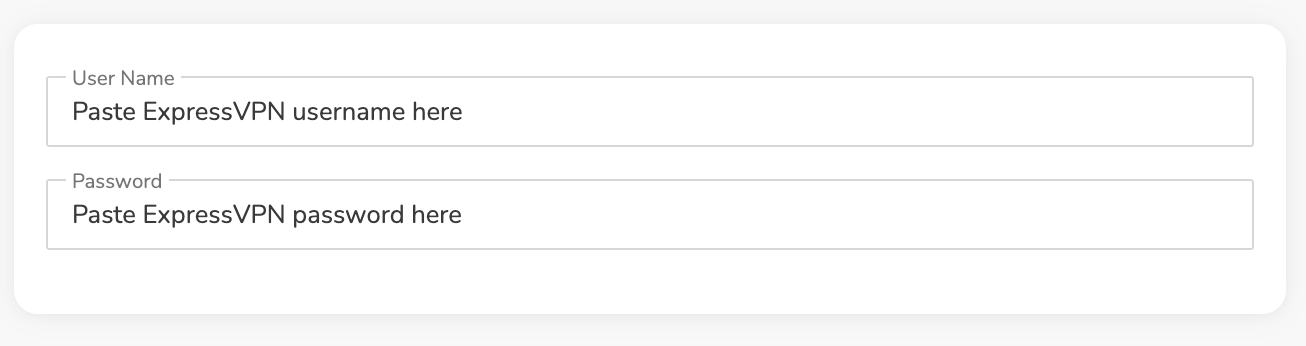
In the Username and Password field enter the ExpressVPN OpenVPN Username and Password that you obtained.

ExpressVPN on FlashRouters Privacy App Setup - OpenVPN Specific Username and Password
Roqos VPN ExpressVPN enter username and password

Select an ExpressVPN server

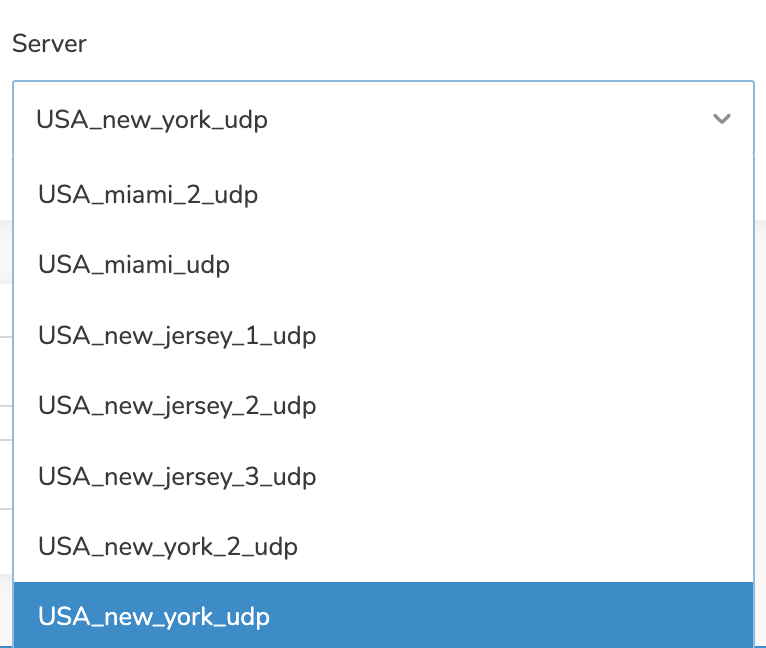
Click the Server dropdown and type in or scroll to your preferred server location.

Roqos VPN ExpressVPN select server

Click the Save button.

Roqos VPN Save Settings

Connect to ExpressVPN

Once you click Save you will be returned to the VPN OUT menu.

Click the Connect button to start your ExpressVPN connection. Please be patient as the router connects your entire network through VPN.

Roqos VPN Connect

Assign devices to connect to VPN

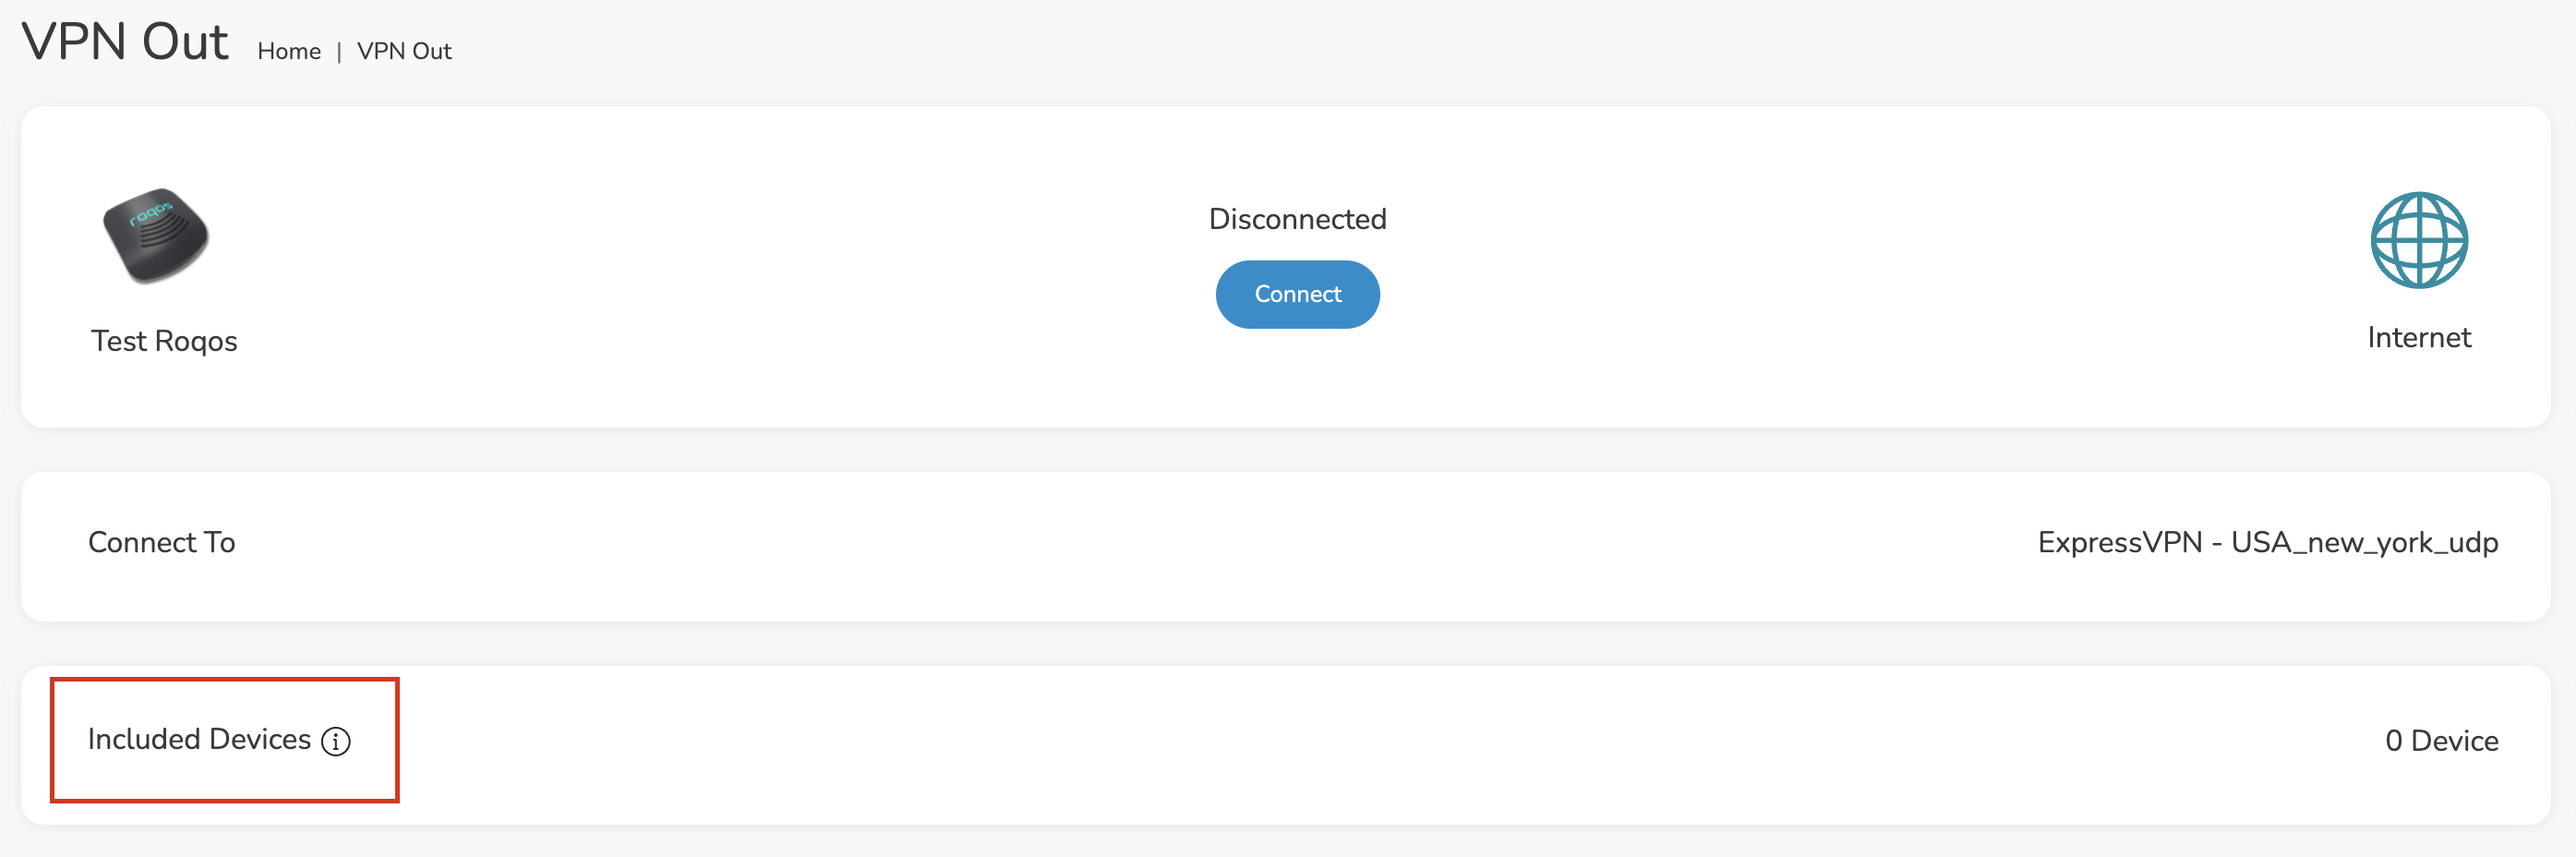
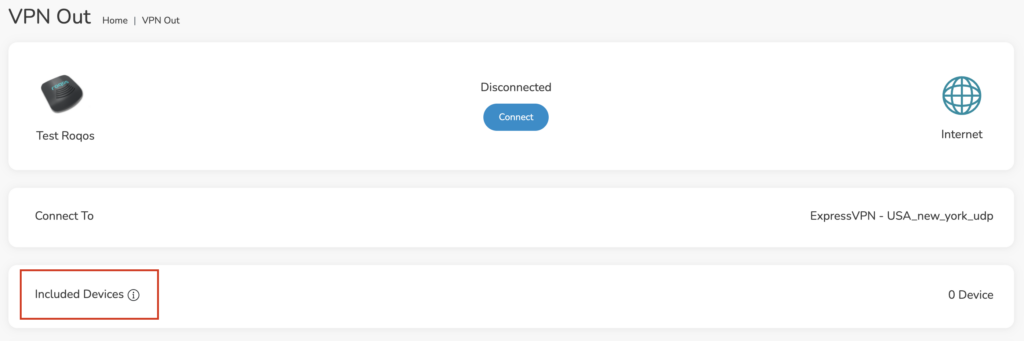
By default there are no devices assigned to the VPN tunnel. Click Included Devices. From this page you can choose if all devices should connect to ExpressVPN or only certain devices.

Roqos VPN Included Devices

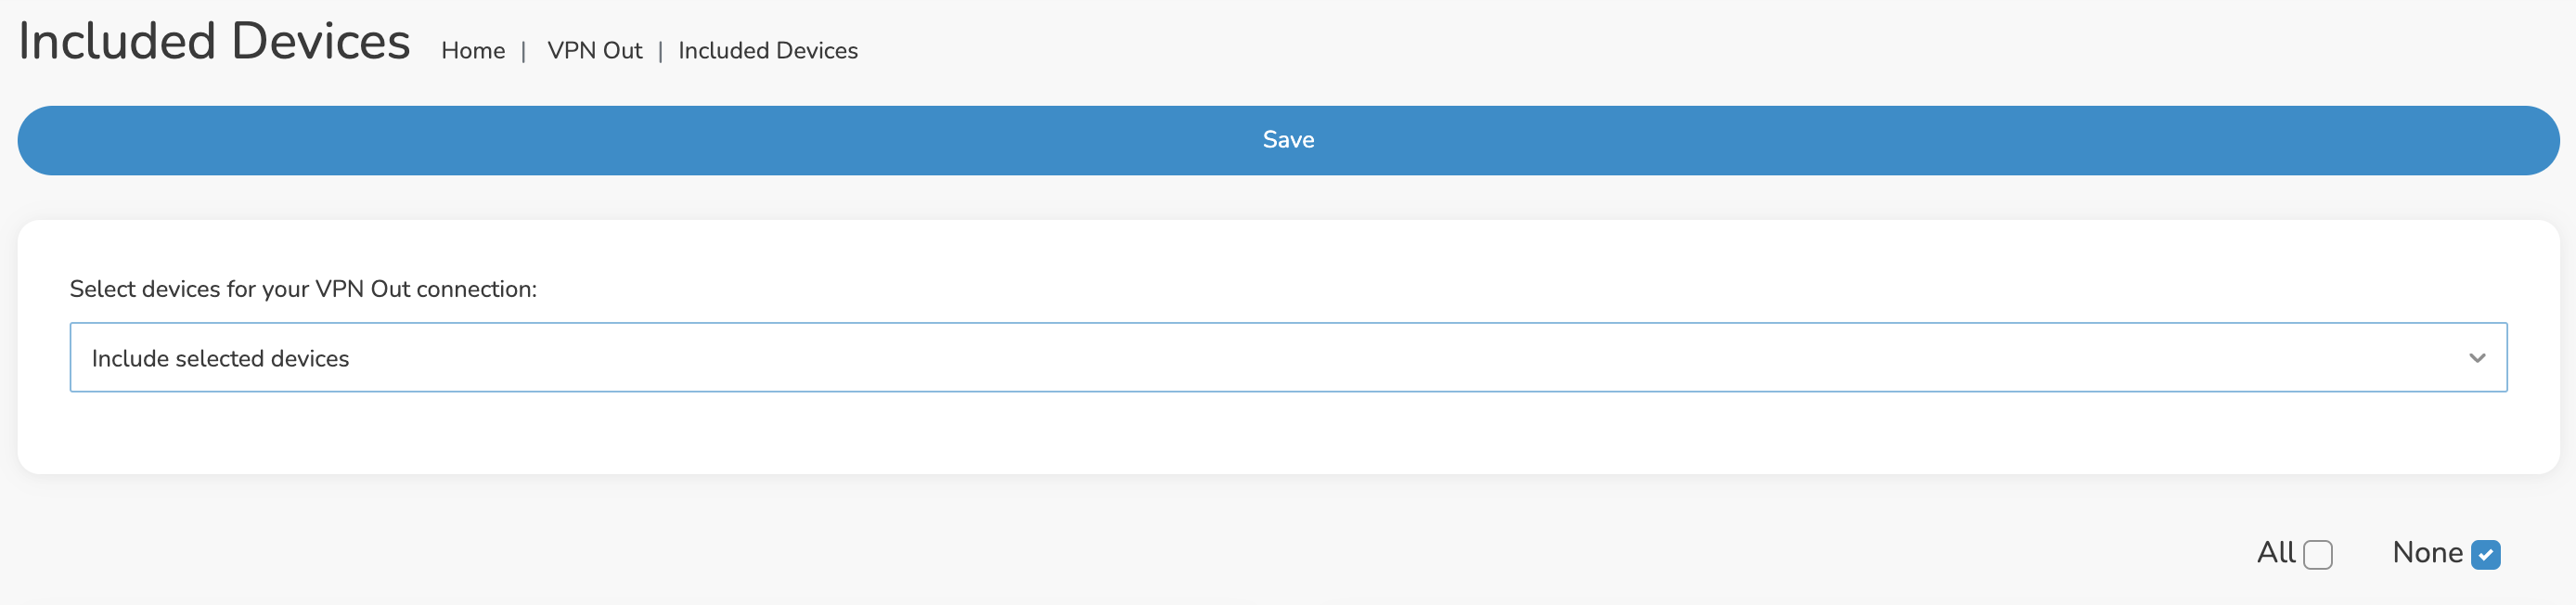
From the dropdown select Include all devices if you want every device that connects to the Roqos to connect to ExpressVPN. Then click Save.

Roqos VPN Include All Devices

If you only want specific devices to connect to ExpressVPN while others bypass the VPN connection select Include selected devices from the dropdown and then toggle the sliders for the devices you want connected to VPN. Click Save.

Roqos VPN Include Selected devices

Verify a successful ExpressVPN connection

Make sure you are connected to the Roqos network via WiFi or ethernet connection on your device.

Visit ExpressVPN’s IP Check to verify your new IP Address and virtual location.

You should see Connected at the top of the page underneath ExpressVPN.

Connect to a different ExpressVPN server

To change your server click Disconnect on the VPN OUT page then return to the Connect To section to select a new server from the Server dropdown and click Save. Now click Connect once again on the VPN Out page.

Disconnect from ExpressVPN

To disconnect from ExpressVPN click the Disconnect button.

TROUBLESHOOTING

Still having issues? Visit the FR Privacy App Troubleshooting section.

Troubleshoot Here

SmartDNSProxy SmartDNS Setup

TeamFlashRouters · Jun 13, 2019 ·

SmartDNSProxy offers a SmartDNS service for unblocking geo-restricted content without the encryption of a VPN service. SmartDNS routes DNS servers to different regions which “tricks” the website to allow access to previously restricted content.

SmartDNS does not change your IP Address or provide the encryption that a VPN connection does. This can result in faster speeds and unblocked content.

SmartDNS and VPN should not be configured at the same time. When using a SmartDNS connection, make sure to disable your VPN connection on the FlashRouter.

Register your IP Address

If you are not already a SmartDNSProxy user Sign Up Now.

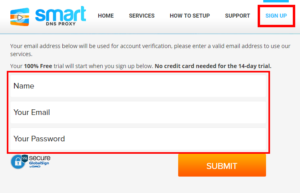
Click on Sign Up and fill in the requested information.

SmartDNSProxy SmartDNS Account Sign Up For DD-WRT FlashRouter

Access the e-mail you entered and Verify your new account.

SmartDNSProxy SmartDNS Activate DNS for DD-WRT FlashRouter

Your account will now be verified.

Activate SmartDNSProxy SmartDNS Service and Subscription

Login to SmartDNSProxy

SmartDNSProxy Server Location Addresses for FlashRouter DD-WRT Settings

Visit SmartDNSProxy’s DNS servers list and note the DNS servers of the location you would like to access content from.

Enter SmartDNSProxy SmartDNS servers on your FlashRouter

Navigate to Setup > Basic Setup

  1. Scroll down to Network Address Server Settings (DHCP).
  2. Enter in any combination of SmartDNSProxy SmartDNS servers you noted into Static DNS fields 1 and 2.
  3. Click Apply Settings at the bottom of the page.
  4. Reboot the FlashRouter.

Once the router is fully booted back up, you can access your desired regional content on any device that connects to the FlashRouter’s network.

NordVPN Asus AX1800S OpenVPN Setup

TeamFlashRouters · Feb 26, 2024 ·

Preparing for NordVPN Asus AX1800S Setup

Obtain your NordVPN manual Username and Password

If you are not already an NordVPN user Sign Up Now.

1. Log in to your account on the NordVPN website.

NordVPN login

2. Click NordVPN on the left hand side and then click Setup NordVPN manually.

NordVPN setup manually

3. Enter in the verification code that was sent to your email.

NordVPN verify code

4. Copy and paste your NordVPN manual username and password to a secure location. This is the username and password you will enter into the router settings to connect to NordVPN.

NordVPN credentials

Download your NordVPN .ovpn file

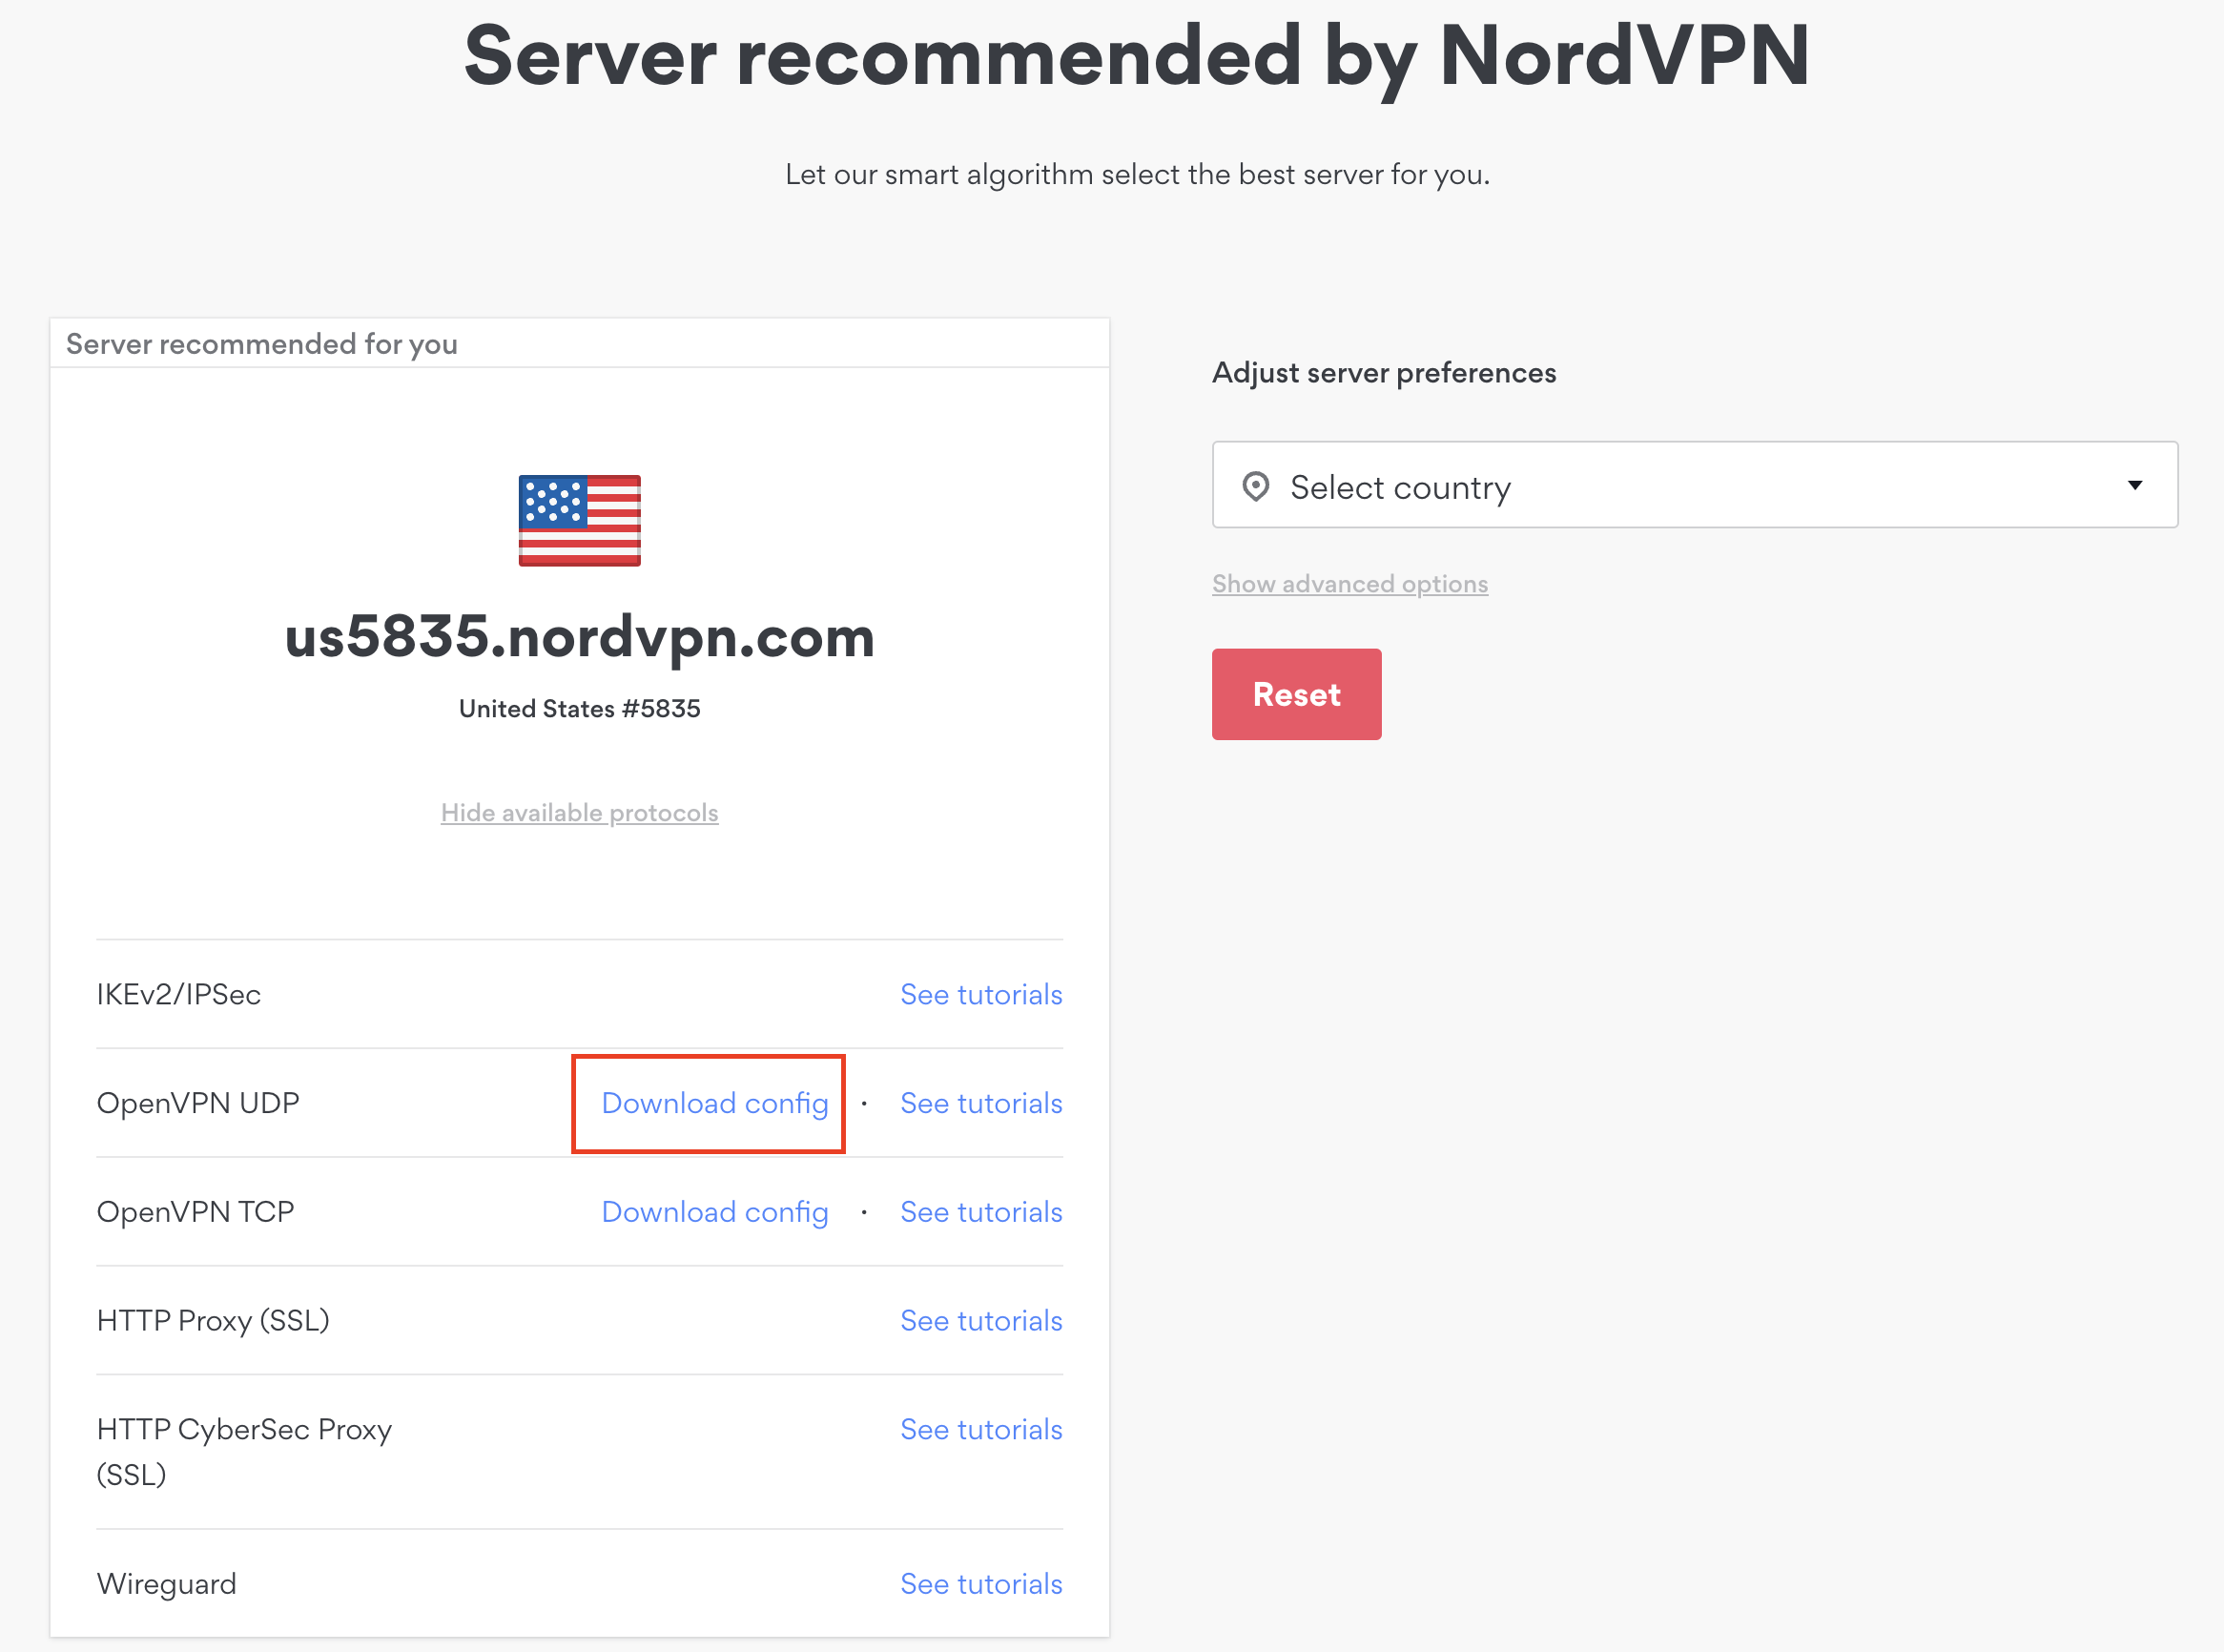
1. There are two options for obtaining the .ovpn file. The first and recommended is to navigate to NordVPN’s server recommendation page. Click Recommended Server to display the fastest server based on your actual location. You can adjust the country if you don’t want to connect to the recommended country.

Then click Show Available Protocols. Click Download Config next to OpenVPN UDP. This will download the .ovpn file to your computer for this server. Do not open this file.

NordVPN Recommended Server

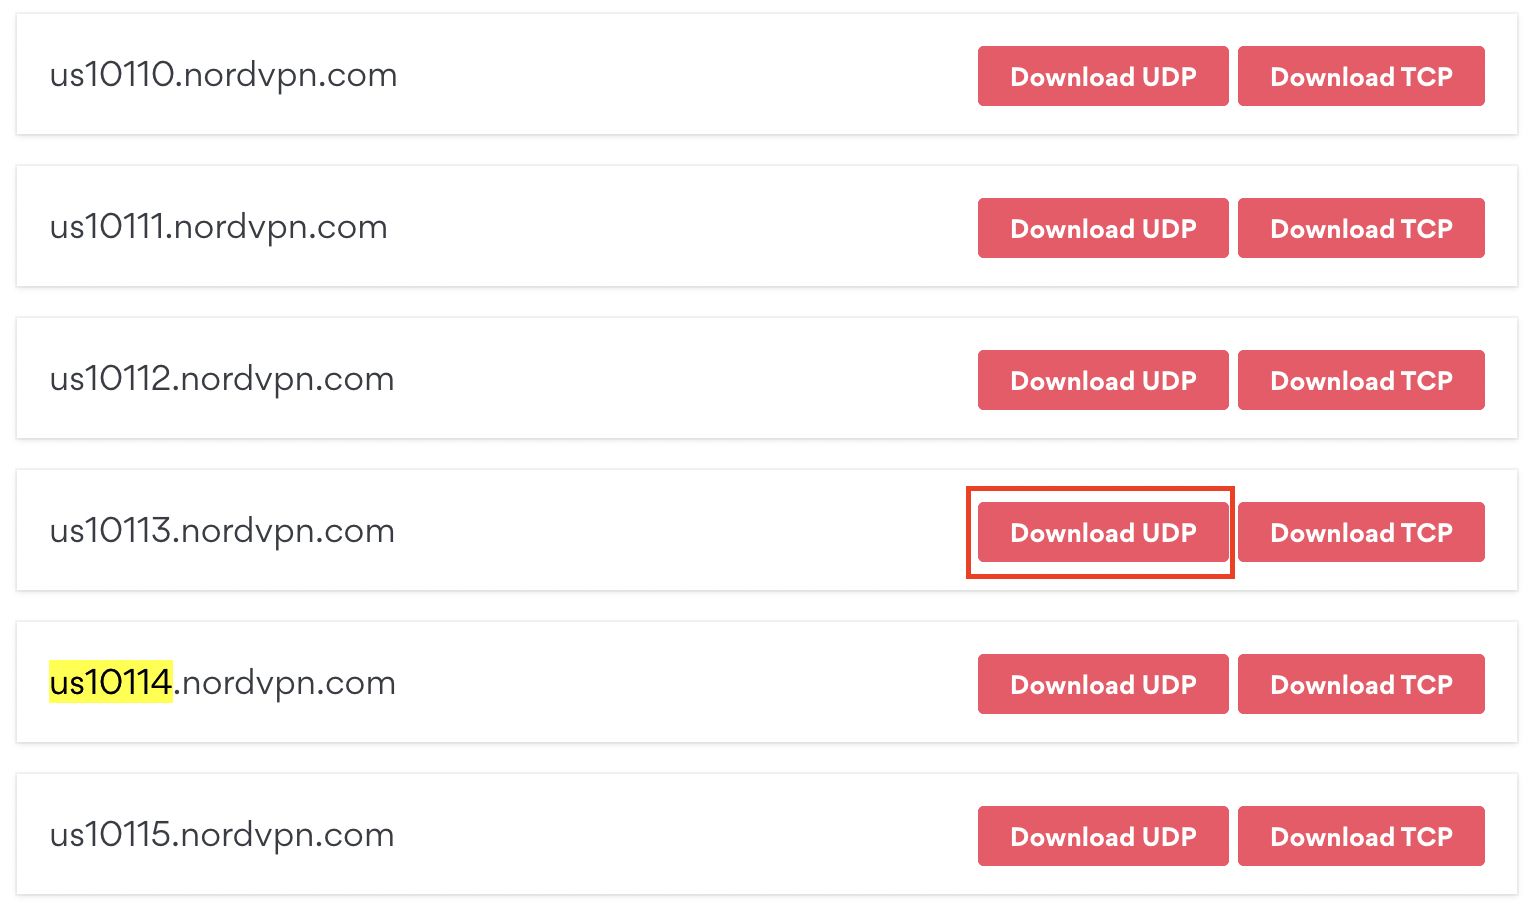
The second method to obtain a server is for connecting to a specific server number that you know you want to use. This applies to NordVPN Dedicated IP servers if you are signed up for that service. Go to NordVPN’s .ovpn file page. Then search for the server number that you want to use and click Download UDP.

NordVPN Download Specific Server

Asus AX1800S Router Setup for NordVPN

Login to Asus firmware settings in a browser on any computer or smart device connected to the FlashRouter’s network.

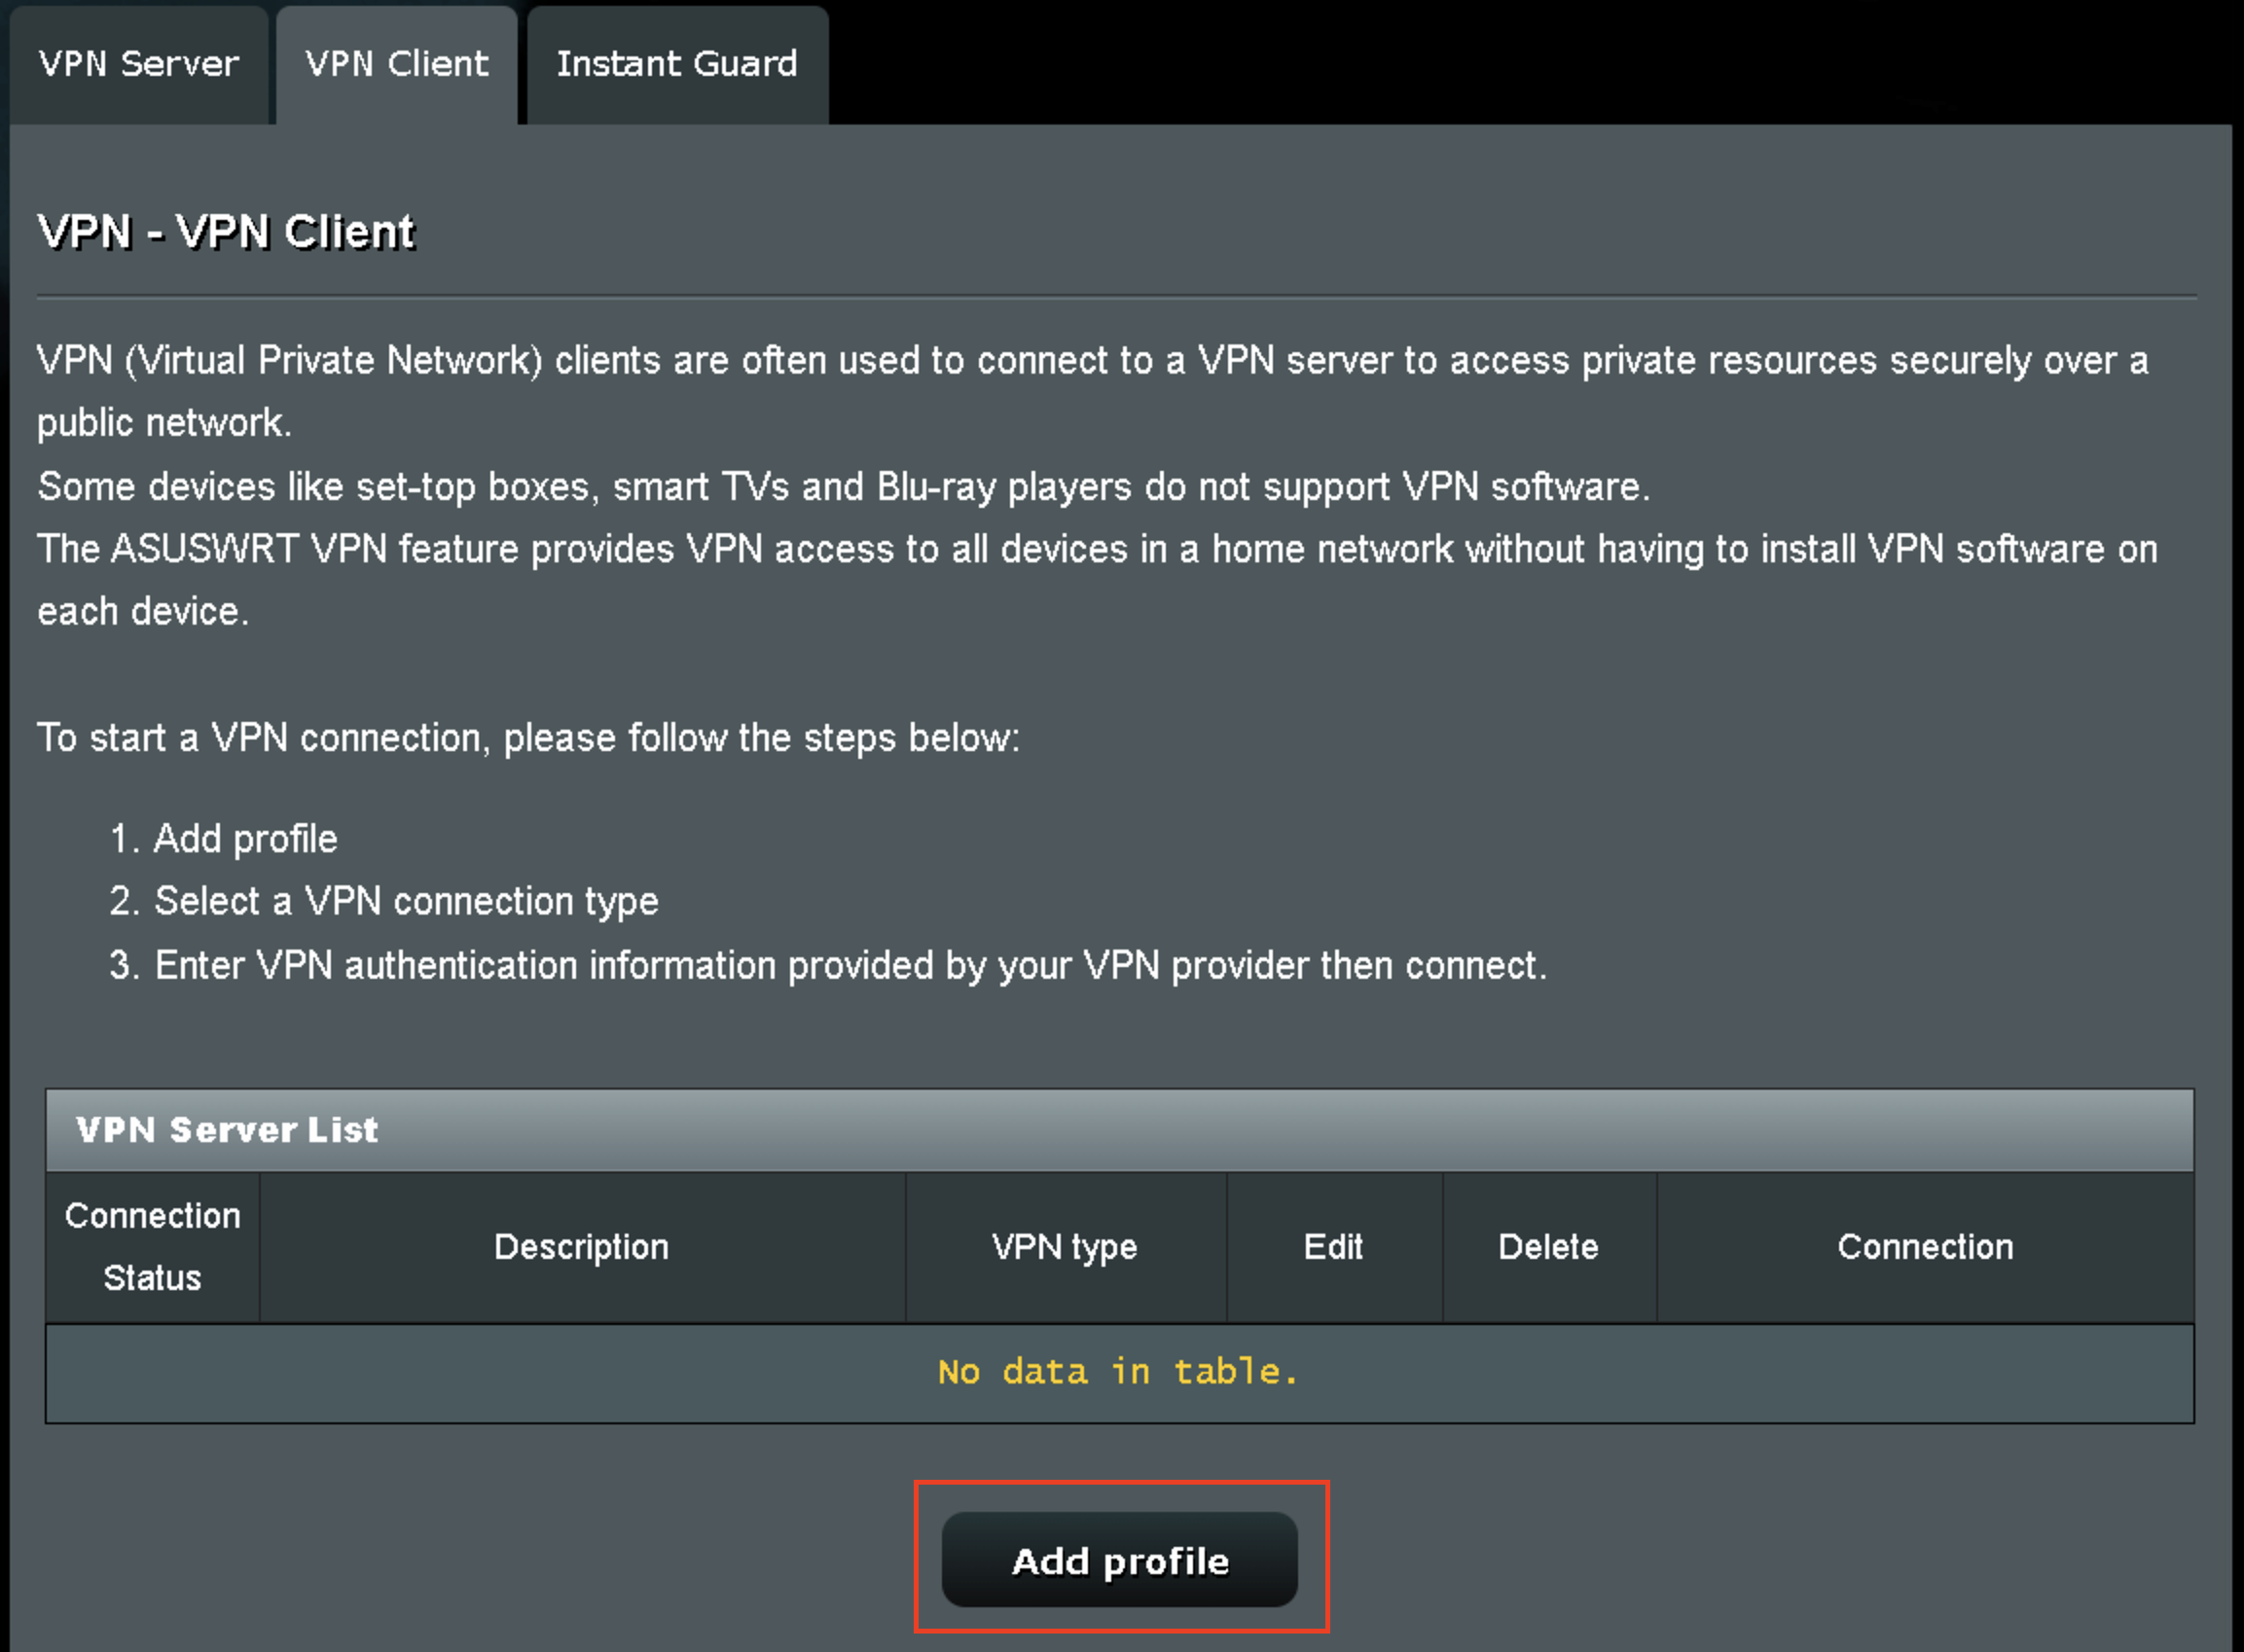
1. Navigate to the VPN tab.

Merlin VPN Tab

2. Navigate to the VPN Client tab.

Asus AX1800S VPN Settings

3. Click Add Profile.

Asus AX1800S VPN Settings

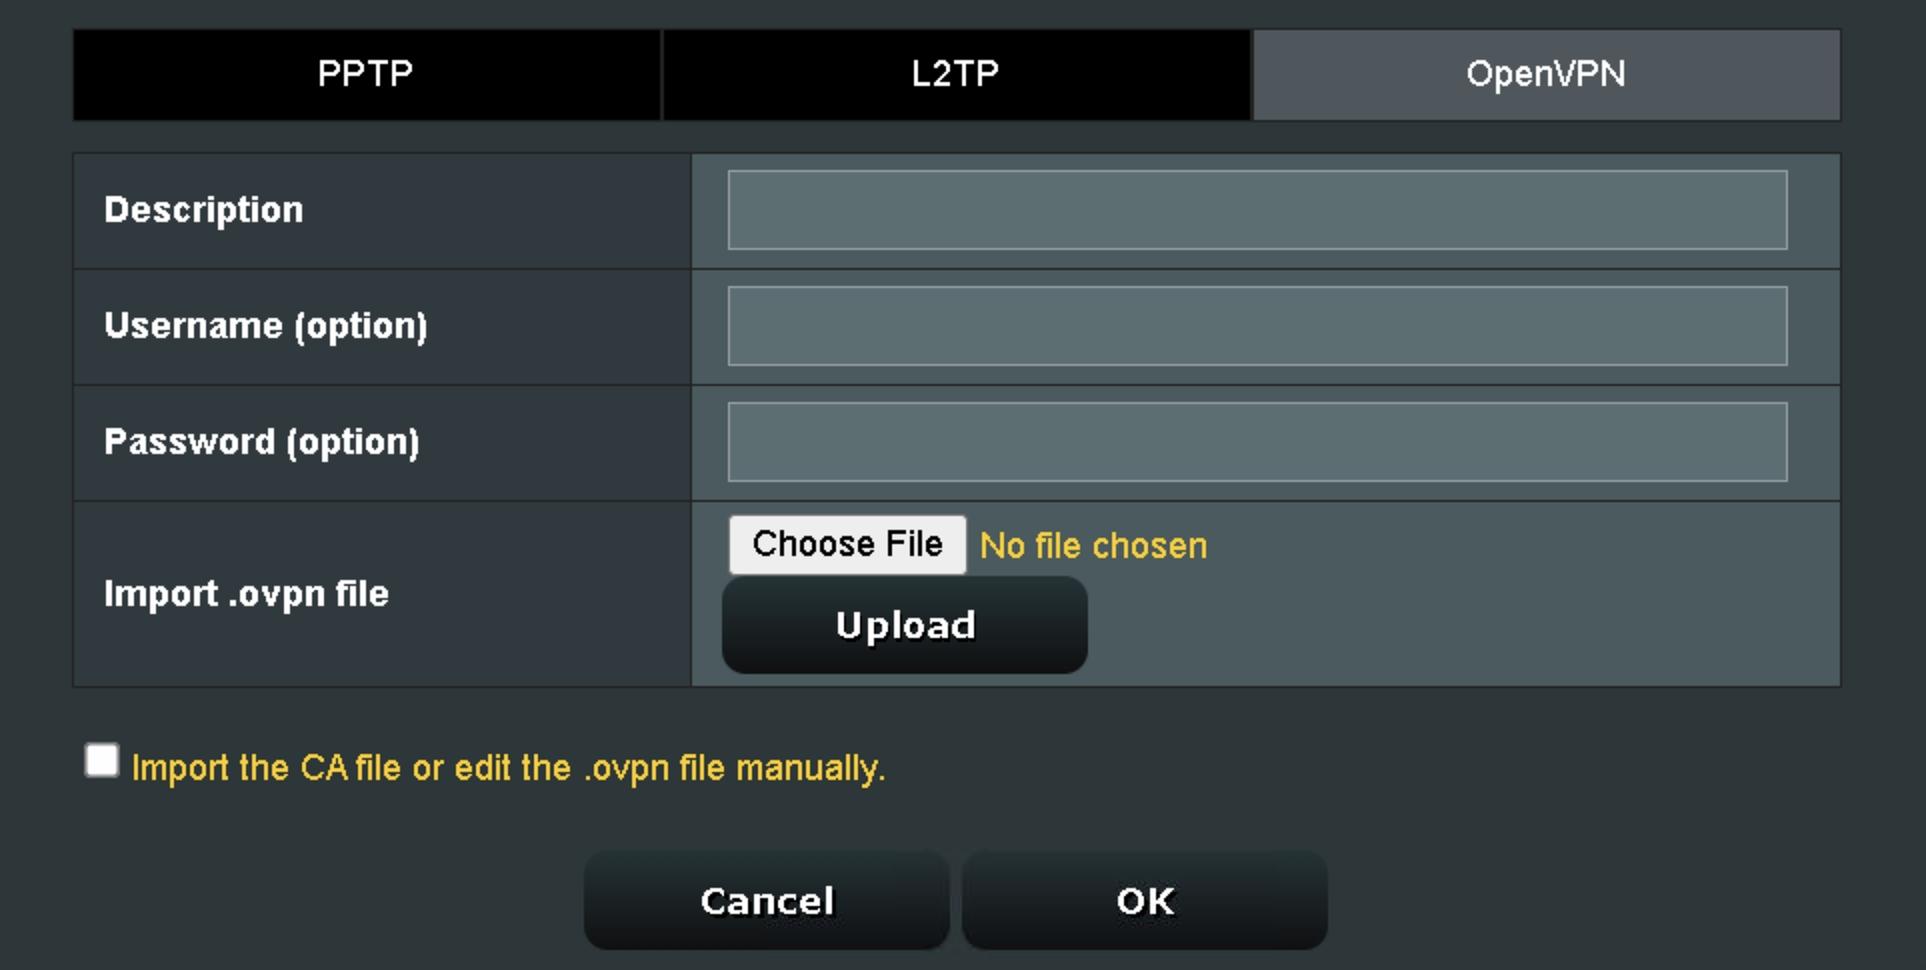
4. Click Choose file and select the .ovpn file you downloaded earlier. Then click Upload.

Asus AX1800S OpenVPN upload

5. In the Description field enter in the name you’d like to use for this OpenVPN Client profile. We typically advise entering in the location or server number here.

6. Enter your NordVPN username and password that you obtained earlier in the Username and Password. Note that these are different from your NordVPN email login and password. Click OK.

7. Click the Activate button.

Verify a successful NordVPN connection

  1. You should now see a check mark in the Connection Status area.
  2. Visit NordVPN’s IP Check to verify your new IP address and virtual location.

In some cases you may notice that the location is not showing the same location as the server you have input in your router settings; this is because geo tracking tools are often tricked by VPN connections. As long as you see an IP address that is not the same as your normal Internet IP address then you are indeed connected to NordVPN.

How to change the NordVPN server

  1. Follow the steps at the top of the page to obtain a new .ovpn file.
  2. Then proceed with the settings same as initial setup.
  3. Be sure to deactivate a previously active connection before activating the new one. You do not want to connect to two at the same time.

TROUBLESHOOTING

Still having issues? Visit the VPN Troubleshooting section.

Troubleshoot Here

ExpressVPN Asus AX1800S OpenVPN Setup

TeamFlashRouters · Feb 26, 2024 ·

Preparing for ExpressVPN Asus AX1800S Setup

Obtain your ExpressVPN OpenVPN Information

If you are not already an ExpressVPN user Sign Up Now.

1. Log in to your account on the ExpressVPN website.

ExpressVPN login page

2. Successfully log in with your account information. Select More.

3. Select Manual Configuration and copy the Username and Password that are displayed on the right hand side of the screen.

ExpressVPN Manual Configuration
ExpressVPN username and password

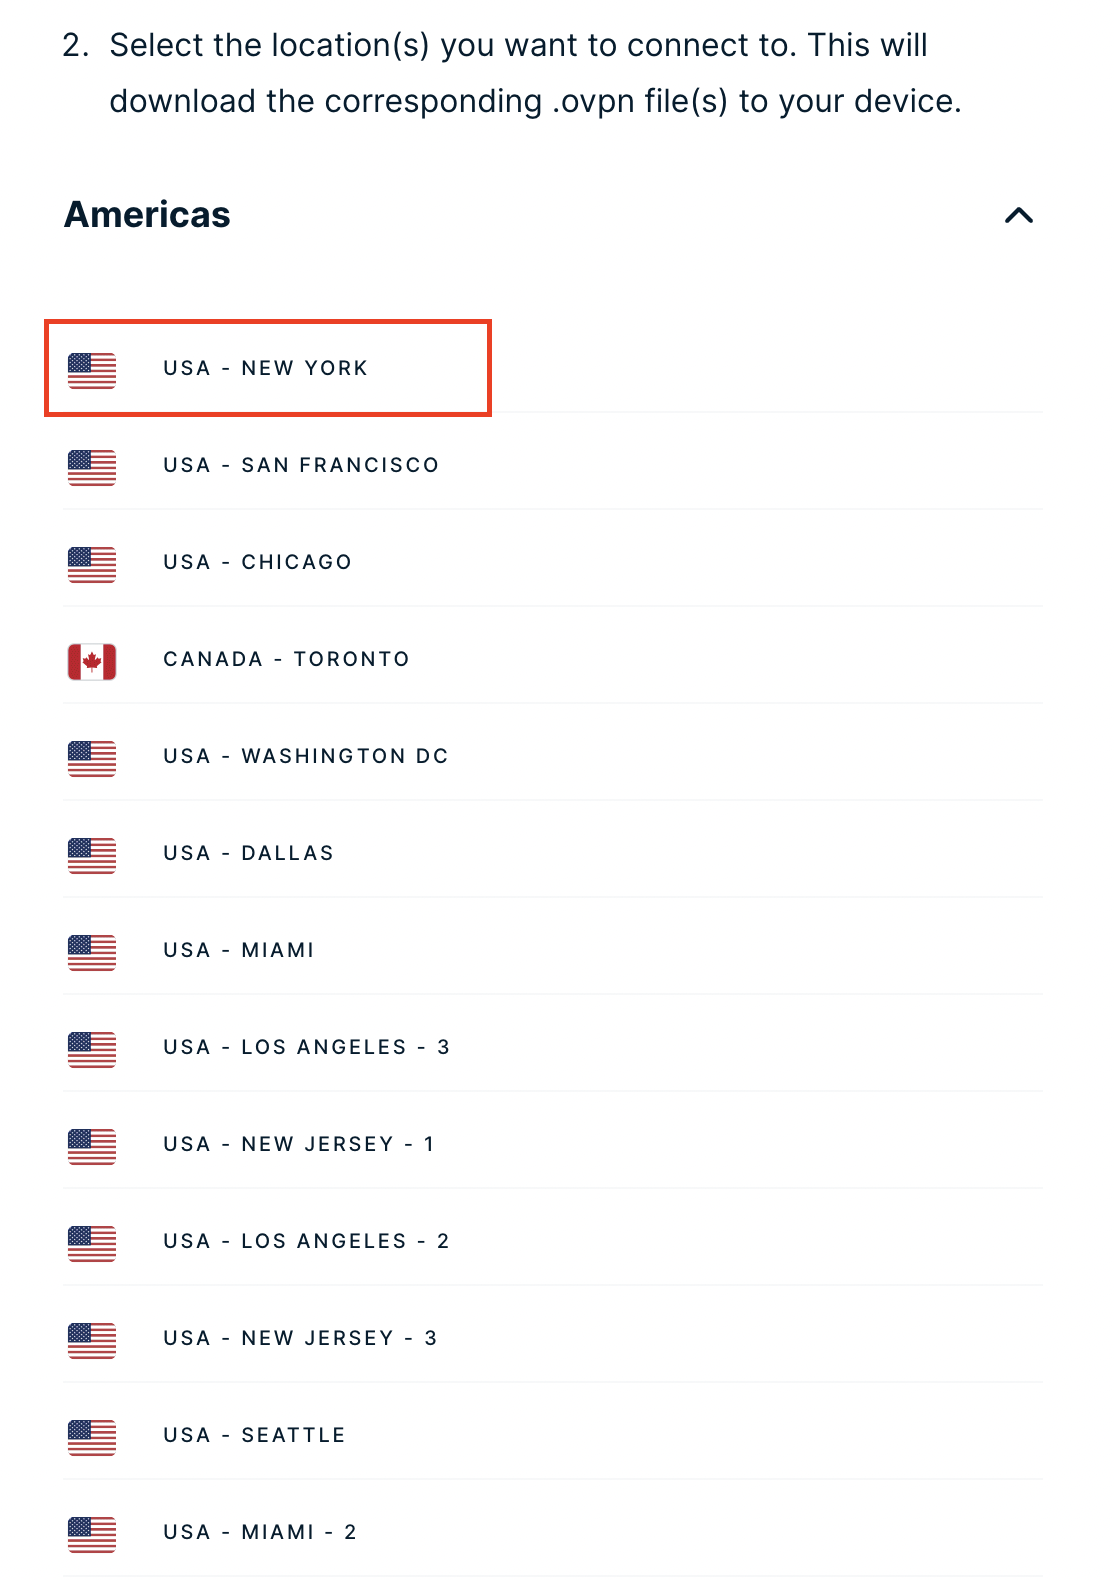
4. Click the Server Location that you want to connect to. This will download a .ovpn file to your computer that we will use later on. There is no need to open the file. For this example I have selected New York but feel free to select any server listed there.

ExpressVPN Download .ovpn file

Asus AX1800S Router Setup for ExpressVPN

Login to Asus firmware settings in a browser on any computer or smart device connected to the FlashRouter’s network.

1. Navigate to the VPN tab.

Merlin VPN Tab

2. Navigate to the VPN Client tab.

Asus AX1800S VPN Settings

3. Click Add Profile.

Asus AX1800S VPN Settings

4. Click Choose file and select the .ovpn file you downloaded earlier. Then click Upload.

Asus AX1800S OpenVPN upload

5. In the Description field enter in the name you’d like to use for this OpenVPN Client profile. We typically advise entering in the location or server number here.

6. Enter your ExpressVPN username and password that you obtained earlier in the Username and Password. Note that these are different from your ExpressVPN email login and password.

7. Click the Activate button.

Verify a successful ExpressVPN connection

  1. You should now see a check mark in the Connection Status area.
  2. Visit ExpressVPN’s IP Check to verify your new IP address and virtual location.

In some cases you may notice that the location is not showing the same location as the server you have input in your router settings; this is because geo tracking tools are often tricked by VPN connections. As long as you see an IP address that is not the same as your normal Internet IP address then you are indeed connected to ExpressVPN.

How to change the ExpressVPN server

  1. Follow the steps at the top of the page to obtain a new .ovpn file.
  2. Then proceed with the settings same as initial setup.
  3. Be sure to deactivate a previously active connection before activating the new one. You do not want to connect to two at the same time.

TROUBLESHOOTING

Still having issues? Visit the VPN Troubleshooting section.

Troubleshoot Here

Why are streaming services blocked while connected to VPN?

TeamFlashRouters · Jun 4, 2019 ·

Streaming services and VPN

Most popular streaming services such as Netflix, Hulu, and Amazon Prime block incoming VPN connections. This does not mean the VPN is not working, it simply means they have recognized you are connecting to a VPN server and filtered that server from being able to stream.

Below are several options for you to follow if you encounter this issue while connected to a VPN on your FlashRouter.

VPN provider server recommendation

Contact your VPN provider for a server recommendation that is not blocked by popular streaming services. Be sure to mention that you are connecting to VPN via a router instead of the computer client. If your VPN provider does not have a helpful suggestion or server recommendation please try the below options or contact us for a solution.

Bypass VPN by device

The FlashRouters Privacy App has a VPN bypass by device feature that can be used on devices dedicated to streaming.

Use SmartDNS

If access to streaming services not in your region is a higher priority for you then VPN encryption we recommend using a SmartDNS service on your FlashRouter to access the content you desire.

ExpressVPN MediaStreamer SmartDNS Setup

TeamFlashRouters · Jun 13, 2019 ·

ExpressVPN offers a SmartDNS service known as MediaStreamer for unblocking geo-restricted content without the encryption of a VPN service. SmartDNS routes DNS servers to different regions which “tricks” the website to allow access to previously restricted content.

SmartDNS does not change your IP Address or provide the encryption that a VPN connection does. This can result in faster speeds and unblocked content.

SmartDNS and VPN should not both be configured at the same time. When using a SmartDNS connection make sure to disable your VPN connection on the FlashRouter.

Login to ExpressVPN

If you are not already a ExpressVPN user Sign Up Now.

Visit ExpressVPN website login page and successfully login.

Register your IP with ExpressVPN

Navigate to the DNS Settings tab on top right of the ExpressVPN Dashboard.

ExpressVPN MediaStreamer DNS Settings

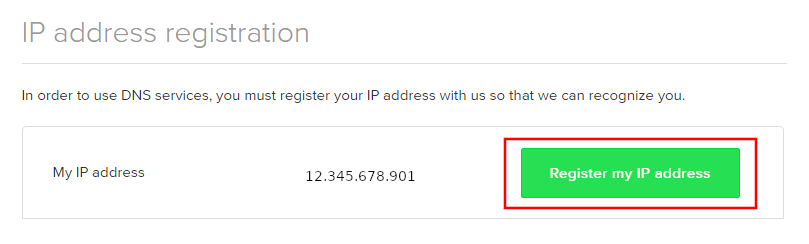
Click on Register my IP address.

Register IP for ExpressVPN MediaStreamer use on FlashRouter DD-WRT

Navigate to the ExpressVPN Dashboard.

Finding ExpressVPN MediaStreamer Specific DNS Servers in ExpressVPN Dashboard

Click on Set Up on More Devices.

Finding ExpressVPN MediaStreamer Specific DNS Servers

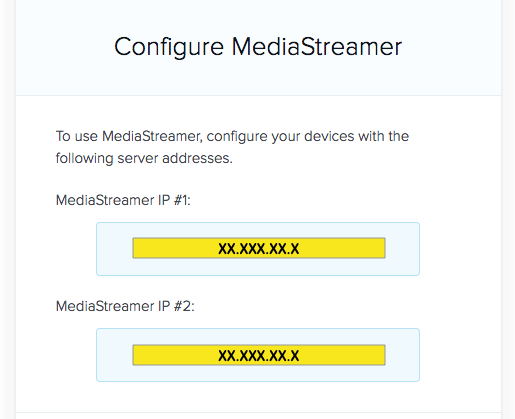
Scroll down and click on MediaStreamer and note the DNS servers that appear on the right side of the page.

ExpressVPN MediaStreamer Specific DNS servers

Enter MediaStreamer SmartDNS servers on your FlashRouter

Navigate to Setup > Basic Setup

  1. Scroll down to Network Address Server Settings (DHCP).
  2. Enter in the MediaStreamer SmartDNS servers you noted into Static DNS fields 1 and 2.
  3. Click Apply Settings at the bottom of the page.
  4. Reboot the FlashRouter.

Once the FlashRouter has fully rebooted, you can now access your desired regional content on any device that connects to the FlashRouter’s network.

Roqos VPN Connected, but my device IP is unchanged

TeamFlashRouters · Mar 8, 2022 ·

If your VPN Out page in your Roqos settings is reporting that you are Connected to your VPN provider but your IP Address and location have not changed when you visit What is my IP address? follow the below checklist.

Double check that your device is connected to the Roqos network

Since the Roqos UI is being accessed securely via the cloud you can change the settings while your device is not connected to the Roqos network. This would result in your IP Address not updating when you connect to VPN.

Make sure that you are connected to your Roqos WiFi network or from an ethernet port on the back of the Roqos directly to your device and not another network.

Assign Devices To Connect To VPN in the Roqos

By default there are no devices assigned to the VPN tunnel. To assign devices to the Roqos’ VPN connection.

1. Login to your Roqos UI.

2. Select the VPN tab on the left hand menu and select VPN Out.

Roqos VPN Out

3. Click Included Devices. From this page you can choose if all devices should connect to VPN or only certain devices.

Roqos VPN Included Devices

4. From the dropdown select Include all devices if you want every device that connects to the Roqos to connect to VPN or if you only want specific devices to connect to VPN while others bypass the VPN connection select Include selected devices from the dropdown and then toggle the sliders for the devices you want connected to VPN. Click Save.

Turn off VPN device applications

Connecting to VPN via a device application or browser extension at the same time while connecting via your Roqos is not recommended. Doubling up on VPN connections can cause issues with speeds and stability.

When you are connected to the Roqos VPN network at home you should leave all VPN applications and extensions disconnected and unopened.

IPVanish Asus AX1800S OpenVPN Setup

TeamFlashRouters · Feb 26, 2024 ·

Preparing for IPVanish Asus AX1800S Setup

Download your IPVanish .ovpn file

If you are not already an IPVanish user Sign Up Now.

1. Log in to your account on the IPVanish website.

IPVanish login

2. Successfully log in with your account information then go to IPVanish .ovpn file page.

3. Click on the .ovpn file for the server location you want to use to dowloand the .ovpn file. Do not open this file.

IPVanish download ovpn

Asus AX1800S Router Setup for IPVanish

Login to Asus firmware settings in a browser on any computer or smart device connected to the FlashRouter’s network.

1. Navigate to the VPN tab.

Merlin VPN Tab

2. Navigate to the VPN Client tab.

Asus AX1800S VPN Settings

3. Click Add Profile.

Asus AX1800S VPN Settings

4. Click Choose file and select the .ovpn file you downloaded earlier. Then click Upload.

Asus AX1800S OpenVPN upload

5. In the Description field enter in the name you’d like to use for this OpenVPN Client profile. We typically advise entering in the location or server number here.

6. Enter your IPVanish account email/username and password.

7. Click the Activate button.

Verify a successful IPVanish connection

  1. You should now see a check mark in the Connection Status area.
  2. Visit IPVanish’s IP Check to verify your new IP address and virtual location.

In some cases you may notice that the location is not showing the same location as the server you have input in your router settings; this is because geo tracking tools are often tricked by VPN connections. As long as you see an IP address that is not the same as your normal Internet IP address then you are indeed connected to IPVanish.

How to change the IPVanish server

  1. Follow the steps at the top of the page to obtain a new .ovpn file.
  2. Then proceed with the settings same as initial setup.
  3. Be sure to deactivate a previously active connection before activating the new one. You do not want to connect to two at the same time.

TROUBLESHOOTING

Still having issues? Visit the VPN Troubleshooting section.

Troubleshoot Here

Why is my connection speed slower?

TeamFlashRouters · Jun 4, 2019 ·

The encryption provided by a VPN connection almost always results in slower connection speed. In some cases you may have noticed that your computer or tablet was working faster when running a VPN client application or program, that is because a computer has a processor that is normally about 4-6x times as strong as a the processor on a router, and that is for managing a single VPN connection. A router has a smaller processor and is managing an entire network of devices. Encrypting an entire network does take considerable processing power.

Speed test results while connected to VPN are never going to be accurate. A speed test measures the rate at which a data packet travels from one server to another, however when you are connecting to VPN the data packets travel to an extra server where they are encrypted and then sent back into the route. We strongly recommend disabling the FlashRouter’s VPN connection when testing speeds to make sure there isn’t and issue with the router.

Connection Types

Ethernet: Wired ethernet connections will almost always be the most stable and reliable connection. To speed up your internet connection, use an ethernet cable to wire your devices to the FlashRouter.

Wireless (5.0GHz): The 5.0GHz WiFi frequency has less range than the standard 2.4GHz WiFi, but also transmits your internet connection at a significantly faster speed. If you were previously using the 2.4GHz network and experiencing slow speeds please connect to the 5GHz wireless network which should improve your speed.

Connect to the closest VPN server

Our supported VPN providers offer many servers in different countries and regions. If a server has slower connection speed we recommend connecting to the server closest to your actual location.

The process for changing servers is detailed in your provider’s setup instructions.

FlashRouters Privacy App

DD-WRT Manual VPN Configuration

Select a UDP server

UDP servers do not authenticate every data packets the way TCP servers do which results in faster connection speeds.

VPN provider server recommendation

Contact your VPN provider for a server recommendation that should provide the fastest speeds for you.

PrivateInternetAccess (PIA) Asus AX1800S OpenVPN Setup

TeamFlashRouters · Feb 26, 2024 ·

Preparing for PIA Asus AX1800S Setup

Download your PIA .ovpn file

If you are not already a PIA user Sign Up Now.

1. Log in to your account on the PIA website.

PIA login

2. Successfully log in with your account information then go to PIA’s OpenVPN Config Generator.

3. On the OpenVPN Configuration Generator select the following:

OpenVPN Version: OpenVPN 2.4 or newer

Select Platform: Linux

Select Region: Choose the server location you’d like to connect to

Select Port: Typically we recommend UDP/1198 RSA-2048 AES-128-CBC SHA1 for best speeds but feel free to select the one you want to use.

4. Click Generate to download the .ovpn file. Do not open this file once it is downloaded.

PIA Generate .ovpn file

Asus AX1800S Router Setup for PIA

Login to Asus firmware settings in a browser on any computer or smart device connected to the FlashRouter’s network.

1. Navigate to the VPN tab.

Merlin VPN Tab

2. Navigate to the VPN Client tab.

Asus AX1800S VPN Settings

3. Click Add Profile.

Asus AX1800S VPN Settings

4. Click Choose file and select the .ovpn file you downloaded earlier. Then click Upload.

Asus AX1800S OpenVPN upload

5. In the Description field enter in the name you’d like to use for this OpenVPN Client profile. We typically advise entering in the location here.

6. Enter your PIA account username and password.

7. Click the Activate button.

Verify a successful PIA connection

  1. You should now see a check mark in the Connection Status area.
  2. Visit PIA’s IP Check to verify your new IP address and virtual location.

In some cases you may notice that the location is not showing the same location as the server you have input in your router settings; this is because geo tracking tools are often tricked by VPN connections. As long as you see an IP address that is not the same as your normal Internet IP address then you are indeed connected to PIA.

How to change the PIA server

  1. Follow the steps at the top of the page to obtain a new .ovpn file.
  2. Then proceed with the settings same as initial setup.
  3. Be sure to deactivate a previously active connection before activating the new one. You do not want to connect to two at the same time.

TROUBLESHOOTING

Still having issues? Visit the VPN Troubleshooting section.

Troubleshoot Here

Change WiFi name and password on Asus

TeamFlashRouters · Feb 26, 2024 ·

Set a custom WiFi network name and password for your devices to join the Asus FlashRouter’s network.

View our guide for more instructions on how to access AsusWRT firmware settings.

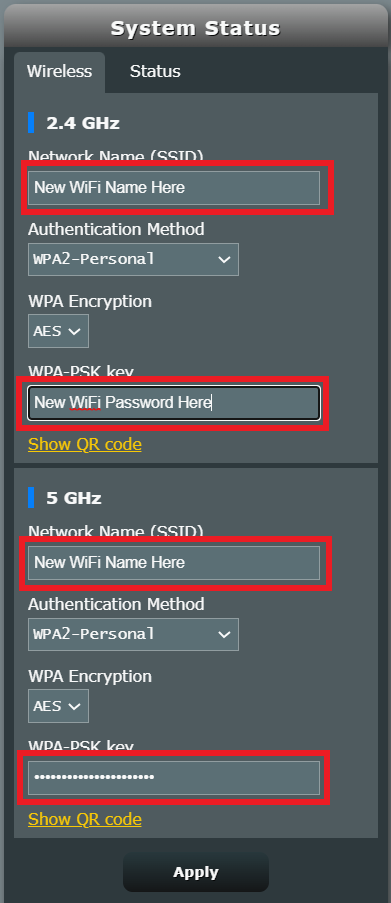
1. Under General select Network Map.

Merlin Wifi change name and pass

2. In the Network name (SSID) field enter the name you want your Asus WiFi to appear as. This can be the same or different for both 2.4GHz and 5GHz bands. We typically advise setting different names for each so you can connect your streaming devices to the 5GHz band as that is the faster WiFi band.

3. In the WPA-PSK key field enter the password you want to join your devices to the Asus WiFi network. If your WiFi names are the same for 2.4GHz and 5GHz make sure they have the exact same wireless password set.

4. Click Apply and then rejoin the new wireless network.

Wireless Client Bridge Setup

TeamFlashRouters · Apr 22, 2019 ·

If you need to extend your wired connection capabilities and you are not able to wire directly into your main router, you can setup a FlashRouter as a Wireless Client Bridge. In Wireless Client Bridge mode the FlashRouter connects to your main router via WiFi, and then transmits your internet signal via the FlashRouter LAN ports for wired internet access anywhere in your home or office.

Preparing for Wireless Client Bridge Setup

Verify your wireless information

In order to setup your FlashRouter as a Wireless Client Bridge, you will need the exact SSID and password of your existing wireless network. Make sure you have this information before proceeding.

We recommend using a 2.4GHz network to repeat as this network will have more range.

Locate the Local IP Address of the existing wireless network

Locate the Local IP Address of the existing router that the FlashRouter will be bridged to.

DD-WRT Router Setup for Wireless Client Bridge

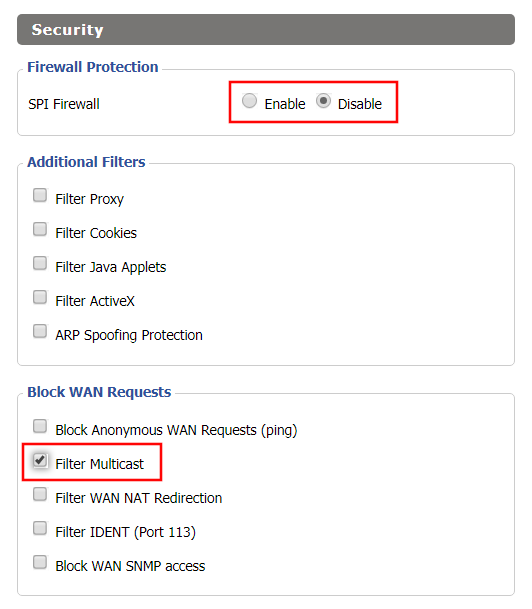
Disable Firewall

Navigate to Security > Firewall

Wireless Repeater Bridge Setup on FlashRouter DD-WRT - Disable Firewall and Enable Filter Multicast
  1. Set SPI Firewall to Disable.
  2. Uncheck all boxes except for Filter Multicast.
  3. Click Save.

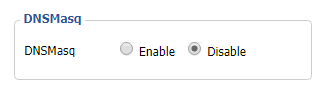
Disable DNSmasq

Navigate to Services > Services

Wireless Repeater Bridge Setup on FlashRouter DD-WRT - Disable DNSMasqButton
  1. Set DNSmasq to Disable.
  2. Click Save.

Enter Wireless settings

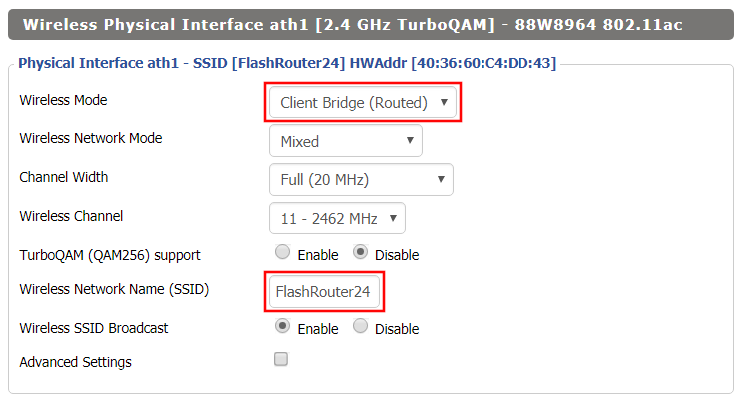
Navigate to Wireless > Basic Settings

Wireless Client Bridge Setup on FlashRouter DD-WRT - Set Wireless Mode to Client Bridge
  1. In the Wireless Physical Interface settings for the 2.4GHz network set the Wireless Mode to Client Bridge.
  2. Change the Wireless Network Name (SSID) to match exactly with the Wireless Network Name of the network that you will bridge to.
  3. Click Save.

Enter Wireless Security settings

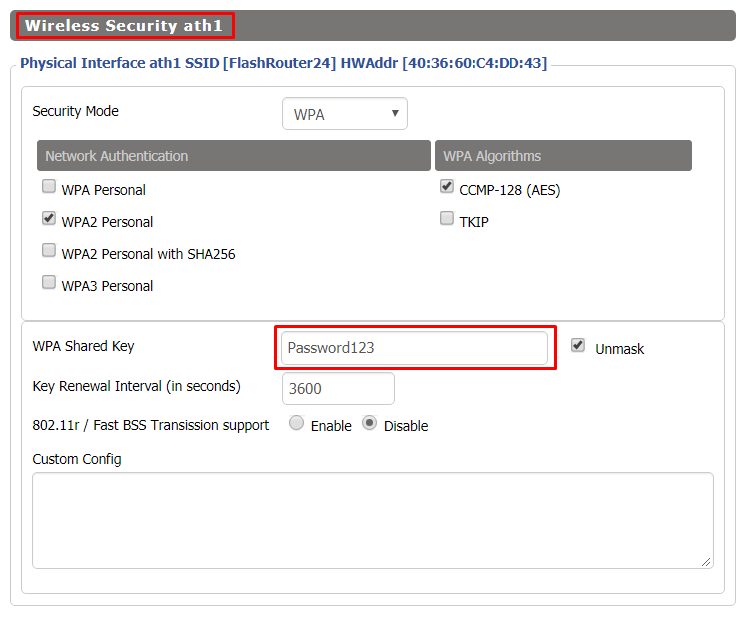
Navigate to Wireless > Wireless Security

Wireless Client Bridge Setup on FlashRouter DD-WRT - Set Wireless Password
  1. Change the WPA Shared Key to match exactly with the Wireless Password of the network that you will bridge to.
  2. Click Save.

Change the FlashRouter's Local IP Address

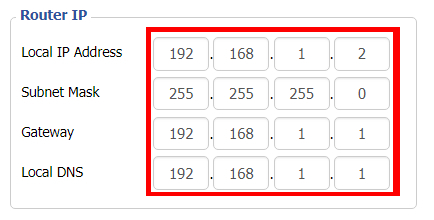
Navigate to Setup > Basic Setup

  1. Set the Local IP Address to a different address on the same subnet as the existing network that you noted early. (example: if the existing network is 192.168.1.1 then set the Local IP Address to 192.168.1.2)
  2. Set the Gateway to the Local IP Address of the existing network. (example: 192.168.1.1)
  3. Set the Local DNS to the Local IP Address of the existing network. (example: 192.168.1.1)
  4. Click Apply Settings.

Reboot your FlashRouter

Power off the FlashRouter for 30 seconds and then power it back on. When it boots back up you will be able to access the FlashRouter’s settings at the new Local IP Address that you set. Your existing network and the FlashRouter’s network will now be bridged wirelessly.

Your FlashRouter is now providing wired connection access to your main router network. Wireless connections to the FlashRouter are disabled in this setup.

Back up your settings

Navigate to Administration > Backup

  1. Click the Backup button.
  2. A file named nvrambak.bin will be saved to your computer.
  3. You can load nvrambak.bin to restore your settings in the event of a reset.

TROUBLESHOOTING

Still having issues? Visit our Troubleshooting section to diagnose common problems here.

Troubleshoot Here

How to Access Your GL.iNet FlashRouter Settings

TeamFlashRouters · Feb 26, 2024 ·

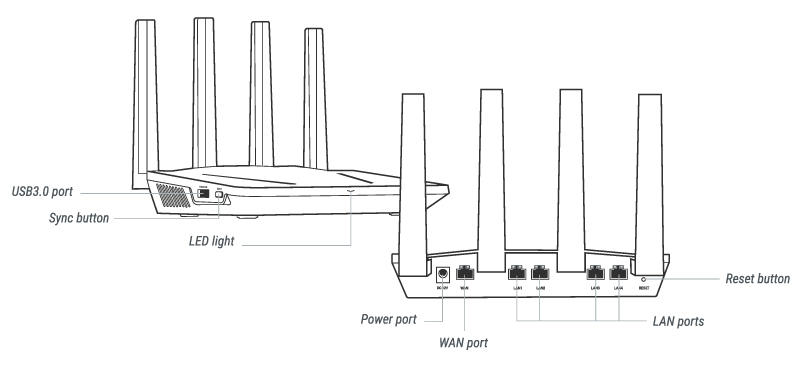
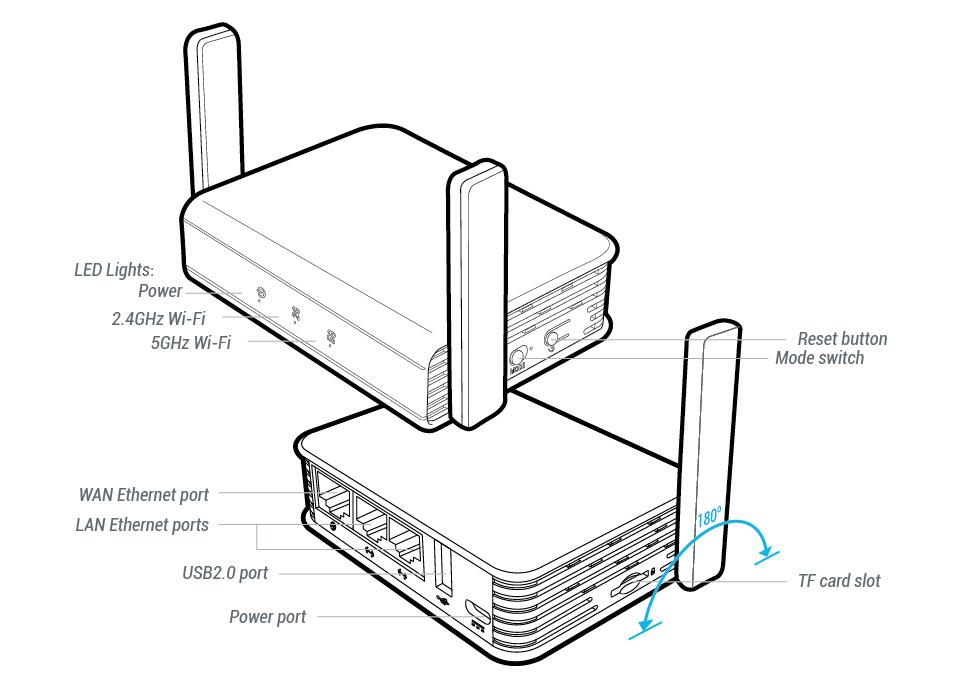
This quick guide walk you through connecting to your GL.iNet FlashRouter (Flint, Slate, Beryl, or Marble) and logging into the admin settings page. You’ll use either WiFi or an Ethernet cable, then access the router dashboard through your browser.

Step 1. Connect Your Device to the Router

You can connect by WiFi or Ethernet:

  • WiFi: Look for a network name like FlashRouter24 or FlashRouter50
    • The WiFi password has been set to: Wireless#9483C
    • ⚠️ Be sure to capitalize the “W” in
  • Ethernet: Plug an Ethernet cable from your computer into one of the router’s LAN ports (usually marked or color-coded differently from the WAN port).

👉 Pro tip: Disconnect from any other WiFi networks during setup.

Step 2. Open the Router Login Page

  1. Open a web browser (Chrome, Safari, Firefox, Edge).
  2. In the address bar, type: 192.168.8.1
  3. Press Enter.
GL.iNet router access

This is the local router dashboard address (not a public website). If the page doesn’t load:

  • Try a different browser.
  • Clear your cache.
  • Ensure your device is connected to the FlashRouter network.

Step 3. Log In to the Router Settings

  • Default password: glopenwrt1 or openwrt
  • This is the factory default for all GL.iNet routers shipped by FlashRouters.
GL.iNet admin password enter

💡 Once you’re in, you can update your admin password in the settings for extra security.

Next Steps

Now that you’ve accessed your GL.iNet FlashRouter, you can:

  • Set up your VPN service
  • Customize your WiFi name and password
  • Adjust device controls and security settings

Check our support library for your specific VPN setup guide.

Surfshark Manual OpenVPN Setup

TeamFlashRouters · Apr 24, 2019 ·

Preparing for Manual Surfshark Setup

Obtain your Surfshark OpenVPN information

If you are not already an Surfshark user Sign Up Now.

1. Log in to your account on the Surfshark website.

2. Successfully log in with your account information and Navigate to the Manual Connection Guide. Here you will find the OpenVPN Specific Username and Password required for manual configuration.

FlashRouters Privacy App - SurfShark OpenVPN Specific Username and Password

Surfshark Server Addresses

View a full list of Surfshark servers.

United States

Atlanta:
us-atl.prod.surfshark.com
Buffalo:
us-buf.prod.surfshark.com
Chicago:
us-chi.prod.surfshark.com
Dallas:
us-dal.prod.surfshark.com
Las Vegas:
us-las.prod.surfshark.com
Los Angeles:
us-lax.prod.surfshark.com
Miami:
us-mia.prod.surfshark.com
New York City:
us-nyc.prod.surfshark.com
Phoenix:
us-phx.prod.surfshark.com
San Fransisco:
us-sfo.prod.surfshark.com
Seattle:
us-sea.prod.surfshark.com

DD-WRT Router Setup for Surfshark

Navigate to Services > VPN

Enter Surfshark settings

OpenVPN Client

Start OpenVPN Client

If you wish to disable your VPN connection simply set this to Disable at any time and click Apply Settings.

Server IP/Name

Copy and paste the server you would like to connect to from the server list above. Be sure there are no extra spaces or characters.

If you wish to change Surfshark connection locations, THIS IS THE ONLY FIELD YOU NEED TO CHANGE.

Port

1194

Tunnel Device

TUN

Tunnel Protocol

UDP

Encryption cipher

None

Hash Algorithm

SHA512

Userpass Authentication

Enable

Username

Enter your OpenVPN specific Username.

Password

Enter your OpenVPN specific Password.

Advanced Options

Enable

TLS Cipher

None

LZO Compression

Disabled

NAT

Enable

Firewall Protection

Enable

TLS Auth Key

-----BEGIN OpenVPN Static key V1-----
b02cb1d7c6fee5d4f89b8de72b51a8d0
c7b282631d6fc19be1df6ebae9e2779e
6d9f097058a31c97f57f0c35526a44ae
09a01d1284b50b954d9246725a1ead1f
f224a102ed9ab3da0152a15525643b2e
ee226c37041dc55539d475183b889a10
e18bb94f079a4a49888da566b9978346
0ece01daaf93548beea6c827d9674897
e7279ff1a19cb092659e8c1860fbad0d
b4ad0ad5732f1af4655dbd66214e552f
04ed8fd0104e1d4bf99c249ac229ce16
9d9ba22068c6c0ab742424760911d463
6aafb4b85f0c952a9ce4275bc821391a
a65fcd0d2394f006e3fba0fd34c4bc4a
b260f4b45dec3285875589c97d3087c9
134d3a3aa2f904512e85aa2dc2202498
-----END OpenVPN Static key V1-----

Additional Config

remote-cert-tls server
remote-random
nobind
tun-mtu 1500
tun-mtu-extra 32
mssfix 1450
persist-key
persist-tun
ping-timer-rem
reneg-sec 0
cipher AES-256-GCM
log /tmp/vpn.log

Policy Based Routing

This field can be used for split VPN and Dual Gateway routing.

CA Cert

-----BEGIN CERTIFICATE-----
MIIFTTCCAzWgAwIBAgIJAMs9S3fqwv+mMA0GCSqGSIb3DQEBCwUAMD0xCzAJBgNV
BAYTAlZHMRIwEAYDVQQKDAlTdXJmc2hhcmsxGjAYBgNVBAMMEVN1cmZzaGFyayBS
b290IENBMB4XDTE4MDMxNDA4NTkyM1oXDTI4MDMxMTA4NTkyM1owPTELMAkGA1UE
BhMCVkcxEjAQBgNVBAoMCVN1cmZzaGFyazEaMBgGA1UEAwwRU3VyZnNoYXJrIFJv
b3QgQ0EwggIiMA0GCSqGSIb3DQEBAQUAA4ICDwAwggIKAoICAQDEGMNj0aisM63o
SkmVJyZPaYX7aPsZtzsxo6m6p5Wta3MGASoryRsBuRaH6VVa0fwbI1nw5ubyxkua
Na4v3zHVwuSq6F1p8S811+1YP1av+jqDcMyojH0ujZSHIcb/i5LtaHNXBQ3qN48C
c7sqBnTIIFpmb5HthQ/4pW+a82b1guM5dZHsh7q+LKQDIGmvtMtO1+NEnmj81BAp
FayiaD1ggvwDI4x7o/Y3ksfWSCHnqXGyqzSFLh8QuQrTmWUm84YHGFxoI1/8AKdI
yVoB6BjcaMKtKs/pbctk6vkzmYf0XmGovDKPQF6MwUekchLjB5gSBNnptSQ9kNgn
TLqi0OpSwI6ixX52Ksva6UM8P01ZIhWZ6ua/T/tArgODy5JZMW+pQ1A6L0b7egIe
ghpwKnPRG+5CzgO0J5UE6gv000mqbmC3CbiS8xi2xuNgruAyY2hUOoV9/BuBev8t
tE5ZCsJH3YlG6NtbZ9hPc61GiBSx8NJnX5QHyCnfic/X87eST/amZsZCAOJ5v4EP
SaKrItt+HrEFWZQIq4fJmHJNNbYvWzCE08AL+5/6Z+lxb/Bm3dapx2zdit3x2e+m
iGHekuiE8lQWD0rXD4+T+nDRi3X+kyt8Ex/8qRiUfrisrSHFzVMRungIMGdO9O/z
CINFrb7wahm4PqU2f12Z9TRCOTXciQIDAQABo1AwTjAdBgNVHQ4EFgQUYRpbQwyD
ahLMN3F2ony3+UqOYOgwHwYDVR0jBBgwFoAUYRpbQwyDahLMN3F2ony3+UqOYOgw
DAYDVR0TBAUwAwEB/zANBgkqhkiG9w0BAQsFAAOCAgEAn9zV7F/XVnFNZhHFrt0Z
S1Yqz+qM9CojLmiyblMFh0p7t+Hh+VKVgMwrz0LwDH4UsOosXA28eJPmech6/bjf
ymkoXISy/NUSTFpUChGO9RabGGxJsT4dugOw9MPaIVZffny4qYOc/rXDXDSfF2b+
303lLPI43y9qoe0oyZ1vtk/UKG75FkWfFUogGNbpOkuz+et5Y0aIEiyg0yh6/l5Q
5h8+yom0HZnREHhqieGbkaGKLkyu7zQ4D4tRK/mBhd8nv+09GtPEG+D5LPbabFVx
KjBMP4Vp24WuSUOqcGSsURHevawPVBfgmsxf1UCjelaIwngdh6WfNCRXa5QQPQTK
ubQvkvXONCDdhmdXQccnRX1nJWhPYi0onffvjsWUfztRypsKzX4dvM9k7xnIcGSG
EnCC4RCgt1UiZIj7frcCMssbA6vJ9naM0s7JF7N3VKeHJtqe1OCRHMYnWUZt9vrq
X6IoIHlZCoLlv39wFW9QNxelcAOCVbD+19MZ0ZXt7LitjIqe7yF5WxDQN4xru087
FzQ4Hfj7eH1SNLLyKZkA1eecjmRoi/OoqAt7afSnwtQLtMUc2bQDg6rHt5C0e4dC
LqP/9PGZTSJiwmtRHJ/N5qYWIh9ju83APvLm/AGBTR2pXmj9G3KdVOkpIC7L35dI
623cSEC3Q3UZutsEm/UplsM=
-----END CERTIFICATE-----

CLICK APPLY SETTINGS

Leave all settings not mentioned above as their default setting.

Verify a successful Surfshark connection

Navigate to Status > OpenVPN

  1. You should now see a CONNECTED SUCCESS message.
  2. Visit WhatIsMyIPAddress to verify your new IP address, virtual location, and status as Protected at the top of the page.

In some cases you may notice that the location is not showing the same location as the server you have input in your router settings; this is because geo tracking tools are often tricked by VPN connections. As long as you see an IP address that is not the same as your normal Internet IP address then you are indeed connected to Surfshark VPN.

Back up your settings

Navigate to Administration > Backup

  1. Click the Backup button.
  2. A file named nvrambak.bin will be saved to your computer.
  3. You can load nvrambak.bin to restore your settings in the event of a reset.

How to change the Surfshark server

  1. Visit the Surfshark Manual setup page and scroll down to Section 3.
  2. Copy and paste one of the server IP Address into the Server IP/Name field.
  3. Click Apply Settings.

TROUBLESHOOTING

Still having issues? Visit the VPN Troubleshooting section.

Troubleshoot Here

Cudy Internet Setup

TeamFlashRouters · Feb 26, 2024 ·

Follow this article when you receive your new Cudy FlashRouter to connect it to the Internet.

1. Connect the ethernet cable that came with the router from an open LAN ethernet port on your ISP modem or other router to the WAN port if you purchased a Cudy AX3000 or to ethernet port #1 of the device marked Primary if you purchased a Cudy M1800 or Cudy M3000.

Cudy Mesh internet wiring

2. Connect the power to the router and wait about 2 minutes for the router to fully boot up.

3. Connect your computer, phone, or tablet to the Cudy router via wireless (FlashRouter24 / FlashRouter50) or via ethernet cable to one of the LAN ports on the router.

The FlashRouter WiFi password is printed on the sheet that came with the router and is set to Wireless#[First 5 characters of your router MAC]. The router MAC can be found on the bottom of your router if you cannot locate the sheet. For e.g. if your MAC is 1459C07E70A8 then your WiFi password is Wireless#1459C

Be sure to capitalize the W.

4. Once connected via wireless or ethernet on your device open your browser and go to 192.168.10.1

Cudy local IP access

5. Enter openwrt as the admin password to access the Cudy firmware settings.

Cudy router access

6. Verify that your Cudy FlashRouter is reporting as Internet and WAN Connected.

Cudy Verify Internet

6. Verify that your Cudy FlashRouter is reporting as Internet and WAN Connected.

7. If you purchased a Cudy M1800 or Cudy M3000 mesh package you can now take the unit labeled Node to the location you want it connecting from and power it up. It will connect to the Primary network that was just setup automatically. You will then see the Mesh Units number increase according to the number that you have purchased shortly.

Cudy Verify Mesh connection

TROUBLESHOOTING

Still having issues? Visit the VPN Troubleshooting section.

Troubleshoot Here
« Previous Page
Next Page »

Primary Sidebar

  • Troubleshooting
  • Router Access
  • Internet Connection Issues
  • WiFi Connectivity
  • General VPN Issues
  • TeamViewer Remote Support
  • DD-WRT Firmware
  • Facebook
  • Twitter
  • Instagram
  • Pinterest
  • YouTube

Footer