• Skip to primary navigation
  • Skip to main content
  • Skip to primary sidebar
  • Skip to footer

FlashRouters Support Portal

Prioritizing Privacy

  • SETUP GUIDES
    • Privacy Hero Router Setup Guide
    • ASUS-WRT Router Setup Guide
    • AsusWRT-Merlin Router Setup Guide
    • DD-WRT Router Setup Guide
    • ExpressVPN Router Setup Guide
    • GL.iNet Router Setup Guide
    • Roqos Core Router Setup Guide
  • TROUBLESHOOTING
    • Router Access
    • WiFi Connectivity
    • Internet Connection Issues
    • General VPN Issues
    • DD-WRT Firmware
    • TeamViewer Remote Support
  • FAQs
    • Router FAQs
    • VPN FAQs
    • Warranty and Returns FAQs
    • Sales FAQs
    • Shipping FAQs
    • Service Plan FAQs
  • Show Search
Hide Search

Search Results for: that for sure

Windscribe Manual OpenVPN Setup

TeamFlashRouters · Apr 25, 2019 ·

Preparing for Manual Windscribe Setup

Verify your Windscribe login information

If you are not already an Windscribe user Sign Up Now.

1. Log in to your account on the Windscribe website.

2. Click on the Download link at the top of the page.

3. Scroll down to the Config Generators section and Click on the OpenVPN link.
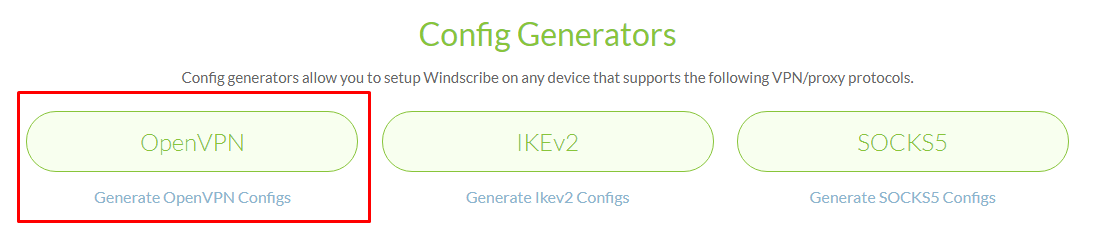
Windscribe Website - Generate OpenVPN Configuration Files

4. Click on Get Credentials and copy the Username and Password. This information will be used later on in the configuration.
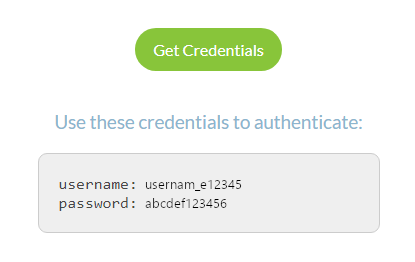
Windscribe Website OpenVPN Specific Username and Password

Windscribe Server Addresses

United States

US East:
us-east.windscribe.com
US West:
us-west.windscribe.com
US Windflix:
wf-us.windscribe.com

Canada

Canada:
ca.windscribe.com
Canada West:
ca-west.windscribe.com

Additional Servers

Australia:
au.windscribe.com
Austria:
at.windscribe.com
Belgium:
be.windscribe.com
Brazil:
br.windscribe.com
Bulgaria:
bg.windscribe.com
Czech Republic:
cz.windscribe.com
Denmark:
dk.windscribe.com
Egypt:
eg.windscribe.com
Finland:
fi.windscribe.com
France:
fr.windscribe.com
Germany:
de.windscribe.com
Hong Kong:
hk.windscribe.com
Hungary:
hu.windscribe.com
India:
in.windscribe.com
Ireland:
ie.windscribe.com
Italy:
it.windscribe.com
Japan:
jp.windscribe.com
Latvia:
lv.windscribe.com
Luxemburg:
lu.windscribe.com
Malaysia:
my.windscribe.com
Mexico:
mx.windscribe.com
Netherlands:
nl.windscribe.com
Norway:
no.windscribe.com
Poland:
pl.windscribe.com
Romania:
ro.windscribe.com
Russia:
ru.windscribe.com
Singapore:
ch.windscribe.com
South Africa:
za.windscribe.com
South Korea:
kr.windscribe.com
Spain:
es.windscribe.com
Sweden:
se.windscribe.com
Switzerland:
ch.windscribe.com
Taiwan:
tw.windscribe.com
Turkey:
tr.windscribe.com
Ukraine:
ua.windscribe.com
United Kingdom:
uk.windscribe.com

DD-WRT Router Setup for Windscribe

Navigate to Services > VPN

Enter Windscribe settings

OpenVPN Client

Start OpenVPN Client

If you wish to disable your VPN connection simply set this to Disable at any time and click Apply Settings.

Server IP/Name

Copy and Paste the server you would like to connect to from the server list above. Be sure there are no extra spaces or characters.

If you wish to change Windscribe connection locations, THIS IS THE ONLY FIELD YOU NEED TO CHANGE.

Port

443

Tunnel Device

TUN

Tunnel Protocol

UDP

Encryption cipher

AES-256-CBC

Hash Algorithm

SHA512

User Pass Authentication

Enable

Username

Enter your OpenVPN specific Username.

Password

Enter your OpenVPN specific Password.

Advanced Options

Enable

TLS Cipher

None

LZO Compression

Adaptive

NAT

Enable

Firewall Protection

Enable

TLS Auth Key

-----BEGIN OpenVPN Static key V1-----
5801926a57ac2ce27e3dfd1dd6ef8204
2d82bd4f3f0021296f57734f6f1ea714
a6623845541c4b0c3dea0a050fe6746c
b66dfab14cda27e5ae09d7c155aa554f
399fa4a863f0e8c1af787e5c602a801d
3a2ec41e395a978d56729457fe6102d7
d9e9119aa83643210b33c678f9d4109e
3154ac9c759e490cb309b319cf708cae
83ddadc3060a7a26564d1a24411cd552
fe6620ea16b755697a4fc5e6e9d0cfc0
c5c4a1874685429046a424c026db672e
4c2c492898052ba59128d46200b40f88
0027a8b6610a4d559bdc9346d33a0a6b
08e75c7fd43192b162bfd0aef0c716b3
1584827693f676f9a5047123466f0654
eade34972586b31c6ce7e395f4b478cb
-----END OpenVPN Static key V1-----

Additional Config

tun-mtu-extra 32
mssfix 1450
persist-key
persist-tun

Policy Based Routing

This field can be used for split VPN and Dual Gateway routing.

CA Cert

-----BEGIN CERTIFICATE-----
MIIFozCCA4ugAwIBAgIBATANBgkqhkiG9w0BAQ0FADBAMQswCQYDVQQGEwJDSDEV
MBMGA1UEChMMUHJvdG9uVlBOIEFHMRowGAYDVQQDExFQcm90b25WUE4gUm9vdCBD
QTAeFw0xNzAyMTUxNDM4MDBaFw0yNzAyMTUxNDM4MDBaMEAxCzAJBgNVBAYTAkNI
MRUwEwYDVQQKEwxQcm90b25WUE4gQUcxGjAYBgNVBAMTEVByb3RvblZQTiBSb290
IENBMIICIjANBgkqhkiG9w0BAQEFAAOCAg8AMIICCgKCAgEAt+BsSsZg7+AuqTq7
vDbPzfygtl9f8fLJqO4amsyOXlI7pquL5IsEZhpWyJIIvYybqS4s1/T7BbvHPLVE
wlrq8A5DBIXcfuXrBbKoYkmpICGc2u1KYVGOZ9A+PH9z4Tr6OXFfXRnsbZToie8t
2Xjv/dZDdUDAqeW89I/mXg3k5x08m2nfGCQDm4gCanN1r5MT7ge56z0MkY3FFGCO
qRwspIEUzu1ZqGSTkG1eQiOYIrdOF5cc7n2APyvBIcfvp/W3cpTOEmEBJ7/14RnX
nHo0fcx61Inx/6ZxzKkW8BMdGGQF3tF6u2M0FjVN0lLH9S0ul1TgoOS56yEJ34hr
JSRTqHuar3t/xdCbKFZjyXFZFNsXVvgJu34CNLrHHTGJj9jiUfFnxWQYMo9UNUd4
a3PPG1HnbG7LAjlvj5JlJ5aqO5gshdnqb9uIQeR2CdzcCJgklwRGCyDT1pm7eoiv
WV19YBd81vKulLzgPavu3kRRe83yl29It2hwQ9FMs5w6ZV/X6ciTKo3etkX9nBD9
ZzJPsGQsBUy7CzO1jK4W01+u3ItmQS+1s4xtcFxdFY8o/q1zoqBlxpe5MQIWN6Qa
lryiET74gMHE/S5WrPlsq/gehxsdgc6GDUXG4dk8vn6OUMa6wb5wRO3VXGEc67IY
m4mDFTYiPvLaFOxtndlUWuCruKcCAwEAAaOBpzCBpDAMBgNVHRMEBTADAQH/MB0G
A1UdDgQWBBSDkIaYhLVZTwyLNTetNB2qV0gkVDBoBgNVHSMEYTBfgBSDkIaYhLVZ
TwyLNTetNB2qV0gkVKFEpEIwQDELMAkGA1UEBhMCQ0gxFTATBgNVBAoTDFByb3Rv
blZQTiBBRzEaMBgGA1UEAxMRUHJvdG9uVlBOIFJvb3QgQ0GCAQEwCwYDVR0PBAQD
AgEGMA0GCSqGSIb3DQEBDQUAA4ICAQCYr7LpvnfZXBCxVIVc2ea1fjxQ6vkTj0zM
htFs3qfeXpMRf+g1NAh4vv1UIwLsczilMt87SjpJ25pZPyS3O+/VlI9ceZMvtGXd
MGfXhTDp//zRoL1cbzSHee9tQlmEm1tKFxB0wfWd/inGRjZxpJCTQh8oc7CTziHZ
ufS+Jkfpc4Rasr31fl7mHhJahF1j/ka/OOWmFbiHBNjzmNWPQInJm+0ygFqij5qs
51OEvubR8yh5Mdq4TNuWhFuTxpqoJ87VKaSOx/Aefca44Etwcj4gHb7LThidw/ky
zysZiWjyrbfX/31RX7QanKiMk2RDtgZaWi/lMfsl5O+6E2lJ1vo4xv9pW8225B5X
eAeXHCfjV/vrrCFqeCprNF6a3Tn/LX6VNy3jbeC+167QagBOaoDA01XPOx7Odhsb
Gd7cJ5VkgyycZgLnT9zrChgwjx59JQosFEG1DsaAgHfpEl/N3YPJh68N7fwN41Cj
zsk39v6iZdfuet/sP7oiP5/gLmA/CIPNhdIYxaojbLjFPkftVjVPn49RqwqzJJPR
N8BOyb94yhQ7KO4F3IcLT/y/dsWitY0ZH4lCnAVV/v2YjWAWS3OWyC8BFx/Jmc3W
DK/yPwECUcPgHIeXiRjHnJt0Zcm23O2Q3RphpU+1SO3XixsXpOVOYP6rJIXW9bMZ
A1gTTlpi7A==
-----END CERTIFICATE-----

CLICK APPLY SETTINGS

Leave all settings not mentioned above as their default setting.

Verify a successful VPN connection

Navigate to Status > OpenVPN

  1. You should now see a CONNECTED SUCCESS message.
  2. Visit WhatIsMyIPAddress to verify your new IP address, virtual location, and status as Protected at the top of the page.

In some cases you may notice that the location is not showing the same location as the server you have input in your router settings; this is because geo tracking tools are often tricked by VPN connections. As long as you see an IP address that is not the same as your normal Internet IP address then you are indeed connected to Windscribe VPN.

Back up your settings

Navigate to Administration > Backup

  1. Click the Backup button.
  2. A file named nvrambak.bin will be saved to your computer.
  3. You can load nvrambak.bin to restore your settings in the event of a reset.

How to change the Windscribe server

  1. Copy and paste the server IP Address from the server list above into the Server IP/Name field.
  2. Click Apply Settings.
TROUBLESHOOTING

Still having issues? Visit the VPN Troubleshooting section.

Troubleshoot Here

Cudy Access Router Settings

TeamFlashRouters · Feb 26, 2024 ·

Follow this guide to access the router settings of your Cudy FlashRouter.

1. Connect your computer, phone, or tablet to the Cudy router via wireless (FlashRouter24 / FlashRouter50) or via ethernet cable to one of the LAN ports on the router.

The FlashRouter WiFi password is printed on the sheet that came with the router and is set to Wireless#[First 5 characters of your router MAC]. The router MAC can be found on the bottom of your router if you cannot locate the sheet. For e.g. if your MAC is 1459C07E70A8 then your WiFi password is Wireless#1459C

Be sure to capitalize the W.

2. Once connected via wireless or ethernet on your device open your browser and go to 192.168.10.1

Cudy local IP access

3. Enter openwrt1 or openwrt as the admin password to access the Cudy firmware settings.

Cudy router access

TROUBLESHOOTING

Still having issues? Visit the VPN Troubleshooting section.

Troubleshoot Here

Cudy Change Wi-Fi name and password

TeamFlashRouters · Feb 26, 2024 ·

Follow this guide to change the Wi-Fi name and password on your Cudy FlashRouter.

1. Connect your computer, phone, or tablet to the Cudy router via wireless (FlashRouter24 / FlashRouter50) or via ethernet cable to one of the LAN ports on the router.

The FlashRouter WiFi password is printed on the sheet that came with the router and is set to Wireless#[First 5 characters of your router MAC]. The router MAC can be found on the bottom of your router if you cannot locate the sheet. For e.g. if your MAC is 1459C07E70A8 then your WiFi password is Wireless#1459C

Be sure to capitalize the W.

2. Once connected via wireless or ethernet on your device open your browser and go to 192.168.10.1

Cudy local IP access

3. Enter openwrt as the admin password to access the Cudy firmware settings.

Cudy router access

3. Click General Settings.

Cudy General Settings

4. Click Wireless.

Cudy Wireless tab

5. Change the SSID and Password fields for both 2.4GHz and 5GHz bands.The SSIDs should be unique and NOT a duplicate of an existing network. Click Save & Apply.

Cudy Change Wifi Name and password

TROUBLESHOOTING

Still having issues? Visit the VPN Troubleshooting section.

Troubleshoot Here

IPVanish Manual OpenVPN Setup

TeamFlashRouters · Apr 5, 2019 ·

Preparing for Manual IPVanish Setup

Verify your IPVanish login information

If you are not already an IPVanish user Sign Up Now.

Log in to your account on the IPVanish website.

IPVanish Server Addresses

View a full list of IPVanish servers.

America

Ashburn:
iad-a01.ipvanish.com
through
iad-a78.ipvanish.com

Atlanta:
atl-a01.ipvanish.com
through
atl-a88.ipvanish.com

Boston:
bos-c01.ipvanish.com
through
bos-c27.ipvanish.com

Chicago:
chi-a01.ipvanish.com
through
chi-a58.ivpanish.com

Cleveland:
cle-c01.ipvanish.com
through
cle-c20.ipvanish.com

Dallas:
dal-a01.ipvanish.com
through
dal-a79.ipvanish.com

Denver:
den-c01.ipvanish.com
through
den-c13.ipvanish.com

Jackson:
jan-c01.ipvanish.com
through
jan-c15.ipvanish.com

Las Vegas:
las-c11.ipvanish.com
through
las-c20.ipvanish.com

Los Angeles:
lax-a01.ipvanish.com
through
lax-a60.ipvanish.com

Miami:
mia-a01.ipvanish.com
through
mia-a34.ipvanish.com

Milwaukee:
mke-c01.ipvanish.com
through
mke-c19.ipvanish.com

New York:
nyc-a01.ipvanish.com
through
nyc-a51.ipvanish.com

Phoenix:
phx-a01.ipvanish.com
through
phx-a24.ipvanish.com

Salt Lake City:
slc-c01.ipvanish.com
through
slc-c12.ipvanish.com

San Jose:
sjc-a01.ipvanish.com
through
sjc-a27.ipvanish.com

Seattle:
sea-a01-ipvanish.com
through
sea-a41.ipvanish.com

St. Louis:
stl-c01.ipvanish.com
through
stl-c18.ipvanish.com

United Kingdom

London:
lon-a01.ipvanish.com
through
lon-a69.ipvanish.com

lon-c01.ipvanish.com
through
lon-c58.ipvanish.com

Manchester:
man-c01.ipvanish.com
through
man-c09.ipvanish.com

DD-WRT Router Setup for IPVanish

Navigate to Services > VPN

Enter IPVanish settings

OpenVPN Client

Start OpenVPN Client

If you wish to disable your VPN connection simply set this to Disable at any time and click Apply Settings.

Server IP/Name

Copy and paste the server you would like to connect to from the server list above. Be sure there are no extra spaces or characters.

If you wish to change IPVanish connection locations, THIS IS THE ONLY FIELD YOU NEED TO CHANGE.

Port

443

Tunnel Device

TUN

Tunnel Protocol

UDP

Encryption cipher

AES-256-CBC

Hash Algorithm

SHA256

User Pass Authentication

Enable

Username

Enter the Username you successfully logged in to your IPVanish account with.

Password

Enter the Password you successfully logged in to your IPVanish account with.

Advanced Options

Enable

TLS Cipher

None

LZO Compression

Adaptive

NAT

Enable

Firewall Protection

Enable

Additional Config

persist-key
persist-tun
persist-remote-ip
keysize 256

Policy Based Routing

This field can be used for split VPN and Dual Gateway routing.

CA Cert

-----BEGIN CERTIFICATE-----
MIIErTCCA5WgAwIBAgIJAMYKzSS8uPKDMA0GCSqGSIb3DQEBDQUAMIGVMQswCQYD
VQQGEwJVUzELMAkGA1UECBMCRkwxFDASBgNVBAcTC1dpbnRlciBQYXJrMREwDwYD
VQQKEwhJUFZhbmlzaDEVMBMGA1UECxMMSVBWYW5pc2ggVlBOMRQwEgYDVQQDEwtJ
UFZhbmlzaCBDQTEjMCEGCSqGSIb3DQEJARYUc3VwcG9ydEBpcHZhbmlzaC5jb20w
HhcNMTIwMTExMTkzMjIwWhcNMjgxMTAyMTkzMjIwWjCBlTELMAkGA1UEBhMCVVMx
CzAJBgNVBAgTAkZMMRQwEgYDVQQHEwtXaW50ZXIgUGFyazERMA8GA1UEChMISVBW
YW5pc2gxFTATBgNVBAsTDElQVmFuaXNoIFZQTjEUMBIGA1UEAxMLSVBWYW5pc2gg
Q0ExIzAhBgkqhkiG9w0BCQEWFHN1cHBvcnRAaXB2YW5pc2guY29tMIIBIjANBgkq
hkiG9w0BAQEFAAOCAQ8AMIIBCgKCAQEAt9DBWNr/IKOuY3TmDP5x7vYZR0DGxLbX
U8TyAzBbjUtFFMbhxlHiXVQrZHmgzih94x7BgXM7tWpmMKYVb+gNaqMdWE680Qm3
nOwmhy/dulXDkEHAwD05i/iTx4ZaUdtV2vsKBxRg1vdC4AEiwD7bqV4HOi13xcG9
71aQ55Mj1KeCdA0aNvpat1LWx2jjWxsfI8s2Lv5Fkoi1HO1+vTnnaEsJZrBgAkLX
pItqP29Lik3/OBIvkBIxlKrhiVPixE5qNiD+eSPirsmROvsyIonoJtuY4Dw5K6pc
NlKyYiwo1IOFYU3YxffwFJk+bSW4WVBhsdf5dGxq/uOHmuz5gdwxCwIDAQABo4H9
MIH6MAwGA1UdEwQFMAMBAf8wHQYDVR0OBBYEFEv9FCWJHefBcIPX9p8RHCVOGe6u
MIHKBgNVHSMEgcIwgb+AFEv9FCWJHefBcIPX9p8RHCVOGe6uoYGbpIGYMIGVMQsw
CQYDVQQGEwJVUzELMAkGA1UECBMCRkwxFDASBgNVBAcTC1dpbnRlciBQYXJrMREw
DwYDVQQKEwhJUFZhbmlzaDEVMBMGA1UECxMMSVBWYW5pc2ggVlBOMRQwEgYDVQQD
EwtJUFZhbmlzaCBDQTEjMCEGCSqGSIb3DQEJARYUc3VwcG9ydEBpcHZhbmlzaC5j
b22CCQDGCs0kvLjygzANBgkqhkiG9w0BAQ0FAAOCAQEAI2dkh/43ksV2fdYpVGhY
aFZPVqCJoToCez0IvOmLeLGzow+EOSrY508oyjYeNP4VJEjApqo0NrMbKl8g/8bp
LBcotOCF1c1HZ+y9v7648uumh01SMjsbBeHOuQcLb+7gX6c0pEmxWv8qj5JiW3/1
L1bktnjW5Yp5oFkFSMXjOnIoYKHyKLjN2jtwH6XowUNYpg4qVtKU0CXPdOznWcd9
/zSfa393HwJPeeVLbKYaFMC4IEbIUmKYtWyoJ9pJ58smU3pWsHZUg9Zc0LZZNjkN
lBdQSLmUHAJ33Bd7pJS0JQeiWviC+4UTmzEWRKa7pDGnYRYNu2cUo0/voStphv8E
VA==
-----END CERTIFICATE-----

CLICK APPLY SETTINGS

Leave all settings not mentioned above as their default setting.

Verify a successful IPVanish connection

Navigate to Status > OpenVPN

  1. You should now see a CONNECTED SUCCESS message.
  2. Visit IPVanish’s IP Check to verify your new IP address and virtual location.

In some cases you may notice that the location is not showing the same location as the server you have input in your router settings; this is because geo tracking tools are often tricked by VPN connections. As long as you see an IP address that is not the same as your normal Internet IP address then you are indeed connected to IPVanish.

Back up your settings

Navigate to Administration > Backup.

  1. Click the Backup button.
  2. A file named nvrambak.bin will be saved to your computer.
  3. You can load nvrambak.bin to restore your settings in the event of a reset.

How to change the IPVanish server

  1. Copy the new IPVanish server address from the above server list.
  2. Paste the server into the Server IP/Name field.
  3. Click Apply Settings.
TROUBLESHOOTING

Still having issues? Visit the VPN Troubleshooting section.

Troubleshoot Here

ExpressVPN Manual OpenVPN Setup

admin · Feb 19, 2019 ·

Preparing for Manual ExpressVPN Setup

Obtain your ExpressVPN OpenVPN Information

If you are not already an ExpressVPN user Sign Up Now.

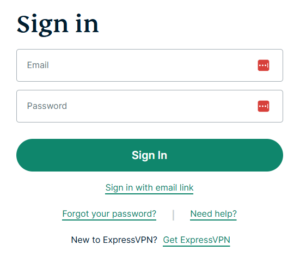
1. Log in to your account on the ExpressVPN website.

ExpressVPN login page

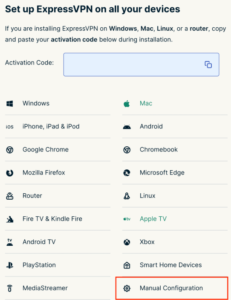
2. Successfully log in with your account information. Select More.

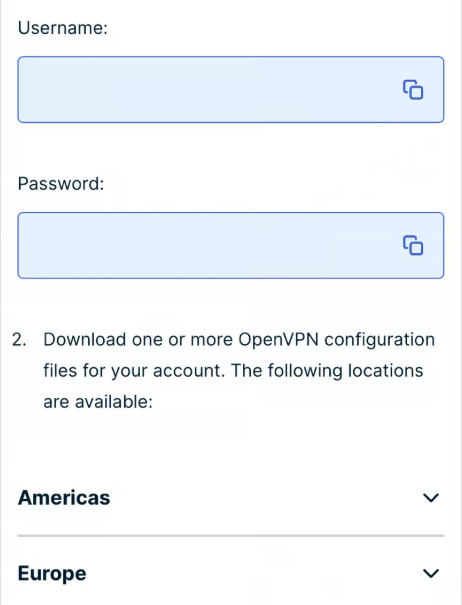
3. Select Manual Configuration and copy the Username and Password that are displayed on the right hand side of the screen.

ExpressVPN Manual Configuration
ExpressVPN username and password

ExpressVPN Server Addresses

Americas

usa-atlanta-ca-version-2.expressnetw.com
usa-boston-ca-version-2.expressnetw.com
usa-chicago-ca-version-2.expressnetw.com
usa-dallas-ca-version-2.expressnetw.com
usa-dallas-2-ca-version-2.expressnetw.com
usa-denver-ca-version-2.expressnetw.com
usa-kansascity-ca-version-2.expressnetw.com
usa-losangeles-ca-version-2.expressnetw.com
usa-losangeles-1-ca-version-2.expressnetw.com
usa-losangeles-2-ca-version-2.expressnetw.com
usa-losangeles-3-ca-version-2.expressnetw.com
usa-los-angeles-4-ca-version-2.expressnetw.com
usa-miami-ca-version-2.expressnetw.com
usa-miami-2-ca-version-2.expressnetw.com
usa-minneapolis-ca-version-2.expressnetw.com
usa-newjersey-1-ca-version-2.expressnetw.com
usa-newjersey-3-ca-version-2.expressnetw.com
usa-newyork-ca-version-2.expressnetw.com
us-new-york-2-ca-version-2.expressnetw.com
usa-phoenix-ca-version-2.expressnetw.com
usa-saltlakecity-ca-version-2.expressnetw.com
usa-sanfrancisco-ca-version-2.expressnetw.com
usa-sanjose-ca-version-2.expressnetw.com
usa-seattle-ca-version-2.expressnetw.com
usa-tampa-1-ca-version-2.expressnetw.com
usa-virginia-ca-version-2.expressnetw.com
usa-washingtondc-ca-version-2.expressnetw.com
usa-washingtondc-2-ca-version-2.expressnetw.com
canada-montreal-ca-version-2.expressnetw.com
canada-toronto-ca-version-2.expressnetw.com
canada-toronto-2-ca-version-2.expressnetw.com
canada-vancouver-ca-version-2.expressnetw.com
mexico-ca-version-2.expressnetw.com
argentina-ca-version-2.expressnetw.com
brazil-ca-version-2.expressnetw.com
brazil-2-ca-version-2.expressnetw.com
chile-ca-version-2.expressnetw.com
colombia-ca-version-2.expressnetw.com
costarica-ca-version-2.expressnetw.com
ecuador-ca-version-2.expressnetw.com
guatemala-ca-version-2.expressnetw.com
panama-ca-version-2.expressnetw.com
peru-ca-version-2.expressnetw.com
uruguay-ca-version-2.expressnetw.com
venezuela-ca-version-2.expressnetw.com

Europe

uk-berkshire-ca-version-2.expressnetw.com
uk-berkshire-2-ca-version-2.expressnetw.com
uk-docklands-ca-version-2.expressnetw.com
uk-east-london-ca-version-2.expressnetw.com
uk-kent-ca-version-2.expressnetw.com
uk-london-ca-version-2.expressnetw.com
france-paris-1-ca-version-2.expressnetw.com
france-paris-2-ca-version-2.expressnetw.com
france-strasbourg-ca-version-2.expressnetw.com
germany-darmstadt-ca-version-2.expressnetw.com
germany-frankfurt-1-ca-version-2.expressnetw.com
germany-frankfurt-2-ca-version-2.expressnetw.com
germany-nuremberg-ca-version-2.expressnetw.com
italy-cosenza-ca-version-2.expressnetw.com
italy-milan-ca-version-2.expressnetw.com
netherlands-amsterdam-ca-version-2.expressnetw.com
netherlands-rotterdam-ca-version-2.expressnetw.com
netherlands-thehague-ca-version-2.expressnetw.com
spain-barcelona-ca-version-2.expressnetw.com
spain-ca-version-2.expressnetw.com
sweden-ca-version-2.expressnetw.com
sweden-2-ca-version-2.expressnetw.com
switzerland-ca-version-2.expressnetw.com
switzerland-2-ca-version-2.expressnetw.com
albania-ca-version-2.expressnetw.com
andorra-ca-version-2.expressnetw.com
armenia-ca-version-2.expressnetw.com
austria-ca-version-2.expressnetw.com
azerbaijan-ca-version-2.expressnetw.com
belarus-ca-version-2.expressnetw.com
belgium-ca-version-2.expressnetw.com
bosniaandherzegovina-ca-version-2.expressnetw.com
bulgaria-ca-version-2.expressnetw.com
croatia-ca-version-2.expressnetw.com
cyprus-ca-version-2.expressnetw.com
czechrepublic-ca-version-2.expressnetw.com
denmark-ca-version-2.expressnetw.com
estonia-ca-version-2.expressnetw.com
finland-ca-version-2.expressnetw.com
georgia-ca-version-2.expressnetw.com
greece-ca-version-2.expressnetw.com
hungary-ca-version-2.expressnetw.com
iceland-ca-version-2.expressnetw.com
ireland-ca-version-2.expressnetw.com
isleofman-ca-version-2.expressnetw.com
jersey-ca-version-2.expressnetw.com
latvia-ca-version-2.expressnetw.com
liechtenstein-ca-version-2.expressnetw.com
lithuania-ca-version-2.expressnetw.com
luxembourg-ca-version-2.expressnetw.com
macedonia-ca-version-2.expressnetw.com
malta-ca-version-2.expressnetw.com
moldova-ca-version-2.expressnetw.com
monaco-ca-version-2.expressnetw.com
montenegro-ca-version-2.expressnetw.com
norway-ca-version-2.expressnetw.com
poland-ca-version-2.expressnetw.com
portugal-ca-version-2.expressnetw.com
romania-ca-version-2.expressnetw.com
serbia-ca-version-2.expressnetw.com
slovakia-ca-version-2.expressnetw.com
slovenia-ca-version-2.expressnetw.com
ukraine-ca-version-2.expressnetw.com

Asia Pacific

australia-brisbane-ca-version-2.expressnetw.com
australia-melbourne-ca-version-2.expressnetw.com
australia-perth-ca-version-2.expressnetw.com
australia-sydney-ca-version-2.expressnetw.com
australia-sydney-2-ca-version-2.expressnetw.com
australia-sydney-3-ca-version-2.expressnetw.com
hongkong-2-ca-version-2.expressnetw.com
hongkong4-ca-version-2.expressnetw.com
hongkong-1-ca-version-2.expressnetw.com
japan-tokyo-1-ca-version-2.expressnetw.com
japan-tokyo-2-ca-version-2.expressnetw.com
india-chennai-ca-version-2.expressnetw.com
india-mumbai-1-ca-version-2.expressnetw.com
singapore-cbd-ca-version-2.expressnetw.com
singapore-jurong-ca-version-2.expressnetw.com
southkorea-ca-version-2.expressnetw.com
southkorea2-ca-version-2.expressnetw.com
bangladesh-ca-version-2.expressnetw.com
bhutan-ca-version-2.expressnetw.com
brunei-ca-version-2.expressnetw.com
cambodia-ca-version-2.expressnetw.com
indonesia-ca-version-2.expressnetw.com
kazakhstan-ca-version-2.expressnetw.com
kyrgyzstan-ca-version-2.expressnetw.com
laos-ca-version-2.expressnetw.com
macau-ca-version-2.expressnetw.com
malaysia-ca-version-2.expressnetw.com
mongolia-ca-version-2.expressnetw.com
myanmar-ca-version-2.expressnetw.com
nepal-ca-version-2.expressnetw.com
newzealand-ca-version-2.expressnetw.com
pakistan-ca-version-2.expressnetw.com
ph-via-sing-ca-version-2.expressnetw.com
srilanka-ca-version-2.expressnetw.com
taiwan-3-ca-version-2.expressnetw.com
thailand-ca-version-2.expressnetw.com
vietnam-ca-version-2.expressnetw.com

Middle East and Africa

algeria-ca-version-2.expressnetw.com
israel-ca-version-2.expressnetw.com
kenya-ca-version-2.expressnetw.com
southafrica-ca-version-2.expressnetw.com

DD-WRT Router Setup for ExpressVPN

Navigate to Services > VPN

Enter ExpressVPN settings

OpenVPN Client

Start OpenVPN Client

If you wish to disable your VPN connection simply set this to Disable at any time and click Apply Settings.
Server IP/Name

Copy and paste the server you would like to connect to from the server list above. Be sure there are no extra spaces or characters.

If you wish to change ExpressVPN connection locations, THE ONLY SETTING YOU NEED TO CHANGE IS THE EXPRESSVPN SERVER ADDRESS.*

Port

1195

Tunnel Device

TUN

Tunnel Protocol

UDP

Encryption cipher

AES-256-CBC

Hash Algorithm

SHA512

User Pass Authentication

Enable

Username

Enter the Username you found in the Manual Config section.

Password

Enter the Password you found in the Manual Config section.

Advanced Options

Enable

TLS Cipher

None

LZO Compression

Adaptive

NAT

Enable

Firewall Protection

Enable

nsCertType verification

Checked

TLS Auth Key

-----BEGIN OpenVPN Static key V1-----
48d9999bd71095b10649c7cb471c1051
b1afdece597cea06909b99303a18c674
01597b12c04a787e98cdb619ee960d90
a0165529dc650f3a5c6fbe77c91c137d
cf55d863fcbe314df5f0b45dbe974d9b
de33ef5b4803c3985531c6c23ca6906d
6cd028efc8585d1b9e71003566bd7891
b9cc9212bcba510109922eed87f5c8e6
6d8e59cbd82575261f02777372b2cd4c
a5214c4a6513ff26dd568f574fd40d6c
d450fc788160ff68434ce2bf6afb00e7
10a3198538f14c4d45d84ab42637872e
778a6b35a124e700920879f1d003ba93
dccdb953cdf32bea03f365760b0ed800
2098d4ce20d045b45a83a8432cc73767
7aed27125592a7148d25c87fdbe0a3f6
-----END OpenVPN Static key V1-----

Additional Config

persist-key
persist-tun
fragment 1300
mssfix 1450
keysize 256

Policy Based Routing

This field can be used for split VPN and Dual Gateway routing.

CA Cert

-----BEGIN CERTIFICATE-----
MIIF+DCCA+CgAwIBAgIBATANBgkqhkiG9w0BAQ0FADCBhDELMAkGA1UEBhMCVkcx
DDAKBgNVBAgMA0JWSTETMBEGA1UECgwKRXhwcmVzc1ZQTjETMBEGA1UECwwKRXhw
cmVzc1ZQTjEWMBQGA1UEAwwNRXhwcmVzc1ZQTiBDQTElMCMGCSqGSIb3DQEJARYW
c3VwcG9ydEBleHByZXNzdnBuLmNvbTAeFw0xNTEwMjEwMDAwMDBaFw0yNjA0MDEy
MTEyMDBaMIGEMQswCQYDVQQGEwJWRzEMMAoGA1UECAwDQlZJMRMwEQYDVQQKDApF
eHByZXNzVlBOMRMwEQYDVQQLDApFeHByZXNzVlBOMRYwFAYDVQQDDA1FeHByZXNz
VlBOIENBMSUwIwYJKoZIhvcNAQkBFhZzdXBwb3J0QGV4cHJlc3N2cG4uY29tMIIC
IjANBgkqhkiG9w0BAQEFAAOCAg8AMIICCgKCAgEAxzXvHZ25OsESKRMQFINHJNqE
9kVRLWJS50oVB2jxobudPhCsWvJSApvar8CB2RrqkVMhXu2HT3FBtDL91INg070q
AyjjRpzEbDPWqQ1+G0tk0sjiJt2mXPJK2IlNFnhe6rTs09Pkpcp8qRhfZay/dIlm
agohQAr4JvYL1Ajg9A3sLb8JkY03H6GhOF8EKYTqhrEppCcg4sQKQhNSytRoQAm8
Ta+tnTYIedwWpqjUXP9YXFOvljPaixfYug24eAkpTjeuWTcELSyfnuiBeK+z9+5O
YunhqFt2QZMq33kLFZGMN2gHRCzngxxphurypsPRo7jiFgQI1yLt8uZsEZ+otGEK
91jjKfOC+g9TBy2RUtxk1neWcQ6syXDuc3rBNrGA8iM0ZoEqQ1BC8xWr3NYlSjqN
+1mgpTAX3/Dxze4GzHd7AmYaYJV8xnKBVNphlMlg1giCAu5QXjMxPbfCgZiEFq/u
q0SOKQJeT3AI/uVPSvwCMWByjyMbDpKKAK8Hy3UT5m4bCNu8J7bxj+vdnq0A2HPw
tF0FwBl/TIM3zNsyFrZZ0j6jLRT50mFsgDBKcD4L/J5rjdCsKPu5rodhxe38rCx2
GknP1Zkov4yoVCcR48+CQwg3oBkq0/EflvWUvcYApzs9SomUM/g+8Q/V0WOfJmFW
uxN9YntZlnzHRSRjrvMCAwEAAaNzMHEwHQYDVR0OBBYEFIzmQGj8xS+0LLklwqHD
45VVOZRJMB8GA1UdIwQYMBaAFIzmQGj8xS+0LLklwqHD45VVOZRJMA8GA1UdEwEB
/wQFMAMBAf8wCwYDVR0PBAQDAgEGMBEGCWCGSAGG+EIBAQQEAwIBFjANBgkqhkiG
9w0BAQ0FAAOCAgEAbHfuMKtojm1NgX7qSU2Rm2B5L8G0FuFP0L40dj8O5WHt45j2
z8coMK90vrUnQEZNQmRzot7v3XjVzVlxBWYSsCEApTsSDNi/4BNFP8H/BUUtJuy2
GFTO4wDVJnqNkZOHBmyVD75s1Y+W8a+zB4jkMeDEhOHZdwQ0l1fJDDgXal5f1UT5
F5WH6/RwHmWTwX4GxuCiIVtx70CjkXqhM8yZtTp1UtHLRNYcNSIes0vrAPHPgoA5
z9B8UvsOjuP+mfcjzi0LGGrY+2pJu0BKO2dRnarIZZABETIisI3FokoTszx5jpRP
yxyUTuRDKWHrvi0PPtOmC8nFahfugWFUi6uBsqCaSeuex+ahnTPCq0b1l0Ozpg0Y
eE8CW1TL9Y92b01up2c+PP6wZOIm3JyTH+L5smDFbh80V42dKyGNdPXMg5IcJhj3
YfAy4k8h/qbWY57KFcIzKx40bFsoI7PeydbGtT/dIoFLSZRLW5bleXNgG9mXZp27
0UeEC6CpATCS6uVl8LVT1I02uulHUpFaRmTEOrmMxsXGt6UAwYTY55K/B8uuID34
1xKbeC0kzhuN2gsL5UJaocBHyWK/AqwbeBttdhOCLwoaj7+nSViPxICObKrg3qav
GNCvtwy/fEegK9X/wlp2e2CFlIhFbadeXOBr9Fn8ypYPP17mTqe98OJYM04=
-----END CERTIFICATE-----

Public Client Cert

-----BEGIN CERTIFICATE-----
MIIDTjCCAregAwIBAgIDKzZvMA0GCSqGSIb3DQEBCwUAMIGFMQswCQYDVQQGEwJV
UzELMAkGA1UECBMCQ0ExFTATBgNVBAcTDFNhbkZyYW5jaXNjbzEVMBMGA1UEChMM
Rm9ydC1GdW5zdG9uMRgwFgYDVQQDEw9Gb3J0LUZ1bnN0b24gQ0ExITAfBgkqhkiG
9w0BCQEWEm1lQG15aG9zdC5teWRvbWFpbjAgFw0xNjExMDMwMzA2MThaGA8yMDY2
MTEwMzAzMDYxOFowgYoxCzAJBgNVBAYTAlZHMQwwCgYDVQQIDANCVkkxEzARBgNV
BAoMCkV4cHJlc3NWUE4xEzARBgNVBAsMCkV4cHJlc3NWUE4xHDAaBgNVBAMME2V4
cHJlc3N2cG5fY3VzdG9tZXIxJTAjBgkqhkiG9w0BCQEWFnN1cHBvcnRAZXhwcmVz
c3Zwbi5jb20wggEiMA0GCSqGSIb3DQEBAQUAA4IBDwAwggEKAoIBAQCrOYt/KOi2
uMDGev3pXg8j1SO4J/4EVWDF7vJcKr2jrZlqD/zuAFx2W1YWvwumPO6PKH4PU962
1aNdiumaUkv/RplCfznnnxqobhJuTE2oA+rS1bOq+9OhHwF9jgNXNVk+XX4d0toS
T5uGE6Z3OdmPBur8o5AlCf78PDSAwpFOw5HrgLqOEU4hTweC1/czX2VsvsHv22HR
I6JMZgP8gGQii/p9iukqfaJvGdPciL5p1QRBUQIi8P8pNvEp1pVIpxYj7/LOUqb2
DxFvgmp2v1IQ0Yu88SWsFk84+xAYHzfkLyS31Sqj5uLRBnJqx3fIlOihQ50GI72f
wPMwo+OippvVAgMBAAGjPzA9MAwGA1UdEwEB/wQCMAAwDgYDVR0PAQH/BAQDAgSw
MB0GA1UdDgQWBBSkBM1TCX9kBgFsv2RmOzudMXa9njANBgkqhkiG9w0BAQsFAAOB
gQA+2e4b+33zFmA+1ZQ46kWkfiB+fEeDyMwMLeYYyDS2d8mZhNZKdOw7dy4Ifz9V
qzp4aKuQ6j61c6k1UaQQL0tskqWVzslSFvs9NZyUAJLLdGUc5TT2MiLwiXQwd4Uv
H6bGeePdhvB4+ZbW7VMD7TE8hZhjhAL4F6yAP1EQvg3LDA==
-----END CERTIFICATE-----

Private Client Key

-----BEGIN RSA PRIVATE KEY-----
MIIEpAIBAAKCAQEAqzmLfyjotrjAxnr96V4PI9UjuCf+BFVgxe7yXCq9o62Zag/8
7gBcdltWFr8Lpjzujyh+D1PettWjXYrpmlJL/0aZQn85558aqG4SbkxNqAPq0tWz
qvvToR8BfY4DVzVZPl1+HdLaEk+bhhOmdznZjwbq/KOQJQn+/Dw0gMKRTsOR64C6
jhFOIU8Hgtf3M19lbL7B79th0SOiTGYD/IBkIov6fYrpKn2ibxnT3Ii+adUEQVEC
IvD/KTbxKdaVSKcWI+/yzlKm9g8Rb4Jqdr9SENGLvPElrBZPOPsQGB835C8kt9Uq
o+bi0QZyasd3yJTooUOdBiO9n8DzMKPjoqab1QIDAQABAoIBAHgsekC0SKi+AOcN
OZqJ3pxqophE0V7fQX2KWGXhxZnUZMFxGTc936deMYzjZ1y0lUa6x8cgOUcfqHol
3hDmw9oWBckLHGv5Wi9umdb6DOLoZO62+FQATSdfaJ9jheq2Ub2YxsRN0apaXzB6
KDKz0oM0+sZ4Udn9Kw6DfuIELRIWwEx4w0v3gKW7YLC4Jkc4AwLkPK03xEA/qImf
kCmaMPLhrgVQt+IFfP8bXzL7CCC04rNU/IS8pyjex+iUolnQZlbXntF7Bm4V2mz0
827ZVqrgAb/hEQRlsTW3rRkVh+rrdoUE7BCZRTFmRCbLoShjN6XuSf4sAus8ch4U
EN12gN0CgYEA4o/tSvij1iPaXLmt4KOEuxqmSGB8MLKhFde8lBbNdrDgxiIH9bH7
khKx15XRTX0qLDbs8b2/UJygZG0Aa1kIBqZTXTgeMAuxPRTesALJPdqQ/ROnbJcd
FkI7gllrAG8VB0fH4wTRsRd0vWEB6YlCdE107u6LEsLAHxOj9Q5819cCgYEAwXjx
9RkQ2qITBx5Ewib8YsltA0n3cmRomPicLlsnKV5DfvyCLpFIsZ1h3f9dUpfxRLwz
p8wcoLiq9cCoOGdu1udw/yBTqmhaXWhUK/g77f9Ze2ZB1OEhuyKLYJ1vW/h/Z/a1
aPCMxZqsDTPCePsuO8Cez5gqs8LjM3W7EyzRxDMCgYEAvhHrDFt975fSiLoJgo0M
PIAGAnBXn+8sLwv3m/FpW+rWF8LTFK/Fku12H5wDpNOdvswxijkauIE+GiJMGMLv
dcyx4WHECaC1h73reJRNykOEIZ0Md5BrCZJ1JEzp9Mo8RQhWTEFtvfkkqgApP4g0
pSeaMx0StaGG1kt+4IbP+68CgYBrZdQKlquAck/Vt7u7eyDHRcE5/ilaWtqlb/xi
zz7h++3D5C/v4b5UumTFcyg+3RGVclPKZcfOgDSGzzeSd/hTW46iUTOgeOUQzQVM
kzPRXdoyYgVRQtgSpY5xR3O1vjAbahwx8LZ0SvQPMBhYSDbV/Isr+fBacWjl/Aip
EEwxeQKBgQDdrAEnVlOFoCLw4sUjsPoxkLjhTAgI7CYk5NNxX67Rnj0tp+Y49+sG
Uhl5sCGfMKkLShiON5P2oxZa+B0aPtQjsdnsFPa1uaZkK4c++SS6AetzYRpVDLmL
p7/1CulE0z3O0sBekpwiuaqLJ9ZccC81g4+2j8j6c50rIAct3hxIxw==
-----END RSA PRIVATE KEY-----

CLICK APPLY SETTINGS

Leave all settings not mentioned above as their default setting.

Verify a successful ExpressVPN connection

Navigate to Status > OpenVPN.

  1. You should now see a CONNECTED SUCCESS message.
  2. Visit ExpressVPN’s IP Check to verify your new IP address and virtual location.

In some cases you may notice that the location is not showing the same location as the server you have input in your router settings; this is because geo tracking tools are often tricked by VPN connections. As long as you see an IP address that is not the same as your normal Internet IP address then you are indeed connected to ExpressVPN.

Back up your settings

Navigate to Administration > Backup

  1. Click the Backup button.
  2. A file named nvrambak.bin will be saved to your computer.
  3. You can load nvrambak.bin to restore your settings in the event of a reset.

How to change the ExpressVPN server

  1. Copy the new ExpressVPN server address from the above server list.
  2. Paste the server into the Server IP/Name field.
  3. Click Apply Settings.
TROUBLESHOOTING

Still having issues? Visit the VPN Troubleshooting section.

Troubleshoot Here

TP-Link Access Router Settings

TeamFlashRouters · Apr 11, 2024 ·

Follow this guide to access the router settings of your TP-Link FlashRouter.

1. Connect your computer, phone, or tablet to the TP-Link router via wireless (FlashRouter24 / FlashRouter50) or via ethernet cable to one of the LAN ports on the router.

The FlashRouter WiFi password is printed on the sheet that came with the router and is set to Wireless#[First 5 characters of your router MAC]. The router MAC can be found on the bottom of your router if you cannot locate the sheet. For e.g. if your MAC is 1459C07E70A8 then your WiFi password is Wireless#1459C

Be sure to capitalize the W.

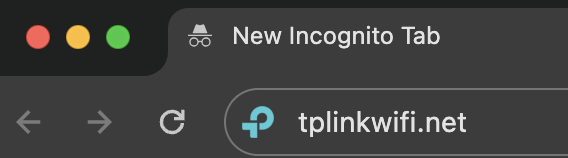
2. Once connected via wireless or ethernet on your device open your browser and go to tplinkwifi.net

TP-Link URL Access

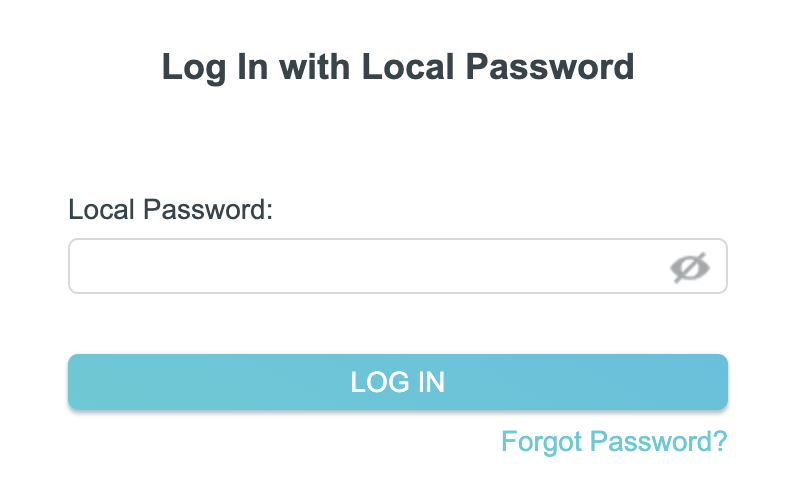
3. Enter tp-link as the admin password to access the TP-Link firmware settings.

TP-Link admin password

TROUBLESHOOTING

Still having issues? Visit the VPN Troubleshooting section.

Troubleshoot Here

TP-Link Internet Setup

TeamFlashRouters · Apr 11, 2024 ·

Follow this article when you receive your new TP-Link FlashRouter to connect it to the Internet.

1. Connect the ethernet cable that came with the router from an open LAN ethernet port on your ISP modem or other router to the WAN port of the TP-Link.

2. Connect the power to the router and wait about 2 minutes for the router to fully boot up.

3. Connect your computer, phone, or tablet to the TP-Link router via wireless (FlashRouter24 / FlashRouter50) or via ethernet cable to one of the LAN ports on the router.

The FlashRouter WiFi password is printed on the sheet that came with the router and is set to Wireless#[First 5 characters of your router MAC]. The router MAC can be found on the bottom of your router if you cannot locate the sheet. For e.g. if your MAC is 1459C07E70A8 then your WiFi password is Wireless#1459C

Be sure to capitalize the W.

4. Once connected via wireless or ethernet on your device open your browser and go to tplinkwifi.net

TP-Link URL Access

5. Enter tp-link as the admin password to access the TP-Link firmware settings.

TP-Link admin password

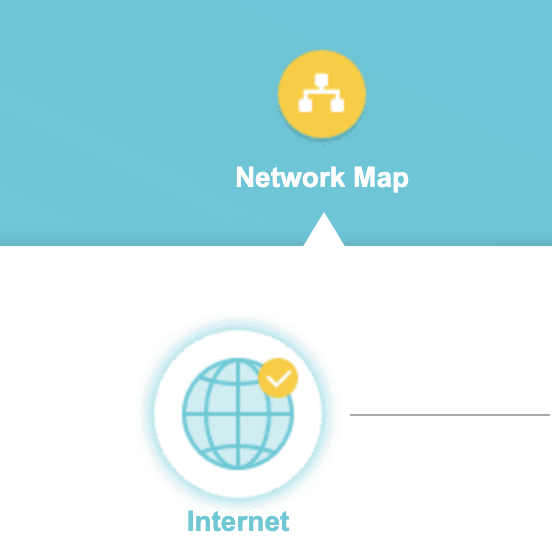
6. Verify that your TP-Link FlashRouter is reporting as Internet and WAN Connected.

TP-Link Internet Connected

TROUBLESHOOTING

Still having issues? Visit the VPN Troubleshooting section.

Troubleshoot Here

IVPN WireGuard Setup

TeamFlashRouters · Oct 13, 2021 ·

Preparing for IVPN WireGuard Setup

Verify your IVPN login information

If you are not already a IVPN user Sign Up Now.

Log in to your account on the IVPN website.

IVPN website login

DD-WRT Router Setup for IVPN WireGuard

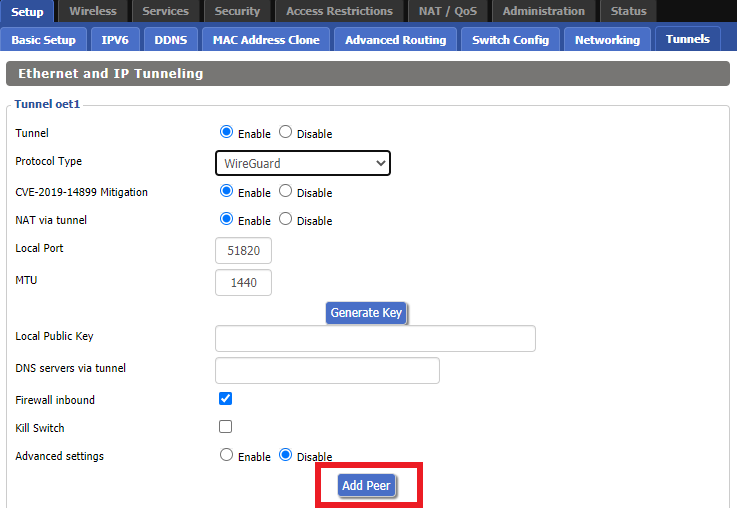
Navigate to Setup > Tunnels 

Enter IVPN WireGuard settings

1. Click Add Tunnel.

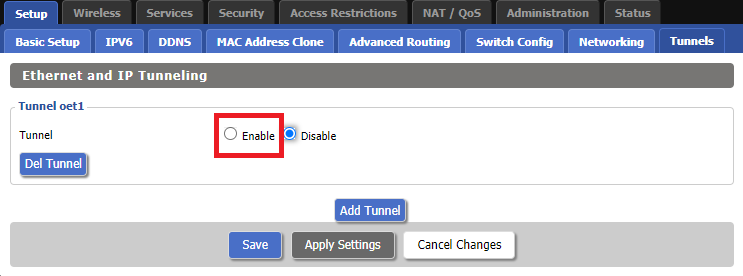
2. Set Tunnel to Enable.

Setup - Tunnel - Enable Tunnel

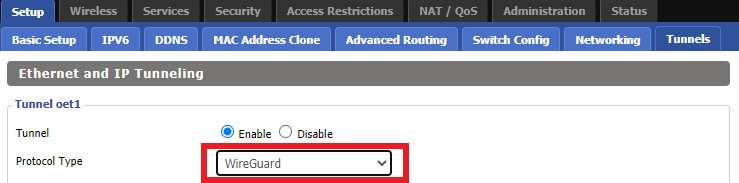
3. Select Wireguard from the dropdown.

Setup - Tunnel - Select Wireguard

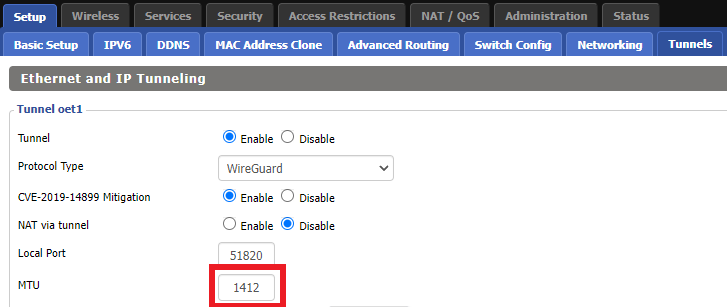
3. Set MTU to 1412.

IVPN Wireguard MTU setting

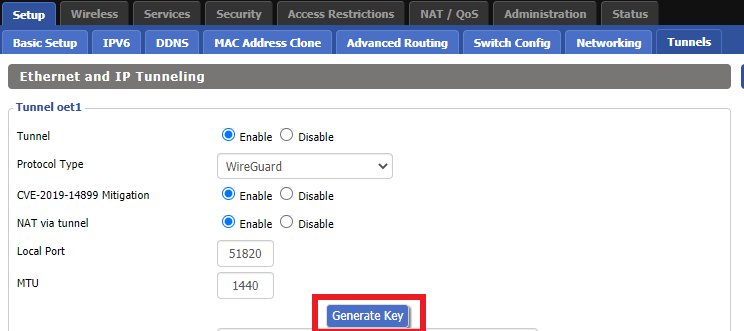
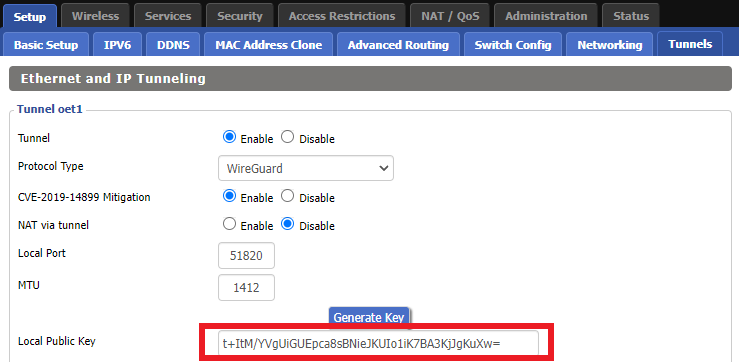
4. Click Generate Key.

Setup - Tunnel - Generate Key

9. Copy the Local Public Key.

IVPN Wireguard Local Public Key

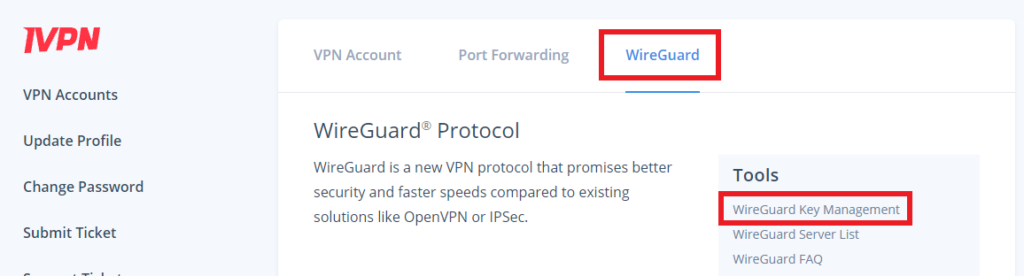
10. In a new tab (leave the DD-WRT settings opened), go to your IVPN Account and click WireGuard and then click WireGuard Key Management.

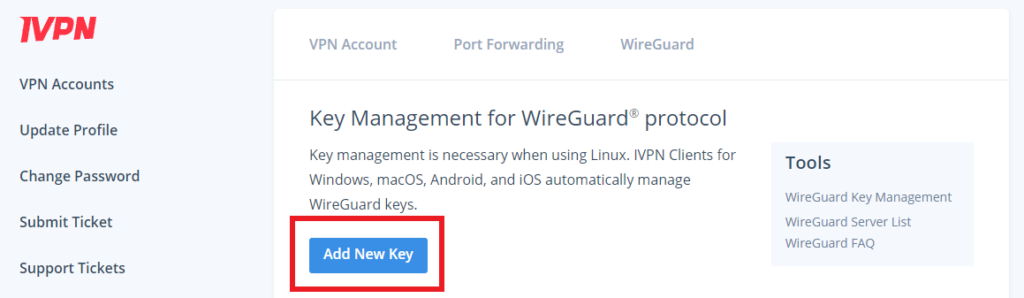
IVPN Wireguard Key Management

11. Click Add New Key.

IVPN Wireguard Add New Key

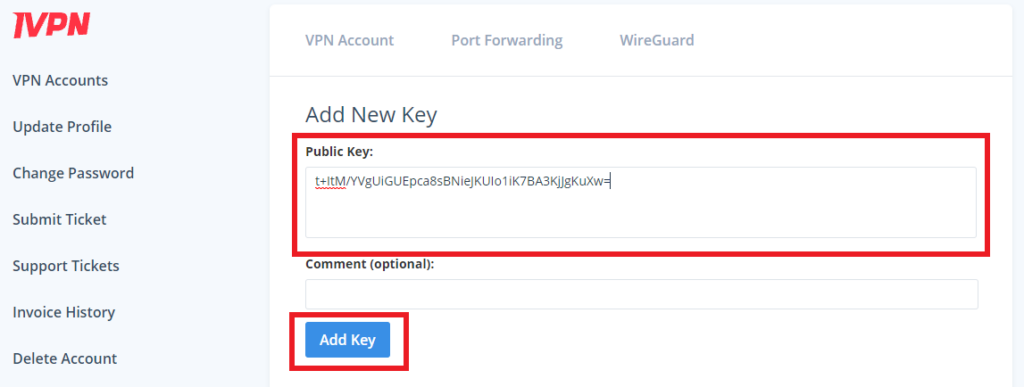
12. Paste the copied Local Public key to the Public Key field and click Add Key.

IVPN Wireguard Paste Public Key

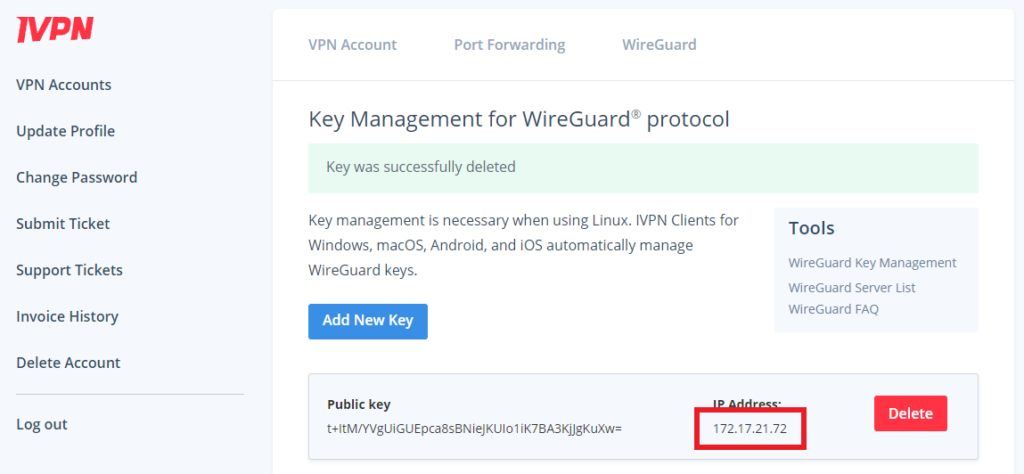
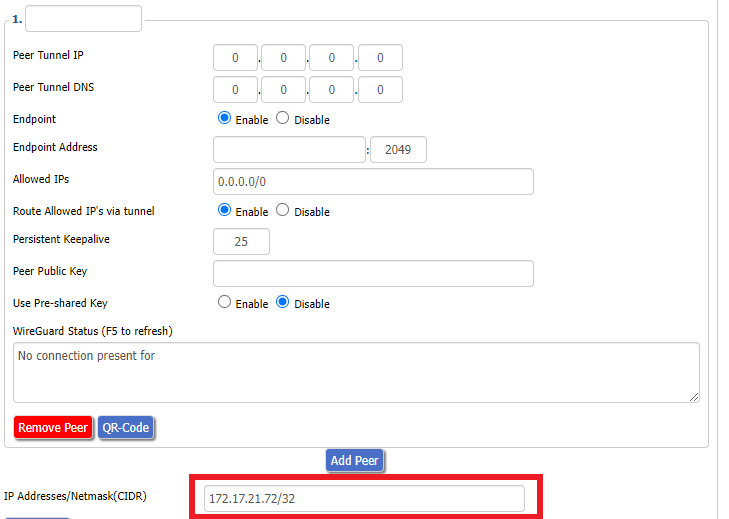
13.Copy the IP Address assigned to your public key and add it to the IP Addresses/Netmask(CIDR) field followed by a /32 subnet mask.

IVPN Wireguard copy IP Address
IVPN Wireguard paste IP Address

Certain DD-WRT builds will show two separate fields here: IP Address and Subnet Mask. If that is the case set the IP Address field to the Address without the /32 added and set the Subnet Mask to 255.255.255.255

14. Click Add Peer.

Setup - Tunnel - Add Peer

15. Set the Peer Tunnel IP to 0.0.0.0. Set Peer Tunnel DNS to 172.16.0.1

IVPN Wireguard Peer Tunnel IP and DNS

16. Set Endpoint to Enable.

IVPN Wireguard Enable Endpoint

17. Go to the IVPN Server Status page and copy the server name for the WireGuard server location you want to connect to.

IVPN Wireguard Endpoint server

Be sure to copy the WireGuard server address and not the OpenVPN server address.

18. Paste the server name you copied into the Endpoint Address field and set the Port to 2049.

IVPN Wireguard Endpoint Address

19. On the IVPN Server Status page copy the Public Key of the server location you entered. Paste the Public Key into the Peer Public Key field.

IVPN Wireguard copy server Public Key
IVPN Wireguard enter Peer Public Key

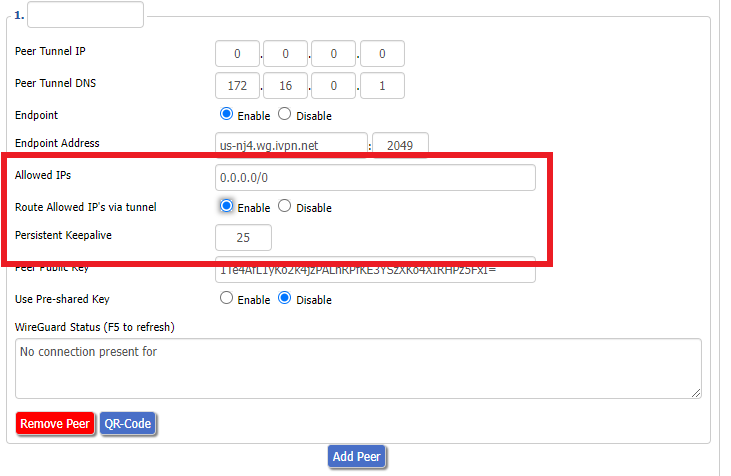
20. Leave Allowed IPs as 0.0.0.0/0. Set Router Allowed IP’s via tunnel to Enable. Set Persistent Keep Alive to 25.

IVPN Wireguard Peer settings

21. At the bottom of the page click Save and then click Apply Settings.
Set IVPN DNS servers

Navigate to Setup > Basic Setup

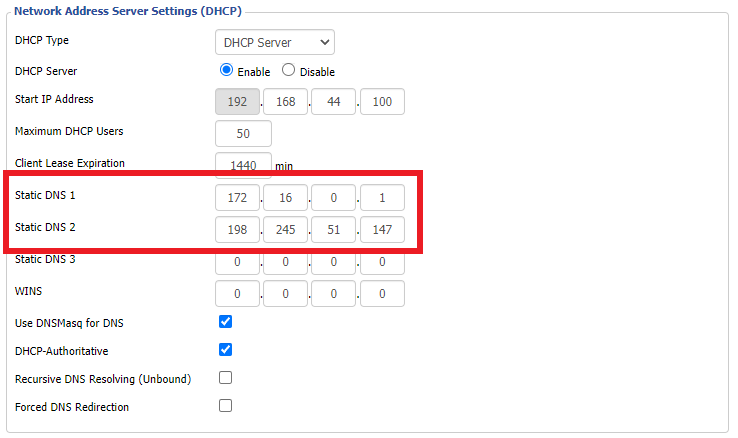
Set Static DNS 1 to 172.16.0.1

Set Static DNS 2 to 198.245.51.147

IVPN Wireguard Static DNS

Click Apply Settings.
Reboot the FlashRouter

Navigate to Administration > Management

Scroll to the bottom of the page and click the red Reboot Router button. Wait for the FlashRouter to reboot and then reconnect.

Verify a successful IVPN connection

Navigate to Setup > Tunnels

  1. You should Endpoint, Latest handshake, and Transfer in the WireGuard status area.
  2. Visit IVPN’s website to verify your status as using IVPN.

Back up your settings

Navigate to Administration > Backup

  1. Click the Backup button.
  2. A file named nvrambak.bin will be saved to your computer.
  3. You can load nvrambak.bin to restore your settings in the event of a reset.

TROUBLESHOOTING

Still having issues? Visit the VPN Troubleshooting section.

Troubleshoot Here

Privacy Hero VPN Setup Guide for Privacy Hero

TeamFlashRouters · Apr 3, 2023 ·

Your Privacy Hero router uses Cloud Based router management which means you can access the router settings from anywhere on any device that has an internet connection. You can follow these steps while connected to your phone, other Wi-Fi network, or the Privacy Hero network.

Use these steps to connect to Privacy Hero’s own WireGuard VPN servers. You will automatically be connected to the ideal USA or Canada server based on your location.

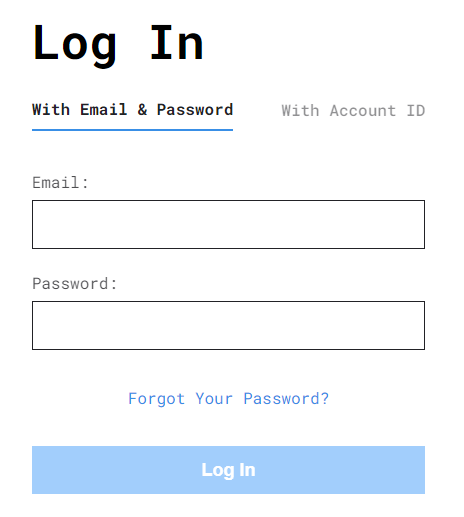
1. From any device that has a browser such as a computer, smartphone, or tablet visit app.privacyhero.com

App.PrivacyHero.com

2. Enter your Privacy Hero account email and password. Click Login.

Privacy Hero Access Settings

If you have not created your Privacy Hero account yet please follow these instructions.

3. Click the VPN symbol.

Privacy Hero Setup VPN

4. Set the VPN toggle to On.

Privacy Hero Enable VPN

5. Connect to the Privacy Hero’s via wireless or ethernet connection on your device and visit What is my IP Address from a private/incognito browser to verify your new IP address and virtual location.

Privacy Hero’s cloud based router settings access makes it so you can change settings while not connected to the Privacy Hero network so if your IP Address has not changed be sure to double check that you are indeed connected to the Privacy Hero network on the device you are checking your IP from.

Keep in mind that the VPN connection will not change the location of the streaming services listed in the Streaming Relocation area of the Privacy Hero settings.

TROUBLESHOOTING

Still having issues? Visit the VPN Troubleshooting section.

Troubleshoot Here

NordVPN Setup on Roqos

TeamFlashRouters · Dec 24, 2021 ·

Preparing for NordVPN Setup

Obtain your NordVPN manual Username and Password

If you are not already a NordVPN user Sign Up Now.

1. Log in to your account on the NordVPN website.

NordVPN login

2. Click NordVPN on the left hand side and then click Setup NordVPN manually.

NordVPN setup manually

3. Enter in the verification code that was sent to your email.

NordVPN verify code

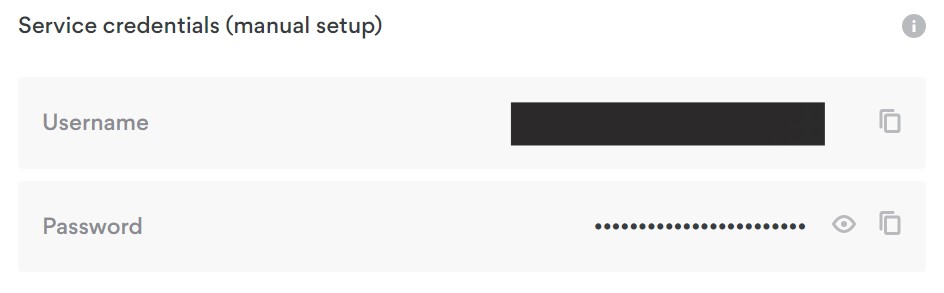
4. Copy and paste your NordVPN manual username and password to a secure location. This is the username and password you will enter into the router settings to connect to NordVPN.

NordVPN credentials

Connecting to NordVPN in the Roqos Core

Access the Roqos Core UI

1. Login to the Roqos Core web app in a browser on any computer or smart device.

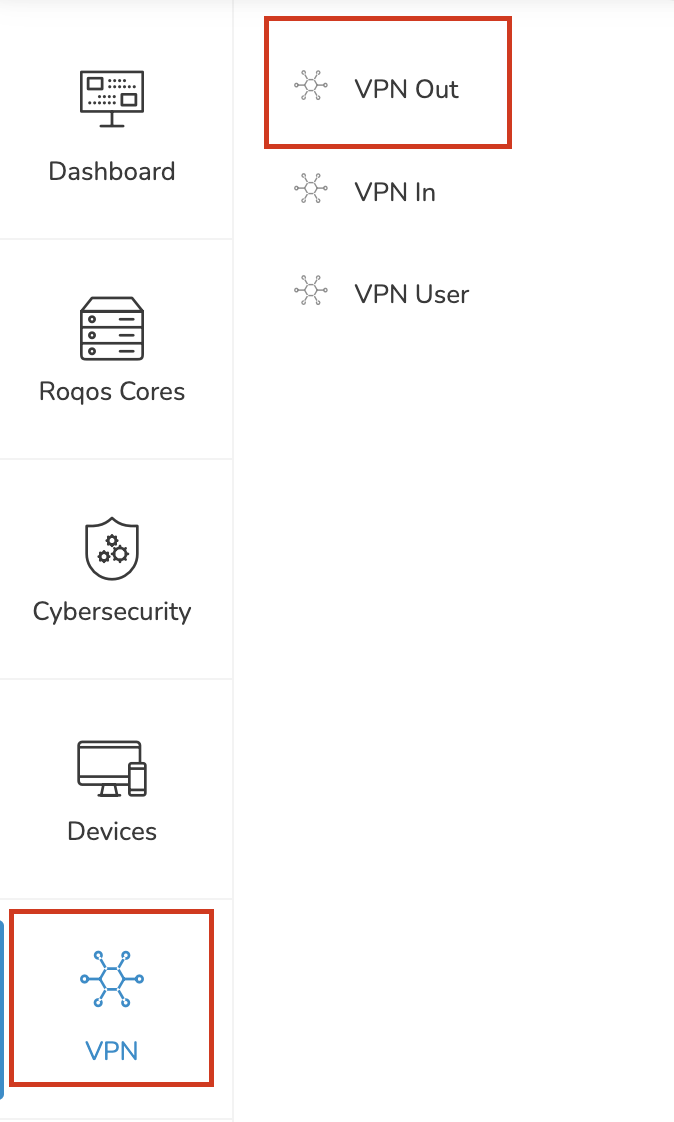
2. Click VPN from the navigation menu and then click VPN OUT.

Roqos VPN Out

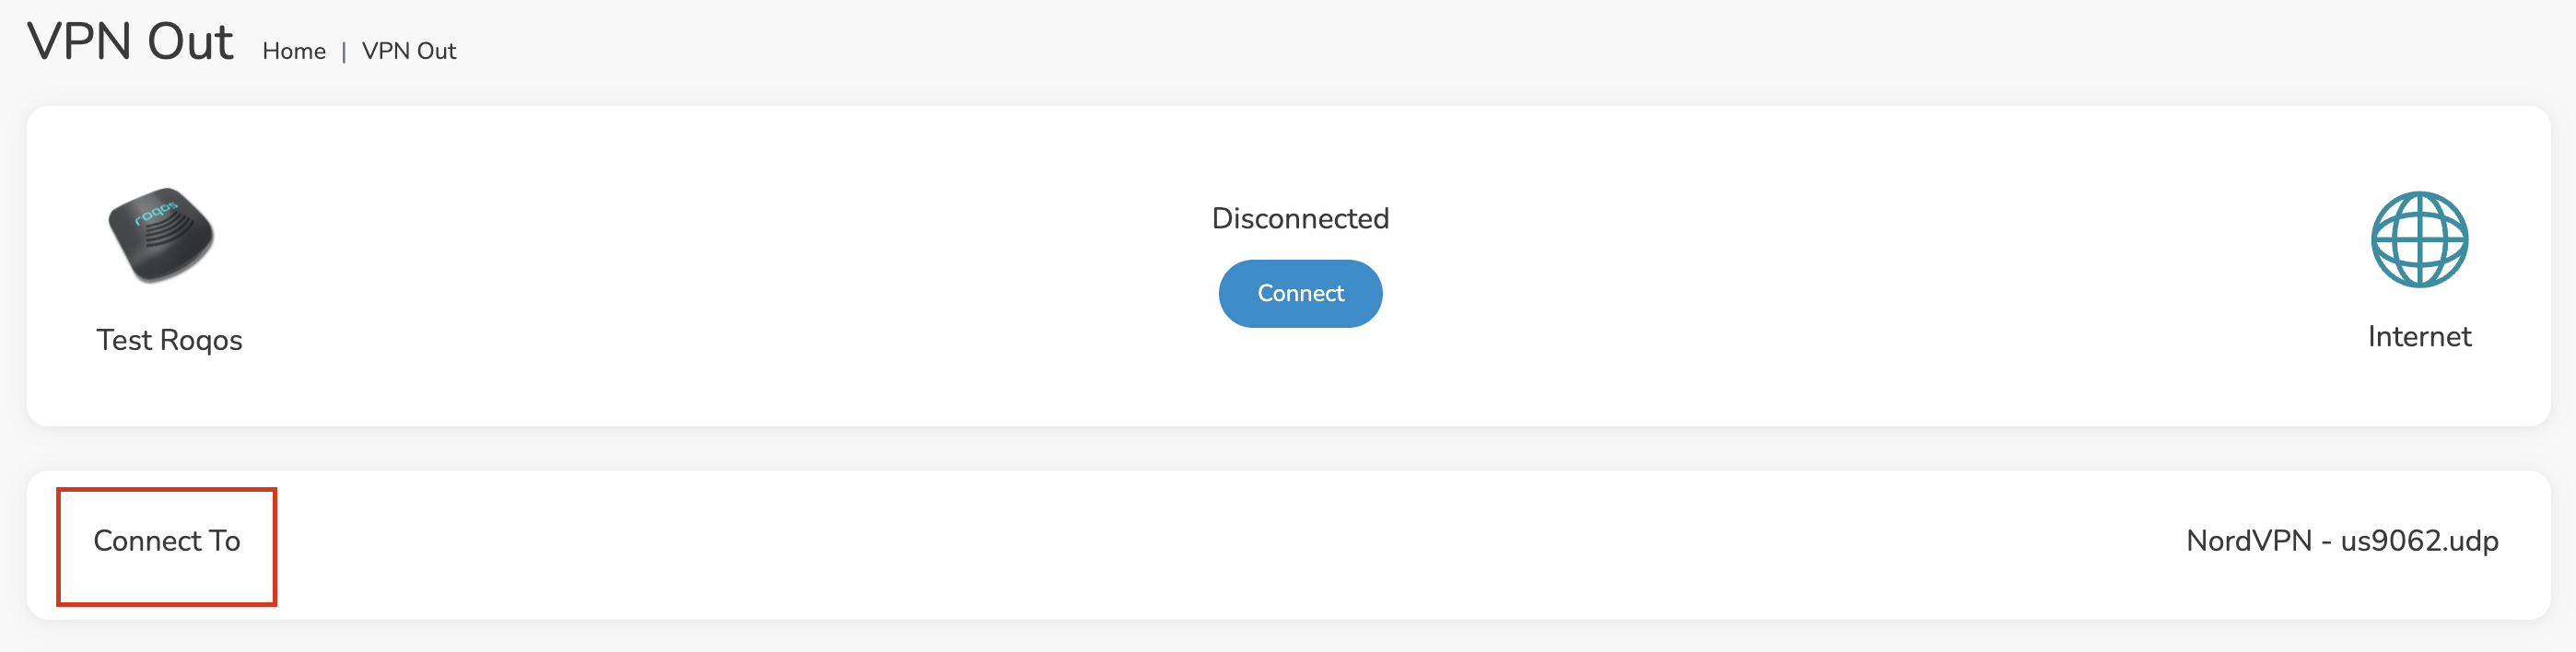
3. Click the Connect to box.

Roqos NordVPN Connect to

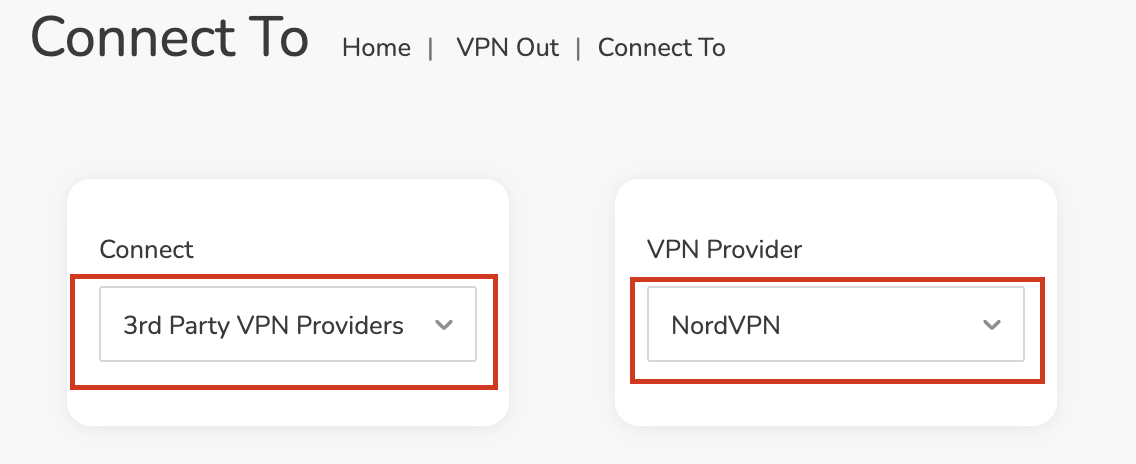
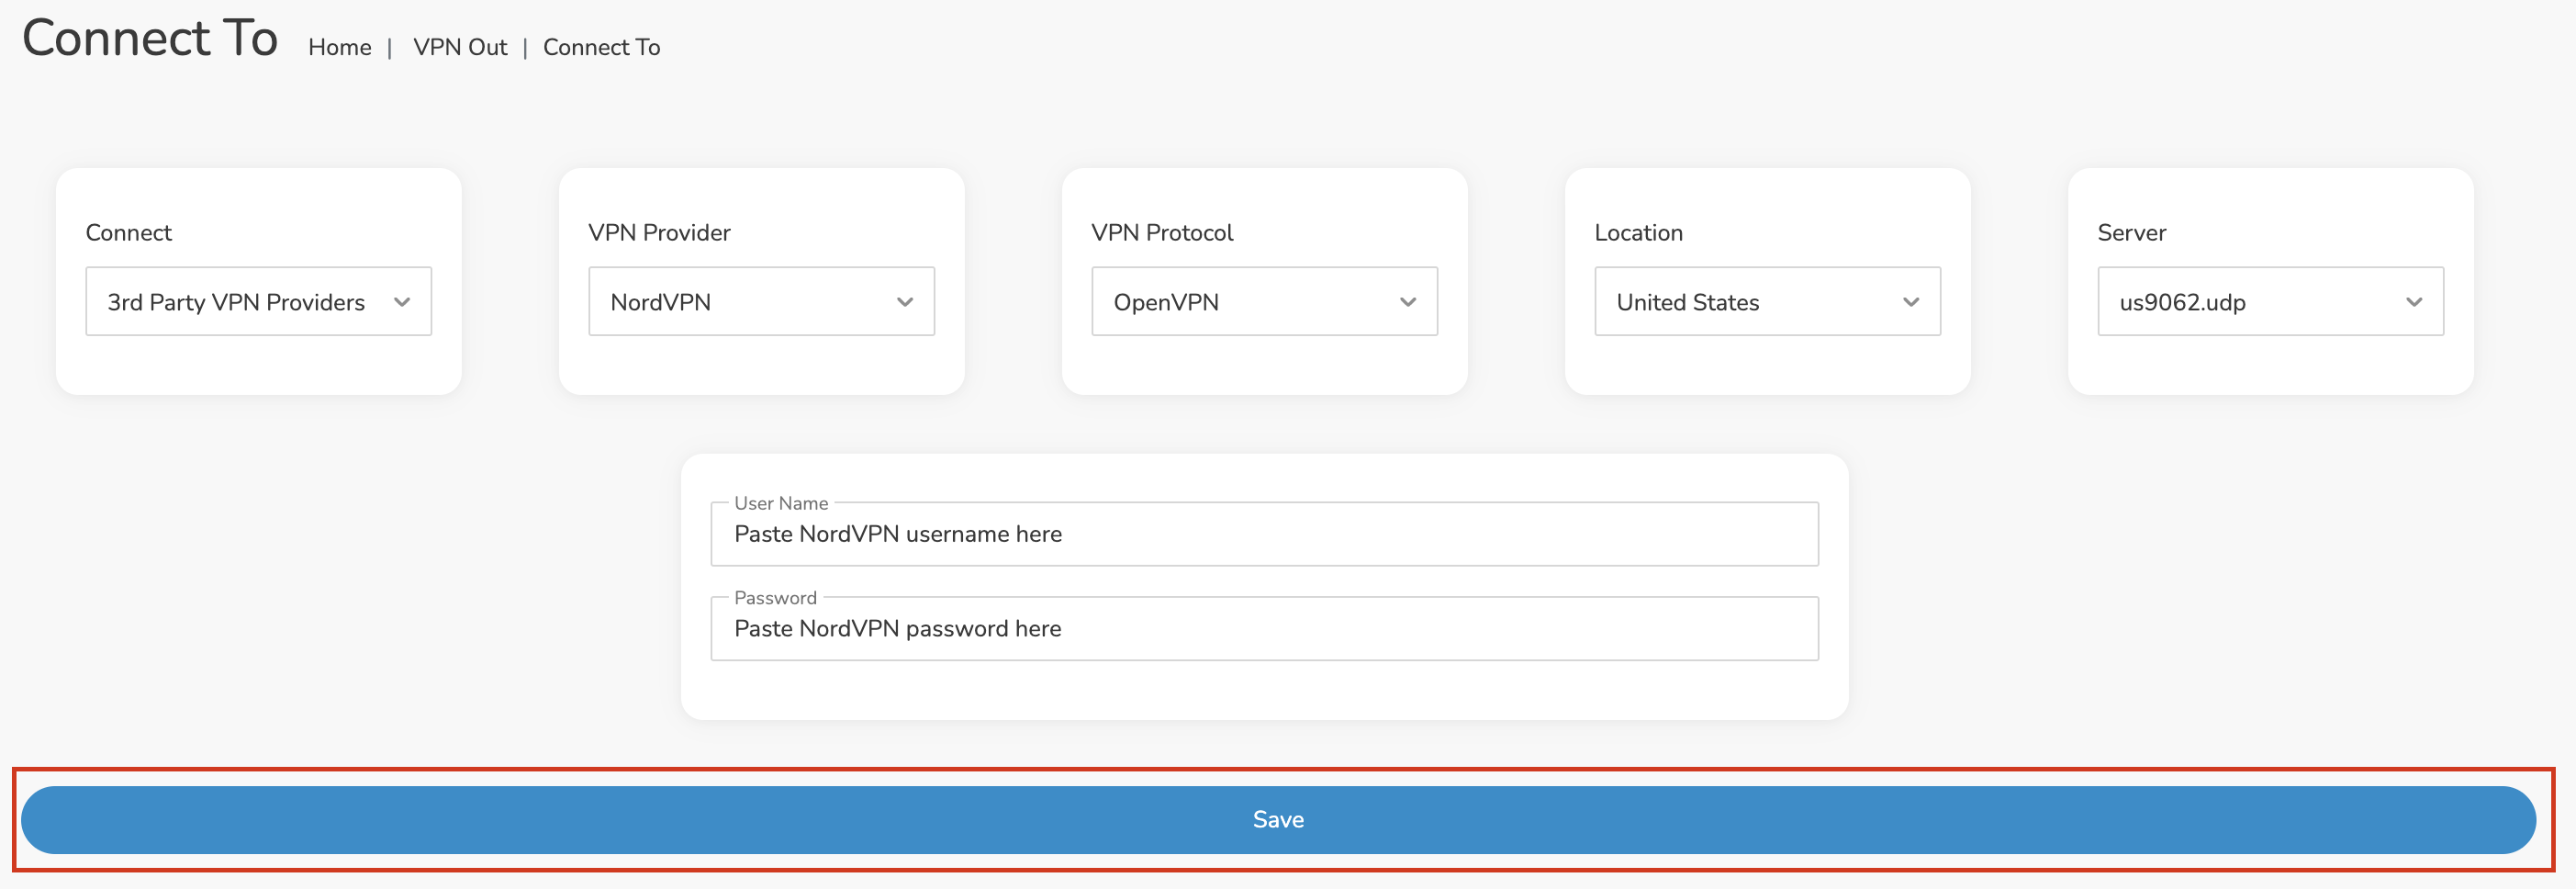
4. In the Connect dropdown choose 3rd Party VPN Providers and for the VPN Provider dropdown choose NordVPN.

Roqos NordVPN select provider

Enter your NordVPN information

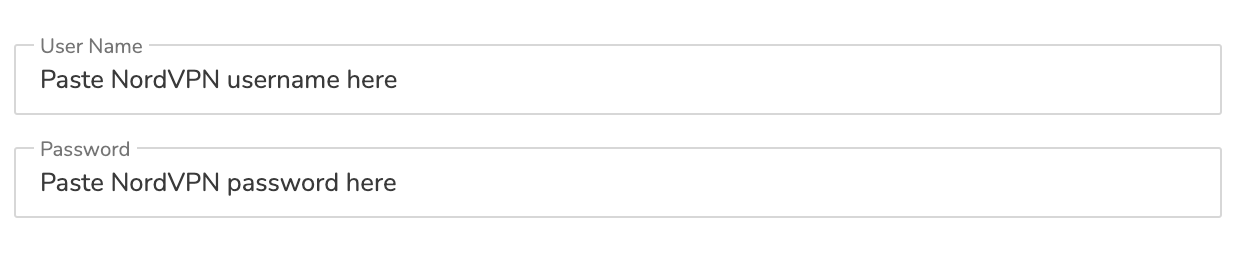
In the Username and Password field enter the NordVPN OpenVPN Username and Password that you obtained.

NordVPN credentials
Roqos NordVPN enter username and password

Select a NordVPN server

Navigate to NordVPN server recommendation page. Click Recommended server and select the country you want to connect to and note the server number that appears.

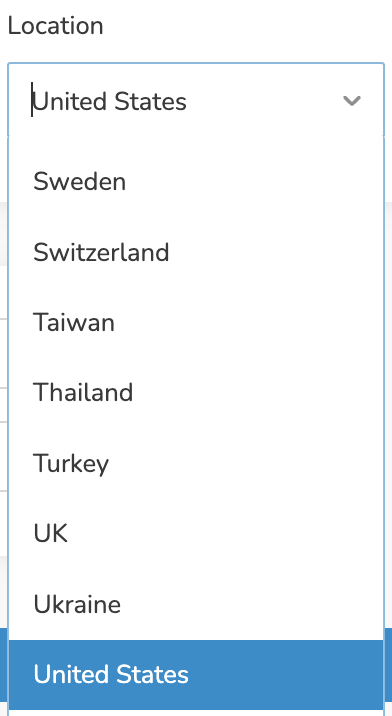
Click the Location dropdown and type in or scroll to the preferred server country.

Roqos NordVPN Select Location

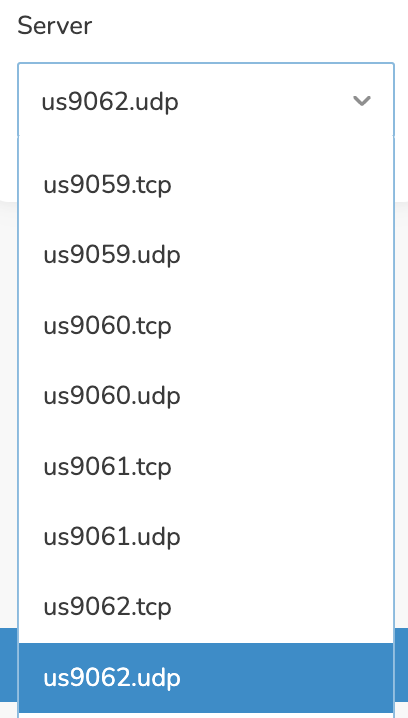
Click the Server dropdown and type in or scroll to the server number that was recommended. Select the UDP version of the server.

Roqos NordVPN select server number

Click the Save button.

Roqos NordVPN Save Settings

Connect to NordVPN

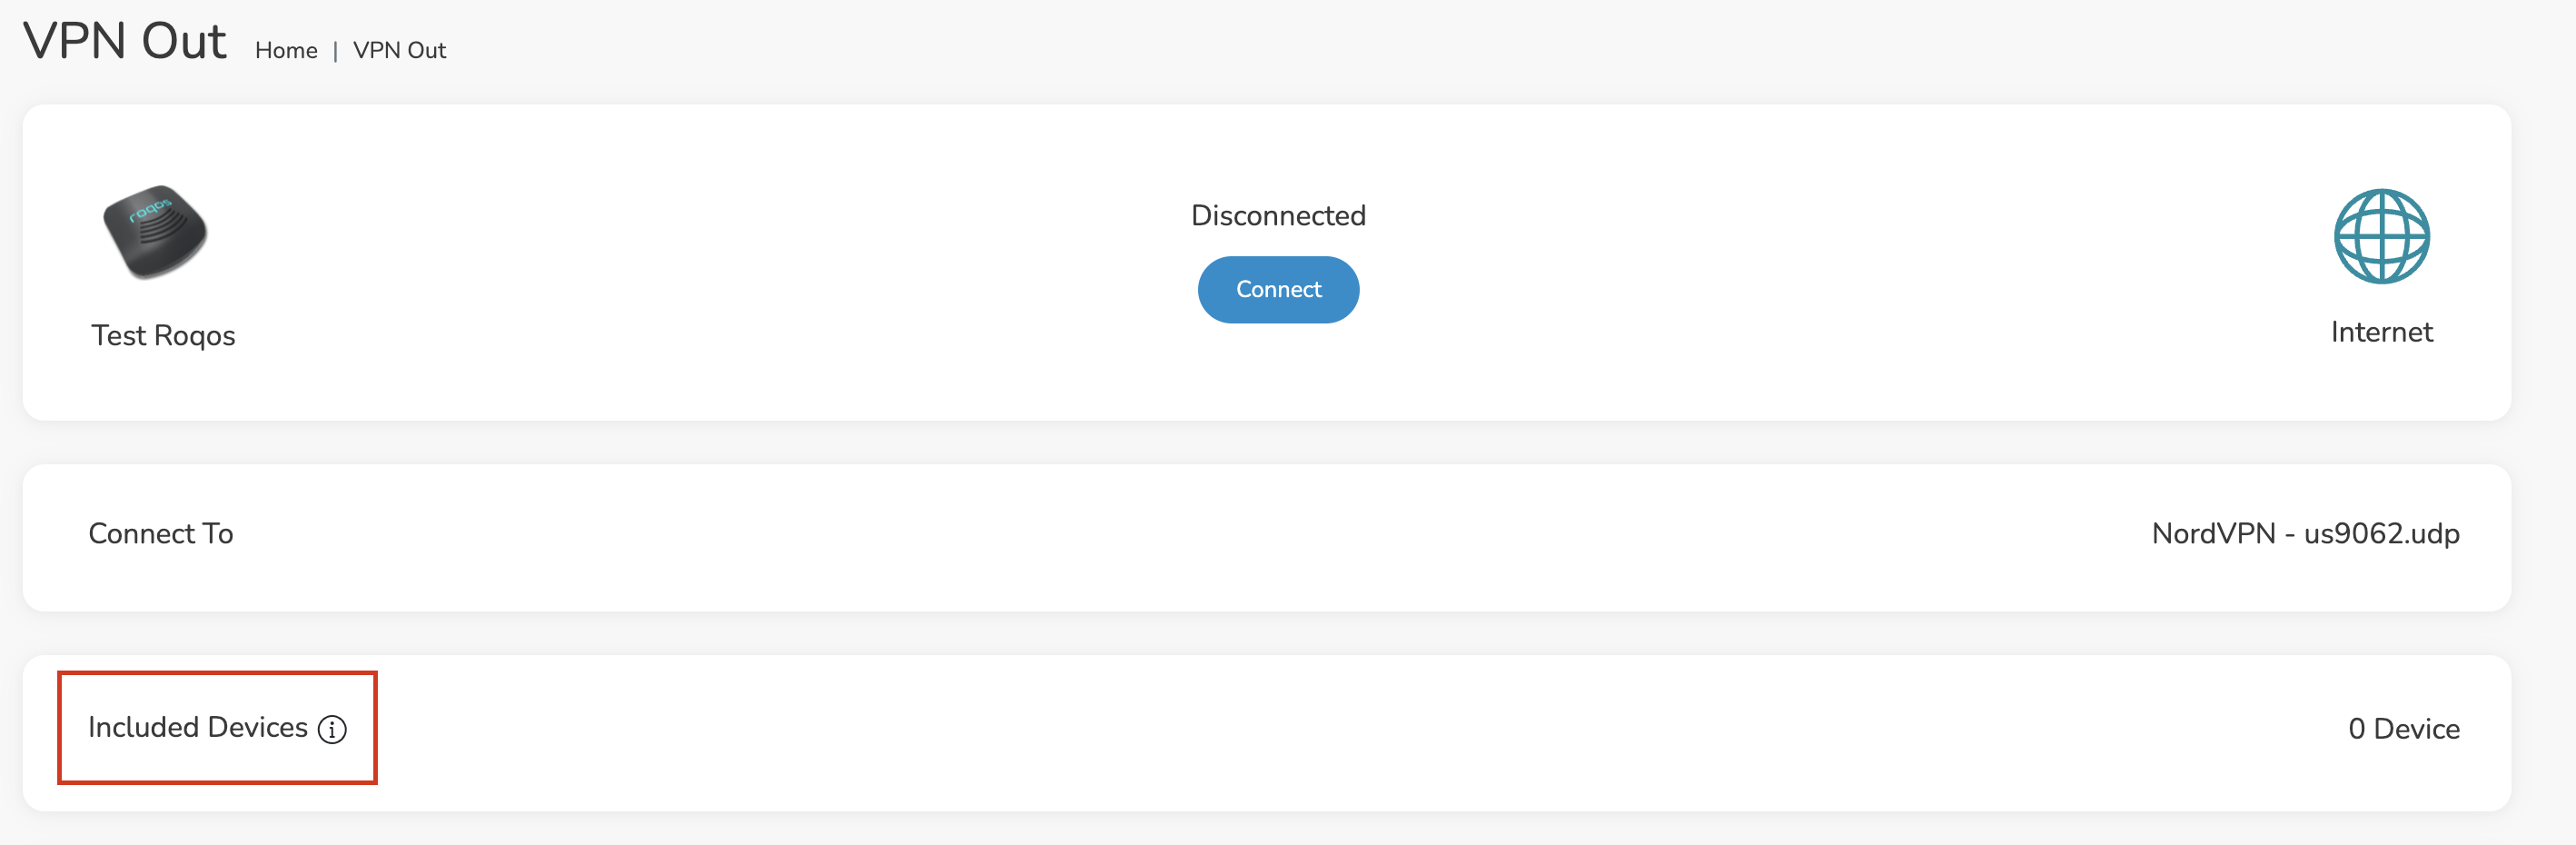
Once you click Save you will be returned to the VPN OUT menu.

Click the Connect button to start your NordVPN connection. Please be patient as the router connects your entire network through VPN.

Roqos VPN Connect

Assign devices to connect to VPN

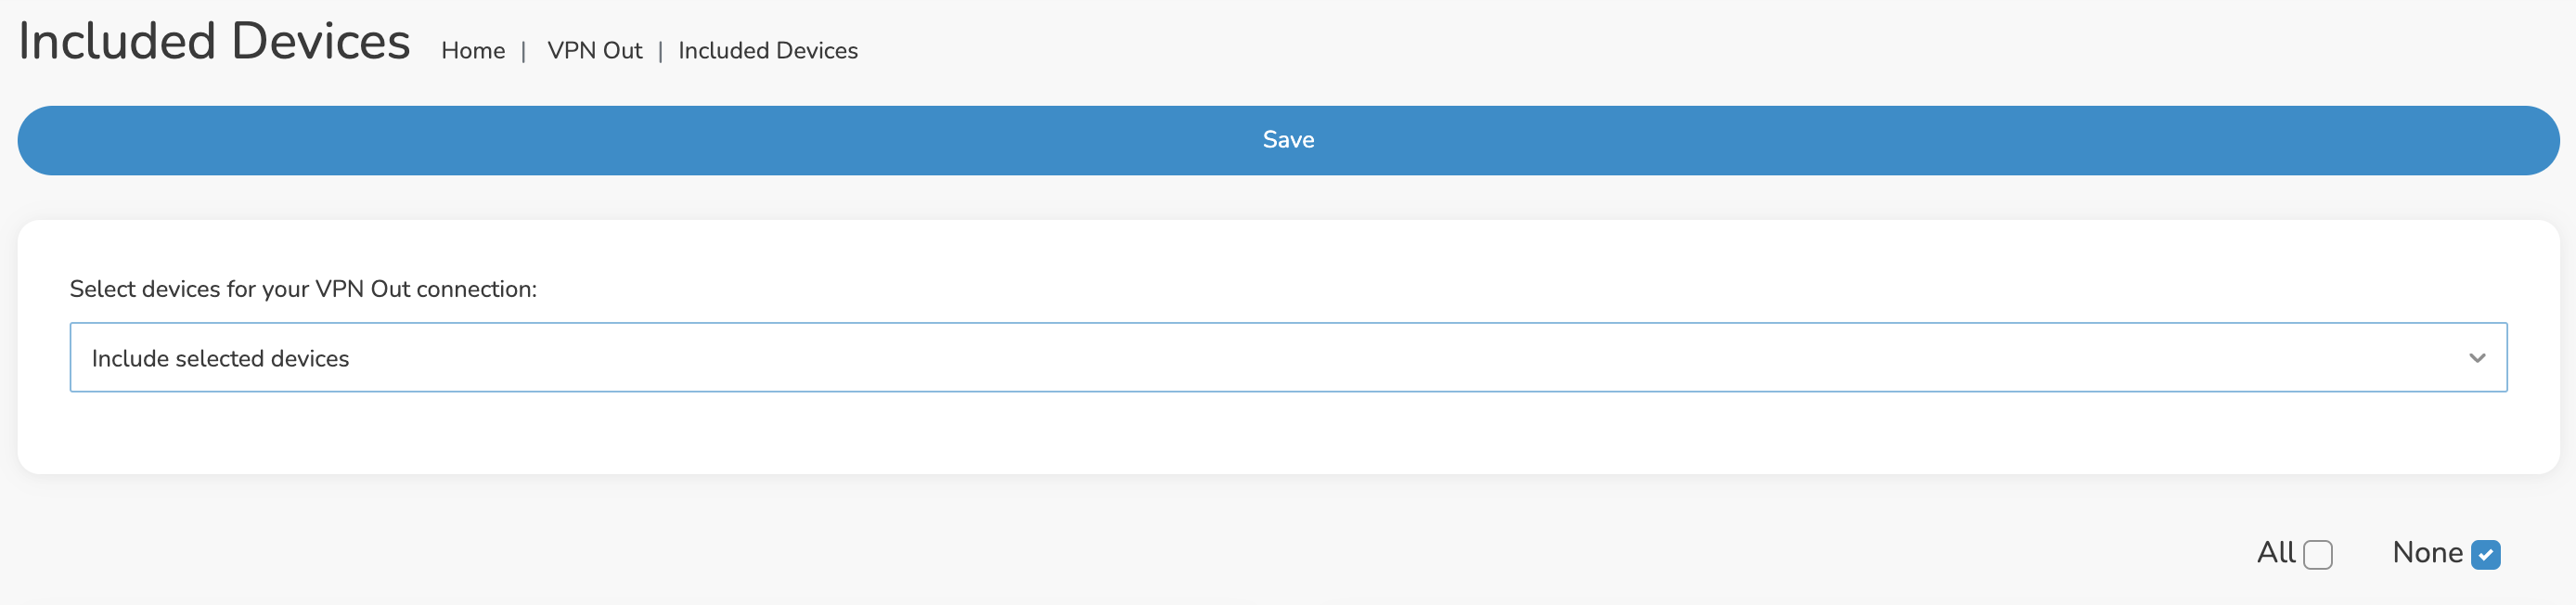
By default there are no devices assigned to the VPN tunnel. Click Included Devices. From this page you can choose if all devices should connect to NordVPN or only certain devices.

Roqos NordVPN Included Devices

From the dropdown select Include all devices if you want every device that connects to the Roqos to connect to NordVPN. Then click Save.

Roqos VPN Include All Devices

If you only want specific devices to connect to NordVPN while others bypass the VPN connection select Include selected devices from the dropdown and then toggle the sliders for the devices you want connected to VPN. Click Save.

Roqos VPN Include Selected devices

Verify a successful NordVPN connection

Make sure you are connected to the Roqos network via WiFi or ethernet connection on your device.

Visit NordVPN’s website to verify your new IP Address and Protected Status at the top of the page.

You should see Connected at the top of the page underneath NordVPN.

Connect to a different NordVPN server

To change your server click Disconnect on the VPN OUT page then return to the Connect To section to select a new server from the Server dropdown and click Save. Now click Connect once again on the VPN Out page.

Disconnect from NordVPN

To disconnect from NordVPN click the Disconnect button.

TROUBLESHOOTING

Still having issues? Visit the FR Privacy App Troubleshooting section.

Troubleshoot Here

Change WiFi name and password on Merlin

TeamFlashRouters · Jan 19, 2022 ·

Set a custom WiFi network name and password for your devices to join the Merlin FlashRouter’s network.

Login to Asus Merlin firmware settings in a browser on any computer or smart device.

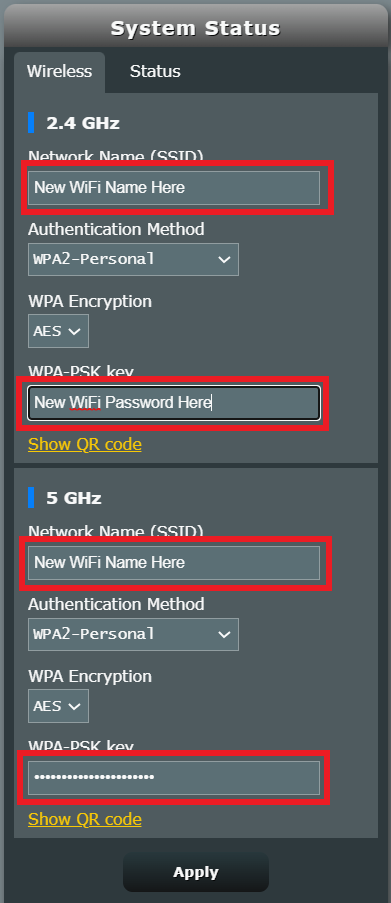
1. Under General select Network Map.

Merlin Wifi change name and pass

2. In the Network name (SSID) field enter the name you want your Asus WiFi to appear as. This can be the same or different for both 2.4GHz and 5GHz bands. We typically advise setting different names for each so you can connect your streaming devices to the 5GHz band as that is the faster WiFi band.

3. In the WPA-PSK key field enter the password you want to join your devices to the Merlin WiFi network. If your WiFi names are the same for 2.4GHz and 5GHz make sure they have the exact same wireless password set.

4. Click Apply and then rejoin the new wireless network.

NordVPN Setup Guide for Privacy Hero

TeamFlashRouters · Apr 3, 2023 ·

Your Privacy Hero NordVPN Router uses cloud-based management, which means you can securely access and adjust your router settings from anywhere, on any device with an internet connection. Whether you’re connected through your phone, another Wi-Fi network, or directly to the Privacy Hero network, setup and management are always within reach.

Follow the steps below to connect your Privacy Hero to NordVPN NordLynx or OpenVPN servers. By default, you’ll automatically connect to the fastest, most reliable server available based on your location. If you prefer, you can also select a specific country server and input it directly into your Privacy Hero for more control.

:point_right: Don’t have a Privacy Hero yet? Get your Privacy Hero NordVPN Router here

NordVPN Nordlynx Setup for Privacy Hero

1. From any device that has a browser such as a computer, smartphone, or tablet visit app.privacyhero.com

App.PrivacyHero.com

2. Enter your Privacy Hero account email and password. Click Login.

Privacy Hero Access Settings

3. Click the VPN symbol.

Privacy Hero Setup VPN

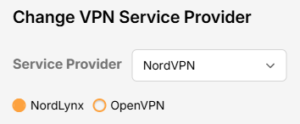
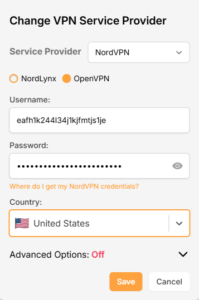
4. Click the Change button and select NordVPN from the dropdown.

Privacy Hero Change VPN Providers

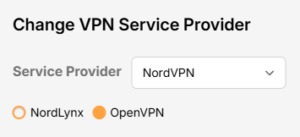
5. Click the Change button and select NordVPN from the dropdown and choose the NordLynx option. Next you will need to obtain your Token.

NordVPN Protocol Privacy Hero

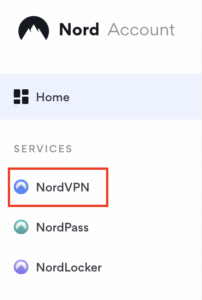
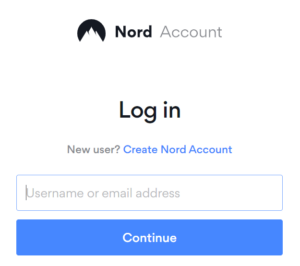
6. In a new tab login to your NordVPN account and select NordVPN from your list of Services.

NordVPN account

7. At the bottom of the page click Get Access token and you will receive a code via email. Enter this code to proceed.

NordVPN Access Token

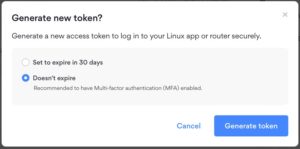
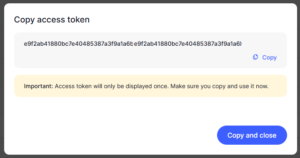
8. After you enter the email code select Generate new token and set it to Doesn’t expire. Copy this token.

NordVPN Generate new token
NordVPN Copy Token

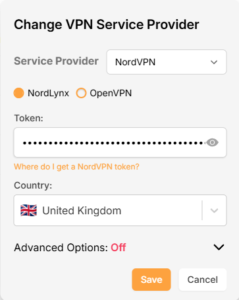
9. Paste the token and then Click Save to connect to the server address recommended by NordVPN within your country.

NordVPN Protocols Privacy Hero

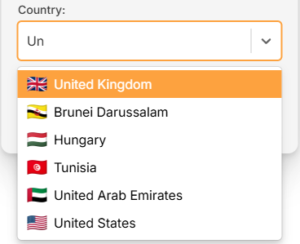
10. To connect to a specific location, click the Country dropdown menu and scroll or type to search from the available options. Choose your preferred country and you will automatically connect to the recommended server within that country at the time. Then click Save.

Nordlynx VPN Country Selection Privacy Hero

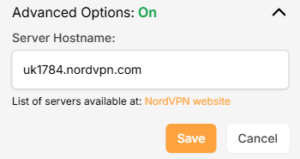
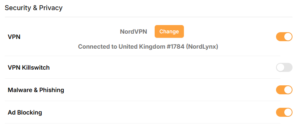
11. If you prefer to enter a specific server address number click Advanced Options and then type in the NordVPN server you would like to use as shown below e.g. uk1784.nordvpn.com. Then click Save.

Nordlynx Advanced Privacy Hero

Use the NordVPN’s server recommendation tool to select a specific country and receive a recommendation for the fastest server based on your actual location. You can then enter that server in the Privacy Hero settings manually.

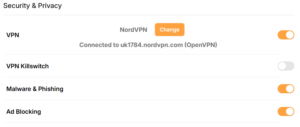
12. Your Privacy Hero settings should now show a Connected message, indicating you have successfully signed in to your NordVPN NordLynx VPN server!

Privacy Hero Nordlynx Connected

NordVPN OpenVPN Setup for Privacy Hero

1. From any device that has a browser such as a computer, smartphone, or tablet visit app.privacyhero.com

App.PrivacyHero.com

2. Enter your Privacy Hero account email and password. Click Login.

Privacy Hero Access Settings

3. Click the VPN symbol.

Privacy Hero Setup VPN

4. Click the Change button and select NordVPN from the dropdown.

Privacy Hero Change VPN Providers

5. Choose the OpenVPN option to connect to OpenVPN servers or to setup a NordVPN Dedicated IP address. Next you will need to obtain your Manual Service credentials.

NordVPN Protocol Privacy Hero

6. In a new tab login to your NordVPN account and select NordVPN from your list of Services.

NordVPN login
NordVPN account

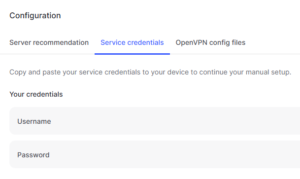
7. At the bottom of the page in the Manual Setup section click Setup NordVPN manually then under the Configuration section go to Service credentials. Click Verify email to receive a code via email and enter the code to view and copy your credentials.

NordVPN Manual OpenVPN
NordVPN Service Credentials

8. Enter these credentials into the OpenVPN Username and Password sections in your Privacy Hero and Click Save if you want to connect to the server address recommended by NordVPN within your country.

NordVPN OpenVPN Privacy Hero

9. To connect to a specific location, click the Country dropdown menu and scroll or type to search from the available options. Choose your preferred country and you will automatically connect to the recommended server within that country at the time. Then click Save.

Nordlynx VPN Country Selection Privacy Hero

10. To connect with a NordVPN Dedicated IP Address or if you prefer to enter a specific server address number click Advanced Options and then type in the NordVPN server you would like to use as shown below e.g. uk1784.nordvpn.com. Then click Save.

Nordlynx Advanced Privacy Hero

Use the NordVPN’s server recommendation tool to select a specific country and receive a recommendation for the fastest server based on your actual location. You can then enter that server in the Privacy Hero settings manually.

11. Your Privacy Hero settings should now show a Connected message, indicating you have successfully signed in to your NordVPN Dedicated IP address or preferred OpenVPN server!

NordVPN OpenVPN Connected Privacy Hero

Privacy Hero’s cloud based router settings access makes it so you can change settings while not connected to the Privacy Hero network. Visit the NordVPN IP Check to verify your VPN IP address. If it has not changed be sure to double check that you are indeed connected to the Privacy Hero network.

Keep in mind that the VPN connection will not change the location of the streaming services listed in the Streaming Relocation area of the Privacy Hero settings if the Streaming Relocation feature is Enabled.

Still having issues?

Feel free to submit a ticket and we will get back to you as soon as possible.

Open Ticket

OPEN SUPPORT TICKET

Please fill out the form below and be sure to use the same e-mail on file so we can streamline our diagnoses of your issue.

[zendesk_request_form]

TP-Link Change Wi-Fi name and password

TeamFlashRouters · Apr 16, 2024 ·

Follow this guide to change the Wi-Fi name and password on your TP-Link FlashRouter.

1. Connect your computer, phone, or tablet to the TP-Link router via wireless (FlashRouter24 / FlashRouter50) or via ethernet cable to one of the LAN ports on the router.

The FlashRouter WiFi password is printed on the sheet that came with the router and is set to Wireless#[First 5 characters of your router MAC]. The router MAC can be found on the bottom of your router if you cannot locate the sheet. For e.g. if your MAC is 1459C07E70A8 then your WiFi password is Wireless#1459C

Be sure to capitalize the W.

2. Once connected via wireless or ethernet on your device open your browser and go to the TP-Link firmware settings.

TP-Link URL Access

3. Enter tp-link as the admin password to access the TP-Link firmware settings.

TP-Link admin password

4. Click Wireless.

TP-Link Wireless tab

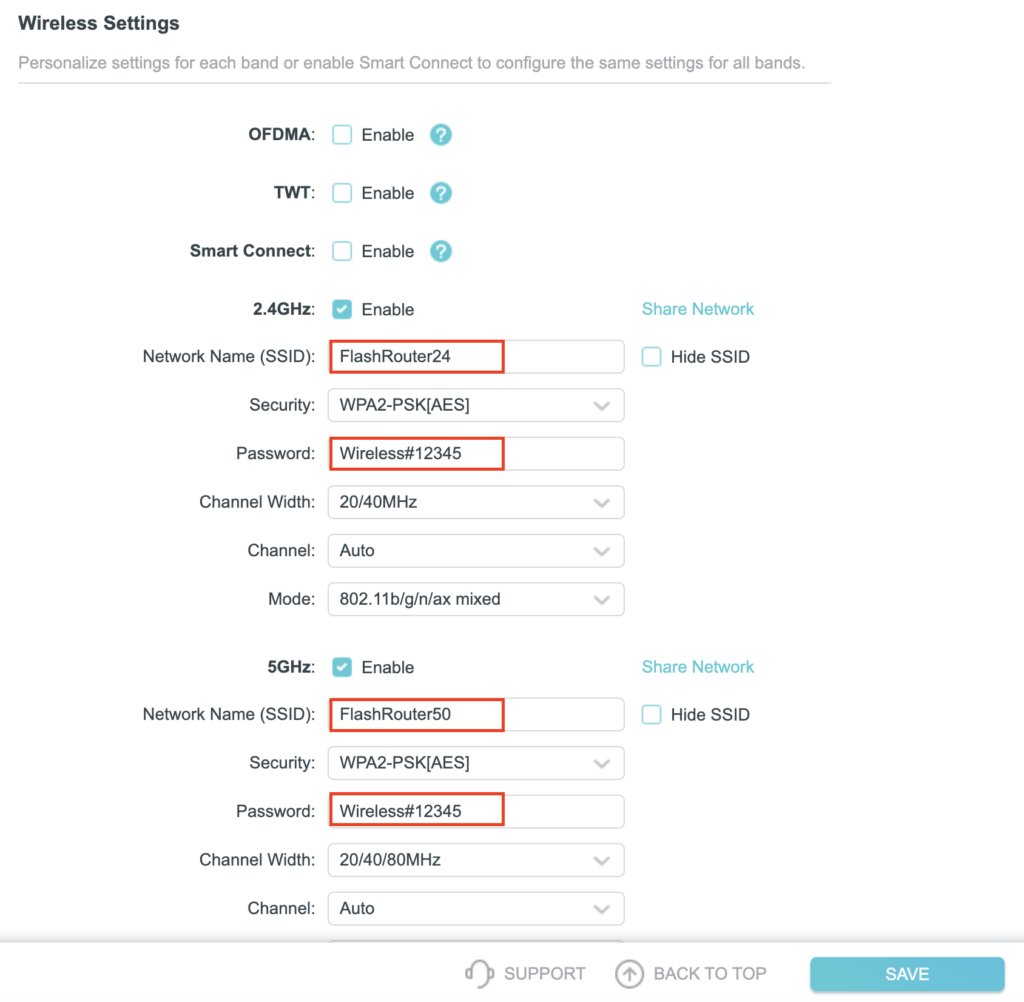
5. Change the Network Name (SSID) and Password fields to what you want to use. The SSID should be unique and NOT a duplicate of an existing network. Click Save.

TP-Link Change Wireless name and password

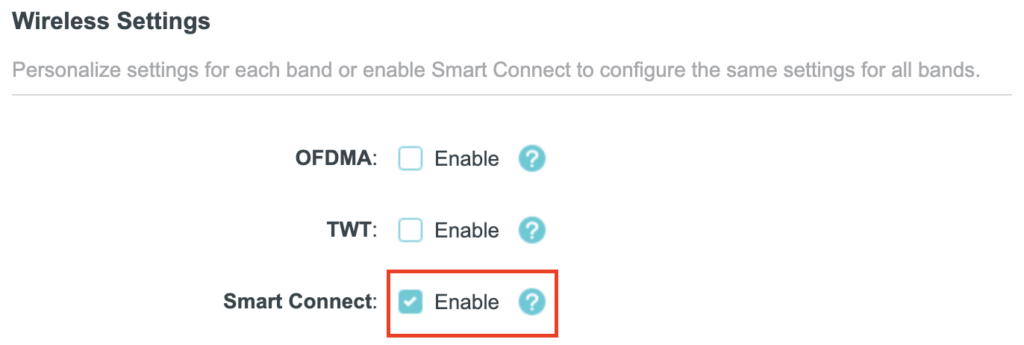
If you want both 2.4GHz and 5GHz networks to be bonded and have the same name click the Smart Connect checkbox.

TP-Link Separate Wifi

6. Connect your devices to the new wireless network.

TROUBLESHOOTING

Still having issues? Visit the VPN Troubleshooting section.

Troubleshoot Here

PrivateInternetAccess (PIA) Setup on Roqos

TeamFlashRouters · Dec 24, 2021 ·

Preparing for PIA Setup

Obtain your PIA login information

If you are not already an PIA user Sign Up Now.

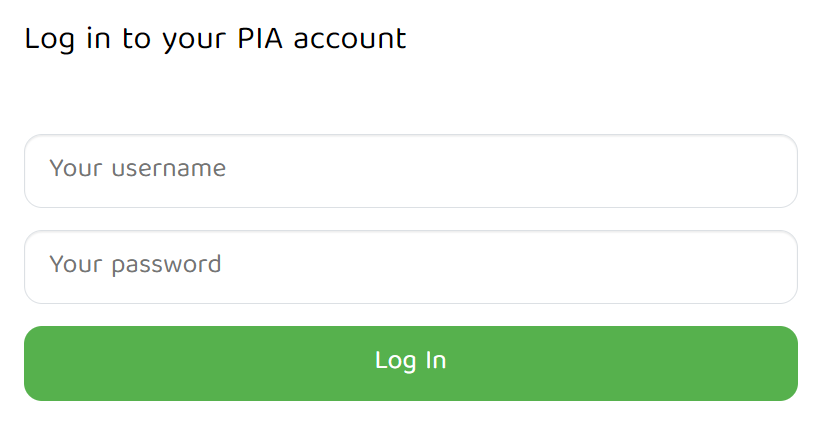
1. Visit PIA’s website login page.

PIA login

2. Successfully log in with your account information.

Connecting to PIA in the Roqos Core

Access the Roqos Core UI

1. Login to the Roqos Core web app in a browser on any computer or smart device.

2. Click VPN from the navigation menu and then click VPN OUT.

Roqos VPN Out

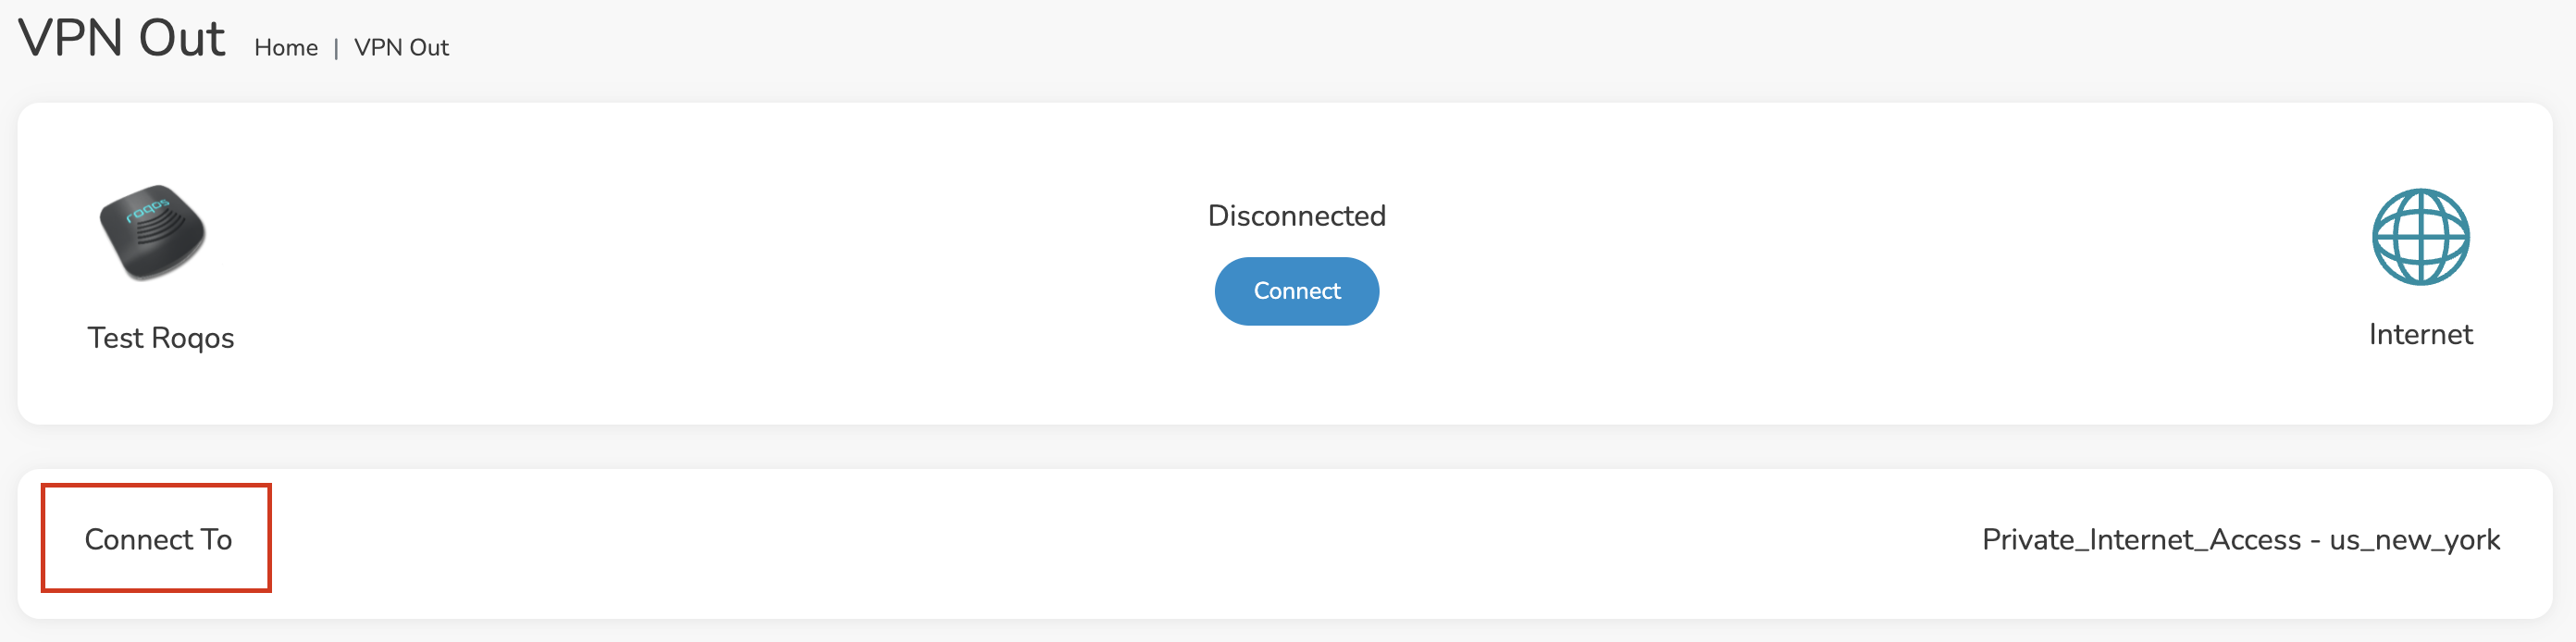
3. Click the Connect to box.

Roqos PIA Connect to

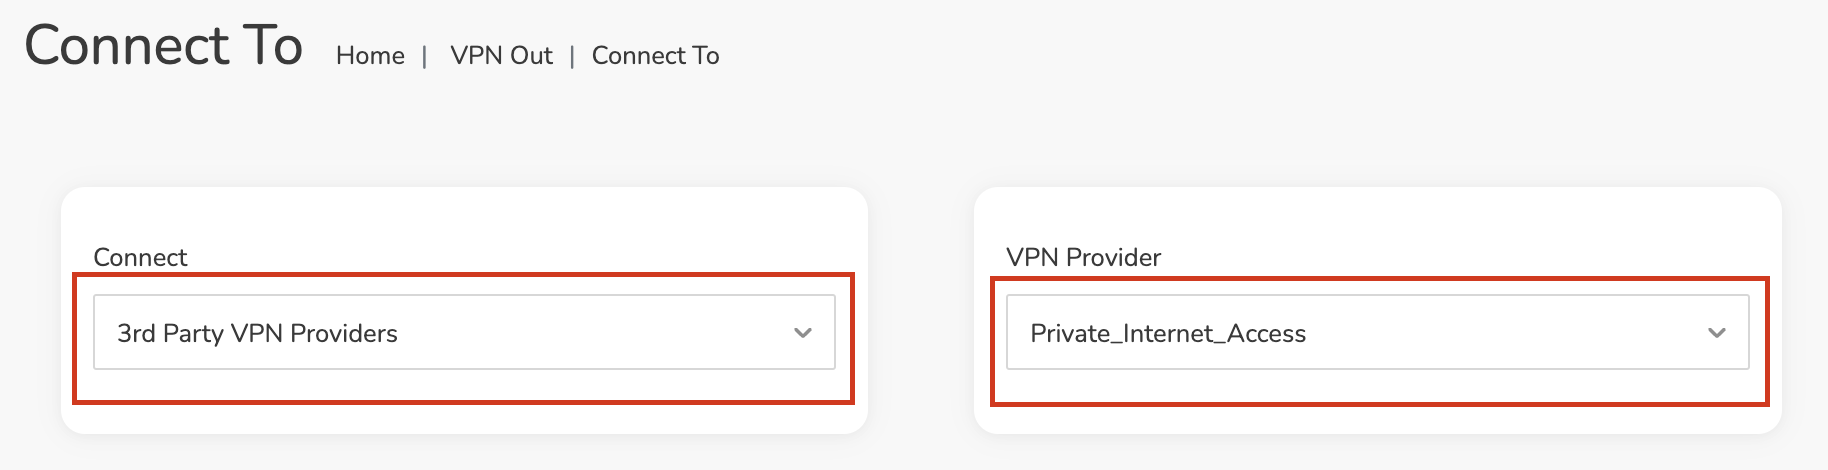
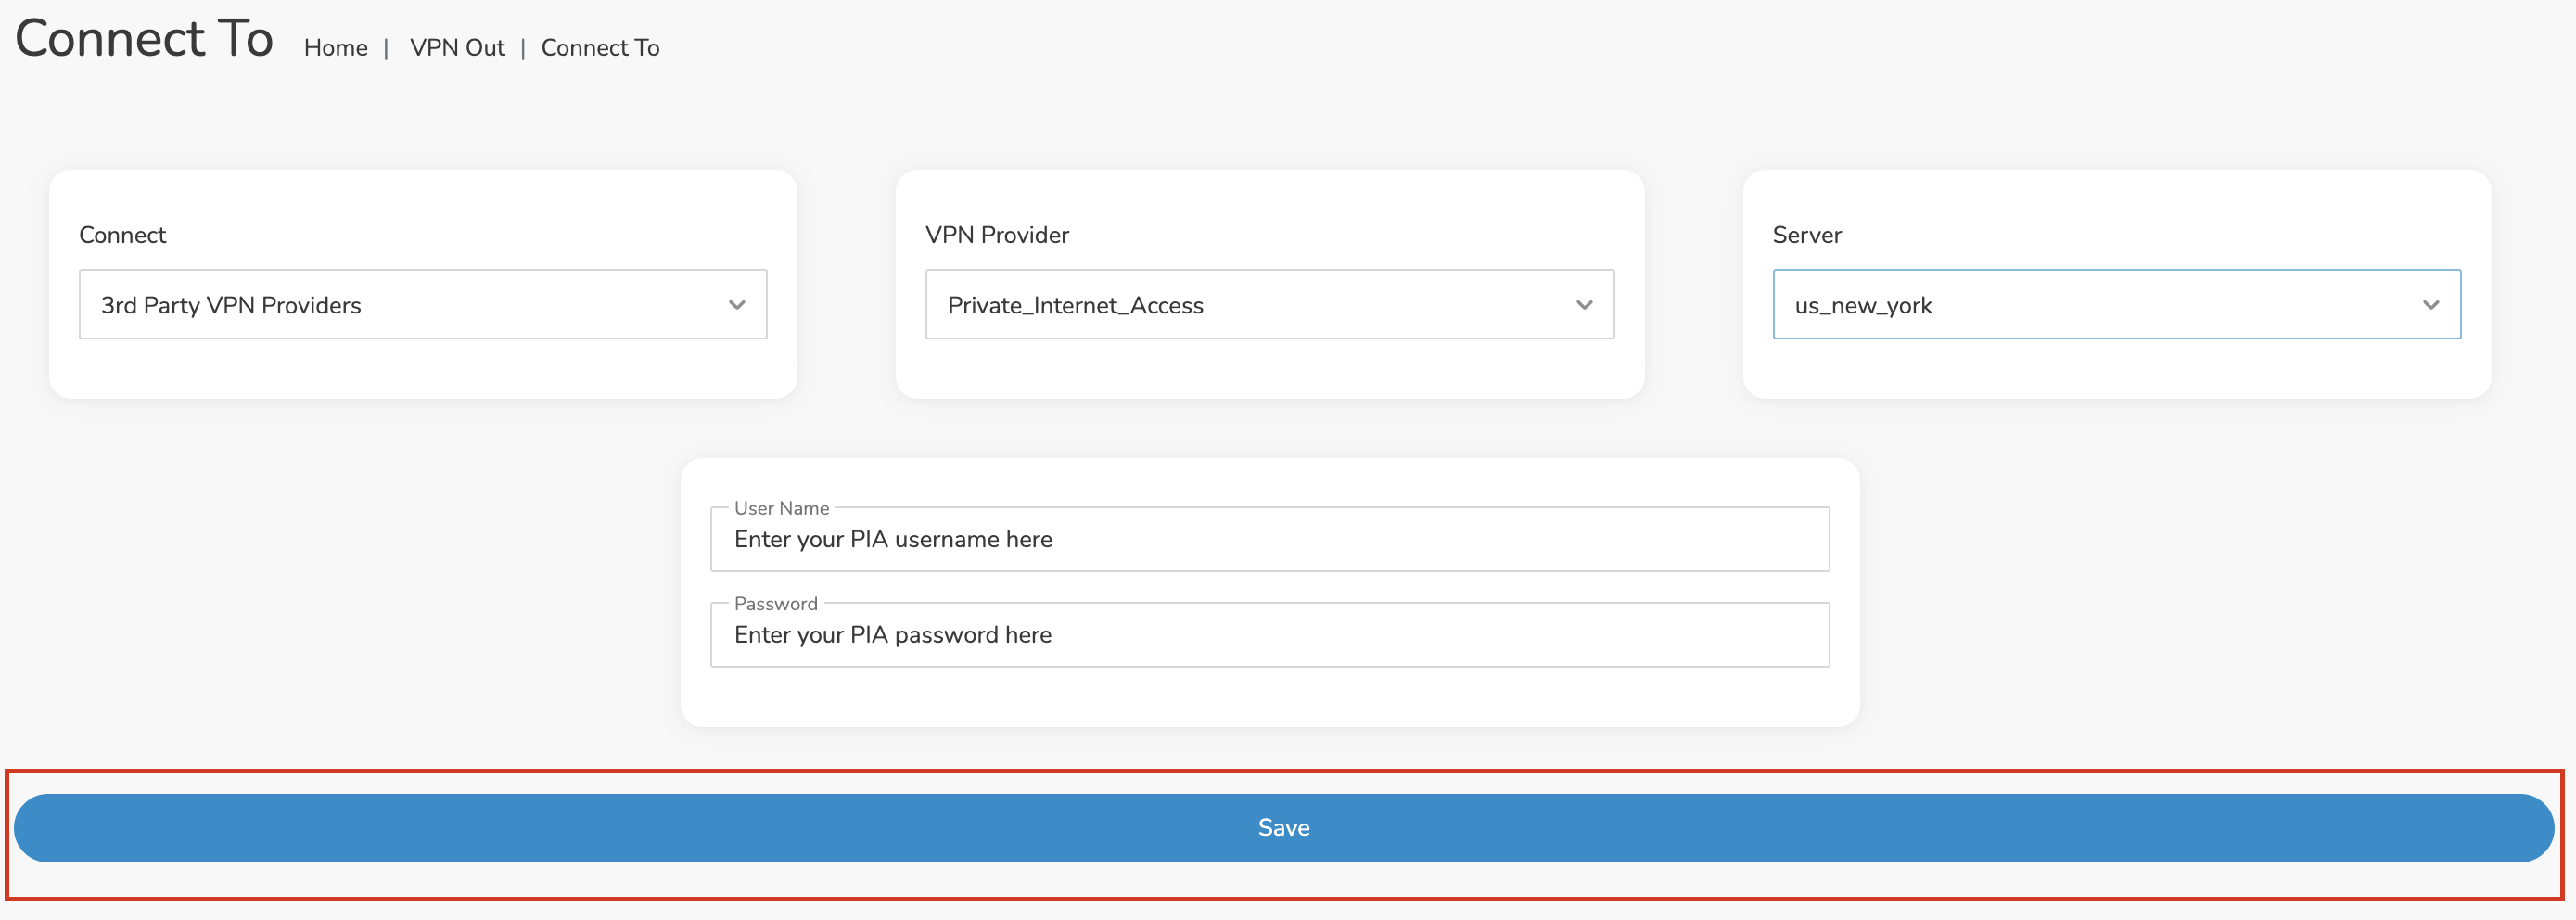
4. In the Connect dropdown choose 3rd Party VPN Providers and for the VPN Provider dropdown choose Private_Internet_Access.

Roqos PIA select provider

Enter your PIA information

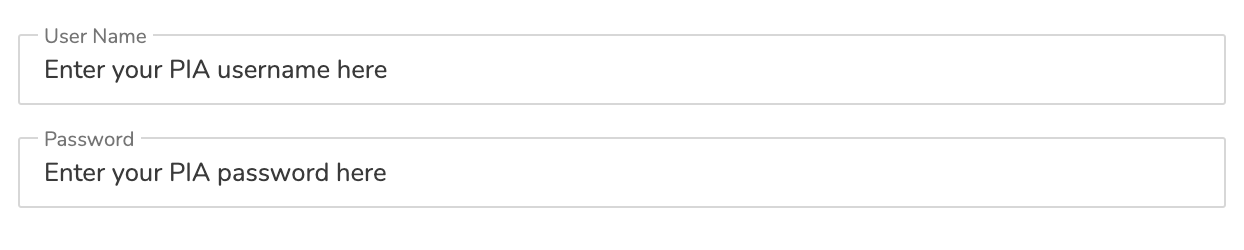
In the Username and Password field enter the PIA Username and Password that you logged in with.

Roqos PIA enter username and password

Select a PIA server

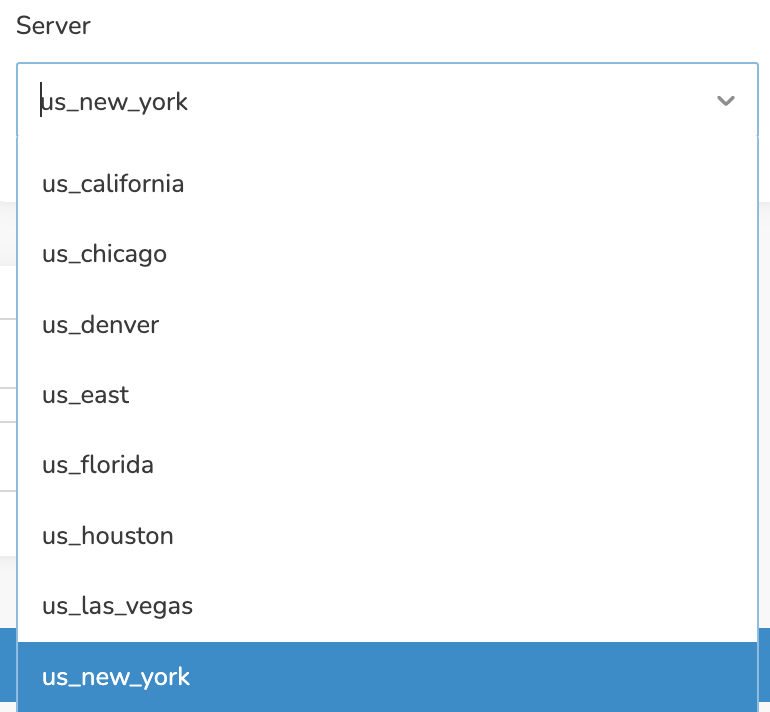
Click the Server dropdown and type in or scroll to your preferred server location.

Roqos PIA server select

Click the Save button.

Roqos PIA Save Settings

Connect to PIA

Once you click Save you will be returned to the VPN OUT menu.

Click the Connect button to start your PIA connection. Please be patient as the router connects your entire network through VPN.

Roqos VPN Connect

Assign devices to connect to VPN

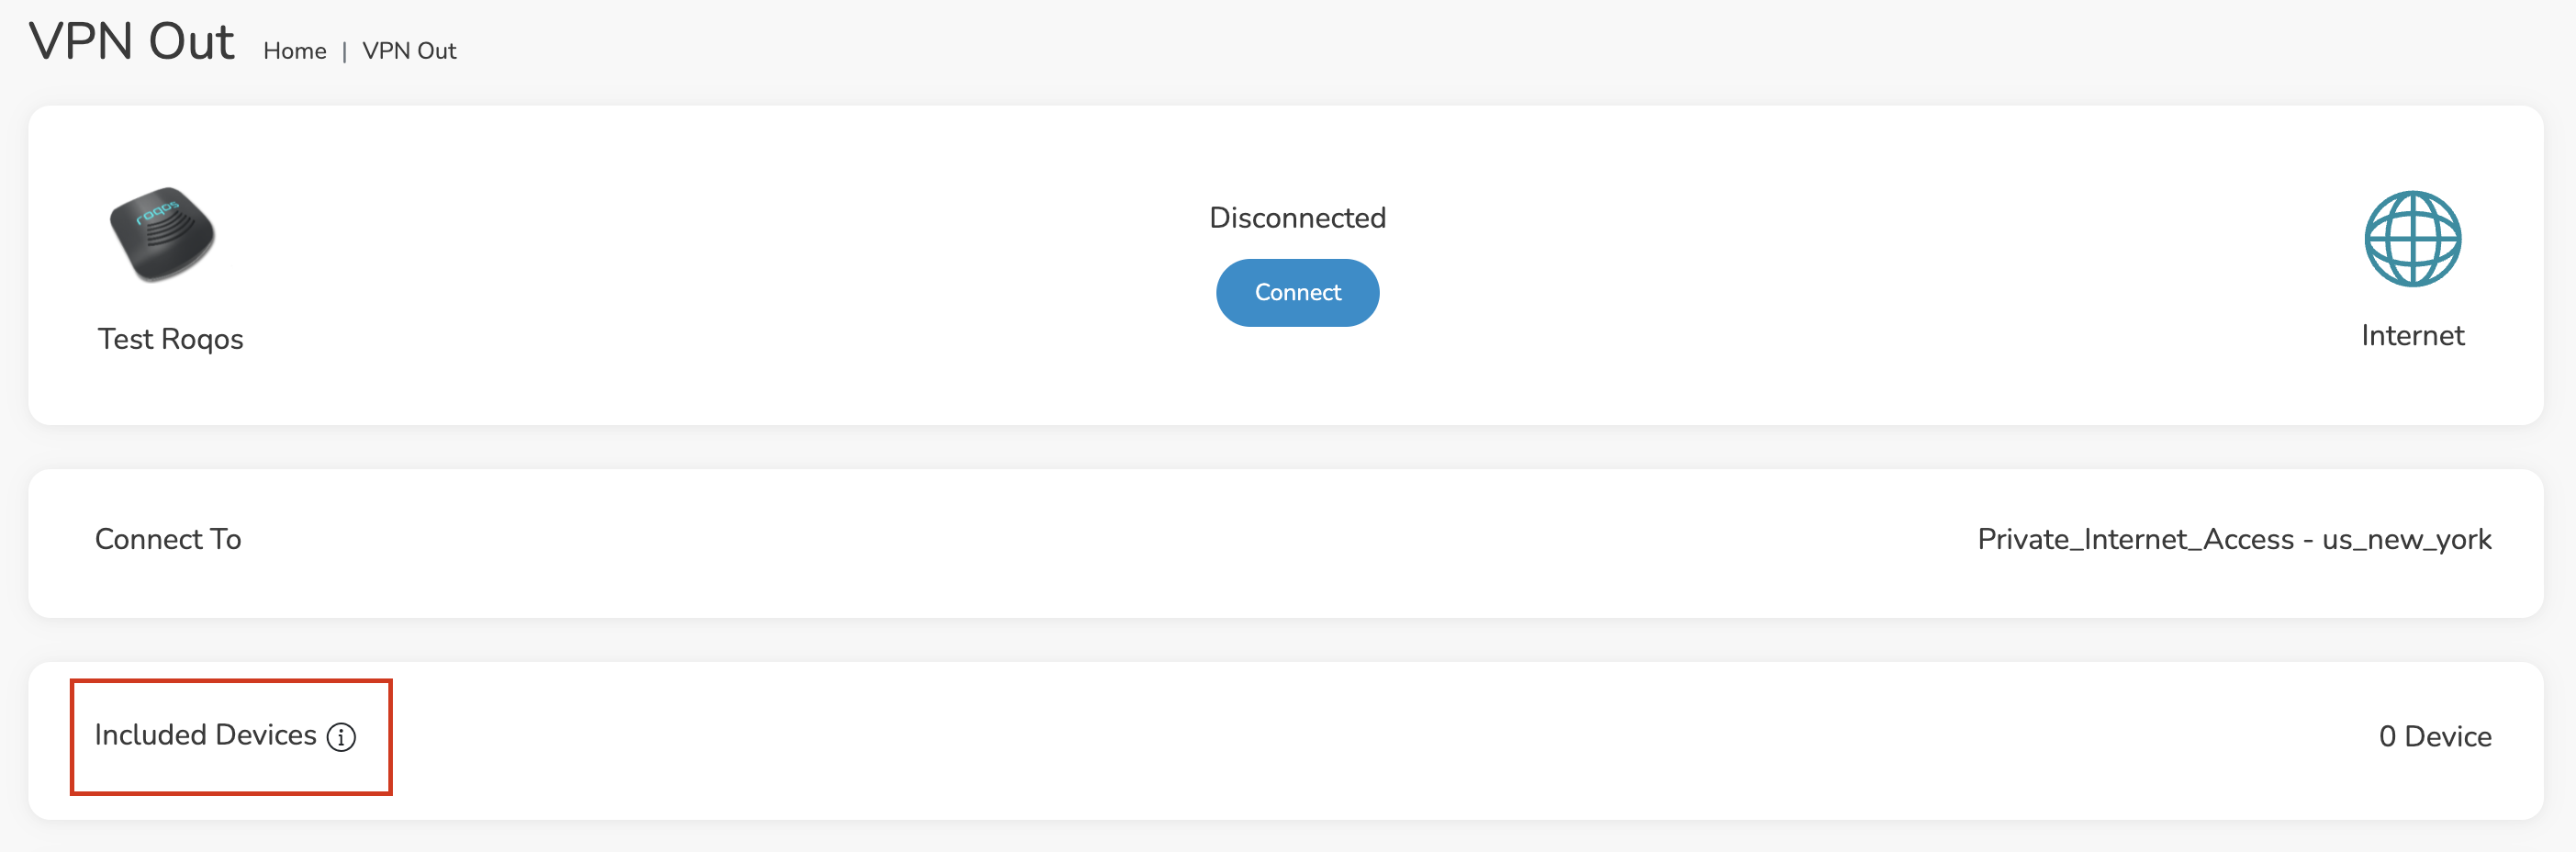
By default there are no devices assigned to the VPN tunnel. Click Included Devices. From this page you can choose if all devices should connect to PIA or only certain devices.

Roqos PIA Included Devices

From the dropdown select Include all devices if you want every device that connects to the Roqos to connect to PIA. Then click Save.

Roqos VPN Include All Devices

If you only want specific devices to connect to PIA while others bypass the VPN connection select Include selected devices from the dropdown and then toggle the sliders for the devices you want connected to VPN. Click Save.

Roqos VPN Include Selected devices

Verify a successful PIA connection

Make sure you are connected to the Roqos network via WiFi or ethernet connection on your device.

Visit PIA’s IP Check to verify your new IP Address and virtual location.

You should see Connected at the top of the page underneath Private_Internet_Access.

Connect to a different PIA server

To change your server click Disconnect on the VPN OUT page then return to the Connect To section to select a new server from the Server dropdown and click Save. Now click Connect once again on the VPN Out page.

Disconnect from PIA

To disconnect from PIA click the Disconnect button.

TROUBLESHOOTING

Still having issues? Visit the FR Privacy App Troubleshooting section.

Troubleshoot Here

Private Internet Access VPN Setup Guide for Privacy Hero

TeamFlashRouters · Apr 3, 2023 ·

Your Privacy Hero router uses Cloud Based router management which means you can access the router settings from anywhere on any device that has an internet connection. You can follow these steps while connected to your phone, other Wi-Fi network, or the Privacy Hero network

Private Internet Access (PIA) Wireguard Setup for Privacy Hero (recommended)

1. From any device that has a browser such as a computer, smartphone, or tablet visit app.privacyhero.com.

App.PrivacyHero.com

2. Enter your Privacy Hero account email and password. Click Login.

Privacy Hero Access Settings

3. Click the VPN symbol.

Privacy Hero Setup VPN

4. Click the Change button and select Private Internet Access from the dropdown.

Privacy Hero Change VPN Providers

5. Enter your correct PIA account login username and password and click Save.

Privacy Hero select Private Internet Access
Privacy Hero Private Internet Access enter login

6. Click Save if you want to automatically connect to the ideal server location as recommended by Private Internet Access.

Or, connect to a specific server location click Advanced Options and then type in the PIA server name you would like to use. (All server names are noted below).

Then click Save.

Privacy Hero Private Internet Access enter VPN location

North America

bahamas.privacy.network
ca-ontario.privacy.network
ca-toronto.privacy.network
ca-vancouver.privacy.network
ca-montreal.privacy.network
greenland.privacy.network
gt-guatemala-pf.privacy.network
mexico.privacy.network
panama.privacy.network
sanjose.privacy.network
us-alabama-pf.privacy.network
us-alaska-pf.privacy.network
us-arkansas-pf.privacy.network
us-atlanta.privacy.network
us-california.privacy.network
us-chicago.privacy.network
us-connecticut-pf.privacy.network
us-denver.privacy.network
us-florida.privacy.network
us-houston.privacy.network
us-idaho-pf.privacy.network
us-indiana-pf.privacy.network
us-iowa-pf.privacy.network
us-kansas-pf.privacy.network
us-kentucky-pf.privacy.network
us-lasvegas.privacy.network
us-louisiana-pf.privacy.network
us-maine-pf.privacy.network
us-massachusetts-pf.privacy.network
us-michigan-pf.privacy.network
us-minnesota-pf.privacy.network
us-mississippi-pf.privacy.network
us-missouri-pf.privacy.network
us-montana-pf.privacy.network
us-nebraska-pf.privacy.network
us-new-hampshire-pf.privacy.network
us-new-mexico-pf.privacy.network
us-newyorkcity.privacy.network
us-north-carolina-pf.privacy.network
us-north-dakota-pf.privacy.network
us-ohio-pf.privacy.network
us-oklahoma-pf.privacy.network
us-oregon-pf.privacy.network
us-pennsylvania-pf.privacy.network
us-rhode-island-pf.privacy.network
us-seattle.privacy.network
us-siliconvalley.privacy.network
us-south-carolina-pf.privacy.network
us-south-dakota-pf.privacy.network
us-texas.privacy.network
us-tennessee-pf.privacy.network
us-vermont-pf.privacy.network
us-virginia-pf.privacy.network
us-washingtondc.privacy.network
us-west-virginia-pf.privacy.network
us-wisconsin-pf.privacy.network
us-wyoming-pf.privacy.network
us3.privacy.network
us-baltimore.privacy.network
us-honolulu.privacy.network
us-newjersey.privacy.network
us-saltlakecity.privacy.network
us-streaming-2.privacy.network
us-streaming.privacy.network
us-wilmington.privacy.network

South America

ar.privacy.network
bo-bolivia-pf.privacy.network
bogota.privacy.network
br.privacy.network
ec-ecuador-pf.privacy.network
pe-peru-pf.privacy.network
santiago.privacy.network
uy-uruguay-pf.privacy.network
venezuela.privacy.network

Europe

al.privacy.network
ad.privacy.network
austria.privacy.network
brussels.privacy.network
ba.privacy.network
sofia.privacy.network
zagreb.privacy.network
czech.privacy.network
de-berlin.privacy.network
de-frankfurt.privacy.network
denmark.privacy.network
denmark-2.privacy.network
spain.privacy.network
es-valencia.privacy.network
ee.privacy.network
fi.privacy.network
fi-2.privacy.network
france.privacy.network
gr.privacy.network
hungary.privacy.network
italy.privacy.network
italy-2.privacy.network
is.privacy.network
ireland.privacy.network
man.privacy.network
lv.privacy.network
liechtenstein.privacy.network
lt.privacy.network
lu.privacy.network
malta.privacy.network
md.privacy.network
monaco.privacy.network
montenegro.privacy.network
nl-amsterdam.privacy.network
mk.privacy.network
no.privacy.network
poland.privacy.network
pt.privacy.network
ro.privacy.network
sweden.privacy.network
sweden-2.privacy.network
rs.privacy.network
sk.privacy.network
slovenia.privacy.network
swiss.privacy.network
tr.privacy.network
uk-london.privacy.network
uk-manchester.privacy.network
uk-southampton.privacy.network
uk-2.privacy.network
ua.privacy.network

Asia

ae.privacy.network
bangladesh.privacy.network
cambodia.privacy.network
china.privacy.network
cyprus.privacy.network
georgia.privacy.network
hk.privacy.network
in.privacy.network
israel.privacy.network
jakarta.privacy.network
japan.privacy.network
japan-2.privacy.network
kazakhstan.privacy.network
kr-south-korea-pf.privacy.network
kualalumpur.privacy.network
macau.privacy.network
mongolia.privacy.network
np-nepal-pf.privacy.network
philippines.privacy.network
qatar.privacy.network
saudiarabia.privacy.network
sg.privacy.network
srilanka.privacy.network
taiwan.privacy.network
vietnam.privacy.network
yerevan.privacy.network

Oceania

au-adelaide-pf.privacy.network
au-australia-so.privacy.network
au-brisbane-pf.privacy.network
aus-melbourne.privacy.network
aus-perth.privacy.network
au-sydney.privacy.network
nz.privacy.network

Africa

dz.privacy.network
egypt.privacy.network
morocco.privacy.network
nigeria.privacy.network
za.privacy.network

8. Your Privacy Hero settings should now show a Connected message, indicating you have successfully signed in to your PIA VPN server!

Private Internet Access (PIA) OpenVPN Setup for Privacy Hero

1. From any device that has a browser such as a computer, smartphone, or tablet visit app.privacyhero.com.

App.PrivacyHero.com

2. Enter your Privacy Hero account email and password. Click Login.

Privacy Hero Access Settings

3. Click the VPN symbol.

Privacy Hero Setup VPN

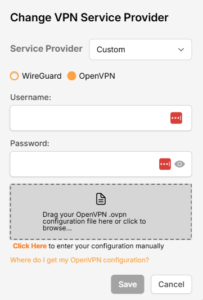
4. Click the Change button and select Custom from the dropdown and choose the OpenVPN option.

5. Enter your PIA Account login as the Username and Password.

6. Now log in to your PIA Account page.

7. Go to the Downloads section.

8. Scroll down to the bottom of the page, and go to OpenVPN Configuration Generator.

9. Choose OpenVPN 2.4 or newer and Linux.

10. From the Select Port section, choose UDP/1198 AES-128-CBC for a faster connection or choose UDP/1197 AES-256-CBC for stronger security as shown in the image below then Click Generate to download the server configuration file.

11. Drag and drop or click to Upload the server file into the Custom box on your Privacy Hero settings page then click Save.

12. Your Privacy Hero settings should now show a Connected message, indicating you have successfully signed in to your PIA VPN server!

Privacy Hero’s cloud based router settings access makes it so you can change settings while not connected to the Privacy Hero network. Visit the Private Internet Access IP Check to verify your VPN IP address. If it has not changed be sure to double check that you are indeed connected to the Privacy Hero network.

Keep in mind that the VPN connection will not change the location of the streaming services listed in the Streaming Relocation area of the Privacy Hero settings.

TROUBLESHOOTING

Still having issues? Visit the VPN Troubleshooting section.

Troubleshoot Here

TP-Link Change Wireless Channel

TeamFlashRouters · Apr 16, 2024 ·

Follow this guide to change the Wireless channel on your TP-Link FlashRouter.

1. Connect your computer, phone, or tablet to the TP-Link router via wireless (FlashRouter24 / FlashRouter50) or via ethernet cable to one of the LAN ports on the router.

The FlashRouter WiFi password is printed on the sheet that came with the router and is set to Wireless#[First 5 characters of your router MAC]. The router MAC can be found on the bottom of your router if you cannot locate the sheet. For e.g. if your MAC is 1459C07E70A8 then your WiFi password is Wireless#1459C

Be sure to capitalize the W.

2. Once connected via wireless or ethernet on your device open your browser and go to the TP-Link firmware settings.

TP-Link URL Access

3. Enter tp-link as the admin password to access the TP-Link firmware settings.

TP-Link admin password

4. Click Wireless.

TP-Link Wireless tab

5. Change the Channel setting to the number that you want to use. Click Save.

TP-Link Change Wireless Channel

6. Connect your devices to the wireless network again as they may have been disconnected when making this change.

TROUBLESHOOTING

Still having issues? Visit the VPN Troubleshooting section.

Troubleshoot Here

Shipping FAQs

admin · Jan 29, 2019 ·

Shipping FAQs

General Shipping FAQs

What company do you use for shipping?

For domestic shipping, we offer United State Postal Service (USPS), and a FedEx Expedited 2-3 Day delivery option.

For International shipments, we offer USPS and FedEx.

Where do you ship from?

We ship all packages from our New Jersey warehouse.

How much does shipping cost?

Domestic Customers:

  • Free Standard Shipping 3-10 day Delivery when you purchase a router with any Service Plan.
  • $20 Flat Rate FedEx 2-3 Day Express shipping

International Customers:

  • Pricing for USPS, and FedEx will vary by country. You can see rates on the Shipping Estimate tab on any FlashRouters product page. FlashRouters does not add any internal handling fees to international rates.
  • Note: Customers pay customs, duties, processing fees, and taxes (if applicable).

How fast do you ship?

We aim to ship your purchase within 1-2 business days from the original order date.

There may be a delay of up to 24 hours if our configuration team is unable to configure your router as requested. In these cases, our support team will reach out to you in an attempt to find a solution. If the team does not hear back from you within 24 hours they will ship out the unit to avoid further delays. Keep in mind  our support team will be available to assist if you have any setup issues once you receive your router.

Who pays for shipping?

Domestic customers can choose Free standard shipping. Customers pay shipping costs including customs, duties, processing fees, and taxes (if applicable) for all other options.

Can you ship to my country?

We ship to almost all countries around the world with some exclusions. If you would like to ship to any of these excluded countries, we recommend using PayPal and a Freight forwarding service such as Aramex, MyUS, or Shipito.

Another option if you are located in a country we do not ship to is to purchase a compatible router locally that we can flash remotely for you via our Flash My Router plan. A full list of compatible routers are listed there.

Known excluded countries are:
  • Afghanistan
  • Algeria
  • Angola
  • Bangladesh
  • Benin
  • Bhutan
  • Bosnia & Herzegovina
  • Botswana
  • Brazil
  • Burkina Faso
  • Burundi
  • Cape Verde
  • Central African Republic
  • Chad
  • Comoros
  • Congo – Brazzaville
  • Congo – Kinshasa
  • Cuba
  • Djibouti
  • Egypt
  • Eritrea
  • Eswatini
  • Ethiopia
  • Gabon
  • Gambia
  • Ghana
  • Guinea-Bissau
  • India
  • Indonesia
  • Iran
  • Iraq
  • Kenya
  • Kiribati
  • Kosovo
  • Laos
  • Lesotho
  • Liberia
  • Libya
  • Madagascar
  • Malawi
  • Malaysia
  • Mali
  • Mauritania
  • Mauritius
  • Mayotte
  • Mozambique
  • Myanmar (Burma)
  • Namibia
  • Nauru
  • Niger
  • Nigeria
  • Niue
  • North Korea
  • Palastinian Territories
  • Russia
  • Rwanda
  • Sao Tome & Principe
  • Senegal
  • Seychelles
  • Sierra Leone
  • Solomon Islands
  • Somalia
  • Sudan
  • Syria
  • Tajikistan
  • Tanzania
  • Togo
  • Tokelau
  • Tunisia
  • Turkmenistan
  • Tuvalu
  • Uganda
  • Wallis & Futuna
  • Western Sahara
  • Zambia
  • Zimbabwe

2025 - Postal Calendar

We will not be able to ship on the dates below. Your package will be shipped the following business day.

  • New Year’s Day: January-01
  • Martin Luther King Jr. Day: January-20
  • President’s Day: February-17
  • Memorial Day: May-26
  • Independence Day: July-04
  • Labor Day: September-01
  • Columbus Day: October-13
  • Veteran’s Day: November-11
  • Thanksgiving Day: November-27
  • Christmas Eve: December-24
  • New Year’s Eve: December-31


2025 Holiday Shipping Deadlines
In order to ensure timely delivery of your packages for the holiday season, please refer to the following shipping deadline dates for the following types of mail.

PLEASE NOTE: All deadlines are at 1PM EST of the designated.

US

  • USPS Priority 12/18
  • USPS APO/FPO/DPO 12/11
  • FedEx 12/21

International

International dates are for estimated delivery dates. However, customs can cause issues and may take longer.

  • Puerto Rico 12/21
  • Canada  12/21
  • Mexico 12/21
  • UK 12/20
  • Hong Kong 12/19
  • Australia 12/19
  • Middle East 12/19

Regardless of your carrier or country, we recommend that you place your holiday orders as soon as possible to ensure timely delivery.

Customs and Expenses

Will there be extra customs charges when my FlashRouter arrives?

There may be additional customs fees incurred based on the local importation laws of your country. You (the recipient) are responsible for all customs fees charged by your country’s customs agency.

Customs charges are NOT factored into the FlashRouters shipping cost.

All customs fees will be a separate charge and must be paid for by the recipient of the package.

We do our best to inform you of possible customs fees to the best of our ability, however we will not accept returns because of refusal to pay these fees.

If we receive a return due to failure to pay customs fees, you will be refunded but ONLY for the price of the FlashRouter. Original Shipping charges will NOT be refunded.

We do our best to make FlashRouters’ shipping quick and affordable but are unable to foresee all customs-related issues. Please be sure to check before ordering if you are concerned with local customs fees.

Do you charge sales tax?

We will charge sales tax in any state where we are required to do so. Currently that is within New Jersey, due to the fact that this is the physical location of our business and New York but that is subject to change as law dictates.

Any taxes or customs fees that are incurred to your country’s current policies are out of our hands. We do our best to make the router and the shipping quick and affordable.

CyberGhost Manual OpenVPN Setup

TeamFlashRouters · Apr 9, 2019 ·

Preparing for Manual CyberGhost Setup

Obtain your CyberGhost OpenVPN Information

If you are not already a CyberGhost user Sign Up Now.

1. Log in to your account on the CyberGhost website.

CyberGhost Website Login

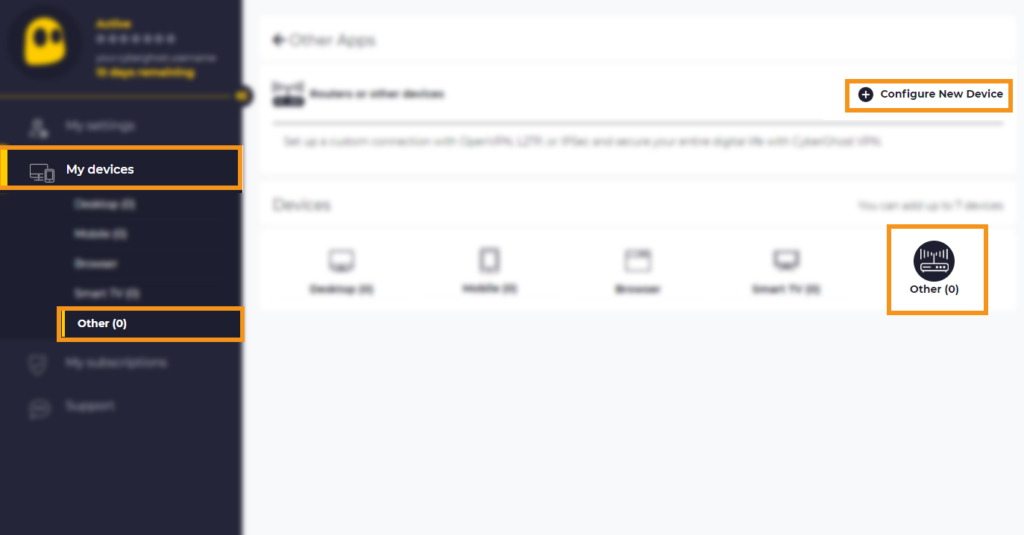
2. Select My Devices.

3. Select Other and then Configure New Device.

CyberGhost Website OpenVPN Configuration Files Generator Cyberghost - Website Screen CyberGhost Website OpenVPN Configuration Files Generator

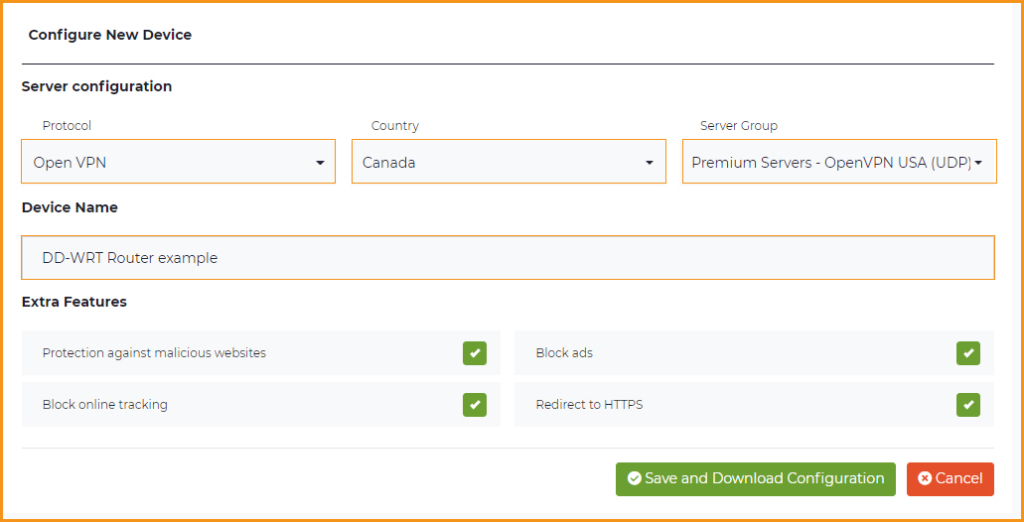
4. Set Protocol to OpenVPN. Select the Country you would like to connect to. Select the Server Group. Name the device in the Device Name field. Click Save Configuration.

CyberGhost Website OpenVPN Configuration Files Generator 3

5. Press View configuration.

CyberGhost Website OpenVPN Configuration Files Generator 2

6. Copy the Username, and Password that appear to a notepad, since you will need this information later in the setup process. Click Download Configuration.

CyberGhost Website OpenVPN Configuration Files Generator 1

Open the file that was downloaded with NotePad++ for Windows or TextEdit for Apple. You only need the ca.crt, client.crt, and client.key files. All CyberGhost servers have different keys and certificates.

DD-WRT Router Setup for CyberGhost

Navigate to Services > VPN

Enter CyberGhost settings

OpenVPN Client

Start OpenVPN Client

If you wish to disable your VPN connection simply set this to Disable at any time and click Apply Settings.
Server IP/Name

Copy and paste the server you selected in your account. Be sure there are no extra spaces or characters.

Port

443

Tunnel Device

TUN

Tunnel Protocol

UDP

Encryption cipher

AES-256-CBC

Hash Algorithm

SHA256

User Pass Authentication

Enable

Username

Enter the Username you obtained in your CyberGhost account.

Password

Enter the Password you obtained in your CyberGhost account.

Advanced Options

Enable

TLS Cipher

None

LZO Compression

Adaptive

NAT

Enable

Firewall Protection

Enable

Additional Config

tun-mtu 1500
fragment 1300
mssfix 1300

Policy Based Routing

This field can be used for split VPN and Dual Gateway routing.

CA Cert

—–BEGIN CERTIFICATE—–
MIIGWjCCBEKgAwIBAgIJAJxUG61mxDS7MA0GCSqGSIb3DQEBDQUAMHsxCzAJBgNV
BAYTAlJPMRIwEAYDVQQHEwlCdWNoYXJlc3QxGDAWBgNVBAoTD0N5YmVyR2hvc3Qg
Uy5BLjEbMBkGA1UEAxMSQ3liZXJHaG9zdCBSb290IENBMSEwHwYJKoZIhvcNAQkB
FhJpbmZvQGN5YmVyZ2hvc3Qucm8wHhcNMTcwNjE5MDgxNzI1WhcNMzcwNjE0MDgx
NzI1WjB7MQswCQYDVQQGEwJSTzESMBAGA1UEBxMJQnVjaGFyZXN0MRgwFgYDVQQK
Ew9DeWJlckdob3N0IFMuQS4xGzAZBgNVBAMTEkN5YmVyR2hvc3QgUm9vdCBDQTEh
MB8GCSqGSIb3DQEJARYSaW5mb0BjeWJlcmdob3N0LnJvMIICIjANBgkqhkiG9w0B
AQEFAAOCAg8AMIICCgKCAgEA7O8+mji2FlQhJXn/G4VLrKPjGtxgQBAdjo0dZEQz
KX08q14dLkslmOLgShStWKrOiLXGAvB1rPvvk613jtA0KjQLpgyLy9lIWohQKYjj
5jrJYXMZMkbSHBYI9L8L7iezBEFYrjYKdDo51nq99wRFhKdbyKKjDh3e2L2SVEZL
T1ogkK5gWzjvH+mjjtjUUicK+YjGwWOz6I+KKaG4Ve/D/cE6nCLbhHIMMnargZEu
7sqA6BFeS4kEP/ZdCZoTSX2n43XV1q63nJt/v0KDetbZDciFVW9h9SVPG4qT44p0
550N+Mom7zTX7S/ID5T9dplgU8sRGtIMrG0cIMD9zmpFgUnMusCrR7jJFr0sMAve
TbgZg95LmstV6R6WKZkSFdUrE0DHl4dHoZvTFX+1LhwhHgjgDLaosX0vhG/C/7Lp
oVWimd6RRQT3M9o4Fa1TuhfvBzQ20QHrmRV/yKvGNK0xckZ6EZ/QY7Z55ORU15Tg
ab4ebnblYPWoEmn0mIYP3LFFeoR5OS1EX7+j4kPv+bwPGsmpHjxmZyq2Y7sJBpbO
CJgbkn52WZdPBIRDpPdIHQ8pAJC4T0iMK9xvAwWNl/V6EYYNpR97osyEDXn+BTdA
HlhJ5fck9KlwI9mb1Kg1bhbvbmaIAiOLenSULYf3j6rI1ygo3R2cCyybtuAq8M7z
0OECAwEAAaOB4DCB3TAdBgNVHQ4EFgQU6tdK1g/He5qzjeAoM5eHt4in9iUwga0G
A1UdIwSBpTCBooAU6tdK1g/He5qzjeAoM5eHt4in9iWhf6R9MHsxCzAJBgNVBAYT
AlJPMRIwEAYDVQQHEwlCdWNoYXJlc3QxGDAWBgNVBAoTD0N5YmVyR2hvc3QgUy5B
LjEbMBkGA1UEAxMSQ3liZXJHaG9zdCBSb290IENBMSEwHwYJKoZIhvcNAQkBFhJp
bmZvQGN5YmVyZ2hvc3Qucm+CCQCcVButZsQ0uzAMBgNVHRMEBTADAQH/MA0GCSqG
SIb3DQEBDQUAA4ICAQDNyQ92kj4qiNjnHk99qvnFw9qGfwB9ofaPL74zh0G5hEe3
Wgb2o4fqUGnvUNgOu53gJksz3DcPQ8t40wfmm9I1Z8tiM9qrqvkuQ+nKcLgdooXt
EsTybPIYDZ2cWR/5E0TKRvC7RFzKgQ4D77Vbi4TdaHiDV7ZNfU1iLCoBGcYm80hc
UHEs5KIVLwUmcSOTmbZBySJxcSD0yUpS7nlZGwLY6VQrU+JFwDSisbXT4DXf3iSz
p7FzW0/u/SFvWsPHrjE0hkPoZPalYvouaJEHKAhip0ZwSmitlxbBnmm8+K/3c9mL
A5/uXrirfpuhhs8V3lyV2mczVtSiTl6gpi88gc//JY80JeHdupjO25T3XEzY9cpx
ecmkWaUEjLMx4wVoXQuUiPonfILM6OLwi+zUS8gQErdFeGvcQXbncPa4SdJuHkF8
lgiX2i8S8fPGdXvU37E9bdAXwP5nZriYq1s0D59Qfvz+vLXVkmyZp6ztxjKjKole
mPMak0Y5c1Q4RjNF6tmQoFuy/ACSkWy14Tzu2dFp7UiVbGg1FOvKhfs48zC2/IUQ
v1arqmPT/9LVq3B2DVT9UKXRUXX/f/jSSsVjkz4uUe2jUyL+XHX1nSmROTPHSAJ+
oKf0BLnfqUxFkEUTwLnayssP2nwGgq35b7wEbTFIXdrjHGFUVQIDeERz8UThew==
—–END CERTIFICATE—–

Public Client Cert

Copy and paste all contents of the client.crt file starting and ending with:
—–BEGIN CERTIFICATE—–
…
—–END CERTIFICATE—–

Private Client Key

Copy and paste all contents of the client.key file starting and ending with:
—–BEGIN PRIVATE KEY—–
…
—–END PRIVATE KEY—–

CLICK APPLY SETTINGS

Leave all settings not mentioned above as their default setting.

Verify a successful CyberGhost connection

Navigate to Status > OpenVPN

  1. You should now see a CONNECTED SUCCESS message.
  2. Visit CyberGhost’s website to verify your new IP address and virtual location.

In some cases you may notice that the location is not showing the same location as the server you have input in your router settings; this is because geo tracking tools are often tricked by VPN connections. As long as you see an IP address that is not the same as your normal Internet IP address then you are indeed connected to CyberGhost.

Back up your settings

Navigate to Administration > Backup

  1. Click the Backup button.
  2. A file named nvrambak.bin will be saved to your computer.
  3. You can load nvrambak.bin to restore your settings in the event of a reset.

How to change the CyberGhost server

  1. Follow the instructions for obtaining the OpenVPN information from above.
  2. Enter the new Server Address in the Server IP/Name field.
  3. Enter the new Username and Password.
  4. Enter the new ca.crt, client.crt, and client.key
  5. Click Apply Settings.
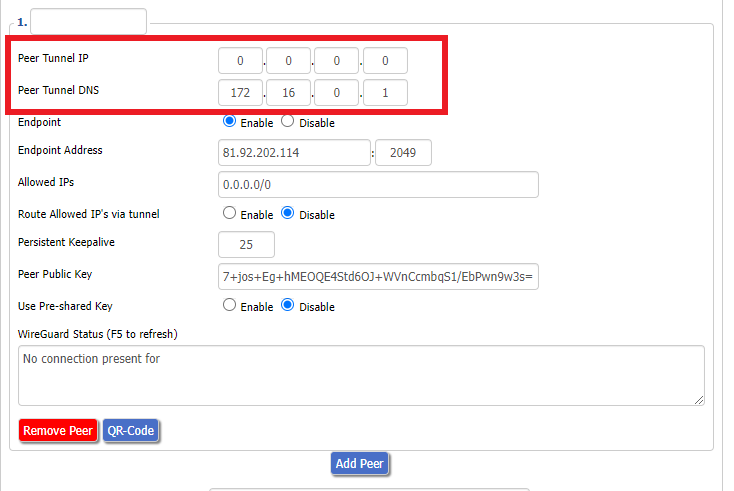
TROUBLESHOOTING

Still having issues? Visit the VPN Troubleshooting section.

Troubleshoot Here

Warranty and Returns FAQs

admin · Jan 29, 2019 ·

Warranty and Returns FAQs

At FlashRouters, we are confident that every router sold will function as advertised. We open, inspect, upgrade, configure, and then test all FlashRouters before they get shipped out. That is why we guarantee you will receive a working unit and offer our own 1-Year Hardware Warranty included with all New and Refurbished routers purchased from the FlashRouters website.

If you would like to extend the warranty coverage period to 2 years, the option is available during the FlashRouters checkout process.

Since we are so certain you will be happy with your upgraded and super secure network, all routers purchased from FlashRouters.com also come with a 30-day satisfaction guarantee.

Please read the warranty and return section in detail before placing an order or requesting an RMA. Our goal is to make the return process as smooth and transparent as possible for all customers. If the router you purchased does not work out for your needs we still want you to be satisfied with your purchasing experience.

Hardware Warranty and Return Policy

Requesting an RMA

Automated Return Merchant Authorization (RMA) requests are available from within your customer account panel. If you are eligible for a return then your RMA request will be approved. If your RMA request is not valid then it will be denied and you must e-mail FlashRouters Support for any additional information or actions. RMAs are valid for 7 days from the day they are issued. 

The following are the available options when submitting an RMA request. Continue reading for more information on all available RMA options and conditions. 

  1. Hardware Guarantee – available for 7 days after receiving your FlashRouter.
  2. Satisfaction Guarantee – available for 30 days after receiving your FlashRouter.
  3. Hardware Warranty – available for 1 year, or 2 years if upgraded when purchasing a FlashRouter.
  4. Hardware Repair – Anyone with a valid FlashRouters Support subscription is eligible for free Hardware Repair. 

Please note we can only provide prepaid labels for approved Hardware Warranty returns within the USA. Prepaid labels are not available for international customers. All return shipping for 30 Day Satisfaction refunds is paid for by the customer.

Hardware Guarantee

In the rare case you receive a faulty router, you can open a ticket to contact FlashRouter Support for an RMA or request an RMA in your customer account panel and we will work to rectify the situation immediately. If it is determined that the power supply you received was faulty, and not the router itself, our team will immediately ship you out a tested power supply at no additional cost.

Rest assured that we individually test and inspect every FlashRouter with great detail before shipment. BUT… if router gremlins (yes they do exist) snuck into your router during the shipping process and it no longer powers on, our team will supply you with a prepaid shipping label to return the unit back to our offices. As soon as we receive verified tracking on your return shipment we will ship out another thoroughly tested unit to you at no additional cost.

You must contact us within 7 days from when you received your FlashRouter to be eligible for a Hardware Guarantee prepaid shipping label from FlashRouters.

30-Day Satisfaction Guarantee

If you are not satisfied with the performance of your router after trying it out for up to 30 days, you can open a ticket to contact FlashRouter Support for an RMA or request an RMA in your customer account panel. Once the RMA is approved, you will then have the option to ship the unit back to FlashRouters.

Once we receive the return, our team inspects and refunds accordingly based on the original purchase price of your FlashRouter. Please note there is a $25 restocking fee and refunds do not include any initial shipping costs associated with your order. All restocking fees are returned as Store Credit. This means if you make another purchase at FlashRouters then your fee is refunded.

The item must also be fully functional and have no signs of cosmetic damage for you to receive the maximum refund. If you do not include the original boxing, or any router accessories you may also be charged an additional fee as indicated.

Ethernet Cable: $5

Power Source: $10 

Antennas: $5 per antenna

Router Stand: $10

Box: $10

Cosmetic Damage: Up to $25

What is covered under the 30-Day Satisfaction Guarantee?

If the VPN speeds or WiFi network speeds are not what you had hoped, if the setup is too complicated, or you just decided on another solution; these are all covered under the 30-Day Satisfaction Guarantee. 

We will not accept any returns of working routers after 30 days from the date you received your router. After 30 days, router returns/replacements will only be processed under the Hardware Warranty. 

Can I get the restocking fee waived?

If you place a new order for a different FlashRouter unit before returning your initial purchase, then we will waive the restocking fee. Otherwise the $25 restocking fee will be applied to your customer account as a store credit. You can then use this $25 store credit on any future FlashRouter purchase.

Rewards Points refunds

If you return your FlashRouter under the 30 day satisfaction guarantee then you will lose any reward points received for your initial purchase.

Hardware Warranty

A 1-year Hardware Warranty is included with the purchase of all New and Refurbished FlashRouters. If your router suffers hardware failure within 365 days from the date you received the unit then we will replace your router with another fully tested unit. You must pay for return shipping of the faulty unit back to our offices located in New Jersey, USA and our team will ship out your replacement at no additional cost.

You must contact the FlashRouter support team for an RMA number or request an RMA from your customer account panel before returning a router for warranty replacement. If you do not receive approval for a return then you will not be eligible for a replacement unit.

There are 2 options for receiving a Hardware Warranty replacement unit:

Option #1: Process another order for immediate shipping and as soon as we receive the returned device back in our offices we will issue you a refund for the initial purchase.

Option #2: Ship your faulty router back to our office, and as soon as we receive the unit our returns department will have a replacement unit shipped out to you at no extra cost.

How long do I have before my RMA expires?

RMA’s are good for 7 days from the date they are issued.

What if I upgraded to a 2 year Hardware Warranty at checkout?

All refund, replacement, RMA details, and options covered by the 1-year Warranty apply in the exact same manner for 2 year warranties over each respective warranty coverage period.

If for any reason the router you purchased is no longer in stock or discontinued then you have the option to replace your router with one of equal value or receive a refund. Hardware warranties are only eligible for refunds if we are unable to provide a replacement unit for you.

What should I do if my router is out of warranty coverage?

If your FlashRouter is out of the warranty coverage period, we are first and foremost apologetic for the passing of your router. Be sure to contact our sales team though and you can receive a special coupon as a return customer for a shiny new wireless networking centerpiece.

What is not covered with a FlashRouter Warranty?

Items that have been clearly damaged either by the customer or during the return process are not eligible for a full refund. This includes routers that have visible dents, scratches, or moving parts inside the router.

Can I upgrade to a 2 year warranty after my FlashRouter purchase?

2 year warranty upgrades are only available at the time of your FlashRouter purchase. Upgrades are not available once a FlashRouter order has been shipped. 

Can I get a Warranty on my router if I purchased a “Flash My Router” plan from FlashRouters?

Routers that have been “flashed” and configured by our support specialists for anyone who has purchased a Flash My Router Plan are not eligible for warranty coverage from FlashRouters. Only routers purchased through the FlashRouters.com website are eligible for warranty replacements or refunds.

Hardware Repair

FlashRouters is proud to offer a free repair and upgrade service for anyone with an active Silver or Gold Service Plan subscription. Any and all shipment costs associated with FlashRouter repairs or upgrade requests are the burden of the customer and will not be paid for by FlashRouters. However, the repair and upgrade service itself is FREE.

If you do choose to ship your router back to our office for repair, then you should include a prepaid shipping label in your package back to your home or office, so our team can send the router back to you whether we are able to repair the unit or not. Router accessories like power supplies, ethernet cable, or antennas do not need to be included when shipping back a unit for repair.

If our team is not able to resurrect your router from a power failure, faulty firmware upgrade, or any other reason then we can return the faulty unit back to you using the return shipping label included with your return package. Alternatively, we can destroy the unit and refund the return shipping costs if that is your preference.

Open Box Routers

What is an Open Box Router?

Open Box routers are fully functional units that have cosmetic flaws and are sold at heavy discounts. These units come with the same Support Plan options as New or RM units, which means you get the same support service with extremely discounted hardware.

Open Box routers are covered under the FlashRouter 30-Day Satisfaction Guarantee BUT come with no Hardware Warranty. We take every measure possible to ensure complete functionality and our team fully load tests these devices before shipment, but you should be very aware that you buy these discounted “open box” devices at your own risk without any Hardware Warranty.

What is the Open Box Router return policy?

Open Box Routers can only be returned within 30 days from the date you received your router. Returns will not be accepted on open box routers after 30-Day Satisfaction Guarantee window has expired. Please note that Open Box Router return shipping costs are not covered by FlashRouters and initial shipping costs are not included in any refunds. 

Accessories Warranty

All Accessories come with manufacturer warranties as listed on the respective product pages. 

FlashRouters will accept returns for refund or replacement of accessories only within 30 days from the date you received your order. After 30 days you must contact the manufacturer for any warranty replacements.

Accessories must be returned with all original packaging and with no cosmetic damage to receive a full refund. A missing box or damage to an item will result in a restocking fee per our discretion.

"Flash My Router" Refund Policy

The “Flash My Router” product offered by FlashRouters is a virtual service provided by the FlashRouters support team. This product includes a remote support session where our support team will flash your router and then complete your internet, WiFi, and VPN setup, and in certain cases support additional router features. 

Once your remote support session is completed there are absolutely no refunds on “Flash My Router” purchases. In the case we are unable to successfully flash your router we will offer a full refund for your “Flash My Router” purchase. “Flash My Router” purchases are fully refundable if you decide you would no longer like to use the service after your purchase is completed.

Service Plan Subscription Refund Policy

All FlashRouter router purchases include a recurring FlashRouters Service Plan subscription. There are 3 levels of support to choose from as either a quarterly or yearly recurring billing plan.

30-Day Satisfaction Guarantee

If you choose to return your FlashRouter under the 30-Day Satisfaction Guarantee, then you are eligible for a full refund on any Service Plan purchased with your FlashRouter.

Cancellation Policy

You may cancel your recurring billing at any time and you will not be charged again. Please note you will not be refunded for unused time from the initial billing/service period of your support plan subscription.

If you choose to cancel your 3 month FlashRouter support plan then you will retain support until the end of the 3 month period. If you choose to cancel your 1 year FlashRouter support plan then you will retain support until the end of the 1 year period. You will not lose time from your existing service plan if you cancel when a plan is active.

There is a 7-day grace period after Service Plan renewals have been charged, where you may request an immediate cancellation and full refund.

How do I change my FlashRouter Support subscription level?

How do I Upgrade my Service Plan?

You can upgrade a Service Plan at any time during a billing cycle. You must e-mail or live chat our support team and request an upgrade. Our team will then issue you store credit for any unused time on your existing Service Plan, which will then be immediately applied to your new upgraded Service Plan purchase. Your recurring billing will then continue at the new Service Plan level. Your 3 months or 1 year of upgrade service will start again from the date of the upgrade purchase. 

How do I switch from a Quarterly to a Yearly Service Plan?

If you would like to switch to a Yearly plan from a Quarterly plan of the same service level, then you must e-mail or live chat our support team and request an upgrade. Our team will then issue you store credit for any unused time on your existing Quarterly Service Plan, which will then be immediately applied to your new Yearly Service Plan purchase. Your recurring billing will then continue at the Yearly Service Plan level. Your 1 year of service will start again from the date of the upgrade purchase. 

How do I Downgrade my Service Plan?

If you are subscribed a Service Plan, but would like to switch to a lower level Service Plan then you can request that our support team cancel your recurring billing at any time. As soon your existing Service Plan is expired you can make a new purchase for the new Service Plan of your choice.

How do I switch from a Yearly to a Quarterly Service Plan?

If you would like to change the billing cycle from yearly to quarterly, you may cancel your existing subscription plan and then once your year of service has expired, you may purchase a Quarterly Service Plan instead.

If you just purchased a FlashRouter, there is a 7-day grace period from when you receive your unit if you would like an immediate change from Yearly to a Quarterly Service Plan.

How do I cancel my subscription?

You may request a Service Plan subscription cancellation by e-mailing support@flashrouters.com or from within your customer account panel at any time. You will be notified of a successful cancellation and your payment method will not be billed again.

Please note there are no refunds when cancelling your subscription. Cancellation means you will not be billed again for your Service Plan, there are no partial refunds for cancelled Service Plans.

Privacy Hero VPN Kill Switch Setup

TeamFlashRouters · Apr 3, 2023 ·

Your Privacy Hero router uses Cloud Based router management which means you can access the router settings from anywhere on any device that has an internet connection. You can follow these steps while connected to your phone, other Wi-Fi network, or the Privacy Hero network.

Use these steps to enable Privacy Hero’s VPN Kill Switch to make sure that no traffic goes through your router unless it is connected to VPN.

1. From any device that has a browser such as a computer, smartphone, or tablet visit app.privacyhero.com

App.PrivacyHero.com

2. Enter your Privacy Hero account email and password. Click Login.

Privacy Hero Access Settings

If you have not created your Privacy Hero account yet please follow these instructions.

3. Click the VPN symbol.

Privacy Hero Setup VPN

4. Toggle the VPN Kill Switch setting to On.

Privacy Hero VPN Kill Switch

TROUBLESHOOTING

Still having issues? Visit the VPN Troubleshooting section.

Troubleshoot Here

ExpressVPN Setup Guide for Privacy Hero

TeamFlashRouters · Aug 14, 2025 ·

Your Privacy Hero router uses Cloud Based router management which means you can access the router settings from anywhere on any device that has an internet connection. You can follow these steps while connected to your phone, other Wi-Fi network, or the Privacy Hero network.

Use these steps to connect to ExpressVPN OpenVPN servers. First you will need to gather your unique OpenVPN login credentials and download the correct .ovpn file from the ExpressVPN website.

1. From any device that has a browser such as a computer, smartphone, or tablet visit app.privacyhero.com

App.PrivacyHero.com

2. Enter your Privacy Hero account email and password. Click Login.

Privacy Hero Access Settings

3. Click the VPN symbol.

Privacy Hero Setup VPN

4. Click the Change button and select Custom from the dropdown.

Privacy Hero Change VPN Providers

5. In a new tab login to your ExpressVPN account.

6. Select Manual Configuration from the menu options.

7. Copy and paste the username and password from the blue boxes into the Custom box on your Privacy Hero settings page.

8. Download a server file from any of the available regions shown in the ExpressVPN Manual Configuration section (Americas, Europe, Asia Pacific, etc)

9. Drag and drop or click to Upload the server file into the Custom box on your Privacy Hero settings page and then you will need to add one line to the top of the configuration.

10. At the top of your OpenVPN configuration add in the following line as shown in the picture above
proto udp
Now click the Save button.

11. Your Privacy Hero settings should now show a Connected message, indicating you have successfully signed in to your ExpressVPN server.

12. Connect to the Privacy Hero via WiFi or ethernet connection on your device and visit an IP checker from a private/incognito browser to verify your new IP address and virtual location.

Privacy Hero’s cloud based router settings access makes it so you can change settings while not connected to the Privacy Hero network so if your IP Address has not changed be sure to double check that you are indeed connected to the Privacy Hero network on the device you are checking your IP from.

Keep in mind that the VPN connection will not change the location of the streaming services listed in the Streaming Relocation area of the Privacy Hero settings if the Streaming Relocation feature is Enabled.

TROUBLESHOOTING

Still having issues? Visit the VPN Troubleshooting section.

Troubleshoot Here

Change WiFi name and password on Roqos

TeamFlashRouters · Nov 14, 2021 ·

Change your Roqos’ WiFi Network Name and Password to anything you like. Make sure it is not a duplicate of an existing WiFi name.

Login to Roqos Core UI web app in a browser on any computer or smart device.

1. Click the navigation menu and select Basic Settings > WiFi Settings.

Roqos Basic Settings - WiFi Settings

2. Click Main WiFi.

Roqos WiFi Settings - Main WiFi

3. Click Settings.

Roqos WiFi Settings - Settings

4. Enter the new Network Name and Network Password. Click Save.

Roqos WiFi Settings - Enter new name and password

5. Reconnect your WiFi devices to the new network with the password you just set.

ProtonVPN Setup Guide for Privacy Hero

TeamFlashRouters · Sep 17, 2025 ·

Your Privacy Hero router uses Cloud Based router management which means you can access the router settings from anywhere on any device that has an internet connection. You can follow these steps while connected to your phone, other Wi-Fi network, or the Privacy Hero network.

ProtonVPN Wireguard Setup for Privacy Hero (recommended)

1. From any device that has a browser such as a computer, smartphone, or tablet visit app.privacyhero.com.

App.PrivacyHero.com

2. Enter your Privacy Hero account email and password. Click Login.

Privacy Hero Access Settings

3. Click the VPN symbol.

Privacy Hero Setup VPN

4. Click the Change button and select Custom from the dropdown and choose the Wireguard option.

Privacy Hero Change VPN Providers

5. In a new tab login to your ProtonVPN account.

6. Go to the Downloads section of your ProtonVPN account page.

7. Scroll down to find the WireGuard configuration section. Name your configuration and then select Router as the platform, and select Standard server configs.

8. Click on the country name that you want to choose, and Download any of the available server files from the list.

9. Drag and drop or click to Upload the server file into the Custom box on your Privacy Hero settings page. Then press Save.

10. Your Privacy Hero settings should now show a Connected message, indicating you have successfully signed in to your ProtonVPN server!

Wireguard connection

ProtonVPN OpenVPN Setup for Privacy Hero

1. From any device that has a browser such as a computer, smartphone, or tablet visit app.privacyhero.com.

App.PrivacyHero.com

2. Enter your Privacy Hero account email and password. Click Login.

Privacy Hero Access Settings

3. Click the VPN symbol.

Privacy Hero Setup VPN

4. Click the Change button and select Custom from the dropdown and choose the OpenVPN option.

Privacy Hero Change VPN Providers

5. In a new tab login to your ProtonVPN account.

6. Navigate to the Account tab and find your OpenVPN specific Username and Password.

FlashRouters DD-WRT Privacy APP ProtonVPN OpenVPN Specific Username and Password

7. Copy and paste the username and password from previous step into the Custom box on your Privacy Hero settings page.

8. Go to the Downloads section of your ProtonVPN account page.

9. Scroll down to find the OpenVPN Configuration Files section. Then select “Router” as the platform, and select “Standard Server Configs.”

10. Click on the country name that you want to choose, and Download any of the available server files from the list.

11. Drag and drop or click to Upload the server file into the Custom box on your Privacy Hero settings page. Then press Save.

12. Your Privacy Hero settings should now show a Connected message, indicating you have successfully signed in to your ProtonVPN server!

Privacy Hero’s cloud based router settings access makes it so you can change settings while not connected to the Privacy Hero network. Visit the ProtonVPN IP Check to verify your VPN IP address. If it has not changed be sure to double check that you are indeed connected to the Privacy Hero network.

Keep in mind that the VPN connection will not change the location of the streaming services listed in the Streaming Relocation area of the Privacy Hero settings if the Streaming Relocation feature is Enabled.

TROUBLESHOOTING

Still having issues? Contact our Support Team.

Troubleshoot Here

Wireless Guest Network Setup – Bridged (Advanced)

TeamFlashRouters · Jun 12, 2019 ·

If you would like to prevent visitors from connecting to your main WiFi network then you can create a Bridged Guest Network that will prevent access to the main router. This setup also allows you to create different rules for different WiFi SSID’s in your home ranging from QoS controls, access restrictions, VPN network segmentation, and more.

Preparing for Wireless Guest Network Setup

If you have a Dual-band or Tri-Band router you can setup a WiFi Guest Network, creating a separate VLAN (virtual local area network) for your visitors, or in order to segment your VPN networks on any band you like. We recommend using the 2.4GHz network for your DD-WRT Guest Wireless Network so it is compatible with the most possible WiFi devices. Setting up a guest network for visitors in your home allows you to keep them off of your main WiFi network.

We recommend performing this setup while connected to the FlashRouter via ethernet cable. If your computer does not have an ethernet port and you must proceed via wireless connection to the FlashRouter pay attention to the wireless connection as you may need to rejoin the FlashRouter’s network after making changes.

DD-WRT Router Setup for Wireless Guest Network

Enter Wireless settings

Navigate to Wireless > Basic Settings

Bridged Wireless Guest Network Setup on DD-WRT FlashRouter – Setting SSID for Guest Network
  1. Under the 2.4GHz or 5GHz Interface click the Add button.
  2. In the Wireless Network Name (SSID) field enter the unique network name of the guest network.
  3. Click Save.

Enter Wireless Security settings

Navigate to Wireless > Wireless Security

Bridged Wireless Guest Network Setup on DD-WRT FlashRouter – Setting Guest Network Wireless Password
  1. Duplicate the wireless security settings that are set for the other bands for the newly created virtual interface.
  2. Click Apply Settings.
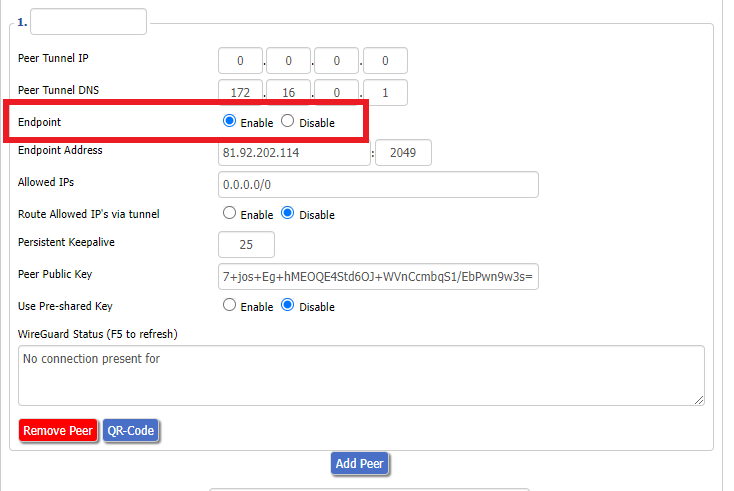
  3. Reboot your router.

Create Bridge

Navigate to Setup > Networking

Bridged Wireless Guest Network Setup on DD-WRT FlashRouter – Create Bridge
  1. Under Create Bridge click Add. Name the newly created bridge br1.
  2. Click Apply Settings

Assign to Bridge

Bridged Wireless Guest Network Setup on DD-WRT FlashRouter – Assign Bridge
  1. Under Assign to Bridge select br1 from the Assignment dropdown. Select wl1.1 or ath1.1 depending on your router model.
  2. Click Apply Settings.
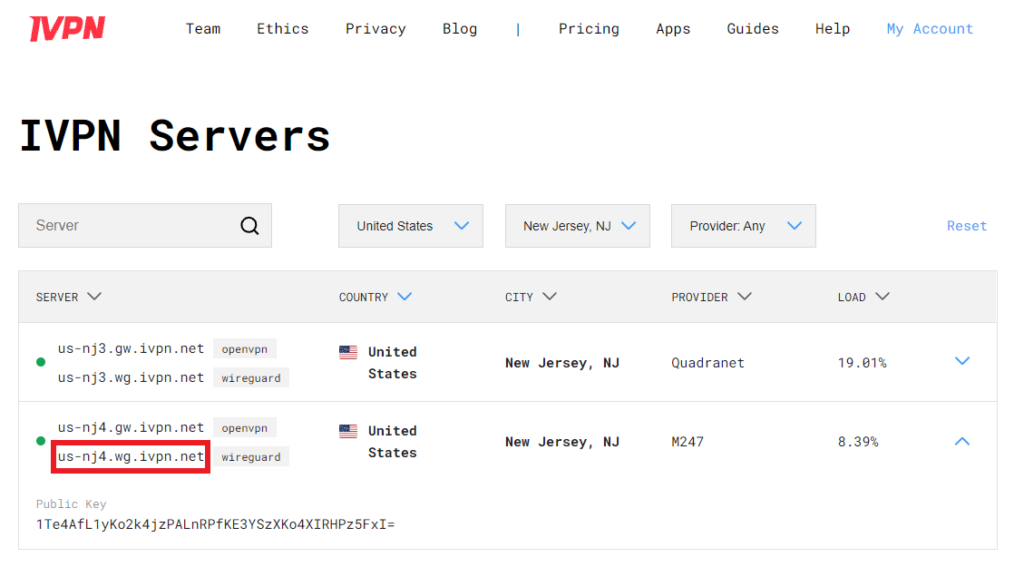
Depending on the router model and WiFi band you are using, the wireless interfaces will be labelled differently.

This setting can be labelled wl1.1, ath0.1, wl2.1, and so on. Make sure when you get up to the bridge assignment section that you are using the correct guest network Virtual Interface.

Network Configuration br1

Bridged Wireless Guest Network Setup on DD-WRT FlashRouter – Configure Bridge DNS Redirection
  1. Under Network Configuration br1 select Enable for Forced DNS Redirection.
  2. Set Optional DNS Target to 208.67.220.220
  3. Set IP Address to 192.168.12.1
  4. Set Subnet Mask to 255.255.255.0
  5. Click Apply Settings.
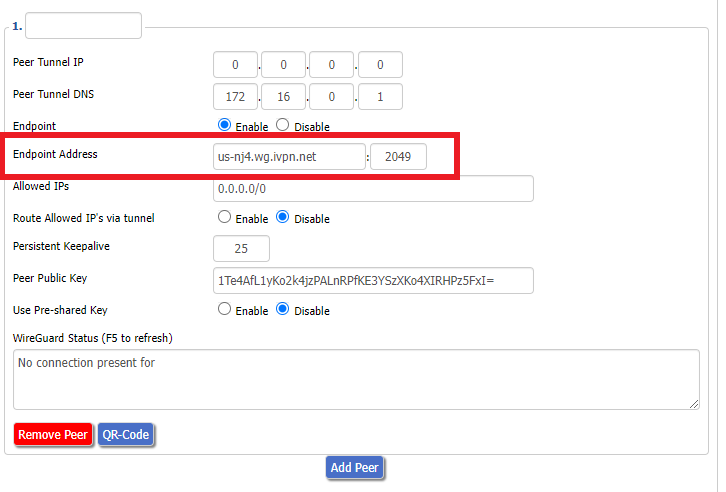
Multiple DHCP Server

Bridged Wireless Guest Network Setup on DD-WRT FlashRouter – Configure DHCP Server Settings
  1. Under Multiple DHCP Server click Add.
  2. Set the first dropdown to br1.
  3. Click Apply Settings.
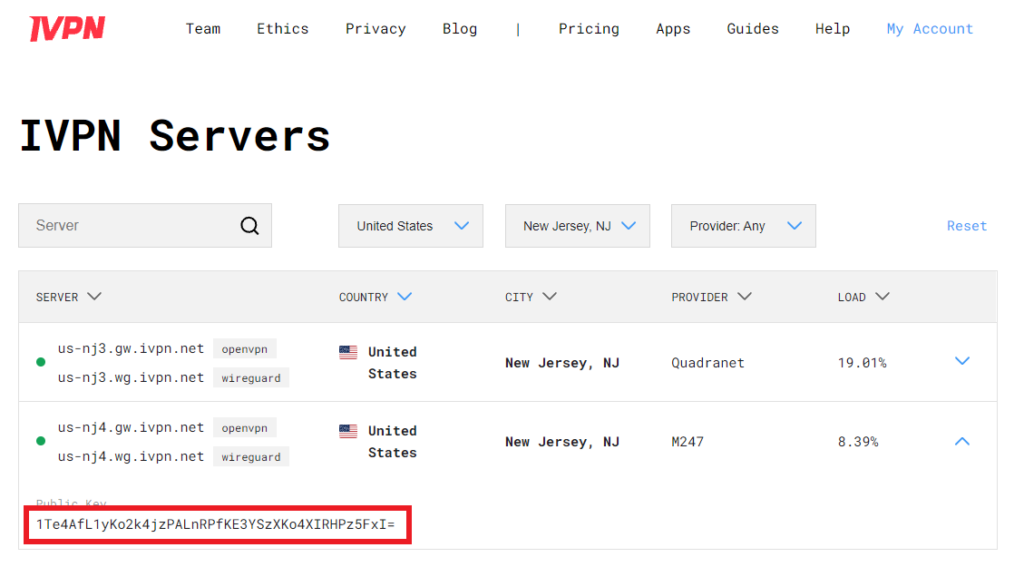
  4. Reboot your router.

Firewall Rules

Navigate to Administration > Commands

  1. Copy the fire script from below and paste into the empty Commands shell
  2. Click Save Firewall.
  3. Wait one minute and then reboot your router.

iptables -I FORWARD -i br1 -o br0 -m state –state NEW -j DROP
iptables -I FORWARD -i br0 -o br1 -m state –state NEW -j DROP
iptables -I INPUT -i br1 -p tcp –dport telnet -j REJECT –reject-with tcp-reset
iptables -I INPUT -i br1 -p tcp –dport ssh -j REJECT –reject-with tcp-reset
iptables -I INPUT -i br1 -p tcp –dport www -j REJECT –reject-with tcp-reset
iptables -I INPUT -i br1 -p tcp –dport https -j REJECT –reject-with tcp-reset

You will now have a working Bridged Guest Network on the FlashRouter. By inputting the firewall rules, this will also prevent any guests on your network from gaining access to your router settings.

Back up your settings

Navigate to Administration > Backup

  1. Click the Backup button.
  2. A file named nvrambak.bin will be saved to your computer.
  3. You can load nvrambak.bin to restore your settings in the event of a reset.

TROUBLESHOOTING

Still having issues? Visit our Troubleshooting section to diagnose common problems here.

Troubleshoot Here

How to Access Your AsusWRT FlashRouter Settings

TeamFlashRouters · Oct 16, 2025 ·

This quick guide will walk you through connecting to your AsusWRT FlashRouter and logging into the admin settings page. You’ll use either WiFi or an Ethernet cable, then access the router dashboard through your browser.

Step 1. Connect Your Device to the Router

You can connect by WiFi or Ethernet:

  • WiFi: Look for a network name like FlashRouter24 or FlashRouter50.
    • The WiFi password is set to: Wireless#[First 5 characters of your router’s MAC]
    • Example: If your MAC is CC28A07E70A8, your WiFi password is Wireless#CC28A.
    • ⚠️ Be sure to capitalize the “W” in Wireless.
  • Ethernet: Plug an Ethernet cable from your computer into one of the router’s LAN ports (usually marked or color-coded differently from the WAN port).

👉 Pro tip: Disconnect from any other WiFi networks during setup.

Step 2. Open the Router Login Page

  1. Open a web browser (Chrome, Safari, Firefox, Edge).
  2. In the address bar, type: 192.168.50.1 or go to asusrouter.com
  3. Press Enter.
Access Asus Router

This is the local router dashboard address (not a public website). If the page doesn’t load:

  • Try a different browser.
  • Clear your cache.
  • Ensure your device is connected to the FlashRouter network.

Step 3. Log In to the Router Settings

  • Default username: flashrouter
  • Default password: asuswrt-admin1
  • Some older devices may use: asuswrt1 or asuswrt
  • This is the factory default for AsusWRT routers shipped by FlashRouters.
Asus Router Login

💡 Once you’re in, you can update your admin password in the settings for extra security.

Next Steps

Now that you’ve accessed your AsusWRT FlashRouter, you can:

  • Set up your VPN service
  • Customize your WiFi name and password
  • Adjust device controls and security settings

Check our support library for your specific VPN setup guide.

Set a Static IP for your connected devices on Roqos

TeamFlashRouters · Dec 21, 2021 ·

By assigning specific Static IP addresses to your devices you can better manage your network and make sure they connect with the same Local IP Address each time they connect to your Roqos.

Login to Roqos Core UI web app in a browser on any computer or smart device.

1. Click the navigation menu and select Basic Settings > LAN Settings.
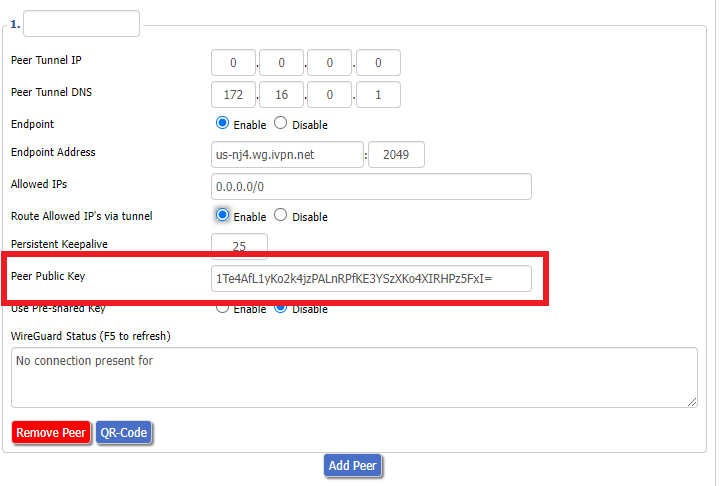
Roqos Basic Settings - LAN settings

2. Click Static IP Assignments.

Roqos LAN settings - Static IP Assignments

3. Click Add Assignment.

Roqos LAN settings - Add Assignment

4. Toggle the device hat you want to set a Static IP for and then enter 192.168.23.x with x being any number between 2 and 254. Click Save.

Now, every time the device connects to the Roqos network it will be assigned the same Static IP address on the Local network.

« Previous Page

Primary Sidebar

  • Troubleshooting
  • Router Access
  • Internet Connection Issues
  • WiFi Connectivity
  • General VPN Issues
  • TeamViewer Remote Support
  • DD-WRT Firmware
  • Facebook
  • Twitter
  • Instagram
  • Pinterest
  • YouTube

Footer