• Skip to primary navigation
  • Skip to main content
  • Skip to primary sidebar
  • Skip to footer

FlashRouters Support Portal

Prioritizing Privacy

  • SETUP GUIDES
    • Privacy Hero Router Setup Guide
    • ASUS-WRT Router Setup Guide
    • AsusWRT-Merlin Router Setup Guide
    • DD-WRT Router Setup Guide
    • ExpressVPN Router Setup Guide
    • GL.iNet Router Setup Guide
    • Roqos Core Router Setup Guide
  • TROUBLESHOOTING
    • Router Access
    • WiFi Connectivity
    • Internet Connection Issues
    • General VPN Issues
    • DD-WRT Firmware
    • TeamViewer Remote Support
  • FAQs
    • Router FAQs
    • VPN FAQs
    • Warranty and Returns FAQs
    • Sales FAQs
    • Shipping FAQs
    • Service Plan FAQs
  • Show Search
Hide Search

Search Results for: click for m

How do I save and load a backup file?

TeamFlashRouters · Jun 4, 2019 ·

Why should I save a backup file?

Save a backup file of your correctly configured DD-WRT settings to ensure you can load the working settings in a few simple clicks instead of manually configuring each setting in the event of a reset.

Save a backup file

Navigate to Administration > Backup

  1. Click Backup and save / download the file.
  2. Name the backup file “FlashRouter Backup”

Load a backup file

Navigate to Administration > Backup

  1. Click Choose File and find the backup file you previously saved.
  2. Click Restore.
How to Load a Backup File in DD-WRT FlashRouter

Cudy Change Wi-Fi name and password

TeamFlashRouters · Feb 26, 2024 ·

Follow this guide to change the Wi-Fi name and password on your Cudy FlashRouter.

1. Connect your computer, phone, or tablet to the Cudy router via wireless (FlashRouter24 / FlashRouter50) or via ethernet cable to one of the LAN ports on the router.

The FlashRouter WiFi password is printed on the sheet that came with the router and is set to Wireless#[First 5 characters of your router MAC]. The router MAC can be found on the bottom of your router if you cannot locate the sheet. For e.g. if your MAC is 1459C07E70A8 then your WiFi password is Wireless#1459C

Be sure to capitalize the W.

2. Once connected via wireless or ethernet on your device open your browser and go to 192.168.10.1

Cudy local IP access

3. Enter openwrt as the admin password to access the Cudy firmware settings.

Cudy router access

3. Click General Settings.

Cudy General Settings

4. Click Wireless.

Cudy Wireless tab

5. Change the SSID and Password fields for both 2.4GHz and 5GHz bands.The SSIDs should be unique and NOT a duplicate of an existing network. Click Save & Apply.

Cudy Change Wifi Name and password

TROUBLESHOOTING

Still having issues? Visit the VPN Troubleshooting section.

Troubleshoot Here

How do I reset and reconfigure my ExpressVPN/Aircove FlashRouter?

TeamFlashRouters · Mar 16, 2022 ·

When is a router reset needed?

A reset of the FlashRouter should only be performed in the following instances:

  • You have exhausted all other troubleshooting methods and cannot access your router settings.
  • Password to access the FlashRouter’s settings are not working.
  • Power light on the router is blinking steadily.
  • Router is not accessible after upgrading the firmware

Reset Router

Asus FlashRouters:

  1. While the router is powered off press and hold the WPS button on the back or side of the router. Power up the router while continuing to hold the WPS. Continue to hold for 15 seconds as the router powers on (note this could be up to 45 seconds on some models before lights flash).
  2. You will see the lights on the router flashing steadily and this is how you know you have reset the router.
  3. Let the router sit for about a minute and then reboot the router.

Aircove, Linksys and Netgear FlashRouters:

  1. While the router is plugged in, find the reset button located on the back of the router. You will need a pin or pencil to hold down the button for 15 seconds.
  2. You will see the lights on the back of the router flash simultaneously and this is how you know you have reset the router.
  3. Let the router sit for about a minute and then reboot the router.

Access Router Settings

1. Connect to the FlashRouter’s network via ethernet cable or wireless.

The wireless network will appear as “Aircove”, “Linksys##”, “Netgear##”, or “Asus” and the password to join the network will be the default wireless password printed on the bottom of the router.

2. Open your web browser and enter expressvpnrouter.com or 192.168.132.1 in the URL.

ExpressVPNrouter.com
192.168.132.1

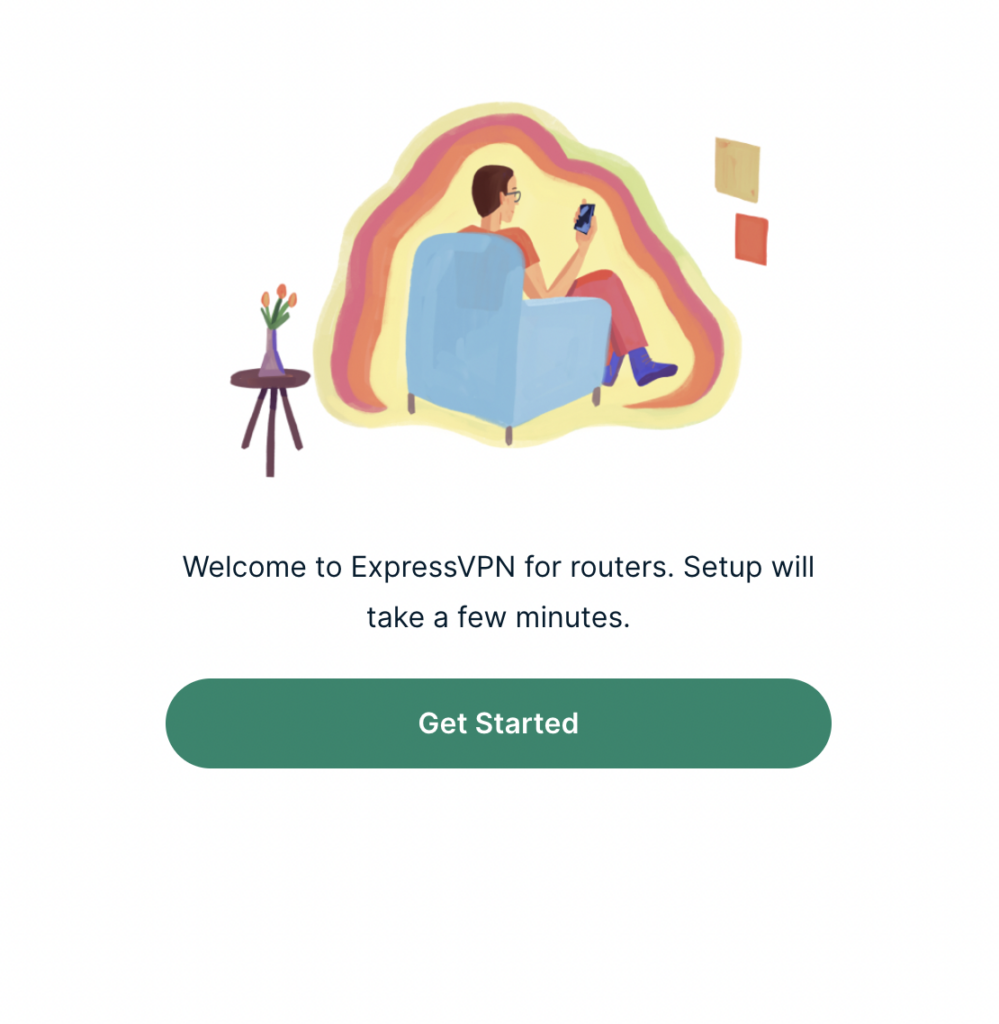
3. Click Get Started on the ExpressVPN page that is displayed.

ExpressVPN Get Started

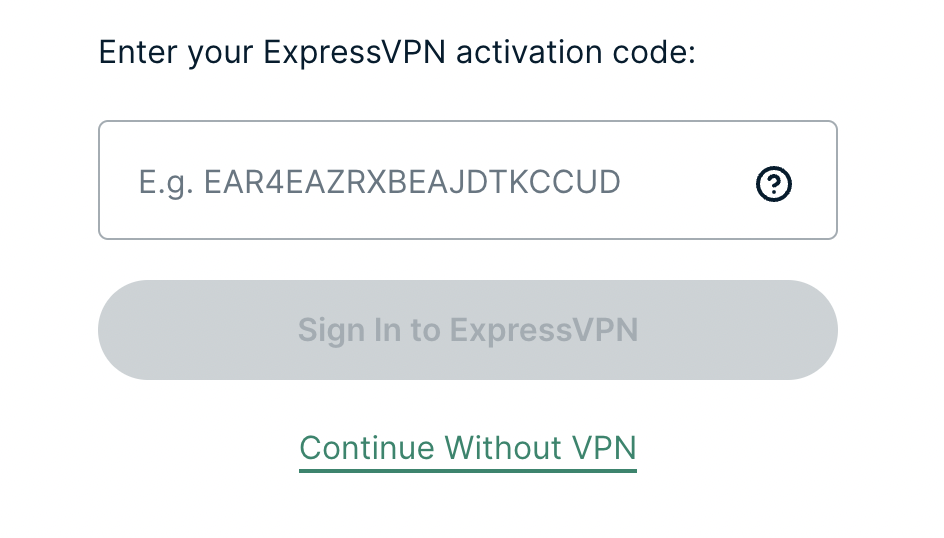
4a. If your FlashRouter is wired to the Internet correctly then you will be prompted to enter your ExpressVPN Activation Code found in your ExpressVPN account. Paste that in and click Sign in to ExpressVPN.

ExpressVPN Activation Code

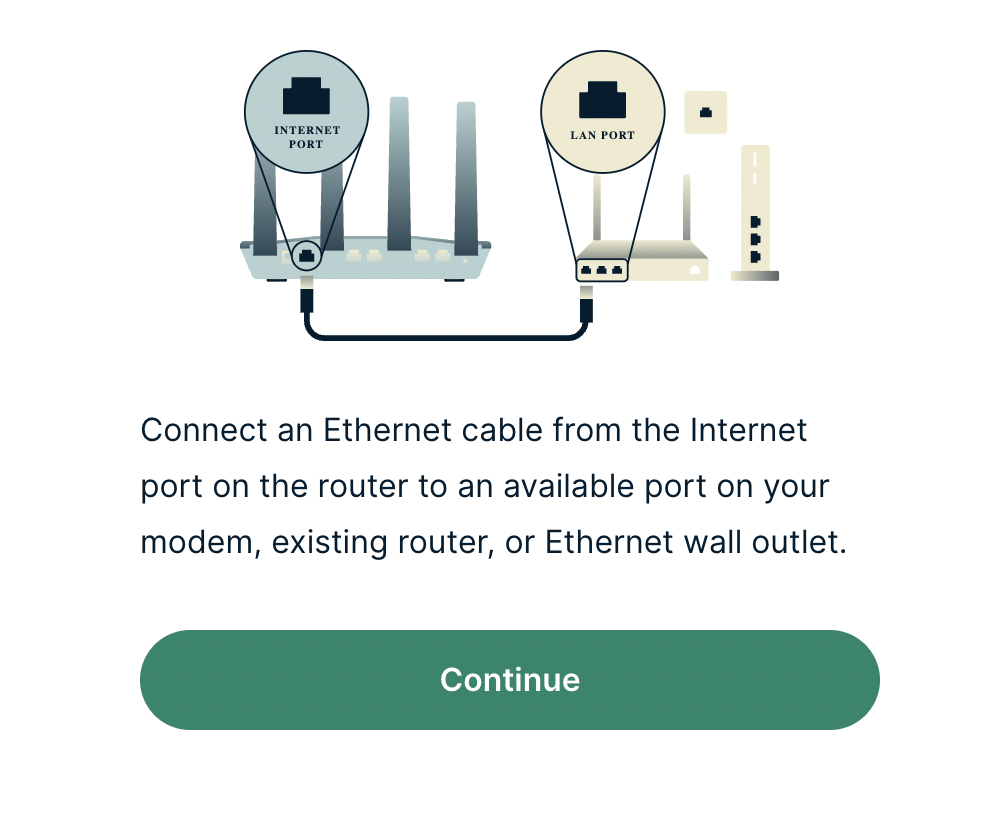
4b. If your FlashRouter is not wired correctly or is not receiving Internet properly make sure you are wired as detailed in the diagram that appears. If you are stuck at this screen we recommend powering off your ISP modem and any other router that the ExpressVPN FlashRouter is wired to and then powering them back up one by one.

Proceed with step “4a” above once the router is receiving Internet and you are prompted to enter the Activation Code.

ExpressVPN Wiring

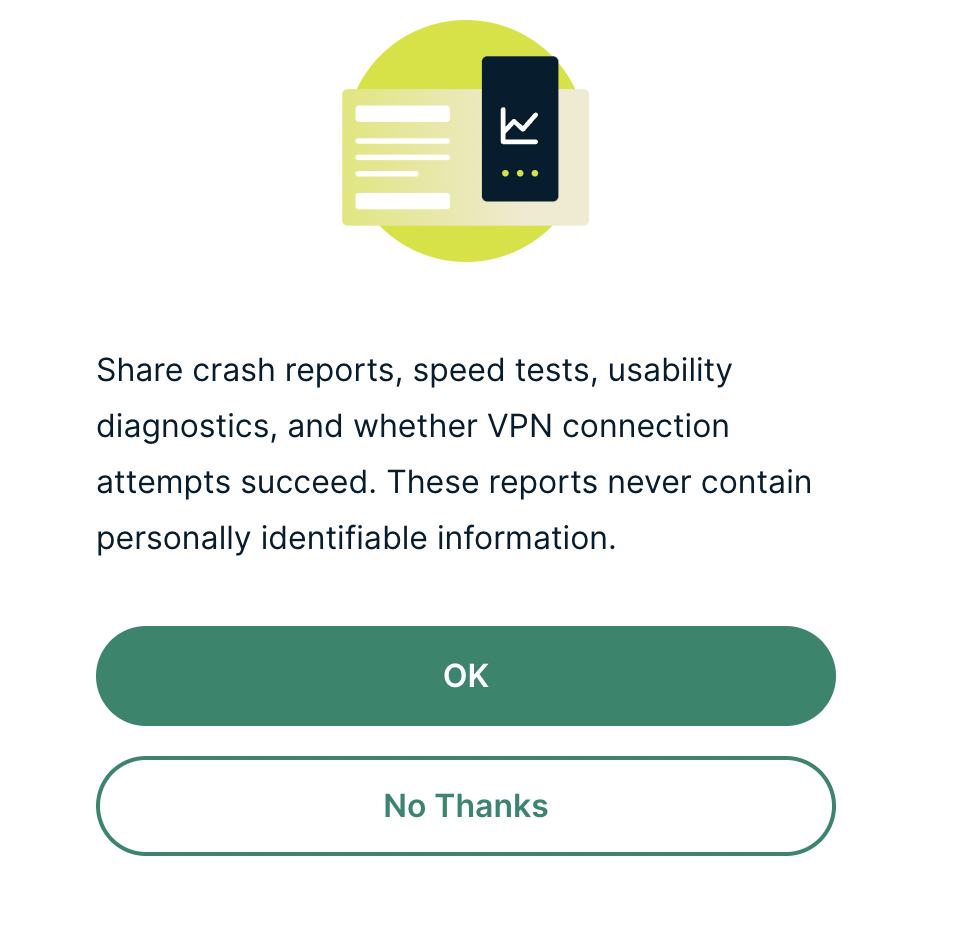
5. Select if you want to share anonymous crash report data with ExpressVPN to help them improve the firmware for future releases.

ExpressVPN Share Crash Report

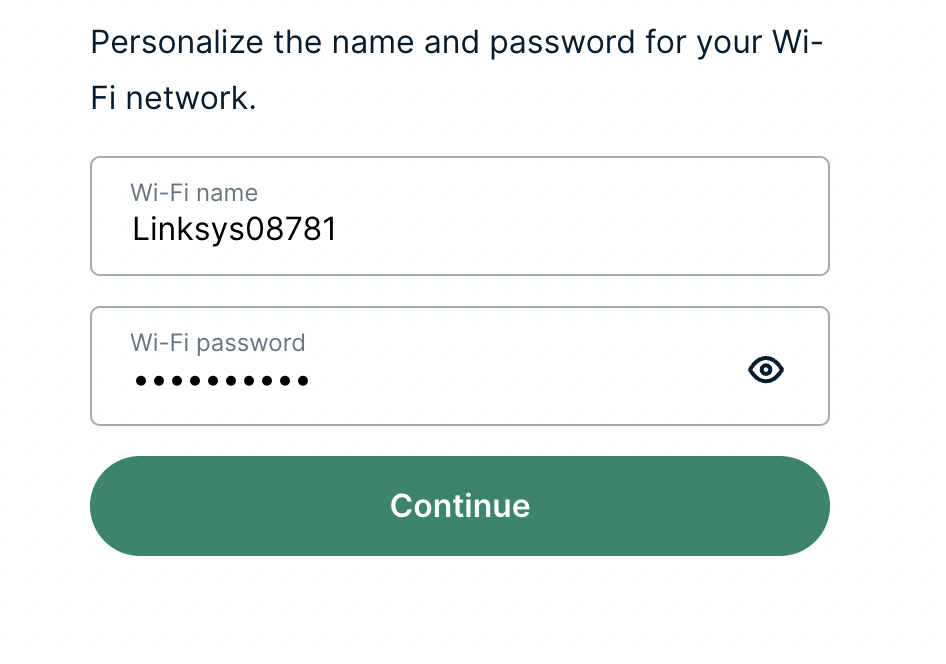
6. Set the WiFi name and password your wireless devices will use to connect to the FlashRouter’s network. Make sure the WiFi name is unique and not a duplicate of an existing WiFi name if you change it. You can also leave it as the default information if you like. Click Continue.

ExpressVPN Set WiFi Name and Password

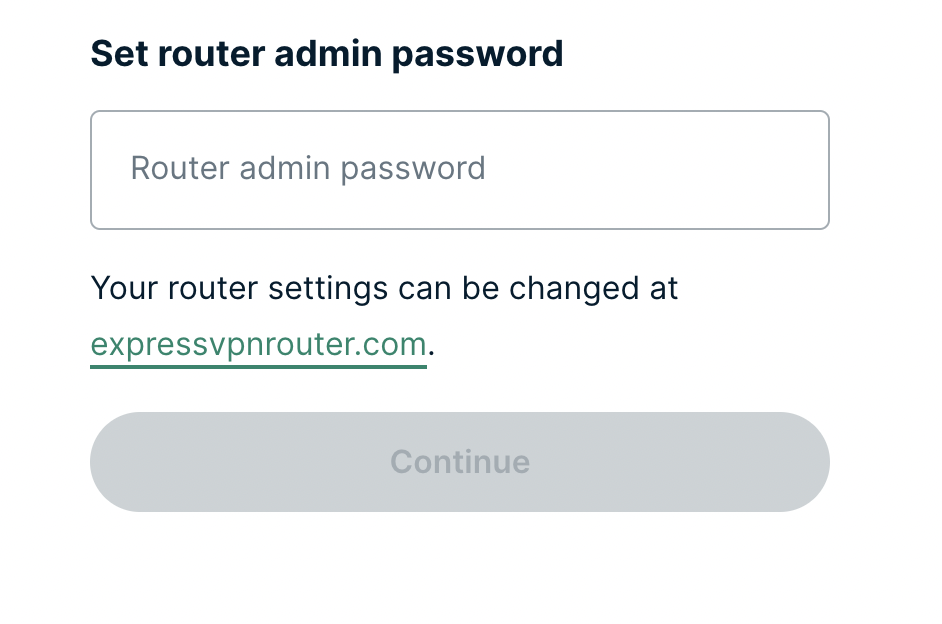
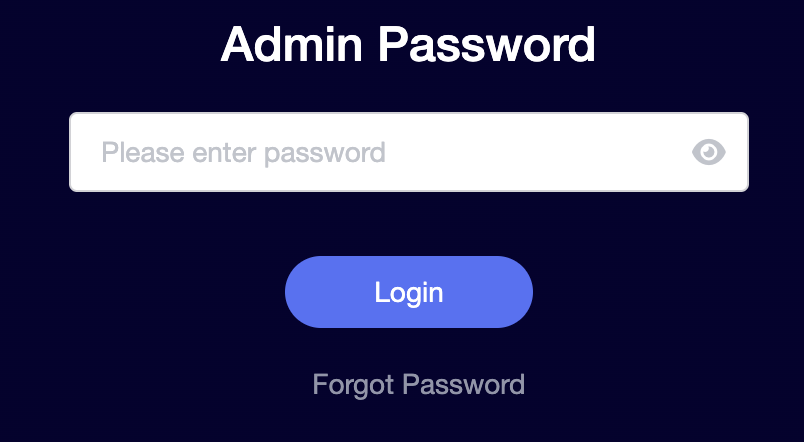
7. Enter the admin password you will use to access the ExpressVPN router settings. Be sure to TYPE CAREFULLY when setting the admin password as a typo will result in needing to reset the router again. Note this password in a secure location or commit it to memory.

ExpressVPN admin password

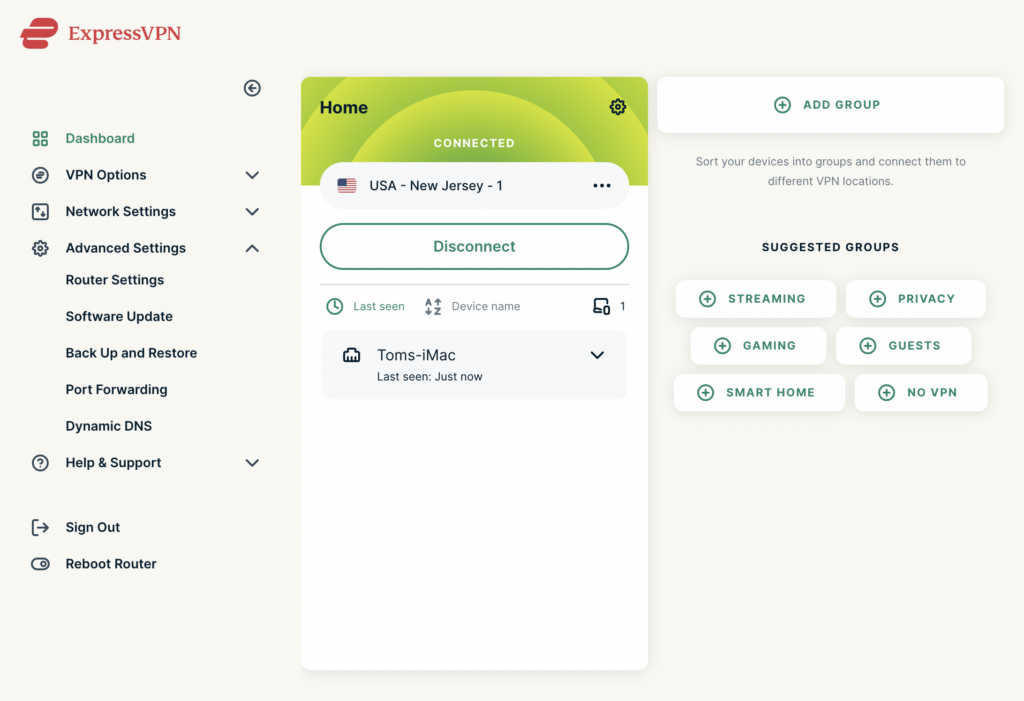
8. Your ExpressVPN FlashRouter is now fully setup!

ExpressVPN Connected

ExpressVPN/Aircove FlashRouter Internet Setup and Activation

TeamFlashRouters · Mar 16, 2022 ·

Follow this article when you receive your new ExpressVPN FlashRouter to connect your FlashRouter to the Internet via ExpressVPN and customize your network so it is ready to use.

Obtain your ExpressVPN Activation Code

If you are not already an ExpressVPN user Sign Up Now.

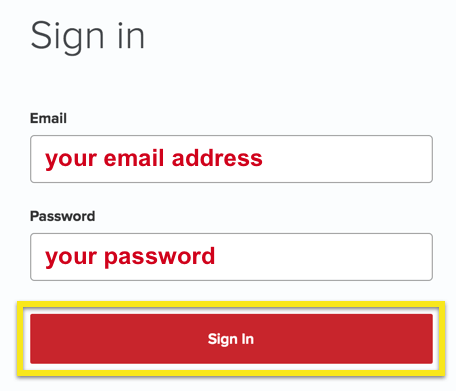
1. Visit ExpressVPN’s website login page.

ExpressVPN on FlashRouters Privacy App Setup - Sign Into ExpressVPN Dashboard

2. Copy your ExpressVPN Activation code and paste it into a document or leave this page open while you proceed with the instructions.

Access Router Settings

1. Connect to the FlashRouter’s network via ethernet cable or wireless.

The wireless network will appear as “Aircove”, “Linksys##”, “Netgear##”, or “Asus” and the password to join the network will be the default wireless password printed on the bottom of the router.

2. Open your web browser and enter expressvpnrouter.com or 192.168.132.1 in the URL.

ExpressVPNrouter.com
192.168.132.1

3. Click Get Started on the ExpressVPN page that is displayed.

ExpressVPN Get Started

4a. If your FlashRouter is wired to the Internet correctly then you will be prompted to enter your ExpressVPN Activation Code found in your ExpressVPN account. Paste that in and click Sign in to ExpressVPN.

ExpressVPN Activation Code

4b. If your FlashRouter is not wired correctly or is not receiving Internet properly make sure you are wired as detailed in the diagram that appears. If you are stuck at this screen we recommend powering off your ISP modem and any other router that the ExpressVPN FlashRouter is wired to and then powering them back up one by one.

Proceed with step “4a” above once the router is receiving Internet and you are prompted to enter the Activation Code.

ExpressVPN Wiring

5. Select if you want to share anonymous crash report data with ExpressVPN to help them improve the firmware for future releases.

ExpressVPN Share Crash Report

6. Set the WiFi name and password your wireless devices will use to connect to the FlashRouter’s network. Make sure the WiFi name is unique and not a duplicate of an existing WiFi name if you change it. You can also leave it as the default information if you like. Click Continue.

ExpressVPN Set WiFi Name and Password

7. Enter the admin password you will use to access the ExpressVPN router settings. Be sure to TYPE CAREFULLY when setting the admin password as a typo will result in needing to reset the router again. Note this password in a secure location or commit it to memory.

ExpressVPN admin password

8. Your ExpressVPN FlashRouter is now fully setup!

ExpressVPN Connected

Privacy Hero Streaming Relocation

TeamFlashRouters · Apr 3, 2023 ·

Your Privacy Hero router uses Cloud Based router management which means you can access the router settings from anywhere on any device that has an internet connection. You can follow these steps while connected to your phone, other Wi-Fi network, or the Privacy Hero network.

Use these steps change your location for popular streaming services allowing you to access to regionally restricted content. Privacy Hero uses DNS routing to change your location which is a great way around VPN streaming blocks.

1. From any device that has a browser such as a computer, smartphone, or tablet visit app.privacyhero.com

App.PrivacyHero.com

2. Enter your Privacy Hero account email and password. Click Login.

Privacy Hero Access Settings

3. Click the Streaming symbol.

Privacy Hero Streaming

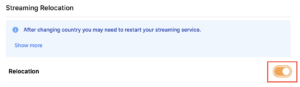
4. Set the Streaming Relocation toggle to On.

Privacy Hero enable Streaming Relocation

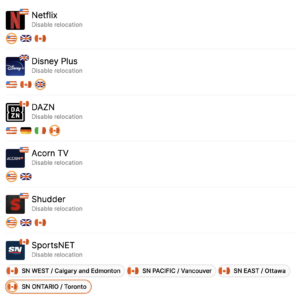
5. Click the flag of the country you would like the listed streaming service to use.

Privacy Hero select Region

This streaming relocation feature will not change your IP address in the way that a VPN does. This is why it is not able to be blocked in the same way that a VPN connection can be.

The listed services on the streaming relocation page will not be connected to VPN even if the Privacy Hero has an active VPN connection. These services are set to bypass the router’s VPN tunnel to avoid streaming blocks.

Toggling the streaming relocation feature On will also relocate many other streaming services automatically. They will be automatically optimized for the best connection with no manual selection needed for:
ABC
Adult Swim
All 4
Apple TV Channels
BBC
Britbox
CBC Gem
CBS Sports
Crackle
DirecTV Stream
DSTV Now
Filmrise
Freeform
Freevee
Frndly TV
F1 TV
FX Now
ITV
MGM+
Molotov.TV
My 5
NBC
NBC Sports
Now E
Now TV
Pandora
Paramount+
PBS
Peacock
Philo
Pluto TV
Showmax
Sling
SonyLIV
S Sports Plus
Starz
Stirr
TBS
Tennis Channel
The CW
Tubi
TVPlayer
Vudu
Xumo
Zattoo

TROUBLESHOOTING

Still having issues? Visit the VPN Troubleshooting section.

Troubleshoot Here

How do I set a Static IP for my device in DD-WRT?

TeamFlashRouters · May 30, 2019 ·

It can be very useful to setup static local IP addresses for devices on your FlashRouter network. By assigning specific IP’s to specific devices you can better control and manage how your network and the internet interacts with each device.

Once you setup a static IP you can set access restrictions, monitor and control bandwidth, as well as bypass a router VPN connection or setup a device specific Kill Switch. Without a static IP assignment you may lose device specific settings when the DHCP lease to the router expires.

Navigate to Services > Services

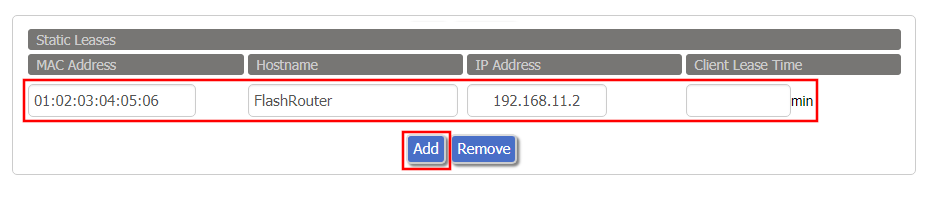
Set Static IP by Device MAC Address in FlashRouter DD-WRT Settings
  1. Under Static Leases click Add once.
  2. Fill in the newly appeared fields.
    • MAC Address: Enter the device’s MAC address which can be found on the device itself or on the Status > LAN page.
    • Hostame: Enter a name for the device. Make sure that there are no spaces.
    • IP Address: Enter the desired static IP Address of the device. It should be on the same subnet as the FlashRouter (192.168.11.x)
    • Client Lease Time: Leave this field blank.
  3. Click Apply Settings
  4. Repeat the steps above for each individual static IP address you would like to setup. If you click Add before clicking Apply Settings you will lose the configuration.

If a device has wireless and ethernet capabilities the MAC Addresses will be different for a wireless connection and an ethernet connection. Make sure to set a static IP for both MAC Addresses in this case.

Separate 2.4GHz and 5GHz Wi-Fi bands on ExpressVPN/Aircove firmware

TeamFlashRouters · Mar 16, 2022 ·

By default ExpressVPN firmware bonds the 2.4GHz and 5GHz wireless networks to a single wireless network name. Your device will automatically choose which one will provide the best connection. You can separate these networks to have unique Wi-Fi names so you can control which network your devices will use.

1. Connect to the FlashRouter’s network via ethernet cable or wireless.

2. Open your web browser and enter expressvpnrouter.com or 192.168.132.1 in the URL.

ExpressVPNrouter.com
192.168.132.1

3. Login with your ExpressVPN FlashRouter admin password.

ExpressVPN Router admin login

4. Select Network Settings on the left hand side of the menu.

ExpressVPN Network Settings

5. Select Wi-Fi Settings on the left hand side of the menu.

ExpressVPN WiFi Settings

6. Click the toggle for Separate 2.4GHz and 5GHz Wi-Fi.

ExpressVPN Separate 2.4GHz and 5GHz

7. Separate Wi-Fi details for the 5GHz band will now display. You can change the name and password if you so choose or leave it with the default name and password with “-5GHz” added to the name. Click Save. Click Continue.

ExpressVPN 5GHz added

TP-Link Change Wi-Fi name and password

TeamFlashRouters · Apr 16, 2024 ·

Follow this guide to change the Wi-Fi name and password on your TP-Link FlashRouter.

1. Connect your computer, phone, or tablet to the TP-Link router via wireless (FlashRouter24 / FlashRouter50) or via ethernet cable to one of the LAN ports on the router.

The FlashRouter WiFi password is printed on the sheet that came with the router and is set to Wireless#[First 5 characters of your router MAC]. The router MAC can be found on the bottom of your router if you cannot locate the sheet. For e.g. if your MAC is 1459C07E70A8 then your WiFi password is Wireless#1459C

Be sure to capitalize the W.

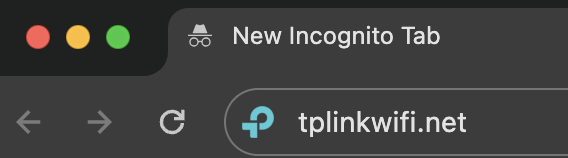
2. Once connected via wireless or ethernet on your device open your browser and go to the TP-Link firmware settings.

TP-Link URL Access

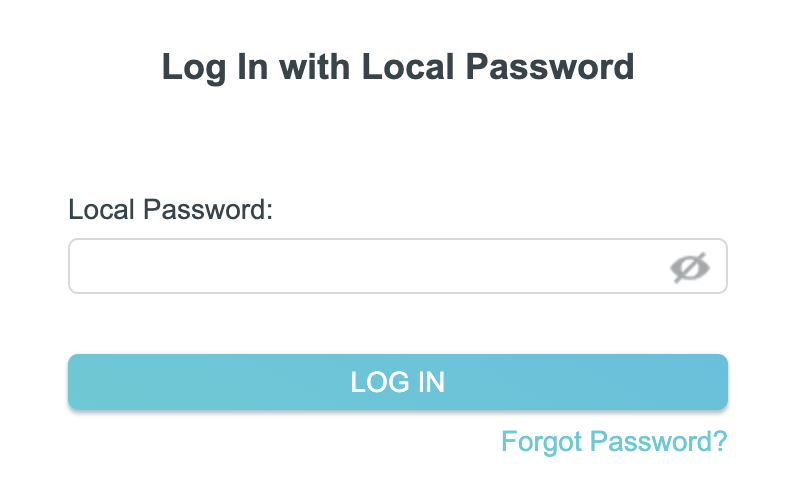
3. Enter tp-link as the admin password to access the TP-Link firmware settings.

TP-Link admin password

4. Click Wireless.

TP-Link Wireless tab

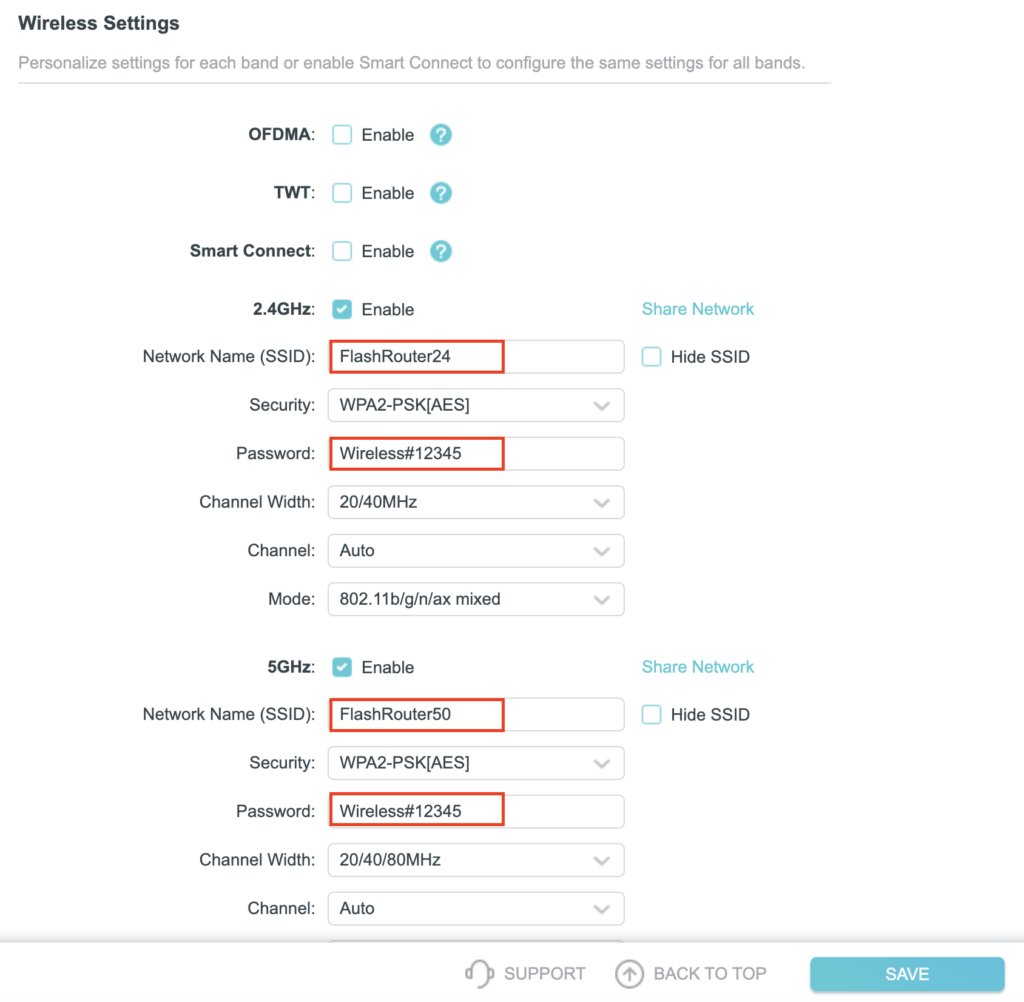
5. Change the Network Name (SSID) and Password fields to what you want to use. The SSID should be unique and NOT a duplicate of an existing network. Click Save.

TP-Link Change Wireless name and password

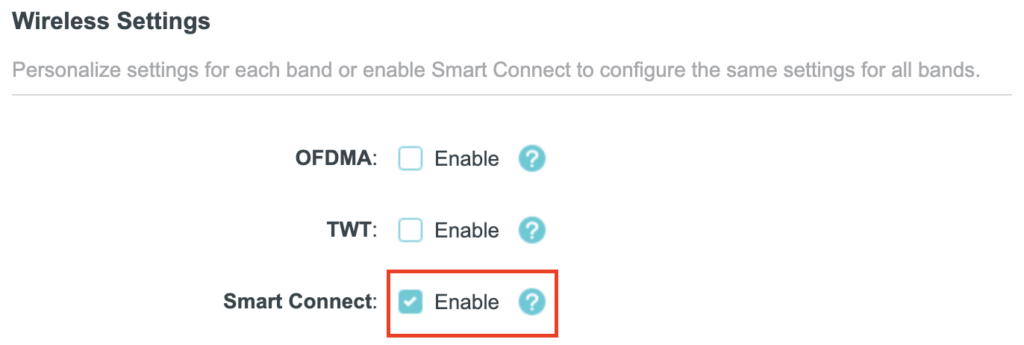
If you want both 2.4GHz and 5GHz networks to be bonded and have the same name click the Smart Connect checkbox.

TP-Link Separate Wifi

6. Connect your devices to the new wireless network.

TROUBLESHOOTING

Still having issues? Visit the VPN Troubleshooting section.

Troubleshoot Here

Using Device Groups to connect to multiple VPN locations on ExpressVPN/Aircove firmware

TeamFlashRouters · May 12, 2022 ·

ExpressVPN offers a great feature of connecting the FlashRouter to multiple ExpressVPN servers at the same time. You can then assign your devices to the location that you wish.

1. Connect to the FlashRouter’s network via ethernet cable or wireless.

2. Open your web browser and enter expressvpnrouter.com or 192.168.132.1 in the URL.

ExpressVPNrouter.com
192.168.132.1

3. Login with your ExpressVPN FlashRouter admin password.

ExpressVPN Router admin login

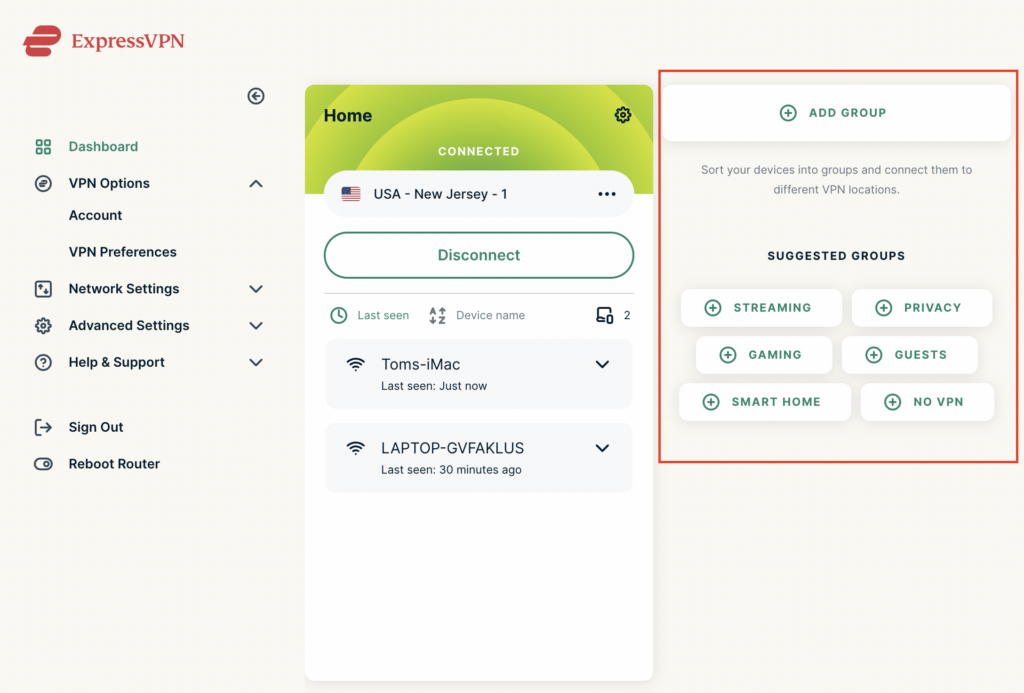
4. Select Add Group and name the new group or select one of the pre-named groups below.

ExpressVPN Add Group

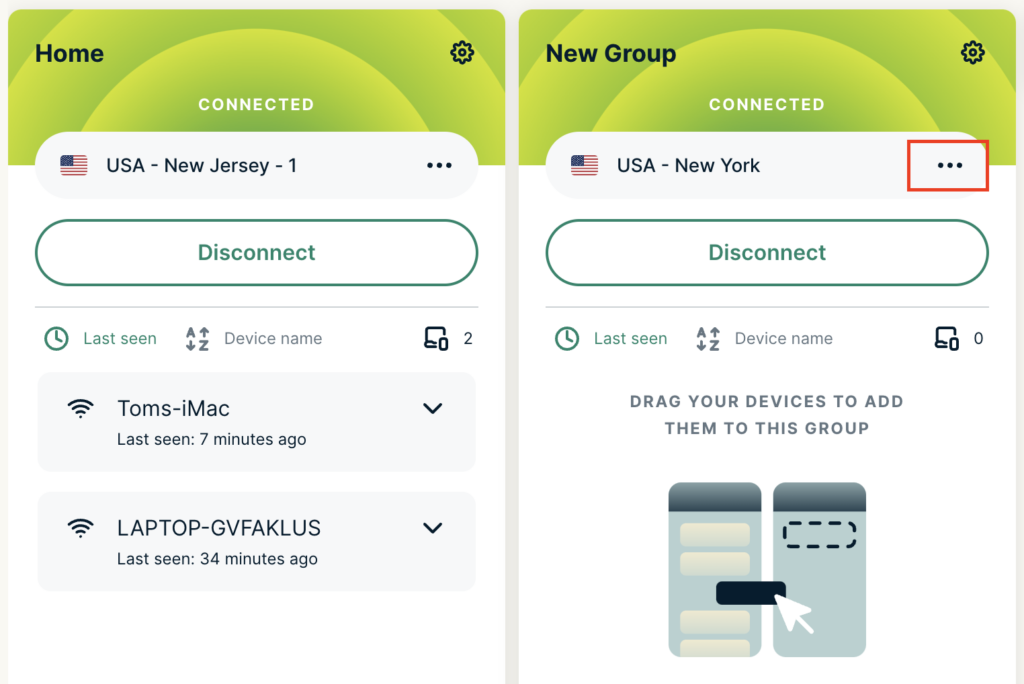
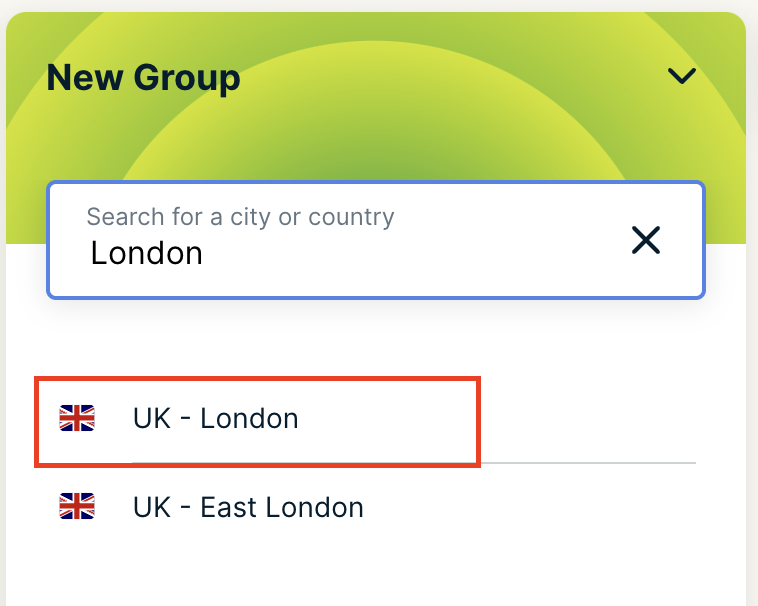
5. Click the three dots next to the new server location and type in the location you want to connect to. Click the new location to connect.

ExpressVPN Change server
ExpressVPN select new server

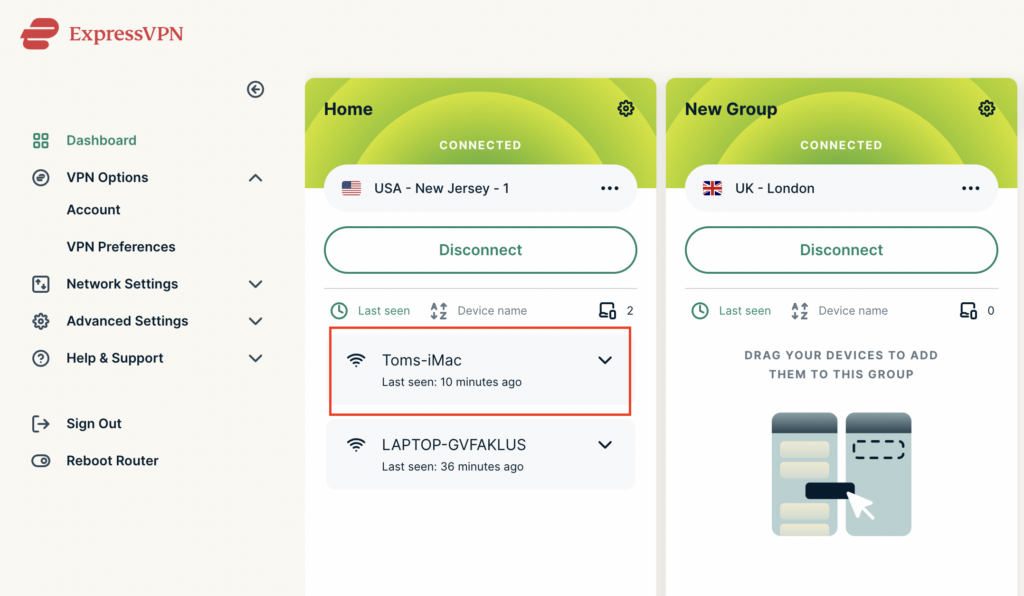
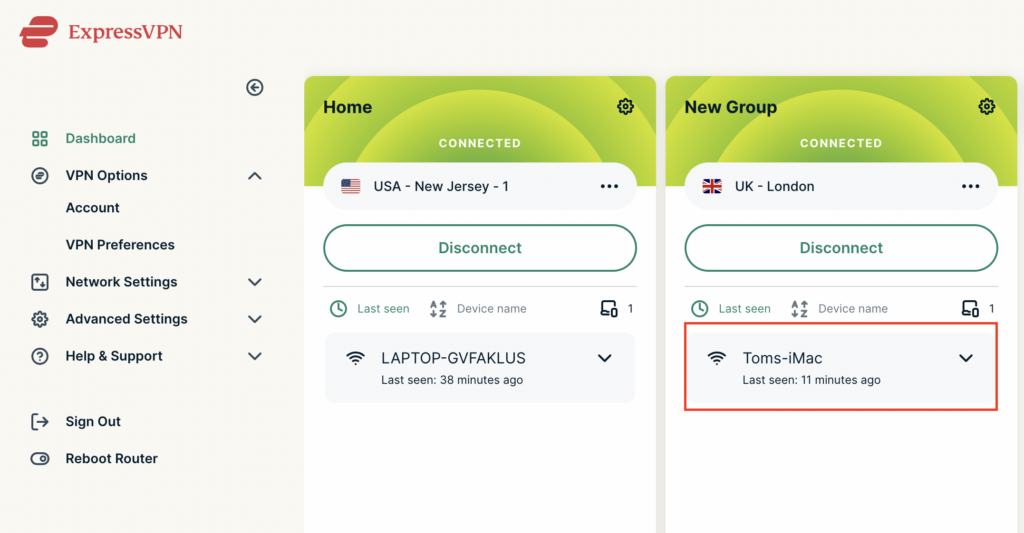
5. Click and drag the device that you want assigned to the VPN New Group.

ExpressVPN select device
ExpressVPN device assigned

The devices assigned to new group will now connect to that location while the devices in the first VPN group will remain connected to the VPN server selected in that area.

Privacy Hero Change VPN Providers

TeamFlashRouters · Apr 3, 2023 ·

Your Privacy Hero router uses Cloud Based router management which means you can access the router settings from anywhere on any device that has an internet connection. You can follow these steps while connected to your phone, other Wi-Fi network, or the Privacy Hero network.

Each Privacy Hero router comes with a year free of Privacy Hero WireGuard VPN and can be setup for NordVPN and Surfshark users as well. Use these steps to change between the VPN providers to find the best connection for your needs.

1. From any device that has a browser such as a computer, smartphone, or tablet visit app.privacyhero.com

App.PrivacyHero.com

2. Enter your Privacy Hero account email and password. Click Login.

Privacy Hero Access Settings

If you have not created your Privacy Hero account yet please follow these instructions.

3. Click the VPN symbol.

Privacy Hero Setup VPN

4. Click the Change button and select the VPN provider that you want to use.

Privacy Hero Change VPN Providers

Follow our guides for connecting to NordVPN or Surfshark. If you are switching to Privacy Hero VPN just select it from dropdown and toggle the VPN switch to On.

TROUBLESHOOTING

Still having issues? Visit the VPN Troubleshooting section.

Troubleshoot Here

Setting up a Guest WiFi Network on Roqos

TeamFlashRouters · Nov 14, 2021 ·

Create a Guest WiFi network on your Roqos to segment certain devices from the main network and set custom content filters as you see fit. Note that this is only for 2.4GHz wireless.

Login to Roqos Core UI web app in a browser on any computer or smart device.

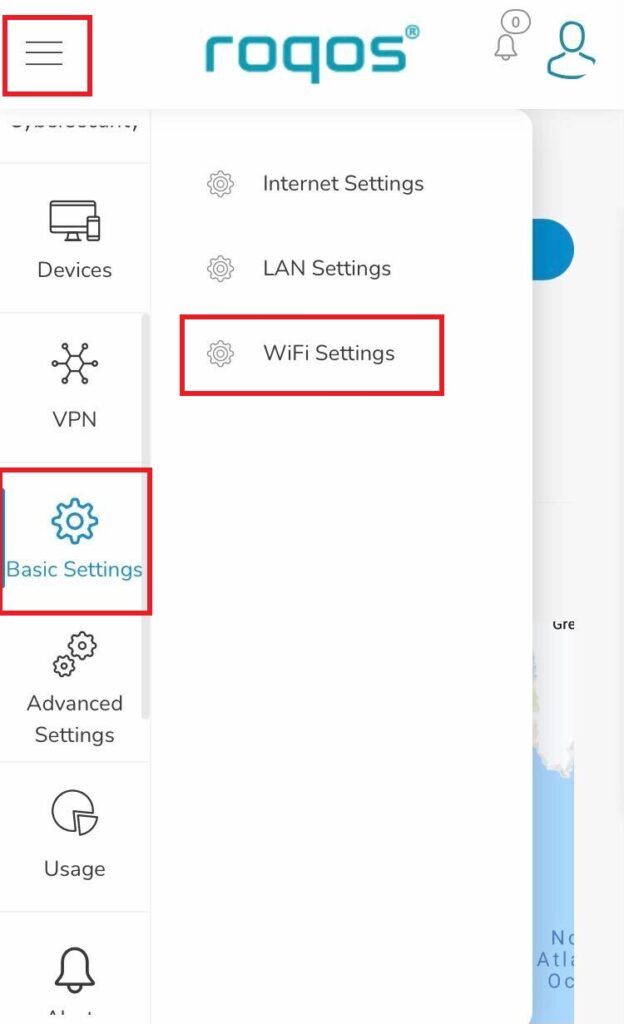
1. Click the navigation menu and select Basic Settings > WiFi Settings.

Roqos Basic Settings - WiFi Settings

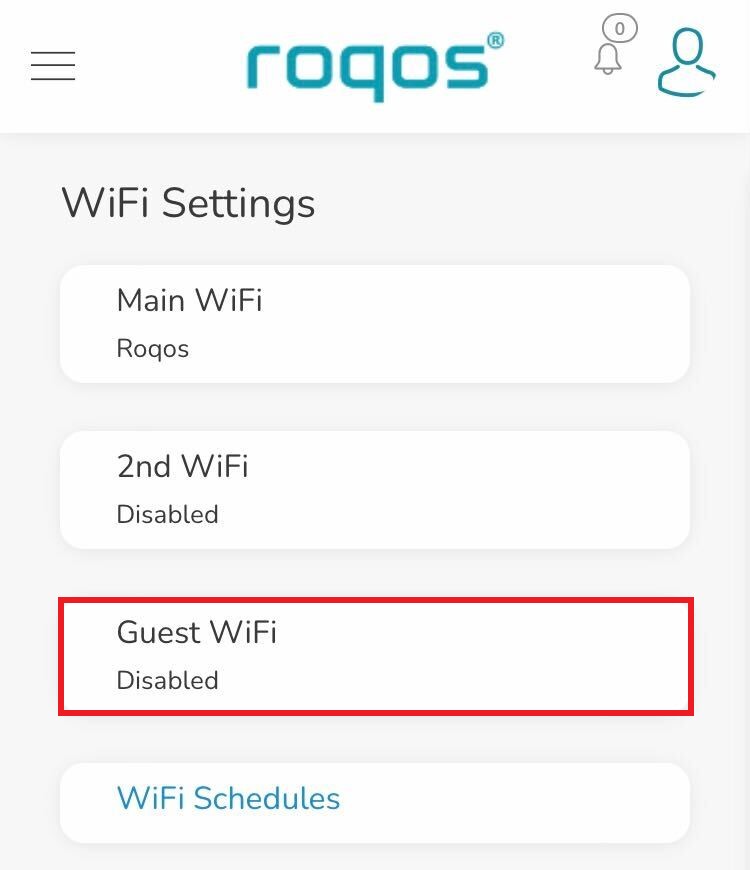
2. Click Guest WiFi.

Roqos WiFi Settings - Guest Wifi

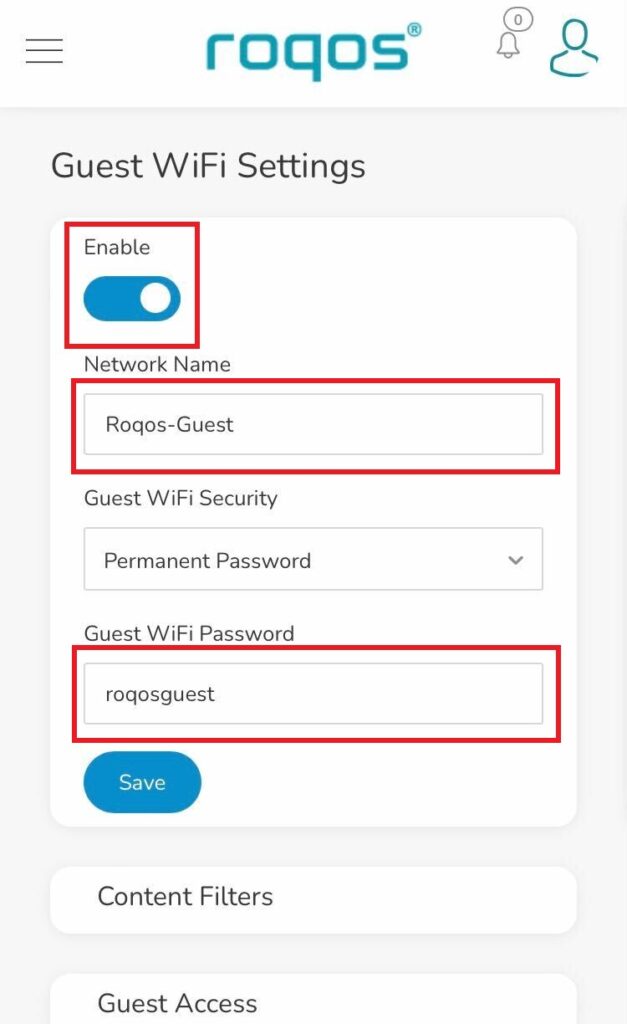
3. Toggle the Enable slider and set the Network Name and Guest WiFi Password. Click Save.

Roqos WiFi Settings - Guest Wifi name and password

4. Optional: If you wish to set specific Content Filters for the Guest Network and set the Filters that you see fit.

Privacy Hero Safe Surf

TeamFlashRouters · Apr 3, 2023 ·

Your Privacy Hero router uses Cloud Based router management which means you can access the router settings from anywhere on any device that has an internet connection. You can follow these steps while connected to your phone, other Wi-Fi network, or the Privacy Hero network.

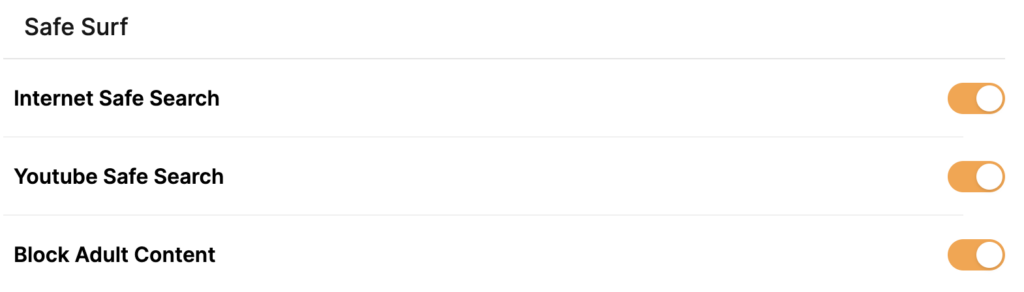
The Safe Surf settings feature allows users to block inappropriate search results, YouTube videos, and adult content. All devices assigned to this profile will have these rules applied.

1. From any device that has a browser such as a computer, smartphone, or tablet visit app.privacyhero.com

App.PrivacyHero.com

2. Enter your Privacy Hero account email and password. Click Login.

Privacy Hero Access Settings

If you have not created your Privacy Hero account yet please follow these instructions.

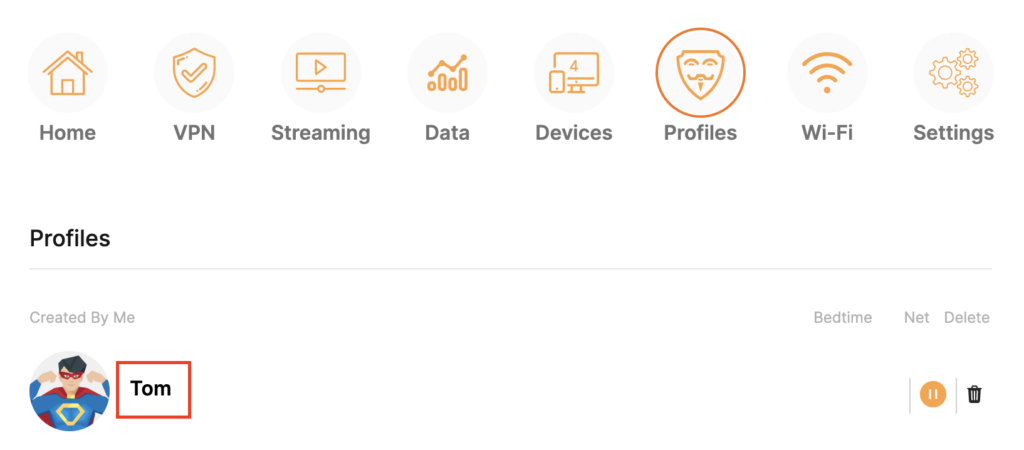
3. Click the Profiles symbol.

Privacy Hero Profiles

4. Click the name of the User Profile.

Privacy Hero Select Profile

5. Toggle On the settings for Internet Safe Search, YouTube Safe Search, and Block Adult Content as needed.

Privacy Hero Safe Search

TROUBLESHOOTING

Still having issues? Visit the VPN Troubleshooting section.

Troubleshoot Here

How do I find my router local IP address?

Dave · May 3, 2019 ·

The Local IP Address is the address that you can use to access a router’s firmware settings. Use the below instructions to find the local IP Address of the router you are connected to.

Make sure you are connected to the FlashRouter’s network via ethernet or WiFi. Keep in mind these instructions may vary based on your current software version.

Find IP Address in Windows

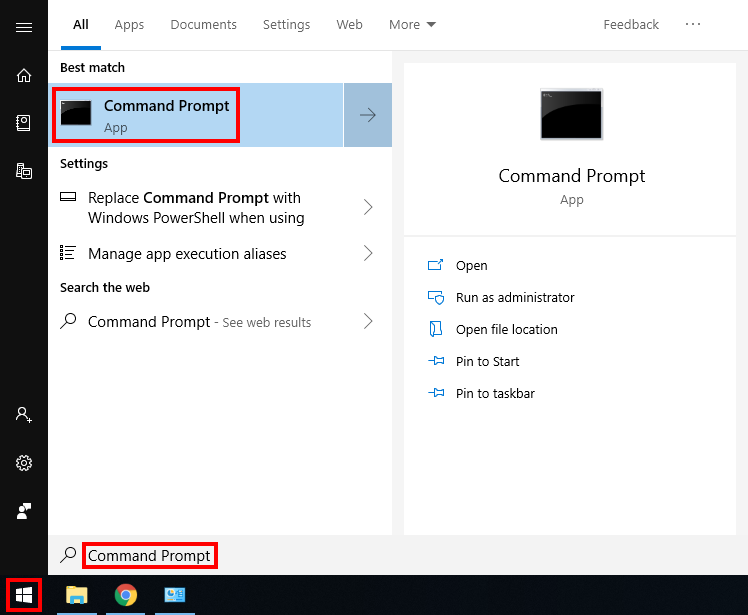
1.  Open the Window search box, and search “command prompt”

How to Find IP Address using Windows Command Prompt

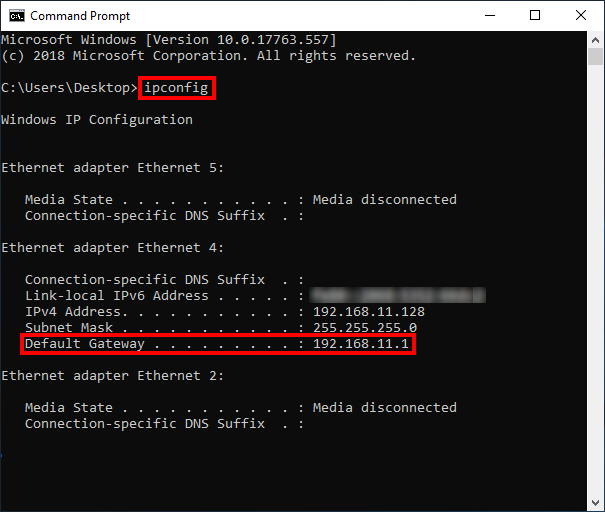
2. Type “ipconfig” and press Enter.

3. Your router’s local IP address will be listed next to Default Gateway.

How to Find IP Address using Windows Command Prompt 2

Find IP Address in Apple / Mac

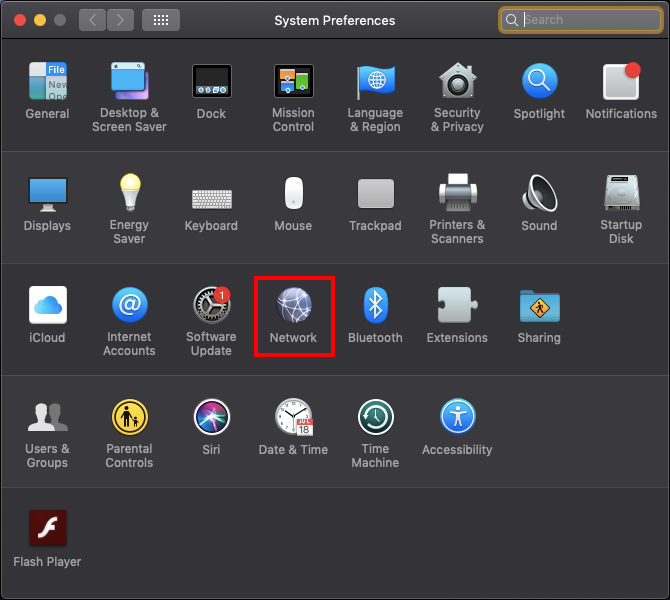
1. Open System Preferences, and select Network.

Find Static DNS settings for FlashRouter DD-WRT Using a MAC Computer

2. Select the adapter that is connected via ethernet or wireless. This will vary based on your current connection.

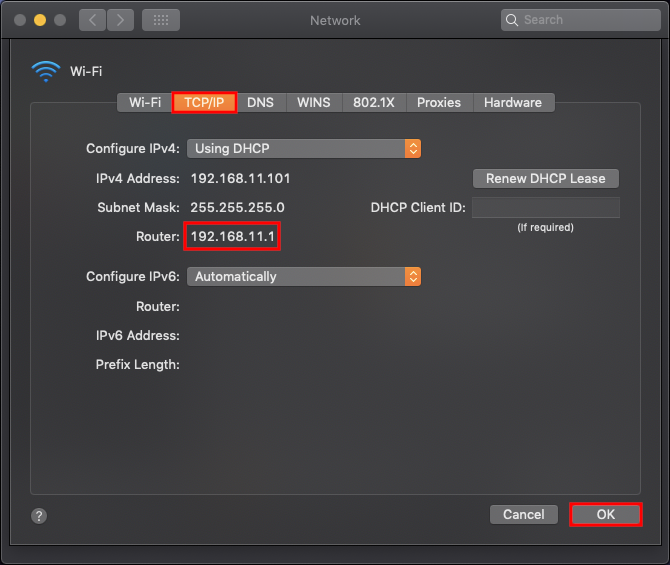
3. Select Advanced.

How to Find IP Address using a MAC Computer 2

4. Select the TCP/IP tab.

5. Your router’s local IP address will be listed next to Router.

Find IP Address in iOS

1.  Open Settings

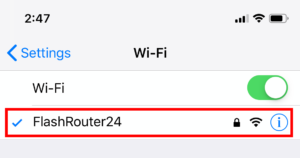
2. Select WiFi, and select the blue icon next to your current connection.

Select FlashRouters DD-WRT Wireless Network in order to Check Static IP Network Settings on iOS Mobile Device

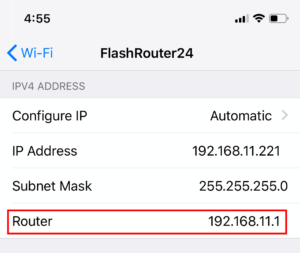
3. Your router’s local IP address will be listed next to Router.

How to Find IP Address on IOS 2

Find IP Address in Android

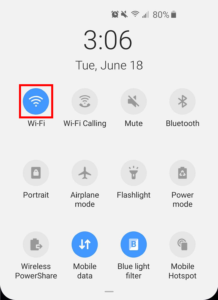
1. From the top of the screen, swipe down to display settings.

2. Select WiFi.

WiFi Icon and Settings in Android Mobile Device

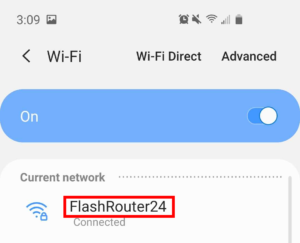
3. Select your current network.

How to Find IP Address on Android Device

4. Click on the gear next to Network Name (note this may be different on varying Android devices)
5. Click Advanced
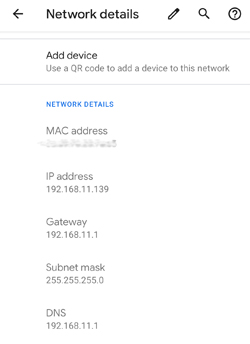
6. Your router’s local IP address will be listed as the Gateway under Network Details.

Find Router IP on Android

Once you have followed these instructions to find the Local IP Address of the router you can enter the Local IP address in your web browsers URL to access the router’s firmware settings.

GL.iNet Access Router Settings and Firmware Upgrade

TeamFlashRouters · Apr 3, 2023 ·

Follow this guide to upgrade the firmware of your GL.iNet FlashRouter.

1. Connect your computer, phone, or tablet to the GL.iNet router via wireless (FlashRouter24 / FlashRouter50) or via ethernet cable to one of the LAN ports on the router.

The FlashRouter WiFi password is printed on the sheet that came with the router and is set to Wireless#[First 5 characters of your router MAC]. The router MAC can be found on the bottom of your router if you cannot locate the sheet. For e.g. if your MAC is 9483C07E70A8 then your WiFi password is Wireless#9483C

Be sure to capitalize the W.

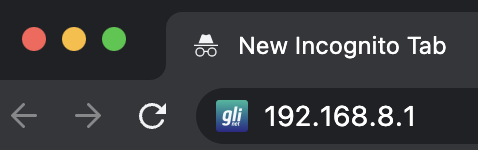
2. Once connected via wireless or ethernet on your device open your browser and go to 192.168.8.1

GL.iNet router access

3. Enter openwrt as the admin password to access the GL.iNet firmware settings. Newer devices may have a different admin password set as openwrt1 or glopenwrt1

GL.iNet admin password enter

3. If a new firmware upgrade is available the router settings will either display a banner when you first access the router or a header. Click Install or the Upgrade arrow depending on which appears for you.

GL.iNet Firmware Upgrade Banner
GL.iNet Firmware Upgrade Header

4. Make sure the Keep Settings toggle is pushed to the right so your router does not get reset. Click the Install button to begin the firmware upgrade.

GL.iNet Install Firmware Upgrade

5. The firmware update should take about 2-3 minutes. You may need to reconnect your wireless devices after the network comes back up in your available networks.

TROUBLESHOOTING

Still having issues? Visit the VPN Troubleshooting section.

Troubleshoot Here

How do I change my Wireless Password?

Dave · Apr 29, 2019 ·

Change the FlashRouter’s wireless network password to any password you like.

Navigate to Wireless > Wireless Security

Changing Wireless password in DD-WRT Wireless Security Settings
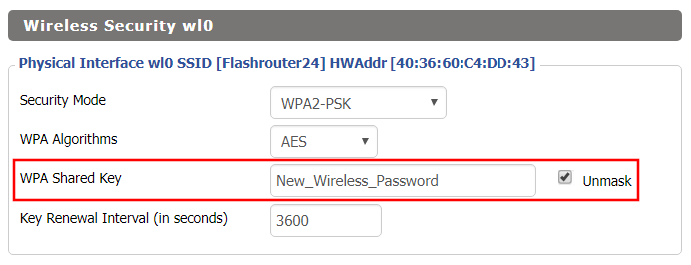
  1. Click Unmask next to the Shared Key field to see what you are typing and enter in the new wireless password you would like to use.
  2. Click Apply Settings.
  3. Reconnect to the wireless network using your new password.

How do I boost my Wireless Transmission power?

Dave · Apr 29, 2019 ·

Boost the wireless transmission power if you need to increase the wireless range of the FlashRouter.

Important Information

We recommend reading the entry in the DD-WRT Wiki to familiarize yourself with what TX Power values represent.

Broadcom routers

  • Netgear R8500
  • Netgear R7000
  • Netgear R6400 V2
  • Netgear R6300 V2
  • Asus RT-AC5300
  • Asus RT-AC66U
  • Asus RT-AC56U

Navigate to Wireless > WL# or ath# Advanced

  1. Set the TX Power to the desired value.
  2. Click Apply Settings.
Boost TX Power in DD-WRT Advanced Wireless Settings page to Increase Wireless Transmission

Atheros routers

  • Netgear R9000
  • Netgear R7800
  • Linksys WRT3200ACM
  • LinksysWRT32X
  • Linksys WRT1900AC/v2/ACS
  • LinksysWRT1200AC

Navigate to Wireless > Basic Settings

  1. Check Advanced Settings under the wireless interface you would like to boost.
  2. Set the TX Power to the desired value.
  3. Click Apply Settings.
Boost TX Power in DD-WRT Advanced Wireless Settings page to Increase Wireless Transmission

We advise to proceed with caution when setting the TX Power. This has been known to negatively effect the hardware if set too high.

Number test

admin · Oct 23, 2019 ·

  1. Visit ExpressVPN’s website login page
    ExpressVPN on FlashRouters Privacy App Setup - Sign Into ExpressVPN Dashboard
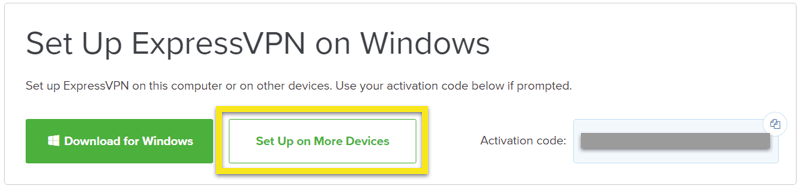
  2. Successfully log in with your account information. Select Setup on More Devices.
    ExpressVPN on FlashRouters Privacy App Setup - Setup On More Devices
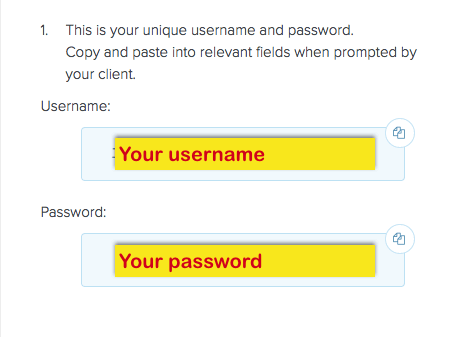
  3. Select Manual Config and copy the Username and Password that are displayed on the right hand side of the screen.
    ExpressVPN on FlashRouters Privacy App Setup - OpenVPN Specific Username and Password

SmartDNSProxy SmartDNS Setup

TeamFlashRouters · Jun 13, 2019 ·

SmartDNSProxy offers a SmartDNS service for unblocking geo-restricted content without the encryption of a VPN service. SmartDNS routes DNS servers to different regions which “tricks” the website to allow access to previously restricted content.

SmartDNS does not change your IP Address or provide the encryption that a VPN connection does. This can result in faster speeds and unblocked content.

SmartDNS and VPN should not be configured at the same time. When using a SmartDNS connection, make sure to disable your VPN connection on the FlashRouter.

Register your IP Address

If you are not already a SmartDNSProxy user Sign Up Now.

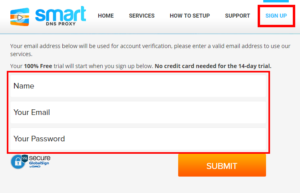
Click on Sign Up and fill in the requested information.

SmartDNSProxy SmartDNS Account Sign Up For DD-WRT FlashRouter

Access the e-mail you entered and Verify your new account.

SmartDNSProxy SmartDNS Activate DNS for DD-WRT FlashRouter

Your account will now be verified.

Activate SmartDNSProxy SmartDNS Service and Subscription

Login to SmartDNSProxy

SmartDNSProxy Server Location Addresses for FlashRouter DD-WRT Settings

Visit SmartDNSProxy’s DNS servers list and note the DNS servers of the location you would like to access content from.

Enter SmartDNSProxy SmartDNS servers on your FlashRouter

Navigate to Setup > Basic Setup

  1. Scroll down to Network Address Server Settings (DHCP).
  2. Enter in any combination of SmartDNSProxy SmartDNS servers you noted into Static DNS fields 1 and 2.
  3. Click Apply Settings at the bottom of the page.
  4. Reboot the FlashRouter.

Once the router is fully booted back up, you can access your desired regional content on any device that connects to the FlashRouter’s network.

How do I change my Wireless Network Name (SSID)?

TeamFlashRouters · May 1, 2019 ·

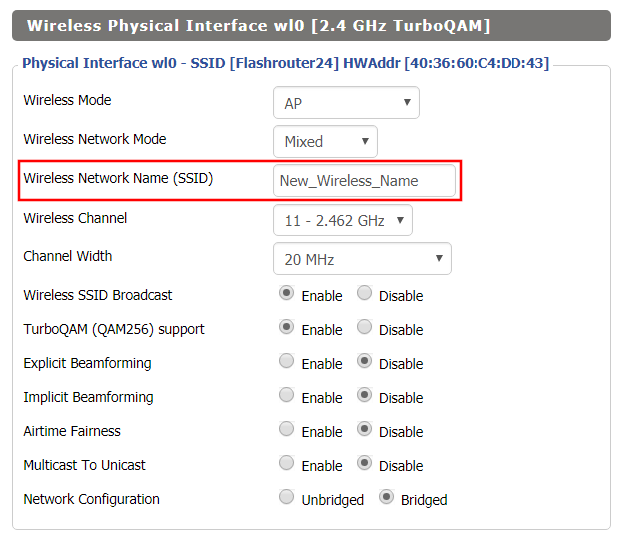
Change the FlashRouter’s wireless network name to any name you like.

Navigate to Wireless > Basic Settings

Changing SSID in DD-WRT Wireless Basic Settings page
  1. Click into the Wireless Network Name (SSID) field and enter in the new wireless name you would like to use.
  2. Click Apply Settings.
  3. Reconnect to the wireless network using your new wireless network name.

Roqos VPN Connected, but my device IP is unchanged

TeamFlashRouters · Mar 8, 2022 ·

If your VPN Out page in your Roqos settings is reporting that you are Connected to your VPN provider but your IP Address and location have not changed when you visit What is my IP address? follow the below checklist.

Double check that your device is connected to the Roqos network

Since the Roqos UI is being accessed securely via the cloud you can change the settings while your device is not connected to the Roqos network. This would result in your IP Address not updating when you connect to VPN.

Make sure that you are connected to your Roqos WiFi network or from an ethernet port on the back of the Roqos directly to your device and not another network.

Assign Devices To Connect To VPN in the Roqos

By default there are no devices assigned to the VPN tunnel. To assign devices to the Roqos’ VPN connection.

1. Login to your Roqos UI.

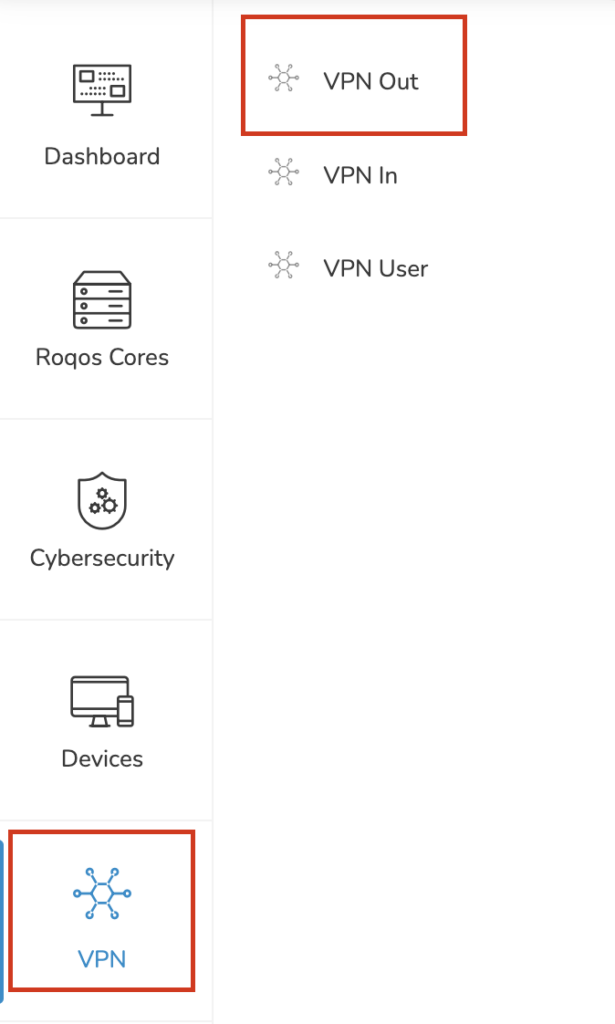
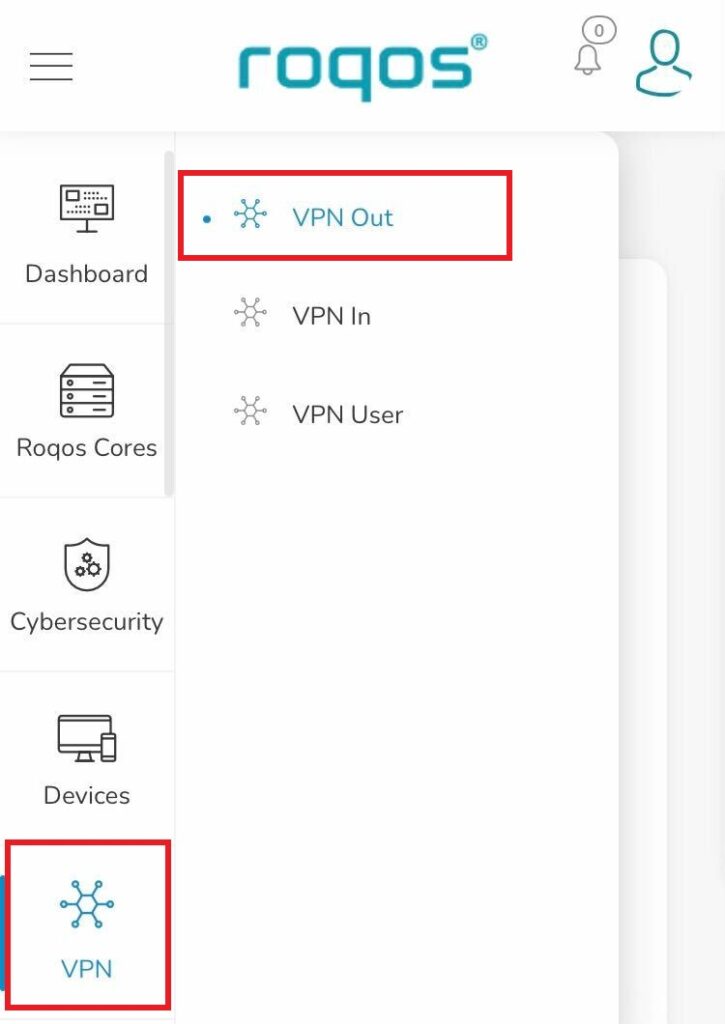
2. Select the VPN tab on the left hand menu and select VPN Out.

Roqos VPN Out

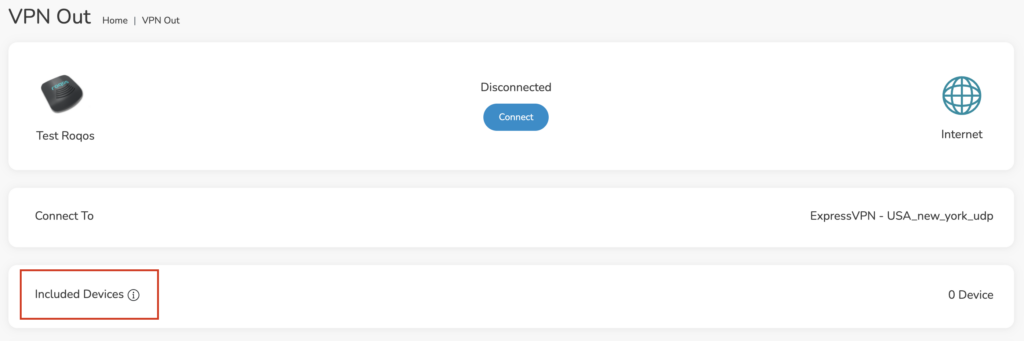
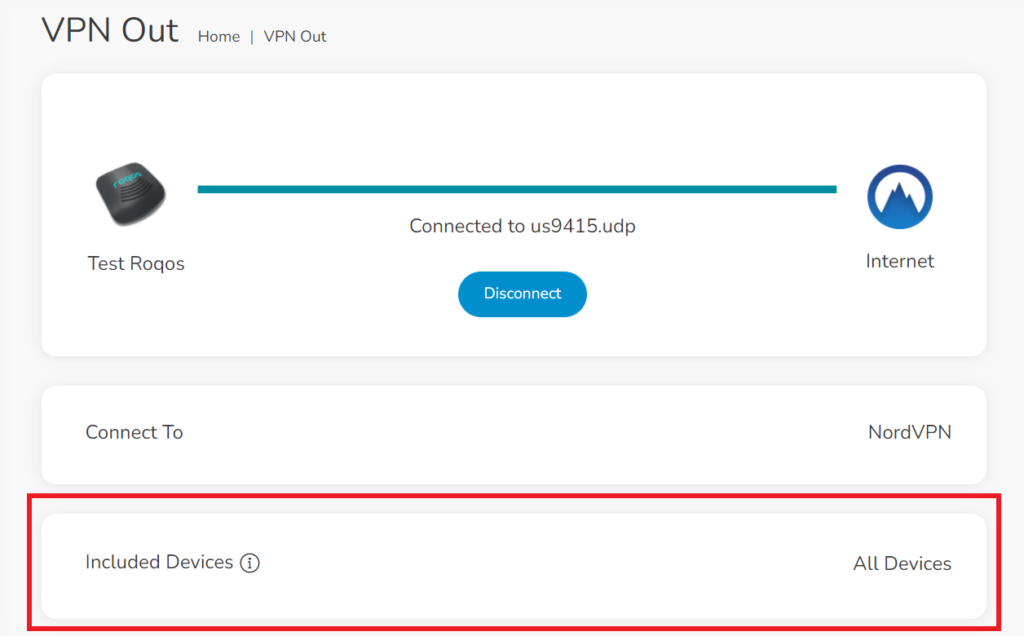
3. Click Included Devices. From this page you can choose if all devices should connect to VPN or only certain devices.

Roqos VPN Included Devices

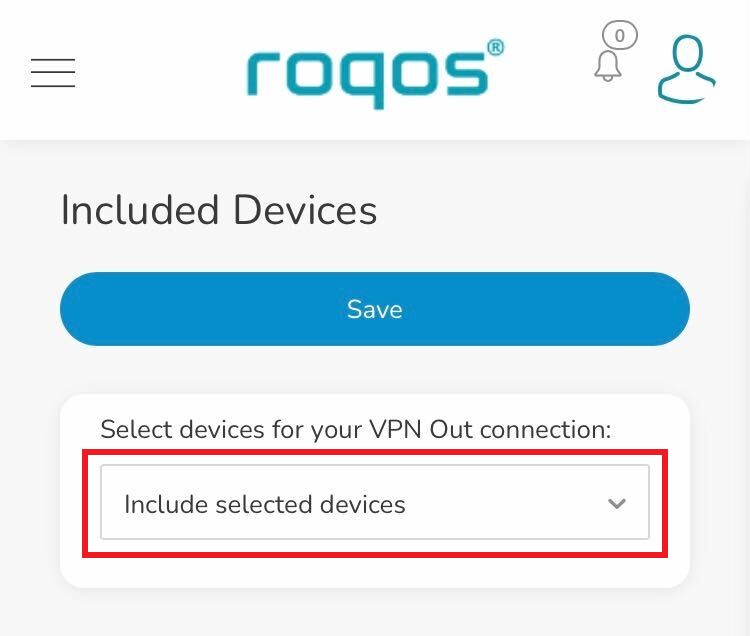
4. From the dropdown select Include all devices if you want every device that connects to the Roqos to connect to VPN or if you only want specific devices to connect to VPN while others bypass the VPN connection select Include selected devices from the dropdown and then toggle the sliders for the devices you want connected to VPN. Click Save.

Turn off VPN device applications

Connecting to VPN via a device application or browser extension at the same time while connecting via your Roqos is not recommended. Doubling up on VPN connections can cause issues with speeds and stability.

When you are connected to the Roqos VPN network at home you should leave all VPN applications and extensions disconnected and unopened.

Privacy Hero Disable Wi-Fi

TeamFlashRouters · Feb 8, 2023 ·

Your Privacy Hero router uses Cloud Based router management which means you can access the router settings from anywhere on any device that has an internet connection. You can follow these steps while connected to your phone, other Wi-Fi network, or the Privacy Hero network.

Use these steps to disable your Privacy Hero Wi-Fi so only ethernet connections are active. This is not a required step just a preference.

1. From any device that has a browser such as a computer, smartphone, or tablet visit app.privacyhero.com

App.PrivacyHero.com

2. Enter your Privacy Hero account email and password. Click Login.

Privacy Hero Access Settings

If you have not created your Privacy Hero account yet please follow these instructions.

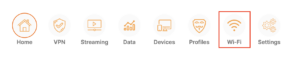
3. Click the Wi-Fi symbol.

Privacy Hero Select Wifi

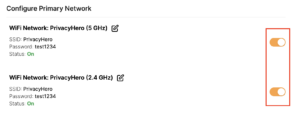
4. Set the toggle switches to the off position for the Wi-Fi bands you want to disable.

Privacy Hero Disable Wifi

TROUBLESHOOTING

Still having issues? Visit the VPN Troubleshooting section.

Troubleshoot Here

Ad blocking on Roqos

Dave · Dec 16, 2021 ·

Enable Ad blocking on your Roqos Core so you are not inundated with ads across the internet.

Login to Roqos Core UI web app in a browser on any computer or smart device.

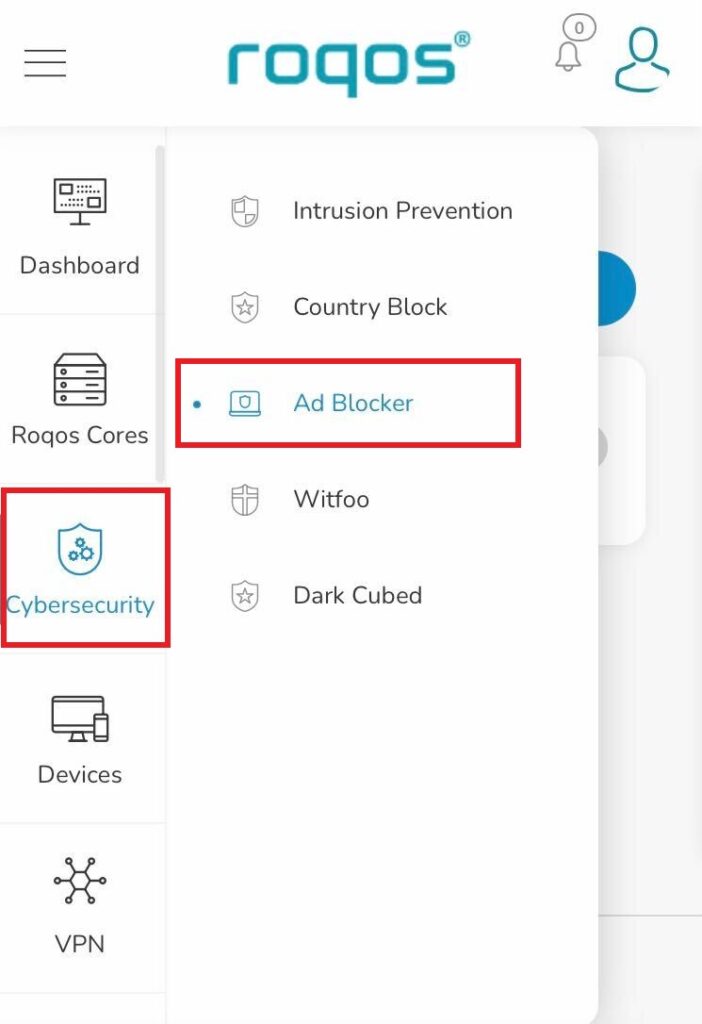
1. Click the navigation menu and select Cybersecurity > Ad blocker.

Roqos Cybersecurity - Ad blocker

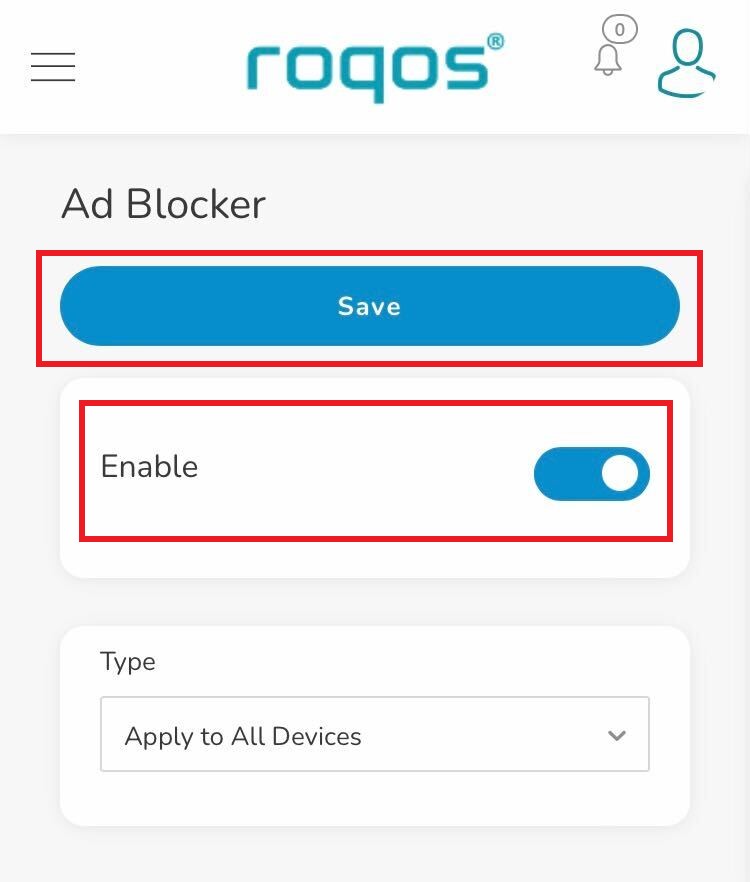
2. Toggle the Enable slider and select if you want to apply Ad blocking to all devices or only select profiles and click Save.

Roqos Cybersecurity - Enable Ad blocker

Block Websites by Country on Roqos

Dave · Dec 16, 2021 ·

Country Block allows you to select countries that you identify to be an unsafe and block internet traffic between your network and those countries.

Login to Roqos Core UI web app in a browser on any computer or smart device.

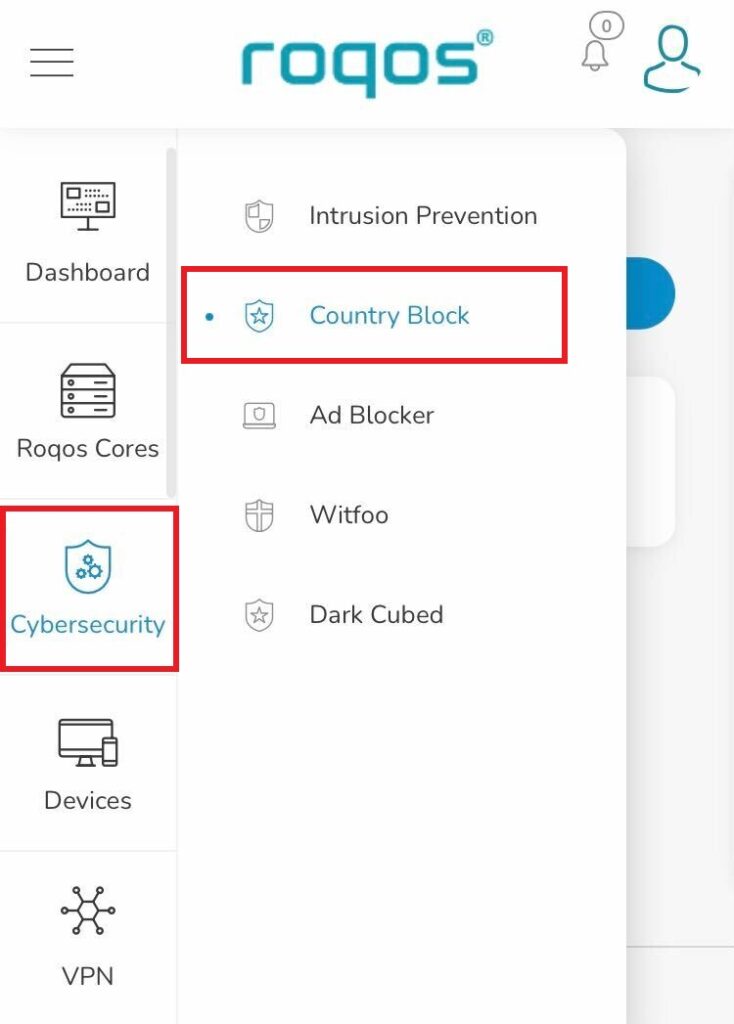
1. Click the navigation menu and select Cybersecurity > Country Block.

Roqos Cybersecurity - Country Block

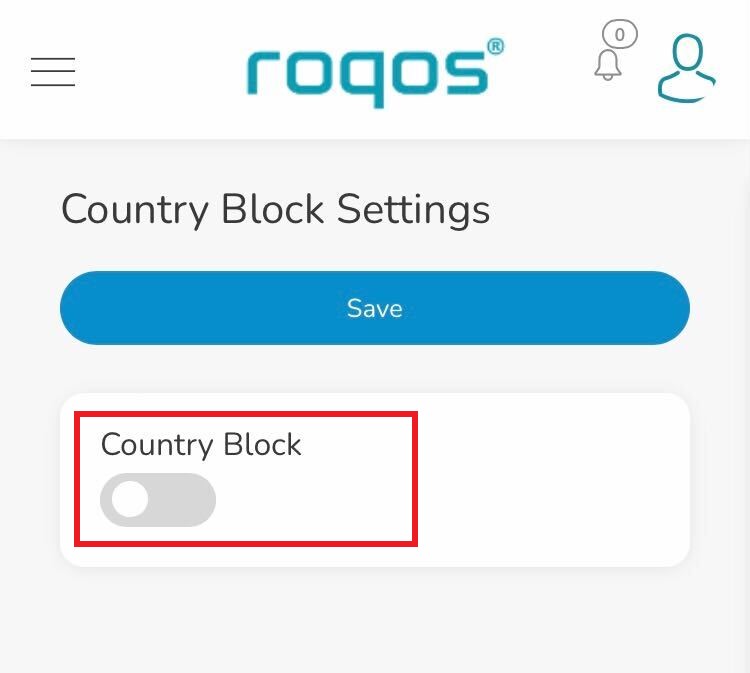
2. Toggle the Country Block setting.

Roqos Cybersecurity - Enable Country Block

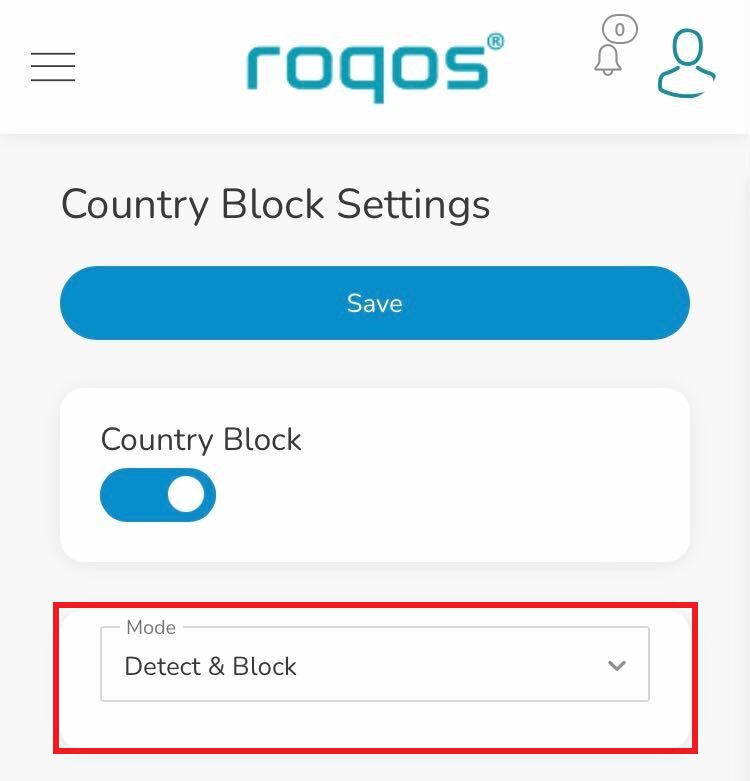
3. In the Mode dropdown select Detect & Block or Detect Only.

Roqos Cybersecurity - Country Block Mode

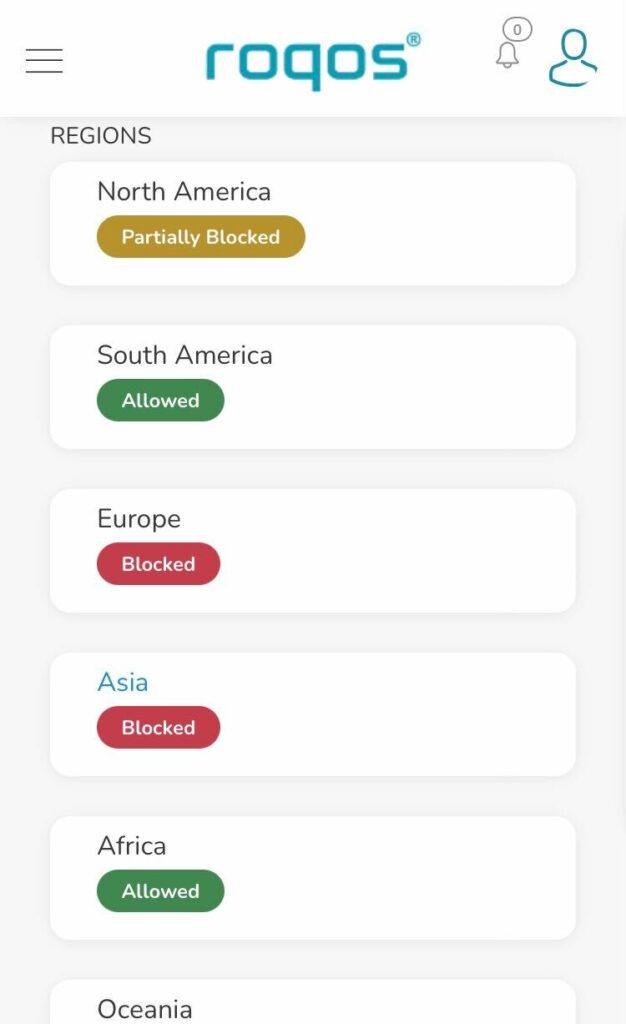
4. Under Regions you can select the regions you want to block or specific countries within that region. Once your selections are made click Save.

Roqos Cybersecurity - Select Blocked Countries

Getflix SmartDNS Setup

TeamFlashRouters · Apr 4, 2019 ·

Getflix offers a SmartDNS service for unblocking geo-restricted content without the encryption of a VPN service. SmartDNS routes DNS servers to different regions which “tricks” the website to allow access to previously restricted content.

SmartDNS does not change your IP Address or provide the encryption that a VPN connection does. This can result in faster speeds and unblocked content.

SmartDNS and VPN should not both be configured at the same time. When using a SmartDNS connection make sure to disable your VPN connection on the FlashRouter.

Login to Getflix

If you are not already a Getflix user Sign Up Now.

New customer Signup for GetFlix SmartDNS Service

Login to Getflix’s website login page.

Visit Getflix’s DNS servers list page and note the DNS servers of the location you would like to access content from.

Getflix DNS Server Location Addresses for FlashRouter DD-WRT Settings

Enter Getflix SmartDNS servers on your FlashRouter

Navigate to Setup > Basic Setup

  1. Scroll down to Network Address Server Settings (DHCP).
  2. Enter in any combination of Getflix SmartDNS servers you noted into Static DNS fields 1 and 2.
  3. Click Apply Settings at the bottom of the page.
  4. Reboot the FlashRouter.

Register your IP Address

When the router is fully booted back up visit your Getflix user dashboard and make sure your IP Address is registered with Getflix. If it is not click Force IP Update.

Register IP Address for Getflix use on FlashRouter DD-WRT

Once you are successfully registered you can now access your desired regional content on any device that connects to the FlashRouter’s network.

Select devices for VPN on Roqos

Dave · Dec 16, 2021 ·

Select specific devices that you want to pass through the Roqos Core’s VPN tunnel. This is a great solution in instances of streaming services blocking incoming VPN connections or other VPN related service interruptions.

Login to Roqos Core UI web app in a browser on any computer or smart device.

1. Click the navigation menu and select VPN  > VPN Out.

Roqos VPN - VPN Out

2. Select Included Devices.

Roqos VPN - Included Devices

3. In the Select devices for your VPN Out connection dropdown select Include selected devices and check the devices you want to connect to VPN. Click Save.

Roqos VPN - Include selected devices

Now these devices will be connected to the VPN tunnel. All other devices will bypass the VPN tunnel and use your ISP’s IP Address.

DNS Setup for Asus Merlin

TeamFlashRouters · Jan 19, 2022 ·

Enter custom DNS servers in your Asus Merlin firmware to avoid using your ISP DNS, which will steal and collect your browsing data.

Login to Asus Merlin firmware settings in a browser on any computer or smart device.

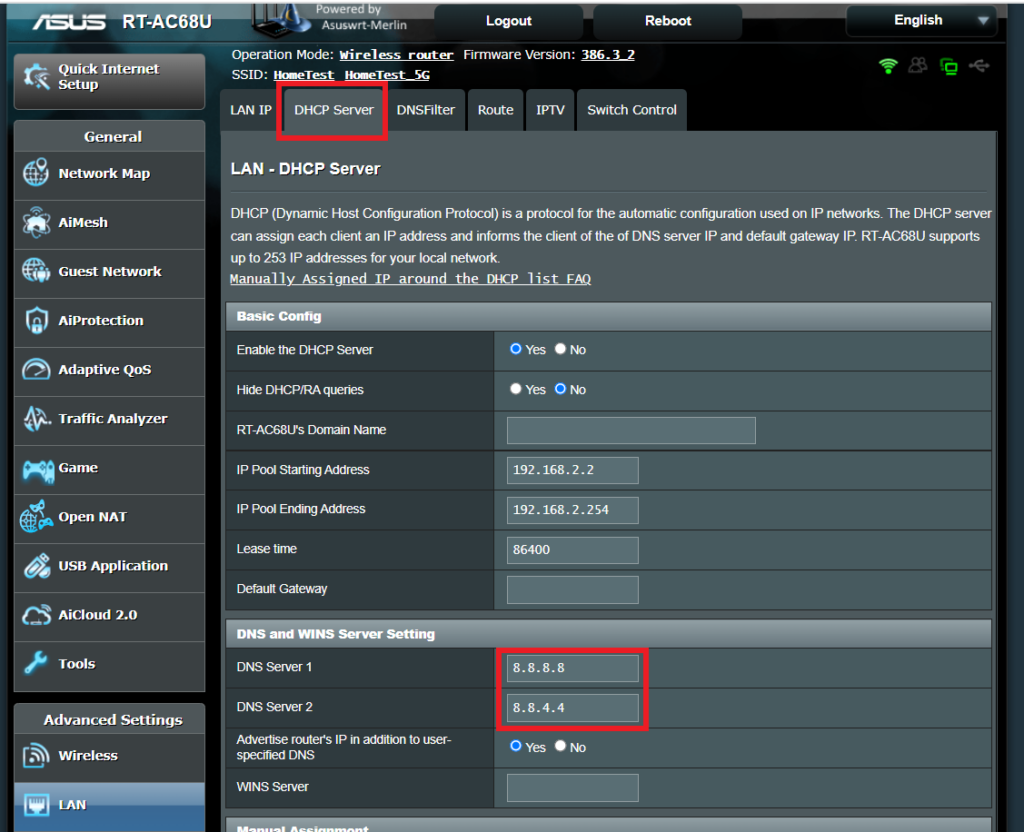
1. Under Advanced Settings select LAN.

2. Click the DHCP Server tab.

3. In the DNS Server 1 and DNS Server 2 fields enter the DNS server that you wish to use.

Merlin DNS Setup

4. Click Apply and then reboot the router and reconnect to the network.

VPN Killswitch for Asus Merlin

TeamFlashRouters · Jan 19, 2022 ·

Once you have OpenVPN connected on your Merlin FlashRouter you can enable the VPN Killswitch so that no internet traffic passes through your router that is not encrypted by the VPN tunnel.

Login to Asus Merlin firmware settings in a browser on any computer or smart device.

1. Under Advanced Settings select VPN.

2. Click the VPN Client tab.

3. Set Killswitch – Block routed clients if tunnel goes down to Yes.

Merlin Accept DNS configuration Redirect Internet and Kill Switch

4. Click Apply.

Privacy Hero VPN Setup Guide for Privacy Hero

TeamFlashRouters · Apr 3, 2023 ·

Your Privacy Hero router uses Cloud Based router management which means you can access the router settings from anywhere on any device that has an internet connection. You can follow these steps while connected to your phone, other Wi-Fi network, or the Privacy Hero network.

Use these steps to connect to Privacy Hero’s own WireGuard VPN servers. You will automatically be connected to the ideal USA or Canada server based on your location.

1. From any device that has a browser such as a computer, smartphone, or tablet visit app.privacyhero.com

App.PrivacyHero.com

2. Enter your Privacy Hero account email and password. Click Login.

Privacy Hero Access Settings

If you have not created your Privacy Hero account yet please follow these instructions.

3. Click the VPN symbol.

Privacy Hero Setup VPN

4. Set the VPN toggle to On.

Privacy Hero Enable VPN

5. Connect to the Privacy Hero’s via wireless or ethernet connection on your device and visit What is my IP Address from a private/incognito browser to verify your new IP address and virtual location.

Privacy Hero’s cloud based router settings access makes it so you can change settings while not connected to the Privacy Hero network so if your IP Address has not changed be sure to double check that you are indeed connected to the Privacy Hero network on the device you are checking your IP from.

Keep in mind that the VPN connection will not change the location of the streaming services listed in the Streaming Relocation area of the Privacy Hero settings.

TROUBLESHOOTING

Still having issues? Visit the VPN Troubleshooting section.

Troubleshoot Here

Change Wireless Channels on ExpressVPN/Aircove firmware

TeamFlashRouters · Mar 16, 2022 ·

Changing the wireless channel on your ExpressVPN FlashRouter can help with WiFi stability and allows you to use a wireless channel with less traffic in your local environment.

1. Connect to the FlashRouter’s network via ethernet cable or wireless.

2. Open your web browser and enter expressvpnrouter.com or 192.168.132.1 in the URL.

ExpressVPNrouter.com
192.168.132.1

3. Login with your ExpressVPN FlashRouter admin password.

ExpressVPN Router admin login

4. Select Network Settings on the left hand side of the menu.

ExpressVPN Network Settings

5. Select Wi-Fi Settings on the left hand side of the menu.

ExpressVPN WiFi Settings

6. Select Advanced Settings.

ExpressVPN WiFi Advanced Settings

7. Select the Channel Width and Main Channel you want your ExpressVPN FlashRouter to use. Note that higher 5GHz Wi-Fi channels will not be compatible with older devices. Click Save. Click Continue.

ExpressVPN WiFi Channels

Why is my DNS showing as 192.168.11.1 on my devices?

TeamFlashRouters · May 30, 2019 ·

When connected to a FlashRouter’s network the DNS settings of the devices will be reporting as 192.168.11.1. This means that the router is handling DNS internally through the servers you have set in the Setup > Basic Setup section of the router. If you did not set any custom DNS here, then you will using your ISP or VPN DNS servers automatically.

You can always customize the DNS servers in the router to your preferred servers and through DNSmasq the router will use 192.168.11.1 to route these servers to your connected devices.

In some instances disabling DNSMasq in the DD-WRT settings can help unblock previously blocked websites while connected to VPN. This will force devices to report the DNS servers set in the router directly as opposed to 192.168.11.1.

Disabling DNSMasq is not recommended unless FlashRouters specifically advises you but we have seen this work for certain VPN providers. To disable the DNSMasq do the following.

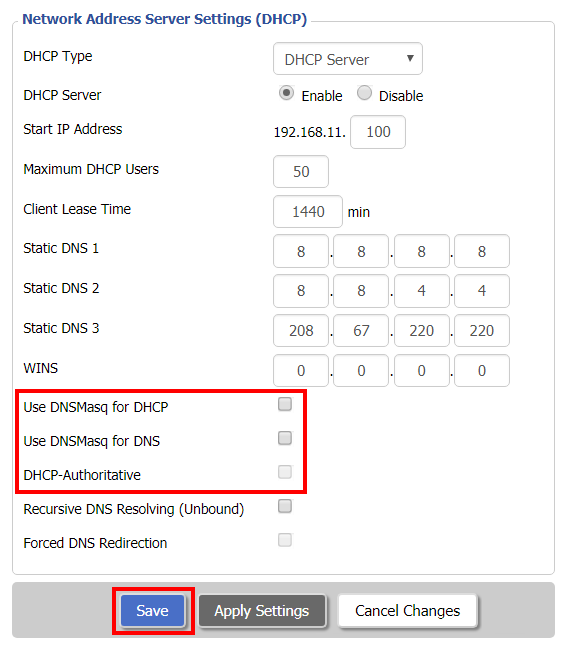
Navigate to Setup > Basic Setup

Disable DNSMaq Settings
  1. Uncheck Use DNSMasq for DHCP.
  2. Uncheck Use DNSMasq for DNS.
  3. Uncheck DHCP-Authoritative.
  4. Click Save.

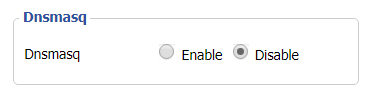
Navigate to Services > Services

Disable DNSMaq Settings 2
  1. Set DNSMasq to Disable.
  2. Click Apply Settings.
  3. Reboot router.
« Previous Page
Next Page »

Primary Sidebar

  • Troubleshooting
  • Router Access
  • Internet Connection Issues
  • WiFi Connectivity
  • General VPN Issues
  • TeamViewer Remote Support
  • DD-WRT Firmware
  • Facebook
  • Twitter
  • Instagram
  • Pinterest
  • YouTube

Footer