• Skip to primary navigation
  • Skip to main content
  • Skip to primary sidebar
  • Skip to footer

FlashRouters Support Portal

Prioritizing Privacy

  • SETUP GUIDES
    • Privacy Hero Router Setup Guide
    • ASUS-WRT Router Setup Guide
    • AsusWRT-Merlin Router Setup Guide
    • DD-WRT Router Setup Guide
    • ExpressVPN Router Setup Guide
    • GL.iNet Router Setup Guide
    • Roqos Core Router Setup Guide
  • TROUBLESHOOTING
    • Router Access
    • WiFi Connectivity
    • Internet Connection Issues
    • General VPN Issues
    • DD-WRT Firmware
    • TeamViewer Remote Support
  • FAQs
    • Router FAQs
    • VPN FAQs
    • Warranty and Returns FAQs
    • Sales FAQs
    • Shipping FAQs
    • Service Plan FAQs
  • Show Search
Hide Search

Search Results for: own new tv show

Flint/Slate GL.iNet Change Wi-Fi name and password

TeamFlashRouters · Apr 20, 2023 ·

Follow this guide to change the Wi-Fi name and password on your GL.iNet FlashRouter.

1. Connect your computer, phone, or tablet to the GL.iNet router via wireless (FlashRouter24 / FlashRouter50) or via ethernet cable to one of the LAN ports on the router.

The FlashRouter WiFi password is printed on the sheet that came with the router and is set to Wireless#[First 5 characters of your router MAC]. The router MAC can be found on the bottom of your router if you cannot locate the sheet. For e.g. if your MAC is 1459C07E70A8 then your WiFi password is Wireless#1459C

Be sure to capitalize the W.

2. Once connected via wireless or ethernet on your device open your browser and go to 192.168.8.1
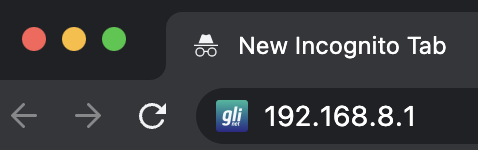
GL.iNet router access

3. Enter openwrt as the admin password to access the GL.iNet firmware settings.
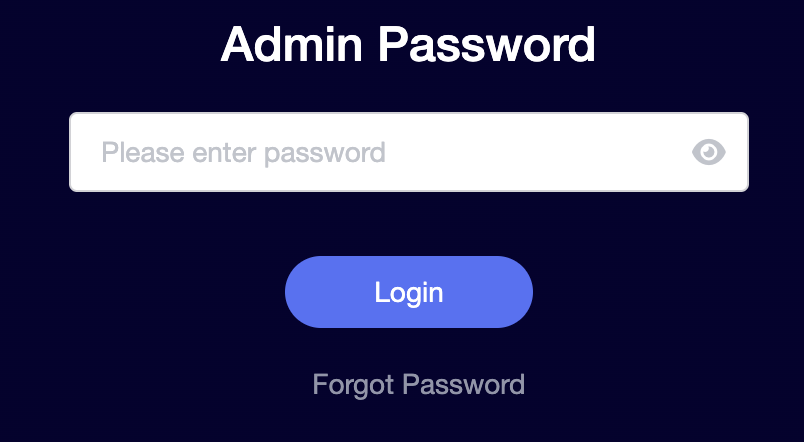
GL.iNet admin password enter

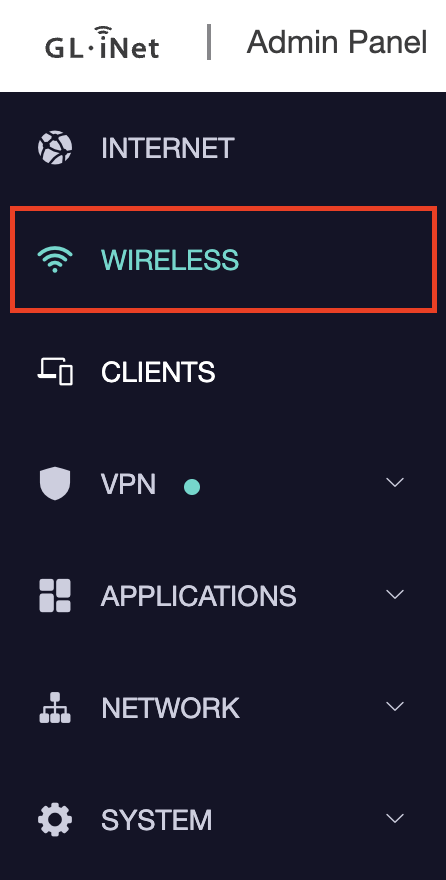
4. Click Wireless.

GL.iNet Click Wireless

5. Click Modify under the 5GHz or 2.4GHz band.
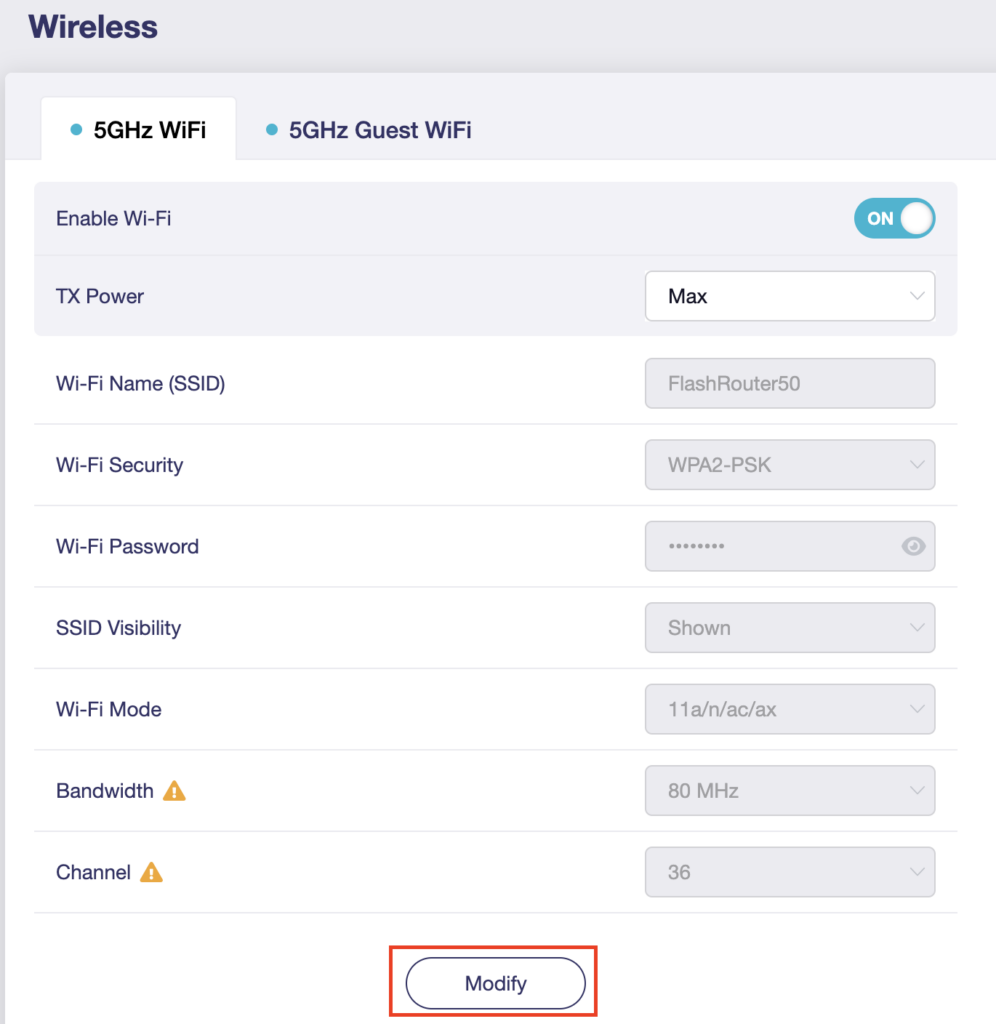
GL.iNet Modify Wifi

The 5GHz and 2.4GHz information must be changed at separate times. Keep in mind that if you are connected to wireless when changing one band you may need to reconnect with the new info you set to be on the network again to make changes to the other band.

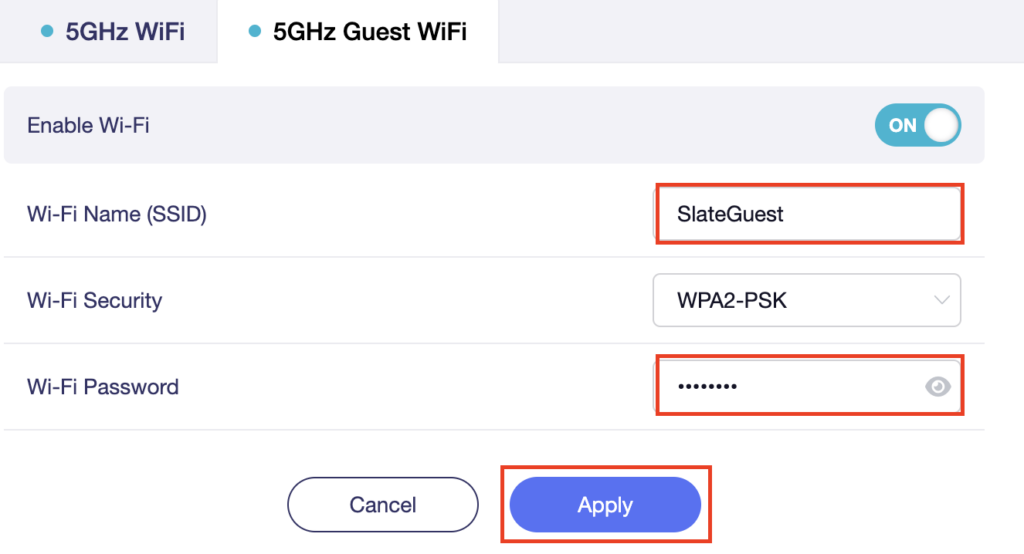
6. Change the Wi-Fi Name (SSID) and Wi-Fi Password fields to what you want to use. The SSID should be unique and NOT a duplicate of an existing network. Click Apply.
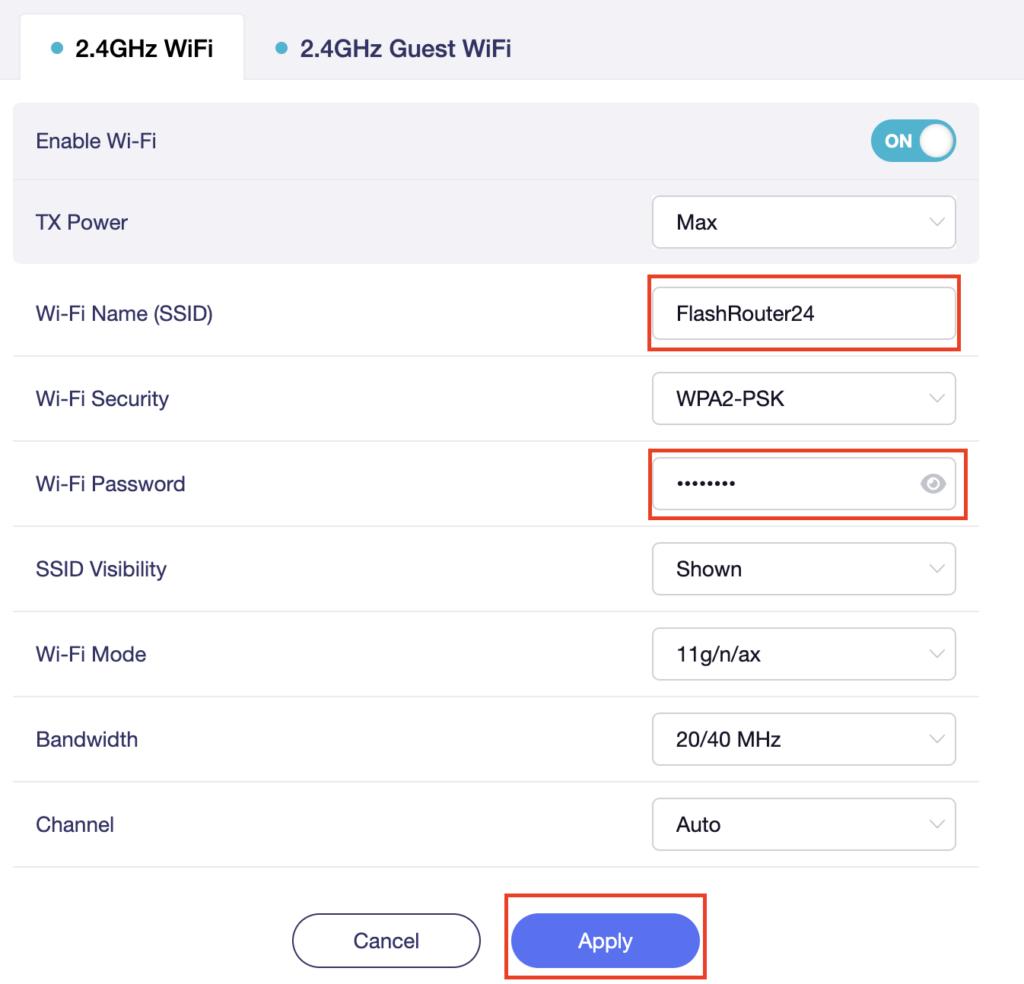
GL.iNet change Wifi name and password

7. Connect your devices to the new wireless network.
TROUBLESHOOTING

Still having issues? Visit the VPN Troubleshooting section.

Troubleshoot Here

VPN Unlimited Manual OpenVPN Setup

TeamFlashRouters · Apr 19, 2019 ·

Preparing for Manual VPN Unlimited Setup

Verify your VPN Unlimited login information

If you are not already a VPN Unlimited user Sign Up Now.

Log in to your account on the VPN Unlimited website.

VPN Unlimited Website Login

Generate your VPN Unlimited OVPN Configuration Files

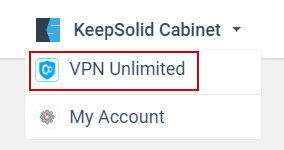
1. Navigate to the VPN Unlimited section in the dropdown on the top left.

VPN Unlimited Website Login

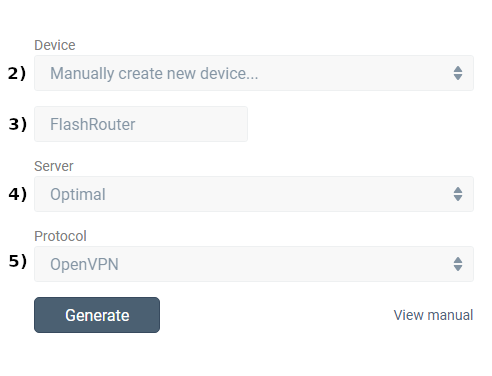
2. Set Device to “Manually create new device…”

3. Name your device.

4. Select Server.

5. Set Protocol to OpenVPN.

FlashRouters DD-WRT Privacy App - Create Open VPN Configuration files

6. Open the ‘.OVPN’ file in a word processing program.

NOTE: We highly recommend using Notepad++ for Windows or TextEdit for Apple to open these files in order to preserve text format.

DD-WRT Router Setup for VPN Unlimited

Navigate to the Services > VPN

Enter VPN Unlimited settings

OpenVPN Client

Start OpenVPN Client

If you wish to disable your VPN connection simply set this to Disable at any time and click Apply Settings.

Server IP/Name

At the bottom of the .ovpn file you downloaded above, you can find your server address, it should look something like us-la.vpnunlimitedapp.com

Port

1194 for Tunnel Protocol UDP
80 for Tunnel Protocol TCP

Tunnel Device

TUN

Tunnel Protocol

UDP or TCP

Encryption cipher

Blowfish-CBC

Hash Algorithm

SHA1

User Pass Authentication

Disabled

Advanced Options

Enable

TLS Cipher

None

LZO Compression

Adaptive

NAT

Enable

Firewall Protection

Enable

nsCertType verification

Checked

Additional Config

persist-key
persist-tun

Policy Based Routing

This field can be used for split VPN and Dual Gateway routing.

CA Cert

—–BEGIN CERTIFICATE—–
MIIEjjCCA/egAwIBAgIJAKsVbHBdakXuMA0GCSqGSIb3DQEBBQUAMIHgMQswCQYD
VQQGEwJVUzELMAkGA1UECBMCTlkxETAPBgNVBAcTCE5ldyBZb3JrMR8wHQYDVQQK
ExZTaW1wbGV4IFNvbHV0aW9ucyBJbmMuMRYwFAYDVQQLEw1WcG4gVW5saW1pdGVk
MSMwIQYDVQQDExpzZXJ2ZXIudnBudW5saW1pdGVkYXBwLmNvbTEjMCEGA1UEKRMa
c2VydmVyLnZwbnVubGltaXRlZGFwcC5jb20xLjAsBgkqhkiG9w0BCQEWH3N1cHBv
cnRAc2ltcGxleHNvbHV0aW9uc2luYy5jb20wHhcNMTMxMjE2MTM1OTQ0WhcNMjMx
MjE0MTM1OTQ0WjCB4DELMAkGA1UEBhMCVVMxCzAJBgNVBAgTAk5ZMREwDwYDVQQH
EwhOZXcgWW9yazEfMB0GA1UEChMWU2ltcGxleCBTb2x1dGlvbnMgSW5jLjEWMBQG
A1UECxMNVnBuIFVubGltaXRlZDEjMCEGA1UEAxMac2VydmVyLnZwbnVubGltaXRl
ZGFwcC5jb20xIzAhBgNVBCkTGnNlcnZlci52cG51bmxpbWl0ZWRhcHAuY29tMS4w
LAYJKoZIhvcNAQkBFh9zdXBwb3J0QHNpbXBsZXhzb2x1dGlvbnNpbmMuY29tMIGf
MA0GCSqGSIb3DQEBAQUAA4GNADCBiQKBgQDADUzS8QWGvdhLFKsEzAiq5+b0ukKj
Bza0k6/dmCeYTvCVqGKg/h1IAtQdVVLAkmEp0zvGH7PuOhXm7zZrCouBr/RiG4tE
coRHwc6AJmowkYERlY7+xGx3OuNrD00QceNTsan0bn78jwt0zhFNmHdoTtFjgK3o
qmQYSAtbEVWYgwIDAQABo4IBTDCCAUgwHQYDVR0OBBYEFKClmYP+tMNgWagUJCCH
jtaui2k+MIIBFwYDVR0jBIIBDjCCAQqAFKClmYP+tMNgWagUJCCHjtaui2k+oYHm
pIHjMIHgMQswCQYDVQQGEwJVUzELMAkGA1UECBMCTlkxETAPBgNVBAcTCE5ldyBZ
b3JrMR8wHQYDVQQKExZTaW1wbGV4IFNvbHV0aW9ucyBJbmMuMRYwFAYDVQQLEw1W
cG4gVW5saW1pdGVkMSMwIQYDVQQDExpzZXJ2ZXIudnBudW5saW1pdGVkYXBwLmNv
bTEjMCEGA1UEKRMac2VydmVyLnZwbnVubGltaXRlZGFwcC5jb20xLjAsBgkqhkiG
9w0BCQEWH3N1cHBvcnRAc2ltcGxleHNvbHV0aW9uc2luYy5jb22CCQCrFWxwXWpF
7jAMBgNVHRMEBTADAQH/MA0GCSqGSIb3DQEBBQUAA4GBALkWhfw7SSV7it+ZYZmT
+cQbExjlYgQ40zae2J2CqIYACRcfsDHvh7Q+fiwSocevv2NE0dWi6WB2H6SiudYj
vDvubAX/QbzfBxtbxCCoAIlfPCm8xOnWFN7TUJAzWwHJkKgEnu29GZHu2x8J+7Ve
DbKH5RTMHHe8FkSxh6Zz/BMN
—–END CERTIFICATE—–

Public Client Cert

Copy and Paste all contents in between the <cert> and </cert> lines from your .ovpn file starting and ending with:
—–BEGIN CERTIFICATE—–
…
—–END CERTIFICATE—–

Private Client Key

Copy and Paste all contents in between the <key> and </key> lines from your .ovpn file starting and ending with:
—–BEGIN RSA PRIVATE KEY—–
…
—–END RSA PRIVATE KEY—–

CLICK APPLY SETTINGS

Leave all settings not mentioned above as their default setting.

Verify a successful VPN Unlimited connection

Navigate to the Status > OpenVPN

  1. You should now see a CONNECTED SUCCESS message.
  2. Visit to WhatIsMyIPAddress to verify your new IP address and virtual location.

In some cases you may notice that the location is not showing the same location as the server you have input in your router settings; this is because geo tracking tools are often tricked by VPN connections. As long as you see an IP address that is not the same as your normal Internet IP address then you are indeed connected to VPN Unlimited.

Back up your settings

Navigate to the Administration > Backup

  1. Click the Backup button.
  2. A file named nvrambak.bin will be saved to your computer.
  3. You can load nvrambak.bin to restore your settings in the event of a reset.

How to change the VPN Unlimited server

  1. Follow Steps 1-6 to Generate an .OVPN file for the server you wish to connect to and open it a word processing program.
  2. Copy and paste the server IP Address into the Server IP/Name field.
  3. Copy and paste the <cert> into the Public Client Cert field.
  4. Copy and paste the <key> into the Private Client Key field.
  5. Click Apply Settings.

TROUBLESHOOTING

Still having issues? Visit the VPN Troubleshooting section.

Troubleshoot Here

Wireless Repeater Setup

TeamFlashRouters · Apr 16, 2019 ·

If you need to extend your wireless and wired connection capabilities, you can setup a FlashRouter as a Wireless Repeater. In Wireless Repeater mode the FlashRouter connects to your main router via WiFi and then creates a completely separate network segment for you. This new “repeater” network then transmits your internet signal via FlashRouter LAN ports for wired internet access while also creating a new Wireless Extender network that will expand your wireless network range throughout your home or office just like a mesh network.

Preparing for Wireless Repeater Setup

Verify your wireless information

To connect your FlashRouter wirelessly to your existing wireless network you will need the Wireless Network Name (SSID) and Wireless Password of the existing wireless network that you will repeat. Verify and note this information.

We recommend using a 2.4GHz network to repeat as this network will have more range. Be sure to click Add under the 2.4GHz settings and not the 5GHz settings.

DD-WRT Router Setup for Wireless Repeater

Disable Firewall

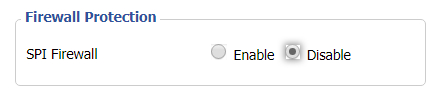
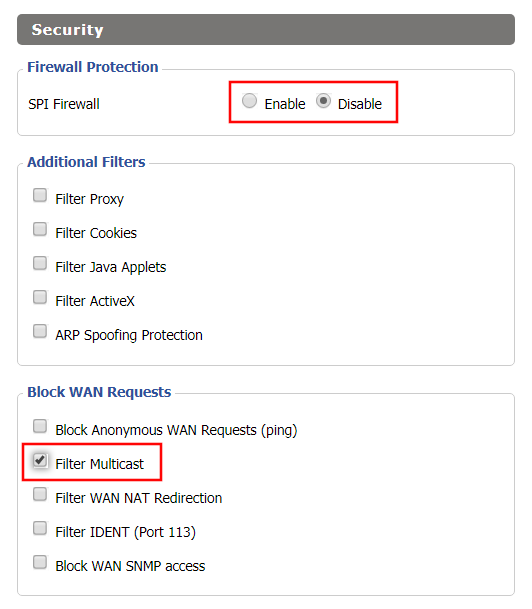
Navigate to Security > Firewall

Wireless Repeater Setup on DD-WRT FlashRouter - Disable SPI Firewall
  1. Set SPI Firewall to Disable.
  2. Click Save.

Enter Wireless settings

Navigate to Wireless > Basic Settings

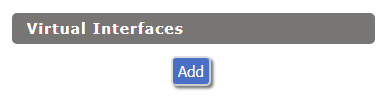
Select Add in the Virtual Interface area.

Wireless Repeater Setup on DD-WRT FlashRouter - Add Virtual Interface

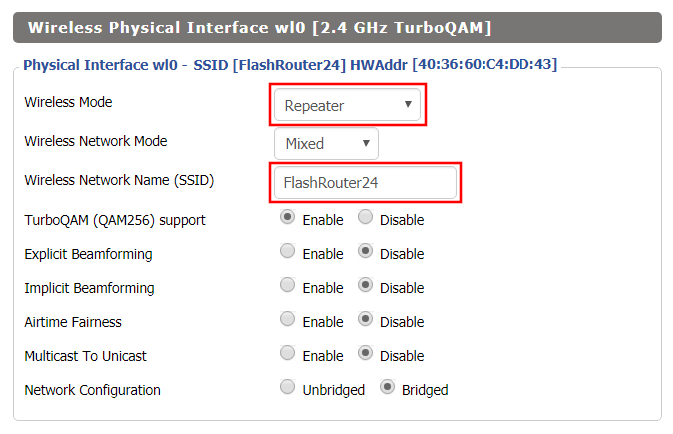
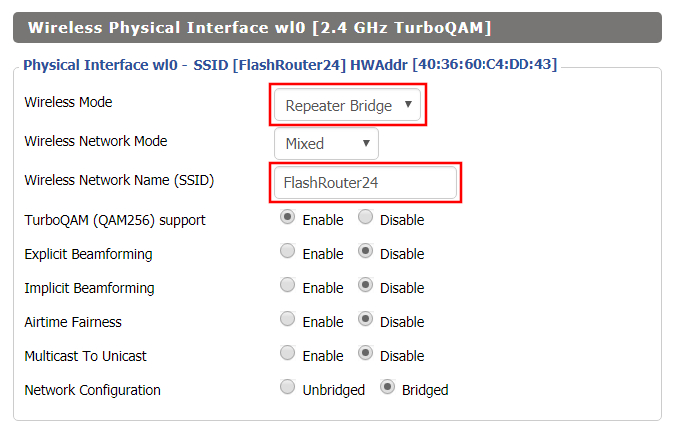
In the Wireless Physical Interface settings for the 2.4GHz network set the Wireless Mode to Repeater.

FlashRouters with a Broadcom chipset will have Repeater as an option in the dropdown but FlashRouters with an Atheroes chipset will not. Select Client or Client (Routed) if Repeater is not listed for your FlashRouter.

Change the Wireless Network Name (SSID) to match exactly with the Wireless Network Name of the network that you will repeat.

Wireless Repeater Setup on DD-WRT FlashRouter - Set Wireless Mode to Repeater

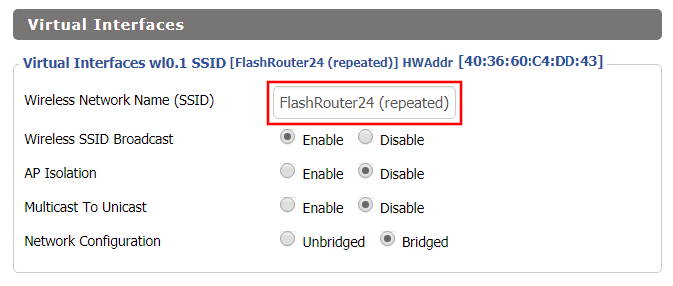
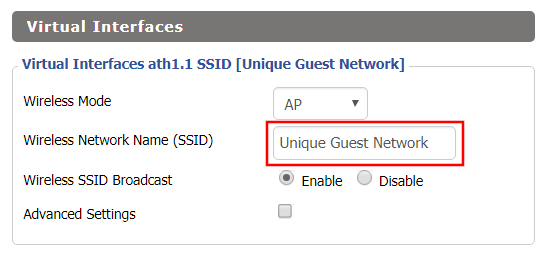
In the Virtual Interfaces settings change the Wireless Network Name (SSID) to FlashRouter24 or any other unique SSID.

Wireless Repeater Setup on DD-WRT FlashRouter - Set SSID for Repeated Band

CLICK SAVE

Enter Wireless Security settings

Navigate to Wireless > Wireless Security

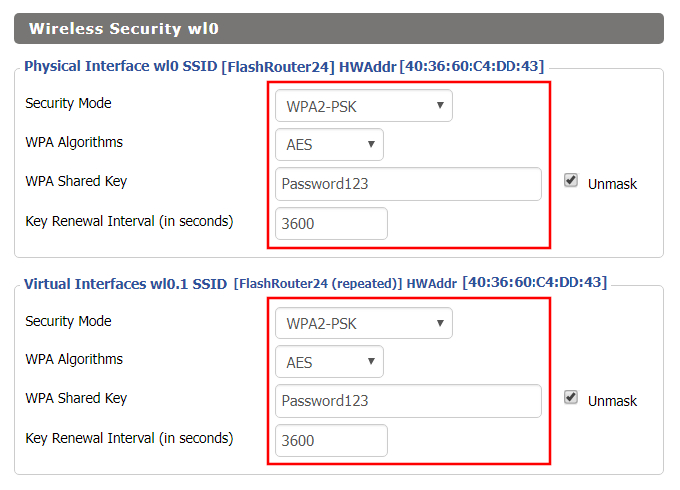
Wireless Repeater Setup on DD-WRT FlashRouter - Set Wireless Password
  1. Duplicate the wireless security settings that are set for the other bands for the newly created virtual interface.
  2. Change the WPA Shared Key to match exactly with the Wireless Password of the network that you will repeat.
  3. Click Apply Settings.

Verify the Internet Connection

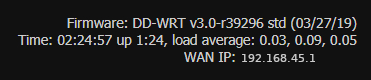
In the top right hand corner of the DD-WRT you should see the WAN IP change from 0.0.0.0 to an actual IP Address. Once this changes navigate to any website to test your Internet connection.

Wireless Repeater Setup on DD-WRT FlashRouter - Verify WAN Connection

Back up your settings

Navigate to the Administration > Backup page.

  1. Click the Backup button.
  2. A file named nvrambak.bin will be saved to your computer.
  3. You can load nvrambak.bin to restore your settings in the event of a reset.

TROUBLESHOOTING

Still having issues? Visit our Troubleshooting section to diagnose common problems here.

Troubleshoot Here

How do I change my Wireless Password?

Dave · Apr 29, 2019 ·

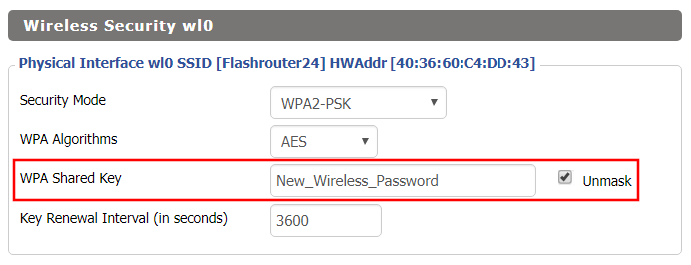
Change the FlashRouter’s wireless network password to any password you like.

Navigate to Wireless > Wireless Security

Changing Wireless password in DD-WRT Wireless Security Settings
  1. Click Unmask next to the Shared Key field to see what you are typing and enter in the new wireless password you would like to use.
  2. Click Apply Settings.
  3. Reconnect to the wireless network using your new password.

PrivateInternetAccess (PIA) Merlin OpenVPN Setup

TeamFlashRouters · Jan 11, 2023 ·

Preparing for PIA Merlin Setup

Download your PIA .ovpn file

If you are not already a PIA user Sign Up Now.

1. Log in to your account on the PIA website.

PIA login

2. Successfully log in with your account information then go to PIA’s OpenVPN Config Generator.

3. On the OpenVPN Configuration Generator select the following:

OpenVPN Version: OpenVPN 2.4 or newer

Select Platform: Linux

Select Region: Choose the server location you’d like to connect to

Select Port: Typically we recommend UDP/1198 RSA-2048 AES-128-CBC SHA1 for best speeds but feel free to select the one you want to use.

4. Click Generate to download the .ovpn file. Do not open this file once it is downloaded.

PIA Generate .ovpn file

Merlin Router Setup for PIA

Login to Asus Merlin firmware settings in a browser on any computer or smart device connected to the Merlin FlashRouter’s network.

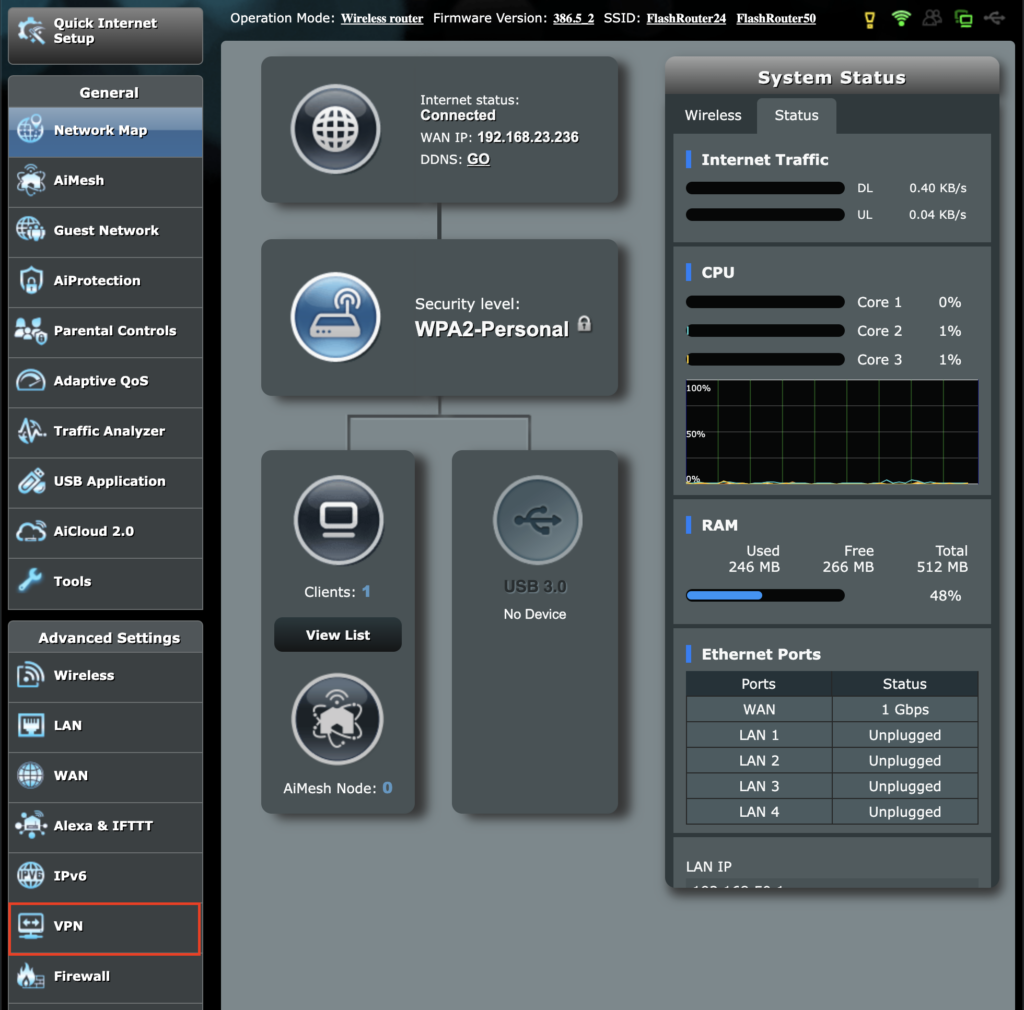
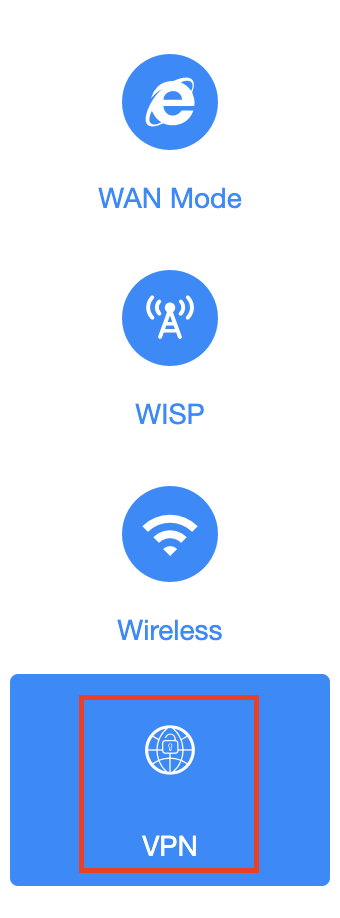
1. Navigate to the VPN tab.

Merlin VPN Tab

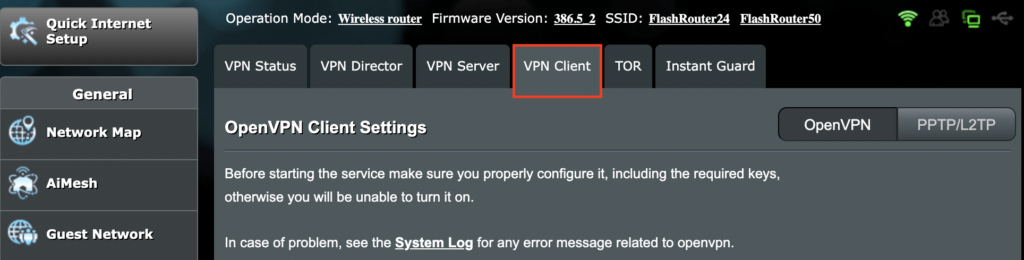
2. Navigate to the VPN Client tab.

Merlin VPN Client Tab

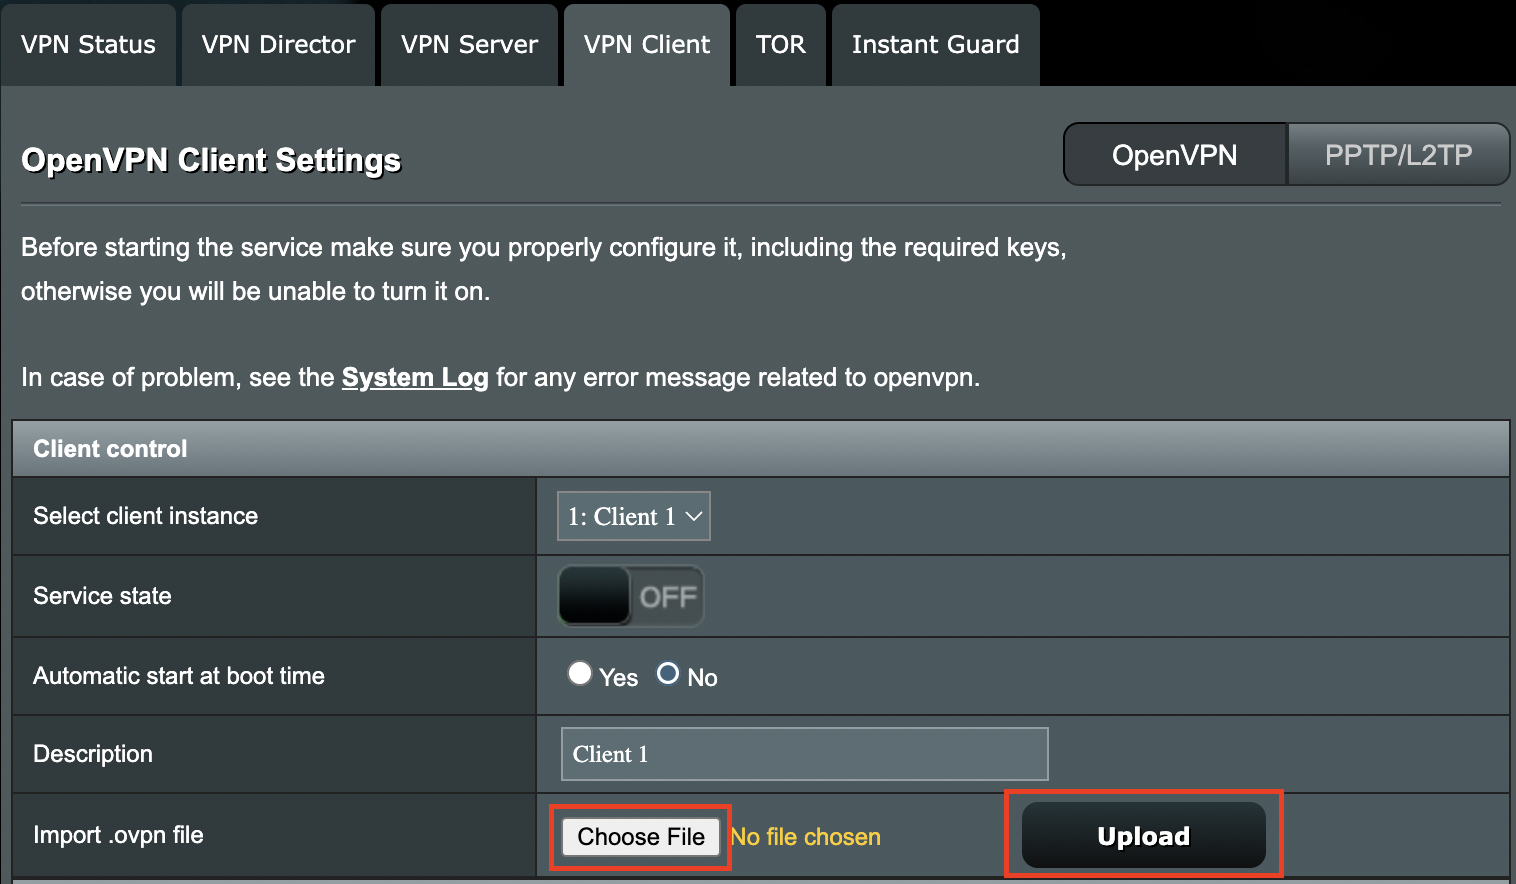
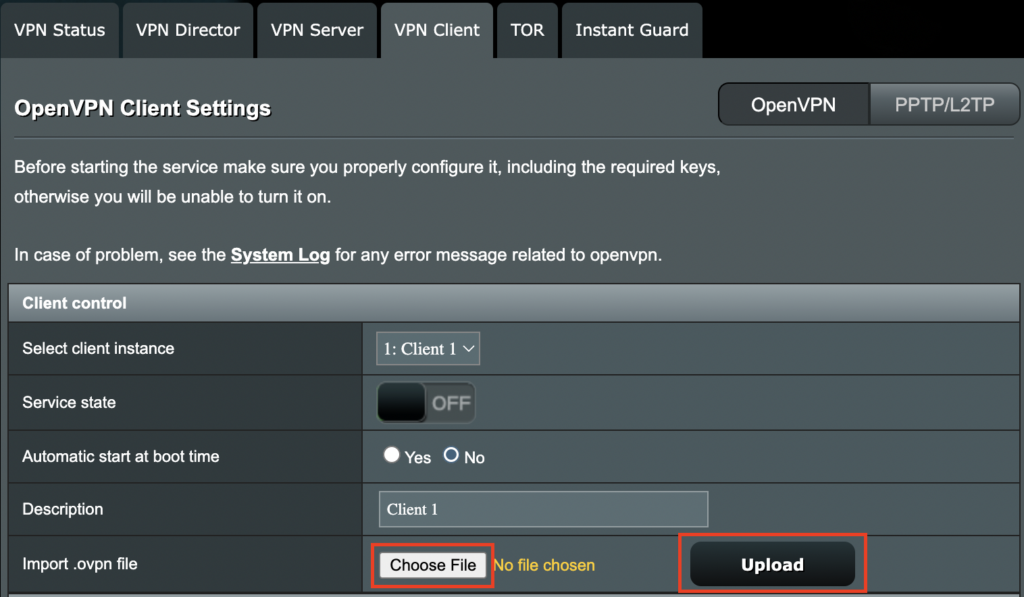
3. Click Choose file and select the .ovpn file you downloaded earlier. Then click Upload.

Merlin Choose File Upload

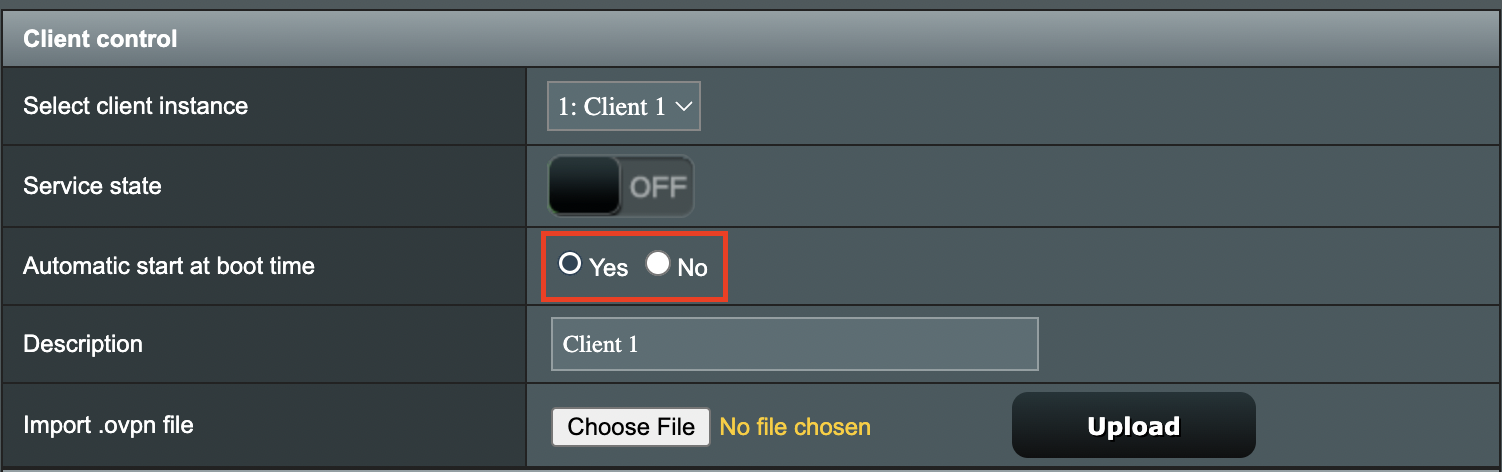
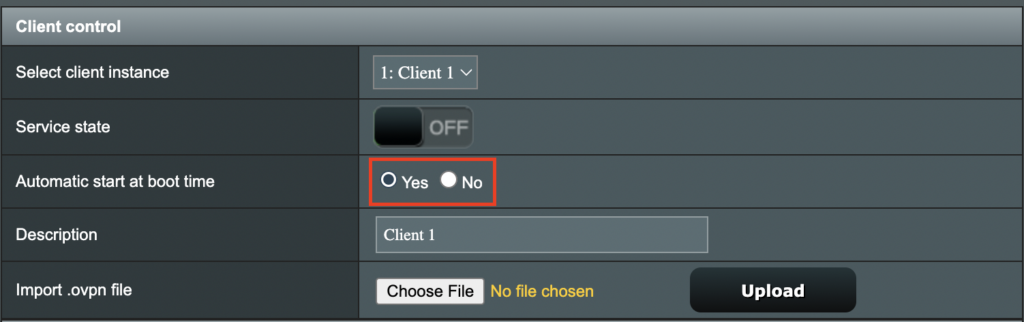
4. Set Automatic Start at boot time to Yes if you want the VPN connection to begin automatically when the router is powered off and back on.

Merlin Automatic Start at boot time

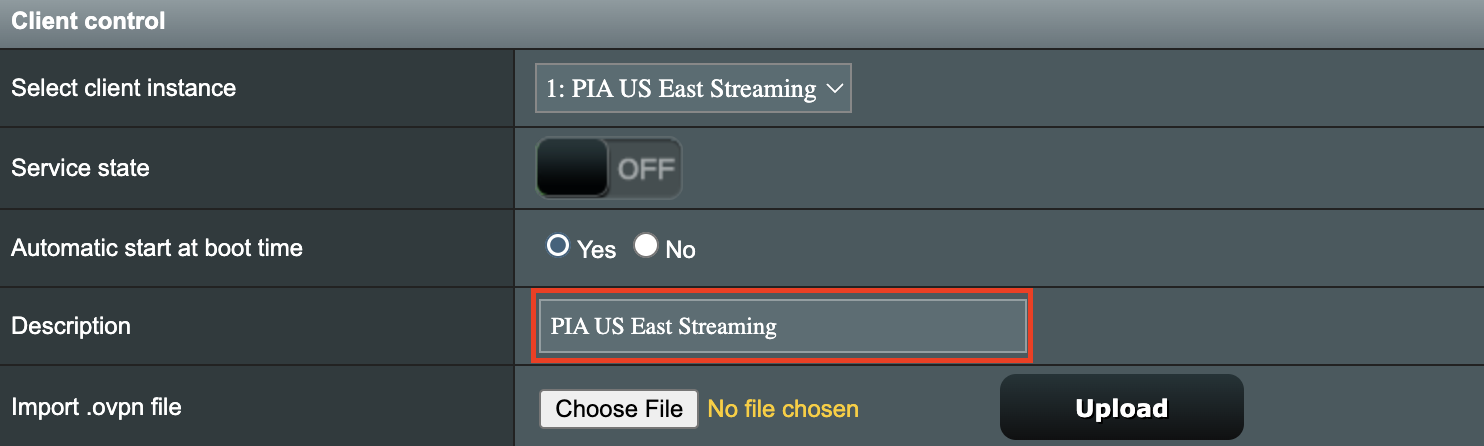
5. In the Description field enter in the name you’d like to use for this OpenVPN Client profile. We typically advise entering in the location here. Our example server was in US East Streaming so I have entered in PIA US East Streaming.

PIA Description

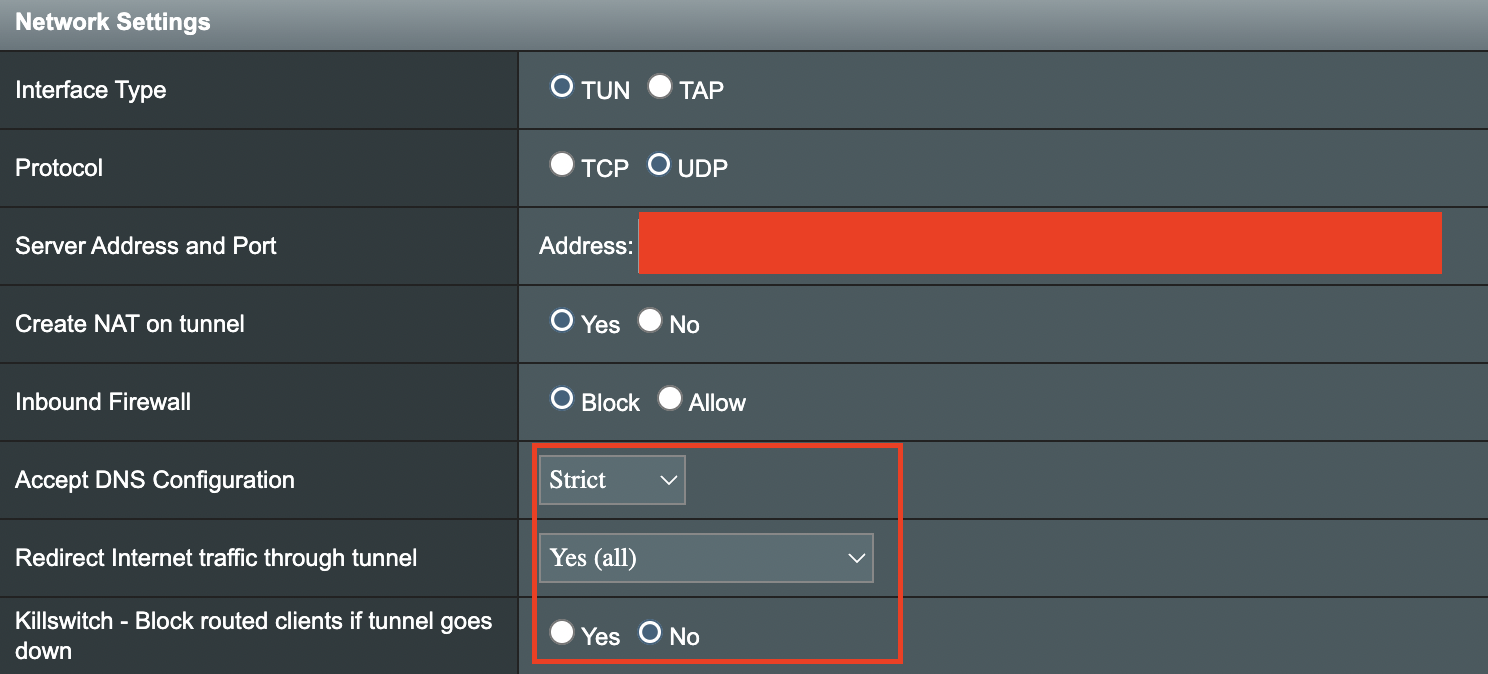
6. Set Accept DNS Configuration to Strict. Set Redirect Internet traffic through tunnel to Yes (all). Set Kill Switch to Yes or No depending on if you want the Internet to be killed if the VPN connection drops.

Merlin Accept DNS configuration Redirect Internet and Kill Switch

If you only want certain devices to connect to the OpenVPN Client profile you are setting up instead of all the devices connected to the FlashRouter’s network please set the Redirect Internet traffic through tunnel to VPN Director. Then complete the instructions on this page and then view our VPN Director guide.

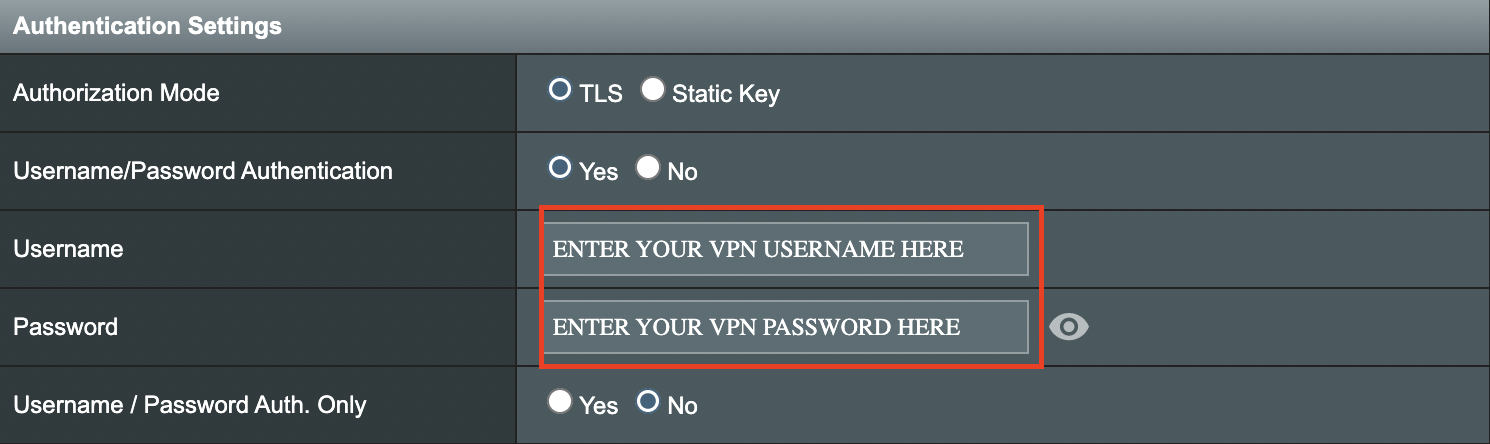
7. Enter your PIA account username and password.

Merlin VPN Username and Password

8. Click Apply at the bottom of the page.

9. At the top of the page set the Service State toggle to ON to activate the VPN connection.

Merlin Service State All Providers

Verify a successful PIA connection

  1. You should now see a CONNECTED message.
  2. Visit PIA’s IP Check to verify your new IP address and virtual location.

In some cases you may notice that the location is not showing the same location as the server you have input in your router settings; this is because geo tracking tools are often tricked by VPN connections. As long as you see an IP address that is not the same as your normal Internet IP address then you are indeed connected to PIA.

How to change the PIA server

  1. Follow the steps at the top of the page to obtain a new .ovpn file.
  2. Then proceed with the settings same as initial setup.

TROUBLESHOOTING

Still having issues? Visit the VPN Troubleshooting section.

Troubleshoot Here

IPVanish Merlin OpenVPN Setup

TeamFlashRouters · Jan 11, 2023 ·

Preparing for IPVanish Merlin Setup

Download your IPVanish .ovpn file

If you are not already an IPVanish user Sign Up Now.

1. Log in to your account on the IPVanish website.

IPVanish login

2. Successfully log in with your account information then go to IPVanish .ovpn file page.

3. Click on the .ovpn file for the server location you want to use to dowloand the .ovpn file. Do not open this file.

IPVanish download ovpn

Merlin Router Setup for IPVanish

Login to Asus Merlin firmware settings in a browser on any computer or smart device connected to the Merlin FlashRouter’s network.

1. Navigate to the VPN tab.

Merlin VPN Tab

2. Navigate to the VPN Client tab.

Merlin VPN Client Tab

3. Click Choose file and select the .ovpn file you downloaded earlier. Then click Upload.

Merlin Choose File Upload

4. Set Automatic Start at boot time to Yes if you want the VPN connection to begin automatically when the router is powered off and back on.

Merlin Automatic Start at boot time

5. In the Description field enter in the name you’d like to use for this OpenVPN Client profile. We typically advise entering in the location here. Our example server was in nyc-a50 so I have entered in IPVanish a-50.

IPVanish Description

6. Set Accept DNS Configuration to Strict. Set Redirect Internet traffic through tunnel to Yes (all). Set Kill Switch to Yes or No depending on if you want the Internet to be killed if the VPN connection drops.

Merlin Accept DNS configuration Redirect Internet and Kill Switch

If you only want certain devices to connect to the OpenVPN Client profile you are setting up instead of all the devices connected to the FlashRouter’s network please set the Redirect Internet traffic through tunnel to VPN Director. Then complete the instructions on this page and then view our VPN Director guide.

7. Enter your IPVanish account email/username and password.

Merlin VPN Username and Password

8. Click Apply at the bottom of the page.

9. At the top of the page set the Service State toggle to ON to activate the VPN connection.

Merlin Service State All Providers

Verify a successful IPVanish connection

  1. You should now see a CONNECTED message.
  2. Visit IPVanish’s IP Check to verify your new IP address and virtual location.

In some cases you may notice that the location is not showing the same location as the server you have input in your router settings; this is because geo tracking tools are often tricked by VPN connections. As long as you see an IP address that is not the same as your normal Internet IP address then you are indeed connected to IPVanish.

How to change the IPVanish server

  1. Follow the steps at the top of the page to obtain a new .ovpn file.
  2. Then proceed with the settings same as initial setup.

TROUBLESHOOTING

Still having issues? Visit the VPN Troubleshooting section.

Troubleshoot Here

ProtonVPN Manual OpenVPN Setup

TeamFlashRouters · Apr 19, 2019 ·

Preparing for Manual ProtonVPN Setup

Verify your ProtonVPN login information

If you are not already an ProtonVPN user Sign Up Now.

1. Log in to your account on the ProtonVPN website.

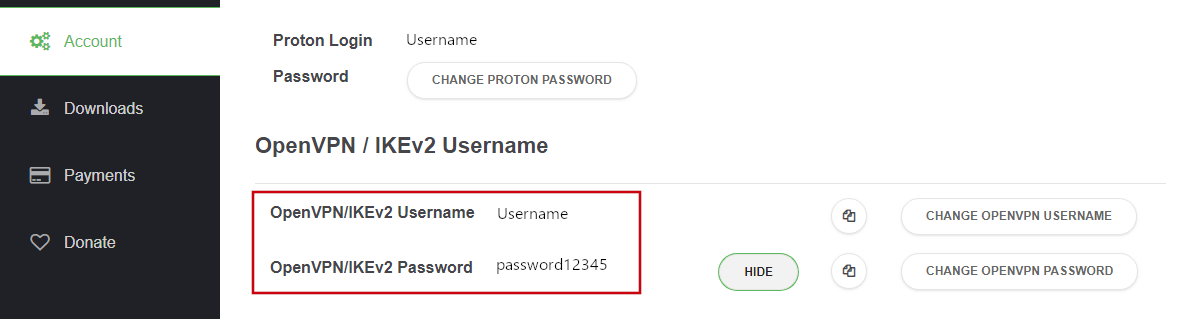
2. Navigate to the Account tab and note your OpenVPN specific Username and Password.

FlashRouters DD-WRT Privacy APP ProtonVPN OpenVPN Specific Username and Password

ProtonVPN Server Addresses

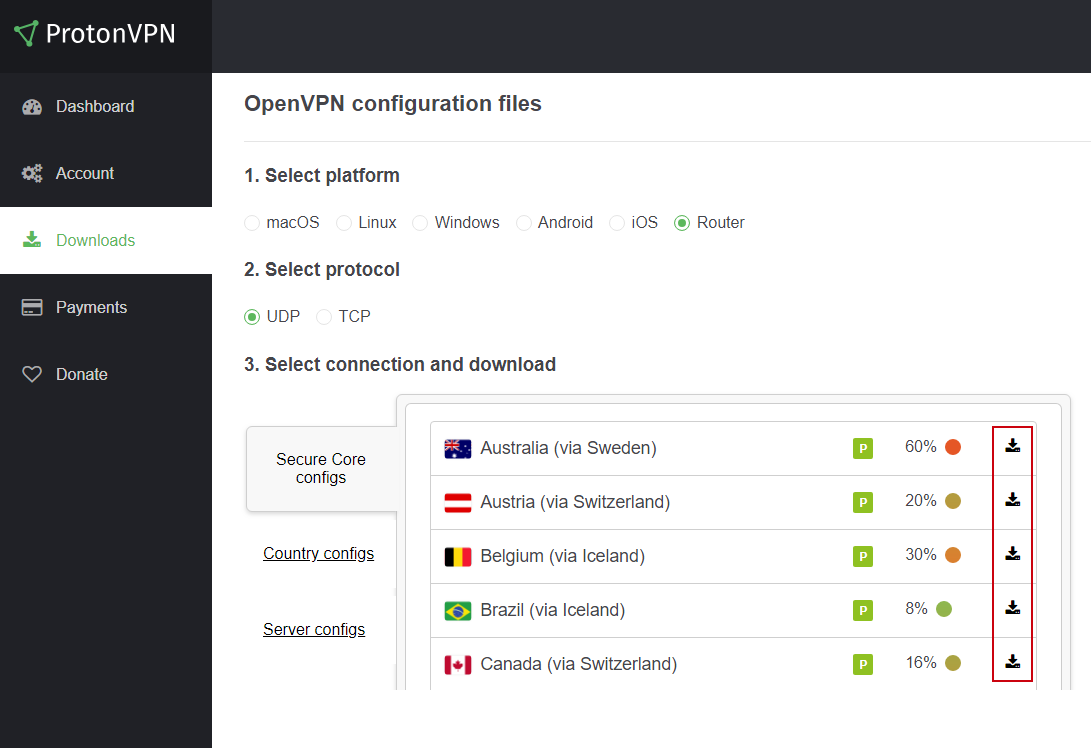
Click on the following link to Download the .ovpn file containing the Server IP Address you wish to connect to.

Open the .ovpn file that is downloaded to your computer with NotePad++ for Windows or TextEdit for Apple.

DD-WRT Router Setup for ProtonVPN

Navigate to Services > VPN

Enter ProtonVPN settings

OpenVPN Client

Start OpenVPN Client

If you wish to disable your VPN connection simply set this to Disable at any time and click Apply Settings.

Server IP/Name

At the top of the .ovpn file you downloaded above, there is a line e.g.:
remote 206.226.72.27 1194
206.226.72.27 is your ProtonVPN server IP address. Enter that IP Address in this field.

Port

1194

Tunnel Device

TUN

Tunnel Protocol

UDP

Encryption cipher

AES-256-CBC

Hash Algorithm

SHA512

Userpass Authentication

Enable

Username

Enter your OpenVPN specific Username.

Password

Enter your OpenVPN specific Password.

Advanced Options

Enable

TLS Cipher

None

LZO Compression

Adaptive

NAT

Enable

Firewall Protection

Enable

TLS Auth Key

-----BEGIN OpenVPN Static key V1-----
6acef03f62675b4b1bbd03e53b187727
423cea742242106cb2916a8a4c829756
3d22c7e5cef430b1103c6f66eb1fc5b3
75a672f158e2e2e936c3faa48b035a6d
e17beaac23b5f03b10b868d53d03521d
8ba115059da777a60cbfd7b2c9c57472
78a15b8f6e68a3ef7fd583ec9f398c8b
d4735dab40cbd1e3c62a822e97489186
c30a0b48c7c38ea32ceb056d3fa5a710
e10ccc7a0ddb363b08c3d2777a3395e1
0c0b6080f56309192ab5aacd4b45f55d
a61fc77af39bd81a19218a79762c3386
2df55785075f37d8c71dc8a42097ee43
344739a0dd48d03025b0450cf1fb5e8c
aeb893d9a96d1f15519bb3c4dcb40ee3
16672ea16c012664f8a9f11255518deb
-----END OpenVPN Static key V1-----

Additional Config

tun-mtu-extra 32
mssfix 1450
persist-key
persist-tun

Policy Based Routing

This field can be used for split VPN and Dual Gateway routing.

CA Cert

-----BEGIN CERTIFICATE-----
MIIFozCCA4ugAwIBAgIBATANBgkqhkiG9w0BAQ0FADBAMQswCQYDVQQGEwJDSDEV
MBMGA1UEChMMUHJvdG9uVlBOIEFHMRowGAYDVQQDExFQcm90b25WUE4gUm9vdCBD
QTAeFw0xNzAyMTUxNDM4MDBaFw0yNzAyMTUxNDM4MDBaMEAxCzAJBgNVBAYTAkNI
MRUwEwYDVQQKEwxQcm90b25WUE4gQUcxGjAYBgNVBAMTEVByb3RvblZQTiBSb290
IENBMIICIjANBgkqhkiG9w0BAQEFAAOCAg8AMIICCgKCAgEAt+BsSsZg7+AuqTq7
vDbPzfygtl9f8fLJqO4amsyOXlI7pquL5IsEZhpWyJIIvYybqS4s1/T7BbvHPLVE
wlrq8A5DBIXcfuXrBbKoYkmpICGc2u1KYVGOZ9A+PH9z4Tr6OXFfXRnsbZToie8t
2Xjv/dZDdUDAqeW89I/mXg3k5x08m2nfGCQDm4gCanN1r5MT7ge56z0MkY3FFGCO
qRwspIEUzu1ZqGSTkG1eQiOYIrdOF5cc7n2APyvBIcfvp/W3cpTOEmEBJ7/14RnX
nHo0fcx61Inx/6ZxzKkW8BMdGGQF3tF6u2M0FjVN0lLH9S0ul1TgoOS56yEJ34hr
JSRTqHuar3t/xdCbKFZjyXFZFNsXVvgJu34CNLrHHTGJj9jiUfFnxWQYMo9UNUd4
a3PPG1HnbG7LAjlvj5JlJ5aqO5gshdnqb9uIQeR2CdzcCJgklwRGCyDT1pm7eoiv
WV19YBd81vKulLzgPavu3kRRe83yl29It2hwQ9FMs5w6ZV/X6ciTKo3etkX9nBD9
ZzJPsGQsBUy7CzO1jK4W01+u3ItmQS+1s4xtcFxdFY8o/q1zoqBlxpe5MQIWN6Qa
lryiET74gMHE/S5WrPlsq/gehxsdgc6GDUXG4dk8vn6OUMa6wb5wRO3VXGEc67IY
m4mDFTYiPvLaFOxtndlUWuCruKcCAwEAAaOBpzCBpDAMBgNVHRMEBTADAQH/MB0G
A1UdDgQWBBSDkIaYhLVZTwyLNTetNB2qV0gkVDBoBgNVHSMEYTBfgBSDkIaYhLVZ
TwyLNTetNB2qV0gkVKFEpEIwQDELMAkGA1UEBhMCQ0gxFTATBgNVBAoTDFByb3Rv
blZQTiBBRzEaMBgGA1UEAxMRUHJvdG9uVlBOIFJvb3QgQ0GCAQEwCwYDVR0PBAQD
AgEGMA0GCSqGSIb3DQEBDQUAA4ICAQCYr7LpvnfZXBCxVIVc2ea1fjxQ6vkTj0zM
htFs3qfeXpMRf+g1NAh4vv1UIwLsczilMt87SjpJ25pZPyS3O+/VlI9ceZMvtGXd
MGfXhTDp//zRoL1cbzSHee9tQlmEm1tKFxB0wfWd/inGRjZxpJCTQh8oc7CTziHZ
ufS+Jkfpc4Rasr31fl7mHhJahF1j/ka/OOWmFbiHBNjzmNWPQInJm+0ygFqij5qs
51OEvubR8yh5Mdq4TNuWhFuTxpqoJ87VKaSOx/Aefca44Etwcj4gHb7LThidw/ky
zysZiWjyrbfX/31RX7QanKiMk2RDtgZaWi/lMfsl5O+6E2lJ1vo4xv9pW8225B5X
eAeXHCfjV/vrrCFqeCprNF6a3Tn/LX6VNy3jbeC+167QagBOaoDA01XPOx7Odhsb
Gd7cJ5VkgyycZgLnT9zrChgwjx59JQosFEG1DsaAgHfpEl/N3YPJh68N7fwN41Cj
zsk39v6iZdfuet/sP7oiP5/gLmA/CIPNhdIYxaojbLjFPkftVjVPn49RqwqzJJPR
N8BOyb94yhQ7KO4F3IcLT/y/dsWitY0ZH4lCnAVV/v2YjWAWS3OWyC8BFx/Jmc3W
DK/yPwECUcPgHIeXiRjHnJt0Zcm23O2Q3RphpU+1SO3XixsXpOVOYP6rJIXW9bMZ
A1gTTlpi7A==
-----END CERTIFICATE-----

CLICK APPLY SETTINGS

Leave all settings not mentioned above as their default setting.

Verify a successful ProtonVPN connection

Navigate to Status > OpenVPN

  1. You should now see a CONNECTED SUCCESS message.
  2. Visit WhatIsMyIPAddress to verify your new IP address, virtual location, and status as Protected at the top of the page.

In some cases you may notice that the location is not showing the same location as the server you have input in your router settings; this is because geo tracking tools are often tricked by VPN connections. As long as you see an IP address that is not the same as your normal Internet IP address then you are indeed connected to ProtonVPN.

Back up your settings

Navigate to Administration > Backup

  1. Click the Backup button.
  2. A file named nvrambak.bin will be saved to your computer.
  3. You can load nvrambak.bin to restore your settings in the event of a reset.

How to change the ProtonVPN server

  1. Download and open a new .ovpn file from ProtonVPN.
  2. Copy and paste the server IP Address into the Server IP/Name field.
  3. Click Apply Settings.

TROUBLESHOOTING

Still having issues? Visit the VPN Troubleshooting section.

Troubleshoot Here

ExpressVPN Setup on Roqos

Dave · Dec 16, 2021 ·

Preparing for ExpressVPN Setup

Obtain your ExpressVPN login information

If you are not already an ExpressVPN user Sign Up Now.

1. Visit ExpressVPN’s website login page.

ExpressVPN login page

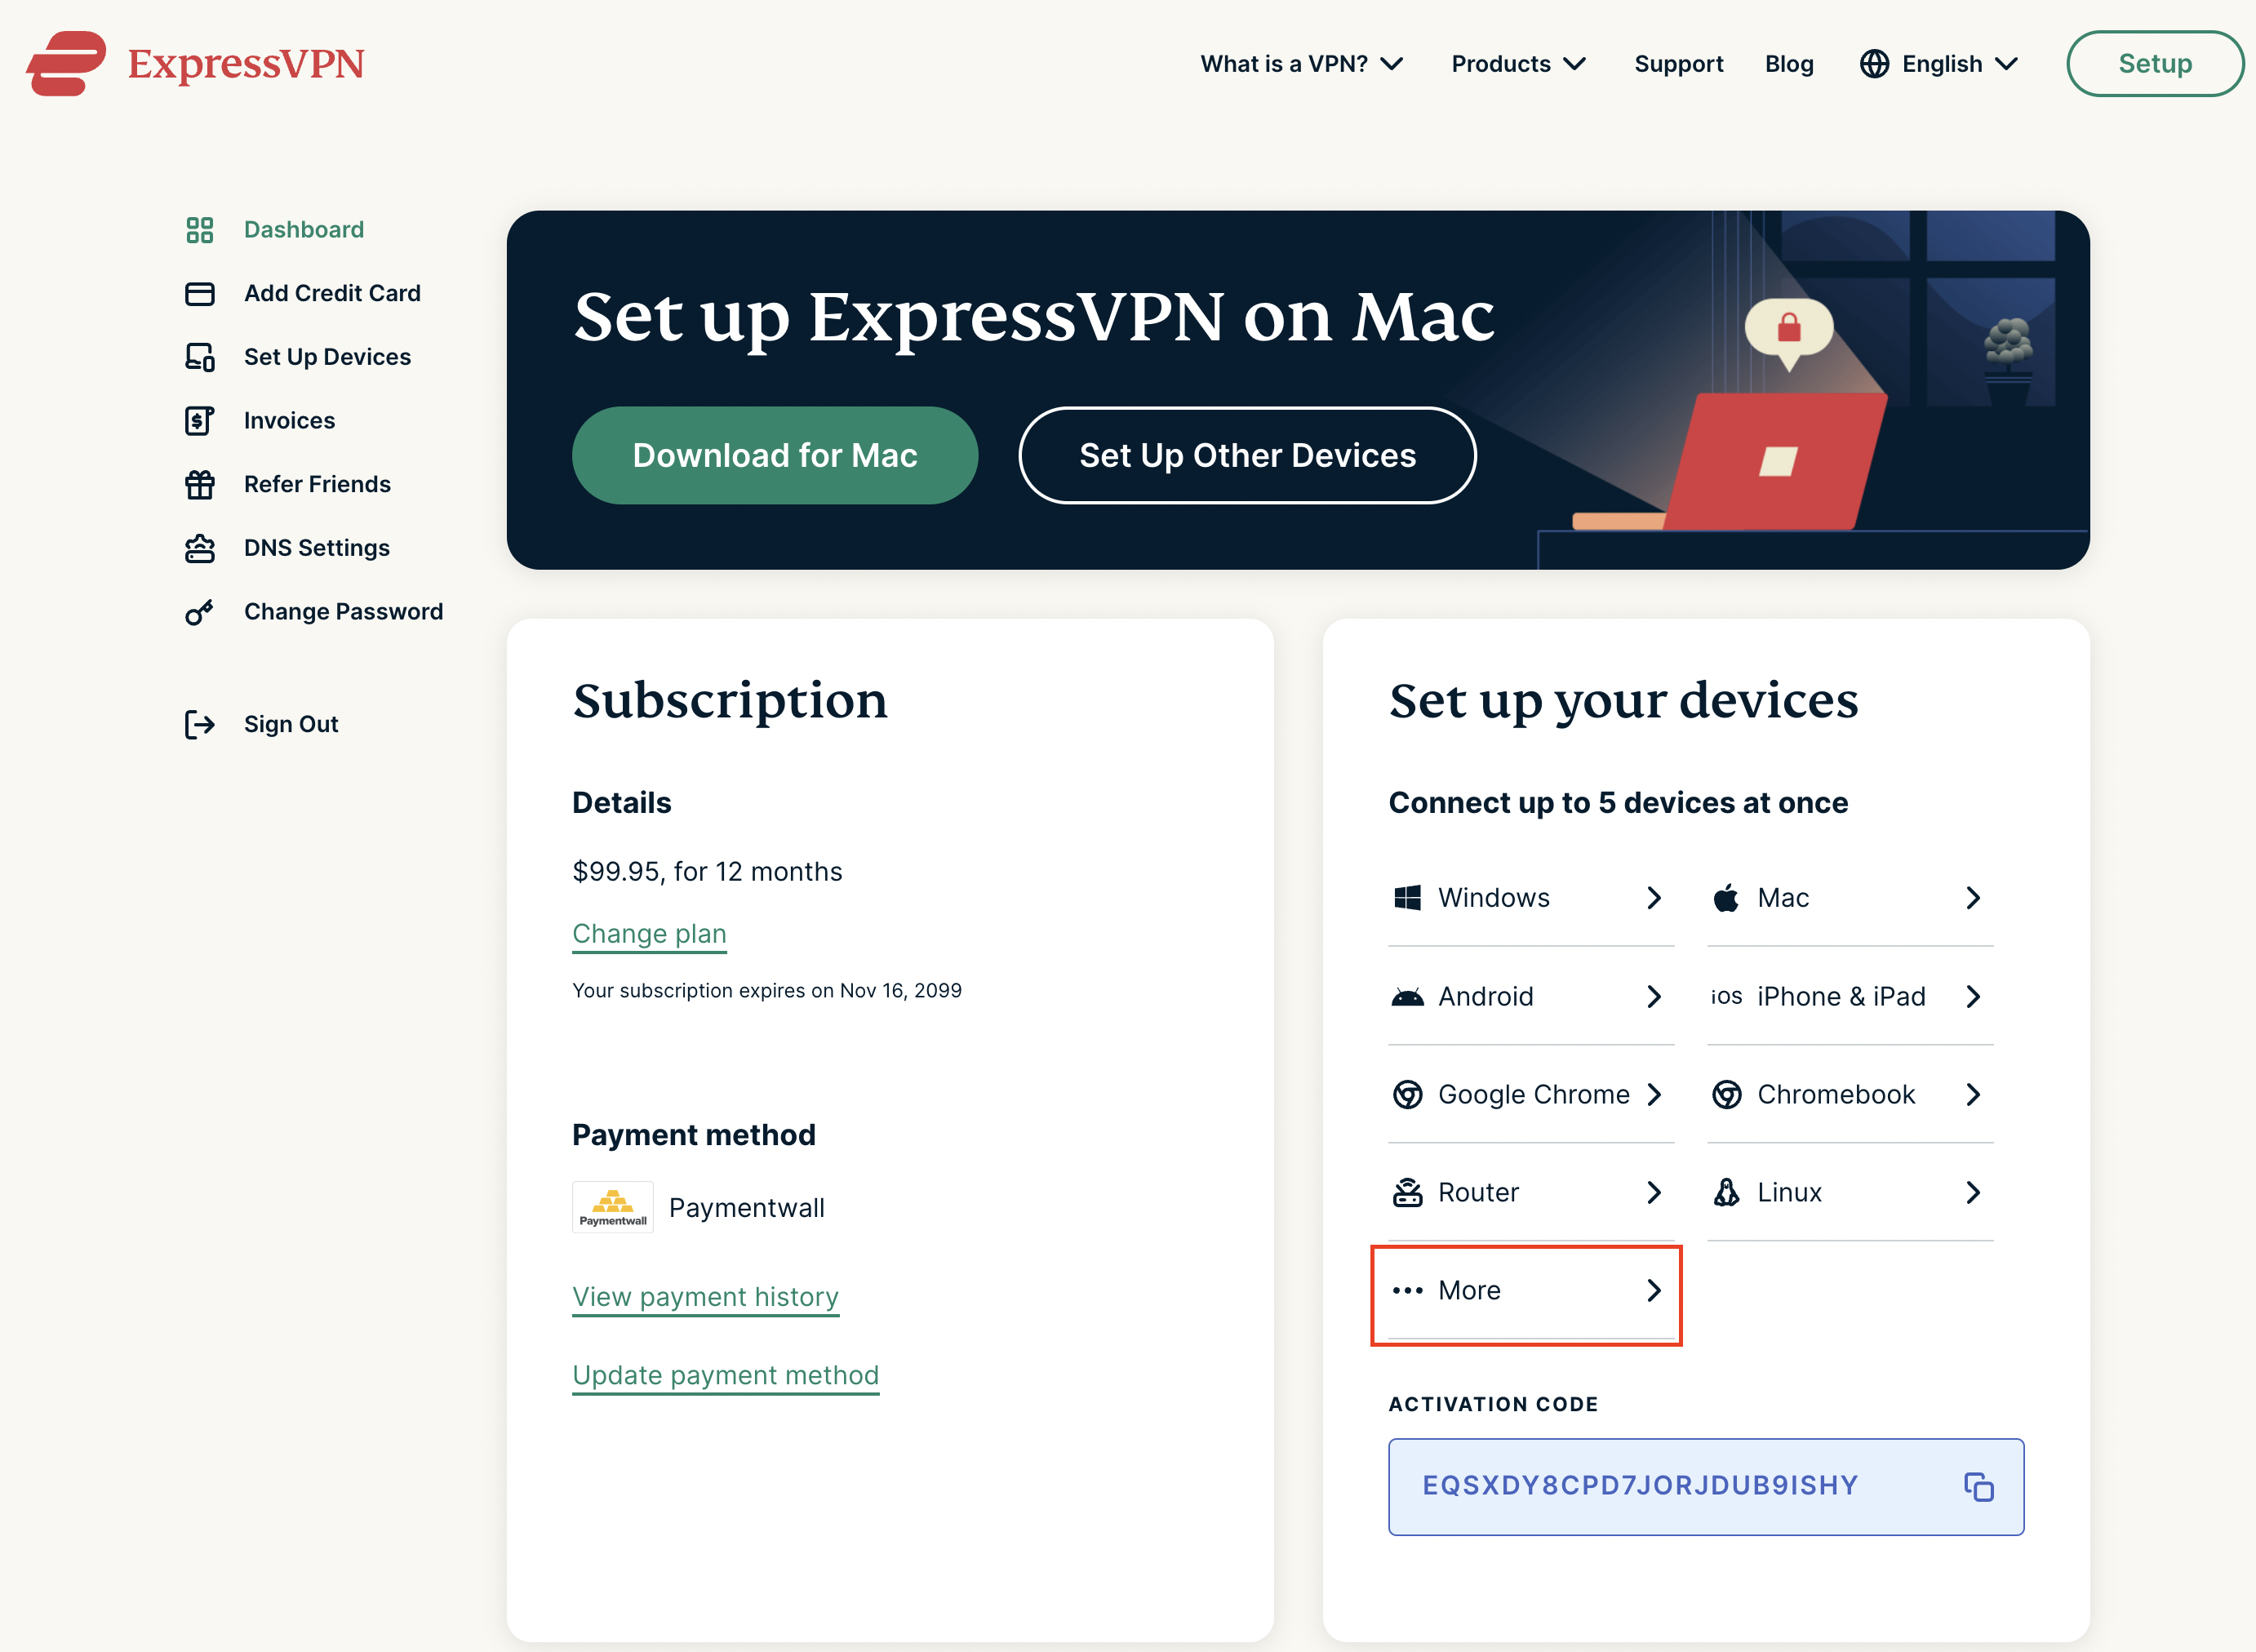
2. Successfully log in with your account information. Select More.

ExpressVPN account page

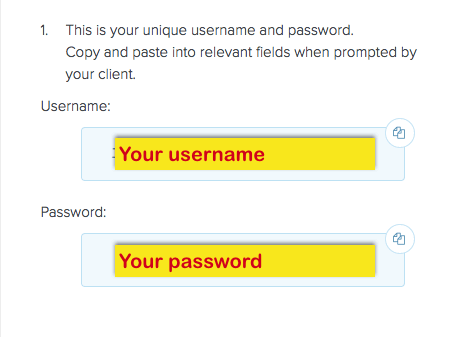
3. Select Manual Configuration and copy the Username and Password that are displayed on the right hand side of the screen.

ExpressVPN Manual Configuration
ExpressVPN username and password

Connecting to ExpressVPN in the Roqos Core

Access the Roqos Core UI

1. Login to the Roqos Core web app in a browser on any computer or smart device.

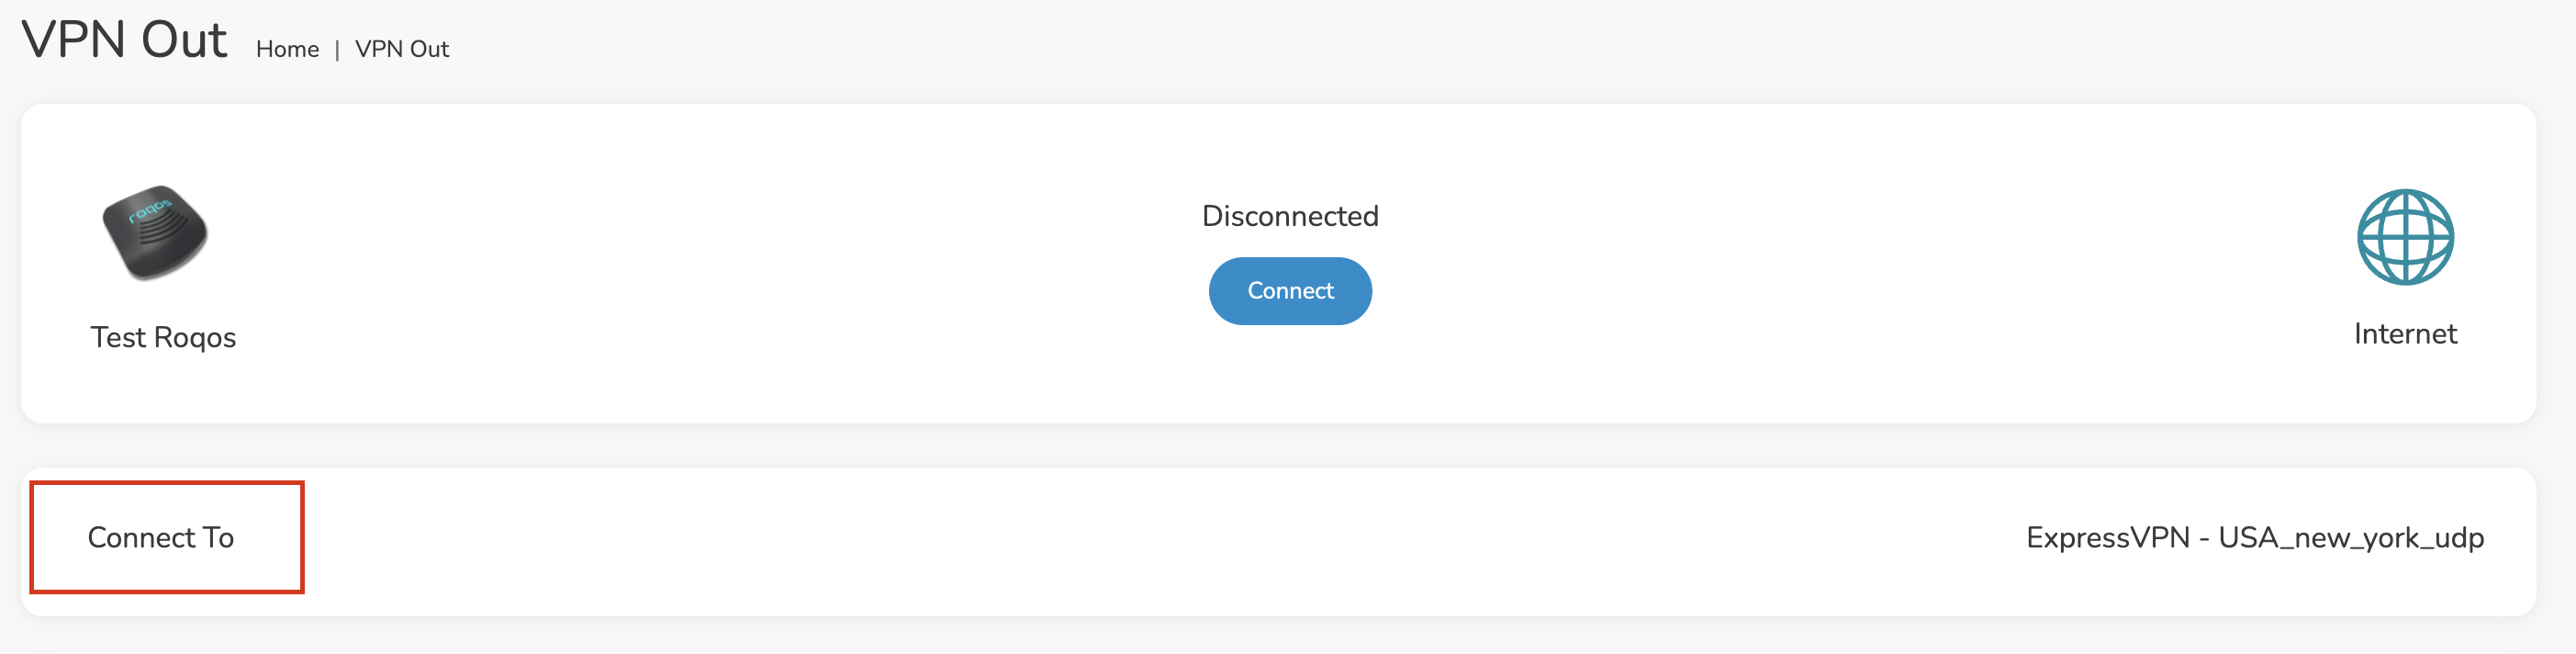
2. Click VPN from the navigation menu and then click VPN OUT.

Roqos VPN Out

3. Click the Connect to box.

Roqos VPN Connect to

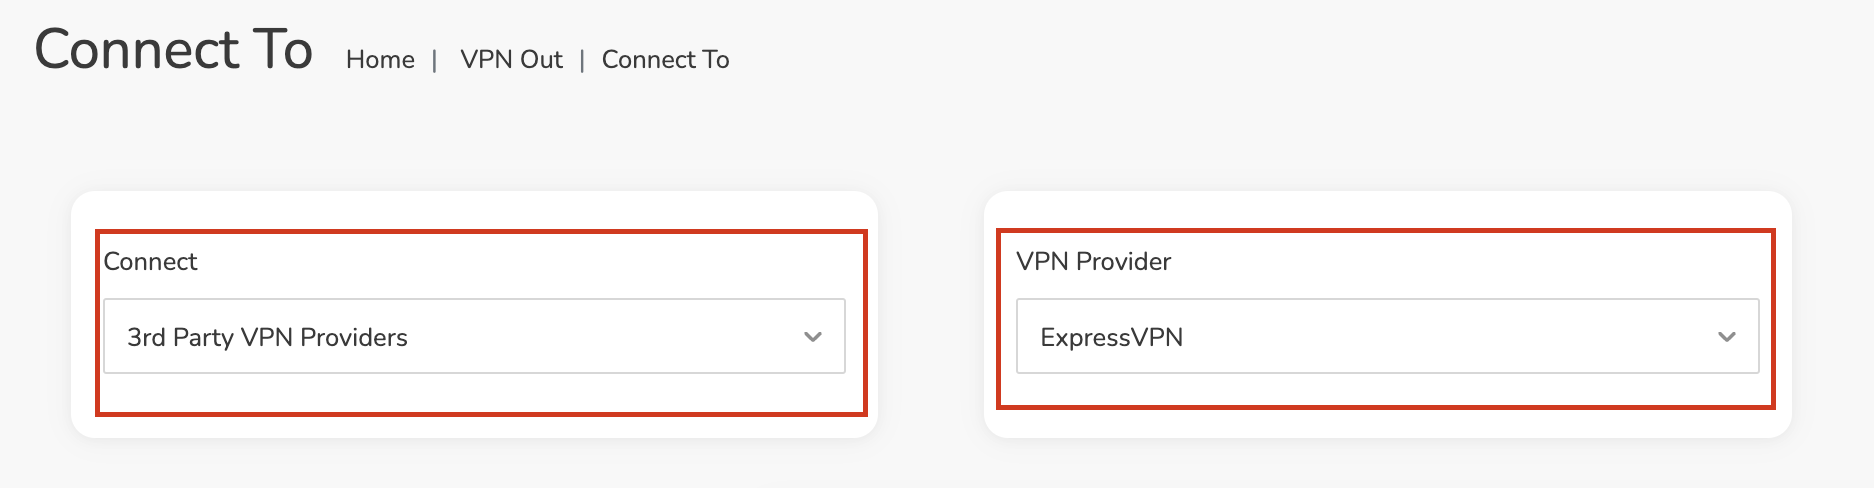
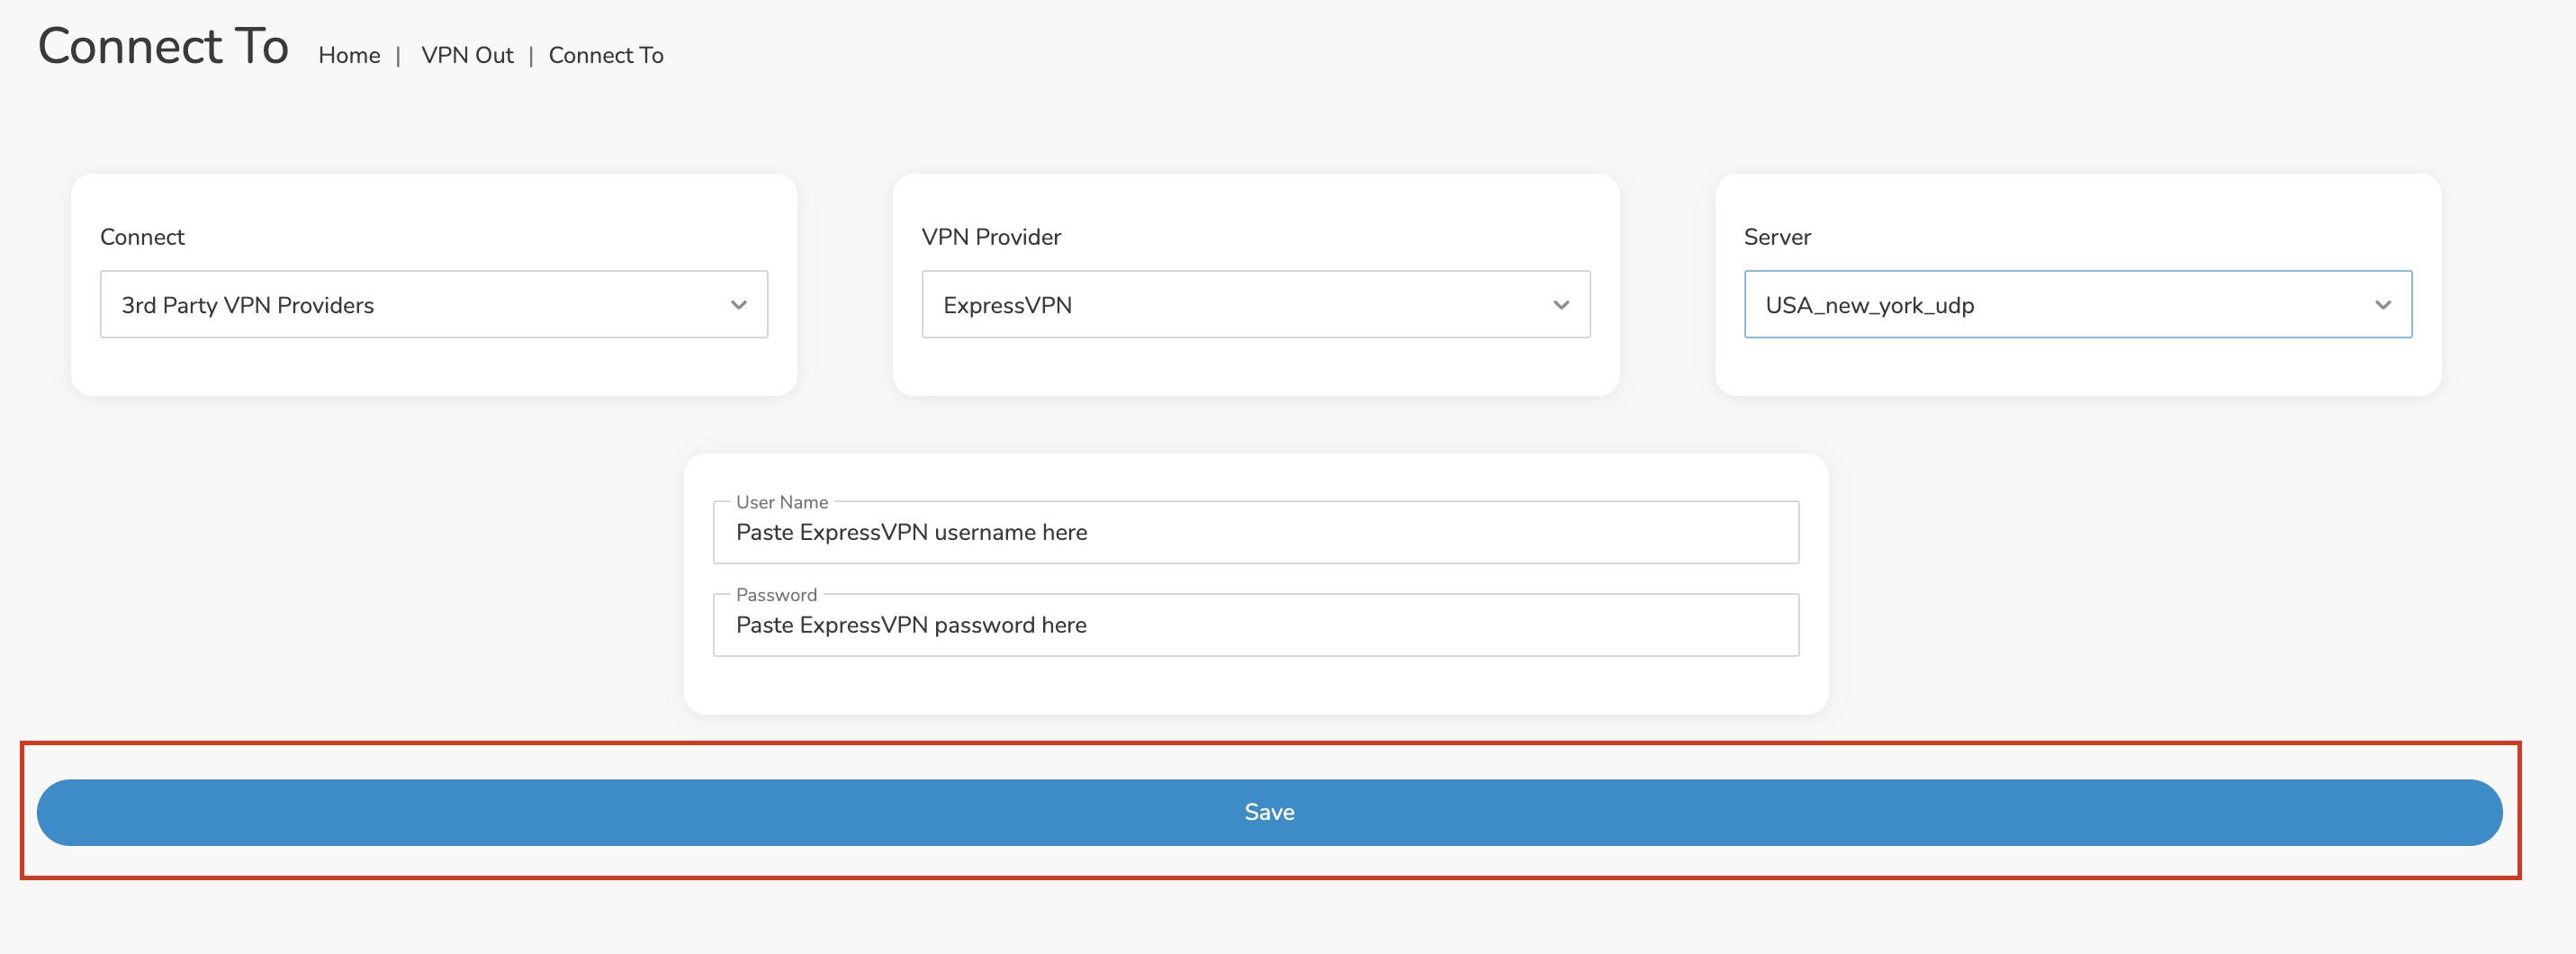
4. In the Connect dropdown choose 3rd Party VPN Providers and for the VPN Provider dropdown choose ExpressVPN.

Roqos ExpressVPN select provider

Enter your ExpressVPN information

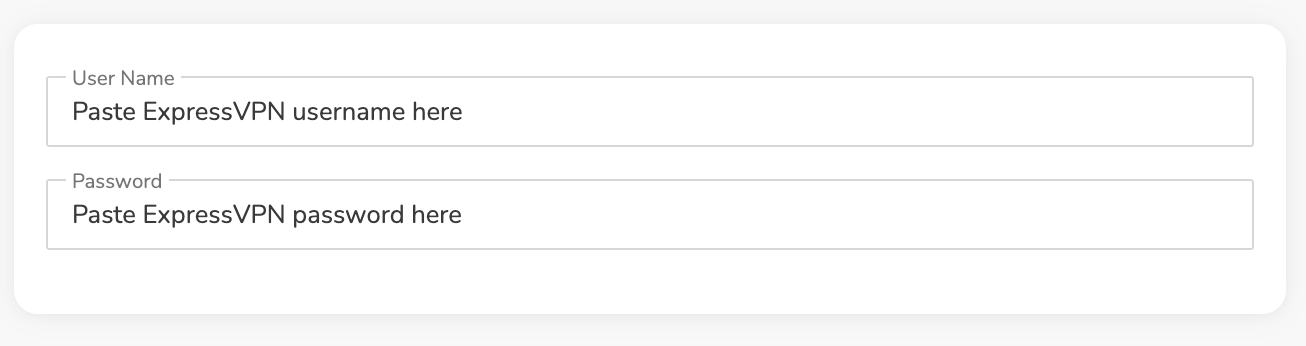
In the Username and Password field enter the ExpressVPN OpenVPN Username and Password that you obtained.

ExpressVPN on FlashRouters Privacy App Setup - OpenVPN Specific Username and Password
Roqos VPN ExpressVPN enter username and password

Select an ExpressVPN server

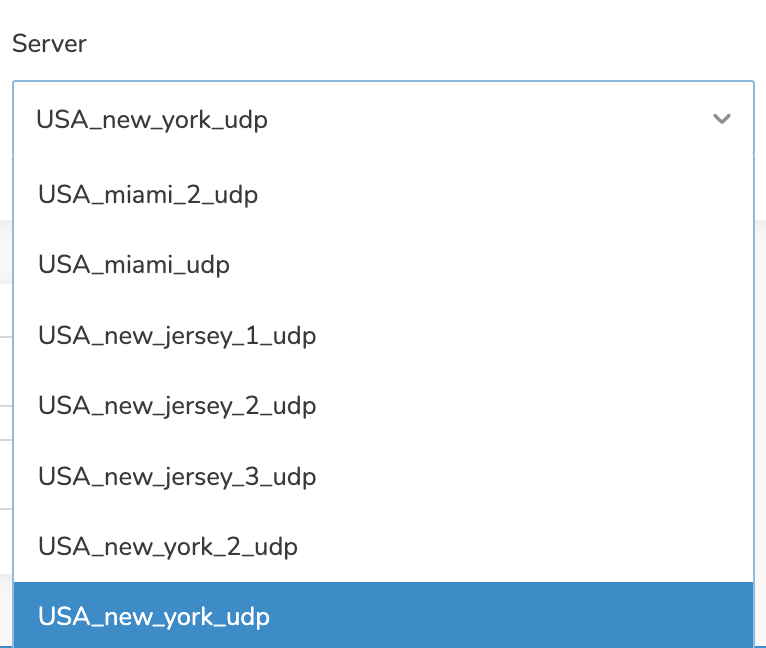
Click the Server dropdown and type in or scroll to your preferred server location.

Roqos VPN ExpressVPN select server

Click the Save button.

Roqos VPN Save Settings

Connect to ExpressVPN

Once you click Save you will be returned to the VPN OUT menu.

Click the Connect button to start your ExpressVPN connection. Please be patient as the router connects your entire network through VPN.

Roqos VPN Connect

Assign devices to connect to VPN

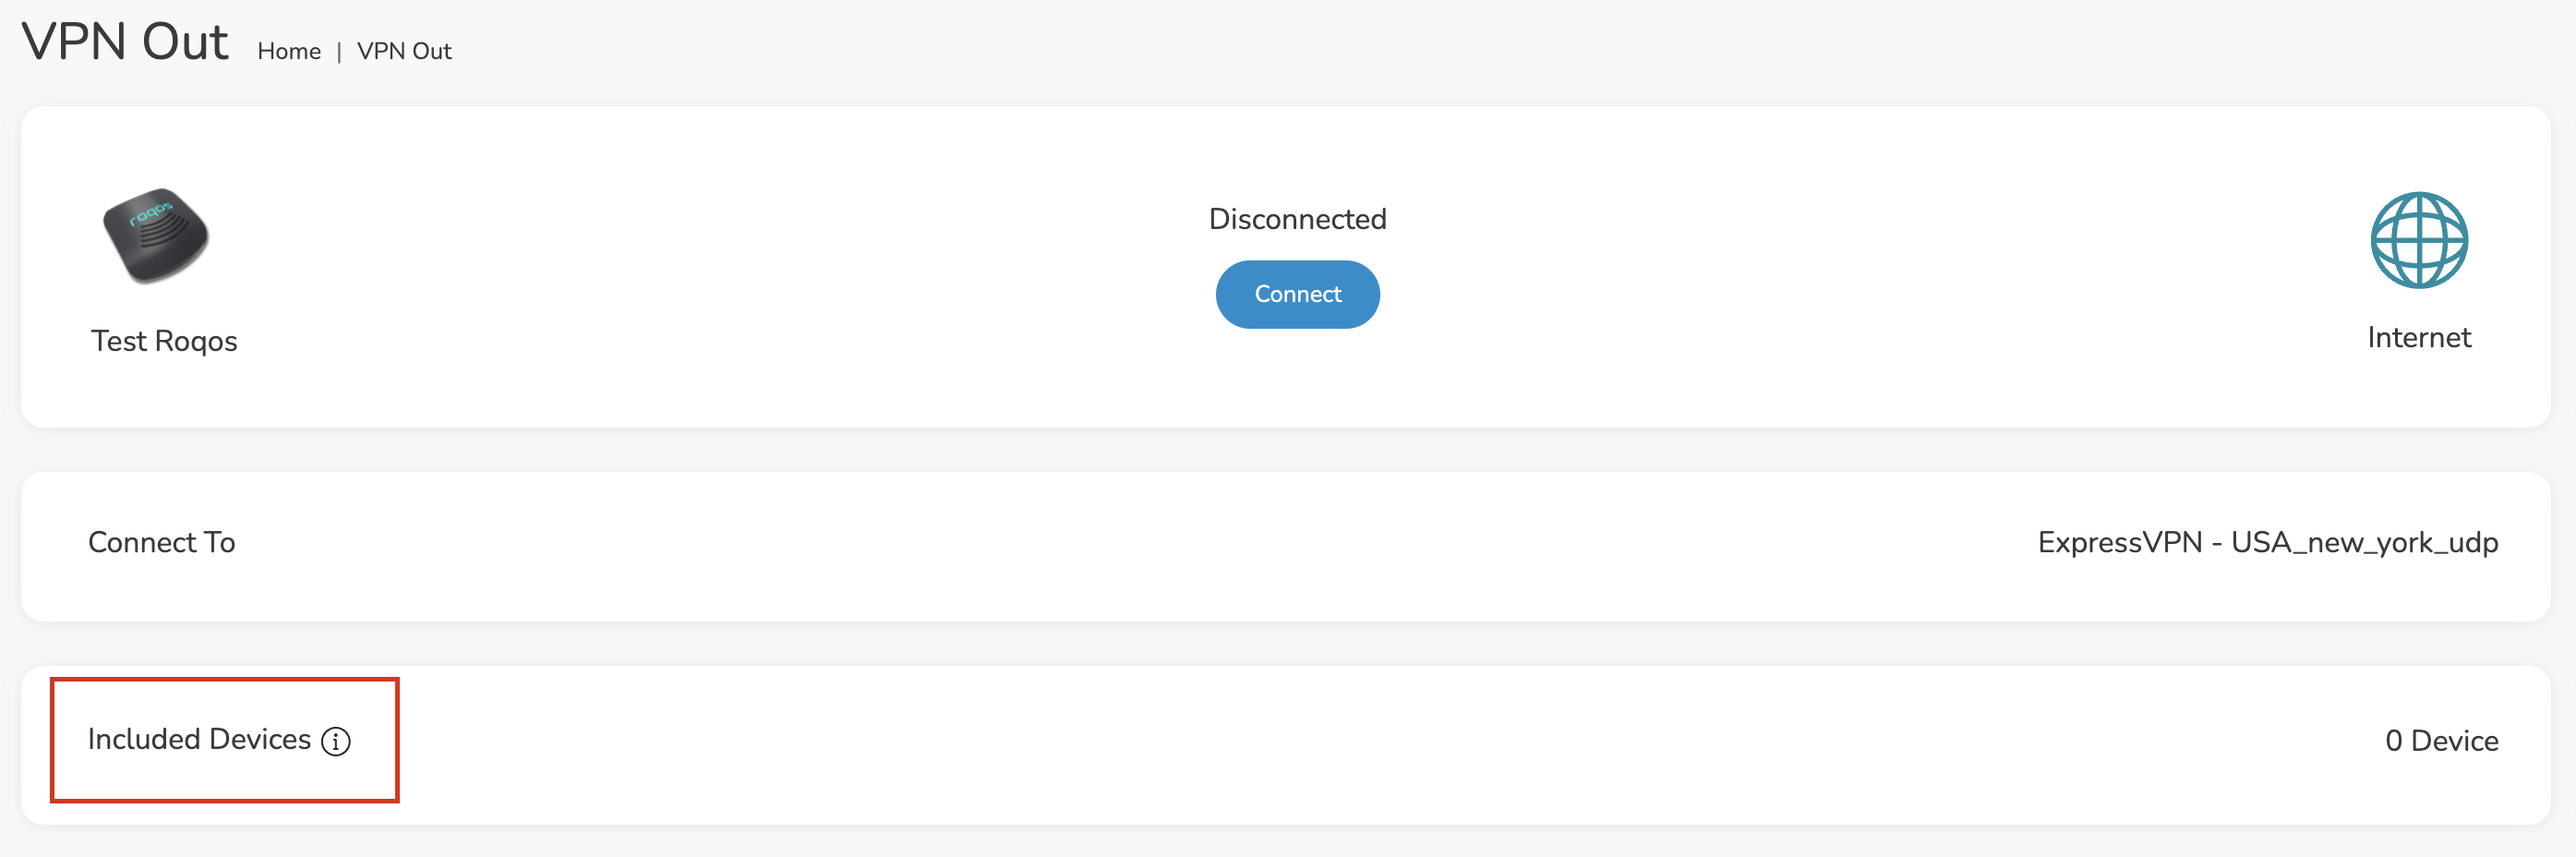
By default there are no devices assigned to the VPN tunnel. Click Included Devices. From this page you can choose if all devices should connect to ExpressVPN or only certain devices.

Roqos VPN Included Devices

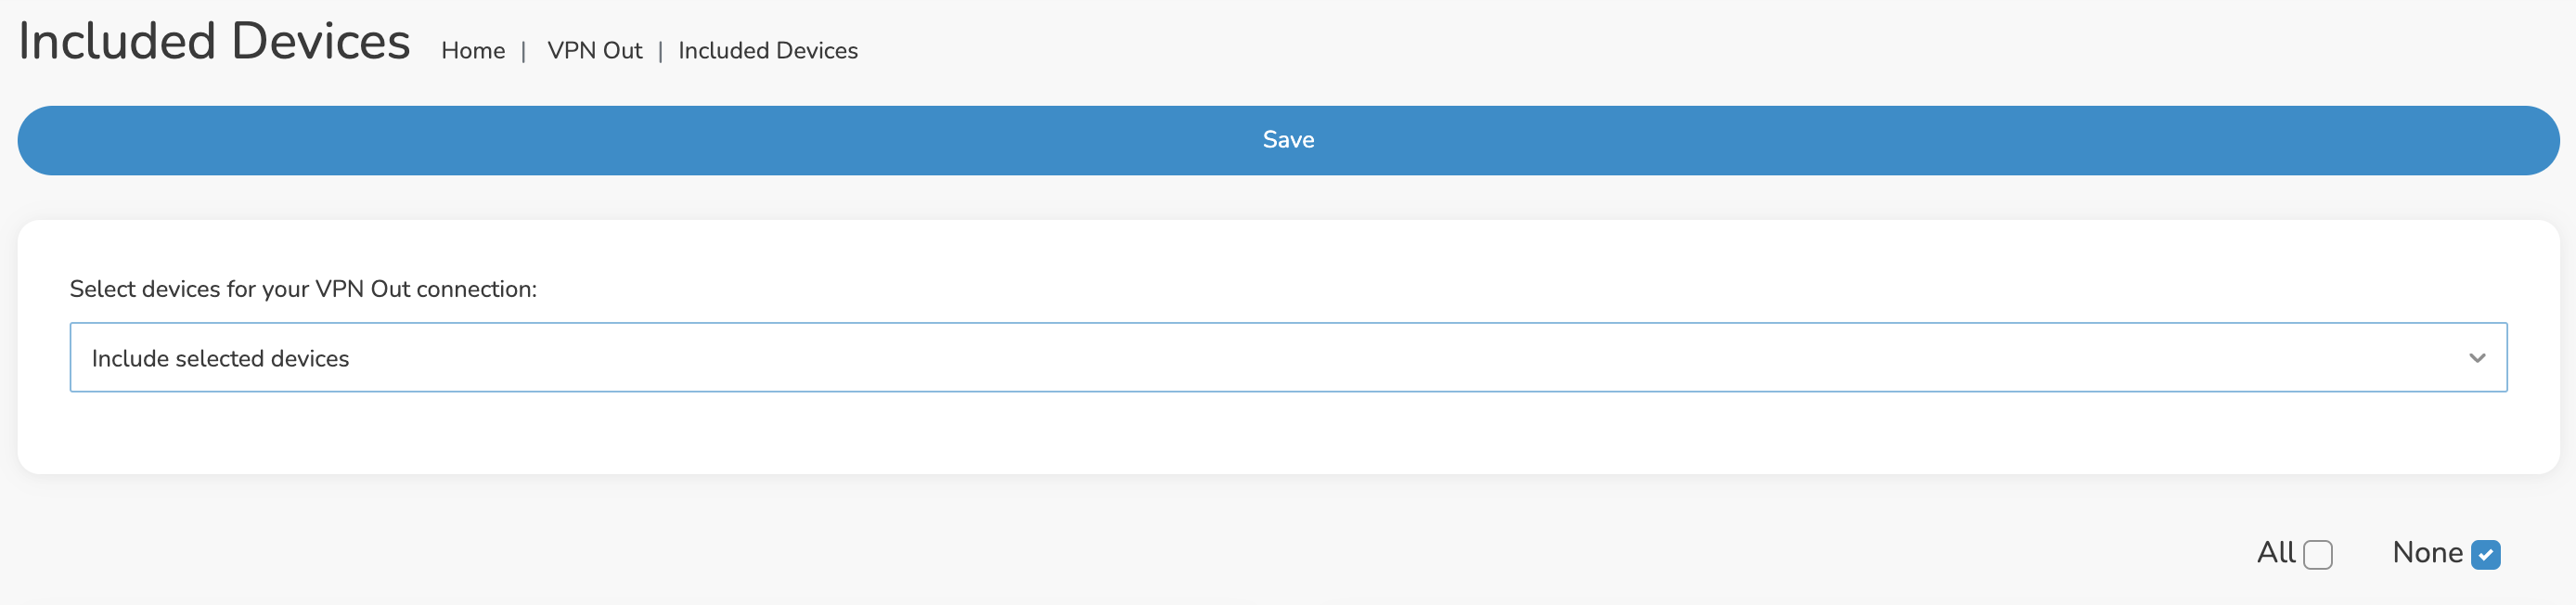
From the dropdown select Include all devices if you want every device that connects to the Roqos to connect to ExpressVPN. Then click Save.

Roqos VPN Include All Devices

If you only want specific devices to connect to ExpressVPN while others bypass the VPN connection select Include selected devices from the dropdown and then toggle the sliders for the devices you want connected to VPN. Click Save.

Roqos VPN Include Selected devices

Verify a successful ExpressVPN connection

Make sure you are connected to the Roqos network via WiFi or ethernet connection on your device.

Visit ExpressVPN’s IP Check to verify your new IP Address and virtual location.

You should see Connected at the top of the page underneath ExpressVPN.

Connect to a different ExpressVPN server

To change your server click Disconnect on the VPN OUT page then return to the Connect To section to select a new server from the Server dropdown and click Save. Now click Connect once again on the VPN Out page.

Disconnect from ExpressVPN

To disconnect from ExpressVPN click the Disconnect button.

TROUBLESHOOTING

Still having issues? Visit the FR Privacy App Troubleshooting section.

Troubleshoot Here

How do I change my Wireless Network Name (SSID)?

TeamFlashRouters · May 1, 2019 ·

Change the FlashRouter’s wireless network name to any name you like.

Navigate to Wireless > Basic Settings

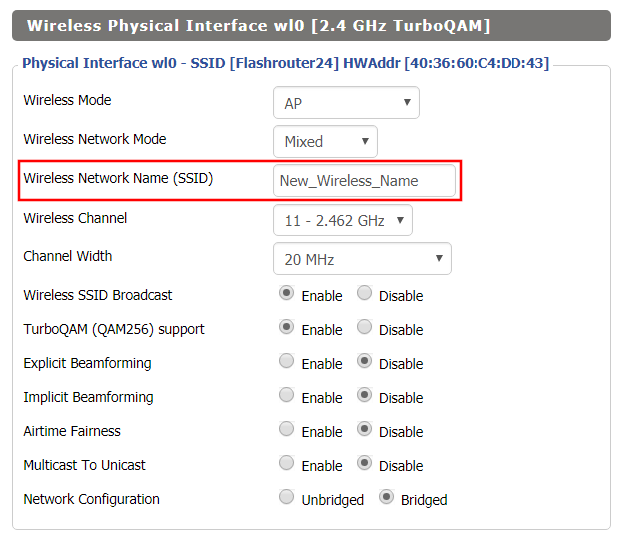
Changing SSID in DD-WRT Wireless Basic Settings page
  1. Click into the Wireless Network Name (SSID) field and enter in the new wireless name you would like to use.
  2. Click Apply Settings.
  3. Reconnect to the wireless network using your new wireless network name.

Surfshark Manual OpenVPN Setup

TeamFlashRouters · Apr 24, 2019 ·

Preparing for Manual Surfshark Setup

Obtain your Surfshark OpenVPN information

If you are not already an Surfshark user Sign Up Now.

1. Log in to your account on the Surfshark website.

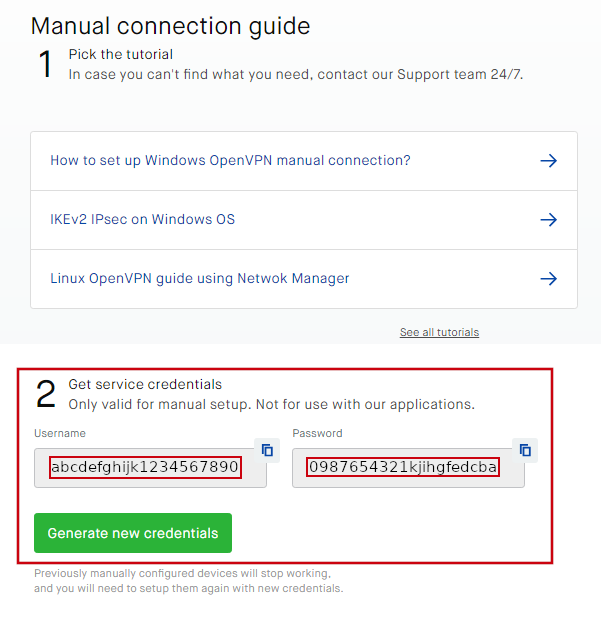
2. Successfully log in with your account information and Navigate to the Manual Connection Guide. Here you will find the OpenVPN Specific Username and Password required for manual configuration.

FlashRouters Privacy App - SurfShark OpenVPN Specific Username and Password

Surfshark Server Addresses

View a full list of Surfshark servers.

United States

Atlanta:
us-atl.prod.surfshark.com
Buffalo:
us-buf.prod.surfshark.com
Chicago:
us-chi.prod.surfshark.com
Dallas:
us-dal.prod.surfshark.com
Las Vegas:
us-las.prod.surfshark.com
Los Angeles:
us-lax.prod.surfshark.com
Miami:
us-mia.prod.surfshark.com
New York City:
us-nyc.prod.surfshark.com
Phoenix:
us-phx.prod.surfshark.com
San Fransisco:
us-sfo.prod.surfshark.com
Seattle:
us-sea.prod.surfshark.com

DD-WRT Router Setup for Surfshark

Navigate to Services > VPN

Enter Surfshark settings

OpenVPN Client

Start OpenVPN Client

If you wish to disable your VPN connection simply set this to Disable at any time and click Apply Settings.

Server IP/Name

Copy and paste the server you would like to connect to from the server list above. Be sure there are no extra spaces or characters.

If you wish to change Surfshark connection locations, THIS IS THE ONLY FIELD YOU NEED TO CHANGE.

Port

1194

Tunnel Device

TUN

Tunnel Protocol

UDP

Encryption cipher

None

Hash Algorithm

SHA512

Userpass Authentication

Enable

Username

Enter your OpenVPN specific Username.

Password

Enter your OpenVPN specific Password.

Advanced Options

Enable

TLS Cipher

None

LZO Compression

Disabled

NAT

Enable

Firewall Protection

Enable

TLS Auth Key

-----BEGIN OpenVPN Static key V1-----
b02cb1d7c6fee5d4f89b8de72b51a8d0
c7b282631d6fc19be1df6ebae9e2779e
6d9f097058a31c97f57f0c35526a44ae
09a01d1284b50b954d9246725a1ead1f
f224a102ed9ab3da0152a15525643b2e
ee226c37041dc55539d475183b889a10
e18bb94f079a4a49888da566b9978346
0ece01daaf93548beea6c827d9674897
e7279ff1a19cb092659e8c1860fbad0d
b4ad0ad5732f1af4655dbd66214e552f
04ed8fd0104e1d4bf99c249ac229ce16
9d9ba22068c6c0ab742424760911d463
6aafb4b85f0c952a9ce4275bc821391a
a65fcd0d2394f006e3fba0fd34c4bc4a
b260f4b45dec3285875589c97d3087c9
134d3a3aa2f904512e85aa2dc2202498
-----END OpenVPN Static key V1-----

Additional Config

remote-cert-tls server
remote-random
nobind
tun-mtu 1500
tun-mtu-extra 32
mssfix 1450
persist-key
persist-tun
ping-timer-rem
reneg-sec 0
cipher AES-256-GCM
log /tmp/vpn.log

Policy Based Routing

This field can be used for split VPN and Dual Gateway routing.

CA Cert

-----BEGIN CERTIFICATE-----
MIIFTTCCAzWgAwIBAgIJAMs9S3fqwv+mMA0GCSqGSIb3DQEBCwUAMD0xCzAJBgNV
BAYTAlZHMRIwEAYDVQQKDAlTdXJmc2hhcmsxGjAYBgNVBAMMEVN1cmZzaGFyayBS
b290IENBMB4XDTE4MDMxNDA4NTkyM1oXDTI4MDMxMTA4NTkyM1owPTELMAkGA1UE
BhMCVkcxEjAQBgNVBAoMCVN1cmZzaGFyazEaMBgGA1UEAwwRU3VyZnNoYXJrIFJv
b3QgQ0EwggIiMA0GCSqGSIb3DQEBAQUAA4ICDwAwggIKAoICAQDEGMNj0aisM63o
SkmVJyZPaYX7aPsZtzsxo6m6p5Wta3MGASoryRsBuRaH6VVa0fwbI1nw5ubyxkua
Na4v3zHVwuSq6F1p8S811+1YP1av+jqDcMyojH0ujZSHIcb/i5LtaHNXBQ3qN48C
c7sqBnTIIFpmb5HthQ/4pW+a82b1guM5dZHsh7q+LKQDIGmvtMtO1+NEnmj81BAp
FayiaD1ggvwDI4x7o/Y3ksfWSCHnqXGyqzSFLh8QuQrTmWUm84YHGFxoI1/8AKdI
yVoB6BjcaMKtKs/pbctk6vkzmYf0XmGovDKPQF6MwUekchLjB5gSBNnptSQ9kNgn
TLqi0OpSwI6ixX52Ksva6UM8P01ZIhWZ6ua/T/tArgODy5JZMW+pQ1A6L0b7egIe
ghpwKnPRG+5CzgO0J5UE6gv000mqbmC3CbiS8xi2xuNgruAyY2hUOoV9/BuBev8t
tE5ZCsJH3YlG6NtbZ9hPc61GiBSx8NJnX5QHyCnfic/X87eST/amZsZCAOJ5v4EP
SaKrItt+HrEFWZQIq4fJmHJNNbYvWzCE08AL+5/6Z+lxb/Bm3dapx2zdit3x2e+m
iGHekuiE8lQWD0rXD4+T+nDRi3X+kyt8Ex/8qRiUfrisrSHFzVMRungIMGdO9O/z
CINFrb7wahm4PqU2f12Z9TRCOTXciQIDAQABo1AwTjAdBgNVHQ4EFgQUYRpbQwyD
ahLMN3F2ony3+UqOYOgwHwYDVR0jBBgwFoAUYRpbQwyDahLMN3F2ony3+UqOYOgw
DAYDVR0TBAUwAwEB/zANBgkqhkiG9w0BAQsFAAOCAgEAn9zV7F/XVnFNZhHFrt0Z
S1Yqz+qM9CojLmiyblMFh0p7t+Hh+VKVgMwrz0LwDH4UsOosXA28eJPmech6/bjf
ymkoXISy/NUSTFpUChGO9RabGGxJsT4dugOw9MPaIVZffny4qYOc/rXDXDSfF2b+
303lLPI43y9qoe0oyZ1vtk/UKG75FkWfFUogGNbpOkuz+et5Y0aIEiyg0yh6/l5Q
5h8+yom0HZnREHhqieGbkaGKLkyu7zQ4D4tRK/mBhd8nv+09GtPEG+D5LPbabFVx
KjBMP4Vp24WuSUOqcGSsURHevawPVBfgmsxf1UCjelaIwngdh6WfNCRXa5QQPQTK
ubQvkvXONCDdhmdXQccnRX1nJWhPYi0onffvjsWUfztRypsKzX4dvM9k7xnIcGSG
EnCC4RCgt1UiZIj7frcCMssbA6vJ9naM0s7JF7N3VKeHJtqe1OCRHMYnWUZt9vrq
X6IoIHlZCoLlv39wFW9QNxelcAOCVbD+19MZ0ZXt7LitjIqe7yF5WxDQN4xru087
FzQ4Hfj7eH1SNLLyKZkA1eecjmRoi/OoqAt7afSnwtQLtMUc2bQDg6rHt5C0e4dC
LqP/9PGZTSJiwmtRHJ/N5qYWIh9ju83APvLm/AGBTR2pXmj9G3KdVOkpIC7L35dI
623cSEC3Q3UZutsEm/UplsM=
-----END CERTIFICATE-----

CLICK APPLY SETTINGS

Leave all settings not mentioned above as their default setting.

Verify a successful Surfshark connection

Navigate to Status > OpenVPN

  1. You should now see a CONNECTED SUCCESS message.
  2. Visit WhatIsMyIPAddress to verify your new IP address, virtual location, and status as Protected at the top of the page.

In some cases you may notice that the location is not showing the same location as the server you have input in your router settings; this is because geo tracking tools are often tricked by VPN connections. As long as you see an IP address that is not the same as your normal Internet IP address then you are indeed connected to Surfshark VPN.

Back up your settings

Navigate to Administration > Backup

  1. Click the Backup button.
  2. A file named nvrambak.bin will be saved to your computer.
  3. You can load nvrambak.bin to restore your settings in the event of a reset.

How to change the Surfshark server

  1. Visit the Surfshark Manual setup page and scroll down to Section 3.
  2. Copy and paste one of the server IP Address into the Server IP/Name field.
  3. Click Apply Settings.

TROUBLESHOOTING

Still having issues? Visit the VPN Troubleshooting section.

Troubleshoot Here

Managing User Profiles on Roqos

Dave · Dec 16, 2021 ·

User Profiles allow you to organize your devices connected to the Roqos Core. This allow you to see a user profile’s usage history, set a schedule when devices are allowed to connect to the Internet, and filter out specific content such as explicit websites and games.

Login to Roqos Core UI web app in a browser on any computer or smart device.

Adding new User Profile

1. Click the navigation menu and select Users.

2. To add a new User Profile click Add User.

3. In the Name field enter the name for the User Profile. You can add an image for the User Profile here as well.

4. You will see a list of devices connected to the Roqos Core at the bottom of the page. Check the box of the devices that you would like to add to this User Profile. Then click Save.

Tracking Usage History

1. Click the User Profile that you want to review.

2. Select Usage History.

3. On the new page you can view usage by Top Visited, All Activity, and Activity Graph.

Schedule Pauses

1. Click the User Profile that you want to review.

2. Select Scheduled Pauses.

3. Click Add Schedule.

4. From here you can set the name of the schedule, the days that the schedule will be in effect, and if the schedule should be applied all day or during specific hours. Click Save.

Filters

1. Click the User Profile that you want to review.

2. Select Filters.

3. From here you can use the toggle to Block explicit websites and Block explicit search results.

4. In the Safe Youtube dropdown you can select None, Moderate, or Strict.

5. The Blocked Content area allows you to block specific services such as Games and Social Media.

6. Add specific websites to the Block Sites list if the above policies did not cover them.

7. Add specific websites to the Allowed Sites list if you want to block all websites except for a few.

CyberGhost Merlin OpenVPN Setup

TeamFlashRouters · Mar 30, 2023 ·

Preparing for CyberGhost Setup

Obtain your CyberGhost OpenVPN information

If you are not already a CyberGhost user Sign Up Now.

1. Log in to your account on the CyberGhost website.

CyberGhost Website Login

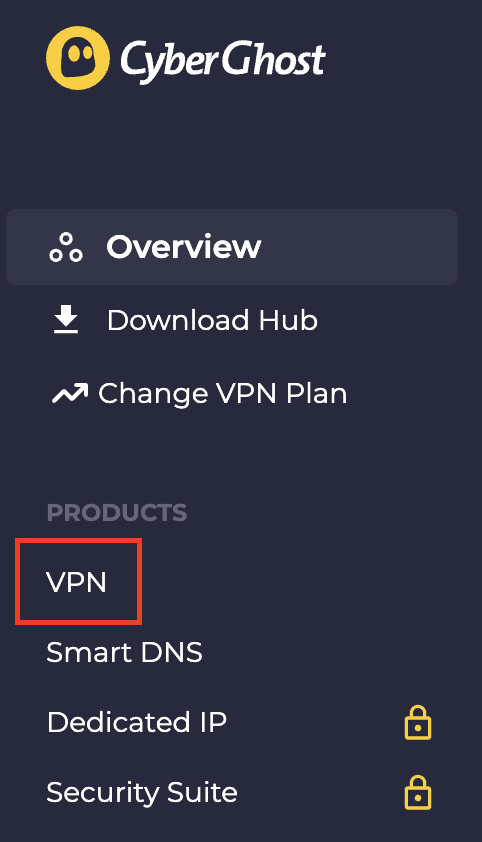
2. Select VPN.

CyberGhost VPN

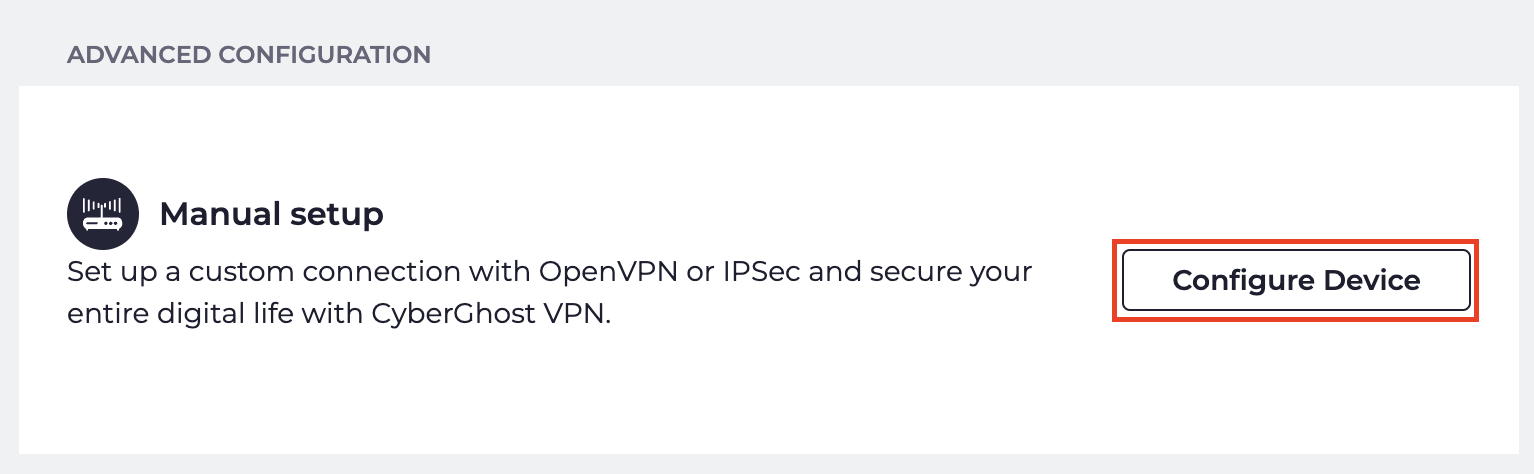
3. Click Configure New Device.

CyberGhost Configure Device

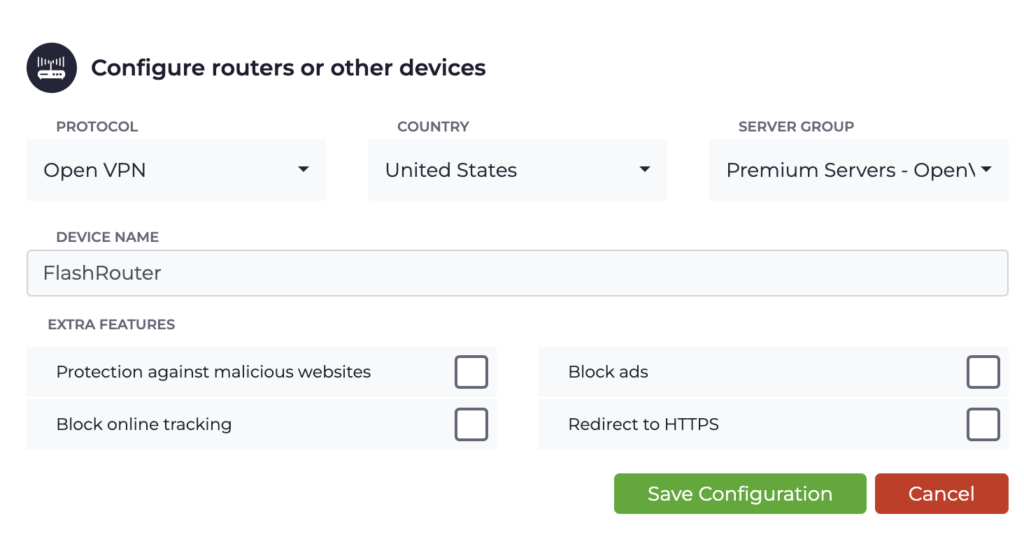
4. Set Protocol to OpenVPN. Select the Country you would like to connect to. Select the Server Group. Name the device in the Device Name field. Click Save Configuration.

CyberGhost protocol and location

5. Press View configuration.

CyberGhost view configuration

6. Copy the Username, and Password that appear to a notepad, since you will need this information later in the setup process. Click Download Configuration.

CyberGhost Website OpenVPN Configuration Files Generator 1

Open the folder that was downloaded. Then open the ca.crt the client.crt, and client.key files with NotePad++ for Windows or TextEdit for Apple. All CyberGhost servers have different keys and certificates.

Merlin Router Setup for CyberGhost

Login to Asus Merlin firmware settings in a browser on any computer or smart device connected to the Merlin FlashRouter’s network.

1. Navigate to the VPN tab.

Merlin VPN Tab

2. Navigate to the VPN Client tab.

Merlin VPN Client Tab

3. Click Choose file and select the .ovpn file from the folder you downloaded earlier. Then click Upload.

Merlin Choose File Upload

4. Set Automatic Start at boot time to Yes if you want the VPN connection to begin automatically when the router is powered off and back on.

Merlin Automatic Start at boot time

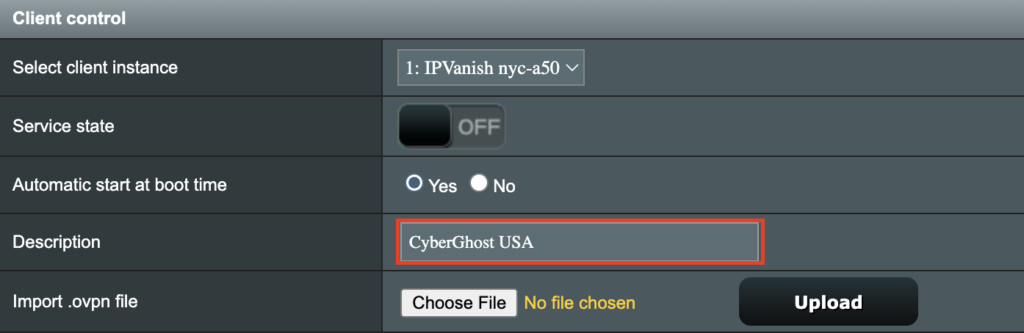
5. In the Description field enter in the name you’d like to use for this OpenVPN Client profile. We typically advise entering in the location here. Our example server was in USA so I have entered in CyberGhost USA.

Merlin CyberGhost Description field

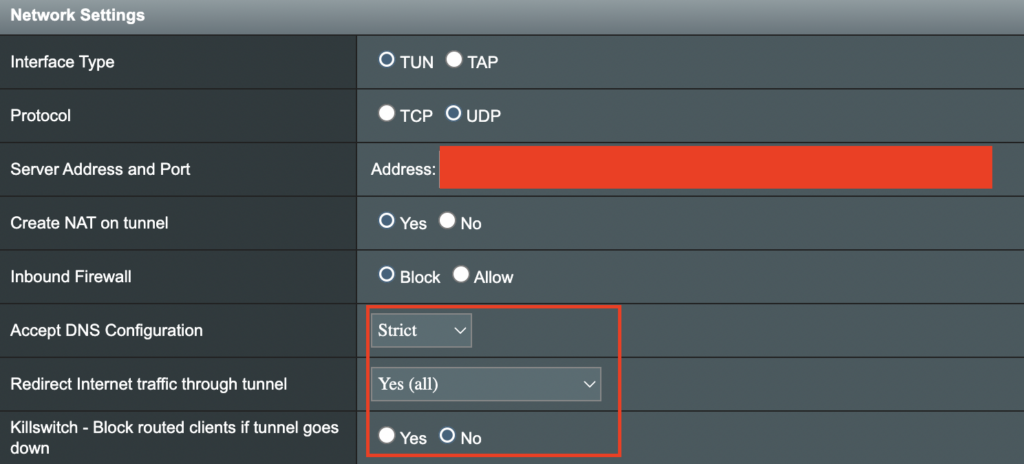
6. Set Accept DNS Configuration to Strict. Set Redirect Internet traffic through tunnel to Yes (all). Set Kill Switch to Yes or No depending on if you want the Internet to be killed if the VPN connection drops.

Merlin Accept DNS configuration Redirect Internet and Kill Switch

If you only want certain devices to connect to the OpenVPN Client profile you are setting up instead of all the devices connected to the FlashRouter’s network please set the Redirect Internet traffic through tunnel to VPN Director. Then complete the instructions on this page and then view our VPN Director guide.

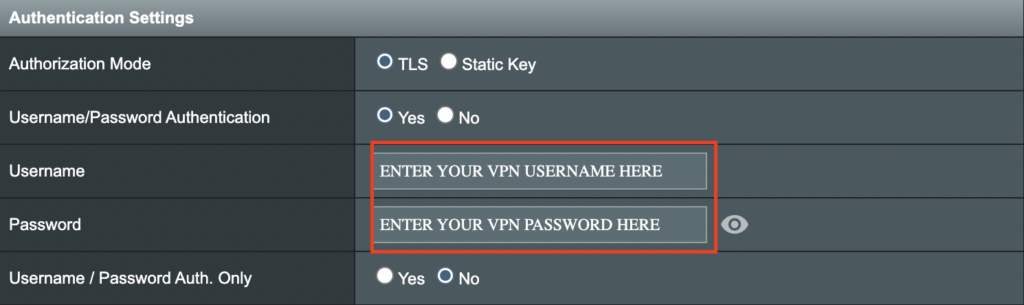
7. Enter your CyberGhost OpenVPN username and password that you obtained earlier. Do not enter your account login.

Merlin VPN Username and Password

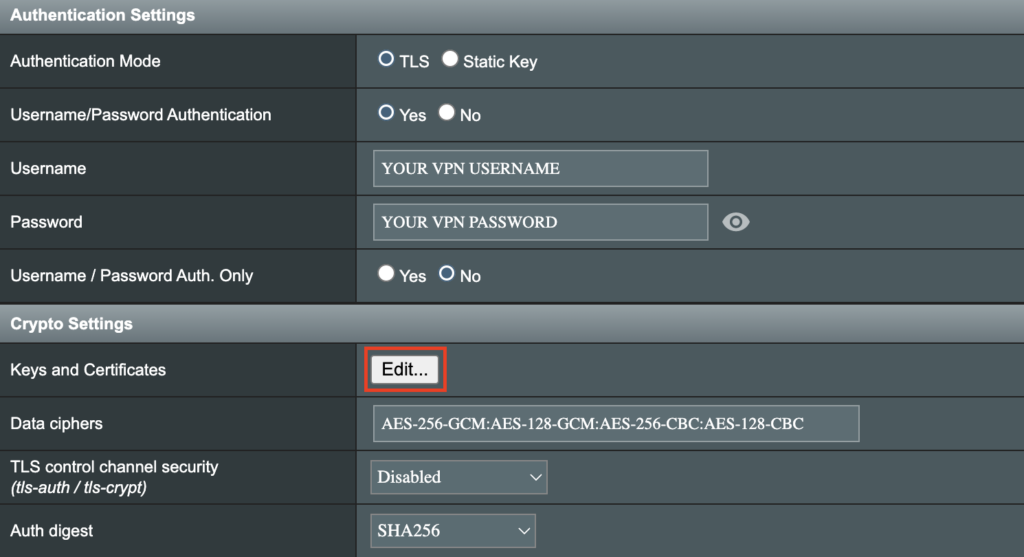
8. Click the Edit button in the Keys and Certificates area.

Merlin Keys and Certificates Edit button

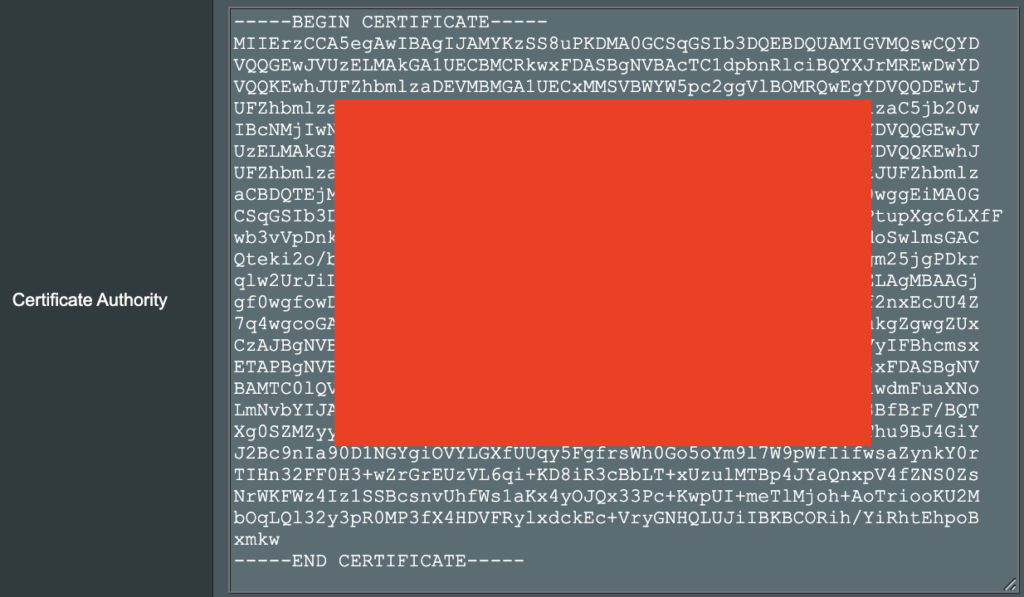
9. In the Certificate Authority field paste in the entire content of the ca.crt file.

—– BEGIN xxx —– / —– END xxx —– block (including those two lines).

Merlin Certificate Authority

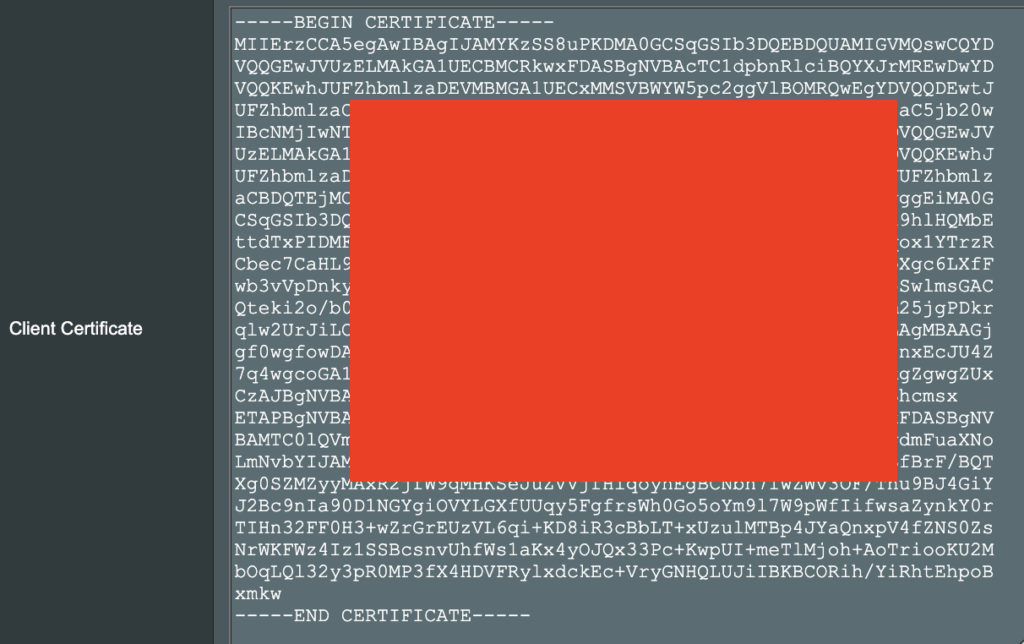
10. In the Client Certificate field paste in the entire content of the client.crt file.

—– BEGIN xxx —– / —– END xxx —– block (including those two lines).

Merlin Client Certificate

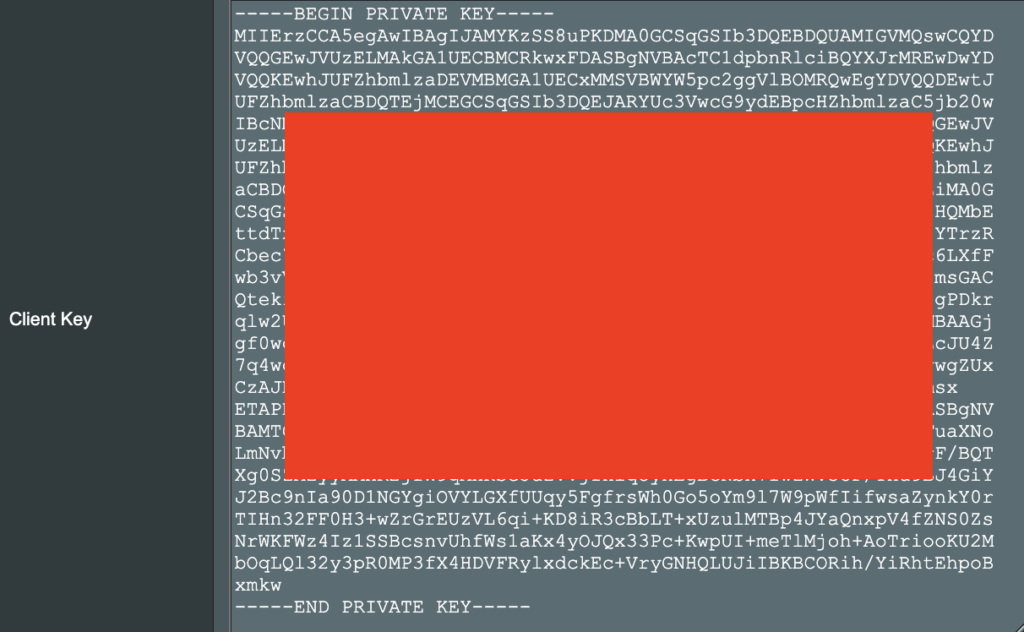
11. In the Client Key field paste in the entire content of the client.key file.

—– BEGIN xxx —– / —– END xxx —– block (including those two lines).

Merlin Client Key

12. Click Save at the bottom of that window.

13. Click Apply at the bottom of the page.

14. At the top of the page set the Service State toggle to ON to activate the VPN connection.

Merlin Service State All Providers

Verify a successful CyberGhost connection

  1. You should now see a CONNECTED message.
  2. Visit What is my IP Address from a private/incognito browser to verify your new IP address and virtual location.

TROUBLESHOOTING

Still having issues? Visit the FR Privacy App Troubleshooting section.

Troubleshoot Here

IPVanish Cudy OpenVPN Setup

TeamFlashRouters · Feb 29, 2024 ·

Preparing for IPVanish Cudy Setup

Download your IPVanish .ovpn file

If you are not already an IPVanish user Sign Up Now.

1. Log in to your account on the IPVanish website.

IPVanish login

2. Successfully log in with your account information then go to IPVanish .ovpn file page.

3. Click on the .ovpn file for the server location you want to use to dowloand the .ovpn file. Do not open this file.

IPVanish download ovpn

Cudy Router Setup for IPVanish

Login to Cudy firmware settings in a browser on any computer or smart device connected to the Cudy FlashRouter’s network.

1. Click General Settings.

Cudy General Settings

2. Click VPN.

Cudy VPN Tab

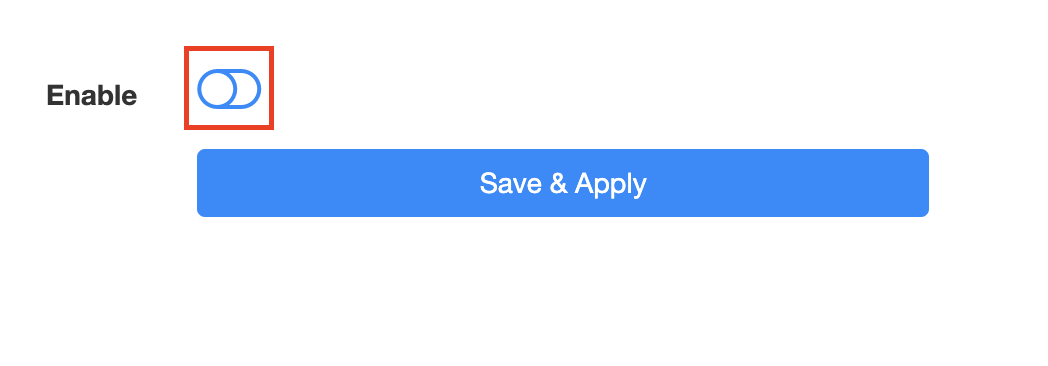
3. Toggle the Enable switch to On.

Cudy enable VPN

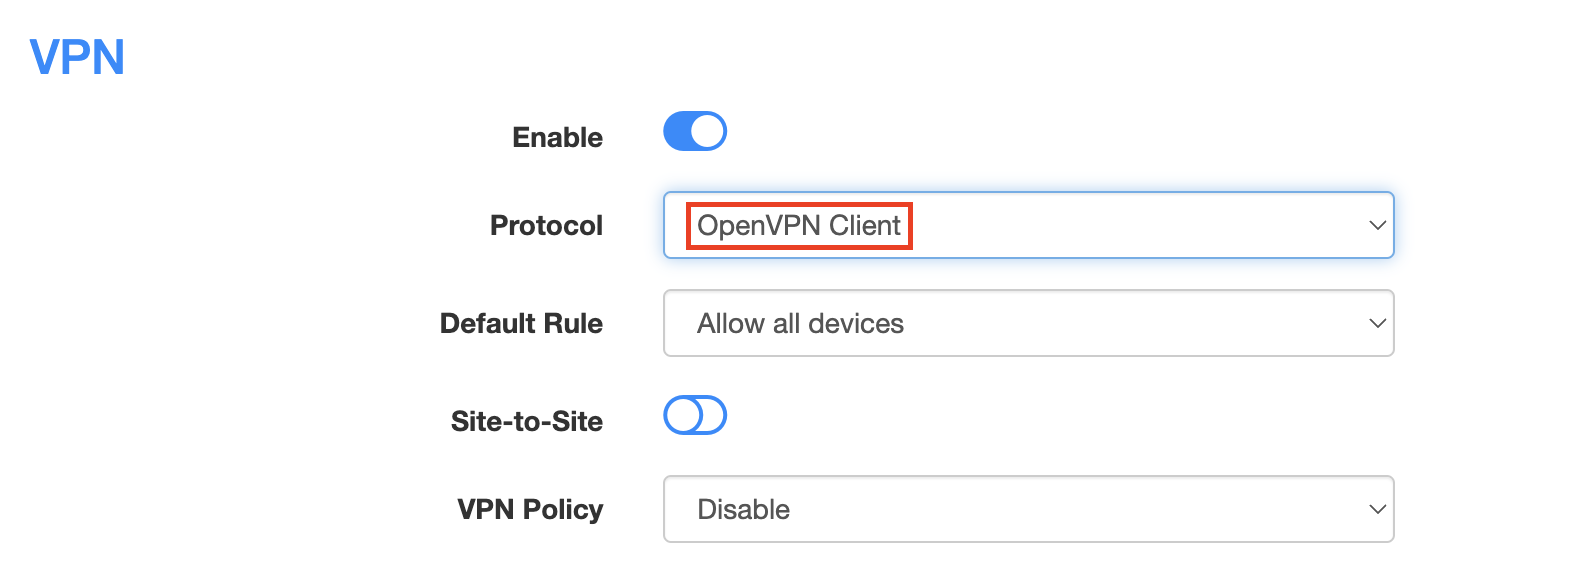
4. Select OpenVPN Client from the Protocol dropdown.

Cudy select OpenVPN Client

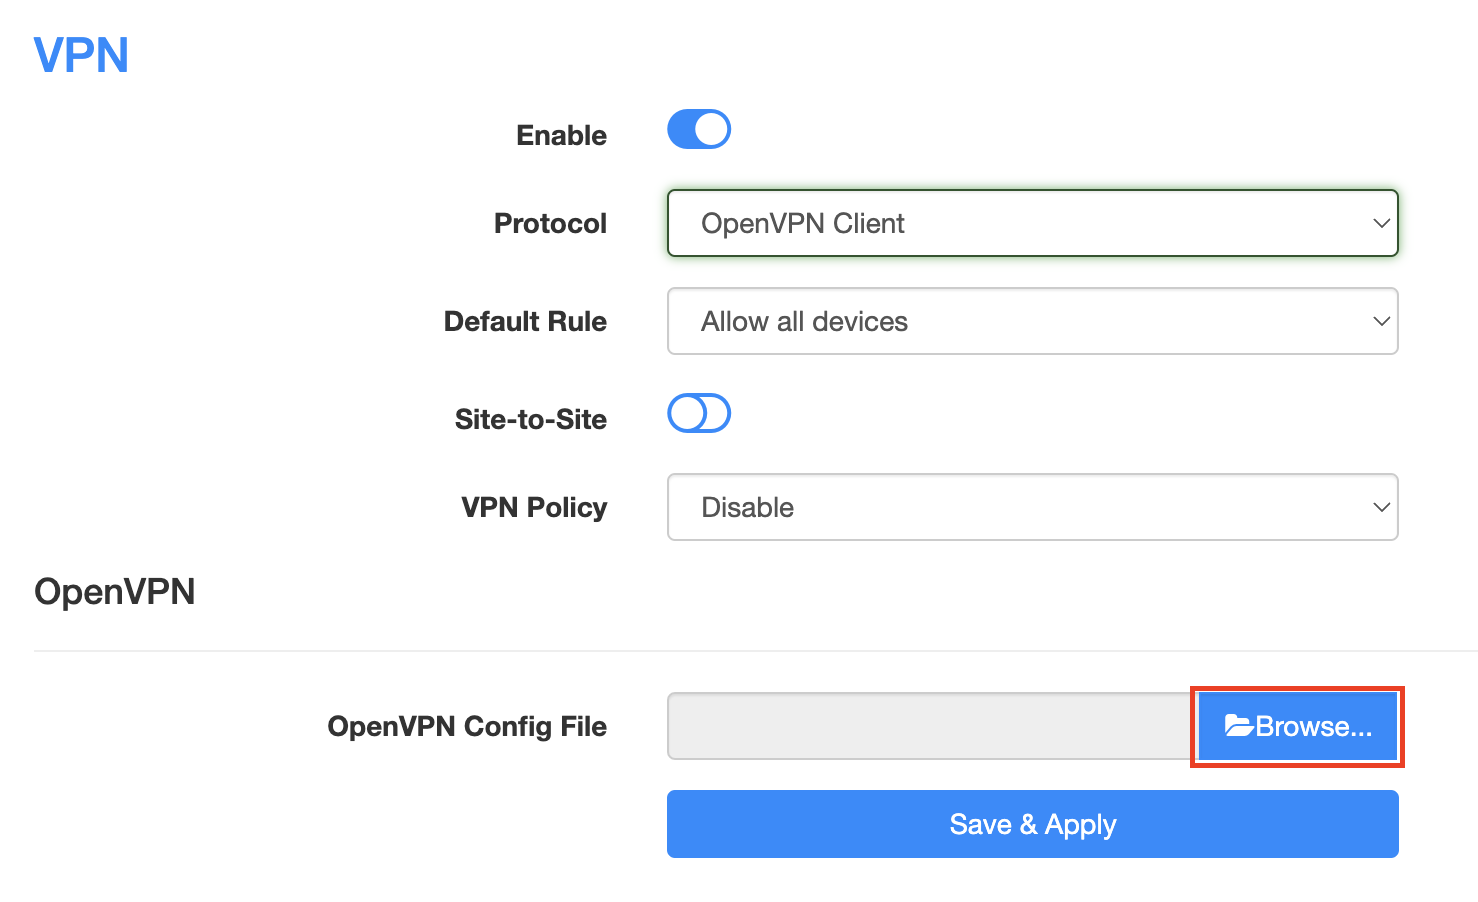
5. Click Browse and select the .ovpn file you downloaded earlier. You should see the server file name listed next to Current Config File after doing so.

Cudy OpenVPN Browse button

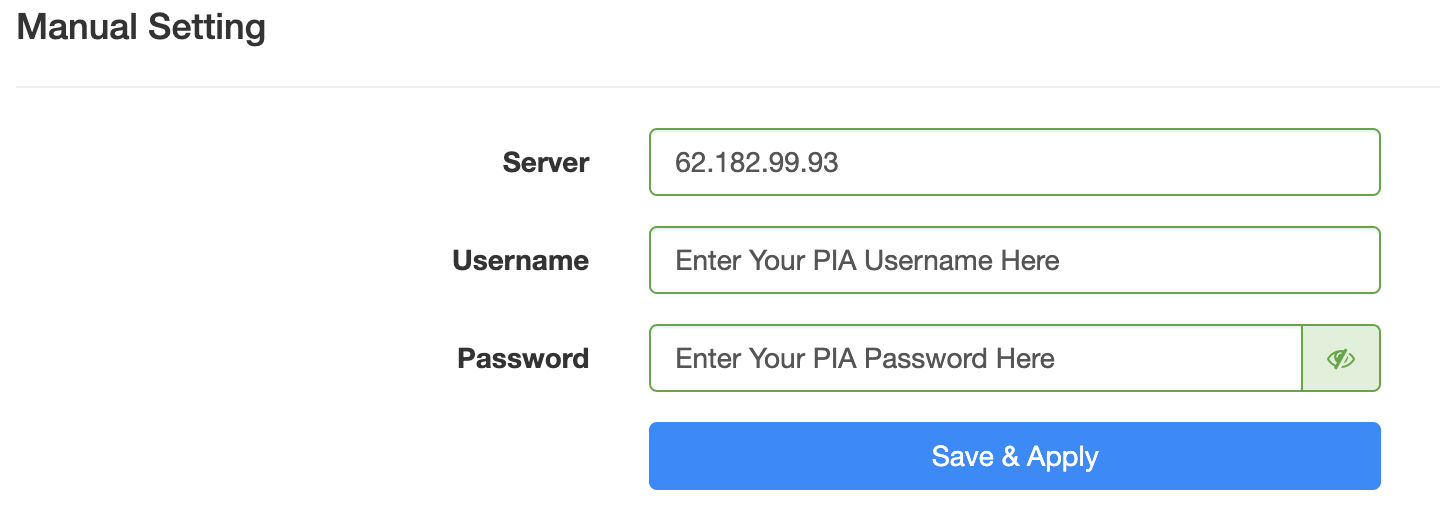
6. Enter your IPVanish account login email and password that you obtained earlier in the Username and Password.

Cudy IPVanish enter username and password

7. Click Save & Apply at the bottom of the page.

Verify a successful IPVanish connection

  1. You should now see a CONNECTED message.
  2. Visit IPVanish’s IP Check to verify your new IP address and virtual location.

In some cases you may notice that the location is not showing the same location as the server you have input in your router settings; this is because geo tracking tools are often tricked by VPN connections. As long as you see an IP address that is not the same as your normal Internet IP address then you are indeed connected to IPVanish.

How to change the IPVanish server

  1. Follow the steps at the top of the page to obtain a new .ovpn file.
  2. Then proceed with the settings same as initial setup.

TROUBLESHOOTING

Still having issues? Visit the VPN Troubleshooting section.

Troubleshoot Here

PrivateInternetAccess (PIA) Cudy OpenVPN Setup

TeamFlashRouters · Feb 29, 2024 ·

Preparing for PIA Cudy Setup

Download your PIA .ovpn file

If you are not already a PIA user Sign Up Now.

1. Log in to your account on the PIA website.

PIA login

2. Successfully log in with your account information then go to PIA’s OpenVPN Config Generator.

3. On the OpenVPN Configuration Generator select the following:

OpenVPN Version: OpenVPN 2.4 or newer

Select Platform: Linux

Select Region: Choose the server location you’d like to connect to

Select Port: Typically we recommend UDP/1198 RSA-2048 AES-128-CBC SHA1 for best speeds but feel free to select the one you want to use.

4. Click Generate to download the .ovpn file. Do not open this file once it is downloaded.

PIA Generate .ovpn file

Cudy Router Setup for PIA

Login to Cudy firmware settings in a browser on any computer or smart device connected to the Cudy FlashRouter’s network.

1. Click General Settings.

Cudy General Settings

2. Click VPN.

Cudy VPN Tab

3. Toggle the Enable switch to On.

Cudy enable VPN

4. Select OpenVPN Client from the Protocol dropdown.

Cudy select OpenVPN Client

5. Click Browse and select the .ovpn file you downloaded earlier. You should see the server file name listed next to Current Config File after doing so.

Cudy OpenVPN Browse button

6. Enter your PIA account login username and password in the Username and Password.

Cudy PIA enter username and password

7. Click Save & Apply at the bottom of the page.

Verify a successful PIA connection

  1. You should now see a CONNECTED message.
  2. Visit PIA’s IP Check to verify your new IP address and virtual location.

In some cases you may notice that the location is not showing the same location as the server you have input in your router settings; this is because geo tracking tools are often tricked by VPN connections. As long as you see an IP address that is not the same as your normal Internet IP address then you are indeed connected to PIA.

How to change the PIA server

  1. Follow the steps at the top of the page to obtain a new .ovpn file.
  2. Then proceed with the settings same as initial setup.

TROUBLESHOOTING

Still having issues? Visit the VPN Troubleshooting section.

Troubleshoot Here

PrivateInternetAccess (PIA) Manual OpenVPN Setup

TeamFlashRouters · Apr 5, 2019 ·

Preparing for Manual PIA Setup

Verify your PIA login information

If you are not already a PIA user Sign Up Now.

Log in to your account on the PIA website.

FlashRouters Privacy App - PIA Login

PIA Server Addresses

The below servers are the only servers compatible with PIA router connections. Dedicated IP Addresses are not able to connect via routers.

United States

us-california.privacy.network
us-newjersey.privacy.network
us-chicago.privacy.network
us-texas.privacy.network
us-florida.privacy.network
us-seattle.privacy.network
us3.privacy.network
us-siliconvalley.privacy.network
us-newyorkcity.privacy.network
us-washingtondc.privacy.network
us-atlanta.privacy.network
us-houston.privacy.network
us-denver.privacy.network

United Kingdom

uk-london.privacy.network
uk-manchester.privacy.network

Canada

ca-toronto.privacy.network
ca-montreal.privacy.network

Australia

au-sydney.privacy.network
aus-melbourne.privacy.network
aus-perth.privacy.network

Germany

de-berlin.privacy.network
de-frankfurt.privacy.network

Rest of the World

ae.privacy.network
austria.privacy.network
dz.privacy.network
ad.privacy.network
ar.privacy.network
yerevan.privacy.network
bahamas.privacy.network
bangladesh.privacy.network
brussels.privacy.network
sofia.privacy.network
cambodia.privacy.network
china.privacy.network
cyprus.privacy.network
czech.privacy.network
denmark.privacy.network
egypt.privacy.network
fi.privacy.network
france.privacy.network
georgia.privacy.network
greenland.privacy.network
hungary.privacy.network
is.privacy.network
in.privacy.network
iran.privacy.network
ireland.privacy.network
man.privacy.network
israel.privacy.network
italy.privacy.network
japan.privacy.network
kazakhstan.privacy.network
liechtenstein.privacy.network
lu.privacy.network
macau.privacy.network
malta.privacy.network
mexico.privacy.network
md.privacy.network
monaco.privacy.network
mongolia.privacy.network
montenegro.privacy.network
morocco.privacy.network
nl-amsterdam.privacy.network
nz.privacy.network
nigeria.privacy.network
no.privacy.network
panama.privacy.network
philippines.privacy.network
poland.privacy.network
qatar.privacy.network
ro.privacy.network
rs.privacy.network
saudiarabia.privacy.network
spain.privacy.network
srilanka.privacy.network
sweden.privacy.network
swiss.privacy.network
sg.privacy.network
tr.privacy.network
taiwan.privacy.network
ua.privacy.network
venezuela.privacy.network
vietnam.privacy.network
za.privacy.network

DD-WRT Router Setup for PIA

Navigate to Services > VPN

PIA offers two different Encryption levels.
Default Encryption (AES-128) typically provides faster speeds.
Strong Encryption (AES-256) provides stronger encryption.
Follow the table below of the one that fits your needs.

Enter PIA settings (Default Encryption)

OpenVPN Client

Start OpenVPN Client

If you wish to disable your VPN connection simply set this to Disable at any time and click Apply Settings.

Server IP/Name

Copy and paste the server you would like to connect to from the server list above. Be sure there are no extra spaces or characters.

If you wish to change PIA connection locations, THIS IS THE ONLY FIELD YOU NEED TO CHANGE.

Port

1198

Tunnel Device

TUN

Tunnel Protocol

UDP

Encryption cipher

AES-128-CBC

Hash Algorithm

SHA1

First Data Cipher

Not set

Second Data Cipher

Not set

Third Data Cipher

Not set

Userpass Authentication

Enable

Username

Enter the Username you successfully logged in to your PIA account with.

Password

Enter the Password you successfully logged in to your PIA account with.

Advanced Options

Enable

TLS Cipher

None

LZO Compression

Disabled

NAT

Enable

Firewall Protection

Enable

Additional Config

persist-key
persist-tun

Policy Based Routing

This field can be used for split VPN and Dual Gateway routing.

CA Cert

-----BEGIN CERTIFICATE-----
MIIFqzCCBJOgAwIBAgIJAKZ7D5Yv87qDMA0GCSqGSIb3DQEBDQUAMIHoMQswCQYD
VQQGEwJVUzELMAkGA1UECBMCQ0ExEzARBgNVBAcTCkxvc0FuZ2VsZXMxIDAeBgNV
BAoTF1ByaXZhdGUgSW50ZXJuZXQgQWNjZXNzMSAwHgYDVQQLExdQcml2YXRlIElu
dGVybmV0IEFjY2VzczEgMB4GA1UEAxMXUHJpdmF0ZSBJbnRlcm5ldCBBY2Nlc3Mx
IDAeBgNVBCkTF1ByaXZhdGUgSW50ZXJuZXQgQWNjZXNzMS8wLQYJKoZIhvcNAQkB
FiBzZWN1cmVAcHJpdmF0ZWludGVybmV0YWNjZXNzLmNvbTAeFw0xNDA0MTcxNzM1
MThaFw0zNDA0MTIxNzM1MThaMIHoMQswCQYDVQQGEwJVUzELMAkGA1UECBMCQ0Ex
EzARBgNVBAcTCkxvc0FuZ2VsZXMxIDAeBgNVBAoTF1ByaXZhdGUgSW50ZXJuZXQg
QWNjZXNzMSAwHgYDVQQLExdQcml2YXRlIEludGVybmV0IEFjY2VzczEgMB4GA1UE
AxMXUHJpdmF0ZSBJbnRlcm5ldCBBY2Nlc3MxIDAeBgNVBCkTF1ByaXZhdGUgSW50
ZXJuZXQgQWNjZXNzMS8wLQYJKoZIhvcNAQkBFiBzZWN1cmVAcHJpdmF0ZWludGVy
bmV0YWNjZXNzLmNvbTCCASIwDQYJKoZIhvcNAQEBBQADggEPADCCAQoCggEBAPXD
L1L9tX6DGf36liA7UBTy5I869z0UVo3lImfOs/GSiFKPtInlesP65577nd7UNzzX
lH/P/CnFPdBWlLp5ze3HRBCc/Avgr5CdMRkEsySL5GHBZsx6w2cayQ2EcRhVTwWp
cdldeNO+pPr9rIgPrtXqT4SWViTQRBeGM8CDxAyTopTsobjSiYZCF9Ta1gunl0G/
8Vfp+SXfYCC+ZzWvP+L1pFhPRqzQQ8k+wMZIovObK1s+nlwPaLyayzw9a8sUnvWB
/5rGPdIYnQWPgoNlLN9HpSmsAcw2z8DXI9pIxbr74cb3/HSfuYGOLkRqrOk6h4RC
OfuWoTrZup1uEOn+fw8CAwEAAaOCAVQwggFQMB0GA1UdDgQWBBQv63nQ/pJAt5tL
y8VJcbHe22ZOsjCCAR8GA1UdIwSCARYwggESgBQv63nQ/pJAt5tLy8VJcbHe22ZO
sqGB7qSB6zCB6DELMAkGA1UEBhMCVVMxCzAJBgNVBAgTAkNBMRMwEQYDVQQHEwpM
b3NBbmdlbGVzMSAwHgYDVQQKExdQcml2YXRlIEludGVybmV0IEFjY2VzczEgMB4G
A1UECxMXUHJpdmF0ZSBJbnRlcm5ldCBBY2Nlc3MxIDAeBgNVBAMTF1ByaXZhdGUg
SW50ZXJuZXQgQWNjZXNzMSAwHgYDVQQpExdQcml2YXRlIEludGVybmV0IEFjY2Vz
czEvMC0GCSqGSIb3DQEJARYgc2VjdXJlQHByaXZhdGVpbnRlcm5ldGFjY2Vzcy5j
b22CCQCmew+WL/O6gzAMBgNVHRMEBTADAQH/MA0GCSqGSIb3DQEBDQUAA4IBAQAn
a5PgrtxfwTumD4+3/SYvwoD66cB8IcK//h1mCzAduU8KgUXocLx7QgJWo9lnZ8xU
ryXvWab2usg4fqk7FPi00bED4f4qVQFVfGfPZIH9QQ7/48bPM9RyfzImZWUCenK3
7pdw4Bvgoys2rHLHbGen7f28knT2j/cbMxd78tQc20TIObGjo8+ISTRclSTRBtyC
GohseKYpTS9himFERpUgNtefvYHbn70mIOzfOJFTVqfrptf9jXa9N8Mpy3ayfodz
1wiqdteqFXkTYoSDctgKMiZ6GdocK9nMroQipIQtpnwd4yBDWIyC6Bvlkrq5TQUt
YDQ8z9v+DMO6iwyIDRiU
-----END CERTIFICATE-----

CLICK APPLY SETTINGS

Leave all settings not mentioned above as their default setting.

Enter PIA settings (Strong Encryption)

OpenVPN Client

Start OpenVPN Client

If you wish to disable your VPN connection simply set this to Disable at any time and click Apply Settings.

Server IP/Name

Copy and paste the server you would like to connect to from the server list above. Be sure there are no extra spaces or characters.

If you wish to change PIA connection locations, THIS IS THE ONLY FIELD YOU NEED TO CHANGE.

Port

1197

Tunnel Device

TUN

Tunnel Protocol

UDP

Encryption cipher

AES-256-CBC

Hash Algorithm

SHA256

First Data Cipher

Not set

Second Data Cipher

Not set

Third Data Cipher

Not set

Userpass Authentication

Enable

Username

Enter the Username you successfully logged in to your PIA account with.

Password

Enter the Password you successfully logged in to your PIA account with.

Advanced Options

Enable

TLS Cipher

None

LZO Compression

Adaptive

NAT

Enable

Firewall Protection

Enable

Additional Config

persist-key
persist-tun

Policy Based Routing

This field can be used for split VPN and Dual Gateway routing.

CA Cert

-----BEGIN CERTIFICATE-----
MIIHqzCCBZOgAwIBAgIJAJ0u+vODZJntMA0GCSqGSIb3DQEBDQUAMIHoMQswCQYD
VQQGEwJVUzELMAkGA1UECBMCQ0ExEzARBgNVBAcTCkxvc0FuZ2VsZXMxIDAeBgNV
BAoTF1ByaXZhdGUgSW50ZXJuZXQgQWNjZXNzMSAwHgYDVQQLExdQcml2YXRlIElu
dGVybmV0IEFjY2VzczEgMB4GA1UEAxMXUHJpdmF0ZSBJbnRlcm5ldCBBY2Nlc3Mx
IDAeBgNVBCkTF1ByaXZhdGUgSW50ZXJuZXQgQWNjZXNzMS8wLQYJKoZIhvcNAQkB
FiBzZWN1cmVAcHJpdmF0ZWludGVybmV0YWNjZXNzLmNvbTAeFw0xNDA0MTcxNzQw
MzNaFw0zNDA0MTIxNzQwMzNaMIHoMQswCQYDVQQGEwJVUzELMAkGA1UECBMCQ0Ex
EzARBgNVBAcTCkxvc0FuZ2VsZXMxIDAeBgNVBAoTF1ByaXZhdGUgSW50ZXJuZXQg
QWNjZXNzMSAwHgYDVQQLExdQcml2YXRlIEludGVybmV0IEFjY2VzczEgMB4GA1UE
AxMXUHJpdmF0ZSBJbnRlcm5ldCBBY2Nlc3MxIDAeBgNVBCkTF1ByaXZhdGUgSW50
ZXJuZXQgQWNjZXNzMS8wLQYJKoZIhvcNAQkBFiBzZWN1cmVAcHJpdmF0ZWludGVy
bmV0YWNjZXNzLmNvbTCCAiIwDQYJKoZIhvcNAQEBBQADggIPADCCAgoCggIBALVk
hjumaqBbL8aSgj6xbX1QPTfTd1qHsAZd2B97m8Vw31c/2yQgZNf5qZY0+jOIHULN
De4R9TIvyBEbvnAg/OkPw8n/+ScgYOeH876VUXzjLDBnDb8DLr/+w9oVsuDeFJ9K
V2UFM1OYX0SnkHnrYAN2QLF98ESK4NCSU01h5zkcgmQ+qKSfA9Ny0/UpsKPBFqsQ
25NvjDWFhCpeqCHKUJ4Be27CDbSl7lAkBuHMPHJs8f8xPgAbHRXZOxVCpayZ2SND
fCwsnGWpWFoMGvdMbygngCn6jA/W1VSFOlRlfLuuGe7QFfDwA0jaLCxuWt/BgZyl
p7tAzYKR8lnWmtUCPm4+BtjyVDYtDCiGBD9Z4P13RFWvJHw5aapx/5W/CuvVyI7p
Kwvc2IT+KPxCUhH1XI8ca5RN3C9NoPJJf6qpg4g0rJH3aaWkoMRrYvQ+5PXXYUzj
tRHImghRGd/ydERYoAZXuGSbPkm9Y/p2X8unLcW+F0xpJD98+ZI+tzSsI99Zs5wi
jSUGYr9/j18KHFTMQ8n+1jauc5bCCegN27dPeKXNSZ5riXFL2XX6BkY68y58UaNz
meGMiUL9BOV1iV+PMb7B7PYs7oFLjAhh0EdyvfHkrh/ZV9BEhtFa7yXp8XR0J6vz
1YV9R6DYJmLjOEbhU8N0gc3tZm4Qz39lIIG6w3FDAgMBAAGjggFUMIIBUDAdBgNV
HQ4EFgQUrsRtyWJftjpdRM0+925Y6Cl08SUwggEfBgNVHSMEggEWMIIBEoAUrsRt
yWJftjpdRM0+925Y6Cl08SWhge6kgeswgegxCzAJBgNVBAYTAlVTMQswCQYDVQQI
EwJDQTETMBEGA1UEBxMKTG9zQW5nZWxlczEgMB4GA1UEChMXUHJpdmF0ZSBJbnRl
cm5ldCBBY2Nlc3MxIDAeBgNVBAsTF1ByaXZhdGUgSW50ZXJuZXQgQWNjZXNzMSAw
HgYDVQQDExdQcml2YXRlIEludGVybmV0IEFjY2VzczEgMB4GA1UEKRMXUHJpdmF0
ZSBJbnRlcm5ldCBBY2Nlc3MxLzAtBgkqhkiG9w0BCQEWIHNlY3VyZUBwcml2YXRl
aW50ZXJuZXRhY2Nlc3MuY29tggkAnS7684Nkme0wDAYDVR0TBAUwAwEB/zANBgkq
hkiG9w0BAQ0FAAOCAgEAJsfhsPk3r8kLXLxY+v+vHzbr4ufNtqnL9/1Uuf8NrsCt
pXAoyZ0YqfbkWx3NHTZ7OE9ZRhdMP/RqHQE1p4N4Sa1nZKhTKasV6KhHDqSCt/dv
Em89xWm2MVA7nyzQxVlHa9AkcBaemcXEiyT19XdpiXOP4Vhs+J1R5m8zQOxZlV1G
tF9vsXmJqWZpOVPmZ8f35BCsYPvv4yMewnrtAC8PFEK/bOPeYcKN50bol22QYaZu
LfpkHfNiFTnfMh8sl/ablPyNY7DUNiP5DRcMdIwmfGQxR5WEQoHL3yPJ42LkB5zs
6jIm26DGNXfwura/mi105+ENH1CaROtRYwkiHb08U6qLXXJz80mWJkT90nr8Asj3
5xN2cUppg74nG3YVav/38P48T56hG1NHbYF5uOCske19F6wi9maUoto/3vEr0rnX
JUp2KODmKdvBI7co245lHBABWikk8VfejQSlCtDBXn644ZMtAdoxKNfR2WTFVEwJ
iyd1Fzx0yujuiXDROLhISLQDRjVVAvawrAtLZWYK31bY7KlezPlQnl/D9Asxe85l
8jO5+0LdJ6VyOs/Hd4w52alDW/MFySDZSfQHMTIc30hLBJ8OnCEIvluVQQ2UQvoW
+no177N9L2Y+M9TcTA62ZyMXShHQGeh20rb4kK8f+iFX8NxtdHVSkxMEFSfDDyQ=
-----END CERTIFICATE-----

CLICK APPLY SETTINGS

Leave all settings not mentioned above as their default setting.

Verify a successful PIA connection

Navigate to Status > OpenVPN

  1. You should now see a CONNECTED SUCCESS message.
  2. Visit PIA’s IP Check to verify your new IP address and virtual location.

In some cases you may notice that the location is not showing the same location as the server you have input in your router settings; this is because geo tracking tools are often tricked by VPN connections. As long as you see an IP address that is not the same as your normal Internet IP address then you are indeed connected to PIA.

Back up your settings

Navigate to Administration > Backup

  1. Click the Backup button.
  2. A file named nvrambak.bin will be saved to your computer.
  3. You can load nvrambak.bin to restore your settings in the event of a reset.

How to change the PIA server

  1. Copy the new PIA server address from the above server list.
  2. Paste the server into the Server IP/Name field.
  3. Click Apply Settings.

TROUBLESHOOTING

Still having issues? Visit the VPN Troubleshooting section.

Troubleshoot Here

NordVPN Setup for AsusWRT Firmware Routers

TeamFlashRouters · Oct 15, 2025 ·

You can connect to NordVPN on your AsusWRT router using NordLynx, OpenVPN, or a Dedicated IP.

Quick Options

  • NordLynx: Choose your preferred country from NordVPN’s server list

  • OpenVPN: Choose your preferred city or country from NordVPN’s server list.

  • Dedicated IP (optional): Enter your unique configuration file if you’ve been assigned a static NordVPN IP.

:point_right: If you are not already a NordVPN user Sign Up Now.

NordVPN NordLynx Setup for AsusWRT

1. Get your NordVPN Access Token for NordLynx connections. Log in to your NordVPN account and select NordVPN from your list of Services.

NordVPN Services Section

2. At the bottom of the page click Get Access token and you will receive a code via email. Enter this code to proceed.

NordVPN Access Token

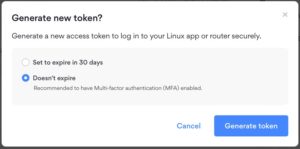
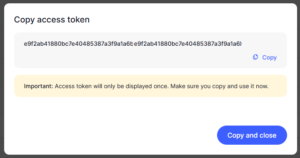
3. After you enter the email code select Generate new token and set it to Doesn’t expire. Copy this token.

NordVPN Generate new token
NordVPN Copy Token

4. Log in to the Asus settings page by connecting to the Asus router’s WiFi (or wired LAN) on your computer. Then, enter 192.168.50.1 or asusrouter.com in the browser.

View our guide for more instructions on how to access AsusWRT firmware settings.

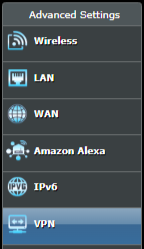
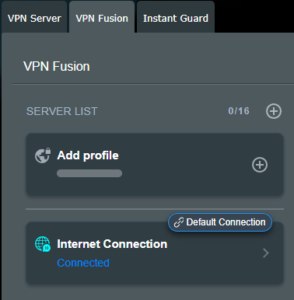
5. Navigate to the VPN tab and then select the VPN Fusion tab, then click Add profile.

Click the VPN Button
VPN Fusion Add Profile

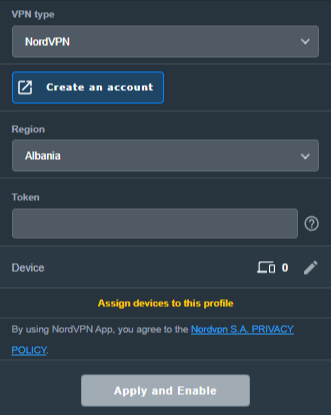
6. Fill in your NordVPN information, then click Apply and Enable.

  • Connection Name: Choose a name for your NordLynx connection.
  • VPN Type: Select NordVPN
  • Region: Choose your VPN server location
  • Token: Copy and paste your NordVPN token.
Apply NordLynx Settings

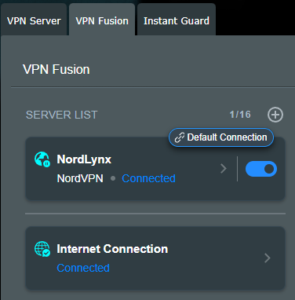
6. You should now see the Profile say Connected, indicating that the NordVPN server is successfully connected to your router!

VPN Fusion NordLynx Connected

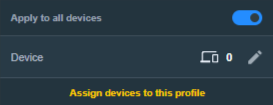
7. The VPN connection is automatically set to Apply to all devices.

If you only want certain devices to connect to the VPN, then turn off the VPN connection and switch off Apply to all devices.

Now click the pencil next to the Device section and select the devices (computer, phone, etc.) that you want to connect to VPN. Click OK and then click Apply all settings.

Apply VPN by Device

NordVPN OpenVPN Setup for AsusWRT

1. Get your NordVPN manual service credentials for OpenVPN connections. Log in to your NordVPN account and select NordVPN from your list of Services.

NordVPN Services Section

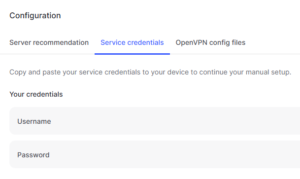
2. At the bottom of the page in the Manual Setup section click Setup NordVPN manually then under the Configuration section go to Service credentials. Click Verify email to receive a code via email and enter the code to view and copy your credentials.

NordVPN Manual OpenVPN
NordVPN Service Credentials

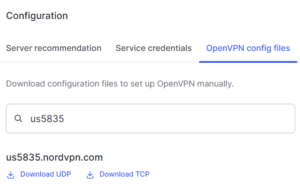
3. Click on OpenVPN config files. Search and download the server file for your preferred NordVPN location, UDP is recommended.

NordVPN OpenVPN Config Files

4. Log in to the Asus settings page by connecting to the Asus router’s WiFi (or wired LAN) on your computer. Then, enter 192.168.50.1 or asusrouter.com in the browser.

View our guide for more instructions on how to access AsusWRT firmware settings.

5. Navigate to the VPN tab and then click on the VPN Fusion tab, then click Add Profile.

Click the VPN Button
VPN Fusion Add Profile

6. Fill in your NordVPN information then click Apply and Enable.

  • Connection Name: Choose a name for your NordVPN OpenVPN connection.
  • VPN Type: Select OpenVPN
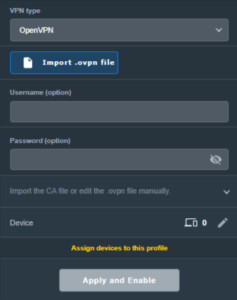
  • Import .ovpn File: Upload the OpenVPN file that you downloaded.
  • Username and Password: Copy and paste your NordVPN manual service credentials.
AsusWRT OpenVPN Connection File Load

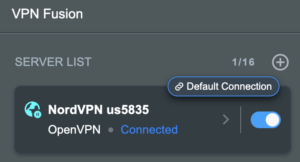
6. You should now see the Profile say Connected, indicating that the NordVPN server is successfully connected to your router!

Asus NordVPN Connected

7. The VPN connection is automatically set to Apply to all devices.

If you only want certain devices to connect to the VPN, then turn off the VPN connection and switch off Apply to all devices.

Now click the pencil next to the Device section and select the devices (computer, phone, etc.) that you want to connect to VPN. Click OK and then click Apply all settings.

Apply VPN by Device

NordVPN Dedicated IP Setup for AsusWRT

1. Get your NordVPN manual service credentials for OpenVPN connections. Log in to your NordVPN account and select NordVPN from your list of Services.

NordVPN Services Section

2. At the bottom of the page in the Manual Setup section click Setup NordVPN manually then under the Configuration section go to Service credentials. Click Verify email to receive a code via email and enter the code to view and copy your credentials.

NordVPN Manual OpenVPN
NordVPN Service Credentials

3. Now download your Dedicated IP configuration file from the NordVPN website.

4. Log in to the Asus settings page by connecting to the Asus router’s WiFi (or wired LAN) on your computer. Then, enter 192.168.50.1 or asusrouter.com in the browser.

View our guide for more instructions on how to access AsusWRT firmware settings.

5. Navigate to the VPN tab then click on the VPN Fusion tab, then click Add Profile.

Click the VPN Button
VPN Fusion Add Profile

6. Fill in your NordVPN information then click Apply and Enable.

  • Connection Name: Choose a name for your NordVPN Dedicated IP connection.
  • VPN Type: Select OpenVPN
  • Import .ovpn File: Upload the Dedicated IP OpenVPN file that you downloaded.
  • Username and Password: Copy and paste your NordVPN manual service credentials.
AsusWRT OpenVPN Connection File Load

6. You should now see the Profile say Connected, indicating that the NordVPN server is successfully connected to your router!

Asus NordVPN Connected

7. The VPN connection is automatically set to Apply to all devices.

If you only want certain devices to connect to the VPN, then turn off the VPN connection and switch off Apply to all devices.

Now click the pencil next to the Device section and select the devices (computer, phone, etc.) that you want to connect to VPN. Click OK and then click Apply all settings.

Apply VPN by Device
  1. Connect your devices to the Asus router network and visit the NordVPN website, at the top it should display Your Status: Protected.
  2. Visit NordVPN’s IP Check to verify your new IP address and virtual location.

🚫📱Do not run NordVPN apps on devices connected to your NordVPN router. Using the app at the same time as the router VPN may cause conflicts and connection issues.

Still having issues?

Feel free to submit a ticket and we will get back to you as soon as possible.

VPN Director for Asus Merlin

TeamFlashRouters · Jan 19, 2022 ·

Once you have OpenVPN connected on your Merlin FlashRouter you can manage your VPN connections by device or by VPN servers or even VPN providers. This is a major advantage of Asus Merlin firmware as it allows up to 5 VPN connections at the same.

Login to Asus Merlin firmware settings in a browser on any computer or smart device.

Setup multiple VPN clients

1. Under Advanced Settings select VPN.

2. Click the VPN Client tab.

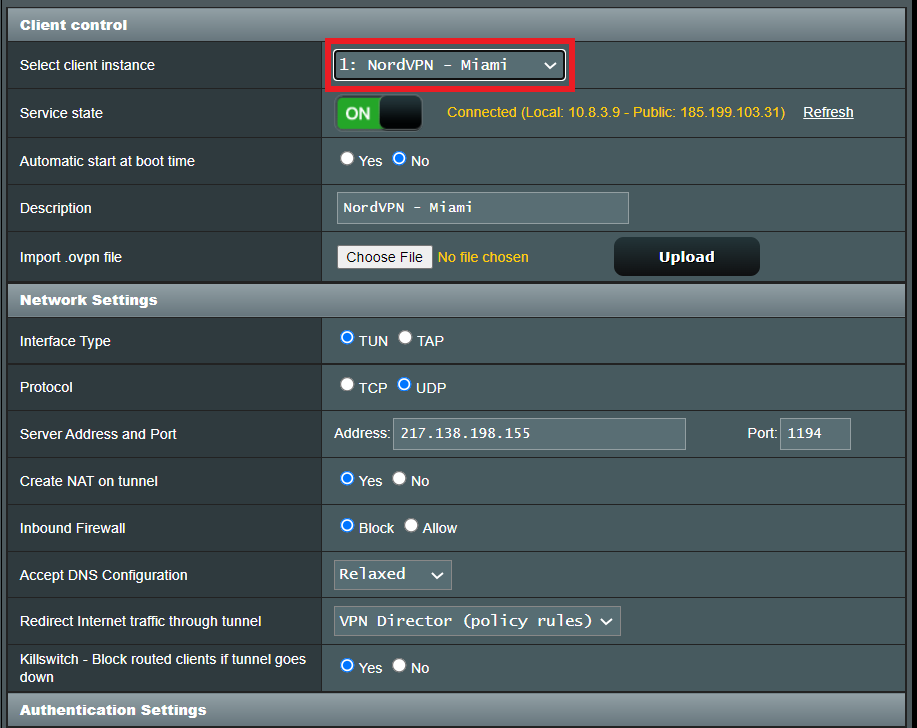
3. In the Select Client instance dropdown select a new client instance to setup and follow your VPN providers setup guide.

VPN Director select client instance

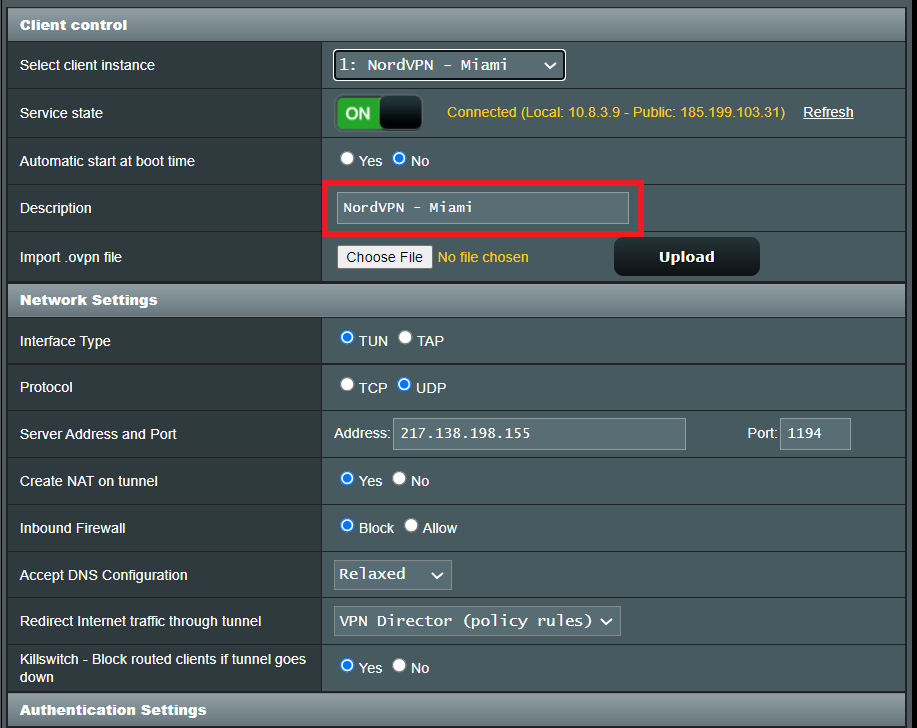
4. Name the client in the Description field for more clarity for which server or provider is being setup.

VPN Director Description

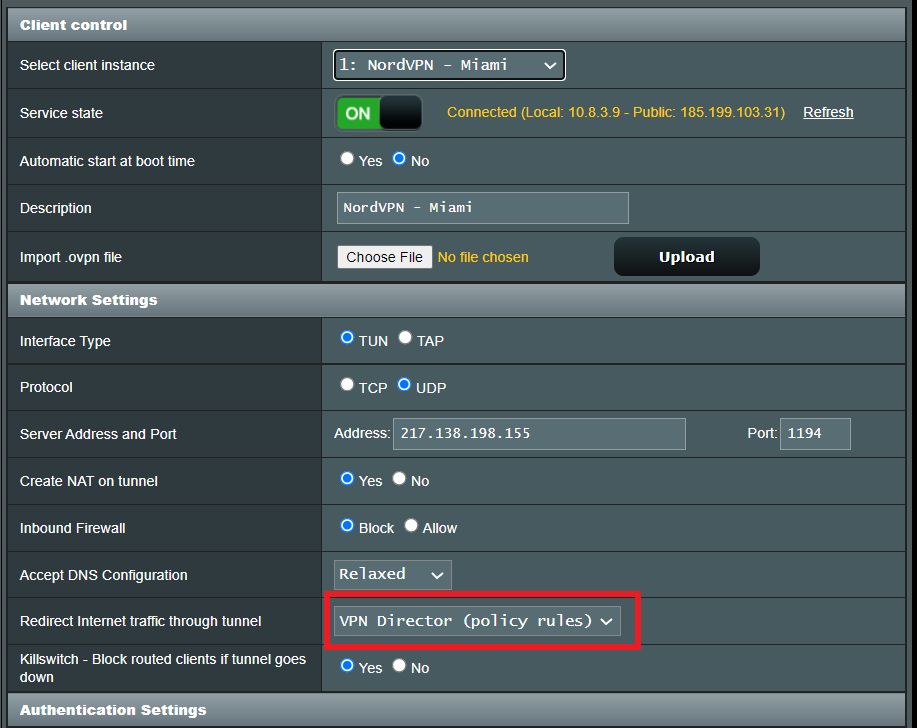
5. Set the Redirect Internet traffic through tunnel dropdown to VPN Director.

VPN Director Policy

Start or Stop VPN Client

1. Under Advanced Settings select VPN.

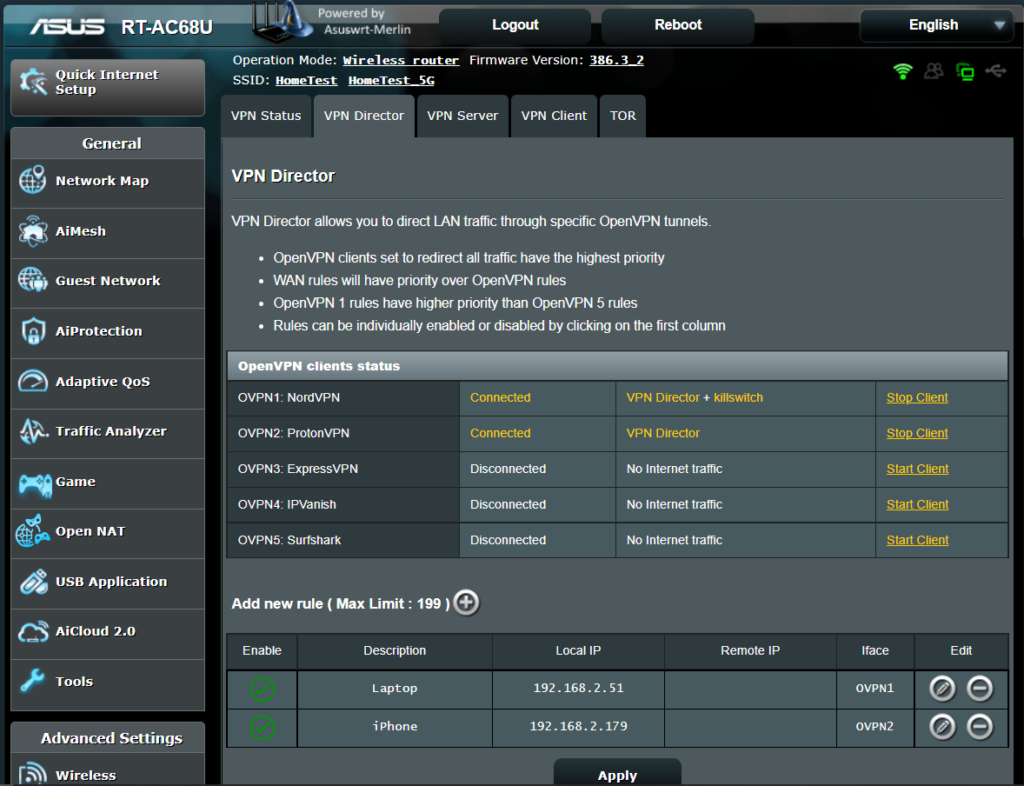
2. Click the VPN Director tab.

Merlin VPN Director

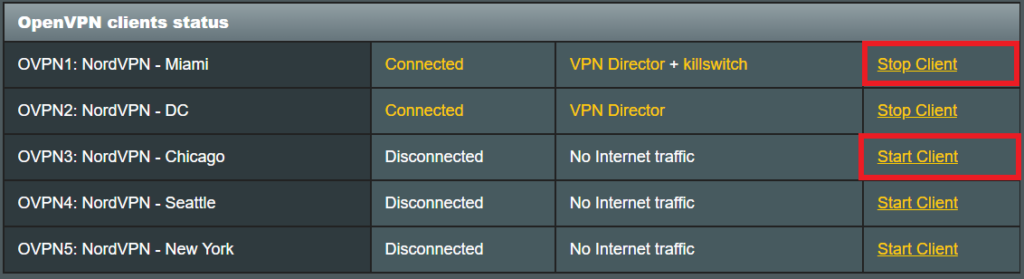
3. With multiple VPN clients connected you can start and stop them as needed from this page.

VPN Director

Assign a device to a specific VPN client

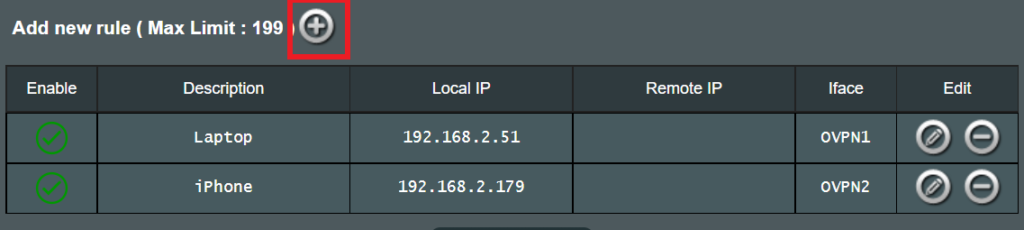
1. On the VPN Director page click the + symbol next to Add new rule.

VPN direct add new rule

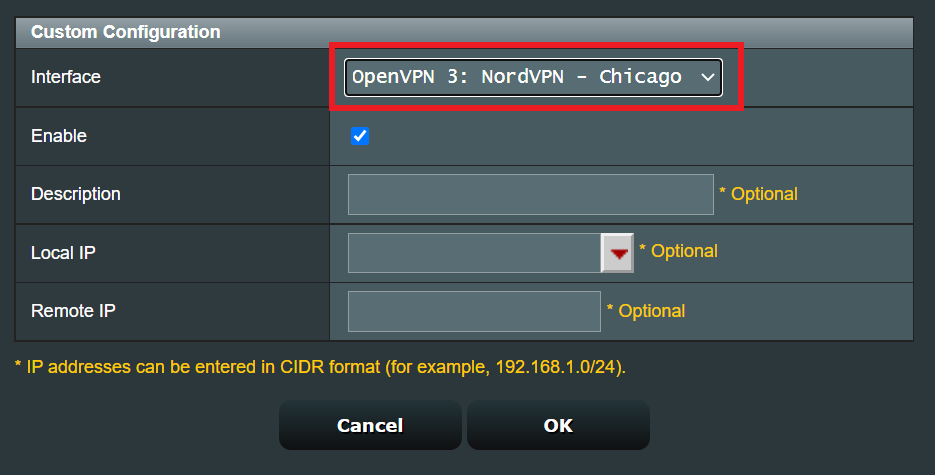
2. Select the Interface that you want to add the device to.

VPN director select interface

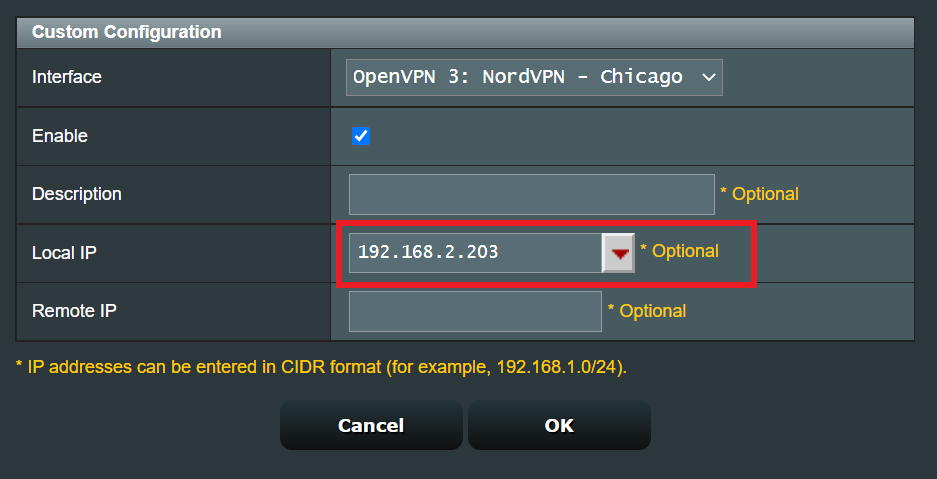
3. Click the Local IP dropdown and a full list of devices connected to the Merlin FlashRouter should appear. Select the device you want to assign to this VPN client.

VPN director select device

4. Click OK and click Apply.

NordVPN Manual OpenVPN Setup

TeamFlashRouters · Apr 8, 2019 ·

Preparing for Manual NordVPN Setup

Verify your NordVPN login information

If you are not already an NordVPN user Sign Up Now.

Log in to your account on the NordVPN website.

NordVPN Server Addresses

For a NordVPN server recommendation visit their Recommend Server page.

Once you have selected the server you want to connect to, download the UDP .ovpn file containing the Server IP Address, TLS Auth Key, and CA Cert referenced below.

Open the .ovpn file that is downloaded to your computer with NotePad++ for Windows or TextEdit for Apple. You will only need the Server IP Address, TLS Auth Key, and CA Cert from this file. All NordVPN servers and .ovpn files have different IP Addresses, keys, and certificates.

DD-WRT Router Setup for NordVPN

Navigate to Services > VPN

Enter NordVPN settings

OpenVPN Client

Start OpenVPN Client

If you wish to disable your VPN connection simply set this to Disable at any time and click Apply Settings.

Server IP/Name

At the top of the .ovpn file you downloaded above, there is a line e.g.:
remote 206.226.72.27 1194
206.226.72.27 is your NordVPN server IP address. Enter the IP Address in this field.

Port

1194

Tunnel Device

TUN

Tunnel Protocol

UDP

Encryption cipher

AES-256-CBC

Hash Algorithm

SHA512

Userpass Authentication

Enable

Username

Enter the Username you successfully logged in to your NordVPN account with.

Password

Enter the Password you successfully logged in to your NordVPN account with.

Advanced Options

Enable

TLS Cipher

None

LZO Compression

Adaptive

NAT

Enable

Firewall Protection

Enable

TLS Auth Key

In the .ovpn file copy and paste all contents in between the <tls-auth> and </tls-auth> lines from your .ovpn file starting and ending with:
—–BEGIN OpenVPN Static key V1—–
…
—–END OpenVPN Static key V1—–

Additional Config

tun-mtu-extra 32
mssfix 1450
persist-key
persist-tun

Policy Based Routing

This field can be used for split VPN and Dual Gateway routing.

CA Cert

In the .ovpn file Copy and Paste all contents in between the <ca> and </ca> lines from your .ovpn file starting and ending with:
—–BEGIN CERTIFICATE—–
…
—–END CERTIFICATE—–

CLICK APPLY SETTINGS

Leave all settings not mentioned above as their default setting.

Verify a successful NordVPN connection

Navigate to Status > OpenVPN

  1. You should now see a CONNECTED SUCCESS message.
  2. Visit NordVPN’s website to verify your new IP address, virtual location, and status as Protected at the top of the page.

In some cases you may notice that the location is not showing the same location as the server you have input in your router settings; this is because geo tracking tools are often tricked by VPN connections. As long as you see an IP address that is not the same as your normal Internet IP address then you are indeed connected to NordVPN.

Back up your settings

Navigate to Administration > Backup

  1. Click the Backup button.
  2. A file named nvrambak.bin will be saved to your computer.
  3. You can load nvrambak.bin to restore your settings in the event of a reset.

How to change the NordVPN server

  1. Download and open a new .ovpn file from NordVPN.
  2. Copy and paste the server IP Address into the Server IP/Name field.
  3. Copy and paste the TLS Auth Key into the TLS Auth Key field.
  4. Copy and paste the CA Cert into the CA Cert field.
  5. Click Apply Settings.

TROUBLESHOOTING

Still having issues? Visit the VPN Troubleshooting section.

Troubleshoot Here

NordVPN Setup on Roqos

TeamFlashRouters · Dec 24, 2021 ·

Preparing for NordVPN Setup

Obtain your NordVPN manual Username and Password

If you are not already a NordVPN user Sign Up Now.

1. Log in to your account on the NordVPN website.

NordVPN login

2. Click NordVPN on the left hand side and then click Setup NordVPN manually.

NordVPN setup manually

3. Enter in the verification code that was sent to your email.

NordVPN verify code

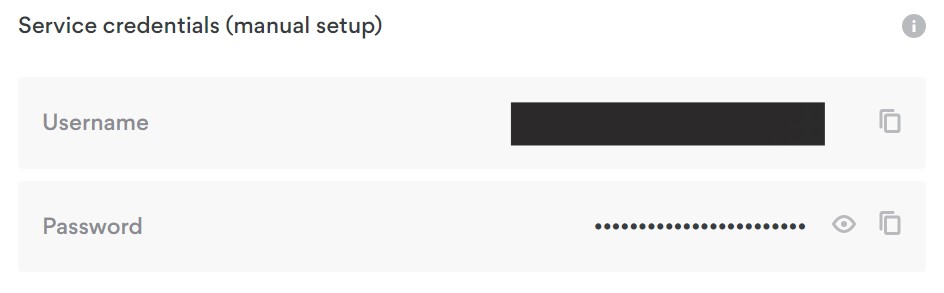
4. Copy and paste your NordVPN manual username and password to a secure location. This is the username and password you will enter into the router settings to connect to NordVPN.

NordVPN credentials

Connecting to NordVPN in the Roqos Core

Access the Roqos Core UI

1. Login to the Roqos Core web app in a browser on any computer or smart device.

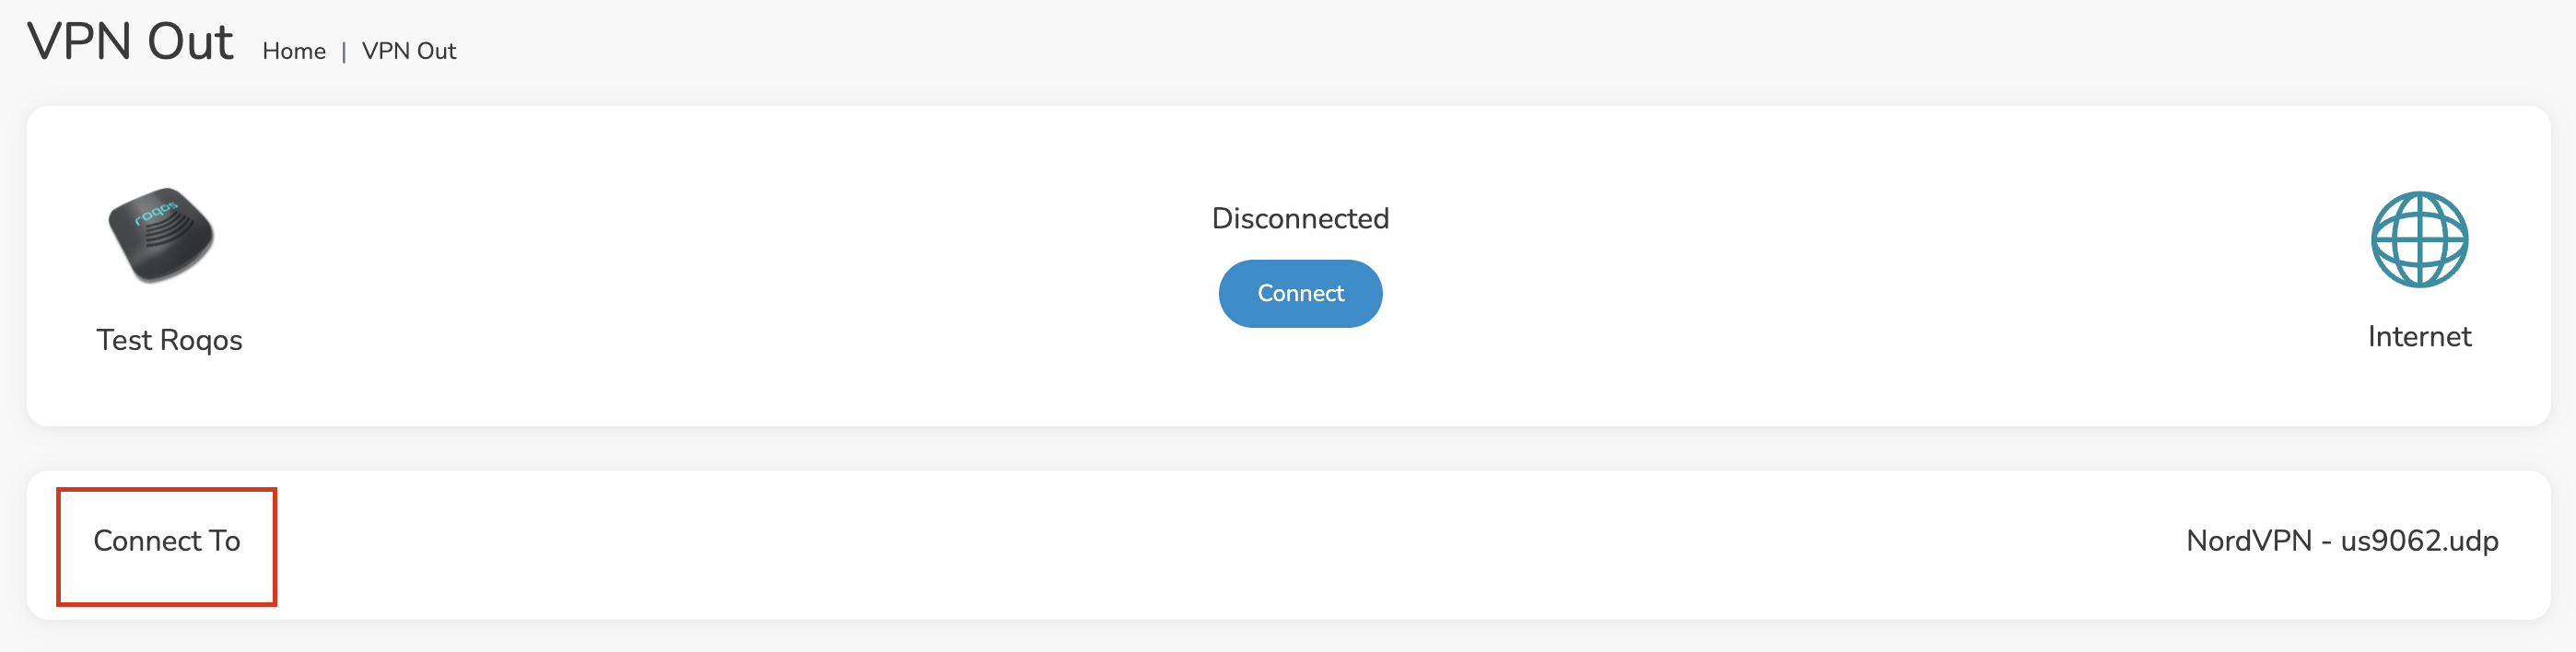
2. Click VPN from the navigation menu and then click VPN OUT.

Roqos VPN Out

3. Click the Connect to box.

Roqos NordVPN Connect to

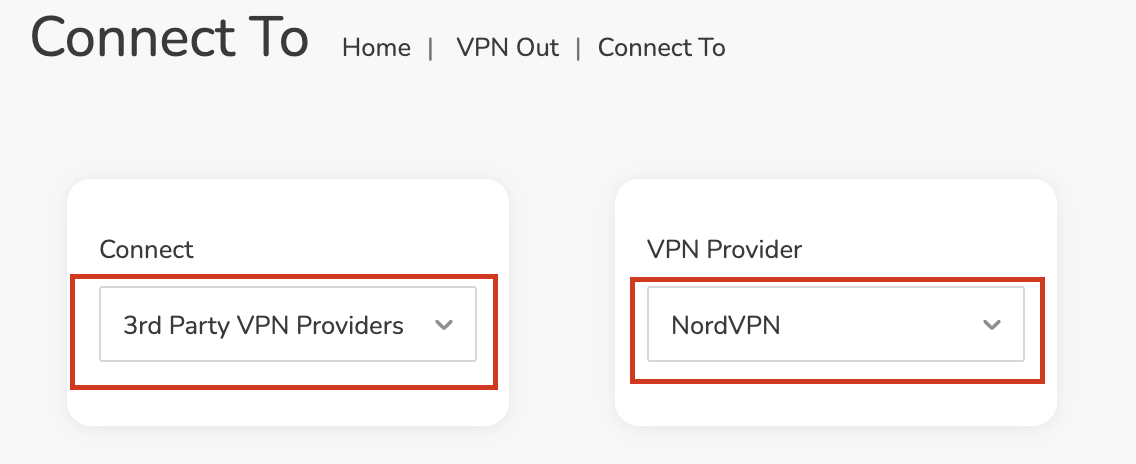
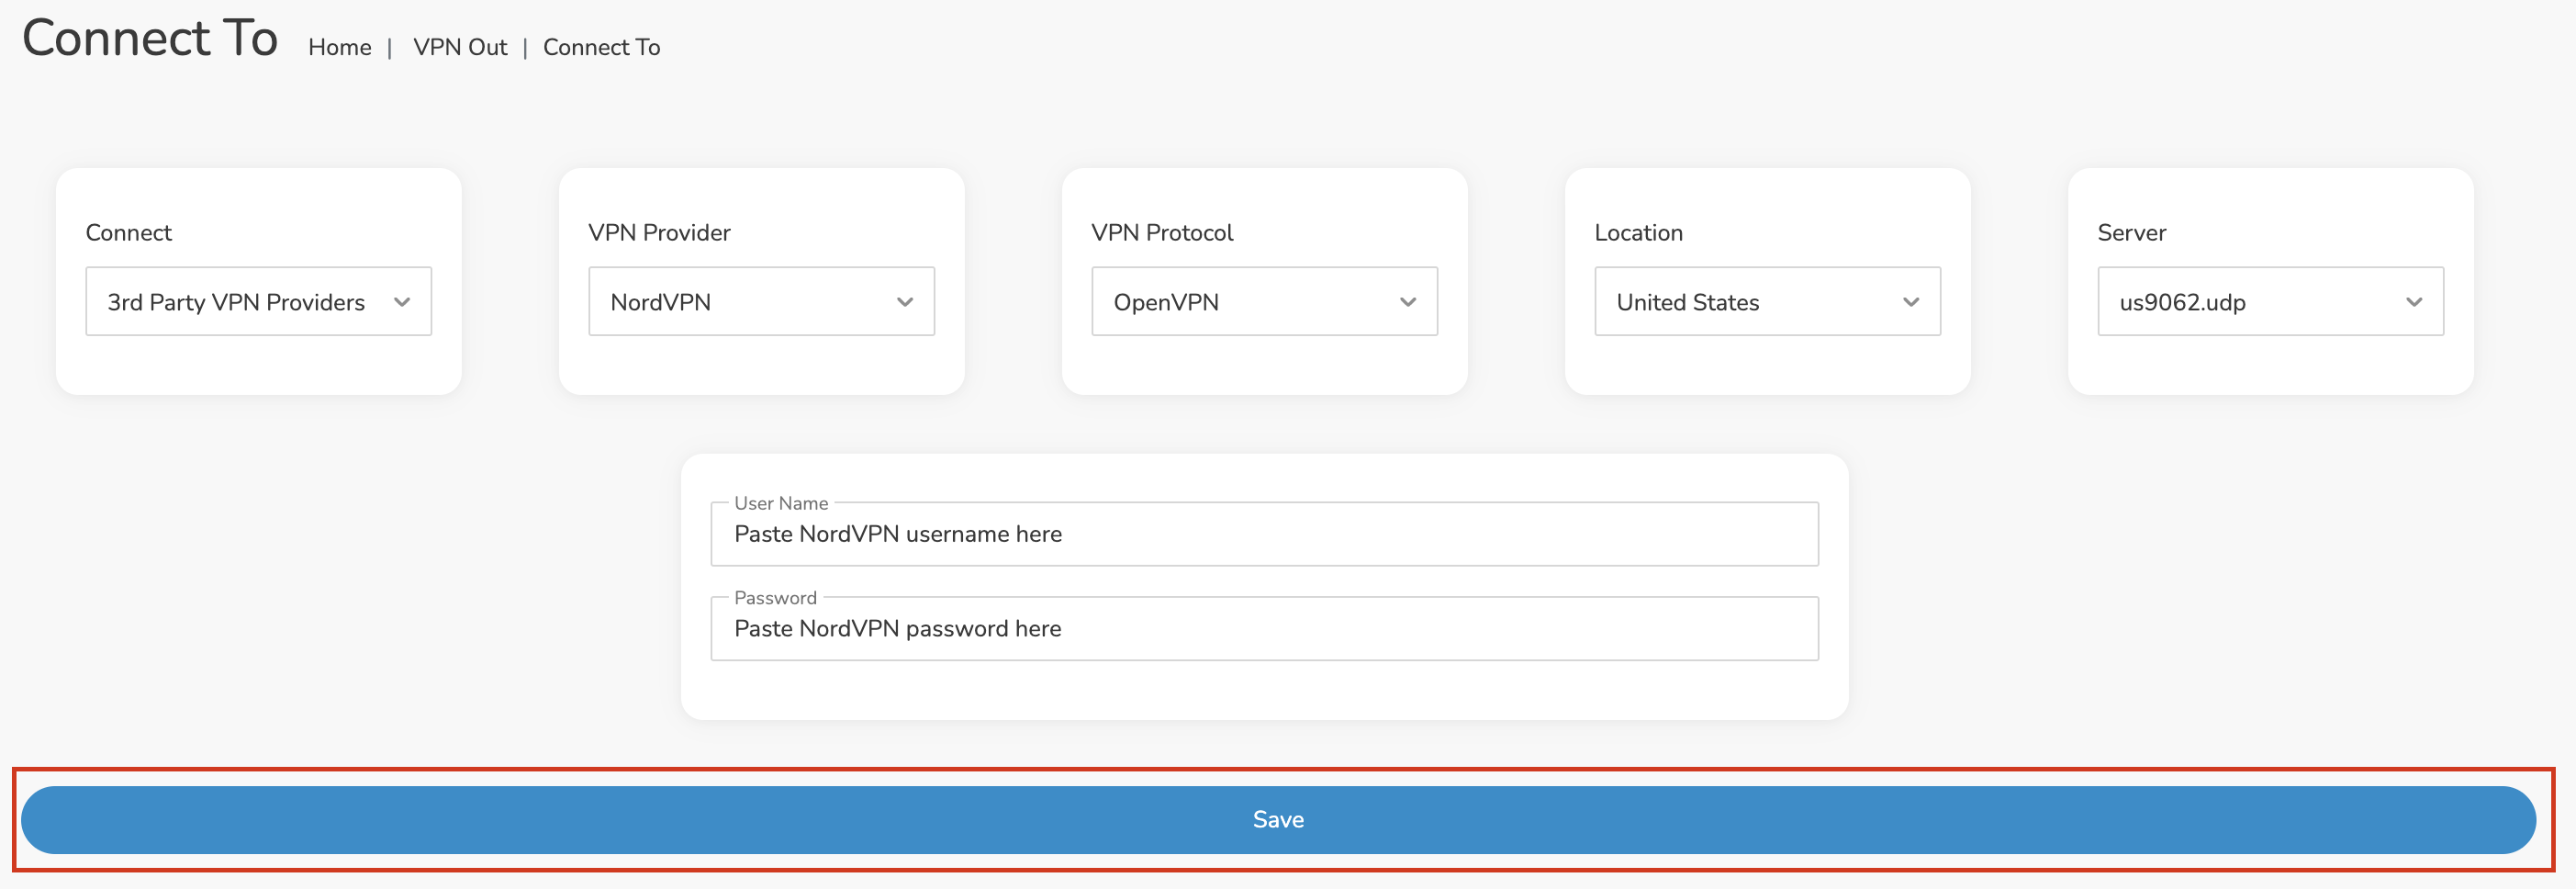
4. In the Connect dropdown choose 3rd Party VPN Providers and for the VPN Provider dropdown choose NordVPN.

Roqos NordVPN select provider

Enter your NordVPN information

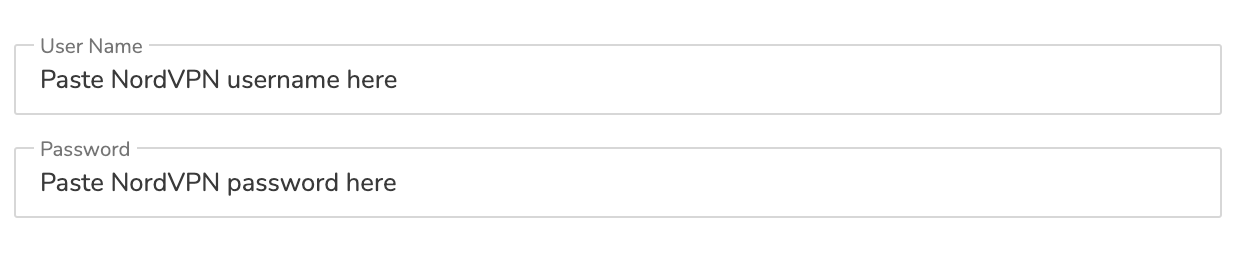
In the Username and Password field enter the NordVPN OpenVPN Username and Password that you obtained.

NordVPN credentials
Roqos NordVPN enter username and password

Select a NordVPN server

Navigate to NordVPN server recommendation page. Click Recommended server and select the country you want to connect to and note the server number that appears.

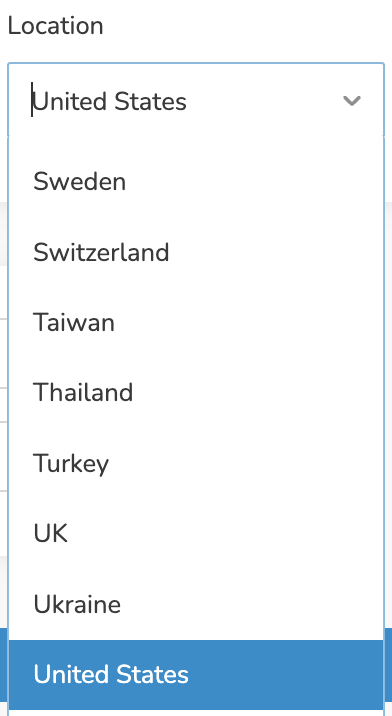
Click the Location dropdown and type in or scroll to the preferred server country.

Roqos NordVPN Select Location

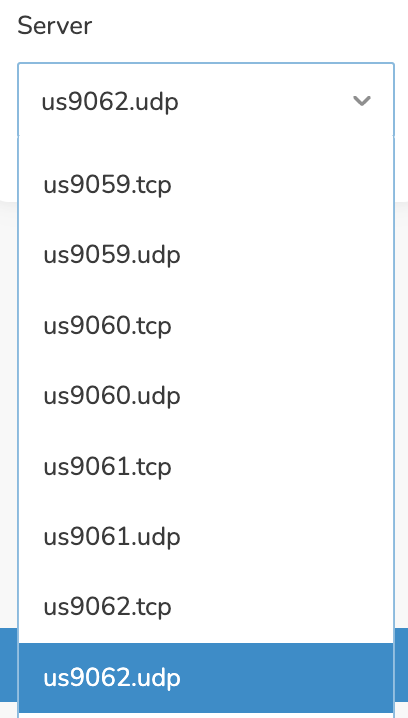
Click the Server dropdown and type in or scroll to the server number that was recommended. Select the UDP version of the server.

Roqos NordVPN select server number

Click the Save button.

Roqos NordVPN Save Settings

Connect to NordVPN

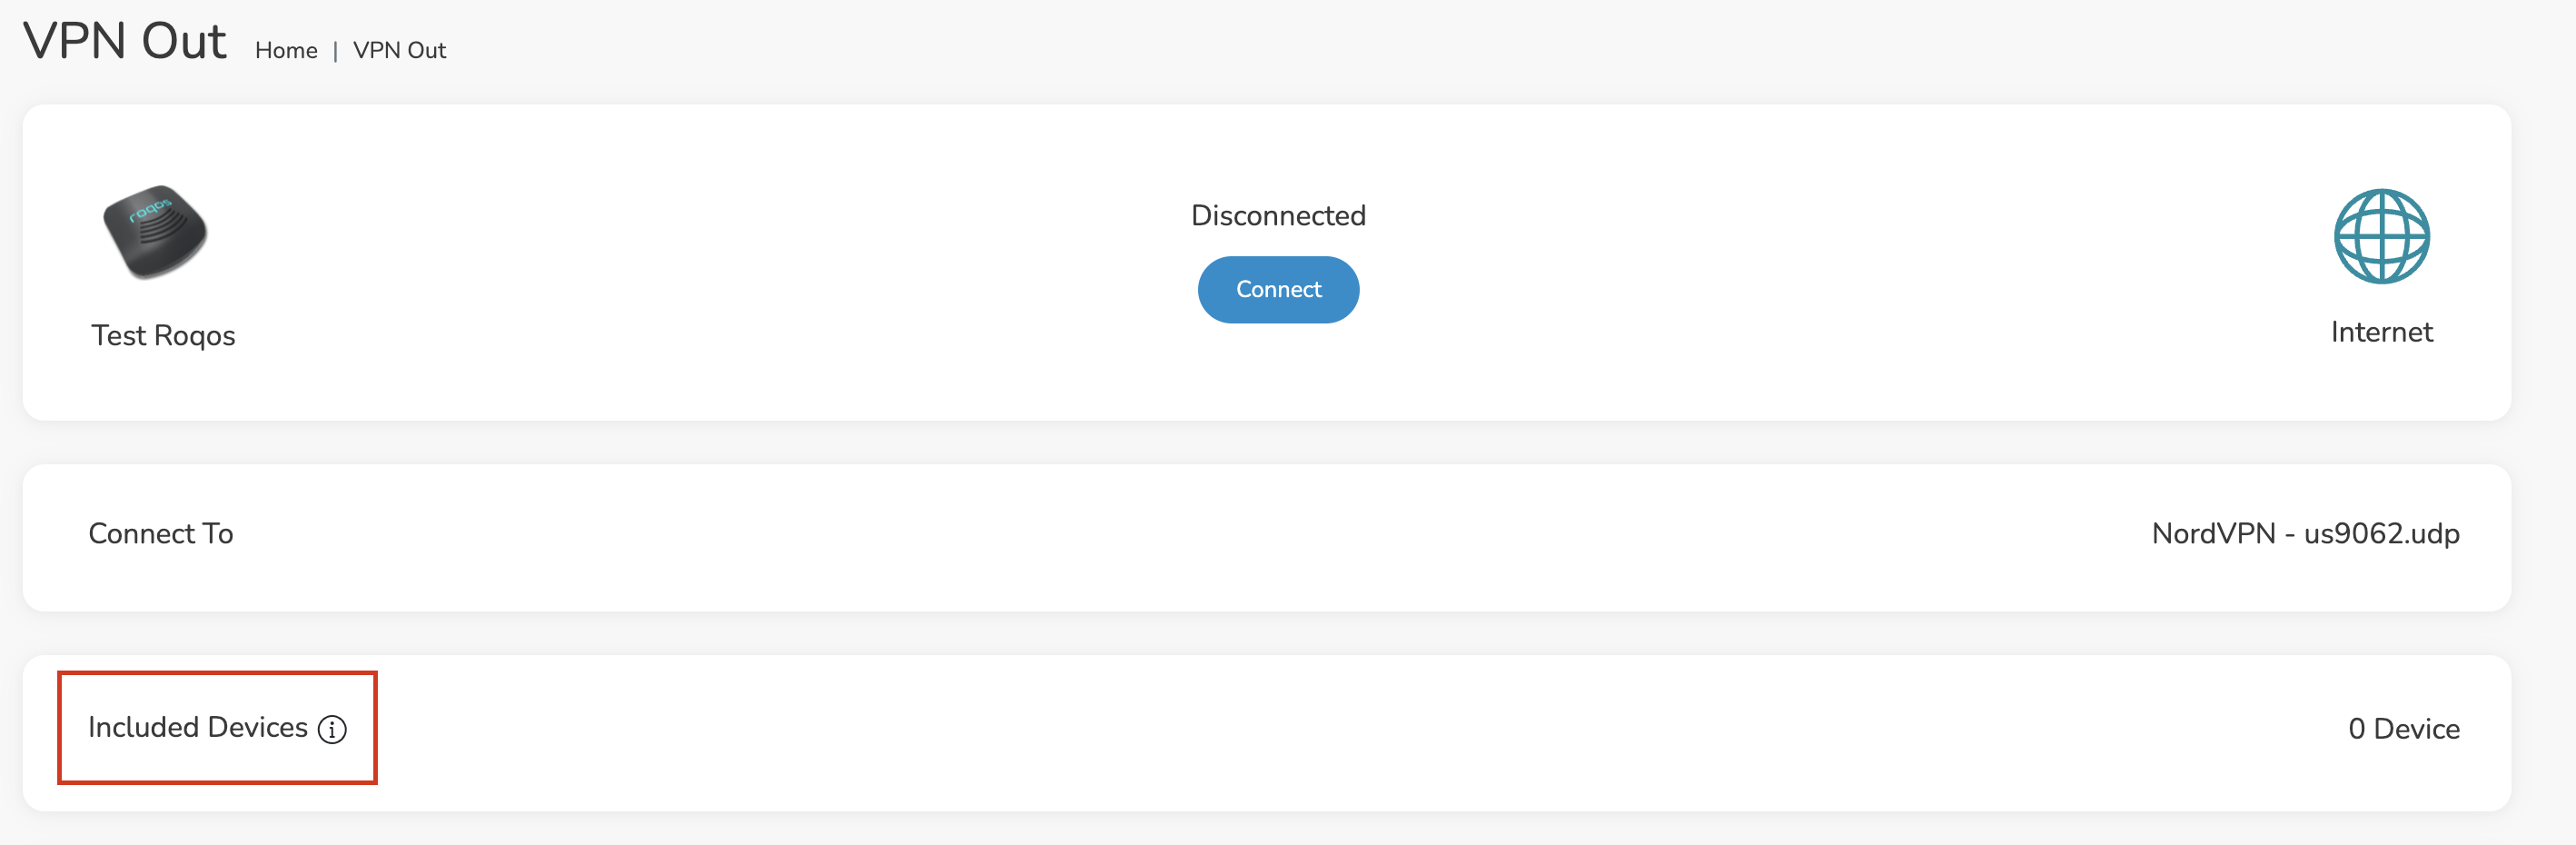
Once you click Save you will be returned to the VPN OUT menu.

Click the Connect button to start your NordVPN connection. Please be patient as the router connects your entire network through VPN.

Roqos VPN Connect

Assign devices to connect to VPN

By default there are no devices assigned to the VPN tunnel. Click Included Devices. From this page you can choose if all devices should connect to NordVPN or only certain devices.

Roqos NordVPN Included Devices

From the dropdown select Include all devices if you want every device that connects to the Roqos to connect to NordVPN. Then click Save.

Roqos VPN Include All Devices

If you only want specific devices to connect to NordVPN while others bypass the VPN connection select Include selected devices from the dropdown and then toggle the sliders for the devices you want connected to VPN. Click Save.

Roqos VPN Include Selected devices

Verify a successful NordVPN connection

Make sure you are connected to the Roqos network via WiFi or ethernet connection on your device.

Visit NordVPN’s website to verify your new IP Address and Protected Status at the top of the page.

You should see Connected at the top of the page underneath NordVPN.

Connect to a different NordVPN server

To change your server click Disconnect on the VPN OUT page then return to the Connect To section to select a new server from the Server dropdown and click Save. Now click Connect once again on the VPN Out page.

Disconnect from NordVPN

To disconnect from NordVPN click the Disconnect button.

TROUBLESHOOTING

Still having issues? Visit the FR Privacy App Troubleshooting section.

Troubleshoot Here

PrivateInternetAccess (PIA) Setup on Roqos

TeamFlashRouters · Dec 24, 2021 ·

Preparing for PIA Setup

Obtain your PIA login information

If you are not already an PIA user Sign Up Now.

1. Visit PIA’s website login page.

PIA login

2. Successfully log in with your account information.

Connecting to PIA in the Roqos Core

Access the Roqos Core UI

1. Login to the Roqos Core web app in a browser on any computer or smart device.

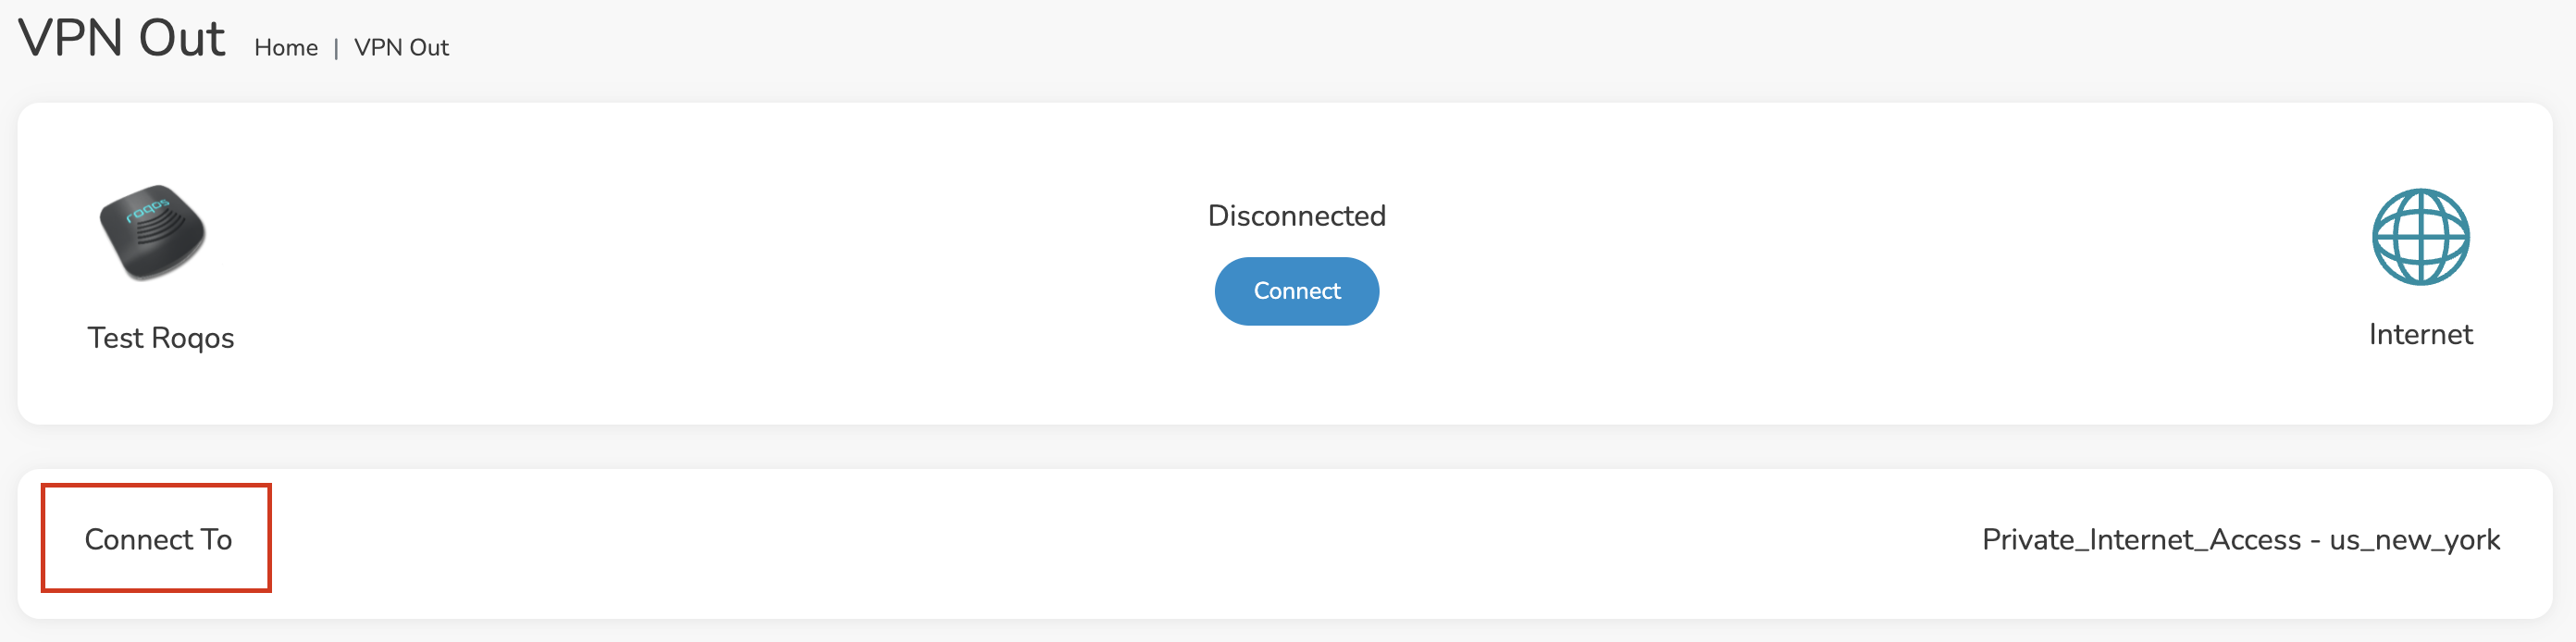
2. Click VPN from the navigation menu and then click VPN OUT.

Roqos VPN Out

3. Click the Connect to box.

Roqos PIA Connect to

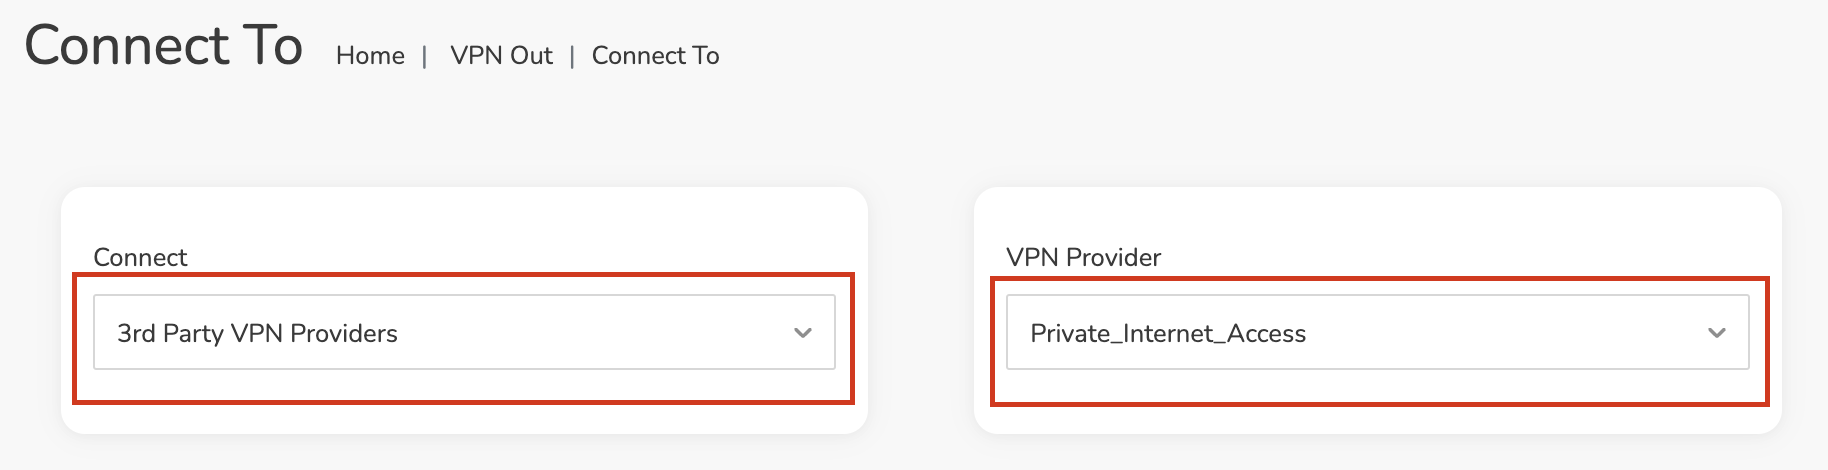
4. In the Connect dropdown choose 3rd Party VPN Providers and for the VPN Provider dropdown choose Private_Internet_Access.

Roqos PIA select provider

Enter your PIA information

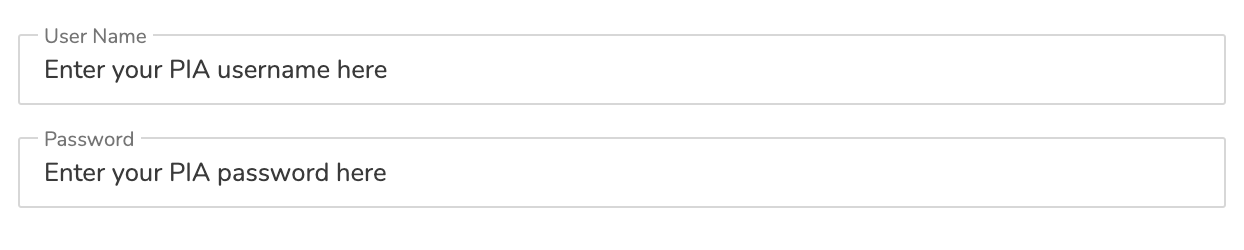
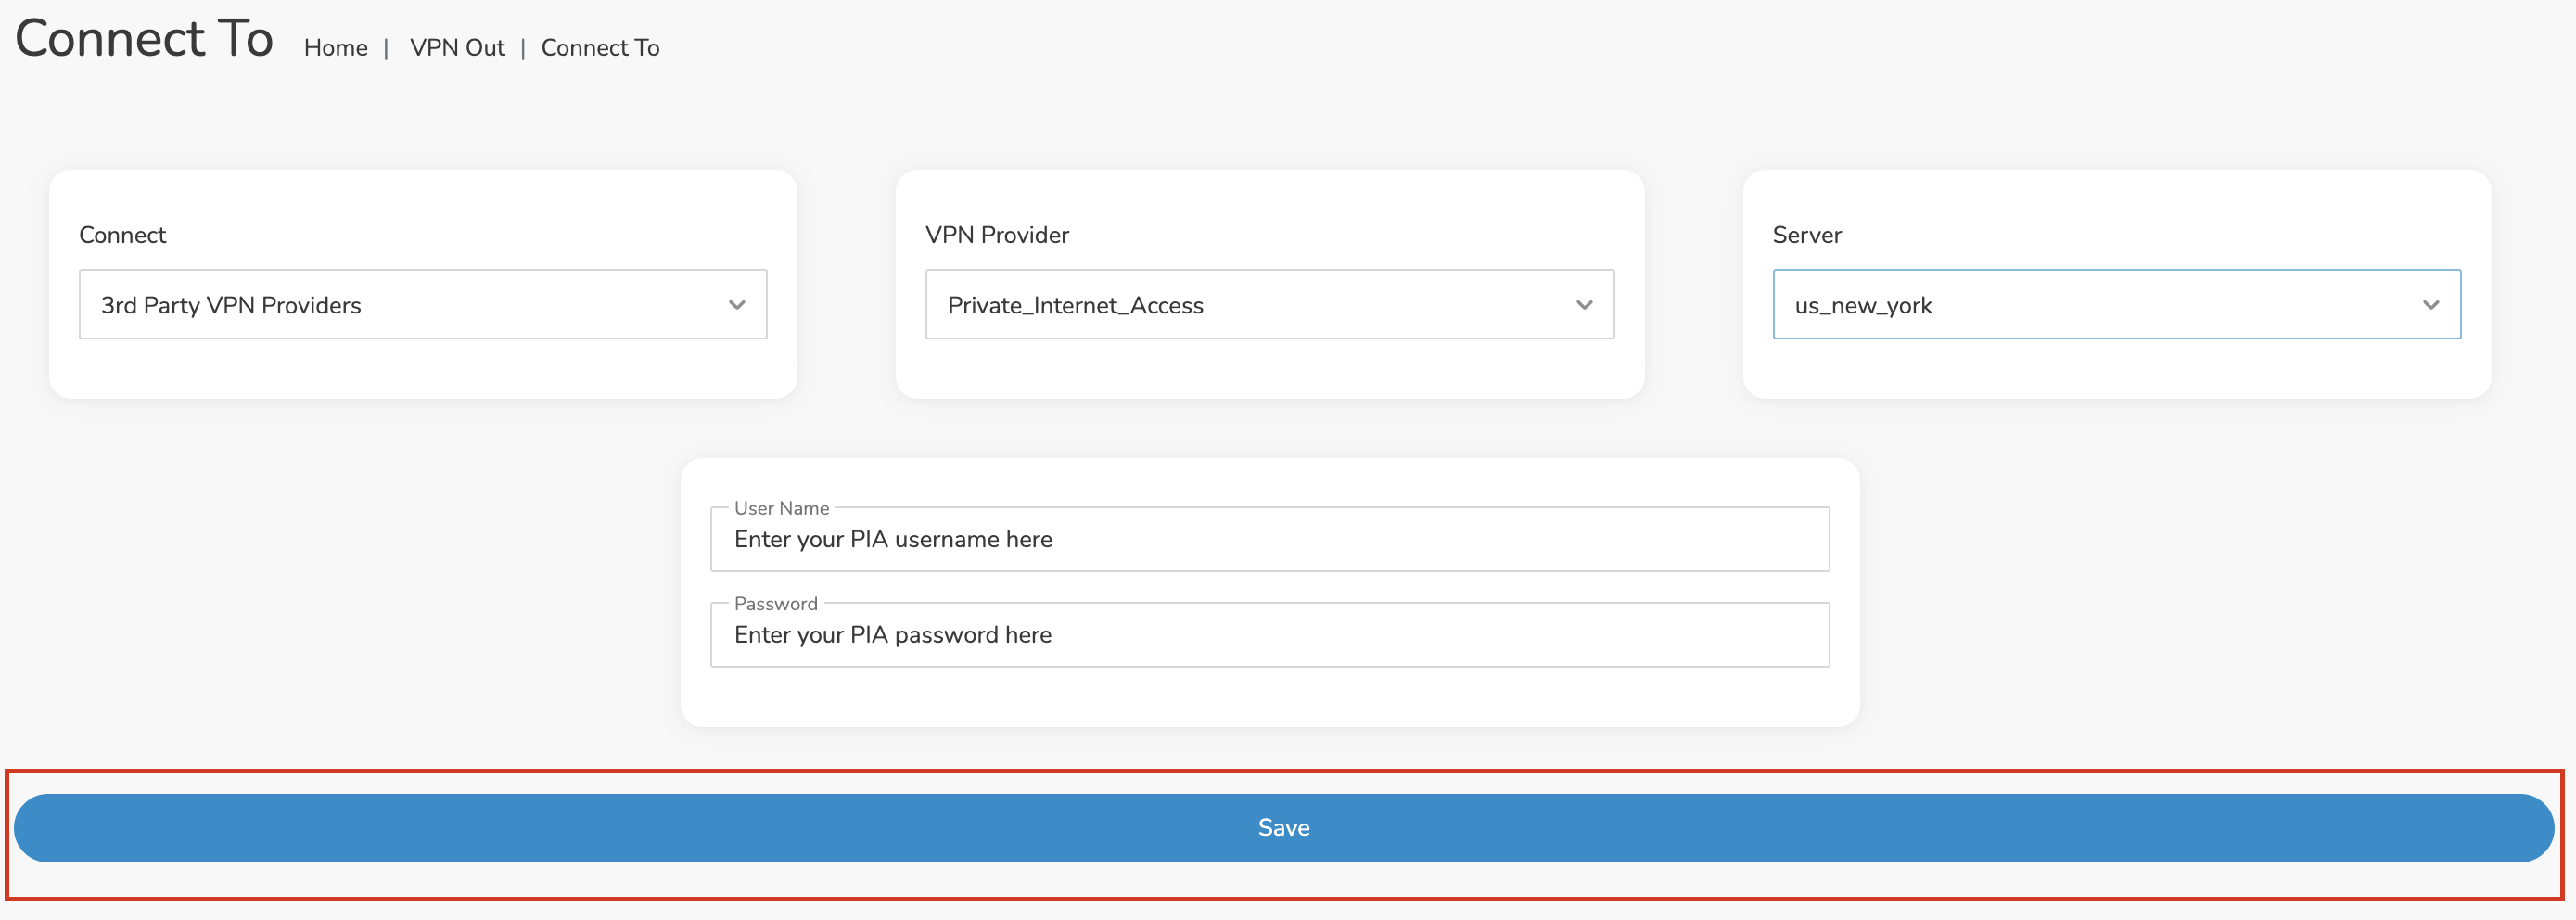
In the Username and Password field enter the PIA Username and Password that you logged in with.

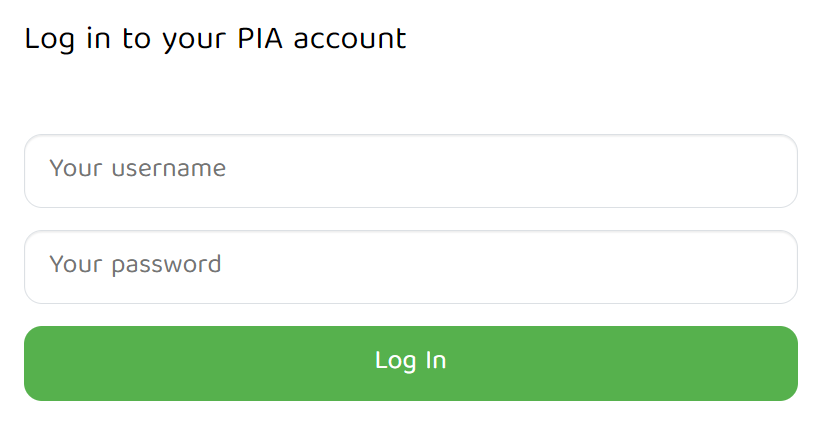
Roqos PIA enter username and password

Select a PIA server

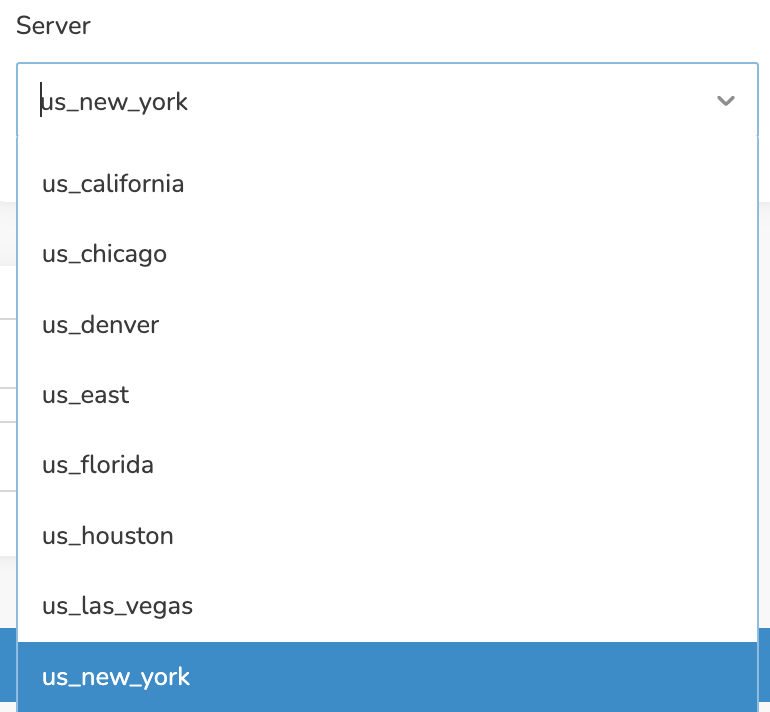
Click the Server dropdown and type in or scroll to your preferred server location.

Roqos PIA server select

Click the Save button.

Roqos PIA Save Settings

Connect to PIA

Once you click Save you will be returned to the VPN OUT menu.

Click the Connect button to start your PIA connection. Please be patient as the router connects your entire network through VPN.

Roqos VPN Connect

Assign devices to connect to VPN

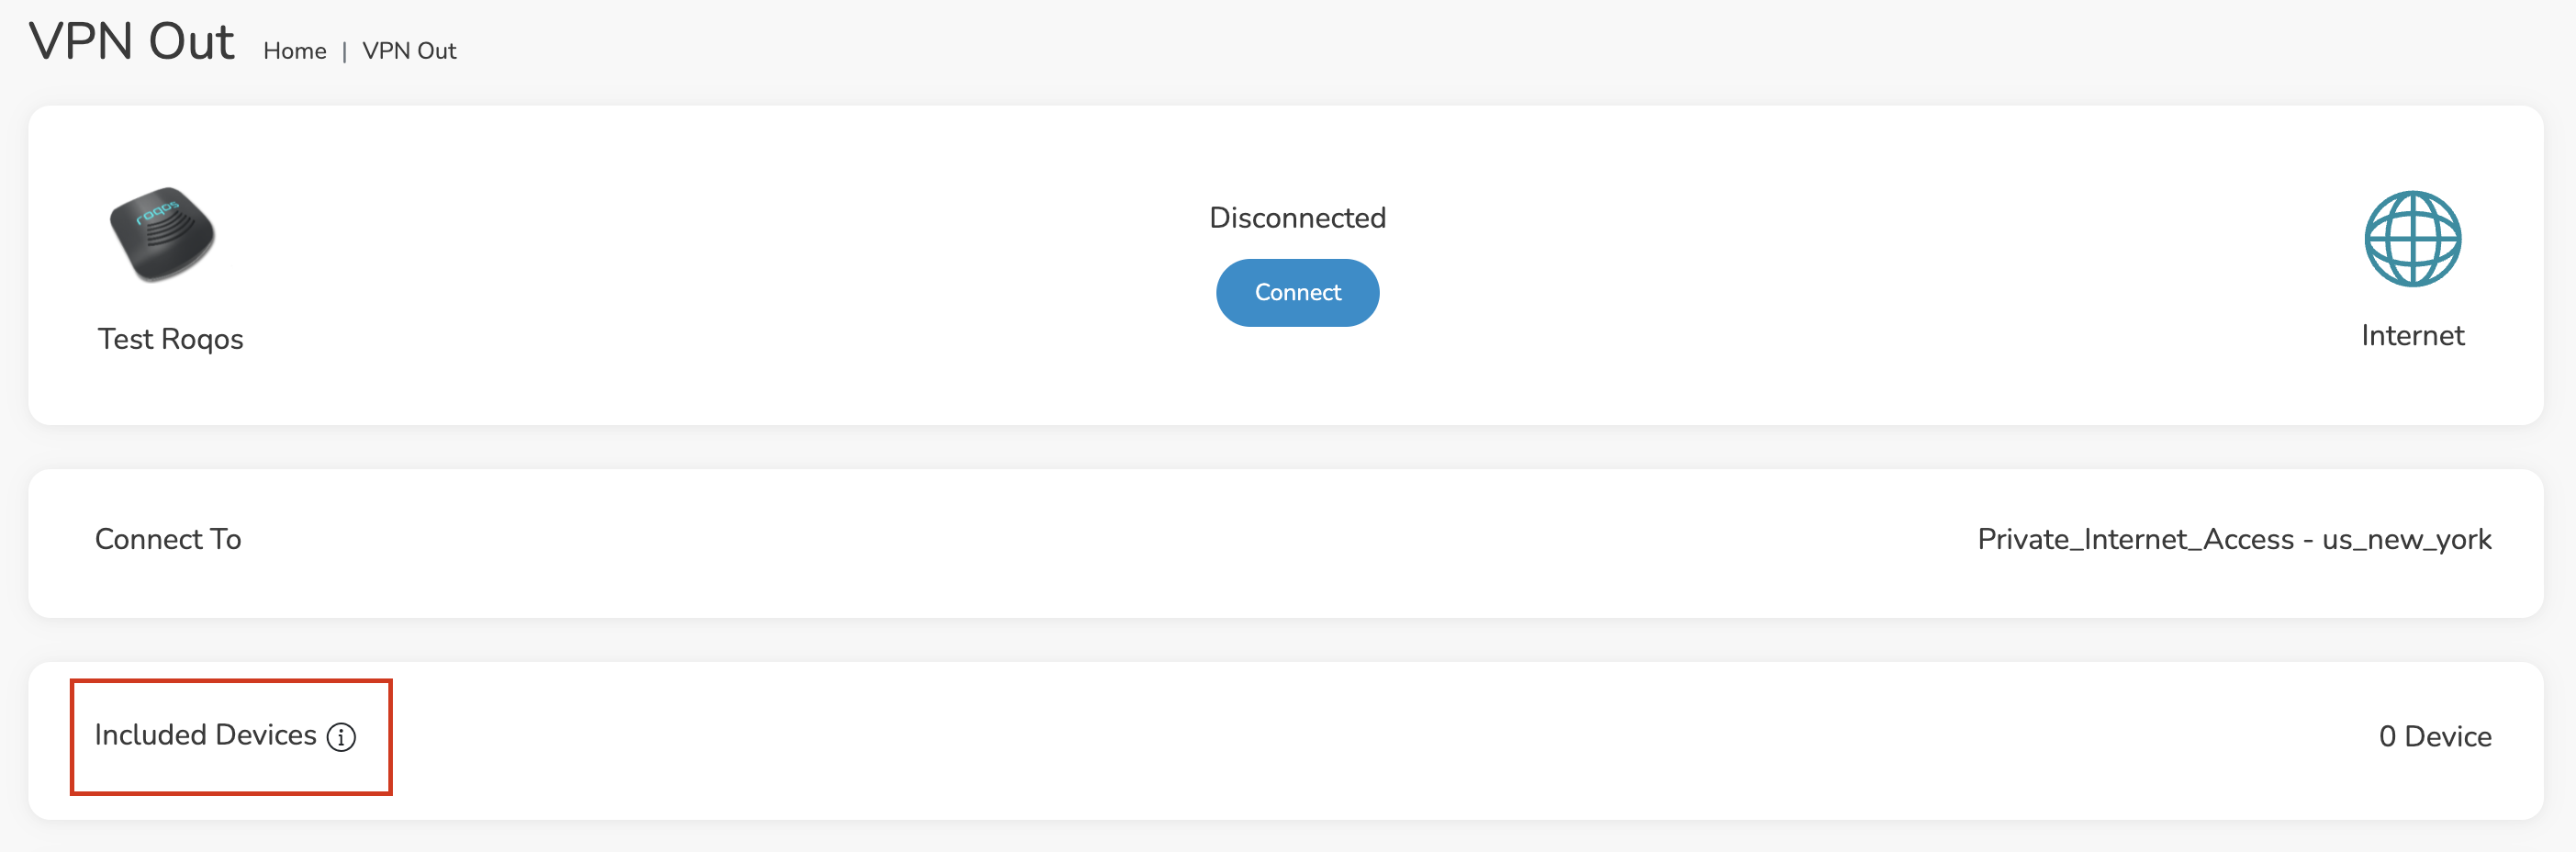
By default there are no devices assigned to the VPN tunnel. Click Included Devices. From this page you can choose if all devices should connect to PIA or only certain devices.

Roqos PIA Included Devices

From the dropdown select Include all devices if you want every device that connects to the Roqos to connect to PIA. Then click Save.

Roqos VPN Include All Devices

If you only want specific devices to connect to PIA while others bypass the VPN connection select Include selected devices from the dropdown and then toggle the sliders for the devices you want connected to VPN. Click Save.

Roqos VPN Include Selected devices

Verify a successful PIA connection

Make sure you are connected to the Roqos network via WiFi or ethernet connection on your device.

Visit PIA’s IP Check to verify your new IP Address and virtual location.

You should see Connected at the top of the page underneath Private_Internet_Access.

Connect to a different PIA server

To change your server click Disconnect on the VPN OUT page then return to the Connect To section to select a new server from the Server dropdown and click Save. Now click Connect once again on the VPN Out page.

Disconnect from PIA

To disconnect from PIA click the Disconnect button.

TROUBLESHOOTING

Still having issues? Visit the FR Privacy App Troubleshooting section.

Troubleshoot Here

Change server locations on ExpressVPN/Aircove firmware

TeamFlashRouters · May 12, 2022 ·

You can change the ExpressVPN server location at any time so your Internet connection appears as originating from that location.

1. Connect to the FlashRouter’s network via ethernet cable or wireless.

2. Open your web browser and enter expressvpnrouter.com or 192.168.132.1 in the URL.

ExpressVPNrouter.com
192.168.132.1

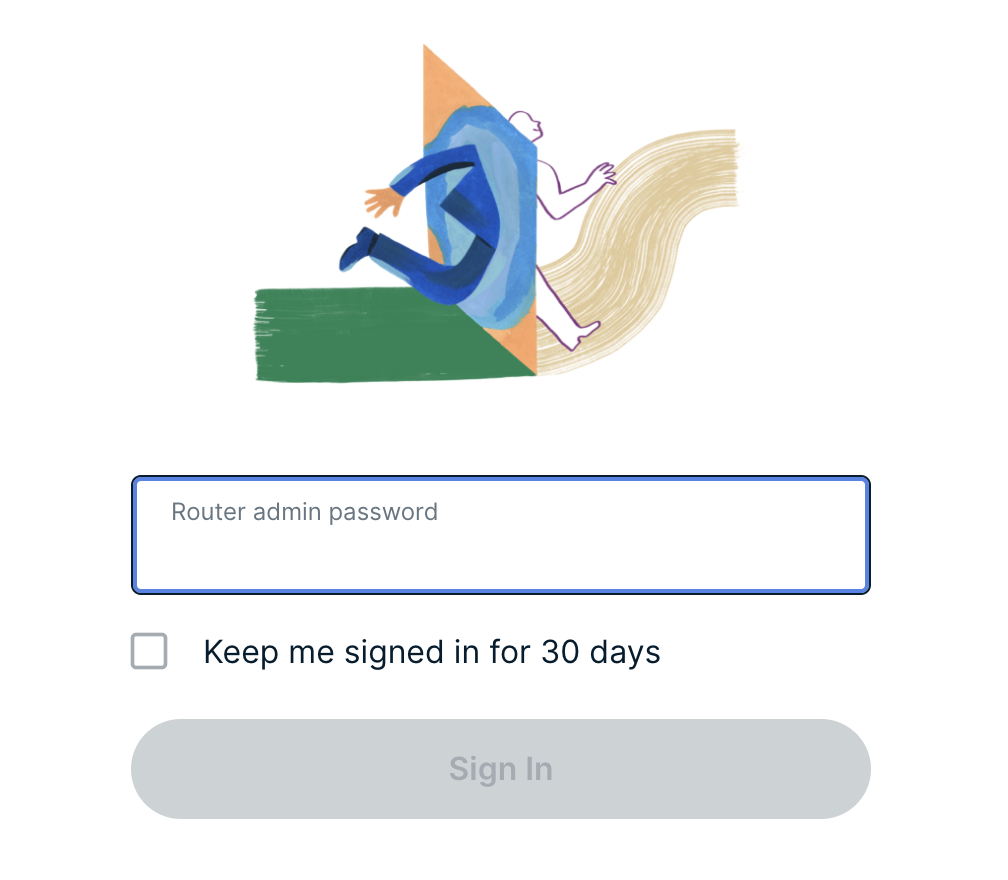
3. Login with your ExpressVPN FlashRouter admin password.

ExpressVPN Router admin login

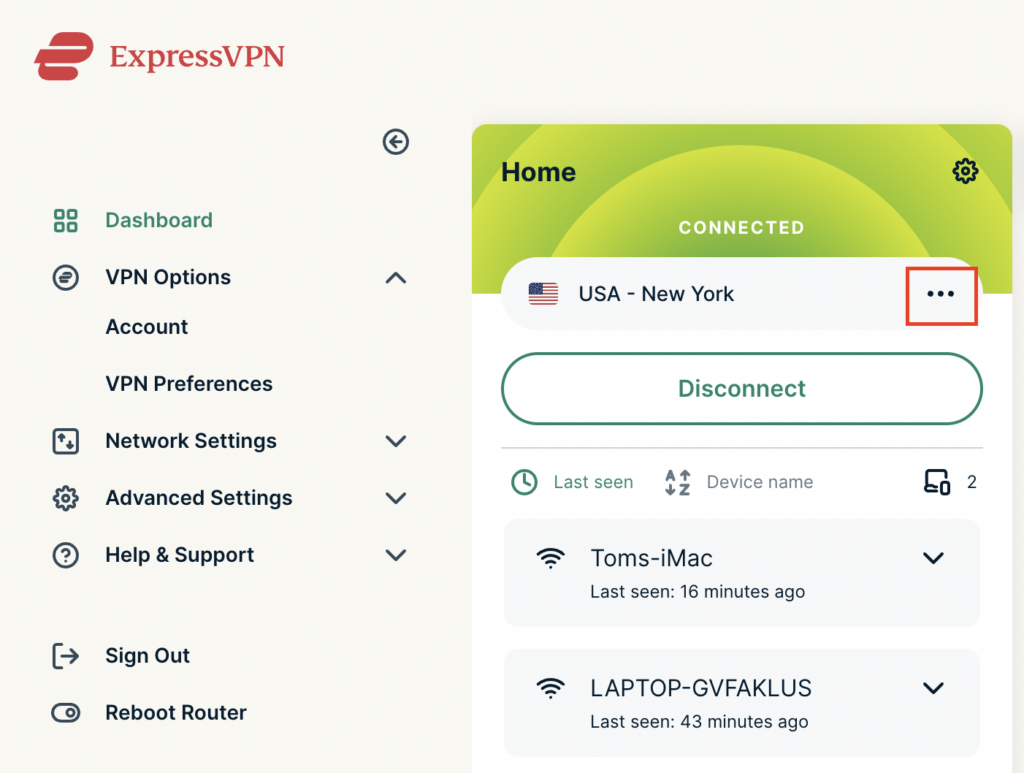
4. Click the three dots next to the server location.

ExpressVPN change server 1

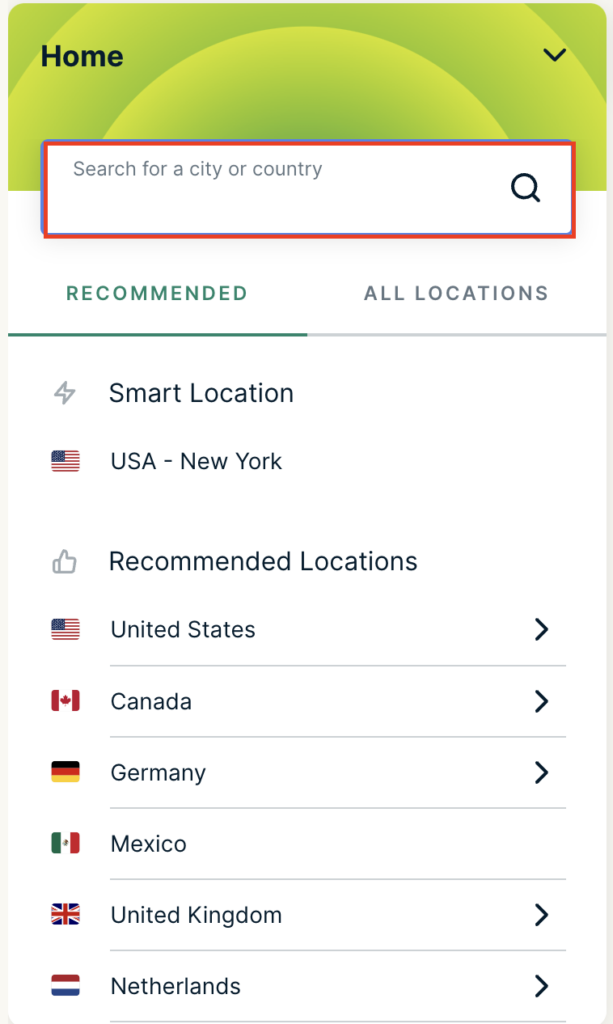
5. Type in the location you want to connect to. Click the new location to connect.

ExpressVPN change server 2

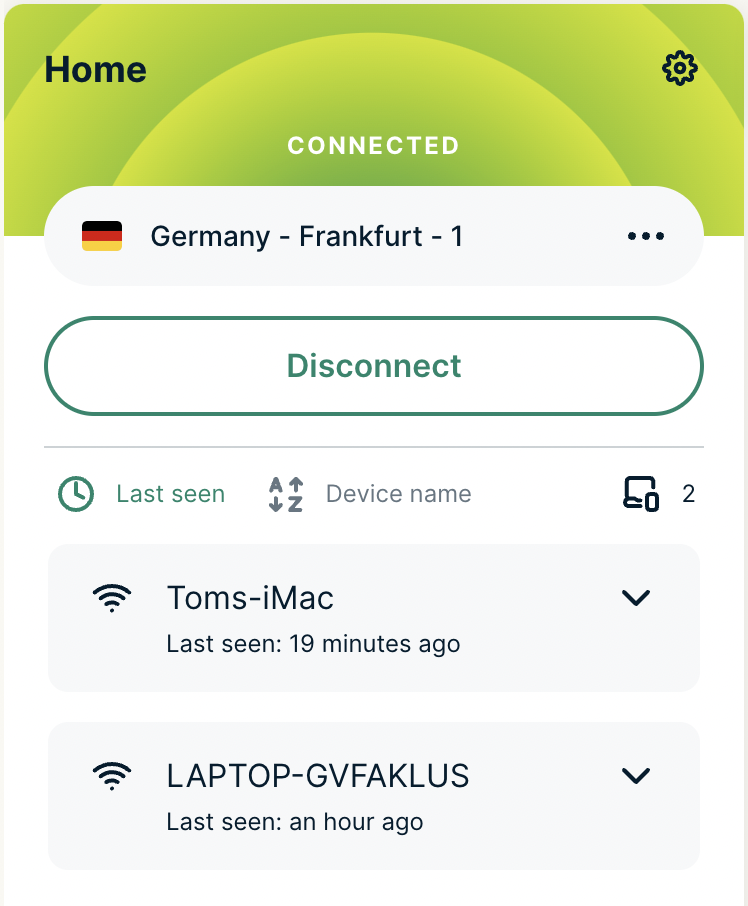
6. You are now connected to the new server location.

ExpressVPN change server 3

ExpressVPN offers servers in locations all over the world. Typically for speeds it is best to connect to the server closest to your actual location. Clicking a country instead of a city will connect you to the ideal city in that country.

Change WiFi name and password on Roqos

TeamFlashRouters · Nov 14, 2021 ·

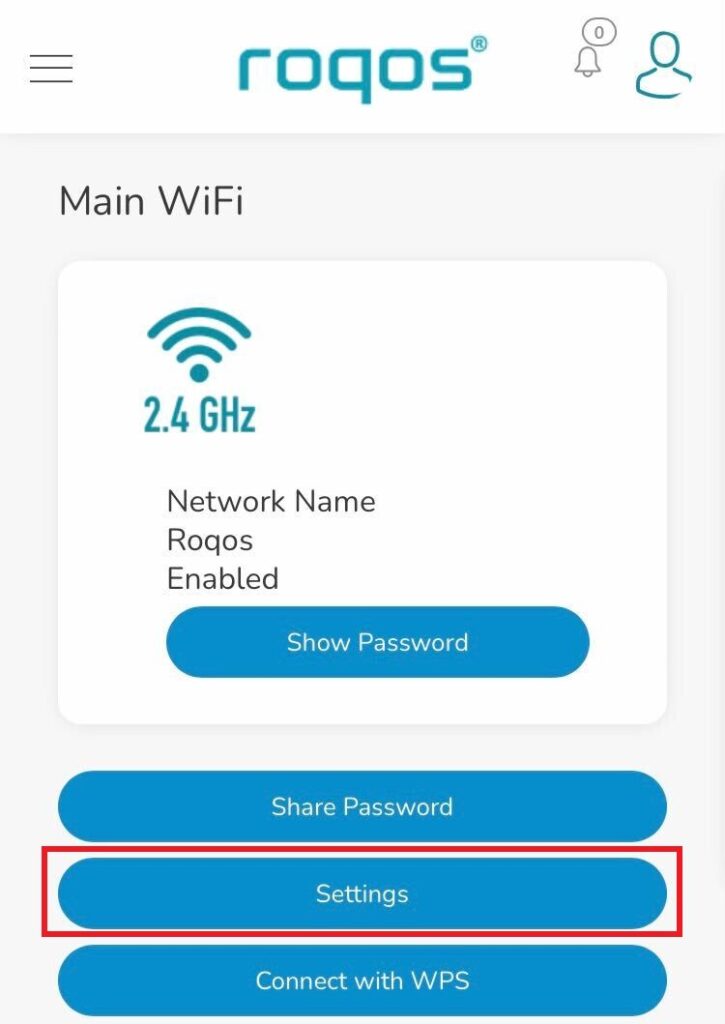
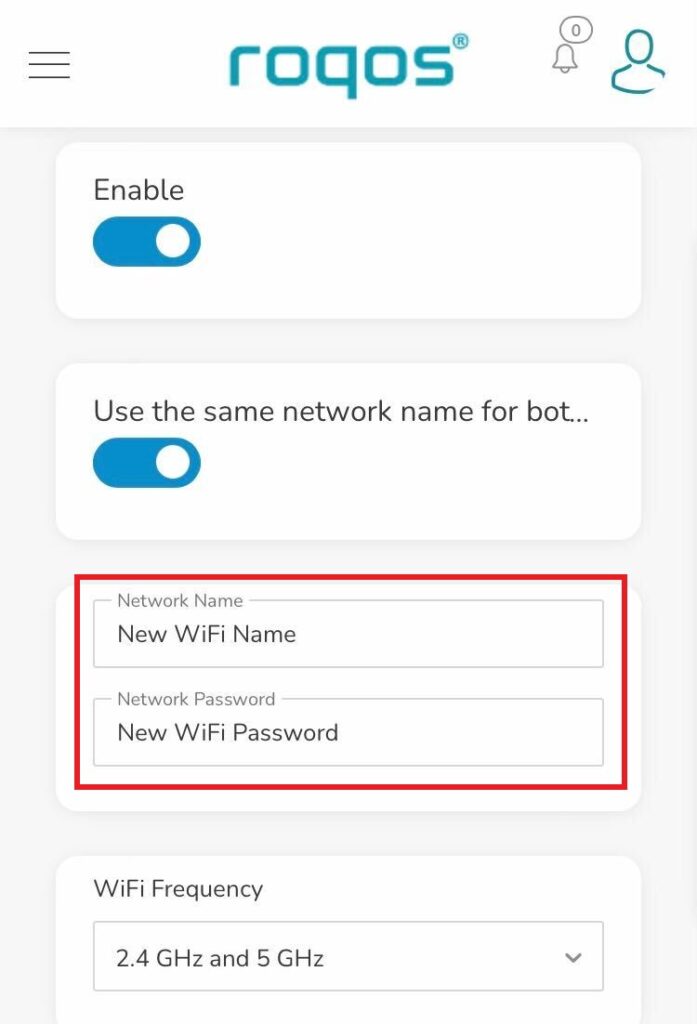
Change your Roqos’ WiFi Network Name and Password to anything you like. Make sure it is not a duplicate of an existing WiFi name.

Login to Roqos Core UI web app in a browser on any computer or smart device.

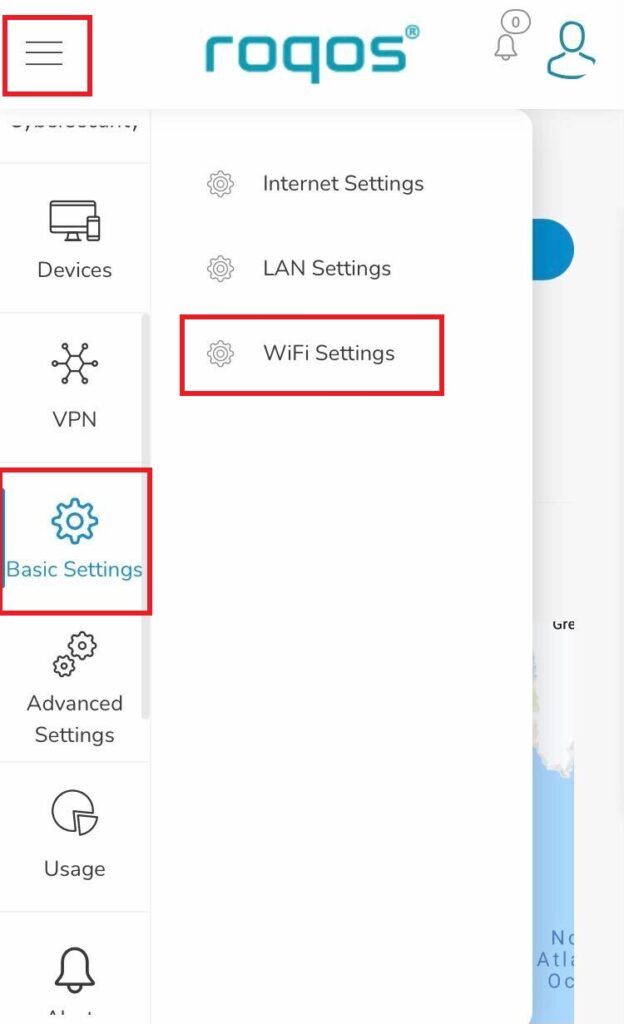
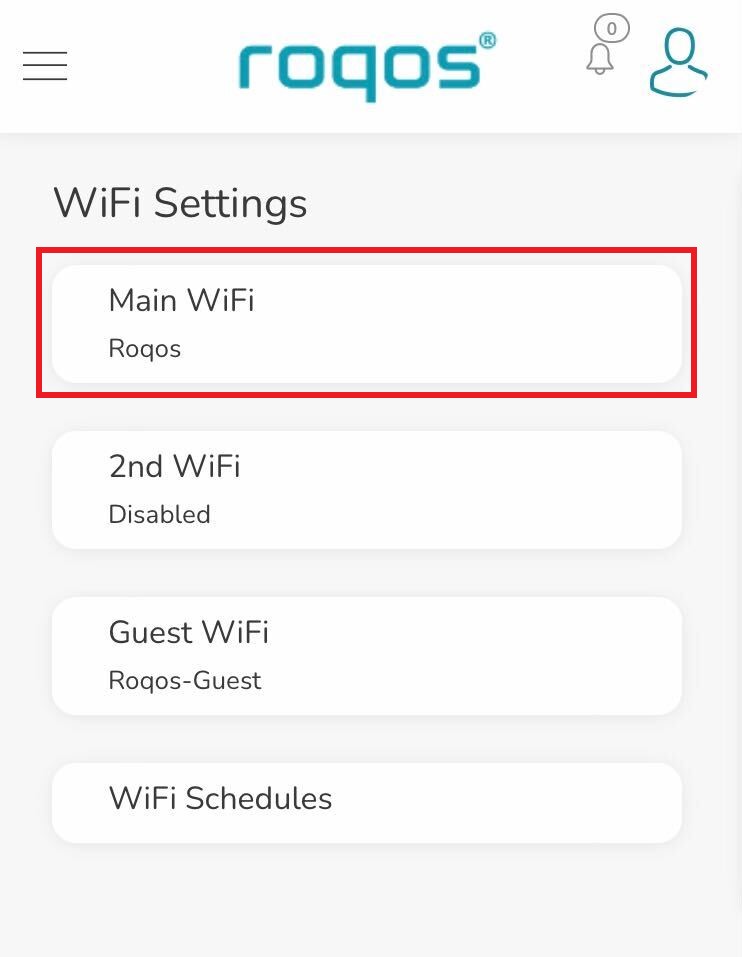
1. Click the navigation menu and select Basic Settings > WiFi Settings.

Roqos Basic Settings - WiFi Settings

2. Click Main WiFi.

Roqos WiFi Settings - Main WiFi

3. Click Settings.

Roqos WiFi Settings - Settings

4. Enter the new Network Name and Network Password. Click Save.

Roqos WiFi Settings - Enter new name and password

5. Reconnect your WiFi devices to the new network with the password you just set.

Wireless Guest Network Setup – Bridged (Advanced)

TeamFlashRouters · Jun 12, 2019 ·

If you would like to prevent visitors from connecting to your main WiFi network then you can create a Bridged Guest Network that will prevent access to the main router. This setup also allows you to create different rules for different WiFi SSID’s in your home ranging from QoS controls, access restrictions, VPN network segmentation, and more.

Preparing for Wireless Guest Network Setup

If you have a Dual-band or Tri-Band router you can setup a WiFi Guest Network, creating a separate VLAN (virtual local area network) for your visitors, or in order to segment your VPN networks on any band you like. We recommend using the 2.4GHz network for your DD-WRT Guest Wireless Network so it is compatible with the most possible WiFi devices. Setting up a guest network for visitors in your home allows you to keep them off of your main WiFi network.

We recommend performing this setup while connected to the FlashRouter via ethernet cable. If your computer does not have an ethernet port and you must proceed via wireless connection to the FlashRouter pay attention to the wireless connection as you may need to rejoin the FlashRouter’s network after making changes.

DD-WRT Router Setup for Wireless Guest Network

Enter Wireless settings

Navigate to Wireless > Basic Settings

Bridged Wireless Guest Network Setup on DD-WRT FlashRouter – Setting SSID for Guest Network
  1. Under the 2.4GHz or 5GHz Interface click the Add button.
  2. In the Wireless Network Name (SSID) field enter the unique network name of the guest network.
  3. Click Save.

Enter Wireless Security settings

Navigate to Wireless > Wireless Security

Bridged Wireless Guest Network Setup on DD-WRT FlashRouter – Setting Guest Network Wireless Password
  1. Duplicate the wireless security settings that are set for the other bands for the newly created virtual interface.
  2. Click Apply Settings.
  3. Reboot your router.

Create Bridge

Navigate to Setup > Networking

Bridged Wireless Guest Network Setup on DD-WRT FlashRouter – Create Bridge
  1. Under Create Bridge click Add. Name the newly created bridge br1.
  2. Click Apply Settings

Assign to Bridge

Bridged Wireless Guest Network Setup on DD-WRT FlashRouter – Assign Bridge
  1. Under Assign to Bridge select br1 from the Assignment dropdown. Select wl1.1 or ath1.1 depending on your router model.
  2. Click Apply Settings.

Depending on the router model and WiFi band you are using, the wireless interfaces will be labelled differently.

This setting can be labelled wl1.1, ath0.1, wl2.1, and so on. Make sure when you get up to the bridge assignment section that you are using the correct guest network Virtual Interface.

Network Configuration br1

Bridged Wireless Guest Network Setup on DD-WRT FlashRouter – Configure Bridge DNS Redirection
  1. Under Network Configuration br1 select Enable for Forced DNS Redirection.
  2. Set Optional DNS Target to 208.67.220.220
  3. Set IP Address to 192.168.12.1
  4. Set Subnet Mask to 255.255.255.0
  5. Click Apply Settings.

Multiple DHCP Server

Bridged Wireless Guest Network Setup on DD-WRT FlashRouter – Configure DHCP Server Settings
  1. Under Multiple DHCP Server click Add.
  2. Set the first dropdown to br1.
  3. Click Apply Settings.
  4. Reboot your router.

Firewall Rules

Navigate to Administration > Commands

  1. Copy the fire script from below and paste into the empty Commands shell
  2. Click Save Firewall.
  3. Wait one minute and then reboot your router.

iptables -I FORWARD -i br1 -o br0 -m state –state NEW -j DROP
iptables -I FORWARD -i br0 -o br1 -m state –state NEW -j DROP
iptables -I INPUT -i br1 -p tcp –dport telnet -j REJECT –reject-with tcp-reset
iptables -I INPUT -i br1 -p tcp –dport ssh -j REJECT –reject-with tcp-reset
iptables -I INPUT -i br1 -p tcp –dport www -j REJECT –reject-with tcp-reset
iptables -I INPUT -i br1 -p tcp –dport https -j REJECT –reject-with tcp-reset

You will now have a working Bridged Guest Network on the FlashRouter. By inputting the firewall rules, this will also prevent any guests on your network from gaining access to your router settings.

Back up your settings

Navigate to Administration > Backup

  1. Click the Backup button.
  2. A file named nvrambak.bin will be saved to your computer.
  3. You can load nvrambak.bin to restore your settings in the event of a reset.

TROUBLESHOOTING

Still having issues? Visit our Troubleshooting section to diagnose common problems here.

Troubleshoot Here

Flint/Slate GL.iNet Internet Setup

TeamFlashRouters · Apr 3, 2023 ·

Follow this article when you receive your new Flint or Slate GL.iNet router to connect it to the Internet.

1. Connect the ethernet cable that came with the router from an open LAN ethernet port on your ISP modem or other router to the WAN port of the Flint or Slate GL.iNet router.

Flint Internet
Slate Internet

2. Connect the power to the router and wait about 2 minutes for the router to fully boot up.

3. Connect your computer, phone, or tablet to the GL.iNet router via wireless (FlashRouter24 / FlashRouter50) or via ethernet cable to one of the LAN ports on the router.

The FlashRouter WiFi password is printed on the sheet that came with the router and is set to Wireless#[First 5 characters of your router MAC]. The router MAC can be found on the bottom of your router if you cannot locate the sheet. For e.g. if your MAC is 1459C07E70A8 then your WiFi password is Wireless#1459C

Be sure to capitalize the W.

4. Once connected via wireless or ethernet on your device open your browser and go to 192.168.8.1

GL.iNet router access

5. Enter openwrt as the admin password to access the GL.iNet firmware settings.

GL.iNet admin password enter

6. Verify that your Flint/Slate GL.iNet router is receiving a WAN IP Address and webpages are loading while connected to its network.

GL.iNet WAN Settings

TROUBLESHOOTING

Still having issues? Visit the VPN Troubleshooting section.

Troubleshoot Here

GL.iNet Access Router Settings and Firmware Upgrade

TeamFlashRouters · Apr 3, 2023 ·

Follow this guide to upgrade the firmware of your GL.iNet FlashRouter.

1. Connect your computer, phone, or tablet to the GL.iNet router via wireless (FlashRouter24 / FlashRouter50) or via ethernet cable to one of the LAN ports on the router.

The FlashRouter WiFi password is printed on the sheet that came with the router and is set to Wireless#[First 5 characters of your router MAC]. The router MAC can be found on the bottom of your router if you cannot locate the sheet. For e.g. if your MAC is 9483C07E70A8 then your WiFi password is Wireless#9483C

Be sure to capitalize the W.

2. Once connected via wireless or ethernet on your device open your browser and go to 192.168.8.1

GL.iNet router access

3. Enter openwrt as the admin password to access the GL.iNet firmware settings. Newer devices may have a different admin password set as openwrt1 or glopenwrt1

GL.iNet admin password enter

3. If a new firmware upgrade is available the router settings will either display a banner when you first access the router or a header. Click Install or the Upgrade arrow depending on which appears for you.

GL.iNet Firmware Upgrade Banner
GL.iNet Firmware Upgrade Header

4. Make sure the Keep Settings toggle is pushed to the right so your router does not get reset. Click the Install button to begin the firmware upgrade.

GL.iNet Install Firmware Upgrade

5. The firmware update should take about 2-3 minutes. You may need to reconnect your wireless devices after the network comes back up in your available networks.

TROUBLESHOOTING

Still having issues? Visit the VPN Troubleshooting section.

Troubleshoot Here

How do I reset and reconfigure my FlashRouter?

Dave · May 3, 2019 ·

When is a router reset needed?

A reset of the FlashRouter should only be performed in the following instances:

  • You have exhausted all other troubleshooting methods and cannot access your router settings.
  • A backup file was saved of your previously working settings.
  • Username and password to access the FlashRouter’s settings are not working.
  • Power light on the router is blinking steadily.
  • Firmware upgrade was performed with Reset to Default settings selected.

Reset Router

Asus FlashRouters:

  1. While the router is powered off press and hold the WPS button on the back or side of the router. Power up the router while continuing to hold the WPS. Continue to hold for 15 seconds as the router powers on (note this could be up to 45 seconds on some models before lights flash).
  2. You will see the lights on the router flashing steadily and this is how you know you have reset the router.
  3. Let the router sit for about a minute and then reboot the router.

Linksys and Netgear FlashRouters:

  1. While the router is plugged in, find the reset button located on the back of the router. You will need a pin or pencil to hold down the button for 15 seconds.
  2. You will see the lights on the back of the router flash simultaneously and this is how you know you have reset the router.
  3. Let the router sit for about a minute and then reboot the router.

Access Router Settings

1. Connect to the FlashRouter’s network via ethernet cable or wireless.

The wireless network will appear as “dd-wrt” and will likely not require a password to join. If it does require a password to join the password will be the default wireless password found on the bottom of the router.

2. Open your web browser and enter 192.168.1.1 in the URL.

Reset FlashRouters DD-WRT Settings Back to Default Settings

3. Delete the dots and enter the new administration login in the Router Username, Router Password, and Re-enter to confirm fields.

TYPE CAREFULLY when setting the administration login as a typo will result in needing to reset the router again.

Change Local IP Address and DNS

Navigate to Setup > Basic Setup

1. Set the Local IP Address to 192.168.11.1

2. Set the Static DNS 1 to 8.8.8.8

3. Set the Static DNS 2 to 8.8.4.4

4. Set the Static DNS 3 to 208.67.220.220

Enter New Local IP Address and DNS Servers After FlashRouter DD-WRT Reset

CLICK SAVE

Setup WiFi

Navigate to Wireless > Basic Settings

Find your FlashRouter model in the WiFi Setup section and replicate the wireless settings on this page.

CLICK APPLY SETTINGS

REBOOT ROUTER

Connect to the FlashRouter's network

You will be able to connect to the newly setup wireless network using the details you set. The router will now be accessible at 192.168.11.1

Back up your settings

  1. Click the Backup button.
  2. A file named nvrambak.bin will be saved to your computer.
  3. You can load nvrambak.bin to restore your settings in the event of a reset.

Flint/Slate GL.iNet Guest Network Setup

TeamFlashRouters · Apr 20, 2023 ·

Follow this guide to setup a Guest Network on your GL.iNet FlashRouter. Devices connected to the guest network will be on a separate subnet and will not have access to the router settings or be able to talk to devices on the main network.

1. Connect your computer, phone, or tablet to the GL.iNet router via wireless (FlashRouter24 / FlashRouter50) or via ethernet cable to one of the LAN ports on the router.

The FlashRouter WiFi password is printed on the sheet that came with the router and is set to Wireless#[First 5 characters of your router MAC]. The router MAC can be found on the bottom of your router if you cannot locate the sheet. For e.g. if your MAC is 1459C07E70A8 then your WiFi password is Wireless#1459C

Be sure to capitalize the W.

2. Once connected via wireless or ethernet on your device open your browser and go to 192.168.8.1

GL.iNet router access

3. Enter openwrt as the admin password to access the GL.iNet firmware settings.

GL.iNet admin password enter

4. Click Wireless.

GL.iNet Click Wireless

5. Click 5GHz Guest Wi-Fi or 2.4GHz Guest Wi-Fi.

GL.iNet Select Guest Wifi

6. Click Modify.

GL.iNet Guest Modify

7. Set the Enable Wi-Fi toggle to the ON position.

GL.iNet Enable Guest Wifi

8. Change the Wi-Fi Name (SSID) and Wi-Fi Password fields to what you want to use. The SSID should be unique and NOT a duplicate of an existing network. Click Apply.

GL.iNet Guest change wifi name and pass

9. Connect your devices to the new guest wireless network.

TROUBLESHOOTING

Still having issues? Visit the VPN Troubleshooting section.

Troubleshoot Here

How do I read my Wireless status?

Dave · Apr 29, 2019 ·

The wireless status page is very helpful in diagnosing where a wireless issue stems from. Make sure the settings displayed on this page match the actual settings you have set in the DD-WRT Wireless settings. Review our recommended wireless settings for your FlashRouter if you are not getting accurate readouts.

Navigate to Status > Wireless

Interface

Select from the wireless interface that you want to view the readouts for.

MAC Address

Used to identify the wireless interface.

Chipset

Displays the wireless hardware that your FlashRouter uses.

Radio

Should always be set to Radio is On unless you have intentionally disabled the wireless on the FlashRouter. If this is displaying Radio is Off for certain wireless interfaces we recommend adjusting the Wireless Channel on the Wireless > Basic Settings page.

Mode

This should read as AP unless you are using an Advanced Wireless setup such as a Repeater, Client, or Repeater Bridge.

Network

Displays the wireless network mode that you have set for a specific wireless interface.

SSID

Displays the wireless network name that you have set for a specific wireless interface.

Channel

Displays the channel that you have set for a specific wireless interface. If this reads as Unknown it is best to select a new wireless channel or reboot the FlashRouter and check again.

TX Power

Displays the wireless transmit power that you have set for a specific wireless interface. If this reads as Unknown it is best reboot the FlashRouter and check again.

Rate

Displays an approximation of the max wireless speed available on a wireless band.

ACK Timing

Displays the ACK Timing that you have set for a specific wireless interface. If this reads as Unknown it is best reboot the FlashRouter and check again.

Encryption

Should always read as Enabled, WPA2 Personal.

Received (RX)

If this appears as 0% and there are no errors then it means that no devices have connected to the wireless interface yet. If this appears as 0% and the errors match the amount of OK packets you will need to adjust the wireless settings on the Wireless > Basic Settings page.

Transmitted (TX)

If this appears as 0% you will need to adjust the wireless settings on the Wireless > Basic Settings page.

Wireless Repeater Bridge Setup

TeamFlashRouters · Apr 22, 2019 ·

If you need to extend your connection capabilities and you are not able to wire directly into your main router, you can setup a FlashRouter as a Wireless Repeater Bridge. In Wireless Repeater Bridge mode the FlashRouter connects to your main router on the same subnet via WiFi, and then transmits your internet signal via the FlashRouter for internet access anywhere in your home or office.

Preparing for Wireless Repeater Bridge Setup

Verify your wireless information

In order to setup your FlashRouter as a Wireless Repeater Bridge, you will need the exact SSID and password of your existing wireless network. Make sure you have this information before proceeding.
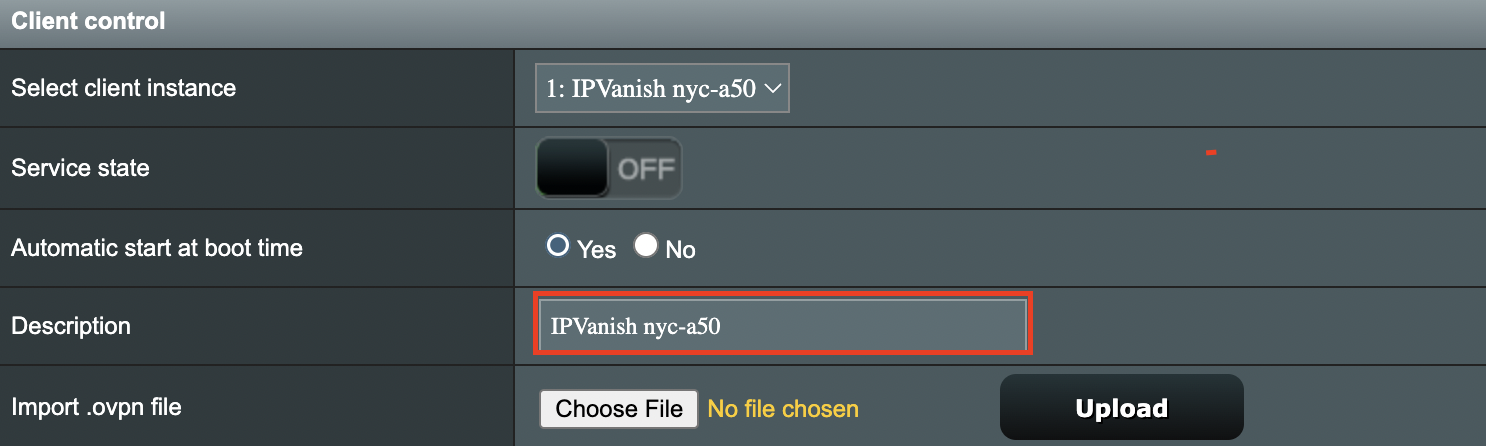
We recommend using a 2.4GHz network to repeat as this network will have more range. Be sure to click Add under the 2.4GHz settings and not the 5GHz settings.

Locate the Local IP Address of the existing wireless network

Locate the Local IP Address of the existing router that the FlashRouter will be bridged to.

DD-WRT Router Setup for Wireless Repeater Bridge

Disable Firewall

Navigate to Security > Firewall

Wireless Repeater Bridge Setup on FlashRouter DD-WRT - Disable Firewall and Enable Filter Multicast
  1. Set SPI Firewall to Disable.
  2. Uncheck all boxes except for Filter Multicast.
  3. Click Save.

Disable DNSmasq

Navigate to Services > Services

Wireless Repeater Bridge Setup on FlashRouter DD-WRT - Disable DNSMasqButton
  1. Set DNSmasq to Disable.
  2. Click Save.

Enter Wireless settings

Navigate to Wireless > Basic Settings

Select Add in the Virtual Interface area.

Wireless Repeater Setup on DD-WRT FlashRouter - Add Virtual Interface

In the Wireless Physical Interface settings for the 2.4GHz network set the Wireless Mode to Repeater Bridge.

Change the Wireless Network Name (SSID) to match exactly with the Wireless Network Name of the network that you will bridge to.

Set Wireless Mode to Repeater Bridge in FlashRouter DD-WRT Basic Wireless Settings Page

In the Virtual Interfaces settings change the Wireless Network Name (SSID) to FlashRouter24 or any other unique SSID.

Wireless Repeater Setup on DD-WRT FlashRouter - Set SSID for Repeated Band

CLICK SAVE

Enter Wireless Security settings

Navigate to Wireless > Wireless Security

Wireless Repeater Setup on DD-WRT FlashRouter - Set Wireless Password
  1. Duplicate the wireless security settings that are set for the other bands for the newly created virtual interface.
  2. Change the WPA Shared Key to match exactly with the Wireless Password of the network that you will bridge to.
  3. Click Save.

Change the FlashRouter's Local IP Address

Navigate to Setup > Basic Setup

Wireless Repeater Bridge Setup on FlashRouter DD-WRT - Set Local Router IP, Gateway, Local DNS
  1. Set the Local IP Address to a different address on the same subnet as the existing network that you noted early. (example: if the existing network is 192.168.1.1 then set the Local IP Address to 192.168.1.2)
  2. Set the Gateway to the Local IP Address of the existing network. (example: 192.168.1.1)
  3. Set the Local DNS to the Local IP Address of the existing network. (example: 192.168.1.1)
  4. Click Save.

Change the FlashRouter's Operating Mode

Navigate to Setup > Advanced Routing

Set Operating Mode to Router in FlashRouter DD-WRT Basic Wireless Settings Page
  1. Set the Operating Mode to Router.
  2. Click Apply Settings.

Reboot your FlashRouter

Power off the FlashRouter for 30 seconds and then power it back on. When it boots back up you will be able to access the FlashRouter’s settings at the new Local IP Address that you set. Your existing network and the FlashRouter’s network will now be bridged wirelessly.

Back up your settings

Navigate to Administration > Backup

  1. Click the Backup button.
  2. A file named nvrambak.bin will be saved to your computer.
  3. You can load nvrambak.bin to restore your settings in the event of a reset.

TROUBLESHOOTING

Still having issues? Visit our Troubleshooting section to diagnose common problems here.

Troubleshoot Here

SmartDNSProxy SmartDNS Setup

TeamFlashRouters · Jun 13, 2019 ·

SmartDNSProxy offers a SmartDNS service for unblocking geo-restricted content without the encryption of a VPN service. SmartDNS routes DNS servers to different regions which “tricks” the website to allow access to previously restricted content.

SmartDNS does not change your IP Address or provide the encryption that a VPN connection does. This can result in faster speeds and unblocked content.

SmartDNS and VPN should not be configured at the same time. When using a SmartDNS connection, make sure to disable your VPN connection on the FlashRouter.

Register your IP Address

If you are not already a SmartDNSProxy user Sign Up Now.

Click on Sign Up and fill in the requested information.

SmartDNSProxy SmartDNS Account Sign Up For DD-WRT FlashRouter

Access the e-mail you entered and Verify your new account.

SmartDNSProxy SmartDNS Activate DNS for DD-WRT FlashRouter

Your account will now be verified.

Activate SmartDNSProxy SmartDNS Service and Subscription

Login to SmartDNSProxy

SmartDNSProxy Server Location Addresses for FlashRouter DD-WRT Settings

Visit SmartDNSProxy’s DNS servers list and note the DNS servers of the location you would like to access content from.

Enter SmartDNSProxy SmartDNS servers on your FlashRouter

Navigate to Setup > Basic Setup

  1. Scroll down to Network Address Server Settings (DHCP).
  2. Enter in any combination of SmartDNSProxy SmartDNS servers you noted into Static DNS fields 1 and 2.
  3. Click Apply Settings at the bottom of the page.
  4. Reboot the FlashRouter.

Once the router is fully booted back up, you can access your desired regional content on any device that connects to the FlashRouter’s network.
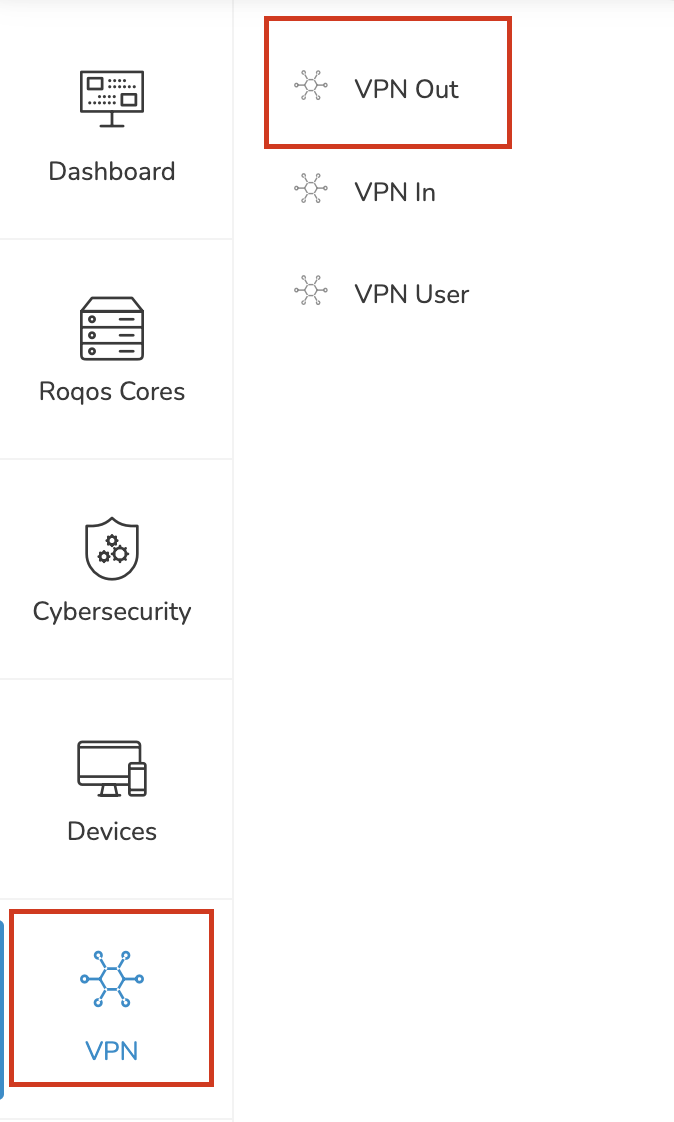
« Previous Page
Next Page »

Primary Sidebar

  • Troubleshooting
  • Router Access
  • Internet Connection Issues
  • WiFi Connectivity
  • General VPN Issues
  • TeamViewer Remote Support
  • DD-WRT Firmware
  • Facebook
  • Twitter
  • Instagram
  • Pinterest
  • YouTube

Footer