• Skip to primary navigation
  • Skip to main content
  • Skip to primary sidebar
  • Skip to footer

FlashRouters Support Portal

Prioritizing Privacy

  • SETUP GUIDES
    • Privacy Hero Router Setup Guide
    • ASUS-WRT Router Setup Guide
    • AsusWRT-Merlin Router Setup Guide
    • DD-WRT Router Setup Guide
    • ExpressVPN Router Setup Guide
    • GL.iNet Router Setup Guide
    • Roqos Core Router Setup Guide
  • TROUBLESHOOTING
    • Router Access
    • WiFi Connectivity
    • Internet Connection Issues
    • General VPN Issues
    • DD-WRT Firmware
    • TeamViewer Remote Support
  • FAQs
    • Router FAQs
    • VPN FAQs
    • Warranty and Returns FAQs
    • Sales FAQs
    • Shipping FAQs
    • Service Plan FAQs
  • Show Search
Hide Search

Search Results for: issues with pro

Untangle Support

TeamFlashRouters · Jul 16, 2019 ·

Support for Untangle Router NG Firewall features is provided by the Untangle Support team and not the FlashRouter support team.

We recommend reviewing these excellent resources that Untangle has created to get you setup as desired.

  • Untangle Help Center
  • Untangle Wiki
  • Untangle Forums
  • Untangle.com

To contact Untangle directly you can email them at support@untangle.com and their team would be happy to assist you with getting setup to use their NG Firewall settings such as Web Monitor, Captive Portal, Intrusion Prevention, and many other features supported by the Untangle firmware running on your FlashRouter.

How do I boost my Wireless Transmission power?

Dave · Apr 29, 2019 ·

Boost the wireless transmission power if you need to increase the wireless range of the FlashRouter.
Important Information

We recommend reading the entry in the DD-WRT Wiki to familiarize yourself with what TX Power values represent.

Broadcom routers

  • Netgear R8500
  • Netgear R7000
  • Netgear R6400 V2
  • Netgear R6300 V2
  • Asus RT-AC5300
  • Asus RT-AC66U
  • Asus RT-AC56U

Navigate to Wireless > WL# or ath# Advanced

  1. Set the TX Power to the desired value.
  2. Click Apply Settings.
Boost TX Power in DD-WRT Advanced Wireless Settings page to Increase Wireless Transmission

Atheros routers

  • Netgear R9000
  • Netgear R7800
  • Linksys WRT3200ACM
  • LinksysWRT32X
  • Linksys WRT1900AC/v2/ACS
  • LinksysWRT1200AC

Navigate to Wireless > Basic Settings

  1. Check Advanced Settings under the wireless interface you would like to boost.
  2. Set the TX Power to the desired value.
  3. Click Apply Settings.
Boost TX Power in DD-WRT Advanced Wireless Settings page to Increase Wireless Transmission

We advise to proceed with caution when setting the TX Power. This has been known to negatively effect the hardware if set too high.

Why can’t I connect to WiFi using the WPS button feature?

Dave · Apr 29, 2019 ·

DD-WRT firmware automatically disables the WPS feature as it is a known security vulnerability. This makes your router more secure with DD-WRT than with factory firmware.

For any device that uses a WPS WiFi connection there should always be an alternate method to connect the device via WiFi.

DNS Setup for DD-WRT FlashRouters

TeamFlashRouters · Apr 3, 2019 ·

The Domain Name System (DNS) is the phonebook of the Internet. DNS resolves website domain names (www.website.com) to IP Addresses so you don’t have to remember the IP Address of every site you visit.

We setup each FlashRouter with Google DNS (8.8.8.8 , 8.8.4.4) and/or OpenDNS (208.67.220.220 , 208.67.222.222) to prevent your ISP DNS from leaking when connected to the FlashRouter.
By using a trusted DNS server like those listed below, or from your trusted VPN service provider, you can prevent ISP’S from compiling your browsing data and selling it to third parties without your consent.

Recommended DNS servers

GoogleDNS

Primary DNS: 8.8.8.8

Secondary DNS: 8.8.4.4

OpenDNS

Primary DNS: 208.67.220.220

Secondary DNS: 208.67.222.222

Cloudfare

Primary DNS: 1.1.1.1

Secondary DNS: 1.0.0.1

Level 3

Primary DNS: 209.244.0.3

Secondary DNS: 209.244.0.4

How to change the DNS on your FlashRouter

We preset each FlashRouter with GoogleDNS and OpenDNS so there is no need to change the DNS servers unless you have reset the FlashRouter or want to use different DNS servers.

Navigate to Setup > Basic Setup

DNS Setup on DD-WRT FlashRouters
  1. Scroll down to Network Address Server Settings (DHCP).
  2. Enter in any combination of valid DNS servers into Statict DNS fields 1, 2, and 3.
  3. Click Apply Settings at the bottom of the page.
  4. Power cycle your FlashRouter off and back on.

DNS Leak Test

We recommend checking to see if your DNS is leaking when using VPN.

My 5.0GHz network is not showing up

TeamFlashRouters · May 2, 2019 ·

Verify the device supports 5GHz

5.0GHz networks are not compatible with all devices so first make sure that you device’s wireless adapter supports 5GHz wireless frequencies.

If you are not sure, find out if your device support 5 GHz via Google search or by looking in the wireless hardware details in the device’s network settings. If you see Wireless a/b/g/n support then you have a compatible device. If you are missing the Wireless a then this means there is no 5 GHz support.

Enter the recommended wireless settings

Our team has tested the wireless functionality for each FlashRouter that we offer and shared our recommended wireless settings in our Wifi Setup area. Replicate the settings for your FlashRouter model found on that page.

Lower the wireless channel

Some devices do support 5.0GHz connections but not the higher channels that DD-WRT firmware offers.

Navigate to Wireless > Basic Settings

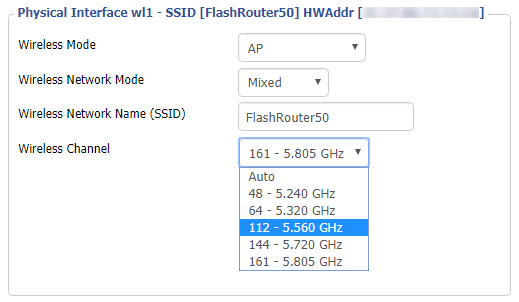
Lower the wireless channel setting for the 5.0GHz band that is not showing. Based on our tests the most broadly compatible channels are 36, 48 and 161.

CLICK APPLY SETTINGS

Refresh your device's network adapter

The easiest way to accomplish this is by rebooting your device as the settings to reset your adapter may vary on all types of internet connected devices.

Review wireless Status

Navigate to Status > Wireless

The readouts on this page can help tell if there are errors with the FlashRouter’s wireless. View our article on how to read the Wireless Status page for more information.

Why can’t I send emails while connected to VPN?

TeamFlashRouters · Jun 4, 2019 ·

Can’t send or receive emails? Connecting to a VPN server can result in your email client not being able to send or receive emails. This can happen for several reasons:

  • The VPN provider you are connected to is blocking the ports the email client is using (SMTP).
  • Your email service is blocking access to datacenter IPs
  • Your email service is only allowing access to residential IPs
  • Your email service is only allowing access to IPs of its own country
  • Your email service is only allowing access to certain ISPs

This issue will only occur with email client applications and not with web browser email.

Steps to take if your email is not working

Change SMTP port

Access the settings of your email client and change the SMTP port to 587 or 465.

Change the VPN server

Connect to a different VPN server. The process for changing servers is detailed in your provider’s setup instructions.

FlashRouters Privacy App

DD-WRT Manual VPN Configuration

Disconnect from VPN

Disconnect from VPN on the FlashRouter and use your ISP Internet connection when using email.

Dual router setup users can leave the VPN running on the FlashRouter and simply connect to the other router’s network when using email.

Contact your VPN Service Provider

In some cases if you contact your VPN service provider they will be able to give you access to a specifically requested e-mail service.

My 2.4GHz network is not showing up

TeamFlashRouters · May 2, 2019 ·

If you ever have an issue with WiFi, you can always wire directly into the FlashRouter to verify and/or update your current WiFi settings.

Enter the recommended wireless settings

Our team has tested the wireless functionality for each FlashRouter that we offer and shared our recommended wireless settings in our Wifi Setup area. Replicate the settings for your FlashRouter model found on that page if the 2.4GHz is not showing.

Change the wireless channel

Navigate to Wireless > Basic Settings

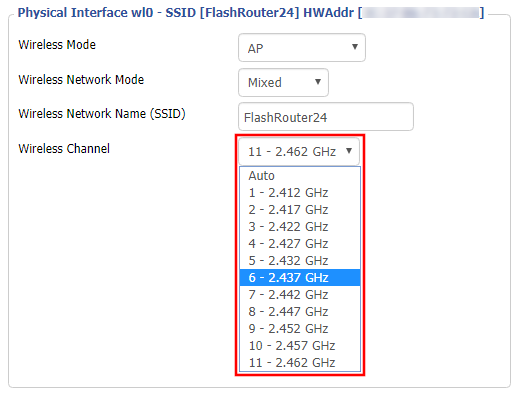
Change the wireless channel setting for the 2.4GHz band that is not appearing. The most broadly compatible channels are 6 and 11.

CLICK APPLY SETTINGS

Refresh your device's network adapter

In rare instances the wireless adapter for your device may stop picking up WiFi networks and must be reset. This will be different for each device, that is why the best way to refresh your wireless adapter is to simply reboot any device in question and see if the adapter now picks up your WiFi networks.

Review wireless Status

Navigate to Status > Wireless

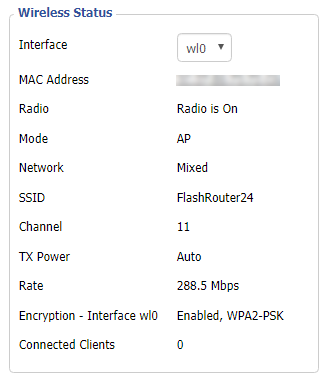
The readouts on this page can help tell if there are errors with the FlashRouter’s wireless. View our article on how to read the Wireless Status page for more information.

How do I reset and reconfigure my ExpressVPN/Aircove FlashRouter?

TeamFlashRouters · Mar 16, 2022 ·

When is a router reset needed?

A reset of the FlashRouter should only be performed in the following instances:

  • You have exhausted all other troubleshooting methods and cannot access your router settings.
  • Password to access the FlashRouter’s settings are not working.
  • Power light on the router is blinking steadily.
  • Router is not accessible after upgrading the firmware

Reset Router

Asus FlashRouters:

  1. While the router is powered off press and hold the WPS button on the back or side of the router. Power up the router while continuing to hold the WPS. Continue to hold for 15 seconds as the router powers on (note this could be up to 45 seconds on some models before lights flash).
  2. You will see the lights on the router flashing steadily and this is how you know you have reset the router.
  3. Let the router sit for about a minute and then reboot the router.

Aircove, Linksys and Netgear FlashRouters:

  1. While the router is plugged in, find the reset button located on the back of the router. You will need a pin or pencil to hold down the button for 15 seconds.
  2. You will see the lights on the back of the router flash simultaneously and this is how you know you have reset the router.
  3. Let the router sit for about a minute and then reboot the router.

Access Router Settings

1. Connect to the FlashRouter’s network via ethernet cable or wireless.

The wireless network will appear as “Aircove”, “Linksys##”, “Netgear##”, or “Asus” and the password to join the network will be the default wireless password printed on the bottom of the router.

2. Open your web browser and enter expressvpnrouter.com or 192.168.132.1 in the URL.

ExpressVPNrouter.com
192.168.132.1

3. Click Get Started on the ExpressVPN page that is displayed.

ExpressVPN Get Started

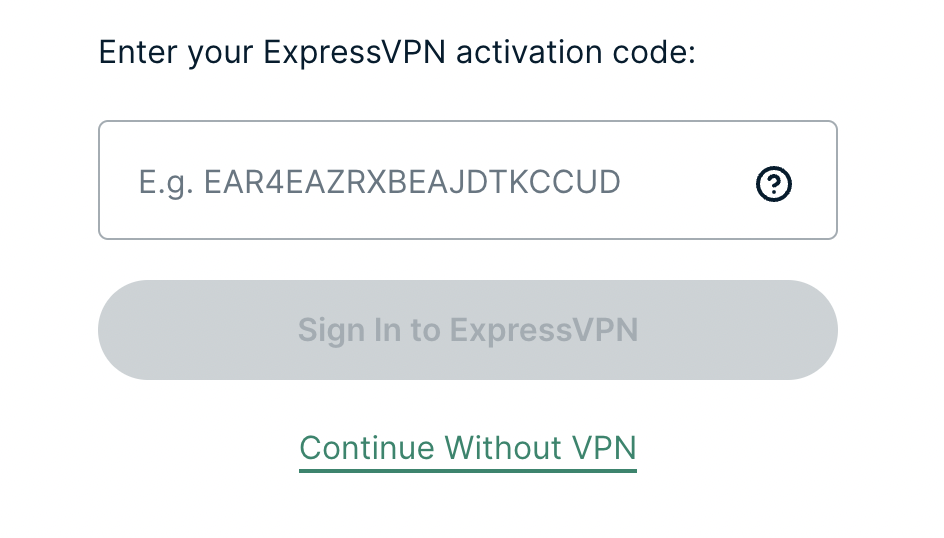
4a. If your FlashRouter is wired to the Internet correctly then you will be prompted to enter your ExpressVPN Activation Code found in your ExpressVPN account. Paste that in and click Sign in to ExpressVPN.

ExpressVPN Activation Code

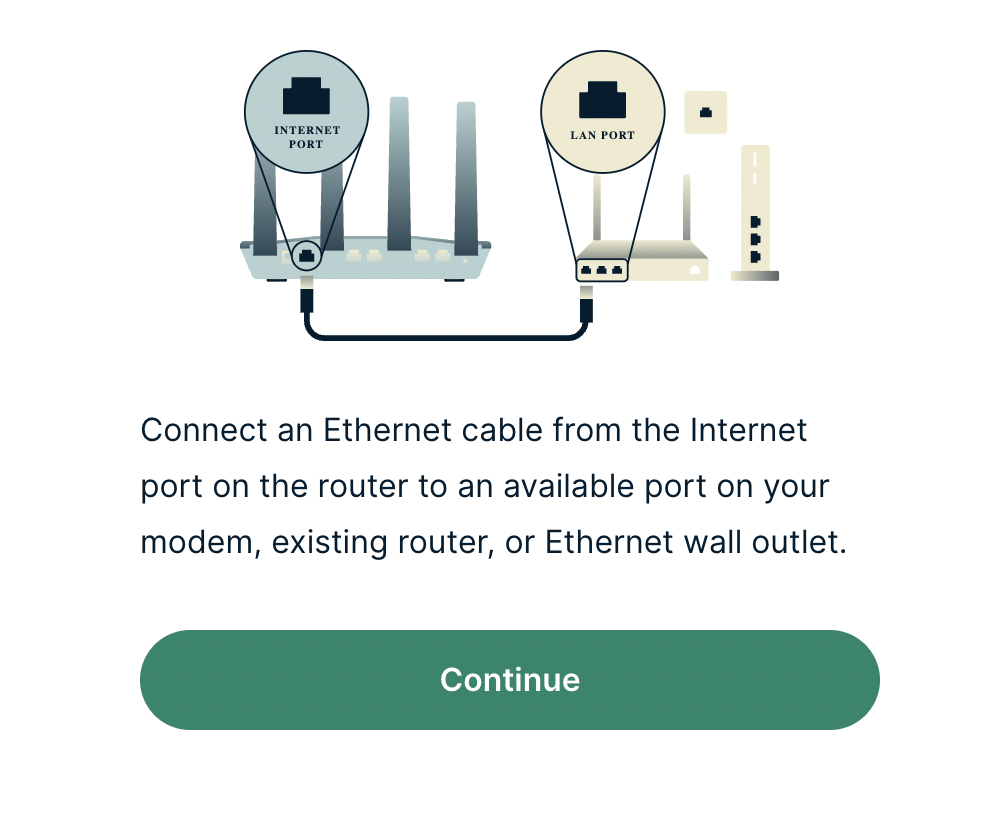
4b. If your FlashRouter is not wired correctly or is not receiving Internet properly make sure you are wired as detailed in the diagram that appears. If you are stuck at this screen we recommend powering off your ISP modem and any other router that the ExpressVPN FlashRouter is wired to and then powering them back up one by one.

Proceed with step “4a” above once the router is receiving Internet and you are prompted to enter the Activation Code.

ExpressVPN Wiring

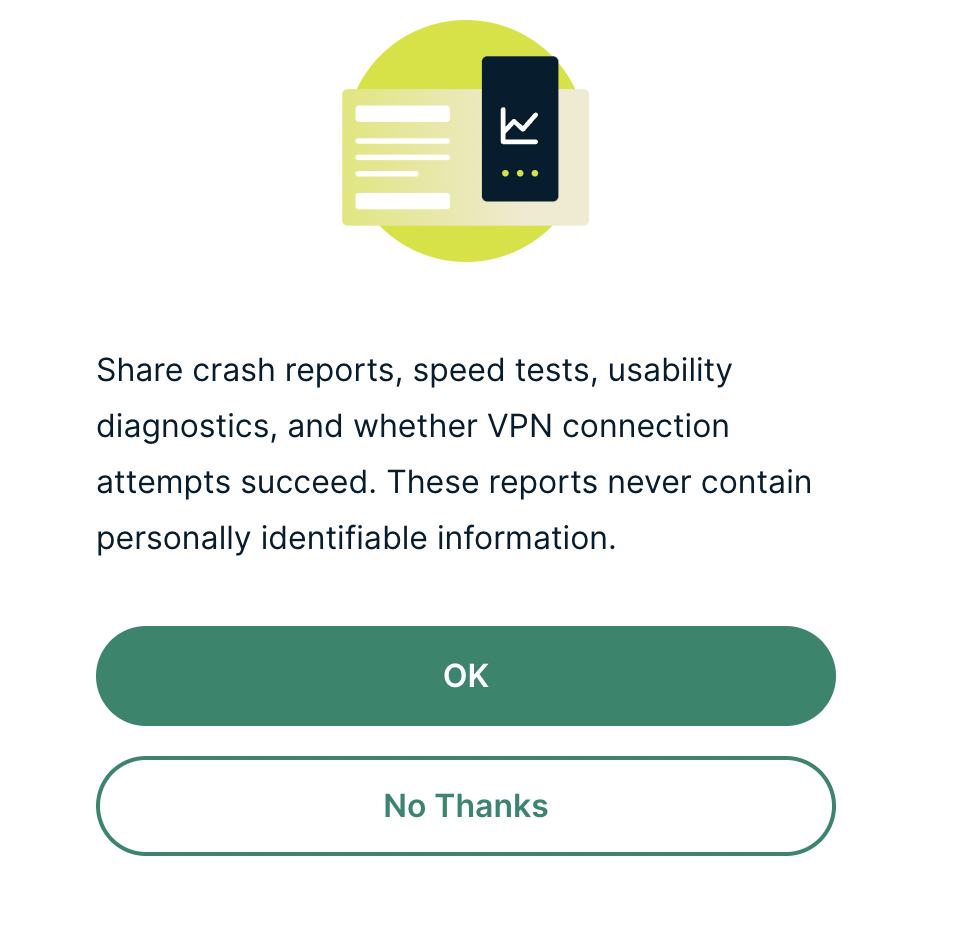
5. Select if you want to share anonymous crash report data with ExpressVPN to help them improve the firmware for future releases.

ExpressVPN Share Crash Report

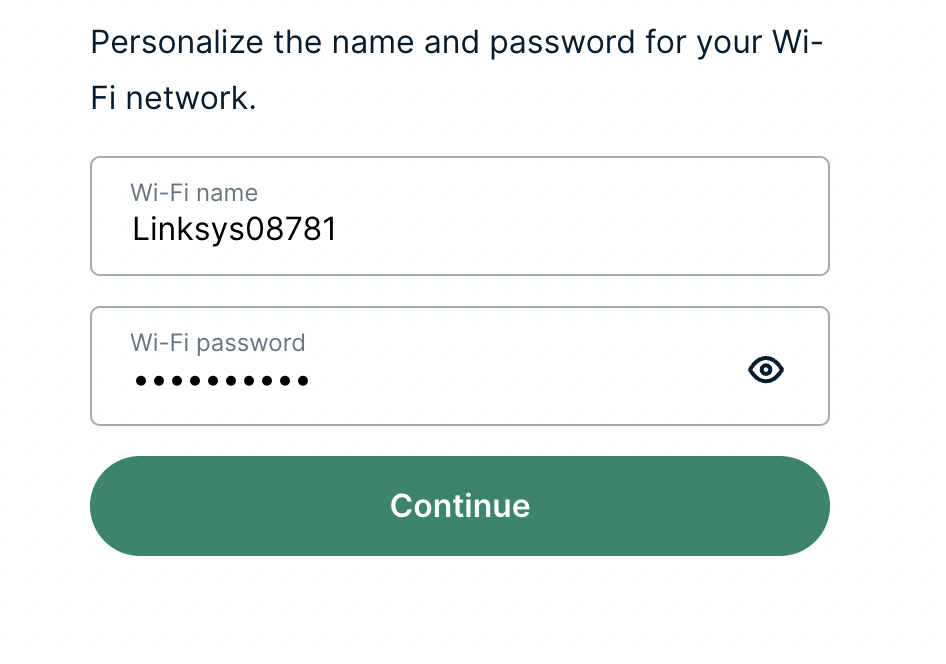
6. Set the WiFi name and password your wireless devices will use to connect to the FlashRouter’s network. Make sure the WiFi name is unique and not a duplicate of an existing WiFi name if you change it. You can also leave it as the default information if you like. Click Continue.

ExpressVPN Set WiFi Name and Password

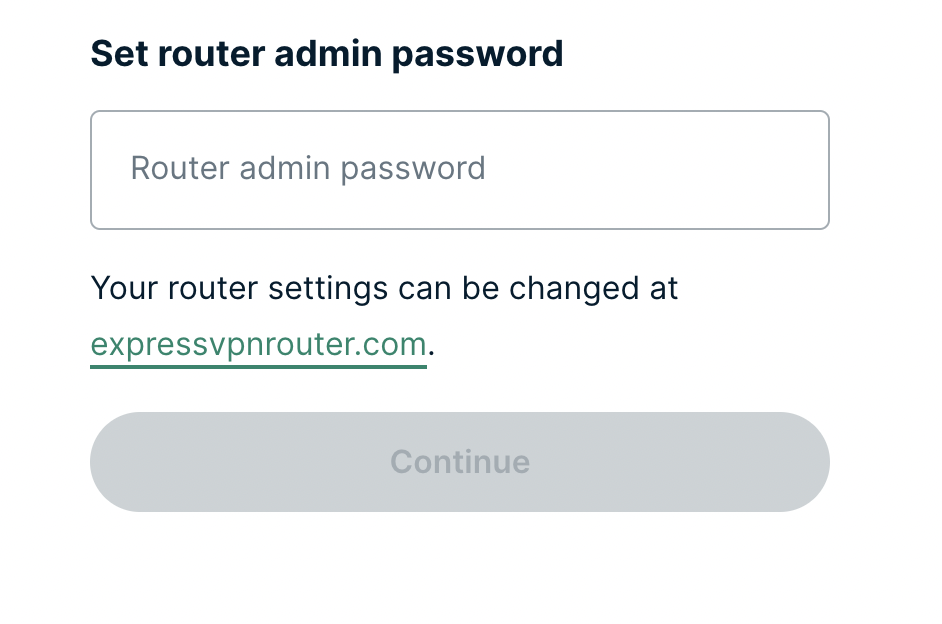
7. Enter the admin password you will use to access the ExpressVPN router settings. Be sure to TYPE CAREFULLY when setting the admin password as a typo will result in needing to reset the router again. Note this password in a secure location or commit it to memory.

ExpressVPN admin password

8. Your ExpressVPN FlashRouter is now fully setup!

ExpressVPN Connected

NordVPN Setup Guide for Privacy Hero

TeamFlashRouters · Apr 3, 2023 ·

Your Privacy Hero NordVPN Router uses cloud-based management, which means you can securely access and adjust your router settings from anywhere, on any device with an internet connection. Whether you’re connected through your phone, another Wi-Fi network, or directly to the Privacy Hero network, setup and management are always within reach.

Follow the steps below to connect your Privacy Hero to NordVPN NordLynx or OpenVPN servers. By default, you’ll automatically connect to the fastest, most reliable server available based on your location. If you prefer, you can also select a specific country server and input it directly into your Privacy Hero for more control.

:point_right: Don’t have a Privacy Hero yet? Get your Privacy Hero NordVPN Router here

NordVPN Nordlynx Setup for Privacy Hero

1. From any device that has a browser such as a computer, smartphone, or tablet visit app.privacyhero.com

App.PrivacyHero.com

2. Enter your Privacy Hero account email and password. Click Login.

Privacy Hero Access Settings

3. Click the VPN symbol.

Privacy Hero Setup VPN

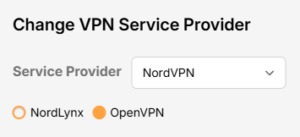
4. Click the Change button and select NordVPN from the dropdown.

Privacy Hero Change VPN Providers

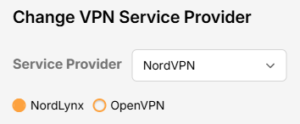
5. Click the Change button and select NordVPN from the dropdown and choose the NordLynx option. Next you will need to obtain your Token.

NordVPN Protocol Privacy Hero

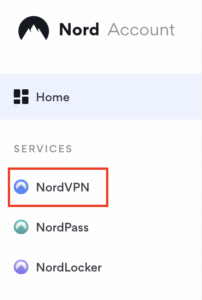
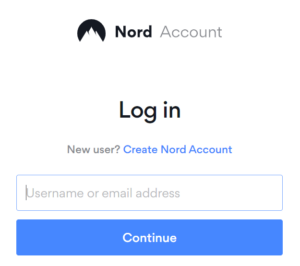
6. In a new tab login to your NordVPN account and select NordVPN from your list of Services.

NordVPN account

7. At the bottom of the page click Get Access token and you will receive a code via email. Enter this code to proceed.

NordVPN Access Token

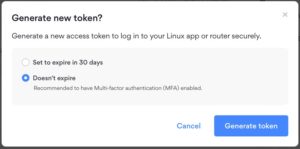
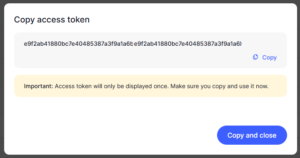
8. After you enter the email code select Generate new token and set it to Doesn’t expire. Copy this token.

NordVPN Generate new token
NordVPN Copy Token

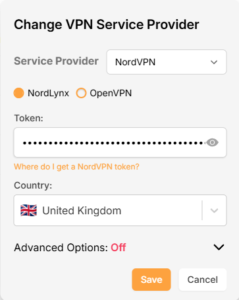
9. Paste the token and then Click Save to connect to the server address recommended by NordVPN within your country.

NordVPN Protocols Privacy Hero

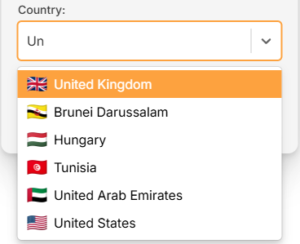
10. To connect to a specific location, click the Country dropdown menu and scroll or type to search from the available options. Choose your preferred country and you will automatically connect to the recommended server within that country at the time. Then click Save.

Nordlynx VPN Country Selection Privacy Hero

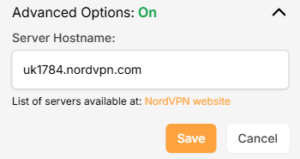
11. If you prefer to enter a specific server address number click Advanced Options and then type in the NordVPN server you would like to use as shown below e.g. uk1784.nordvpn.com. Then click Save.

Nordlynx Advanced Privacy Hero

Use the NordVPN’s server recommendation tool to select a specific country and receive a recommendation for the fastest server based on your actual location. You can then enter that server in the Privacy Hero settings manually.

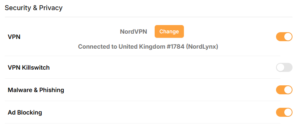
12. Your Privacy Hero settings should now show a Connected message, indicating you have successfully signed in to your NordVPN NordLynx VPN server!

Privacy Hero Nordlynx Connected

NordVPN OpenVPN Setup for Privacy Hero

1. From any device that has a browser such as a computer, smartphone, or tablet visit app.privacyhero.com

App.PrivacyHero.com

2. Enter your Privacy Hero account email and password. Click Login.

Privacy Hero Access Settings

3. Click the VPN symbol.

Privacy Hero Setup VPN

4. Click the Change button and select NordVPN from the dropdown.

Privacy Hero Change VPN Providers

5. Choose the OpenVPN option to connect to OpenVPN servers or to setup a NordVPN Dedicated IP address. Next you will need to obtain your Manual Service credentials.

NordVPN Protocol Privacy Hero

6. In a new tab login to your NordVPN account and select NordVPN from your list of Services.

NordVPN login
NordVPN account

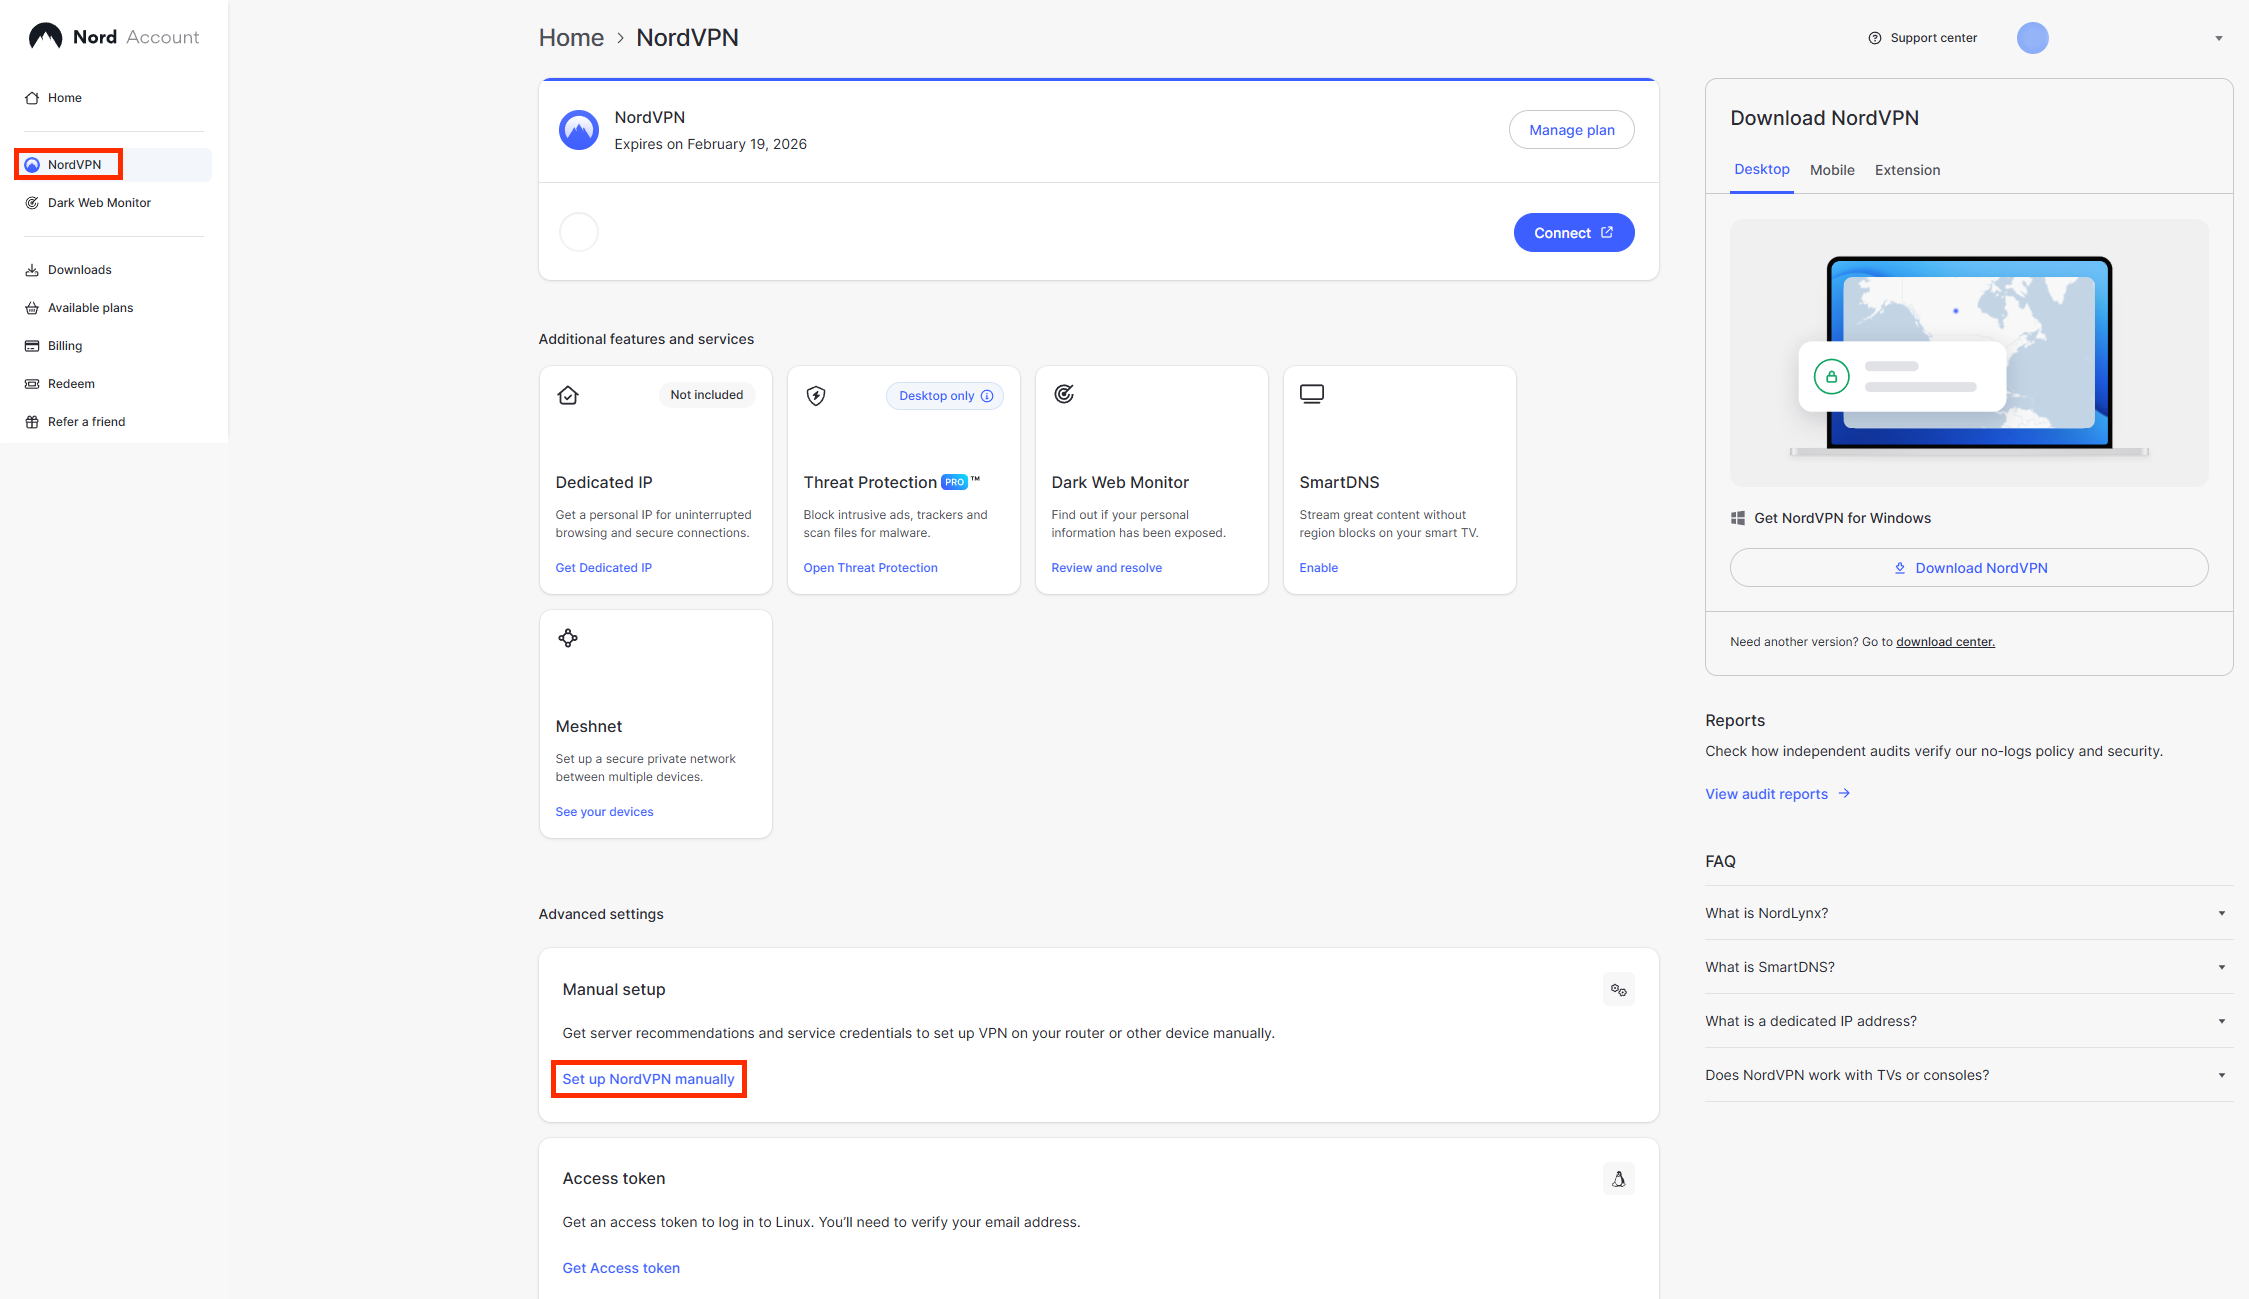
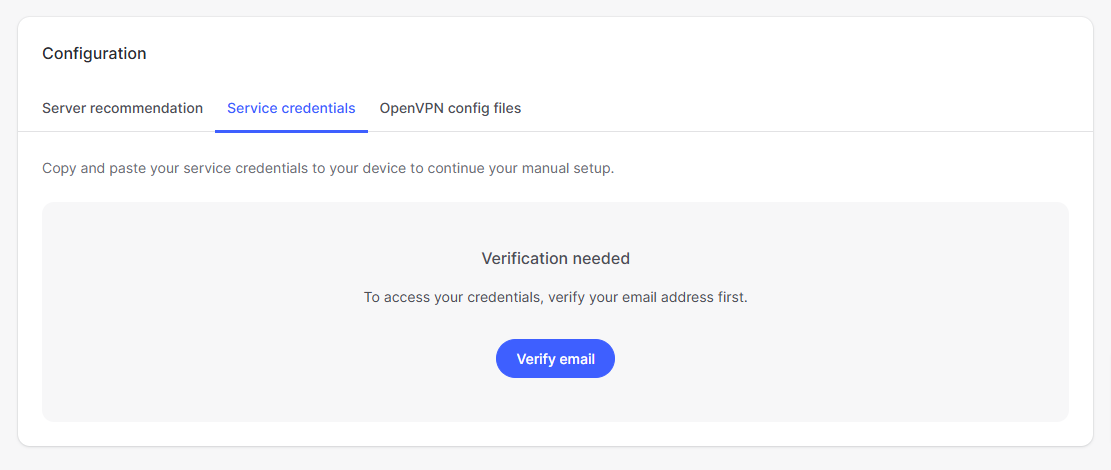
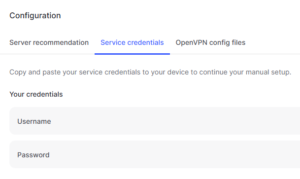
7. At the bottom of the page in the Manual Setup section click Setup NordVPN manually then under the Configuration section go to Service credentials. Click Verify email to receive a code via email and enter the code to view and copy your credentials.

NordVPN Manual OpenVPN
NordVPN Service Credentials

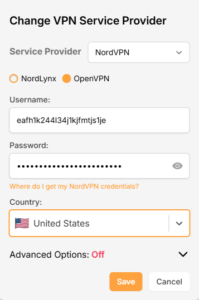
8. Enter these credentials into the OpenVPN Username and Password sections in your Privacy Hero and Click Save if you want to connect to the server address recommended by NordVPN within your country.

NordVPN OpenVPN Privacy Hero

9. To connect to a specific location, click the Country dropdown menu and scroll or type to search from the available options. Choose your preferred country and you will automatically connect to the recommended server within that country at the time. Then click Save.

Nordlynx VPN Country Selection Privacy Hero

10. To connect with a NordVPN Dedicated IP Address or if you prefer to enter a specific server address number click Advanced Options and then type in the NordVPN server you would like to use as shown below e.g. uk1784.nordvpn.com. Then click Save.

Nordlynx Advanced Privacy Hero

Use the NordVPN’s server recommendation tool to select a specific country and receive a recommendation for the fastest server based on your actual location. You can then enter that server in the Privacy Hero settings manually.

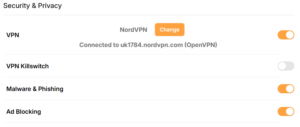
11. Your Privacy Hero settings should now show a Connected message, indicating you have successfully signed in to your NordVPN Dedicated IP address or preferred OpenVPN server!

NordVPN OpenVPN Connected Privacy Hero

Privacy Hero’s cloud based router settings access makes it so you can change settings while not connected to the Privacy Hero network. Visit the NordVPN IP Check to verify your VPN IP address. If it has not changed be sure to double check that you are indeed connected to the Privacy Hero network.

Keep in mind that the VPN connection will not change the location of the streaming services listed in the Streaming Relocation area of the Privacy Hero settings if the Streaming Relocation feature is Enabled.

Still having issues?

Feel free to submit a ticket and we will get back to you as soon as possible.

How do I upgrade the DD-WRT firmware of my FlashRouter?

TeamFlashRouters · May 30, 2019 ·

The following DD-WRT builds are from 11/24/2024 r58699. Keep in mind that these builds are for upgrading routers that already have DD-WRT firmware flashed. To flash a stock firmware router with DD-WRT firmware see our Flash My Router plan!

Download an updated DD-WRT firmware build for your specific FlashRouter model below. Contact support@flashrouters.com if you are uncertain about your router model or your router model is not available below.

  • Asus RT-AC5300
  • Asus RT-AC56U
  • Asus RT-AC66U
  • Asus RT-AC68U
  • Asus RT-AC87U
  • Linksys WRT1200AC
  • Linksys WRT1900AC
  • Linksys WRT1900ACv2
  • Linksys WRT1900ACS
  • Linksys WRT1900ACSv2
  • Linksys WRT3200ACM
  • Linksys WRT32X
  • Netgear R6300v2
  • Netgear R6400
  • Netgear R6400v2
  • Netgear R6700
  • Netgear R6700v2
  • Netgear R6700v3
  • Netgear R7000
  • Netgear R7000P
  • Netgear R7450
  • Netgear R7800
  • Netgear R8000
  • Netgear R8500
  • Netgear R9000

Please be aware that FlashRouters is not responsible for any DIY firmware flashing updates. If you have questions or concerns contact FlashRouters Support or check out the DD-WRT Community for additional helpful resources.

Make sure you are following the directions below to load the firmware file into the router settings and not trying to open the firmware file on its own.

Access the FlashRouter via wired connection. It is possible to upgrade firmware via WiFi, but this is not recommended unless you are unable to wire directly to the router.

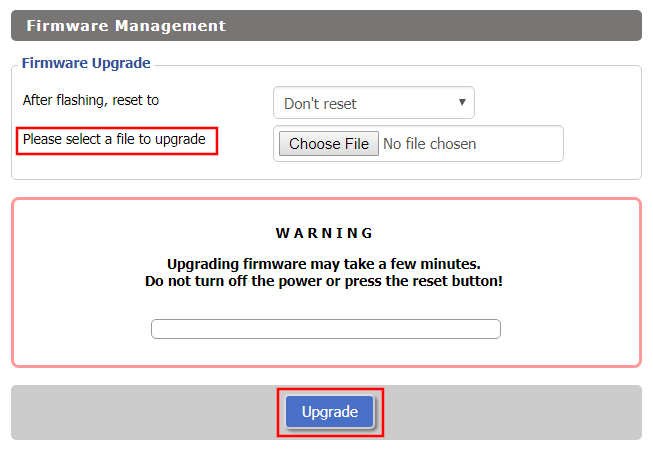
Navigate to Administration > Firmware Upgrade

Firmware Upgrade page in FlashRouter DD-WRT settings
  1. Do NOT select Reset to Default Settings in the dropdown menu as this will erase all of your FlashRouter settings.
    NOTE: If you are updating from an older DD-WRT build you may be required to reset the router after a firmware update for new features and UI to properly load. You will then be required to setup the administration username and password along with your WiFi and VPN network settings.
  2. Click Choose File and select the file you have downloaded.
  3. Click Upgrade.

Using Device Groups to bypass VPN on ExpressVPN/Aircove firmware

TeamFlashRouters · May 12, 2022 ·

Bypassing the ExpressVPN tunnel on certain devices allows you to have multiple IP Addresses while connected to the same router. This feature is very helpful with certain websites where VPN is blocked such as streaming services and banking information.

1. Connect to the FlashRouter’s network via ethernet cable or wireless.

2. Open your web browser and enter expressvpnrouter.com or 192.168.132.1 in the URL.

ExpressVPNrouter.com
192.168.132.1

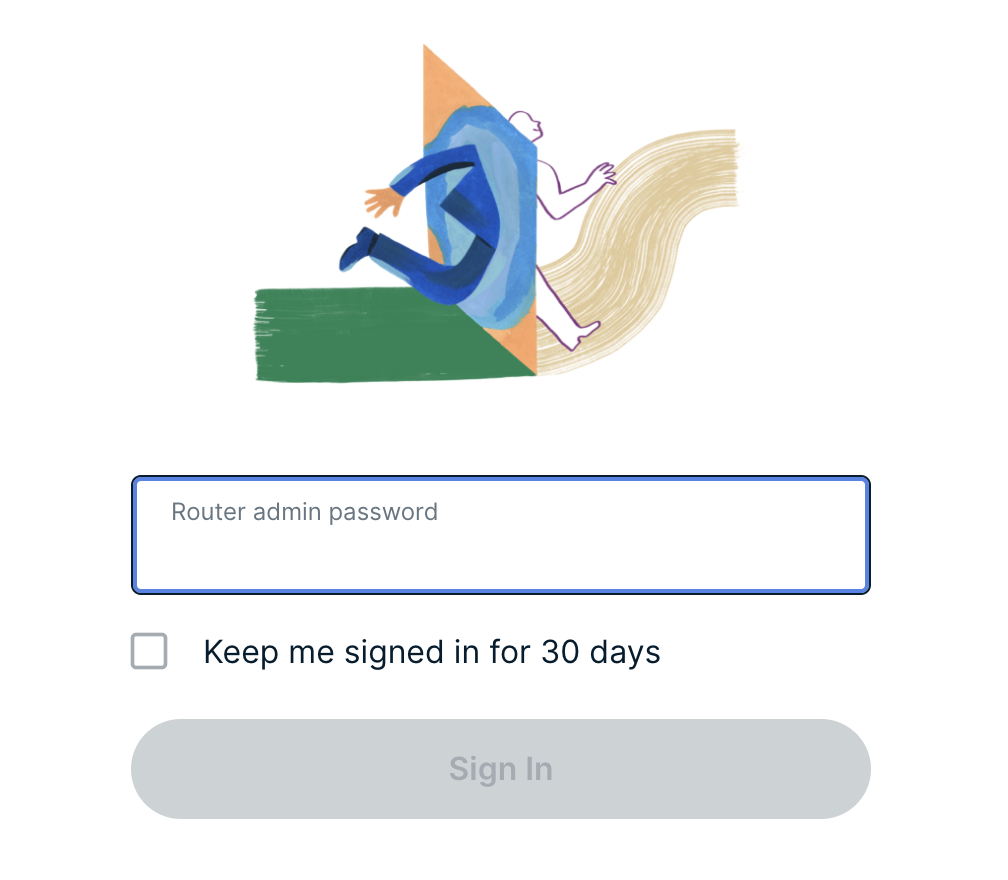
3. Login with your ExpressVPN FlashRouter admin password.

ExpressVPN Router admin login

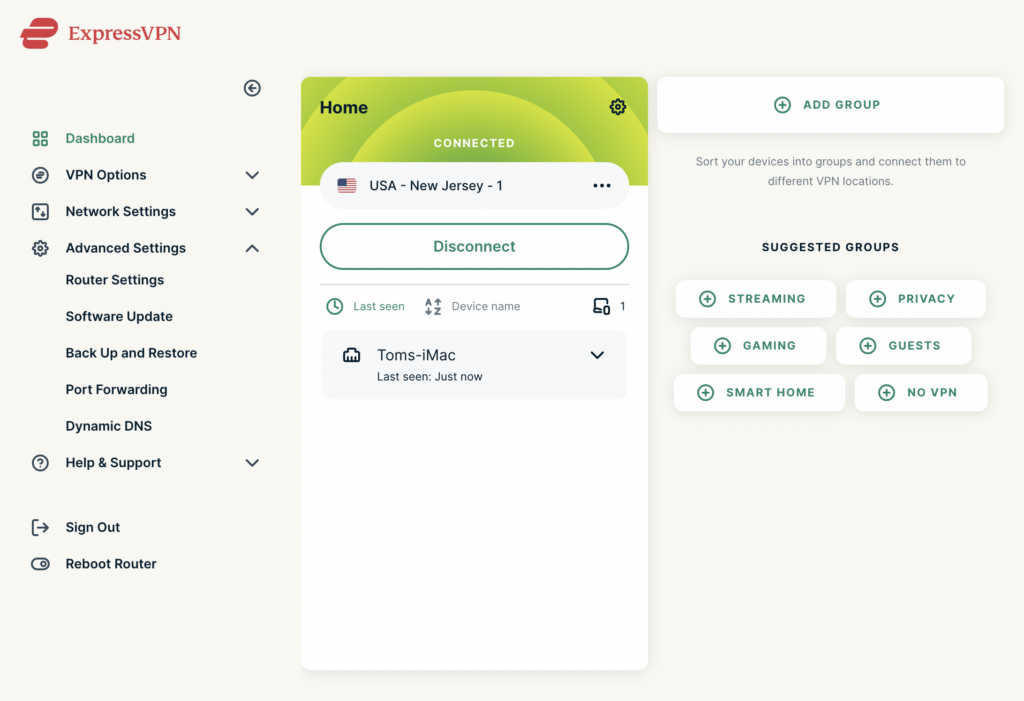
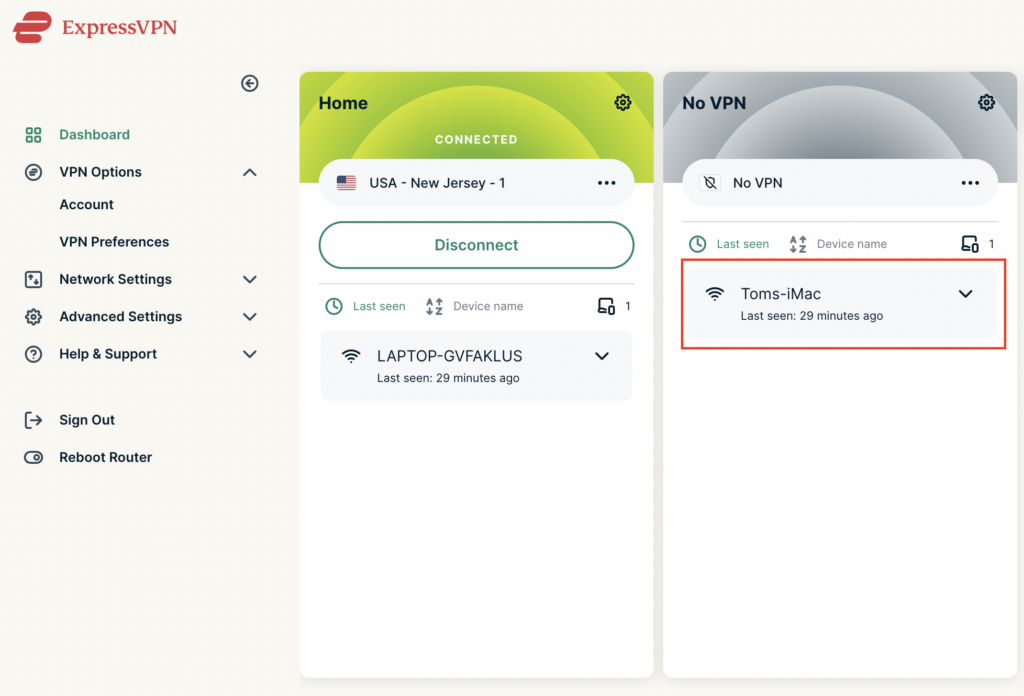
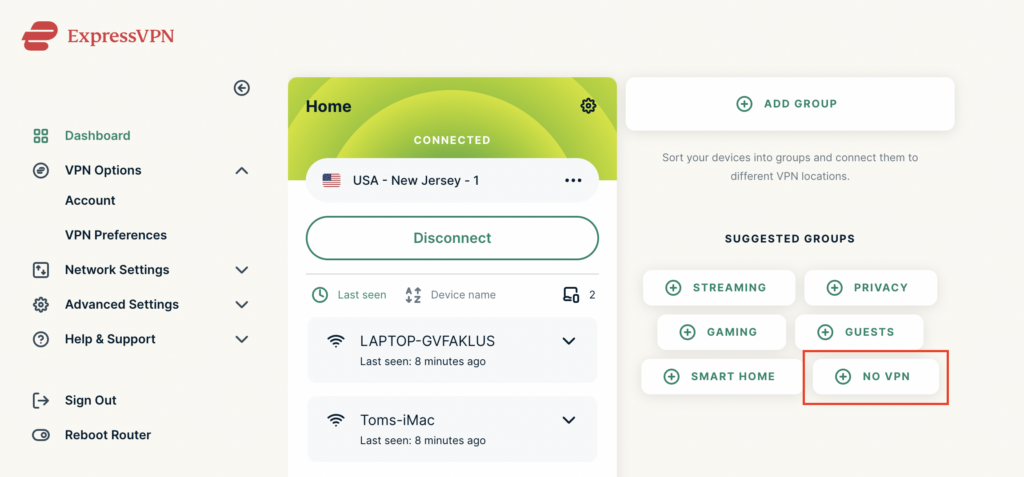
4. Select VPN Off on the right hand side of the menu.

ExpressVPN select No VPN

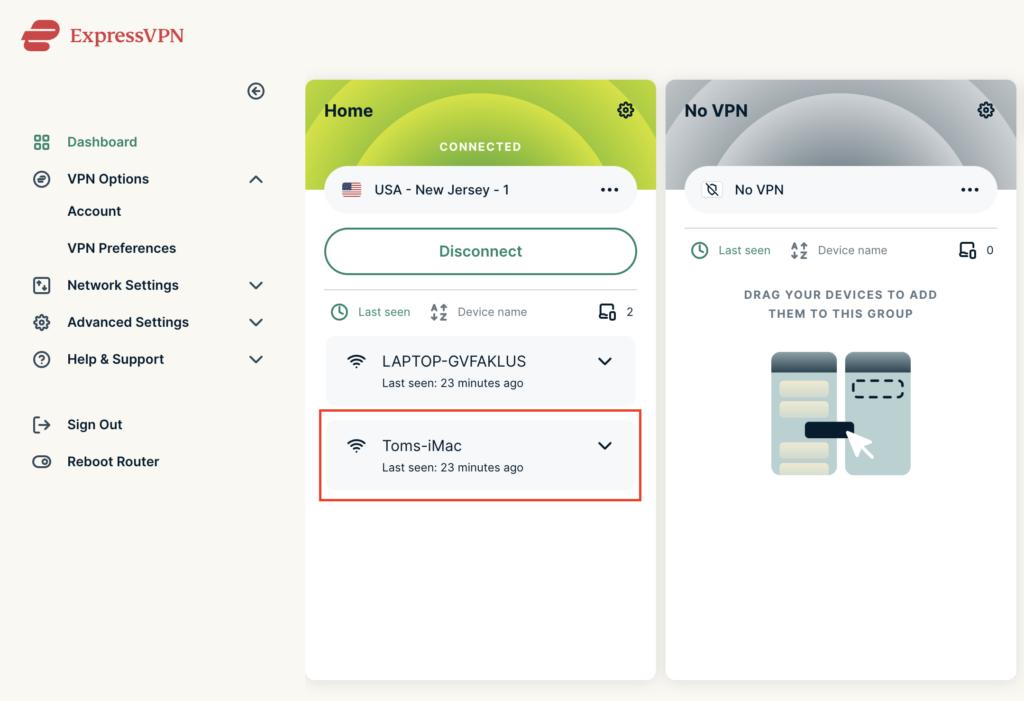
5. Click and drag the device that you want to bypass the VPN tunnel to the No VPN area.

ExpressVPN No VPN select device
ExpressVPN No VPN select device 2

The devices assigned to No VPN will now correct directly to your ISP internet while the devices in the VPN group will remain connected to the VPN server.

Set a Static IP for your connected devices on Roqos

TeamFlashRouters · Dec 21, 2021 ·

By assigning specific Static IP addresses to your devices you can better manage your network and make sure they connect with the same Local IP Address each time they connect to your Roqos.

Login to Roqos Core UI web app in a browser on any computer or smart device.

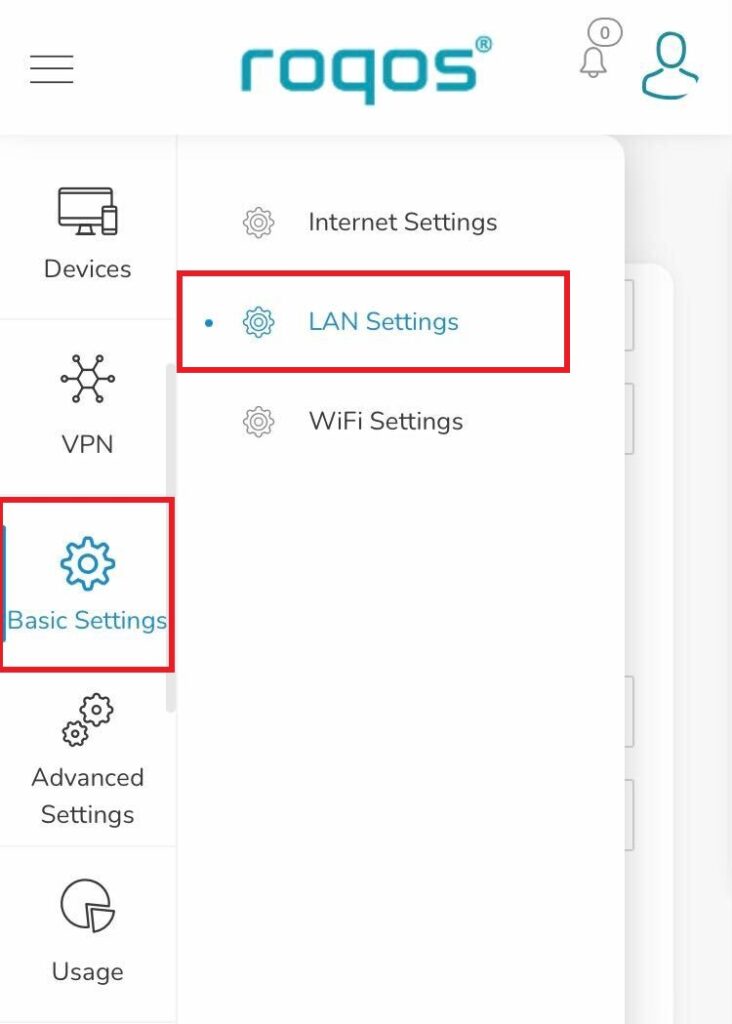
1. Click the navigation menu and select Basic Settings > LAN Settings.

Roqos Basic Settings - LAN settings

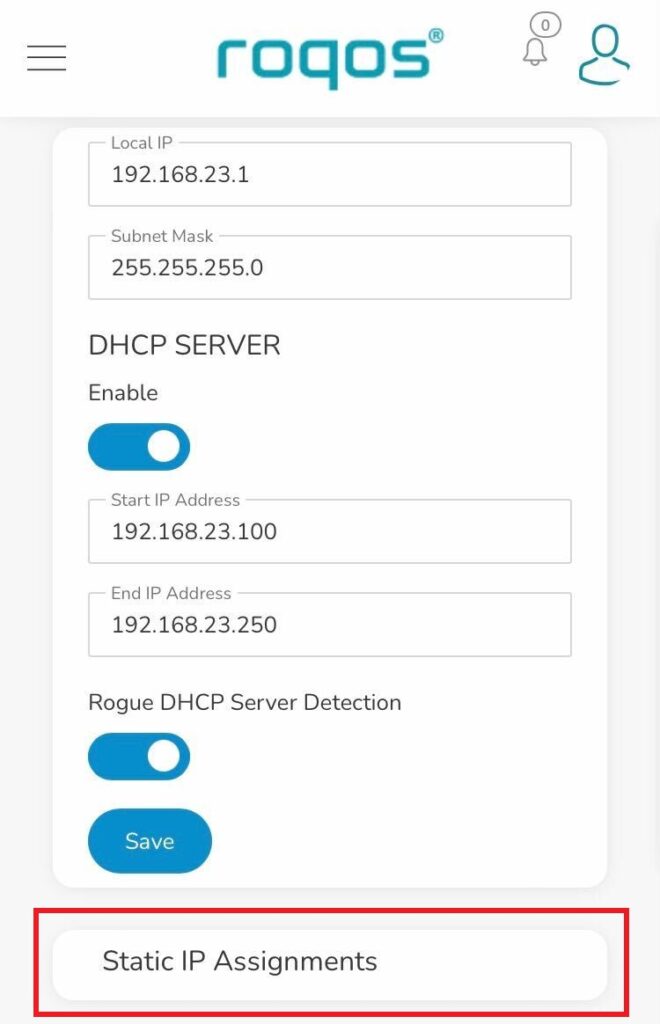
2. Click Static IP Assignments.

Roqos LAN settings - Static IP Assignments

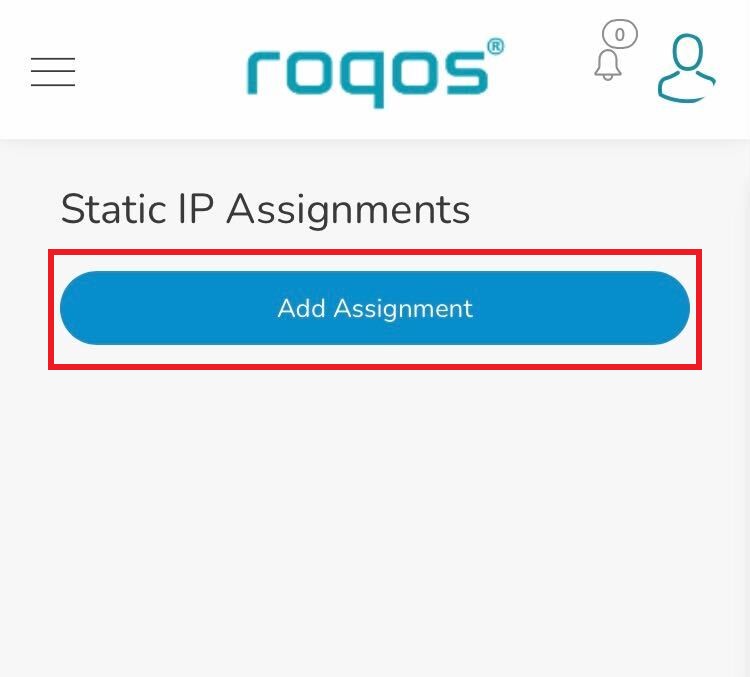
3. Click Add Assignment.

Roqos LAN settings - Add Assignment

4. Toggle the device hat you want to set a Static IP for and then enter 192.168.23.x with x being any number between 2 and 254. Click Save.

Now, every time the device connects to the Roqos network it will be assigned the same Static IP address on the Local network.

How do I check for static network settings on my devices?

TeamFlashRouters · May 8, 2019 ·

Static network settings set on a device from a previous connection will interfere with the FlashRouter’s network. Typically the FlashRouter’s network performs best when connected devices are set to automatically use the FlashRouter’s IP Address and DNS.

Make sure you are connected to the FlashRouter’s network via ethernet or WiFi. Keep in mind these instructions may vary based on your current software version.

Check for Static IP Address in Windows

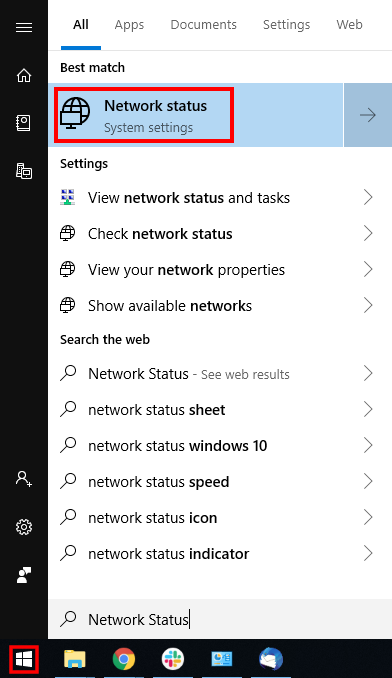
1.  Open the Window search box, and search “Network Status”

Find Static DNS settings for FlashRouter DD-WRT in Windows Computer

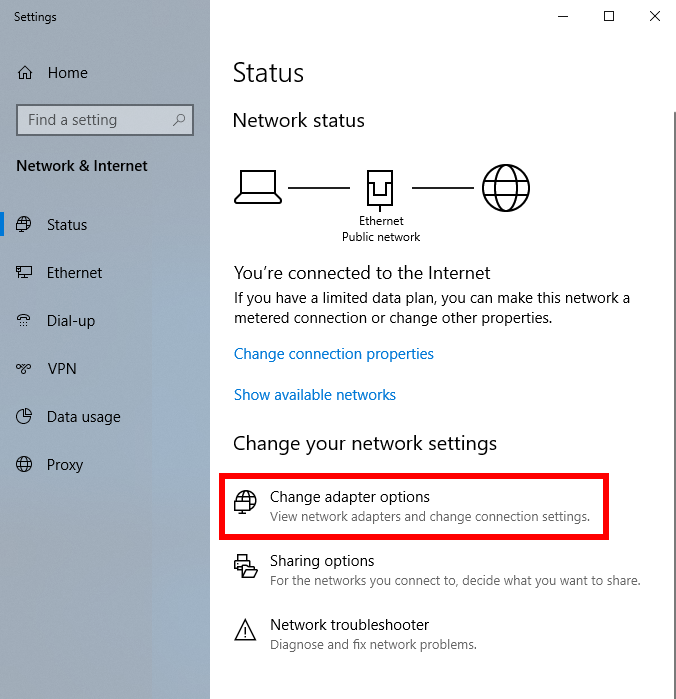
2. Select “Change adapter optons”

Find Static DNS settings for FlashRouter DD-WRT in Windows Computer 2

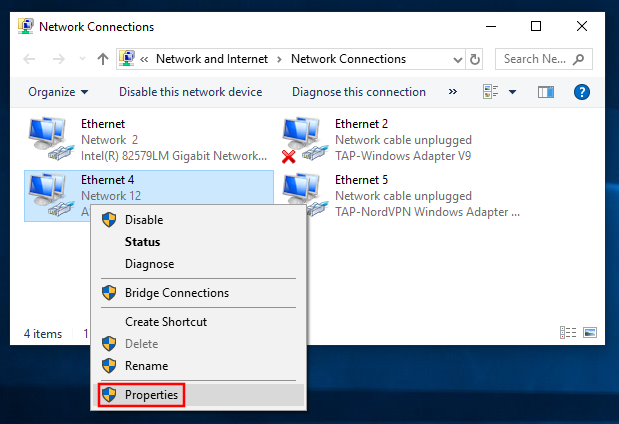
3. Right click on the WiFi and/or ethernet adapter and select Properties.

Find Static DNS settings for FlashRouter DD-WRT in Windows Computer 3

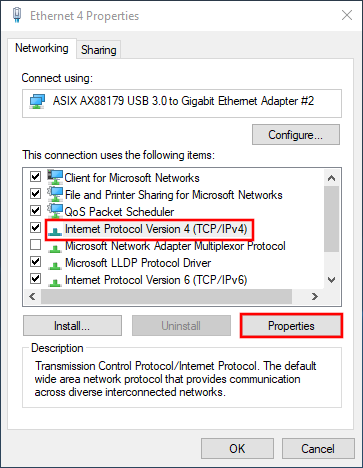
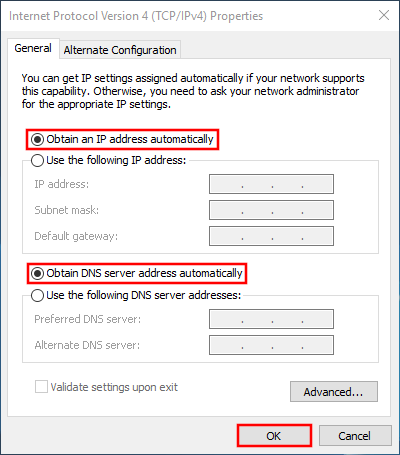
4. Highlight Internet Protocol Version 4 (TCP/IPv4) and click Properties.

5. Delete the values entered for IP address, Subnet mask, Default gateway, Preferred DNS server, and Alternate DNS server.

6. Select Obtain an IP address automatically and Obtain DNS server address automatically.

7. Click OK.

Find Static DNS settings for FlashRouter DD-WRT in Windows Computer 4

Check for Static IP Address in Apple / Mac

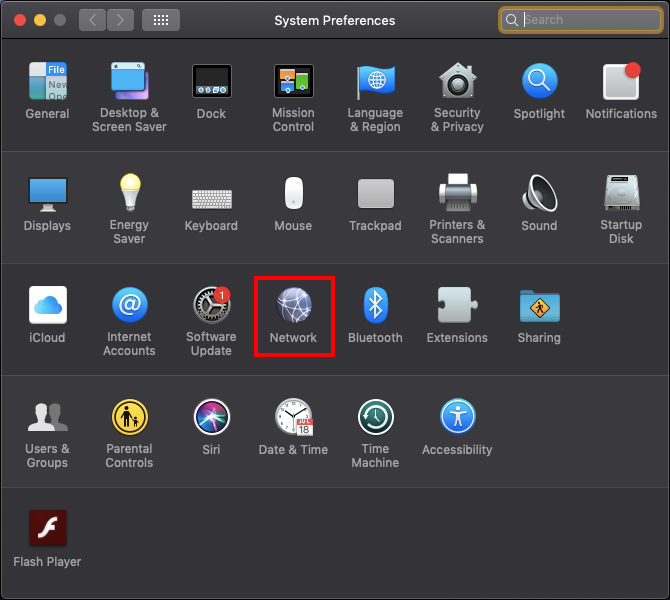
1. Open System Preferences, and select Network.

Find Static DNS settings for FlashRouter DD-WRT Using a MAC Computer

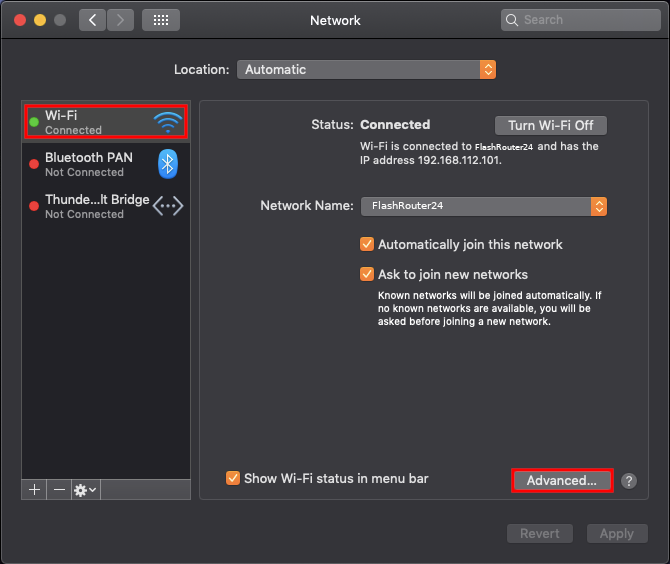
2. Select the adapter that is connected via ethernet or wireless. This will vary based on your current connection.

3. Select Advanced.

Find Static DNS settings for FlashRouter DD-WRT Using a MAC Computer 2

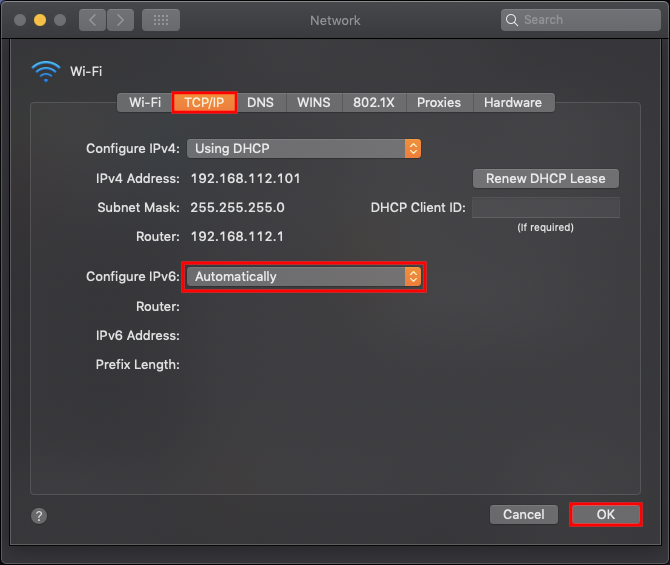
4. Select the TCP/IP tab.

5. Set Configure IPv4 to Automatically.

Find Static DNS settings for FlashRouter DD-WRT Using a MAC Computer 4

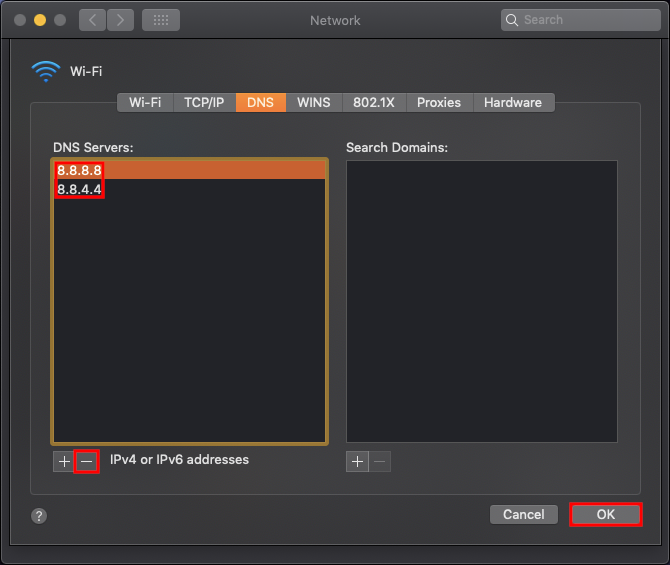
6. Select the DNS field and highlight any DNS servers you see there. If they can be removed you should click the minus symbol below.

Find Static DNS settings for FlashRouter DD-WRT Using a MAC Computer 5

7. Click OK.

8. Click Apply.

Check for Static IP Address in iOS

1.  Open Settings

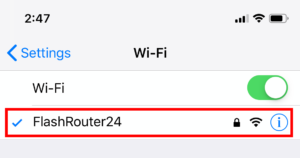
2. Select WiFi, and select the blue icon next to your current connection.

Select FlashRouters DD-WRT Wireless Network in order to Check Static IP Network Settings on iOS Mobile Device

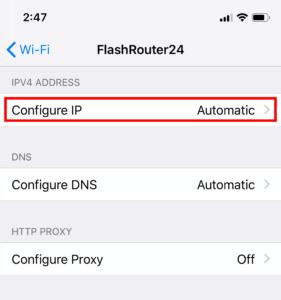
3. Make sure Configure IP is set to Automatically.

Check Static IP Network Settings on iOS Mobile Device and set Configure IP to Automatic

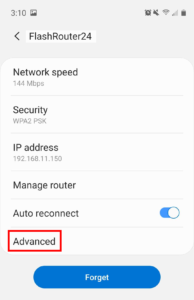
Check for Static IP Address in Android

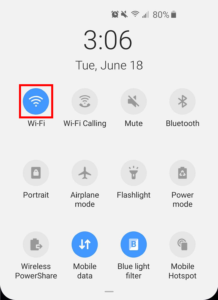
1. From the top of the screen, swipe down to display settings.

2. Select WiFi.

WiFi Icon and Settings in Android Mobile Device

3. Select your current network.

4. Select Advanced.

Advanced Settings Button in Android Mobile Device

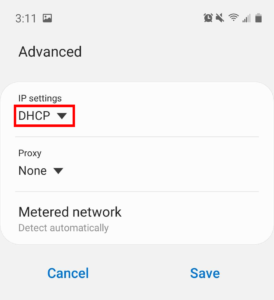
5. Make sure that IP settings is set to DHCP.

Check Static IP DHCP Network Settings in Android Mobile Device

Privacy Hero Bypass certain devices from VPN

TeamFlashRouters · Apr 3, 2023 ·

Your Privacy Hero router uses Cloud Based router management which means you can access the router settings from anywhere on any device that has an internet connection. You can follow these steps while connected to your phone, other Wi-Fi network, or the Privacy Hero network.

If you have certain devices in your network that you do NOT want connecting to VPN you can follow these steps to bypass these devices from the Privacy Hero’s VPN connection.

1. From any device that has a browser such as a computer, smartphone, or tablet visit app.privacyhero.com

App.PrivacyHero.com

2. Enter your Privacy Hero account email and password. Click Login.

Privacy Hero Access Settings

If you have not created your Privacy Hero account yet please follow these instructions.

3. Click the Devices symbol.

Privacy Hero Devices

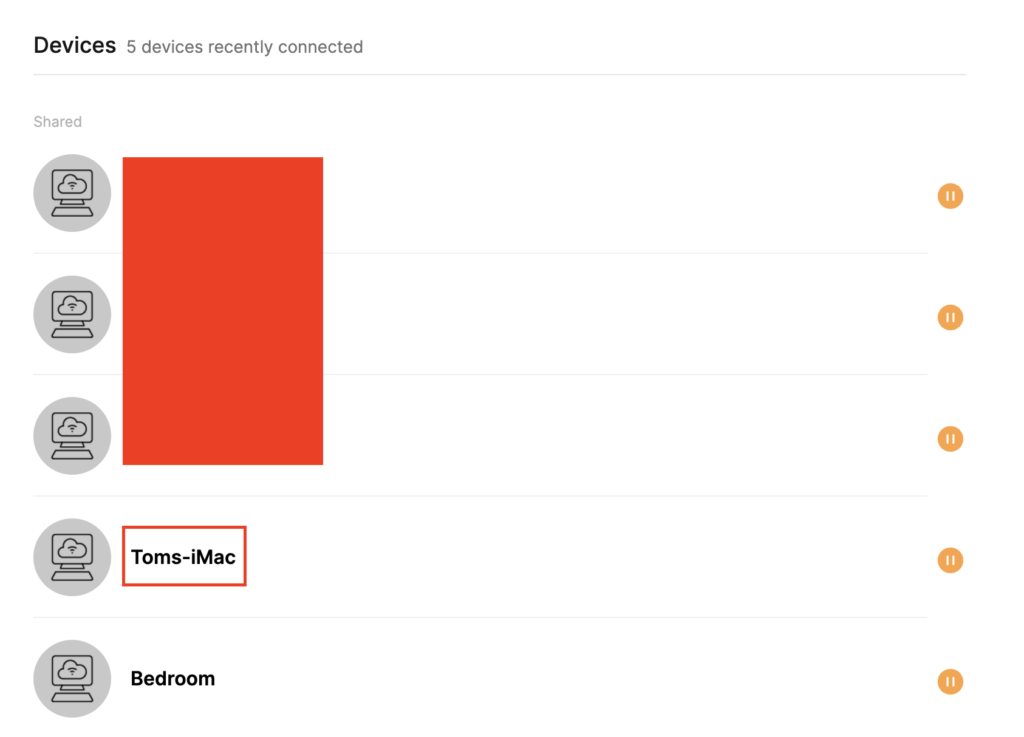
4. Click the name of the Device you want to bypass from VPN.

Privacy Hero Select Device

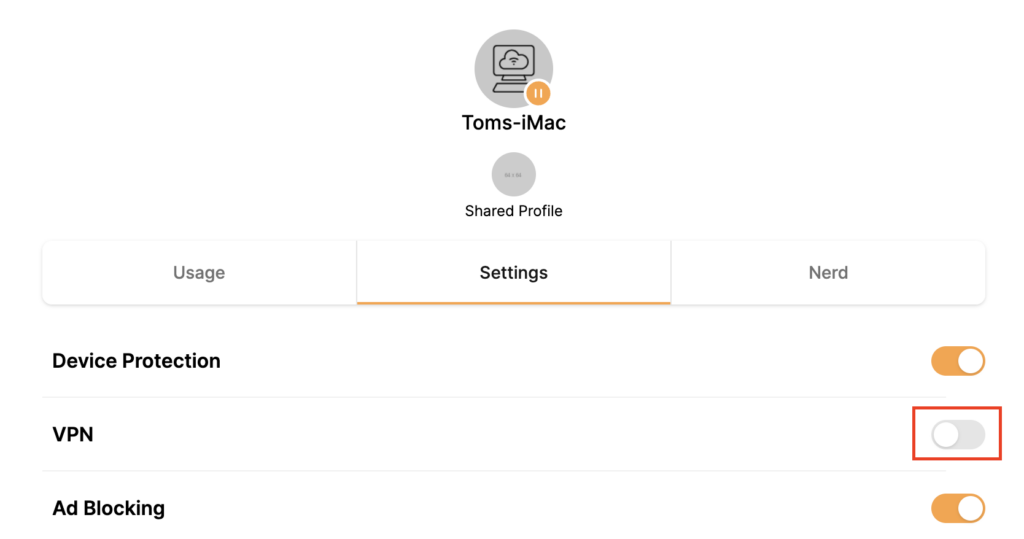
5. Set the VPN toggle to Off. You can also do the same for Adblocking and Device Protection as needed.

Privacy Hero VPN off by device

TROUBLESHOOTING

Still having issues? Visit the VPN Troubleshooting section.

Troubleshoot Here

Surfshark AsusWRT WireGuard Setup

TeamFlashRouters · Apr 29, 2024 ·

Preparing for Surfshark AsusWRT Setup

Copy your Surfshark Private Key

If you are not already a Surfshark user Sign Up Now.

1. Log in to your account on the Surfshark website.

Surfshark Account Login

2. Click VPN Manual Setup.

Surfshark VPN Manual Setup

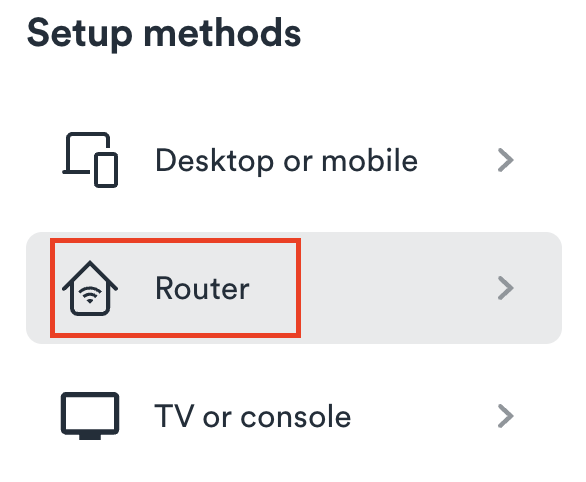
3. Select Router as the Setup method.

Surfshark setup method Router

4. Select WireGuard as the Protocol.

Surfshark select WireGuard

5. Select I don’t have a key pair.

Surfshark No Key Pair

6. Enter FlashRouter as the name of the connection and click Next.

Surfshark Connection Name

7. Click Generate a new key pair.

Surfshark Generate new Key Pair

8. A Public Key and Private Key will then appear. Use the copy box to copy the Private Key. You will not need the public key.

Surfshark Private Key

AsusWRT Router Setup for Surfshark

Login to AsusWRT firmware settings in a browser on any computer or smart device connected to the AsusWRT FlashRouter’s network.

1. Navigate to the VPN tab.

Merlin VPN Tab

2. Navigate to the VPN Fusion tab.

Asus VPN Fusion

3. Click Add profile.

Asus Add profile

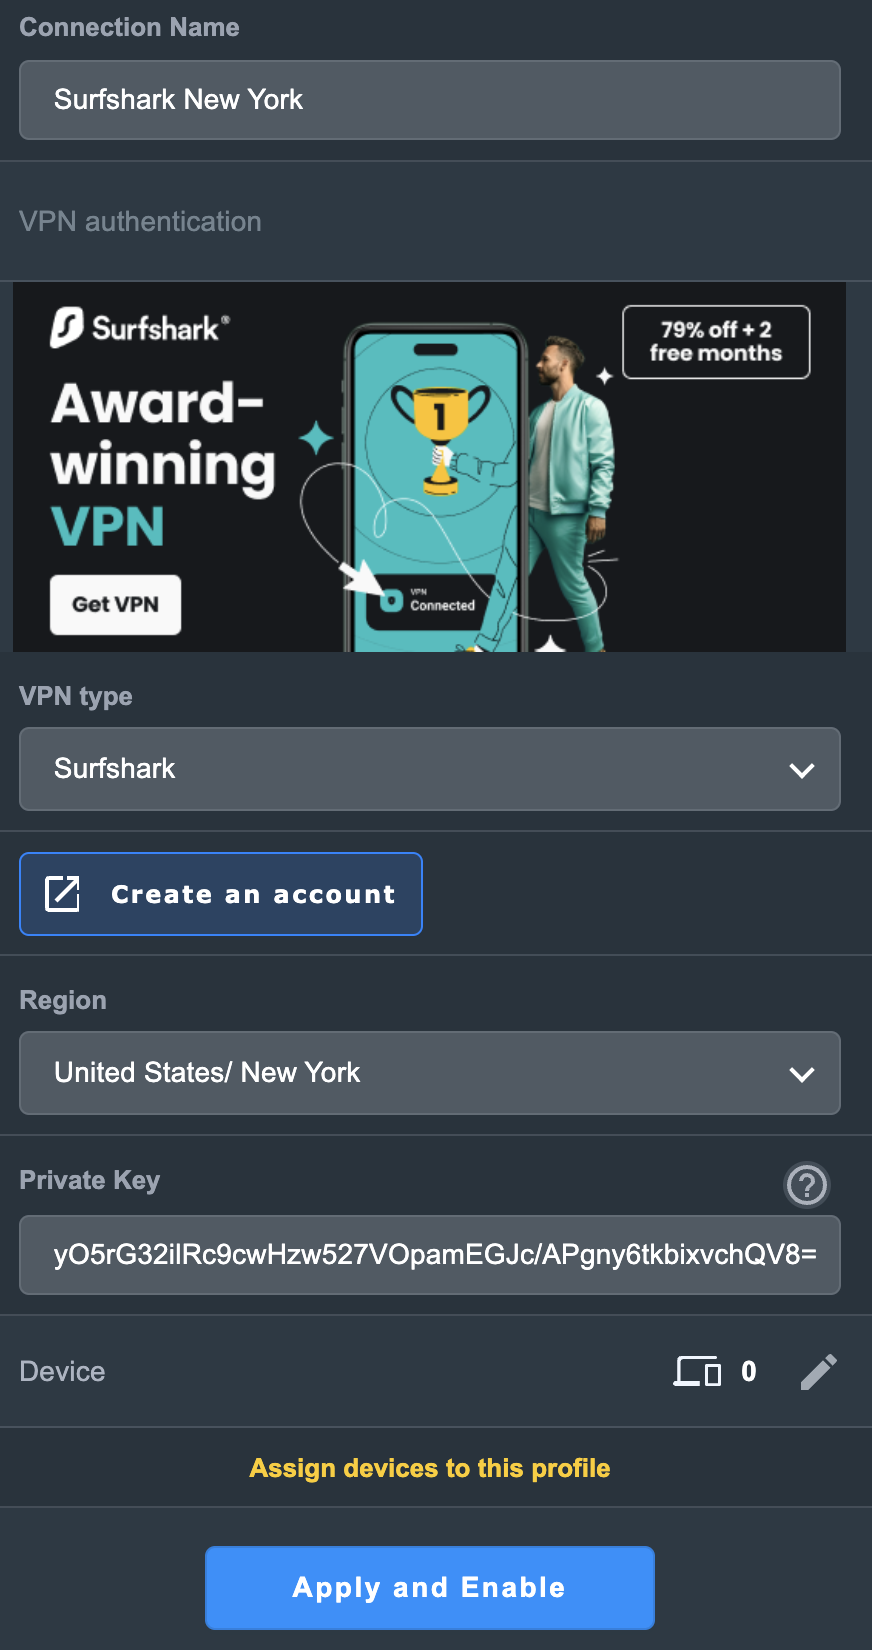
4. In the Connection Name field enter in Surfshark.

5. In the VPN Type dropdown select Surfshark.

6. In the Region dropdown select the Surfshark location you want to connect to.

7. In the Private Key field paste in the Surfshark Private Key obtained earlier.

8. Click Apply and Enable at the bottom of the page.

Asus Surfshark profile

If you only want certain devices to connect to the Surfshark profile you are setting up instead of all the devices connected to the FlashRouter’s network click into the profile and disable Apply to all devices. Then click Devices and select the devices that you want to connect to VPN.

Asus VPN devices
Asus VPN select devices

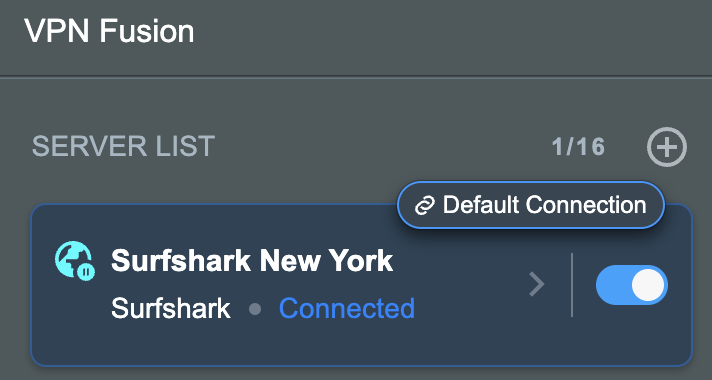
9. At the top of the page set the Service State toggle to ON to activate the VPN connection.

Asus Surfshark Connected

Verify a successful Surfshark connection

  1. You should now see a CONNECTED message.
  2. Visit Surfshark’s IP Check to verify your new IP address and virtual location.

In some cases you may notice that the location is not showing the same location as the server you have input in your router settings; this is because geo tracking tools are often tricked by VPN connections. As long as you see an IP address that is not the same as your normal Internet IP address then you are indeed connected to Surfshark.

How to change the Surfshark server

  1. Use the profile service state toggle to disconnect the currently connected location.
  2. Then click into the Surfshark profile in the router’s settings.
  3. Then adjust the Region dropdown to a new location.
  4. Click Apply all settings.
  5. Use the profile service state toggle to connect the new location.

TROUBLESHOOTING

Still having issues? Visit the VPN Troubleshooting section.

Troubleshoot Here

HMA VPN Manual OpenVPN Setup

TeamFlashRouters · Apr 11, 2019 ·

Please note: HMA no longer allows router based integration, please visit our top recommended VPNs.

TROUBLESHOOTING

Still having issues? Visit the VPN Troubleshooting section.

Troubleshoot Here

IPVanish VPN Setup Guide for Privacy Hero

TeamFlashRouters · Sep 23, 2025 ·

Your Privacy Hero router uses Cloud Based router management which means you can access the router settings from anywhere on any device that has an internet connection. You can follow these steps while connected to your phone, other Wi-Fi network, or the Privacy Hero network.

IPVanish Wireguard Setup for Privacy Hero (recommended)

1. From any device that has a browser such as a computer, smartphone, or tablet visit app.privacyhero.com.

App.PrivacyHero.com

2. Enter your Privacy Hero account email and password. Click Login.

Privacy Hero Access Settings

3. Click the VPN symbol.

Privacy Hero Setup VPN

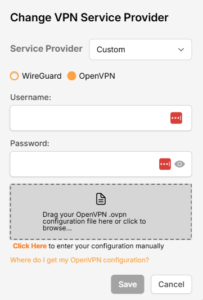
4. Click the Change button and select Custom from the dropdown and choose the Wireguard option.

Privacy Hero Change VPN Providers

5. In a new tab login to your IPVanish account.

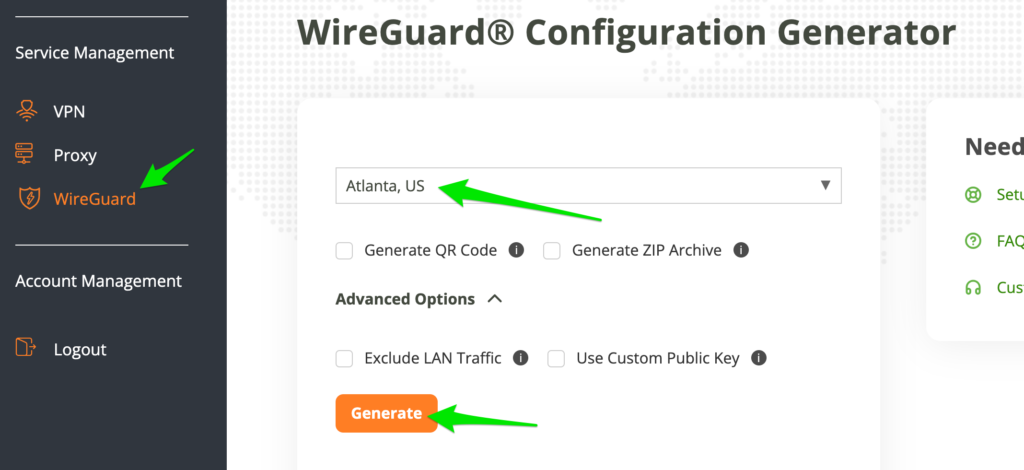
6. Click WireGuard on the left menu to access the WireGuard Configuration Generator.

Then select the server location and click Generate to download the WireGuard configuration file.

7. Drag and drop or click to Upload the server file into the Custom box on your Privacy Hero settings page. Then press Save.

8. Your Privacy Hero settings should now show a Connected message, indicating you have successfully signed in to your IPVanish VPN server!

IPVanish OpenVPN Setup for Privacy Hero

1. From any device that has a browser such as a computer, smartphone, or tablet visit app.privacyhero.com.

App.PrivacyHero.com

2. Enter your Privacy Hero account email and password. Click Login.

Privacy Hero Access Settings

3. Click the VPN symbol.

Privacy Hero Setup VPN

4. Click the Change button and select Custom from the dropdown and choose the OpenVPN option.

Privacy Hero Change VPN Providers

5. Download an .ovpn file from the IPVanish server list.

6. Drag and drop or click to Upload the server file into the Custom box on your Privacy Hero settings page.

7. Enter your IPVanish account login as the Username and Password. Then press Save.

8. Your Privacy Hero settings should now show a Connected message, indicating you have successfully signed in to your IPVanish VPN server!

Privacy Hero’s cloud based router settings access makes it so you can change settings while not connected to the Privacy Hero network. Visit the IPVanish IP Check to verify your VPN IP address. If it has not changed be sure to double check that you are indeed connected to the Privacy Hero network.

Keep in mind that the VPN connection will not change the location of the streaming services listed in the Streaming Relocation area of the Privacy Hero settings if the Streaming Relocation feature is Enabled.

TROUBLESHOOTING

Still having issues? Visit the VPN Troubleshooting section.

Troubleshoot Here

Obtain your NordVPN manual Username and Password for OpenVPN

TeamFlashRouters · Aug 14, 2024 ·

Obtain your NordVPN manual Username and Password

If you are not already an NordVPN user Sign Up Now.

1. Log in to your account on the NordVPN website.

NordVPN login

2. Click NordVPN on the left hand side and then click Setup NordVPN manually.

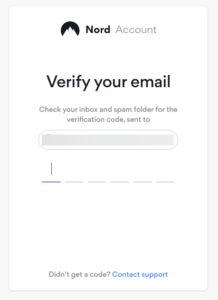
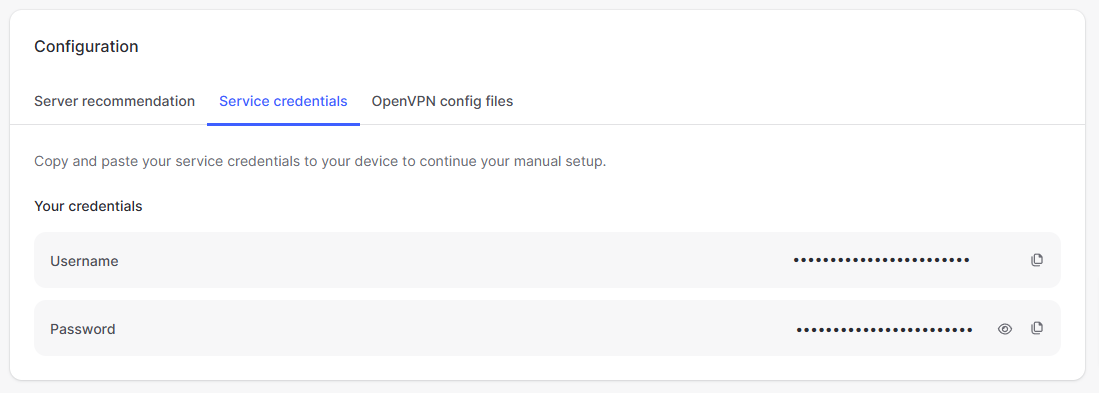
3. Go to the Service Credentials section and click Verify email. Enter in the verification code that was sent to your email.

Nord Email Verification
NordVPN verify code

4. Copy and paste your NordVPN manual username and password to a secure location. This is the username and password you will enter into the router settings to connect to NordVPN OpenVPN.

NordVPN OpenVPN Credentials

TROUBLESHOOTING

Still having issues? Visit the VPN Troubleshooting section.

Troubleshoot Here

Access FlashRouter DD-WRT firmware settings

TeamFlashRouters · Mar 22, 2019 ·

You must be connected to the FlashRouter network via ethernet or WiFi connection on your device in order to be able to access the FlashRouter’s firmware settings.

Why do I need to access my FlashRouter's settings?

It is important to understand how to access your router if you want to:
  • Change WiFi or admin passwords
  • Switch VPN server locations
  • Attempt custom setups
  • Troubleshoot your network

Connect your device to the FlashRouter network

We recommend using a computer, tablet, or phone to access your FlashRouter firmware settings. You can connect your device to the FlashRouter via Ethernet Cable or Wireless connection.

Please note, you will NOT be able access the firmware settings unless you connect your device to the FlashRouter Network.

via Ethernet

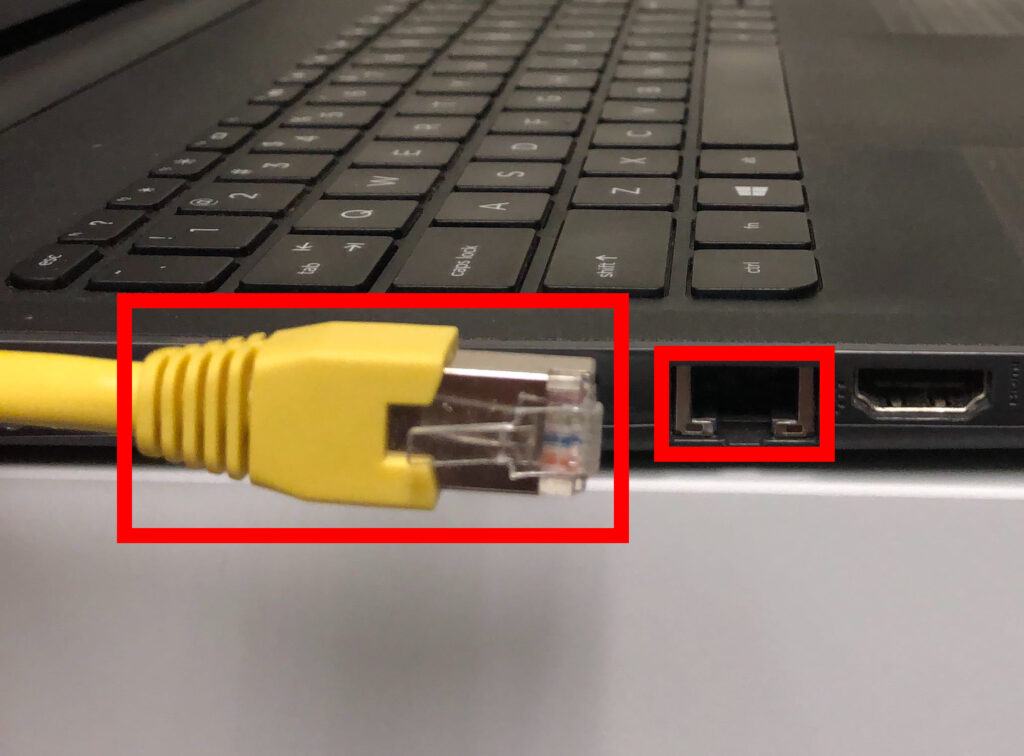
Connect an Ethernet cable to your device’s Ethernet port.

Access FlashRouters DD-WRT Admin Settings via Ethernet Connection 1

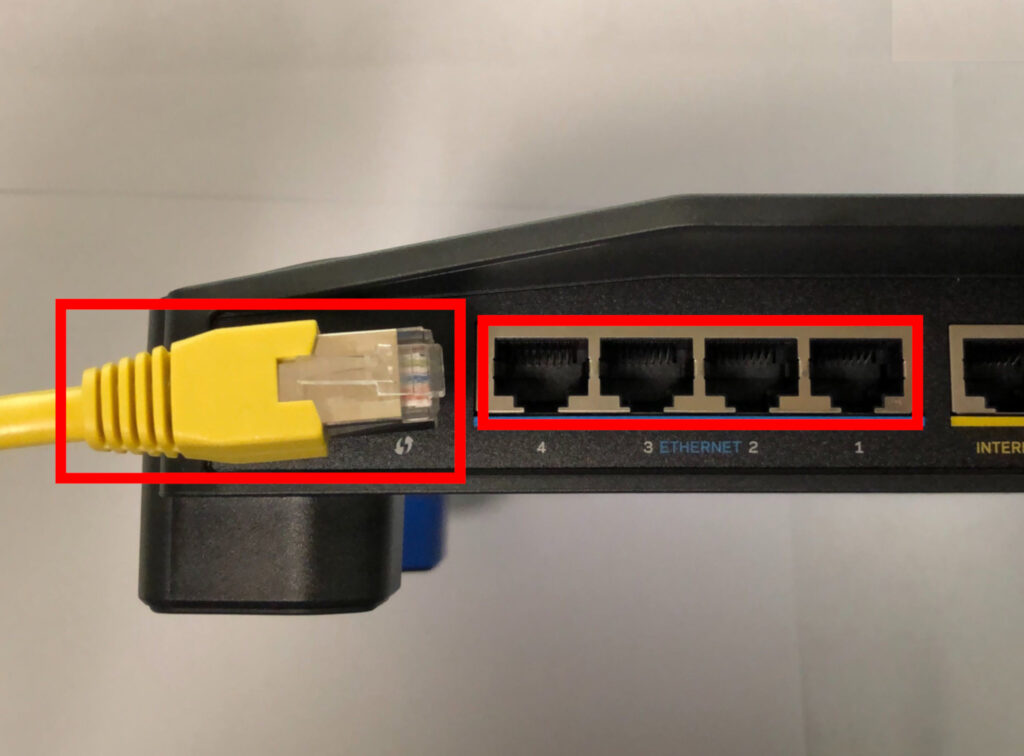
Connect the other end of that Ethernet cable to a FlashRouter LAN/numbered port.

Access FlashRouters DD-WRT Admin Settings via Ethernet Connection 2

Be sure NOT to connect your device to the WAN/internet port of the FlashRouter. Please use the LAN/numbered ports to connect your devices.
via Wireless

Navigate to the available wireless networks in your device network settings and join any of the available FlashRouter networks – FlashRouter24, FlashRouter50, or FlashRouter80 (if you have a tri-band router).

Access the FlashRouter settings

We recommend using a Google Chrome or Mozilla Firefox incognito/private browsing window to access the FlashRouter firmware settings. You can access the main DD-WRT firmware GUI or you can go directly into the FlashRouters Privacy App settings to manage your basic router settings and VPN connection settings right away.

Please note, after accessing the FlashRouter Settings at the Local IP Address, you will be prompted to enter an admin username and password. You can find this information in the subsections below.

DD-WRT - Firmware GUI

Local IP Address: 192.168.11.1

Username: flashrouter

Password: ddwrt

Keep in mind that if you enable HTTPS and disable HTTP access you will need to add https:// in front of the Local IP Address to access your FlashRouter’s firmware settings.

If your router has been reset for any reason then you can access the router at a local IP address of 192.168.1.1.

Please note you will be required to set the administration username and password as well as your WiFi and VPN network settings after a reset.

TROUBLESHOOTING

Still having issues? Visit our Troubleshooting section to diagnose common problems here.

Troubleshoot Here

IPv6 Internet Setup

TeamFlashRouters · Apr 3, 2019 ·

Most ISPs only support IPv4. Unless your ISP supports IPv6 then enabling it on the FlashRouter will not enable it across your network.

For most VPN users IPv6 should remain disabled as the VPN connection was designed to operate under IPv4 addresses only. Enabling IPv6 in this instance may compromise the security of the VPN tunnel.

We typically only recommend enabling IPv6 if you are not using VPN or if your VPN provider requires that IPv6 be enabled.

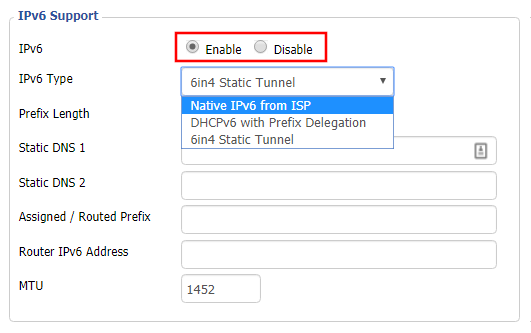
Enable IPv6

Navigate to Setup > IPv6

Access FlashRouters DD-WRT Admin Settings and Disable Remote Access
  1. Set IPv6 to Enable.
  2. Select Native IPv6 from ISP in the dropdown.
  3. If you have specific IPv6 DNS servers you would like to add you can add them in the Static DNS fields or leave those fields blank.
  4. Click Apply Settings.

Power cycle your FlashRouter

Power your FlashRouter off and then power it back on by unplugging and then plugging it back in or using the button on the back of the FlashRouter.
Verify a successful IPv6 connection

Once the FlashRouter is finished powering back up, connect one of your devices to the FlashRouter via Ethernet or Wireless.

Visit  http://ipv6-test.com/ where you should see Supported under IPv6 connectivity if your ISP supports IPv6 and your modem is setup to passthrough IPv6.

Please be aware that we can not replicate ISP specific IPv6 issues, which makes them challenging to troubleshoot. We recommend contacting your ISP as the first step of troubleshooting.

Privacy Hero Access Router Settings

TeamFlashRouters · Feb 8, 2023 ·

Your Privacy Hero router uses Cloud Based router management which means you can access the router settings from anywhere on any device that has an internet connection. You can follow these steps while connected to your phone, other Wi-Fi network, or the Privacy Hero network.

1. From any device that has a browser such as a computer, smartphone, or tablet visit app.privacyhero.com

App.PrivacyHero.com

2. Enter your Privacy Hero account email and password. Click Login.

Privacy Hero Access Settings

If you have not created your Privacy Hero account yet please follow these instructions.

TROUBLESHOOTING

Still having issues? Visit the VPN Troubleshooting section.

Troubleshoot Here

Privacy Hero Change Wi-Fi Name and Password

TeamFlashRouters · Feb 8, 2023 ·

Your Privacy Hero router uses Cloud Based router management which means you can access the router settings from anywhere on any device that has an internet connection. You can follow these steps while connected to your phone, other Wi-Fi network, or the Privacy Hero network.

Use these steps to change your Privacy Hero WiFi name and password.

1. From any device that has a browser such as a computer, smartphone, or tablet visit app.privacyhero.com

App.PrivacyHero.com

2. Enter your Privacy Hero account email and password. Click Login.

Privacy Hero Access Settings

If you have not created your Privacy Hero account yet please follow these instructions.

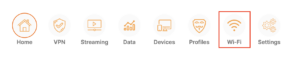
3. Click the Wi-Fi symbol.

Privacy Hero Select Wifi

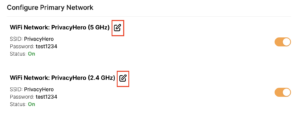
4. Click the edit box for the 5GHz network or the 2.4GHz network.

Privacy Hero Edit Wifi network

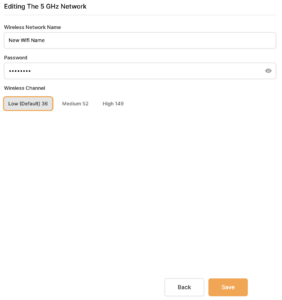
5. Enter the new Wi-Fi name and password you’d like to set. Click Save at the bottom of the page.

Privacy Hero enter new wifi name and password

TROUBLESHOOTING

Still having issues? Visit the VPN Troubleshooting section.

Troubleshoot Here

Privacy Hero Change Wireless Channel

TeamFlashRouters · Feb 8, 2023 ·

Your Privacy Hero router uses Cloud Based router management which means you can access the router settings from anywhere on any device that has an internet connection. You can follow these steps while connected to your phone, other Wi-Fi network, or the Privacy Hero network.

Use these steps to change your Privacy Hero wireless channel.

1. From any device that has a browser such as a computer, smartphone, or tablet visit app.privacyhero.com

App.PrivacyHero.com

2. Enter your Privacy Hero account email and password. Click Login.

Privacy Hero Access Settings

If you have not created your Privacy Hero account yet please follow these instructions.

3. Click the Wi-Fi symbol.

Privacy Hero Select Wifi

4. Click the edit box for the 5GHz network or the 2.4GHz network.

Privacy Hero Edit Wifi network

5. Select the new Wireless Channel that you would like to use. Click Save at the bottom of the page.

Privacy Hero enter new wifi name and password

TROUBLESHOOTING

Still having issues? Visit the VPN Troubleshooting section.

Troubleshoot Here

Wireless Access Point Setup

TeamFlashRouters · Apr 23, 2019 ·

A Wireless Access Point is a setup that has the FlashRouter using an existing network’s DHCP instead of assigning its own. The FlashRouter’s WAN/Internet port should be not be connected to your modem or other router while performing this setup.

Preparing for Wireless Access Point Setup

Locate the Local IP Address of the existing wireless network

Locate the Local IP Address of the existing router that the FlashRouter will be bridged to.

DD-WRT Router Setup for Wireless Access Point

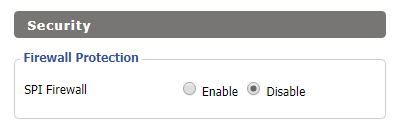
Disable Firewall

Navigate to Security > Firewall

Wireless Client Bridge Setup on FlashRouter DD-WRT - Disable Firewall
  1. Set SPI Firewall to Disable.
  2. Click Save.

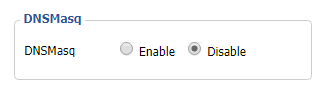
Disable DNSmasq

Navigate to Services > Services

Wireless Repeater Bridge Setup on FlashRouter DD-WRT - Disable DNSMasqButton
  1. Set DNSmasq to Disable.
  2. Click Save.

Change the FlashRouter's Local IP Address

Navigate to Setup > Basic Setup

Wireless Client Bridge Setup on FlashRouter DD-WRT - Set Local IP
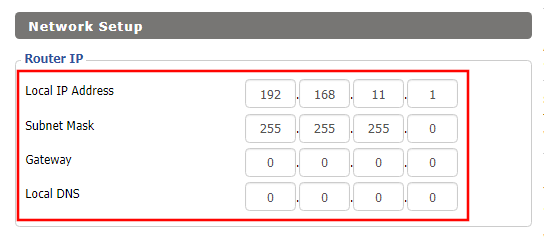
  1. Set the Local IP Address to a different address on the same subnet as the existing network that you noted early. (example: if the existing network is 192.168.1.1 then set the Local IP Address to 192.168.1.2)
  2. Set the Gateway to the Local IP Address of the existing network. (example: 192.168.1.1)
  3. Set the Local DNS to the Local IP Address of the existing network. (example: 192.168.1.1)
  4. Click Save.

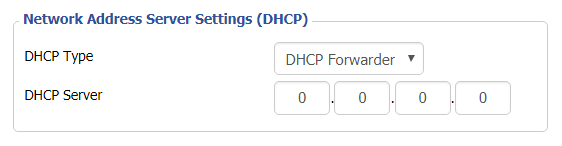
Change the FlashRouter's DHCP settings

DHCP Forwarder Setup for DD-WRT
  1. Set the DHCP Type to DHCP Forwarder.
  2. Click Save.

Change the FlashRouter's Operating Mode

Navigate to Setup > Advanced Routing

DHCP Forwarder Setup for DD-WRT
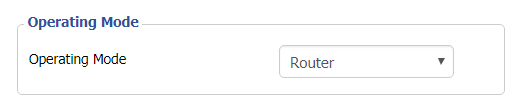
  1. Set the Operating Mode to Router.
  2. Click Apply Settings.

Reboot your FlashRouter

  • Power off the FlashRouter for 30 seconds and connect from the other router’s LAN port to one of the FlashRouter’s LAN port then power it back on.  When it boots back up you will be able to access the FlashRouter’s settings at the new Local IP Address that you set.

Back up your settings

Navigate to the Administration > Backup page.

  1. Click the Backup button.
  2. A file named nvrambak.bin will be saved to your computer.
  3. You can load nvrambak.bin to restore your settings in the event of a reset.

TROUBLESHOOTING

Still having issues? Visit our Troubleshooting section to diagnose common problems here.

Troubleshoot Here

Privacy Hero Disable Wi-Fi

TeamFlashRouters · Feb 8, 2023 ·

Your Privacy Hero router uses Cloud Based router management which means you can access the router settings from anywhere on any device that has an internet connection. You can follow these steps while connected to your phone, other Wi-Fi network, or the Privacy Hero network.

Use these steps to disable your Privacy Hero Wi-Fi so only ethernet connections are active. This is not a required step just a preference.

1. From any device that has a browser such as a computer, smartphone, or tablet visit app.privacyhero.com

App.PrivacyHero.com

2. Enter your Privacy Hero account email and password. Click Login.

Privacy Hero Access Settings

If you have not created your Privacy Hero account yet please follow these instructions.

3. Click the Wi-Fi symbol.

Privacy Hero Select Wifi

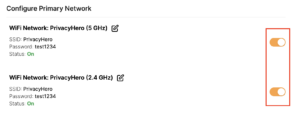
4. Set the toggle switches to the off position for the Wi-Fi bands you want to disable.

Privacy Hero Disable Wifi

TROUBLESHOOTING

Still having issues? Visit the VPN Troubleshooting section.

Troubleshoot Here

NordVPN Setup for GL.iNet Routers

TeamFlashRouters · May 29, 2023 ·

You can connect to NordVPN on your GL.iNet router using NordLynx, OpenVPN, or a Dedicated IP.

Quick Options

  • NordLynx: Choose your preferred city or country from NordVPN’s server list

  • OpenVPN: Choose your preferred city or country from NordVPN’s server list.

  • Dedicated IP (optional): Enter your unique configuration file if you’ve been assigned a static NordVPN IP.

:point_right: If you are not already a NordVPN user Sign Up Now.

NordVPN NordLynx Setup for GLiNet

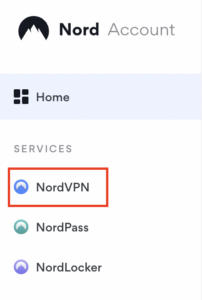
1. Get your NordVPN Access Token for NordLynx connections. Log in to your NordVPN account and select NordVPN from your list of Services.

NordVPN Services Section

2. At the bottom of the page click Get Access token and you will receive a code via email. Enter this code to proceed.

NordVPN Access Token

3. After you enter the email code select Generate new token and set it to Doesn’t expire. Copy this token.

NordVPN Generate new token
NordVPN Copy Token

4. Login to GL.iNet firmware settings (usually 192.168.8.1) in a browser on any computer or smart device connected to the GL.iNet FlashRouter’s network.

View our guide for more instructions on how to access GL.iNet firmware settings.

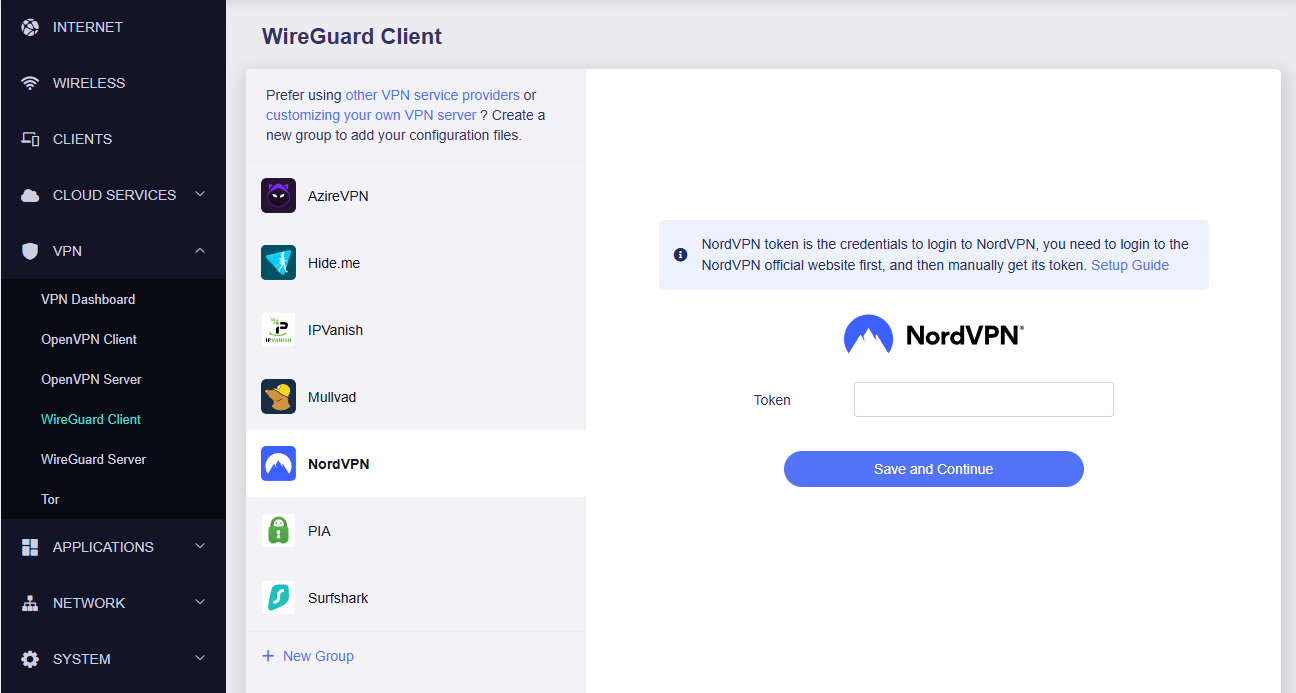
5. Navigate to the VPN tab and select Wireguard Client then choose NordVPN. Enter your Token then click Save and Continue

GLiNet NordVPN Wireguard

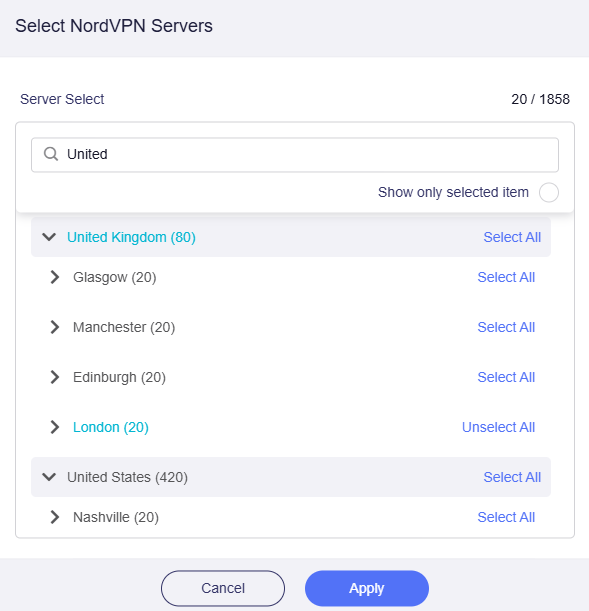
6. Select your preferred server locations, and click Apply.

GLiNet Select NordLynx Servers

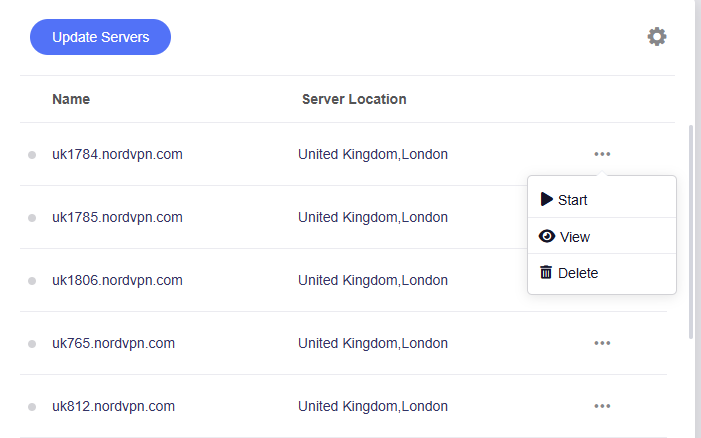
7. Start a connection by clicking the 3 dots (…) > Start next to your chosen server.

GLiNet NordLynx Start

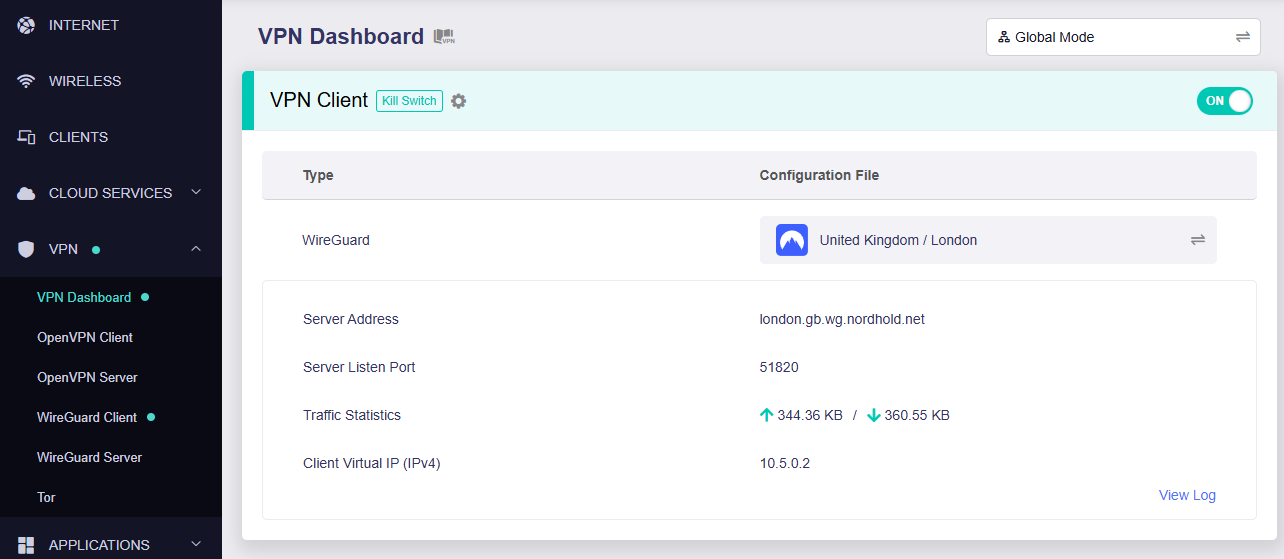
8. A green dot confirms success. You can also switch between Global Mode or Policy Mode for routing in the VPN Dashboard.

GLiNet NordLynx Connected

NordVPN OpenVPN Setup for GLiNet

1. Get your NordVPN manual service credentials for OpenVPN connections. Log in to your NordVPN account and select NordVPN from your list of Services.

NordVPN Service

2. At the bottom of the page in the Manual Setup section click Setup NordVPN manually then under the Configuration section go to Service credentials. Click Verify email to receive a code via email and enter the code to view and copy your credentials.

NordVPN Manual OpenVPN
NordVPN Service Credentials

3. Login to GL.iNet firmware settings (usually 192.168.8.1) in a browser on any computer or smart device connected to the GL.iNet FlashRouter’s network.

View our guide for more instructions on how to access GL.iNet firmware settings.

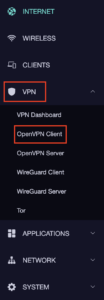
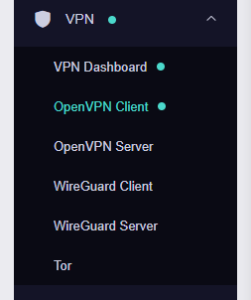
4. Navigate to the VPN tab and select OpenVPN Client.

GL.iNet VPN OpenVPN Client

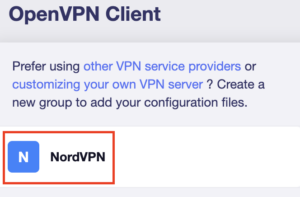
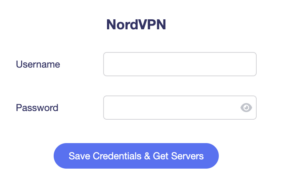
5. Select the NordVPN group, enter your manual credentials, then click Save Credentials & Get Servers.

GL.iNet NordVPN Group
GL.iNet NordVPN Login

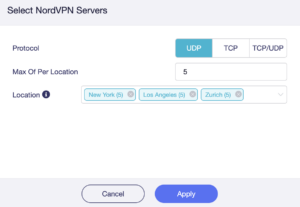
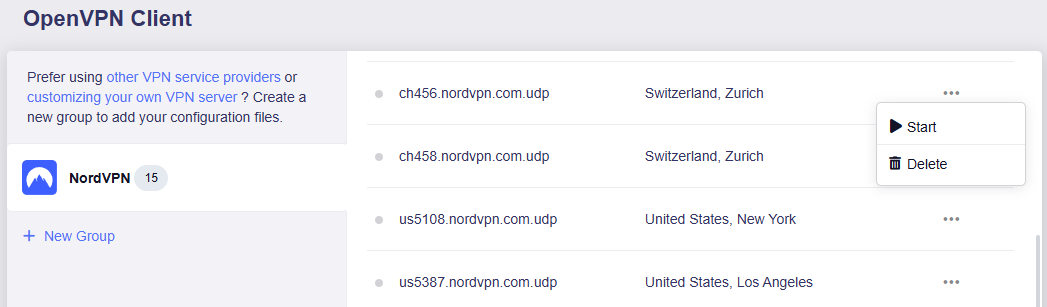
6. Choose UDP (recommended), select your preferred server locations, and click Apply.

GL.iNet NordVPN select servers

7. Start a connection by clicking the 3 dots (…) > Start next to your chosen server.

NordVPN GLiNet OpenVPN Start

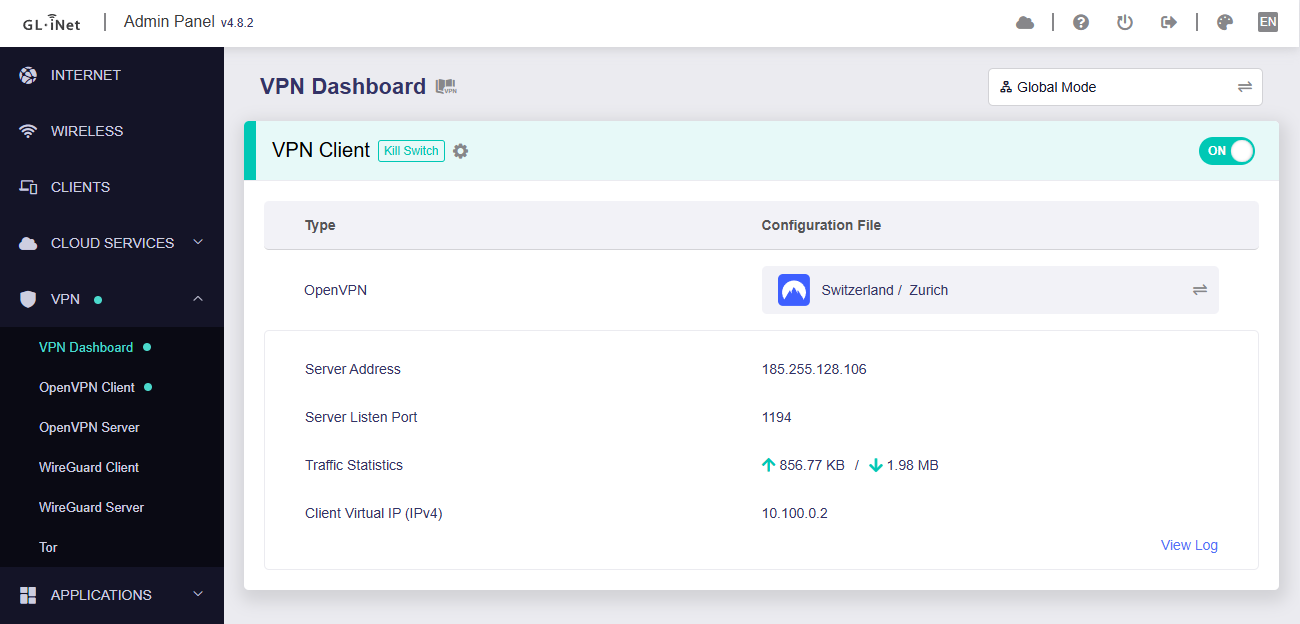
8. A green dot confirms success. You can also switch between Global Mode or Policy Mode for routing in the VPN Dashboard.

GLiNet VPN Dashboard

NordVPN Dedicated IP Setup for GLiNet

1. Get your NordVPN manual service credentials for OpenVPN connections. Log in to your NordVPN account and select NordVPN from your list of Services.

NordVPN Service

2. At the bottom of the page in the Manual Setup section click Setup NordVPN manually then under the Configuration section go to Service credentials. Click Verify email to receive a code via email and enter the code to view and copy your credentials.

NordVPN Manual OpenVPN
NordVPN Service Credentials

3. Login to GL.iNet firmware settings (usually 192.168.8.1) in a browser on any computer or smart device connected to the GL.iNet FlashRouter’s network.

View our guide for more instructions on how to access GL.iNet firmware settings.

4. Navigate to the VPN tab and select OpenVPN Client.

GLiNet VPN Dashboard

5. Download your Dedicated IP configuration file from the NordVPN website.

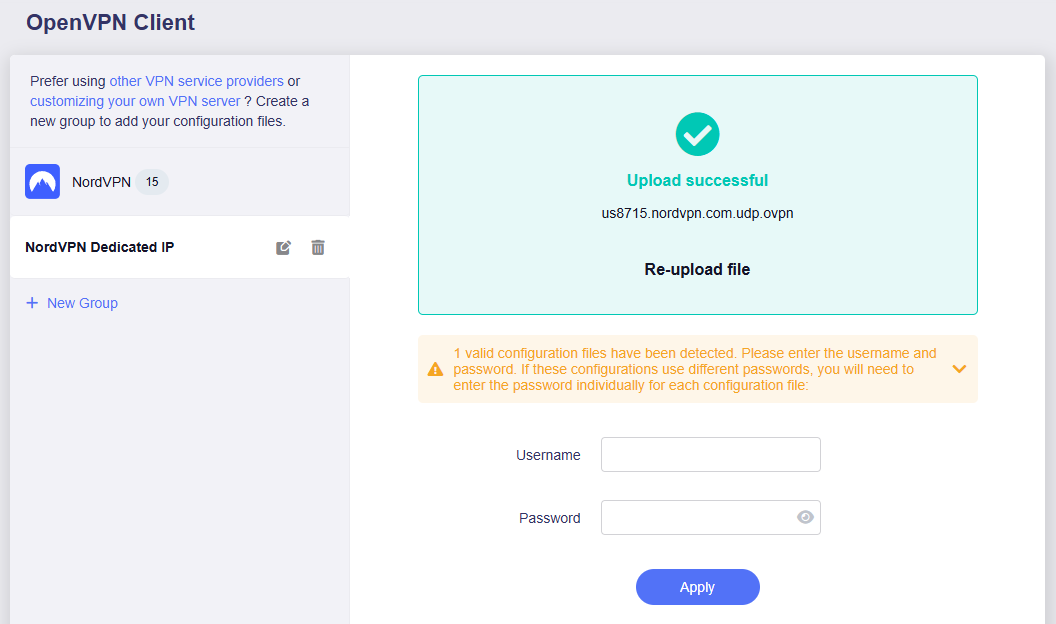
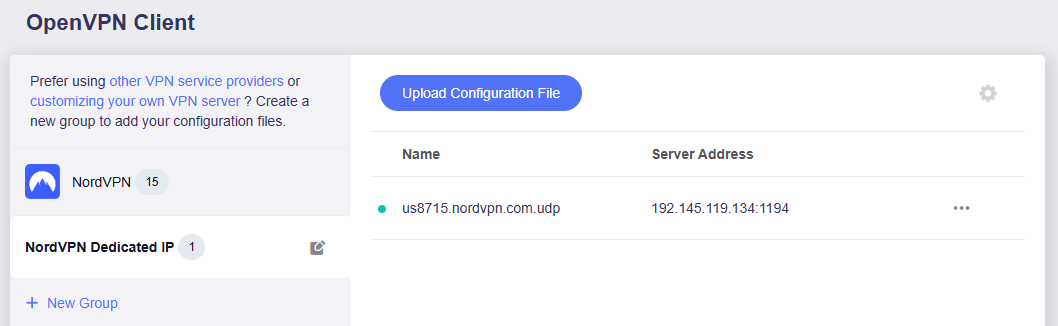
6. Click +New Group and name your NordVPN Dedicated IP connection, then upload the configuration file, enter your manual service credentials and click Apply.

GLiNet Dedicated IP Address Load

7. Start a connection by clicking the 3 dots (…) > Start next to your chosen server.

GLiNet Dedicated IP

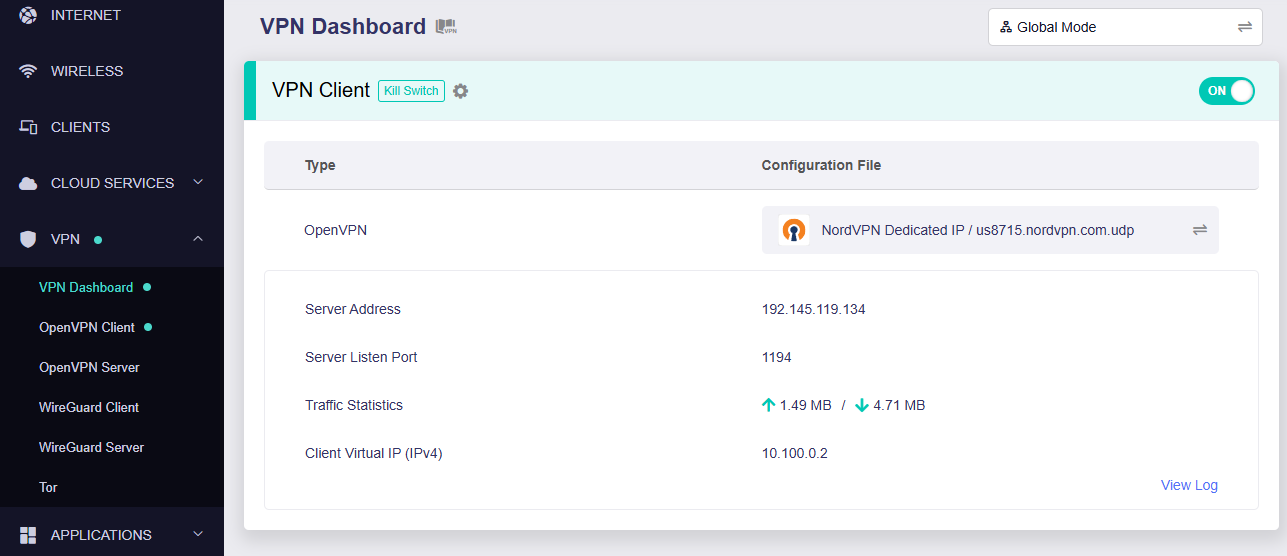
8. A green dot confirms success. You can also switch between Global Mode or Policy Mode for routing in the VPN Dashboard.

GLiNet Dedicated IP Dashboard
  1. You should now see information appear in the Server Address, Server Listen Port, Traffic Statistics, and Client Virtual IP areas.
  2. Visit NordVPN’s IP Check to verify your new IP address and virtual location.

In some cases you may notice that the location is not showing the same location as the server you have input in your router settings; this is because geo tracking tools are often tricked by VPN connections. As long as you see an IP address that is not the same as your normal Internet IP address then you are indeed connected to NordVPN.

🚫📱Do not run NordVPN apps on devices connected to your NordVPN router. Using the app at the same time as the router VPN may cause conflicts and connection issues.
Still having issues?

Feel free to submit a ticket and we will get back to you as soon as possible.

NordVPN Setup for AsusWRT Firmware Routers

TeamFlashRouters · Oct 15, 2025 ·

You can connect to NordVPN on your AsusWRT router using NordLynx, OpenVPN, or a Dedicated IP.

Quick Options

  • NordLynx: Choose your preferred country from NordVPN’s server list

  • OpenVPN: Choose your preferred city or country from NordVPN’s server list.

  • Dedicated IP (optional): Enter your unique configuration file if you’ve been assigned a static NordVPN IP.

:point_right: If you are not already a NordVPN user Sign Up Now.

NordVPN NordLynx Setup for AsusWRT

1. Get your NordVPN Access Token for NordLynx connections. Log in to your NordVPN account and select NordVPN from your list of Services.

NordVPN Services Section

2. At the bottom of the page click Get Access token and you will receive a code via email. Enter this code to proceed.

NordVPN Access Token

3. After you enter the email code select Generate new token and set it to Doesn’t expire. Copy this token.

NordVPN Generate new token
NordVPN Copy Token

4. Log in to the Asus settings page by connecting to the Asus router’s WiFi (or wired LAN) on your computer. Then, enter 192.168.50.1 or asusrouter.com in the browser.
View our guide for more instructions on how to access AsusWRT firmware settings.

5. Navigate to the VPN tab and then select the VPN Fusion tab, then click Add profile.

Click the VPN Button
VPN Fusion Add Profile

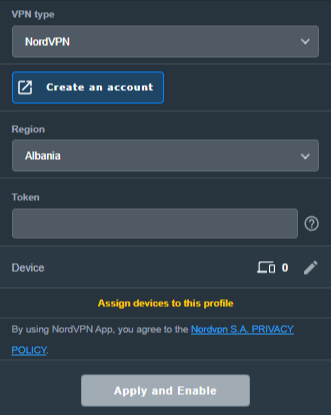
6. Fill in your NordVPN information, then click Apply and Enable.

  • Connection Name: Choose a name for your NordLynx connection.
  • VPN Type: Select NordVPN
  • Region: Choose your VPN server location
  • Token: Copy and paste your NordVPN token.
Apply NordLynx Settings

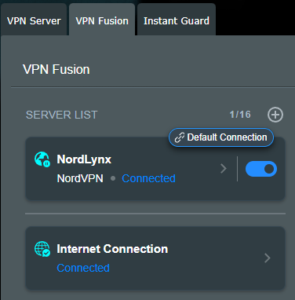
6. You should now see the Profile say Connected, indicating that the NordVPN server is successfully connected to your router!

VPN Fusion NordLynx Connected

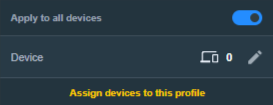
7. The VPN connection is automatically set to Apply to all devices.

If you only want certain devices to connect to the VPN, then turn off the VPN connection and switch off Apply to all devices.

Now click the pencil next to the Device section and select the devices (computer, phone, etc.) that you want to connect to VPN. Click OK and then click Apply all settings.

Apply VPN by Device

NordVPN OpenVPN Setup for AsusWRT

1. Get your NordVPN manual service credentials for OpenVPN connections. Log in to your NordVPN account and select NordVPN from your list of Services.

NordVPN Services Section

2. At the bottom of the page in the Manual Setup section click Setup NordVPN manually then under the Configuration section go to Service credentials. Click Verify email to receive a code via email and enter the code to view and copy your credentials.

NordVPN Manual OpenVPN
NordVPN Service Credentials

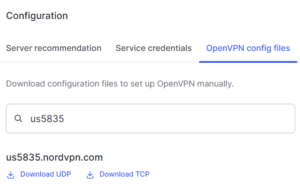
3. Click on OpenVPN config files. Search and download the server file for your preferred NordVPN location, UDP is recommended.

NordVPN OpenVPN Config Files

4. Log in to the Asus settings page by connecting to the Asus router’s WiFi (or wired LAN) on your computer. Then, enter 192.168.50.1 or asusrouter.com in the browser.
View our guide for more instructions on how to access AsusWRT firmware settings.

5. Navigate to the VPN tab and then click on the VPN Fusion tab, then click Add Profile.

Click the VPN Button
VPN Fusion Add Profile

6. Fill in your NordVPN information then click Apply and Enable.

  • Connection Name: Choose a name for your NordVPN OpenVPN connection.
  • VPN Type: Select OpenVPN
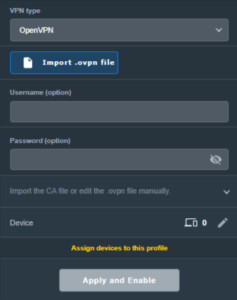
  • Import .ovpn File: Upload the OpenVPN file that you downloaded.
  • Username and Password: Copy and paste your NordVPN manual service credentials.
AsusWRT OpenVPN Connection File Load

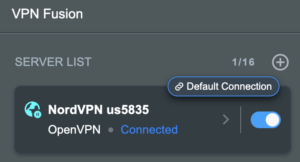
6. You should now see the Profile say Connected, indicating that the NordVPN server is successfully connected to your router!

Asus NordVPN Connected

7. The VPN connection is automatically set to Apply to all devices.

If you only want certain devices to connect to the VPN, then turn off the VPN connection and switch off Apply to all devices.

Now click the pencil next to the Device section and select the devices (computer, phone, etc.) that you want to connect to VPN. Click OK and then click Apply all settings.

Apply VPN by Device

NordVPN Dedicated IP Setup for AsusWRT

1. Get your NordVPN manual service credentials for OpenVPN connections. Log in to your NordVPN account and select NordVPN from your list of Services.

NordVPN Services Section

2. At the bottom of the page in the Manual Setup section click Setup NordVPN manually then under the Configuration section go to Service credentials. Click Verify email to receive a code via email and enter the code to view and copy your credentials.

NordVPN Manual OpenVPN
NordVPN Service Credentials

3. Now download your Dedicated IP configuration file from the NordVPN website.

4. Log in to the Asus settings page by connecting to the Asus router’s WiFi (or wired LAN) on your computer. Then, enter 192.168.50.1 or asusrouter.com in the browser.
View our guide for more instructions on how to access AsusWRT firmware settings.

5. Navigate to the VPN tab then click on the VPN Fusion tab, then click Add Profile.

Click the VPN Button
VPN Fusion Add Profile

6. Fill in your NordVPN information then click Apply and Enable.

  • Connection Name: Choose a name for your NordVPN Dedicated IP connection.
  • VPN Type: Select OpenVPN
  • Import .ovpn File: Upload the Dedicated IP OpenVPN file that you downloaded.
  • Username and Password: Copy and paste your NordVPN manual service credentials.
AsusWRT OpenVPN Connection File Load

6. You should now see the Profile say Connected, indicating that the NordVPN server is successfully connected to your router!

Asus NordVPN Connected

7. The VPN connection is automatically set to Apply to all devices.

If you only want certain devices to connect to the VPN, then turn off the VPN connection and switch off Apply to all devices.

Now click the pencil next to the Device section and select the devices (computer, phone, etc.) that you want to connect to VPN. Click OK and then click Apply all settings.

Apply VPN by Device
  1. Connect your devices to the Asus router network and visit the NordVPN website, at the top it should display Your Status: Protected.
  2. Visit NordVPN’s IP Check to verify your new IP address and virtual location.

🚫📱Do not run NordVPN apps on devices connected to your NordVPN router. Using the app at the same time as the router VPN may cause conflicts and connection issues.
Still having issues?

Feel free to submit a ticket and we will get back to you as soon as possible.

IVPN WireGuard Setup

TeamFlashRouters · Oct 13, 2021 ·

Preparing for IVPN WireGuard Setup

Verify your IVPN login information

If you are not already a IVPN user Sign Up Now.

Log in to your account on the IVPN website.

IVPN website login

DD-WRT Router Setup for IVPN WireGuard

Navigate to Setup > Tunnels 

Enter IVPN WireGuard settings

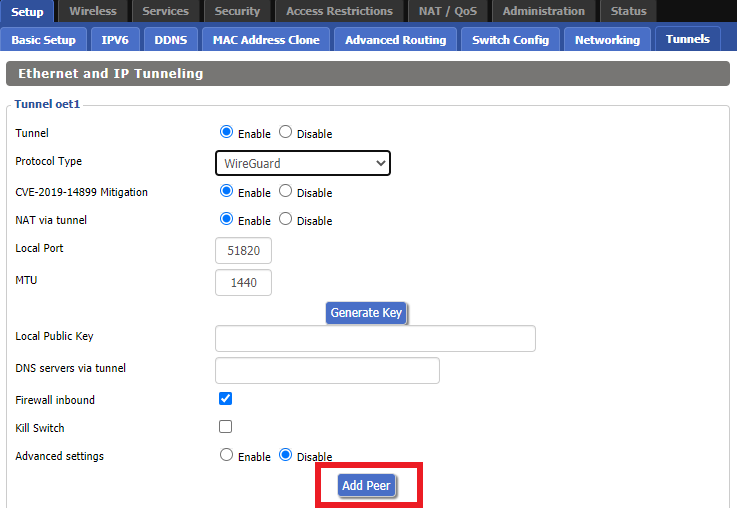
1. Click Add Tunnel.

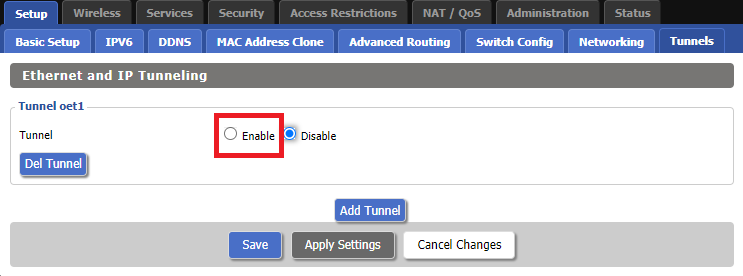
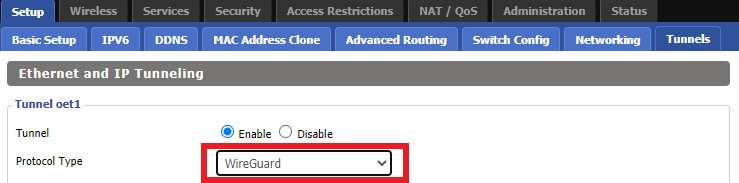
2. Set Tunnel to Enable.

Setup - Tunnel - Enable Tunnel

3. Select Wireguard from the dropdown.

Setup - Tunnel - Select Wireguard

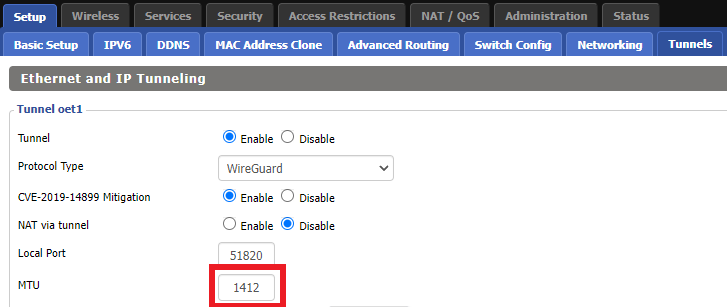
3. Set MTU to 1412.

IVPN Wireguard MTU setting

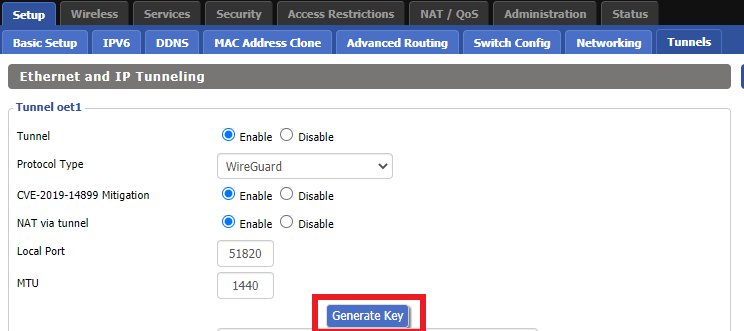
4. Click Generate Key.

Setup - Tunnel - Generate Key

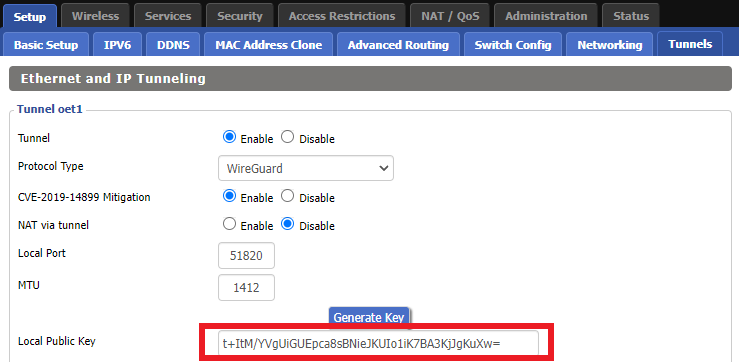
9. Copy the Local Public Key.

IVPN Wireguard Local Public Key

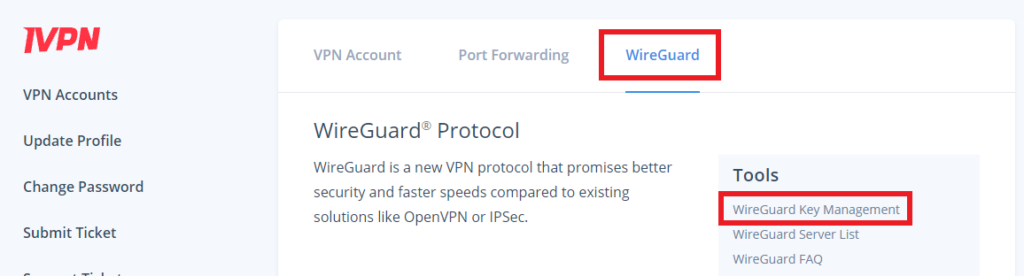
10. In a new tab (leave the DD-WRT settings opened), go to your IVPN Account and click WireGuard and then click WireGuard Key Management.

IVPN Wireguard Key Management

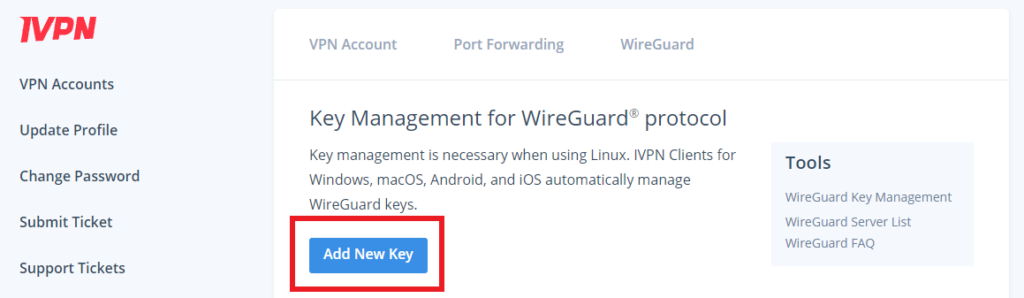
11. Click Add New Key.

IVPN Wireguard Add New Key

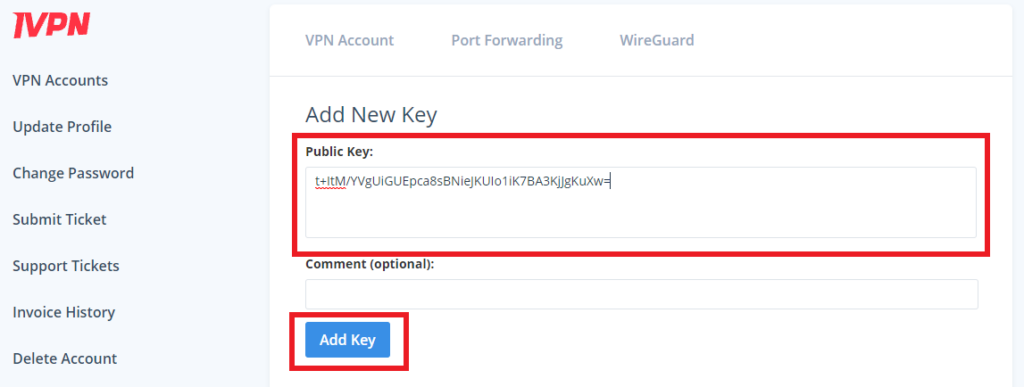
12. Paste the copied Local Public key to the Public Key field and click Add Key.

IVPN Wireguard Paste Public Key

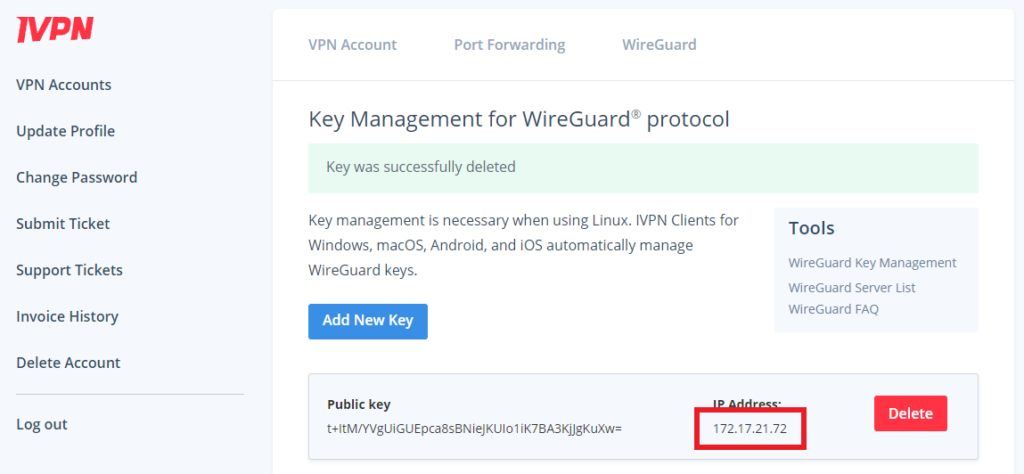
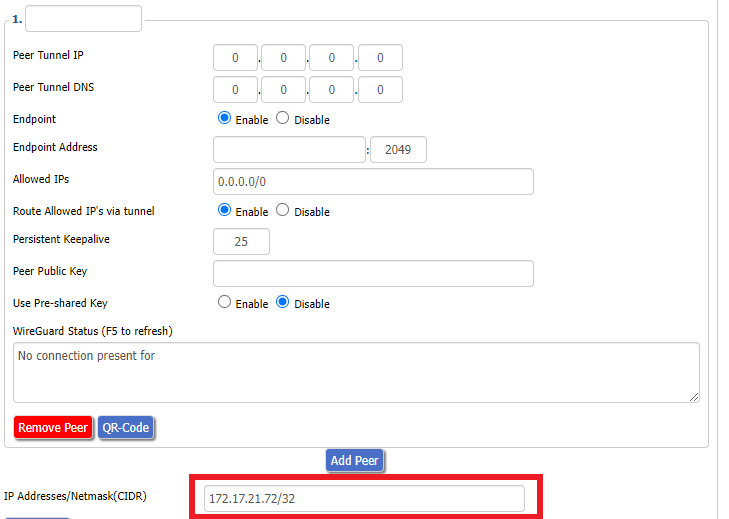
13.Copy the IP Address assigned to your public key and add it to the IP Addresses/Netmask(CIDR) field followed by a /32 subnet mask.

IVPN Wireguard copy IP Address
IVPN Wireguard paste IP Address

Certain DD-WRT builds will show two separate fields here: IP Address and Subnet Mask. If that is the case set the IP Address field to the Address without the /32 added and set the Subnet Mask to 255.255.255.255

14. Click Add Peer.

Setup - Tunnel - Add Peer

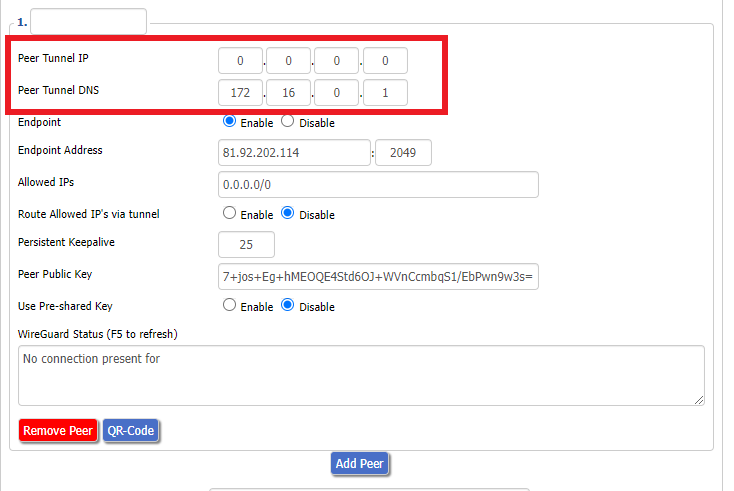
15. Set the Peer Tunnel IP to 0.0.0.0. Set Peer Tunnel DNS to 172.16.0.1

IVPN Wireguard Peer Tunnel IP and DNS

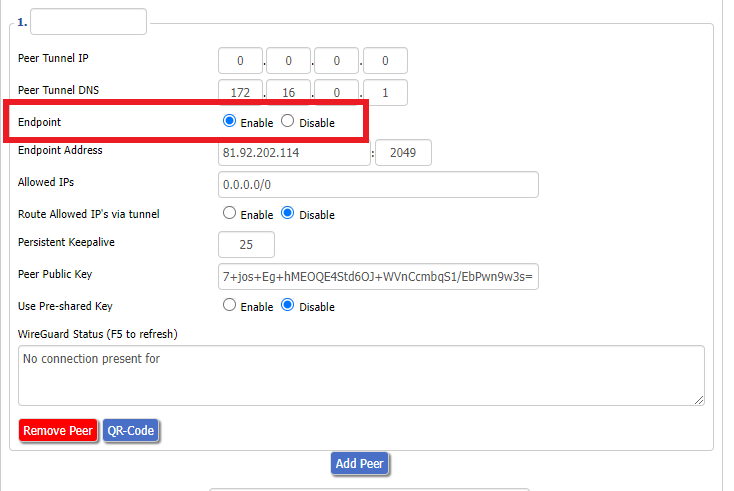
16. Set Endpoint to Enable.

IVPN Wireguard Enable Endpoint

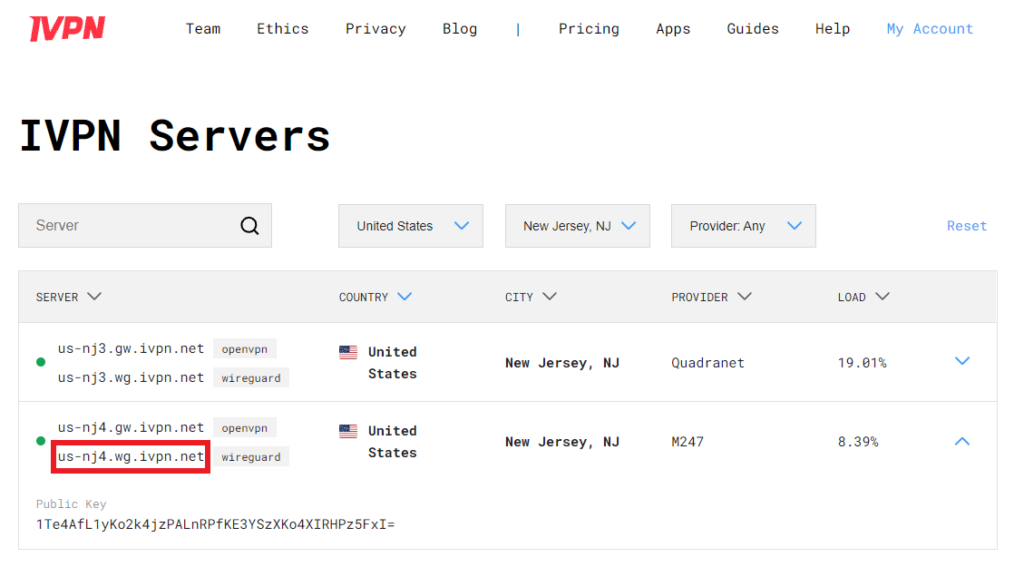
17. Go to the IVPN Server Status page and copy the server name for the WireGuard server location you want to connect to.

IVPN Wireguard Endpoint server

Be sure to copy the WireGuard server address and not the OpenVPN server address.

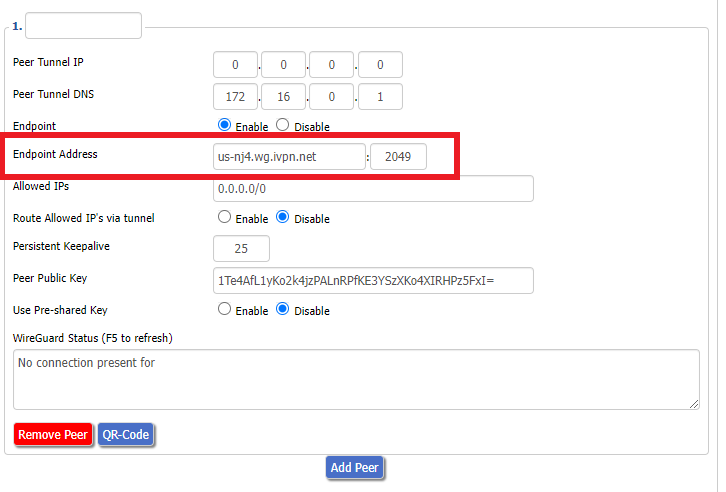
18. Paste the server name you copied into the Endpoint Address field and set the Port to 2049.

IVPN Wireguard Endpoint Address

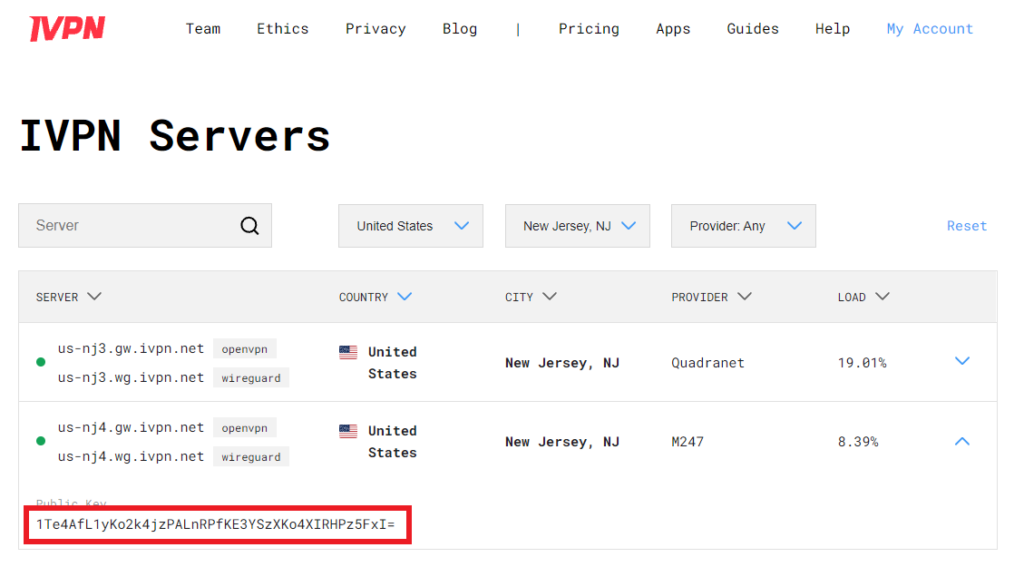
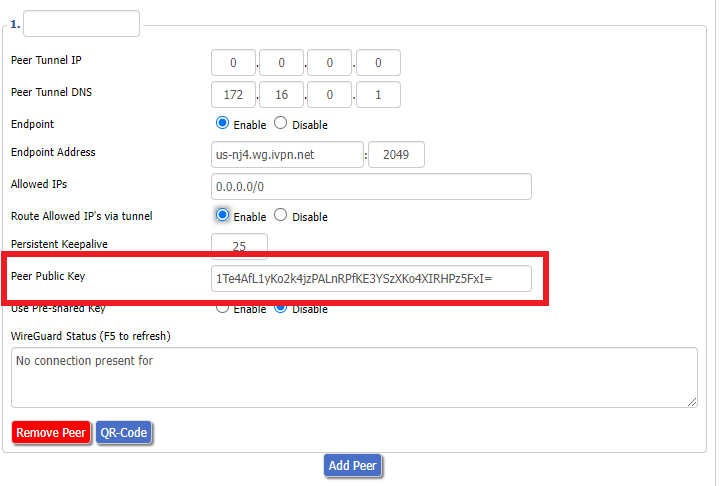
19. On the IVPN Server Status page copy the Public Key of the server location you entered. Paste the Public Key into the Peer Public Key field.

IVPN Wireguard copy server Public Key
IVPN Wireguard enter Peer Public Key

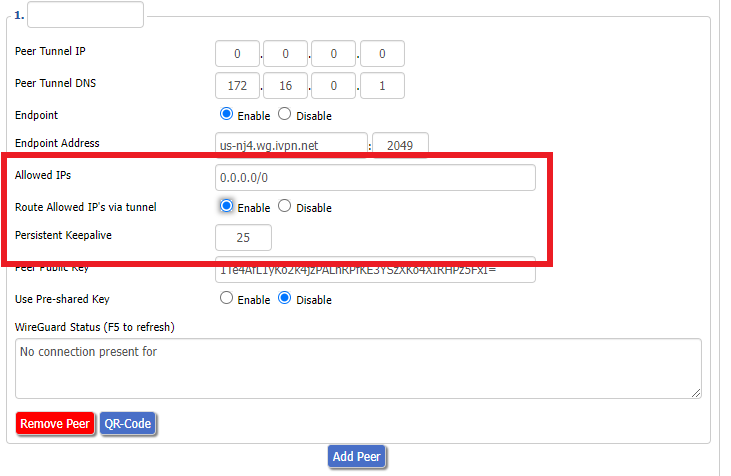
20. Leave Allowed IPs as 0.0.0.0/0. Set Router Allowed IP’s via tunnel to Enable. Set Persistent Keep Alive to 25.

IVPN Wireguard Peer settings

21. At the bottom of the page click Save and then click Apply Settings.

Set IVPN DNS servers

Navigate to Setup > Basic Setup

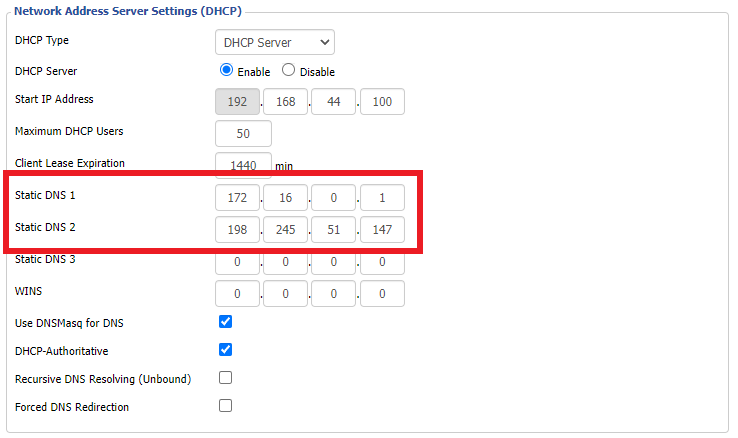
Set Static DNS 1 to 172.16.0.1

Set Static DNS 2 to 198.245.51.147

IVPN Wireguard Static DNS

Click Apply Settings.

Reboot the FlashRouter

Navigate to Administration > Management

Scroll to the bottom of the page and click the red Reboot Router button. Wait for the FlashRouter to reboot and then reconnect.

Verify a successful IVPN connection

Navigate to Setup > Tunnels

  1. You should Endpoint, Latest handshake, and Transfer in the WireGuard status area.
  2. Visit IVPN’s website to verify your status as using IVPN.

Back up your settings

Navigate to Administration > Backup

  1. Click the Backup button.
  2. A file named nvrambak.bin will be saved to your computer.
  3. You can load nvrambak.bin to restore your settings in the event of a reset.

TROUBLESHOOTING

Still having issues? Visit the VPN Troubleshooting section.

Troubleshoot Here

Privacy Hero VPN Setup Guide for Privacy Hero

TeamFlashRouters · Apr 3, 2023 ·

Your Privacy Hero router uses Cloud Based router management which means you can access the router settings from anywhere on any device that has an internet connection. You can follow these steps while connected to your phone, other Wi-Fi network, or the Privacy Hero network.

Use these steps to connect to Privacy Hero’s own WireGuard VPN servers. You will automatically be connected to the ideal USA or Canada server based on your location.

1. From any device that has a browser such as a computer, smartphone, or tablet visit app.privacyhero.com

App.PrivacyHero.com

2. Enter your Privacy Hero account email and password. Click Login.

Privacy Hero Access Settings

If you have not created your Privacy Hero account yet please follow these instructions.

3. Click the VPN symbol.

Privacy Hero Setup VPN

4. Set the VPN toggle to On.

Privacy Hero Enable VPN

5. Connect to the Privacy Hero’s via wireless or ethernet connection on your device and visit What is my IP Address from a private/incognito browser to verify your new IP address and virtual location.

Privacy Hero’s cloud based router settings access makes it so you can change settings while not connected to the Privacy Hero network so if your IP Address has not changed be sure to double check that you are indeed connected to the Privacy Hero network on the device you are checking your IP from.

Keep in mind that the VPN connection will not change the location of the streaming services listed in the Streaming Relocation area of the Privacy Hero settings.

TROUBLESHOOTING

Still having issues? Visit the VPN Troubleshooting section.

Troubleshoot Here

NordVPN Setup on Roqos

TeamFlashRouters · Dec 24, 2021 ·

Preparing for NordVPN Setup

Obtain your NordVPN manual Username and Password

If you are not already a NordVPN user Sign Up Now.

1. Log in to your account on the NordVPN website.

NordVPN login

2. Click NordVPN on the left hand side and then click Setup NordVPN manually.

NordVPN setup manually

3. Enter in the verification code that was sent to your email.

NordVPN verify code

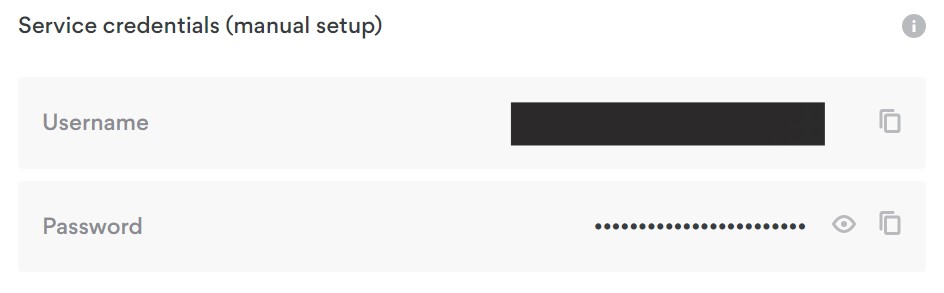
4. Copy and paste your NordVPN manual username and password to a secure location. This is the username and password you will enter into the router settings to connect to NordVPN.

NordVPN credentials

Connecting to NordVPN in the Roqos Core

Access the Roqos Core UI

1. Login to the Roqos Core web app in a browser on any computer or smart device.

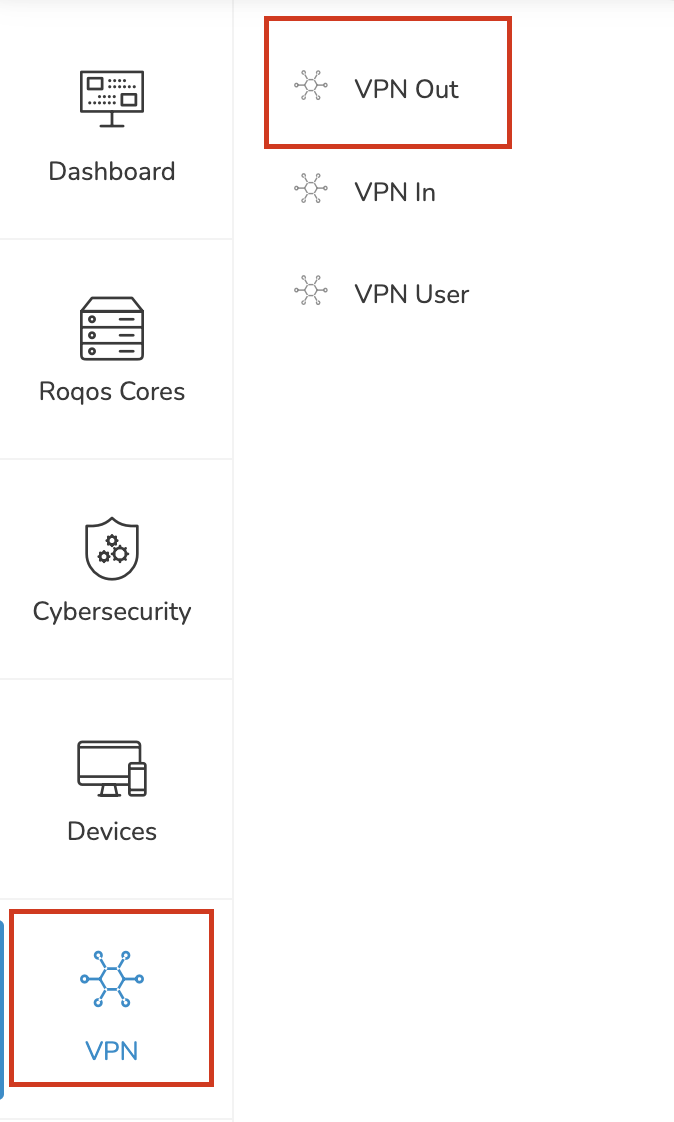
2. Click VPN from the navigation menu and then click VPN OUT.

Roqos VPN Out

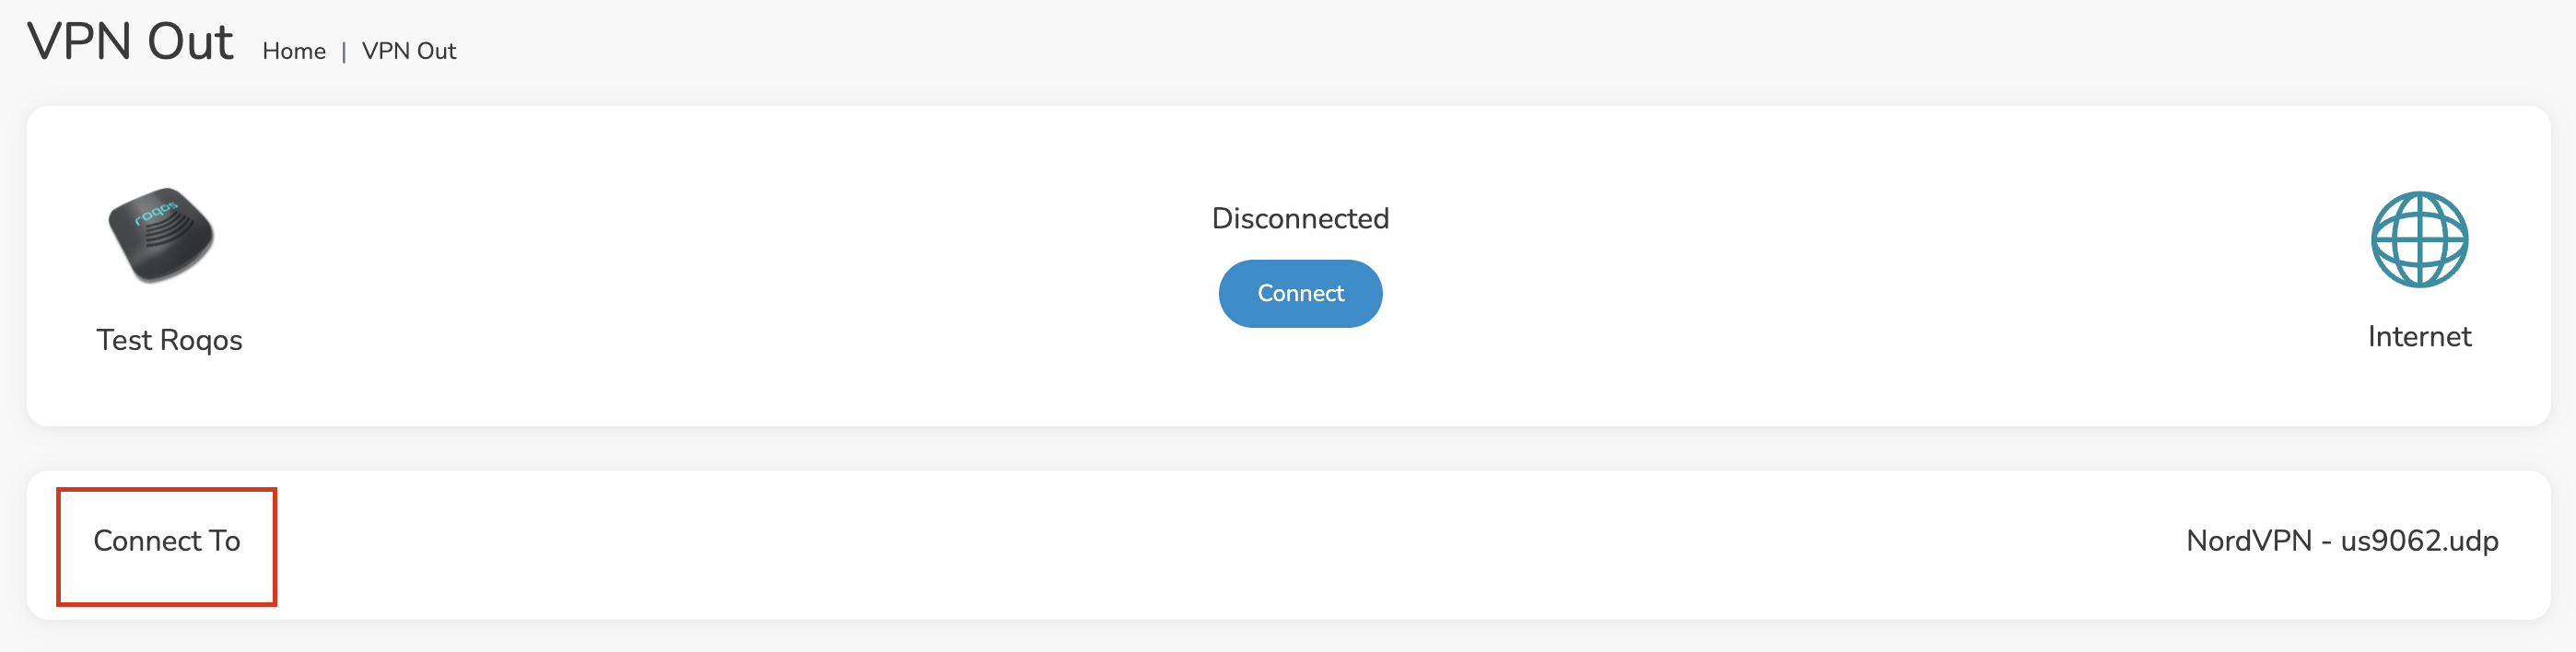
3. Click the Connect to box.

Roqos NordVPN Connect to

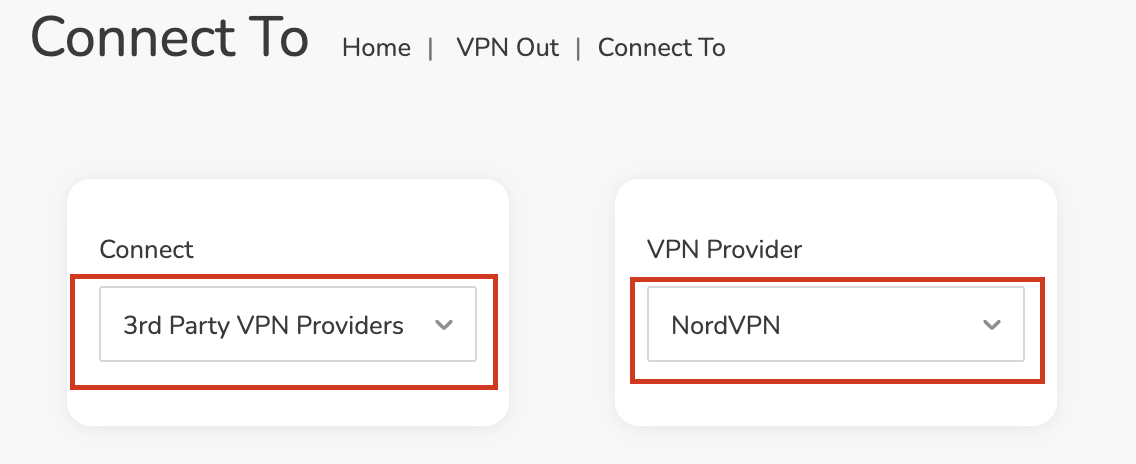
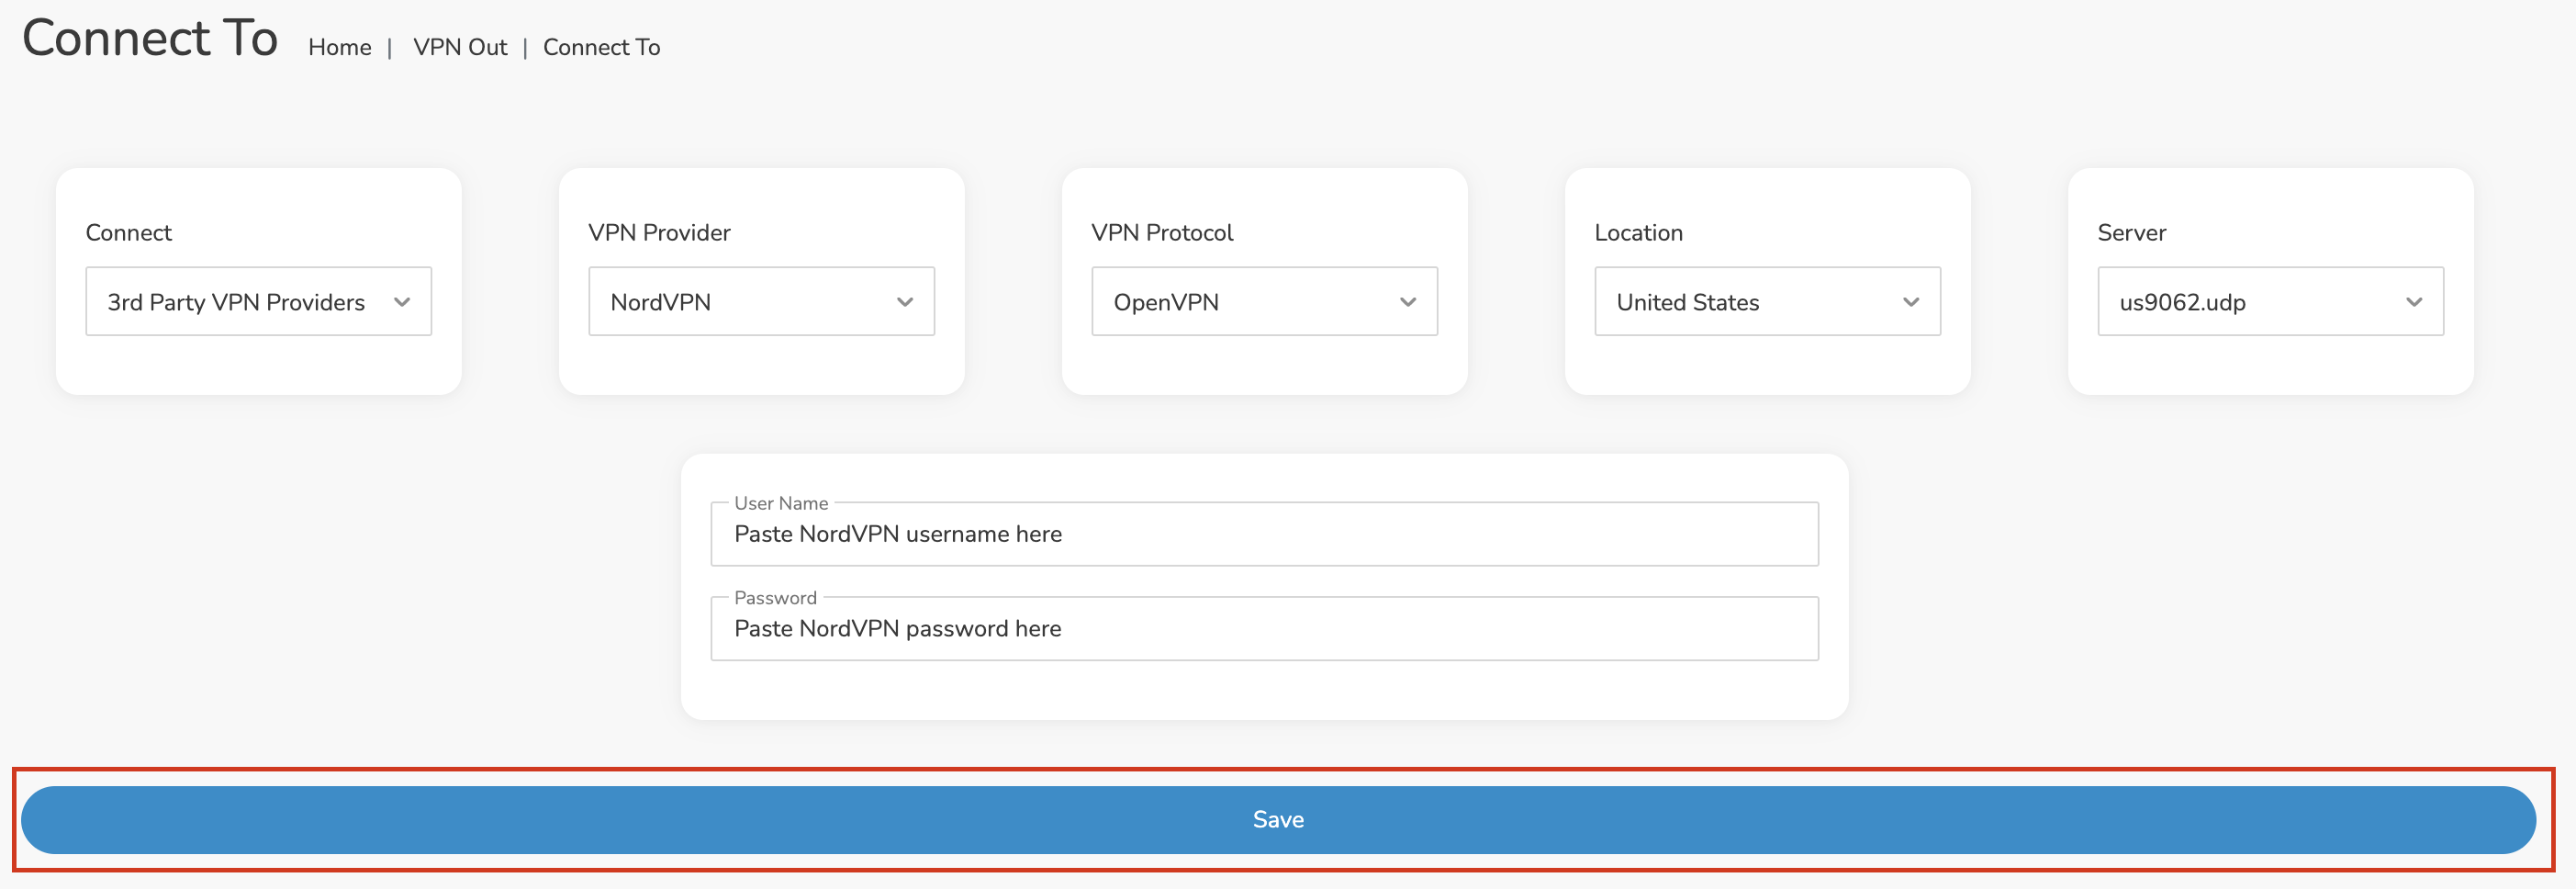
4. In the Connect dropdown choose 3rd Party VPN Providers and for the VPN Provider dropdown choose NordVPN.

Roqos NordVPN select provider

Enter your NordVPN information

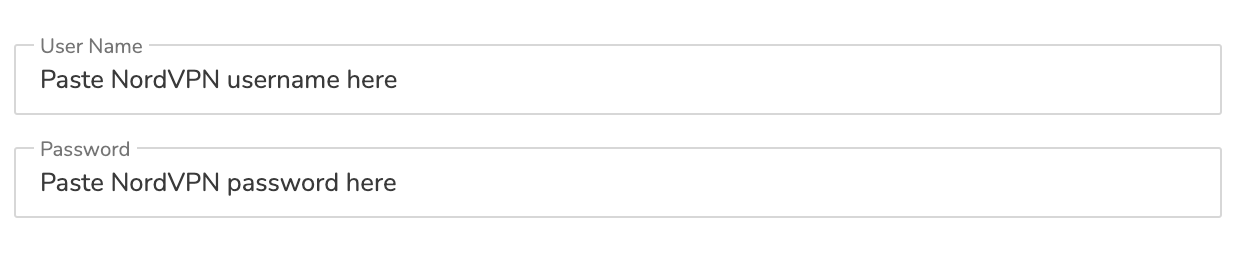
In the Username and Password field enter the NordVPN OpenVPN Username and Password that you obtained.

NordVPN credentials
Roqos NordVPN enter username and password

Select a NordVPN server

Navigate to NordVPN server recommendation page. Click Recommended server and select the country you want to connect to and note the server number that appears.

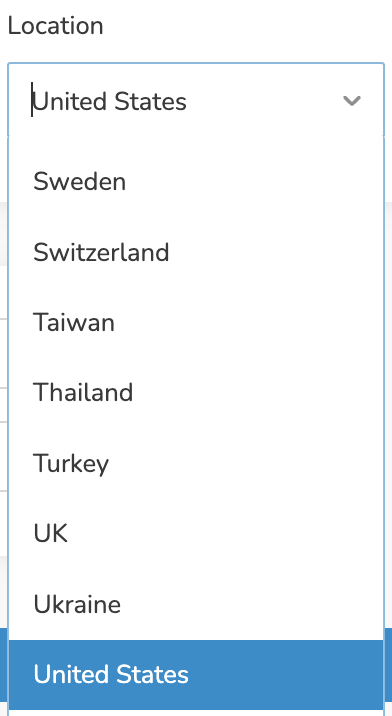
Click the Location dropdown and type in or scroll to the preferred server country.

Roqos NordVPN Select Location

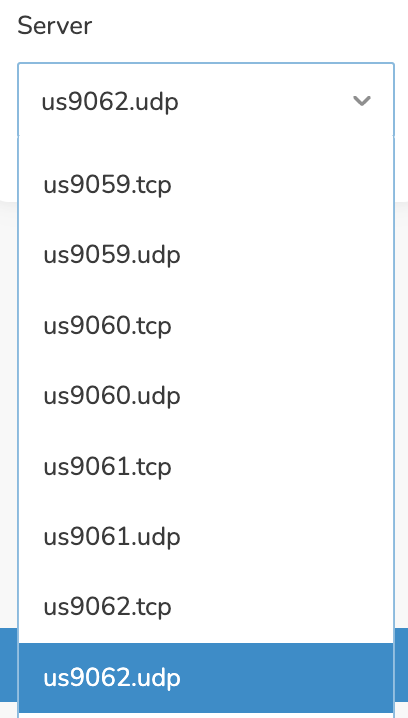
Click the Server dropdown and type in or scroll to the server number that was recommended. Select the UDP version of the server.
Roqos NordVPN select server number

Click the Save button.
Roqos NordVPN Save Settings

Connect to NordVPN

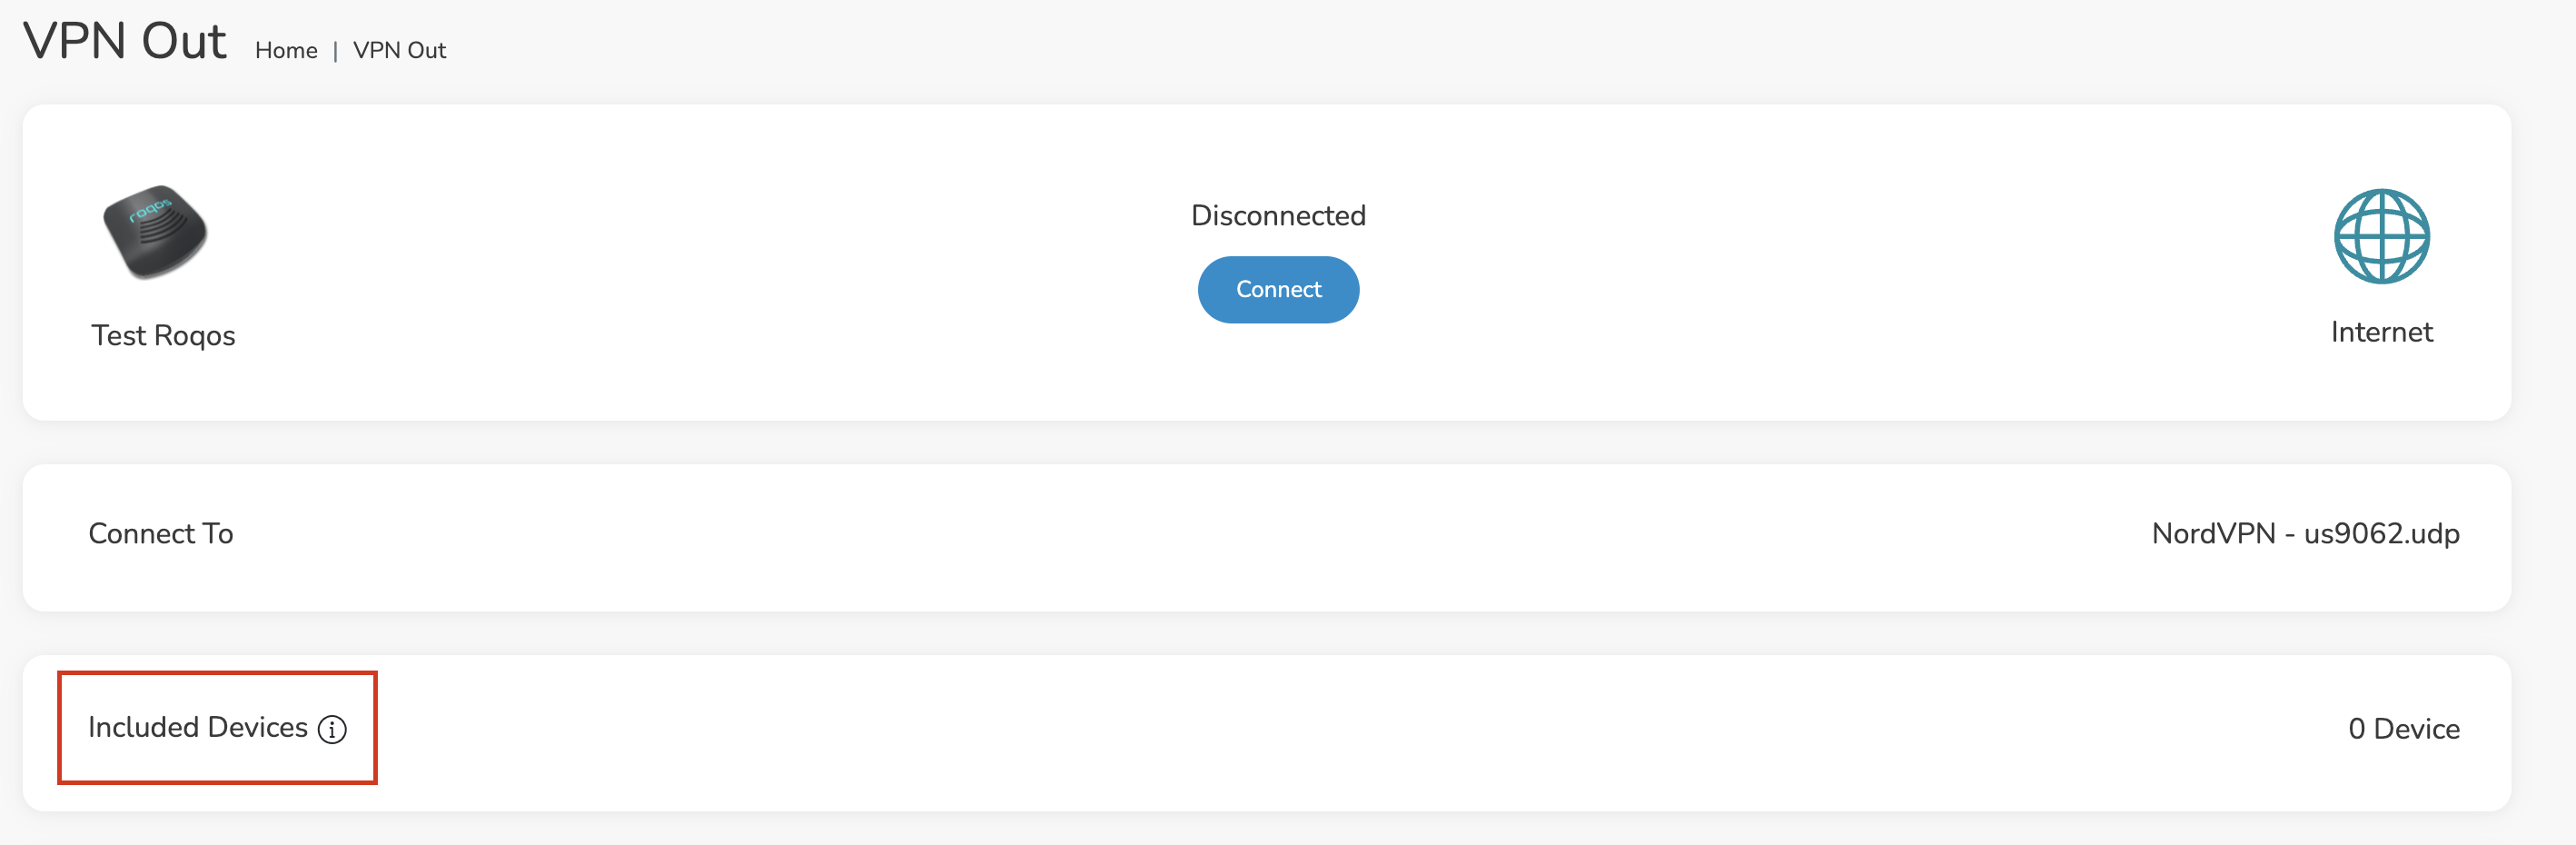
Once you click Save you will be returned to the VPN OUT menu.

Click the Connect button to start your NordVPN connection. Please be patient as the router connects your entire network through VPN.

Roqos VPN Connect

Assign devices to connect to VPN

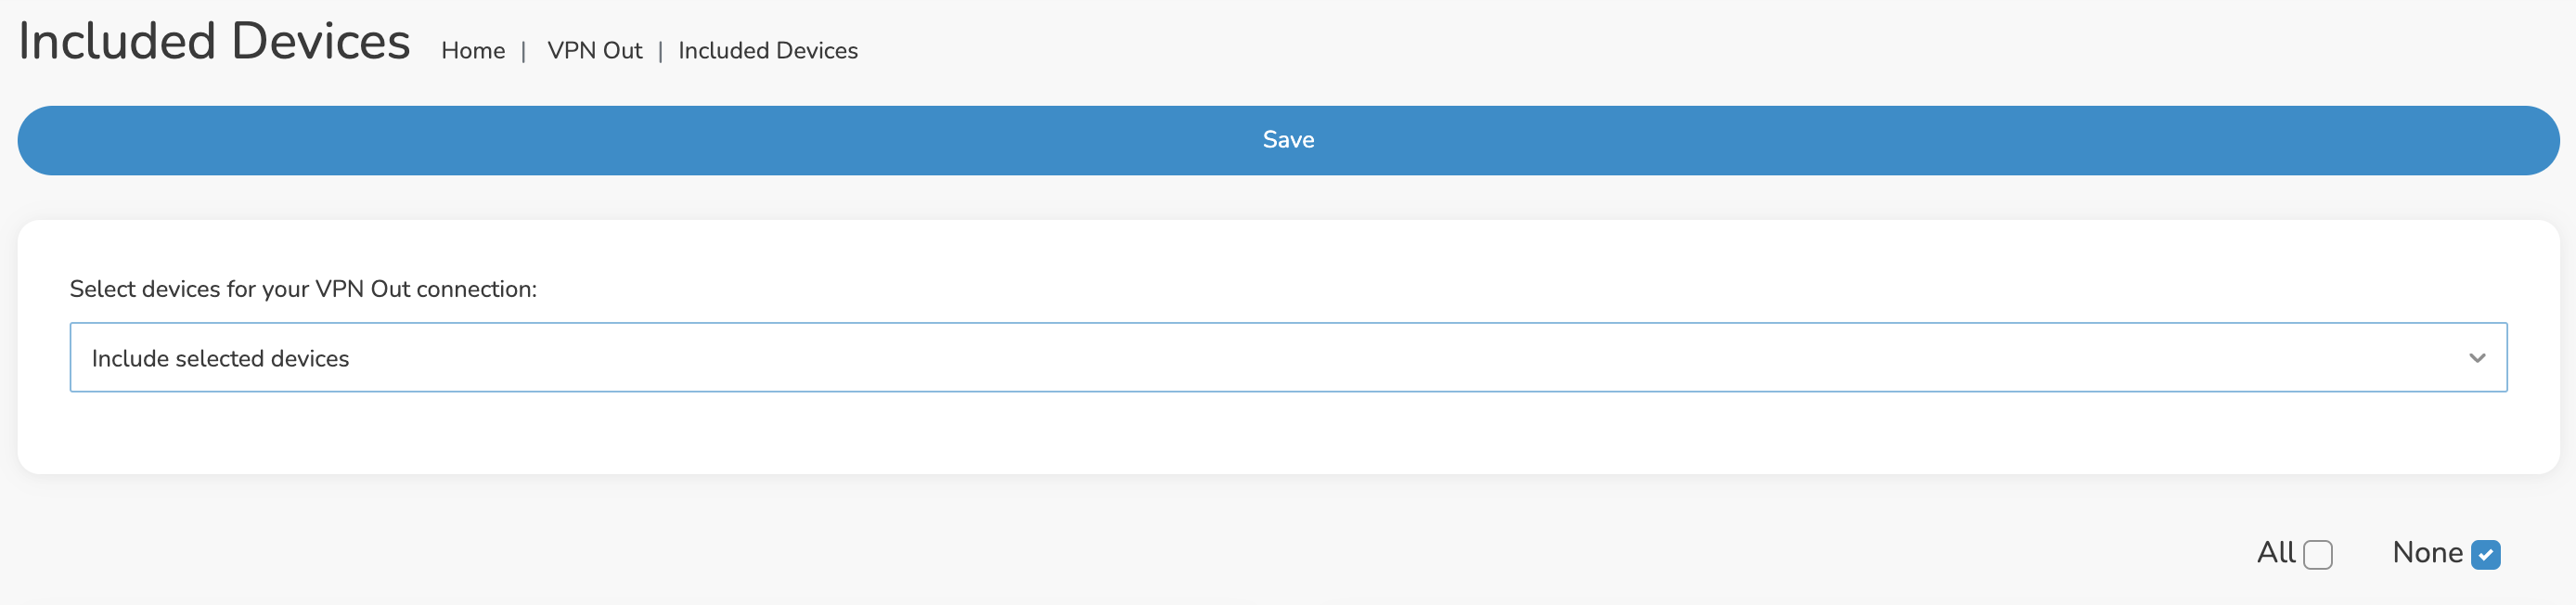
By default there are no devices assigned to the VPN tunnel. Click Included Devices. From this page you can choose if all devices should connect to NordVPN or only certain devices.

Roqos NordVPN Included Devices

From the dropdown select Include all devices if you want every device that connects to the Roqos to connect to NordVPN. Then click Save.

Roqos VPN Include All Devices

If you only want specific devices to connect to NordVPN while others bypass the VPN connection select Include selected devices from the dropdown and then toggle the sliders for the devices you want connected to VPN. Click Save.

Roqos VPN Include Selected devices

Verify a successful NordVPN connection

Make sure you are connected to the Roqos network via WiFi or ethernet connection on your device.

Visit NordVPN’s website to verify your new IP Address and Protected Status at the top of the page.

You should see Connected at the top of the page underneath NordVPN.

Connect to a different NordVPN server

To change your server click Disconnect on the VPN OUT page then return to the Connect To section to select a new server from the Server dropdown and click Save. Now click Connect once again on the VPN Out page.

Disconnect from NordVPN

To disconnect from NordVPN click the Disconnect button.

TROUBLESHOOTING

Still having issues? Visit the FR Privacy App Troubleshooting section.

Troubleshoot Here
« Previous Page
Next Page »

Primary Sidebar

  • Troubleshooting
  • Router Access
  • Internet Connection Issues
  • WiFi Connectivity
  • General VPN Issues
  • TeamViewer Remote Support
  • DD-WRT Firmware
  • Facebook
  • Twitter
  • Instagram
  • Pinterest
  • YouTube

Footer