• Skip to primary navigation
  • Skip to main content
  • Skip to primary sidebar
  • Skip to footer

FlashRouters Support Portal

Prioritizing Privacy

  • SETUP GUIDES
    • Privacy Hero Router Setup Guide
    • ASUS-WRT Router Setup Guide
    • AsusWRT-Merlin Router Setup Guide
    • DD-WRT Router Setup Guide
    • ExpressVPN Router Setup Guide
    • GL.iNet Router Setup Guide
    • Roqos Core Router Setup Guide
  • TROUBLESHOOTING
    • Router Access
    • WiFi Connectivity
    • Internet Connection Issues
    • General VPN Issues
    • DD-WRT Firmware
    • TeamViewer Remote Support
  • FAQs
    • Router FAQs
    • VPN FAQs
    • Warranty and Returns FAQs
    • Sales FAQs
    • Shipping FAQs
    • Service Plan FAQs
  • Show Search
Hide Search

Search Results for: dial from compu

TP-Link Internet Setup

TeamFlashRouters · Apr 11, 2024 ·

Follow this article when you receive your new TP-Link FlashRouter to connect it to the Internet.

1. Connect the ethernet cable that came with the router from an open LAN ethernet port on your ISP modem or other router to the WAN port of the TP-Link.

2. Connect the power to the router and wait about 2 minutes for the router to fully boot up.

3. Connect your computer, phone, or tablet to the TP-Link router via wireless (FlashRouter24 / FlashRouter50) or via ethernet cable to one of the LAN ports on the router.

The FlashRouter WiFi password is printed on the sheet that came with the router and is set to Wireless#[First 5 characters of your router MAC]. The router MAC can be found on the bottom of your router if you cannot locate the sheet. For e.g. if your MAC is 1459C07E70A8 then your WiFi password is Wireless#1459C

Be sure to capitalize the W.

4. Once connected via wireless or ethernet on your device open your browser and go to tplinkwifi.net
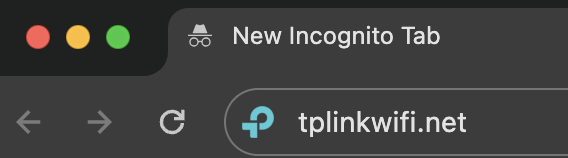
TP-Link URL Access

5. Enter tp-link as the admin password to access the TP-Link firmware settings.
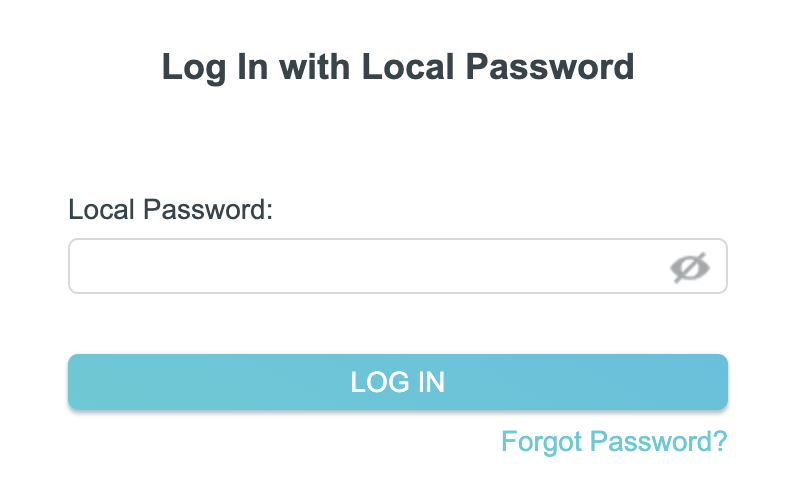
TP-Link admin password

6. Verify that your TP-Link FlashRouter is reporting as Internet and WAN Connected.
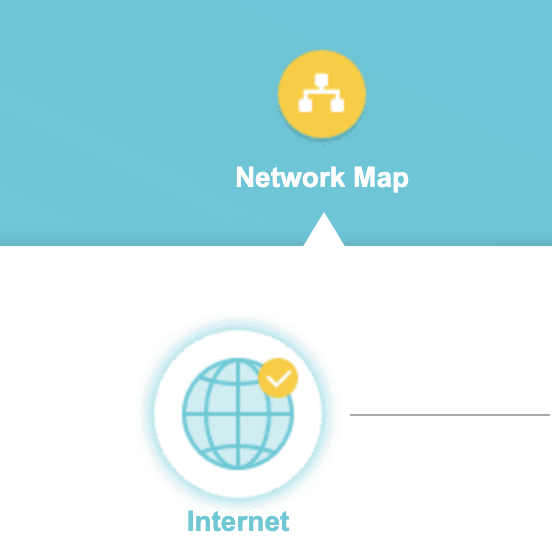
TP-Link Internet Connected

TROUBLESHOOTING

Still having issues? Visit the VPN Troubleshooting section.

Troubleshoot Here

VPN Director for Asus Merlin

TeamFlashRouters · Jan 19, 2022 ·

Once you have OpenVPN connected on your Merlin FlashRouter you can manage your VPN connections by device or by VPN servers or even VPN providers. This is a major advantage of Asus Merlin firmware as it allows up to 5 VPN connections at the same.

Login to Asus Merlin firmware settings in a browser on any computer or smart device.

Setup multiple VPN clients

1. Under Advanced Settings select VPN.

2. Click the VPN Client tab.

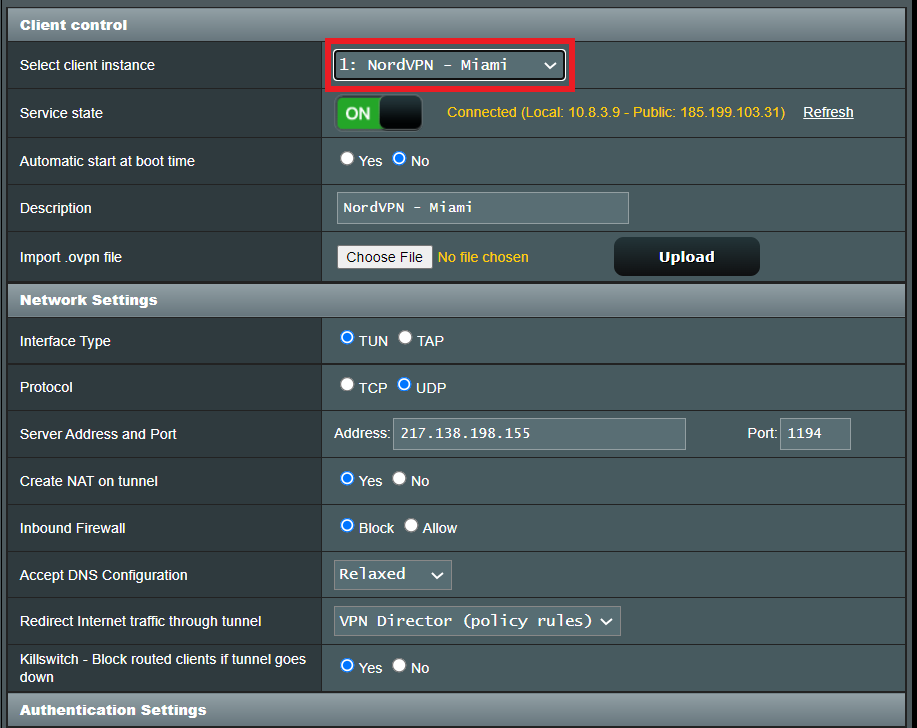
3. In the Select Client instance dropdown select a new client instance to setup and follow your VPN providers setup guide.

VPN Director select client instance

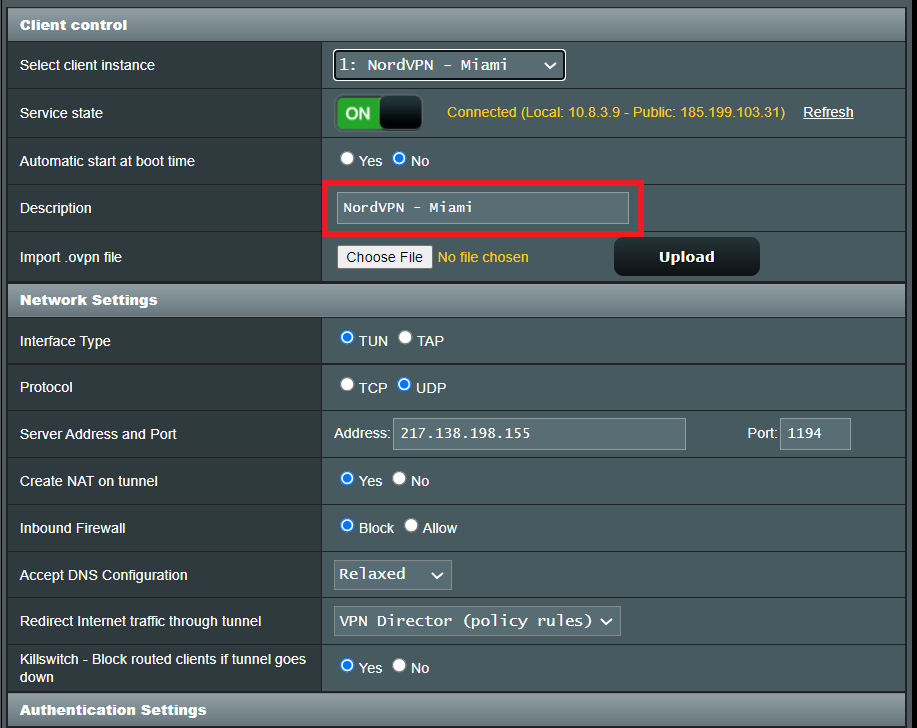
4. Name the client in the Description field for more clarity for which server or provider is being setup.

VPN Director Description

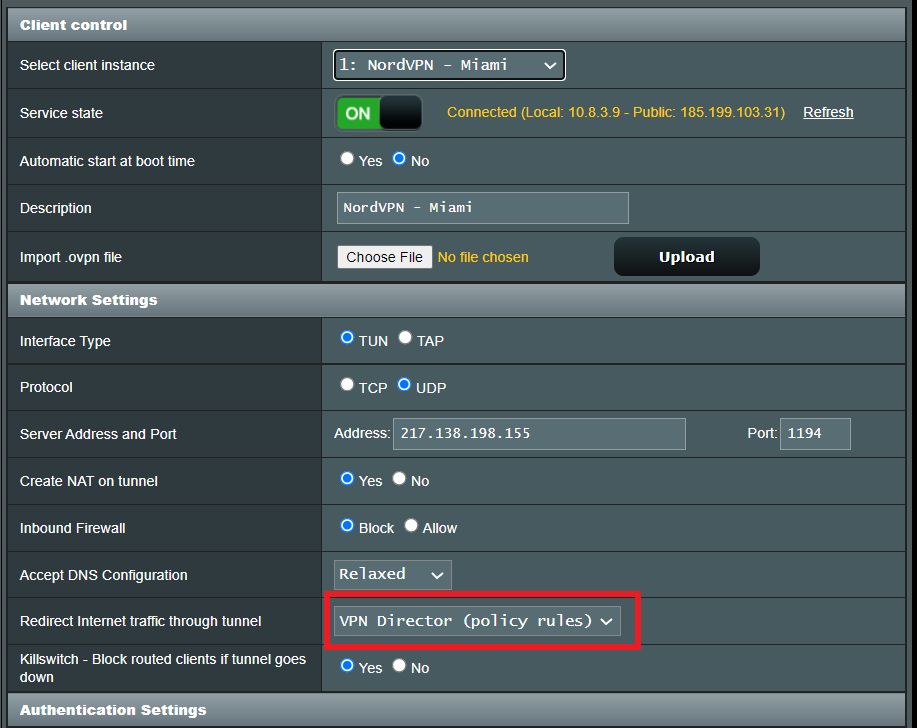
5. Set the Redirect Internet traffic through tunnel dropdown to VPN Director.

VPN Director Policy

Start or Stop VPN Client

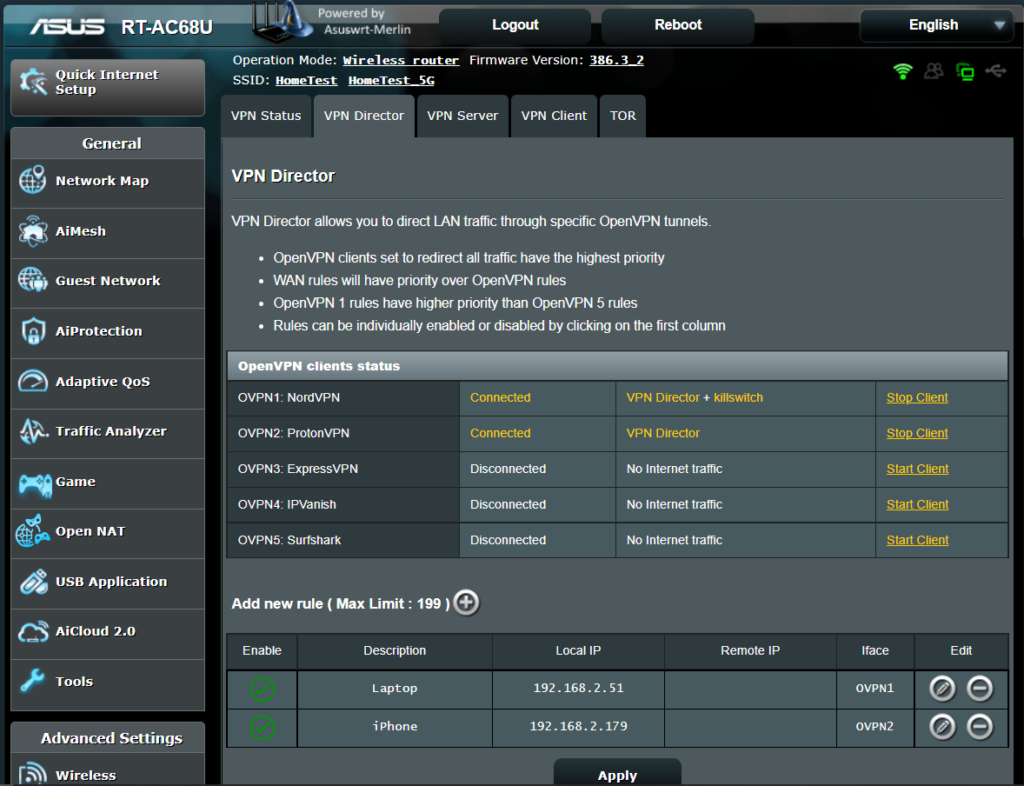
1. Under Advanced Settings select VPN.

2. Click the VPN Director tab.

Merlin VPN Director

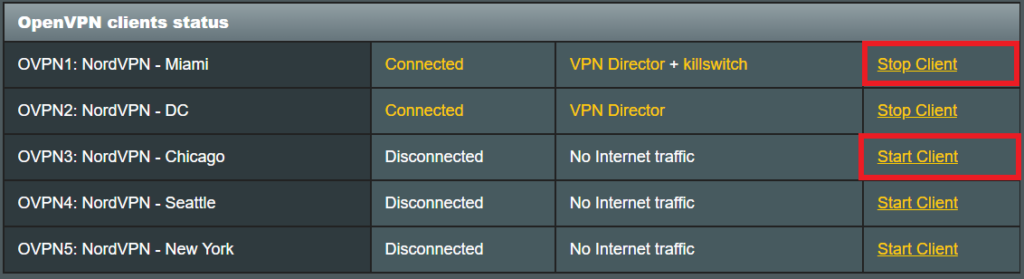
3. With multiple VPN clients connected you can start and stop them as needed from this page.

VPN Director

Assign a device to a specific VPN client

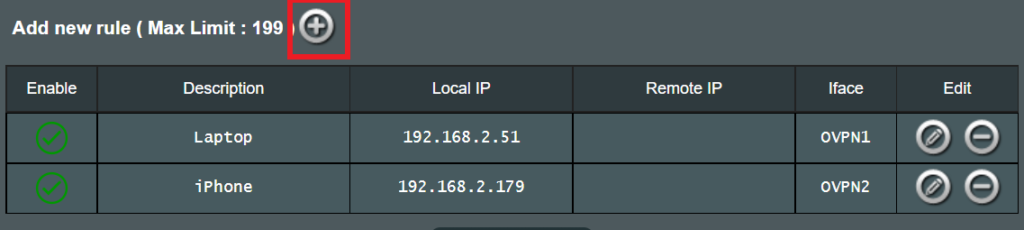
1. On the VPN Director page click the + symbol next to Add new rule.

VPN direct add new rule

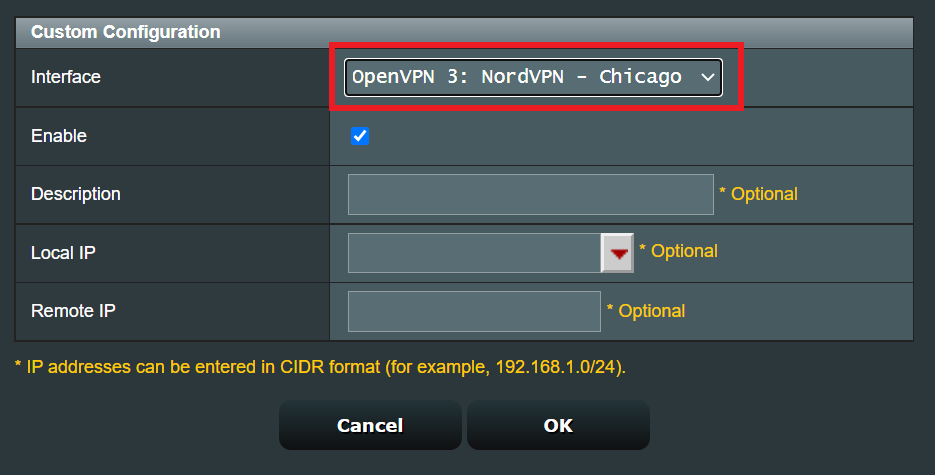
2. Select the Interface that you want to add the device to.

VPN director select interface

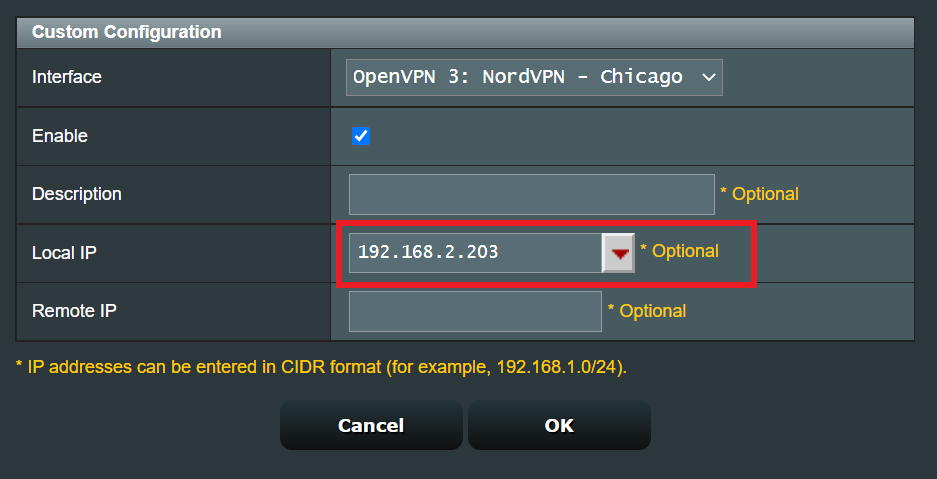
3. Click the Local IP dropdown and a full list of devices connected to the Merlin FlashRouter should appear. Select the device you want to assign to this VPN client.

VPN director select device

4. Click OK and click Apply.

How do I schedule a reboot of my FlashRouter?

TeamFlashRouters · May 30, 2019 ·

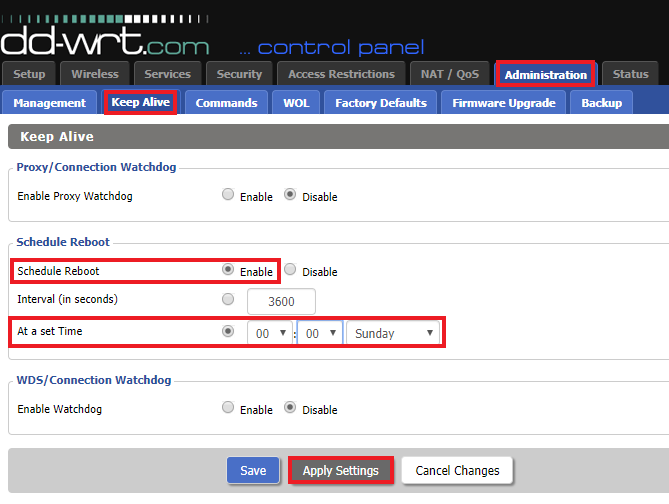
Schedule a reboot of the FlashRouter to restart your connection. A reboot of your network can help with stability and prevent the connection from slowing down over time.

Navigate to Administration > Keep Alive

Schedule a Reboot in FlashRouter DD-WRT Settings
  1. Enable Schedule Reboot.
  2. Select At a Set Time, and select the time of the day and day of the week you wish to schedule your reboot.
  3. Click Apply Settings.

IVPN WireGuard Setup

TeamFlashRouters · Oct 13, 2021 ·

Preparing for IVPN WireGuard Setup

Verify your IVPN login information

If you are not already a IVPN user Sign Up Now.

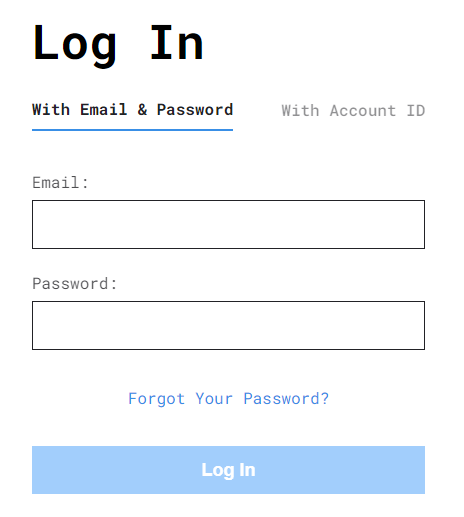
Log in to your account on the IVPN website.

IVPN website login

DD-WRT Router Setup for IVPN WireGuard

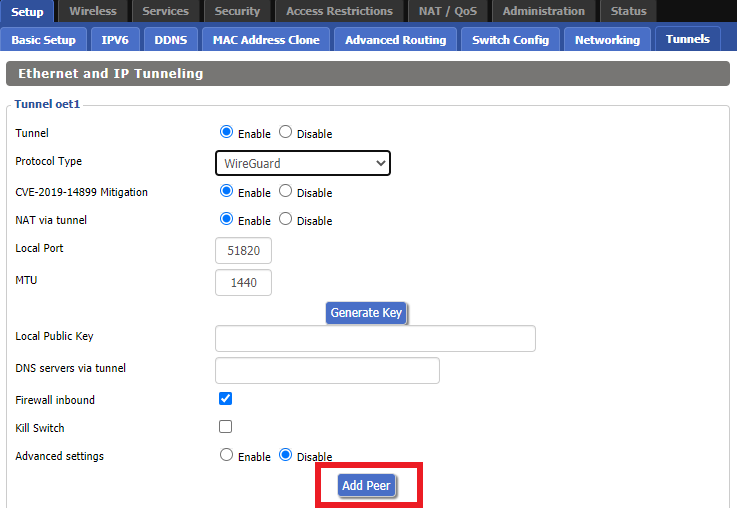
Navigate to Setup > Tunnels 

Enter IVPN WireGuard settings

1. Click Add Tunnel.

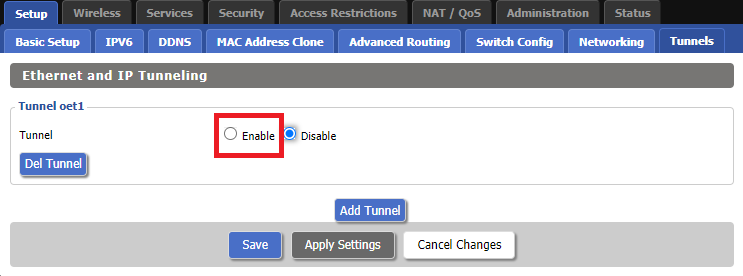
2. Set Tunnel to Enable.

Setup - Tunnel - Enable Tunnel

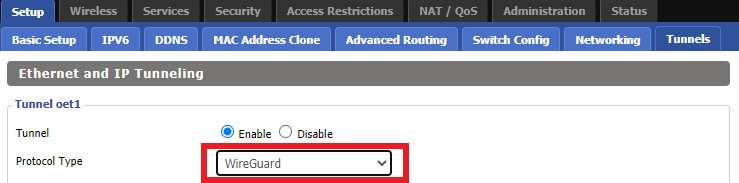
3. Select Wireguard from the dropdown.

Setup - Tunnel - Select Wireguard

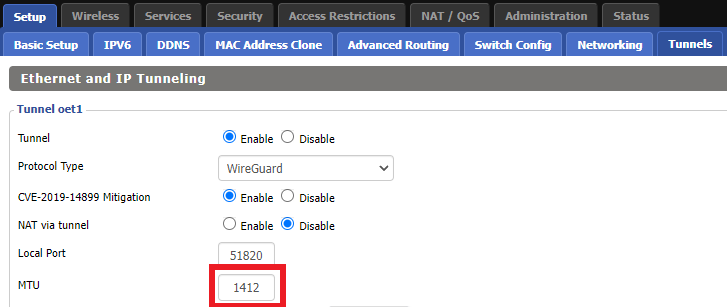
3. Set MTU to 1412.

IVPN Wireguard MTU setting

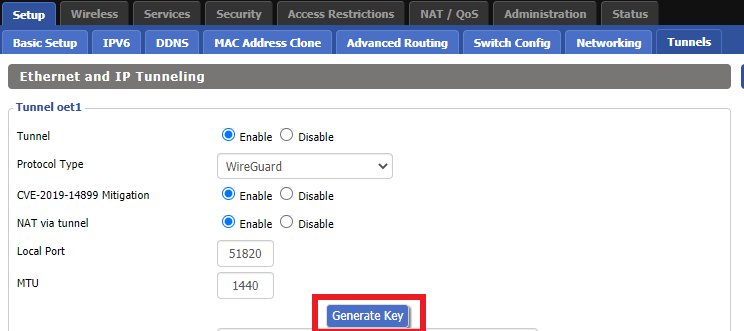
4. Click Generate Key.

Setup - Tunnel - Generate Key

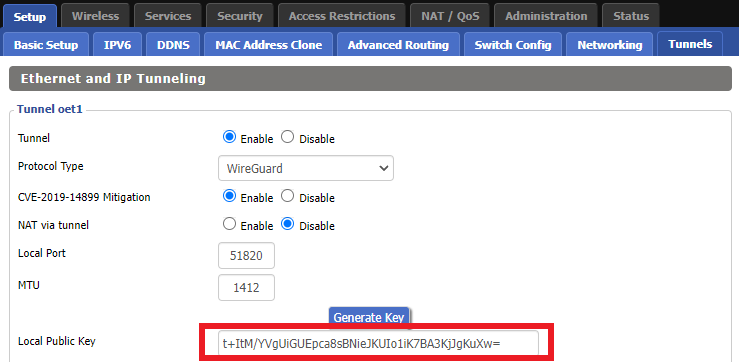
9. Copy the Local Public Key.

IVPN Wireguard Local Public Key

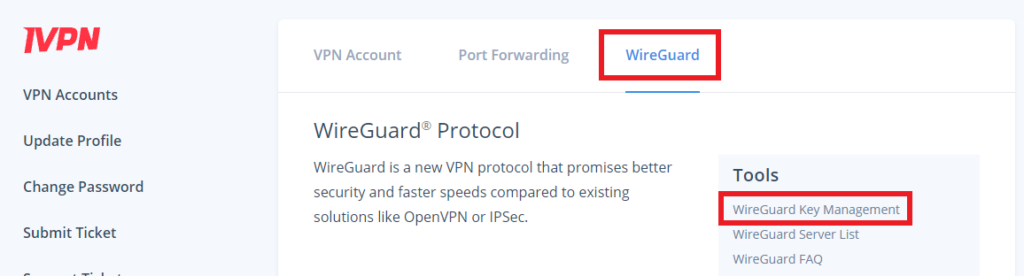
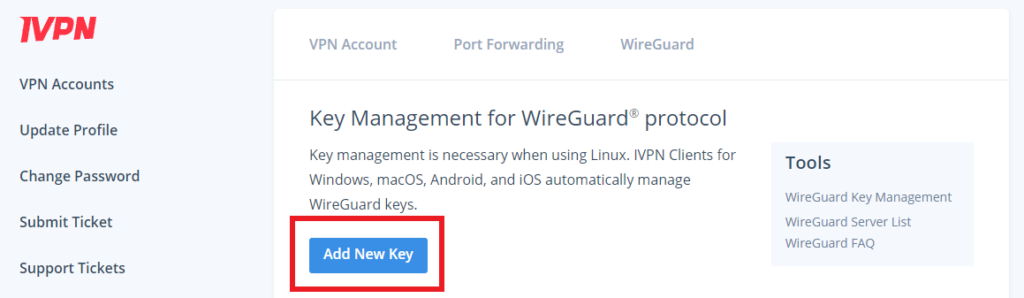
10. In a new tab (leave the DD-WRT settings opened), go to your IVPN Account and click WireGuard and then click WireGuard Key Management.

IVPN Wireguard Key Management

11. Click Add New Key.

IVPN Wireguard Add New Key

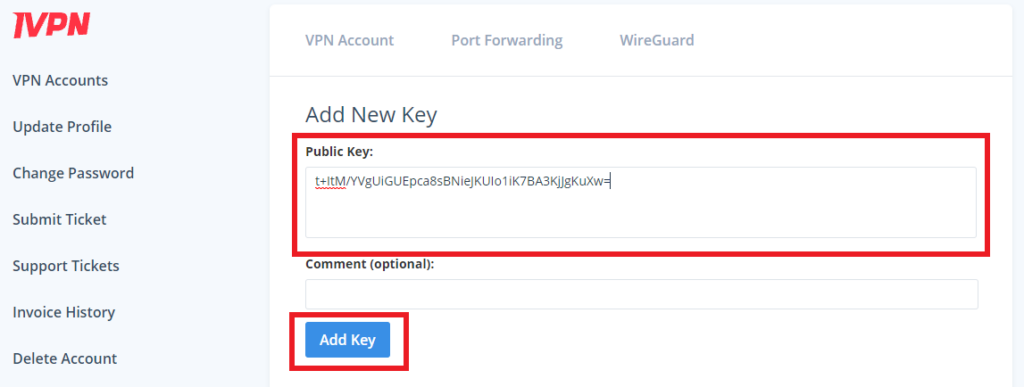
12. Paste the copied Local Public key to the Public Key field and click Add Key.

IVPN Wireguard Paste Public Key

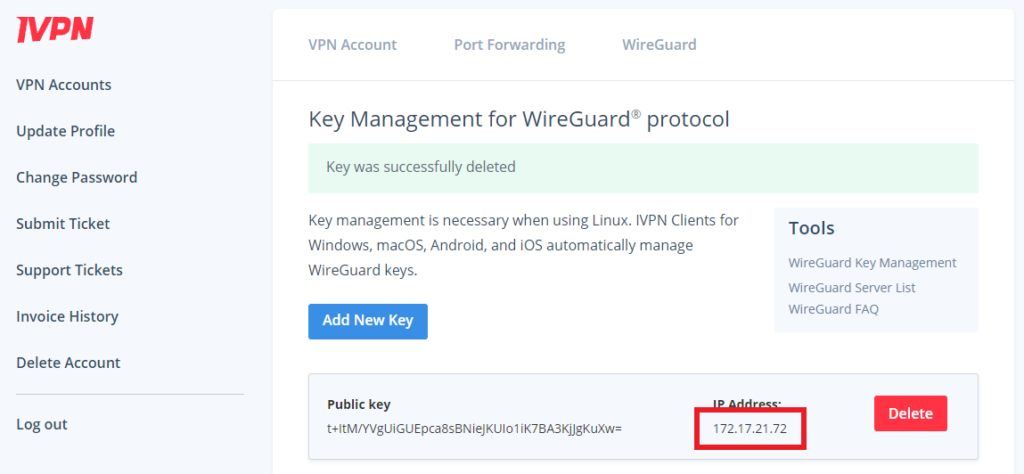
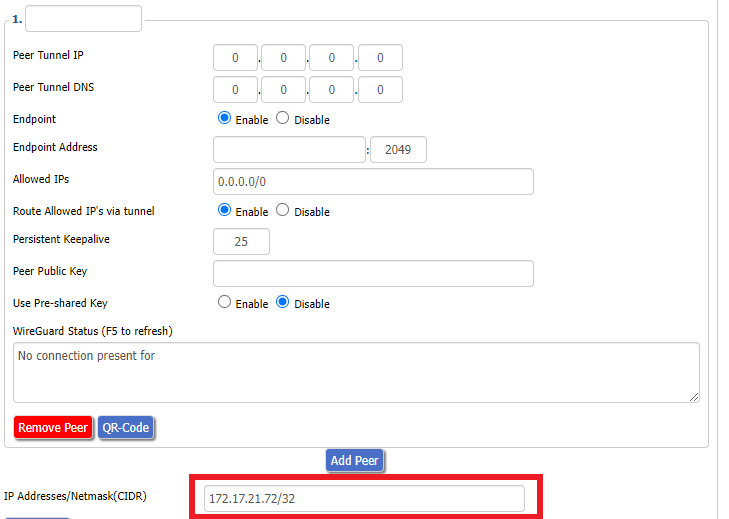
13.Copy the IP Address assigned to your public key and add it to the IP Addresses/Netmask(CIDR) field followed by a /32 subnet mask.

IVPN Wireguard copy IP Address
IVPN Wireguard paste IP Address

Certain DD-WRT builds will show two separate fields here: IP Address and Subnet Mask. If that is the case set the IP Address field to the Address without the /32 added and set the Subnet Mask to 255.255.255.255

14. Click Add Peer.

Setup - Tunnel - Add Peer

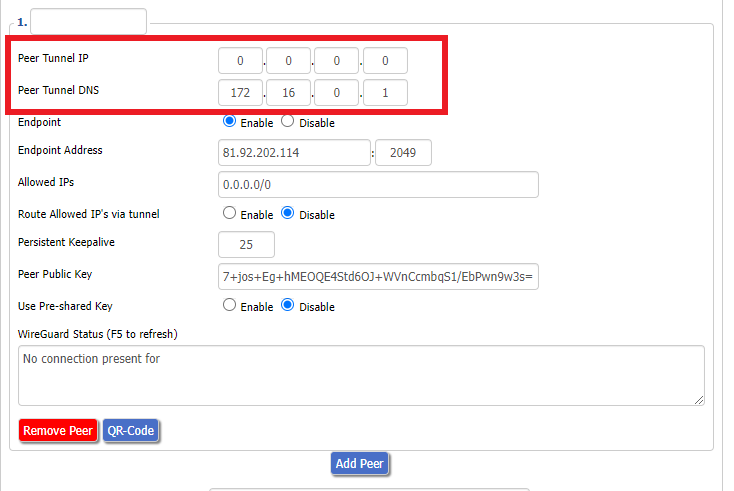
15. Set the Peer Tunnel IP to 0.0.0.0. Set Peer Tunnel DNS to 172.16.0.1

IVPN Wireguard Peer Tunnel IP and DNS

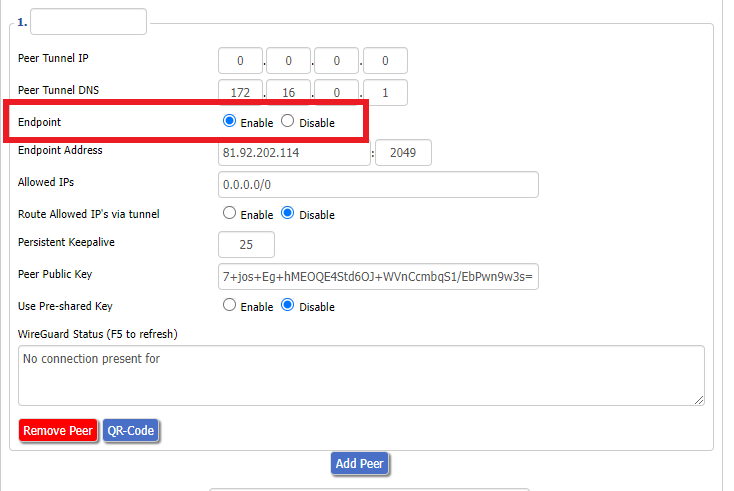
16. Set Endpoint to Enable.

IVPN Wireguard Enable Endpoint

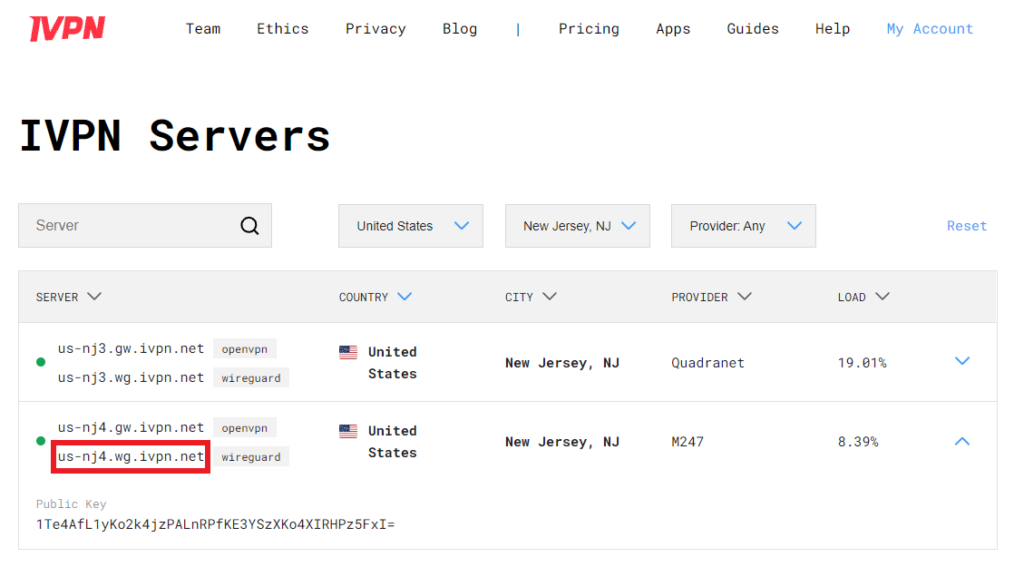
17. Go to the IVPN Server Status page and copy the server name for the WireGuard server location you want to connect to.

IVPN Wireguard Endpoint server

Be sure to copy the WireGuard server address and not the OpenVPN server address.

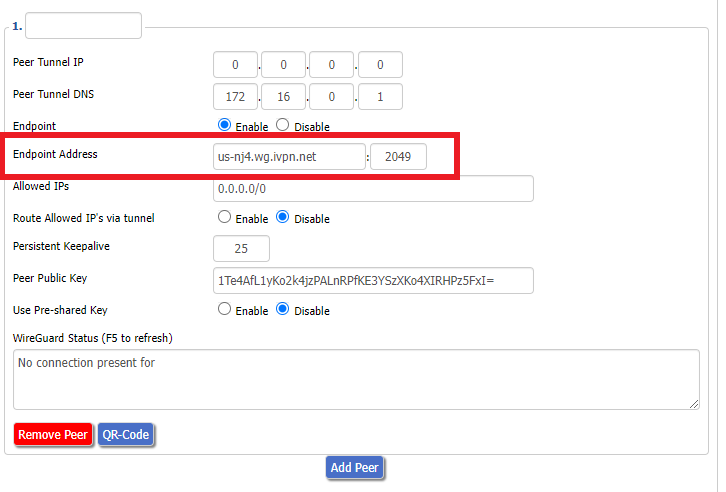
18. Paste the server name you copied into the Endpoint Address field and set the Port to 2049.

IVPN Wireguard Endpoint Address

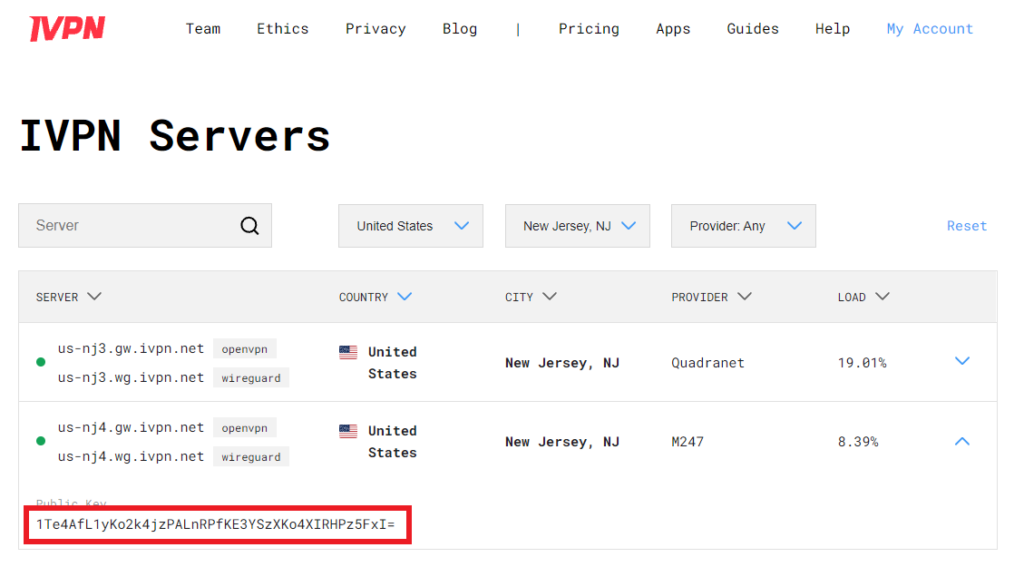
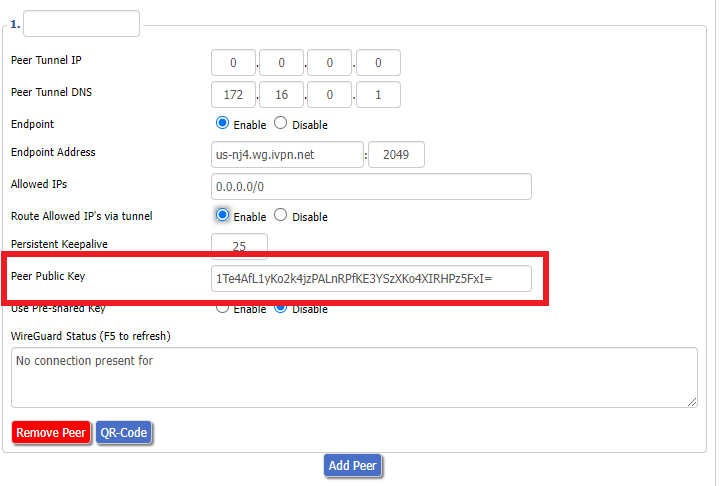
19. On the IVPN Server Status page copy the Public Key of the server location you entered. Paste the Public Key into the Peer Public Key field.


IVPN Wireguard copy server Public Key
IVPN Wireguard enter Peer Public Key

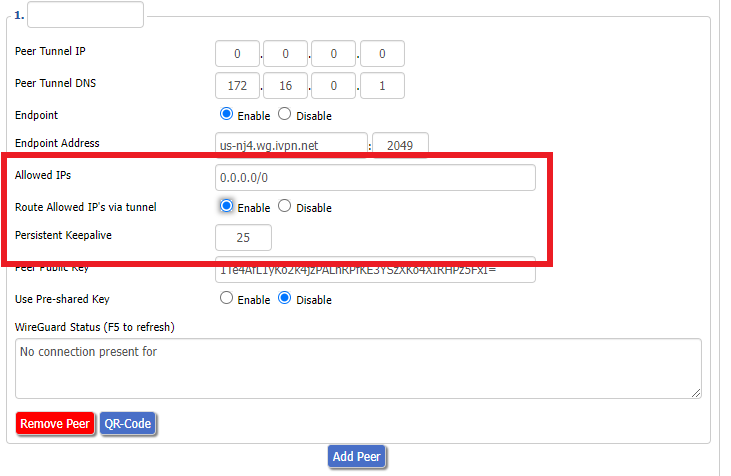
20. Leave Allowed IPs as 0.0.0.0/0. Set Router Allowed IP’s via tunnel to Enable. Set Persistent Keep Alive to 25.

IVPN Wireguard Peer settings

21. At the bottom of the page click Save and then click Apply Settings.

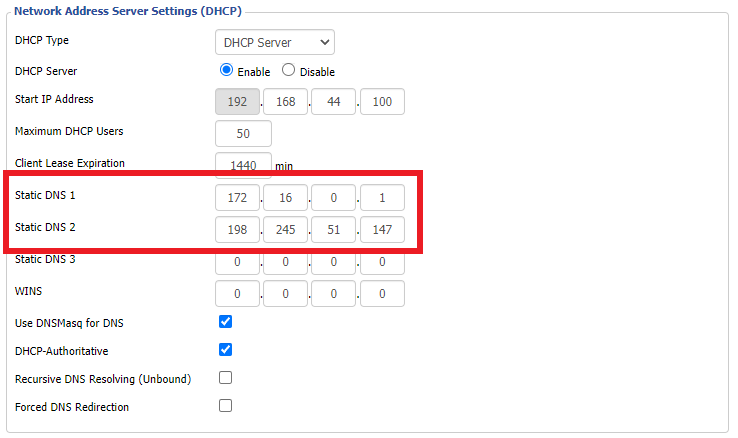
Set IVPN DNS servers

Navigate to Setup > Basic Setup

Set Static DNS 1 to 172.16.0.1

Set Static DNS 2 to 198.245.51.147

IVPN Wireguard Static DNS

Click Apply Settings.

Reboot the FlashRouter

Navigate to Administration > Management

Scroll to the bottom of the page and click the red Reboot Router button. Wait for the FlashRouter to reboot and then reconnect.

Verify a successful IVPN connection

Navigate to Setup > Tunnels

  1. You should Endpoint, Latest handshake, and Transfer in the WireGuard status area.
  2. Visit IVPN’s website to verify your status as using IVPN.

Back up your settings

Navigate to Administration > Backup

  1. Click the Backup button.
  2. A file named nvrambak.bin will be saved to your computer.
  3. You can load nvrambak.bin to restore your settings in the event of a reset.

TROUBLESHOOTING

Still having issues? Visit the VPN Troubleshooting section.

Troubleshoot Here

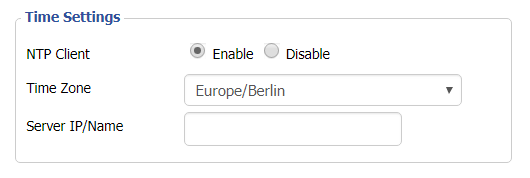
Why is my Time Zone set to Europe/Berlin?

TeamFlashRouters · May 30, 2019 ·

Europe/Berlin is the default Time Zone setting for DD-WRT firmware.

To change this to your location’s actual Time Zone do the following.

Navigate to Setup > Basic Setup

Select your actual Time Zone from the dropdown field. Leave the Server IP/Name field blank.

CLICK APPLY SETTINGS

The network may reboot for a moment. Simply reconnect when it is back up.

Disabling the NTP Client setting will result in the VPN connection not working so we ask that you please leave it enabled at all times.

CyberGhost Manual OpenVPN Setup

TeamFlashRouters · Apr 9, 2019 ·

Preparing for Manual CyberGhost Setup

Obtain your CyberGhost OpenVPN Information

If you are not already a CyberGhost user Sign Up Now.

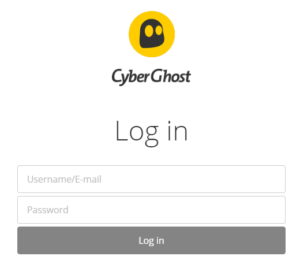
1. Log in to your account on the CyberGhost website.

CyberGhost Website Login

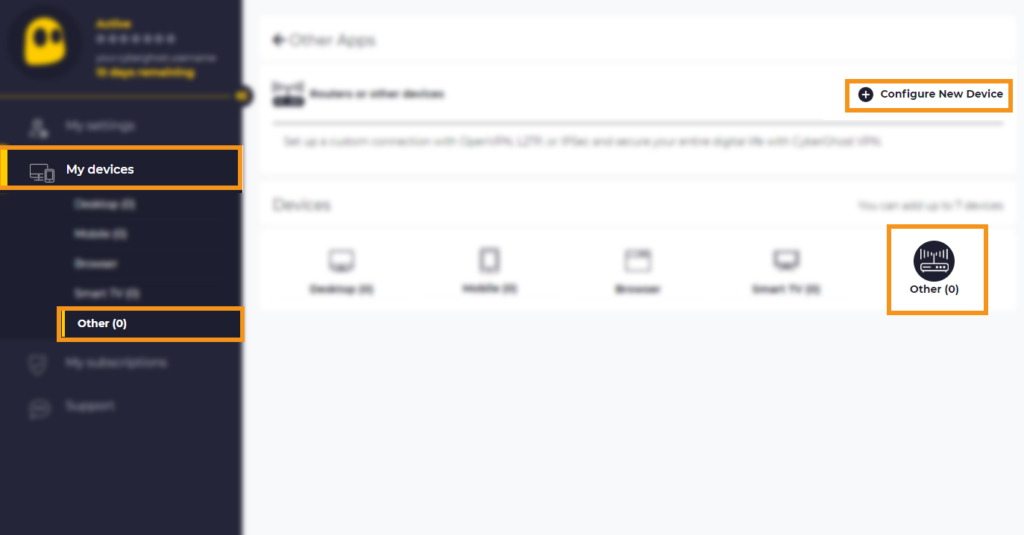
2. Select My Devices.

3. Select Other and then Configure New Device.

CyberGhost Website OpenVPN Configuration Files Generator Cyberghost - Website Screen CyberGhost Website OpenVPN Configuration Files Generator

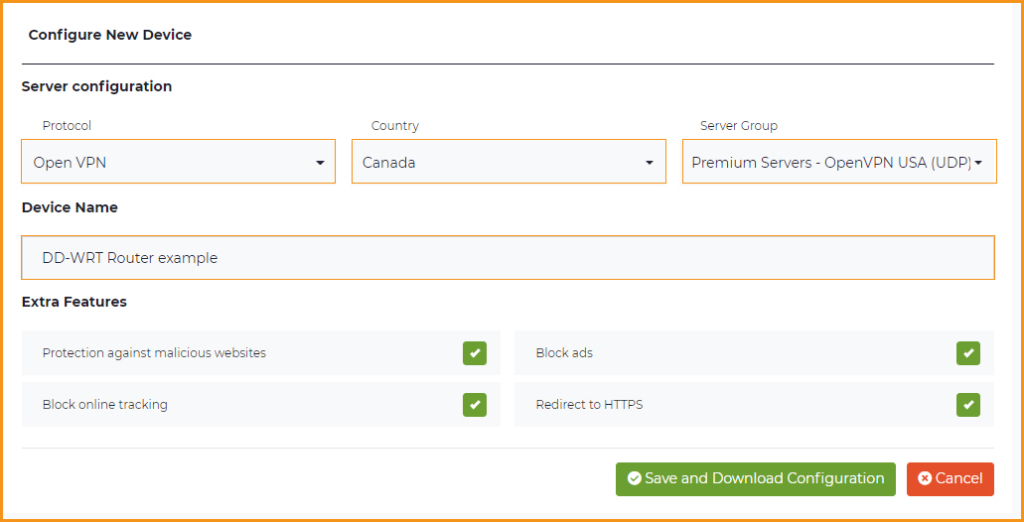
4. Set Protocol to OpenVPN. Select the Country you would like to connect to. Select the Server Group. Name the device in the Device Name field. Click Save Configuration.

CyberGhost Website OpenVPN Configuration Files Generator 3

5. Press View configuration.

CyberGhost Website OpenVPN Configuration Files Generator 2

6. Copy the Username, and Password that appear to a notepad, since you will need this information later in the setup process. Click Download Configuration.

CyberGhost Website OpenVPN Configuration Files Generator 1

Open the file that was downloaded with NotePad++ for Windows or TextEdit for Apple. You only need the ca.crt, client.crt, and client.key files. All CyberGhost servers have different keys and certificates.

DD-WRT Router Setup for CyberGhost

Navigate to Services > VPN

Enter CyberGhost settings

OpenVPN Client

Start OpenVPN Client

If you wish to disable your VPN connection simply set this to Disable at any time and click Apply Settings.

Server IP/Name

Copy and paste the server you selected in your account. Be sure there are no extra spaces or characters.

Port

443

Tunnel Device

TUN

Tunnel Protocol

UDP

Encryption cipher

AES-256-CBC

Hash Algorithm

SHA256

User Pass Authentication

Enable

Username

Enter the Username you obtained in your CyberGhost account.

Password

Enter the Password you obtained in your CyberGhost account.

Advanced Options

Enable

TLS Cipher

None

LZO Compression

Adaptive

NAT

Enable

Firewall Protection

Enable

Additional Config

tun-mtu 1500
fragment 1300
mssfix 1300

Policy Based Routing

This field can be used for split VPN and Dual Gateway routing.

CA Cert

—–BEGIN CERTIFICATE—–
MIIGWjCCBEKgAwIBAgIJAJxUG61mxDS7MA0GCSqGSIb3DQEBDQUAMHsxCzAJBgNV
BAYTAlJPMRIwEAYDVQQHEwlCdWNoYXJlc3QxGDAWBgNVBAoTD0N5YmVyR2hvc3Qg
Uy5BLjEbMBkGA1UEAxMSQ3liZXJHaG9zdCBSb290IENBMSEwHwYJKoZIhvcNAQkB
FhJpbmZvQGN5YmVyZ2hvc3Qucm8wHhcNMTcwNjE5MDgxNzI1WhcNMzcwNjE0MDgx
NzI1WjB7MQswCQYDVQQGEwJSTzESMBAGA1UEBxMJQnVjaGFyZXN0MRgwFgYDVQQK
Ew9DeWJlckdob3N0IFMuQS4xGzAZBgNVBAMTEkN5YmVyR2hvc3QgUm9vdCBDQTEh
MB8GCSqGSIb3DQEJARYSaW5mb0BjeWJlcmdob3N0LnJvMIICIjANBgkqhkiG9w0B
AQEFAAOCAg8AMIICCgKCAgEA7O8+mji2FlQhJXn/G4VLrKPjGtxgQBAdjo0dZEQz
KX08q14dLkslmOLgShStWKrOiLXGAvB1rPvvk613jtA0KjQLpgyLy9lIWohQKYjj
5jrJYXMZMkbSHBYI9L8L7iezBEFYrjYKdDo51nq99wRFhKdbyKKjDh3e2L2SVEZL
T1ogkK5gWzjvH+mjjtjUUicK+YjGwWOz6I+KKaG4Ve/D/cE6nCLbhHIMMnargZEu
7sqA6BFeS4kEP/ZdCZoTSX2n43XV1q63nJt/v0KDetbZDciFVW9h9SVPG4qT44p0
550N+Mom7zTX7S/ID5T9dplgU8sRGtIMrG0cIMD9zmpFgUnMusCrR7jJFr0sMAve
TbgZg95LmstV6R6WKZkSFdUrE0DHl4dHoZvTFX+1LhwhHgjgDLaosX0vhG/C/7Lp
oVWimd6RRQT3M9o4Fa1TuhfvBzQ20QHrmRV/yKvGNK0xckZ6EZ/QY7Z55ORU15Tg
ab4ebnblYPWoEmn0mIYP3LFFeoR5OS1EX7+j4kPv+bwPGsmpHjxmZyq2Y7sJBpbO
CJgbkn52WZdPBIRDpPdIHQ8pAJC4T0iMK9xvAwWNl/V6EYYNpR97osyEDXn+BTdA
HlhJ5fck9KlwI9mb1Kg1bhbvbmaIAiOLenSULYf3j6rI1ygo3R2cCyybtuAq8M7z
0OECAwEAAaOB4DCB3TAdBgNVHQ4EFgQU6tdK1g/He5qzjeAoM5eHt4in9iUwga0G
A1UdIwSBpTCBooAU6tdK1g/He5qzjeAoM5eHt4in9iWhf6R9MHsxCzAJBgNVBAYT
AlJPMRIwEAYDVQQHEwlCdWNoYXJlc3QxGDAWBgNVBAoTD0N5YmVyR2hvc3QgUy5B
LjEbMBkGA1UEAxMSQ3liZXJHaG9zdCBSb290IENBMSEwHwYJKoZIhvcNAQkBFhJp
bmZvQGN5YmVyZ2hvc3Qucm+CCQCcVButZsQ0uzAMBgNVHRMEBTADAQH/MA0GCSqG
SIb3DQEBDQUAA4ICAQDNyQ92kj4qiNjnHk99qvnFw9qGfwB9ofaPL74zh0G5hEe3
Wgb2o4fqUGnvUNgOu53gJksz3DcPQ8t40wfmm9I1Z8tiM9qrqvkuQ+nKcLgdooXt
EsTybPIYDZ2cWR/5E0TKRvC7RFzKgQ4D77Vbi4TdaHiDV7ZNfU1iLCoBGcYm80hc
UHEs5KIVLwUmcSOTmbZBySJxcSD0yUpS7nlZGwLY6VQrU+JFwDSisbXT4DXf3iSz
p7FzW0/u/SFvWsPHrjE0hkPoZPalYvouaJEHKAhip0ZwSmitlxbBnmm8+K/3c9mL
A5/uXrirfpuhhs8V3lyV2mczVtSiTl6gpi88gc//JY80JeHdupjO25T3XEzY9cpx
ecmkWaUEjLMx4wVoXQuUiPonfILM6OLwi+zUS8gQErdFeGvcQXbncPa4SdJuHkF8
lgiX2i8S8fPGdXvU37E9bdAXwP5nZriYq1s0D59Qfvz+vLXVkmyZp6ztxjKjKole
mPMak0Y5c1Q4RjNF6tmQoFuy/ACSkWy14Tzu2dFp7UiVbGg1FOvKhfs48zC2/IUQ
v1arqmPT/9LVq3B2DVT9UKXRUXX/f/jSSsVjkz4uUe2jUyL+XHX1nSmROTPHSAJ+
oKf0BLnfqUxFkEUTwLnayssP2nwGgq35b7wEbTFIXdrjHGFUVQIDeERz8UThew==
—–END CERTIFICATE—–

Public Client Cert

Copy and paste all contents of the client.crt file starting and ending with:
—–BEGIN CERTIFICATE—–
…
—–END CERTIFICATE—–

Private Client Key

Copy and paste all contents of the client.key file starting and ending with:
—–BEGIN PRIVATE KEY—–
…
—–END PRIVATE KEY—–

CLICK APPLY SETTINGS

Leave all settings not mentioned above as their default setting.

Verify a successful CyberGhost connection

Navigate to Status > OpenVPN

  1. You should now see a CONNECTED SUCCESS message.
  2. Visit CyberGhost’s website to verify your new IP address and virtual location.

In some cases you may notice that the location is not showing the same location as the server you have input in your router settings; this is because geo tracking tools are often tricked by VPN connections. As long as you see an IP address that is not the same as your normal Internet IP address then you are indeed connected to CyberGhost.

Back up your settings

Navigate to Administration > Backup

  1. Click the Backup button.
  2. A file named nvrambak.bin will be saved to your computer.
  3. You can load nvrambak.bin to restore your settings in the event of a reset.

How to change the CyberGhost server

  1. Follow the instructions for obtaining the OpenVPN information from above.
  2. Enter the new Server Address in the Server IP/Name field.
  3. Enter the new Username and Password.
  4. Enter the new ca.crt, client.crt, and client.key
  5. Click Apply Settings.

TROUBLESHOOTING

Still having issues? Visit the VPN Troubleshooting section.

Troubleshoot Here

DD-WRT Router Setup Guide

DD-WRT Router Setup Guide

Quick Start Guide for DD-WRT FlashRouters

Find setup guides, FAQs and troubleshooting tips for DD-WRT configured FlashRouters.

VIEW SUPPORTED ROUTER MODELS

AC1450, R6220, R6230, R6250, R6260, R6300 V1, R6300 V2, R6400 V1, R6400 V2, R6700 V1, R6700 V2, R6700 V3, R7000, R7000P, R7800, R8000, R9000, XR500

Asus Logo

RT-AC56U/R, RT-AC68U V1, RT-AC68U V2, RT-AC1900P, RT-AC87U, RT-AC3100, RT-AC5300

WRT1200AC, WRT1900AC V1, WRT1900AC V2, WRT1900ACS V1, WRT1900ACS V2, WRT32X, WRT3200ACM

Internet Setup

  • Connect FlashRouter to Internet
  • Access FlashRouter DD-WRT firmware settings
  • What are some extra steps I can take to secure my network?
  • IPv6 Internet Setup
  • PPPoE Internet Setup

WiFi Setup

VPN Setup

DD-WRT Features

  • How do I set a Static IP for my device in DD-WRT?
  • How do I upgrade the DD-WRT firmware of my FlashRouter?
  • How do I save and load a backup file?
  • How do I schedule a reboot of my FlashRouter?
  • How do I change the DHCP range of my FlashRouter?

Search Support Articles

Troubleshooting

  • Why can’t I send emails while connected to VPN?
  • What is a DNS leak and how can I prevent a DNS leak in my router?
  • My VPN stopped working on my FlashRouter.
  • Why is my connection speed slower?
  • Why are streaming services blocked while connected to VPN?
  • How do I find my router local IP address?
  • How do I reset and reconfigure my FlashRouter?
  • How do I check for static network settings on my devices?
  • Why is my router not connecting to internet?
  • How to fix an Unidentified Network or Limited Connection.
  • Why are some of my devices not connecting to the internet?
  • Why is the internet LED red on my router?
  • Why is the power light on my FlashRouter blinking?
  • My 2.4GHz network is not showing up
  • My 5.0GHz network is not showing up
  • My WiFi password is not working
  • Why did my WiFi SSID change to ‘dd-wrt’?
  • Why are devices disconnecting from Wireless?
  • Why is my WiFi signal weak?

More Ways to Get Help

GET IN TOUCH

BUY SUPPORT
BROWSE FAQs

Change server locations on ExpressVPN/Aircove firmware

TeamFlashRouters · May 12, 2022 ·

You can change the ExpressVPN server location at any time so your Internet connection appears as originating from that location.

1. Connect to the FlashRouter’s network via ethernet cable or wireless.

2. Open your web browser and enter expressvpnrouter.com or 192.168.132.1 in the URL.

ExpressVPNrouter.com
192.168.132.1

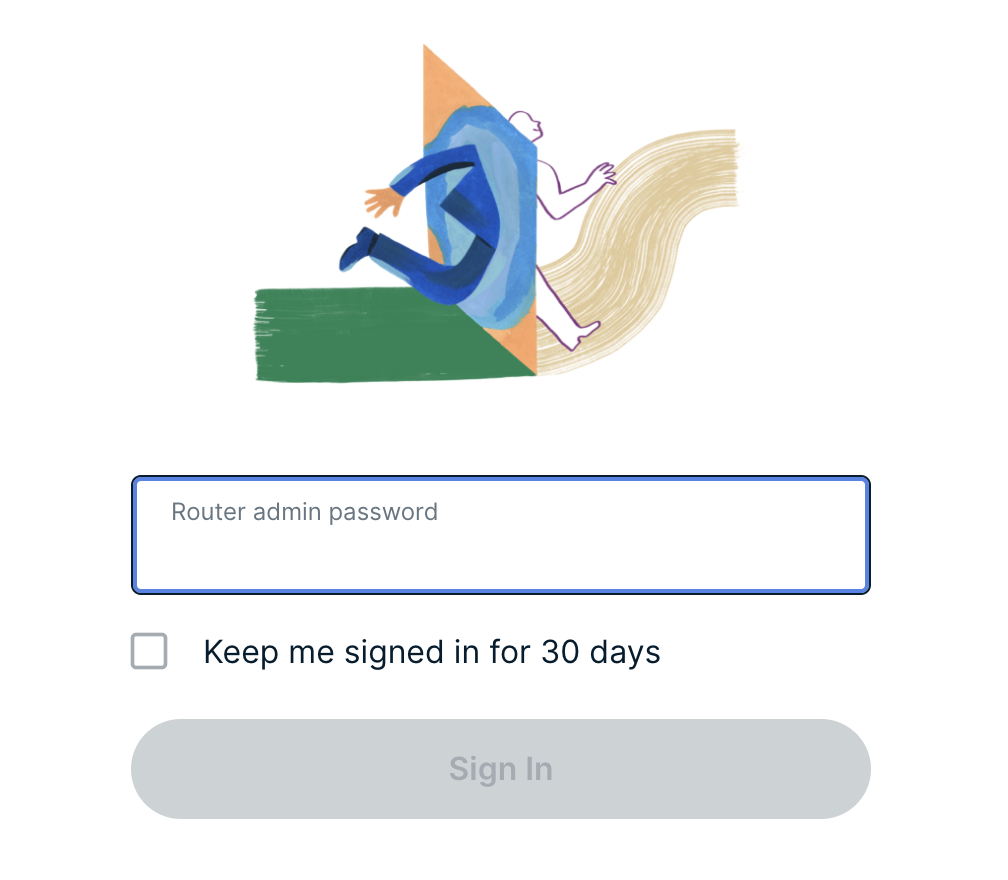
3. Login with your ExpressVPN FlashRouter admin password.

ExpressVPN Router admin login

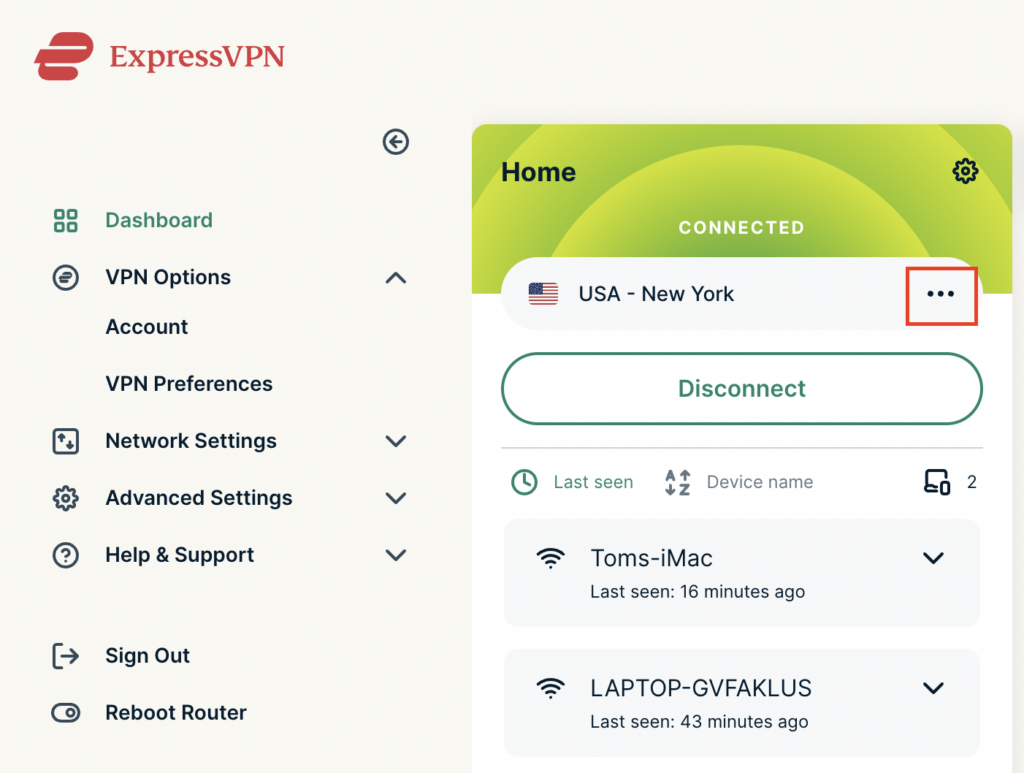
4. Click the three dots next to the server location.

ExpressVPN change server 1

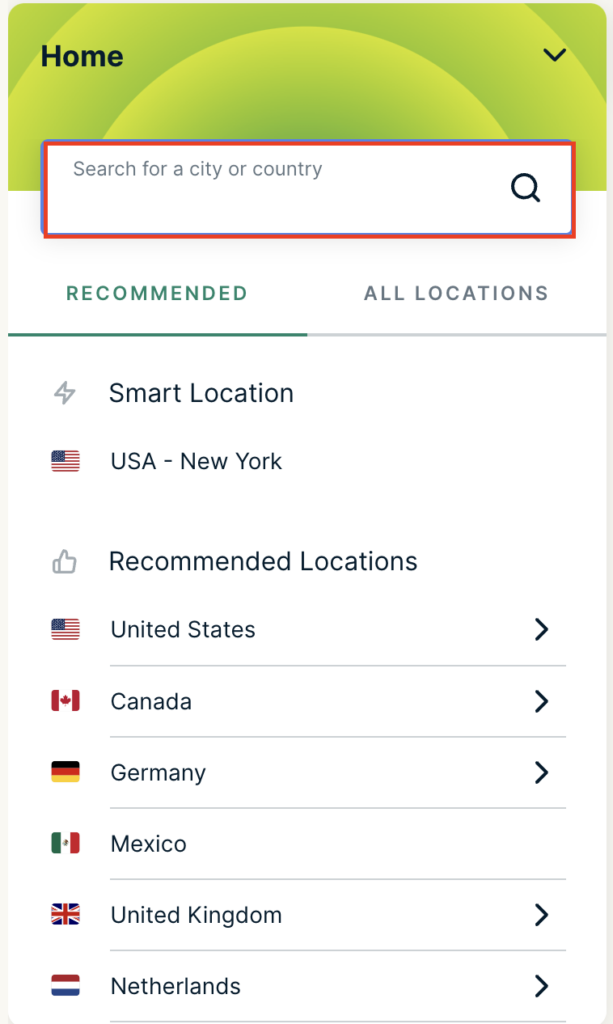
5. Type in the location you want to connect to. Click the new location to connect.

ExpressVPN change server 2

6. You are now connected to the new server location.

ExpressVPN change server 3

ExpressVPN offers servers in locations all over the world. Typically for speeds it is best to connect to the server closest to your actual location. Clicking a country instead of a city will connect you to the ideal city in that country.

Which DD-WRT wireless extender setup should I be using?

TeamFlashRouters · Jun 11, 2019 ·

FlashRouters supports four unique DD-WRT wireless extender setups – options similar to an open source Mesh network. Each different wireless extender configuration serves a different purpose. Read below to see which guide fits your configuration requirements!

Wireless Repeater

Why should I choose Wireless Repeater Setup?

  1. If you have a MiFi wireless only internet connection or other type of WiFi internet where there is no access to any ethernet port for a wired internet connection, then you can setup a wireless repeater network to both extend WiFi and add wired connection capabilities.
  2. If you have a large home or office area that requires additional WiFi coverage can use a wireless repeater setup to extend the existing network.
  3. If you want to create a separate VPN WiFi network in your home without placing the FlashRouter in the same room as your primary router you can use wireless repeater to establish a WiFi internet connection and then connect to VPN on your WiFi repeater network.
  4. If you want a wireless Dual Router setup option where you can have local ISP IP address through your main router WiFi network and your VPN IP address through your FlashRouter Wireless Repeater WiFi network, both available for you to connect at all times. Each network is on a unique subnet.

View the FlashRouter Wireless Repeater Setup Guide.

Wireless Repeater Bridge

Use Cases

Wireless Repeater Bridge Setup

  1. Anyone that needs all their devices connected to the same local network.
  2. Anyone with a MiFi internet connection that does not have an ethernet port and has no need for VPN.
  3. Anyone with a large wireless area that requires additional coverage.

Wireless Client Bridge

Use Cases

Wireless Client Bridge Setup

  1. Anyone with a MiFi internet connection that needs wired access.
  2. Anyone that needs additional wired ports instead of using a switch.
  3. Anyone with wired only devices in their home that are too far from your main router.

Wireless Access Point DHCP Forwarder

Use Cases

Wireless Access Point DHCP Forwarder Setup

  1. Anyone that needs their devices connected to the same local network and wants lossless LAN to LAN speeds via wireless and ethernet connection.
  2. Anyone that wants to use their main router to provide DHCP to their router instead of having an additional DHCP server.

Setting up a Guest WiFi Network on Roqos

TeamFlashRouters · Nov 14, 2021 ·

Create a Guest WiFi network on your Roqos to segment certain devices from the main network and set custom content filters as you see fit. Note that this is only for 2.4GHz wireless.

Login to Roqos Core UI web app in a browser on any computer or smart device.

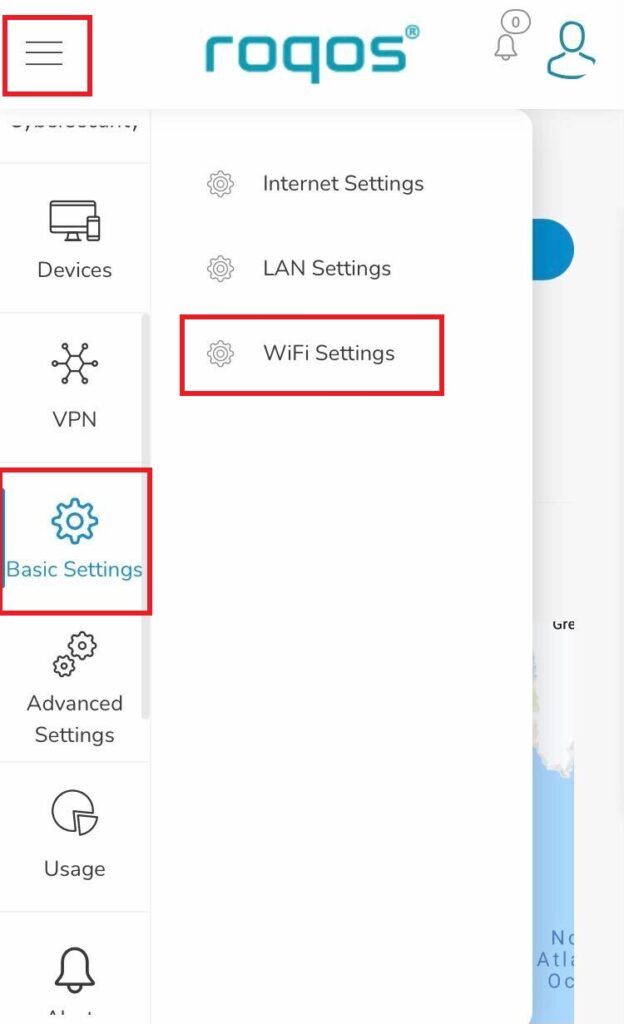
1. Click the navigation menu and select Basic Settings > WiFi Settings.

Roqos Basic Settings - WiFi Settings

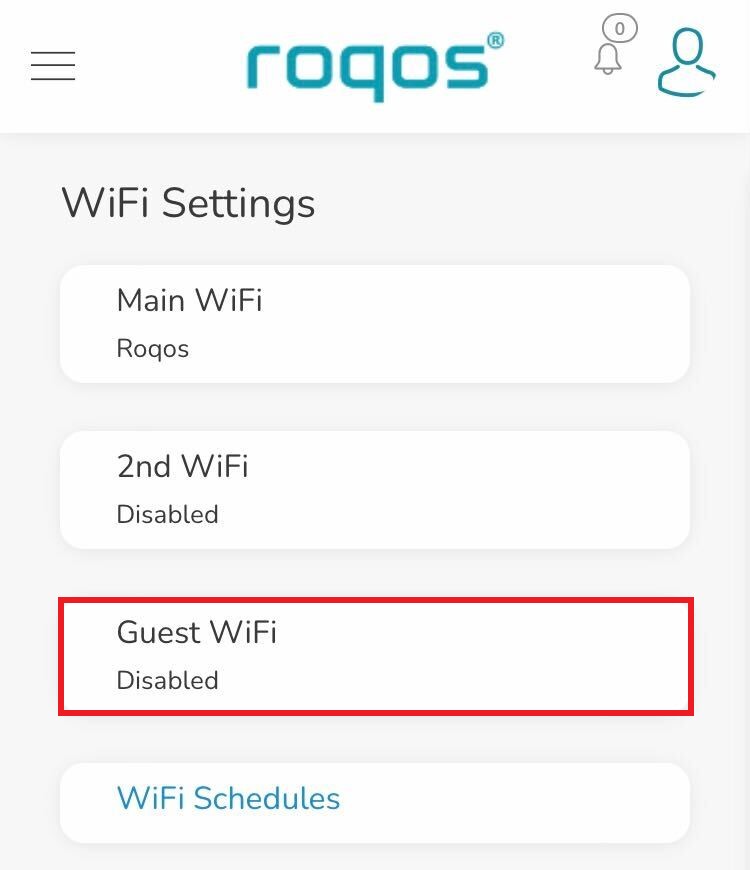
2. Click Guest WiFi.

Roqos WiFi Settings - Guest Wifi

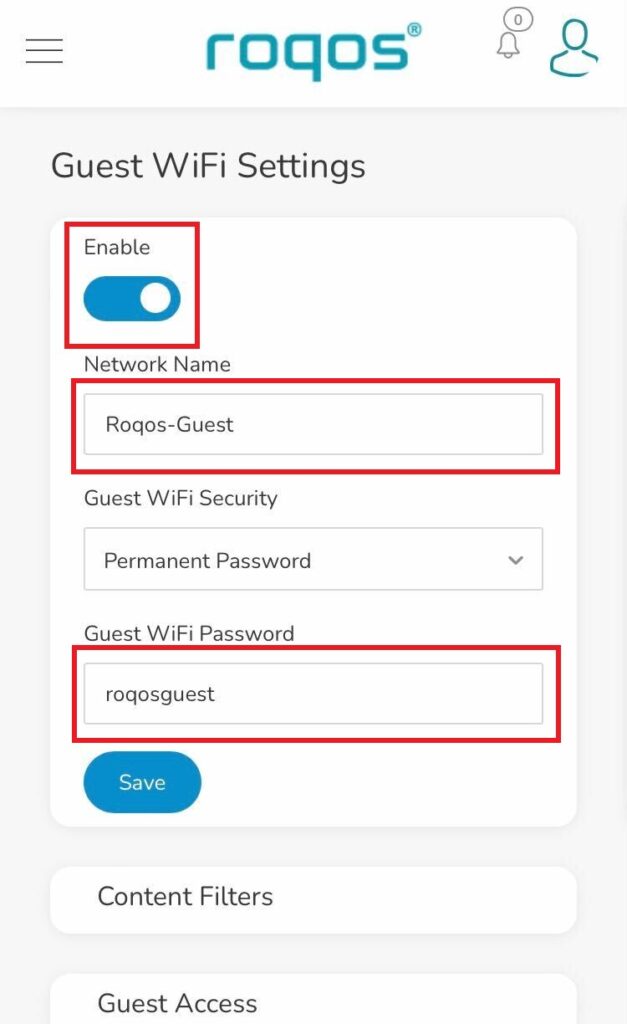
3. Toggle the Enable slider and set the Network Name and Guest WiFi Password. Click Save.

Roqos WiFi Settings - Guest Wifi name and password

4. Optional: If you wish to set specific Content Filters for the Guest Network and set the Filters that you see fit.

PPPoE Internet Setup

TeamFlashRouters · Mar 21, 2019 ·

Most ISPs do not require PPPoE credentials. If you are certain this is an ISP requirement in your setup, we kindly ask that you get in touch with your ISP to verify that they do in fact require PPPoE authentication and to provide you with the correct credentials to enter into your FlashRouter.

Before you enter your PPPoE credentials, you should have already setup your FlashRouter in a Single Router Setup with correct wiring. Once you enter PPPoE credentials you should then be able to connect to the internet.

If you are using a Dual Router Setup there is no need to enter PPPoE credentials if they are already entered in the existing router. You can disregard this article.

Enter your PPPoE credentials

DD-WRT Firmware

Navigate to Setup > Basic Setup

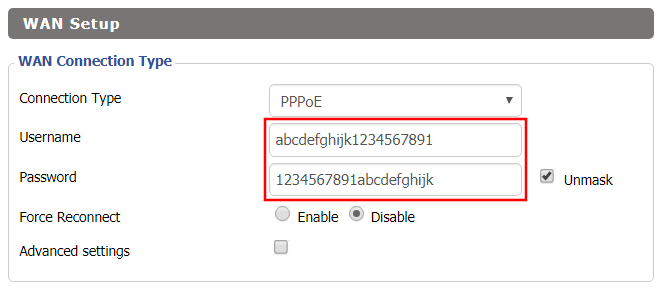
Access FlashRouters DD-WRT Admin Settings - Enter PPPOE Username and Password
  1. Set the Connection Type dropdown to PPPoE.
  2. Enter your ISP assigned PPPoE username and password.
  3. Click Apply Settings.

Power cycle your network devices

  1. Power off your ISP modem and the FlashRouter.
  2. Power on the ISP modem and wait for it to fully boot up.
  3. Power on the FlashRouter.

Verify a successful Internet connection

Once the FlashRouter is booted up connect one of your devices to the FlashRouter via Ethernet or Wireless.

Visit any website and make sure the page fully loads. Once you have verified a successful Internet connection, begin connecting your network devices to the FlashRouter via wired or WiFi.

Please be aware that our support is not able to replicate PPPoE issues on our end, which makes them challenging to troubleshoot. In the event of an issue we recommend using a Dual Router Setup.

Block Websites by Country on Roqos

Dave · Dec 16, 2021 ·

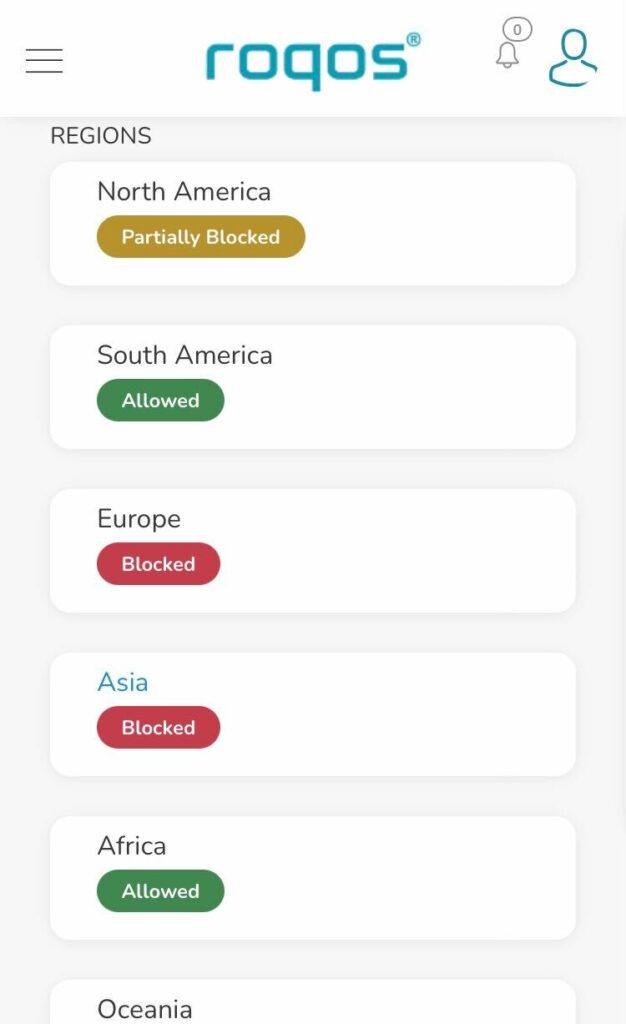
Country Block allows you to select countries that you identify to be an unsafe and block internet traffic between your network and those countries.

Login to Roqos Core UI web app in a browser on any computer or smart device.

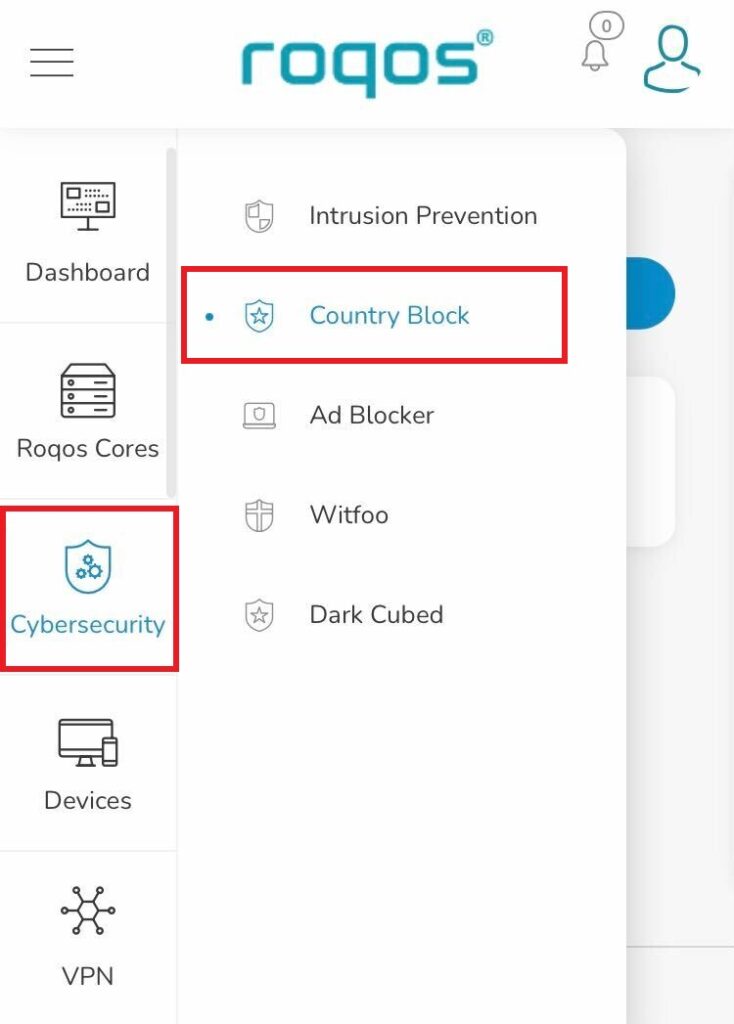
1. Click the navigation menu and select Cybersecurity > Country Block.

Roqos Cybersecurity - Country Block

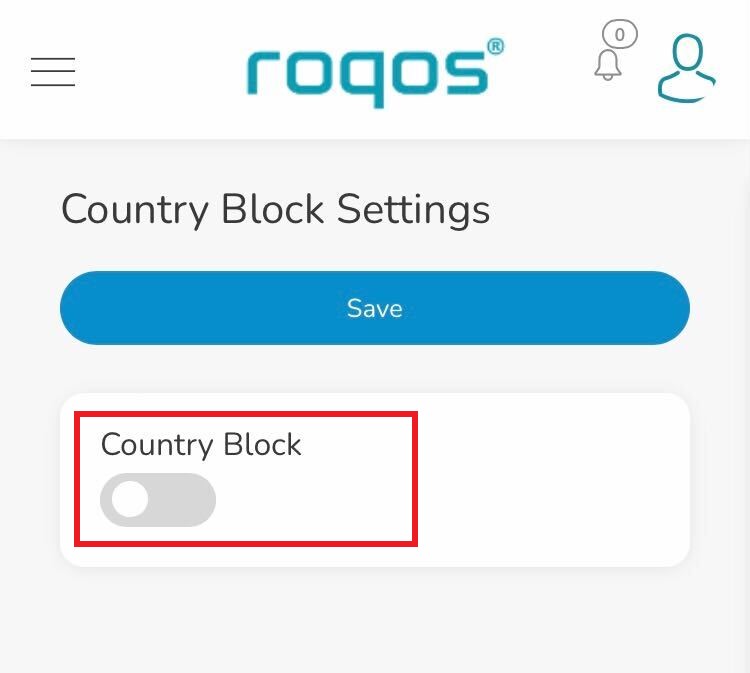
2. Toggle the Country Block setting.

Roqos Cybersecurity - Enable Country Block

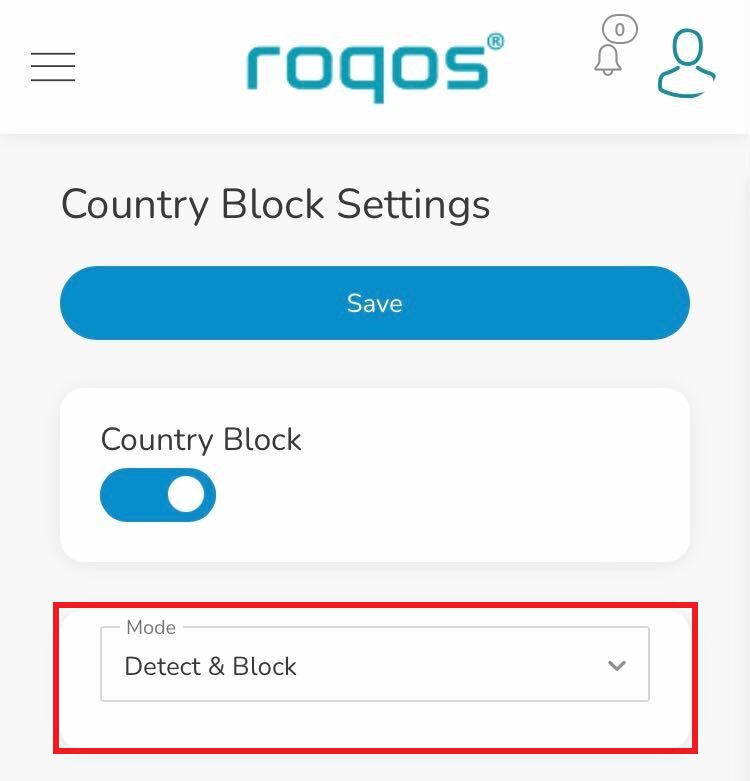
3. In the Mode dropdown select Detect & Block or Detect Only.

Roqos Cybersecurity - Country Block Mode

4. Under Regions you can select the regions you want to block or specific countries within that region. Once your selections are made click Save.

Roqos Cybersecurity - Select Blocked Countries

What is a DNS leak and how can I prevent a DNS leak in my router?

TeamFlashRouters · Jun 11, 2019 ·

What is a DNS leak?

A DNS Leak is an instance where your ISP receives DNS requests despite being connected to a VPN tunnel.

How do I check if my DNS is leaking?

  1. Perform the extended test on DNSLeakTest.com. Be sure to do so on multiple web browsers for best accuracy.
  2. Here you should only find one server and your ISP should not be listed as your actual ISP.
  3. If your actual ISP is not listed there is no DNS leak.

How can I prevent a DNS leak in DD-WRT?

Check your device's browser settings

Updates to web browsers have added DNS settings capabilities, while this often makes your browsing experience more secure it can also effect the results of a DNS leak test. You can go into your browser’s settings and search for “DNS” and disable the DNS of the browser for more accurate DNS leak test results.

A simple web search for “DNS settings [browser name]” should return helpful information for finding the setting in your browser.

Adjust DD-WRT settings

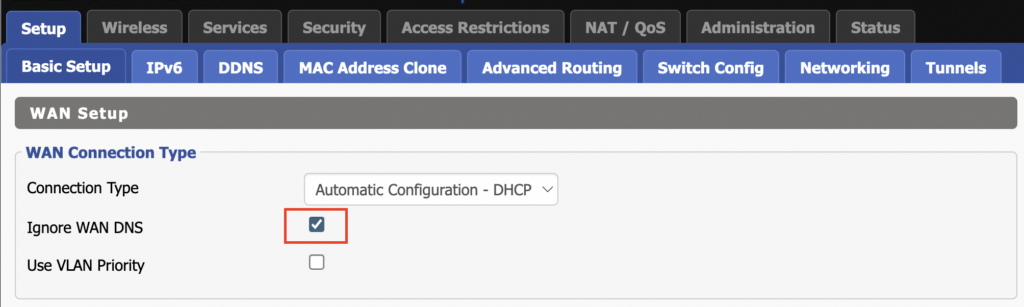
1. On the Setup > Basic Setup page of the DD-WRT settings check the Ignore WAN DNS box.

This setting may not appear in older DD-WRT firmware builds. If it is not appearing for you, upgrade your DD-WRT firmware.

DD-WRT Check Ignore WAN DNS

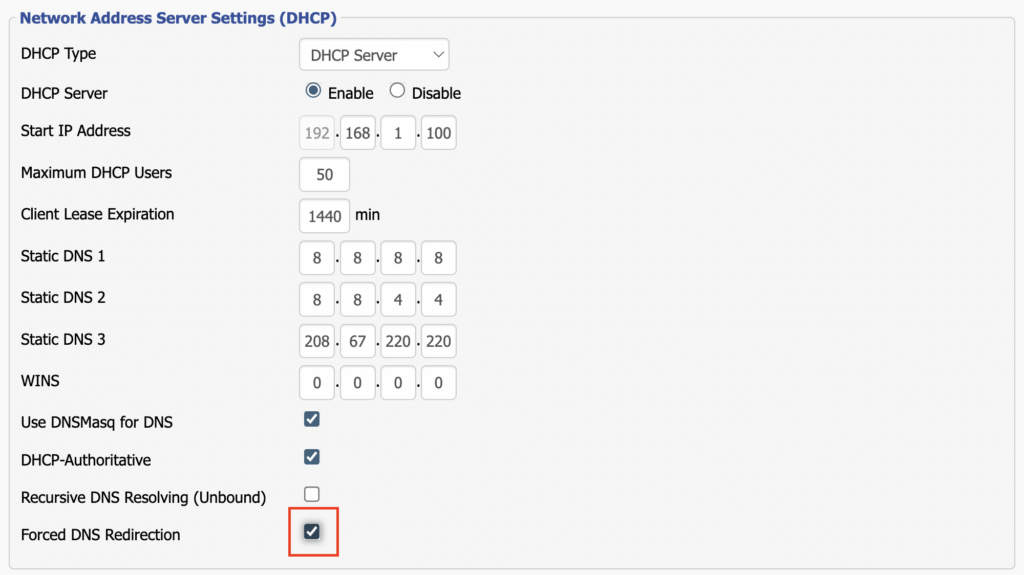
2. Lower on the same page check the Forced DNS Redirection box.

DD-WRT Check Forced DNS Redirection

3. Click Apply Settings at the bottom of the page and then wait a full minute and power the FlashRouter off and back on. Reconnect to the FlashRouter’s network once it boots back up and then make sure you are connected to VPN by going to https://whatismyipaddress.com then perform the DNS leak test again.

Adding your VPN provider’s DNS servers to the router’s configuration can be helpful as well. The DNS servers are typically found on the VPN provider’s website or you can reach out to their team for a recommendation of what DNS servers to enter.

« Previous Page

Primary Sidebar

  • Troubleshooting
  • Router Access
  • Internet Connection Issues
  • WiFi Connectivity
  • General VPN Issues
  • TeamViewer Remote Support
  • DD-WRT Firmware
  • Facebook
  • Twitter
  • Instagram
  • Pinterest
  • YouTube

Footer