• Skip to primary navigation
  • Skip to main content
  • Skip to primary sidebar
  • Skip to footer

FlashRouters Support Portal

Prioritizing Privacy

  • SETUP GUIDES
    • Privacy Hero Router Setup Guide
    • ASUS-WRT Router Setup Guide
    • AsusWRT-Merlin Router Setup Guide
    • DD-WRT Router Setup Guide
    • ExpressVPN Router Setup Guide
    • GL.iNet Router Setup Guide
    • Roqos Core Router Setup Guide
  • TROUBLESHOOTING
    • Router Access
    • WiFi Connectivity
    • Internet Connection Issues
    • General VPN Issues
    • DD-WRT Firmware
    • TeamViewer Remote Support
  • FAQs
    • Router FAQs
    • VPN FAQs
    • Warranty and Returns FAQs
    • Sales FAQs
    • Shipping FAQs
    • Service Plan FAQs
  • Show Search
Hide Search

Search Results for: static dns

How do I reset and reconfigure my FlashRouter?

Dave · May 3, 2019 ·

When is a router reset needed?

A reset of the FlashRouter should only be performed in the following instances:

  • You have exhausted all other troubleshooting methods and cannot access your router settings.
  • A backup file was saved of your previously working settings.
  • Username and password to access the FlashRouter’s settings are not working.
  • Power light on the router is blinking steadily.
  • Firmware upgrade was performed with Reset to Default settings selected.

Reset Router

Asus FlashRouters:

  1. While the router is powered off press and hold the WPS button on the back or side of the router. Power up the router while continuing to hold the WPS. Continue to hold for 15 seconds as the router powers on (note this could be up to 45 seconds on some models before lights flash).
  2. You will see the lights on the router flashing steadily and this is how you know you have reset the router.
  3. Let the router sit for about a minute and then reboot the router.

Linksys and Netgear FlashRouters:

  1. While the router is plugged in, find the reset button located on the back of the router. You will need a pin or pencil to hold down the button for 15 seconds.
  2. You will see the lights on the back of the router flash simultaneously and this is how you know you have reset the router.
  3. Let the router sit for about a minute and then reboot the router.

Access Router Settings

1. Connect to the FlashRouter’s network via ethernet cable or wireless.

The wireless network will appear as “dd-wrt” and will likely not require a password to join. If it does require a password to join the password will be the default wireless password found on the bottom of the router.

2. Open your web browser and enter 192.168.1.1 in the URL.
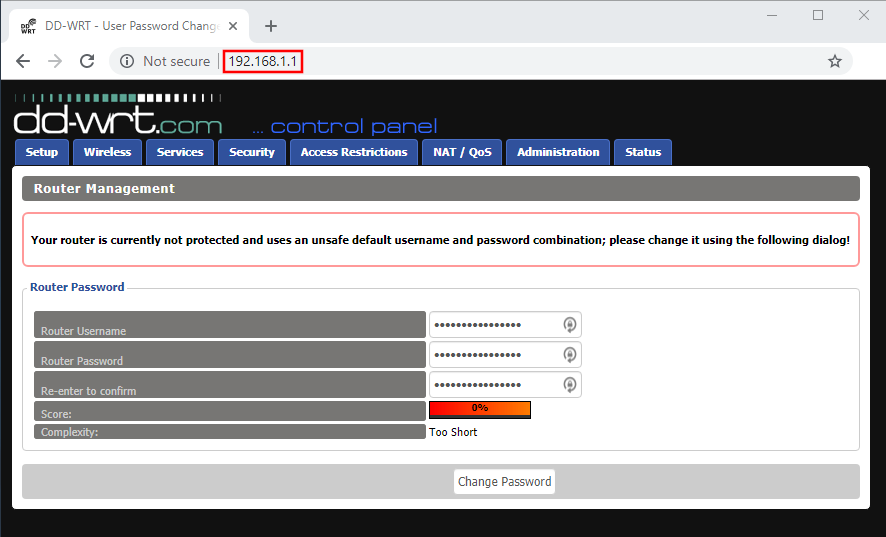
Reset FlashRouters DD-WRT Settings Back to Default Settings

3. Delete the dots and enter the new administration login in the Router Username, Router Password, and Re-enter to confirm fields.

TYPE CAREFULLY when setting the administration login as a typo will result in needing to reset the router again.

Change Local IP Address and DNS

Navigate to Setup > Basic Setup

1. Set the Local IP Address to 192.168.11.1

2. Set the Static DNS 1 to 8.8.8.8

3. Set the Static DNS 2 to 8.8.4.4

4. Set the Static DNS 3 to 208.67.220.220
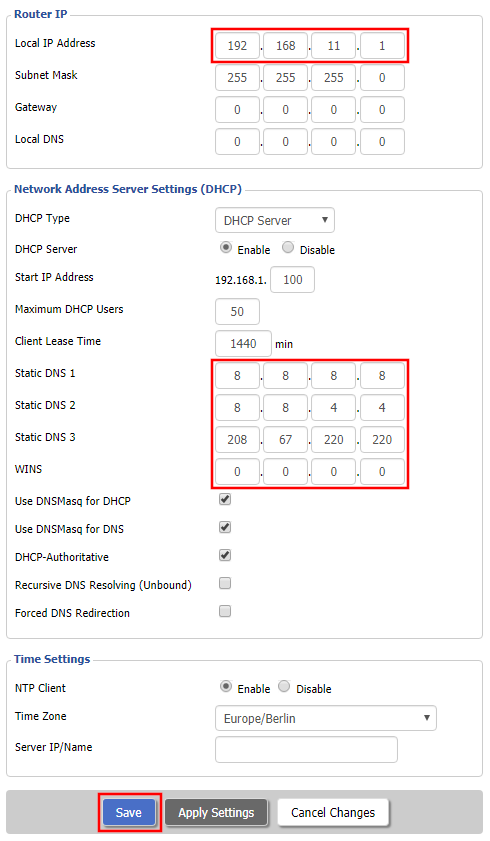
Enter New Local IP Address and DNS Servers After FlashRouter DD-WRT Reset

CLICK SAVE

Setup WiFi

Navigate to Wireless > Basic Settings

Find your FlashRouter model in the WiFi Setup section and replicate the wireless settings on this page.

CLICK APPLY SETTINGS

REBOOT ROUTER

Connect to the FlashRouter's network

You will be able to connect to the newly setup wireless network using the details you set. The router will now be accessible at 192.168.11.1

Back up your settings

  1. Click the Backup button.
  2. A file named nvrambak.bin will be saved to your computer.
  3. You can load nvrambak.bin to restore your settings in the event of a reset.
SmartDNSProxy SmartDNS Setup

TeamFlashRouters · Jun 13, 2019 ·

SmartDNSProxy offers a SmartDNS service for unblocking geo-restricted content without the encryption of a VPN service. SmartDNS routes DNS servers to different regions which “tricks” the website to allow access to previously restricted content.

SmartDNS does not change your IP Address or provide the encryption that a VPN connection does. This can result in faster speeds and unblocked content.

SmartDNS and VPN should not be configured at the same time. When using a SmartDNS connection, make sure to disable your VPN connection on the FlashRouter.

Register your IP Address

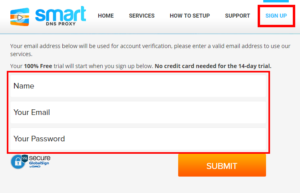
If you are not already a SmartDNSProxy user Sign Up Now.

Click on Sign Up and fill in the requested information.

SmartDNSProxy SmartDNS Account Sign Up For DD-WRT FlashRouter

Access the e-mail you entered and Verify your new account.

SmartDNSProxy SmartDNS Activate DNS for DD-WRT FlashRouter

Your account will now be verified.

Activate SmartDNSProxy SmartDNS Service and Subscription

Login to SmartDNSProxy

SmartDNSProxy Server Location Addresses for FlashRouter DD-WRT Settings

Visit SmartDNSProxy’s DNS servers list and note the DNS servers of the location you would like to access content from.

Enter SmartDNSProxy SmartDNS servers on your FlashRouter

Navigate to Setup > Basic Setup

  1. Scroll down to Network Address Server Settings (DHCP).
  2. Enter in any combination of SmartDNSProxy SmartDNS servers you noted into Static DNS fields 1 and 2.
  3. Click Apply Settings at the bottom of the page.
  4. Reboot the FlashRouter.

Once the router is fully booted back up, you can access your desired regional content on any device that connects to the FlashRouter’s network.

ExpressVPN MediaStreamer SmartDNS Setup

TeamFlashRouters · Jun 13, 2019 ·

ExpressVPN offers a SmartDNS service known as MediaStreamer for unblocking geo-restricted content without the encryption of a VPN service. SmartDNS routes DNS servers to different regions which “tricks” the website to allow access to previously restricted content.

SmartDNS does not change your IP Address or provide the encryption that a VPN connection does. This can result in faster speeds and unblocked content.

SmartDNS and VPN should not both be configured at the same time. When using a SmartDNS connection make sure to disable your VPN connection on the FlashRouter.

Login to ExpressVPN

If you are not already a ExpressVPN user Sign Up Now.

Visit ExpressVPN website login page and successfully login.

Register your IP with ExpressVPN

Navigate to the DNS Settings tab on top right of the ExpressVPN Dashboard.

ExpressVPN MediaStreamer DNS Settings

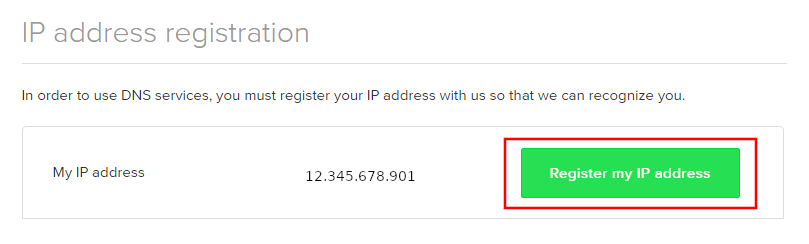
Click on Register my IP address.

Register IP for ExpressVPN MediaStreamer use on FlashRouter DD-WRT

Navigate to the ExpressVPN Dashboard.

Finding ExpressVPN MediaStreamer Specific DNS Servers in ExpressVPN Dashboard

Click on Set Up on More Devices.

Finding ExpressVPN MediaStreamer Specific DNS Servers

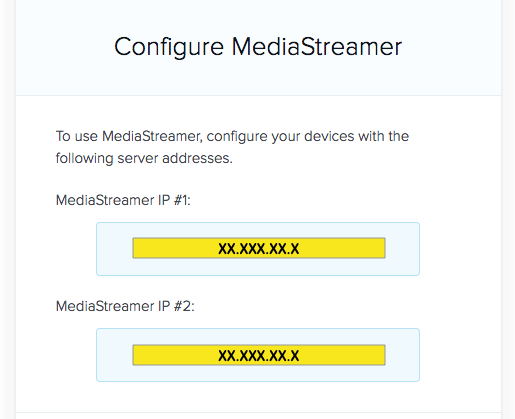
Scroll down and click on MediaStreamer and note the DNS servers that appear on the right side of the page.

ExpressVPN MediaStreamer Specific DNS servers

Enter MediaStreamer SmartDNS servers on your FlashRouter

Navigate to Setup > Basic Setup

  1. Scroll down to Network Address Server Settings (DHCP).
  2. Enter in the MediaStreamer SmartDNS servers you noted into Static DNS fields 1 and 2.
  3. Click Apply Settings at the bottom of the page.
  4. Reboot the FlashRouter.

Once the FlashRouter has fully rebooted, you can now access your desired regional content on any device that connects to the FlashRouter’s network.

Getflix SmartDNS Setup

TeamFlashRouters · Apr 4, 2019 ·

Getflix offers a SmartDNS service for unblocking geo-restricted content without the encryption of a VPN service. SmartDNS routes DNS servers to different regions which “tricks” the website to allow access to previously restricted content.

SmartDNS does not change your IP Address or provide the encryption that a VPN connection does. This can result in faster speeds and unblocked content.

SmartDNS and VPN should not both be configured at the same time. When using a SmartDNS connection make sure to disable your VPN connection on the FlashRouter.

Login to Getflix

If you are not already a Getflix user Sign Up Now.

New customer Signup for GetFlix SmartDNS Service

Login to Getflix’s website login page.

Visit Getflix’s DNS servers list page and note the DNS servers of the location you would like to access content from.

Getflix DNS Server Location Addresses for FlashRouter DD-WRT Settings

Enter Getflix SmartDNS servers on your FlashRouter

Navigate to Setup > Basic Setup

  1. Scroll down to Network Address Server Settings (DHCP).
  2. Enter in any combination of Getflix SmartDNS servers you noted into Static DNS fields 1 and 2.
  3. Click Apply Settings at the bottom of the page.
  4. Reboot the FlashRouter.

Register your IP Address

When the router is fully booted back up visit your Getflix user dashboard and make sure your IP Address is registered with Getflix. If it is not click Force IP Update.

Register IP Address for Getflix use on FlashRouter DD-WRT

Once you are successfully registered you can now access your desired regional content on any device that connects to the FlashRouter’s network.

How do I check for static network settings on my devices?

TeamFlashRouters · May 8, 2019 ·

Static network settings set on a device from a previous connection will interfere with the FlashRouter’s network. Typically the FlashRouter’s network performs best when connected devices are set to automatically use the FlashRouter’s IP Address and DNS.

Make sure you are connected to the FlashRouter’s network via ethernet or WiFi. Keep in mind these instructions may vary based on your current software version.

Check for Static IP Address in Windows

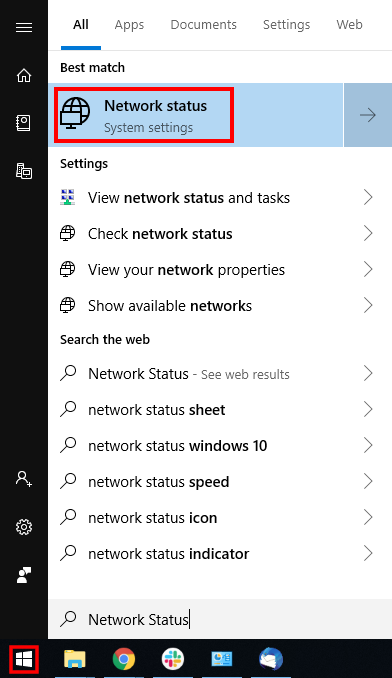
1.  Open the Window search box, and search “Network Status”

Find Static DNS settings for FlashRouter DD-WRT in Windows Computer

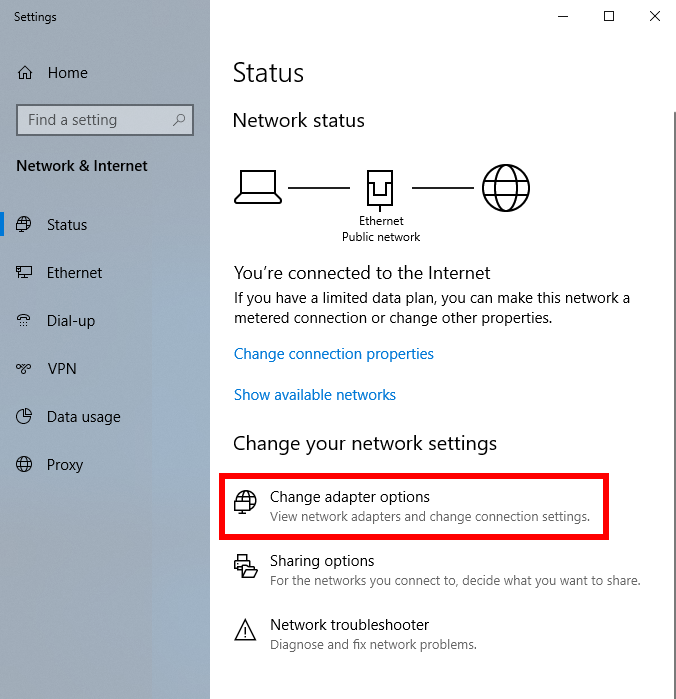
2. Select “Change adapter optons”

Find Static DNS settings for FlashRouter DD-WRT in Windows Computer 2

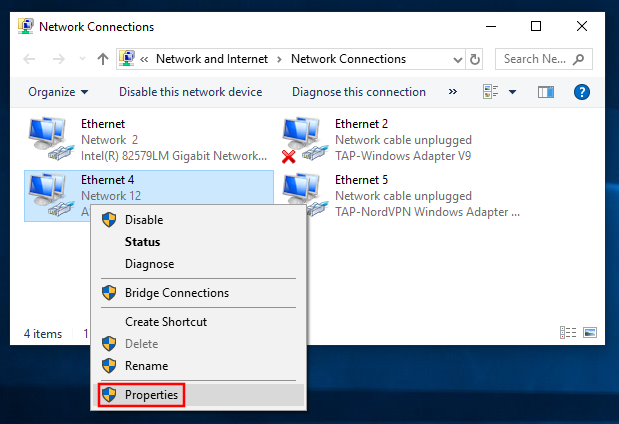
3. Right click on the WiFi and/or ethernet adapter and select Properties.

Find Static DNS settings for FlashRouter DD-WRT in Windows Computer 3

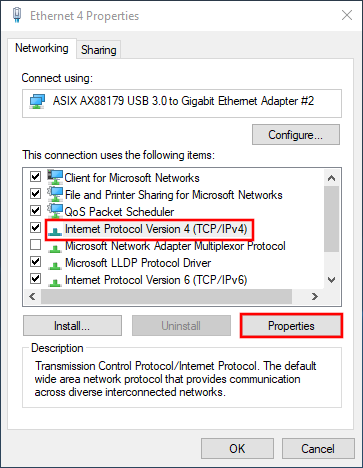
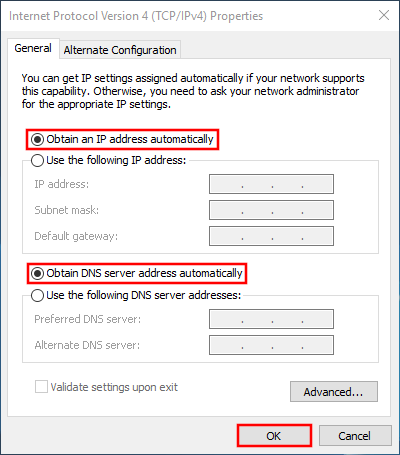
4. Highlight Internet Protocol Version 4 (TCP/IPv4) and click Properties.

5. Delete the values entered for IP address, Subnet mask, Default gateway, Preferred DNS server, and Alternate DNS server.

6. Select Obtain an IP address automatically and Obtain DNS server address automatically.

7. Click OK.

Find Static DNS settings for FlashRouter DD-WRT in Windows Computer 4

Check for Static IP Address in Apple / Mac

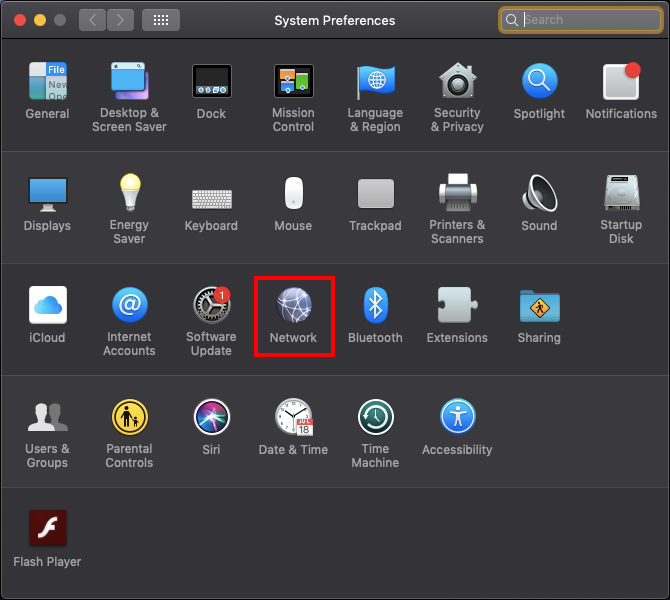
1. Open System Preferences, and select Network.

Find Static DNS settings for FlashRouter DD-WRT Using a MAC Computer

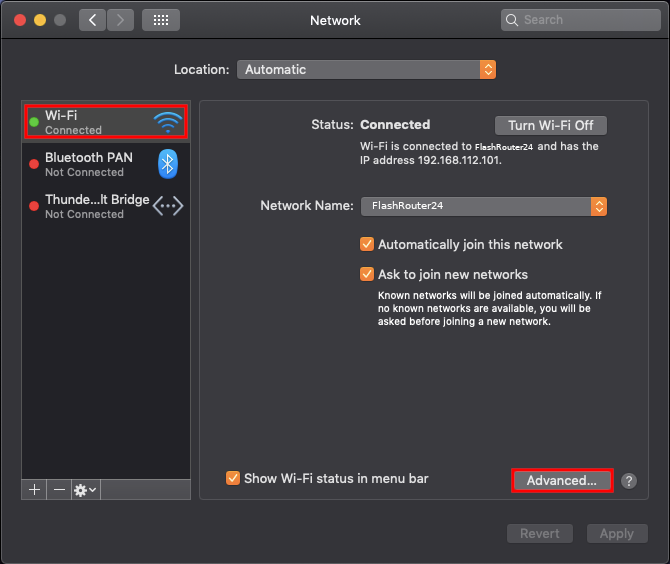
2. Select the adapter that is connected via ethernet or wireless. This will vary based on your current connection.

3. Select Advanced.

Find Static DNS settings for FlashRouter DD-WRT Using a MAC Computer 2

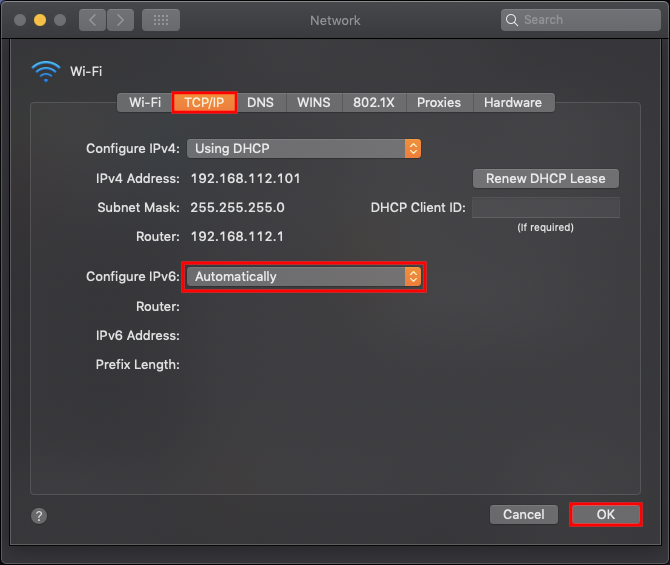
4. Select the TCP/IP tab.

5. Set Configure IPv4 to Automatically.

Find Static DNS settings for FlashRouter DD-WRT Using a MAC Computer 4

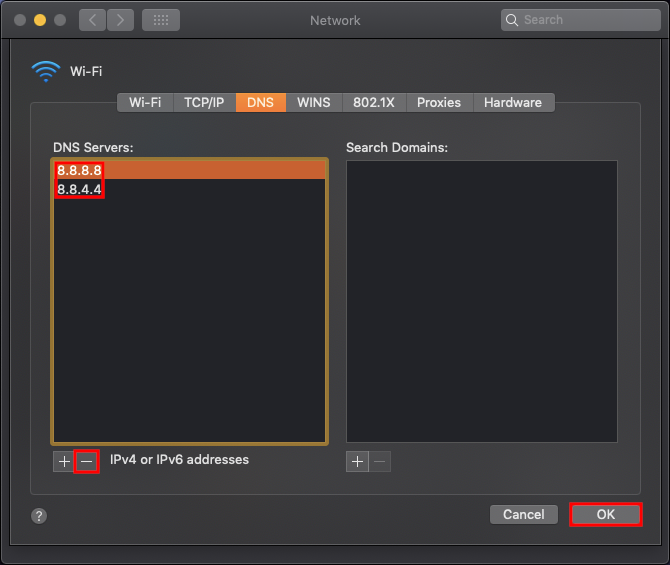
6. Select the DNS field and highlight any DNS servers you see there. If they can be removed you should click the minus symbol below.

Find Static DNS settings for FlashRouter DD-WRT Using a MAC Computer 5

7. Click OK.

8. Click Apply.

Check for Static IP Address in iOS

1.  Open Settings

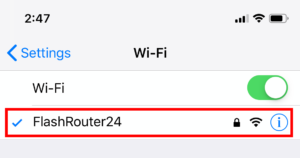
2. Select WiFi, and select the blue icon next to your current connection.

Select FlashRouters DD-WRT Wireless Network in order to Check Static IP Network Settings on iOS Mobile Device

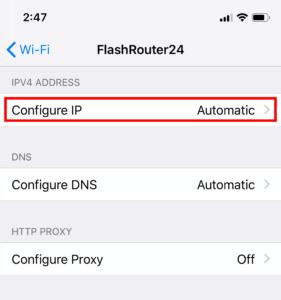
3. Make sure Configure IP is set to Automatically.

Check Static IP Network Settings on iOS Mobile Device and set Configure IP to Automatic

Check for Static IP Address in Android

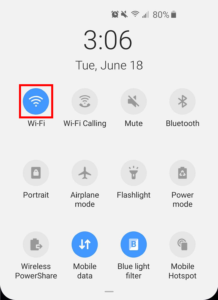
1. From the top of the screen, swipe down to display settings.

2. Select WiFi.

WiFi Icon and Settings in Android Mobile Device

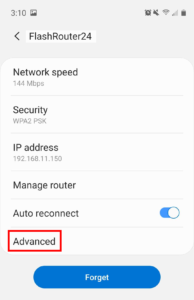
3. Select your current network.

4. Select Advanced.

Advanced Settings Button in Android Mobile Device

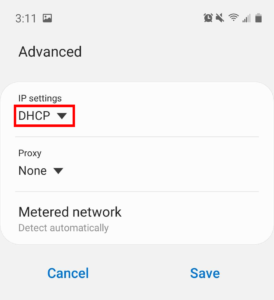
5. Make sure that IP settings is set to DHCP.

Check Static IP DHCP Network Settings in Android Mobile Device

IVPN WireGuard Setup

TeamFlashRouters · Oct 13, 2021 ·

Preparing for IVPN WireGuard Setup

Verify your IVPN login information

If you are not already a IVPN user Sign Up Now.

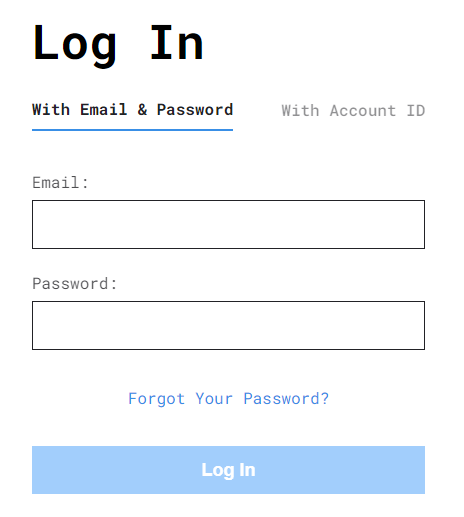
Log in to your account on the IVPN website.

IVPN website login

DD-WRT Router Setup for IVPN WireGuard

Navigate to Setup > Tunnels 

Enter IVPN WireGuard settings

1. Click Add Tunnel.

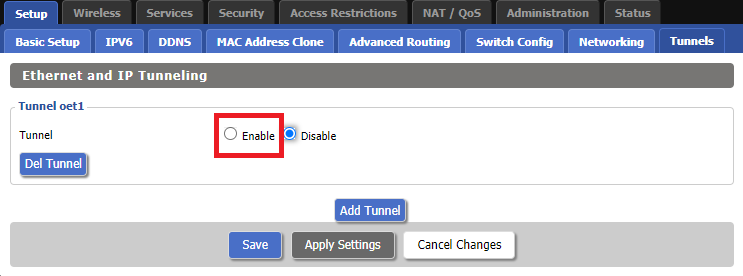
2. Set Tunnel to Enable.

Setup - Tunnel - Enable Tunnel

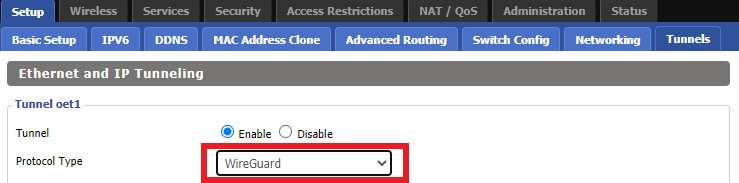
3. Select Wireguard from the dropdown.

Setup - Tunnel - Select Wireguard

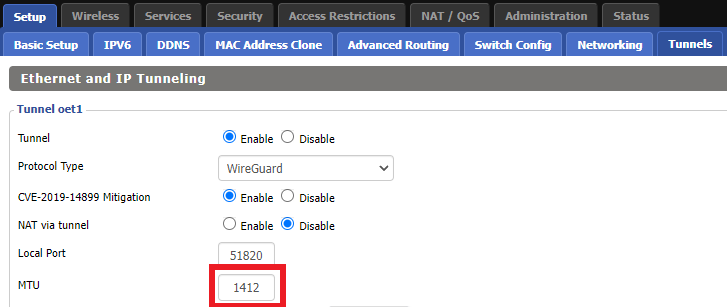
3. Set MTU to 1412.

IVPN Wireguard MTU setting

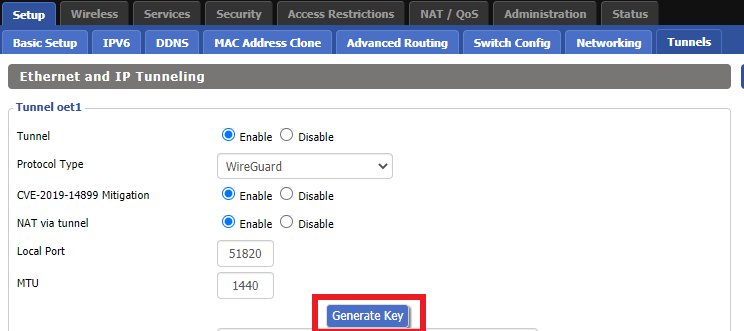
4. Click Generate Key.

Setup - Tunnel - Generate Key

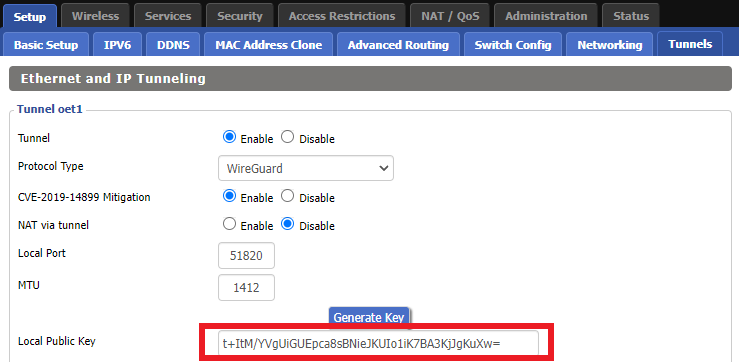
9. Copy the Local Public Key.

IVPN Wireguard Local Public Key

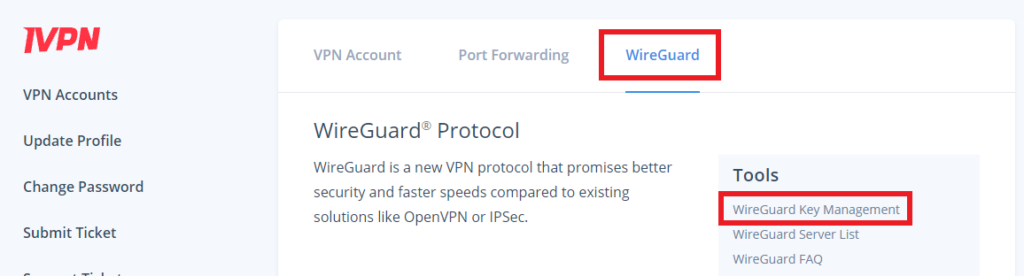
10. In a new tab (leave the DD-WRT settings opened), go to your IVPN Account and click WireGuard and then click WireGuard Key Management.

IVPN Wireguard Key Management

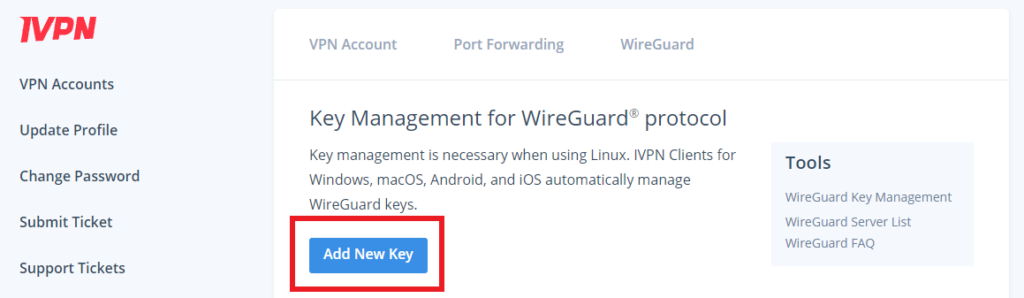
11. Click Add New Key.

IVPN Wireguard Add New Key

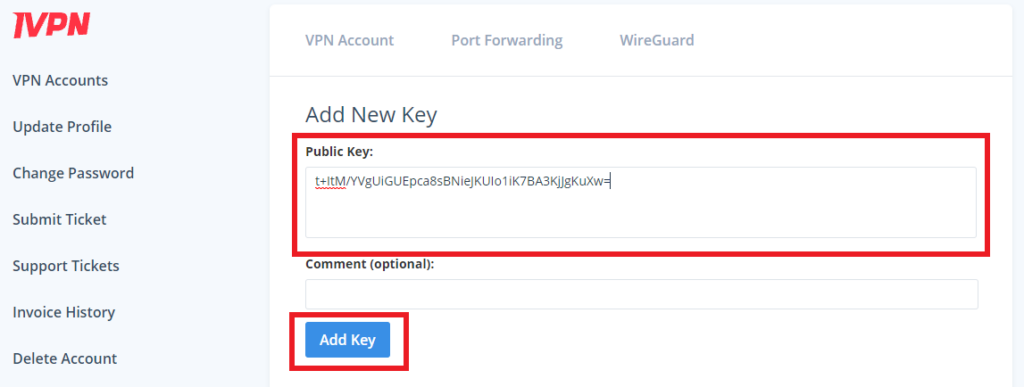
12. Paste the copied Local Public key to the Public Key field and click Add Key.

IVPN Wireguard Paste Public Key

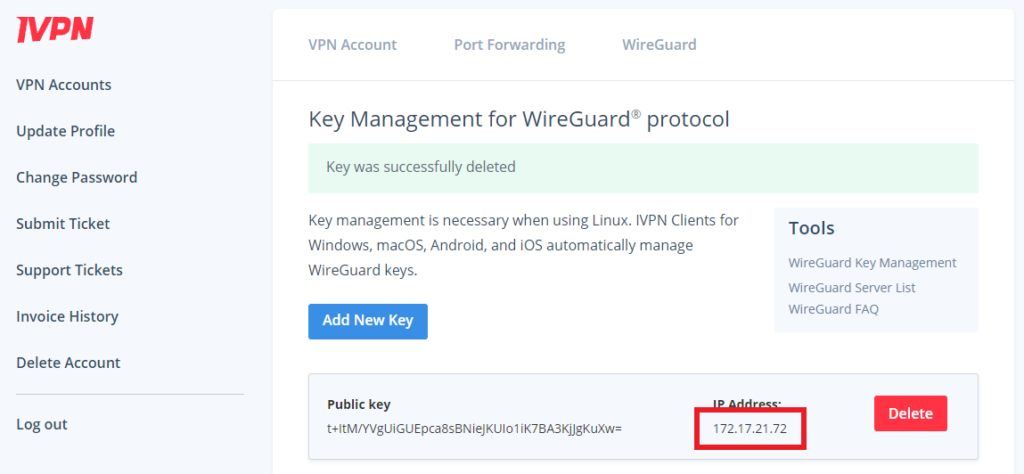
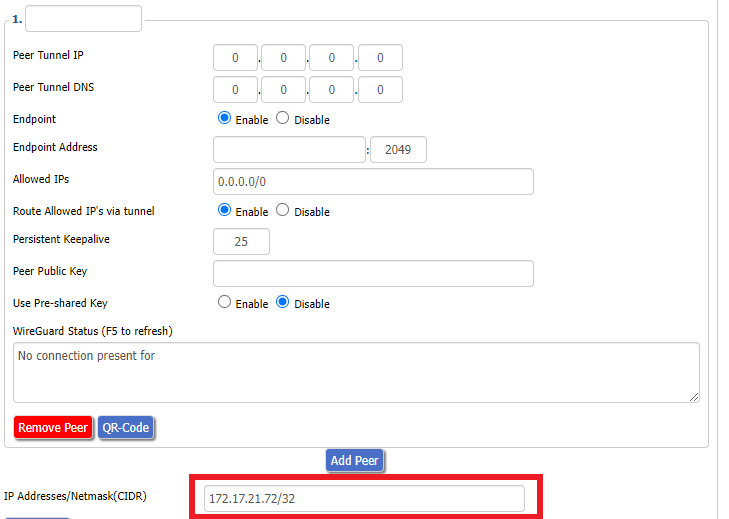
13.Copy the IP Address assigned to your public key and add it to the IP Addresses/Netmask(CIDR) field followed by a /32 subnet mask.

IVPN Wireguard copy IP Address
IVPN Wireguard paste IP Address

Certain DD-WRT builds will show two separate fields here: IP Address and Subnet Mask. If that is the case set the IP Address field to the Address without the /32 added and set the Subnet Mask to 255.255.255.255

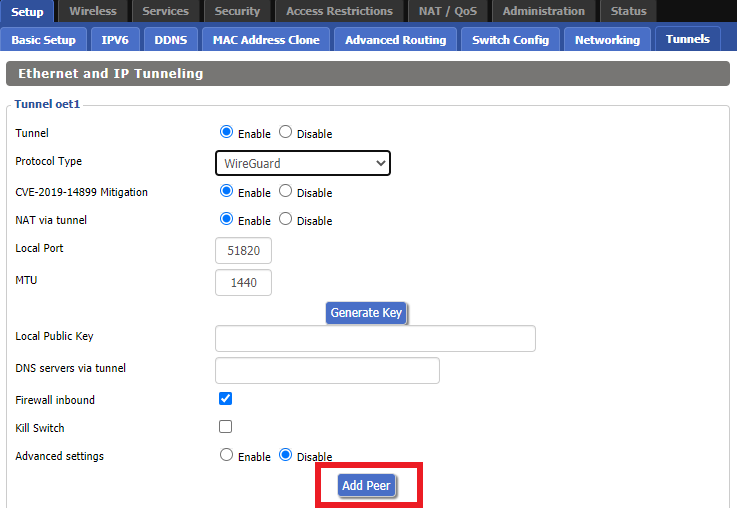
14. Click Add Peer.

Setup - Tunnel - Add Peer

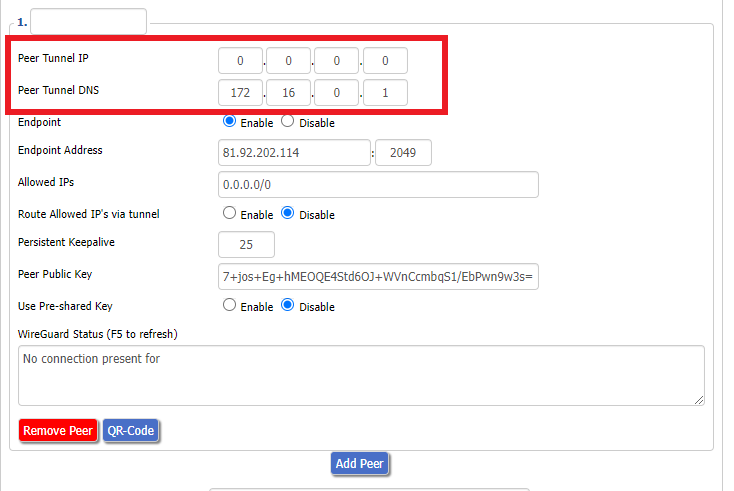
15. Set the Peer Tunnel IP to 0.0.0.0. Set Peer Tunnel DNS to 172.16.0.1

IVPN Wireguard Peer Tunnel IP and DNS

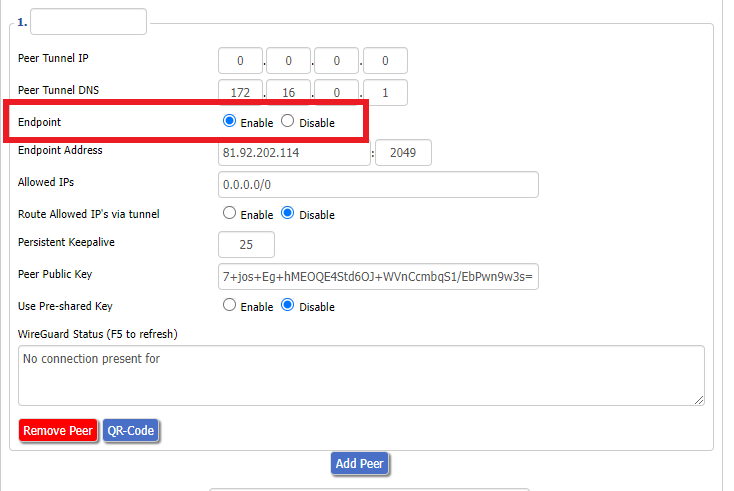
16. Set Endpoint to Enable.

IVPN Wireguard Enable Endpoint

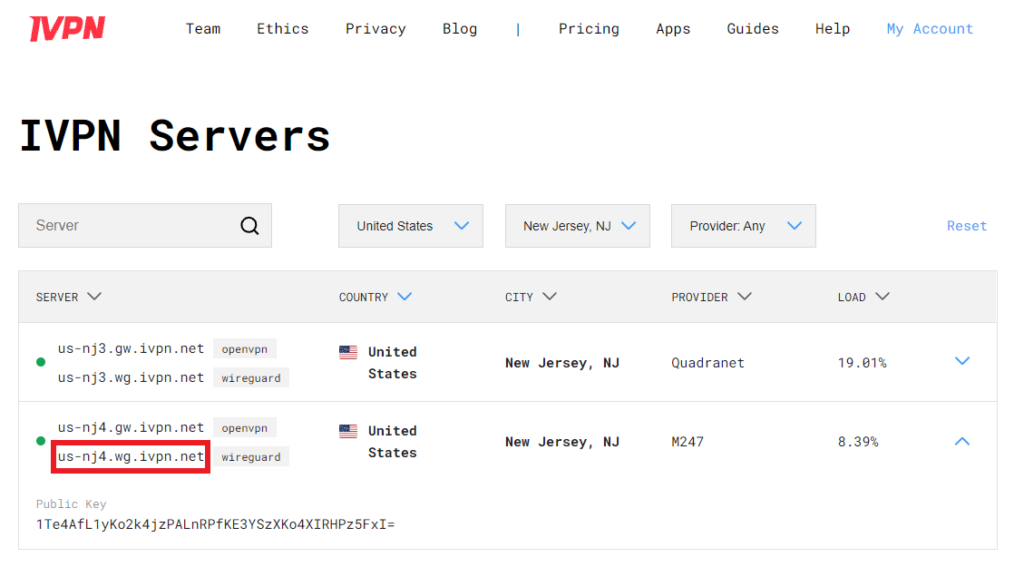
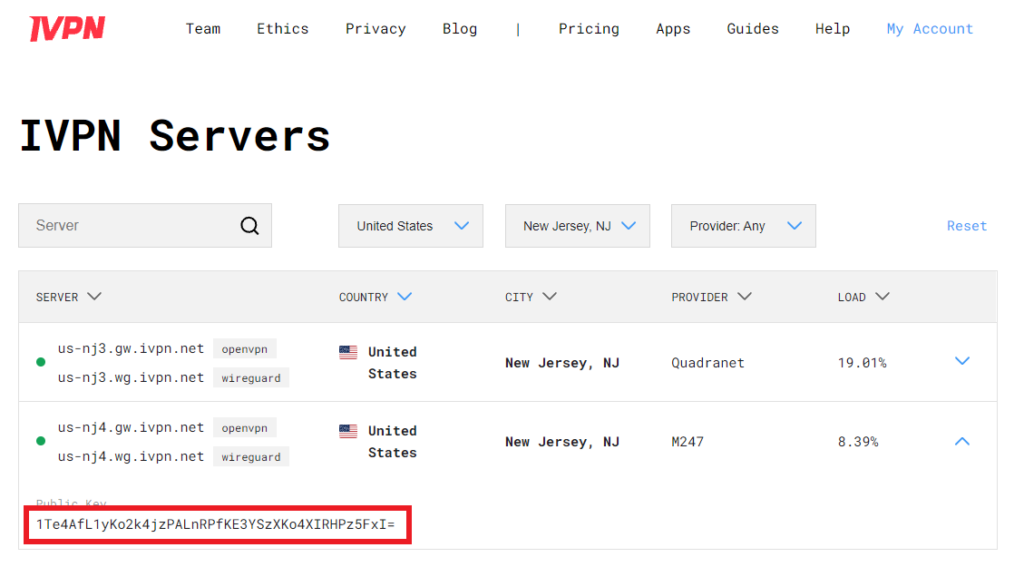
17. Go to the IVPN Server Status page and copy the server name for the WireGuard server location you want to connect to.

IVPN Wireguard Endpoint server

Be sure to copy the WireGuard server address and not the OpenVPN server address.

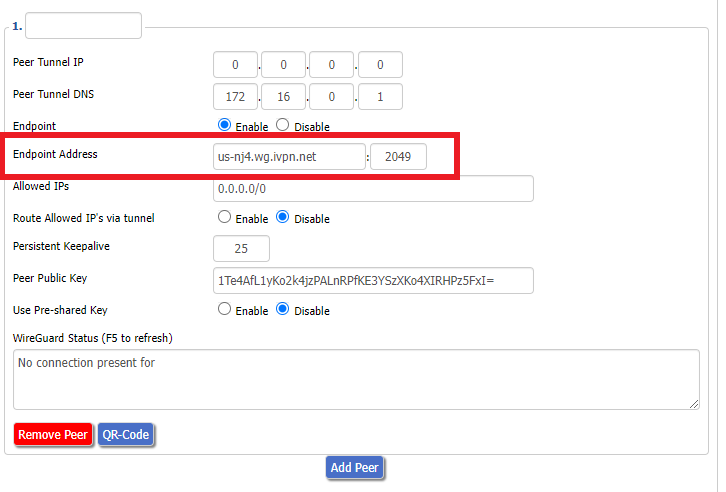
18. Paste the server name you copied into the Endpoint Address field and set the Port to 2049.

IVPN Wireguard Endpoint Address

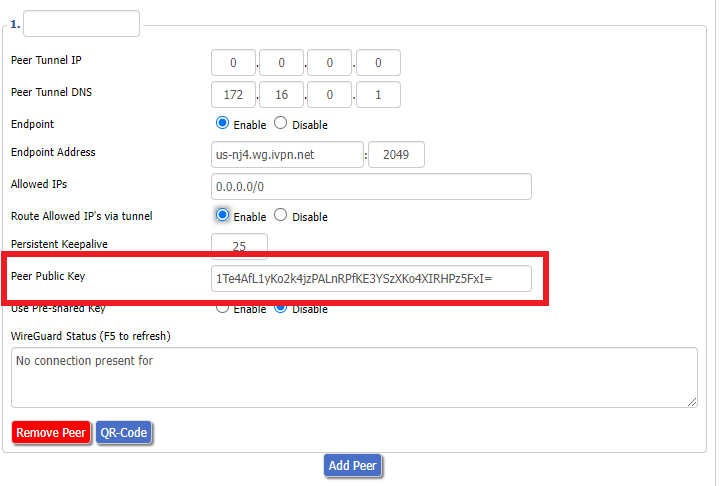
19. On the IVPN Server Status page copy the Public Key of the server location you entered. Paste the Public Key into the Peer Public Key field.

IVPN Wireguard copy server Public Key
IVPN Wireguard enter Peer Public Key

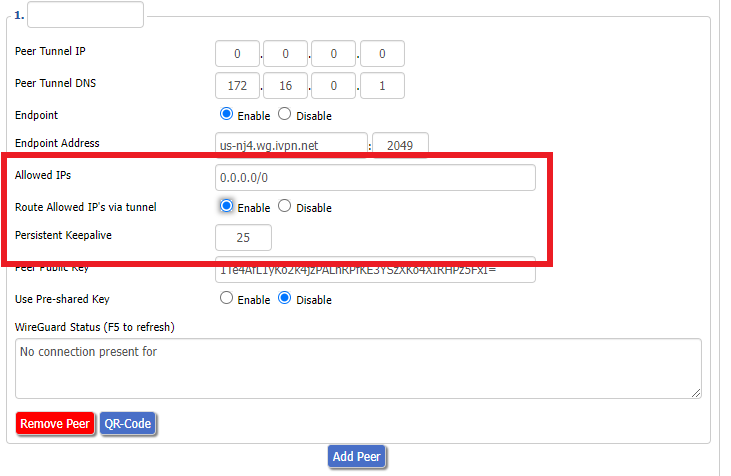
20. Leave Allowed IPs as 0.0.0.0/0. Set Router Allowed IP’s via tunnel to Enable. Set Persistent Keep Alive to 25.

IVPN Wireguard Peer settings

21. At the bottom of the page click Save and then click Apply Settings.

Set IVPN DNS servers

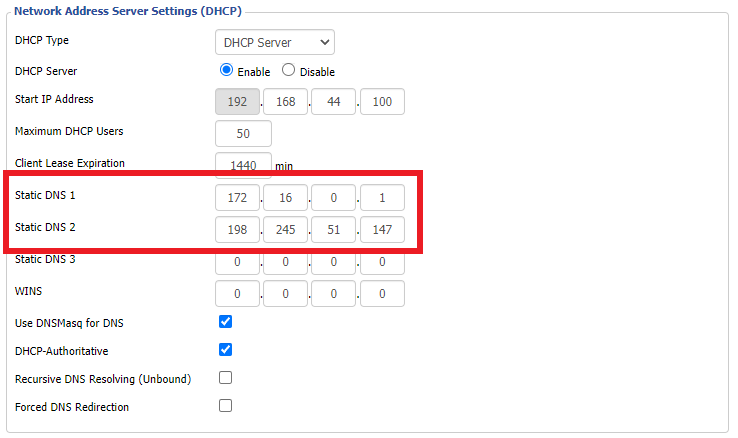
Navigate to Setup > Basic Setup

Set Static DNS 1 to 172.16.0.1

Set Static DNS 2 to 198.245.51.147

IVPN Wireguard Static DNS

Click Apply Settings.

Reboot the FlashRouter

Navigate to Administration > Management

Scroll to the bottom of the page and click the red Reboot Router button. Wait for the FlashRouter to reboot and then reconnect.

Verify a successful IVPN connection

Navigate to Setup > Tunnels

  1. You should Endpoint, Latest handshake, and Transfer in the WireGuard status area.
  2. Visit IVPN’s website to verify your status as using IVPN.

Back up your settings

Navigate to Administration > Backup

  1. Click the Backup button.
  2. A file named nvrambak.bin will be saved to your computer.
  3. You can load nvrambak.bin to restore your settings in the event of a reset.

TROUBLESHOOTING

Still having issues? Visit the VPN Troubleshooting section.

Troubleshoot Here

Mullvad WireGuard Setup

TeamFlashRouters · Aug 19, 2021 ·

Preparing for Mullvad WireGuard Setup

Verify your Mullvad login information

If you are not already a Mullvad user Sign Up Now.

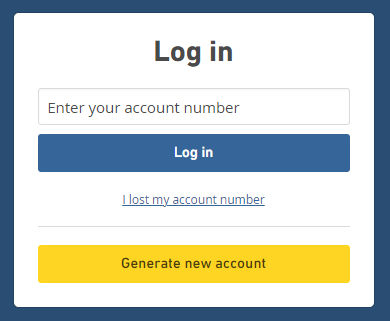
Log in to your account on the Mullvad website.

Mullvad Login

Select Manage ports and WireGuard Keys displayed on the account page.

Mullvad Manage ports and WireGuard Keys

DD-WRT Router Setup for Mullvad WireGuard

Navigate to Setup > Tunnels 

Enter Mullvad WireGuard settings

1. Click Add Tunnel.

2. Set Tunnel to Enable.

Setup - Tunnel - Enable Tunnel

3. Select Wireguard from the dropdown.

Setup - Tunnel - Select Wireguard

4. Click Add Peer.

Setup - Tunnel - Add Peer

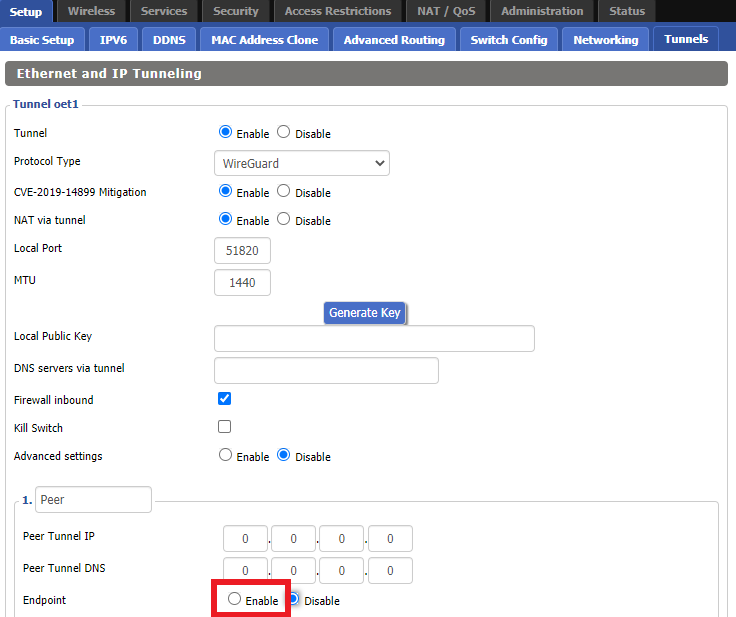
5. Set Endpoint to Enable.

Setup - Tunnel - Enable Endpoint

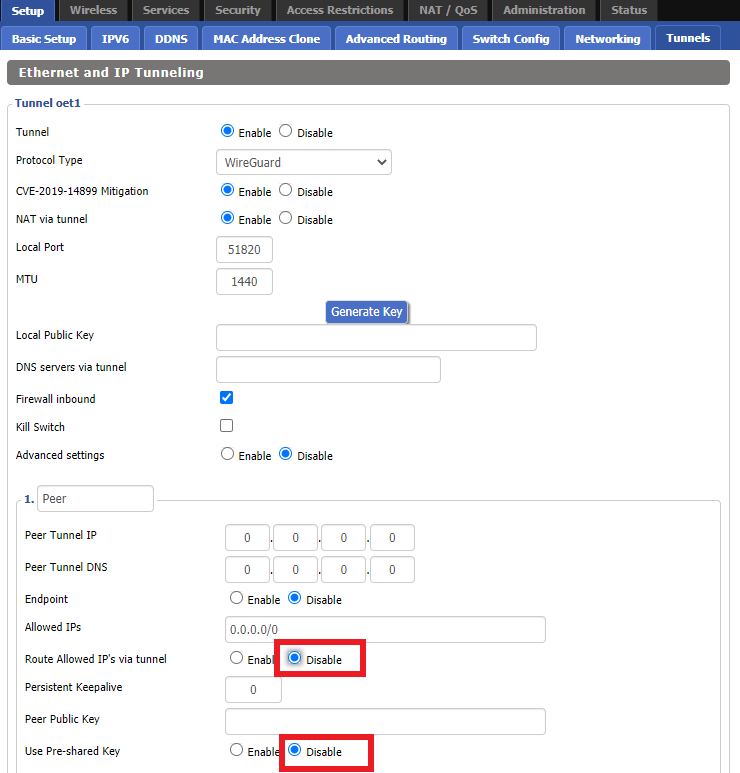
6. Set Router Allowed IP’s via tunnel and Use Pre-shared Key to Disable.

Setup - Tunnel - Disable Preshare Key and Allow IP

7. Click Generate Key.

Setup - Tunnel - Generate Key

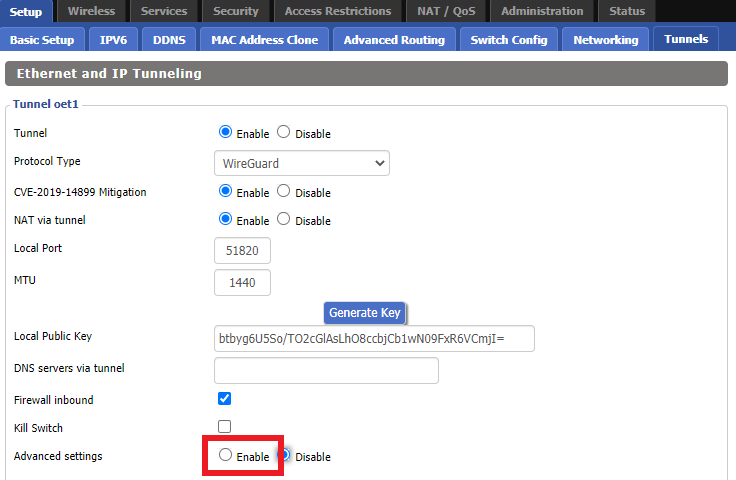
8. Set Advanced Settings to Enable.

Setup - Tunnel - Enable Advanced Settings

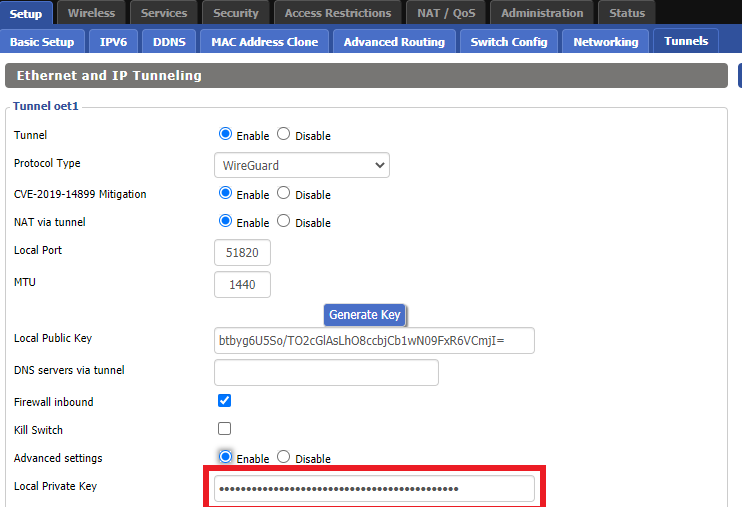
9. Copy the Local Private Key.

Setup - Tunnel - Copy Local Private Key

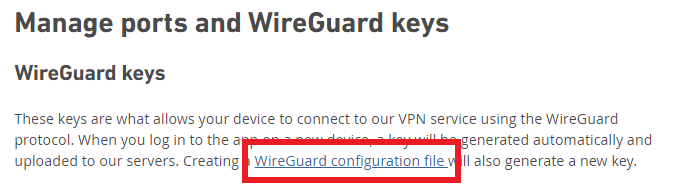
10. In a new tab (leave the DD-WRT settings opened), go to your Mullvad Account and click Manage Ports and WireGuard Keys.

Mullvad Account - Manage ports and Wireguard Keys

11. Click WireGuard configuration file.

Mullvad - Wireguard configuration file

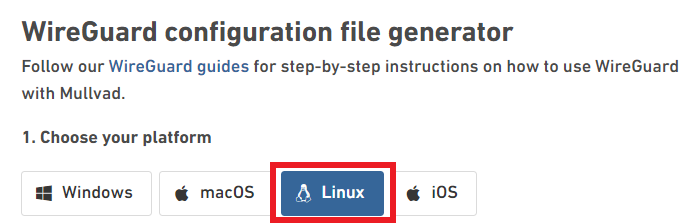
12. Select Linux as your Platform.

Mullvad - Select Linux

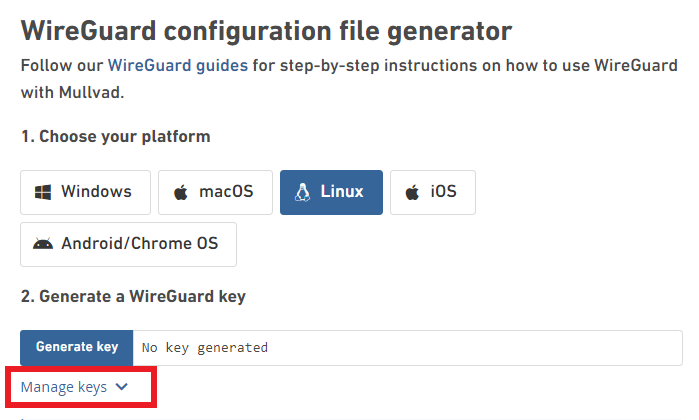
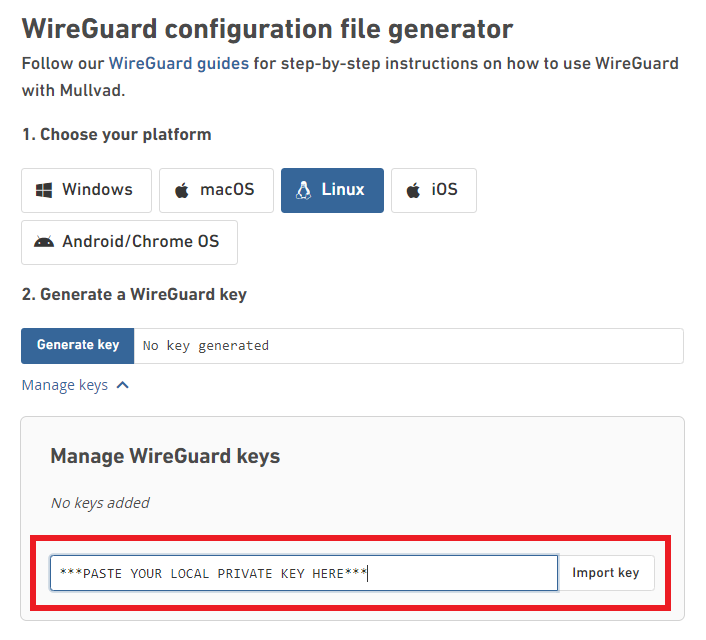
13. Click Manage Keys.

Mullvad - Manage Keys

14. Paste the copied Local Private key to the Manage WireGuard Keys field and click Import Keys.

Mullvad - Import Key

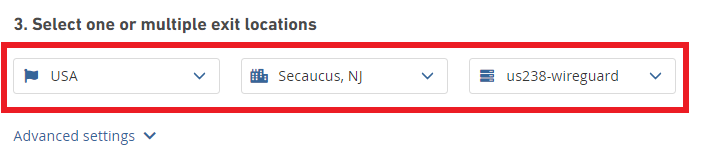
15. Select your Country, City, and Server number that you want to connect to.

Mullvad - Select Location

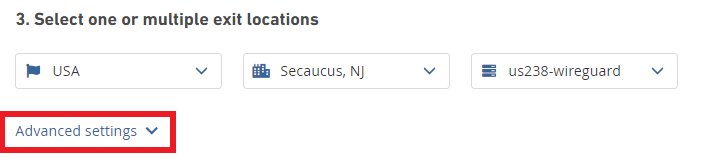
16. Click Advanced Settings.

Mullvad - Advanced Settings

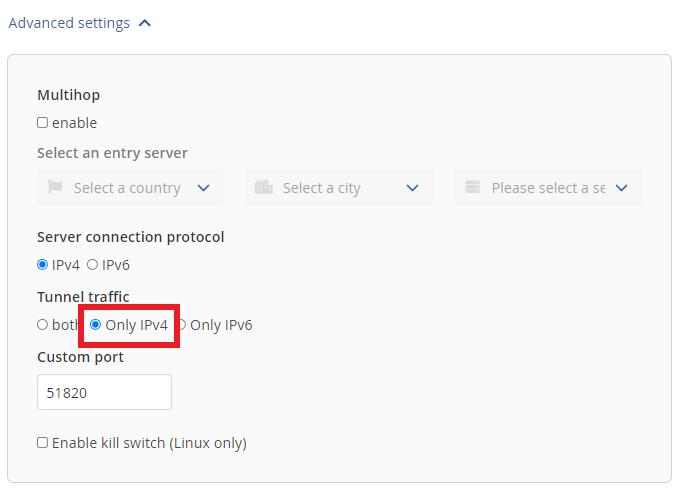
17. Set the Tunnel Traffic to Only IPv4.

Mullvad - Only IPv4

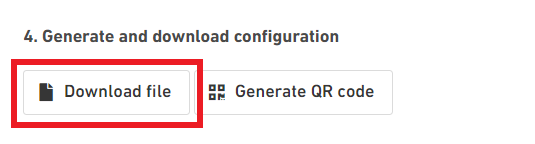
18. Click Download File.

Mullvad - Download Config

19. Open the config file that was downloaded to your computer with NotePad or Notepad++ for Windows or TextEdit for Mac.

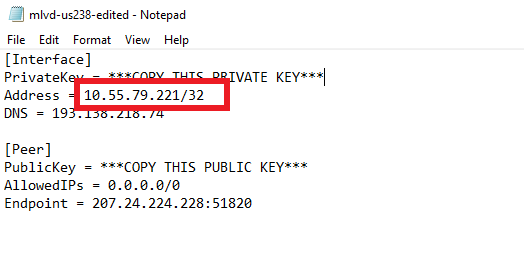
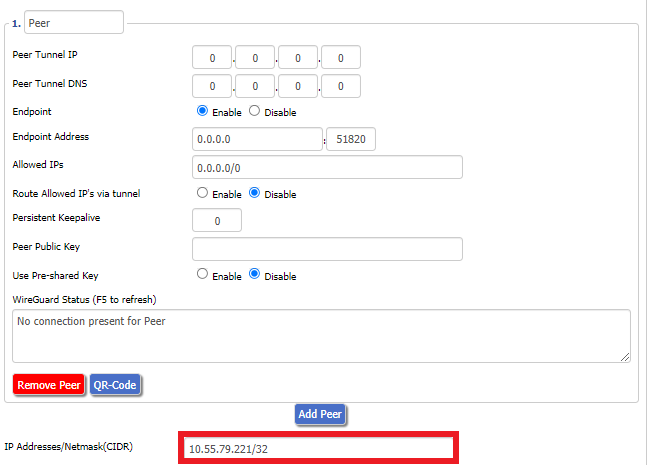
20. In the downloaded config file under [Interface] enter the Address into the IP Addresses/Netmask(CIDR) field in the DD-WRT settings.

Config File - Copy IP Address
Setup - Tunnel - IP Address Netmask Note

Certain DD-WRT builds will show two separate fields here: IP Address and Subnet Mask. If that is the case set the IP Address field to the Address without the /32 added and set the Subnet Mask to 255.255.255.255

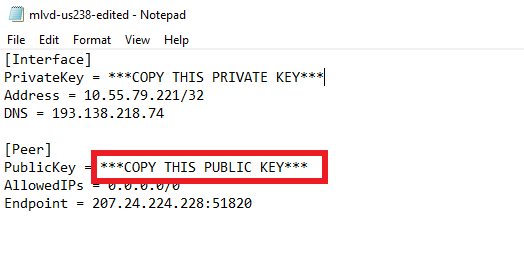
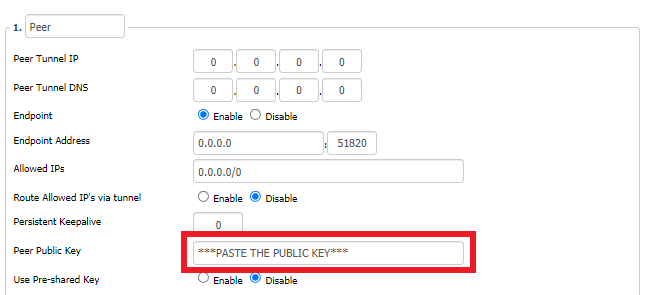
21. In the config file under [Peer] copy the PublicKey and paste it into the Peer Public Key field in the DD-WRT Settings.

Config File - Copy PublicKey
Setup - Tunnel - Paste Public Key

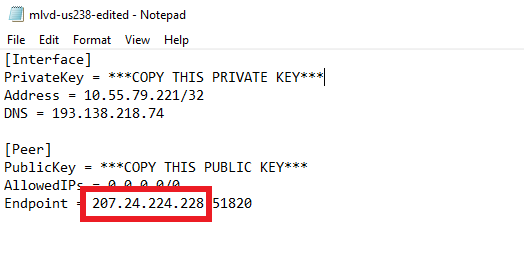
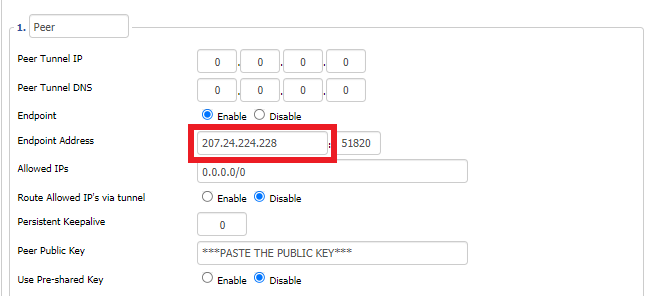
22. In the config file under [Peer] copy the Endpoint and paste it into the Endpoint Address field.

Config File - Endpoint
Setup - Tunnel - Endpoint Address

23. At the bottom of the page click Save and then click Apply Settings.

Enter Mullvad WireGuard Commands

Navigate to Administration > Commands

1. Copy and paste the text below and click Save Startup.

sleep 30
echo "Update route table on startup..."
WGSERVER=$(/usr/sbin/nvram get oet1_rem0)
WANGW=$(/usr/sbin/nvram get wan_gateway)
WANIF=$(/usr/sbin/nvram get wan_iface)
route add -host $WGSERVER gw $WANGW dev $WANIF
route del default
route add default dev oet1
ip route flush cache
mkdir -p /tmp/etc/config
ln -s /tmp/custom.sh /tmp/etc/config/wg-route-fix.wanup
echo "... Done route table update."

2. Copy and paste the text below and click Save Custom.

#!/bin/sh
sleep 5
echo "Update route table on wanup ..."
WGSERVER=$(/usr/sbin/nvram get oet1_rem0)
WANGW=$(/usr/sbin/nvram get wan_gateway)
WANIF=$(/usr/sbin/nvram get wan_iface)
route add -host $WGSERVER gw $WANGW dev $WANIF
route del default
route add default dev oet1
ip route flush cache
echo "... Done route table update."

3. Copy and paste the text below and click Save Firewall.

WANIF=$(/usr/sbin/nvram get wan_iface)
iptables -t nat -I POSTROUTING -o oet1 -j MASQUERADE
iptables -I FORWARD -i br0 -o $WANIF -m state –state NEW -j REJECT –reject-with icmp-host-prohibited
iptables -I FORWARD -i br0 -p tcp -o $WANIF -m state –state NEW -j REJECT –reject-with tcp-reset

Set Mullvad DNS servers

Navigate to Setup > Basic Setup

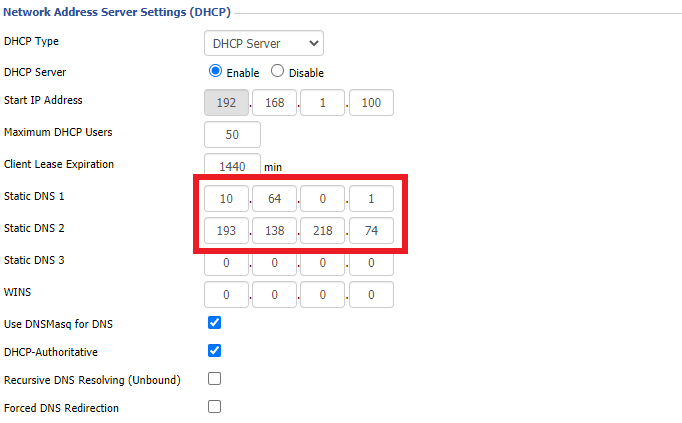
Set Static DNS 1 to 10.64.0.1

Set Static DNS 2 to 193.138.218.74

Setup - Basic Setup - Mullvad DNS

Click Apply Settings.

Reboot the FlashRouter

Navigate to Administration > Management

Scroll to the bottom of the page and click the red Reboot Router button. Wait for the FlashRouter to reboot and then reconnect.

Verify a successful Mullvad connection

Navigate to Setup > Tunnels

  1. You should see Endpoint, Latest handshake, and Transfer in the WireGuard status area.
  2. Visit Mullvad’s IP Check to verify your status as using Mullvad.

Back up your settings

Navigate to Administration > Backup

  1. Click the Backup button.
  2. A file named nvrambak.bin will be saved to your computer.
  3. You can load nvrambak.bin to restore your settings in the event of a reset.

TROUBLESHOOTING

Still having issues? Visit the VPN Troubleshooting section.

Troubleshoot Here

IPv6 Internet Setup

TeamFlashRouters · Apr 3, 2019 ·

Most ISPs only support IPv4. Unless your ISP supports IPv6 then enabling it on the FlashRouter will not enable it across your network.

For most VPN users IPv6 should remain disabled as the VPN connection was designed to operate under IPv4 addresses only. Enabling IPv6 in this instance may compromise the security of the VPN tunnel.

We typically only recommend enabling IPv6 if you are not using VPN or if your VPN provider requires that IPv6 be enabled.

Enable IPv6

Navigate to Setup > IPv6

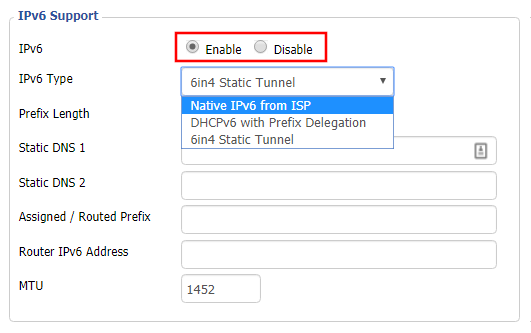
Access FlashRouters DD-WRT Admin Settings and Disable Remote Access
  1. Set IPv6 to Enable.
  2. Select Native IPv6 from ISP in the dropdown.
  3. If you have specific IPv6 DNS servers you would like to add you can add them in the Static DNS fields or leave those fields blank.
  4. Click Apply Settings.

Power cycle your FlashRouter

Power your FlashRouter off and then power it back on by unplugging and then plugging it back in or using the button on the back of the FlashRouter.

Verify a successful IPv6 connection

Once the FlashRouter is finished powering back up, connect one of your devices to the FlashRouter via Ethernet or Wireless.

Visit  http://ipv6-test.com/ where you should see Supported under IPv6 connectivity if your ISP supports IPv6 and your modem is setup to passthrough IPv6.

Please be aware that we can not replicate ISP specific IPv6 issues, which makes them challenging to troubleshoot. We recommend contacting your ISP as the first step of troubleshooting.
DD-WRT Router Setup Guide

DD-WRT Router Setup Guide

Quick Start Guide for DD-WRT FlashRouters

Find setup guides, FAQs and troubleshooting tips for DD-WRT configured FlashRouters.

VIEW SUPPORTED ROUTER MODELS

AC1450, R6220, R6230, R6250, R6260, R6300 V1, R6300 V2, R6400 V1, R6400 V2, R6700 V1, R6700 V2, R6700 V3, R7000, R7000P, R7800, R8000, R9000, XR500

Asus Logo

RT-AC56U/R, RT-AC68U V1, RT-AC68U V2, RT-AC1900P, RT-AC87U, RT-AC3100, RT-AC5300

WRT1200AC, WRT1900AC V1, WRT1900AC V2, WRT1900ACS V1, WRT1900ACS V2, WRT32X, WRT3200ACM

Internet Setup

  • Connect FlashRouter to Internet
  • Access FlashRouter DD-WRT firmware settings
  • What are some extra steps I can take to secure my network?
  • IPv6 Internet Setup
  • PPPoE Internet Setup

WiFi Setup

VPN Setup

DD-WRT Features

  • How do I set a Static IP for my device in DD-WRT?
  • How do I upgrade the DD-WRT firmware of my FlashRouter?
  • How do I save and load a backup file?
  • How do I schedule a reboot of my FlashRouter?
  • How do I change the DHCP range of my FlashRouter?

Search Support Articles

Troubleshooting

  • Why can’t I send emails while connected to VPN?
  • What is a DNS leak and how can I prevent a DNS leak in my router?
  • My VPN stopped working on my FlashRouter.
  • Why is my connection speed slower?
  • Why are streaming services blocked while connected to VPN?
  • How do I find my router local IP address?
  • How do I reset and reconfigure my FlashRouter?
  • How do I check for static network settings on my devices?
  • Why is my router not connecting to internet?
  • How to fix an Unidentified Network or Limited Connection.
  • Why are some of my devices not connecting to the internet?
  • Why is the internet LED red on my router?
  • Why is the power light on my FlashRouter blinking?
  • My 2.4GHz network is not showing up
  • My 5.0GHz network is not showing up
  • My WiFi password is not working
  • Why did my WiFi SSID change to ‘dd-wrt’?
  • Why are devices disconnecting from Wireless?
  • Why is my WiFi signal weak?

More Ways to Get Help

GET IN TOUCH

BUY SUPPORT
BROWSE FAQs

Primary Sidebar

  • Troubleshooting
  • Router Access
  • Internet Connection Issues
  • WiFi Connectivity
  • General VPN Issues
  • TeamViewer Remote Support
  • DD-WRT Firmware
  • Facebook
  • Twitter
  • Instagram
  • Pinterest
  • YouTube

Footer