• Skip to primary navigation
  • Skip to main content
  • Skip to primary sidebar
  • Skip to footer

FlashRouters Support Portal

Prioritizing Privacy

  • SETUP GUIDES
    • Privacy Hero Router Setup Guide
    • ASUS-WRT Router Setup Guide
    • AsusWRT-Merlin Router Setup Guide
    • DD-WRT Router Setup Guide
    • ExpressVPN Router Setup Guide
    • GL.iNet Router Setup Guide
    • Roqos Core Router Setup Guide
  • TROUBLESHOOTING
    • Router Access
    • WiFi Connectivity
    • Internet Connection Issues
    • General VPN Issues
    • DD-WRT Firmware
    • TeamViewer Remote Support
  • FAQs
    • Router FAQs
    • VPN FAQs
    • Warranty and Returns FAQs
    • Sales FAQs
    • Shipping FAQs
    • Service Plan FAQs
  • Show Search
Hide Search

Search Results for: your name de qu

Separate 2.4GHz and 5GHz Wi-Fi bands on ExpressVPN/Aircove firmware

TeamFlashRouters · Mar 16, 2022 ·

By default ExpressVPN firmware bonds the 2.4GHz and 5GHz wireless networks to a single wireless network name. Your device will automatically choose which one will provide the best connection. You can separate these networks to have unique Wi-Fi names so you can control which network your devices will use.

1. Connect to the FlashRouter’s network via ethernet cable or wireless.

2. Open your web browser and enter expressvpnrouter.com or 192.168.132.1 in the URL.

ExpressVPNrouter.com
192.168.132.1

3. Login with your ExpressVPN FlashRouter admin password.
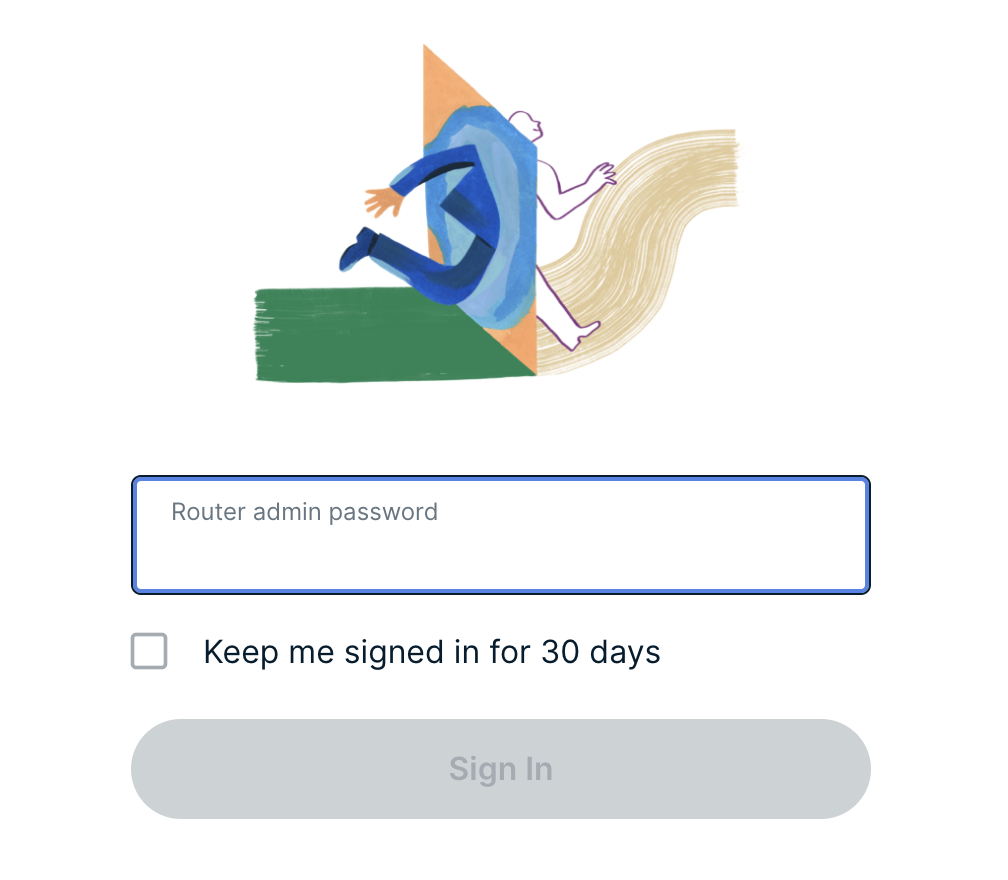
ExpressVPN Router admin login

4. Select Network Settings on the left hand side of the menu.

ExpressVPN Network Settings

5. Select Wi-Fi Settings on the left hand side of the menu.

ExpressVPN WiFi Settings

6. Click the toggle for Separate 2.4GHz and 5GHz Wi-Fi.

ExpressVPN Separate 2.4GHz and 5GHz

7. Separate Wi-Fi details for the 5GHz band will now display. You can change the name and password if you so choose or leave it with the default name and password with “-5GHz” added to the name. Click Save. Click Continue.

ExpressVPN 5GHz added

How to Access Your GL.iNet FlashRouter Settings

TeamFlashRouters · Feb 26, 2024 ·

This quick guide walk you through connecting to your GL.iNet FlashRouter (Flint, Slate, Beryl, or Marble) and logging into the admin settings page. You’ll use either WiFi or an Ethernet cable, then access the router dashboard through your browser.

Step 1. Connect Your Device to the Router

You can connect by WiFi or Ethernet:

  • WiFi: Look for a network name like FlashRouter24 or FlashRouter50
    • The WiFi password has been set to: Wireless#9483C
    • ⚠️ Be sure to capitalize the “W” in
  • Ethernet: Plug an Ethernet cable from your computer into one of the router’s LAN ports (usually marked or color-coded differently from the WAN port).

👉 Pro tip: Disconnect from any other WiFi networks during setup.

Step 2. Open the Router Login Page

  1. Open a web browser (Chrome, Safari, Firefox, Edge).
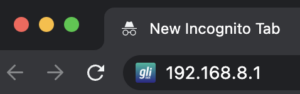
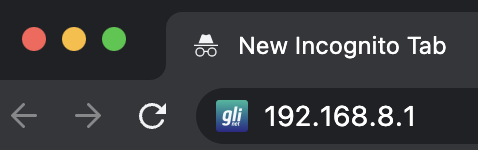
  2. In the address bar, type: 192.168.8.1
  3. Press Enter.
GL.iNet router access

This is the local router dashboard address (not a public website). If the page doesn’t load:

  • Try a different browser.
  • Clear your cache.
  • Ensure your device is connected to the FlashRouter network.
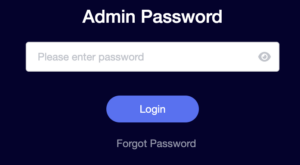
Step 3. Log In to the Router Settings

  • Default password: glopenwrt1 or openwrt
  • This is the factory default for all GL.iNet routers shipped by FlashRouters.
GL.iNet admin password enter

💡 Once you’re in, you can update your admin password in the settings for extra security.

Next Steps

Now that you’ve accessed your GL.iNet FlashRouter, you can:

  • Set up your VPN service
  • Customize your WiFi name and password
  • Adjust device controls and security settings

Check our support library for your specific VPN setup guide.

Change WiFi name and password on Roqos

TeamFlashRouters · Nov 14, 2021 ·

Change your Roqos’ WiFi Network Name and Password to anything you like. Make sure it is not a duplicate of an existing WiFi name.

Login to Roqos Core UI web app in a browser on any computer or smart device.

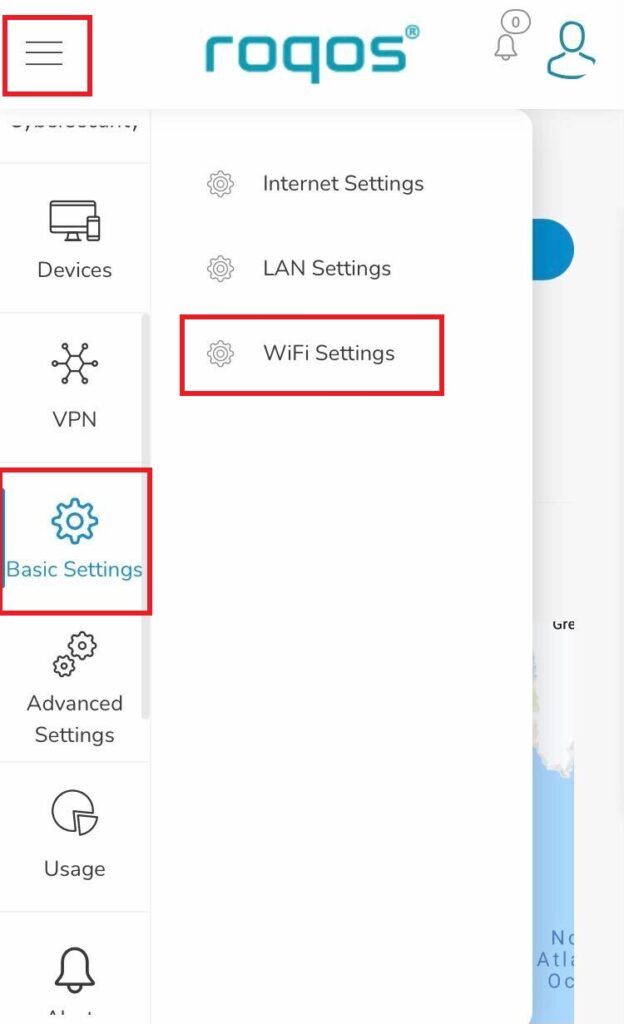
1. Click the navigation menu and select Basic Settings > WiFi Settings.

Roqos Basic Settings - WiFi Settings

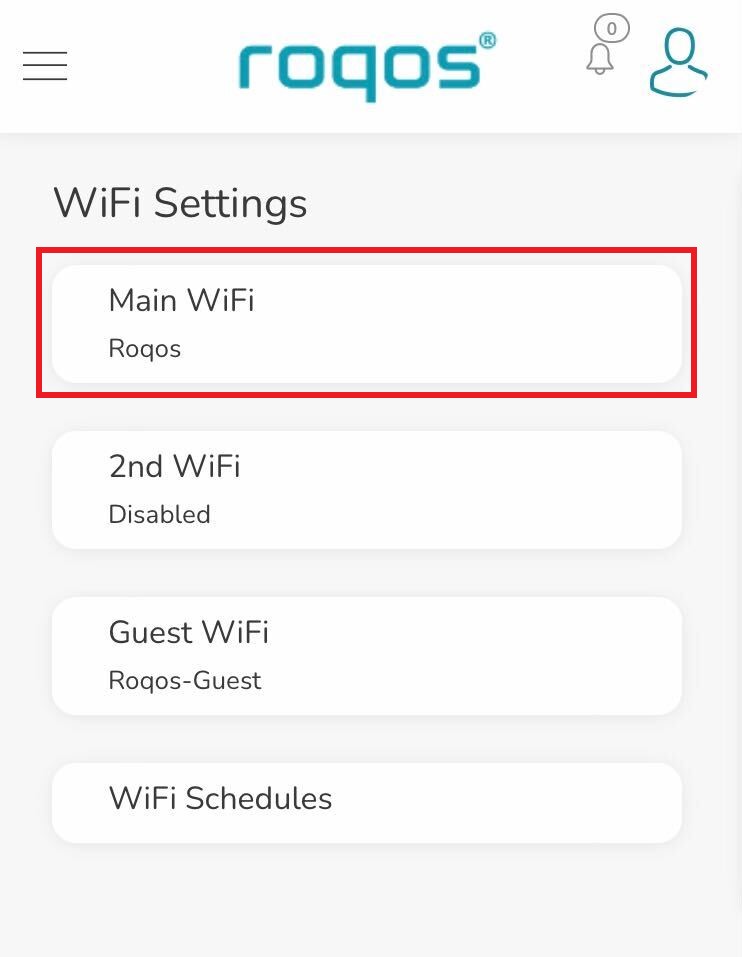
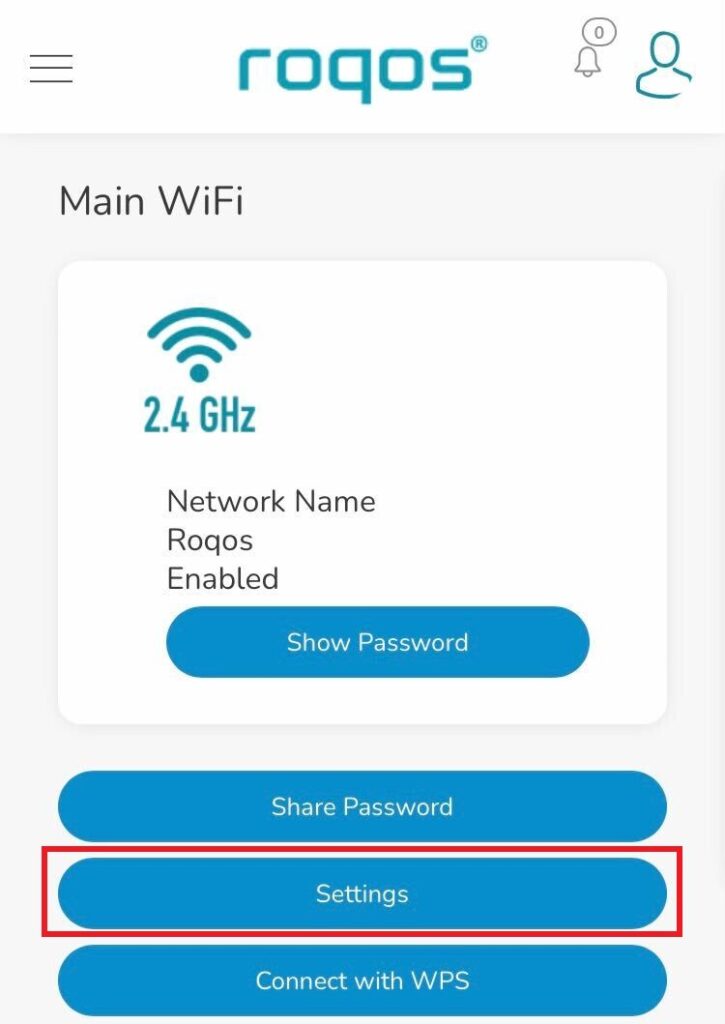
2. Click Main WiFi.

Roqos WiFi Settings - Main WiFi

3. Click Settings.

Roqos WiFi Settings - Settings

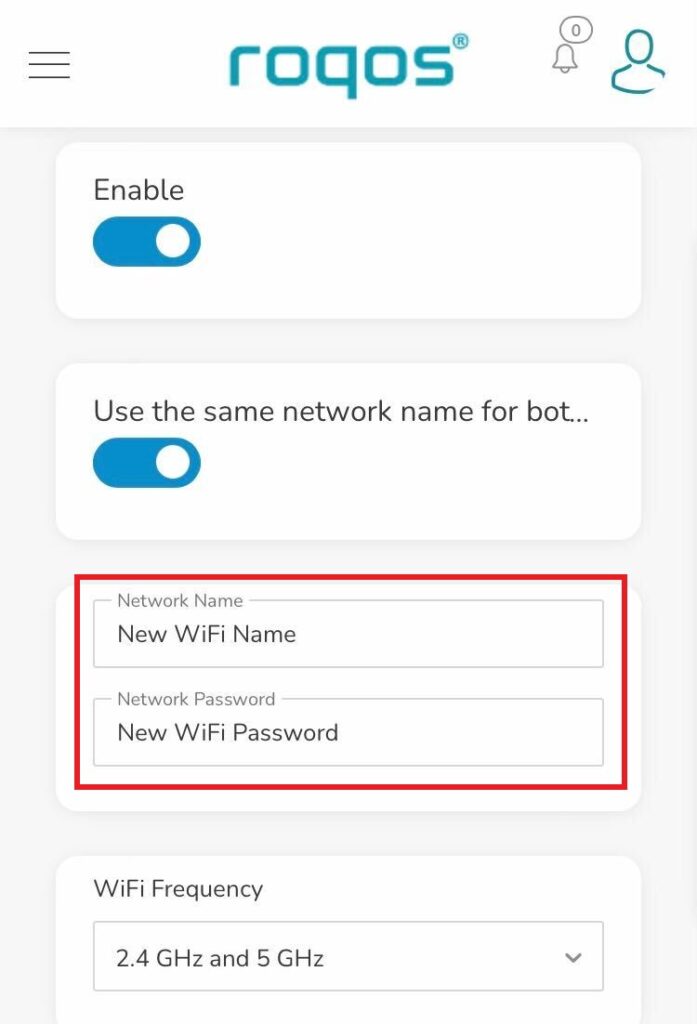
4. Enter the new Network Name and Network Password. Click Save.

Roqos WiFi Settings - Enter new name and password

5. Reconnect your WiFi devices to the new network with the password you just set.

How to Access Your AsusWRT FlashRouter Settings

TeamFlashRouters · Oct 16, 2025 ·

This quick guide will walk you through connecting to your AsusWRT FlashRouter and logging into the admin settings page. You’ll use either WiFi or an Ethernet cable, then access the router dashboard through your browser.

Step 1. Connect Your Device to the Router

You can connect by WiFi or Ethernet:

  • WiFi: Look for a network name like FlashRouter24 or FlashRouter50.
    • The WiFi password is set to: Wireless#[First 5 characters of your router’s MAC]
    • Example: If your MAC is CC28A07E70A8, your WiFi password is Wireless#CC28A.
    • ⚠️ Be sure to capitalize the “W” in Wireless.
  • Ethernet: Plug an Ethernet cable from your computer into one of the router’s LAN ports (usually marked or color-coded differently from the WAN port).

👉 Pro tip: Disconnect from any other WiFi networks during setup.

Step 2. Open the Router Login Page

  1. Open a web browser (Chrome, Safari, Firefox, Edge).
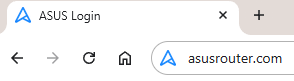
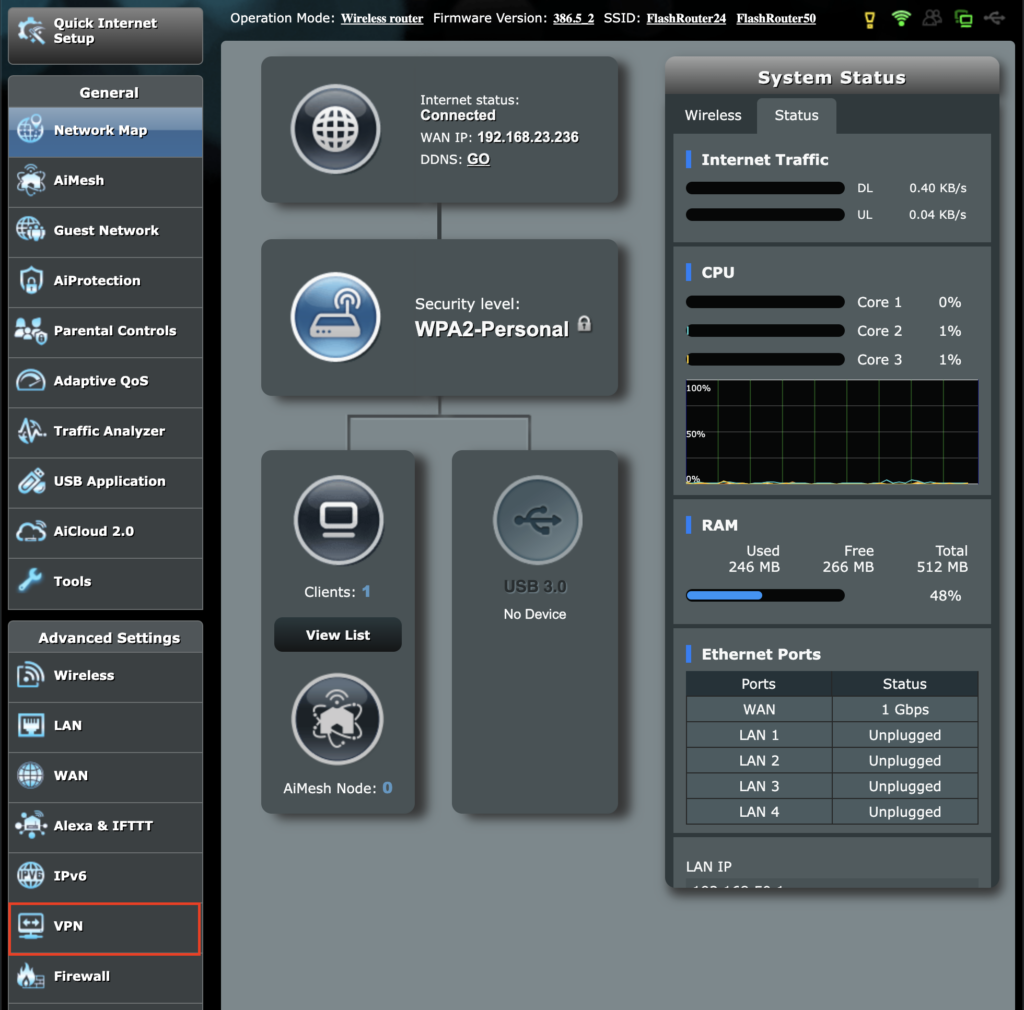
  2. In the address bar, type: 192.168.50.1 or go to asusrouter.com
  3. Press Enter.
Access Asus Router

This is the local router dashboard address (not a public website). If the page doesn’t load:

  • Try a different browser.
  • Clear your cache.
  • Ensure your device is connected to the FlashRouter network.

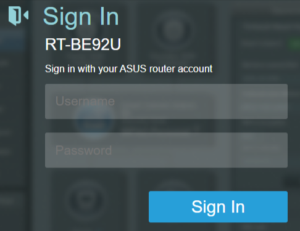
Step 3. Log In to the Router Settings

  • Default username: flashrouter
  • Default password: asuswrt-admin1
  • Some older devices may use: asuswrt1 or asuswrt
  • This is the factory default for AsusWRT routers shipped by FlashRouters.
Asus Router Login

💡 Once you’re in, you can update your admin password in the settings for extra security.

Next Steps

Now that you’ve accessed your AsusWRT FlashRouter, you can:

  • Set up your VPN service
  • Customize your WiFi name and password
  • Adjust device controls and security settings

Check our support library for your specific VPN setup guide.

CyberGhost AsusWRT OpenVPN Setup

TeamFlashRouters · Apr 29, 2024 ·

Preparing for CyberGhost Setup

Obtain your CyberGhost OpenVPN information

If you are not already a CyberGhost user Sign Up Now.

1. Log in to your account on the CyberGhost website.

CyberGhost Website Login

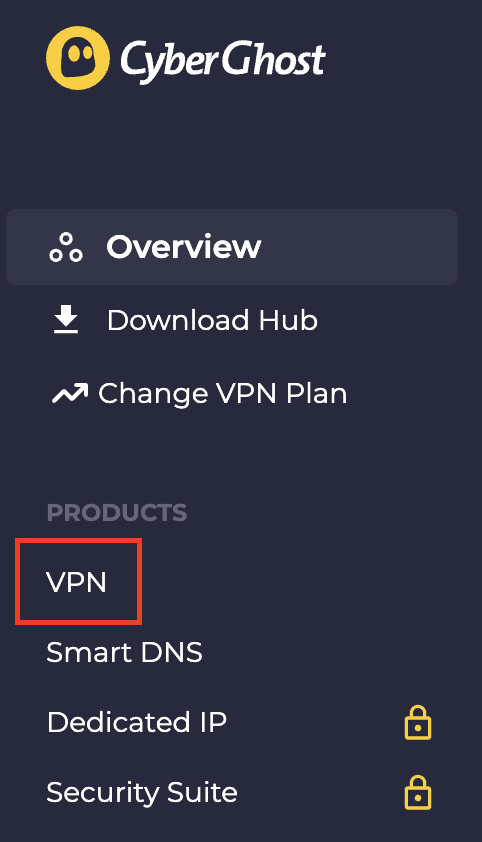
2. Select VPN.

CyberGhost VPN

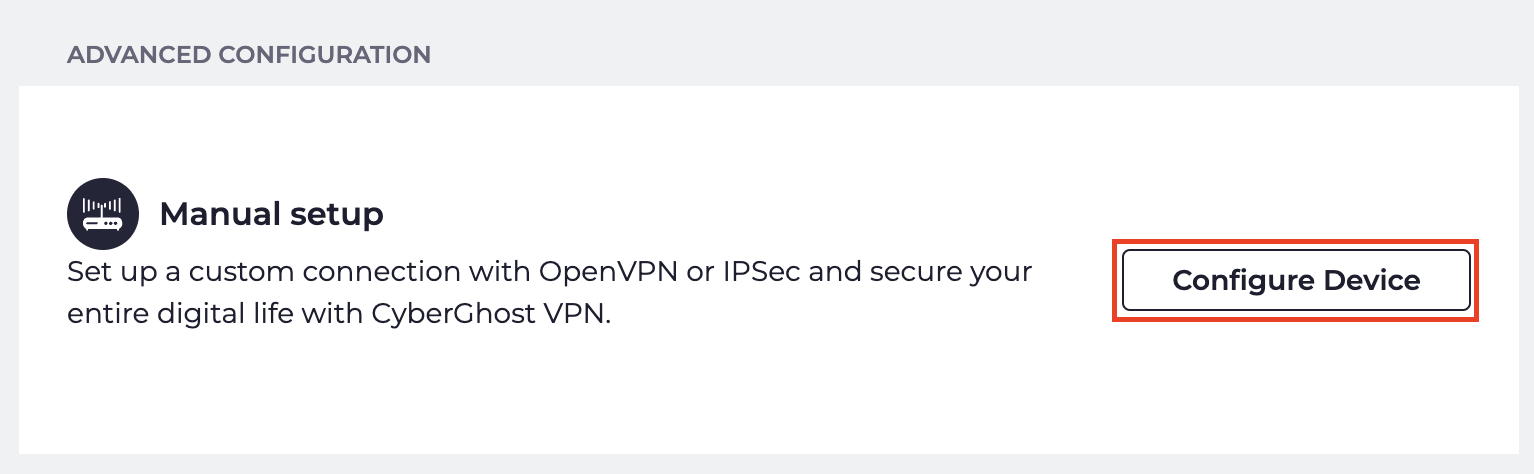
3. Click Configure New Device.

CyberGhost Configure Device

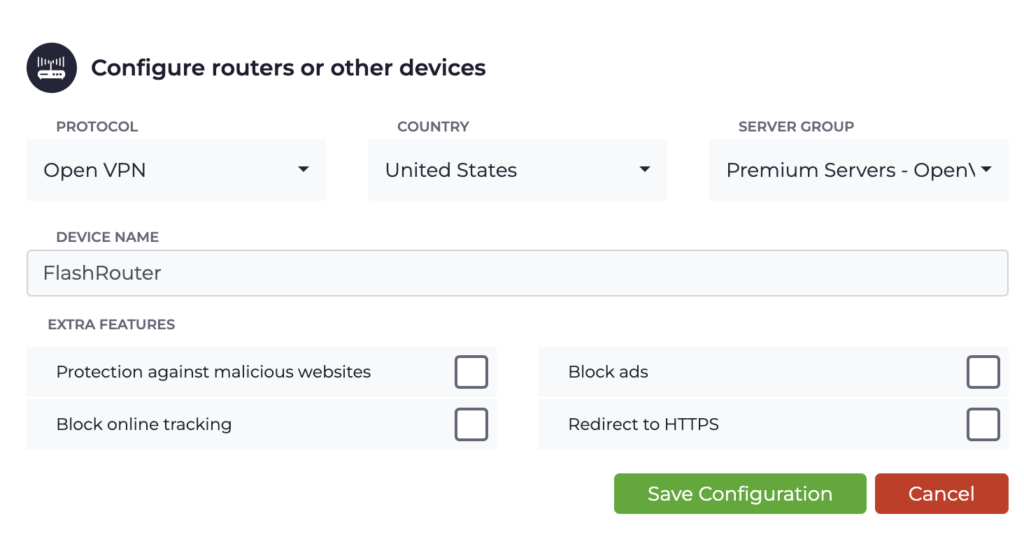
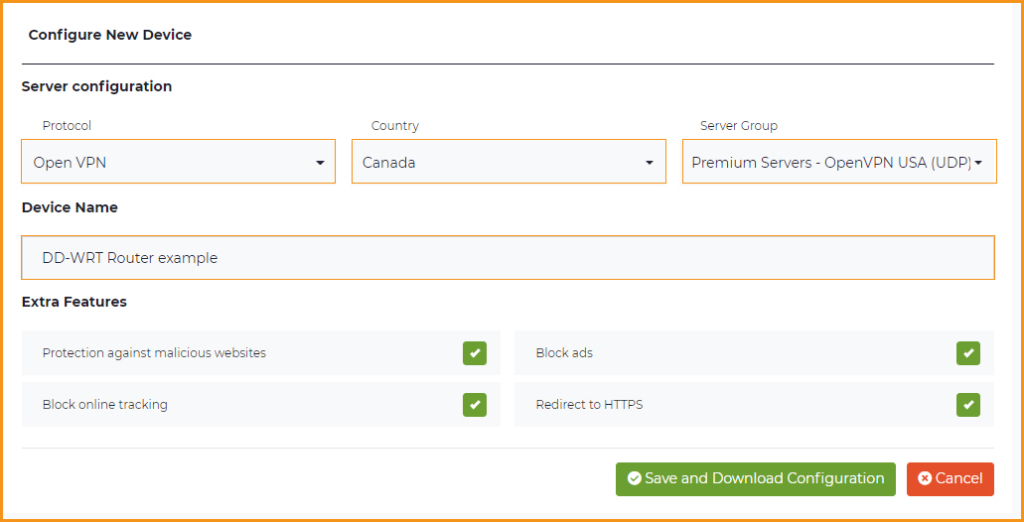
4. Set Protocol to OpenVPN. Select the Country you would like to connect to. Select the Server Group. Name the device in the Device Name field. Click Save Configuration.

CyberGhost protocol and location

5. Press View configuration.

CyberGhost view configuration

6. Copy the Username, and Password that appear to a notepad, since you will need this information later in the setup process. Click Download Configuration.

CyberGhost Website OpenVPN Configuration Files Generator 1

Open the folder that was downloaded. Then open the ca.crt the client.crt, and client.key files with NotePad++ for Windows or TextEdit for Apple. All CyberGhost servers have different keys and certificates.

AsusWRT Router Setup for CyberGhost

Login to AsusWRT firmware settings in a browser on any computer or smart device connected to the AsusWRT FlashRouter’s network.

1. Navigate to the VPN tab.

Merlin VPN Tab

2. Navigate to the VPN Fusion tab.

Asus VPN Fusion

3. Click Add profile.

Asus Add profile

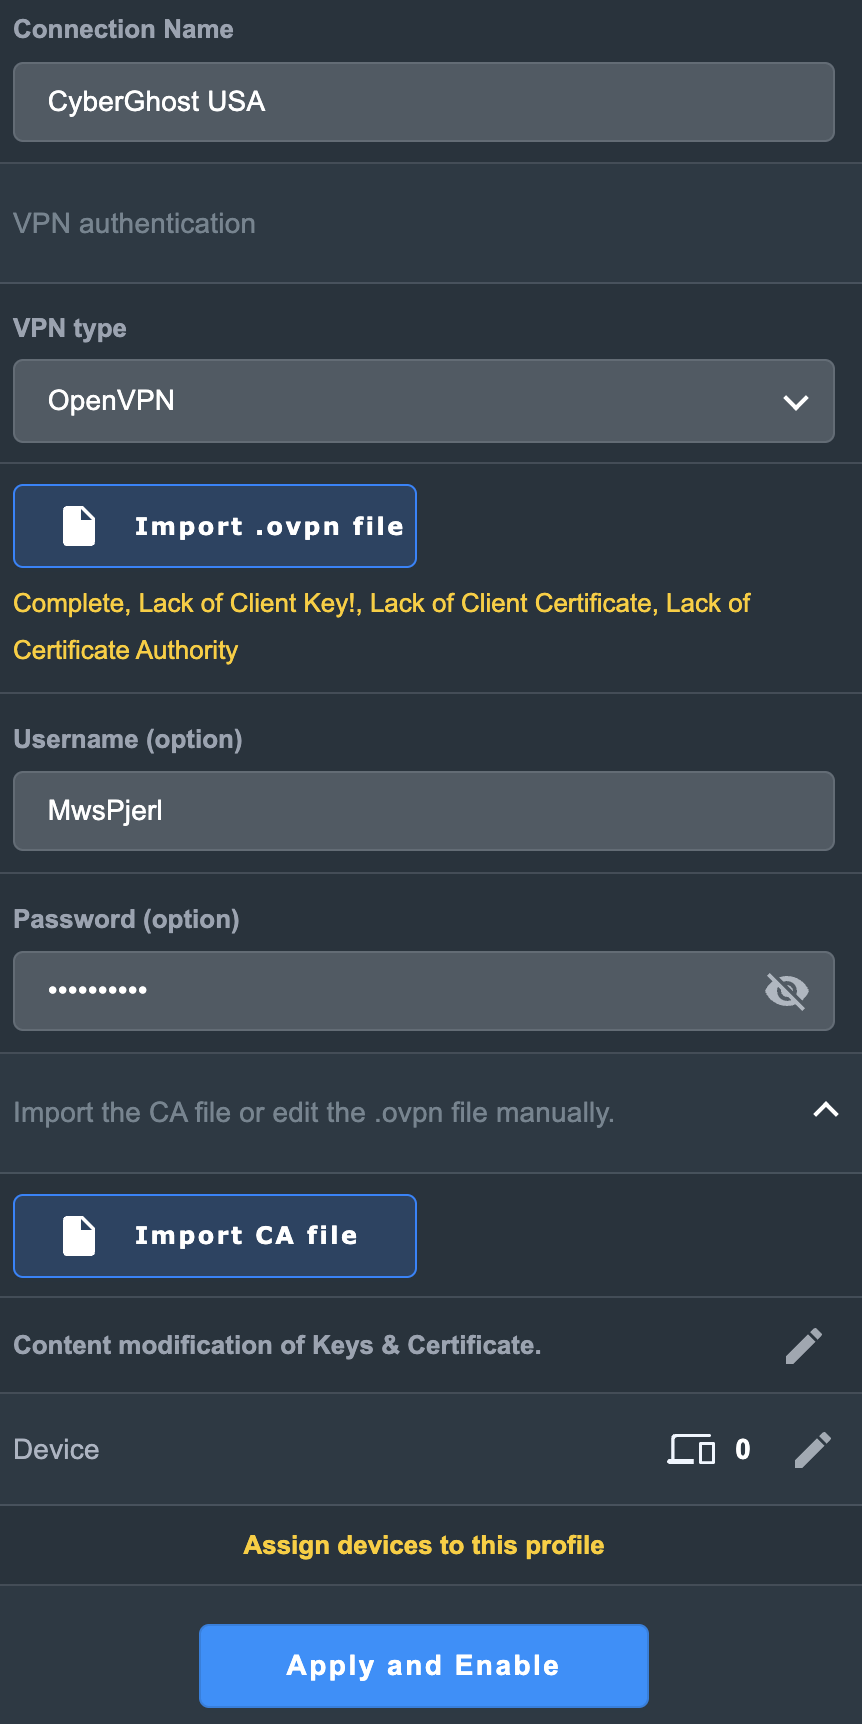
4. In the Connection Name field enter in the name you’d like to use for this OpenVPN Client profile. We typically advise entering in the location or server number here. Our example server was in USA so I have entered in CyberGhost USA.

5. In the VPN Type dropdown select OpenVPN.

6. Click Import .ovpn file and select the openvpn.ovpn file from the folder you downloaded earlier. Then click Upload.

7. In the Username and Password fields enter in the CyberGhost assigned username and password that you obtained earlier.

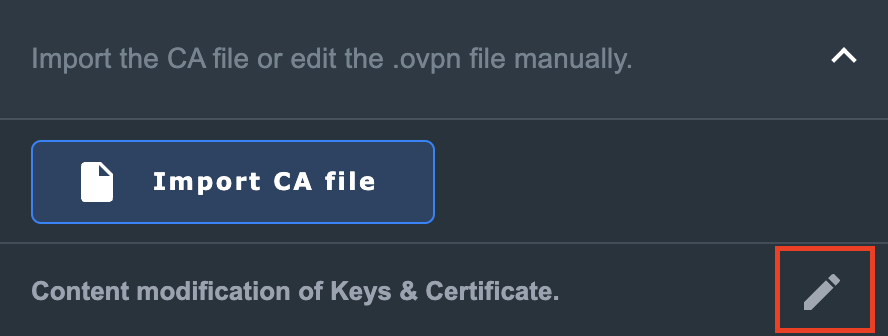
8. After uploading the openvpn.ovpn file you will get a message that says “Complete, Lack of Client Key!, Lack of Client Certificate, Lack of Certificate Authority”. For CyberGhost you need to enter in these details manually. Click Import the CA file or edit the .ovpn file manually and then click the edit icon next to Content modification of Keys and Certificate.

Asus CyberGhost import certs and keys

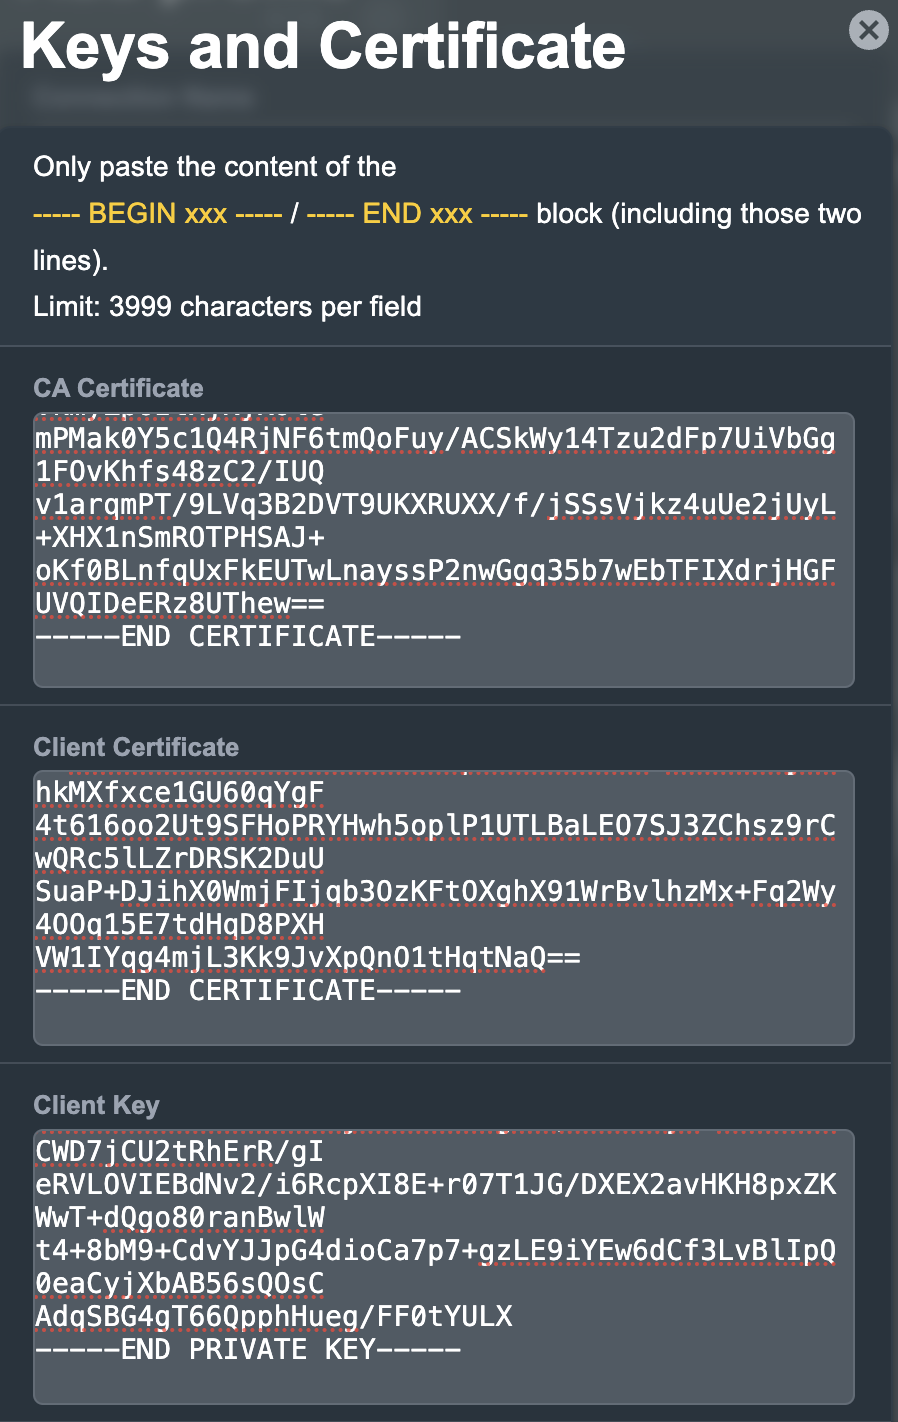
9. In the Certificate Authority field paste in the entire content of the ca.crt file.

—– BEGIN xxx —– / —– END xxx —– block (including those two lines).

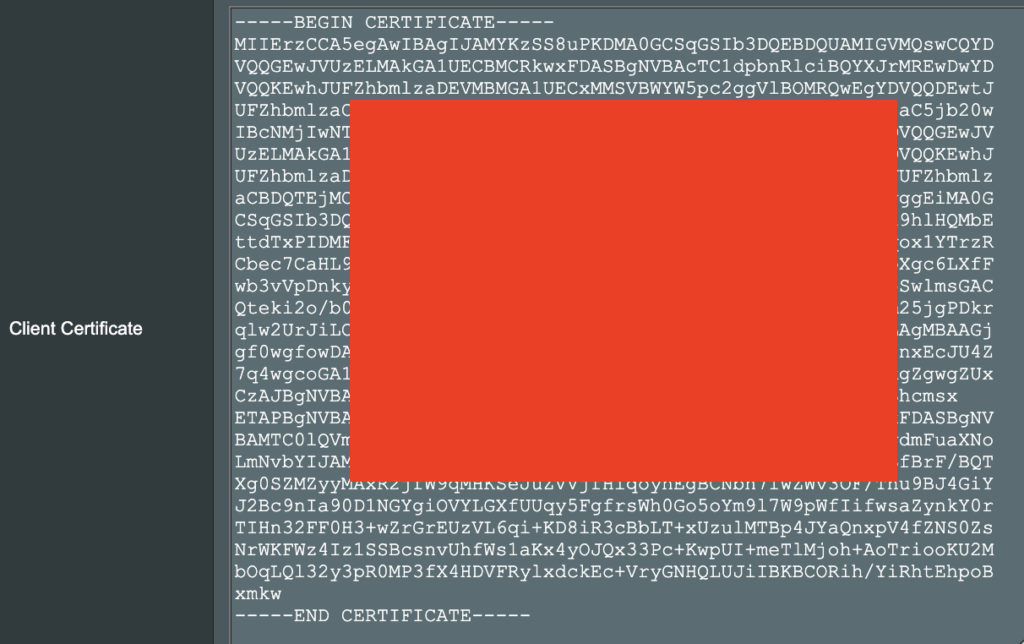
10. In the Client Certificate field paste in the entire content of the client.crt file.

—– BEGIN xxx —– / —– END xxx —– block (including those two lines).

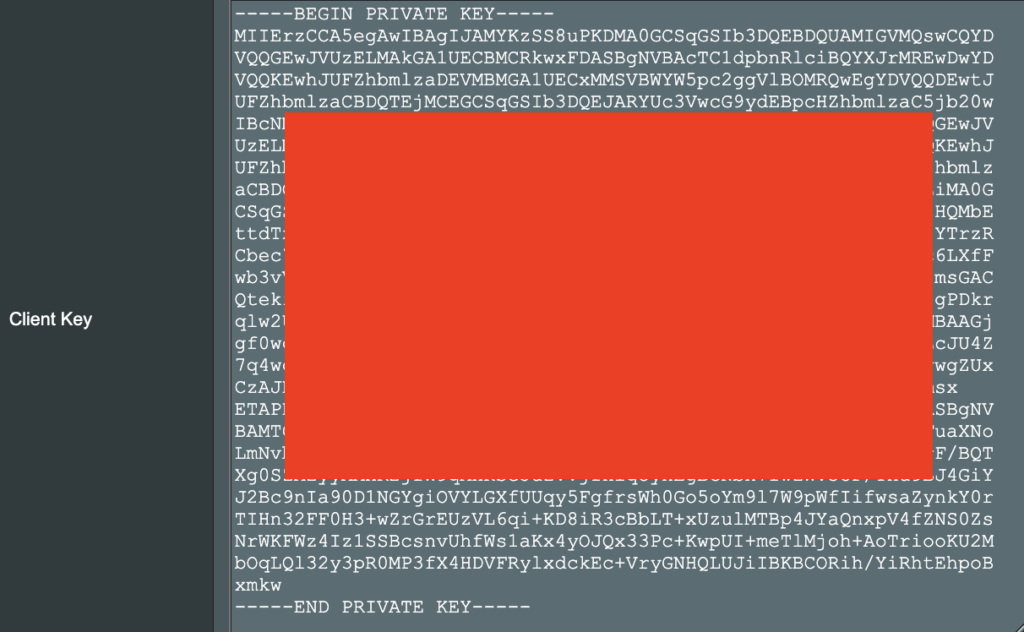
11. In the Client Key field paste in the entire content of the client.key file.

—– BEGIN xxx —– / —– END xxx —– block (including those two lines).

Then click OK.

Asus CyberGhost enter certs and keys

8. Click Apply and Enable at the bottom of the page.

Asus CyberGhost profile

If you only want certain devices to connect to the OpenVPN Client profile you are setting up instead of all the devices connected to the FlashRouter’s network click into the profile and disable Apply to all devices. Then click Devices and select the devices that you want to connect to VPN.

Asus VPN devices
Asus VPN select devices

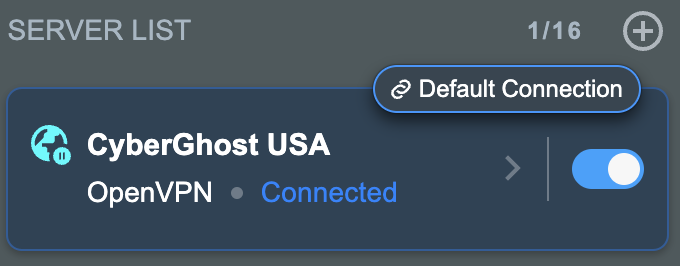
9. At the top of the page set the Service State toggle to ON to activate the VPN connection.

Asus CyberGhost connected

Verify a successful CyberGhost connection

  1. You should now see a CONNECTED message.
  2. Visit What is my IP Address from a private/incognito browser to verify your new IP address and virtual location.

In some cases you may notice that the location is not showing the same location as the server you have input in your router settings; this is because geo tracking tools are often tricked by VPN connections. As long as you see an IP address that is not the same as your normal Internet IP address then you are indeed connected to CyberGhost.

How to change the CyberGhost server

  1. Follow the steps at the top of the page to create a new CyberGhost location profile in your account.
  2. Then proceed with the settings same as initial setup.

TROUBLESHOOTING

Still having issues? Visit the VPN Troubleshooting section.

Troubleshoot Here

PureVPN Manual OpenVPN Setup

TeamFlashRouters · Apr 16, 2019 ·

Preparing for Manual PureVPN Setup

Verify your PureVPN login information

If you are not already an PureVPN user Sign Up Now.

Log in to your account on the PureVPN website.

PureVPN Website Login

Navigate to the Home page and note the VPN username on this page. You will need this specific username later on in the configuration process.
Ex: purevpn0s1234567

PureVPN Server Addresses

View a full list of PureVPN servers.

United States

Miami:
usfl1-ovpn-udp.pointtoserver.com

Seattle:
ussa-ovpn-udp.pointtoserver.com

Houston
:
ustx1-ovpn-tcp.pointtoserver.com

Georgia
:
usga1-ovpn-udp.pointtoserver.com

New Jersey
:
usnj1-ovpn-udp.pointtoserver.com

Washington
:
uswdc1-ovpn-udp.pointtoserver.com

Chicago
:
usil1-ovpn-udp.pointtoserver.com

Phoenix
:
usphx1-ovpn-udp.pointtoserver.com

Los Angeles
:
usla1-ovpn-udp.pointtoserver.com

Virginia
:
vlbr-usvc1-ovpn-udp.pointtoserver.com

San Francisco
:
vlsa-ussf1-ovpn-udp.pointtoserver.com

New York
:
usny1-ovpn-udp.pointtoserver.com

Ohio
:
vleu-usoh1-ovpn-udp.pointtoserver.com

United Kingdom

London:
ukl1-ovpn-udp.pointtoserver.com

Gosport:
ukg1-ovpn-udp.pointtoserver.com

Maidenhead:
ukm1-ovpn-udp.pointtoserver.com

Manchester
:
vlus-uk-man1-ovpn-udp.pointtoserver.com

Leicester
:
vlap-ukle1-ovpn-udp.pointtoserver.com

DD-WRT Router Setup for PureVPN

Navigate to Services > VPN

Enter PureVPN settings

OpenVPN Client

Start OpenVPN Client

If you wish to disable your VPN connection simply set this to Disable at any time and click Apply Settings.

Server IP/Name

Copy and paste the server you would like to connect to from the server list above. Be sure there are no extra spaces or characters.

If you wish to change PureVPN connection locations, THIS IS THE ONLY FIELD YOU NEED TO CHANGE.

Port

53

Tunnel Device

TUN

Tunnel Protocol

UDP

Encryption cipher

AES-256-CBC

Hash Algorithm

SHA1

Userpass Authentication

Enable

Username

Enter the Username you noted from the Home page above.
Ex: purevpn0s1234567

Password

Enter the Password you successfully logged in to your PureVPN account with.

Advanced Options

Enable

TLS Cipher

None

LZO Compression

Adaptive

NAT

Enable

Firewall Protection

Enable

TLS Auth Key

-----BEGIN OpenVPN Static key V1-----
e30af995f56d07426d9ba1f824730521
d4283db4b4d0cdda9c6e8759a3799dcb
7939b6a5989160c9660de0f6125cbb1f
585b41c074b2fe88ecfcf17eab9a33be
1352379cdf74952b588fb161a93e13df
9135b2b29038231e02d657a6225705e6
868ccb0c384ed11614690a1894bfbeb2
74cebf1fe9c2329bdd5c8a40fe882062
4d2ea7540cd79ab76892db51fc371a3a
c5fc9573afecb3fffe3281e61d72e915
79d9b03d8cbf7909b3aebf4d90850321
ee6b7d0a7846d15c27d8290e031e951e
19438a4654663cad975e138f5bc5af89
c737ad822f27e19057731f41e1e254cc
9c95b7175c622422cde9f1f2cfd3510a
dd94498b4d7133d3729dd214a16b27fb
-----END OpenVPN Static key V1-----

Additional Config

tls-cipher “DEFAULT:@SECLEVEL=0”

Policy Based Routing

This field can be used for split VPN and Dual Gateway routing.

CA Cert

-----BEGIN CERTIFICATE-----
MIIEoTCCA4mgAwIBAgIJANysBdFD6U2oMA0GCSqGSIb3DQEBBQUAMIGRMQswCQYD
VQQGEwJISzELMAkGA1UECBMCSEsxETAPBgNVBAcTCEhvbmdLb25nMRAwDgYDVQQK
EwdQdXJlVlBOMQswCQYDVQQLEwJJVDEQMA4GA1UEAxMHUHVyZVZQTjEQMA4GA1UE
KRMHUHVyZVZQTjEfMB0GCSqGSIb3DQEJARYQbWFpbEBob3N0LmRvbWFpbjAeFw0x
NDA0MTAwNzI5NDlaFw0yNDA0MDcwNzI5NDlaMIGRMQswCQYDVQQGEwJISzELMAkG
A1UECBMCSEsxETAPBgNVBAcTCEhvbmdLb25nMRAwDgYDVQQKEwdQdXJlVlBOMQsw
CQYDVQQLEwJJVDEQMA4GA1UEAxMHUHVyZVZQTjEQMA4GA1UEKRMHUHVyZVZQTjEf
MB0GCSqGSIb3DQEJARYQbWFpbEBob3N0LmRvbWFpbjCCASIwDQYJKoZIhvcNAQEB
BQADggEPADCCAQoCggEBAJYqtUkQTlf/pHcGXuuII8S3pfI0fwFbs7l/1RP3nX3n
v1vyuvLi7h0jWsgJU0XM7LJywiRFJ8zsMLH7KZnIg7bscb50GY75WIq7C2NnWnnS
7zzyCCm2XD/2xZPym2lVRytpnWJbpemSS6Hdz7xI3q2FmixuBa1t5FeKsXfeaGGg
+ohwLvamnGHJYUYu3Nu0EWVzzy5wgT0c2C5jleGxl3kxRimD8FpnlAVdqyt0ib/f
f9XanaotSopIHUZmpYjT+udRC2+harlNKvOXYgDRl1mpimCvlzEWpZAo8dyBCxWl
xlBIT8OA8rimGi1XviknuOlWu2cGi13Ug8mCG0MjOQ0CAwEAAaOB+TCB9jAdBgNV
HQ4EFgQUt+1vJ2X2ho12PUDhdo2CsSHYXbYwgcYGA1UdIwSBvjCBu4AUt+1vJ2X2
ho12PUDhdo2CsSHYXbahgZekgZQwgZExCzAJBgNVBAYTAkhLMQswCQYDVQQIEwJI
SzERMA8GA1UEBxMISG9uZ0tvbmcxEDAOBgNVBAoTB1B1cmVWUE4xCzAJBgNVBAsT
AklUMRAwDgYDVQQDEwdQdXJlVlBOMRAwDgYDVQQpEwdQdXJlVlBOMR8wHQYJKoZI
hvcNAQkBFhBtYWlsQGhvc3QuZG9tYWluggkA3KwF0UPpTagwDAYDVR0TBAUwAwEB
/zANBgkqhkiG9w0BAQUFAAOCAQEAAhLQQmkKWJdyGqgMSKOWXSKN2WXTDjIdb9bK
Q8uHeq0LYCcPoRh8VYJg2X4UWR/KO9pKaG+iZJw4Jqz4GQJjjJLKHfsWwj790ay0
7U5KT08qmxFaxZUYn663H9b0+Zud1spTsTJjVe1eoRk6IDbbB4OMUzN9zyWEn6er
xi6llIAjQX1qtlBQasmTAbRtbSsCsZAxL2kXysULIdLrQP0iTgMQqqkv5zvpdEKN
3ciKCd8OHEhHOlAwA0/DNy3dg3Et0F2hNMDJhqMpxXsbKtGJ/rzGXQF2geEVzLZA
o42I1wBOSZLTX1fO1gl3gAGS9aYg5o31rrpBKzQewitJgIuc+Q==
-----END CERTIFICATE-----

CLICK APPLY SETTINGS

Leave all settings not mentioned above as their default setting.

Verify a successful PureVPN connection

Navigate to Status > OpenVPN

  1. You should now see a CONNECTED SUCCESS message.
  2. Visit PureVPN’s website to verify your new IP address, virtual location, and status as Protected at the top of the page.

In some cases you may notice that the location is not showing the same location as the server you have input in your router settings; this is because geo tracking tools are often tricked by VPN connections. As long as you see an IP address that is not the same as your normal Internet IP address then you are indeed connected to PureVPN.

Back up your settings

Navigate to Administration > Backup

  1. Click the Backup button.
  2. A file named nvrambak.bin will be saved to your computer.
  3. You can load nvrambak.bin to restore your settings in the event of a reset.

How to change the PureVPN server

  1. Copy the new PureVPN server address from the above server list.
  2. Paste the server into the Server IP/Name field.
  3. Click Apply Settings.

TROUBLESHOOTING

Still having issues? Visit the VPN Troubleshooting section.

Troubleshoot Here

ProtonVPN Manual OpenVPN Setup

TeamFlashRouters · Apr 19, 2019 ·

Preparing for Manual ProtonVPN Setup

Verify your ProtonVPN login information

If you are not already an ProtonVPN user Sign Up Now.

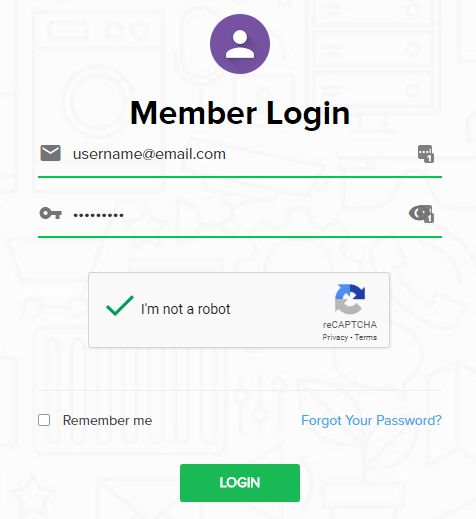
1. Log in to your account on the ProtonVPN website.

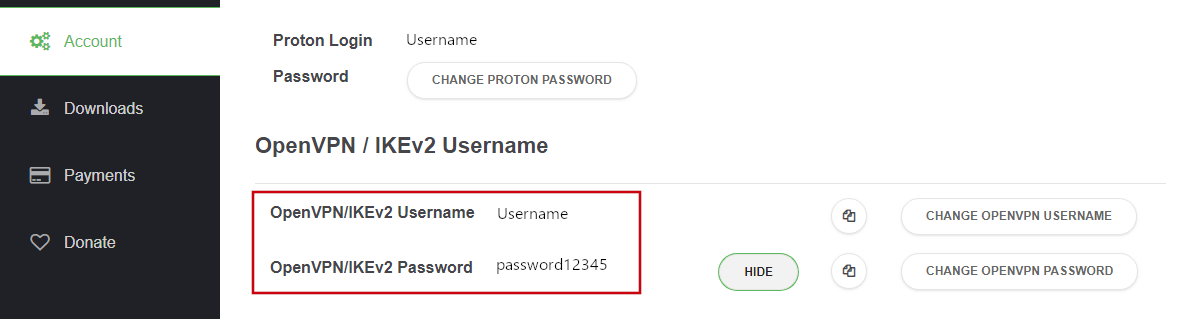
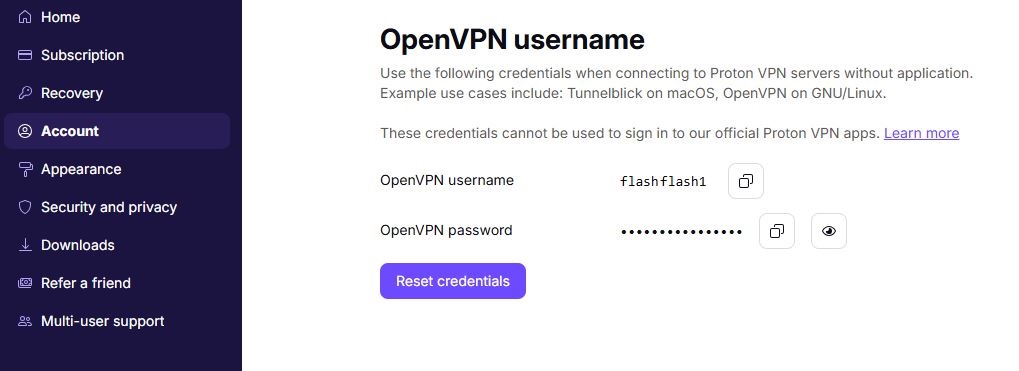
2. Navigate to the Account tab and note your OpenVPN specific Username and Password.

FlashRouters DD-WRT Privacy APP ProtonVPN OpenVPN Specific Username and Password

ProtonVPN Server Addresses

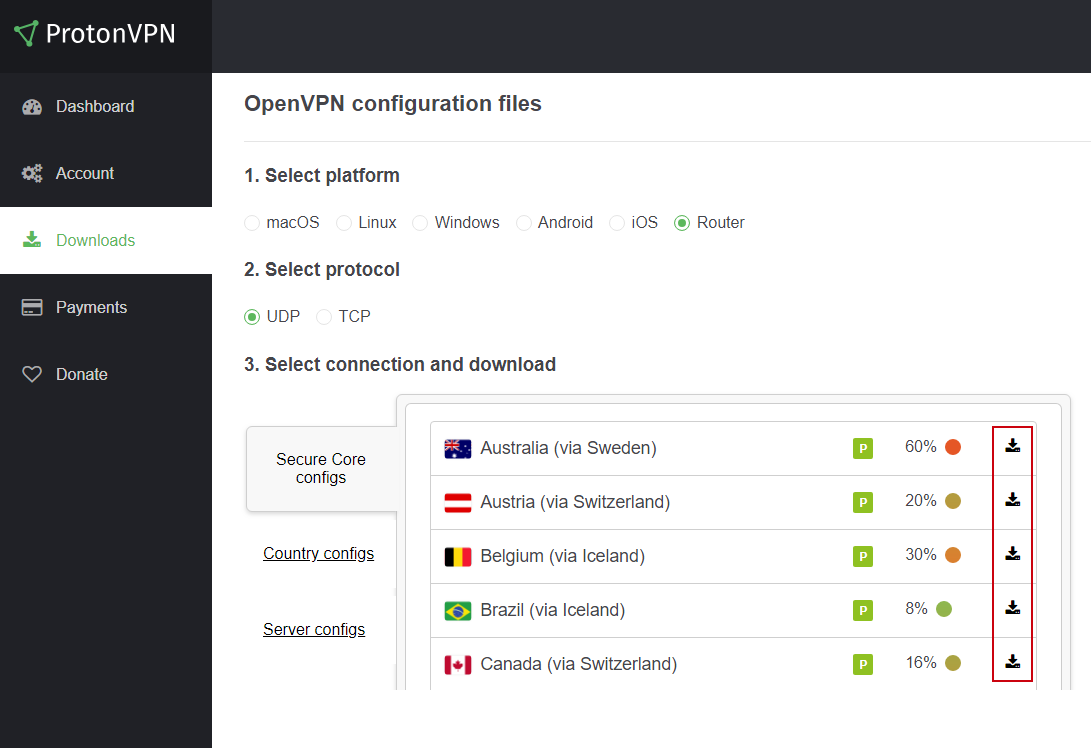
Click on the following link to Download the .ovpn file containing the Server IP Address you wish to connect to.

Open the .ovpn file that is downloaded to your computer with NotePad++ for Windows or TextEdit for Apple.

DD-WRT Router Setup for ProtonVPN

Navigate to Services > VPN

Enter ProtonVPN settings

OpenVPN Client

Start OpenVPN Client

If you wish to disable your VPN connection simply set this to Disable at any time and click Apply Settings.

Server IP/Name

At the top of the .ovpn file you downloaded above, there is a line e.g.:
remote 206.226.72.27 1194
206.226.72.27 is your ProtonVPN server IP address. Enter that IP Address in this field.

Port

1194

Tunnel Device

TUN

Tunnel Protocol

UDP

Encryption cipher

AES-256-CBC

Hash Algorithm

SHA512

Userpass Authentication

Enable

Username

Enter your OpenVPN specific Username.

Password

Enter your OpenVPN specific Password.

Advanced Options

Enable

TLS Cipher

None

LZO Compression

Adaptive

NAT

Enable

Firewall Protection

Enable

TLS Auth Key

-----BEGIN OpenVPN Static key V1-----
6acef03f62675b4b1bbd03e53b187727
423cea742242106cb2916a8a4c829756
3d22c7e5cef430b1103c6f66eb1fc5b3
75a672f158e2e2e936c3faa48b035a6d
e17beaac23b5f03b10b868d53d03521d
8ba115059da777a60cbfd7b2c9c57472
78a15b8f6e68a3ef7fd583ec9f398c8b
d4735dab40cbd1e3c62a822e97489186
c30a0b48c7c38ea32ceb056d3fa5a710
e10ccc7a0ddb363b08c3d2777a3395e1
0c0b6080f56309192ab5aacd4b45f55d
a61fc77af39bd81a19218a79762c3386
2df55785075f37d8c71dc8a42097ee43
344739a0dd48d03025b0450cf1fb5e8c
aeb893d9a96d1f15519bb3c4dcb40ee3
16672ea16c012664f8a9f11255518deb
-----END OpenVPN Static key V1-----

Additional Config

tun-mtu-extra 32
mssfix 1450
persist-key
persist-tun

Policy Based Routing

This field can be used for split VPN and Dual Gateway routing.

CA Cert

-----BEGIN CERTIFICATE-----
MIIFozCCA4ugAwIBAgIBATANBgkqhkiG9w0BAQ0FADBAMQswCQYDVQQGEwJDSDEV
MBMGA1UEChMMUHJvdG9uVlBOIEFHMRowGAYDVQQDExFQcm90b25WUE4gUm9vdCBD
QTAeFw0xNzAyMTUxNDM4MDBaFw0yNzAyMTUxNDM4MDBaMEAxCzAJBgNVBAYTAkNI
MRUwEwYDVQQKEwxQcm90b25WUE4gQUcxGjAYBgNVBAMTEVByb3RvblZQTiBSb290
IENBMIICIjANBgkqhkiG9w0BAQEFAAOCAg8AMIICCgKCAgEAt+BsSsZg7+AuqTq7
vDbPzfygtl9f8fLJqO4amsyOXlI7pquL5IsEZhpWyJIIvYybqS4s1/T7BbvHPLVE
wlrq8A5DBIXcfuXrBbKoYkmpICGc2u1KYVGOZ9A+PH9z4Tr6OXFfXRnsbZToie8t
2Xjv/dZDdUDAqeW89I/mXg3k5x08m2nfGCQDm4gCanN1r5MT7ge56z0MkY3FFGCO
qRwspIEUzu1ZqGSTkG1eQiOYIrdOF5cc7n2APyvBIcfvp/W3cpTOEmEBJ7/14RnX
nHo0fcx61Inx/6ZxzKkW8BMdGGQF3tF6u2M0FjVN0lLH9S0ul1TgoOS56yEJ34hr
JSRTqHuar3t/xdCbKFZjyXFZFNsXVvgJu34CNLrHHTGJj9jiUfFnxWQYMo9UNUd4
a3PPG1HnbG7LAjlvj5JlJ5aqO5gshdnqb9uIQeR2CdzcCJgklwRGCyDT1pm7eoiv
WV19YBd81vKulLzgPavu3kRRe83yl29It2hwQ9FMs5w6ZV/X6ciTKo3etkX9nBD9
ZzJPsGQsBUy7CzO1jK4W01+u3ItmQS+1s4xtcFxdFY8o/q1zoqBlxpe5MQIWN6Qa
lryiET74gMHE/S5WrPlsq/gehxsdgc6GDUXG4dk8vn6OUMa6wb5wRO3VXGEc67IY
m4mDFTYiPvLaFOxtndlUWuCruKcCAwEAAaOBpzCBpDAMBgNVHRMEBTADAQH/MB0G
A1UdDgQWBBSDkIaYhLVZTwyLNTetNB2qV0gkVDBoBgNVHSMEYTBfgBSDkIaYhLVZ
TwyLNTetNB2qV0gkVKFEpEIwQDELMAkGA1UEBhMCQ0gxFTATBgNVBAoTDFByb3Rv
blZQTiBBRzEaMBgGA1UEAxMRUHJvdG9uVlBOIFJvb3QgQ0GCAQEwCwYDVR0PBAQD
AgEGMA0GCSqGSIb3DQEBDQUAA4ICAQCYr7LpvnfZXBCxVIVc2ea1fjxQ6vkTj0zM
htFs3qfeXpMRf+g1NAh4vv1UIwLsczilMt87SjpJ25pZPyS3O+/VlI9ceZMvtGXd
MGfXhTDp//zRoL1cbzSHee9tQlmEm1tKFxB0wfWd/inGRjZxpJCTQh8oc7CTziHZ
ufS+Jkfpc4Rasr31fl7mHhJahF1j/ka/OOWmFbiHBNjzmNWPQInJm+0ygFqij5qs
51OEvubR8yh5Mdq4TNuWhFuTxpqoJ87VKaSOx/Aefca44Etwcj4gHb7LThidw/ky
zysZiWjyrbfX/31RX7QanKiMk2RDtgZaWi/lMfsl5O+6E2lJ1vo4xv9pW8225B5X
eAeXHCfjV/vrrCFqeCprNF6a3Tn/LX6VNy3jbeC+167QagBOaoDA01XPOx7Odhsb
Gd7cJ5VkgyycZgLnT9zrChgwjx59JQosFEG1DsaAgHfpEl/N3YPJh68N7fwN41Cj
zsk39v6iZdfuet/sP7oiP5/gLmA/CIPNhdIYxaojbLjFPkftVjVPn49RqwqzJJPR
N8BOyb94yhQ7KO4F3IcLT/y/dsWitY0ZH4lCnAVV/v2YjWAWS3OWyC8BFx/Jmc3W
DK/yPwECUcPgHIeXiRjHnJt0Zcm23O2Q3RphpU+1SO3XixsXpOVOYP6rJIXW9bMZ
A1gTTlpi7A==
-----END CERTIFICATE-----

CLICK APPLY SETTINGS

Leave all settings not mentioned above as their default setting.

Verify a successful ProtonVPN connection

Navigate to Status > OpenVPN

  1. You should now see a CONNECTED SUCCESS message.
  2. Visit WhatIsMyIPAddress to verify your new IP address, virtual location, and status as Protected at the top of the page.

In some cases you may notice that the location is not showing the same location as the server you have input in your router settings; this is because geo tracking tools are often tricked by VPN connections. As long as you see an IP address that is not the same as your normal Internet IP address then you are indeed connected to ProtonVPN.

Back up your settings

Navigate to Administration > Backup

  1. Click the Backup button.
  2. A file named nvrambak.bin will be saved to your computer.
  3. You can load nvrambak.bin to restore your settings in the event of a reset.

How to change the ProtonVPN server

  1. Download and open a new .ovpn file from ProtonVPN.
  2. Copy and paste the server IP Address into the Server IP/Name field.
  3. Click Apply Settings.

TROUBLESHOOTING

Still having issues? Visit the VPN Troubleshooting section.

Troubleshoot Here

Privacy Hero Bypass certain devices from VPN

TeamFlashRouters · Apr 3, 2023 ·

Your Privacy Hero router uses Cloud Based router management which means you can access the router settings from anywhere on any device that has an internet connection. You can follow these steps while connected to your phone, other Wi-Fi network, or the Privacy Hero network.

If you have certain devices in your network that you do NOT want connecting to VPN you can follow these steps to bypass these devices from the Privacy Hero’s VPN connection.

1. From any device that has a browser such as a computer, smartphone, or tablet visit app.privacyhero.com

App.PrivacyHero.com

2. Enter your Privacy Hero account email and password. Click Login.

Privacy Hero Access Settings

If you have not created your Privacy Hero account yet please follow these instructions.

3. Click the Devices symbol.

Privacy Hero Devices

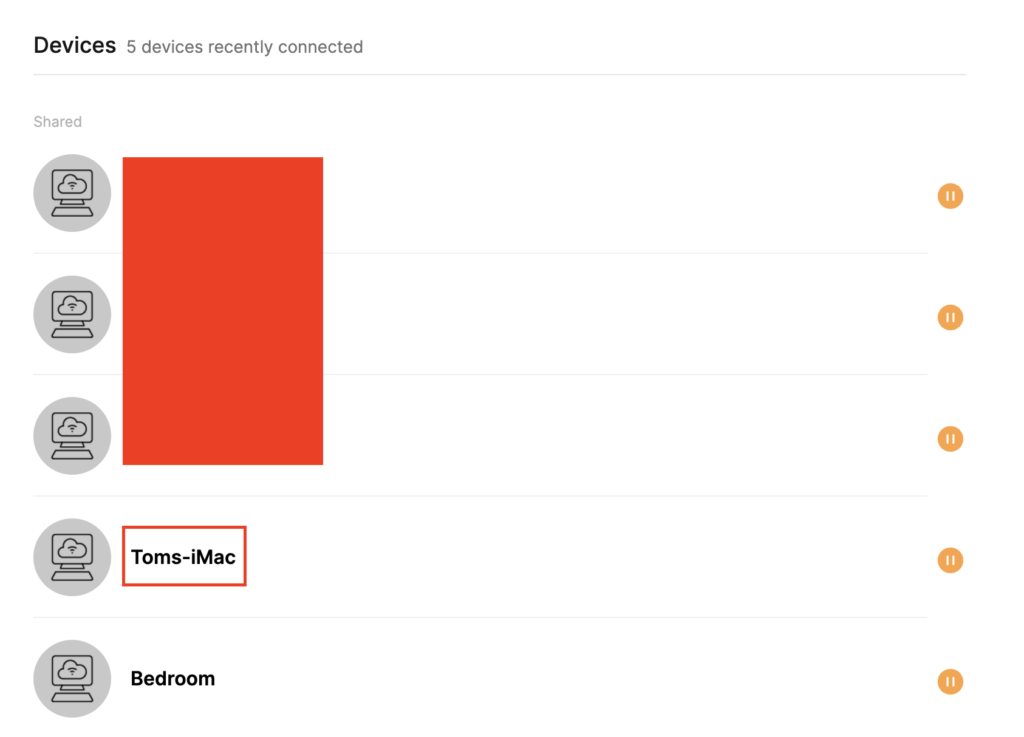
4. Click the name of the Device you want to bypass from VPN.

Privacy Hero Select Device

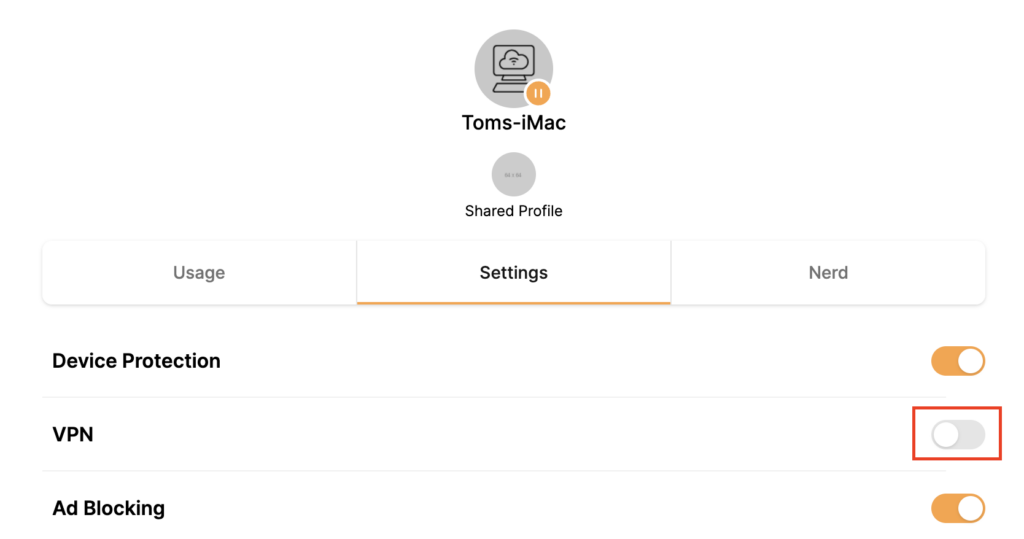
5. Set the VPN toggle to Off. You can also do the same for Adblocking and Device Protection as needed.

Privacy Hero VPN off by device

TROUBLESHOOTING

Still having issues? Visit the VPN Troubleshooting section.

Troubleshoot Here

Surfshark VPN Setup Guide for Privacy Hero

TeamFlashRouters · Sep 23, 2025 ·

Your Privacy Hero NordVPN Router uses cloud-based management, which means you can securely access and adjust your router settings from anywhere, on any device with an internet connection. Whether you’re connected through your phone, another Wi-Fi network, or directly to the Privacy Hero network, setup and management are always within reach.

Follow the steps below to connect your Privacy Hero to Surfshark WireGuard® or OpenVPN servers.

:point_right: Don’t have a Privacy Hero yet? Get your Privacy Hero Router for Surfshark here

Surfshark Wireguard Setup for Privacy Hero (recommended)

1. From any device that has a browser such as a computer, smartphone, or tablet visit app.privacyhero.com.

App.PrivacyHero.com

2. Enter your Privacy Hero account email and password. Click Login.

Privacy Hero Access Settings

3. Click the VPN symbol.

Privacy Hero Setup VPN

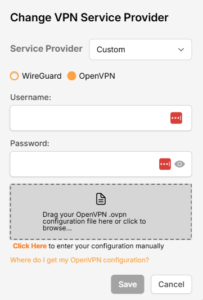
4. Click the Change button and select Custom from the dropdown and choose the Wireguard option.

Privacy Hero Change VPN Providers

5. In a new tab login to your Surfshark account.

6. Navigate to the VPN > Manual Setup tab.

7. Now choose Wireguard and go to the Router section.

8. Now go to Locations, and click on the server location you wish to use. Then, download the server file.

9. Drag and drop or click to Upload the server file into the Custom box on your Privacy Hero settings page. Then press Save.

10. Your Privacy Hero settings should now show a Connected message, indicating you have successfully signed in to your Surfshark VPN server!

Surfshark OpenVPN Setup for Privacy Hero

1. From any device that has a browser such as a computer, smartphone, or tablet visit app.privacyhero.com.

App.PrivacyHero.com

2. Enter your Privacy Hero account email and password. Click Login.

Privacy Hero Access Settings

3. Click the VPN symbol.

Privacy Hero Setup VPN

4. Click the Change button and select Custom from the dropdown and choose the OpenVPN option.

Privacy Hero Change VPN Providers

5. In a new tab login to your Surfshark account.

6. Navigate to the VPN > Manual Setup tab.

7. Now choose OpenVPN and go to the Router section.

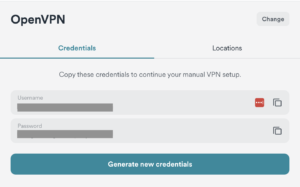
8. Now go to Credentials and find your OpenVPN specific Username and Password.

9. Copy and paste the username and password from previous step into the Custom box on your Privacy Hero settings page.

10. Now go back to the Surfshark account page, and press Locations. 

11. Click on the country name that you want to choose, and Download any of the available server files from the list. (We recommend download the UDP version of the server file).

12. Drag and drop or click to Upload the server file into the Custom box on your Privacy Hero settings page. Then press Save.

13. Your Privacy Hero settings should now show a Connected message, indicating you have successfully signed in to your Surfshark VPN server!

Privacy Hero’s cloud based router settings access makes it so you can change settings while not connected to the Privacy Hero network. Visit the Surfshark IP Check to verify your VPN IP address. If it has not changed be sure to double check that you are indeed connected to the Privacy Hero network.

Keep in mind that the VPN connection will not change the location of the streaming services listed in the Streaming Relocation area of the Privacy Hero settings if the Streaming Relocation feature is Enabled.

TROUBLESHOOTING

Still having issues? Visit the VPN Troubleshooting section.

Troubleshoot Here

Flint/Slate GL.iNet Guest Network Setup

TeamFlashRouters · Apr 20, 2023 ·

Follow this guide to setup a Guest Network on your GL.iNet FlashRouter. Devices connected to the guest network will be on a separate subnet and will not have access to the router settings or be able to talk to devices on the main network.

1. Connect your computer, phone, or tablet to the GL.iNet router via wireless (FlashRouter24 / FlashRouter50) or via ethernet cable to one of the LAN ports on the router.

The FlashRouter WiFi password is printed on the sheet that came with the router and is set to Wireless#[First 5 characters of your router MAC]. The router MAC can be found on the bottom of your router if you cannot locate the sheet. For e.g. if your MAC is 1459C07E70A8 then your WiFi password is Wireless#1459C

Be sure to capitalize the W.

2. Once connected via wireless or ethernet on your device open your browser and go to 192.168.8.1

GL.iNet router access

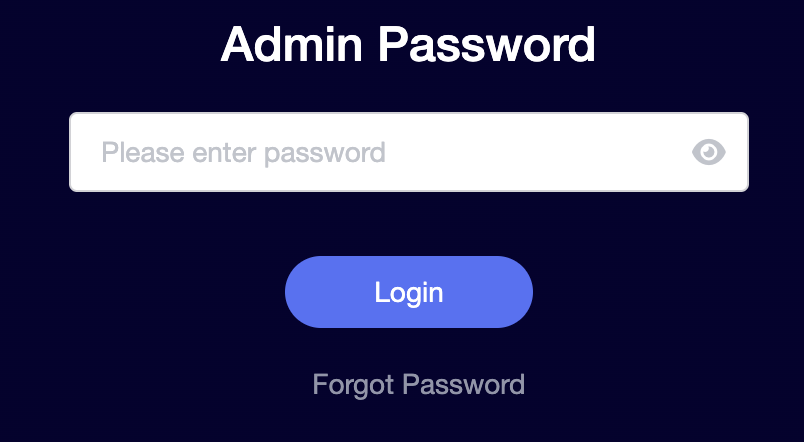
3. Enter openwrt as the admin password to access the GL.iNet firmware settings.

GL.iNet admin password enter

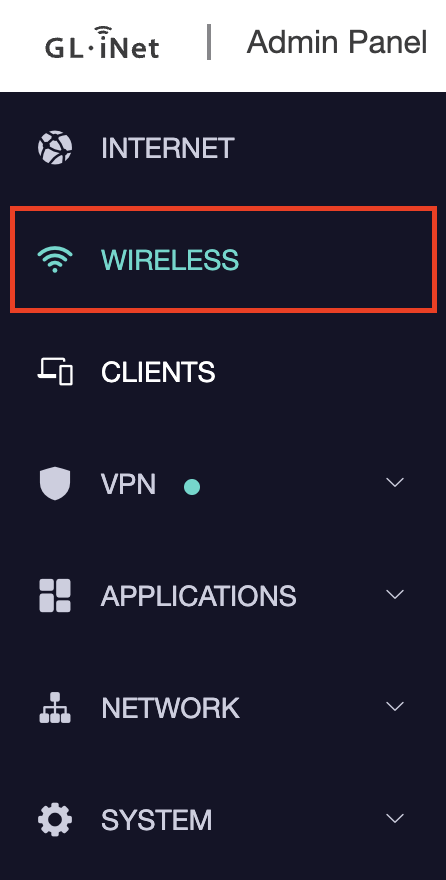
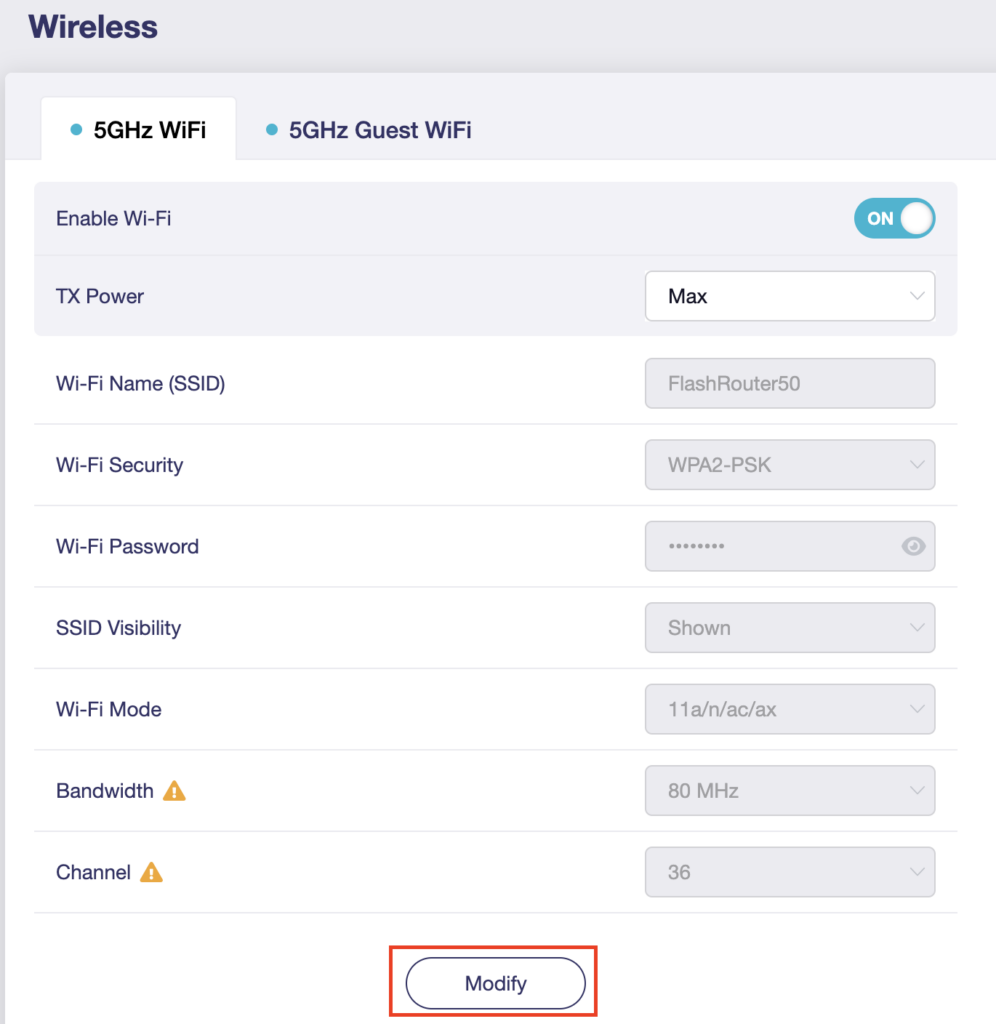
4. Click Wireless.

GL.iNet Click Wireless

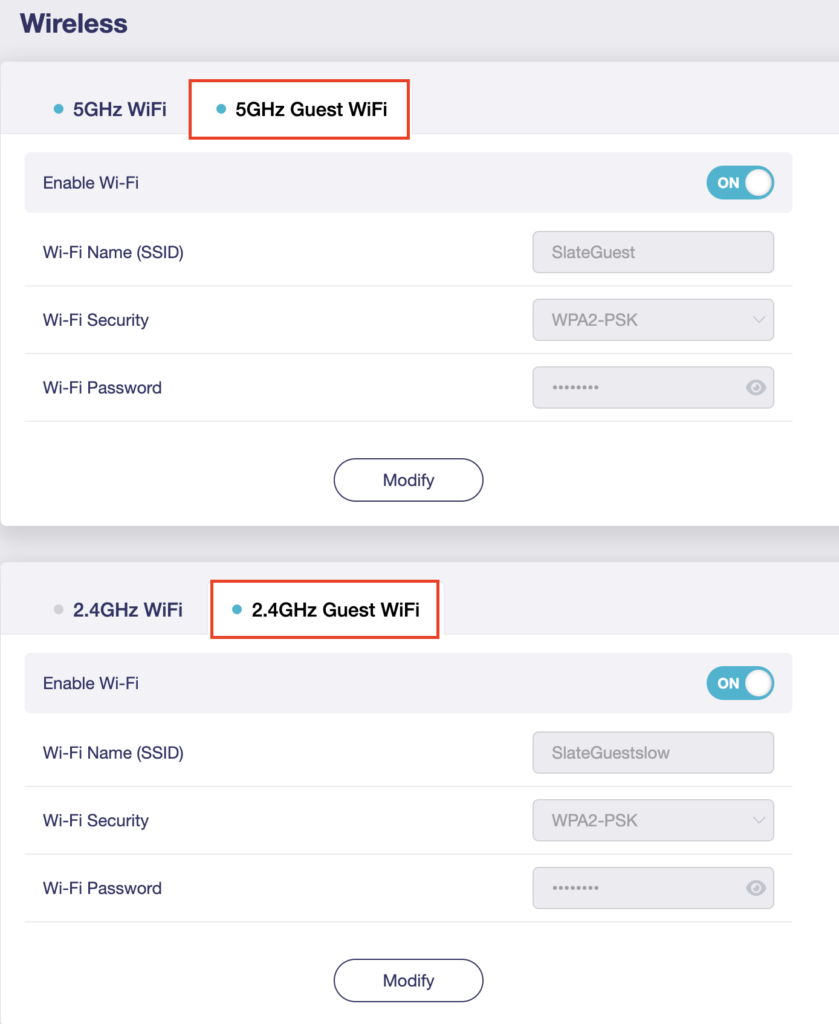
5. Click 5GHz Guest Wi-Fi or 2.4GHz Guest Wi-Fi.

GL.iNet Select Guest Wifi

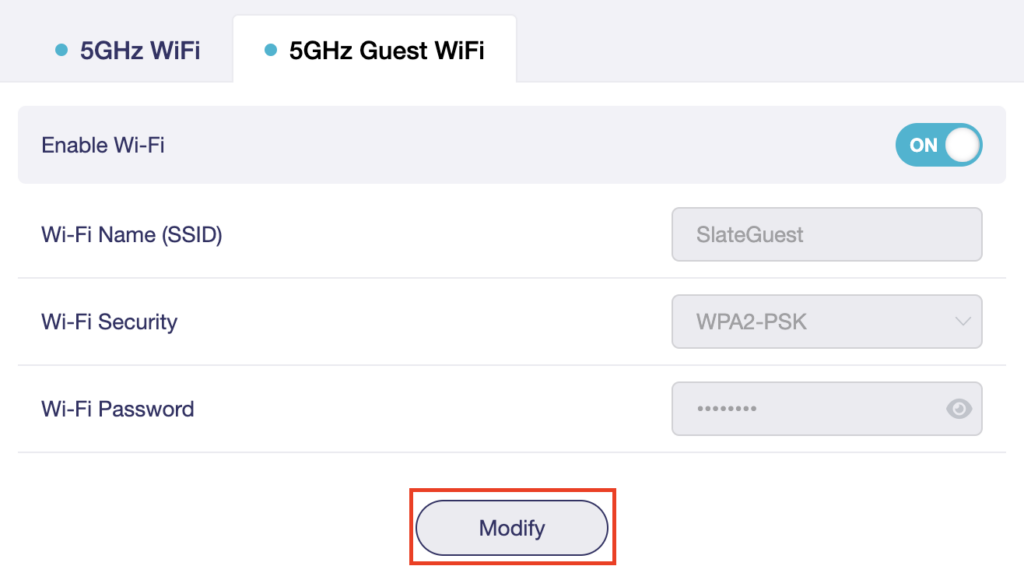
6. Click Modify.

GL.iNet Guest Modify

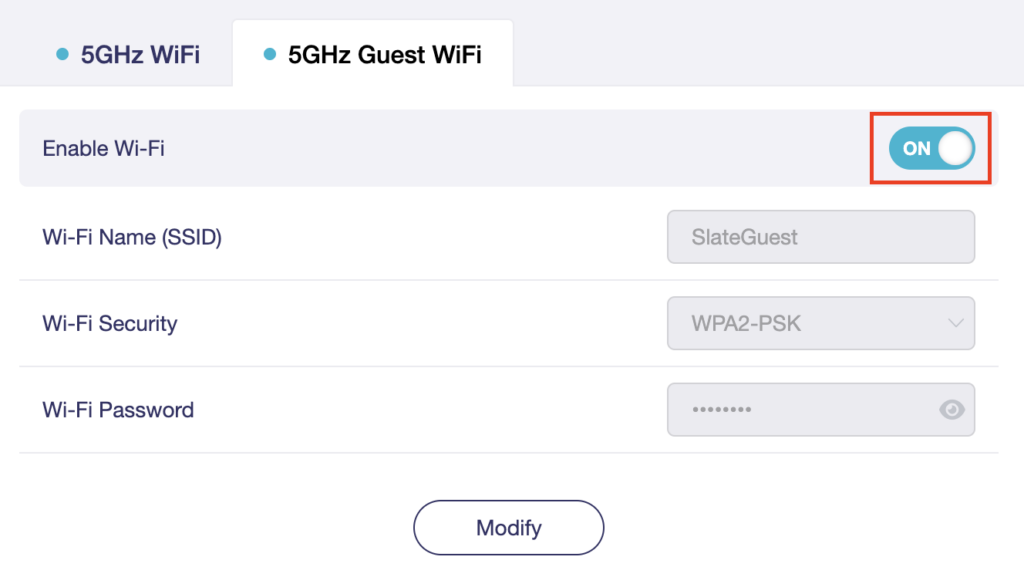
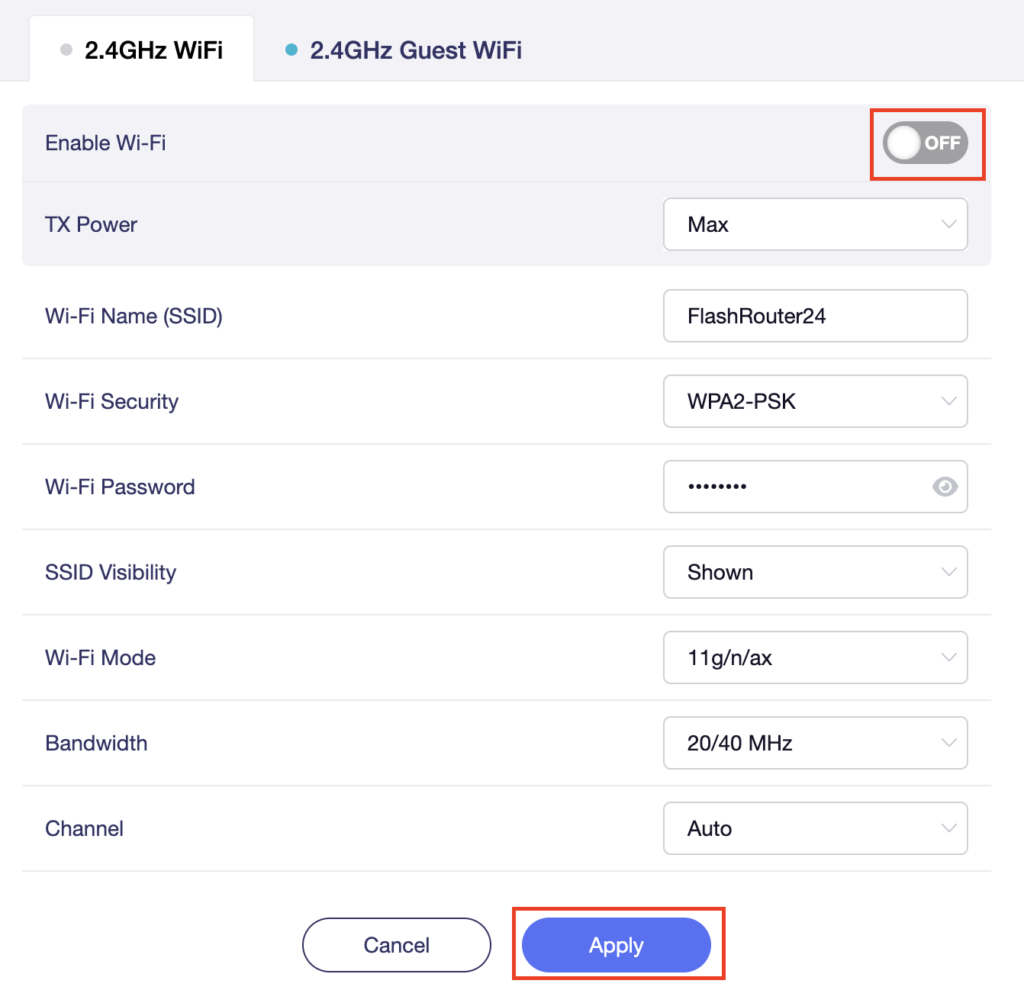
7. Set the Enable Wi-Fi toggle to the ON position.

GL.iNet Enable Guest Wifi

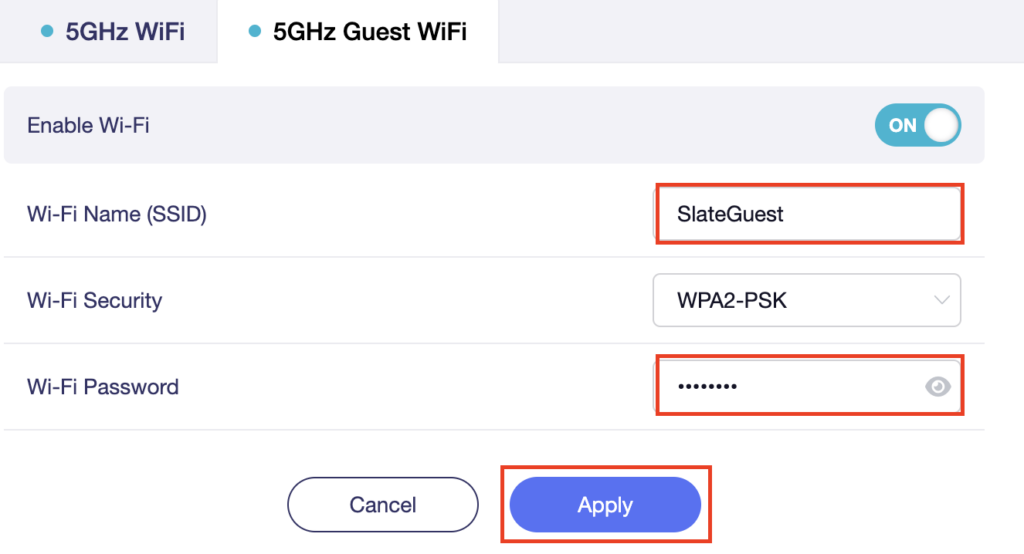
8. Change the Wi-Fi Name (SSID) and Wi-Fi Password fields to what you want to use. The SSID should be unique and NOT a duplicate of an existing network. Click Apply.

GL.iNet Guest change wifi name and pass

9. Connect your devices to the new guest wireless network.

TROUBLESHOOTING

Still having issues? Visit the VPN Troubleshooting section.

Troubleshoot Here

Privacy Hero Activation and Setup

TeamFlashRouters · Feb 8, 2023 ·

Follow this article when you receive your new Privacy Hero router to create your Privacy Hero account, connect your Privacy Hero to the Internet, and customize your network so it is ready to use.

Your Privacy Hero router uses Cloud Based router management which means you can access the router settings from anywhere on any device that has an internet connection. You can follow these steps while connected to your phone or your other Wi-Fi network.

Create your Privacy Hero account

1. From any device that has a browser such as a computer, smartphone, or tablet visit app.privacyhero.com

App.PrivacyHero.com

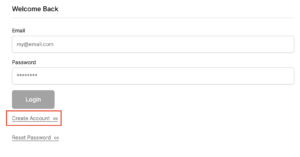
2. Select Create Account.

Privacy Hero create Account

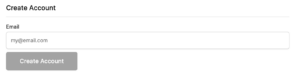
3. Enter the Email address you want to set for your Privacy Hero account. This will be your login to the Privacy Hero settings moving forward. Click Create Account.

Privacy Hero Enter account email

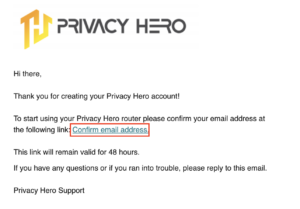
4. Go to your Email inbox and check for an email from Privacy Hero and click the Confirm email address link. This email may be in your Promotions or Spam inbox if it is not appearing in your main inbox.

Privacy Hero Confirm Email

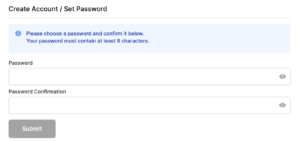
5. Enter the password that you want to use for your Privacy Hero account. Be sure to note this in a secure location so you do not forget. Click Submit.

Privacy Hero create password

6. You have now created your Privacy Hero account. You will use this login to access the Privacy Hero router settings.

Activate your Privacy Hero Internet and setup Wi-Fi

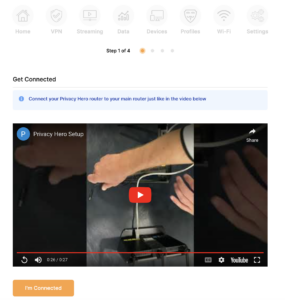
1. You will then be taken to the Router Activation steps. Connect the ethernet cable that the Privacy Hero came with from an open Ethernet port on your ISP modem or other router to the WAN/Internet (blue) port of the Privacy Hero.

Then power the Privacy Hero device on by connecting the power supply. This is shown in the video on the page as well. Wait about a minute or so for the Privacy Hero router to fully boot up and then click I’m Connected.

Wire Up Privacy Hero

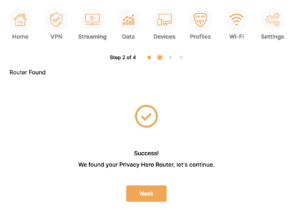
2. The next page may say Router Found or ask you to enter the Activation Code. If it asks for the Activation Code that will be the code printed on the bottom of the Privacy Hero. Enter this code and click Next.

Privacy Hero Router Found

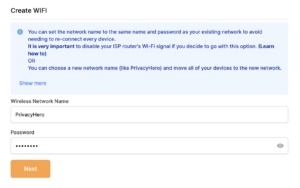
3. Set the Wi-Fi name and password for connecting your devices to the Privacy Hero network. Make sure it is not a duplicate name of an existing Wi-Fi network. Click Next.

Privacy Hero Set wifi name and password

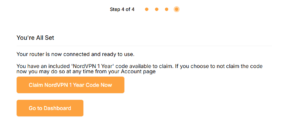
4. To activate your 1 Year NordVPN code:

Click on Claim NordVPN 1 Year Code Now

NordVPN Claim Code

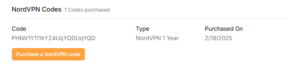
Go to the Account section of your router settings.

Copy the NordVPN code shown under Claim NordVPN 1 Year Code.

PH Nord Code

Go to the NordVPN activation page.

This code can be used with a new or existing NordVPN account.

NordVPN Activate Page

5. You are now all set to begin joining your devices to the new Privacy Hero network with the Wi-Fi name and password you entered and setting up some of the Privacy Hero features.

TROUBLESHOOTING

Still having issues? Visit the VPN Troubleshooting section.

Troubleshoot Here

TP-Link Merge or Separate 2.4GHz and 5GHz Wi-Fi

TeamFlashRouters · Apr 17, 2024 ·

Your TP-Link router broadcasts a 2.4GHz and a 5GHz Wi-Fi network. These can be separated to allow you to assign your devices to the network that best suits them or merged into a single network so your devices automatically select the best band to use. Follow this guide to separate or merge your Wi-Fi bands.

1. Connect your computer, phone, or tablet to the TP-Link router via wireless (FlashRouter24 / FlashRouter50) or via ethernet cable to one of the LAN ports on the router.

The FlashRouter WiFi password is printed on the sheet that came with the router and is set to Wireless#[First 5 characters of your router MAC]. The router MAC can be found on the bottom of your router if you cannot locate the sheet. For e.g. if your MAC is 1459C07E70A8 then your WiFi password is Wireless#1459C

Be sure to capitalize the W.

2. Once connected via wireless or ethernet on your device open your browser and go to the TP-Link firmware settings.

TP-Link URL Access

3. Enter tp-link as the admin password to access the TP-Link firmware settings.

TP-Link admin password

4. Click Wireless.

TP-Link Wireless tab

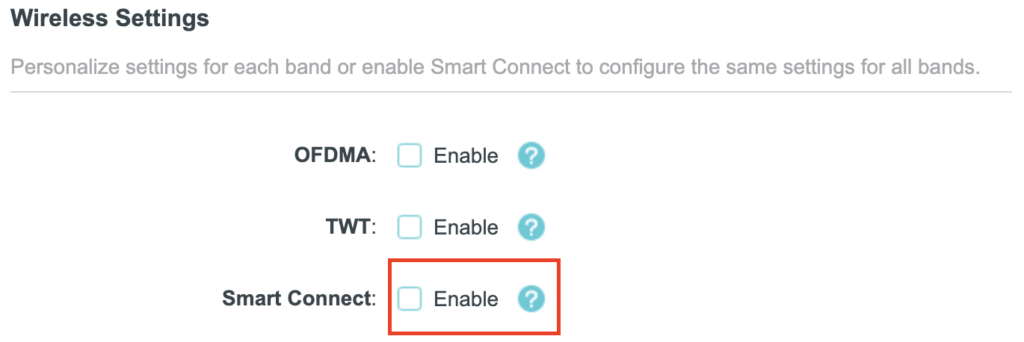
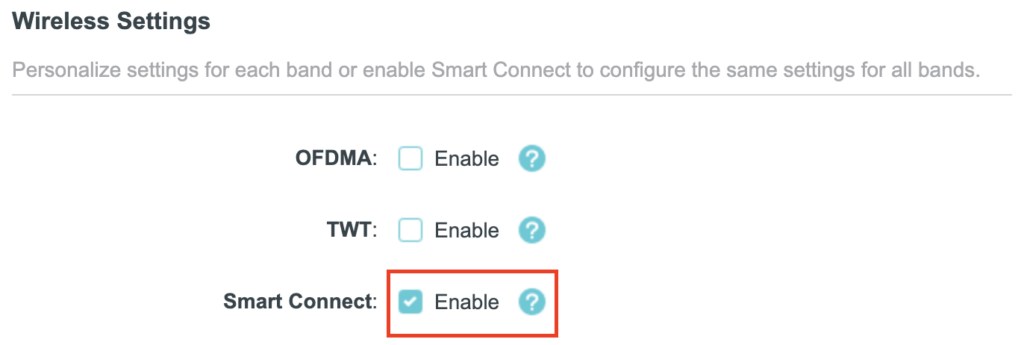
5. Check the Smart Connect checkbox to merge the two Wi-Fi bands. Uncheck the Smart Connect checkbox to separate the two Wi-Fi bands. If you have the two Wi-Fi bands separated make sure the Network Name (SSID) fields have different names for 2.4GHz and 5GHz bands. Click Save.

TP-Link Merge Wifi
TP-Link Separate Wifi

6. Connect your devices to the new wireless network.

TROUBLESHOOTING

Still having issues? Visit the VPN Troubleshooting section.

Troubleshoot Here

Privacy Hero Bedtime Settings (Internet Scheduler)

TeamFlashRouters · Apr 3, 2023 ·

Your Privacy Hero router uses Cloud Based router management which means you can access the router settings from anywhere on any device that has an internet connection. You can follow these steps while connected to your phone, other Wi-Fi network, or the Privacy Hero network.

The Bedtime settings feature allows users to schedule when internet access will be turned off for specific user profiles. All devices assigned to this profile will have these rules applied.

1. From any device that has a browser such as a computer, smartphone, or tablet visit app.privacyhero.com

App.PrivacyHero.com

2. Enter your Privacy Hero account email and password. Click Login.

Privacy Hero Access Settings

If you have not created your Privacy Hero account yet please follow these instructions.

3. Click the Profiles symbol.

Privacy Hero Profiles

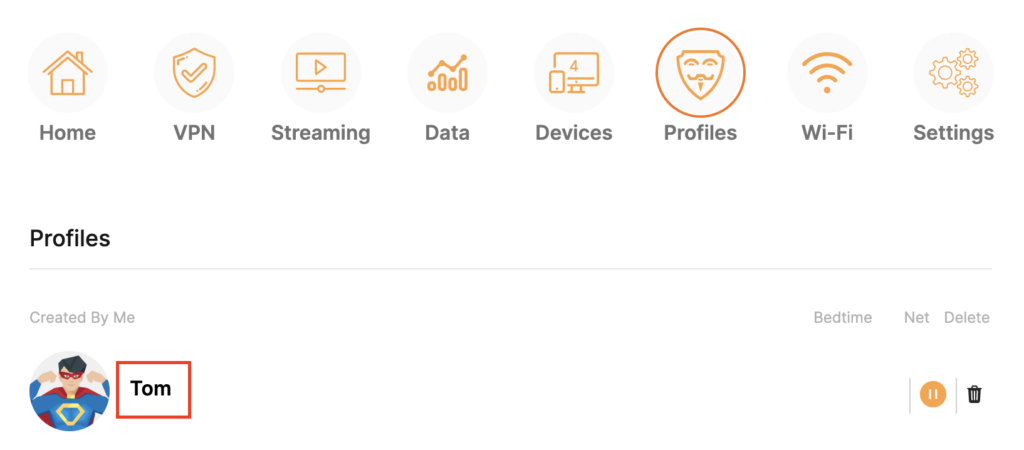
4. Click the name of the User Profile.

Privacy Hero Select Profile

5. Click Schoolnights or Weekends depending on which you need to set rules for.

Privacy Hero Bedtime School Nights Weekends

6. Select the time that you want the Internet to turn off and the days you want this rule to apply to. Click Save.

Privacy Hero Set Bedtime

7. Set the Bedtime toggle to On.

Privacy Hero Enable Bedtime

TROUBLESHOOTING

Still having issues? Visit the VPN Troubleshooting section.

Troubleshoot Here

Privacy Hero Safe Surf

TeamFlashRouters · Apr 3, 2023 ·

Your Privacy Hero router uses Cloud Based router management which means you can access the router settings from anywhere on any device that has an internet connection. You can follow these steps while connected to your phone, other Wi-Fi network, or the Privacy Hero network.

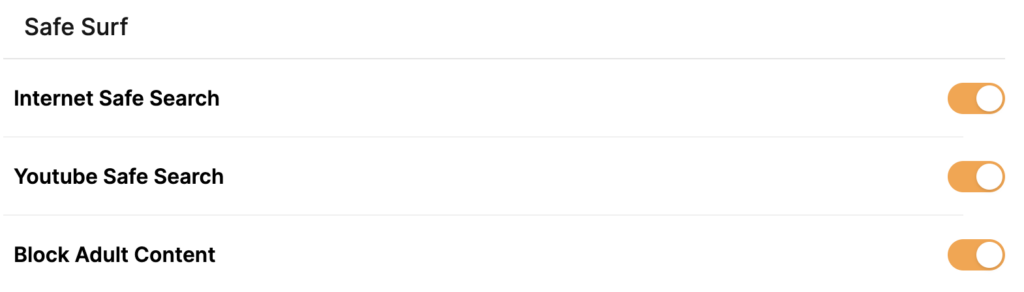
The Safe Surf settings feature allows users to block inappropriate search results, YouTube videos, and adult content. All devices assigned to this profile will have these rules applied.

1. From any device that has a browser such as a computer, smartphone, or tablet visit app.privacyhero.com

App.PrivacyHero.com

2. Enter your Privacy Hero account email and password. Click Login.

Privacy Hero Access Settings

If you have not created your Privacy Hero account yet please follow these instructions.

3. Click the Profiles symbol.

Privacy Hero Profiles

4. Click the name of the User Profile.

Privacy Hero Select Profile

5. Toggle On the settings for Internet Safe Search, YouTube Safe Search, and Block Adult Content as needed.

Privacy Hero Safe Search

TROUBLESHOOTING

Still having issues? Visit the VPN Troubleshooting section.

Troubleshoot Here

Hotspot Shield Manual OpenVPN Setup

TeamFlashRouters · Jul 15, 2020 ·

Preparing for Manual Hotspot Shield Setup

Obtain your Hotspot Shield OpenVPN Information

If you are not already a Hotspot Shield user Sign Up Now.

1. Log in to your account on the Hotspot Shield website.

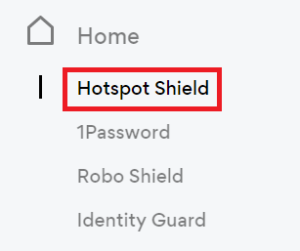
2. Click Hotspot Shield on the left side navigation.

Hotspot Shield - Website Admin

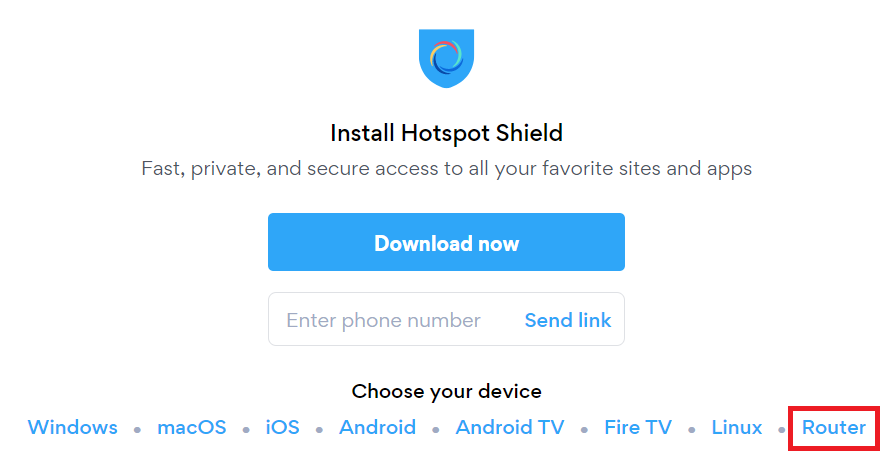
3. Under Choose your device click Router.

Hotspot Shield - Select Router

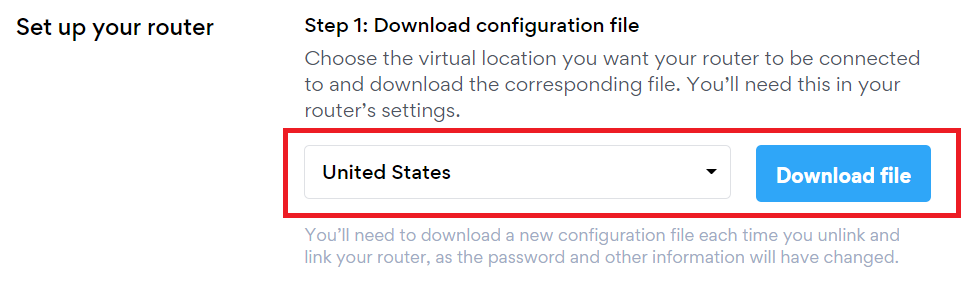
4. In the Set up your router section Select your desired virtual location and then click Download file.

Open the file that was downloaded with NotePad++ for Windows or TextEdit for Apple. You only need the <cert> and <key> from the .ovpn file. All Hotspot Shield servers have different keys and certificates.

Hotspot Shield - Download Configuration File

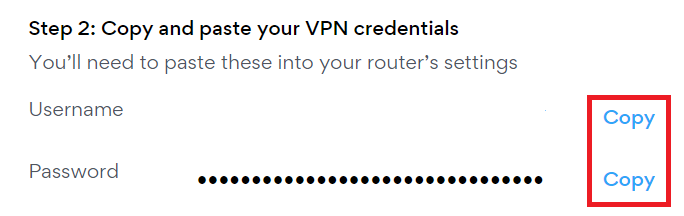
5. Copy the VPN Username, and Password that appear under Step 2 to a notepad, you will need this information later in the setup process.

Hotspot Shield - OpenVPN username and password

DD-WRT Router Setup for Hotspot Shield

Navigate to Services > VPN

Enter Hotspot Shield settings

OpenVPN Client

Start OpenVPN Client

If you wish to disable your VPN connection simply set this to Disable at any time and click Apply Settings.

Server IP/Name

At the top of the .ovpn file you downloaded above, there is a line e.g.:
remote universitycalendar.us 8041
universitycalendar.us is your Hotspot Shield server name. Enter the server name in this field.

Port

8041

Tunnel Device

TUN

Tunnel Protocol

UDP

Encryption cipher

AES-128-CBC

Hash Algorithm

SHA256

User Pass Authentication

Enable

Username

Enter the Username you obtained in your Hotspot Shield account.

Password

Enter the Password you obtained in your Hotspot Shield account.

Advanced Options

Enable

TLS Cipher

None

LZO Compression

No

NAT

Enable

Firewall Protection

Enable

Additional Config

resolv-retry infinite
remote-random
nobind
tun-mtu 1500
tun-mtu-extra 32
mssfix 1450
persist-key
persist-tun
ping 15
ping-restart 0
reneg-sec 0
remote-cert-tls server

Policy Based Routing

This field can be used for split VPN and Dual Gateway routing.

CA Cert

—–BEGIN CERTIFICATE—–
MIIFazCCA1OgAwIBAgIRAIIQz7DSQONZRGPgu2OCiwAwDQYJKoZIhvcNAQELBQAw
TzELMAkGA1UEBhMCVVMxKTAnBgNVBAoTIEludGVybmV0IFNlY3VyaXR5IFJlc2Vh
cmNoIEdyb3VwMRUwEwYDVQQDEwxJU1JHIFJvb3QgWDEwHhcNMTUwNjA0MTEwNDM4
WhcNMzUwNjA0MTEwNDM4WjBPMQswCQYDVQQGEwJVUzEpMCcGA1UEChMgSW50ZXJu
ZXQgU2VjdXJpdHkgUmVzZWFyY2ggR3JvdXAxFTATBgNVBAMTDElTUkcgUm9vdCBY
MTCCAiIwDQYJKoZIhvcNAQEBBQADggIPADCCAgoCggIBAK3oJHP0FDfzm54rVygc
h77ct984kIxuPOZXoHj3dcKi/vVqbvYATyjb3miGbESTtrFj/RQSa78f0uoxmyF+
0TM8ukj13Xnfs7j/EvEhmkvBioZxaUpmZmyPfjxwv60pIgbz5MDmgK7iS4+3mX6U
A5/TR5d8mUgjU+g4rk8Kb4Mu0UlXjIB0ttov0DiNewNwIRt18jA8+o+u3dpjq+sW
T8KOEUt+zwvo/7V3LvSye0rgTBIlDHCNAymg4VMk7BPZ7hm/ELNKjD+Jo2FR3qyH
B5T0Y3HsLuJvW5iB4YlcNHlsdu87kGJ55tukmi8mxdAQ4Q7e2RCOFvu396j3x+UC
B5iPNgiV5+I3lg02dZ77DnKxHZu8A/lJBdiB3QW0KtZB6awBdpUKD9jf1b0SHzUv
KBds0pjBqAlkd25HN7rOrFleaJ1/ctaJxQZBKT5ZPt0m9STJEadao0xAH0ahmbWn
OlFuhjuefXKnEgV4We0+UXgVCwOPjdAvBbI+e0ocS3MFEvzG6uBQE3xDk3SzynTn
jh8BCNAw1FtxNrQHusEwMFxIt4I7mKZ9YIqioymCzLq9gwQbooMDQaHWBfEbwrbw
qHyGO0aoSCqI3Haadr8faqU9GY/rOPNk3sgrDQoo//fb4hVC1CLQJ13hef4Y53CI
rU7m2Ys6xt0nUW7/vGT1M0NPAgMBAAGjQjBAMA4GA1UdDwEB/wQEAwIBBjAPBgNV
HRMBAf8EBTADAQH/MB0GA1UdDgQWBBR5tFnme7bl5AFzgAiIyBpY9umbbjANBgkq
hkiG9w0BAQsFAAOCAgEAVR9YqbyyqFDQDLHYGmkgJykIrGF1XIpu+ILlaS/V9lZL
ubhzEFnTIZd+50xx+7LSYK05qAvqFyFWhfFQDlnrzuBZ6brJFe+GnY+EgPbk6ZGQ
3BebYhtF8GaV0nxvwuo77x/Py9auJ/GpsMiu/X1+mvoiBOv/2X/qkSsisRcOj/KK
NFtY2PwByVS5uCbMiogziUwthDyC3+6WVwW6LLv3xLfHTjuCvjHIInNzktHCgKQ5
ORAzI4JMPJ+GslWYHb4phowim57iaztXOoJwTdwJx4nLCgdNbOhdjsnvzqvHu7Ur
TkXWStAmzOVyyghqpZXjFaH3pO3JLF+l+/+sKAIuvtd7u+Nxe5AW0wdeRlN8NwdC
jNPElpzVmbUq4JUagEiuTDkHzsxHpFKVK7q4+63SM1N95R1NbdWhscdCb+ZAJzVc
oyi3B43njTOQ5yOf+1CceWxG1bQVs5ZufpsMljq4Ui0/1lvh+wjChP4kqKOJ2qxq
4RgqsahDYVvTH9w7jXbyLeiNdd8XM2w9U/t7y0Ff/9yi0GE44Za4rF2LN9d11TPA
mRGunUHBcnWEvgJBQl9nJEiU0Zsnvgc/ubhPgXRR4Xq37Z0j4r7g1SgEEzwxA57d
emyPxgcYxn/eR44/KJ4EBs+lVDR3veyJm+kXQ99b21/+jh5Xos1AnX5iItreGCc=
—–END CERTIFICATE—–
—–BEGIN CERTIFICATE—–
MIIFjTCCA3WgAwIBAgIRANOxciY0IzLc9AUoUSrsnGowDQYJKoZIhvcNAQELBQAw
TzELMAkGA1UEBhMCVVMxKTAnBgNVBAoTIEludGVybmV0IFNlY3VyaXR5IFJlc2Vh
cmNoIEdyb3VwMRUwEwYDVQQDEwxJU1JHIFJvb3QgWDEwHhcNMTYxMDA2MTU0MzU1
WhcNMjExMDA2MTU0MzU1WjBKMQswCQYDVQQGEwJVUzEWMBQGA1UEChMNTGV0J3Mg
RW5jcnlwdDEjMCEGA1UEAxMaTGV0J3MgRW5jcnlwdCBBdXRob3JpdHkgWDMwggEi
MA0GCSqGSIb3DQEBAQUAA4IBDwAwggEKAoIBAQCc0wzwWuUuR7dyXTeDs2hjMOrX
NSYZJeG9vjXxcJIvt7hLQQWrqZ41CFjssSrEaIcLo+N15Obzp2JxunmBYB/XkZqf
89B4Z3HIaQ6Vkc/+5pnpYDxIzH7KTXcSJJ1HG1rrueweNwAcnKx7pwXqzkrrvUHl
Npi5y/1tPJZo3yMqQpAMhnRnyH+lmrhSYRQTP2XpgofL2/oOVvaGifOFP5eGr7Dc
Gu9rDZUWfcQroGWymQQ2dYBrrErzG5BJeC+ilk8qICUpBMZ0wNAxzY8xOJUWuqgz
uEPxsR/DMH+ieTETPS02+OP88jNquTkxxa/EjQ0dZBYzqvqEKbbUC8DYfcOTAgMB
AAGjggFnMIIBYzAOBgNVHQ8BAf8EBAMCAYYwEgYDVR0TAQH/BAgwBgEB/wIBADBU
BgNVHSAETTBLMAgGBmeBDAECATA/BgsrBgEEAYLfEwEBATAwMC4GCCsGAQUFBwIB
FiJodHRwOi8vY3BzLnJvb3QteDEubGV0c2VuY3J5cHQub3JnMB0GA1UdDgQWBBSo
SmpjBH3duubRObemRWXv86jsoTAzBgNVHR8ELDAqMCigJqAkhiJodHRwOi8vY3Js
LnJvb3QteDEubGV0c2VuY3J5cHQub3JnMHIGCCsGAQUFBwEBBGYwZDAwBggrBgEF
BQcwAYYkaHR0cDovL29jc3Aucm9vdC14MS5sZXRzZW5jcnlwdC5vcmcvMDAGCCsG
AQUFBzAChiRodHRwOi8vY2VydC5yb290LXgxLmxldHNlbmNyeXB0Lm9yZy8wHwYD
VR0jBBgwFoAUebRZ5nu25eQBc4AIiMgaWPbpm24wDQYJKoZIhvcNAQELBQADggIB
ABnPdSA0LTqmRf/Q1eaM2jLonG4bQdEnqOJQ8nCqxOeTRrToEKtwT++36gTSlBGx
A/5dut82jJQ2jxN8RI8L9QFXrWi4xXnA2EqA10yjHiR6H9cj6MFiOnb5In1eWsRM
UM2v3e9tNsCAgBukPHAg1lQh07rvFKm/Bz9BCjaxorALINUfZ9DD64j2igLIxle2
DPxW8dI/F2loHMjXZjqG8RkqZUdoxtID5+90FgsGIfkMpqgRS05f4zPbCEHqCXl1
eO5HyELTgcVlLXXQDgAWnRzut1hFJeczY1tjQQno6f6s+nMydLN26WuU4s3UYvOu
OsUxRlJu7TSRHqDC3lSE5XggVkzdaPkuKGQbGpny+01/47hfXXNB7HntWNZ6N2Vw
p7G6OfY+YQrZwIaQmhrIqJZuigsrbe3W+gdn5ykE9+Ky0VgVUsfxo52mwFYs1JKY
2PGDuWx8M6DlS6qQkvHaRUo0FMd8TsSlbF0/v965qGFKhSDeQoMpYnwcmQilRh/0
ayLThlHLN81gSkJjVrPI0Y8xCVPB4twb1PFUd2fPM3sA1tJ83sZ5v8vgFv2yofKR
PB0t6JzUA81mSqM3kxl5e+IZwhYAyO0OTg3/fs8HqGTNKd9BqoUwSRBzp06JMg5b
rUCGwbCUDI0mxadJ3Bz4WxR6fyNpBK2yAinWEsikxqEt
—–END CERTIFICATE—–

Public Client Cert

In the .ovpn file Copy and Paste all contents in between the <cert> and </cert> lines from your .ovpn file starting and ending with:
—–BEGIN CERTIFICATE—–
…
—–END CERTIFICATE—–

Private Client Key

In the .ovpn file Copy and Paste all contents in between the <key> and </key> lines from your .ovpn file starting and ending with:
—–BEGIN PRIVATE KEY—–
…
—–END PRIVATE KEY—–

CLICK APPLY SETTINGS

Leave all settings not mentioned above as their default setting.

Verify a successful Hotspot Shield connection

Navigate to Status > OpenVPN

  1. You should now see a CONNECTED SUCCESS message.
  2. Visit Hotspot Shield’s website to verify your new IP address and virtual location.

In some cases you may notice that the location is not showing the same location as the server you have input in your router settings; this is because geo tracking tools are often tricked by VPN connections. As long as you see an IP address that is not the same as your normal Internet IP address then you are indeed connected to Hotspot Shield.

Back up your settings

Navigate to Administration > Backup

  1. Click the Backup button.
  2. A file named nvrambak.bin will be saved to your computer.
  3. You can load nvrambak.bin to restore your settings in the event of a reset.

How to change the Hotspot Shield server

  1. Follow the instructions for obtaining the OpenVPN information from above.
  2. Enter the new Server Address in the Server IP/Name field.
  3. Enter the new Username and Password.
  4. Enter the new Public Client Cert and Private Client Key.
  5. Click Apply Settings.

TROUBLESHOOTING

Still having issues? Visit the VPN Troubleshooting section.

Troubleshoot Here

ProtonVPN Setup Guide for GL.iNet Routers

Dave · Mar 23, 2026 ·

You can connect to ProtonVPN on your GL.iNet router using Wireguard or OpenVPN.

Quick Options

  • Wireguard: Download your preferred server .conf configuration file from the ProtonVPN website.

  • OpenVPN: Download your preferred server .ovpn configuration file from the ProtonVPN website.

:point_right: If you are not already a ProtonVPN user Sign Up Now.

ProtonVPN Wireguard Setup for GLiNet (Recommended)

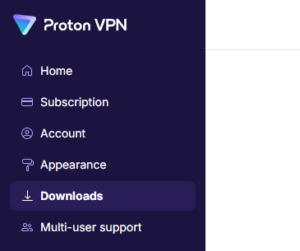
1. Login to your ProtonVPN account and go to the Downloads section of your ProtonVPN account page

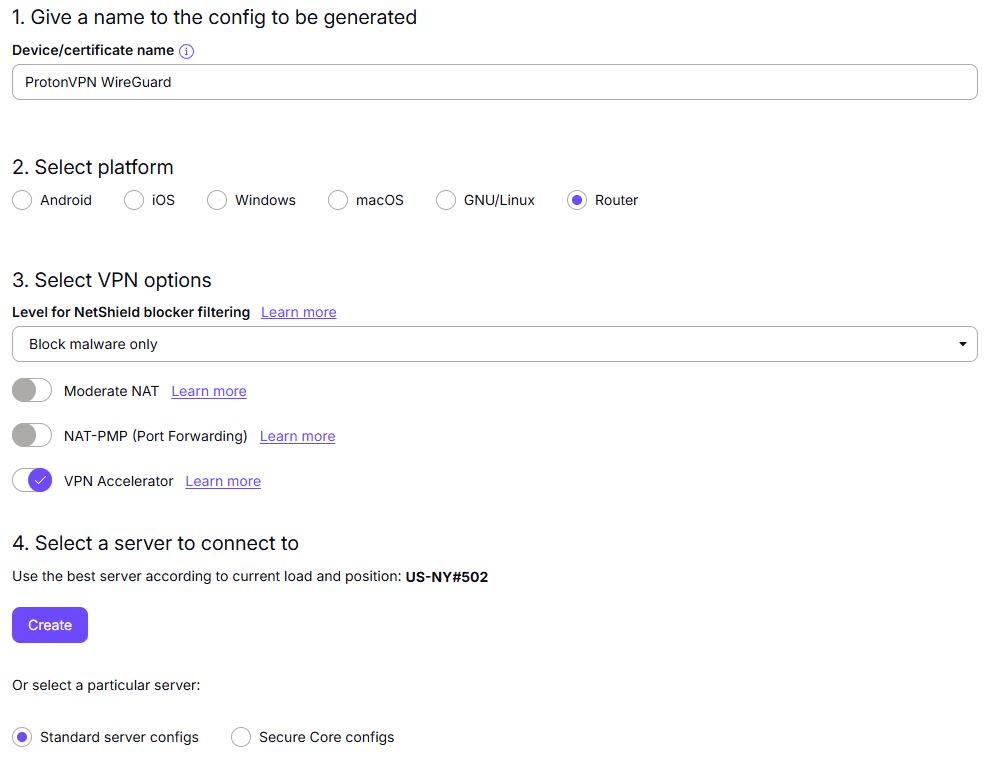
2. Scroll down to find the WireGuard configuration section. Name your configuration and then select Router as the platform, and select Standard server configs.

3. Click Create button to choose the recommended server or scroll down to choose and Download any of the available server files from the list.

4.  Login to GL.iNet firmware settings (usually 192.168.8.1) in a browser on any computer or smart device connected to the GL.iNet FlashRouter’s network.

View our guide for more instructions on how to access GL.iNet firmware settings.

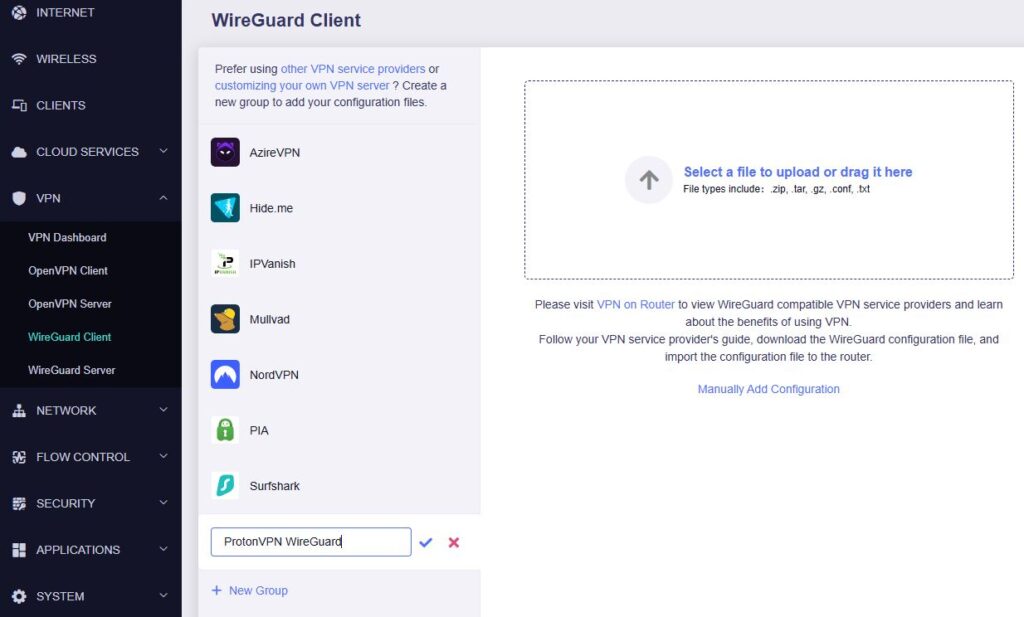
5. Navigate to the VPN tab and select WireGuard Client then click + New Group and name your connection and click the check to save.

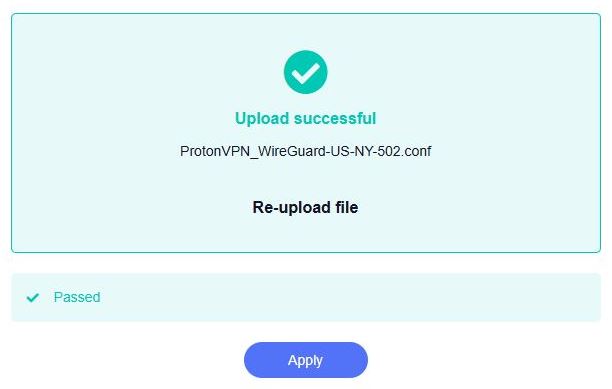
6. Upload the configuration file and click Apply.

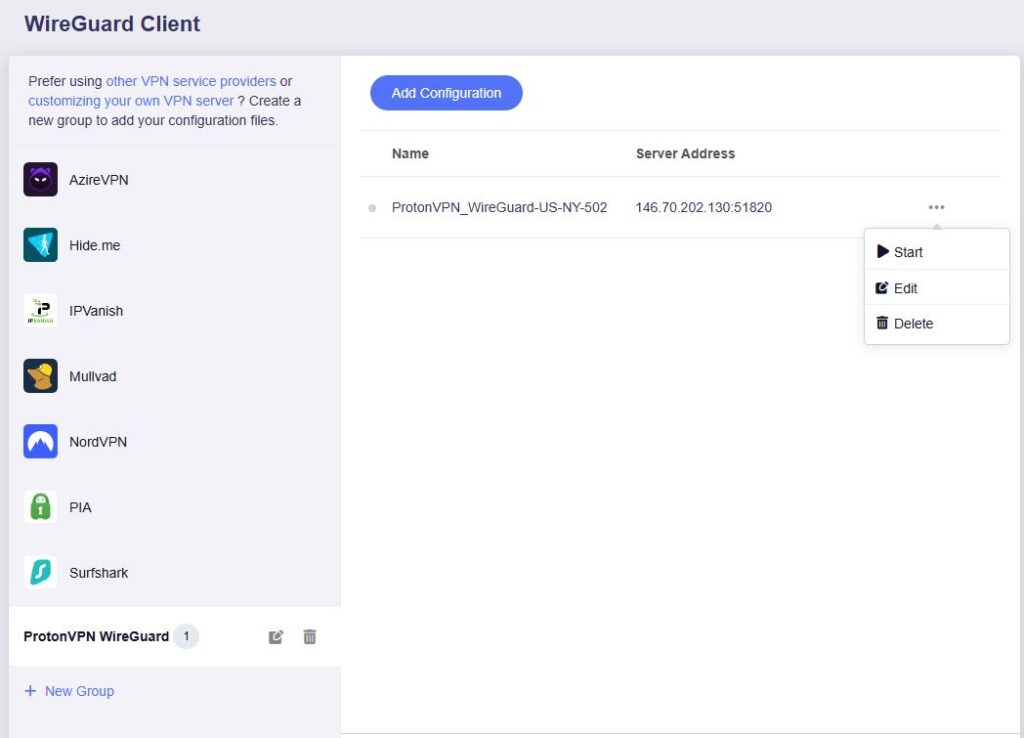
7. Start a connection by clicking the 3 dots (…) > Start next to your chosen server.

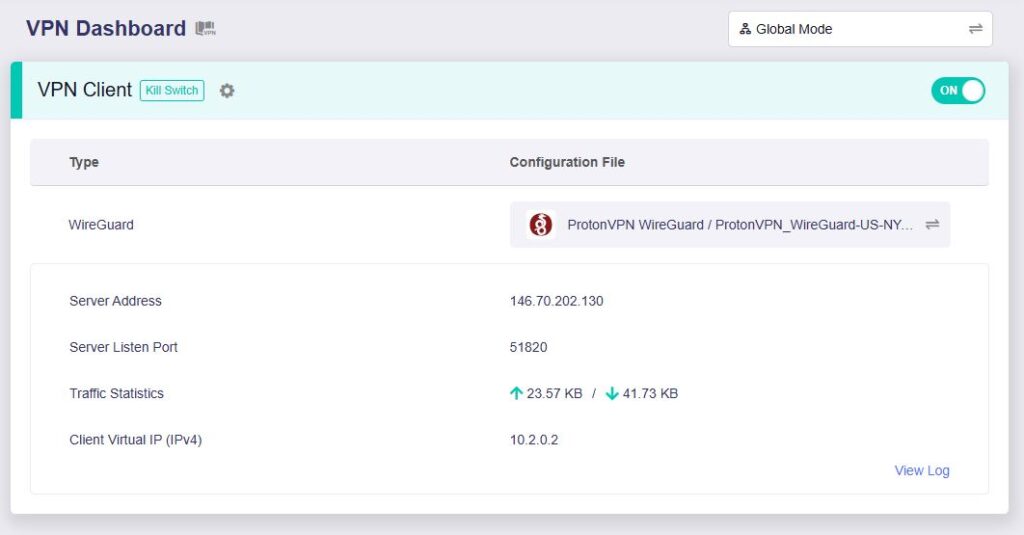
8. A green dot confirms success. You can also switch between Global Mode or Policy Mode for routing in the VPN Dashboard.

ProtonVPN OpenVPN Setup for GLiNet

1. Log in to your ProtonVPN account and navigate to the Account tab. Scroll down to find your OpenVPN specific Username and Password.

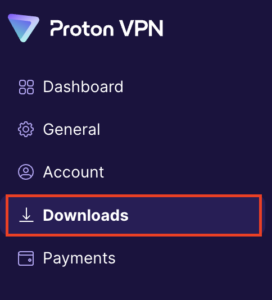
2. Go to the Downloads section of your ProtonVPN account page

ProtonVPN Downloads

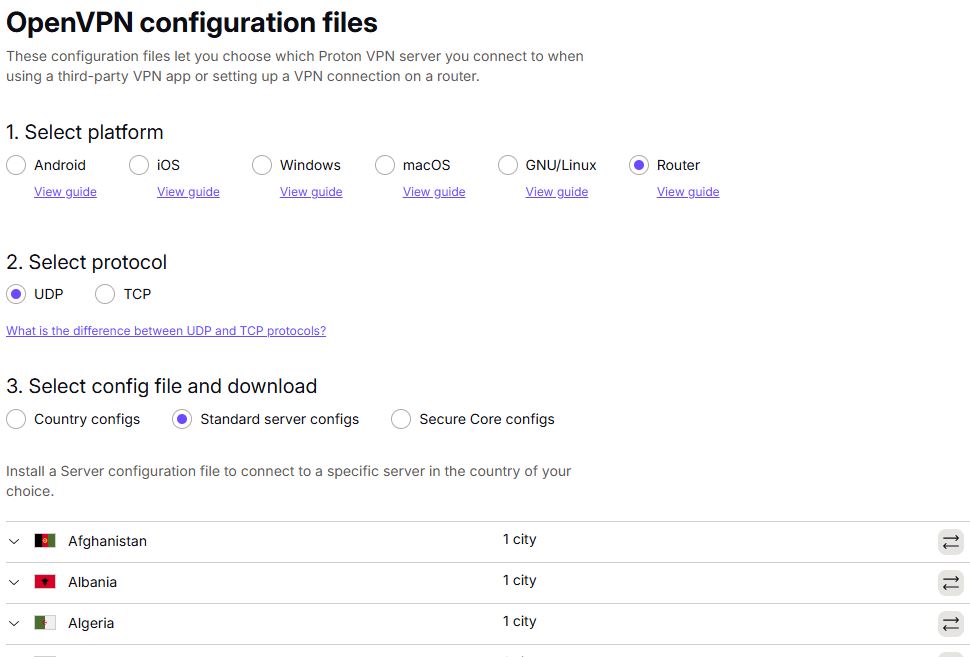
3. Scroll down to find the OpenVPN configuration Files. Select Router as the platform, UDP as the protocol, and select Standard server configs. Choose your preferred country and download the configuration file.

4. Login to GL.iNet firmware settings (usually 192.168.8.1) in a browser on any computer or smart device connected to the GL.iNet FlashRouter’s network.

View our guide for more instructions on how to access GL.iNet firmware settings.

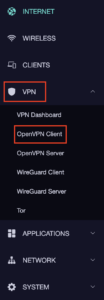
5. Navigate to the VPN tab and select OpenVPN Client.

GL.iNet VPN OpenVPN Client

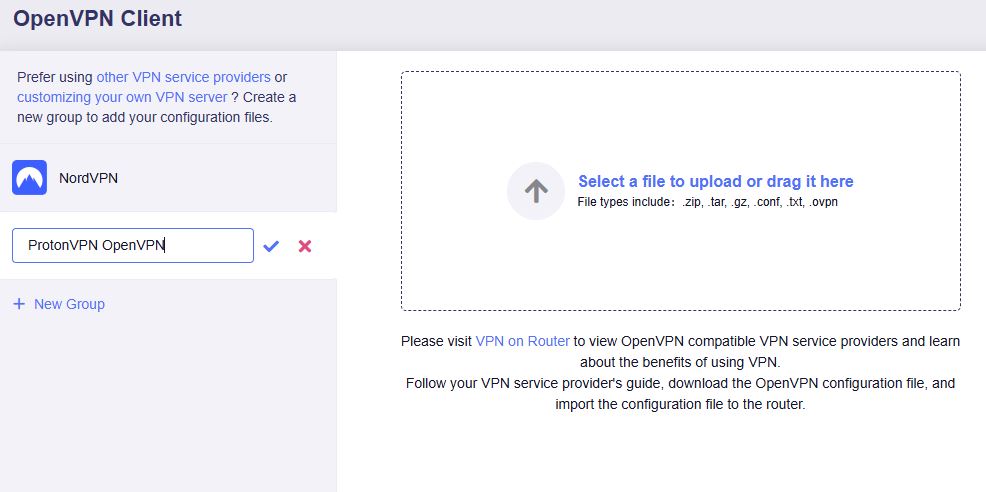
6. Select Add Manually then click + New Group and name your connection and click the check to save.

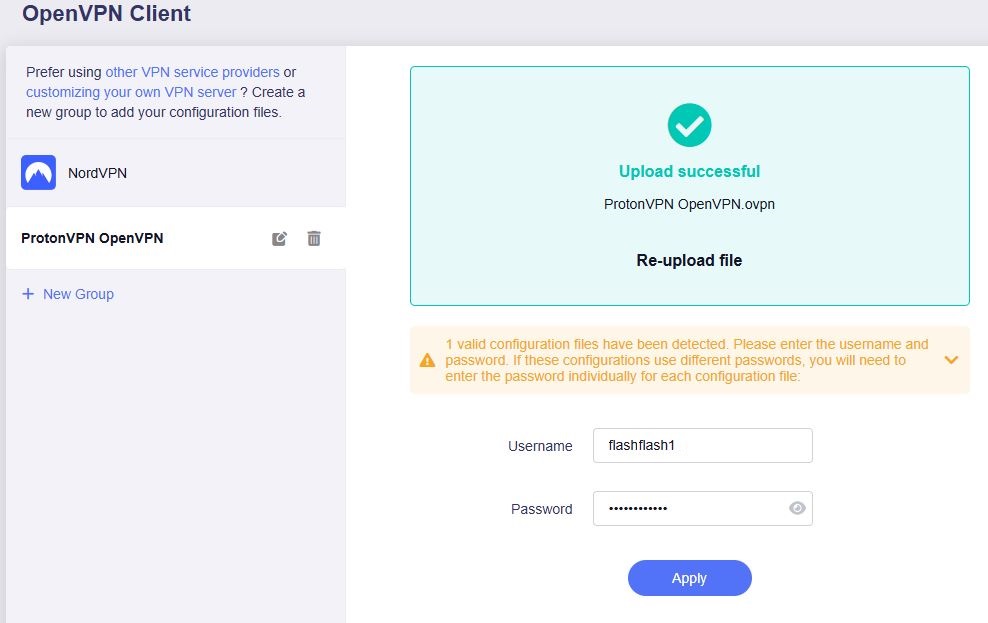
7. Upload the configuration file and input your username and password, click Apply.

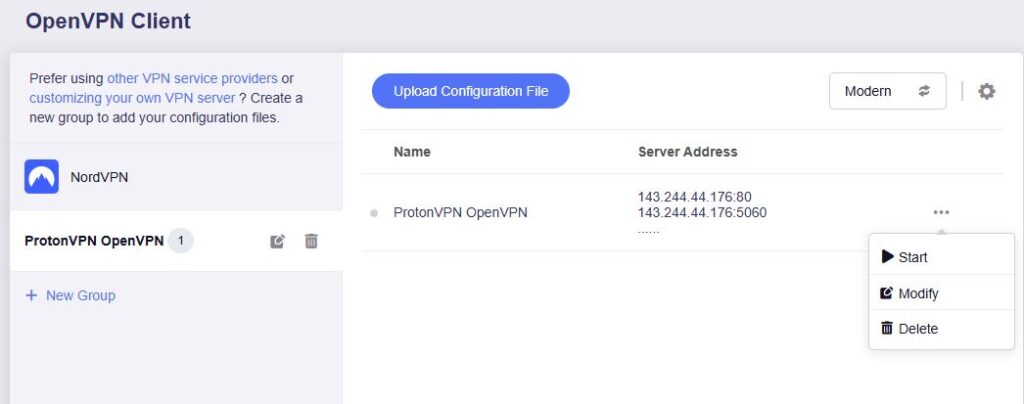
8. Start a connection by clicking the 3 dots (…) > Start next to your chosen server.

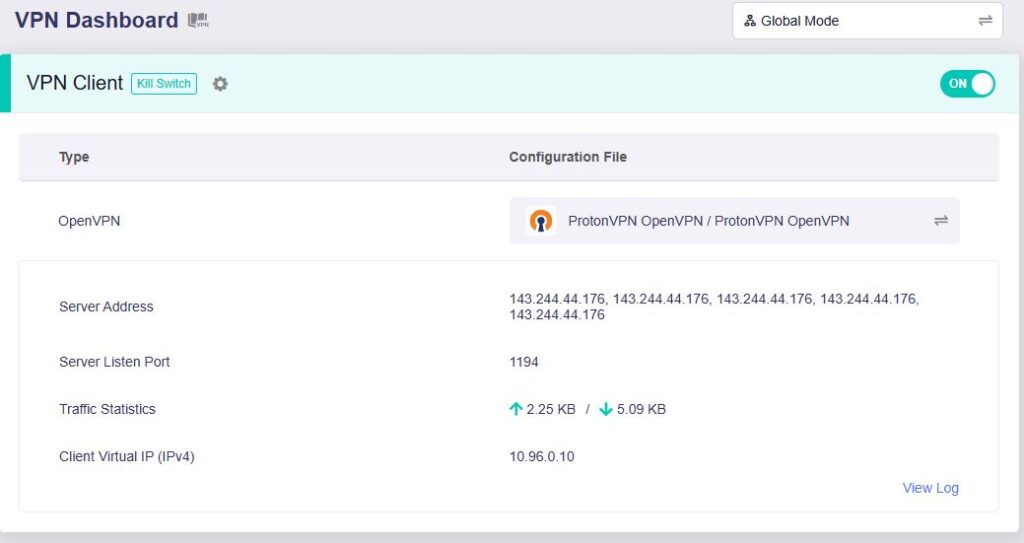
9. A green dot confirms success. You can also switch between Global Mode or Policy Mode for routing in the VPN Dashboard.

  1. You should now see information appear in the Server Address, Server Listen Port, Traffic Statistics, and Client Virtual IP areas.
  2. Visit ProtonVPN’s IP Check to verify your new IP address and virtual location.

In some cases you may notice that the location is not showing the same location as the server you have input in your router settings; this is because geo tracking tools are often tricked by VPN connections. As long as you see an IP address that is not the same as your normal Internet IP address then you are indeed connected to ProtonVPN.

🚫📱Do not run ProtonVPN apps on devices connected to your ProtonVPN router. Using the app at the same time as the router VPN may cause conflicts and connection issues.

Still having issues?

Feel free to submit a ticket and we will get back to you as soon as possible.

CyberGhost Merlin OpenVPN Setup

TeamFlashRouters · Mar 30, 2023 ·

Preparing for CyberGhost Setup

Obtain your CyberGhost OpenVPN information

If you are not already a CyberGhost user Sign Up Now.

1. Log in to your account on the CyberGhost website.

CyberGhost Website Login

2. Select VPN.

CyberGhost VPN

3. Click Configure New Device.

CyberGhost Configure Device

4. Set Protocol to OpenVPN. Select the Country you would like to connect to. Select the Server Group. Name the device in the Device Name field. Click Save Configuration.

CyberGhost protocol and location

5. Press View configuration.

CyberGhost view configuration

6. Copy the Username, and Password that appear to a notepad, since you will need this information later in the setup process. Click Download Configuration.

CyberGhost Website OpenVPN Configuration Files Generator 1

Open the folder that was downloaded. Then open the ca.crt the client.crt, and client.key files with NotePad++ for Windows or TextEdit for Apple. All CyberGhost servers have different keys and certificates.

Merlin Router Setup for CyberGhost

Login to Asus Merlin firmware settings in a browser on any computer or smart device connected to the Merlin FlashRouter’s network.

1. Navigate to the VPN tab.

Merlin VPN Tab

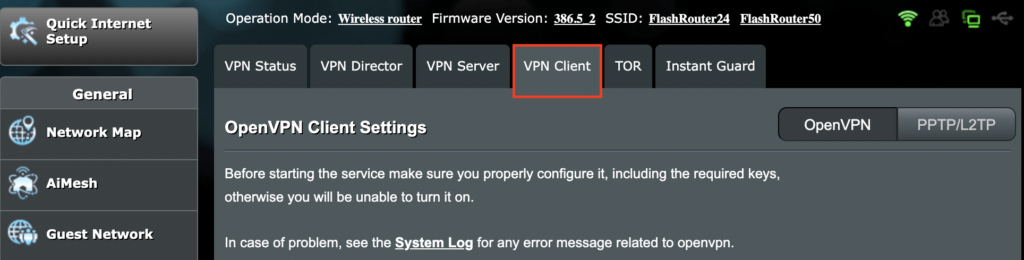
2. Navigate to the VPN Client tab.

Merlin VPN Client Tab

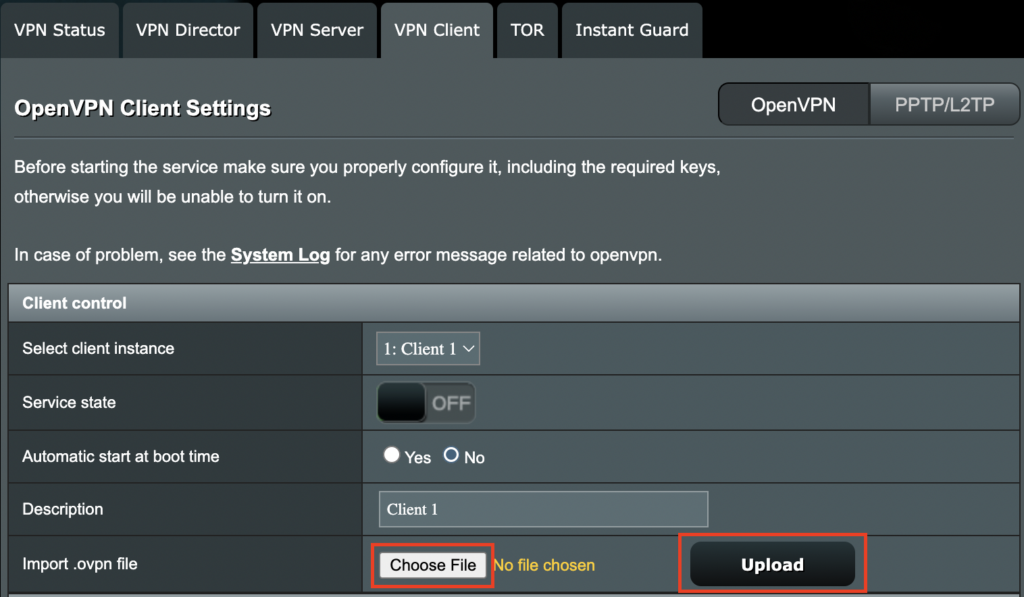
3. Click Choose file and select the .ovpn file from the folder you downloaded earlier. Then click Upload.

Merlin Choose File Upload

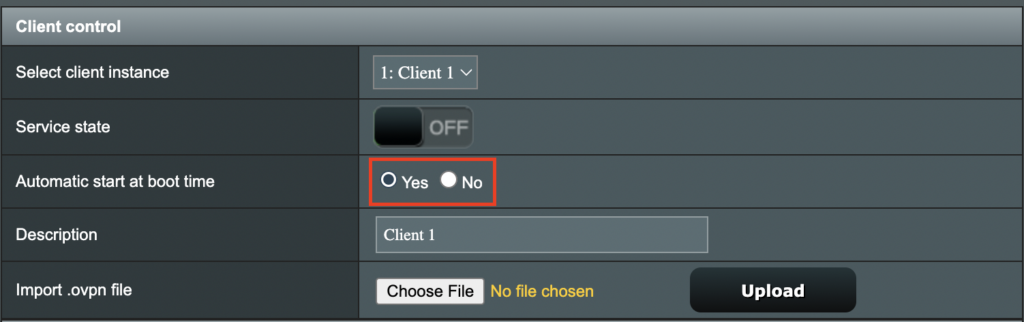
4. Set Automatic Start at boot time to Yes if you want the VPN connection to begin automatically when the router is powered off and back on.

Merlin Automatic Start at boot time

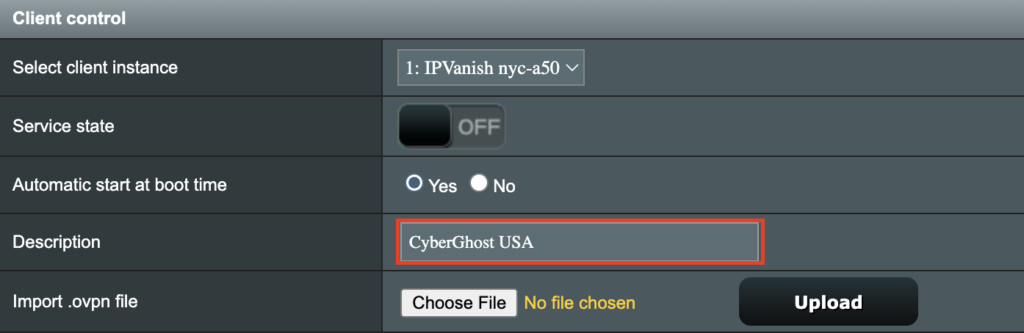
5. In the Description field enter in the name you’d like to use for this OpenVPN Client profile. We typically advise entering in the location here. Our example server was in USA so I have entered in CyberGhost USA.

Merlin CyberGhost Description field

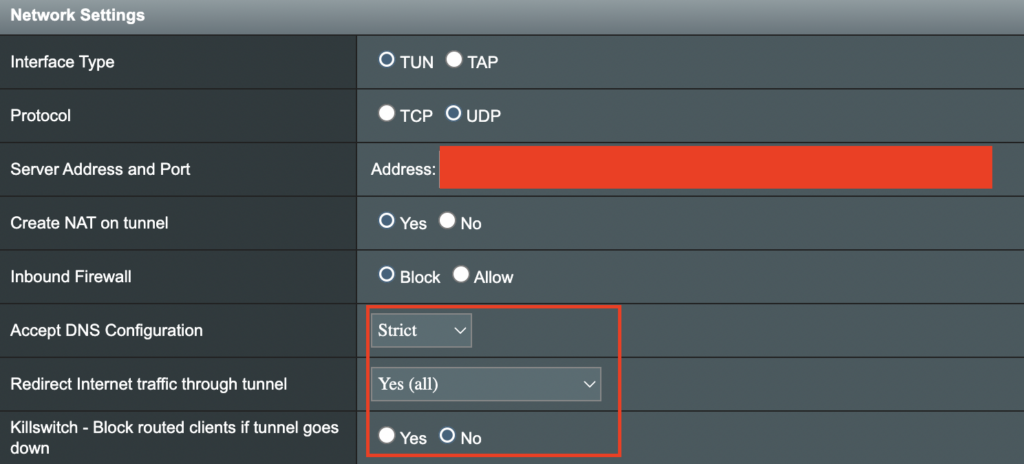
6. Set Accept DNS Configuration to Strict. Set Redirect Internet traffic through tunnel to Yes (all). Set Kill Switch to Yes or No depending on if you want the Internet to be killed if the VPN connection drops.

Merlin Accept DNS configuration Redirect Internet and Kill Switch

If you only want certain devices to connect to the OpenVPN Client profile you are setting up instead of all the devices connected to the FlashRouter’s network please set the Redirect Internet traffic through tunnel to VPN Director. Then complete the instructions on this page and then view our VPN Director guide.

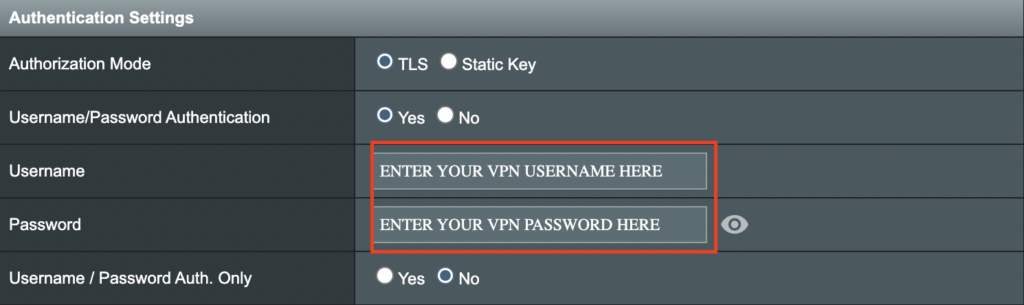
7. Enter your CyberGhost OpenVPN username and password that you obtained earlier. Do not enter your account login.

Merlin VPN Username and Password

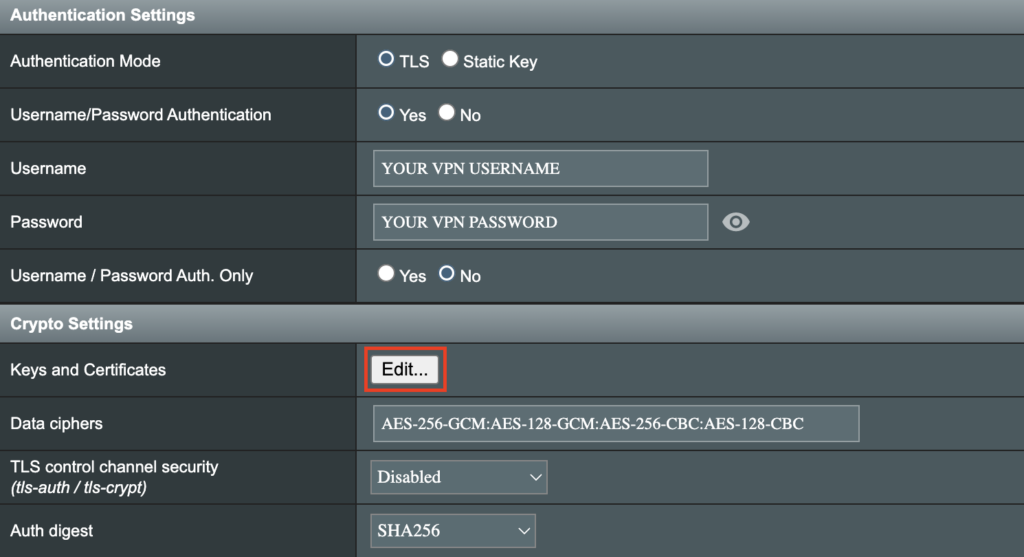
8. Click the Edit button in the Keys and Certificates area.

Merlin Keys and Certificates Edit button

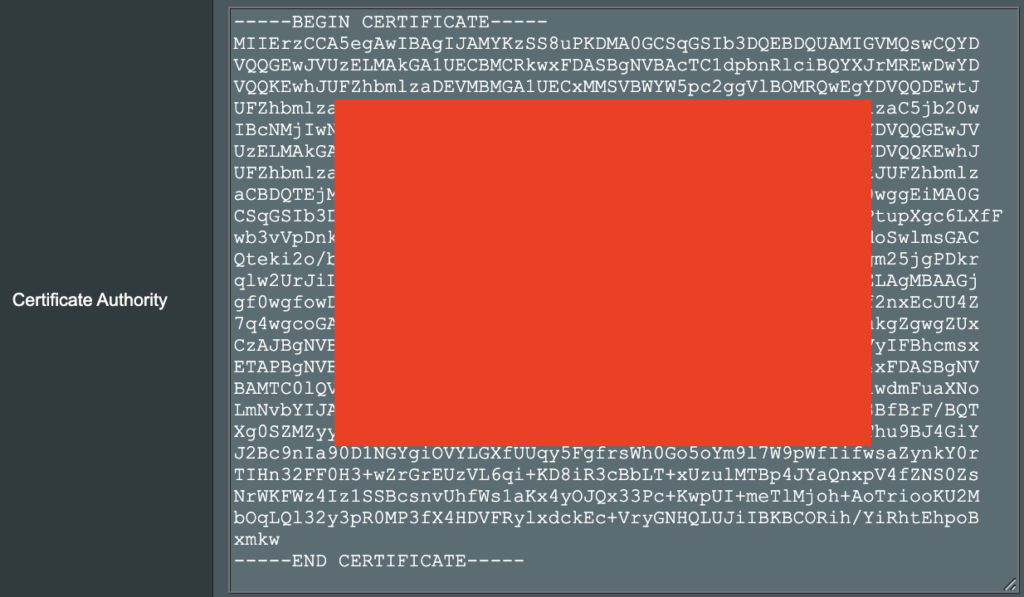
9. In the Certificate Authority field paste in the entire content of the ca.crt file.

—– BEGIN xxx —– / —– END xxx —– block (including those two lines).

Merlin Certificate Authority

10. In the Client Certificate field paste in the entire content of the client.crt file.

—– BEGIN xxx —– / —– END xxx —– block (including those two lines).

Merlin Client Certificate

11. In the Client Key field paste in the entire content of the client.key file.

—– BEGIN xxx —– / —– END xxx —– block (including those two lines).

Merlin Client Key

12. Click Save at the bottom of that window.

13. Click Apply at the bottom of the page.

14. At the top of the page set the Service State toggle to ON to activate the VPN connection.

Merlin Service State All Providers

Verify a successful CyberGhost connection

  1. You should now see a CONNECTED message.
  2. Visit What is my IP Address from a private/incognito browser to verify your new IP address and virtual location.

TROUBLESHOOTING

Still having issues? Visit the FR Privacy App Troubleshooting section.

Troubleshoot Here

ProtonVPN Merlin WireGuard Setup

TeamFlashRouters · Mar 30, 2023 ·

Preparing for ProtonVPN Merlin Setup

Download your ProtonVPN .conf file

If you are not already an ProtonVPN user Sign Up Now.

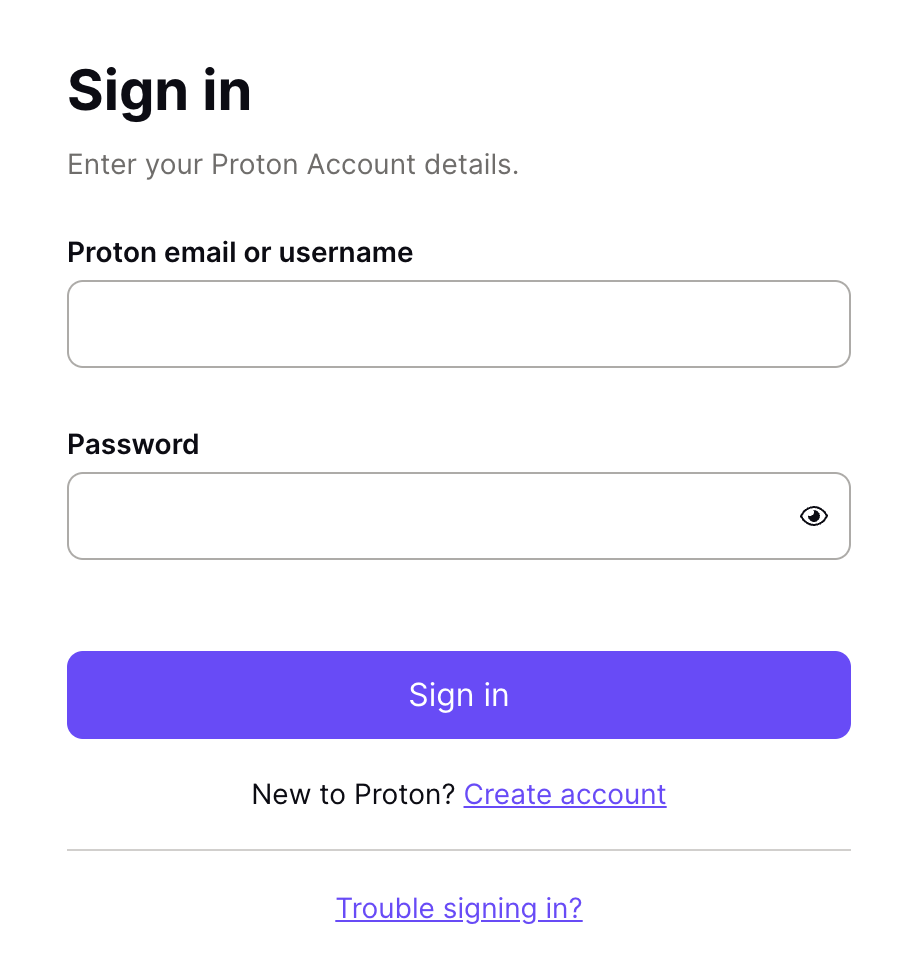
1. Log in to your account on the ProtonVPN website.

ProtonVPN Account Sign in

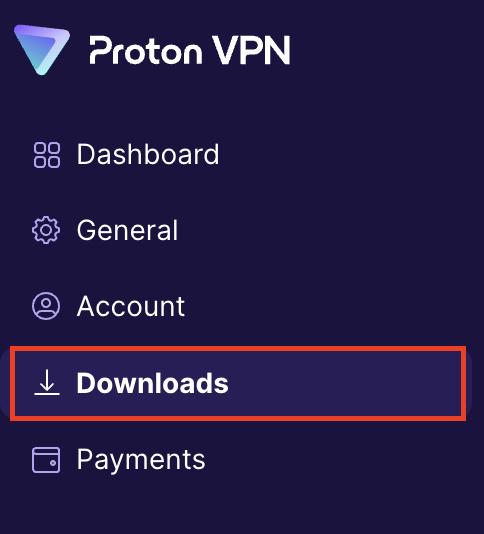
2. Click Downloads.

ProtonVPN Downloads

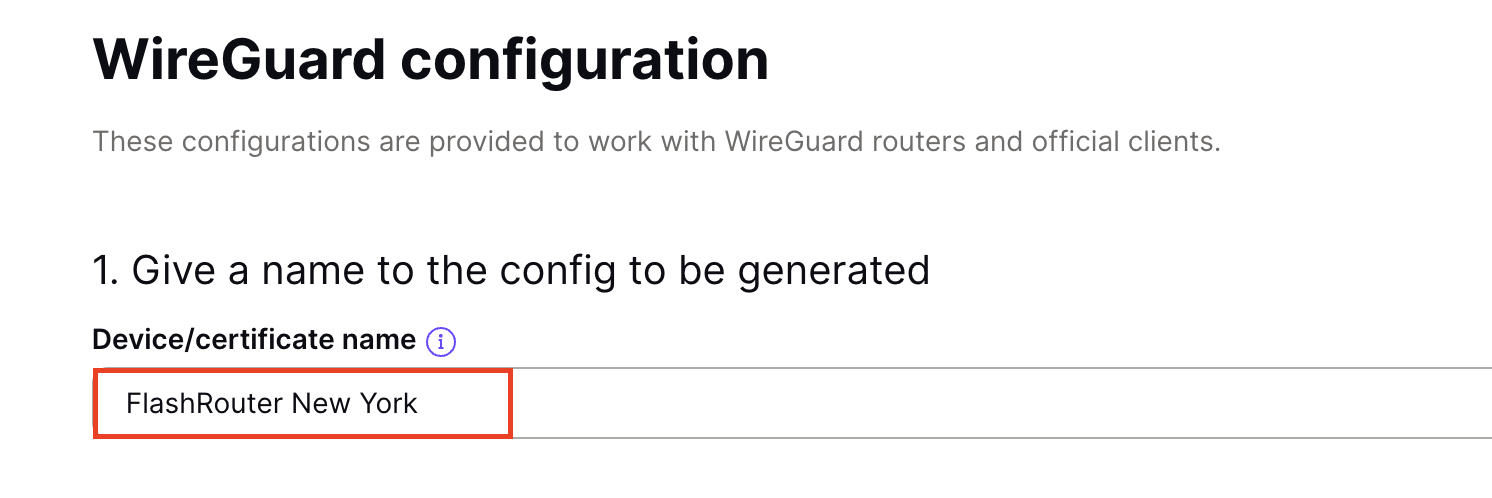
3. Scroll down to WireGuard configuration and name the device FlashRouter.

ProtonVPN WireGuard Configuration Name

4. Select Router as the platform.

ProtonVPN WireGuard select Platform

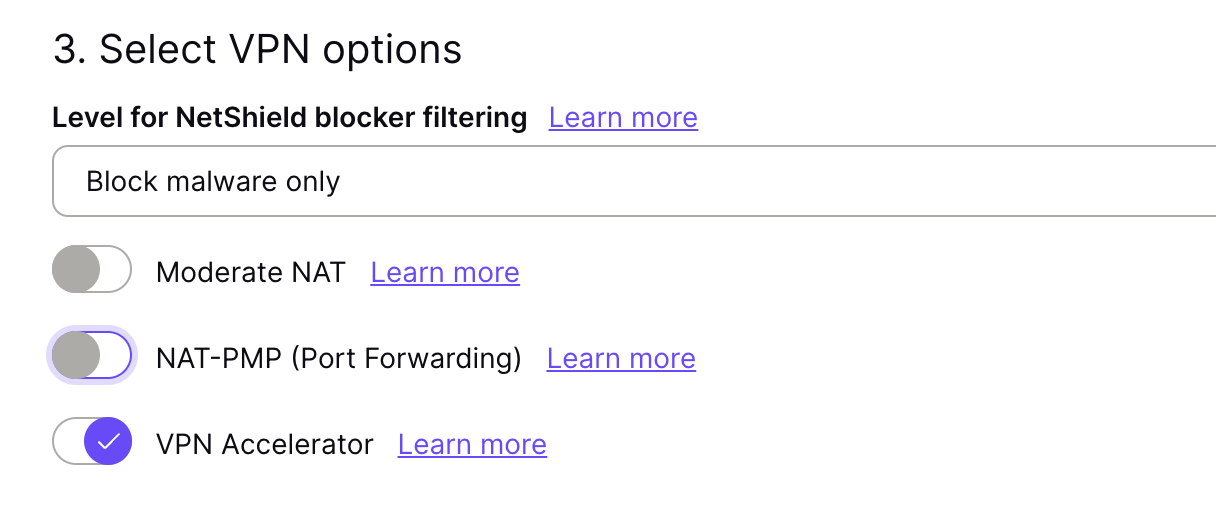
5. Select the VPN options that best fit your needs. We typically use the settings as seen in the screenshot here if you are unsure.

ProtonVPN WireGuard VPN options

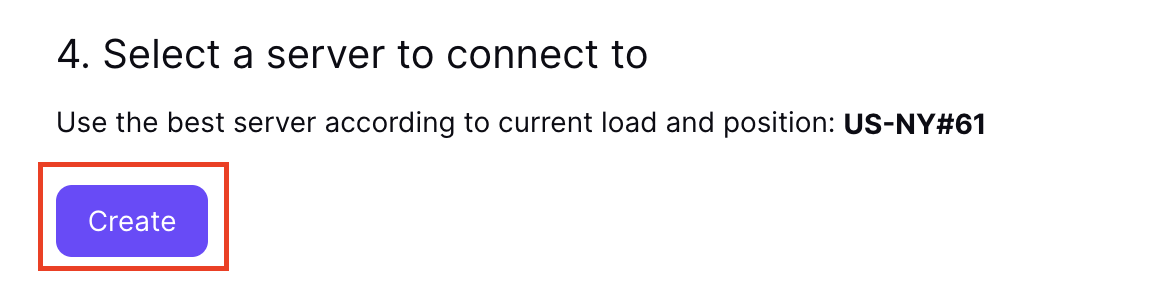
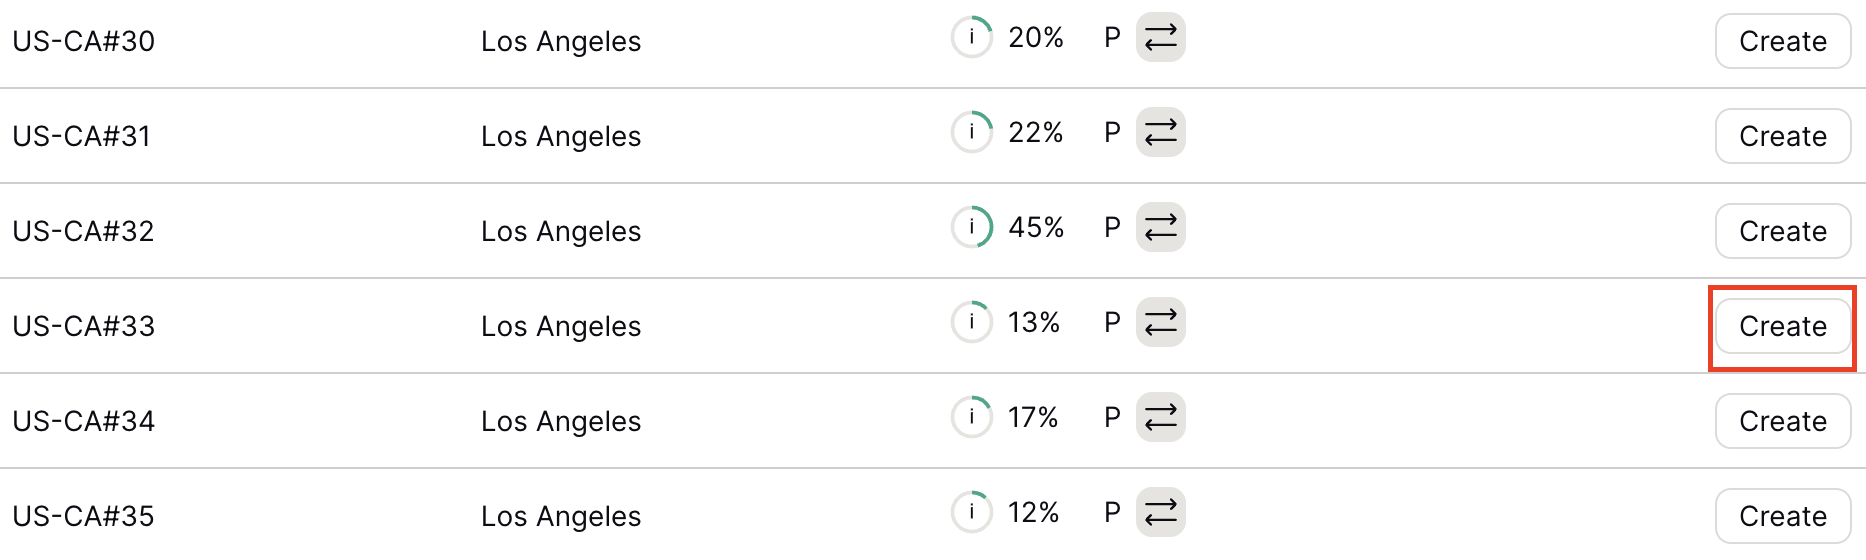
6. Next select the server that you would like to connect to and click Create. At the top of the page you’ll see ProtonVPN’s recommended server which we recommend using unless you need to connect to a specific location.

If you need a specific server location find it in the list and click Create.

ProtonVPN WireGuard recommended server
ProtonVPN WireGuard specific server

7. After clicking Create a new window will appear. Click Download to download the .conf file to your computer.

Merlin Router Setup for ProtonVPN

Login to Asus Merlin firmware settings in a browser on any computer or smart device connected to the Merlin FlashRouter’s network.

1. Navigate to the VPN tab.

Merlin VPN Tab

2. Navigate to the VPN Client tab.

Merlin VPN Client Tab

3. Select WireGuard as the VPN Protocol.

Merlin VPN Client WireGuard

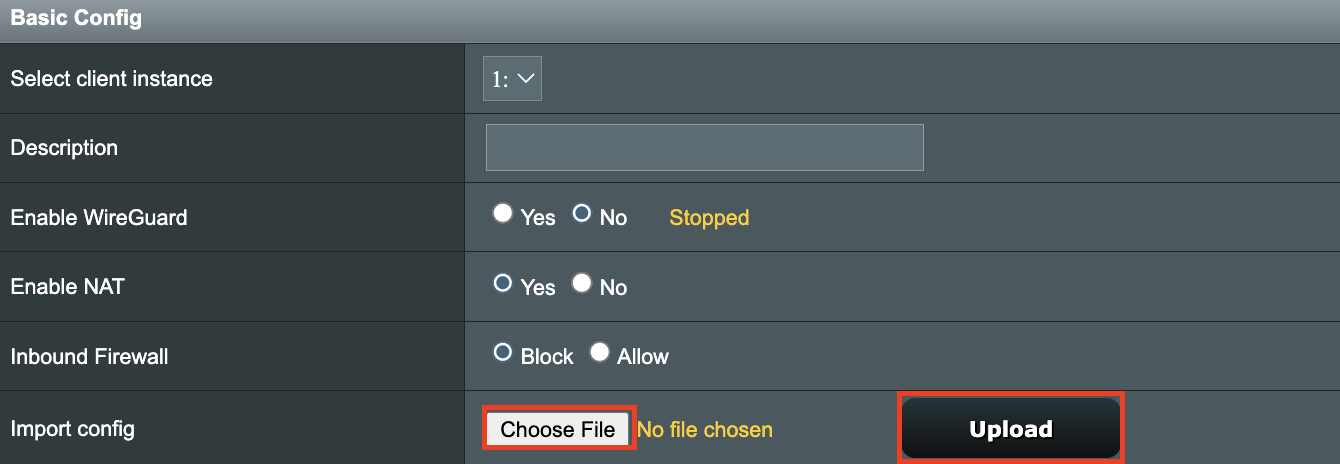
4. Click Choose file and select the .conf file you downloaded earlier. Then click Upload.

Merlin WireGuard Choose File Upload

5. In the Description field enter in the name you’d like to use for this WireGuard Client profile. We typically advise entering in the location here. Our example server was in US-NY#61 so I have entered in ProtonVPN NY-61.

Merlin WireGuard ProtonVPN Description

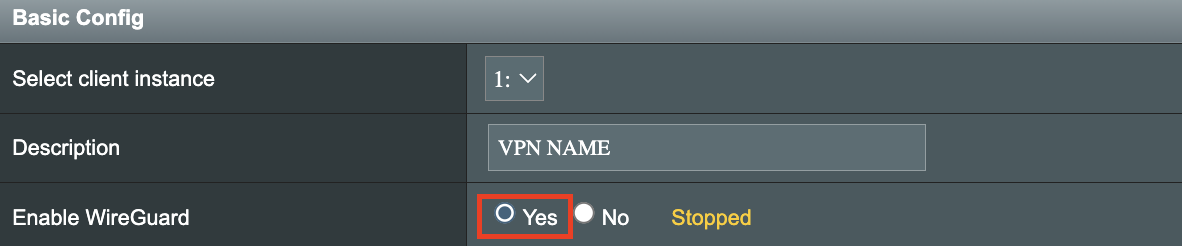
6. Set Enable WireGuard to Yes.

Merlin Enable WireGuard

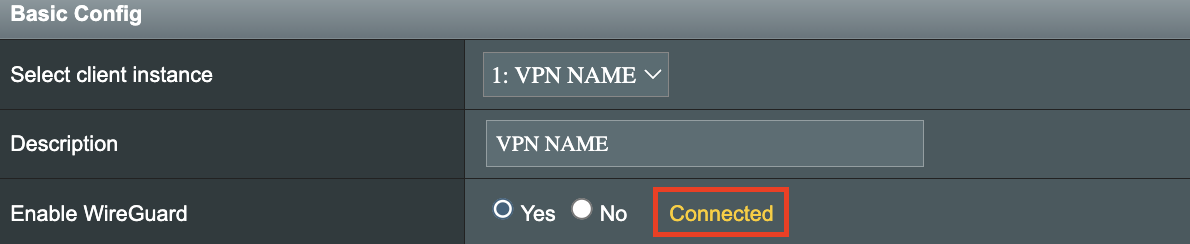
7. Click Apply at the bottom of the page and you should then see a Connected message appear.

Merlin WireGuard Connected

8. By default no devices are assigned to the new active WireGuard connection profile. Click the VPN Director tab to assign specific devices to the new WireGuard profile. Your IP will not be changed on your devices yet.

WireGuard select VPN Director

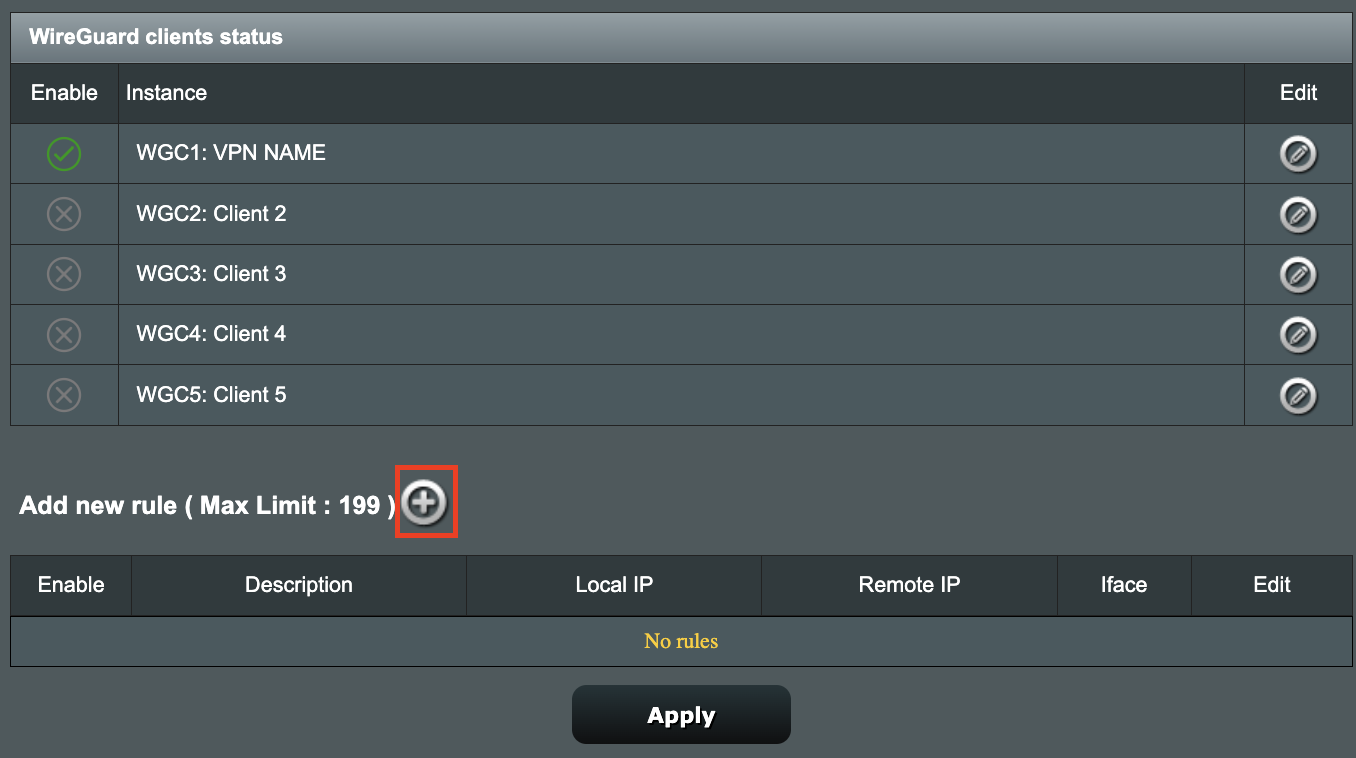
9. On the VPN Director page click the + symbol next to Add new rule.

WireGuard VPN Director Add new rule

10. Select the new WireGuard profile in the Interface dropdown.

WireGuard VPN Director select Interface

11. In the Local IP field enter in 192.168.50.0/24 if you want ALL devices connected to the FlashRouter’s network to use the WireGuard VPN connection. Click OK.

If you only want certain devices to connect to the WireGuard Client profile you have setting up instead of all the devices connected to the FlashRouter’s network please complete the instructions on our VPN Director guide.

12. Then click Apply at the bottom of the page.

Verify a successful ProtonVPN connection

Visit ProtonVPN’s IP Check from a private/incognito browsing window to verify your new IP address and virtual location.

In some cases you may notice that the location is not showing the same location as the server you have input in your router settings; this is because geo tracking tools are often tricked by VPN connections. As long as you see an IP address that is not the same as your normal Internet IP address then you are indeed connected to ProtonVPN.

How to change the ProtonVPN server

  1. Follow the steps at the top of the page to obtain a new .conf file.
  2. Then proceed with the settings same as initial setup.

TROUBLESHOOTING

Still having issues? Visit the VPN Troubleshooting section.

Troubleshoot Here

PrivateInternetAccess (PIA) Manual OpenVPN Setup

TeamFlashRouters · Apr 5, 2019 ·

Preparing for Manual PIA Setup

Verify your PIA login information

If you are not already a PIA user Sign Up Now.

Log in to your account on the PIA website.

FlashRouters Privacy App - PIA Login

PIA Server Addresses

The below servers are the only servers compatible with PIA router connections. Dedicated IP Addresses are not able to connect via routers.

United States

us-california.privacy.network
us-newjersey.privacy.network
us-chicago.privacy.network
us-texas.privacy.network
us-florida.privacy.network
us-seattle.privacy.network
us3.privacy.network
us-siliconvalley.privacy.network
us-newyorkcity.privacy.network
us-washingtondc.privacy.network
us-atlanta.privacy.network
us-houston.privacy.network
us-denver.privacy.network

United Kingdom

uk-london.privacy.network
uk-manchester.privacy.network

Canada

ca-toronto.privacy.network
ca-montreal.privacy.network

Australia

au-sydney.privacy.network
aus-melbourne.privacy.network
aus-perth.privacy.network

Germany

de-berlin.privacy.network
de-frankfurt.privacy.network

Rest of the World

ae.privacy.network
austria.privacy.network
dz.privacy.network
ad.privacy.network
ar.privacy.network
yerevan.privacy.network
bahamas.privacy.network
bangladesh.privacy.network
brussels.privacy.network
sofia.privacy.network
cambodia.privacy.network
china.privacy.network
cyprus.privacy.network
czech.privacy.network
denmark.privacy.network
egypt.privacy.network
fi.privacy.network
france.privacy.network
georgia.privacy.network
greenland.privacy.network
hungary.privacy.network
is.privacy.network
in.privacy.network
iran.privacy.network
ireland.privacy.network
man.privacy.network
israel.privacy.network
italy.privacy.network
japan.privacy.network
kazakhstan.privacy.network
liechtenstein.privacy.network
lu.privacy.network
macau.privacy.network
malta.privacy.network
mexico.privacy.network
md.privacy.network
monaco.privacy.network
mongolia.privacy.network
montenegro.privacy.network
morocco.privacy.network
nl-amsterdam.privacy.network
nz.privacy.network
nigeria.privacy.network
no.privacy.network
panama.privacy.network
philippines.privacy.network
poland.privacy.network
qatar.privacy.network
ro.privacy.network
rs.privacy.network
saudiarabia.privacy.network
spain.privacy.network
srilanka.privacy.network
sweden.privacy.network
swiss.privacy.network
sg.privacy.network
tr.privacy.network
taiwan.privacy.network
ua.privacy.network
venezuela.privacy.network
vietnam.privacy.network
za.privacy.network

DD-WRT Router Setup for PIA

Navigate to Services > VPN

PIA offers two different Encryption levels.
Default Encryption (AES-128) typically provides faster speeds.
Strong Encryption (AES-256) provides stronger encryption.
Follow the table below of the one that fits your needs.

Enter PIA settings (Default Encryption)

OpenVPN Client

Start OpenVPN Client

If you wish to disable your VPN connection simply set this to Disable at any time and click Apply Settings.

Server IP/Name

Copy and paste the server you would like to connect to from the server list above. Be sure there are no extra spaces or characters.

If you wish to change PIA connection locations, THIS IS THE ONLY FIELD YOU NEED TO CHANGE.

Port

1198

Tunnel Device

TUN

Tunnel Protocol

UDP

Encryption cipher

AES-128-CBC

Hash Algorithm

SHA1

First Data Cipher

Not set

Second Data Cipher

Not set

Third Data Cipher

Not set

Userpass Authentication

Enable

Username

Enter the Username you successfully logged in to your PIA account with.

Password

Enter the Password you successfully logged in to your PIA account with.

Advanced Options

Enable

TLS Cipher

None

LZO Compression

Disabled

NAT

Enable

Firewall Protection

Enable

Additional Config

persist-key
persist-tun

Policy Based Routing

This field can be used for split VPN and Dual Gateway routing.

CA Cert

-----BEGIN CERTIFICATE-----
MIIFqzCCBJOgAwIBAgIJAKZ7D5Yv87qDMA0GCSqGSIb3DQEBDQUAMIHoMQswCQYD
VQQGEwJVUzELMAkGA1UECBMCQ0ExEzARBgNVBAcTCkxvc0FuZ2VsZXMxIDAeBgNV
BAoTF1ByaXZhdGUgSW50ZXJuZXQgQWNjZXNzMSAwHgYDVQQLExdQcml2YXRlIElu
dGVybmV0IEFjY2VzczEgMB4GA1UEAxMXUHJpdmF0ZSBJbnRlcm5ldCBBY2Nlc3Mx
IDAeBgNVBCkTF1ByaXZhdGUgSW50ZXJuZXQgQWNjZXNzMS8wLQYJKoZIhvcNAQkB
FiBzZWN1cmVAcHJpdmF0ZWludGVybmV0YWNjZXNzLmNvbTAeFw0xNDA0MTcxNzM1
MThaFw0zNDA0MTIxNzM1MThaMIHoMQswCQYDVQQGEwJVUzELMAkGA1UECBMCQ0Ex
EzARBgNVBAcTCkxvc0FuZ2VsZXMxIDAeBgNVBAoTF1ByaXZhdGUgSW50ZXJuZXQg
QWNjZXNzMSAwHgYDVQQLExdQcml2YXRlIEludGVybmV0IEFjY2VzczEgMB4GA1UE
AxMXUHJpdmF0ZSBJbnRlcm5ldCBBY2Nlc3MxIDAeBgNVBCkTF1ByaXZhdGUgSW50
ZXJuZXQgQWNjZXNzMS8wLQYJKoZIhvcNAQkBFiBzZWN1cmVAcHJpdmF0ZWludGVy
bmV0YWNjZXNzLmNvbTCCASIwDQYJKoZIhvcNAQEBBQADggEPADCCAQoCggEBAPXD
L1L9tX6DGf36liA7UBTy5I869z0UVo3lImfOs/GSiFKPtInlesP65577nd7UNzzX
lH/P/CnFPdBWlLp5ze3HRBCc/Avgr5CdMRkEsySL5GHBZsx6w2cayQ2EcRhVTwWp
cdldeNO+pPr9rIgPrtXqT4SWViTQRBeGM8CDxAyTopTsobjSiYZCF9Ta1gunl0G/
8Vfp+SXfYCC+ZzWvP+L1pFhPRqzQQ8k+wMZIovObK1s+nlwPaLyayzw9a8sUnvWB
/5rGPdIYnQWPgoNlLN9HpSmsAcw2z8DXI9pIxbr74cb3/HSfuYGOLkRqrOk6h4RC
OfuWoTrZup1uEOn+fw8CAwEAAaOCAVQwggFQMB0GA1UdDgQWBBQv63nQ/pJAt5tL
y8VJcbHe22ZOsjCCAR8GA1UdIwSCARYwggESgBQv63nQ/pJAt5tLy8VJcbHe22ZO
sqGB7qSB6zCB6DELMAkGA1UEBhMCVVMxCzAJBgNVBAgTAkNBMRMwEQYDVQQHEwpM
b3NBbmdlbGVzMSAwHgYDVQQKExdQcml2YXRlIEludGVybmV0IEFjY2VzczEgMB4G
A1UECxMXUHJpdmF0ZSBJbnRlcm5ldCBBY2Nlc3MxIDAeBgNVBAMTF1ByaXZhdGUg
SW50ZXJuZXQgQWNjZXNzMSAwHgYDVQQpExdQcml2YXRlIEludGVybmV0IEFjY2Vz
czEvMC0GCSqGSIb3DQEJARYgc2VjdXJlQHByaXZhdGVpbnRlcm5ldGFjY2Vzcy5j
b22CCQCmew+WL/O6gzAMBgNVHRMEBTADAQH/MA0GCSqGSIb3DQEBDQUAA4IBAQAn
a5PgrtxfwTumD4+3/SYvwoD66cB8IcK//h1mCzAduU8KgUXocLx7QgJWo9lnZ8xU
ryXvWab2usg4fqk7FPi00bED4f4qVQFVfGfPZIH9QQ7/48bPM9RyfzImZWUCenK3
7pdw4Bvgoys2rHLHbGen7f28knT2j/cbMxd78tQc20TIObGjo8+ISTRclSTRBtyC
GohseKYpTS9himFERpUgNtefvYHbn70mIOzfOJFTVqfrptf9jXa9N8Mpy3ayfodz
1wiqdteqFXkTYoSDctgKMiZ6GdocK9nMroQipIQtpnwd4yBDWIyC6Bvlkrq5TQUt
YDQ8z9v+DMO6iwyIDRiU
-----END CERTIFICATE-----

CLICK APPLY SETTINGS

Leave all settings not mentioned above as their default setting.

Enter PIA settings (Strong Encryption)

OpenVPN Client

Start OpenVPN Client

If you wish to disable your VPN connection simply set this to Disable at any time and click Apply Settings.

Server IP/Name

Copy and paste the server you would like to connect to from the server list above. Be sure there are no extra spaces or characters.

If you wish to change PIA connection locations, THIS IS THE ONLY FIELD YOU NEED TO CHANGE.

Port

1197

Tunnel Device

TUN

Tunnel Protocol

UDP

Encryption cipher

AES-256-CBC

Hash Algorithm

SHA256

First Data Cipher

Not set

Second Data Cipher

Not set

Third Data Cipher

Not set

Userpass Authentication

Enable

Username

Enter the Username you successfully logged in to your PIA account with.

Password

Enter the Password you successfully logged in to your PIA account with.

Advanced Options

Enable

TLS Cipher

None

LZO Compression

Adaptive

NAT

Enable

Firewall Protection

Enable

Additional Config

persist-key
persist-tun

Policy Based Routing

This field can be used for split VPN and Dual Gateway routing.

CA Cert

-----BEGIN CERTIFICATE-----
MIIHqzCCBZOgAwIBAgIJAJ0u+vODZJntMA0GCSqGSIb3DQEBDQUAMIHoMQswCQYD
VQQGEwJVUzELMAkGA1UECBMCQ0ExEzARBgNVBAcTCkxvc0FuZ2VsZXMxIDAeBgNV
BAoTF1ByaXZhdGUgSW50ZXJuZXQgQWNjZXNzMSAwHgYDVQQLExdQcml2YXRlIElu
dGVybmV0IEFjY2VzczEgMB4GA1UEAxMXUHJpdmF0ZSBJbnRlcm5ldCBBY2Nlc3Mx
IDAeBgNVBCkTF1ByaXZhdGUgSW50ZXJuZXQgQWNjZXNzMS8wLQYJKoZIhvcNAQkB
FiBzZWN1cmVAcHJpdmF0ZWludGVybmV0YWNjZXNzLmNvbTAeFw0xNDA0MTcxNzQw
MzNaFw0zNDA0MTIxNzQwMzNaMIHoMQswCQYDVQQGEwJVUzELMAkGA1UECBMCQ0Ex
EzARBgNVBAcTCkxvc0FuZ2VsZXMxIDAeBgNVBAoTF1ByaXZhdGUgSW50ZXJuZXQg
QWNjZXNzMSAwHgYDVQQLExdQcml2YXRlIEludGVybmV0IEFjY2VzczEgMB4GA1UE
AxMXUHJpdmF0ZSBJbnRlcm5ldCBBY2Nlc3MxIDAeBgNVBCkTF1ByaXZhdGUgSW50
ZXJuZXQgQWNjZXNzMS8wLQYJKoZIhvcNAQkBFiBzZWN1cmVAcHJpdmF0ZWludGVy
bmV0YWNjZXNzLmNvbTCCAiIwDQYJKoZIhvcNAQEBBQADggIPADCCAgoCggIBALVk
hjumaqBbL8aSgj6xbX1QPTfTd1qHsAZd2B97m8Vw31c/2yQgZNf5qZY0+jOIHULN
De4R9TIvyBEbvnAg/OkPw8n/+ScgYOeH876VUXzjLDBnDb8DLr/+w9oVsuDeFJ9K
V2UFM1OYX0SnkHnrYAN2QLF98ESK4NCSU01h5zkcgmQ+qKSfA9Ny0/UpsKPBFqsQ
25NvjDWFhCpeqCHKUJ4Be27CDbSl7lAkBuHMPHJs8f8xPgAbHRXZOxVCpayZ2SND
fCwsnGWpWFoMGvdMbygngCn6jA/W1VSFOlRlfLuuGe7QFfDwA0jaLCxuWt/BgZyl
p7tAzYKR8lnWmtUCPm4+BtjyVDYtDCiGBD9Z4P13RFWvJHw5aapx/5W/CuvVyI7p
Kwvc2IT+KPxCUhH1XI8ca5RN3C9NoPJJf6qpg4g0rJH3aaWkoMRrYvQ+5PXXYUzj
tRHImghRGd/ydERYoAZXuGSbPkm9Y/p2X8unLcW+F0xpJD98+ZI+tzSsI99Zs5wi
jSUGYr9/j18KHFTMQ8n+1jauc5bCCegN27dPeKXNSZ5riXFL2XX6BkY68y58UaNz
meGMiUL9BOV1iV+PMb7B7PYs7oFLjAhh0EdyvfHkrh/ZV9BEhtFa7yXp8XR0J6vz
1YV9R6DYJmLjOEbhU8N0gc3tZm4Qz39lIIG6w3FDAgMBAAGjggFUMIIBUDAdBgNV
HQ4EFgQUrsRtyWJftjpdRM0+925Y6Cl08SUwggEfBgNVHSMEggEWMIIBEoAUrsRt
yWJftjpdRM0+925Y6Cl08SWhge6kgeswgegxCzAJBgNVBAYTAlVTMQswCQYDVQQI
EwJDQTETMBEGA1UEBxMKTG9zQW5nZWxlczEgMB4GA1UEChMXUHJpdmF0ZSBJbnRl
cm5ldCBBY2Nlc3MxIDAeBgNVBAsTF1ByaXZhdGUgSW50ZXJuZXQgQWNjZXNzMSAw
HgYDVQQDExdQcml2YXRlIEludGVybmV0IEFjY2VzczEgMB4GA1UEKRMXUHJpdmF0
ZSBJbnRlcm5ldCBBY2Nlc3MxLzAtBgkqhkiG9w0BCQEWIHNlY3VyZUBwcml2YXRl
aW50ZXJuZXRhY2Nlc3MuY29tggkAnS7684Nkme0wDAYDVR0TBAUwAwEB/zANBgkq
hkiG9w0BAQ0FAAOCAgEAJsfhsPk3r8kLXLxY+v+vHzbr4ufNtqnL9/1Uuf8NrsCt
pXAoyZ0YqfbkWx3NHTZ7OE9ZRhdMP/RqHQE1p4N4Sa1nZKhTKasV6KhHDqSCt/dv
Em89xWm2MVA7nyzQxVlHa9AkcBaemcXEiyT19XdpiXOP4Vhs+J1R5m8zQOxZlV1G
tF9vsXmJqWZpOVPmZ8f35BCsYPvv4yMewnrtAC8PFEK/bOPeYcKN50bol22QYaZu
LfpkHfNiFTnfMh8sl/ablPyNY7DUNiP5DRcMdIwmfGQxR5WEQoHL3yPJ42LkB5zs
6jIm26DGNXfwura/mi105+ENH1CaROtRYwkiHb08U6qLXXJz80mWJkT90nr8Asj3
5xN2cUppg74nG3YVav/38P48T56hG1NHbYF5uOCske19F6wi9maUoto/3vEr0rnX
JUp2KODmKdvBI7co245lHBABWikk8VfejQSlCtDBXn644ZMtAdoxKNfR2WTFVEwJ
iyd1Fzx0yujuiXDROLhISLQDRjVVAvawrAtLZWYK31bY7KlezPlQnl/D9Asxe85l
8jO5+0LdJ6VyOs/Hd4w52alDW/MFySDZSfQHMTIc30hLBJ8OnCEIvluVQQ2UQvoW
+no177N9L2Y+M9TcTA62ZyMXShHQGeh20rb4kK8f+iFX8NxtdHVSkxMEFSfDDyQ=
-----END CERTIFICATE-----

CLICK APPLY SETTINGS

Leave all settings not mentioned above as their default setting.

Verify a successful PIA connection

Navigate to Status > OpenVPN

  1. You should now see a CONNECTED SUCCESS message.
  2. Visit PIA’s IP Check to verify your new IP address and virtual location.

In some cases you may notice that the location is not showing the same location as the server you have input in your router settings; this is because geo tracking tools are often tricked by VPN connections. As long as you see an IP address that is not the same as your normal Internet IP address then you are indeed connected to PIA.

Back up your settings

Navigate to Administration > Backup

  1. Click the Backup button.
  2. A file named nvrambak.bin will be saved to your computer.
  3. You can load nvrambak.bin to restore your settings in the event of a reset.

How to change the PIA server

  1. Copy the new PIA server address from the above server list.
  2. Paste the server into the Server IP/Name field.
  3. Click Apply Settings.

TROUBLESHOOTING

Still having issues? Visit the VPN Troubleshooting section.

Troubleshoot Here

Surfshark Merlin WireGuard Setup

TeamFlashRouters · Mar 30, 2023 ·

Preparing for Surfshark Merlin Setup

Download your Surfshark .conf file

If you are not already a Surfshark user Sign Up Now.

1. Log in to your account on the Surfshark website.

Surfshark Account Login

2. Click VPN Manual Setup.

Surfshark VPN Manual Setup

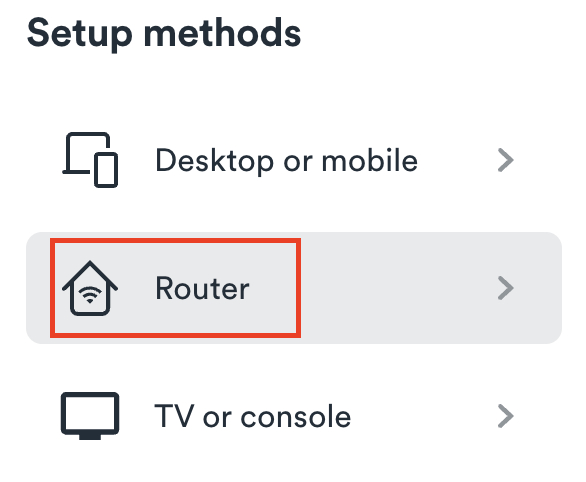
3. Select Router as the Setup Method.

Surfshark setup method Router

4. Select WireGuard as the Protocol.

Surfshark select WireGuard

5. Select I don’t have a key pair.

Surfshark No Key Pair

6. Enter FlashRouter as the name of the connection and click Next.

Surfshark Connection Name

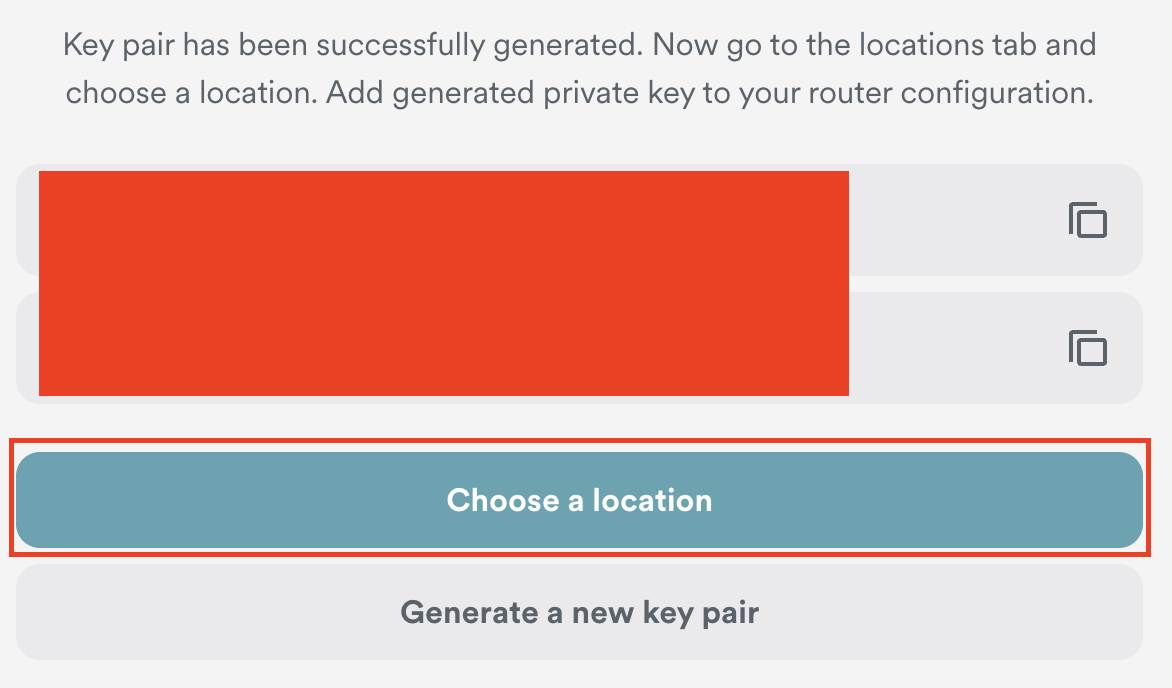
7. Click Generate a new key pair.

Surfshark Generate new Key Pair

8. Click Choose a location.

Surfshark Choose a Location

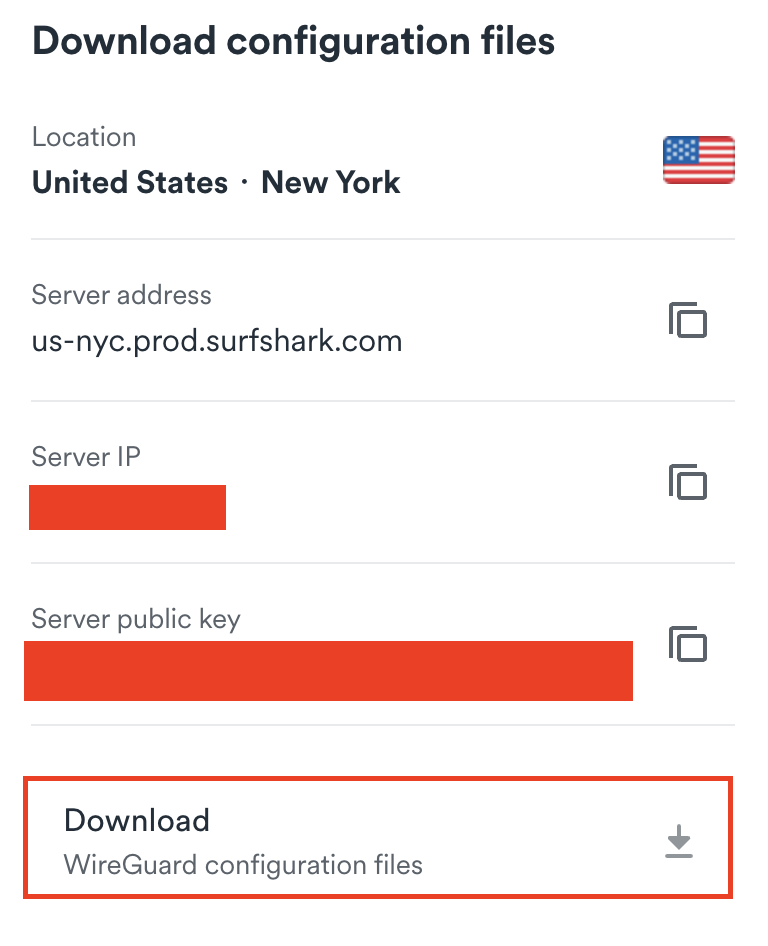
9. Select the server location you want to connect to. Unless you need a specific location we recommend using Surfshark’s recommended Fastest server. Click Download to download the .conf file for this Surfshark server location.

Surfshark download conf file

Merlin Router Setup for Surfshark

Login to Asus Merlin firmware settings in a browser on any computer or smart device connected to the Merlin FlashRouter’s network.

1. Navigate to the VPN tab.

Merlin VPN Tab

2. Navigate to the VPN Client tab.

Merlin VPN Client Tab

3. Select WireGuard as the VPN Protocol.

Merlin VPN Client WireGuard

4. Click Choose file and select the .conf file you downloaded earlier. Then click Upload.

Merlin WireGuard Choose File Upload

5. In the Description field enter in the name you’d like to use for this WireGuard Client profile. We typically advise entering in the location here. Our example server was in New York so I have entered in Surfshark New York.

Merlin WireGuard ProtonVPN Description

6. Set Enable WireGuard to Yes.

Merlin Enable WireGuard

7. Click Apply at the bottom of the page and you should then see a Connected message appear.

Merlin WireGuard Connected

8. By default no devices are assigned to the new active WireGuard connection profile. Click the VPN Director tab to assign specific devices to the new WireGuard profile. Your IP will not be changed on your devices yet.

WireGuard select VPN Director

9. On the VPN Director page click the + symbol next to Add new rule.

WireGuard VPN Director Add new rule

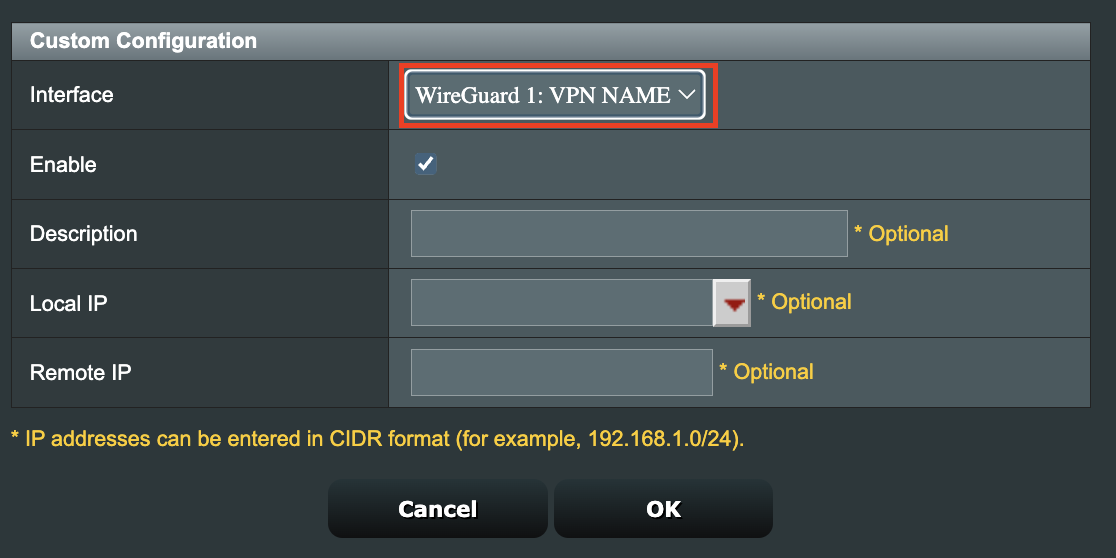
10. Select the new WireGuard profile in the Interface dropdown.

WireGuard VPN Director select Interface

11. In the Local IP field enter in 192.168.50.0/24 if you want ALL devices connected to the FlashRouter’s network to use the WireGuard VPN connection. Click OK.

If you only want certain devices to connect to the WireGuard Client profile you have setting up instead of all the devices connected to the FlashRouter’s network please complete the instructions on our VPN Director guide.

12. Then click Apply at the bottom of the page.

Verify a successful Surfshark connection

Visit Surfshark’s IP Check from a private/incognito browsing window to verify your new IP address and virtual location.

In some cases you may notice that the location is not showing the same location as the server you have input in your router settings; this is because geo tracking tools are often tricked by VPN connections. As long as you see an IP address that is not the same as your normal Internet IP address then you are indeed connected to Surfshark.

How to change the Surfshark server

  1. Follow the steps at the top of the page to obtain a new .conf file.
  2. Then proceed with the settings same as initial setup.

TROUBLESHOOTING

Still having issues? Visit the VPN Troubleshooting section.

Troubleshoot Here

CyberGhost Manual OpenVPN Setup

TeamFlashRouters · Apr 9, 2019 ·

Preparing for Manual CyberGhost Setup

Obtain your CyberGhost OpenVPN Information

If you are not already a CyberGhost user Sign Up Now.

1. Log in to your account on the CyberGhost website.

CyberGhost Website Login

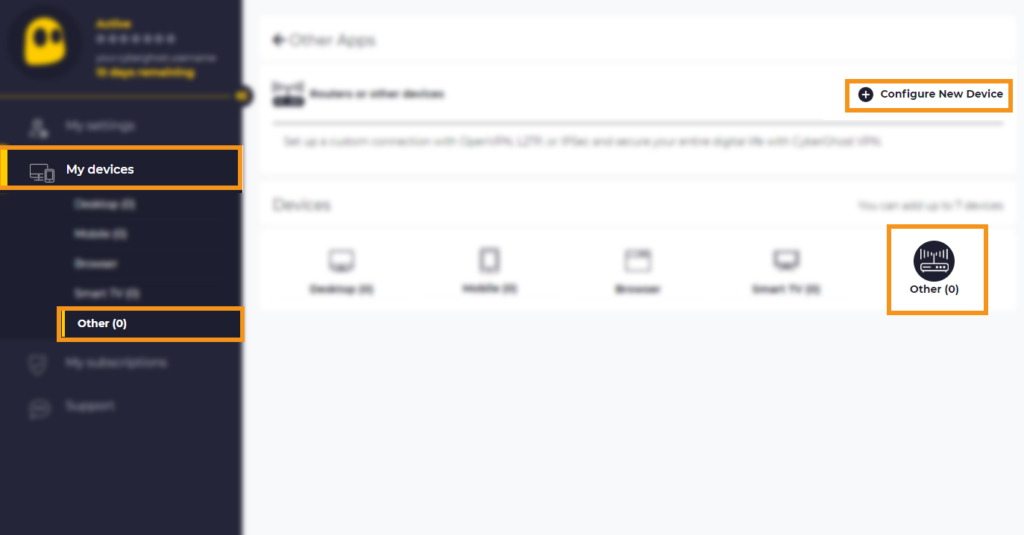
2. Select My Devices.

3. Select Other and then Configure New Device.

CyberGhost Website OpenVPN Configuration Files Generator Cyberghost - Website Screen CyberGhost Website OpenVPN Configuration Files Generator

4. Set Protocol to OpenVPN. Select the Country you would like to connect to. Select the Server Group. Name the device in the Device Name field. Click Save Configuration.

CyberGhost Website OpenVPN Configuration Files Generator 3

5. Press View configuration.

CyberGhost Website OpenVPN Configuration Files Generator 2

6. Copy the Username, and Password that appear to a notepad, since you will need this information later in the setup process. Click Download Configuration.

CyberGhost Website OpenVPN Configuration Files Generator 1

Open the file that was downloaded with NotePad++ for Windows or TextEdit for Apple. You only need the ca.crt, client.crt, and client.key files. All CyberGhost servers have different keys and certificates.

DD-WRT Router Setup for CyberGhost

Navigate to Services > VPN

Enter CyberGhost settings

OpenVPN Client

Start OpenVPN Client

If you wish to disable your VPN connection simply set this to Disable at any time and click Apply Settings.

Server IP/Name

Copy and paste the server you selected in your account. Be sure there are no extra spaces or characters.

Port

443

Tunnel Device

TUN

Tunnel Protocol

UDP

Encryption cipher

AES-256-CBC

Hash Algorithm

SHA256

User Pass Authentication

Enable

Username

Enter the Username you obtained in your CyberGhost account.

Password

Enter the Password you obtained in your CyberGhost account.

Advanced Options

Enable

TLS Cipher

None

LZO Compression

Adaptive

NAT

Enable

Firewall Protection

Enable

Additional Config

tun-mtu 1500
fragment 1300
mssfix 1300

Policy Based Routing

This field can be used for split VPN and Dual Gateway routing.

CA Cert

—–BEGIN CERTIFICATE—–
MIIGWjCCBEKgAwIBAgIJAJxUG61mxDS7MA0GCSqGSIb3DQEBDQUAMHsxCzAJBgNV
BAYTAlJPMRIwEAYDVQQHEwlCdWNoYXJlc3QxGDAWBgNVBAoTD0N5YmVyR2hvc3Qg
Uy5BLjEbMBkGA1UEAxMSQ3liZXJHaG9zdCBSb290IENBMSEwHwYJKoZIhvcNAQkB
FhJpbmZvQGN5YmVyZ2hvc3Qucm8wHhcNMTcwNjE5MDgxNzI1WhcNMzcwNjE0MDgx
NzI1WjB7MQswCQYDVQQGEwJSTzESMBAGA1UEBxMJQnVjaGFyZXN0MRgwFgYDVQQK
Ew9DeWJlckdob3N0IFMuQS4xGzAZBgNVBAMTEkN5YmVyR2hvc3QgUm9vdCBDQTEh
MB8GCSqGSIb3DQEJARYSaW5mb0BjeWJlcmdob3N0LnJvMIICIjANBgkqhkiG9w0B
AQEFAAOCAg8AMIICCgKCAgEA7O8+mji2FlQhJXn/G4VLrKPjGtxgQBAdjo0dZEQz
KX08q14dLkslmOLgShStWKrOiLXGAvB1rPvvk613jtA0KjQLpgyLy9lIWohQKYjj
5jrJYXMZMkbSHBYI9L8L7iezBEFYrjYKdDo51nq99wRFhKdbyKKjDh3e2L2SVEZL
T1ogkK5gWzjvH+mjjtjUUicK+YjGwWOz6I+KKaG4Ve/D/cE6nCLbhHIMMnargZEu
7sqA6BFeS4kEP/ZdCZoTSX2n43XV1q63nJt/v0KDetbZDciFVW9h9SVPG4qT44p0
550N+Mom7zTX7S/ID5T9dplgU8sRGtIMrG0cIMD9zmpFgUnMusCrR7jJFr0sMAve
TbgZg95LmstV6R6WKZkSFdUrE0DHl4dHoZvTFX+1LhwhHgjgDLaosX0vhG/C/7Lp
oVWimd6RRQT3M9o4Fa1TuhfvBzQ20QHrmRV/yKvGNK0xckZ6EZ/QY7Z55ORU15Tg
ab4ebnblYPWoEmn0mIYP3LFFeoR5OS1EX7+j4kPv+bwPGsmpHjxmZyq2Y7sJBpbO
CJgbkn52WZdPBIRDpPdIHQ8pAJC4T0iMK9xvAwWNl/V6EYYNpR97osyEDXn+BTdA
HlhJ5fck9KlwI9mb1Kg1bhbvbmaIAiOLenSULYf3j6rI1ygo3R2cCyybtuAq8M7z
0OECAwEAAaOB4DCB3TAdBgNVHQ4EFgQU6tdK1g/He5qzjeAoM5eHt4in9iUwga0G
A1UdIwSBpTCBooAU6tdK1g/He5qzjeAoM5eHt4in9iWhf6R9MHsxCzAJBgNVBAYT
AlJPMRIwEAYDVQQHEwlCdWNoYXJlc3QxGDAWBgNVBAoTD0N5YmVyR2hvc3QgUy5B
LjEbMBkGA1UEAxMSQ3liZXJHaG9zdCBSb290IENBMSEwHwYJKoZIhvcNAQkBFhJp
bmZvQGN5YmVyZ2hvc3Qucm+CCQCcVButZsQ0uzAMBgNVHRMEBTADAQH/MA0GCSqG
SIb3DQEBDQUAA4ICAQDNyQ92kj4qiNjnHk99qvnFw9qGfwB9ofaPL74zh0G5hEe3
Wgb2o4fqUGnvUNgOu53gJksz3DcPQ8t40wfmm9I1Z8tiM9qrqvkuQ+nKcLgdooXt
EsTybPIYDZ2cWR/5E0TKRvC7RFzKgQ4D77Vbi4TdaHiDV7ZNfU1iLCoBGcYm80hc
UHEs5KIVLwUmcSOTmbZBySJxcSD0yUpS7nlZGwLY6VQrU+JFwDSisbXT4DXf3iSz
p7FzW0/u/SFvWsPHrjE0hkPoZPalYvouaJEHKAhip0ZwSmitlxbBnmm8+K/3c9mL
A5/uXrirfpuhhs8V3lyV2mczVtSiTl6gpi88gc//JY80JeHdupjO25T3XEzY9cpx
ecmkWaUEjLMx4wVoXQuUiPonfILM6OLwi+zUS8gQErdFeGvcQXbncPa4SdJuHkF8
lgiX2i8S8fPGdXvU37E9bdAXwP5nZriYq1s0D59Qfvz+vLXVkmyZp6ztxjKjKole
mPMak0Y5c1Q4RjNF6tmQoFuy/ACSkWy14Tzu2dFp7UiVbGg1FOvKhfs48zC2/IUQ
v1arqmPT/9LVq3B2DVT9UKXRUXX/f/jSSsVjkz4uUe2jUyL+XHX1nSmROTPHSAJ+
oKf0BLnfqUxFkEUTwLnayssP2nwGgq35b7wEbTFIXdrjHGFUVQIDeERz8UThew==
—–END CERTIFICATE—–

Public Client Cert

Copy and paste all contents of the client.crt file starting and ending with:
—–BEGIN CERTIFICATE—–
…
—–END CERTIFICATE—–

Private Client Key

Copy and paste all contents of the client.key file starting and ending with:
—–BEGIN PRIVATE KEY—–
…
—–END PRIVATE KEY—–

CLICK APPLY SETTINGS

Leave all settings not mentioned above as their default setting.

Verify a successful CyberGhost connection

Navigate to Status > OpenVPN

  1. You should now see a CONNECTED SUCCESS message.
  2. Visit CyberGhost’s website to verify your new IP address and virtual location.

In some cases you may notice that the location is not showing the same location as the server you have input in your router settings; this is because geo tracking tools are often tricked by VPN connections. As long as you see an IP address that is not the same as your normal Internet IP address then you are indeed connected to CyberGhost.

Back up your settings

Navigate to Administration > Backup

  1. Click the Backup button.
  2. A file named nvrambak.bin will be saved to your computer.
  3. You can load nvrambak.bin to restore your settings in the event of a reset.

How to change the CyberGhost server

  1. Follow the instructions for obtaining the OpenVPN information from above.
  2. Enter the new Server Address in the Server IP/Name field.
  3. Enter the new Username and Password.
  4. Enter the new ca.crt, client.crt, and client.key
  5. Click Apply Settings.

TROUBLESHOOTING

Still having issues? Visit the VPN Troubleshooting section.

Troubleshoot Here

AirVPN Manual OpenVPN Setup

TeamFlashRouters · Jun 11, 2019 ·

Preparing for Manual AirVPN Setup

Obtain your AirVPN OpenVPN Information

If you are not already a AirVPN user Sign Up Now.

1. Log in to your account on the AirVPN website.

AIRVPN OpenVPN Client Login for FlashRouter DD-WRT VPN Configuration

2. Click on the Client Area tab.

AIRVPN OpenVPN Client Area for FlashRouter DD-WRT VPN Configuration

3. Click on the Config Generator subtab.

AIRVPN OpenVPN Configuration Generator for FlashRouter DD-WRT VPN Configuration

4. Click on the Router icon under Choose your Operating System.

AIRVPN OpenVPN FlashRouter DD-WRT VPN Configuration

5. Select a Protocol under the Protocols section. We recommend UDP.

Select AIRVPN OpenVPN Encryption Protocol for FlashRouter DD-WRT VPN Configuration

6. Select one option under the Choose Servers section. AirVPN sorts these servers by Planet, Continent, Country, and Single servers. Choose whichever best suits your needs.

Sort AIRVPN OpenVPN Specific Certificates for FlashRouter DD-WRT VPN Configuration

7. Scroll down towards the bottom of the page and click on Generate.

Generate AIRVPN OpenVPN Specific Certificates for FlashRouter DD-WRT VPN Configuration

Open the file that was downloaded with NotePad++ for Windows or TextEdit for Apple. You will be copying the Server IP/Name, client.crt and client.key from this file.

Please note, all VPN servers have different keys and certificates. If you wish to change servers in the future, you will have to go through steps 1-7 again.

DD-WRT Router Setup for AirVPN

Navigate to Services > VPN

Enter AirVPN settings

OpenVPN Client

Start OpenVPN Client

If you wish to disable your VPN connection simply set this to Disable at any time and click Apply Settings.

Server IP/Name

Copy and paste the server you selected in your account. Be sure there are no extra spaces or characters.

Port

443

Tunnel Device

TUN

Tunnel Protocol

UDP or TCP

Encryption cipher

AES-256-CBC

Hash Algorithm

SHA1

User Pass Authentication

Disable

Advanced Options

Enable

TLS Cipher

None

LZO Compression

No

NAT

Enable

Firewall Protection

Enable

nsCertType verification

Checked

Policy Based Routing

This field can be used for split VPN and Dual Gateway routing.

TLS Auth Key

—–BEGIN OpenVPN Static key V1—–
7bb7a23a0f5f28d01e792df68f1764ab
f2688719288808bf58e8a2d4f9354ecf
132625dfb895fc3f6330ae1e868e4dfa
c164c0931593d7f9a7da9595cf353433
8896e1d0a987a0d19838944af8fea4e5
215a3a0c76f4c67d5a4aee6a53be66a4
c88b84f850030840fb30f8550ed8068f
35c1ef34ee8f40a0ea5862dfb6f8d3c5
7ab5e27ac2799cf93e8765ff63cd8cd8
6b391b813925cd373bb202796f64d16f
003d042ca828d1b07f18ba1d0cb0323d
df3ee9287e9e084e655699efb3cffa92
3626946fa372e7beee245e7a95b4c1d8
7d16cae685218d4b8afc019b22e41083
476ee9883fe666d236301e55b2062551
4d91c8a69467a758293994df1e6fa7ae
—–END OpenVPN Static key V1—–

CA Cert

—–BEGIN CERTIFICATE—–
MIIGVDCCBDygAwIBAgIJAIzYQ+/kXyADMA0GCSqGSIb3DQEBBQUAMHkxCzAJBgNV
BAYTAklUMQswCQYDVQQIEwJJVDEQMA4GA1UEBxMHUGVydWdpYTETMBEGA1UEChMK
YWlydnBuLm9yZzEWMBQGA1UEAxMNYWlydnBuLm9yZyBDQTEeMBwGCSqGSIb3DQEJ
ARYPaW5mb0BhaXJ2cG4ub3JnMB4XDTE0MDQxMTEwMTU0NVoXDTI0MDQwODEwMTU0
NVoweTELMAkGA1UEBhMCSVQxCzAJBgNVBAgTAklUMRAwDgYDVQQHEwdQZXJ1Z2lh
MRMwEQYDVQQKEwphaXJ2cG4ub3JnMRYwFAYDVQQDEw1haXJ2cG4ub3JnIENBMR4w
HAYJKoZIhvcNAQkBFg9pbmZvQGFpcnZwbi5vcmcwggIiMA0GCSqGSIb3DQEBAQUA
A4ICDwAwggIKAoICAQDGG3ZrJbP61PNjGc4mjTx0TLkUjP7IXZ3wnpPjwF/lwK9n
HgRqoPL0KY/ABJuzMViD8ChtwthNfc7PuJ7vSPtN84lSJ4JGmTxvZkNeLQLZsu1F
f88OcSpjW5ErBM05iVBeF8/ljwaajgFfbgop9W/UK5yMji4qgq5KHxxXqsB8R4rC
eFpWHoNTwFjvXhtVyMgXiT9XAh/vBYim021m8onio4K48q7YRZ4qU8gvE79h5M0g
miIlt6v1vaZskw9cqIBbCYefGMsvBRk2x824ChPf6FazMwAnQHsuBHt6eXAARvfF
DBDanzPHlRSiCP6Je6Vod/MPyepiTZgjgk2VxYUc1ohNxEEGzPGTayeNzLJUldou
P4B+tjJ0Xly30+wvlahADlqjtz3CGQmKMj7btZjd+Uo61B7gau5YiXR/IO7ZpFAC
PCZJSbrwFs6rt9Kewqk8zslfVIro8oDndXRkVsa/c8Qmd6ZE7V+oMGl2OggdWOLl
mDEjkytzx+Bw2sSSalJRAQmOQO8V0anOI6jGYLuU2jnFDsnqSHuwIK11xb6iHmh7
ONsRLUtQ+d64TzB00w2M0fCvGqUIp0N+lf7nsZKsEcU08OoHQYUuwX75ZEOYNSZJ
rqAXohcXdVUHqgRlJRErfSkjcGMM0yqjHkvopcnBIRXKMYTDVXvzRJboyJiVpQID
AQABo4HeMIHbMB0GA1UdDgQWBBTlFdcTqJ4x49Ew1/Ef9OJj0lDIiDCBqwYDVR0j
BIGjMIGggBTlFdcTqJ4x49Ew1/Ef9OJj0lDIiKF9pHsweTELMAkGA1UEBhMCSVQx
CzAJBgNVBAgTAklUMRAwDgYDVQQHEwdQZXJ1Z2lhMRMwEQYDVQQKEwphaXJ2cG4u
b3JnMRYwFAYDVQQDEw1haXJ2cG4ub3JnIENBMR4wHAYJKoZIhvcNAQkBFg9pbmZv
QGFpcnZwbi5vcmeCCQCM2EPv5F8gAzAMBgNVHRMEBTADAQH/MA0GCSqGSIb3DQEB
BQUAA4ICAQCUVAQteCtgNQiZMXV0wCdqivlxlCCuj5sD+XvEuoDqb7dH70u1KQ90
OAbkeotHlIbqJU10xWtvHEjnXg8QG5VOzaWnWWev+ivdPCkGWe8E7C8shsr4WMlA
EF8PPRtzOwCKayxjR713x+Tc2Sb6/rDsXcY5LV6RNmE9HWBM6IoHdqruR8PHkYge
2CPXMuLByEADri6xmvussAjCWEDplJNY7tQsUGT7vjrwrNSNBx/SvxkXnWBj0wYa
EwNu43jrjcRfM/3eGcKDX3cQqTfRQd3j3OA7zmJOXPeExRUIWZTNCvQItGy1TJdw
JTphflw15Bui4l2mYfDqK08zm4aJODrCjoQnVVzM5uOzSTOjmneI6AHj3MjjL3A/
CFA5PCSquBhUycF4UEVf3aPGiV0vAthCBUqM4eKE+rbjWPSaxKghVdr/S82o7Wzz
9mGwnOZDqWk+8AWSsGBjamMk3mNMR45E9FRfPF/dyjOSbVyyTsd1VzlTFEJa0wjB
l3yq3r3iZAM3UtevocAyTEAu0vDYBbS6TgWmWEDOizybB0hNrTx5u/SEI0Kwcthc
rilYxD+n4kmV7TvIR0ZSaYpgYALWQV27zOqY51Ol4UT98WCOokge9HdoFcGJU2Uj
5VneGp14/Oklh7y6BxxxGC3zNGjKGNQYuHGTIgw1DoASmRUdkPkn/w==
—–END CERTIFICATE—–

Public Client Cert

Copy and paste all contents between <cert> and </cert> make sure to also include the following lines when copying and pasting:
—–BEGIN CERTIFICATE—–
…
—–END CERTIFICATE—–

Private Client Key

Copy and paste all contents between <key> and </key> make sure to also include the following lines when copying and pasting:
—–BEGIN PRIVATE KEY—–
…
—–END PRIVATE KEY—–

CLICK APPLY SETTINGS

Leave all settings not mentioned above as their default setting.

Verify a successful AirVPN connection

Navigate to Status > OpenVPN

  1. You should now see a CONNECTED SUCCESS message.
  2. Visit whatismyipaddress.com to verify your new IP address and virtual location.

In some cases you may notice that the location is not showing the same location as the server you have input in your router settings; this is because geo tracking tools are often tricked by VPN connections. As long as you see an IP address that is not the same as your normal Internet IP address then you are indeed connected to AirVPN.

Back up your settings

Navigate to Administration > Backup

  1. Click the Backup button.
  2. A file named nvrambak.bin will be saved to your computer.
  3. You can load nvrambak.bin to restore your settings in the event of a reset.

How to change the AirVPN server

  1. Follow the instructions for obtaining the OpenVPN information from above.
  2. Enter the new Server Address in the Server IP/Name field.
  3. Enter the new client.key and private.key
  4. Click Apply Settings.

TROUBLESHOOTING

Still having issues? Visit the VPN Troubleshooting section.

Troubleshoot Here

Flint/Slate GL.iNet Internet Setup

TeamFlashRouters · Apr 3, 2023 ·

Follow this article when you receive your new Flint or Slate GL.iNet router to connect it to the Internet.

1. Connect the ethernet cable that came with the router from an open LAN ethernet port on your ISP modem or other router to the WAN port of the Flint or Slate GL.iNet router.

Flint Internet
Slate Internet

2. Connect the power to the router and wait about 2 minutes for the router to fully boot up.

3. Connect your computer, phone, or tablet to the GL.iNet router via wireless (FlashRouter24 / FlashRouter50) or via ethernet cable to one of the LAN ports on the router.

The FlashRouter WiFi password is printed on the sheet that came with the router and is set to Wireless#[First 5 characters of your router MAC]. The router MAC can be found on the bottom of your router if you cannot locate the sheet. For e.g. if your MAC is 1459C07E70A8 then your WiFi password is Wireless#1459C

Be sure to capitalize the W.

4. Once connected via wireless or ethernet on your device open your browser and go to 192.168.8.1

GL.iNet router access

5. Enter openwrt as the admin password to access the GL.iNet firmware settings.

GL.iNet admin password enter

6. Verify that your Flint/Slate GL.iNet router is receiving a WAN IP Address and webpages are loading while connected to its network.

GL.iNet WAN Settings

TROUBLESHOOTING

Still having issues? Visit the VPN Troubleshooting section.

Troubleshoot Here

GL.iNet Access Router Settings and Firmware Upgrade

TeamFlashRouters · Apr 3, 2023 ·

Follow this guide to upgrade the firmware of your GL.iNet FlashRouter.

1. Connect your computer, phone, or tablet to the GL.iNet router via wireless (FlashRouter24 / FlashRouter50) or via ethernet cable to one of the LAN ports on the router.

The FlashRouter WiFi password is printed on the sheet that came with the router and is set to Wireless#[First 5 characters of your router MAC]. The router MAC can be found on the bottom of your router if you cannot locate the sheet. For e.g. if your MAC is 9483C07E70A8 then your WiFi password is Wireless#9483C

Be sure to capitalize the W.

2. Once connected via wireless or ethernet on your device open your browser and go to 192.168.8.1

GL.iNet router access

3. Enter openwrt as the admin password to access the GL.iNet firmware settings. Newer devices may have a different admin password set as openwrt1 or glopenwrt1

GL.iNet admin password enter

3. If a new firmware upgrade is available the router settings will either display a banner when you first access the router or a header. Click Install or the Upgrade arrow depending on which appears for you.

GL.iNet Firmware Upgrade Banner
GL.iNet Firmware Upgrade Header

4. Make sure the Keep Settings toggle is pushed to the right so your router does not get reset. Click the Install button to begin the firmware upgrade.

GL.iNet Install Firmware Upgrade

5. The firmware update should take about 2-3 minutes. You may need to reconnect your wireless devices after the network comes back up in your available networks.

TROUBLESHOOTING

Still having issues? Visit the VPN Troubleshooting section.

Troubleshoot Here

Flint/Slate GL.iNet Disable Wi-Fi

TeamFlashRouters · Apr 20, 2023 ·

Follow this guide to disable Wi-Fi network on your GL.iNet FlashRouter.

1. Connect your computer, phone, or tablet to the GL.iNet router via wireless (FlashRouter24 / FlashRouter50) or via ethernet cable to one of the LAN ports on the router.

The FlashRouter WiFi password is printed on the sheet that came with the router and is set to Wireless#[First 5 characters of your router MAC]. The router MAC can be found on the bottom of your router if you cannot locate the sheet. For e.g. if your MAC is 1459C07E70A8 then your WiFi password is Wireless#1459C

Be sure to capitalize the W.

2. Once connected via wireless or ethernet on your device open your browser and go to 192.168.8.1

GL.iNet router access

3. Enter openwrt as the admin password to access the GL.iNet firmware settings.

GL.iNet admin password enter

4. Click Wireless.

GL.iNet Click Wireless

5. Click Modify under the 5GHz or 2.4GHz band.

GL.iNet Modify Wifi

The 5GHz and 2.4GHz bands must be disabled at separate times. Keep in mind that if you are connected to wireless when disabling one band you may need to reconnect with the other band to disable it. Also make sure you have a device that has ethernet capabilities so you can still access the settings with wireless disabled.

6. Set the Enable Wi-Fi toggle to the OFF position and click Apply.

GL.iNet Disable Wifi

TROUBLESHOOTING

Still having issues? Visit the VPN Troubleshooting section.

Troubleshoot Here

Flint/Slate GL.iNet Repeater Setup

TeamFlashRouters · May 29, 2023 ·

If you want to connect your FlashRouter to the Internet via Wi-Fi instead of an ethernet cable you can setup a FlashRouter as a Wireless Repeater. In Wireless Repeater mode the FlashRouter connects to an available network via WiFi and then creates a completely separate network segment for you.

1. Connect your computer, phone, or tablet to the GL.iNet router via wireless (FlashRouter24 / FlashRouter50) or via ethernet cable to one of the LAN ports on the router.

The FlashRouter WiFi password is printed on the sheet that came with the router and is set to Wireless#[First 5 characters of your router MAC]. The router MAC can be found on the bottom of your router if you cannot locate the sheet. For e.g. if your MAC is 1459C07E70A8 then your WiFi password is Wireless#1459C

Be sure to capitalize the W.

2. Once connected via wireless or ethernet on your device open your browser and go to 192.168.8.1

GL.iNet router access

3. Enter openwrt as the admin password to access the GL.iNet firmware settings.

GL.iNet admin password enter

4. Select the Internet tab.

GL.iNet Internet tab

5. In the Repeater area select Connect.

GL.iNet Repeater Connect

6. Select the available Wi-Fi network you want the FlashRouter to use for Internet from the list. You can use a 2.4GHz and/or 5GHz network to connect.

GL.iNet Repeater select Wi-Fi

7. Enter the correct Wi-Fi password in the Password field for the network you selected. Then click Apply.

GL.iNet Repeater enter Wi-Fi password

8. You are now setup with the GL.iNet FlashRouter receiving Internet via Wi-Fi. The Repeater area should now be filled in with the network information of the connection as shown below.

GL.iNet Repeater Setup complete

TROUBLESHOOTING

Still having issues? Visit the VPN Troubleshooting section.

Troubleshoot Here

Privacy Hero Disable Wi-Fi

TeamFlashRouters · Feb 8, 2023 ·

Your Privacy Hero router uses Cloud Based router management which means you can access the router settings from anywhere on any device that has an internet connection. You can follow these steps while connected to your phone, other Wi-Fi network, or the Privacy Hero network.

Use these steps to disable your Privacy Hero Wi-Fi so only ethernet connections are active. This is not a required step just a preference.

1. From any device that has a browser such as a computer, smartphone, or tablet visit app.privacyhero.com

App.PrivacyHero.com

2. Enter your Privacy Hero account email and password. Click Login.

Privacy Hero Access Settings

If you have not created your Privacy Hero account yet please follow these instructions.

3. Click the Wi-Fi symbol.

Privacy Hero Select Wifi

4. Set the toggle switches to the off position for the Wi-Fi bands you want to disable.

Privacy Hero Disable Wifi

TROUBLESHOOTING

Still having issues? Visit the VPN Troubleshooting section.

Troubleshoot Here

Cudy Internet Setup

TeamFlashRouters · Feb 26, 2024 ·

Follow this article when you receive your new Cudy FlashRouter to connect it to the Internet.

1. Connect the ethernet cable that came with the router from an open LAN ethernet port on your ISP modem or other router to the WAN port if you purchased a Cudy AX3000 or to ethernet port #1 of the device marked Primary if you purchased a Cudy M1800 or Cudy M3000.

Cudy Mesh internet wiring

2. Connect the power to the router and wait about 2 minutes for the router to fully boot up.

3. Connect your computer, phone, or tablet to the Cudy router via wireless (FlashRouter24 / FlashRouter50) or via ethernet cable to one of the LAN ports on the router.

The FlashRouter WiFi password is printed on the sheet that came with the router and is set to Wireless#[First 5 characters of your router MAC]. The router MAC can be found on the bottom of your router if you cannot locate the sheet. For e.g. if your MAC is 1459C07E70A8 then your WiFi password is Wireless#1459C

Be sure to capitalize the W.

4. Once connected via wireless or ethernet on your device open your browser and go to 192.168.10.1

Cudy local IP access

5. Enter openwrt as the admin password to access the Cudy firmware settings.

Cudy router access

6. Verify that your Cudy FlashRouter is reporting as Internet and WAN Connected.

Cudy Verify Internet

6. Verify that your Cudy FlashRouter is reporting as Internet and WAN Connected.

7. If you purchased a Cudy M1800 or Cudy M3000 mesh package you can now take the unit labeled Node to the location you want it connecting from and power it up. It will connect to the Primary network that was just setup automatically. You will then see the Mesh Units number increase according to the number that you have purchased shortly.

Cudy Verify Mesh connection

TROUBLESHOOTING

Still having issues? Visit the VPN Troubleshooting section.

Troubleshoot Here

Cudy Access Router Settings

TeamFlashRouters · Feb 26, 2024 ·

Follow this guide to access the router settings of your Cudy FlashRouter.

1. Connect your computer, phone, or tablet to the Cudy router via wireless (FlashRouter24 / FlashRouter50) or via ethernet cable to one of the LAN ports on the router.

The FlashRouter WiFi password is printed on the sheet that came with the router and is set to Wireless#[First 5 characters of your router MAC]. The router MAC can be found on the bottom of your router if you cannot locate the sheet. For e.g. if your MAC is 1459C07E70A8 then your WiFi password is Wireless#1459C

Be sure to capitalize the W.

2. Once connected via wireless or ethernet on your device open your browser and go to 192.168.10.1

Cudy local IP access

3. Enter openwrt1 or openwrt as the admin password to access the Cudy firmware settings.

Cudy router access

TROUBLESHOOTING

Still having issues? Visit the VPN Troubleshooting section.

Troubleshoot Here

TP-Link Access Router Settings

TeamFlashRouters · Apr 11, 2024 ·

Follow this guide to access the router settings of your TP-Link FlashRouter.

1. Connect your computer, phone, or tablet to the TP-Link router via wireless (FlashRouter24 / FlashRouter50) or via ethernet cable to one of the LAN ports on the router.

The FlashRouter WiFi password is printed on the sheet that came with the router and is set to Wireless#[First 5 characters of your router MAC]. The router MAC can be found on the bottom of your router if you cannot locate the sheet. For e.g. if your MAC is 1459C07E70A8 then your WiFi password is Wireless#1459C

Be sure to capitalize the W.

2. Once connected via wireless or ethernet on your device open your browser and go to tplinkwifi.net

TP-Link URL Access

3. Enter tp-link as the admin password to access the TP-Link firmware settings.

TP-Link admin password

TROUBLESHOOTING

Still having issues? Visit the VPN Troubleshooting section.

Troubleshoot Here
« Previous Page
Next Page »

Primary Sidebar

  • Troubleshooting
  • Router Access
  • Internet Connection Issues
  • WiFi Connectivity
  • General VPN Issues
  • TeamViewer Remote Support
  • DD-WRT Firmware
  • Facebook
  • Twitter
  • Instagram
  • Pinterest
  • YouTube

Footer