• Skip to primary navigation
  • Skip to main content
  • Skip to primary sidebar
  • Skip to footer

FlashRouters Support Portal

Prioritizing Privacy

  • SETUP GUIDES
    • Privacy Hero Router Setup Guide
    • ASUS-WRT Router Setup Guide
    • AsusWRT-Merlin Router Setup Guide
    • DD-WRT Router Setup Guide
    • ExpressVPN Router Setup Guide
    • GL.iNet Router Setup Guide
    • Roqos Core Router Setup Guide
  • TROUBLESHOOTING
    • Router Access
    • WiFi Connectivity
    • Internet Connection Issues
    • General VPN Issues
    • DD-WRT Firmware
    • TeamViewer Remote Support
  • FAQs
    • Router FAQs
    • VPN FAQs
    • Warranty and Returns FAQs
    • Sales FAQs
    • Shipping FAQs
    • Service Plan FAQs
  • Show Search
Hide Search

Search Results for: through the fla

IPVanish Manual OpenVPN Setup

TeamFlashRouters · Apr 5, 2019 ·

Preparing for Manual IPVanish Setup

Verify your IPVanish login information

If you are not already an IPVanish user Sign Up Now.

Log in to your account on the IPVanish website.

IPVanish Server Addresses

View a full list of IPVanish servers.

America

Ashburn:
iad-a01.ipvanish.com
through
iad-a78.ipvanish.com

Atlanta:
atl-a01.ipvanish.com
through
atl-a88.ipvanish.com

Boston:
bos-c01.ipvanish.com
through
bos-c27.ipvanish.com

Chicago:
chi-a01.ipvanish.com
through
chi-a58.ivpanish.com

Cleveland:
cle-c01.ipvanish.com
through
cle-c20.ipvanish.com

Dallas:
dal-a01.ipvanish.com
through
dal-a79.ipvanish.com

Denver:
den-c01.ipvanish.com
through
den-c13.ipvanish.com

Jackson:
jan-c01.ipvanish.com
through
jan-c15.ipvanish.com

Las Vegas:
las-c11.ipvanish.com
through
las-c20.ipvanish.com

Los Angeles:
lax-a01.ipvanish.com
through
lax-a60.ipvanish.com

Miami:
mia-a01.ipvanish.com
through
mia-a34.ipvanish.com

Milwaukee:
mke-c01.ipvanish.com
through
mke-c19.ipvanish.com

New York:
nyc-a01.ipvanish.com
through
nyc-a51.ipvanish.com

Phoenix:
phx-a01.ipvanish.com
through
phx-a24.ipvanish.com

Salt Lake City:
slc-c01.ipvanish.com
through
slc-c12.ipvanish.com

San Jose:
sjc-a01.ipvanish.com
through
sjc-a27.ipvanish.com

Seattle:
sea-a01-ipvanish.com
through
sea-a41.ipvanish.com

St. Louis:
stl-c01.ipvanish.com
through
stl-c18.ipvanish.com

United Kingdom

London:
lon-a01.ipvanish.com
through
lon-a69.ipvanish.com

lon-c01.ipvanish.com
through
lon-c58.ipvanish.com

Manchester:
man-c01.ipvanish.com
through
man-c09.ipvanish.com

DD-WRT Router Setup for IPVanish

Navigate to Services > VPN

Enter IPVanish settings

OpenVPN Client

Start OpenVPN Client

If you wish to disable your VPN connection simply set this to Disable at any time and click Apply Settings.

Server IP/Name

Copy and paste the server you would like to connect to from the server list above. Be sure there are no extra spaces or characters.

If you wish to change IPVanish connection locations, THIS IS THE ONLY FIELD YOU NEED TO CHANGE.

Port

443

Tunnel Device

TUN

Tunnel Protocol

UDP

Encryption cipher

AES-256-CBC

Hash Algorithm

SHA256

User Pass Authentication

Enable

Username

Enter the Username you successfully logged in to your IPVanish account with.

Password

Enter the Password you successfully logged in to your IPVanish account with.

Advanced Options

Enable

TLS Cipher

None

LZO Compression

Adaptive

NAT

Enable

Firewall Protection

Enable

Additional Config

persist-key
persist-tun
persist-remote-ip
keysize 256

Policy Based Routing

This field can be used for split VPN and Dual Gateway routing.

CA Cert

-----BEGIN CERTIFICATE-----
MIIErTCCA5WgAwIBAgIJAMYKzSS8uPKDMA0GCSqGSIb3DQEBDQUAMIGVMQswCQYD
VQQGEwJVUzELMAkGA1UECBMCRkwxFDASBgNVBAcTC1dpbnRlciBQYXJrMREwDwYD
VQQKEwhJUFZhbmlzaDEVMBMGA1UECxMMSVBWYW5pc2ggVlBOMRQwEgYDVQQDEwtJ
UFZhbmlzaCBDQTEjMCEGCSqGSIb3DQEJARYUc3VwcG9ydEBpcHZhbmlzaC5jb20w
HhcNMTIwMTExMTkzMjIwWhcNMjgxMTAyMTkzMjIwWjCBlTELMAkGA1UEBhMCVVMx
CzAJBgNVBAgTAkZMMRQwEgYDVQQHEwtXaW50ZXIgUGFyazERMA8GA1UEChMISVBW
YW5pc2gxFTATBgNVBAsTDElQVmFuaXNoIFZQTjEUMBIGA1UEAxMLSVBWYW5pc2gg
Q0ExIzAhBgkqhkiG9w0BCQEWFHN1cHBvcnRAaXB2YW5pc2guY29tMIIBIjANBgkq
hkiG9w0BAQEFAAOCAQ8AMIIBCgKCAQEAt9DBWNr/IKOuY3TmDP5x7vYZR0DGxLbX
U8TyAzBbjUtFFMbhxlHiXVQrZHmgzih94x7BgXM7tWpmMKYVb+gNaqMdWE680Qm3
nOwmhy/dulXDkEHAwD05i/iTx4ZaUdtV2vsKBxRg1vdC4AEiwD7bqV4HOi13xcG9
71aQ55Mj1KeCdA0aNvpat1LWx2jjWxsfI8s2Lv5Fkoi1HO1+vTnnaEsJZrBgAkLX
pItqP29Lik3/OBIvkBIxlKrhiVPixE5qNiD+eSPirsmROvsyIonoJtuY4Dw5K6pc
NlKyYiwo1IOFYU3YxffwFJk+bSW4WVBhsdf5dGxq/uOHmuz5gdwxCwIDAQABo4H9
MIH6MAwGA1UdEwQFMAMBAf8wHQYDVR0OBBYEFEv9FCWJHefBcIPX9p8RHCVOGe6u
MIHKBgNVHSMEgcIwgb+AFEv9FCWJHefBcIPX9p8RHCVOGe6uoYGbpIGYMIGVMQsw
CQYDVQQGEwJVUzELMAkGA1UECBMCRkwxFDASBgNVBAcTC1dpbnRlciBQYXJrMREw
DwYDVQQKEwhJUFZhbmlzaDEVMBMGA1UECxMMSVBWYW5pc2ggVlBOMRQwEgYDVQQD
EwtJUFZhbmlzaCBDQTEjMCEGCSqGSIb3DQEJARYUc3VwcG9ydEBpcHZhbmlzaC5j
b22CCQDGCs0kvLjygzANBgkqhkiG9w0BAQ0FAAOCAQEAI2dkh/43ksV2fdYpVGhY
aFZPVqCJoToCez0IvOmLeLGzow+EOSrY508oyjYeNP4VJEjApqo0NrMbKl8g/8bp
LBcotOCF1c1HZ+y9v7648uumh01SMjsbBeHOuQcLb+7gX6c0pEmxWv8qj5JiW3/1
L1bktnjW5Yp5oFkFSMXjOnIoYKHyKLjN2jtwH6XowUNYpg4qVtKU0CXPdOznWcd9
/zSfa393HwJPeeVLbKYaFMC4IEbIUmKYtWyoJ9pJ58smU3pWsHZUg9Zc0LZZNjkN
lBdQSLmUHAJ33Bd7pJS0JQeiWviC+4UTmzEWRKa7pDGnYRYNu2cUo0/voStphv8E
VA==
-----END CERTIFICATE-----

CLICK APPLY SETTINGS

Leave all settings not mentioned above as their default setting.

Verify a successful IPVanish connection

Navigate to Status > OpenVPN

  1. You should now see a CONNECTED SUCCESS message.
  2. Visit IPVanish’s IP Check to verify your new IP address and virtual location.

In some cases you may notice that the location is not showing the same location as the server you have input in your router settings; this is because geo tracking tools are often tricked by VPN connections. As long as you see an IP address that is not the same as your normal Internet IP address then you are indeed connected to IPVanish.

Back up your settings

Navigate to Administration > Backup.

  1. Click the Backup button.
  2. A file named nvrambak.bin will be saved to your computer.
  3. You can load nvrambak.bin to restore your settings in the event of a reset.

How to change the IPVanish server

  1. Copy the new IPVanish server address from the above server list.
  2. Paste the server into the Server IP/Name field.
  3. Click Apply Settings.

TROUBLESHOOTING

Still having issues? Visit the VPN Troubleshooting section.

Troubleshoot Here

VPN FAQs

admin · Jan 29, 2019 ·

VPN FAQs

General VPN FAQ Answers

What is a VPN?

VPN is an acronym for ‘Virtual Private Network’, historically used by private organizations to seamlessly link geographically diverse locations via the Internet. A VPN ‘tunnels’ traffic between two devices by transmitting it over a secure network. There are also clearly identifiable benefits to individual Internet users accessing a VPN.

  • A VPN provides you with top-level security and privacy for all your Internet downloading, streaming and browsing. As long as you are signed into your VPN account, all data you transmit over the Internet is encrypted.
  • A VPN encrypts your device by hiding the IP address assigned by your Internet Service Provider (ISP) and replacing it with the IP address of your choosing from the list of server locations belonging to your VPN provider. This masks your identity when visiting sites that geo-restricted content, and helps you avoid devious local Internet marketing and advertising schemes that track you through your IP address.

Will a FlashRouter with a built-in VPN client speed up my connection?

FlashRouters are relatively new models that may enhance data transfers across your home network or extend the range of your Wireless signal. However, the speed at which you download or stream content can not exceed the speed of the connection you pay for through your ISP. Purchasing a FlashRouter or signing up for VPN service WILL NOT transform your regular connection into a high-speed broadband connection.

At the same time, if you do have a broadband connection, a FlashRouter with a VPN connection may slow down your transfer speeds due to the processor encrypting all of your data. In certain cases a FlashRouter with a VPN can also prevent throttling by an ISP of specific service like Netflix or Amazon Video.

Which VPN provider should I use?

Our routers have been tested to perform with many of the most popular VPN providers such as ExpressVPN, NordVPN, IPVanish, PrivateInternetAccess & CyberGhost among 50+ VPN providers so that subscribers can get the maximum benefit from their VPN service. If you prefer another provider, that is not an issue at all. You can still use a DD-WRT VPN FlashRouter with any VPN provider that offers DD-WRT router integration support. Contact our team for further information about using our routers with your VPN service of choice or if you need a VPN provider recommendation based on your location.

Should my FlashRouter replace my old router?

A FlashRouter will work as a standalone router by connecting your modem to its Wide Area Network (WAN) port, or using it in a Dual Router Network by connecting it to your existing router through a Local Area Network (LAN)/Ethernet port. Either way a FlashRouter can be configured to tunnel all traffic through the VPN server of your choosing.

If you would like to set up your Home Network so that some devices are being tunneled through a VPN server, and others are connecting to your Internet Service Provider (ISP) within your home country, then using your FlashRouter as an auxiliary device is recommended.

VPN Security FAQ Answers

Can I change my IP address to one in another country?

YES! The countries that you can change your IP address to depend on the offerings of your specific VPN providers. Prices and server locations vary across all VPN providers.

If you choose to purchase a FlashRouter then you will not have to install any VPN client software on your computer to change your IP address; the VPN will already be configured within the router. Therefore, any device you plug into this FlashRouter is automatically assigned the IP address of your selected VPN server.

When is my connection secure?

As long as the VPN account preset into your FlashRouter is active, any device that is connected to the Internet through this router has its network traffic encrypted, and IP address masked. With a FlashRouter you never have to physically login to your VPN account, as the settings have been stored in the router’s DD-WRT firmware.

Don’t worry though! If you are not at home, and using Wi-Fi in a public location, you can still use your VPN account on a laptop or mobile device through various other methods.

How can I be sure my connection is safe and encrypted?

In order to make sure that the connection on your FlashRouter is being rerouted appropriately through your VPN service, visit What is my IP address and make sure the location listed is the one you have chosen in your VPN settings, NOT your actual location.

If you wish, there is an Internet Kill Switch available as well for your router which will block the internet whenever you disconnect from VPN.

What VPN connection standards are supported on a FlashRouter?

Currently we support the OpenVPN protocol for VPN client connections. PPTP VPN has been deemed as insecure by the privacy community and so we no longer offer support for PPTP VPN connections.

Technical VPN FAQ Answers

What operating systems do you support?

A FlashRouter can be used with any operating system, be it Windows, Mac OS or Linux. A FlashRouter can also be used as a wireless access point for iPhones, iPads, and Android devices.

Our routers also work in conjunction with any other brand of router of ADSL or DSL modem/router combo from ISPs across the world.

Can I set up a VPN on a PS4, Xbox One, Kindle Fire, Roku, AppleTV or other devices without native VPN support?

THAT’S WHAT WE ARE HERE FOR!

If you purchase one of our FlashRouters loaded with DD-WRT firmware, you can run the client VPN connection from your router. Once you do this every device connected to the router will tunnel through the VPN.

Now you can stream content like Netflix, BBC iPlayer, Pandora Hulu, or Amazon Instant to your TV through any of these devices, instead of being constrained to streaming content on your computer!

If you need a recommendation for a VPN service with a specific streaming platform do not hesitate to contact our support team.

Sales FAQs
admin · Jan 29, 2019 ·

Sales FAQs

Can My Router Be Preconfigured With My VPN Information?

Plug and Play VPN Support

Yes you can!

To receive a plug and play with VPN device, you will need to provide our team with the credentials from your VPN provider subscription.

IMPORTANT NOTE: This is not required but recommended for users who wish to have the simplest, most seamless experience when the FlashRouter arrives. You can always change the password when the device arrives if you wish as well.


To have your router VPN preconfigured:

  1. Check the “Connect To VPN For Me” box under VPN – Preconfiguration on the Product Page during check out.
  2. Select your VPN provider. If you don’t see your VPN listed select “Other” and you will see an additional field to input who your provider is.
  3. You’ll receive an email after purchase with detailed instructions. If you have any questions our team is happy to help!
Please note:  If you do give a server location, we will automatically start the device with the closest/optimal server for the location we are shipping the device by default. A location has to be added to the initial configuration for plug and play encryption security to occur on the device.


Privacy Hero 2 Only:

While our team isn’t able to pre-configure the Privacy Hero 2 VPN Router before shipping it out since you’ll have to make a Privacy Hero user account and register your router, we can assist you with the VPN set up process once you receive the router and create your Privacy Hero user account via 1-on-1 remote session, email, or live chat on our site.

You can also use our step-by-step Privacy Hero VPN Router Setup Guide to complete the process.

Can I Use My Dedicated IP Address With A FlashRouter?

Dedicated IP Addresses from NordVPN, SurfShark, & TorGuard are supported on almost all of our FlashRouter options.

Check out our Dedicated IP Addresses Blog Post for more details!

Can I Use A FlashRouter With My Current Mesh System?

Yes!

You will be able to connect the FlashRouter of your choosing to your current mesh router via ethernet port as shown below:

ISP Modem/Router —- FlashRouter (VPN) —- Main Mesh Router (VPN from FlashRouter) 

This setup will allow you to keep your mesh network with added VPN protection, as well as add the FlashRouter wireless network for your devices.

You can disable the wifi on the FlashRouter also if you only wanted to use the mesh network for wifi.

Can You Flash My Router and Connect me to VPN?

At FlashRouters, we offer expert router flashing and VPN configuration services through our Flash My Router plans. Whether your router needs custom firmware flashing or just a VPN configuration, we ensure it’s set up for maximum security, privacy, and streaming performance with your chosen VPN provider.

The appointment will take place via remote software. During the appointment, our team will also answer any questions you may have about using the VPN on the router. Flashing is done out of the East Coast of the United States – we will do our best to accommodate your time zone difference if you are located in another part of the United States or another country.

👉 Explore our Flash My Router plans:
🔗 Flash My Router Plans


🔹 How It Works

✅ Flashing vs. Configuration: Some routers require custom firmware (flashing) to enable VPN, while others can be configured without flashing.
✅ Fully Optimized: Our team ensures your router is ready to securely connect to your VPN, block ISP tracking, and enhance your streaming experience.
✅ Remote Assistance Available: Get expert help setting up your VPN connection remotely if needed.


Flashing vs. Configuration: Router Compatibility

At FlashRouters, we handle VPN setup differently based on your router brand and model. Some routers require flashing custom firmware (like DD-WRT or AsusWRT-Merlin), while others can be configured without flashing.

🛠 Router Setup Types by Brand

🔹 Flashing Required (Custom Firmware Installation)

These routers require firmware flashing (DD-WRT or AsusWRT-Merlin) to enable VPN compatibility.

  • Asus – Flashed with AsusWRT-Merlin or updated to the latest AsusWRT build. Some models only require configuration.
  • Linksys – Flashed with DD-WRT firmware.
  • Netgear – Flashed with DD-WRT firmware.

🔹 Configuration Only (No Flashing Required)

These routers have built-in VPN support and only require proper setup.

  • TP-Link – Configured without flashing.
  • GL.iNet – Configured without flashing.
  • Cudy – Configured without flashing.

📌 Other brands are not supported at this time. If you have a different router, we recommend checking out our pre-flashed router options.


✅ Supported VPN Providers

We work with a wide range of VPN providers, including:

  • NordVPN
  • ExpressVPN
  • Surfshark
  • CyberGhost
  • IPVanish
  • Private Internet Access (PIA)
  • VyprVPN
  • ProtonVPN
  • PureVPN
  • Windscribe
  • IVPN
  • Mullvad
  • StrongVPN
  • AzireVPN
  • AstrillVPN
  • HotspotShield VPN

(If your provider isn’t listed, reach out – we may still be able to support it!)


🔗 Get Started Today!

👉 Explore our Flash My Router plans:
🔗 Flash My Router Plans

🔹 Need help selecting the right option? Contact our support team! We’re happy to assist.

How Can I Add The 1 Year NordVPN Service From My FlashRouters.com Order To My Current NordVPN Account?

You can easily combine the free 1 year of NordVPN included with your FlashRouter purchase once you receive the NordVPN Activation Code Email from FlashRouters.com. The email is typically received within 24 hours of order completion and will contain a link as well as an activation code.

This code can be entered at nordvpn.com/activate with the email address associated with your current NordVPN account to add the 1 year of free service to your existing service.


Privacy Hero 2 Only:

You can easily combine the free 1 year of NordVPN included with the Privacy Hero 2 VPN Router during the router activation process.

After activating the router, you’ll receive a NordVPN activation code within your privacy hero account dashboard. This code can be entered at nordvpn.com/activate with the email address associated with your current NordVPN account to add the 1 year of free service to your existing service.

What Are the Differences Between New, Recertified, And Open Box FlashRouters?

New

  • Direct from manufacturer, in new box.
  • Custom flashed on demand at time of the order.
  • 30 Day Satisfaction Guarantee / 1 Year Warranty.

Recertified (RM)

  • Direct from manufacturer/reseller, may be reboxed.
  • Custom flashed on demand at time of the order.
  • Specialists tested to guarantee same functionality as NEW routers.
  • 30 Day Satisfaction Guarantee / 1 Year Warranty.

Open Box

  • Limited quantity, discount items reboxed that may have cosmetic imperfections.
  • Same testing and functionality level and New and RM.
  • 30 Day Satisfaction Guarantee / No Warranty.

Will a FlashRouter Work With My Internet Service Provider?

US Customers (Single Router Solution):

Almost all Internet Service Providers(ISPs) require a modem in place to establish a connection to their service, however a modem by itself doesn’t provide the wifi connectivity needed in the home or office. A FlashRouter can connect directly to all known modems provided by major ISPs to create a wireless network so long as there is an Ethernet port on the modem to connect to the FlashRouter Internet port. 

US Customers (Dual Router Solution): 

Yes, FlashRouters are compatible with your ISP in what is called a Dual Router Set Up.

For this type of setup, you would use your current router or modem router to connect to your local ISP while using a FlashRouter to connect to your VPN. This is recommended as you will not overhaul your network with a new router, and you will be able to use your selected VPN service on the devices you wish to use it with.

This set up would result in the creation of two networks, which can be seen as the “Local Network” and the “FlashRouter Network”. All devices connected to the FlashRouter Network will go through the VPN service. 

For any device you would prefer to use without a VPN, you can connect to the local network. The chain of devices would be connected from LAN ton your modem or modem/router to WAN on the FlashRouter, with your current router connected to the FlashRouter via Ethernet cable. 


International Customers (Single Router Solution):

Almost all Internet Service Providers (ISPs) require a modem in place to establish a connection to their service, however a modem by itself doesn’t provide the wifi connectivity needed in the home or office. A FlashRouter can connect directly to all known modems provided by major ISPs to create a wireless network so long as there is an Ethernet port on the modem to connect to the FlashRouter Internet port. 

International Customers (Dual Router Solution):

ISPs should all be compatible. Some providers require VLAN tagging/VID settings when wiring directly from modem to FlashRouter. 

For this type of setup, you would use your current router or modem router to connect to your local ISP while using a FlashRouter to connect to your VPN. This is recommended as you will not overhaul your network with a new router, and you will be able to use your selected VPN service on the devices you wish to use it with.

This set up would result in the creation of two networks, which can be seen as the “Local Network” and the “FlashRouter Network”. All devices connected to the FlashRouter Network will go through the VPN service. 

For any device you would prefer to use without a VPN, you can connect to the local network. The chain of devices would be connected from LAN ton your modem or modem/router to WAN on the FlashRouter, with your current router connected to the FlashRouter via Ethernet cable. 

What Stock Firmware Features Will I Lose If I Flash My Router

Open Source firmware like DD-WRT or Assu Merlin has many features equivalent to what stock firmware has, in addition to adding new features to a router. However, some features are lost from the stock firmware when a router is flashed.

These are typically features that are put into the stock firmware by the manufacturers themselves. Things like the Linksys App and the NetGear Genie are examples of what would not be available or compatible on the router after flashing.

Most routers also have a WPS button. By default, the WPS button’s functionality is disabled when a router is flashed as it can be vulnerable and a security risk. It can be re-enabled by following this guide but we do not recommend it.

Does a FlashRouter or Service Plan Purchase Include a VPN Subscription?

A subscription to a VPN does not come with a FlashRouter or Service plan. If you are planning to use a VPN, you would need to sign up for one separately, directly from a provider.

Need assistance in finding a VPN Provider? Please visit our recent VPN Provider Best Seller List.

Plug and Play VPN Support

Unlike other VPN Router providers, FlashRouters is proud to offer free VPN service integration with any purchase.

To receive a plug and play with VPN device, you will need to provide our team with the credentials from your VPN provider subscription.

IMPORTANT NOTE: This is not required but recommended for users who wish to have the simplest, most seamless experience when the FlashRouter arrives. You can always change the password when the device arrives if you wish as well.

Shows what to look for when you want to preconfigure your router.

To have your router VPN pre-configured:

  1. Select Yes from the “Want Your Router Preconfigured?” on the Payment Page during checkout.
  2. Select your VPN provider. If you don’t see your VPN listed select “Other” and you will see an additional field to input who your provider is.
  3. Enter your your VPN username and password
  4. For ExpressVPN Firmware Routers there will be an additional box for your activation code.

Please note:  If you do not enter a server location request in “Order Comments”, we will automatically start the device with the closest/optimal server for the location we are shipping the device by default. A location has to be added to the initial configuration for plug and play encryption security to occur on the device.

Can I Use A FlashRouter To Work From Home?

Yes! A large number of our customers use their FlashRouters to “work from home” no matter where your travels take you. Check out our Working Remotely Blog Post for more details.

What is the Difference Between Business VPNs and VPN Services?

Location: VPN Services offer many server locations to encrypt your traffic through. They are located in several countries worldwide for creating a private VPN tunnel for your online activities. A business VPN connects to specific central servers for data or directly to your office, creating a direct tunnel for accessing sensitive work documents and information.

Logging: Most VPN services offer log-free connections for total anonymity and security when connected (it is important to check out their terms of service and privacy policy for full details). A business VPN is monitored and maintained by employers such as corporations, hospitals or universities.

Protection: VPN services secure your family’s personal data while using computers, SmartTVs and various Internet of Things devices. Business VPNs protect the data of the company while you are tunneling into work.

Are There VPN Service Providers That Offer VPN for Business?

There are in fact several trusted VPN providers that have services specially tailored for business use. NordVPN Teams and VyprVPN for Business offer a full suite of solutions like user management tools, dedicated IPs, personal product managers, global server access, business pricing, and more.

These solutions allow you to quickly deploy a safe and secure corporate network without building and maintaining your own servers. If you are a small business looking to quickly secure remote workers as they shift to work from home, and you do not have an in-house IT expert, then you should consider NordVPN Teams or VyprVPN for Business.

Even better, when choosing a business VPN provider like NordVPN or VyprVPN, employees can use routers with direct NordVPN and VyprVPN integration already included through the FR Privacy App. Meaning that a full network kill switch, routing by device, automatic connections, and more are all included as features with your business VPN connection.

Can I use a VPN on a FlashRouter With My Work/Corporate VPN?

Many of our customers have found that they can connect to both their corporate and personal VPN, however due to the variables beyond our control, we cannot guarantee this for every unique situation.

Using two VPNs at once can lead to unpredictable results. Bouncing your network traffic to multiple servers before finally arriving at it’s intended destination can sometimes introduce speed and connection issues.

Please consider that some employers and agencies are more vigilant regarding third party VPN use than others. There are tools readily available that detect the use of VPN services.

While these tools cannot decrypt and view your network traffic, they can tell your employer that you are potentially using a VPN, which can be against company policy.

If your corporate and personal VPN do not work together, then you can always set the computer using your work VPN to bypass the FlashRouter’s VPN tunnel by accessing the router admin panel for your device.

This way, your computer would only use the work VPN. Keep in mind however, your location would appear as your actual location to your work.

Every FlashRouter also comes with a 30 Day Satisfaction Guarantee.

If in the event you determine the FlashRouter is not working out for you, you can return the device within the first 30 Days. A $25 restocking fee does apply.

Can I Use a FlashRouter to Connect to a Dedicated Business VPN Network?

Of course! If you have an OpenVPN server running on a local machine or hosted on a cloud provider like Amazon Web Services (AWS), FlashRouters can create a custom router client configuration to connect the entire router and all connected devices to your OpenVPN server. Instead of employees connecting device-by-device, a router-based VPN connection allows for always-on secure VPN tunneling.

Our service team is here to work with you to test and ensure compatibility before purchasing. Interested in a router based custom client VPN solution for your remote workers? Please do not hesitate to contact us.

And, if you’re looking for a specific router, take a look at some of our most popular options!

How can I Reset the Password for My FlashRouters.com Customer Account?

To reset your password, you’ll want to click the “Account” icon in the upper right hand corner on our main website (Flashrouters.com). Once clicked, a menu will open where you can enter your login information, or select the “Forgot Password” button to trigger a reset email.

If you’re still having issues accessing your FlashRouters.com customer account after attempting a password reset, please reach out to us at support@flashrouters.com for further assistance.

What Payment Methods does FlashRouters Accept?

We accept Apple Pay, Google Pay, and all major cred/debit card providers on our payment method options page during checkout.


If you’d like to complete a purchase using PayPal as a payment method, please contact our team at support@flashrouters.com to request an invoice.

Can I Make Change/Update/Cancel My Order?

We strive to process and ship all orders within one business day. If you wish to make changes or cancellations, please contact us within 24 hours of placing your order at support@flashrouters.com with your order number and the changes you’d like to make.

While we will do our best to accommodate your request, please note that we cannot guarantee changes or cancellations.

Please note that if you need to update the shipping address, the order will require reapproval through our fraud prevention system with the new address.

Trouble Checking Out

Some customers have found that trying the methods below have helped solve any checkout errors they may have encountered:

⚡️Clearing cache
⚡️Refreshing web page
⚡️Switching web browsers
⚡️Using an incognito/private window
⚡️Confirming all billing information is accurate
⚡️Disable VPN if one is enabled
⚡️Disable Ad & Script Blockers if enabled
⚡️If you’re using a mobile device, switching to a computer or laptop would be ideal.

CyberGhost Merlin OpenVPN Setup

TeamFlashRouters · Mar 30, 2023 ·

Preparing for CyberGhost Setup

Obtain your CyberGhost OpenVPN information

If you are not already a CyberGhost user Sign Up Now.

1. Log in to your account on the CyberGhost website.

CyberGhost Website Login

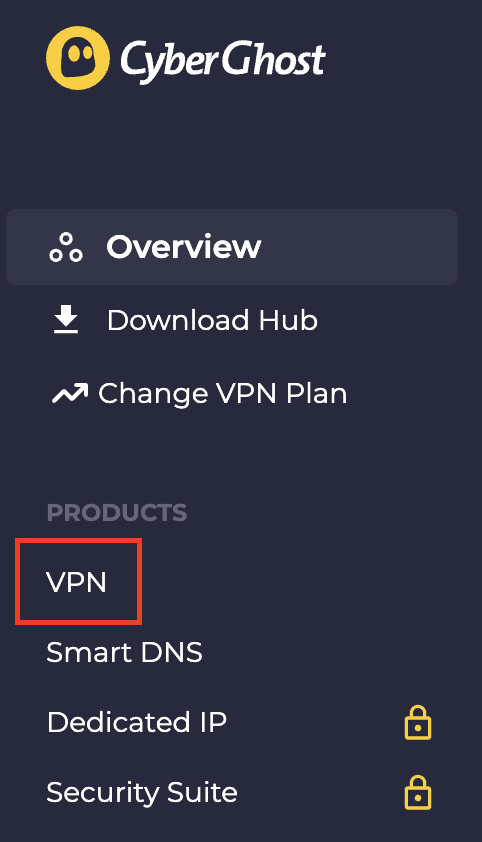
2. Select VPN.

CyberGhost VPN

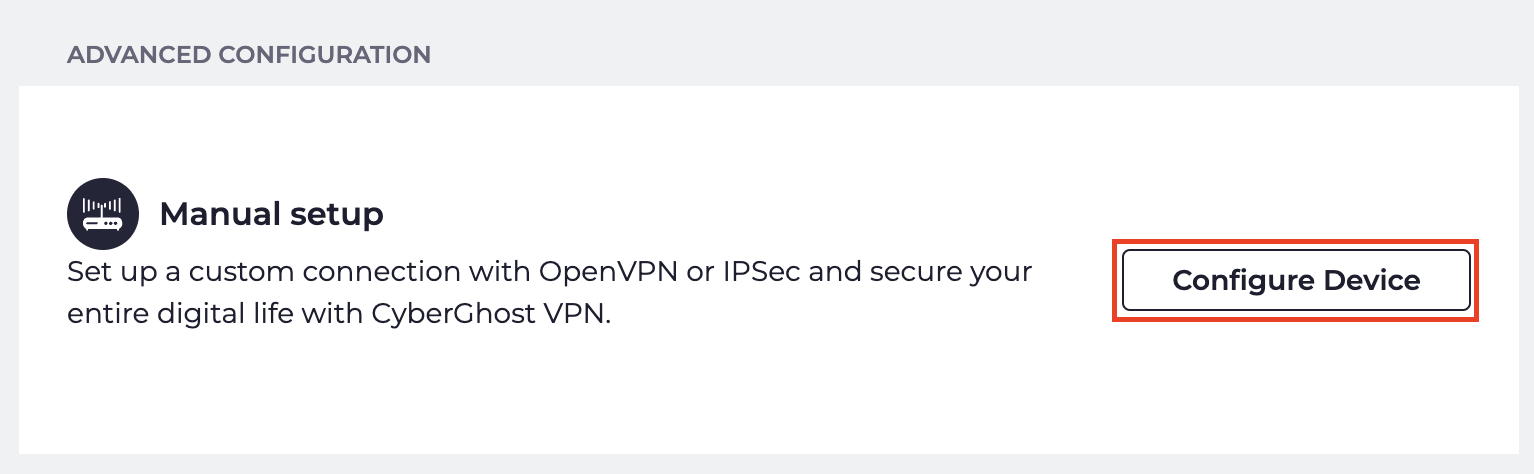
3. Click Configure New Device.

CyberGhost Configure Device

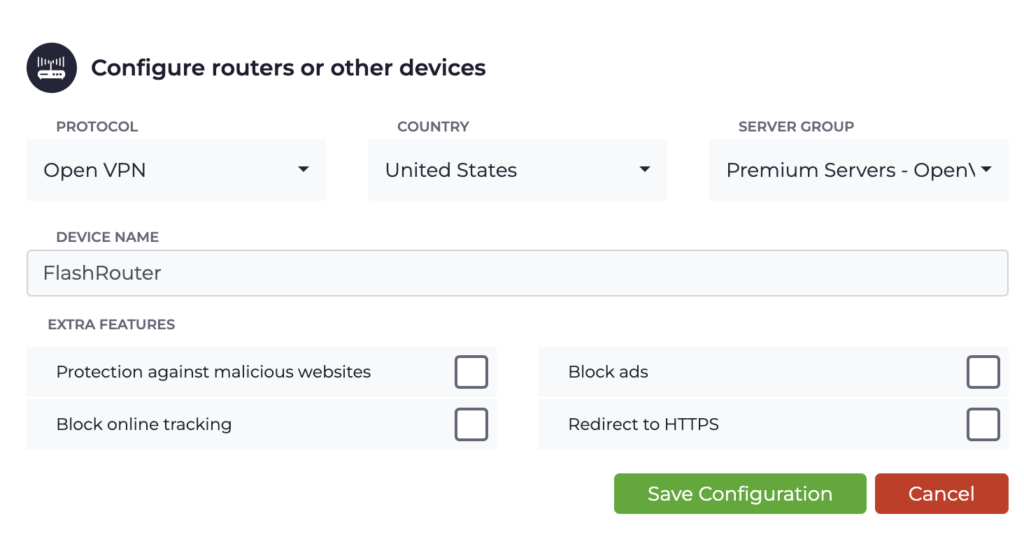
4. Set Protocol to OpenVPN. Select the Country you would like to connect to. Select the Server Group. Name the device in the Device Name field. Click Save Configuration.

CyberGhost protocol and location

5. Press View configuration.

CyberGhost view configuration

6. Copy the Username, and Password that appear to a notepad, since you will need this information later in the setup process. Click Download Configuration.

CyberGhost Website OpenVPN Configuration Files Generator 1

Open the folder that was downloaded. Then open the ca.crt the client.crt, and client.key files with NotePad++ for Windows or TextEdit for Apple. All CyberGhost servers have different keys and certificates.

Merlin Router Setup for CyberGhost

Login to Asus Merlin firmware settings in a browser on any computer or smart device connected to the Merlin FlashRouter’s network.

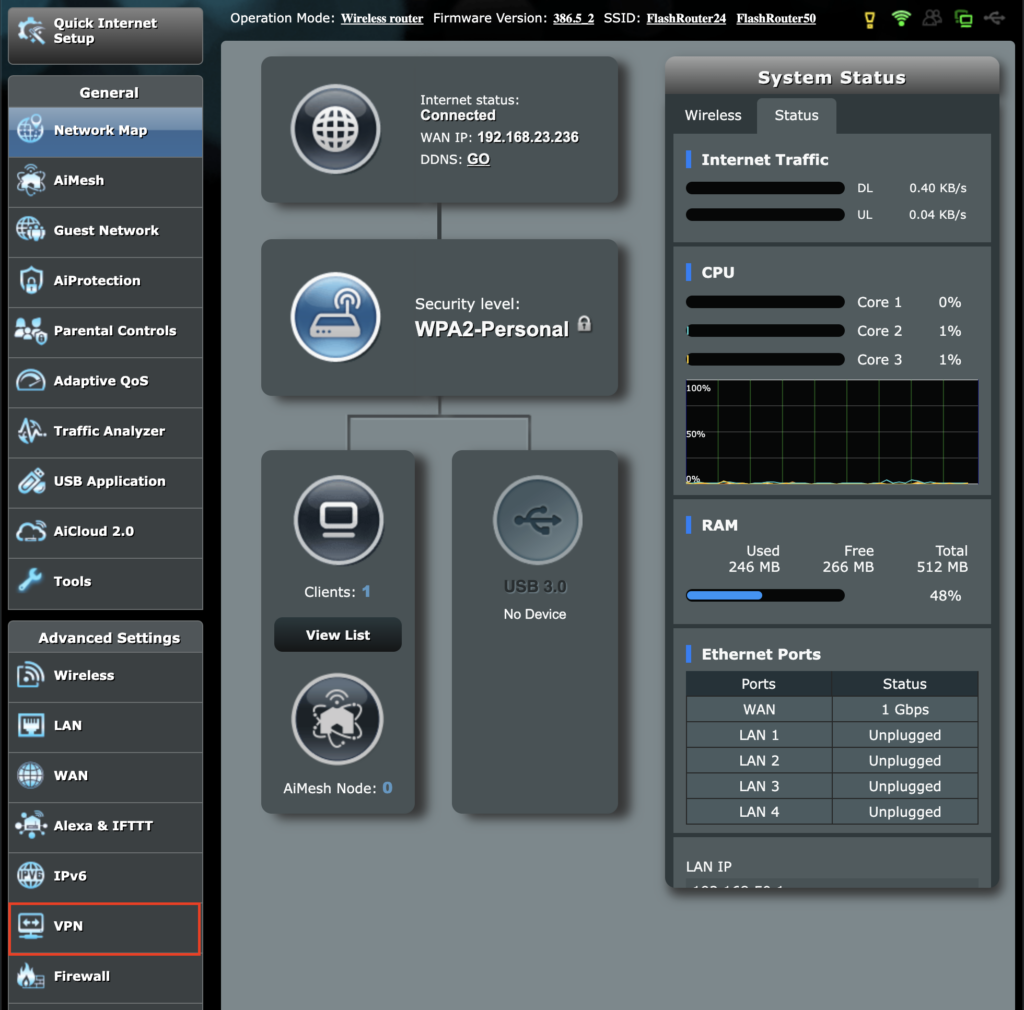
1. Navigate to the VPN tab.

Merlin VPN Tab

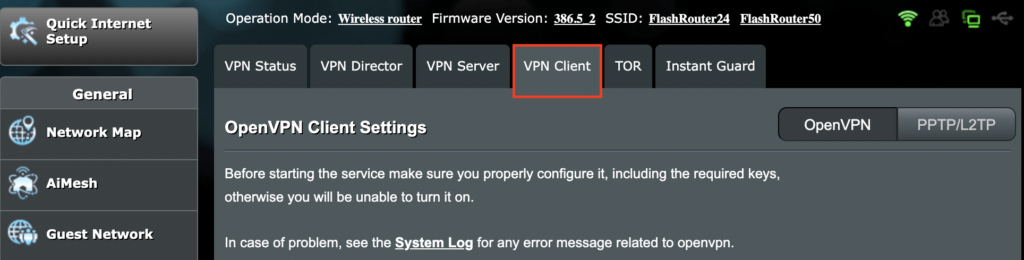
2. Navigate to the VPN Client tab.

Merlin VPN Client Tab

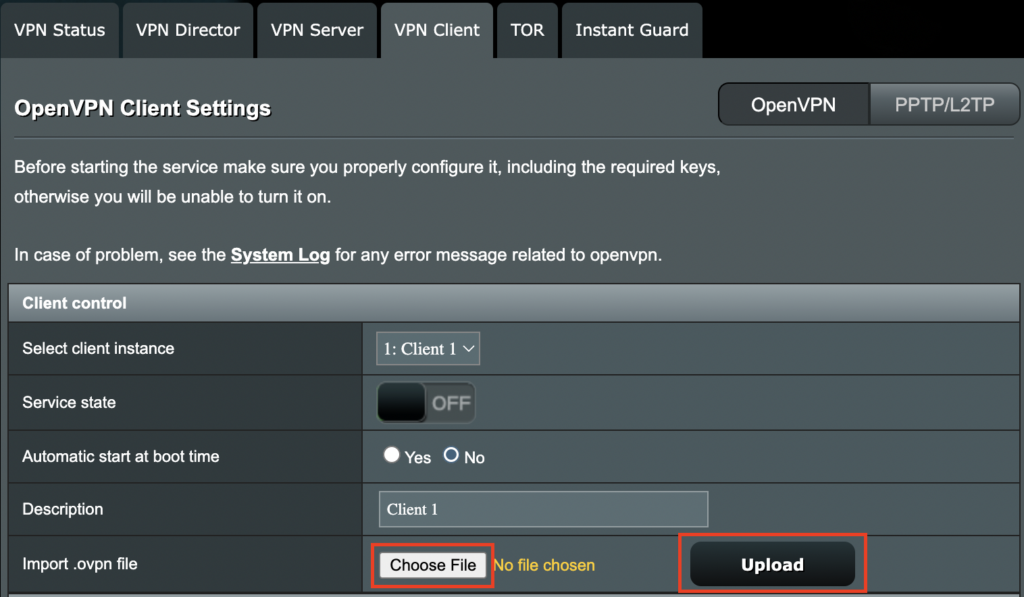
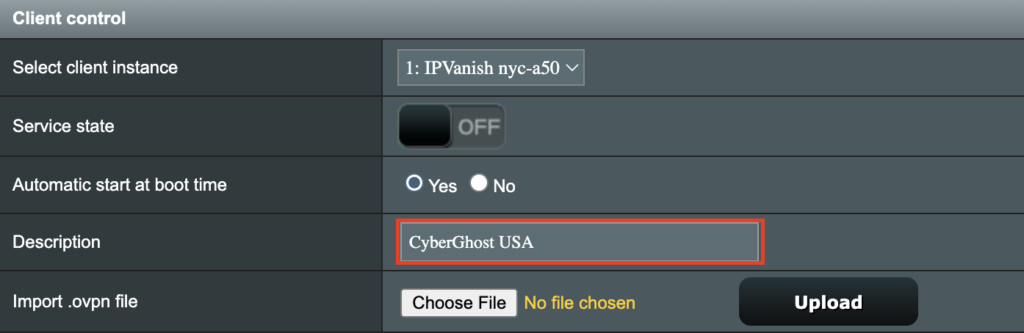
3. Click Choose file and select the .ovpn file from the folder you downloaded earlier. Then click Upload.

Merlin Choose File Upload

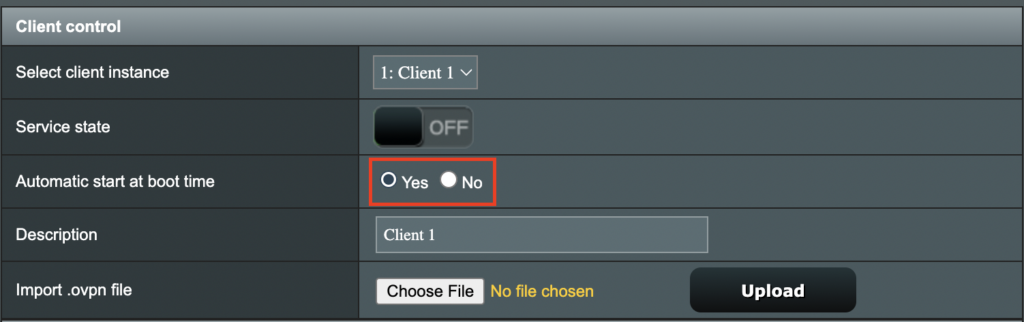
4. Set Automatic Start at boot time to Yes if you want the VPN connection to begin automatically when the router is powered off and back on.

Merlin Automatic Start at boot time

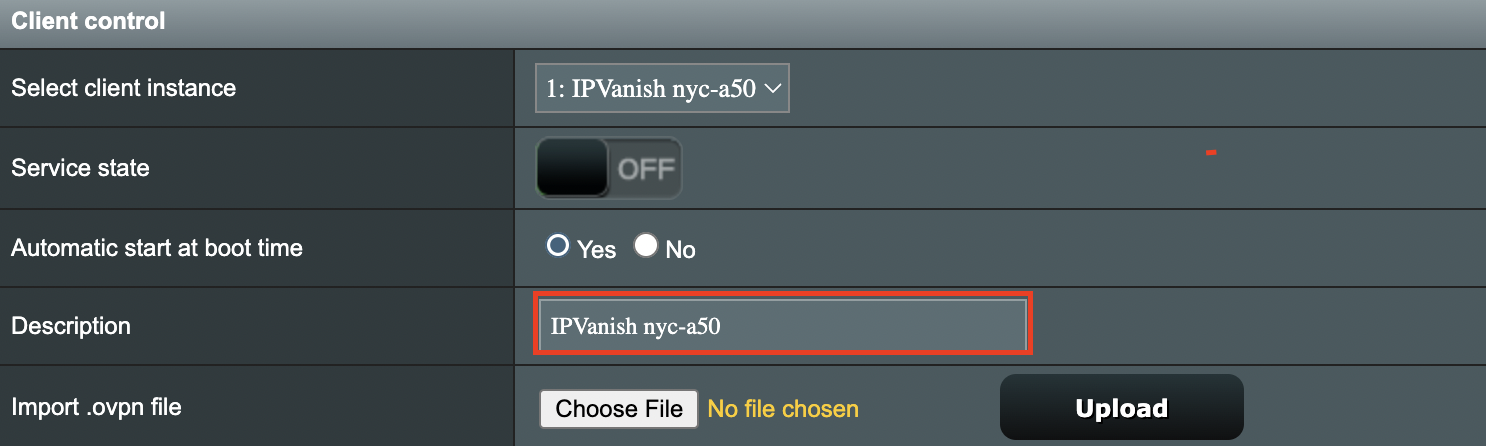
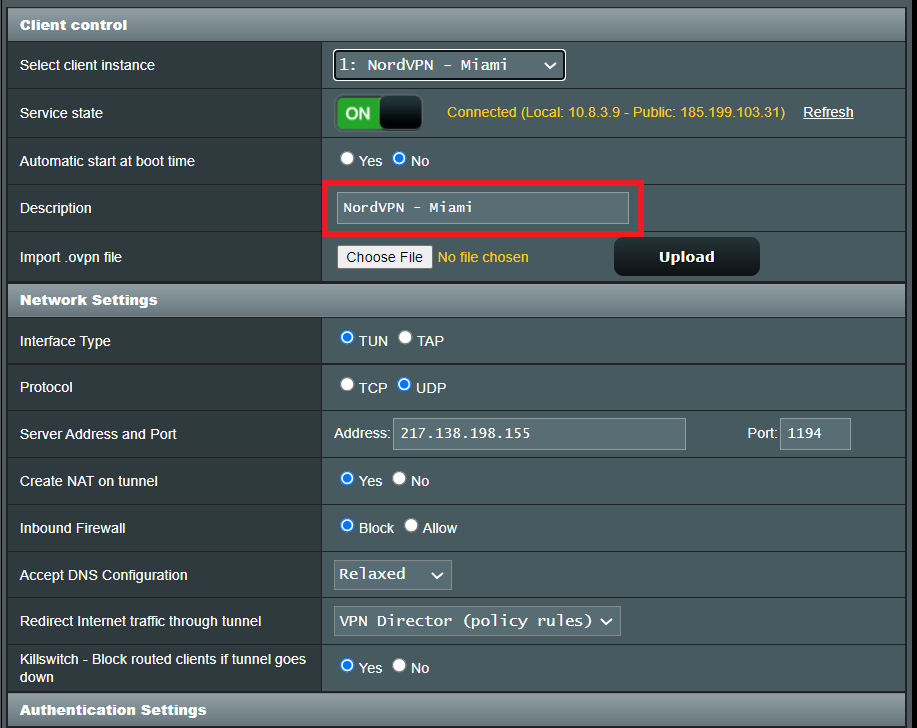
5. In the Description field enter in the name you’d like to use for this OpenVPN Client profile. We typically advise entering in the location here. Our example server was in USA so I have entered in CyberGhost USA.

Merlin CyberGhost Description field

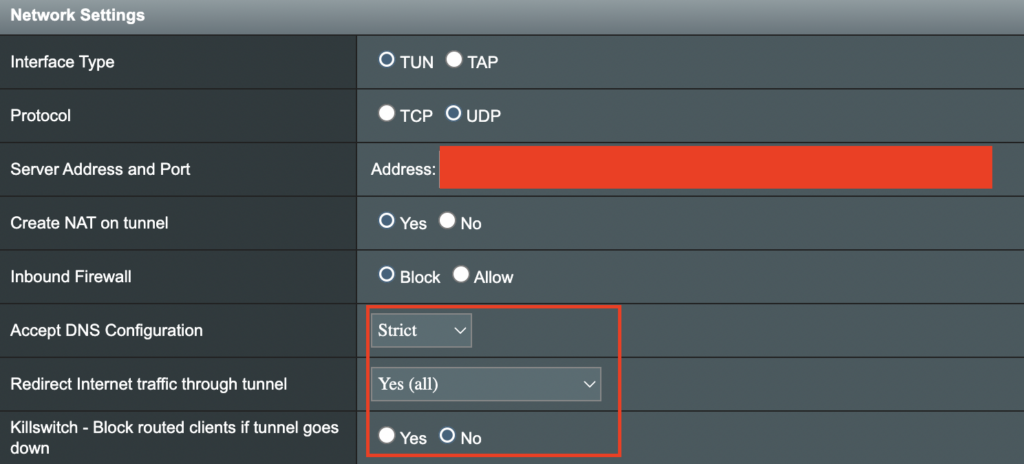
6. Set Accept DNS Configuration to Strict. Set Redirect Internet traffic through tunnel to Yes (all). Set Kill Switch to Yes or No depending on if you want the Internet to be killed if the VPN connection drops.

Merlin Accept DNS configuration Redirect Internet and Kill Switch

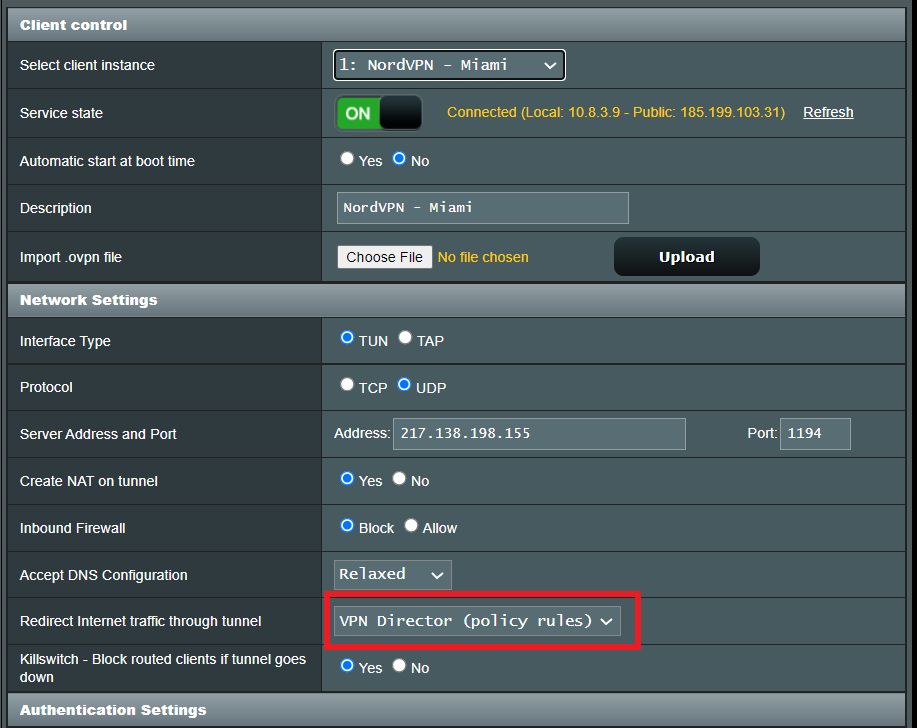
If you only want certain devices to connect to the OpenVPN Client profile you are setting up instead of all the devices connected to the FlashRouter’s network please set the Redirect Internet traffic through tunnel to VPN Director. Then complete the instructions on this page and then view our VPN Director guide.

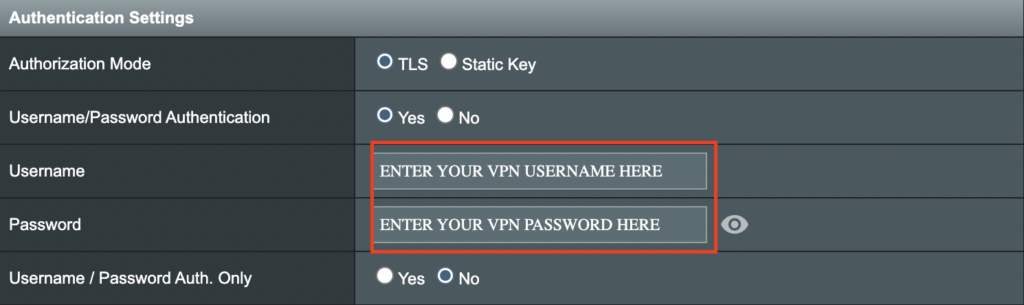
7. Enter your CyberGhost OpenVPN username and password that you obtained earlier. Do not enter your account login.

Merlin VPN Username and Password

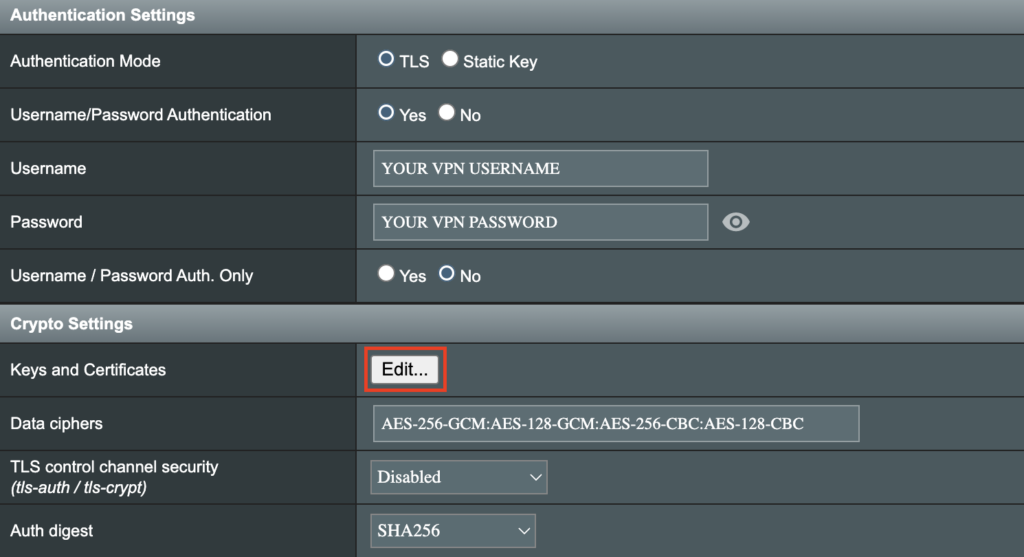
8. Click the Edit button in the Keys and Certificates area.

Merlin Keys and Certificates Edit button

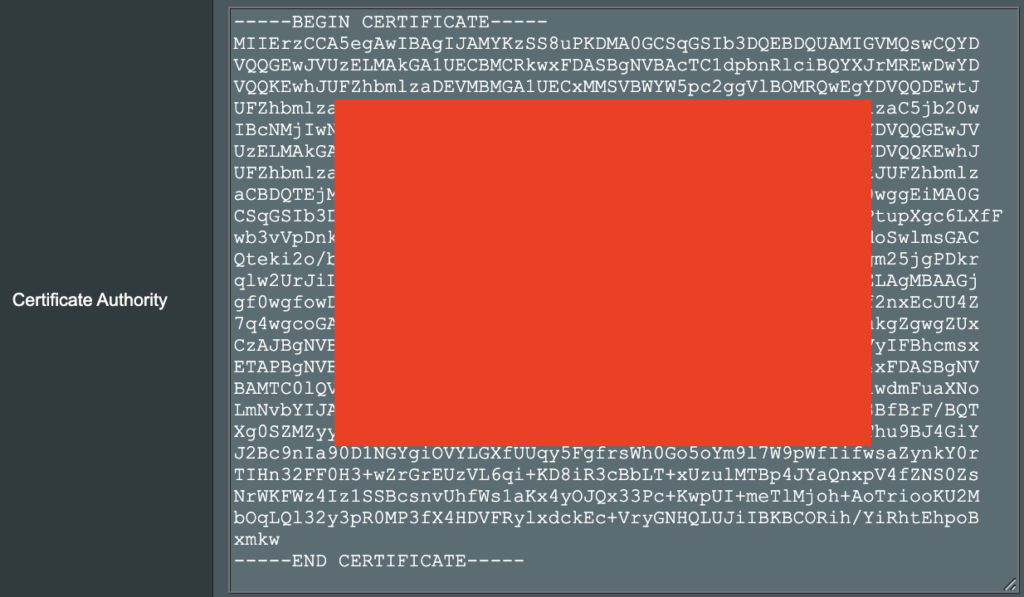
9. In the Certificate Authority field paste in the entire content of the ca.crt file.

—– BEGIN xxx —– / —– END xxx —– block (including those two lines).

Merlin Certificate Authority

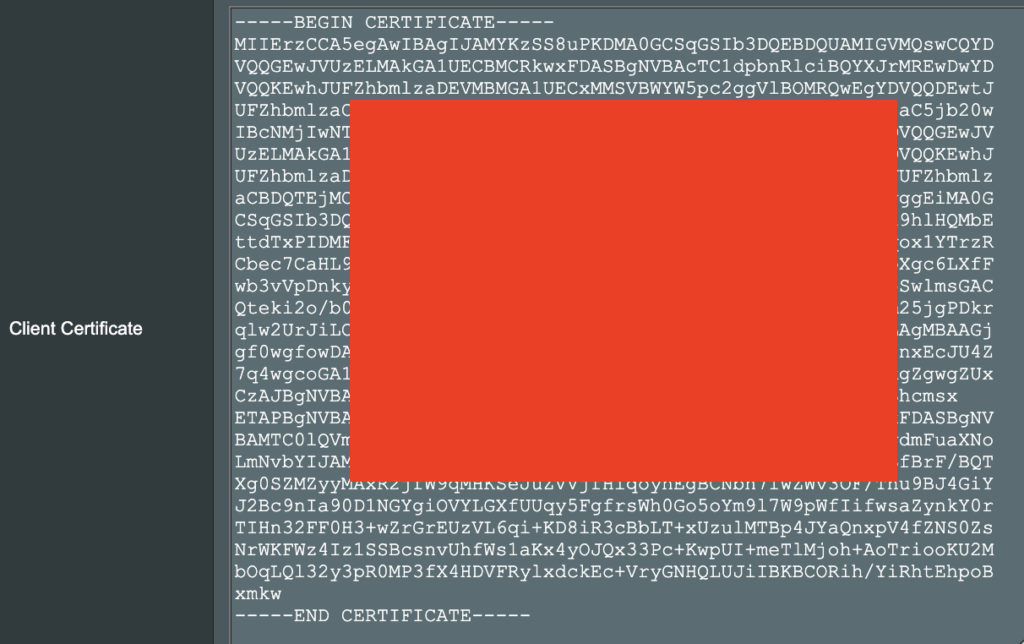
10. In the Client Certificate field paste in the entire content of the client.crt file.

—– BEGIN xxx —– / —– END xxx —– block (including those two lines).

Merlin Client Certificate

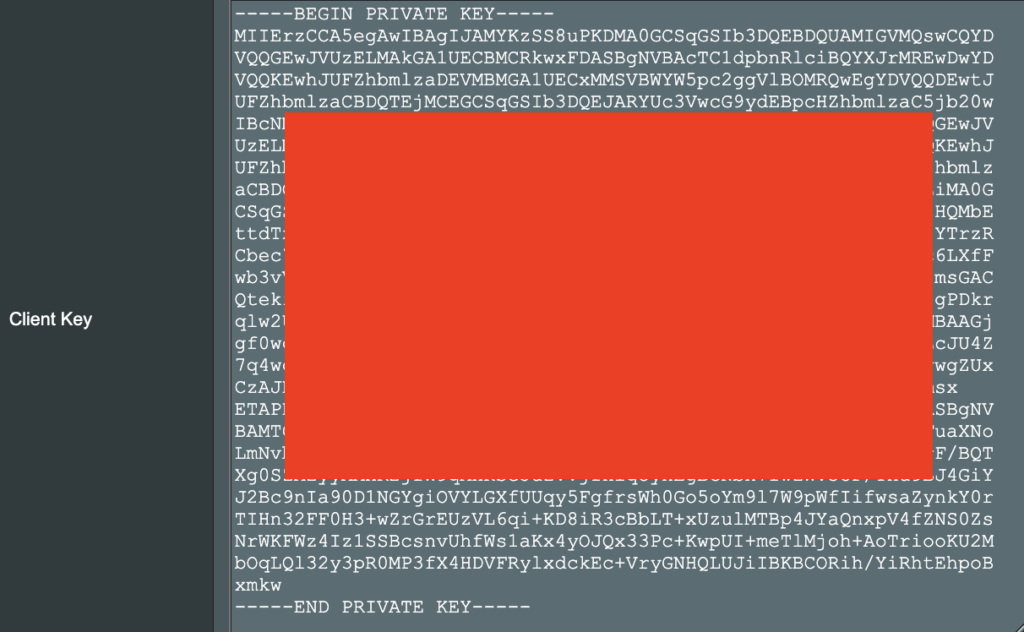
11. In the Client Key field paste in the entire content of the client.key file.

—– BEGIN xxx —– / —– END xxx —– block (including those two lines).

Merlin Client Key

12. Click Save at the bottom of that window.

13. Click Apply at the bottom of the page.

14. At the top of the page set the Service State toggle to ON to activate the VPN connection.

Merlin Service State All Providers

Verify a successful CyberGhost connection

  1. You should now see a CONNECTED message.
  2. Visit What is my IP Address from a private/incognito browser to verify your new IP address and virtual location.

TROUBLESHOOTING

Still having issues? Visit the FR Privacy App Troubleshooting section.

Troubleshoot Here

ExpressVPN Merlin OpenVPN Setup

TeamFlashRouters · Jan 11, 2023 ·

Preparing for ExpressVPN Merlin Setup

Obtain your ExpressVPN OpenVPN Information

If you are not already an ExpressVPN user Sign Up Now.

1. Log in to your account on the ExpressVPN website.

ExpressVPN login page

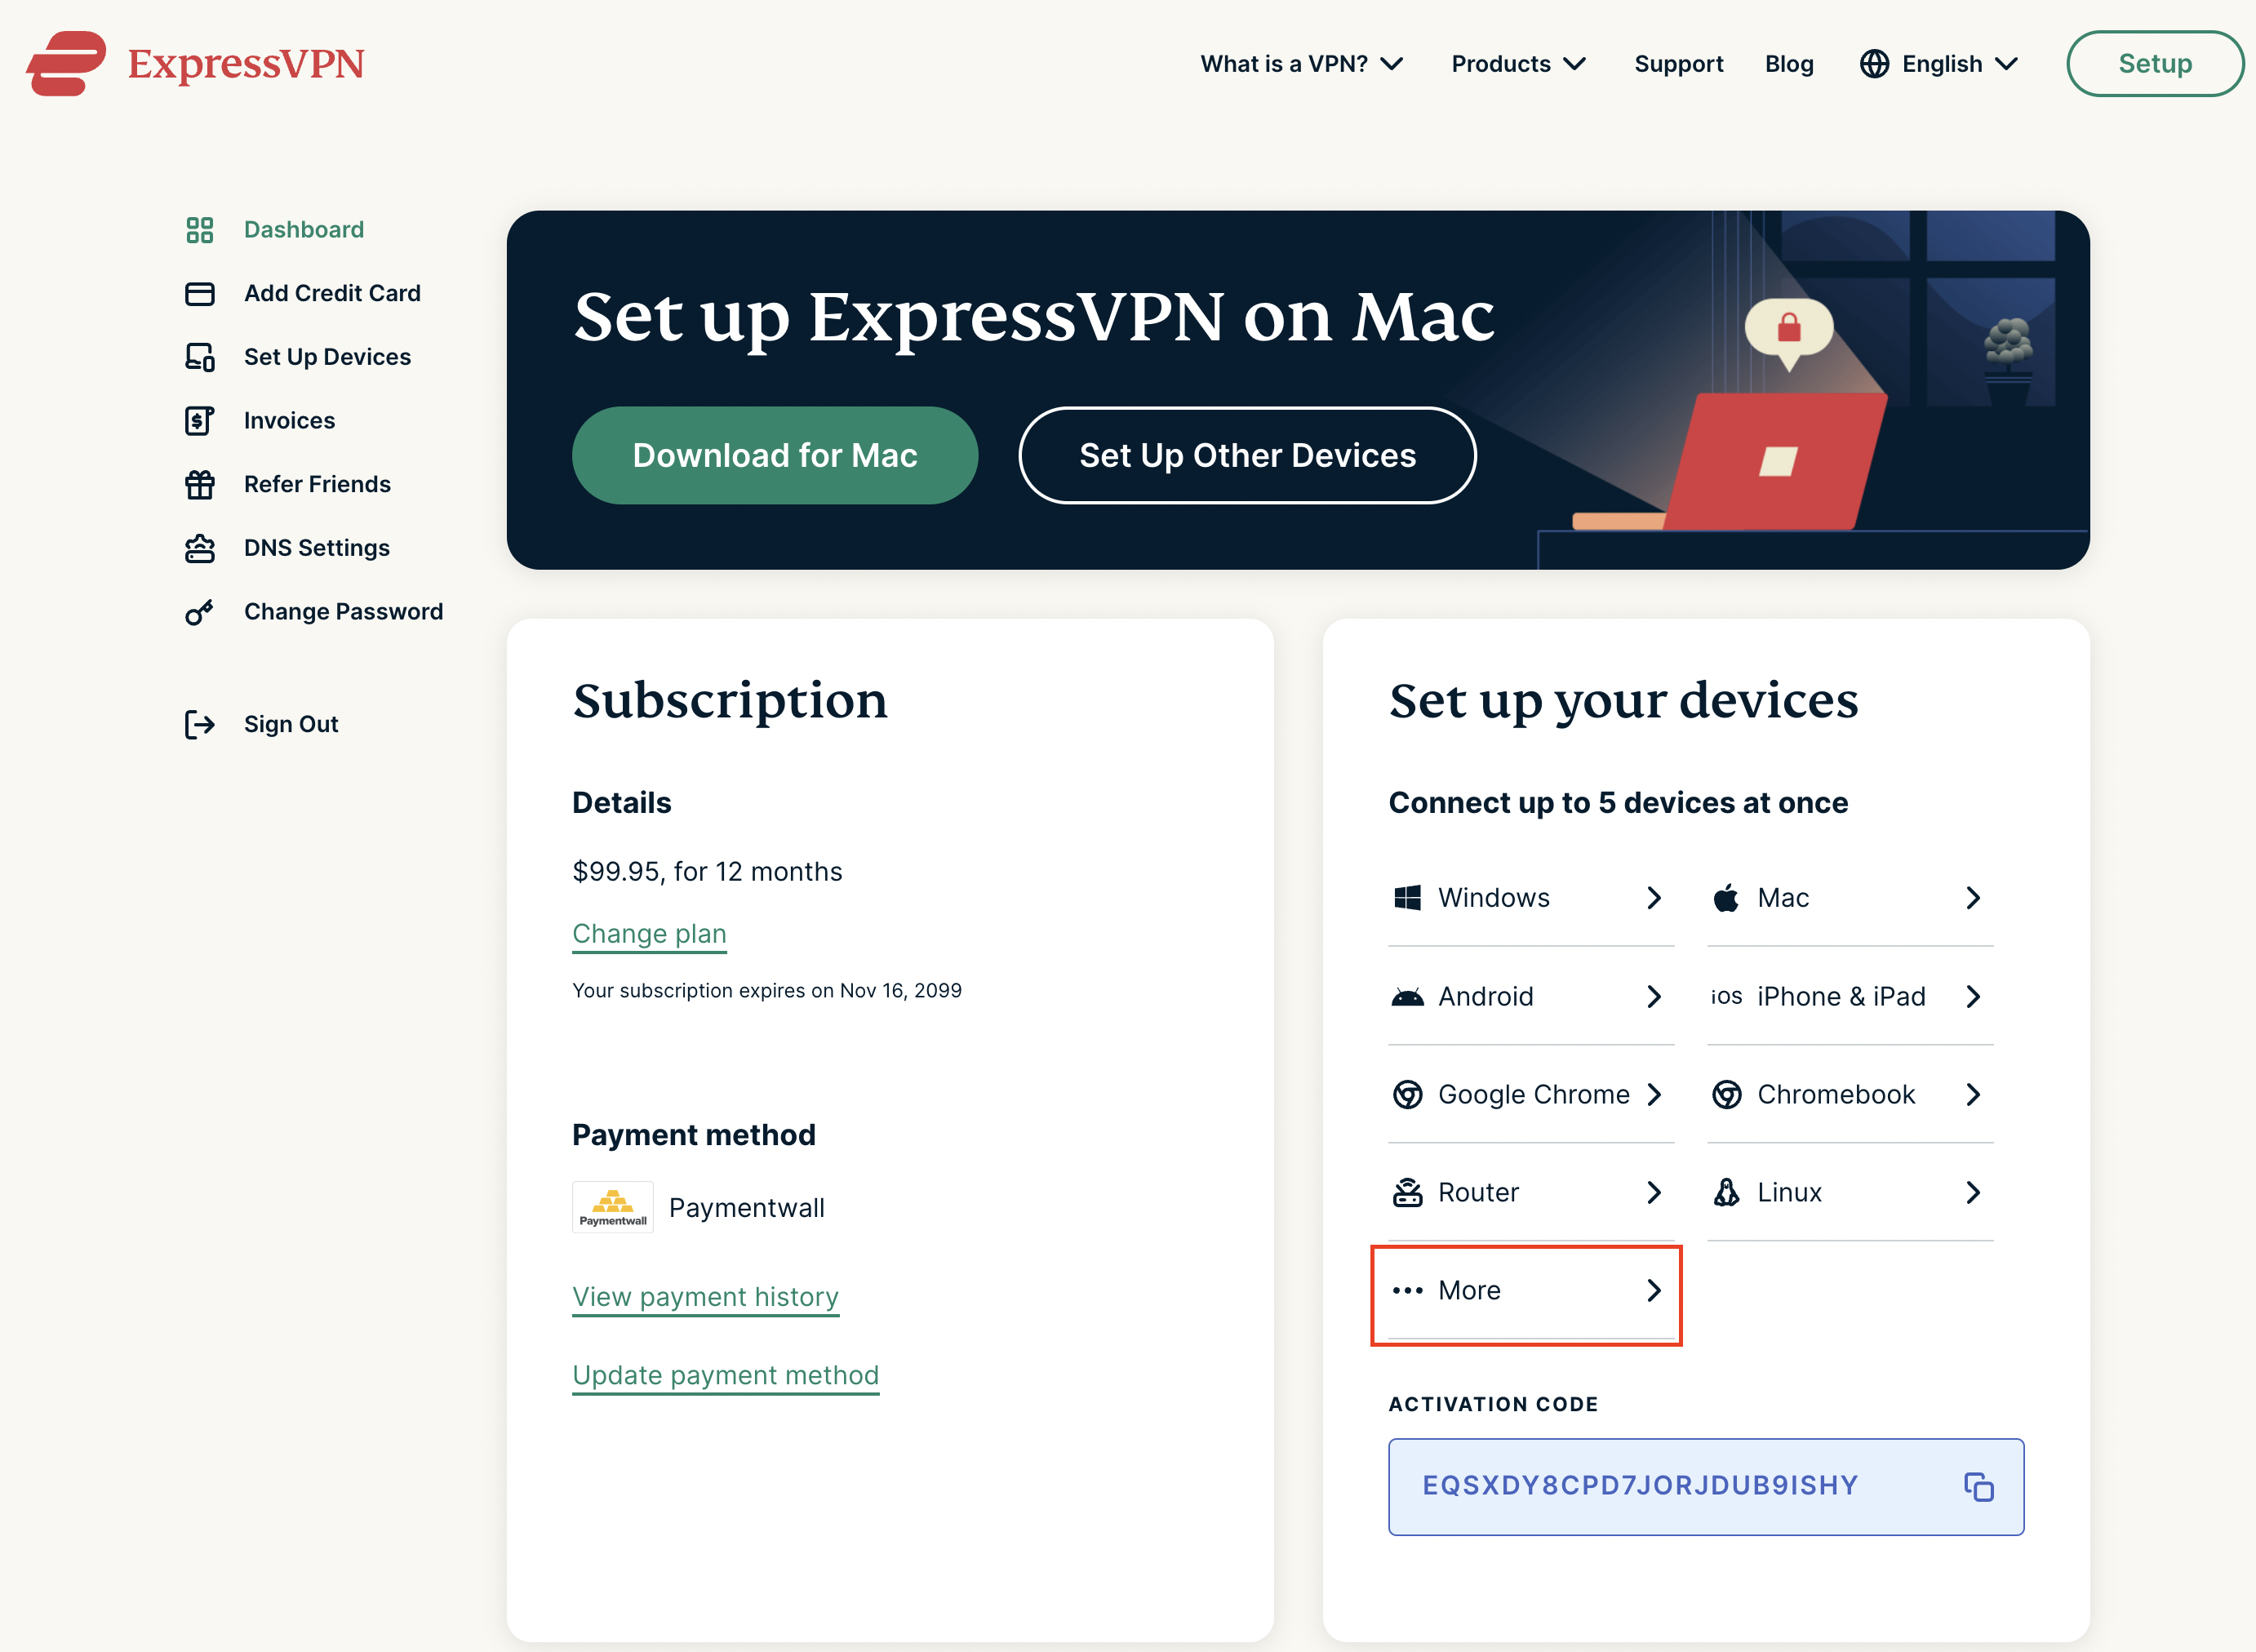
2. Successfully log in with your account information. Select More.

3. Select Manual Configuration and copy the Username and Password that are displayed on the right hand side of the screen.

ExpressVPN Manual Configuration
ExpressVPN username and password

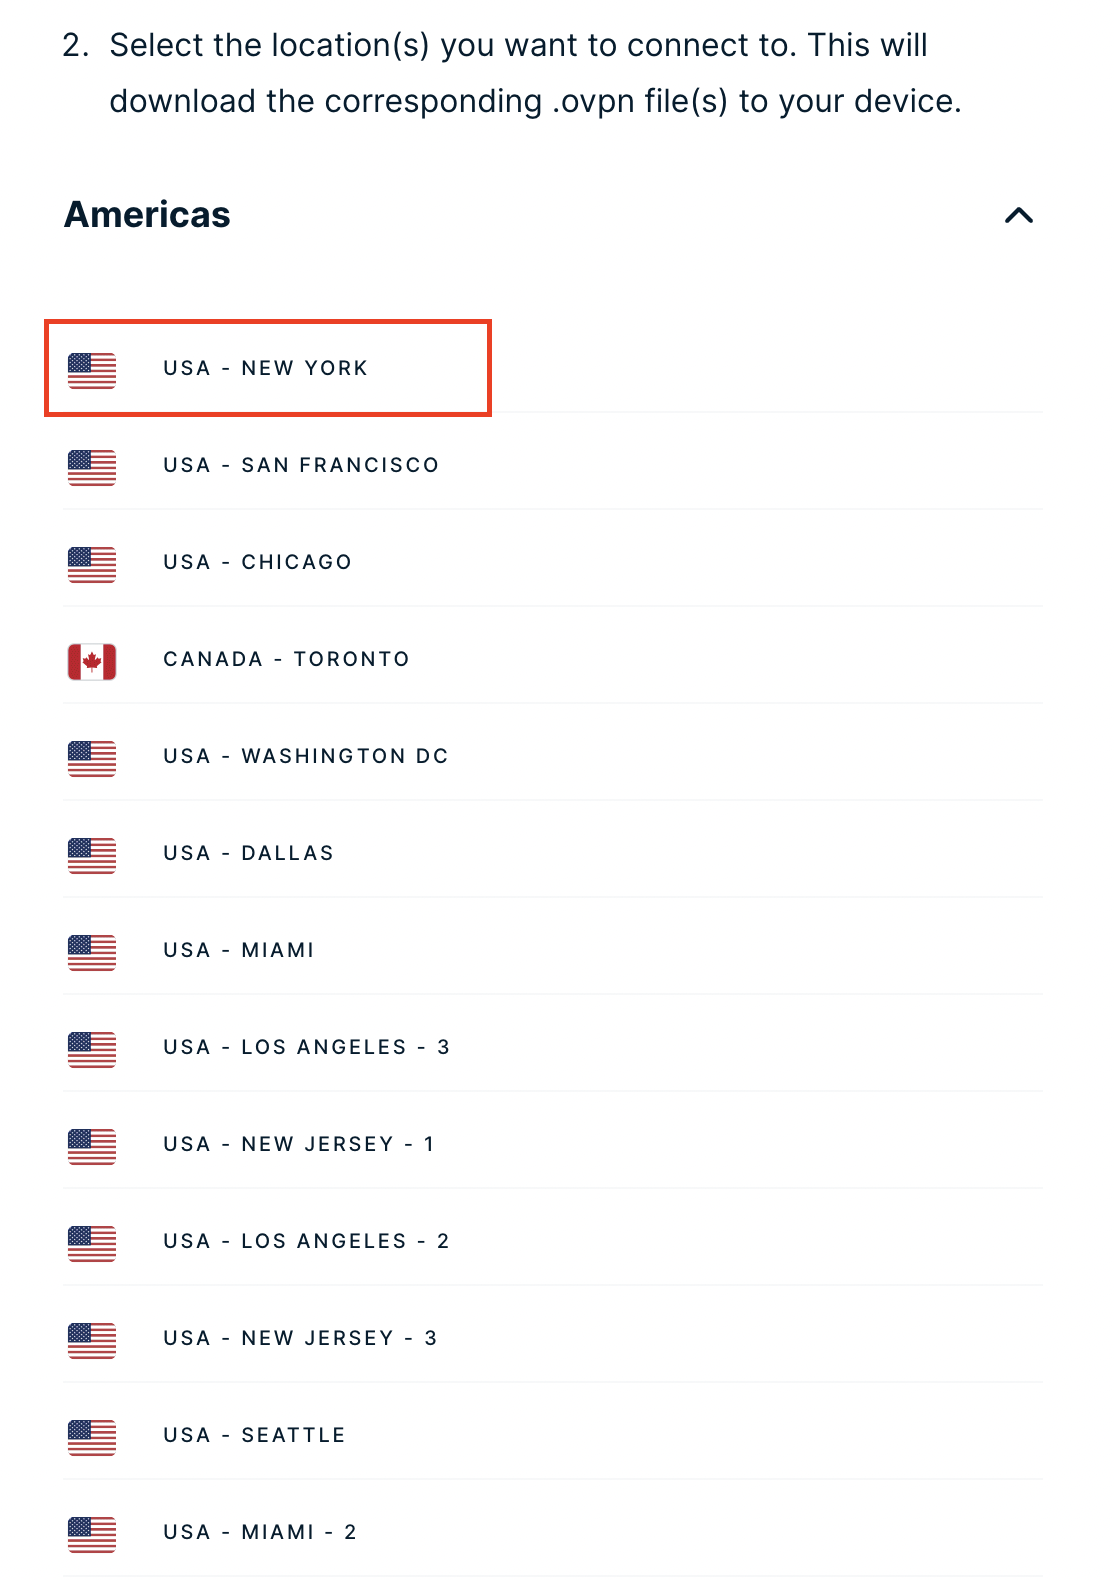
4. Click the Server Location that you want to connect to. This will download a .ovpn file to your computer that we will use later on. There is no need to open the file. For this example I have selected New York but feel free to select any server listed there.

ExpressVPN Download .ovpn file

Merlin Router Setup for ExpressVPN

Login to Asus Merlin firmware settings in a browser on any computer or smart device connected to the Merlin FlashRouter’s network.

1. Navigate to the VPN tab.

Merlin VPN Tab

2. Navigate to the VPN Client tab.

Merlin VPN Client Tab

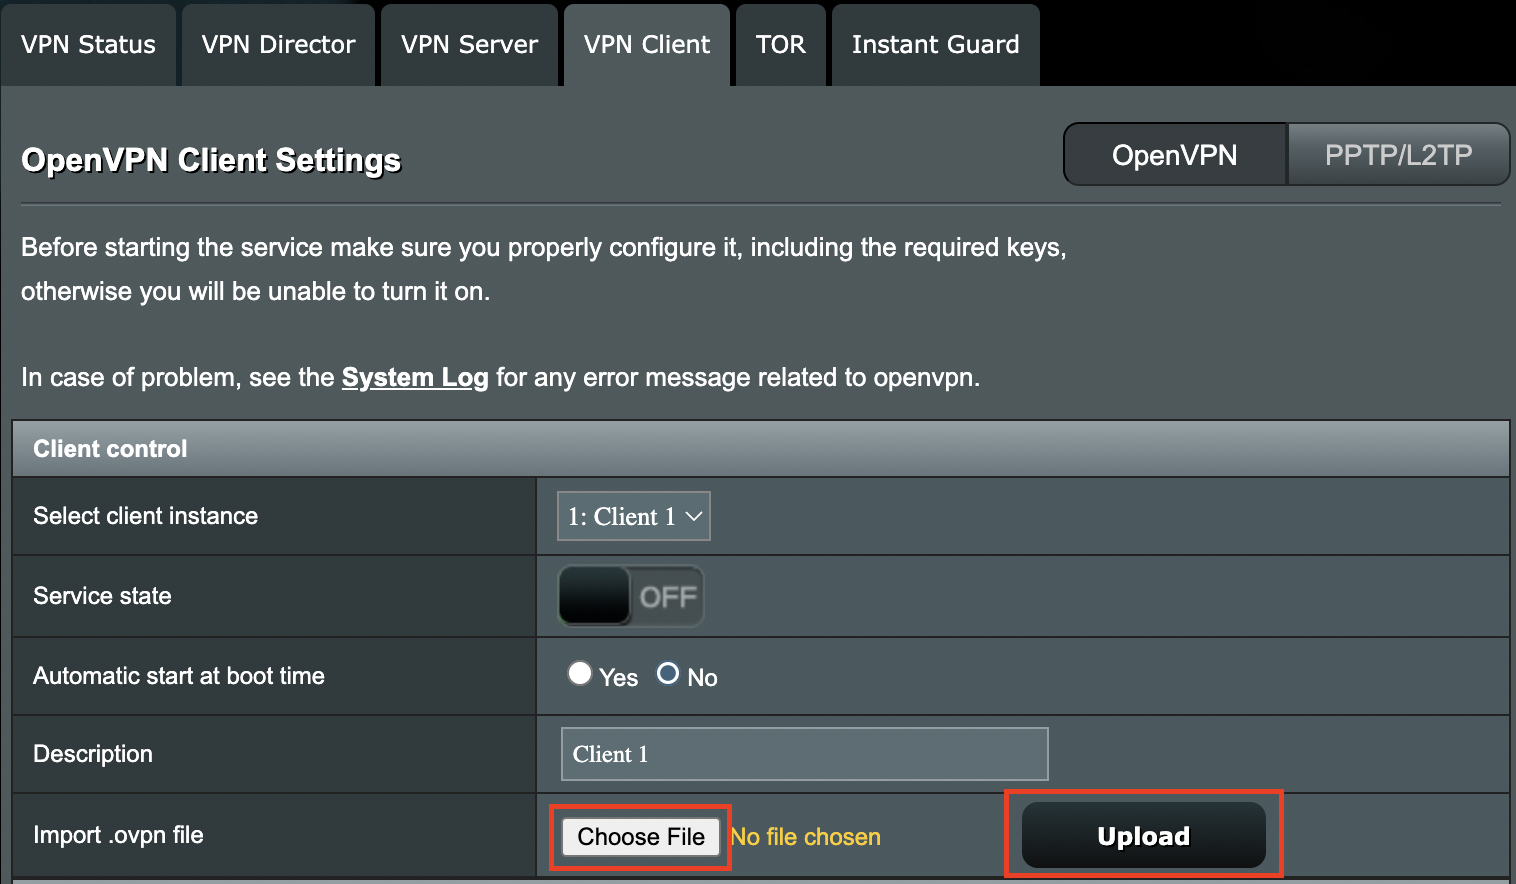
3. Click Choose file and select the .ovpn file you downloaded earlier. Then click Upload.

Merlin Choose File Upload

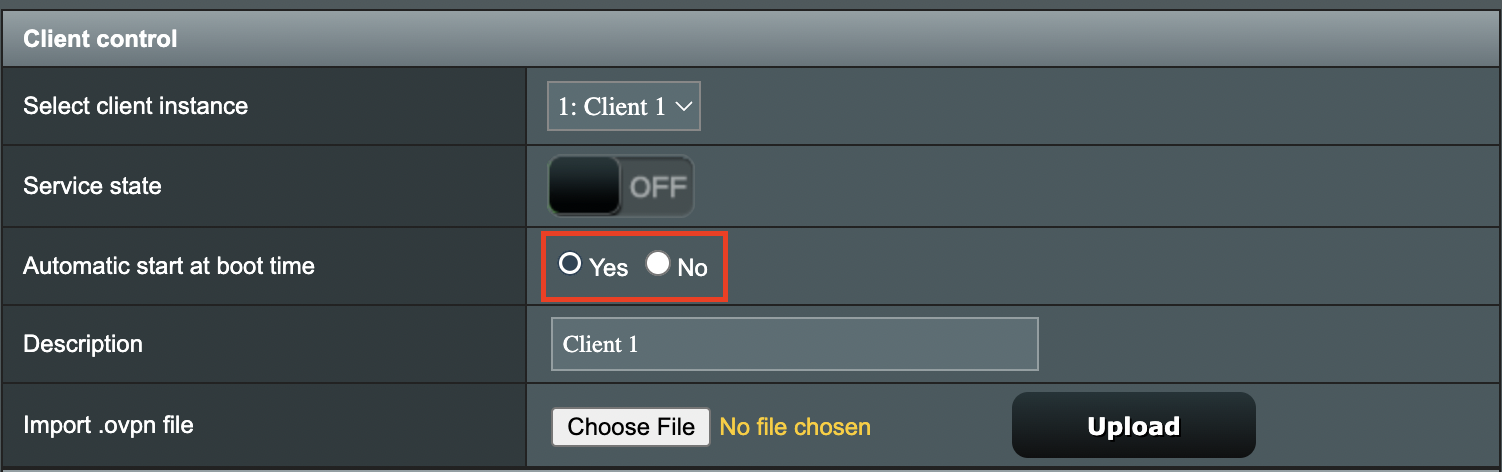
4. Set Automatic Start at boot time to Yes if you want the VPN connection to begin automatically when the router is powered off and back on.

Merlin Automatic Start at boot time

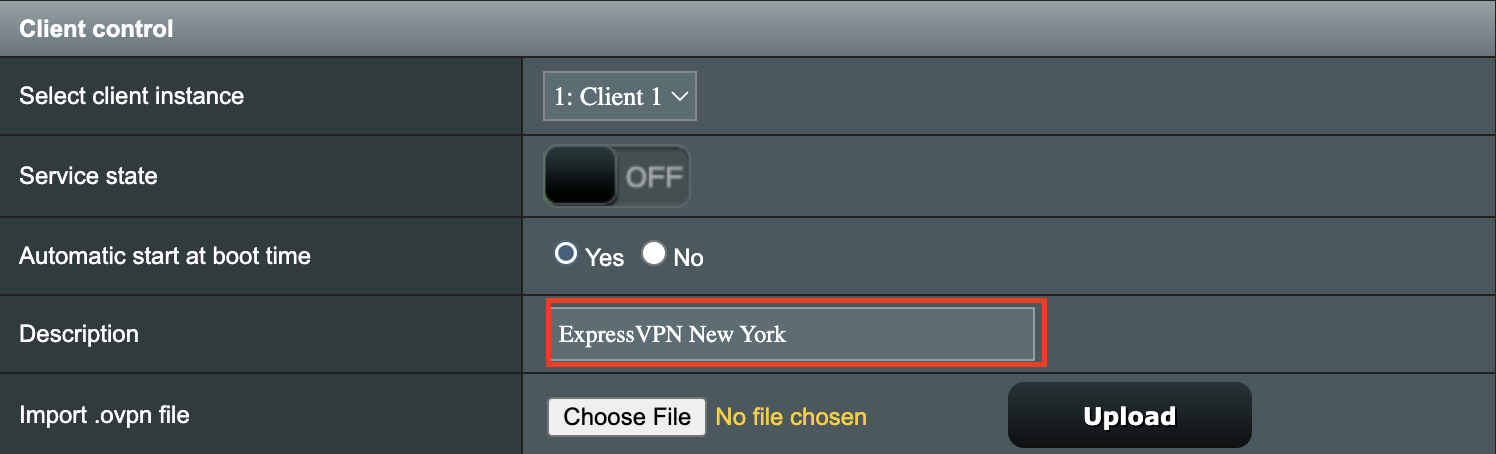
5. In the Description field enter in the name you’d like to use for this OpenVPN Client profile. We typically advise entering in the location or server number here. Our example server was in New York so I have entered in ExpressVPN New York.

Merlin ExpressVPN Description

6. Set Accept DNS Configuration to Strict. Set Redirect Internet traffic through tunnel to Yes (all). Set Kill Switch to Yes or No depending on if you want the Internet to be killed if the VPN connection drops.

Merlin Accept DNS configuration Redirect Internet and Kill Switch

If you only want certain devices to connect to the OpenVPN Client profile you are setting up instead of all the devices connected to the FlashRouter’s network please set the Redirect Internet traffic through tunnel to VPN Director. Then complete the instructions on this page and then view our VPN Director guide.

7. Enter your ExpressVPN username and password that you obtained earlier in the Username and Password. Note that these are different from your ExpressVPN email login and password.

Merlin VPN Username and Password

8. Click Apply at the bottom of the page.

9. At the top of the page set the Service State toggle to ON to activate the VPN connection.

Merlin Service State

Verify a successful ExpressVPN connection

  1. You should now see a CONNECTED message.
  2. Visit ExpressVPN’s IP Check to verify your new IP address and virtual location.

In some cases you may notice that the location is not showing the same location as the server you have input in your router settings; this is because geo tracking tools are often tricked by VPN connections. As long as you see an IP address that is not the same as your normal Internet IP address then you are indeed connected to ExpressVPN.

How to change the ExpressVPN server

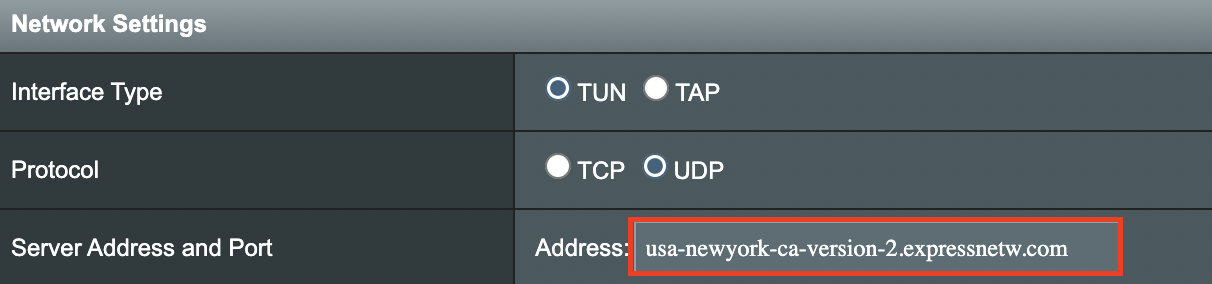
  1. Copy the new ExpressVPN server address from the below server list.
  2. Paste the server into the Server Address field.
  3. Click Apply at the bottom of the page.

ExpressVPN Server Addresses

Americas

usa-atlanta-ca-version-2.expressnetw.com
usa-boston-ca-version-2.expressnetw.com
usa-chicago-ca-version-2.expressnetw.com
usa-dallas-ca-version-2.expressnetw.com
usa-dallas-2-ca-version-2.expressnetw.com
usa-denver-ca-version-2.expressnetw.com
usa-kansascity-ca-version-2.expressnetw.com
usa-losangeles-ca-version-2.expressnetw.com
usa-losangeles-1-ca-version-2.expressnetw.com
usa-losangeles-2-ca-version-2.expressnetw.com
usa-losangeles-3-ca-version-2.expressnetw.com
usa-los-angeles-4-ca-version-2.expressnetw.com
usa-miami-ca-version-2.expressnetw.com
usa-miami-2-ca-version-2.expressnetw.com
usa-minneapolis-ca-version-2.expressnetw.com
usa-newjersey-1-ca-version-2.expressnetw.com
usa-newjersey-3-ca-version-2.expressnetw.com
usa-newyork-ca-version-2.expressnetw.com
us-new-york-2-ca-version-2.expressnetw.com
usa-phoenix-ca-version-2.expressnetw.com
usa-saltlakecity-ca-version-2.expressnetw.com
usa-sanfrancisco-ca-version-2.expressnetw.com
usa-sanjose-ca-version-2.expressnetw.com
usa-seattle-ca-version-2.expressnetw.com
usa-tampa-1-ca-version-2.expressnetw.com
usa-virginia-ca-version-2.expressnetw.com
usa-washingtondc-ca-version-2.expressnetw.com
usa-washingtondc-2-ca-version-2.expressnetw.com
canada-montreal-ca-version-2.expressnetw.com
canada-toronto-ca-version-2.expressnetw.com
canada-toronto-2-ca-version-2.expressnetw.com
canada-vancouver-ca-version-2.expressnetw.com
mexico-ca-version-2.expressnetw.com
argentina-ca-version-2.expressnetw.com
brazil-ca-version-2.expressnetw.com
brazil-2-ca-version-2.expressnetw.com
chile-ca-version-2.expressnetw.com
colombia-ca-version-2.expressnetw.com
costarica-ca-version-2.expressnetw.com
ecuador-ca-version-2.expressnetw.com
guatemala-ca-version-2.expressnetw.com
panama-ca-version-2.expressnetw.com
peru-ca-version-2.expressnetw.com
uruguay-ca-version-2.expressnetw.com
venezuela-ca-version-2.expressnetw.com

Europe

uk-berkshire-ca-version-2.expressnetw.com
uk-berkshire-2-ca-version-2.expressnetw.com
uk-docklands-ca-version-2.expressnetw.com
uk-east-london-ca-version-2.expressnetw.com
uk-kent-ca-version-2.expressnetw.com
uk-london-ca-version-2.expressnetw.com
france-paris-1-ca-version-2.expressnetw.com
france-paris-2-ca-version-2.expressnetw.com
france-strasbourg-ca-version-2.expressnetw.com
germany-darmstadt-ca-version-2.expressnetw.com
germany-frankfurt-1-ca-version-2.expressnetw.com
germany-frankfurt-2-ca-version-2.expressnetw.com
germany-nuremberg-ca-version-2.expressnetw.com
italy-cosenza-ca-version-2.expressnetw.com
italy-milan-ca-version-2.expressnetw.com
netherlands-amsterdam-ca-version-2.expressnetw.com
netherlands-rotterdam-ca-version-2.expressnetw.com
netherlands-thehague-ca-version-2.expressnetw.com
spain-barcelona-ca-version-2.expressnetw.com
spain-ca-version-2.expressnetw.com
sweden-ca-version-2.expressnetw.com
sweden-2-ca-version-2.expressnetw.com
switzerland-ca-version-2.expressnetw.com
switzerland-2-ca-version-2.expressnetw.com
albania-ca-version-2.expressnetw.com
andorra-ca-version-2.expressnetw.com
armenia-ca-version-2.expressnetw.com
austria-ca-version-2.expressnetw.com
azerbaijan-ca-version-2.expressnetw.com
belarus-ca-version-2.expressnetw.com
belgium-ca-version-2.expressnetw.com
bosniaandherzegovina-ca-version-2.expressnetw.com
bulgaria-ca-version-2.expressnetw.com
croatia-ca-version-2.expressnetw.com
cyprus-ca-version-2.expressnetw.com
czechrepublic-ca-version-2.expressnetw.com
denmark-ca-version-2.expressnetw.com
estonia-ca-version-2.expressnetw.com
finland-ca-version-2.expressnetw.com
georgia-ca-version-2.expressnetw.com
greece-ca-version-2.expressnetw.com
hungary-ca-version-2.expressnetw.com
iceland-ca-version-2.expressnetw.com
ireland-ca-version-2.expressnetw.com
isleofman-ca-version-2.expressnetw.com
jersey-ca-version-2.expressnetw.com
latvia-ca-version-2.expressnetw.com
liechtenstein-ca-version-2.expressnetw.com
lithuania-ca-version-2.expressnetw.com
luxembourg-ca-version-2.expressnetw.com
macedonia-ca-version-2.expressnetw.com
malta-ca-version-2.expressnetw.com
moldova-ca-version-2.expressnetw.com
monaco-ca-version-2.expressnetw.com
montenegro-ca-version-2.expressnetw.com
norway-ca-version-2.expressnetw.com
poland-ca-version-2.expressnetw.com
portugal-ca-version-2.expressnetw.com
romania-ca-version-2.expressnetw.com
serbia-ca-version-2.expressnetw.com
slovakia-ca-version-2.expressnetw.com
slovenia-ca-version-2.expressnetw.com
ukraine-ca-version-2.expressnetw.com

Asia Pacific

australia-brisbane-ca-version-2.expressnetw.com
australia-melbourne-ca-version-2.expressnetw.com
australia-perth-ca-version-2.expressnetw.com
australia-sydney-ca-version-2.expressnetw.com
australia-sydney-2-ca-version-2.expressnetw.com
australia-sydney-3-ca-version-2.expressnetw.com
hongkong-2-ca-version-2.expressnetw.com
hongkong4-ca-version-2.expressnetw.com
hongkong-1-ca-version-2.expressnetw.com
japan-tokyo-1-ca-version-2.expressnetw.com
japan-tokyo-2-ca-version-2.expressnetw.com
india-chennai-ca-version-2.expressnetw.com
india-mumbai-1-ca-version-2.expressnetw.com
singapore-cbd-ca-version-2.expressnetw.com
singapore-jurong-ca-version-2.expressnetw.com
southkorea-ca-version-2.expressnetw.com
southkorea2-ca-version-2.expressnetw.com
bangladesh-ca-version-2.expressnetw.com
bhutan-ca-version-2.expressnetw.com
brunei-ca-version-2.expressnetw.com
cambodia-ca-version-2.expressnetw.com
indonesia-ca-version-2.expressnetw.com
kazakhstan-ca-version-2.expressnetw.com
kyrgyzstan-ca-version-2.expressnetw.com
laos-ca-version-2.expressnetw.com
macau-ca-version-2.expressnetw.com
malaysia-ca-version-2.expressnetw.com
mongolia-ca-version-2.expressnetw.com
myanmar-ca-version-2.expressnetw.com
nepal-ca-version-2.expressnetw.com
newzealand-ca-version-2.expressnetw.com
pakistan-ca-version-2.expressnetw.com
ph-via-sing-ca-version-2.expressnetw.com
srilanka-ca-version-2.expressnetw.com
taiwan-3-ca-version-2.expressnetw.com
thailand-ca-version-2.expressnetw.com
vietnam-ca-version-2.expressnetw.com

Middle East and Africa

algeria-ca-version-2.expressnetw.com
israel-ca-version-2.expressnetw.com
kenya-ca-version-2.expressnetw.com
southafrica-ca-version-2.expressnetw.com

Merlin ExpressVPN change server location

TROUBLESHOOTING

Still having issues? Visit the VPN Troubleshooting section.

Troubleshoot Here

NordVPN Merlin OpenVPN Setup

TeamFlashRouters · Jan 11, 2023 ·

Preparing for NordVPN Merlin Setup

Obtain your NordVPN manual Username and Password

If you are not already an NordVPN user Sign Up Now.

1. Log in to your account on the NordVPN website.

NordVPN login

2. Click NordVPN on the left hand side and then click Setup NordVPN manually.

NordVPN setup manually

3. Enter in the verification code that was sent to your email.

NordVPN verify code

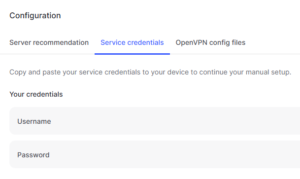
4. Copy and paste your NordVPN manual username and password to a secure location. This is the username and password you will enter into the router settings to connect to NordVPN.

NordVPN credentials

Download your NordVPN .ovpn file

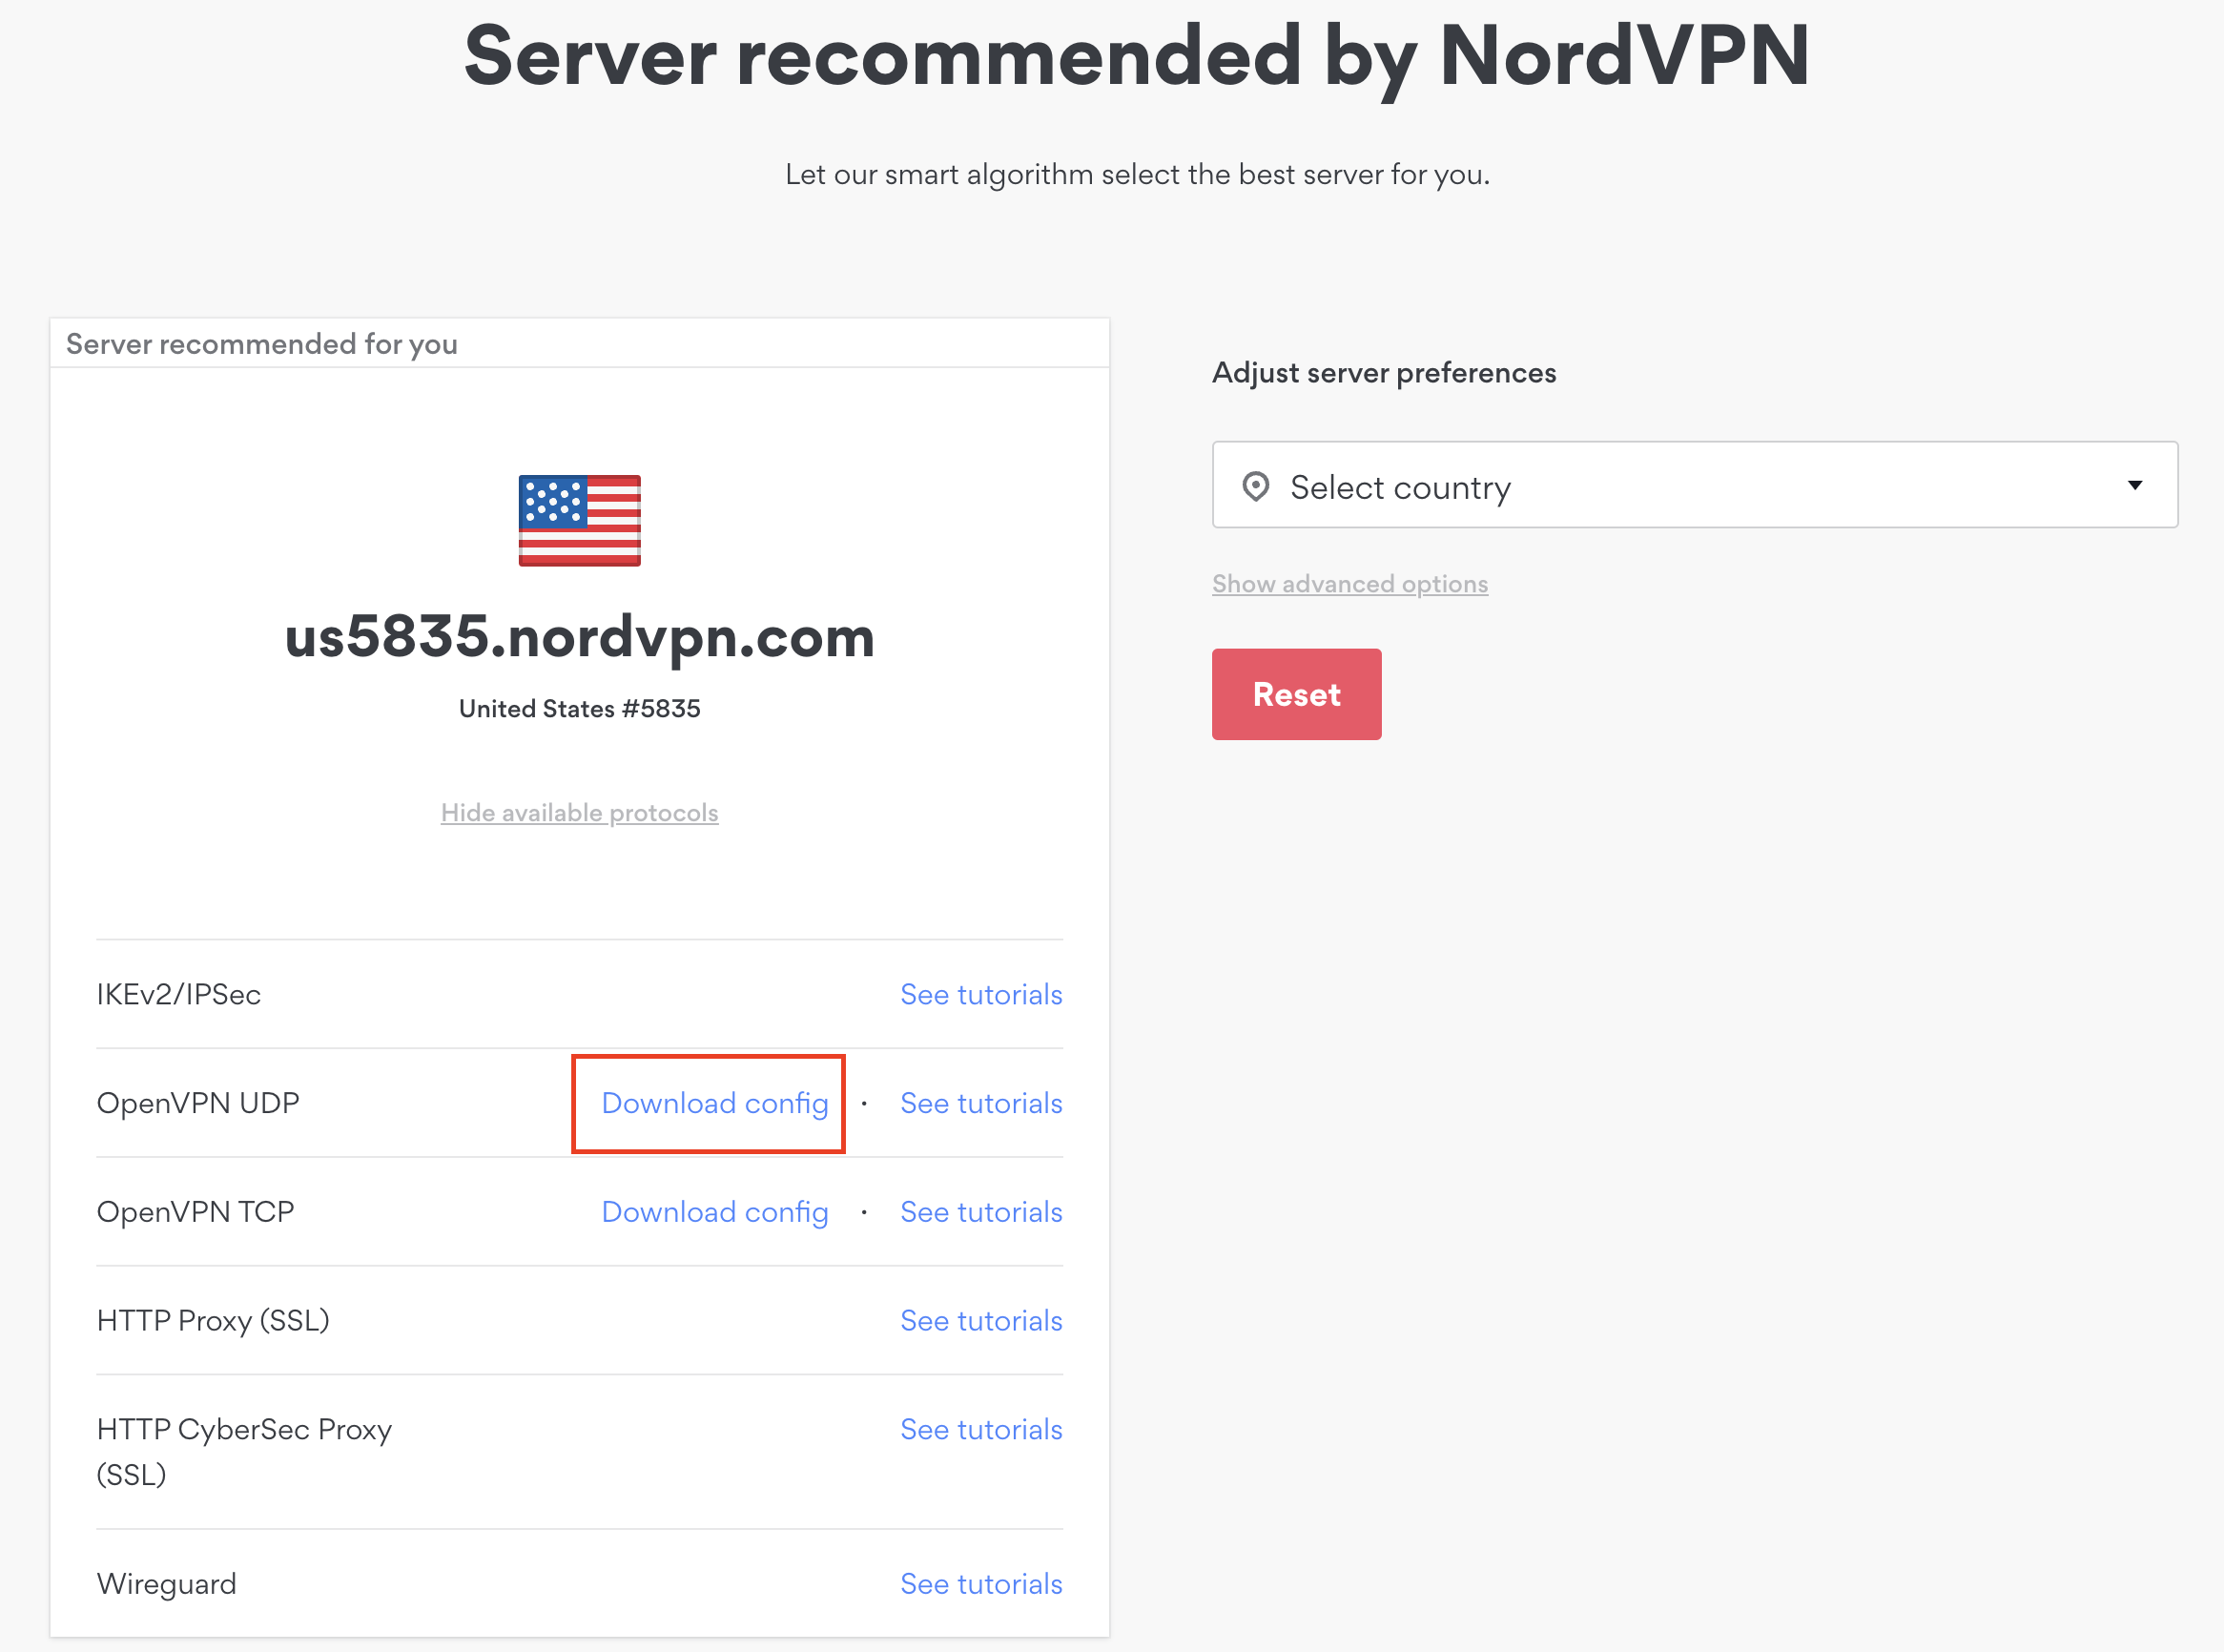
1. There are two options for obtaining the .ovpn file. The first and recommended is to navigate to NordVPN’s server recommendation page. Click Recommended Server to display the fastest server based on your actual location. You can adjust the country if you don’t want to connect to the recommended country.

Then click Show Available Protocols. Click Download Config next to OpenVPN UDP. This will download the .ovpn file to your computer for this server. Do not open this file.

NordVPN Recommended Server

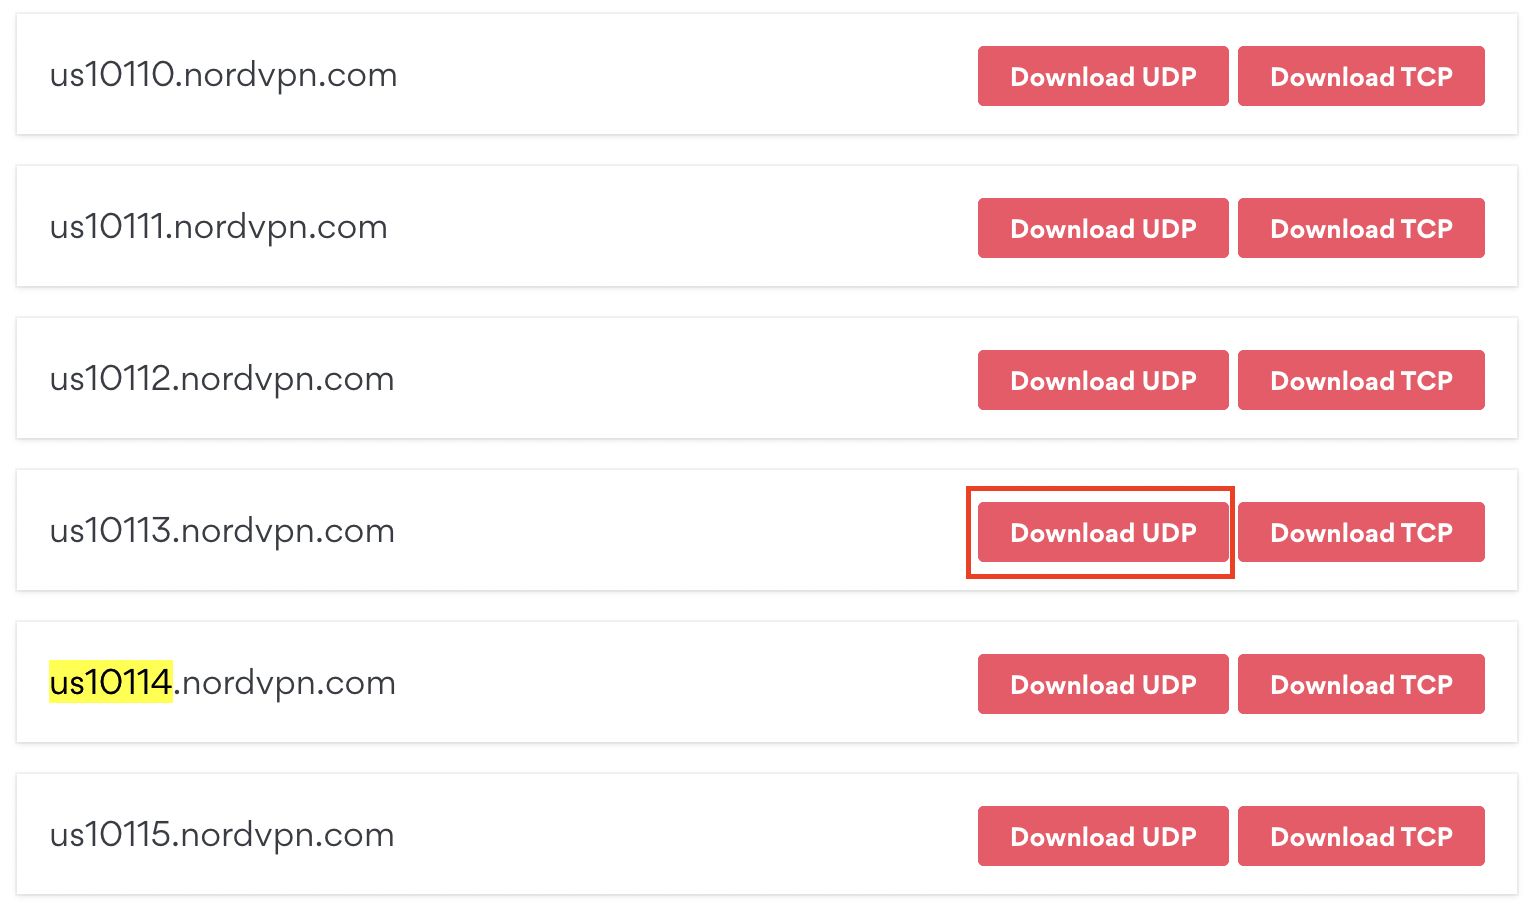
The second method to obtain a server is for connecting to a specific server number that you know you want to use. This applies to NordVPN Dedicated IP servers if you are signed up for that service. Go to NordVPN’s .ovpn file page. Then search for the server number that you want to use and click Download UDP.

NordVPN Download Specific Server

Merlin Router Setup for NordVPN

Login to Asus Merlin firmware settings in a browser on any computer or smart device connected to the Merlin FlashRouter’s network.

1. Navigate to the VPN tab.

Merlin VPN Tab

2. Navigate to the VPN Client tab.

Merlin VPN Client Tab

3. Click Choose file and select the .ovpn file you downloaded earlier. Then click Upload.

Merlin Choose File Upload

4. Set Automatic Start at boot time to Yes if you want the VPN connection to begin automatically when the router is powered off and back on.

Merlin Automatic Start at boot time

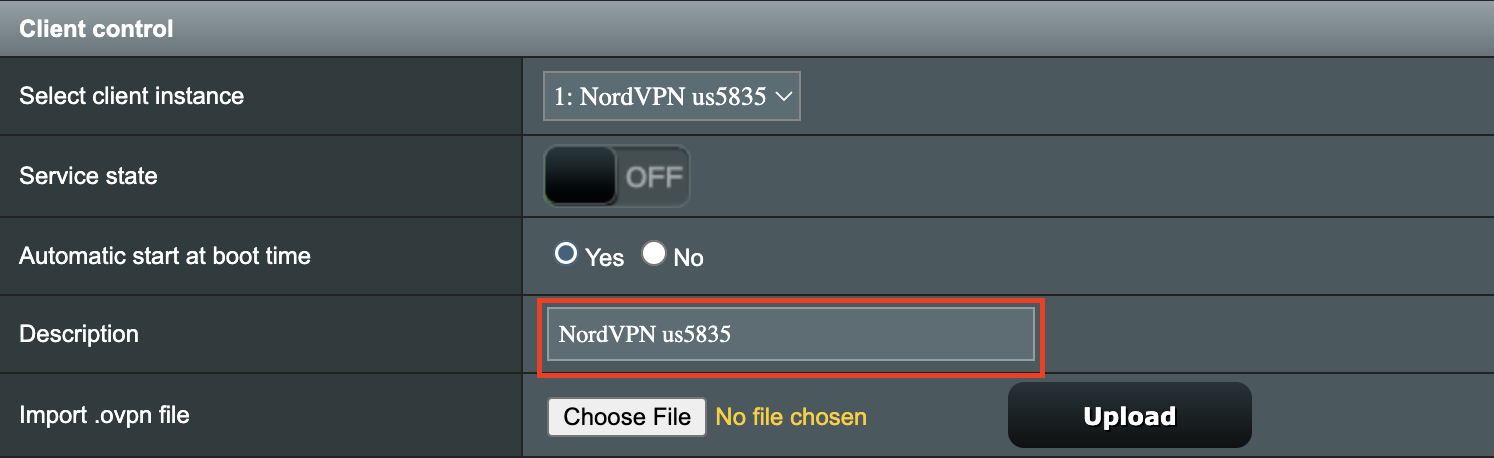
5. In the Description field enter in the name you’d like to use for this OpenVPN Client profile. We typically advise entering in the location or server number here. Our example server was in us5835.nordvpn.com so I have entered in NordVPN us5835.

Merlin NordVPN Description

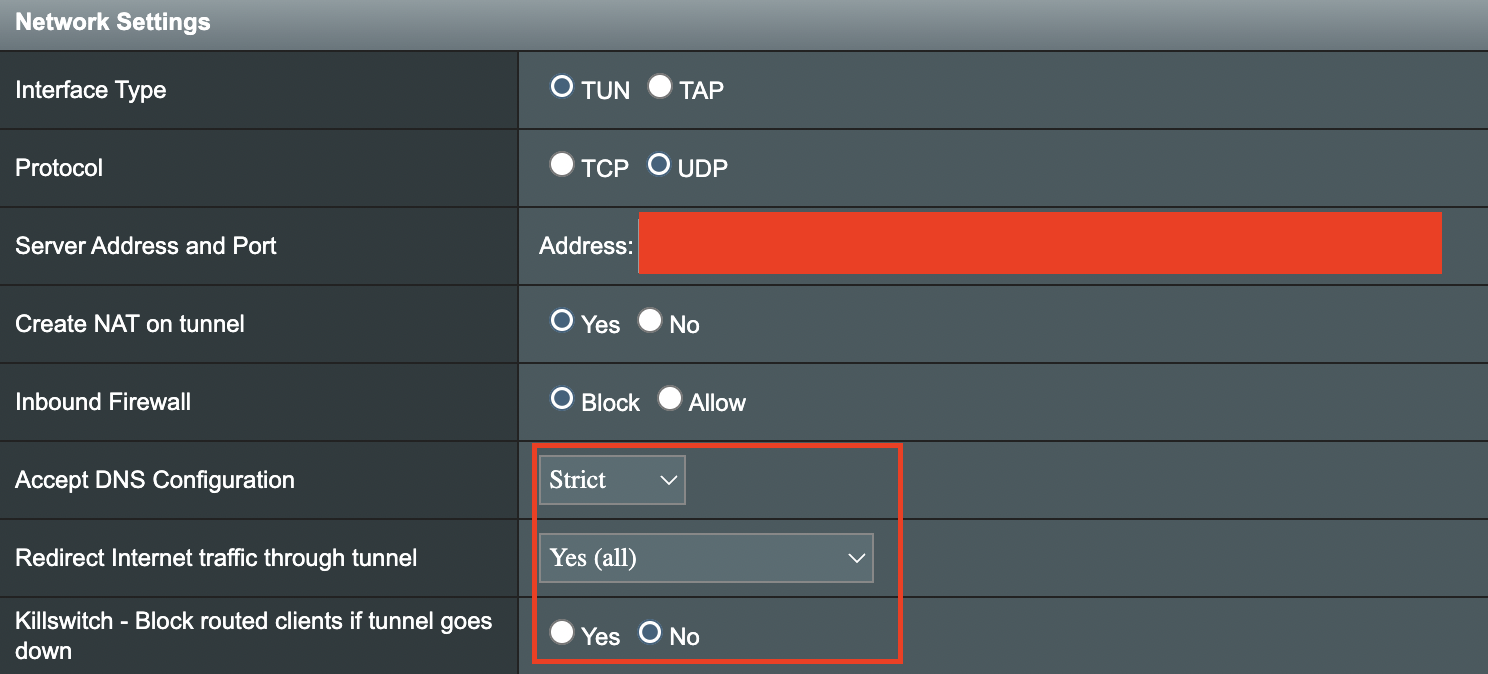
6. Set Accept DNS Configuration to Strict. Set Redirect Internet traffic through tunnel to Yes (all). Set Kill Switch to Yes or No depending on if you want the Internet to be killed if the VPN connection drops.

Merlin Accept DNS configuration Redirect Internet and Kill Switch

If you only want certain devices to connect to the OpenVPN Client profile you are setting up instead of all the devices connected to the FlashRouter’s network please set the Redirect Internet traffic through tunnel to VPN Director. Then complete the instructions on this page and then view our VPN Director guide.

7. Enter your NordVPN username and password that you obtained earlier in the Username and Password. Note that these are different from your NordVPN email login and password.

Merlin VPN Username and Password

8. Click Apply at the bottom of the page.

9. At the top of the page set the Service State toggle to ON to activate the VPN connection.

Merlin Service State All Providers

Verify a successful NordVPN connection

  1. You should now see a CONNECTED message.
  2. Visit NordVPN’s IP Check to verify your new IP address and virtual location.

In some cases you may notice that the location is not showing the same location as the server you have input in your router settings; this is because geo tracking tools are often tricked by VPN connections. As long as you see an IP address that is not the same as your normal Internet IP address then you are indeed connected to NordVPN.

How to change the NordVPN server

  1. Follow the steps at the top of the page to obtain a new .ovpn file.
  2. Then proceed with the settings same as initial setup.

TROUBLESHOOTING

Still having issues? Visit the VPN Troubleshooting section.

Troubleshoot Here

PrivateInternetAccess (PIA) Merlin OpenVPN Setup

TeamFlashRouters · Jan 11, 2023 ·

Preparing for PIA Merlin Setup

Download your PIA .ovpn file

If you are not already a PIA user Sign Up Now.

1. Log in to your account on the PIA website.

PIA login

2. Successfully log in with your account information then go to PIA’s OpenVPN Config Generator.

3. On the OpenVPN Configuration Generator select the following:

OpenVPN Version: OpenVPN 2.4 or newer

Select Platform: Linux

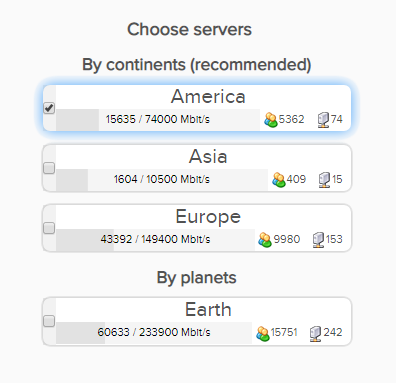
Select Region: Choose the server location you’d like to connect to

Select Port: Typically we recommend UDP/1198 RSA-2048 AES-128-CBC SHA1 for best speeds but feel free to select the one you want to use.

4. Click Generate to download the .ovpn file. Do not open this file once it is downloaded.

PIA Generate .ovpn file

Merlin Router Setup for PIA

Login to Asus Merlin firmware settings in a browser on any computer or smart device connected to the Merlin FlashRouter’s network.

1. Navigate to the VPN tab.

Merlin VPN Tab

2. Navigate to the VPN Client tab.

Merlin VPN Client Tab

3. Click Choose file and select the .ovpn file you downloaded earlier. Then click Upload.

Merlin Choose File Upload

4. Set Automatic Start at boot time to Yes if you want the VPN connection to begin automatically when the router is powered off and back on.

Merlin Automatic Start at boot time

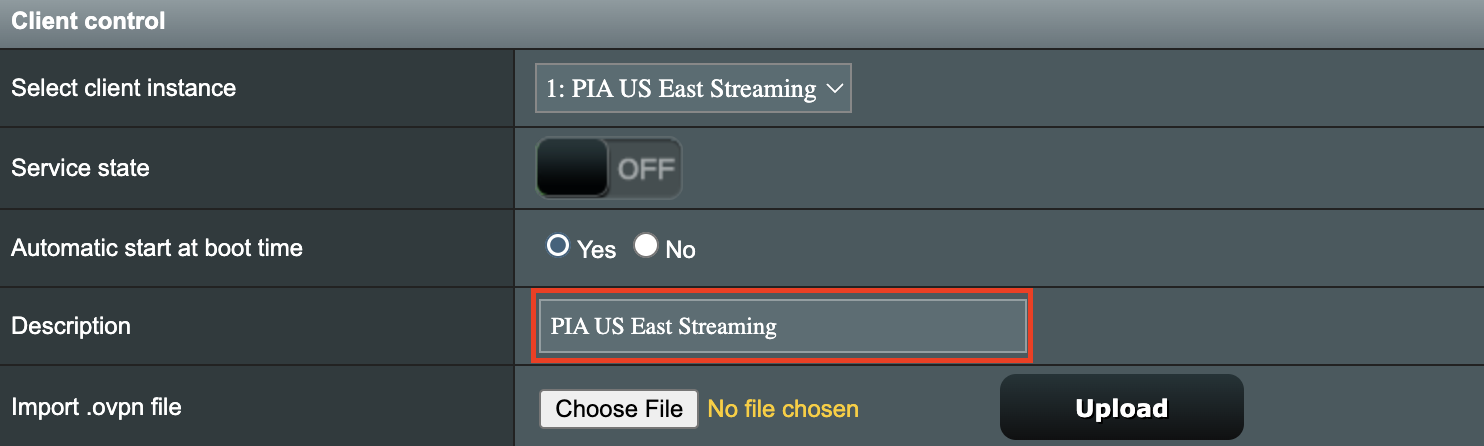
5. In the Description field enter in the name you’d like to use for this OpenVPN Client profile. We typically advise entering in the location here. Our example server was in US East Streaming so I have entered in PIA US East Streaming.

PIA Description

6. Set Accept DNS Configuration to Strict. Set Redirect Internet traffic through tunnel to Yes (all). Set Kill Switch to Yes or No depending on if you want the Internet to be killed if the VPN connection drops.

Merlin Accept DNS configuration Redirect Internet and Kill Switch

If you only want certain devices to connect to the OpenVPN Client profile you are setting up instead of all the devices connected to the FlashRouter’s network please set the Redirect Internet traffic through tunnel to VPN Director. Then complete the instructions on this page and then view our VPN Director guide.

7. Enter your PIA account username and password.

Merlin VPN Username and Password

8. Click Apply at the bottom of the page.

9. At the top of the page set the Service State toggle to ON to activate the VPN connection.

Merlin Service State All Providers

Verify a successful PIA connection

  1. You should now see a CONNECTED message.
  2. Visit PIA’s IP Check to verify your new IP address and virtual location.

In some cases you may notice that the location is not showing the same location as the server you have input in your router settings; this is because geo tracking tools are often tricked by VPN connections. As long as you see an IP address that is not the same as your normal Internet IP address then you are indeed connected to PIA.

How to change the PIA server

  1. Follow the steps at the top of the page to obtain a new .ovpn file.
  2. Then proceed with the settings same as initial setup.

TROUBLESHOOTING

Still having issues? Visit the VPN Troubleshooting section.

Troubleshoot Here

IPVanish Merlin OpenVPN Setup

TeamFlashRouters · Jan 11, 2023 ·

Preparing for IPVanish Merlin Setup

Download your IPVanish .ovpn file

If you are not already an IPVanish user Sign Up Now.

1. Log in to your account on the IPVanish website.

IPVanish login

2. Successfully log in with your account information then go to IPVanish .ovpn file page.

3. Click on the .ovpn file for the server location you want to use to dowloand the .ovpn file. Do not open this file.

IPVanish download ovpn

Merlin Router Setup for IPVanish

Login to Asus Merlin firmware settings in a browser on any computer or smart device connected to the Merlin FlashRouter’s network.

1. Navigate to the VPN tab.

Merlin VPN Tab

2. Navigate to the VPN Client tab.

Merlin VPN Client Tab

3. Click Choose file and select the .ovpn file you downloaded earlier. Then click Upload.

Merlin Choose File Upload

4. Set Automatic Start at boot time to Yes if you want the VPN connection to begin automatically when the router is powered off and back on.

Merlin Automatic Start at boot time

5. In the Description field enter in the name you’d like to use for this OpenVPN Client profile. We typically advise entering in the location here. Our example server was in nyc-a50 so I have entered in IPVanish a-50.

IPVanish Description

6. Set Accept DNS Configuration to Strict. Set Redirect Internet traffic through tunnel to Yes (all). Set Kill Switch to Yes or No depending on if you want the Internet to be killed if the VPN connection drops.

Merlin Accept DNS configuration Redirect Internet and Kill Switch

If you only want certain devices to connect to the OpenVPN Client profile you are setting up instead of all the devices connected to the FlashRouter’s network please set the Redirect Internet traffic through tunnel to VPN Director. Then complete the instructions on this page and then view our VPN Director guide.

7. Enter your IPVanish account email/username and password.

Merlin VPN Username and Password

8. Click Apply at the bottom of the page.

9. At the top of the page set the Service State toggle to ON to activate the VPN connection.

Merlin Service State All Providers

Verify a successful IPVanish connection

  1. You should now see a CONNECTED message.
  2. Visit IPVanish’s IP Check to verify your new IP address and virtual location.

In some cases you may notice that the location is not showing the same location as the server you have input in your router settings; this is because geo tracking tools are often tricked by VPN connections. As long as you see an IP address that is not the same as your normal Internet IP address then you are indeed connected to IPVanish.

How to change the IPVanish server

  1. Follow the steps at the top of the page to obtain a new .ovpn file.
  2. Then proceed with the settings same as initial setup.

TROUBLESHOOTING

Still having issues? Visit the VPN Troubleshooting section.

Troubleshoot Here

How to Access Your GL.iNet FlashRouter Settings

TeamFlashRouters · Feb 26, 2024 ·

This quick guide walk you through connecting to your GL.iNet FlashRouter (Flint, Slate, Beryl, or Marble) and logging into the admin settings page. You’ll use either WiFi or an Ethernet cable, then access the router dashboard through your browser.

Step 1. Connect Your Device to the Router

You can connect by WiFi or Ethernet:

  • WiFi: Look for a network name like FlashRouter24 or FlashRouter50
    • The WiFi password has been set to: Wireless#9483C
    • ⚠️ Be sure to capitalize the “W” in
  • Ethernet: Plug an Ethernet cable from your computer into one of the router’s LAN ports (usually marked or color-coded differently from the WAN port).

👉 Pro tip: Disconnect from any other WiFi networks during setup.

Step 2. Open the Router Login Page

  1. Open a web browser (Chrome, Safari, Firefox, Edge).
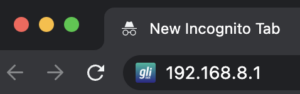
  2. In the address bar, type: 192.168.8.1
  3. Press Enter.
GL.iNet router access

This is the local router dashboard address (not a public website). If the page doesn’t load:

  • Try a different browser.
  • Clear your cache.
  • Ensure your device is connected to the FlashRouter network.

Step 3. Log In to the Router Settings

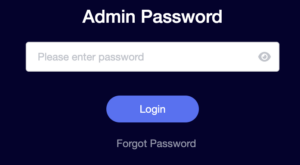
  • Default password: glopenwrt1 or openwrt
  • This is the factory default for all GL.iNet routers shipped by FlashRouters.
GL.iNet admin password enter

💡 Once you’re in, you can update your admin password in the settings for extra security.

Next Steps

Now that you’ve accessed your GL.iNet FlashRouter, you can:

  • Set up your VPN service
  • Customize your WiFi name and password
  • Adjust device controls and security settings

Check our support library for your specific VPN setup guide.

Why is my DNS showing as 192.168.11.1 on my devices?

TeamFlashRouters · May 30, 2019 ·

When connected to a FlashRouter’s network the DNS settings of the devices will be reporting as 192.168.11.1. This means that the router is handling DNS internally through the servers you have set in the Setup > Basic Setup section of the router. If you did not set any custom DNS here, then you will using your ISP or VPN DNS servers automatically.

You can always customize the DNS servers in the router to your preferred servers and through DNSmasq the router will use 192.168.11.1 to route these servers to your connected devices.

In some instances disabling DNSMasq in the DD-WRT settings can help unblock previously blocked websites while connected to VPN. This will force devices to report the DNS servers set in the router directly as opposed to 192.168.11.1.

Disabling DNSMasq is not recommended unless FlashRouters specifically advises you but we have seen this work for certain VPN providers. To disable the DNSMasq do the following.

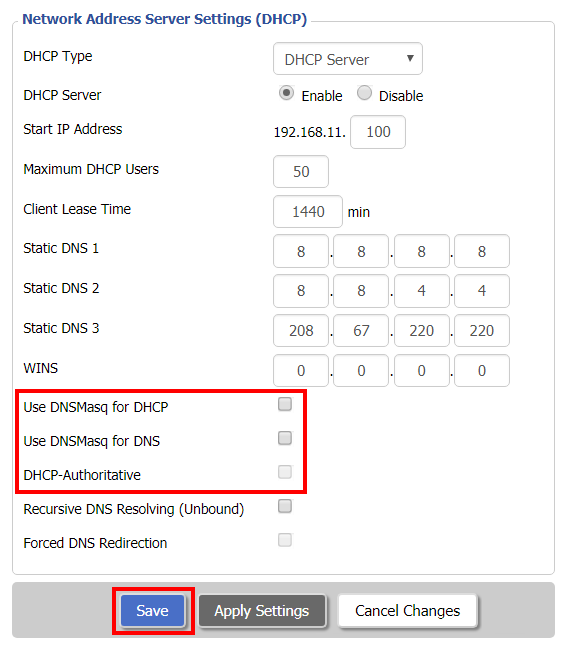
Navigate to Setup > Basic Setup

Disable DNSMaq Settings
  1. Uncheck Use DNSMasq for DHCP.
  2. Uncheck Use DNSMasq for DNS.
  3. Uncheck DHCP-Authoritative.
  4. Click Save.

Navigate to Services > Services

Disable DNSMaq Settings 2
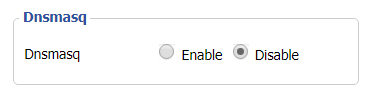
  1. Set DNSMasq to Disable.
  2. Click Apply Settings.
  3. Reboot router.

Router FAQs

admin · Jan 29, 2019 ·

Router FAQs

What is an IP Address?

An IP (Internet Protocol) Address is a numerical assignment for each device (cell phone, iPad, laptop computer, printer etc) inside a network that uses the Internet Protocol for communication. Internet Protocol is responsible for routing information packets across network boundaries. It is the main protocol establishing the Internet.

An IP address serves two predominant functions. First is to host or network interface identification. Second, it provides location addressing. To put it bluntly, an IP address tells wherever you are connecting, to whom you are visiting, and where you are located.

What is DNS?

DNS (Domain Name System) is a protocol within the TCP/IP protocol that uses a set of standards for how computers exchange data on the Internet and on many private networks.

The basic job of DNS is to convert a user-friendly domain name into an IP address that computers use to identify one another. Think of DNS like your cellphone contact list; you tap the name and the phone contacts to a phone number.

It is easier to remember flashrouters.com, rather than its IP address. Imagine if you had to remember all of the IP addresses of your favorite websites!

What is DNSMasq?

DNSMasq is a local DNS server that speeds up host-name searches from your computer/Internet connection after pressing enter.

Basically, DNSMasq gives the router some advanced enterprise functionality – caching DNS records locally so you have a faster browsing experience. Your computer only has to go to the router instead of repeatedly scouring the web for a commonly visited site.

What is Throughput and How Do I Improve it?

Throughput is the average rate of successful delivery of messages through a network. Simply put, throughput measures the speed of message delivery inside a network. If you think about it in relationship to networks and Internet connections, throughput defines the user experience. The key to a pleasing user experience is uninterrupted service and smooth data transfer.

In order to improve throughput,  you should get a router with more memory. If you notice that your network is running slowly due to congestion, you could probably benefit by upgrading your router to one with more memory. FlashMemory and RAM on a router add more room to prevent network congestion and improve throughput.

Most of FlashRouters‘ high-end units come with at least 8 MB of Flash memory and 64 MB of RAM which should be more than capable for providing for the average home users’ or small business will need in the future.

What is PPPoE?

PPPoE stands for Point-to-Point Protocol over Ethernet, a network protocol for encapsulating Point-to-Point Protocol (PPP) frames inside Ethernet frames. It is used mainly with DSL services where individual users connect to a DSL modem over Ethernet.

With PPPoE, users virtually “dial” from one machine to another over an Ethernet network, establish a point-to-point connection and then data packets are securely transported through the connection.

PPPoE offers an Internet service provider (ISP) an easier way to track exactly how much bandwidth you are using in case they want to charge for it in the future.

What is the Difference Between VPN Encryption and Wireless Network Security?

VPN Encryption: If you are connected to the VPN on your home network, then any data that flows over the Internet is entirely encrypted whether you are connected to the Internet either wired or wirelessly. This means that if your Local ISP was trying to see what you are browsing or downloading, they would not be able to see your data.

Wireless Network Security: If you leave your wireless network open or insecure, it does not matter whether Internet traffic is encrypted, because someone can directly see what you are doing on your network, or even worse, can go in and put a wireless password on your network, locking you out. They may also be able to access folders and files on your computer without your control.

Best thing to do is protect your wireless network with a WPA secured password along with your VPN connection.

Are FlashRouters Affected By the Shellshock Bug?

No.

According to our in-house testing and multiple DD-WRT community reports, we have found that the Shellshock vulnerability will not work on with DD-WRT or TomatoUSB installed router. The vulnerability is based on a shell called BASH (Bourne Again Shell) but DD-WRT & Tomato firmware use BusyBox which is confirmed to not have this issue.

Please be advised that if you are using Optware on your DD-WRT router there is a chance that implementation is BASH based. Only used trusted optware on your router.

Which DD-WRT wireless extender setup should I be using?

TeamFlashRouters · Jun 11, 2019 ·

FlashRouters supports four unique DD-WRT wireless extender setups – options similar to an open source Mesh network. Each different wireless extender configuration serves a different purpose. Read below to see which guide fits your configuration requirements!

Wireless Repeater

Why should I choose Wireless Repeater Setup?

  1. If you have a MiFi wireless only internet connection or other type of WiFi internet where there is no access to any ethernet port for a wired internet connection, then you can setup a wireless repeater network to both extend WiFi and add wired connection capabilities.
  2. If you have a large home or office area that requires additional WiFi coverage can use a wireless repeater setup to extend the existing network.
  3. If you want to create a separate VPN WiFi network in your home without placing the FlashRouter in the same room as your primary router you can use wireless repeater to establish a WiFi internet connection and then connect to VPN on your WiFi repeater network.
  4. If you want a wireless Dual Router setup option where you can have local ISP IP address through your main router WiFi network and your VPN IP address through your FlashRouter Wireless Repeater WiFi network, both available for you to connect at all times. Each network is on a unique subnet.

View the FlashRouter Wireless Repeater Setup Guide.

Wireless Repeater Bridge

Use Cases

Wireless Repeater Bridge Setup

  1. Anyone that needs all their devices connected to the same local network.
  2. Anyone with a MiFi internet connection that does not have an ethernet port and has no need for VPN.
  3. Anyone with a large wireless area that requires additional coverage.

Wireless Client Bridge

Use Cases

Wireless Client Bridge Setup

  1. Anyone with a MiFi internet connection that needs wired access.
  2. Anyone that needs additional wired ports instead of using a switch.
  3. Anyone with wired only devices in their home that are too far from your main router.

Wireless Access Point DHCP Forwarder

Use Cases

Wireless Access Point DHCP Forwarder Setup

  1. Anyone that needs their devices connected to the same local network and wants lossless LAN to LAN speeds via wireless and ethernet connection.
  2. Anyone that wants to use their main router to provide DHCP to their router instead of having an additional DHCP server.

How to Access Your AsusWRT FlashRouter Settings

TeamFlashRouters · Oct 16, 2025 ·

This quick guide will walk you through connecting to your AsusWRT FlashRouter and logging into the admin settings page. You’ll use either WiFi or an Ethernet cable, then access the router dashboard through your browser.

Step 1. Connect Your Device to the Router

You can connect by WiFi or Ethernet:

  • WiFi: Look for a network name like FlashRouter24 or FlashRouter50.
    • The WiFi password is set to: Wireless#[First 5 characters of your router’s MAC]
    • Example: If your MAC is CC28A07E70A8, your WiFi password is Wireless#CC28A.
    • ⚠️ Be sure to capitalize the “W” in Wireless.
  • Ethernet: Plug an Ethernet cable from your computer into one of the router’s LAN ports (usually marked or color-coded differently from the WAN port).

👉 Pro tip: Disconnect from any other WiFi networks during setup.

Step 2. Open the Router Login Page

  1. Open a web browser (Chrome, Safari, Firefox, Edge).
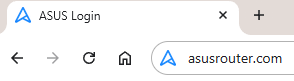
  2. In the address bar, type: 192.168.50.1 or go to asusrouter.com
  3. Press Enter.
Access Asus Router

This is the local router dashboard address (not a public website). If the page doesn’t load:

  • Try a different browser.
  • Clear your cache.
  • Ensure your device is connected to the FlashRouter network.

Step 3. Log In to the Router Settings

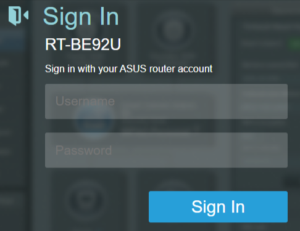
  • Default username: flashrouter
  • Default password: asuswrt-admin1
  • Some older devices may use: asuswrt1 or asuswrt
  • This is the factory default for AsusWRT routers shipped by FlashRouters.
Asus Router Login

💡 Once you’re in, you can update your admin password in the settings for extra security.

Next Steps

Now that you’ve accessed your AsusWRT FlashRouter, you can:

  • Set up your VPN service
  • Customize your WiFi name and password
  • Adjust device controls and security settings

Check our support library for your specific VPN setup guide.

How do I connect a Wireless Extender to my FlashRouter network?

Dave · Apr 29, 2019 ·

The settings of your FlashRouter do not need to change to connect an extender to the FlashRouter’s network. Simply access the settings of the extender device and enter the FlashRouter’s wireless network name and the correct wireless password.

The extender will then connect via wireless to the FlashRouter and add wireless range to your network.

To use a DD-WRT router as an extender follow our Advanced Wireless Setup Guides.

It is also easy to setup a Mesh system like Orbi or Velop and send your entire Mesh network through the FlashRouter VPN Network, for a VPN connected Mesh Network.

Simply connect from an open LAN port on your FlashRouter to the WAN port on your Mesh base station and then use your Mesh smart apps to complete the setup from there.

Warranty and Returns FAQs

admin · Jan 29, 2019 ·

Warranty and Returns FAQs

At FlashRouters, we are confident that every router sold will function as advertised. We open, inspect, upgrade, configure, and then test all FlashRouters before they get shipped out. That is why we guarantee you will receive a working unit and offer our own 1-Year Hardware Warranty included with all New and Refurbished routers purchased from the FlashRouters website.
If you would like to extend the warranty coverage period to 2 years, the option is available during the FlashRouters checkout process.

Since we are so certain you will be happy with your upgraded and super secure network, all routers purchased from FlashRouters.com also come with a 30-day satisfaction guarantee.

Please read the warranty and return section in detail before placing an order or requesting an RMA. Our goal is to make the return process as smooth and transparent as possible for all customers. If the router you purchased does not work out for your needs we still want you to be satisfied with your purchasing experience.

Hardware Warranty and Return Policy

Requesting an RMA

Automated Return Merchant Authorization (RMA) requests are available from within your customer account panel. If you are eligible for a return then your RMA request will be approved. If your RMA request is not valid then it will be denied and you must e-mail FlashRouters Support for any additional information or actions. RMAs are valid for 7 days from the day they are issued. 

The following are the available options when submitting an RMA request. Continue reading for more information on all available RMA options and conditions. 

  1. Hardware Guarantee – available for 7 days after receiving your FlashRouter.
  2. Satisfaction Guarantee – available for 30 days after receiving your FlashRouter.
  3. Hardware Warranty – available for 1 year, or 2 years if upgraded when purchasing a FlashRouter.
  4. Hardware Repair – Anyone with a valid FlashRouters Support subscription is eligible for free Hardware Repair. 

Please note we can only provide prepaid labels for approved Hardware Warranty returns within the USA. Prepaid labels are not available for international customers. All return shipping for 30 Day Satisfaction refunds is paid for by the customer.

Hardware Guarantee

In the rare case you receive a faulty router, you can open a ticket to contact FlashRouter Support for an RMA or request an RMA in your customer account panel and we will work to rectify the situation immediately. If it is determined that the power supply you received was faulty, and not the router itself, our team will immediately ship you out a tested power supply at no additional cost.

Rest assured that we individually test and inspect every FlashRouter with great detail before shipment. BUT… if router gremlins (yes they do exist) snuck into your router during the shipping process and it no longer powers on, our team will supply you with a prepaid shipping label to return the unit back to our offices. As soon as we receive verified tracking on your return shipment we will ship out another thoroughly tested unit to you at no additional cost.

You must contact us within 7 days from when you received your FlashRouter to be eligible for a Hardware Guarantee prepaid shipping label from FlashRouters.

30-Day Satisfaction Guarantee

If you are not satisfied with the performance of your router after trying it out for up to 30 days, you can open a ticket to contact FlashRouter Support for an RMA or request an RMA in your customer account panel. Once the RMA is approved, you will then have the option to ship the unit back to FlashRouters.

Once we receive the return, our team inspects and refunds accordingly based on the original purchase price of your FlashRouter. Please note there is a $25 restocking fee and refunds do not include any initial shipping costs associated with your order. All restocking fees are returned as Store Credit. This means if you make another purchase at FlashRouters then your fee is refunded.

The item must also be fully functional and have no signs of cosmetic damage for you to receive the maximum refund. If you do not include the original boxing, or any router accessories you may also be charged an additional fee as indicated.

Ethernet Cable: $5

Power Source: $10 

Antennas: $5 per antenna

Router Stand: $10

Box: $10

Cosmetic Damage: Up to $25

What is covered under the 30-Day Satisfaction Guarantee?

If the VPN speeds or WiFi network speeds are not what you had hoped, if the setup is too complicated, or you just decided on another solution; these are all covered under the 30-Day Satisfaction Guarantee. 

We will not accept any returns of working routers after 30 days from the date you received your router. After 30 days, router returns/replacements will only be processed under the Hardware Warranty. 

Can I get the restocking fee waived?

If you place a new order for a different FlashRouter unit before returning your initial purchase, then we will waive the restocking fee. Otherwise the $25 restocking fee will be applied to your customer account as a store credit. You can then use this $25 store credit on any future FlashRouter purchase.

Rewards Points refunds

If you return your FlashRouter under the 30 day satisfaction guarantee then you will lose any reward points received for your initial purchase.

Hardware Warranty

A 1-year Hardware Warranty is included with the purchase of all New and Refurbished FlashRouters. If your router suffers hardware failure within 365 days from the date you received the unit then we will replace your router with another fully tested unit. You must pay for return shipping of the faulty unit back to our offices located in New Jersey, USA and our team will ship out your replacement at no additional cost.

You must contact the FlashRouter support team for an RMA number or request an RMA from your customer account panel before returning a router for warranty replacement. If you do not receive approval for a return then you will not be eligible for a replacement unit.

There are 2 options for receiving a Hardware Warranty replacement unit:

Option #1: Process another order for immediate shipping and as soon as we receive the returned device back in our offices we will issue you a refund for the initial purchase.

Option #2: Ship your faulty router back to our office, and as soon as we receive the unit our returns department will have a replacement unit shipped out to you at no extra cost.

How long do I have before my RMA expires?

RMA’s are good for 7 days from the date they are issued.

What if I upgraded to a 2 year Hardware Warranty at checkout?

All refund, replacement, RMA details, and options covered by the 1-year Warranty apply in the exact same manner for 2 year warranties over each respective warranty coverage period.

If for any reason the router you purchased is no longer in stock or discontinued then you have the option to replace your router with one of equal value or receive a refund. Hardware warranties are only eligible for refunds if we are unable to provide a replacement unit for you.

What should I do if my router is out of warranty coverage?

If your FlashRouter is out of the warranty coverage period, we are first and foremost apologetic for the passing of your router. Be sure to contact our sales team though and you can receive a special coupon as a return customer for a shiny new wireless networking centerpiece.

What is not covered with a FlashRouter Warranty?

Items that have been clearly damaged either by the customer or during the return process are not eligible for a full refund. This includes routers that have visible dents, scratches, or moving parts inside the router.

Can I upgrade to a 2 year warranty after my FlashRouter purchase?

2 year warranty upgrades are only available at the time of your FlashRouter purchase. Upgrades are not available once a FlashRouter order has been shipped. 

Can I get a Warranty on my router if I purchased a “Flash My Router” plan from FlashRouters?

Routers that have been “flashed” and configured by our support specialists for anyone who has purchased a Flash My Router Plan are not eligible for warranty coverage from FlashRouters. Only routers purchased through the FlashRouters.com website are eligible for warranty replacements or refunds.

Hardware Repair

FlashRouters is proud to offer a free repair and upgrade service for anyone with an active Silver or Gold Service Plan subscription. Any and all shipment costs associated with FlashRouter repairs or upgrade requests are the burden of the customer and will not be paid for by FlashRouters. However, the repair and upgrade service itself is FREE.

If you do choose to ship your router back to our office for repair, then you should include a prepaid shipping label in your package back to your home or office, so our team can send the router back to you whether we are able to repair the unit or not. Router accessories like power supplies, ethernet cable, or antennas do not need to be included when shipping back a unit for repair.

If our team is not able to resurrect your router from a power failure, faulty firmware upgrade, or any other reason then we can return the faulty unit back to you using the return shipping label included with your return package. Alternatively, we can destroy the unit and refund the return shipping costs if that is your preference.

Open Box Routers

What is an Open Box Router?

Open Box routers are fully functional units that have cosmetic flaws and are sold at heavy discounts. These units come with the same Support Plan options as New or RM units, which means you get the same support service with extremely discounted hardware.

Open Box routers are covered under the FlashRouter 30-Day Satisfaction Guarantee BUT come with no Hardware Warranty. We take every measure possible to ensure complete functionality and our team fully load tests these devices before shipment, but you should be very aware that you buy these discounted “open box” devices at your own risk without any Hardware Warranty.

What is the Open Box Router return policy?

Open Box Routers can only be returned within 30 days from the date you received your router. Returns will not be accepted on open box routers after 30-Day Satisfaction Guarantee window has expired. Please note that Open Box Router return shipping costs are not covered by FlashRouters and initial shipping costs are not included in any refunds. 

Accessories Warranty

All Accessories come with manufacturer warranties as listed on the respective product pages. 

FlashRouters will accept returns for refund or replacement of accessories only within 30 days from the date you received your order. After 30 days you must contact the manufacturer for any warranty replacements.

Accessories must be returned with all original packaging and with no cosmetic damage to receive a full refund. A missing box or damage to an item will result in a restocking fee per our discretion.

"Flash My Router" Refund Policy

The “Flash My Router” product offered by FlashRouters is a virtual service provided by the FlashRouters support team. This product includes a remote support session where our support team will flash your router and then complete your internet, WiFi, and VPN setup, and in certain cases support additional router features. 

Once your remote support session is completed there are absolutely no refunds on “Flash My Router” purchases. In the case we are unable to successfully flash your router we will offer a full refund for your “Flash My Router” purchase. “Flash My Router” purchases are fully refundable if you decide you would no longer like to use the service after your purchase is completed.

Service Plan Subscription Refund Policy

All FlashRouter router purchases include a recurring FlashRouters Service Plan subscription. There are 3 levels of support to choose from as either a quarterly or yearly recurring billing plan.

30-Day Satisfaction Guarantee

If you choose to return your FlashRouter under the 30-Day Satisfaction Guarantee, then you are eligible for a full refund on any Service Plan purchased with your FlashRouter.

Cancellation Policy

You may cancel your recurring billing at any time and you will not be charged again. Please note you will not be refunded for unused time from the initial billing/service period of your support plan subscription.

If you choose to cancel your 3 month FlashRouter support plan then you will retain support until the end of the 3 month period. If you choose to cancel your 1 year FlashRouter support plan then you will retain support until the end of the 1 year period. You will not lose time from your existing service plan if you cancel when a plan is active.

There is a 7-day grace period after Service Plan renewals have been charged, where you may request an immediate cancellation and full refund.

How do I change my FlashRouter Support subscription level?

How do I Upgrade my Service Plan?

You can upgrade a Service Plan at any time during a billing cycle. You must e-mail or live chat our support team and request an upgrade. Our team will then issue you store credit for any unused time on your existing Service Plan, which will then be immediately applied to your new upgraded Service Plan purchase. Your recurring billing will then continue at the new Service Plan level. Your 3 months or 1 year of upgrade service will start again from the date of the upgrade purchase. 

How do I switch from a Quarterly to a Yearly Service Plan?

If you would like to switch to a Yearly plan from a Quarterly plan of the same service level, then you must e-mail or live chat our support team and request an upgrade. Our team will then issue you store credit for any unused time on your existing Quarterly Service Plan, which will then be immediately applied to your new Yearly Service Plan purchase. Your recurring billing will then continue at the Yearly Service Plan level. Your 1 year of service will start again from the date of the upgrade purchase. 

How do I Downgrade my Service Plan?

If you are subscribed a Service Plan, but would like to switch to a lower level Service Plan then you can request that our support team cancel your recurring billing at any time. As soon your existing Service Plan is expired you can make a new purchase for the new Service Plan of your choice.

How do I switch from a Yearly to a Quarterly Service Plan?

If you would like to change the billing cycle from yearly to quarterly, you may cancel your existing subscription plan and then once your year of service has expired, you may purchase a Quarterly Service Plan instead.

If you just purchased a FlashRouter, there is a 7-day grace period from when you receive your unit if you would like an immediate change from Yearly to a Quarterly Service Plan.

How do I cancel my subscription?

You may request a Service Plan subscription cancellation by e-mailing support@flashrouters.com or from within your customer account panel at any time. You will be notified of a successful cancellation and your payment method will not be billed again.

Please note there are no refunds when cancelling your subscription. Cancellation means you will not be billed again for your Service Plan, there are no partial refunds for cancelled Service Plans.

AirVPN Manual OpenVPN Setup

TeamFlashRouters · Jun 11, 2019 ·

Preparing for Manual AirVPN Setup

Obtain your AirVPN OpenVPN Information

If you are not already a AirVPN user Sign Up Now.

1. Log in to your account on the AirVPN website.

AIRVPN OpenVPN Client Login for FlashRouter DD-WRT VPN Configuration

2. Click on the Client Area tab.

AIRVPN OpenVPN Client Area for FlashRouter DD-WRT VPN Configuration

3. Click on the Config Generator subtab.

AIRVPN OpenVPN Configuration Generator for FlashRouter DD-WRT VPN Configuration

4. Click on the Router icon under Choose your Operating System.

AIRVPN OpenVPN FlashRouter DD-WRT VPN Configuration

5. Select a Protocol under the Protocols section. We recommend UDP.

Select AIRVPN OpenVPN Encryption Protocol for FlashRouter DD-WRT VPN Configuration

6. Select one option under the Choose Servers section. AirVPN sorts these servers by Planet, Continent, Country, and Single servers. Choose whichever best suits your needs.

Sort AIRVPN OpenVPN Specific Certificates for FlashRouter DD-WRT VPN Configuration

7. Scroll down towards the bottom of the page and click on Generate.

Generate AIRVPN OpenVPN Specific Certificates for FlashRouter DD-WRT VPN Configuration

Open the file that was downloaded with NotePad++ for Windows or TextEdit for Apple. You will be copying the Server IP/Name, client.crt and client.key from this file.

Please note, all VPN servers have different keys and certificates. If you wish to change servers in the future, you will have to go through steps 1-7 again.

DD-WRT Router Setup for AirVPN

Navigate to Services > VPN

Enter AirVPN settings

OpenVPN Client

Start OpenVPN Client

If you wish to disable your VPN connection simply set this to Disable at any time and click Apply Settings.

Server IP/Name

Copy and paste the server you selected in your account. Be sure there are no extra spaces or characters.

Port

443

Tunnel Device

TUN

Tunnel Protocol

UDP or TCP

Encryption cipher

AES-256-CBC

Hash Algorithm

SHA1

User Pass Authentication

Disable

Advanced Options

Enable

TLS Cipher

None

LZO Compression

No

NAT

Enable

Firewall Protection

Enable

nsCertType verification

Checked

Policy Based Routing

This field can be used for split VPN and Dual Gateway routing.

TLS Auth Key

—–BEGIN OpenVPN Static key V1—–
7bb7a23a0f5f28d01e792df68f1764ab
f2688719288808bf58e8a2d4f9354ecf
132625dfb895fc3f6330ae1e868e4dfa
c164c0931593d7f9a7da9595cf353433
8896e1d0a987a0d19838944af8fea4e5
215a3a0c76f4c67d5a4aee6a53be66a4
c88b84f850030840fb30f8550ed8068f
35c1ef34ee8f40a0ea5862dfb6f8d3c5
7ab5e27ac2799cf93e8765ff63cd8cd8
6b391b813925cd373bb202796f64d16f
003d042ca828d1b07f18ba1d0cb0323d
df3ee9287e9e084e655699efb3cffa92
3626946fa372e7beee245e7a95b4c1d8
7d16cae685218d4b8afc019b22e41083
476ee9883fe666d236301e55b2062551
4d91c8a69467a758293994df1e6fa7ae
—–END OpenVPN Static key V1—–

CA Cert

—–BEGIN CERTIFICATE—–
MIIGVDCCBDygAwIBAgIJAIzYQ+/kXyADMA0GCSqGSIb3DQEBBQUAMHkxCzAJBgNV
BAYTAklUMQswCQYDVQQIEwJJVDEQMA4GA1UEBxMHUGVydWdpYTETMBEGA1UEChMK
YWlydnBuLm9yZzEWMBQGA1UEAxMNYWlydnBuLm9yZyBDQTEeMBwGCSqGSIb3DQEJ
ARYPaW5mb0BhaXJ2cG4ub3JnMB4XDTE0MDQxMTEwMTU0NVoXDTI0MDQwODEwMTU0
NVoweTELMAkGA1UEBhMCSVQxCzAJBgNVBAgTAklUMRAwDgYDVQQHEwdQZXJ1Z2lh
MRMwEQYDVQQKEwphaXJ2cG4ub3JnMRYwFAYDVQQDEw1haXJ2cG4ub3JnIENBMR4w
HAYJKoZIhvcNAQkBFg9pbmZvQGFpcnZwbi5vcmcwggIiMA0GCSqGSIb3DQEBAQUA
A4ICDwAwggIKAoICAQDGG3ZrJbP61PNjGc4mjTx0TLkUjP7IXZ3wnpPjwF/lwK9n
HgRqoPL0KY/ABJuzMViD8ChtwthNfc7PuJ7vSPtN84lSJ4JGmTxvZkNeLQLZsu1F
f88OcSpjW5ErBM05iVBeF8/ljwaajgFfbgop9W/UK5yMji4qgq5KHxxXqsB8R4rC
eFpWHoNTwFjvXhtVyMgXiT9XAh/vBYim021m8onio4K48q7YRZ4qU8gvE79h5M0g
miIlt6v1vaZskw9cqIBbCYefGMsvBRk2x824ChPf6FazMwAnQHsuBHt6eXAARvfF
DBDanzPHlRSiCP6Je6Vod/MPyepiTZgjgk2VxYUc1ohNxEEGzPGTayeNzLJUldou
P4B+tjJ0Xly30+wvlahADlqjtz3CGQmKMj7btZjd+Uo61B7gau5YiXR/IO7ZpFAC
PCZJSbrwFs6rt9Kewqk8zslfVIro8oDndXRkVsa/c8Qmd6ZE7V+oMGl2OggdWOLl
mDEjkytzx+Bw2sSSalJRAQmOQO8V0anOI6jGYLuU2jnFDsnqSHuwIK11xb6iHmh7
ONsRLUtQ+d64TzB00w2M0fCvGqUIp0N+lf7nsZKsEcU08OoHQYUuwX75ZEOYNSZJ
rqAXohcXdVUHqgRlJRErfSkjcGMM0yqjHkvopcnBIRXKMYTDVXvzRJboyJiVpQID
AQABo4HeMIHbMB0GA1UdDgQWBBTlFdcTqJ4x49Ew1/Ef9OJj0lDIiDCBqwYDVR0j
BIGjMIGggBTlFdcTqJ4x49Ew1/Ef9OJj0lDIiKF9pHsweTELMAkGA1UEBhMCSVQx
CzAJBgNVBAgTAklUMRAwDgYDVQQHEwdQZXJ1Z2lhMRMwEQYDVQQKEwphaXJ2cG4u
b3JnMRYwFAYDVQQDEw1haXJ2cG4ub3JnIENBMR4wHAYJKoZIhvcNAQkBFg9pbmZv
QGFpcnZwbi5vcmeCCQCM2EPv5F8gAzAMBgNVHRMEBTADAQH/MA0GCSqGSIb3DQEB
BQUAA4ICAQCUVAQteCtgNQiZMXV0wCdqivlxlCCuj5sD+XvEuoDqb7dH70u1KQ90
OAbkeotHlIbqJU10xWtvHEjnXg8QG5VOzaWnWWev+ivdPCkGWe8E7C8shsr4WMlA
EF8PPRtzOwCKayxjR713x+Tc2Sb6/rDsXcY5LV6RNmE9HWBM6IoHdqruR8PHkYge
2CPXMuLByEADri6xmvussAjCWEDplJNY7tQsUGT7vjrwrNSNBx/SvxkXnWBj0wYa
EwNu43jrjcRfM/3eGcKDX3cQqTfRQd3j3OA7zmJOXPeExRUIWZTNCvQItGy1TJdw
JTphflw15Bui4l2mYfDqK08zm4aJODrCjoQnVVzM5uOzSTOjmneI6AHj3MjjL3A/
CFA5PCSquBhUycF4UEVf3aPGiV0vAthCBUqM4eKE+rbjWPSaxKghVdr/S82o7Wzz
9mGwnOZDqWk+8AWSsGBjamMk3mNMR45E9FRfPF/dyjOSbVyyTsd1VzlTFEJa0wjB
l3yq3r3iZAM3UtevocAyTEAu0vDYBbS6TgWmWEDOizybB0hNrTx5u/SEI0Kwcthc
rilYxD+n4kmV7TvIR0ZSaYpgYALWQV27zOqY51Ol4UT98WCOokge9HdoFcGJU2Uj
5VneGp14/Oklh7y6BxxxGC3zNGjKGNQYuHGTIgw1DoASmRUdkPkn/w==
—–END CERTIFICATE—–

Public Client Cert

Copy and paste all contents between <cert> and </cert> make sure to also include the following lines when copying and pasting:
—–BEGIN CERTIFICATE—–
…
—–END CERTIFICATE—–

Private Client Key

Copy and paste all contents between <key> and </key> make sure to also include the following lines when copying and pasting:
—–BEGIN PRIVATE KEY—–
…
—–END PRIVATE KEY—–

CLICK APPLY SETTINGS

Leave all settings not mentioned above as their default setting.

Verify a successful AirVPN connection

Navigate to Status > OpenVPN

  1. You should now see a CONNECTED SUCCESS message.
  2. Visit whatismyipaddress.com to verify your new IP address and virtual location.

In some cases you may notice that the location is not showing the same location as the server you have input in your router settings; this is because geo tracking tools are often tricked by VPN connections. As long as you see an IP address that is not the same as your normal Internet IP address then you are indeed connected to AirVPN.

Back up your settings

Navigate to Administration > Backup

  1. Click the Backup button.
  2. A file named nvrambak.bin will be saved to your computer.
  3. You can load nvrambak.bin to restore your settings in the event of a reset.

How to change the AirVPN server

  1. Follow the instructions for obtaining the OpenVPN information from above.
  2. Enter the new Server Address in the Server IP/Name field.
  3. Enter the new client.key and private.key
  4. Click Apply Settings.

TROUBLESHOOTING

Still having issues? Visit the VPN Troubleshooting section.

Troubleshoot Here

Surfshark VPN Setup Guide for Privacy Hero

TeamFlashRouters · Sep 23, 2025 ·

Your Privacy Hero NordVPN Router uses cloud-based management, which means you can securely access and adjust your router settings from anywhere, on any device with an internet connection. Whether you’re connected through your phone, another Wi-Fi network, or directly to the Privacy Hero network, setup and management are always within reach.

Follow the steps below to connect your Privacy Hero to Surfshark WireGuard® or OpenVPN servers.

:point_right: Don’t have a Privacy Hero yet? Get your Privacy Hero Router for Surfshark here

Surfshark Wireguard Setup for Privacy Hero (recommended)

1. From any device that has a browser such as a computer, smartphone, or tablet visit app.privacyhero.com.

App.PrivacyHero.com

2. Enter your Privacy Hero account email and password. Click Login.

Privacy Hero Access Settings

3. Click the VPN symbol.

Privacy Hero Setup VPN

4. Click the Change button and select Custom from the dropdown and choose the Wireguard option.

Privacy Hero Change VPN Providers

5. In a new tab login to your Surfshark account.

6. Navigate to the VPN > Manual Setup tab.

7. Now choose Wireguard and go to the Router section.

8. Now go to Locations, and click on the server location you wish to use. Then, download the server file.

9. Drag and drop or click to Upload the server file into the Custom box on your Privacy Hero settings page. Then press Save.

10. Your Privacy Hero settings should now show a Connected message, indicating you have successfully signed in to your Surfshark VPN server!

Surfshark OpenVPN Setup for Privacy Hero

1. From any device that has a browser such as a computer, smartphone, or tablet visit app.privacyhero.com.

App.PrivacyHero.com

2. Enter your Privacy Hero account email and password. Click Login.

Privacy Hero Access Settings

3. Click the VPN symbol.

Privacy Hero Setup VPN

4. Click the Change button and select Custom from the dropdown and choose the OpenVPN option.

Privacy Hero Change VPN Providers

5. In a new tab login to your Surfshark account.

6. Navigate to the VPN > Manual Setup tab.

7. Now choose OpenVPN and go to the Router section.

8. Now go to Credentials and find your OpenVPN specific Username and Password.

9. Copy and paste the username and password from previous step into the Custom box on your Privacy Hero settings page.

10. Now go back to the Surfshark account page, and press Locations. 

11. Click on the country name that you want to choose, and Download any of the available server files from the list. (We recommend download the UDP version of the server file).

12. Drag and drop or click to Upload the server file into the Custom box on your Privacy Hero settings page. Then press Save.

13. Your Privacy Hero settings should now show a Connected message, indicating you have successfully signed in to your Surfshark VPN server!

Privacy Hero’s cloud based router settings access makes it so you can change settings while not connected to the Privacy Hero network. Visit the Surfshark IP Check to verify your VPN IP address. If it has not changed be sure to double check that you are indeed connected to the Privacy Hero network.

Keep in mind that the VPN connection will not change the location of the streaming services listed in the Streaming Relocation area of the Privacy Hero settings if the Streaming Relocation feature is Enabled.

TROUBLESHOOTING

Still having issues? Visit the VPN Troubleshooting section.

Troubleshoot Here

ExpressVPN Setup on Roqos

Dave · Dec 16, 2021 ·

Preparing for ExpressVPN Setup

Obtain your ExpressVPN login information

If you are not already an ExpressVPN user Sign Up Now.

1. Visit ExpressVPN’s website login page.

ExpressVPN login page

2. Successfully log in with your account information. Select More.

ExpressVPN account page

3. Select Manual Configuration and copy the Username and Password that are displayed on the right hand side of the screen.

ExpressVPN Manual Configuration
ExpressVPN username and password

Connecting to ExpressVPN in the Roqos Core

Access the Roqos Core UI

1. Login to the Roqos Core web app in a browser on any computer or smart device.

2. Click VPN from the navigation menu and then click VPN OUT.

Roqos VPN Out

3. Click the Connect to box.

Roqos VPN Connect to

4. In the Connect dropdown choose 3rd Party VPN Providers and for the VPN Provider dropdown choose ExpressVPN.

Roqos ExpressVPN select provider

Enter your ExpressVPN information

In the Username and Password field enter the ExpressVPN OpenVPN Username and Password that you obtained.

ExpressVPN on FlashRouters Privacy App Setup - OpenVPN Specific Username and Password
Roqos VPN ExpressVPN enter username and password

Select an ExpressVPN server

Click the Server dropdown and type in or scroll to your preferred server location.

Roqos VPN ExpressVPN select server

Click the Save button.

Roqos VPN Save Settings

Connect to ExpressVPN

Once you click Save you will be returned to the VPN OUT menu.

Click the Connect button to start your ExpressVPN connection. Please be patient as the router connects your entire network through VPN.

Roqos VPN Connect

Assign devices to connect to VPN

By default there are no devices assigned to the VPN tunnel. Click Included Devices. From this page you can choose if all devices should connect to ExpressVPN or only certain devices.

Roqos VPN Included Devices

From the dropdown select Include all devices if you want every device that connects to the Roqos to connect to ExpressVPN. Then click Save.

Roqos VPN Include All Devices

If you only want specific devices to connect to ExpressVPN while others bypass the VPN connection select Include selected devices from the dropdown and then toggle the sliders for the devices you want connected to VPN. Click Save.

Roqos VPN Include Selected devices

Verify a successful ExpressVPN connection

Make sure you are connected to the Roqos network via WiFi or ethernet connection on your device.

Visit ExpressVPN’s IP Check to verify your new IP Address and virtual location.

You should see Connected at the top of the page underneath ExpressVPN.

Connect to a different ExpressVPN server

To change your server click Disconnect on the VPN OUT page then return to the Connect To section to select a new server from the Server dropdown and click Save. Now click Connect once again on the VPN Out page.

Disconnect from ExpressVPN

To disconnect from ExpressVPN click the Disconnect button.

TROUBLESHOOTING

Still having issues? Visit the FR Privacy App Troubleshooting section.

Troubleshoot Here

Select devices for VPN on Roqos

Dave · Dec 16, 2021 ·

Select specific devices that you want to pass through the Roqos Core’s VPN tunnel. This is a great solution in instances of streaming services blocking incoming VPN connections or other VPN related service interruptions.

Login to Roqos Core UI web app in a browser on any computer or smart device.

1. Click the navigation menu and select VPN  > VPN Out.

Roqos VPN - VPN Out

2. Select Included Devices.

Roqos VPN - Included Devices

3. In the Select devices for your VPN Out connection dropdown select Include selected devices and check the devices you want to connect to VPN. Click Save.

Roqos VPN - Include selected devices

Now these devices will be connected to the VPN tunnel. All other devices will bypass the VPN tunnel and use your ISP’s IP Address.

Teamviewer FAQ and Setup

TeamFlashRouters · May 30, 2019 ·

We do NOT offer phone support here at FlashRouters. You will not receive a phone call to begin your session. Please read the information below for how to get connected during your session time.

What is a Teamviewer session?

A Teamviewer session is the most hands on method of receiving support from FlashRouters.

A support agent will connect directly to your computer and proceed to configure or troubleshoot your FlashRouter with you present.

We use Teamviewer sessions to troubleshoot any issue an eligible customer may have with a FlashRouter that was purchased from us or to configure a compatible router that your purchased independently along with a FlashRouters Support Plan.

In the session a chat window will appear so we can communicate directly with you in real time.

If you follow the information below prior to your session and all goes smoothly a Teamviewer session typically takes anywhere from 15 to 45 minutes.

Do I qualify for a Teamviewer session?

When purchasing a FlashRouter you are able to select a Quarterly or Yearly Bronze, Silver or Gold subscription plan.

Silver Yearly plan comes with one Teamviewer remote support session a year.

Gold Quarterly and Yearly plans come with one session per quarter.

If you support plan has expired or you are signed up for Bronze and you’d like to receive Teamviewer remote support assistance please email support@flashrouters.com

How do I schedule a Teamviewer session?

We are available for scheduled Teamviewer sessions from 10AM – 6:00PM ET Monday through Saturday.

To schedule a session with us open a support ticket or contact us via our live chat. We do not perform sessions that are not scheduled.

If we are available off hours we do our best to accommodate off hours session times with at least 24 hours notification.

Recommended computer and network setup

What computer should I use for Teamviewer?

Teamviewer sessions can not be performed on phones or tablets at this time. We require a Windows or Mac computer to successfully connect and configure your FlashRouter.

Below are the different scenarios from most ideal to least ideal.

I have a Dual Router Setup and a computer with WiFi and Ethernet

If you have an available wireless network NOT coming from the FlashRouter and have a computer that has wireless AND Ethernet capabilities you should be setup as follows:

  1. Connect via wireless to the other router.
  2. Once we have joined the session we will instruct you to wire from the FlashRouter to your computer.

I have a Dual Router Setup and a computer with WiFi only

If you have an available wireless network NOT coming from the FlashRouter and have a computer that has wireless only you should be setup as follows:

  1. Obtaining a USB to Ethernet adapter is ideal.
  2. If that is not possible connect to the FlashRouter’s network via wireless.

Session disconnects may occur with no backup Internet connection.

I have a Single Router Setup and a computer with WiFi and Ethernet

If the FlashRouter is your only wireless network and your computer has wireless and Ethernet capabilities you should be setup as follows:

  1. Connect an Ethernet cable from a numbered port on your FlashRouter directly to your computer.
  2. We may ask you during the session if your smartphone can broadcast an wireless hotspot we can connect to for backup Internet.

I have a Single Router Setup and a computer with WiFi only

If the FlashRouter if your only wireless network and your computer is wireless only you should be setup as follows:

  1. Obtaining a USB to Ethernet adapter is ideal.
  2. If that is not possible connect to the FlashRouter’s network via wireless.

Session disconnects may occur with no backup Internet connection.

How do I download Teamviewer?

Windows

  1. Download Teamviewer for Windows.
  2. Open the Teamviewer application.
  3. Email the User ID and Password (example displayed below) to your existing email thread or our live chat.
Access Teamviewer User ID and Password for FlashRouters Remote Support Session on Windows

Mac

  1. Download Teamviewer for Mac.
  2. Open the Teamviewer application.
  3. Email the User ID and Password (example displayed below) to your existing email thread or our live chat.
Access Teamviewer User ID and Password for FlashRouters Remote Support Session on Mac

When should I provide FlashRouters with my Teamviewer User ID and Password?

About 15 minutes before your scheduled session time update your support ticket e-mail the User ID and Password to your existing email thread, or send via our live chat.

VPN Killswitch for Asus Merlin

TeamFlashRouters · Jan 19, 2022 ·

Once you have OpenVPN connected on your Merlin FlashRouter you can enable the VPN Killswitch so that no internet traffic passes through your router that is not encrypted by the VPN tunnel.

Login to Asus Merlin firmware settings in a browser on any computer or smart device.

1. Under Advanced Settings select VPN.

2. Click the VPN Client tab.

3. Set Killswitch – Block routed clients if tunnel goes down to Yes.

Merlin Accept DNS configuration Redirect Internet and Kill Switch

4. Click Apply.

VPN Director for Asus Merlin

TeamFlashRouters · Jan 19, 2022 ·

Once you have OpenVPN connected on your Merlin FlashRouter you can manage your VPN connections by device or by VPN servers or even VPN providers. This is a major advantage of Asus Merlin firmware as it allows up to 5 VPN connections at the same.

Login to Asus Merlin firmware settings in a browser on any computer or smart device.

Setup multiple VPN clients

1. Under Advanced Settings select VPN.

2. Click the VPN Client tab.

3. In the Select Client instance dropdown select a new client instance to setup and follow your VPN providers setup guide.

VPN Director select client instance

4. Name the client in the Description field for more clarity for which server or provider is being setup.

VPN Director Description

5. Set the Redirect Internet traffic through tunnel dropdown to VPN Director.

VPN Director Policy

Start or Stop VPN Client

1. Under Advanced Settings select VPN.

2. Click the VPN Director tab.

Merlin VPN Director

3. With multiple VPN clients connected you can start and stop them as needed from this page.

VPN Director

Assign a device to a specific VPN client

1. On the VPN Director page click the + symbol next to Add new rule.

VPN direct add new rule

2. Select the Interface that you want to add the device to.

VPN director select interface

3. Click the Local IP dropdown and a full list of devices connected to the Merlin FlashRouter should appear. Select the device you want to assign to this VPN client.

VPN director select device

4. Click OK and click Apply.

NordVPN Setup on Roqos

TeamFlashRouters · Dec 24, 2021 ·

Preparing for NordVPN Setup

Obtain your NordVPN manual Username and Password

If you are not already a NordVPN user Sign Up Now.

1. Log in to your account on the NordVPN website.

NordVPN login

2. Click NordVPN on the left hand side and then click Setup NordVPN manually.

NordVPN setup manually

3. Enter in the verification code that was sent to your email.

NordVPN verify code

4. Copy and paste your NordVPN manual username and password to a secure location. This is the username and password you will enter into the router settings to connect to NordVPN.

NordVPN credentials

Connecting to NordVPN in the Roqos Core

Access the Roqos Core UI

1. Login to the Roqos Core web app in a browser on any computer or smart device.

2. Click VPN from the navigation menu and then click VPN OUT.

Roqos VPN Out

3. Click the Connect to box.

Roqos NordVPN Connect to

4. In the Connect dropdown choose 3rd Party VPN Providers and for the VPN Provider dropdown choose NordVPN.

Roqos NordVPN select provider

Enter your NordVPN information

In the Username and Password field enter the NordVPN OpenVPN Username and Password that you obtained.

NordVPN credentials
Roqos NordVPN enter username and password

Select a NordVPN server

Navigate to NordVPN server recommendation page. Click Recommended server and select the country you want to connect to and note the server number that appears.

Click the Location dropdown and type in or scroll to the preferred server country.

Roqos NordVPN Select Location

Click the Server dropdown and type in or scroll to the server number that was recommended. Select the UDP version of the server.

Roqos NordVPN select server number

Click the Save button.

Roqos NordVPN Save Settings

Connect to NordVPN

Once you click Save you will be returned to the VPN OUT menu.

Click the Connect button to start your NordVPN connection. Please be patient as the router connects your entire network through VPN.

Roqos VPN Connect

Assign devices to connect to VPN

By default there are no devices assigned to the VPN tunnel. Click Included Devices. From this page you can choose if all devices should connect to NordVPN or only certain devices.

Roqos NordVPN Included Devices

From the dropdown select Include all devices if you want every device that connects to the Roqos to connect to NordVPN. Then click Save.

Roqos VPN Include All Devices

If you only want specific devices to connect to NordVPN while others bypass the VPN connection select Include selected devices from the dropdown and then toggle the sliders for the devices you want connected to VPN. Click Save.

Roqos VPN Include Selected devices

Verify a successful NordVPN connection

Make sure you are connected to the Roqos network via WiFi or ethernet connection on your device.

Visit NordVPN’s website to verify your new IP Address and Protected Status at the top of the page.

You should see Connected at the top of the page underneath NordVPN.

Connect to a different NordVPN server

To change your server click Disconnect on the VPN OUT page then return to the Connect To section to select a new server from the Server dropdown and click Save. Now click Connect once again on the VPN Out page.

Disconnect from NordVPN

To disconnect from NordVPN click the Disconnect button.

TROUBLESHOOTING

Still having issues? Visit the FR Privacy App Troubleshooting section.

Troubleshoot Here

NordVPN Setup Guide for Privacy Hero

TeamFlashRouters · Apr 3, 2023 ·

Your Privacy Hero NordVPN Router uses cloud-based management, which means you can securely access and adjust your router settings from anywhere, on any device with an internet connection. Whether you’re connected through your phone, another Wi-Fi network, or directly to the Privacy Hero network, setup and management are always within reach.

Follow the steps below to connect your Privacy Hero to NordVPN NordLynx or OpenVPN servers. By default, you’ll automatically connect to the fastest, most reliable server available based on your location. If you prefer, you can also select a specific country server and input it directly into your Privacy Hero for more control.

:point_right: Don’t have a Privacy Hero yet? Get your Privacy Hero NordVPN Router here

NordVPN Nordlynx Setup for Privacy Hero

1. From any device that has a browser such as a computer, smartphone, or tablet visit app.privacyhero.com

App.PrivacyHero.com

2. Enter your Privacy Hero account email and password. Click Login.

Privacy Hero Access Settings

3. Click the VPN symbol.

Privacy Hero Setup VPN

4. Click the Change button and select NordVPN from the dropdown.

Privacy Hero Change VPN Providers

5. Click the Change button and select NordVPN from the dropdown and choose the NordLynx option. Next you will need to obtain your Token.

NordVPN Protocol Privacy Hero

6. In a new tab login to your NordVPN account and select NordVPN from your list of Services.

NordVPN account

7. At the bottom of the page click Get Access token and you will receive a code via email. Enter this code to proceed.

NordVPN Access Token

8. After you enter the email code select Generate new token and set it to Doesn’t expire. Copy this token.

NordVPN Generate new token
NordVPN Copy Token

9. Paste the token and then Click Save to connect to the server address recommended by NordVPN within your country.

NordVPN Protocols Privacy Hero

10. To connect to a specific location, click the Country dropdown menu and scroll or type to search from the available options. Choose your preferred country and you will automatically connect to the recommended server within that country at the time. Then click Save.

Nordlynx VPN Country Selection Privacy Hero

11. If you prefer to enter a specific server address number click Advanced Options and then type in the NordVPN server you would like to use as shown below e.g. uk1784.nordvpn.com. Then click Save.

Nordlynx Advanced Privacy Hero

Use the NordVPN’s server recommendation tool to select a specific country and receive a recommendation for the fastest server based on your actual location. You can then enter that server in the Privacy Hero settings manually.

12. Your Privacy Hero settings should now show a Connected message, indicating you have successfully signed in to your NordVPN NordLynx VPN server!

Privacy Hero Nordlynx Connected

NordVPN OpenVPN Setup for Privacy Hero

1. From any device that has a browser such as a computer, smartphone, or tablet visit app.privacyhero.com

App.PrivacyHero.com

2. Enter your Privacy Hero account email and password. Click Login.

Privacy Hero Access Settings

3. Click the VPN symbol.

Privacy Hero Setup VPN

4. Click the Change button and select NordVPN from the dropdown.

Privacy Hero Change VPN Providers

5. Choose the OpenVPN option to connect to OpenVPN servers or to setup a NordVPN Dedicated IP address. Next you will need to obtain your Manual Service credentials.

NordVPN Protocol Privacy Hero

6. In a new tab login to your NordVPN account and select NordVPN from your list of Services.

NordVPN login
NordVPN account

7. At the bottom of the page in the Manual Setup section click Setup NordVPN manually then under the Configuration section go to Service credentials. Click Verify email to receive a code via email and enter the code to view and copy your credentials.

NordVPN Manual OpenVPN
NordVPN Service Credentials

8. Enter these credentials into the OpenVPN Username and Password sections in your Privacy Hero and Click Save if you want to connect to the server address recommended by NordVPN within your country.

NordVPN OpenVPN Privacy Hero

9. To connect to a specific location, click the Country dropdown menu and scroll or type to search from the available options. Choose your preferred country and you will automatically connect to the recommended server within that country at the time. Then click Save.

Nordlynx VPN Country Selection Privacy Hero

10. To connect with a NordVPN Dedicated IP Address or if you prefer to enter a specific server address number click Advanced Options and then type in the NordVPN server you would like to use as shown below e.g. uk1784.nordvpn.com. Then click Save.

Nordlynx Advanced Privacy Hero

Use the NordVPN’s server recommendation tool to select a specific country and receive a recommendation for the fastest server based on your actual location. You can then enter that server in the Privacy Hero settings manually.

11. Your Privacy Hero settings should now show a Connected message, indicating you have successfully signed in to your NordVPN Dedicated IP address or preferred OpenVPN server!

NordVPN OpenVPN Connected Privacy Hero

Privacy Hero’s cloud based router settings access makes it so you can change settings while not connected to the Privacy Hero network. Visit the NordVPN IP Check to verify your VPN IP address. If it has not changed be sure to double check that you are indeed connected to the Privacy Hero network.

Keep in mind that the VPN connection will not change the location of the streaming services listed in the Streaming Relocation area of the Privacy Hero settings if the Streaming Relocation feature is Enabled.

Still having issues?

Feel free to submit a ticket and we will get back to you as soon as possible.

PrivateInternetAccess (PIA) Setup on Roqos

TeamFlashRouters · Dec 24, 2021 ·

Preparing for PIA Setup

Obtain your PIA login information

If you are not already an PIA user Sign Up Now.

1. Visit PIA’s website login page.

PIA login

2. Successfully log in with your account information.

Connecting to PIA in the Roqos Core

Access the Roqos Core UI

1. Login to the Roqos Core web app in a browser on any computer or smart device.

2. Click VPN from the navigation menu and then click VPN OUT.

Roqos VPN Out

3. Click the Connect to box.

Roqos PIA Connect to

4. In the Connect dropdown choose 3rd Party VPN Providers and for the VPN Provider dropdown choose Private_Internet_Access.

Roqos PIA select provider

Enter your PIA information

In the Username and Password field enter the PIA Username and Password that you logged in with.

Roqos PIA enter username and password

Select a PIA server

Click the Server dropdown and type in or scroll to your preferred server location.

Roqos PIA server select

Click the Save button.

Roqos PIA Save Settings

Connect to PIA

Once you click Save you will be returned to the VPN OUT menu.

Click the Connect button to start your PIA connection. Please be patient as the router connects your entire network through VPN.

Roqos VPN Connect

Assign devices to connect to VPN

By default there are no devices assigned to the VPN tunnel. Click Included Devices. From this page you can choose if all devices should connect to PIA or only certain devices.

Roqos PIA Included Devices

From the dropdown select Include all devices if you want every device that connects to the Roqos to connect to PIA. Then click Save.

Roqos VPN Include All Devices

If you only want specific devices to connect to PIA while others bypass the VPN connection select Include selected devices from the dropdown and then toggle the sliders for the devices you want connected to VPN. Click Save.

Roqos VPN Include Selected devices

Verify a successful PIA connection

Make sure you are connected to the Roqos network via WiFi or ethernet connection on your device.

Visit PIA’s IP Check to verify your new IP Address and virtual location.

You should see Connected at the top of the page underneath Private_Internet_Access.

Connect to a different PIA server

To change your server click Disconnect on the VPN OUT page then return to the Connect To section to select a new server from the Server dropdown and click Save. Now click Connect once again on the VPN Out page.

Disconnect from PIA

To disconnect from PIA click the Disconnect button.

TROUBLESHOOTING

Still having issues? Visit the FR Privacy App Troubleshooting section.

Troubleshoot Here

Privacy Hero VPN Kill Switch Setup

TeamFlashRouters · Apr 3, 2023 ·

Your Privacy Hero router uses Cloud Based router management which means you can access the router settings from anywhere on any device that has an internet connection. You can follow these steps while connected to your phone, other Wi-Fi network, or the Privacy Hero network.

Use these steps to enable Privacy Hero’s VPN Kill Switch to make sure that no traffic goes through your router unless it is connected to VPN.

1. From any device that has a browser such as a computer, smartphone, or tablet visit app.privacyhero.com

App.PrivacyHero.com

2. Enter your Privacy Hero account email and password. Click Login.

Privacy Hero Access Settings

If you have not created your Privacy Hero account yet please follow these instructions.

3. Click the VPN symbol.

Privacy Hero Setup VPN

4. Toggle the VPN Kill Switch setting to On.

Privacy Hero VPN Kill Switch

TROUBLESHOOTING

Still having issues? Visit the VPN Troubleshooting section.

Troubleshoot Here

IPVanish AsusWRT OpenVPN Setup

TeamFlashRouters · Apr 29, 2024 ·

Preparing for IPVanish AsusWRT Setup

Download your IPVanish .ovpn file

If you are not already an IPVanish user Sign Up Now.

1. Log in to your account on the IPVanish website.

IPVanish login

2. Successfully log in with your account information then go to IPVanish .ovpn file page.

3. Click on the .ovpn file for the server location you want to use to dowloand the .ovpn file. Do not open this file.

IPVanish download ovpn

AsusWRT Router Setup for IPVanish

Login to AsusWRT firmware settings in a browser on any computer or smart device connected to the AsusWRT FlashRouter’s network.

1. Navigate to the VPN tab.

Merlin VPN Tab

2. Navigate to the VPN Fusion tab.

Asus VPN Fusion

3. Click Add profile.

Asus Add profile

4. In the Connection Name field enter in the name you’d like to use for this OpenVPN Client profile. We typically advise entering in the location or server number here. Our example server was in New York so I have entered in IPVanish New York.

5. In the VPN Type dropdown select OpenVPN.

6. Click Import .ovpn file and select the .ovpn file you downloaded earlier. Then click Upload.

7. In the Username and Password fields paste in the IPVanish email and password you use to successfully login to your IPVanish website account.

8. Click Apply and Enable at the bottom of the page.

Asus IPVanish profile

If you only want certain devices to connect to the OpenVPN Client profile you are setting up instead of all the devices connected to the FlashRouter’s network click into the profile and disable Apply to all devices. Then click Devices and select the devices that you want to connect to VPN.

Asus VPN devices
Asus VPN select devices

9. At the top of the page set the Service State toggle to ON to activate the VPN connection.

Asus IPVanish Connected

Verify a successful IPVanish connection

  1. You should now see a CONNECTED message.
  2. Visit IPVanish’s IP Check to verify your new IP address and virtual location.

In some cases you may notice that the location is not showing the same location as the server you have input in your router settings; this is because geo tracking tools are often tricked by VPN connections. As long as you see an IP address that is not the same as your normal Internet IP address then you are indeed connected to IPVanish.

How to change the IPVanish server

  1. Follow the steps at the top of the page to obtain a new .ovpn file.
  2. Then proceed with the settings same as initial setup.

TROUBLESHOOTING

Still having issues? Visit the VPN Troubleshooting section.

Troubleshoot Here

Surfshark AsusWRT WireGuard Setup

TeamFlashRouters · Apr 29, 2024 ·

Preparing for Surfshark AsusWRT Setup

Copy your Surfshark Private Key

If you are not already a Surfshark user Sign Up Now.

1. Log in to your account on the Surfshark website.

Surfshark Account Login

2. Click VPN Manual Setup.

Surfshark VPN Manual Setup

3. Select Router as the Setup method.

Surfshark setup method Router

4. Select WireGuard as the Protocol.

Surfshark select WireGuard

5. Select I don’t have a key pair.

Surfshark No Key Pair

6. Enter FlashRouter as the name of the connection and click Next.

Surfshark Connection Name

7. Click Generate a new key pair.

Surfshark Generate new Key Pair

8. A Public Key and Private Key will then appear. Use the copy box to copy the Private Key. You will not need the public key.

Surfshark Private Key

AsusWRT Router Setup for Surfshark

Login to AsusWRT firmware settings in a browser on any computer or smart device connected to the AsusWRT FlashRouter’s network.

1. Navigate to the VPN tab.

Merlin VPN Tab

2. Navigate to the VPN Fusion tab.

Asus VPN Fusion

3. Click Add profile.

Asus Add profile

4. In the Connection Name field enter in Surfshark.

5. In the VPN Type dropdown select Surfshark.

6. In the Region dropdown select the Surfshark location you want to connect to.

7. In the Private Key field paste in the Surfshark Private Key obtained earlier.

8. Click Apply and Enable at the bottom of the page.

Asus Surfshark profile

If you only want certain devices to connect to the Surfshark profile you are setting up instead of all the devices connected to the FlashRouter’s network click into the profile and disable Apply to all devices. Then click Devices and select the devices that you want to connect to VPN.

Asus VPN devices
Asus VPN select devices

9. At the top of the page set the Service State toggle to ON to activate the VPN connection.

Asus Surfshark Connected

Verify a successful Surfshark connection

  1. You should now see a CONNECTED message.
  2. Visit Surfshark’s IP Check to verify your new IP address and virtual location.

In some cases you may notice that the location is not showing the same location as the server you have input in your router settings; this is because geo tracking tools are often tricked by VPN connections. As long as you see an IP address that is not the same as your normal Internet IP address then you are indeed connected to Surfshark.

How to change the Surfshark server

  1. Use the profile service state toggle to disconnect the currently connected location.
  2. Then click into the Surfshark profile in the router’s settings.
  3. Then adjust the Region dropdown to a new location.
  4. Click Apply all settings.
  5. Use the profile service state toggle to connect the new location.

TROUBLESHOOTING

Still having issues? Visit the VPN Troubleshooting section.

Troubleshoot Here

HMA VPN Manual OpenVPN Setup

TeamFlashRouters · Apr 11, 2019 ·

Please note: HMA no longer allows router based integration, please visit our top recommended VPNs.

TROUBLESHOOTING

Still having issues? Visit the VPN Troubleshooting section.

Troubleshoot Here

CyberGhost AsusWRT OpenVPN Setup

TeamFlashRouters · Apr 29, 2024 ·

Preparing for CyberGhost Setup

Obtain your CyberGhost OpenVPN information

If you are not already a CyberGhost user Sign Up Now.

1. Log in to your account on the CyberGhost website.

CyberGhost Website Login

2. Select VPN.

CyberGhost VPN

3. Click Configure New Device.

CyberGhost Configure Device

4. Set Protocol to OpenVPN. Select the Country you would like to connect to. Select the Server Group. Name the device in the Device Name field. Click Save Configuration.

CyberGhost protocol and location

5. Press View configuration.

CyberGhost view configuration

6. Copy the Username, and Password that appear to a notepad, since you will need this information later in the setup process. Click Download Configuration.

CyberGhost Website OpenVPN Configuration Files Generator 1

Open the folder that was downloaded. Then open the ca.crt the client.crt, and client.key files with NotePad++ for Windows or TextEdit for Apple. All CyberGhost servers have different keys and certificates.

AsusWRT Router Setup for CyberGhost

Login to AsusWRT firmware settings in a browser on any computer or smart device connected to the AsusWRT FlashRouter’s network.

1. Navigate to the VPN tab.

Merlin VPN Tab

2. Navigate to the VPN Fusion tab.

Asus VPN Fusion

3. Click Add profile.

Asus Add profile

4. In the Connection Name field enter in the name you’d like to use for this OpenVPN Client profile. We typically advise entering in the location or server number here. Our example server was in USA so I have entered in CyberGhost USA.

5. In the VPN Type dropdown select OpenVPN.

6. Click Import .ovpn file and select the openvpn.ovpn file from the folder you downloaded earlier. Then click Upload.

7. In the Username and Password fields enter in the CyberGhost assigned username and password that you obtained earlier.

8. After uploading the openvpn.ovpn file you will get a message that says “Complete, Lack of Client Key!, Lack of Client Certificate, Lack of Certificate Authority”. For CyberGhost you need to enter in these details manually. Click Import the CA file or edit the .ovpn file manually and then click the edit icon next to Content modification of Keys and Certificate.

Asus CyberGhost import certs and keys

9. In the Certificate Authority field paste in the entire content of the ca.crt file.

—– BEGIN xxx —– / —– END xxx —– block (including those two lines).

10. In the Client Certificate field paste in the entire content of the client.crt file.

—– BEGIN xxx —– / —– END xxx —– block (including those two lines).

11. In the Client Key field paste in the entire content of the client.key file.

—– BEGIN xxx —– / —– END xxx —– block (including those two lines).

Then click OK.

Asus CyberGhost enter certs and keys

8. Click Apply and Enable at the bottom of the page.

Asus CyberGhost profile

If you only want certain devices to connect to the OpenVPN Client profile you are setting up instead of all the devices connected to the FlashRouter’s network click into the profile and disable Apply to all devices. Then click Devices and select the devices that you want to connect to VPN.

Asus VPN devices
Asus VPN select devices

9. At the top of the page set the Service State toggle to ON to activate the VPN connection.

Asus CyberGhost connected

Verify a successful CyberGhost connection

  1. You should now see a CONNECTED message.
  2. Visit What is my IP Address from a private/incognito browser to verify your new IP address and virtual location.

In some cases you may notice that the location is not showing the same location as the server you have input in your router settings; this is because geo tracking tools are often tricked by VPN connections. As long as you see an IP address that is not the same as your normal Internet IP address then you are indeed connected to CyberGhost.

How to change the CyberGhost server

  1. Follow the steps at the top of the page to create a new CyberGhost location profile in your account.
  2. Then proceed with the settings same as initial setup.

TROUBLESHOOTING

Still having issues? Visit the VPN Troubleshooting section.

Troubleshoot Here
Next Page »

Primary Sidebar

  • Troubleshooting
  • Router Access
  • Internet Connection Issues
  • WiFi Connectivity
  • General VPN Issues
  • TeamViewer Remote Support
  • DD-WRT Firmware
  • Facebook
  • Twitter
  • Instagram
  • Pinterest
  • YouTube

Footer