• Skip to primary navigation
  • Skip to main content
  • Skip to primary sidebar
  • Skip to footer

FlashRouters Support Portal

Prioritizing Privacy

  • SETUP GUIDES
    • Privacy Hero Router Setup Guide
    • ASUS-WRT Router Setup Guide
    • AsusWRT-Merlin Router Setup Guide
    • DD-WRT Router Setup Guide
    • ExpressVPN Router Setup Guide
    • GL.iNet Router Setup Guide
    • Roqos Core Router Setup Guide
  • TROUBLESHOOTING
    • Router Access
    • WiFi Connectivity
    • Internet Connection Issues
    • General VPN Issues
    • DD-WRT Firmware
    • TeamViewer Remote Support
  • FAQs
    • Router FAQs
    • VPN FAQs
    • Warranty and Returns FAQs
    • Sales FAQs
    • Shipping FAQs
    • Service Plan FAQs
  • Show Search
Hide Search

Search Results for: first class cle

IPVanish Manual OpenVPN Setup

TeamFlashRouters · Apr 5, 2019 ·

Preparing for Manual IPVanish Setup

Verify your IPVanish login information

If you are not already an IPVanish user Sign Up Now.

Log in to your account on the IPVanish website.

IPVanish Server Addresses

View a full list of IPVanish servers.

America

Ashburn:
iad-a01.ipvanish.com
through
iad-a78.ipvanish.com

Atlanta:
atl-a01.ipvanish.com
through
atl-a88.ipvanish.com

Boston:
bos-c01.ipvanish.com
through
bos-c27.ipvanish.com

Chicago:
chi-a01.ipvanish.com
through
chi-a58.ivpanish.com

Cleveland:
cle-c01.ipvanish.com
through
cle-c20.ipvanish.com

Dallas:
dal-a01.ipvanish.com
through
dal-a79.ipvanish.com

Denver:
den-c01.ipvanish.com
through
den-c13.ipvanish.com

Jackson:
jan-c01.ipvanish.com
through
jan-c15.ipvanish.com

Las Vegas:
las-c11.ipvanish.com
through
las-c20.ipvanish.com

Los Angeles:
lax-a01.ipvanish.com
through
lax-a60.ipvanish.com

Miami:
mia-a01.ipvanish.com
through
mia-a34.ipvanish.com

Milwaukee:
mke-c01.ipvanish.com
through
mke-c19.ipvanish.com

New York:
nyc-a01.ipvanish.com
through
nyc-a51.ipvanish.com

Phoenix:
phx-a01.ipvanish.com
through
phx-a24.ipvanish.com

Salt Lake City:
slc-c01.ipvanish.com
through
slc-c12.ipvanish.com

San Jose:
sjc-a01.ipvanish.com
through
sjc-a27.ipvanish.com

Seattle:
sea-a01-ipvanish.com
through
sea-a41.ipvanish.com

St. Louis:
stl-c01.ipvanish.com
through
stl-c18.ipvanish.com

United Kingdom

London:
lon-a01.ipvanish.com
through
lon-a69.ipvanish.com

lon-c01.ipvanish.com
through
lon-c58.ipvanish.com

Manchester:
man-c01.ipvanish.com
through
man-c09.ipvanish.com

DD-WRT Router Setup for IPVanish

Navigate to Services > VPN

Enter IPVanish settings

OpenVPN Client

Start OpenVPN Client

If you wish to disable your VPN connection simply set this to Disable at any time and click Apply Settings.

Server IP/Name

Copy and paste the server you would like to connect to from the server list above. Be sure there are no extra spaces or characters.

If you wish to change IPVanish connection locations, THIS IS THE ONLY FIELD YOU NEED TO CHANGE.

Port

443

Tunnel Device

TUN

Tunnel Protocol

UDP

Encryption cipher

AES-256-CBC

Hash Algorithm

SHA256

User Pass Authentication

Enable

Username

Enter the Username you successfully logged in to your IPVanish account with.

Password

Enter the Password you successfully logged in to your IPVanish account with.

Advanced Options

Enable

TLS Cipher

None

LZO Compression

Adaptive

NAT

Enable

Firewall Protection

Enable

Additional Config

persist-key
persist-tun
persist-remote-ip
keysize 256

Policy Based Routing

This field can be used for split VPN and Dual Gateway routing.

CA Cert

-----BEGIN CERTIFICATE-----
MIIErTCCA5WgAwIBAgIJAMYKzSS8uPKDMA0GCSqGSIb3DQEBDQUAMIGVMQswCQYD
VQQGEwJVUzELMAkGA1UECBMCRkwxFDASBgNVBAcTC1dpbnRlciBQYXJrMREwDwYD
VQQKEwhJUFZhbmlzaDEVMBMGA1UECxMMSVBWYW5pc2ggVlBOMRQwEgYDVQQDEwtJ
UFZhbmlzaCBDQTEjMCEGCSqGSIb3DQEJARYUc3VwcG9ydEBpcHZhbmlzaC5jb20w
HhcNMTIwMTExMTkzMjIwWhcNMjgxMTAyMTkzMjIwWjCBlTELMAkGA1UEBhMCVVMx
CzAJBgNVBAgTAkZMMRQwEgYDVQQHEwtXaW50ZXIgUGFyazERMA8GA1UEChMISVBW
YW5pc2gxFTATBgNVBAsTDElQVmFuaXNoIFZQTjEUMBIGA1UEAxMLSVBWYW5pc2gg
Q0ExIzAhBgkqhkiG9w0BCQEWFHN1cHBvcnRAaXB2YW5pc2guY29tMIIBIjANBgkq
hkiG9w0BAQEFAAOCAQ8AMIIBCgKCAQEAt9DBWNr/IKOuY3TmDP5x7vYZR0DGxLbX
U8TyAzBbjUtFFMbhxlHiXVQrZHmgzih94x7BgXM7tWpmMKYVb+gNaqMdWE680Qm3
nOwmhy/dulXDkEHAwD05i/iTx4ZaUdtV2vsKBxRg1vdC4AEiwD7bqV4HOi13xcG9
71aQ55Mj1KeCdA0aNvpat1LWx2jjWxsfI8s2Lv5Fkoi1HO1+vTnnaEsJZrBgAkLX
pItqP29Lik3/OBIvkBIxlKrhiVPixE5qNiD+eSPirsmROvsyIonoJtuY4Dw5K6pc
NlKyYiwo1IOFYU3YxffwFJk+bSW4WVBhsdf5dGxq/uOHmuz5gdwxCwIDAQABo4H9
MIH6MAwGA1UdEwQFMAMBAf8wHQYDVR0OBBYEFEv9FCWJHefBcIPX9p8RHCVOGe6u
MIHKBgNVHSMEgcIwgb+AFEv9FCWJHefBcIPX9p8RHCVOGe6uoYGbpIGYMIGVMQsw
CQYDVQQGEwJVUzELMAkGA1UECBMCRkwxFDASBgNVBAcTC1dpbnRlciBQYXJrMREw
DwYDVQQKEwhJUFZhbmlzaDEVMBMGA1UECxMMSVBWYW5pc2ggVlBOMRQwEgYDVQQD
EwtJUFZhbmlzaCBDQTEjMCEGCSqGSIb3DQEJARYUc3VwcG9ydEBpcHZhbmlzaC5j
b22CCQDGCs0kvLjygzANBgkqhkiG9w0BAQ0FAAOCAQEAI2dkh/43ksV2fdYpVGhY
aFZPVqCJoToCez0IvOmLeLGzow+EOSrY508oyjYeNP4VJEjApqo0NrMbKl8g/8bp
LBcotOCF1c1HZ+y9v7648uumh01SMjsbBeHOuQcLb+7gX6c0pEmxWv8qj5JiW3/1
L1bktnjW5Yp5oFkFSMXjOnIoYKHyKLjN2jtwH6XowUNYpg4qVtKU0CXPdOznWcd9
/zSfa393HwJPeeVLbKYaFMC4IEbIUmKYtWyoJ9pJ58smU3pWsHZUg9Zc0LZZNjkN
lBdQSLmUHAJ33Bd7pJS0JQeiWviC+4UTmzEWRKa7pDGnYRYNu2cUo0/voStphv8E
VA==
-----END CERTIFICATE-----

CLICK APPLY SETTINGS

Leave all settings not mentioned above as their default setting.

Verify a successful IPVanish connection

Navigate to Status > OpenVPN

  1. You should now see a CONNECTED SUCCESS message.
  2. Visit IPVanish’s IP Check to verify your new IP address and virtual location.

In some cases you may notice that the location is not showing the same location as the server you have input in your router settings; this is because geo tracking tools are often tricked by VPN connections. As long as you see an IP address that is not the same as your normal Internet IP address then you are indeed connected to IPVanish.

Back up your settings

Navigate to Administration > Backup.

  1. Click the Backup button.
  2. A file named nvrambak.bin will be saved to your computer.
  3. You can load nvrambak.bin to restore your settings in the event of a reset.

How to change the IPVanish server

  1. Copy the new IPVanish server address from the above server list.
  2. Paste the server into the Server IP/Name field.
  3. Click Apply Settings.

TROUBLESHOOTING

Still having issues? Visit the VPN Troubleshooting section.

Troubleshoot Here

Why can’t I access router settings?

Dave · May 3, 2019 ·

Be sure to first try the preset details to access your FlashRouter’s settings.

First time setup

Are you connected to the FlashRouter's network?

In order to access the FlashRouter’s settings you need to be connected to the FlashRouter’s network via ethernet or WiFi.

It is possible that if you are connected to the FlashRouter’s network you device might have static IP settings from a previous connection preventing it from being read correctly. Check your device’s static IP settings before proceeding.

Is your FlashRouter wired correctly?

Your FlashRouter should be wired as detailed in our Connect FlashRouter to the Internet setup.

A common mistake is to connect from your modem or other router to a LAN/numbered port of the FlashRouter instead of the WAN/Internet port of the FlashRouter as it should be. Doing so results in no access to the FlashRouter’s settings.

Lost access

How to find you FlashRouter's Local IP Address?

It is possible that your Local IP Address was changed at some point. Your Local IP Address is the address that you can access the FlashRouter’s settings with. We recommend finding the Local IP Address of the FlashRouter.

Was your FlashRouter reset?

If your FlashRouter is showing a local IP Address of 192.168.1.1 and you are seeing ‘dd-wrt’ as an available network in your wireless networks, your FlashRouter was reset. Reconfigure your FlashRouter.

Keep in mind that seeing a Local IP Address of 192.168.1.1 can also mean your are wired incorrectly and the router has not been reset. Be sure to check your wireless networks for ‘dd-wrt’. If the FlashRouter’s wireless network name appears as it was set then your FlashRouter was not reset and you should see the above section.

Tried updating firmware

Why can't I access my FlashRouter after a firmware upgrade?

When performing a firmware upgrade there is a dropdown that has Don’t Reset or Reset to Default settings as options.

If you accidentally selected Reset to Default settings you will need to reconfigure your FlashRouter.

If you had Don’t Reset selected and are still unable to connect to the FlashRouter’s network after a firmware upgrade, first make sure you are connected to the FlashRouter’s network as WiFi can disconnect during an upgrade, and then Reboot the FlashRouter.

GL.iNet Access Router Settings and Firmware Upgrade

TeamFlashRouters · Apr 3, 2023 ·

Follow this guide to upgrade the firmware of your GL.iNet FlashRouter.

1. Connect your computer, phone, or tablet to the GL.iNet router via wireless (FlashRouter24 / FlashRouter50) or via ethernet cable to one of the LAN ports on the router.

The FlashRouter WiFi password is printed on the sheet that came with the router and is set to Wireless#[First 5 characters of your router MAC]. The router MAC can be found on the bottom of your router if you cannot locate the sheet. For e.g. if your MAC is 9483C07E70A8 then your WiFi password is Wireless#9483C

Be sure to capitalize the W.

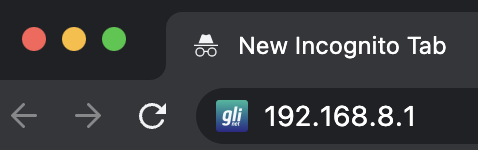
2. Once connected via wireless or ethernet on your device open your browser and go to 192.168.8.1

GL.iNet router access

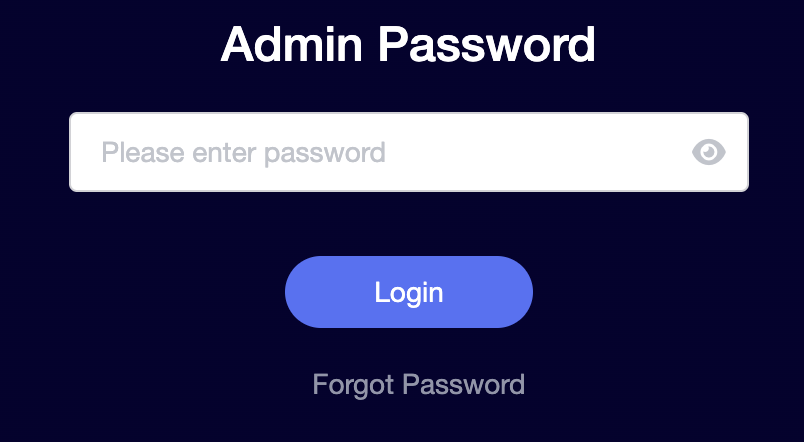
3. Enter openwrt as the admin password to access the GL.iNet firmware settings. Newer devices may have a different admin password set as openwrt1 or glopenwrt1

GL.iNet admin password enter

3. If a new firmware upgrade is available the router settings will either display a banner when you first access the router or a header. Click Install or the Upgrade arrow depending on which appears for you.

GL.iNet Firmware Upgrade Banner
GL.iNet Firmware Upgrade Header

4. Make sure the Keep Settings toggle is pushed to the right so your router does not get reset. Click the Install button to begin the firmware upgrade.

GL.iNet Install Firmware Upgrade

5. The firmware update should take about 2-3 minutes. You may need to reconnect your wireless devices after the network comes back up in your available networks.

TROUBLESHOOTING

Still having issues? Visit the VPN Troubleshooting section.

Troubleshoot Here

PrivateInternetAccess (PIA) Manual OpenVPN Setup

TeamFlashRouters · Apr 5, 2019 ·

Preparing for Manual PIA Setup

Verify your PIA login information

If you are not already a PIA user Sign Up Now.

Log in to your account on the PIA website.

FlashRouters Privacy App - PIA Login

PIA Server Addresses

The below servers are the only servers compatible with PIA router connections. Dedicated IP Addresses are not able to connect via routers.

United States

us-california.privacy.network
us-newjersey.privacy.network
us-chicago.privacy.network
us-texas.privacy.network
us-florida.privacy.network
us-seattle.privacy.network
us3.privacy.network
us-siliconvalley.privacy.network
us-newyorkcity.privacy.network
us-washingtondc.privacy.network
us-atlanta.privacy.network
us-houston.privacy.network
us-denver.privacy.network

United Kingdom

uk-london.privacy.network
uk-manchester.privacy.network

Canada

ca-toronto.privacy.network
ca-montreal.privacy.network

Australia

au-sydney.privacy.network
aus-melbourne.privacy.network
aus-perth.privacy.network

Germany

de-berlin.privacy.network
de-frankfurt.privacy.network

Rest of the World

ae.privacy.network
austria.privacy.network
dz.privacy.network
ad.privacy.network
ar.privacy.network
yerevan.privacy.network
bahamas.privacy.network
bangladesh.privacy.network
brussels.privacy.network
sofia.privacy.network
cambodia.privacy.network
china.privacy.network
cyprus.privacy.network
czech.privacy.network
denmark.privacy.network
egypt.privacy.network
fi.privacy.network
france.privacy.network
georgia.privacy.network
greenland.privacy.network
hungary.privacy.network
is.privacy.network
in.privacy.network
iran.privacy.network
ireland.privacy.network
man.privacy.network
israel.privacy.network
italy.privacy.network
japan.privacy.network
kazakhstan.privacy.network
liechtenstein.privacy.network
lu.privacy.network
macau.privacy.network
malta.privacy.network
mexico.privacy.network
md.privacy.network
monaco.privacy.network
mongolia.privacy.network
montenegro.privacy.network
morocco.privacy.network
nl-amsterdam.privacy.network
nz.privacy.network
nigeria.privacy.network
no.privacy.network
panama.privacy.network
philippines.privacy.network
poland.privacy.network
qatar.privacy.network
ro.privacy.network
rs.privacy.network
saudiarabia.privacy.network
spain.privacy.network
srilanka.privacy.network
sweden.privacy.network
swiss.privacy.network
sg.privacy.network
tr.privacy.network
taiwan.privacy.network
ua.privacy.network
venezuela.privacy.network
vietnam.privacy.network
za.privacy.network

DD-WRT Router Setup for PIA

Navigate to Services > VPN

PIA offers two different Encryption levels.
Default Encryption (AES-128) typically provides faster speeds.
Strong Encryption (AES-256) provides stronger encryption.
Follow the table below of the one that fits your needs.

Enter PIA settings (Default Encryption)

OpenVPN Client

Start OpenVPN Client

If you wish to disable your VPN connection simply set this to Disable at any time and click Apply Settings.

Server IP/Name

Copy and paste the server you would like to connect to from the server list above. Be sure there are no extra spaces or characters.

If you wish to change PIA connection locations, THIS IS THE ONLY FIELD YOU NEED TO CHANGE.

Port

1198

Tunnel Device

TUN

Tunnel Protocol

UDP

Encryption cipher

AES-128-CBC

Hash Algorithm

SHA1

First Data Cipher

Not set

Second Data Cipher

Not set

Third Data Cipher

Not set

Userpass Authentication

Enable

Username

Enter the Username you successfully logged in to your PIA account with.

Password

Enter the Password you successfully logged in to your PIA account with.

Advanced Options

Enable

TLS Cipher

None

LZO Compression

Disabled

NAT

Enable

Firewall Protection

Enable

Additional Config

persist-key
persist-tun

Policy Based Routing

This field can be used for split VPN and Dual Gateway routing.

CA Cert

-----BEGIN CERTIFICATE-----
MIIFqzCCBJOgAwIBAgIJAKZ7D5Yv87qDMA0GCSqGSIb3DQEBDQUAMIHoMQswCQYD
VQQGEwJVUzELMAkGA1UECBMCQ0ExEzARBgNVBAcTCkxvc0FuZ2VsZXMxIDAeBgNV
BAoTF1ByaXZhdGUgSW50ZXJuZXQgQWNjZXNzMSAwHgYDVQQLExdQcml2YXRlIElu
dGVybmV0IEFjY2VzczEgMB4GA1UEAxMXUHJpdmF0ZSBJbnRlcm5ldCBBY2Nlc3Mx
IDAeBgNVBCkTF1ByaXZhdGUgSW50ZXJuZXQgQWNjZXNzMS8wLQYJKoZIhvcNAQkB
FiBzZWN1cmVAcHJpdmF0ZWludGVybmV0YWNjZXNzLmNvbTAeFw0xNDA0MTcxNzM1
MThaFw0zNDA0MTIxNzM1MThaMIHoMQswCQYDVQQGEwJVUzELMAkGA1UECBMCQ0Ex
EzARBgNVBAcTCkxvc0FuZ2VsZXMxIDAeBgNVBAoTF1ByaXZhdGUgSW50ZXJuZXQg
QWNjZXNzMSAwHgYDVQQLExdQcml2YXRlIEludGVybmV0IEFjY2VzczEgMB4GA1UE
AxMXUHJpdmF0ZSBJbnRlcm5ldCBBY2Nlc3MxIDAeBgNVBCkTF1ByaXZhdGUgSW50
ZXJuZXQgQWNjZXNzMS8wLQYJKoZIhvcNAQkBFiBzZWN1cmVAcHJpdmF0ZWludGVy
bmV0YWNjZXNzLmNvbTCCASIwDQYJKoZIhvcNAQEBBQADggEPADCCAQoCggEBAPXD
L1L9tX6DGf36liA7UBTy5I869z0UVo3lImfOs/GSiFKPtInlesP65577nd7UNzzX
lH/P/CnFPdBWlLp5ze3HRBCc/Avgr5CdMRkEsySL5GHBZsx6w2cayQ2EcRhVTwWp
cdldeNO+pPr9rIgPrtXqT4SWViTQRBeGM8CDxAyTopTsobjSiYZCF9Ta1gunl0G/
8Vfp+SXfYCC+ZzWvP+L1pFhPRqzQQ8k+wMZIovObK1s+nlwPaLyayzw9a8sUnvWB
/5rGPdIYnQWPgoNlLN9HpSmsAcw2z8DXI9pIxbr74cb3/HSfuYGOLkRqrOk6h4RC
OfuWoTrZup1uEOn+fw8CAwEAAaOCAVQwggFQMB0GA1UdDgQWBBQv63nQ/pJAt5tL
y8VJcbHe22ZOsjCCAR8GA1UdIwSCARYwggESgBQv63nQ/pJAt5tLy8VJcbHe22ZO
sqGB7qSB6zCB6DELMAkGA1UEBhMCVVMxCzAJBgNVBAgTAkNBMRMwEQYDVQQHEwpM
b3NBbmdlbGVzMSAwHgYDVQQKExdQcml2YXRlIEludGVybmV0IEFjY2VzczEgMB4G
A1UECxMXUHJpdmF0ZSBJbnRlcm5ldCBBY2Nlc3MxIDAeBgNVBAMTF1ByaXZhdGUg
SW50ZXJuZXQgQWNjZXNzMSAwHgYDVQQpExdQcml2YXRlIEludGVybmV0IEFjY2Vz
czEvMC0GCSqGSIb3DQEJARYgc2VjdXJlQHByaXZhdGVpbnRlcm5ldGFjY2Vzcy5j
b22CCQCmew+WL/O6gzAMBgNVHRMEBTADAQH/MA0GCSqGSIb3DQEBDQUAA4IBAQAn
a5PgrtxfwTumD4+3/SYvwoD66cB8IcK//h1mCzAduU8KgUXocLx7QgJWo9lnZ8xU
ryXvWab2usg4fqk7FPi00bED4f4qVQFVfGfPZIH9QQ7/48bPM9RyfzImZWUCenK3
7pdw4Bvgoys2rHLHbGen7f28knT2j/cbMxd78tQc20TIObGjo8+ISTRclSTRBtyC
GohseKYpTS9himFERpUgNtefvYHbn70mIOzfOJFTVqfrptf9jXa9N8Mpy3ayfodz
1wiqdteqFXkTYoSDctgKMiZ6GdocK9nMroQipIQtpnwd4yBDWIyC6Bvlkrq5TQUt
YDQ8z9v+DMO6iwyIDRiU
-----END CERTIFICATE-----

CLICK APPLY SETTINGS

Leave all settings not mentioned above as their default setting.

Enter PIA settings (Strong Encryption)

OpenVPN Client

Start OpenVPN Client

If you wish to disable your VPN connection simply set this to Disable at any time and click Apply Settings.

Server IP/Name

Copy and paste the server you would like to connect to from the server list above. Be sure there are no extra spaces or characters.

If you wish to change PIA connection locations, THIS IS THE ONLY FIELD YOU NEED TO CHANGE.

Port

1197

Tunnel Device

TUN

Tunnel Protocol

UDP

Encryption cipher

AES-256-CBC

Hash Algorithm

SHA256

First Data Cipher

Not set

Second Data Cipher

Not set

Third Data Cipher

Not set

Userpass Authentication

Enable

Username

Enter the Username you successfully logged in to your PIA account with.

Password

Enter the Password you successfully logged in to your PIA account with.

Advanced Options

Enable

TLS Cipher

None

LZO Compression

Adaptive

NAT

Enable

Firewall Protection

Enable

Additional Config

persist-key
persist-tun

Policy Based Routing

This field can be used for split VPN and Dual Gateway routing.

CA Cert

-----BEGIN CERTIFICATE-----
MIIHqzCCBZOgAwIBAgIJAJ0u+vODZJntMA0GCSqGSIb3DQEBDQUAMIHoMQswCQYD
VQQGEwJVUzELMAkGA1UECBMCQ0ExEzARBgNVBAcTCkxvc0FuZ2VsZXMxIDAeBgNV
BAoTF1ByaXZhdGUgSW50ZXJuZXQgQWNjZXNzMSAwHgYDVQQLExdQcml2YXRlIElu
dGVybmV0IEFjY2VzczEgMB4GA1UEAxMXUHJpdmF0ZSBJbnRlcm5ldCBBY2Nlc3Mx
IDAeBgNVBCkTF1ByaXZhdGUgSW50ZXJuZXQgQWNjZXNzMS8wLQYJKoZIhvcNAQkB
FiBzZWN1cmVAcHJpdmF0ZWludGVybmV0YWNjZXNzLmNvbTAeFw0xNDA0MTcxNzQw
MzNaFw0zNDA0MTIxNzQwMzNaMIHoMQswCQYDVQQGEwJVUzELMAkGA1UECBMCQ0Ex
EzARBgNVBAcTCkxvc0FuZ2VsZXMxIDAeBgNVBAoTF1ByaXZhdGUgSW50ZXJuZXQg
QWNjZXNzMSAwHgYDVQQLExdQcml2YXRlIEludGVybmV0IEFjY2VzczEgMB4GA1UE
AxMXUHJpdmF0ZSBJbnRlcm5ldCBBY2Nlc3MxIDAeBgNVBCkTF1ByaXZhdGUgSW50
ZXJuZXQgQWNjZXNzMS8wLQYJKoZIhvcNAQkBFiBzZWN1cmVAcHJpdmF0ZWludGVy
bmV0YWNjZXNzLmNvbTCCAiIwDQYJKoZIhvcNAQEBBQADggIPADCCAgoCggIBALVk
hjumaqBbL8aSgj6xbX1QPTfTd1qHsAZd2B97m8Vw31c/2yQgZNf5qZY0+jOIHULN
De4R9TIvyBEbvnAg/OkPw8n/+ScgYOeH876VUXzjLDBnDb8DLr/+w9oVsuDeFJ9K
V2UFM1OYX0SnkHnrYAN2QLF98ESK4NCSU01h5zkcgmQ+qKSfA9Ny0/UpsKPBFqsQ
25NvjDWFhCpeqCHKUJ4Be27CDbSl7lAkBuHMPHJs8f8xPgAbHRXZOxVCpayZ2SND
fCwsnGWpWFoMGvdMbygngCn6jA/W1VSFOlRlfLuuGe7QFfDwA0jaLCxuWt/BgZyl
p7tAzYKR8lnWmtUCPm4+BtjyVDYtDCiGBD9Z4P13RFWvJHw5aapx/5W/CuvVyI7p
Kwvc2IT+KPxCUhH1XI8ca5RN3C9NoPJJf6qpg4g0rJH3aaWkoMRrYvQ+5PXXYUzj
tRHImghRGd/ydERYoAZXuGSbPkm9Y/p2X8unLcW+F0xpJD98+ZI+tzSsI99Zs5wi
jSUGYr9/j18KHFTMQ8n+1jauc5bCCegN27dPeKXNSZ5riXFL2XX6BkY68y58UaNz
meGMiUL9BOV1iV+PMb7B7PYs7oFLjAhh0EdyvfHkrh/ZV9BEhtFa7yXp8XR0J6vz
1YV9R6DYJmLjOEbhU8N0gc3tZm4Qz39lIIG6w3FDAgMBAAGjggFUMIIBUDAdBgNV
HQ4EFgQUrsRtyWJftjpdRM0+925Y6Cl08SUwggEfBgNVHSMEggEWMIIBEoAUrsRt
yWJftjpdRM0+925Y6Cl08SWhge6kgeswgegxCzAJBgNVBAYTAlVTMQswCQYDVQQI
EwJDQTETMBEGA1UEBxMKTG9zQW5nZWxlczEgMB4GA1UEChMXUHJpdmF0ZSBJbnRl
cm5ldCBBY2Nlc3MxIDAeBgNVBAsTF1ByaXZhdGUgSW50ZXJuZXQgQWNjZXNzMSAw
HgYDVQQDExdQcml2YXRlIEludGVybmV0IEFjY2VzczEgMB4GA1UEKRMXUHJpdmF0
ZSBJbnRlcm5ldCBBY2Nlc3MxLzAtBgkqhkiG9w0BCQEWIHNlY3VyZUBwcml2YXRl
aW50ZXJuZXRhY2Nlc3MuY29tggkAnS7684Nkme0wDAYDVR0TBAUwAwEB/zANBgkq
hkiG9w0BAQ0FAAOCAgEAJsfhsPk3r8kLXLxY+v+vHzbr4ufNtqnL9/1Uuf8NrsCt
pXAoyZ0YqfbkWx3NHTZ7OE9ZRhdMP/RqHQE1p4N4Sa1nZKhTKasV6KhHDqSCt/dv
Em89xWm2MVA7nyzQxVlHa9AkcBaemcXEiyT19XdpiXOP4Vhs+J1R5m8zQOxZlV1G
tF9vsXmJqWZpOVPmZ8f35BCsYPvv4yMewnrtAC8PFEK/bOPeYcKN50bol22QYaZu
LfpkHfNiFTnfMh8sl/ablPyNY7DUNiP5DRcMdIwmfGQxR5WEQoHL3yPJ42LkB5zs
6jIm26DGNXfwura/mi105+ENH1CaROtRYwkiHb08U6qLXXJz80mWJkT90nr8Asj3
5xN2cUppg74nG3YVav/38P48T56hG1NHbYF5uOCske19F6wi9maUoto/3vEr0rnX
JUp2KODmKdvBI7co245lHBABWikk8VfejQSlCtDBXn644ZMtAdoxKNfR2WTFVEwJ
iyd1Fzx0yujuiXDROLhISLQDRjVVAvawrAtLZWYK31bY7KlezPlQnl/D9Asxe85l
8jO5+0LdJ6VyOs/Hd4w52alDW/MFySDZSfQHMTIc30hLBJ8OnCEIvluVQQ2UQvoW
+no177N9L2Y+M9TcTA62ZyMXShHQGeh20rb4kK8f+iFX8NxtdHVSkxMEFSfDDyQ=
-----END CERTIFICATE-----

CLICK APPLY SETTINGS

Leave all settings not mentioned above as their default setting.

Verify a successful PIA connection

Navigate to Status > OpenVPN

  1. You should now see a CONNECTED SUCCESS message.
  2. Visit PIA’s IP Check to verify your new IP address and virtual location.

In some cases you may notice that the location is not showing the same location as the server you have input in your router settings; this is because geo tracking tools are often tricked by VPN connections. As long as you see an IP address that is not the same as your normal Internet IP address then you are indeed connected to PIA.

Back up your settings

Navigate to Administration > Backup

  1. Click the Backup button.
  2. A file named nvrambak.bin will be saved to your computer.
  3. You can load nvrambak.bin to restore your settings in the event of a reset.

How to change the PIA server

  1. Copy the new PIA server address from the above server list.
  2. Paste the server into the Server IP/Name field.
  3. Click Apply Settings.

TROUBLESHOOTING

Still having issues? Visit the VPN Troubleshooting section.

Troubleshoot Here

Cudy Internet Setup

TeamFlashRouters · Feb 26, 2024 ·

Follow this article when you receive your new Cudy FlashRouter to connect it to the Internet.

1. Connect the ethernet cable that came with the router from an open LAN ethernet port on your ISP modem or other router to the WAN port if you purchased a Cudy AX3000 or to ethernet port #1 of the device marked Primary if you purchased a Cudy M1800 or Cudy M3000.

Cudy Mesh internet wiring

2. Connect the power to the router and wait about 2 minutes for the router to fully boot up.

3. Connect your computer, phone, or tablet to the Cudy router via wireless (FlashRouter24 / FlashRouter50) or via ethernet cable to one of the LAN ports on the router.

The FlashRouter WiFi password is printed on the sheet that came with the router and is set to Wireless#[First 5 characters of your router MAC]. The router MAC can be found on the bottom of your router if you cannot locate the sheet. For e.g. if your MAC is 1459C07E70A8 then your WiFi password is Wireless#1459C

Be sure to capitalize the W.

4. Once connected via wireless or ethernet on your device open your browser and go to 192.168.10.1

Cudy local IP access

5. Enter openwrt as the admin password to access the Cudy firmware settings.

Cudy router access

6. Verify that your Cudy FlashRouter is reporting as Internet and WAN Connected.

Cudy Verify Internet

6. Verify that your Cudy FlashRouter is reporting as Internet and WAN Connected.

7. If you purchased a Cudy M1800 or Cudy M3000 mesh package you can now take the unit labeled Node to the location you want it connecting from and power it up. It will connect to the Primary network that was just setup automatically. You will then see the Mesh Units number increase according to the number that you have purchased shortly.

Cudy Verify Mesh connection

TROUBLESHOOTING

Still having issues? Visit the VPN Troubleshooting section.

Troubleshoot Here

TP-Link Internet Setup

TeamFlashRouters · Apr 11, 2024 ·

Follow this article when you receive your new TP-Link FlashRouter to connect it to the Internet.

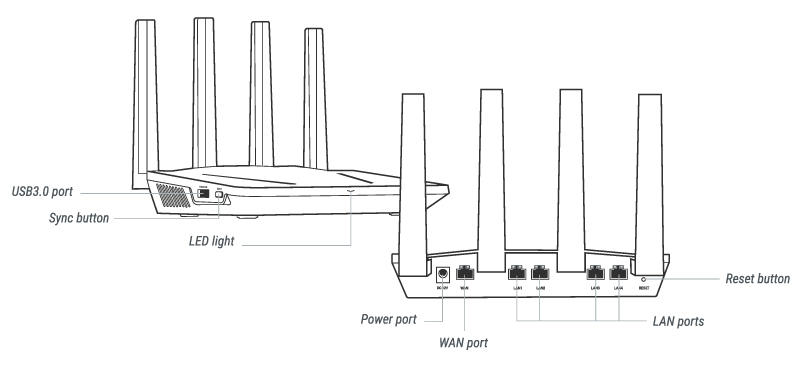
1. Connect the ethernet cable that came with the router from an open LAN ethernet port on your ISP modem or other router to the WAN port of the TP-Link.

2. Connect the power to the router and wait about 2 minutes for the router to fully boot up.

3. Connect your computer, phone, or tablet to the TP-Link router via wireless (FlashRouter24 / FlashRouter50) or via ethernet cable to one of the LAN ports on the router.

The FlashRouter WiFi password is printed on the sheet that came with the router and is set to Wireless#[First 5 characters of your router MAC]. The router MAC can be found on the bottom of your router if you cannot locate the sheet. For e.g. if your MAC is 1459C07E70A8 then your WiFi password is Wireless#1459C

Be sure to capitalize the W.

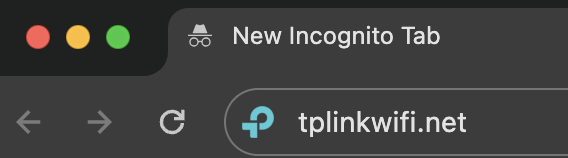
4. Once connected via wireless or ethernet on your device open your browser and go to tplinkwifi.net

TP-Link URL Access

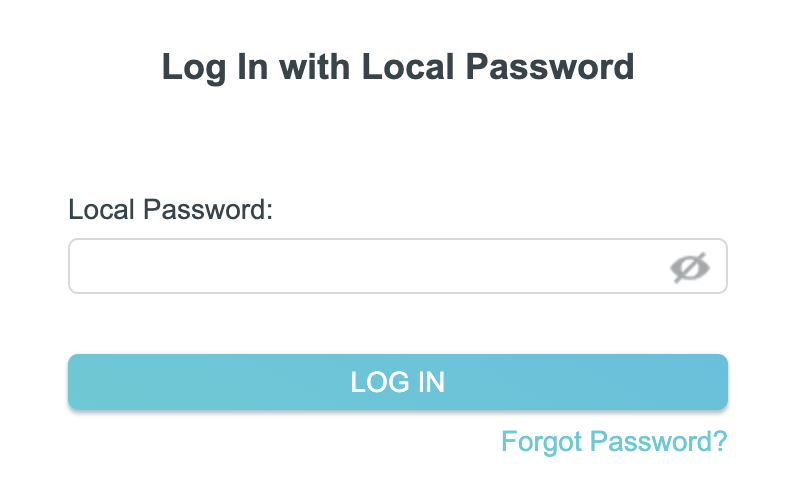
5. Enter tp-link as the admin password to access the TP-Link firmware settings.

TP-Link admin password

6. Verify that your TP-Link FlashRouter is reporting as Internet and WAN Connected.

TP-Link Internet Connected

TROUBLESHOOTING

Still having issues? Visit the VPN Troubleshooting section.

Troubleshoot Here

Asus RT-AC68U B1 / C1 / AC1900 DD-WRT WiFi Settings

Dave · Feb 25, 2019 ·

Recommended DD-WRT WiFi settings for the Asus RT-AC68U are based on extensive testing by FlashRouters. Please note that optimal settings may vary depending on external factors such as home size, interference, and the types of WiFi devices you are connecting in your network.

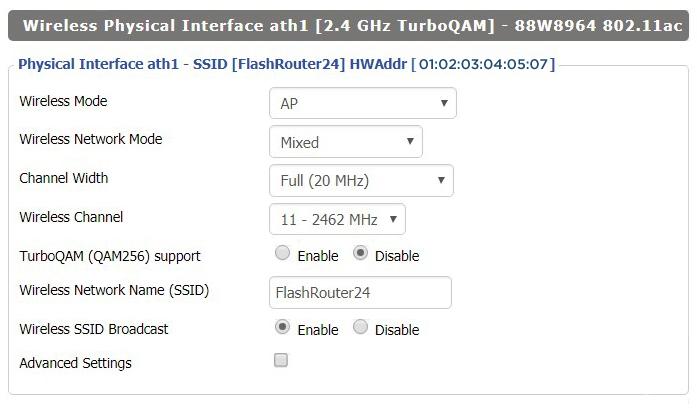
Screenshots below provide a visual display of recommended WiFi and encryption settings exactly as they appear in the Asus RT-AC68U with DD-WRT firmware.

Navigate to the Wireless > Basic Settings to view or edit WiFi network settings.

2.4 GHz - Wireless-N

View AC68U DD-WRT FlashRouter 2.4GHz Settings

5.0 GHz - Wireless-AC

View AC68U DD-WRT FlashRouter 5GHz Settings

Additional DD-WRT WiFi Information

Intimidated by all the available WiFi settings? The DD-WRT website provides extensive information about all of the available configuration options in the firmware. Learn about everything from Wireless channels to channel widths and more in the Basic Wireless Settings – DD-WRT Wiki.

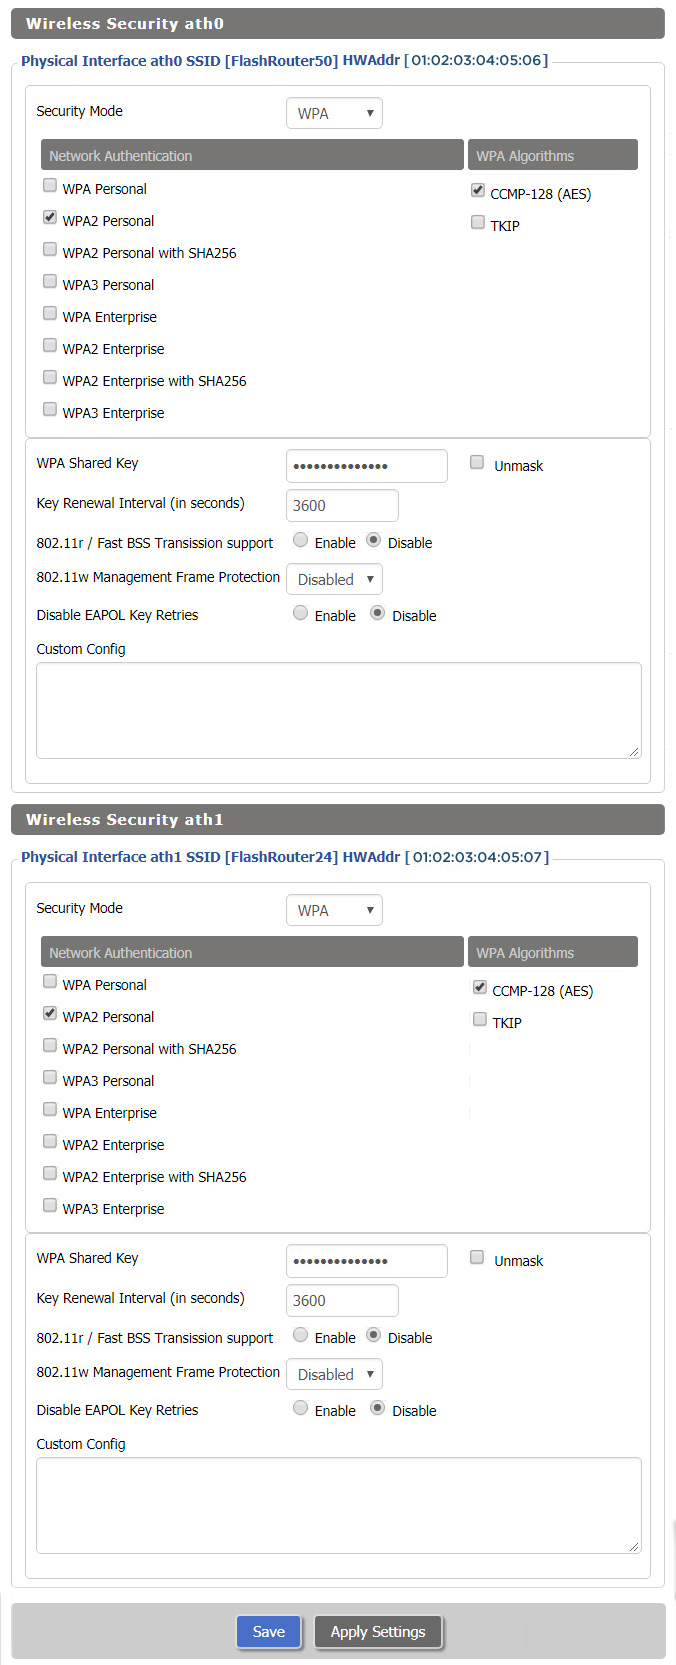
RT-AC68U DD-WRT Wireless Security

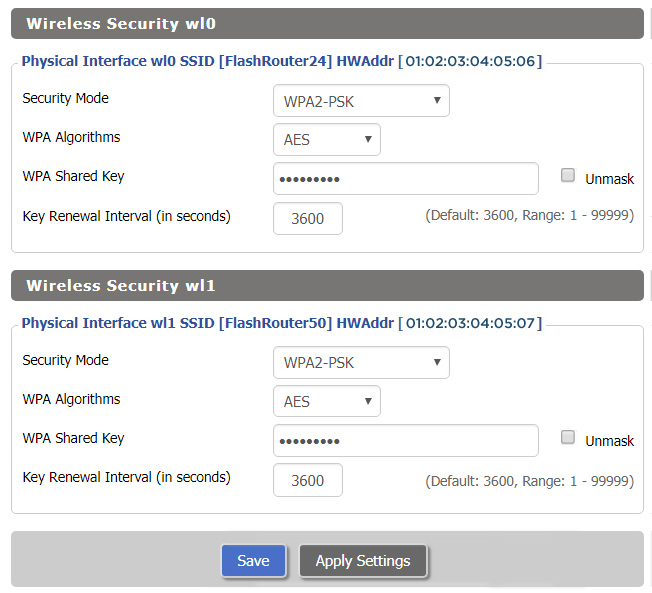
The preset RT-AC68U FlashRouter WiFi password is Wireless#[First 5 characters of your router MAC]. The router MAC can be found on the bottom of your router. For e.g. if your MAC is 1459C07E70A8 then your WiFi password is Wireless#1459C

Navigate to the Wireless > Wireless Security to view or edit WiFi passwords.

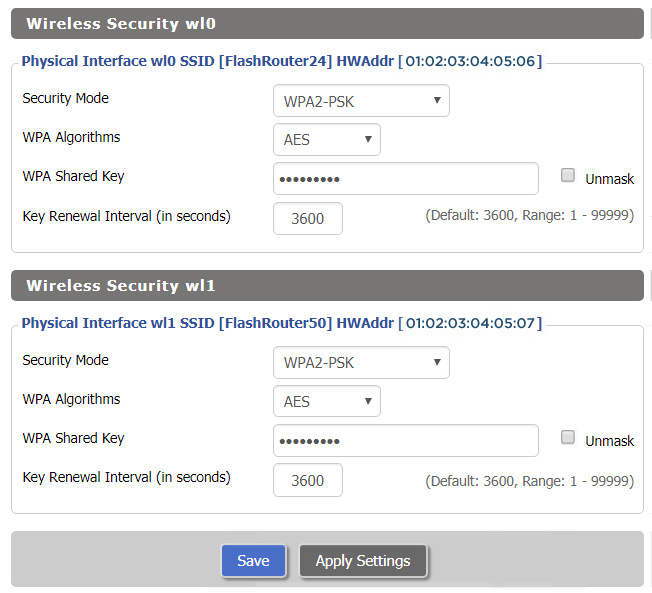
View AC68U DD-WRT FlashRouter WiFi Security Settings

TROUBLESHOOTING

Trouble with your Asus RT-AC68U WiFi? Visit the Wireless troubleshooting section.

Troubleshoot Here

Asus RT-AC66U DD-WRT WiFi Settings

Dave · Feb 25, 2019 ·

Recommended DD-WRT WiFi settings for the Asus RT-AC66U are based on extensive testing by FlashRouters. Please note that optimal settings may vary depending on external factors such as home size, interference, and the types of WiFi devices you are connecting in your network.

Screenshots below provide a visual display of recommended WiFi and encryption settings exactly as they appear in the Asus RT-AC66U with DD-WRT firmware.

Navigate to the Wireless > Basic Settings to view or edit WiFi network settings.

2.4 GHz - Wireless-N

View AC66U DD-WRT FlashRouter 2.4GHz Settings

5.0 GHz - Wireless-AC

View AC66U DD-WRT FlashRouter 5GHz Settings

Additional DD-WRT WiFi Information

Intimidated by all the available WiFi settings? The DD-WRT website provides extensive information about all of the available configuration options in the firmware. Learn about everything from Wireless channels to channel widths and more in the Basic Wireless Settings – DD-WRT Wiki.

RT-AC66U DD-WRT Wireless Security

The preset RT-AC66U FlashRouter WiFi password is Wireless#[First 5 characters of your router MAC]. The router MAC can be found on the bottom of your router. For e.g. if your MAC is 1459C07E70A8 then your WiFi password is Wireless#1459C

Navigate to the Wireless > Wireless Security to view or edit WiFi passwords.

View AC66U DD-WRT FlashRouter WiFi Security Settings

TROUBLESHOOTING

Trouble with your Asus RT-AC66U WiFi? Visit the Wireless troubleshooting section.

Troubleshoot Here

Asus RT-AC56U DD-WRT WiFi Settings

Dave · Mar 5, 2019 ·

Recommended DD-WRT WiFi settings for the Asus RT-AC56U are based on extensive testing by FlashRouters. Please note that optimal settings may vary depending on external factors such as home size, interference, and the types of WiFi devices you are connecting in your network.

Screenshots below provide a visual display of recommended WiFi and encryption settings exactly as they appear in the Asus RT-AC56U with DD-WRT firmware.

Navigate to the Wireless > Basic Settings to view or edit WiFi network settings.

2.4 GHz - Wireless-N

View AC56U DD-WRT FlashRouter 2.4GHz Settings

5.0 GHz - Wireless-AC

View AC56U DD-WRT FlashRouter 5GHz Settings

Additional DD-WRT WiFi Information

Intimidated by all the available WiFi settings? The DD-WRT website provides extensive information about all of the available configuration options in the firmware. Learn about everything from Wireless channels to channel widths and more in the Basic Wireless Settings – DD-WRT Wiki.

RT-AC56U DD-WRT Wireless Security

The preset RT-AC56U FlashRouter WiFi password is Wireless#[First 5 characters of your router MAC]. The router MAC can be found on the bottom of your router. For e.g. if your MAC is 1459C07E70A8 then your WiFi password is Wireless#1459C

Navigate to the Wireless > Wireless Security to view or edit WiFi passwords.

ViewAC56U DD-WRT FlashRouter WiFi Security Settings

TROUBLESHOOTING

Trouble with your Asus RT-AC56U WiFi? Visit the Wireless troubleshooting section.

Troubleshoot Here

Flint/Slate GL.iNet Internet Setup

TeamFlashRouters · Apr 3, 2023 ·

Follow this article when you receive your new Flint or Slate GL.iNet router to connect it to the Internet.

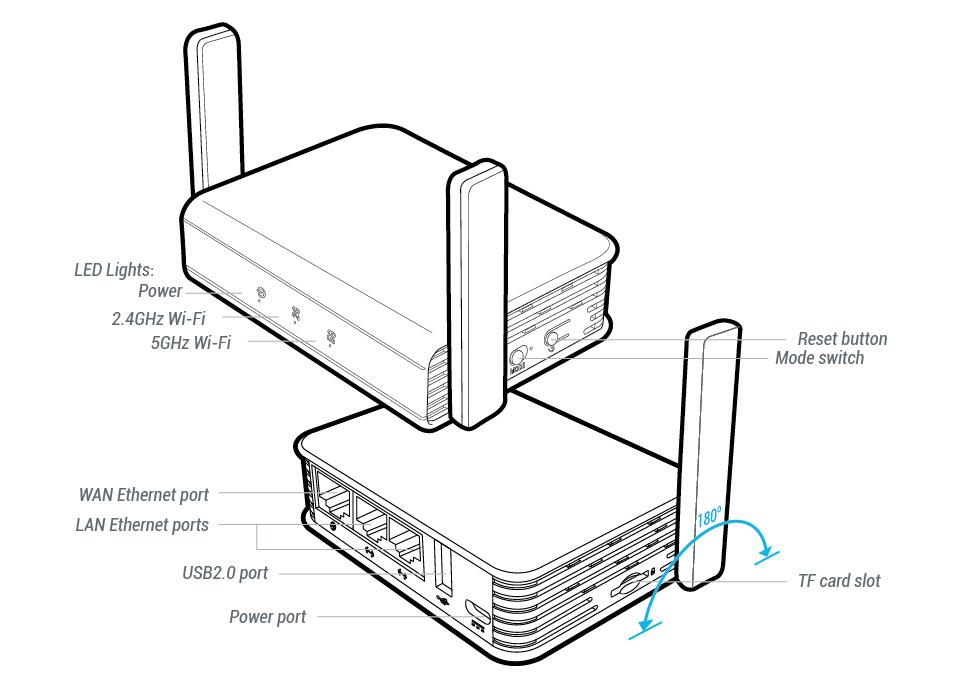
1. Connect the ethernet cable that came with the router from an open LAN ethernet port on your ISP modem or other router to the WAN port of the Flint or Slate GL.iNet router.

Flint Internet
Slate Internet

2. Connect the power to the router and wait about 2 minutes for the router to fully boot up.

3. Connect your computer, phone, or tablet to the GL.iNet router via wireless (FlashRouter24 / FlashRouter50) or via ethernet cable to one of the LAN ports on the router.

The FlashRouter WiFi password is printed on the sheet that came with the router and is set to Wireless#[First 5 characters of your router MAC]. The router MAC can be found on the bottom of your router if you cannot locate the sheet. For e.g. if your MAC is 1459C07E70A8 then your WiFi password is Wireless#1459C

Be sure to capitalize the W.

4. Once connected via wireless or ethernet on your device open your browser and go to 192.168.8.1

GL.iNet router access

5. Enter openwrt as the admin password to access the GL.iNet firmware settings.

GL.iNet admin password enter

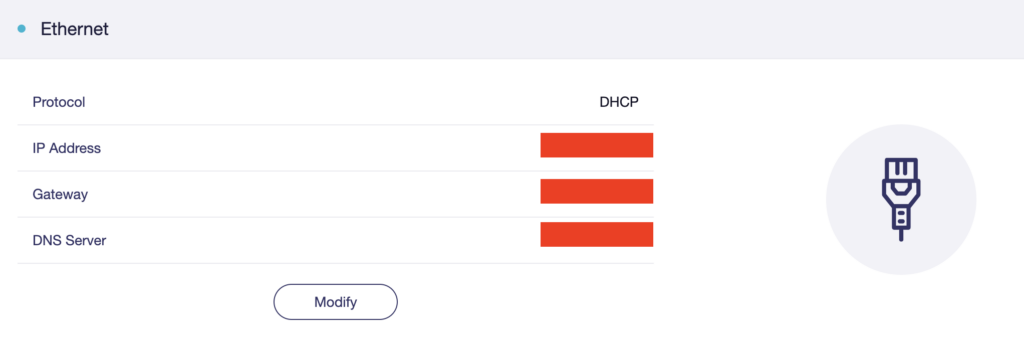
6. Verify that your Flint/Slate GL.iNet router is receiving a WAN IP Address and webpages are loading while connected to its network.

GL.iNet WAN Settings

TROUBLESHOOTING

Still having issues? Visit the VPN Troubleshooting section.

Troubleshoot Here

Flint/Slate GL.iNet Change Wi-Fi name and password

TeamFlashRouters · Apr 20, 2023 ·

Follow this guide to change the Wi-Fi name and password on your GL.iNet FlashRouter.

1. Connect your computer, phone, or tablet to the GL.iNet router via wireless (FlashRouter24 / FlashRouter50) or via ethernet cable to one of the LAN ports on the router.

The FlashRouter WiFi password is printed on the sheet that came with the router and is set to Wireless#[First 5 characters of your router MAC]. The router MAC can be found on the bottom of your router if you cannot locate the sheet. For e.g. if your MAC is 1459C07E70A8 then your WiFi password is Wireless#1459C

Be sure to capitalize the W.

2. Once connected via wireless or ethernet on your device open your browser and go to 192.168.8.1

GL.iNet router access

3. Enter openwrt as the admin password to access the GL.iNet firmware settings.

GL.iNet admin password enter

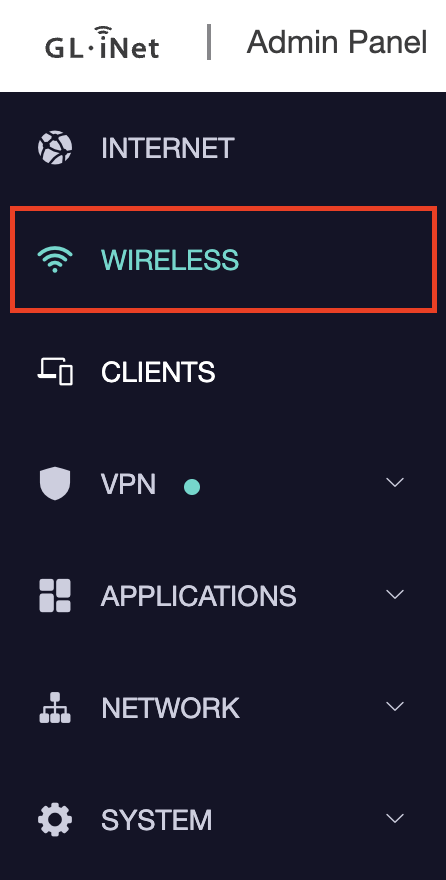
4. Click Wireless.

GL.iNet Click Wireless

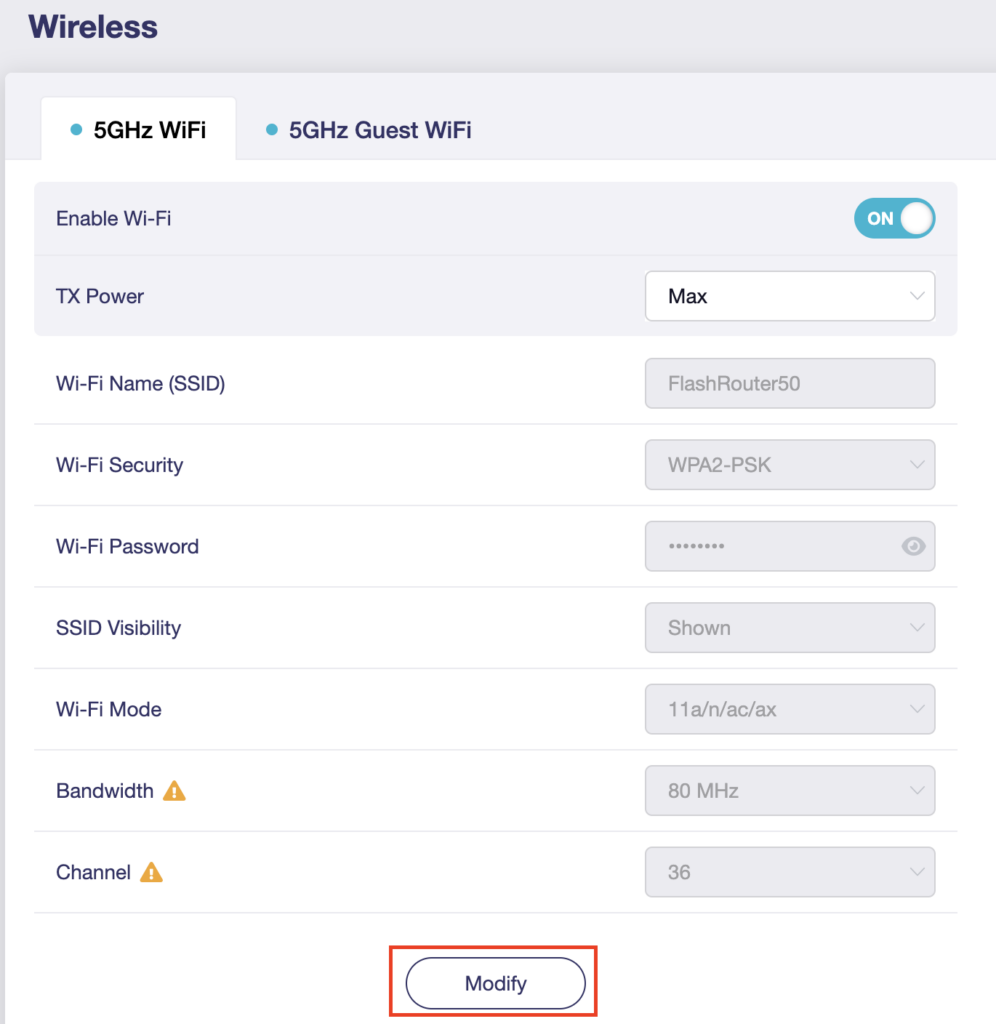
5. Click Modify under the 5GHz or 2.4GHz band.

GL.iNet Modify Wifi

The 5GHz and 2.4GHz information must be changed at separate times. Keep in mind that if you are connected to wireless when changing one band you may need to reconnect with the new info you set to be on the network again to make changes to the other band.

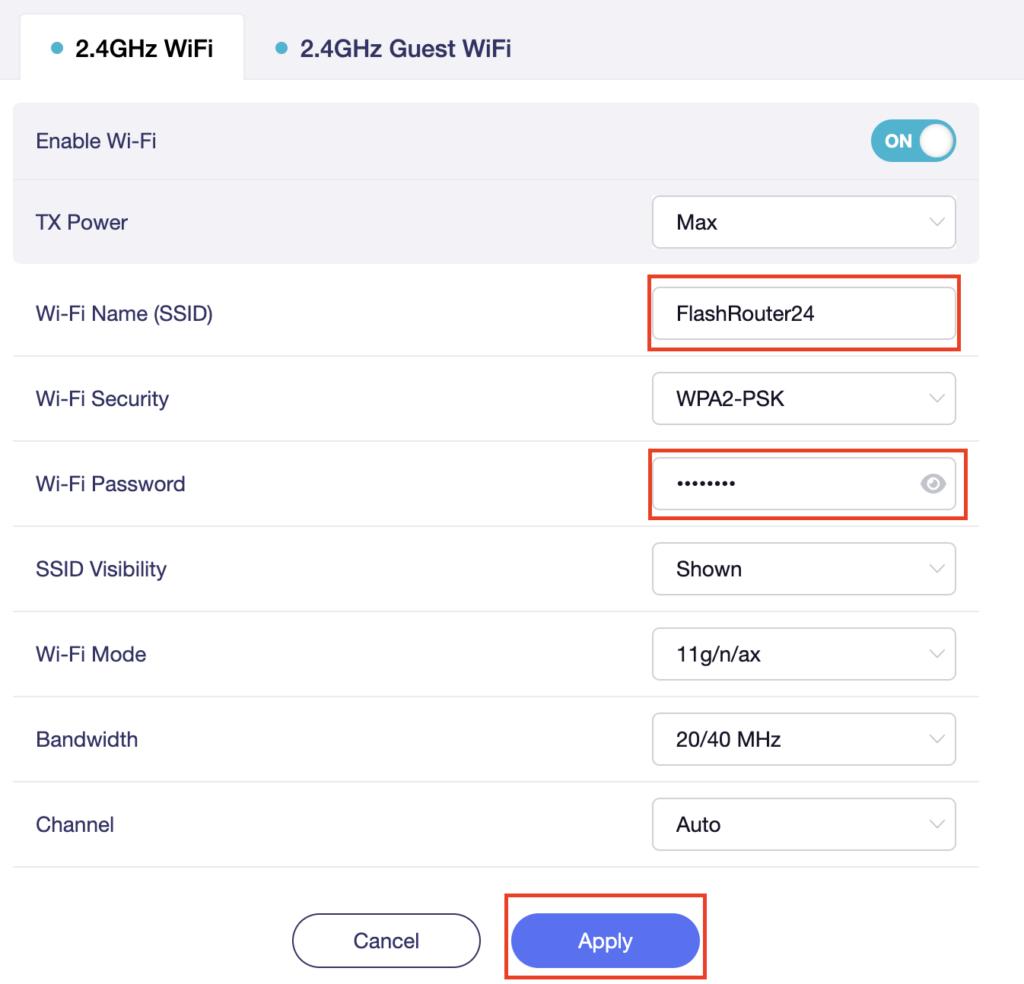
6. Change the Wi-Fi Name (SSID) and Wi-Fi Password fields to what you want to use. The SSID should be unique and NOT a duplicate of an existing network. Click Apply.

GL.iNet change Wifi name and password

7. Connect your devices to the new wireless network.

TROUBLESHOOTING

Still having issues? Visit the VPN Troubleshooting section.

Troubleshoot Here

Flint/Slate GL.iNet Disable Wi-Fi

TeamFlashRouters · Apr 20, 2023 ·

Follow this guide to disable Wi-Fi network on your GL.iNet FlashRouter.

1. Connect your computer, phone, or tablet to the GL.iNet router via wireless (FlashRouter24 / FlashRouter50) or via ethernet cable to one of the LAN ports on the router.

The FlashRouter WiFi password is printed on the sheet that came with the router and is set to Wireless#[First 5 characters of your router MAC]. The router MAC can be found on the bottom of your router if you cannot locate the sheet. For e.g. if your MAC is 1459C07E70A8 then your WiFi password is Wireless#1459C

Be sure to capitalize the W.

2. Once connected via wireless or ethernet on your device open your browser and go to 192.168.8.1

GL.iNet router access

3. Enter openwrt as the admin password to access the GL.iNet firmware settings.

GL.iNet admin password enter

4. Click Wireless.

GL.iNet Click Wireless

5. Click Modify under the 5GHz or 2.4GHz band.

GL.iNet Modify Wifi

The 5GHz and 2.4GHz bands must be disabled at separate times. Keep in mind that if you are connected to wireless when disabling one band you may need to reconnect with the other band to disable it. Also make sure you have a device that has ethernet capabilities so you can still access the settings with wireless disabled.

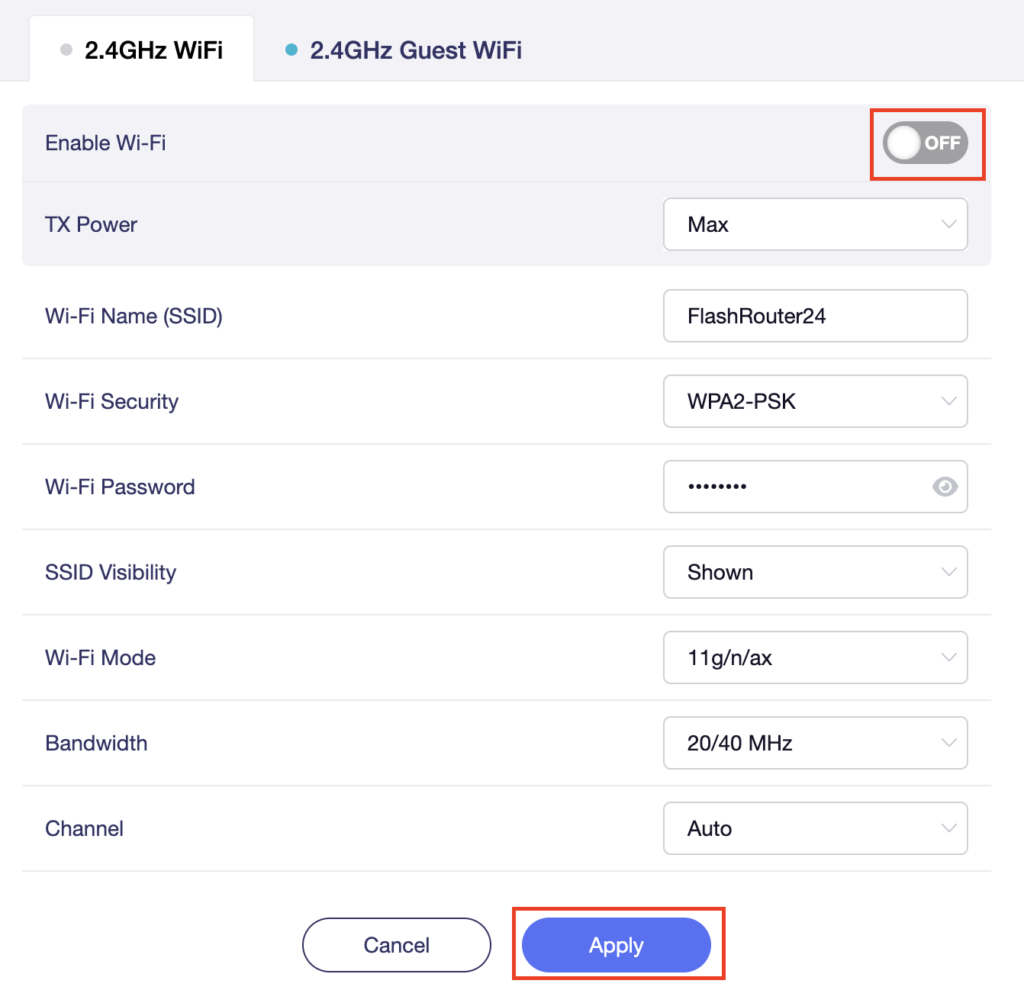
6. Set the Enable Wi-Fi toggle to the OFF position and click Apply.

GL.iNet Disable Wifi

TROUBLESHOOTING

Still having issues? Visit the VPN Troubleshooting section.

Troubleshoot Here

My WiFi password is not working

Dave · Apr 29, 2019 ·

Keep in mind that passwords are case sensitive.

The preset DD-WRT FlashRouter WiFi password is Wireless#[First 5 characters of your router MAC]. The router MAC can be found on the bottom of your router. For e.g. if your MAC is 1459C07E70A8 then your WiFi password is Wireless#1459C

Verify wireless password

Connect an ethernet cable from a numbered port on the FlashRouter to a computer and access the FlashRouter’s settings.

Navigate to Wireless > Wireless Security

Check the Unmask box and note the wireless password that is entered.

Verify the wireless settings

Make sure that you have WPA2 Personal / AES set as the security settings for all bands. For some router models make sure the CCMP-128 (AES) box is checked for all bands.

Forget network on your device

Wireless devices usually offer a “forget” network feature to remove a wireless network from the saved information of the wireless adapter. If you have updated your WiFi password and are trying to connect on a device that previously used the old WiFi password then removing the wireless network and then trying to connect fresh can help with this issue.

Flint/Slate GL.iNet Guest Network Setup

TeamFlashRouters · Apr 20, 2023 ·

Follow this guide to setup a Guest Network on your GL.iNet FlashRouter. Devices connected to the guest network will be on a separate subnet and will not have access to the router settings or be able to talk to devices on the main network.

1. Connect your computer, phone, or tablet to the GL.iNet router via wireless (FlashRouter24 / FlashRouter50) or via ethernet cable to one of the LAN ports on the router.

The FlashRouter WiFi password is printed on the sheet that came with the router and is set to Wireless#[First 5 characters of your router MAC]. The router MAC can be found on the bottom of your router if you cannot locate the sheet. For e.g. if your MAC is 1459C07E70A8 then your WiFi password is Wireless#1459C

Be sure to capitalize the W.

2. Once connected via wireless or ethernet on your device open your browser and go to 192.168.8.1

GL.iNet router access

3. Enter openwrt as the admin password to access the GL.iNet firmware settings.

GL.iNet admin password enter

4. Click Wireless.

GL.iNet Click Wireless

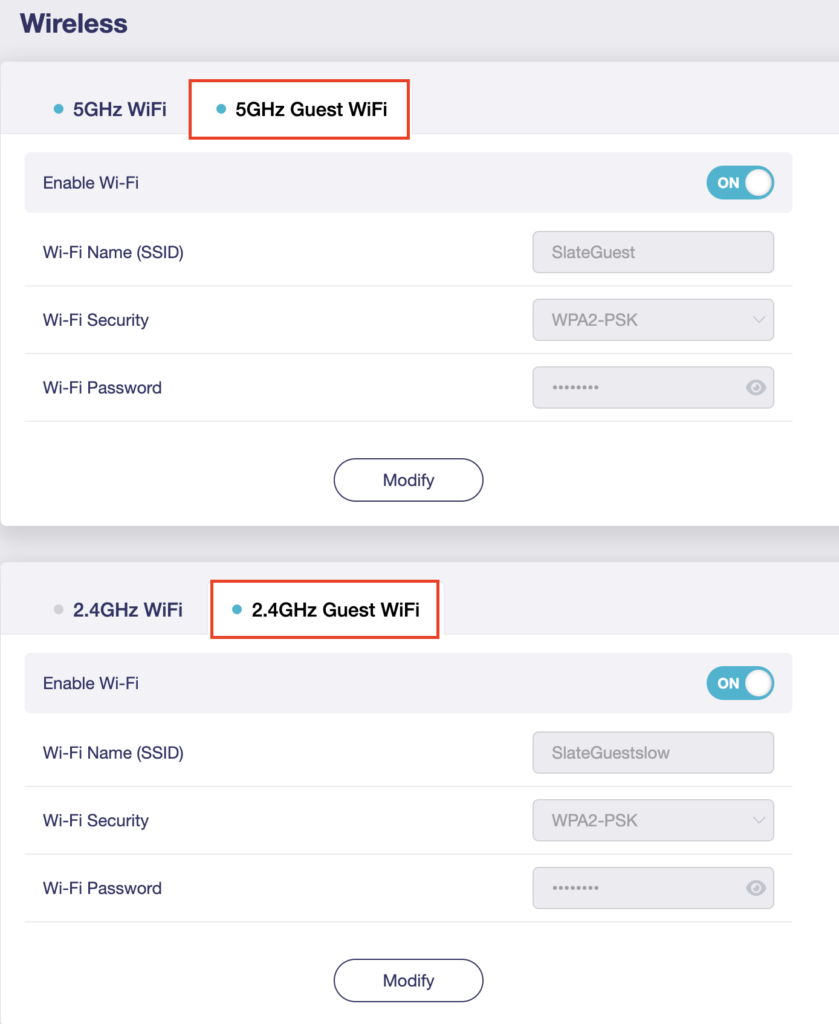
5. Click 5GHz Guest Wi-Fi or 2.4GHz Guest Wi-Fi.

GL.iNet Select Guest Wifi

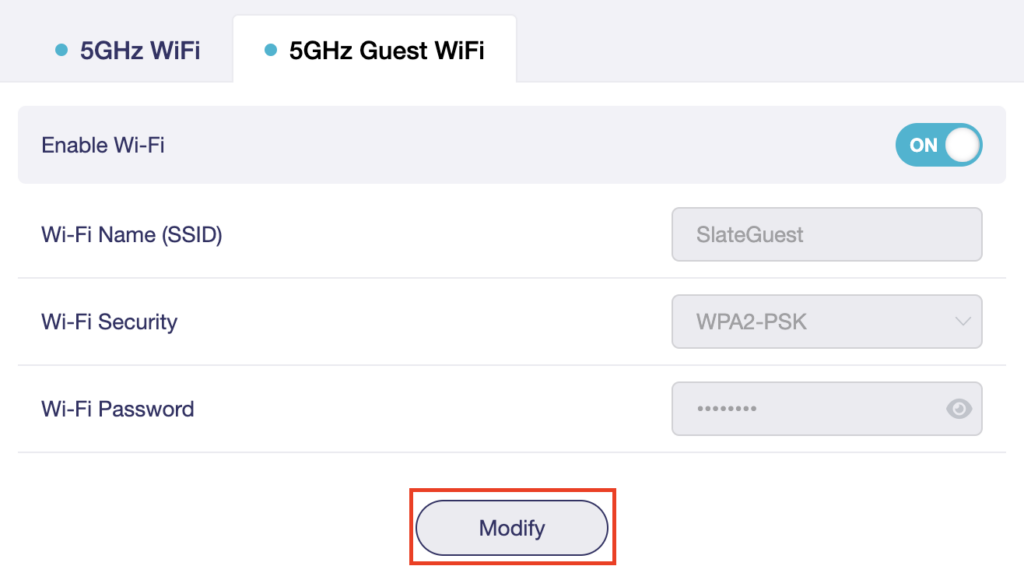
6. Click Modify.

GL.iNet Guest Modify

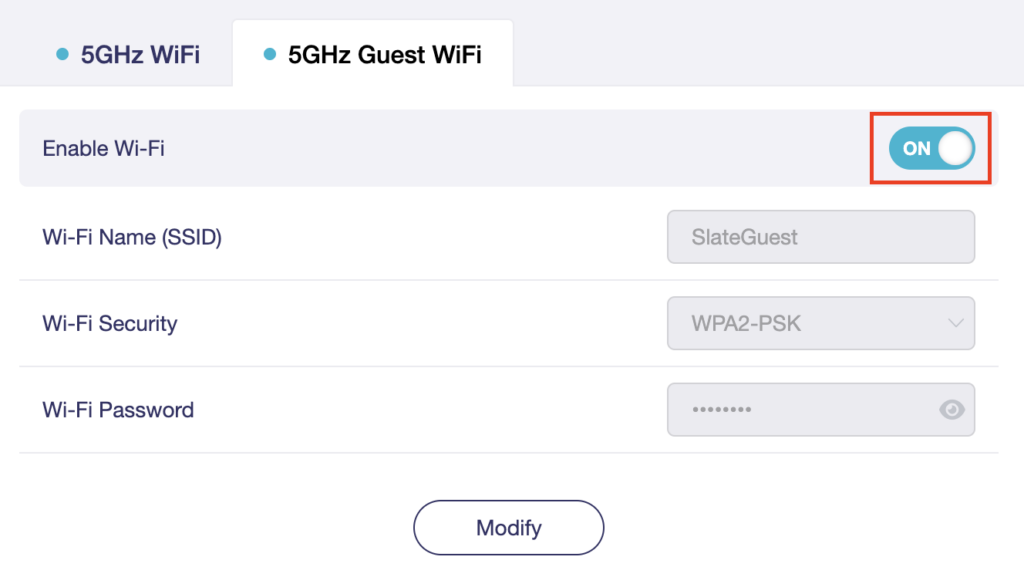
7. Set the Enable Wi-Fi toggle to the ON position.

GL.iNet Enable Guest Wifi

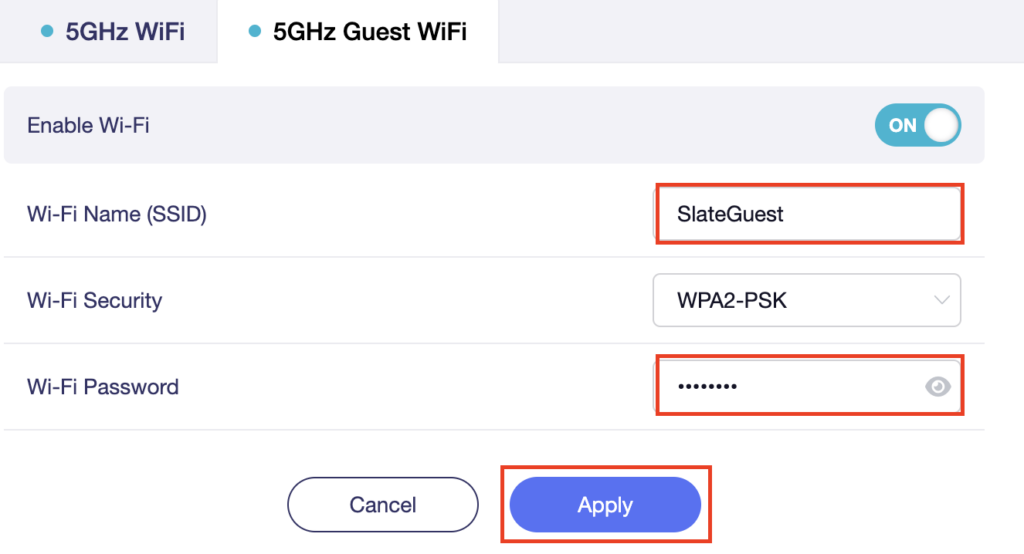
8. Change the Wi-Fi Name (SSID) and Wi-Fi Password fields to what you want to use. The SSID should be unique and NOT a duplicate of an existing network. Click Apply.

GL.iNet Guest change wifi name and pass

9. Connect your devices to the new guest wireless network.

TROUBLESHOOTING

Still having issues? Visit the VPN Troubleshooting section.

Troubleshoot Here

NordVPN Merlin OpenVPN Setup

TeamFlashRouters · Jan 11, 2023 ·

Preparing for NordVPN Merlin Setup

Obtain your NordVPN manual Username and Password

If you are not already an NordVPN user Sign Up Now.

1. Log in to your account on the NordVPN website.

NordVPN login

2. Click NordVPN on the left hand side and then click Setup NordVPN manually.

NordVPN setup manually

3. Enter in the verification code that was sent to your email.

NordVPN verify code

4. Copy and paste your NordVPN manual username and password to a secure location. This is the username and password you will enter into the router settings to connect to NordVPN.

NordVPN credentials

Download your NordVPN .ovpn file

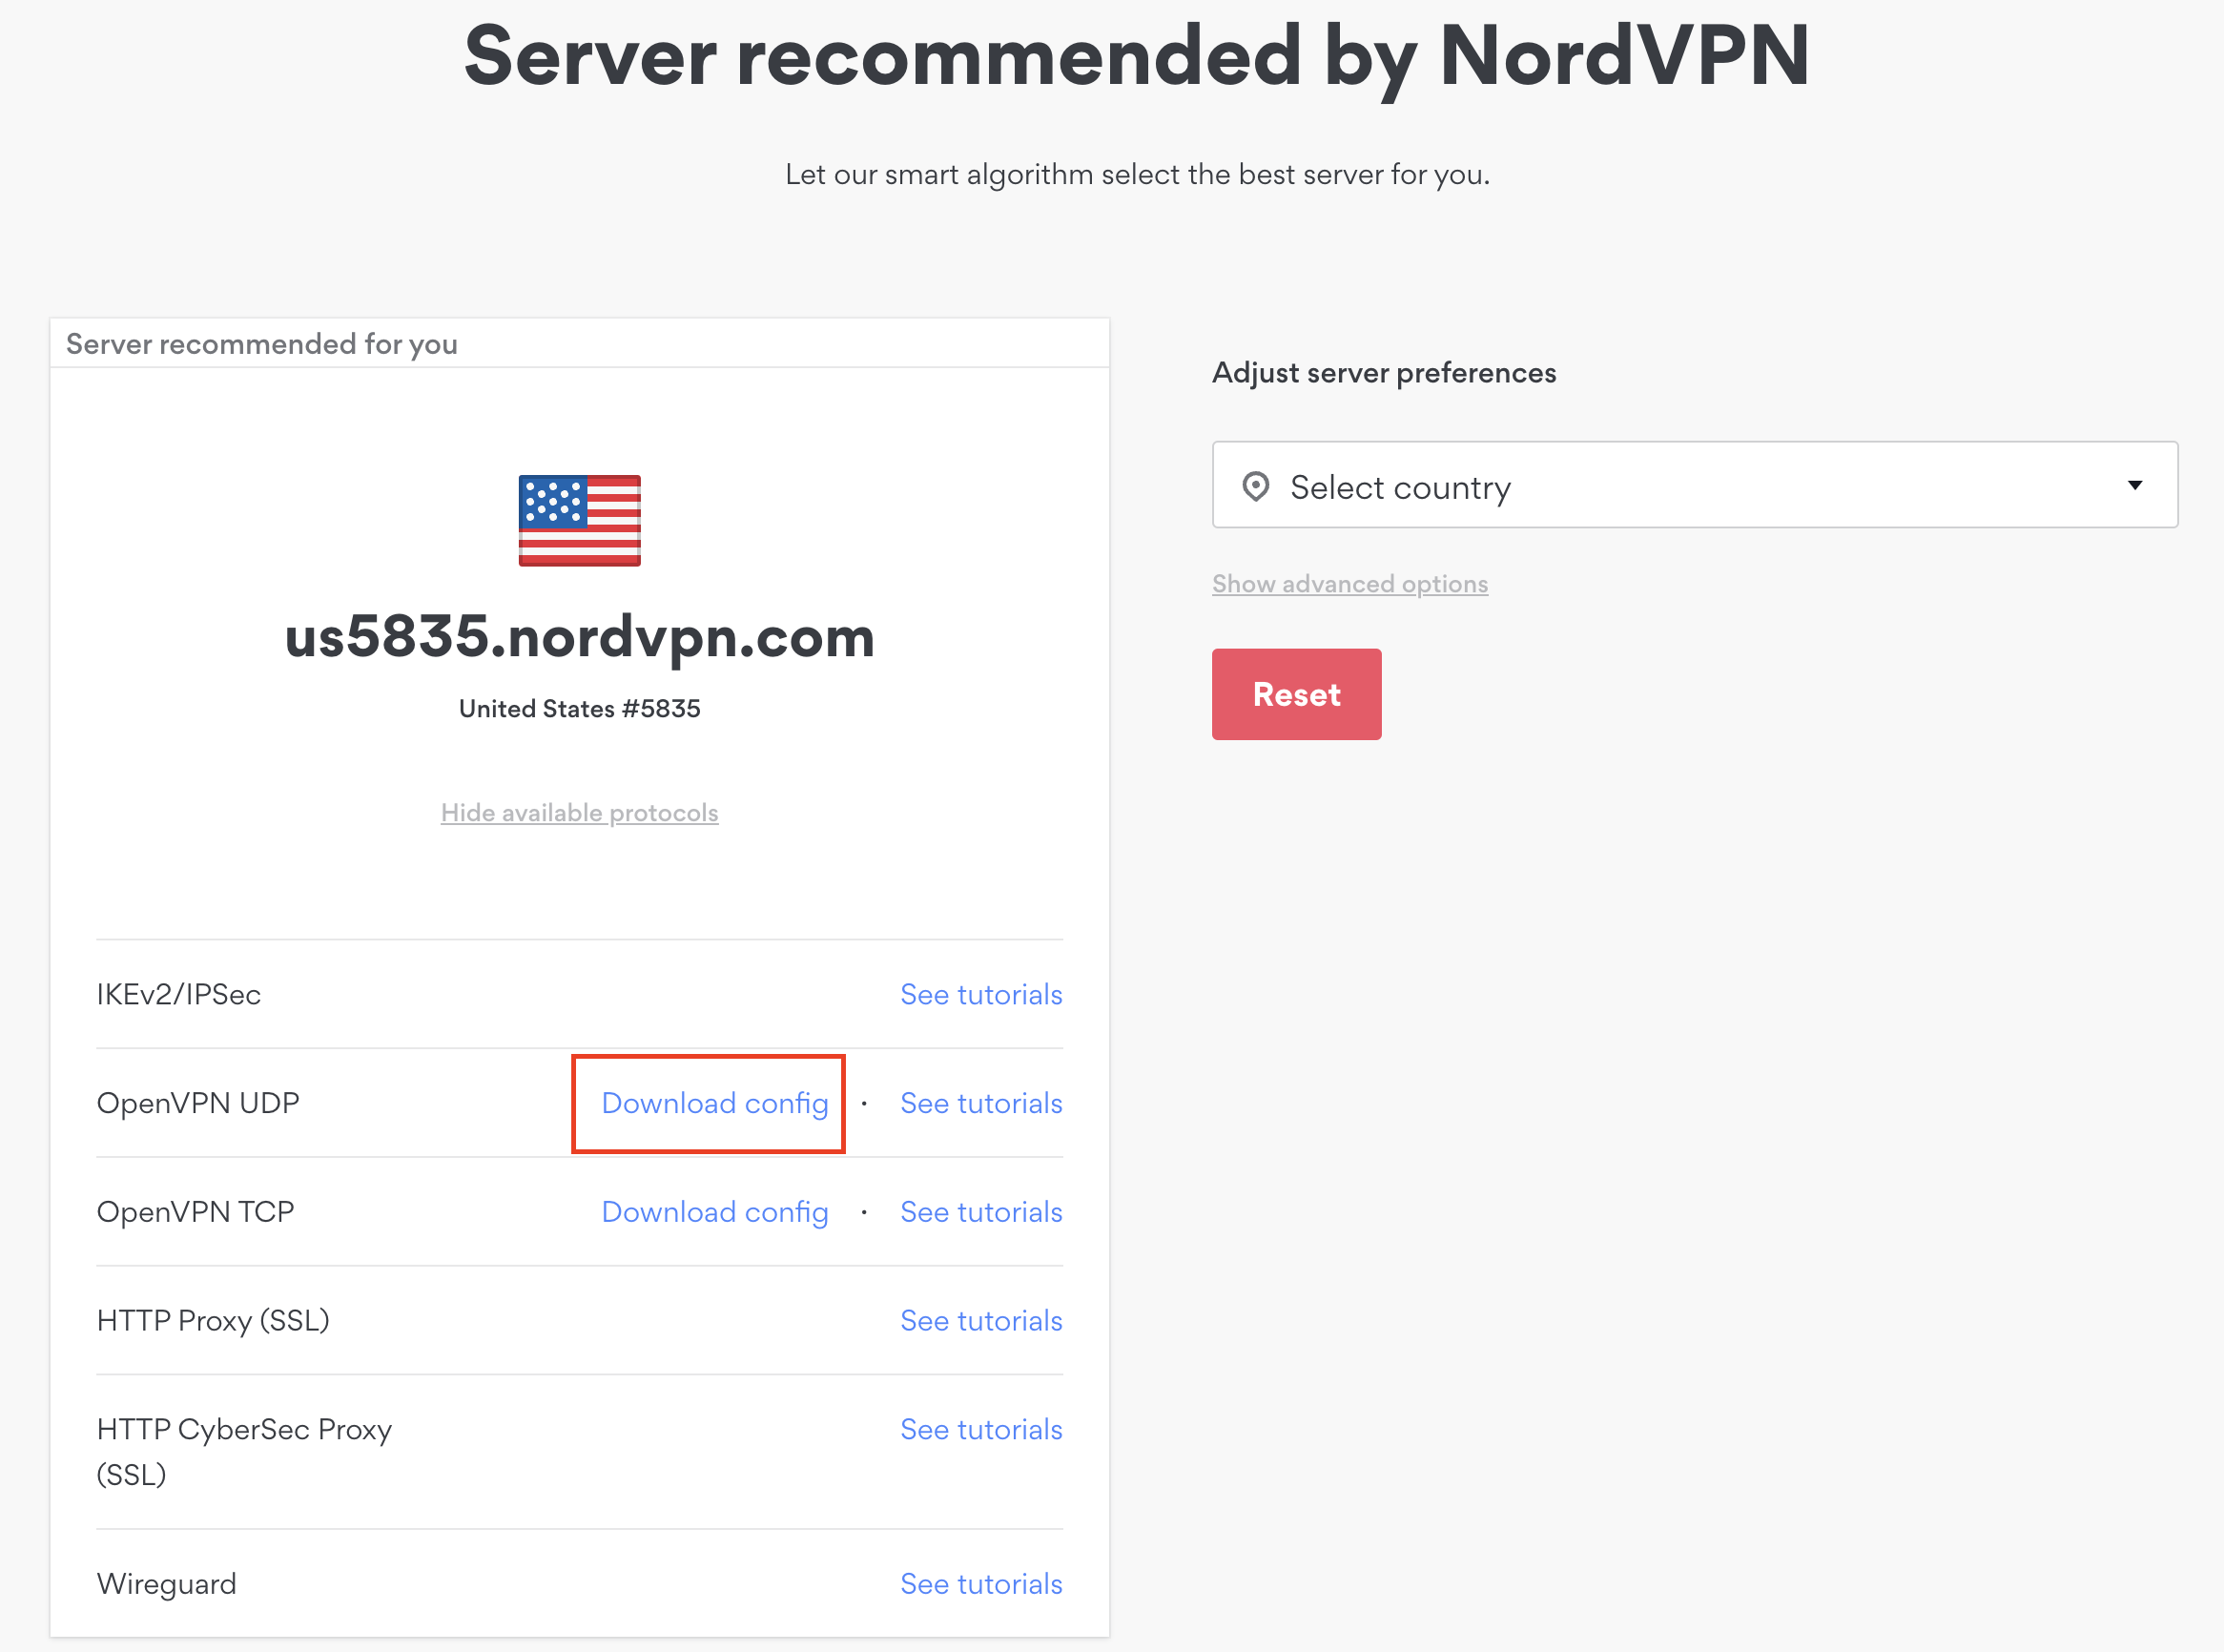
1. There are two options for obtaining the .ovpn file. The first and recommended is to navigate to NordVPN’s server recommendation page. Click Recommended Server to display the fastest server based on your actual location. You can adjust the country if you don’t want to connect to the recommended country.

Then click Show Available Protocols. Click Download Config next to OpenVPN UDP. This will download the .ovpn file to your computer for this server. Do not open this file.

NordVPN Recommended Server

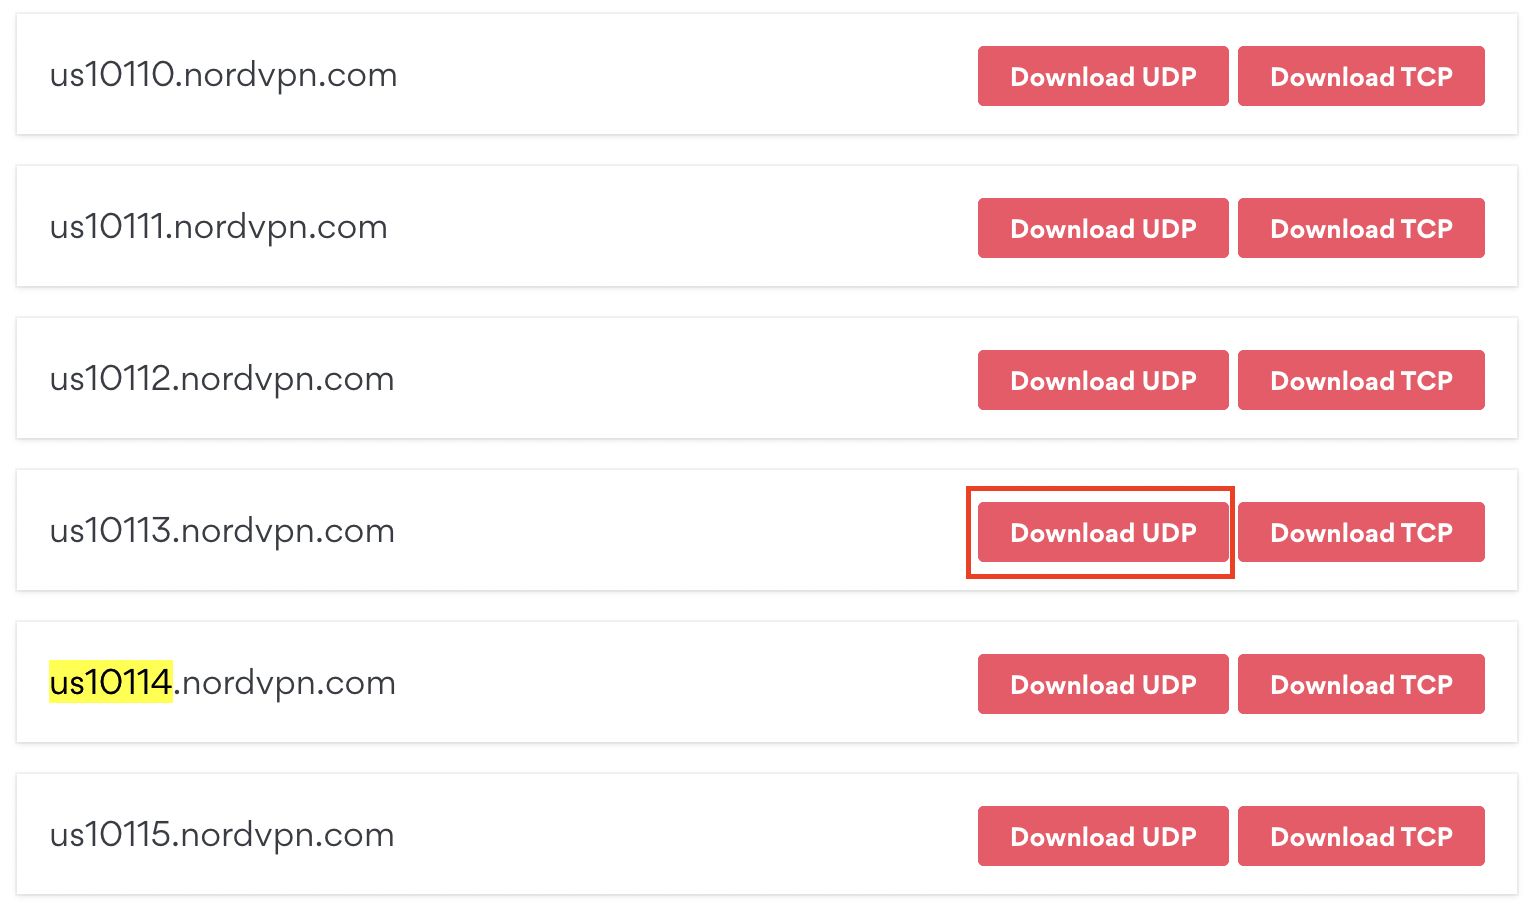
The second method to obtain a server is for connecting to a specific server number that you know you want to use. This applies to NordVPN Dedicated IP servers if you are signed up for that service. Go to NordVPN’s .ovpn file page. Then search for the server number that you want to use and click Download UDP.

NordVPN Download Specific Server

Merlin Router Setup for NordVPN

Login to Asus Merlin firmware settings in a browser on any computer or smart device connected to the Merlin FlashRouter’s network.

1. Navigate to the VPN tab.

Merlin VPN Tab

2. Navigate to the VPN Client tab.

Merlin VPN Client Tab

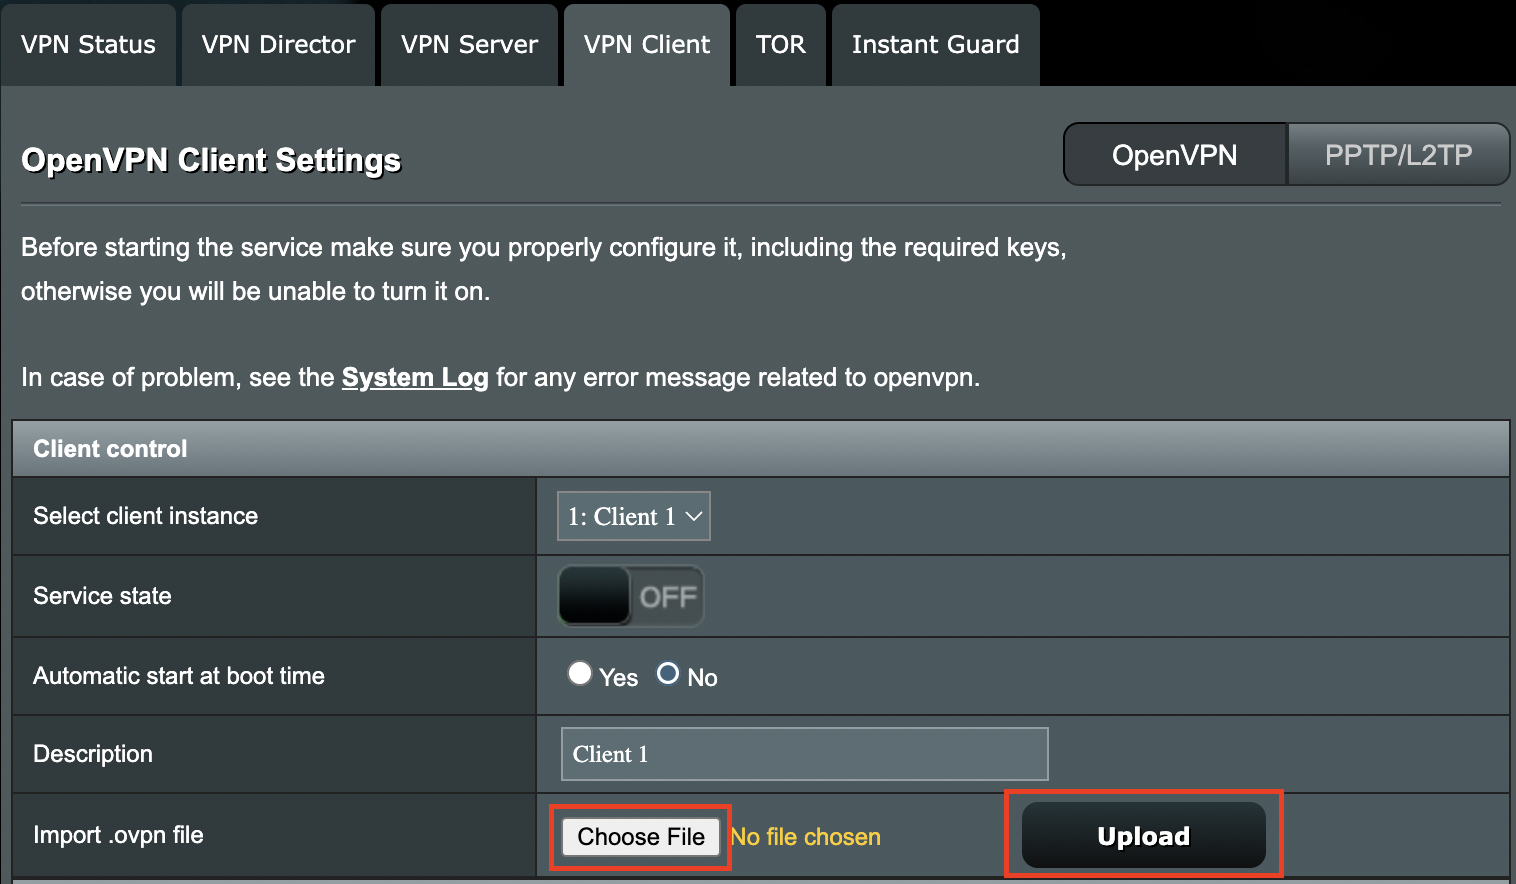
3. Click Choose file and select the .ovpn file you downloaded earlier. Then click Upload.

Merlin Choose File Upload

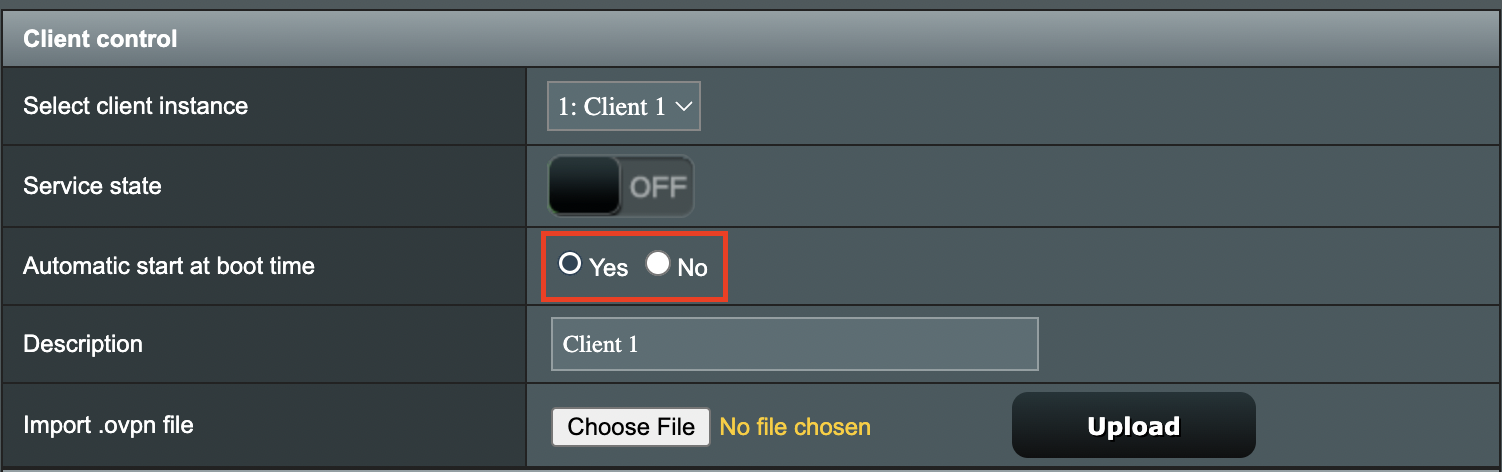
4. Set Automatic Start at boot time to Yes if you want the VPN connection to begin automatically when the router is powered off and back on.

Merlin Automatic Start at boot time

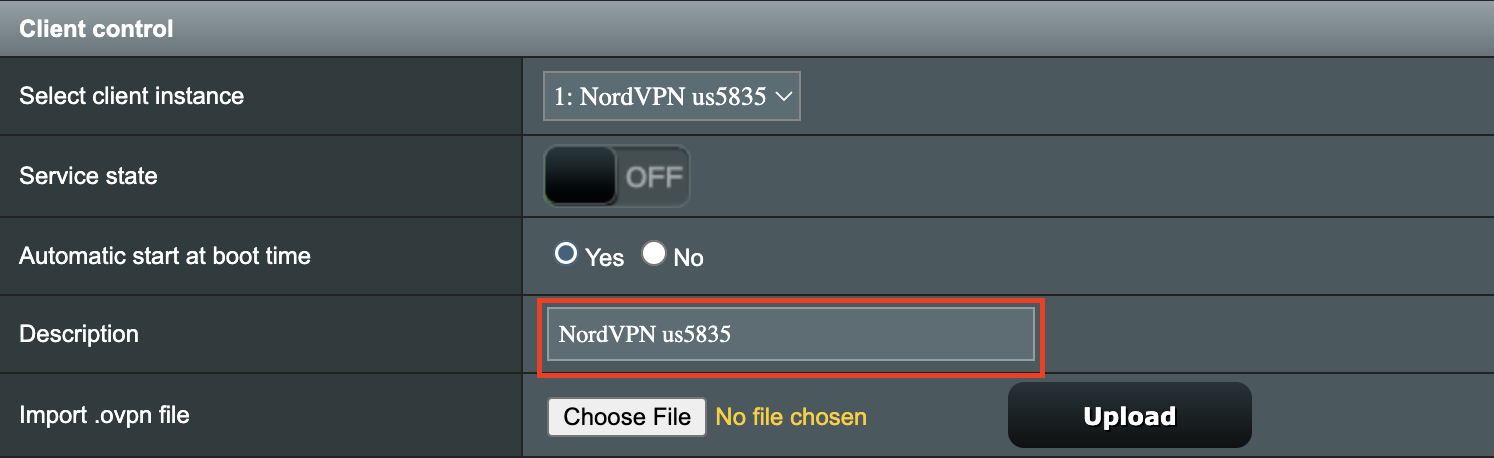
5. In the Description field enter in the name you’d like to use for this OpenVPN Client profile. We typically advise entering in the location or server number here. Our example server was in us5835.nordvpn.com so I have entered in NordVPN us5835.

Merlin NordVPN Description

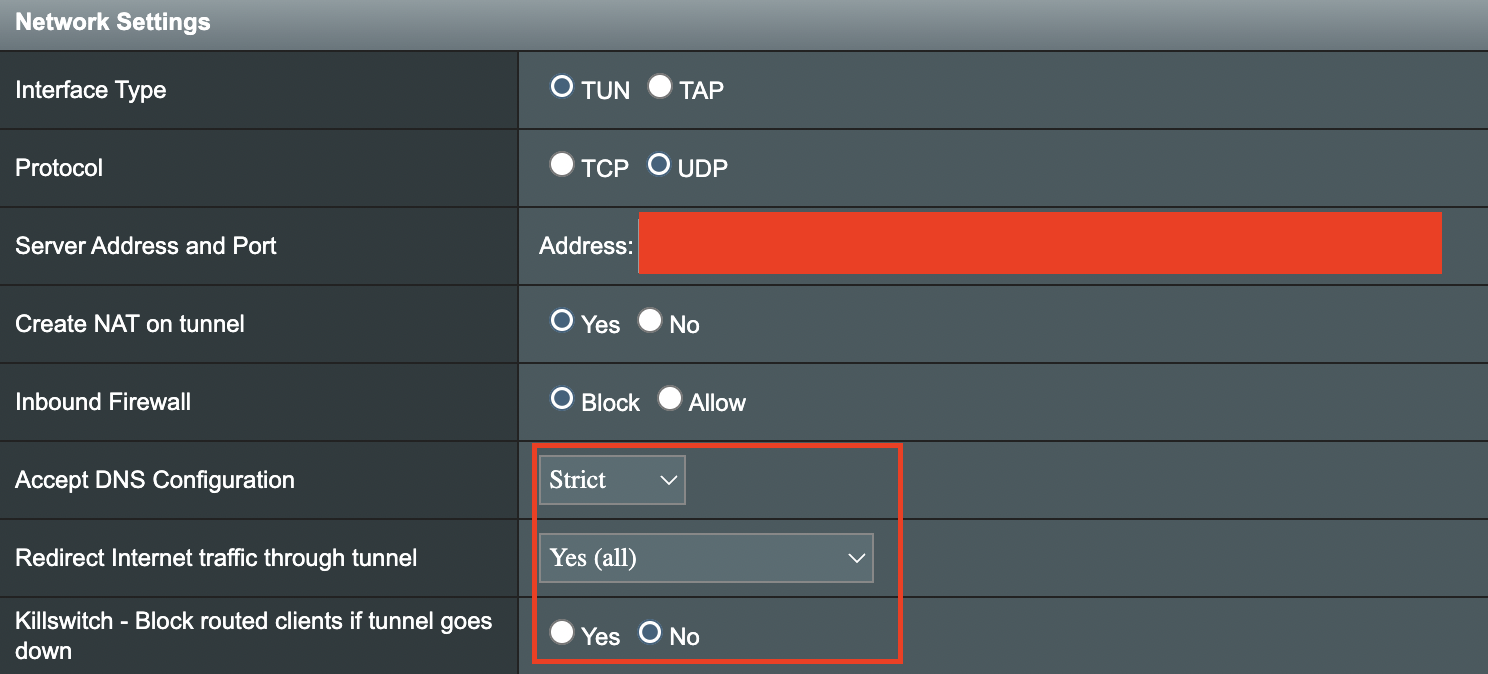
6. Set Accept DNS Configuration to Strict. Set Redirect Internet traffic through tunnel to Yes (all). Set Kill Switch to Yes or No depending on if you want the Internet to be killed if the VPN connection drops.

Merlin Accept DNS configuration Redirect Internet and Kill Switch

If you only want certain devices to connect to the OpenVPN Client profile you are setting up instead of all the devices connected to the FlashRouter’s network please set the Redirect Internet traffic through tunnel to VPN Director. Then complete the instructions on this page and then view our VPN Director guide.

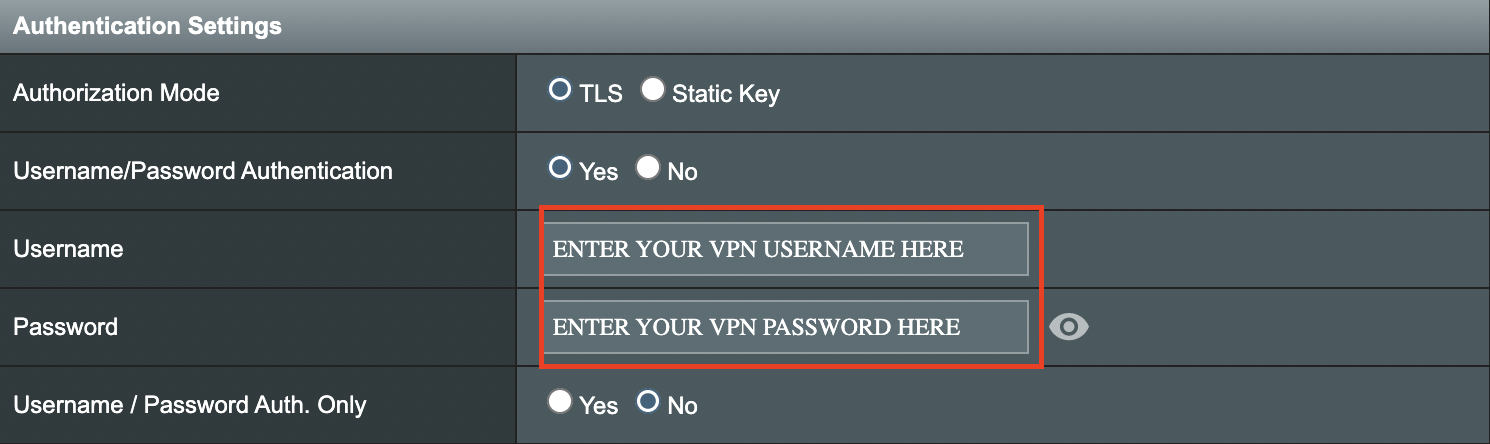
7. Enter your NordVPN username and password that you obtained earlier in the Username and Password. Note that these are different from your NordVPN email login and password.

Merlin VPN Username and Password

8. Click Apply at the bottom of the page.

9. At the top of the page set the Service State toggle to ON to activate the VPN connection.

Merlin Service State All Providers

Verify a successful NordVPN connection

  1. You should now see a CONNECTED message.
  2. Visit NordVPN’s IP Check to verify your new IP address and virtual location.

In some cases you may notice that the location is not showing the same location as the server you have input in your router settings; this is because geo tracking tools are often tricked by VPN connections. As long as you see an IP address that is not the same as your normal Internet IP address then you are indeed connected to NordVPN.

How to change the NordVPN server

  1. Follow the steps at the top of the page to obtain a new .ovpn file.
  2. Then proceed with the settings same as initial setup.

TROUBLESHOOTING

Still having issues? Visit the VPN Troubleshooting section.

Troubleshoot Here

What do the lights on my Roqos Core mean?

TeamFlashRouters · Mar 3, 2022 ·

  1. White (looks blueish white on Teal colored Roqos Cores): System startup
  2. Solid Red: System is up, but there is no internet connection. Roqos Core cannot detect a network link either.
  3. Flashing Red: System is up and there is an ethernet cable connected to Internet port, however Roqos Core is unable to reach the internet. Usually happens with bad ethernet cable, or cable modem/ISP modem not giving IP address to Roqos Core due to ISP provisioning issues, or some other type of network setting blocking Roqos Core’s access to the internet. First thing to try in this scenario is to reboot the ISP router/modem upstream of Roqos Core.
  4. Flashing Blue: Roqos Core is up and connected to the internet, but it is not yet activated. Brand new Roqos Cores, or Roqos Cores that are factory reset will show this behavior when they are ready to be activated again.
  5. Blue (deep blue color, different from #1): Roqos Core is up and activated, everything is normal.

Linksys WRT1200AC DD-WRT WiFi Settings

Dave · Mar 4, 2019 ·

Recommended DD-WRT WiFi settings for the Linksys WRT1200AC are based on extensive testing by FlashRouters. Please note that optimal settings may vary depending on external factors such as home size, interference, and the types of WiFi devices you are connecting in your network.

Screenshots below provide a visual display of recommended WiFi and encryption settings exactly as they appear in the Linksys WRT1200AC with DD-WRT firmware.

Navigate to the Wireless > Basic Settings to view or edit WiFi network settings.

5.0 GHz - Wireless-AC

View WRT1200AC DD-WRT FlashRouter 5GHz Settings

2.4 GHz - Wireless-N

View WRT1900AC DD-WRT FlashRouter 2.4GHz Settings

Additional DD-WRT WiFi Information

Intimidated by all the available WiFi settings? The DD-WRT website provides extensive information about all of the available configuration options in the firmware. Learn about everything from Wireless channels to channel widths and more in the Basic Wireless Settings – DD-WRT Wiki.

WRT1200AC DD-WRT Wireless Security

The preset WRT1200AC FlashRouter WiFi password is Wireless#[First 5 characters of your router MAC]. The router MAC can be found on the bottom of your router. For e.g. if your MAC is 1459C07E70A8 then your WiFi password is Wireless#1459C

Navigate to the Wireless > Wireless Security to view or edit WiFi passwords.

View WRT1200AC DD-WRT FlashRouter WiFi Security Settings

TROUBLESHOOTING

Trouble with your Linksys WRT1200AC WiFi? Visit the Wireless troubleshooting section.

Troubleshoot Here

IPv6 Internet Setup

TeamFlashRouters · Apr 3, 2019 ·

Most ISPs only support IPv4. Unless your ISP supports IPv6 then enabling it on the FlashRouter will not enable it across your network.

For most VPN users IPv6 should remain disabled as the VPN connection was designed to operate under IPv4 addresses only. Enabling IPv6 in this instance may compromise the security of the VPN tunnel.

We typically only recommend enabling IPv6 if you are not using VPN or if your VPN provider requires that IPv6 be enabled.

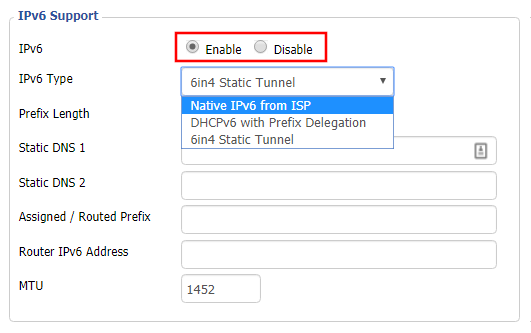
Enable IPv6

Navigate to Setup > IPv6

Access FlashRouters DD-WRT Admin Settings and Disable Remote Access
  1. Set IPv6 to Enable.
  2. Select Native IPv6 from ISP in the dropdown.
  3. If you have specific IPv6 DNS servers you would like to add you can add them in the Static DNS fields or leave those fields blank.
  4. Click Apply Settings.
Power cycle your FlashRouter

Power your FlashRouter off and then power it back on by unplugging and then plugging it back in or using the button on the back of the FlashRouter.

Verify a successful IPv6 connection

Once the FlashRouter is finished powering back up, connect one of your devices to the FlashRouter via Ethernet or Wireless.

Visit  http://ipv6-test.com/ where you should see Supported under IPv6 connectivity if your ISP supports IPv6 and your modem is setup to passthrough IPv6.

Please be aware that we can not replicate ISP specific IPv6 issues, which makes them challenging to troubleshoot. We recommend contacting your ISP as the first step of troubleshooting.

Flint/Slate GL.iNet Repeater Setup

TeamFlashRouters · May 29, 2023 ·

If you want to connect your FlashRouter to the Internet via Wi-Fi instead of an ethernet cable you can setup a FlashRouter as a Wireless Repeater. In Wireless Repeater mode the FlashRouter connects to an available network via WiFi and then creates a completely separate network segment for you.

1. Connect your computer, phone, or tablet to the GL.iNet router via wireless (FlashRouter24 / FlashRouter50) or via ethernet cable to one of the LAN ports on the router.

The FlashRouter WiFi password is printed on the sheet that came with the router and is set to Wireless#[First 5 characters of your router MAC]. The router MAC can be found on the bottom of your router if you cannot locate the sheet. For e.g. if your MAC is 1459C07E70A8 then your WiFi password is Wireless#1459C

Be sure to capitalize the W.

2. Once connected via wireless or ethernet on your device open your browser and go to 192.168.8.1

GL.iNet router access

3. Enter openwrt as the admin password to access the GL.iNet firmware settings.

GL.iNet admin password enter

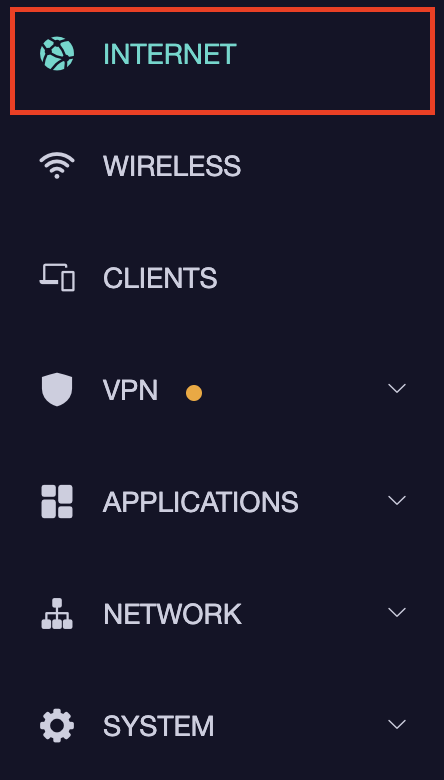
4. Select the Internet tab.

GL.iNet Internet tab

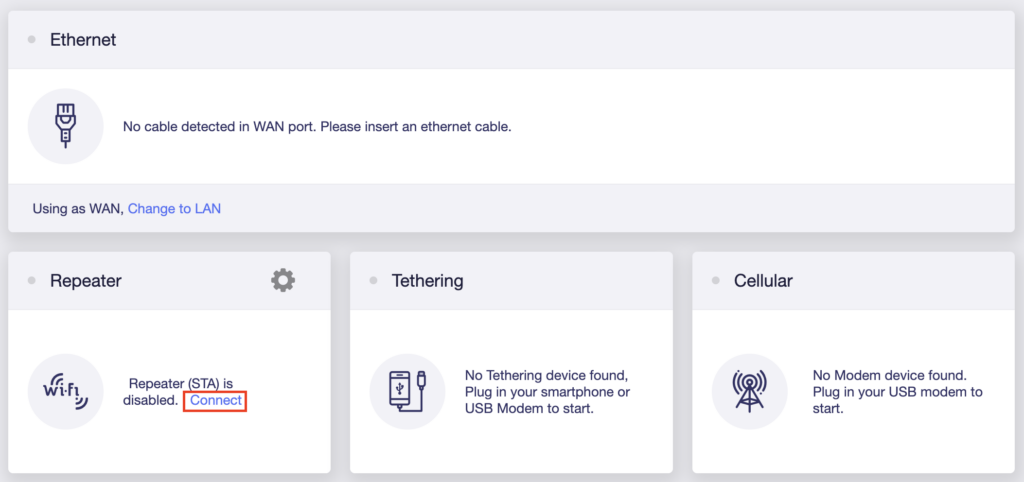
5. In the Repeater area select Connect.

GL.iNet Repeater Connect

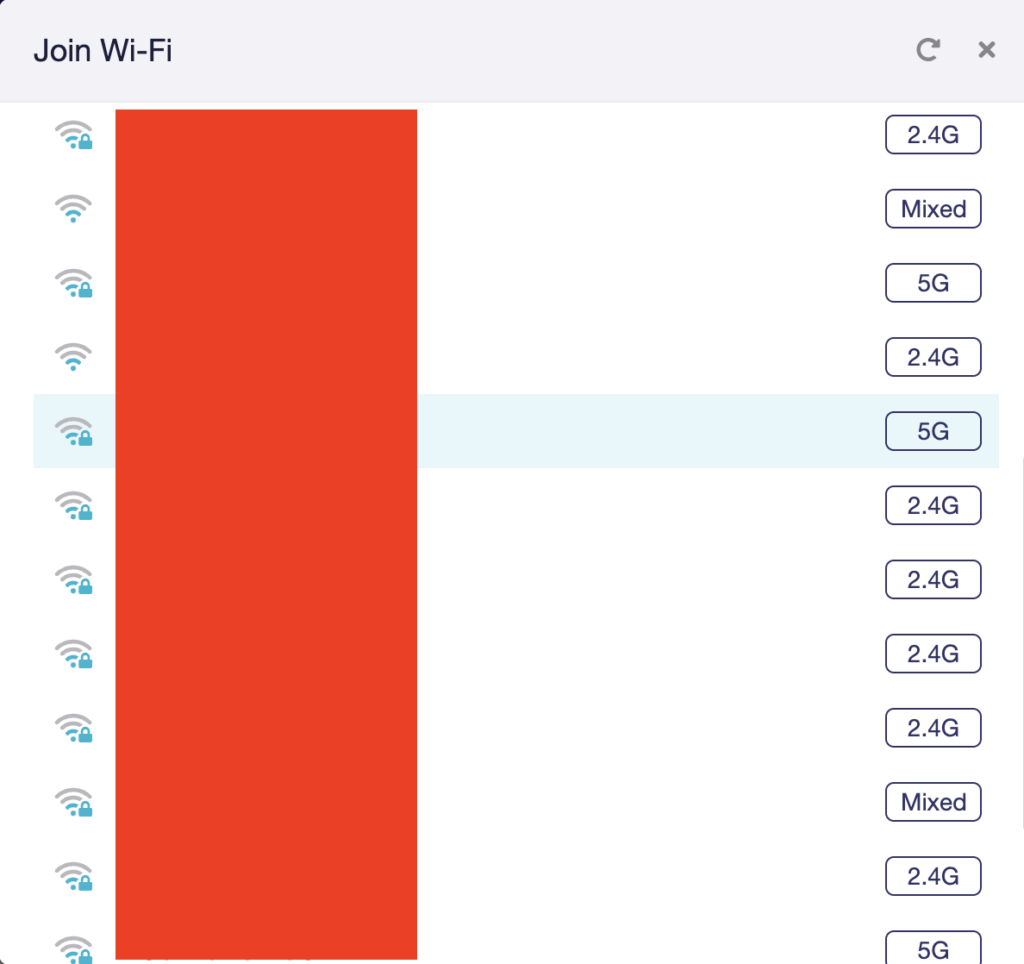
6. Select the available Wi-Fi network you want the FlashRouter to use for Internet from the list. You can use a 2.4GHz and/or 5GHz network to connect.

GL.iNet Repeater select Wi-Fi

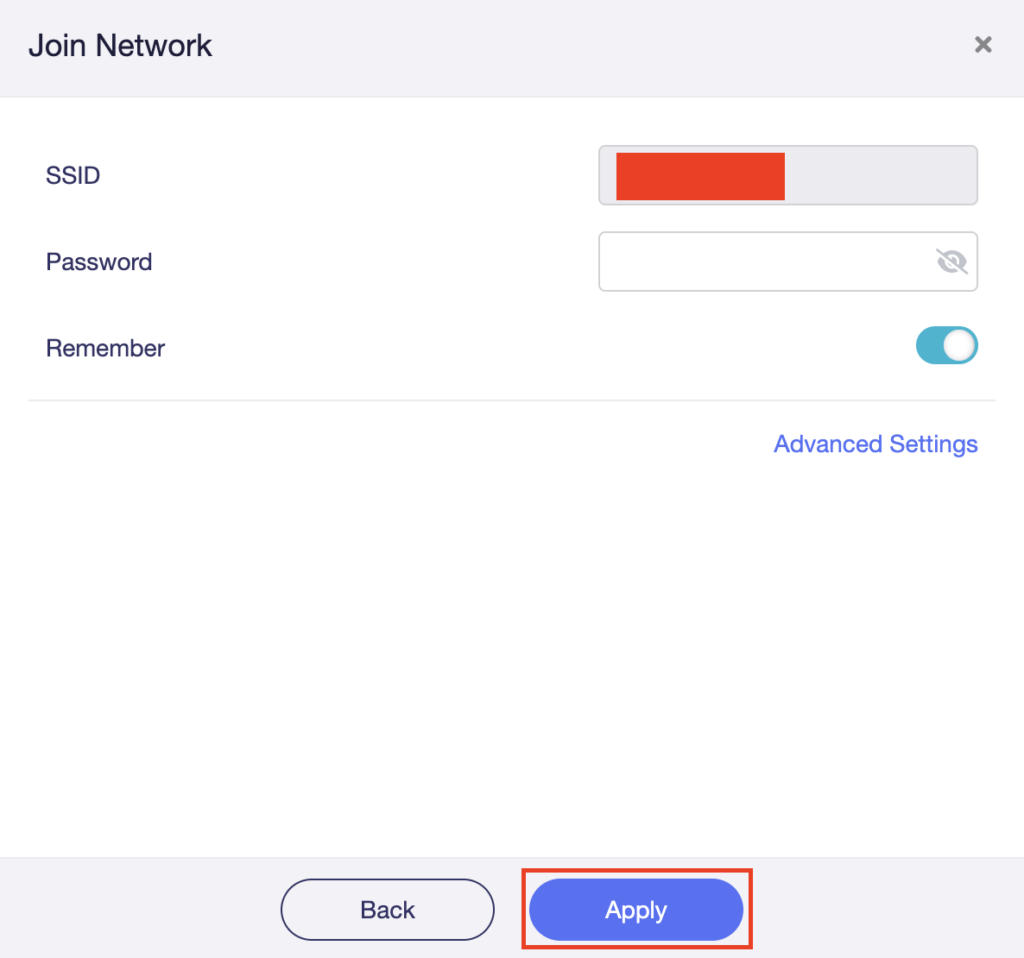
7. Enter the correct Wi-Fi password in the Password field for the network you selected. Then click Apply.

GL.iNet Repeater enter Wi-Fi password

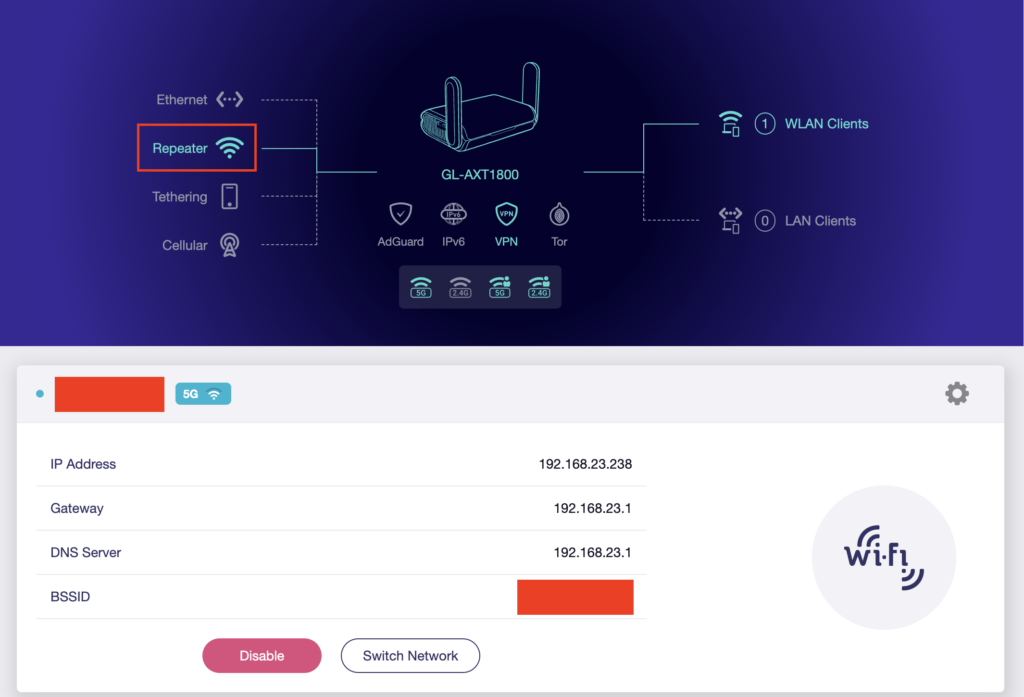
8. You are now setup with the GL.iNet FlashRouter receiving Internet via Wi-Fi. The Repeater area should now be filled in with the network information of the connection as shown below.

GL.iNet Repeater Setup complete

TROUBLESHOOTING

Still having issues? Visit the VPN Troubleshooting section.

Troubleshoot Here

NordVPN Asus AX1800S OpenVPN Setup

TeamFlashRouters · Feb 26, 2024 ·

Preparing for NordVPN Asus AX1800S Setup

Obtain your NordVPN manual Username and Password

If you are not already an NordVPN user Sign Up Now.

1. Log in to your account on the NordVPN website.

NordVPN login

2. Click NordVPN on the left hand side and then click Setup NordVPN manually.

NordVPN setup manually

3. Enter in the verification code that was sent to your email.

NordVPN verify code

4. Copy and paste your NordVPN manual username and password to a secure location. This is the username and password you will enter into the router settings to connect to NordVPN.

NordVPN credentials

Download your NordVPN .ovpn file

1. There are two options for obtaining the .ovpn file. The first and recommended is to navigate to NordVPN’s server recommendation page. Click Recommended Server to display the fastest server based on your actual location. You can adjust the country if you don’t want to connect to the recommended country.

Then click Show Available Protocols. Click Download Config next to OpenVPN UDP. This will download the .ovpn file to your computer for this server. Do not open this file.

NordVPN Recommended Server

The second method to obtain a server is for connecting to a specific server number that you know you want to use. This applies to NordVPN Dedicated IP servers if you are signed up for that service. Go to NordVPN’s .ovpn file page. Then search for the server number that you want to use and click Download UDP.

NordVPN Download Specific Server

Asus AX1800S Router Setup for NordVPN

Login to Asus firmware settings in a browser on any computer or smart device connected to the FlashRouter’s network.

1. Navigate to the VPN tab.

Merlin VPN Tab

2. Navigate to the VPN Client tab.

Asus AX1800S VPN Settings

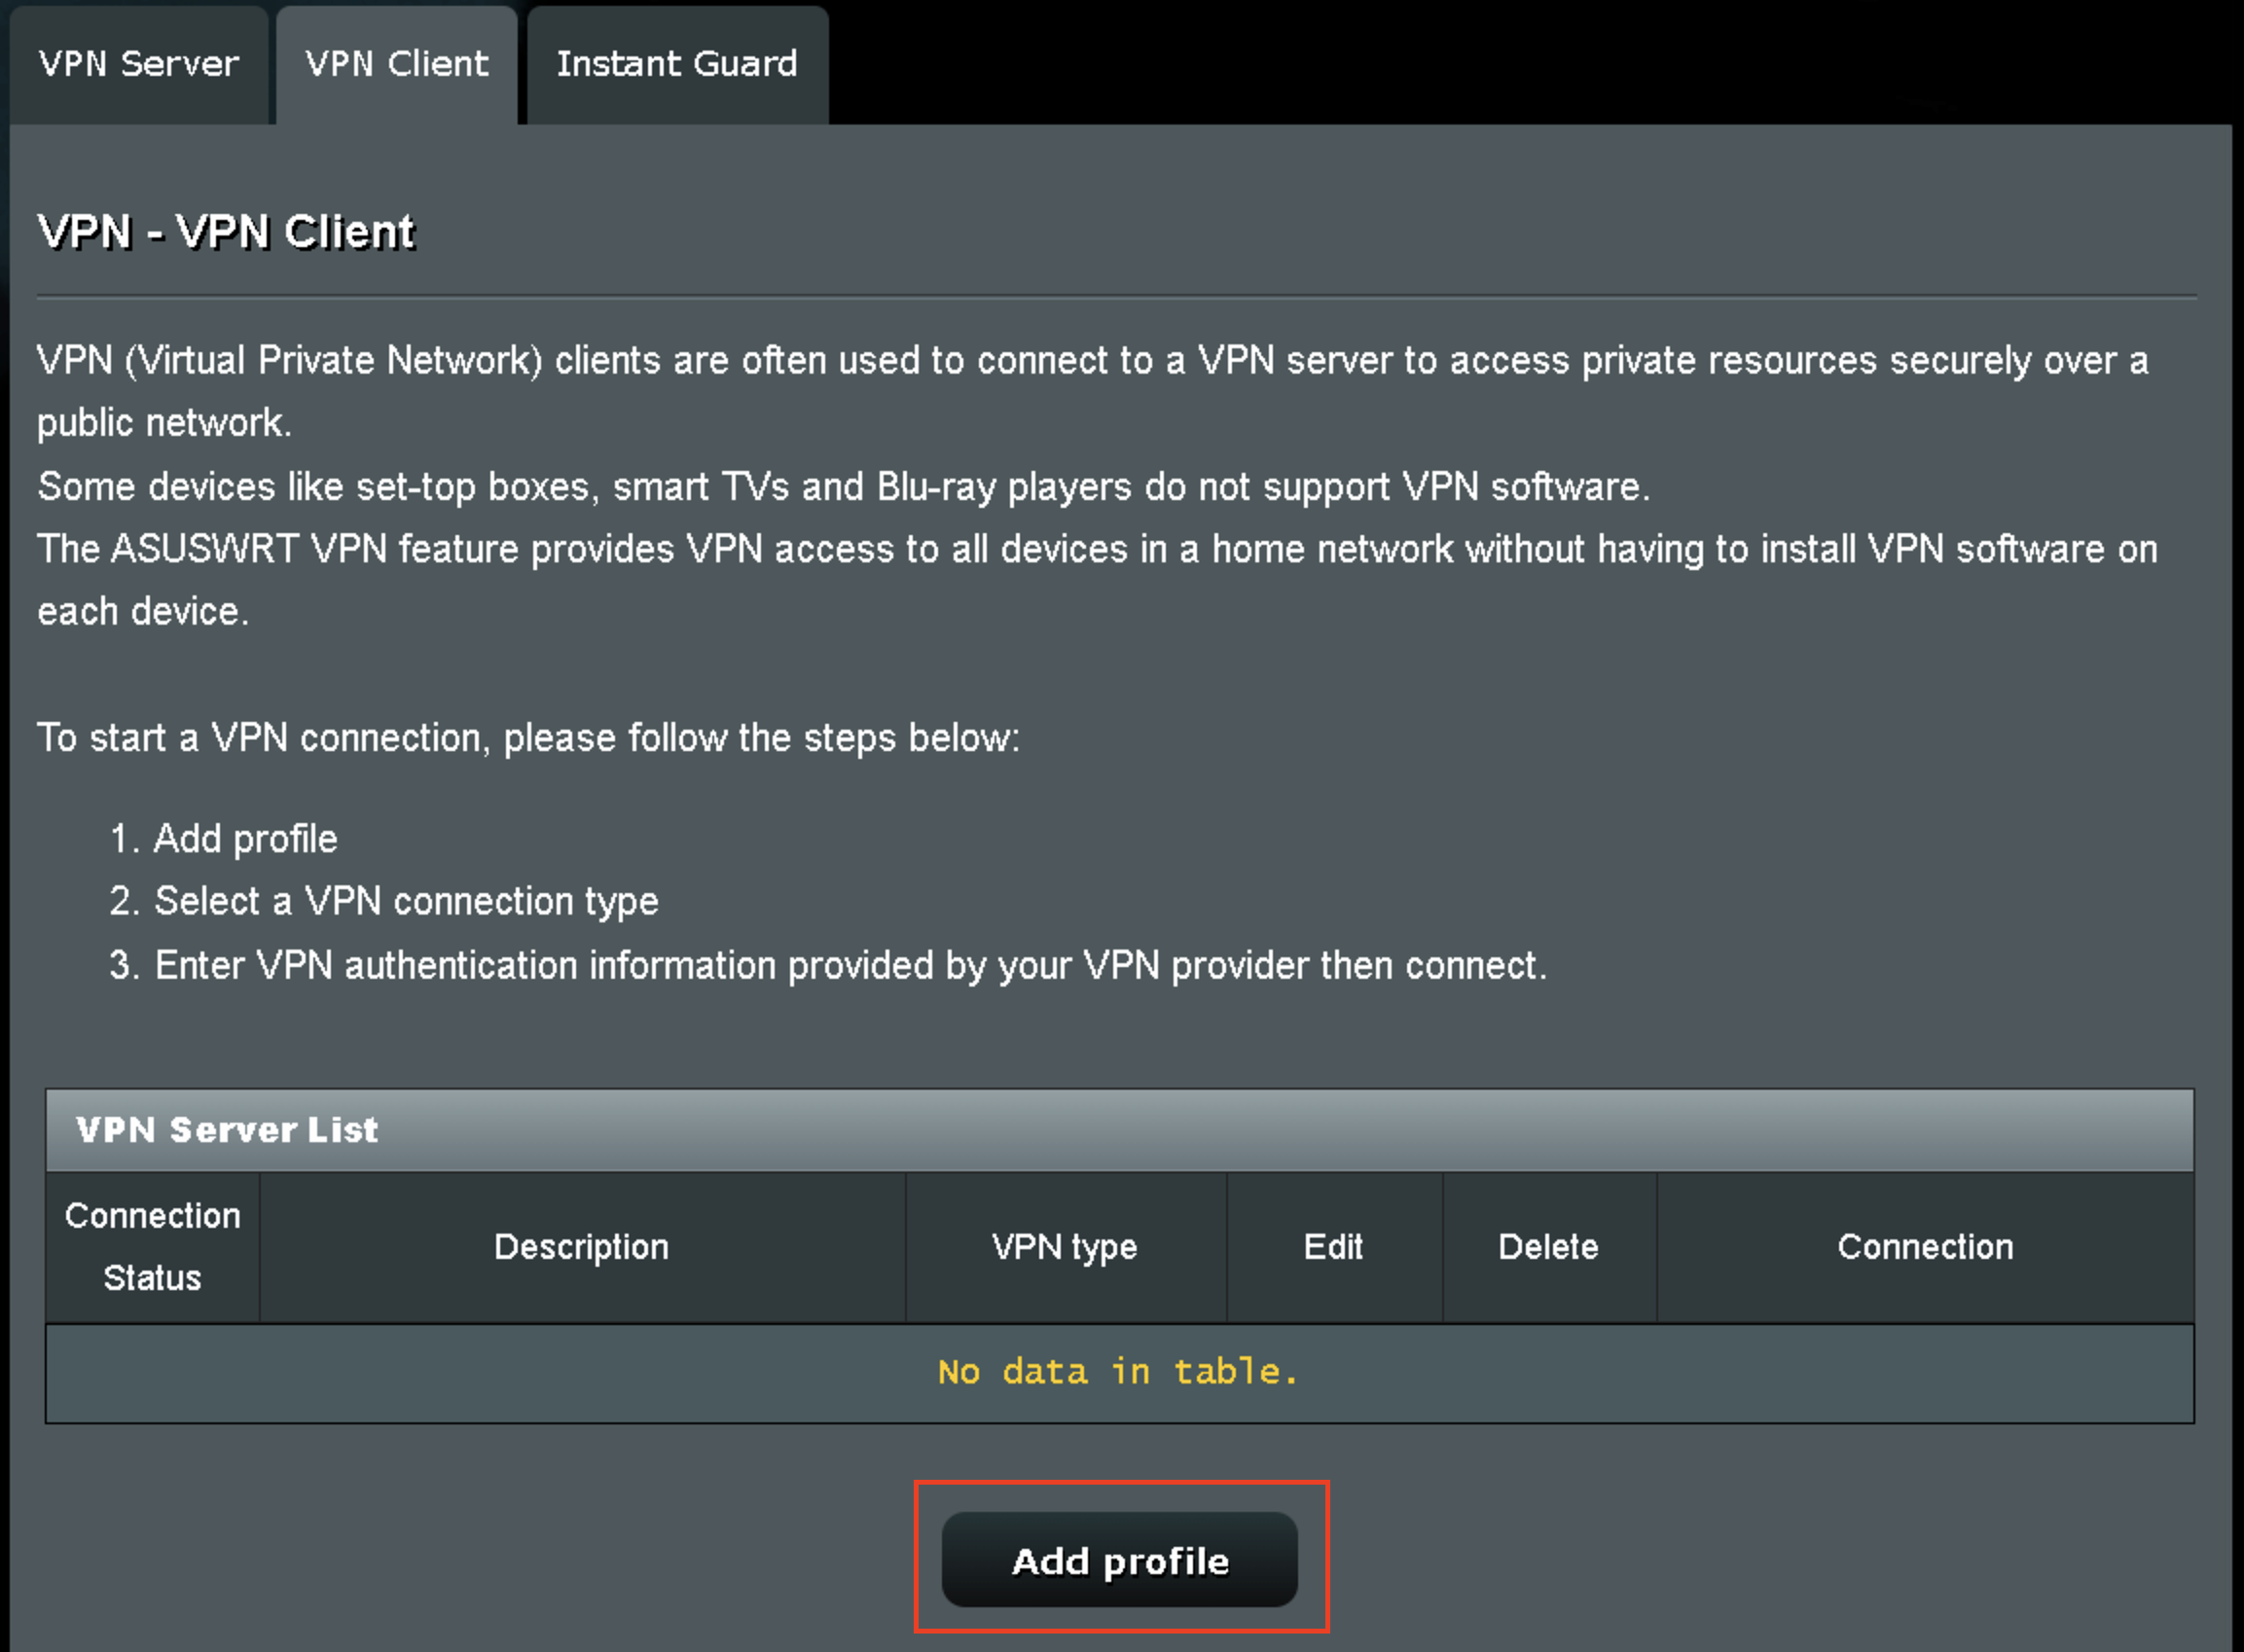
3. Click Add Profile.

Asus AX1800S VPN Settings

4. Click Choose file and select the .ovpn file you downloaded earlier. Then click Upload.

Asus AX1800S OpenVPN upload

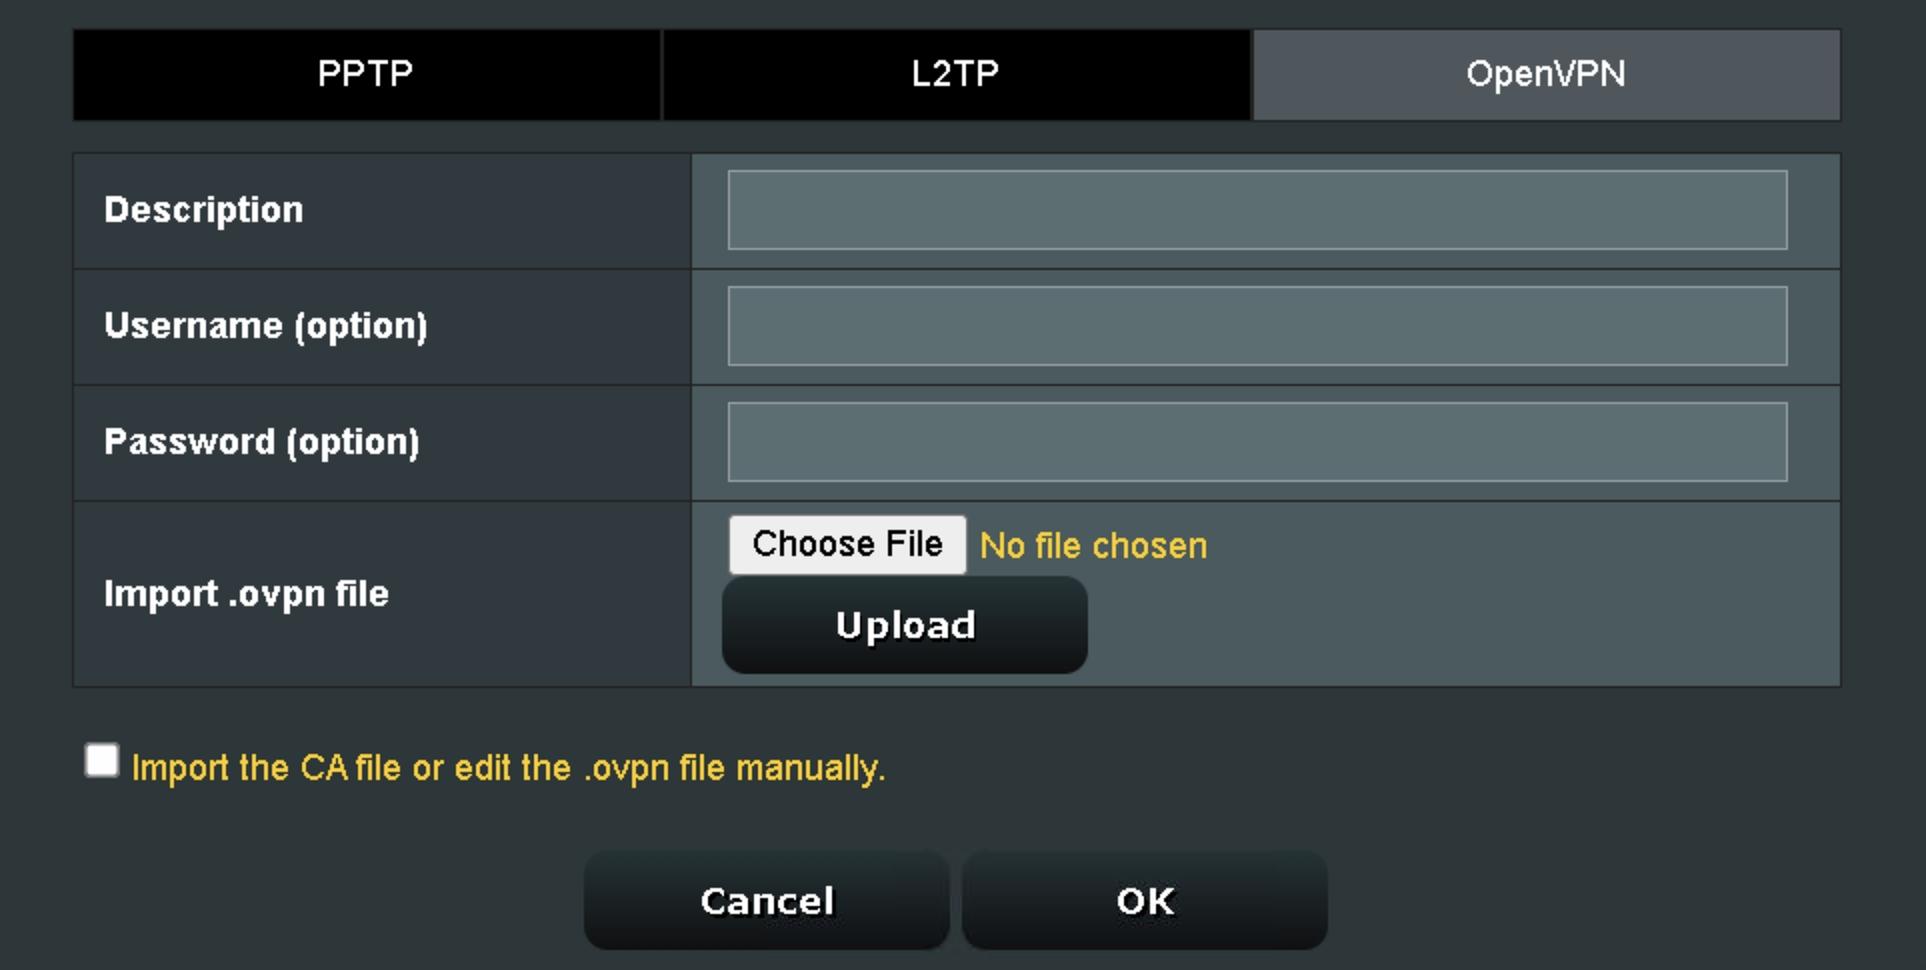
5. In the Description field enter in the name you’d like to use for this OpenVPN Client profile. We typically advise entering in the location or server number here.

6. Enter your NordVPN username and password that you obtained earlier in the Username and Password. Note that these are different from your NordVPN email login and password. Click OK.

7. Click the Activate button.

Verify a successful NordVPN connection

  1. You should now see a check mark in the Connection Status area.
  2. Visit NordVPN’s IP Check to verify your new IP address and virtual location.

In some cases you may notice that the location is not showing the same location as the server you have input in your router settings; this is because geo tracking tools are often tricked by VPN connections. As long as you see an IP address that is not the same as your normal Internet IP address then you are indeed connected to NordVPN.

How to change the NordVPN server

  1. Follow the steps at the top of the page to obtain a new .ovpn file.
  2. Then proceed with the settings same as initial setup.
  3. Be sure to deactivate a previously active connection before activating the new one. You do not want to connect to two at the same time.

TROUBLESHOOTING

Still having issues? Visit the VPN Troubleshooting section.

Troubleshoot Here

My 5.0GHz network is not showing up

TeamFlashRouters · May 2, 2019 ·

Verify the device supports 5GHz

5.0GHz networks are not compatible with all devices so first make sure that you device’s wireless adapter supports 5GHz wireless frequencies.

If you are not sure, find out if your device support 5 GHz via Google search or by looking in the wireless hardware details in the device’s network settings. If you see Wireless a/b/g/n support then you have a compatible device. If you are missing the Wireless a then this means there is no 5 GHz support.

Enter the recommended wireless settings

Our team has tested the wireless functionality for each FlashRouter that we offer and shared our recommended wireless settings in our Wifi Setup area. Replicate the settings for your FlashRouter model found on that page.

Lower the wireless channel

Some devices do support 5.0GHz connections but not the higher channels that DD-WRT firmware offers.

Navigate to Wireless > Basic Settings

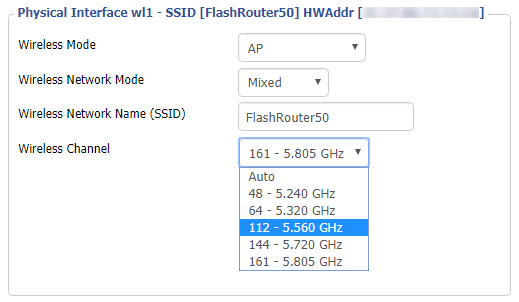
Lower the wireless channel setting for the 5.0GHz band that is not showing. Based on our tests the most broadly compatible channels are 36, 48 and 161.

CLICK APPLY SETTINGS

Refresh your device's network adapter

The easiest way to accomplish this is by rebooting your device as the settings to reset your adapter may vary on all types of internet connected devices.

Review wireless Status

Navigate to Status > Wireless

The readouts on this page can help tell if there are errors with the FlashRouter’s wireless. View our article on how to read the Wireless Status page for more information.

Cudy Access Router Settings

TeamFlashRouters · Feb 26, 2024 ·

Follow this guide to access the router settings of your Cudy FlashRouter.

1. Connect your computer, phone, or tablet to the Cudy router via wireless (FlashRouter24 / FlashRouter50) or via ethernet cable to one of the LAN ports on the router.

The FlashRouter WiFi password is printed on the sheet that came with the router and is set to Wireless#[First 5 characters of your router MAC]. The router MAC can be found on the bottom of your router if you cannot locate the sheet. For e.g. if your MAC is 1459C07E70A8 then your WiFi password is Wireless#1459C

Be sure to capitalize the W.

2. Once connected via wireless or ethernet on your device open your browser and go to 192.168.10.1

Cudy local IP access

3. Enter openwrt1 or openwrt as the admin password to access the Cudy firmware settings.

Cudy router access

TROUBLESHOOTING

Still having issues? Visit the VPN Troubleshooting section.

Troubleshoot Here

Cudy Change Wi-Fi name and password

TeamFlashRouters · Feb 26, 2024 ·

Follow this guide to change the Wi-Fi name and password on your Cudy FlashRouter.

1. Connect your computer, phone, or tablet to the Cudy router via wireless (FlashRouter24 / FlashRouter50) or via ethernet cable to one of the LAN ports on the router.

The FlashRouter WiFi password is printed on the sheet that came with the router and is set to Wireless#[First 5 characters of your router MAC]. The router MAC can be found on the bottom of your router if you cannot locate the sheet. For e.g. if your MAC is 1459C07E70A8 then your WiFi password is Wireless#1459C

Be sure to capitalize the W.

2. Once connected via wireless or ethernet on your device open your browser and go to 192.168.10.1

Cudy local IP access

3. Enter openwrt as the admin password to access the Cudy firmware settings.

Cudy router access

3. Click General Settings.
Cudy General Settings

4. Click Wireless.

Cudy Wireless tab

5. Change the SSID and Password fields for both 2.4GHz and 5GHz bands.The SSIDs should be unique and NOT a duplicate of an existing network. Click Save & Apply.

Cudy Change Wifi Name and password

TROUBLESHOOTING

Still having issues? Visit the VPN Troubleshooting section.

Troubleshoot Here

NordVPN Cudy OpenVPN Setup

TeamFlashRouters · Feb 29, 2024 ·

Preparing for NordVPN Cudy Setup

Obtain your NordVPN manual Username and Password

If you are not already an NordVPN user Sign Up Now.

1. Log in to your account on the NordVPN website.

NordVPN login

2. Click NordVPN on the left hand side and then click Setup NordVPN manually.

NordVPN setup manually

3. Enter in the verification code that was sent to your email.

NordVPN verify code

4. Copy and paste your NordVPN manual username and password to a secure location. This is the username and password you will enter into the router settings to connect to NordVPN.

NordVPN credentials

Download your NordVPN .ovpn file

1. There are two options for obtaining the .ovpn file. The first and recommended is to navigate to NordVPN’s server recommendation page. Click Recommended Server to display the fastest server based on your actual location. You can adjust the country if you don’t want to connect to the recommended country.

Then click Show Available Protocols. Click Download Config next to OpenVPN UDP. This will download the .ovpn file to your computer for this server. Do not open this file.

NordVPN Recommended Server

The second method to obtain a server is for connecting to a specific server number that you know you want to use. This applies to NordVPN Dedicated IP servers if you are signed up for that service. Go to NordVPN’s .ovpn file page. Then search for the server number that you want to use and click Download UDP.

NordVPN Download Specific Server

Cudy Router Setup for NordVPN

Login to Cudy firmware settings in a browser on any computer or smart device connected to the Cudy FlashRouter’s network.

1. Click General Settings.
Cudy General Settings

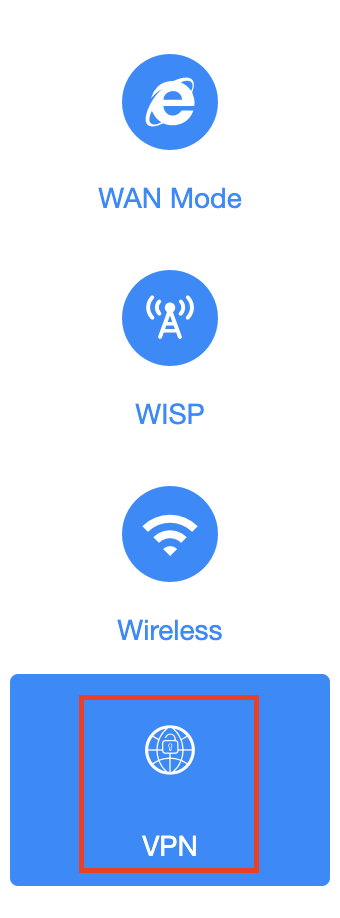
2. Click VPN.

Cudy VPN Tab

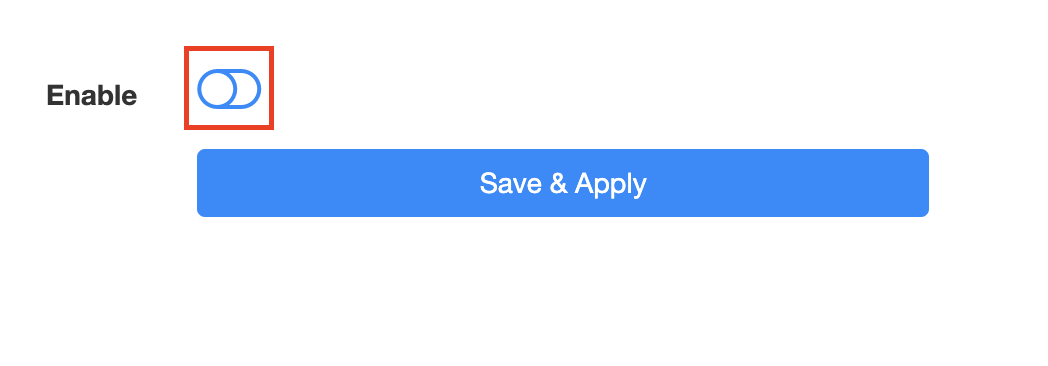
3. Toggle the Enable switch to On.

Cudy enable VPN

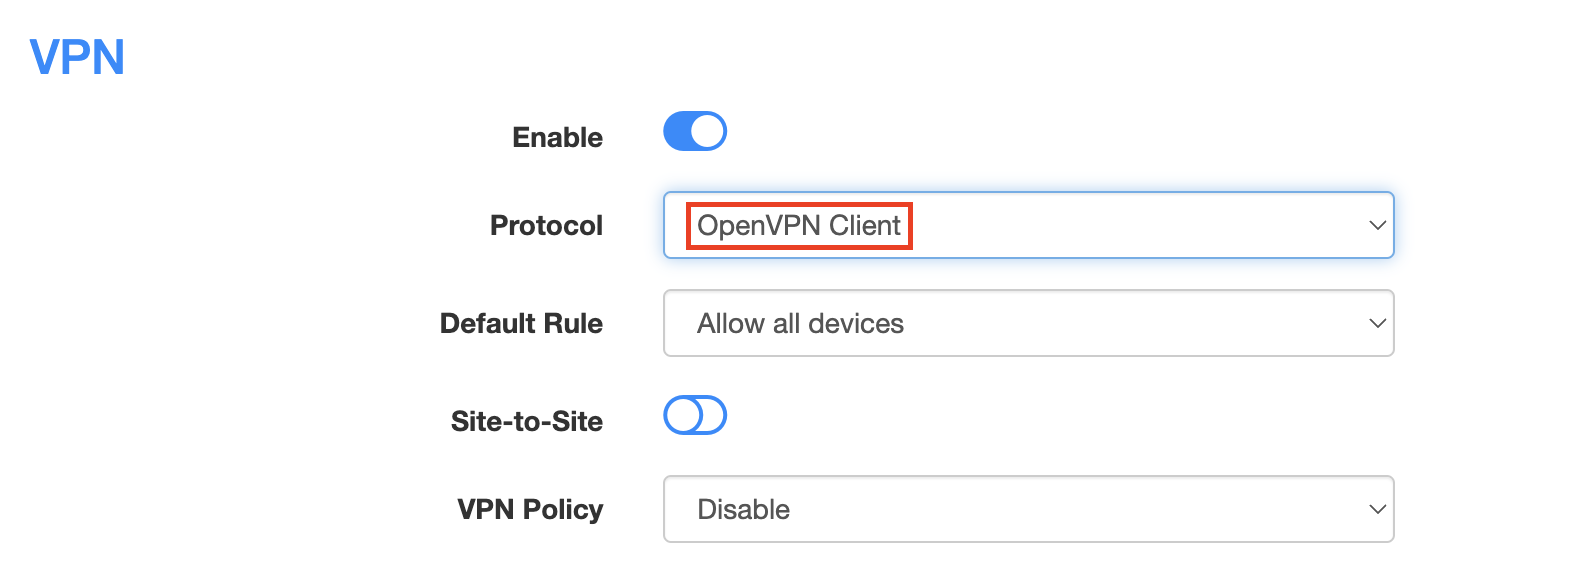
4. Select OpenVPN Client from the Protocol dropdown.

Cudy select OpenVPN Client

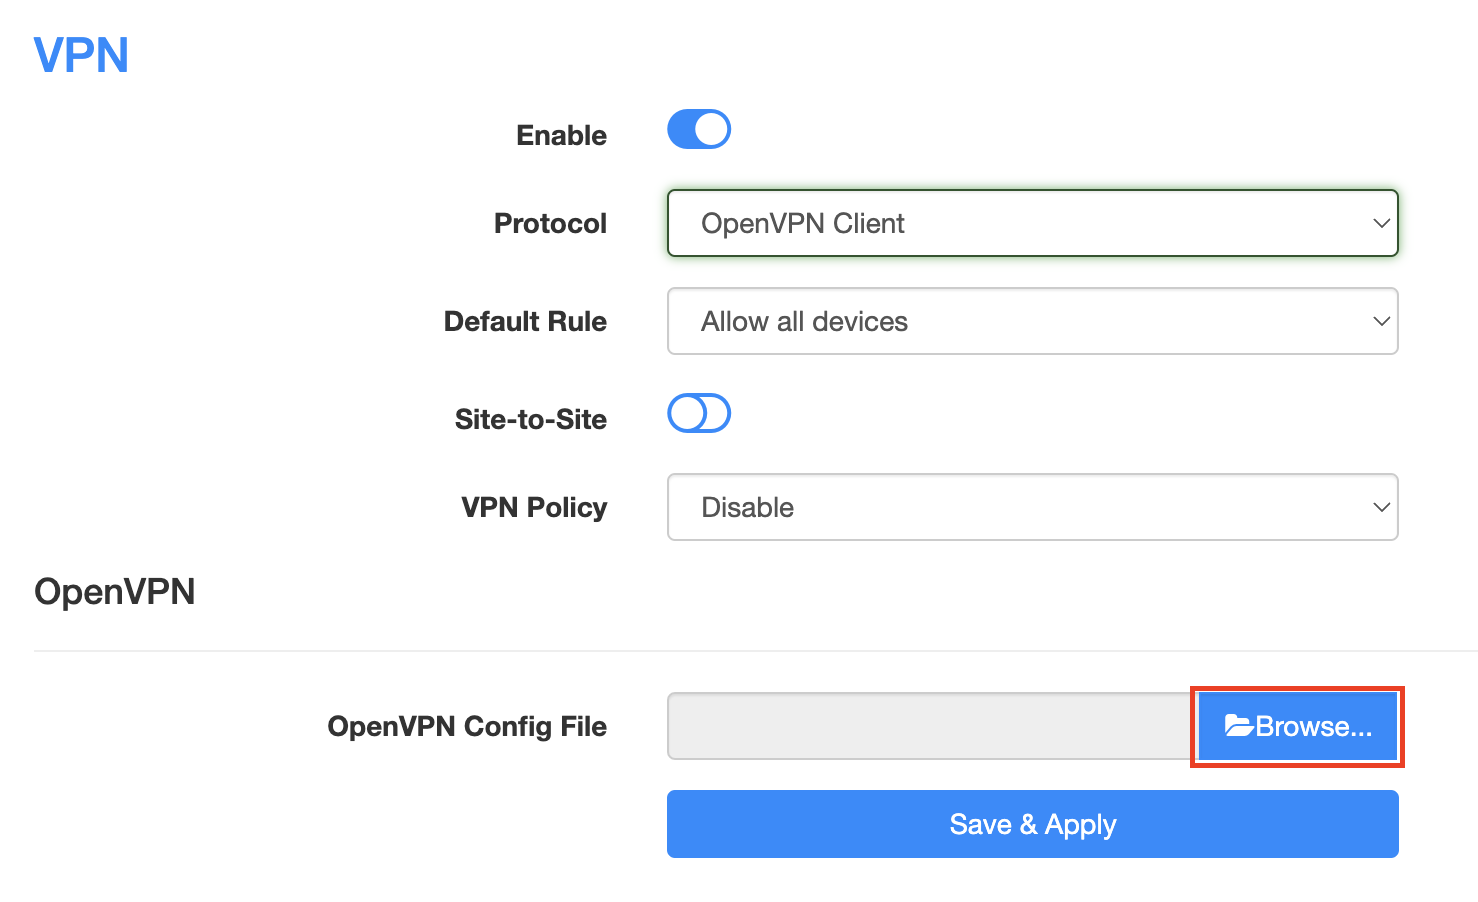
5. Click Browse and select the .ovpn file you downloaded earlier. You should see the server file name listed next to Current Config File after doing so.

Cudy OpenVPN Browse button

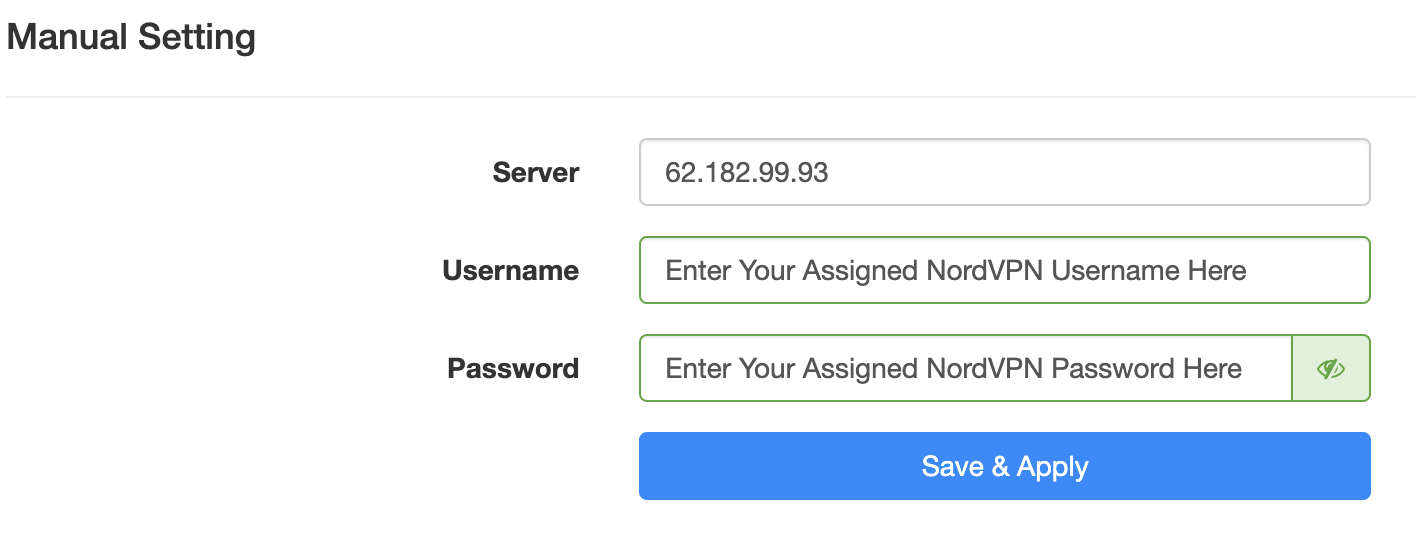
6. Enter your NordVPN username and password that you obtained earlier in the Username and Password. Note that these are different from your NordVPN email login and password.

Cudy NordVPN enter username and password

7. Click Save & Apply at the bottom of the page.

Verify a successful NordVPN connection

  1. You should now see a CONNECTED message.
  2. Visit NordVPN’s IP Check to verify your new IP address and virtual location.

In some cases you may notice that the location is not showing the same location as the server you have input in your router settings; this is because geo tracking tools are often tricked by VPN connections. As long as you see an IP address that is not the same as your normal Internet IP address then you are indeed connected to NordVPN.

How to change the NordVPN server

  1. Follow the steps at the top of the page to obtain a new .ovpn file.
  2. Then proceed with the settings same as initial setup.

TROUBLESHOOTING

Still having issues? Visit the VPN Troubleshooting section.

Troubleshoot Here

Roqos Core Internet Setup and Activation

TeamFlashRouters · Mar 15, 2022 ·

Follow this article when you receive your new Roqos Core router to create your Roqos account, connect your Roqos to the Internet, and customize your network so it is ready to use.

Create your Roqos account

1. From any device that has a browser such as a computer, smartphone, or tablet visit login.roqos.com

Roqos Login URL

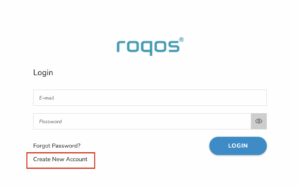
2. Select Create Account.

Roqos Create Account

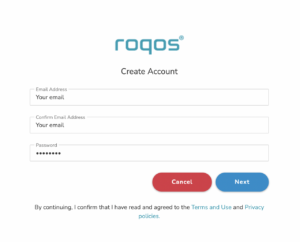
3. Enter the Email address and password you want to set for your Roqos account. This will be your login to the Roqos settings moving forward. Click Next.

Roqos Enter Email

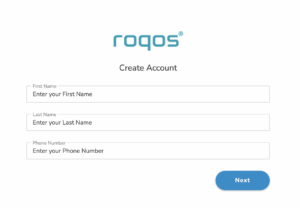
4. Enter the name and phone number you want associated with your Roqos. Click Next.

Roqos Enter Name and Number

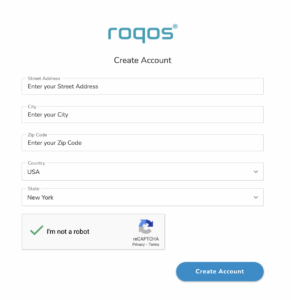
5. Enter the address where your Roqos is located. This section may require a CAPTCHA to be completed to authenticate you are human. Click Create Account.

Roqos Enter Address

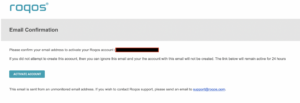
6. You have now created your Roqos account. In a new tab proceed to open the email from Roqos and click the Activate account button.

Roqos email activation

Activate your Roqos Internet

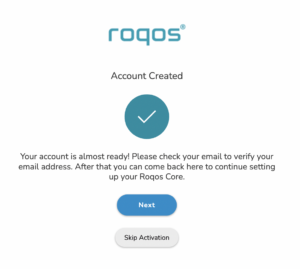
1. From the Account created page click Next to begin the Internet Setup of the Roqos.

Roqos Account Created

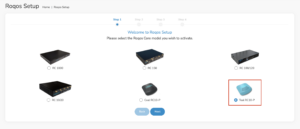
2. Select the Roqos model Teal RC10-P. Click Next.

Roqos Model

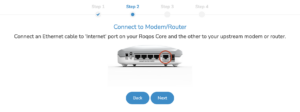
3. Connect the ethernet cable that came with your Roqos from the port labeled INTERNET on the back of your Roqos to an open ethernet port on your ISP Modem or other router in your network.

Roqos Wiring

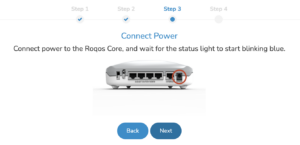
4. Then connect the power adapter that came with the Roqos to the back of the Roqos. Wait for the light on the Roqos to begin blinking blue. Once your see the blinking blue lights on the Roqos click Next.

Roqos Power On

If your Roqos lights does not begin blinking blue after a long while please see the steps in this article and contact us.

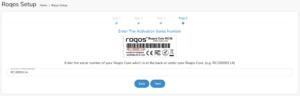
5. Enter in the Roqos serial number found on the bottom of the device exactly as it appears there. Click Next.

Roqos Activation Code

Setup your Roqos Network

1. Enter in a name that you would like to call the Roqos. This is just the Roqo’s device name and it is not the WiFi network name. Click Next.

Roqos Device Name

2. Select the Time Zone of your actual location from the dropdown. Click Next.

Roqos Time Zone

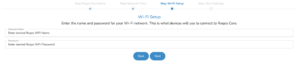
3. Set the WiFi name and password for the Roqos. The WiFi name should be unique and not a duplicate of an existing wireless network. This will be the name that appears in your wireless devices available network list and the password to join the devices to the network. Click Next.

Roqos Set WiFi Name and Password

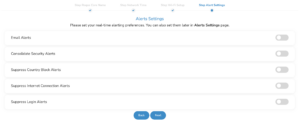
4. Select the custom alert settings as you best see fit using the toggle switches. We typically recommend having the first two toggles selected for Email Alerts and Consolidate Security Alerts. Click Next.

Begin connecting your devices to the Roqos network

You are now done setting up your Roqos to connect to the Internet and can begin joining your wireless devices to the Roqos network and exploring the Roqos Core Features.

Roqos Setup Done

TROUBLESHOOTING

Still having issues? Visit the VPN Troubleshooting section.

Troubleshoot Here

Connecting to OpenVPN on Asus Merlin Firmware

TeamFlashRouters · Sep 22, 2021 ·

To setup VPN on your Asuswrt Merlin router, you will need to first download an OpenVPN (.ovpn) file from your VPN service provider and load it onto your router.

Review your specific VPN service instructions below. Follow these instructions to locate and upload your OpenVPN file. Depending on the VPN service, there may be additional steps and configurations required to complete the setup.

NordVPN

ExpressVPN

IPVanish

Astrill

Hide.Me

Hotspot Shield

IVPN

Mullvad

SaferVPN

StrongVPN

SurfShark

TorGuard

VPNUnlimited

VyprVPN

Windscribe

Using Asuswrt Merlin’s VPN Director, your router can store up to five different VPN connections and switch between them at will.

Why is my router not connecting to internet?

Dave · May 2, 2019 ·

Router not connecting to the internet? Follow these simple steps!

  1. Make sure that you are not setting a WAN IP of 0.0.0.0 in the top right corner of your FlashRouter DD-WRT settings. If you do, then make sure your FlashRouter is wired correctly for Internet.
  2. Try power cycling your ISP modem, FlashRouter and any other router that may be in the setup. Power the modem back on first, wait for it to boot up fully, and then power the FlashRouter back on.
  3. Make sure you do not have Global Kill Switch enabled in the FlashRouters Privacy App and if you do make sure your VPN status is Connected.

Why is the power light on my FlashRouter blinking?

Dave · May 2, 2019 ·

A slowly blinking power light means that the FlashRouter was somehow put into Rescue/Restore/Recovery Mode. This usually happens if the reset button was held down for too long.

This may also happen if you have incorrectly tried to update the firmware on your FlashRouter. The first thing to try is a simple reboot of the router to see if it exits restore mode.

If a reboot does not clear up the issue then try to reset and reconfigure your FlashRouter.

TP-Link Access Router Settings

TeamFlashRouters · Apr 11, 2024 ·

Follow this guide to access the router settings of your TP-Link FlashRouter.

1. Connect your computer, phone, or tablet to the TP-Link router via wireless (FlashRouter24 / FlashRouter50) or via ethernet cable to one of the LAN ports on the router.

The FlashRouter WiFi password is printed on the sheet that came with the router and is set to Wireless#[First 5 characters of your router MAC]. The router MAC can be found on the bottom of your router if you cannot locate the sheet. For e.g. if your MAC is 1459C07E70A8 then your WiFi password is Wireless#1459C

Be sure to capitalize the W.

2. Once connected via wireless or ethernet on your device open your browser and go to tplinkwifi.net

TP-Link URL Access

3. Enter tp-link as the admin password to access the TP-Link firmware settings.
TP-Link admin password

TROUBLESHOOTING

Still having issues? Visit the VPN Troubleshooting section.

Troubleshoot Here

Linksys WRT32X DD-WRT WiFi Settings

admin · Feb 19, 2019 ·

Recommended DD-WRT WiFi settings for the Linksys WRT32X are based on extensive testing by FlashRouters. Please note that optimal settings may vary depending on external factors such as home size, interference, and the types of WiFi devices you are connecting in your network.

Screenshots below provide a visual display of recommended WiFi and encryption settings exactly as they appear in the Linksys WRT32X with DD-WRT firmware.

Navigate to the Wireless > Basic Settings to view or edit WiFi network settings.
5.0 GHz - Wireless-AC

View WRT32X DD-WRT FlashRouter 5GHz #1 Settings

2.4 GHz - Wireless-N

View WRT32X DD-WRT FlashRouter 2.4GHz Settings

Additional DD-WRT WiFi Information

Intimidated by all the available WiFi settings? The DD-WRT website provides extensive information about all of the available configuration options in the firmware. Learn about everything from Wireless channels to channel widths and more in the Basic Wireless Settings – DD-WRT Wiki.

WRT32X DD-WRT Wireless Security

The preset WRT32X FlashRouter WiFi password is Wireless#[First 5 characters of your router MAC]. The router MAC can be found on the bottom of your router. For e.g. if your MAC is 1459C07E70A8 then your WiFi password is Wireless#1459C

Navigate to the Wireless > Wireless Security to view or edit WiFi passwords.

View WRT32X DD-WRT FlashRouter WiFi Security Settings

TROUBLESHOOTING

Trouble with your Linksys WRT32X WiFi? Visit the Wireless troubleshooting section.
Troubleshoot Here
Next Page »

Primary Sidebar

  • Troubleshooting
  • Router Access
  • Internet Connection Issues
  • WiFi Connectivity
  • General VPN Issues
  • TeamViewer Remote Support
  • DD-WRT Firmware
  • Facebook
  • Twitter
  • Instagram
  • Pinterest
  • YouTube

Footer