• Skip to primary navigation
  • Skip to main content
  • Skip to primary sidebar
  • Skip to footer

FlashRouters Support Portal

Prioritizing Privacy

  • SETUP GUIDES
    • Privacy Hero Router Setup Guide
    • ASUS-WRT Router Setup Guide
    • AsusWRT-Merlin Router Setup Guide
    • DD-WRT Router Setup Guide
    • ExpressVPN Router Setup Guide
    • GL.iNet Router Setup Guide
    • Roqos Core Router Setup Guide
  • TROUBLESHOOTING
    • Router Access
    • WiFi Connectivity
    • Internet Connection Issues
    • General VPN Issues
    • DD-WRT Firmware
    • TeamViewer Remote Support
  • FAQs
    • Router FAQs
    • VPN FAQs
    • Warranty and Returns FAQs
    • Sales FAQs
    • Shipping FAQs
    • Service Plan FAQs
  • Show Search
Hide Search

Search Results for: class basic .co

How do I change my Wireless Network Name (SSID)?

TeamFlashRouters · May 1, 2019 ·

Change the FlashRouter’s wireless network name to any name you like.

Navigate to Wireless > Basic Settings
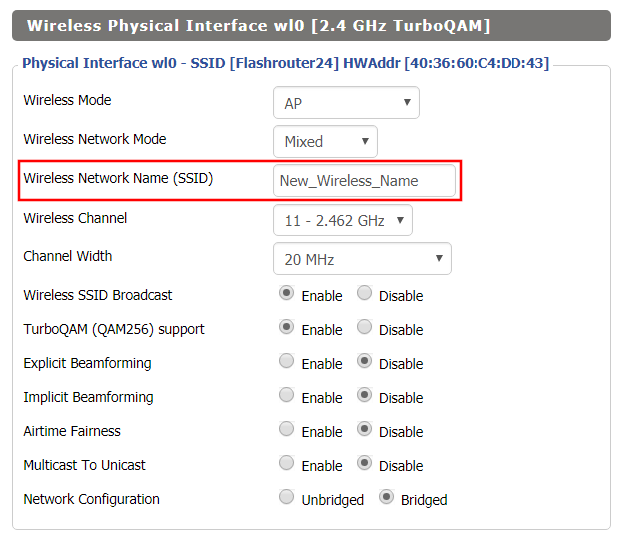
Changing SSID in DD-WRT Wireless Basic Settings page
  1. Click into the Wireless Network Name (SSID) field and enter in the new wireless name you would like to use.
  2. Click Apply Settings.
  3. Reconnect to the wireless network using your new wireless network name.
ExpressVPN MediaStreamer SmartDNS Setup

TeamFlashRouters · Jun 13, 2019 ·

ExpressVPN offers a SmartDNS service known as MediaStreamer for unblocking geo-restricted content without the encryption of a VPN service. SmartDNS routes DNS servers to different regions which “tricks” the website to allow access to previously restricted content.

SmartDNS does not change your IP Address or provide the encryption that a VPN connection does. This can result in faster speeds and unblocked content.

SmartDNS and VPN should not both be configured at the same time. When using a SmartDNS connection make sure to disable your VPN connection on the FlashRouter.

Login to ExpressVPN

If you are not already a ExpressVPN user Sign Up Now.

Visit ExpressVPN website login page and successfully login.

Register your IP with ExpressVPN

Navigate to the DNS Settings tab on top right of the ExpressVPN Dashboard.

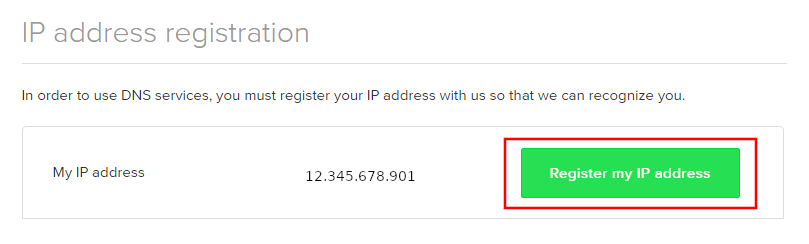
ExpressVPN MediaStreamer DNS Settings

Click on Register my IP address.

Register IP for ExpressVPN MediaStreamer use on FlashRouter DD-WRT

Navigate to the ExpressVPN Dashboard.

Finding ExpressVPN MediaStreamer Specific DNS Servers in ExpressVPN Dashboard

Click on Set Up on More Devices.

Finding ExpressVPN MediaStreamer Specific DNS Servers

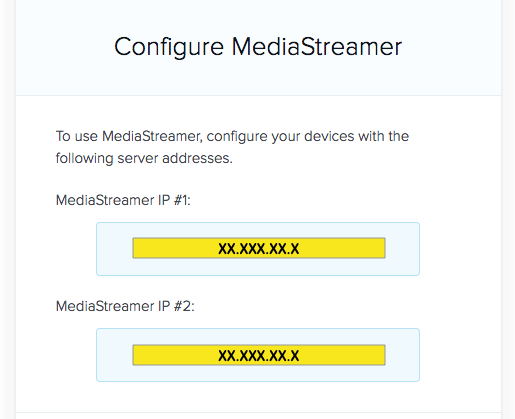
Scroll down and click on MediaStreamer and note the DNS servers that appear on the right side of the page.

ExpressVPN MediaStreamer Specific DNS servers

Enter MediaStreamer SmartDNS servers on your FlashRouter

Navigate to Setup > Basic Setup

  1. Scroll down to Network Address Server Settings (DHCP).
  2. Enter in the MediaStreamer SmartDNS servers you noted into Static DNS fields 1 and 2.
  3. Click Apply Settings at the bottom of the page.
  4. Reboot the FlashRouter.

Once the FlashRouter has fully rebooted, you can now access your desired regional content on any device that connects to the FlashRouter’s network.

My 5.0GHz network is not showing up

TeamFlashRouters · May 2, 2019 ·

Verify the device supports 5GHz

5.0GHz networks are not compatible with all devices so first make sure that you device’s wireless adapter supports 5GHz wireless frequencies.

If you are not sure, find out if your device support 5 GHz via Google search or by looking in the wireless hardware details in the device’s network settings. If you see Wireless a/b/g/n support then you have a compatible device. If you are missing the Wireless a then this means there is no 5 GHz support.

Enter the recommended wireless settings

Our team has tested the wireless functionality for each FlashRouter that we offer and shared our recommended wireless settings in our Wifi Setup area. Replicate the settings for your FlashRouter model found on that page.

Lower the wireless channel

Some devices do support 5.0GHz connections but not the higher channels that DD-WRT firmware offers.

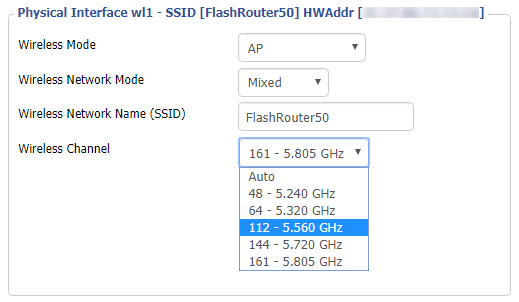
Navigate to Wireless > Basic Settings

Lower the wireless channel setting for the 5.0GHz band that is not showing. Based on our tests the most broadly compatible channels are 36, 48 and 161.

CLICK APPLY SETTINGS

Refresh your device's network adapter

The easiest way to accomplish this is by rebooting your device as the settings to reset your adapter may vary on all types of internet connected devices.

Review wireless Status

Navigate to Status > Wireless

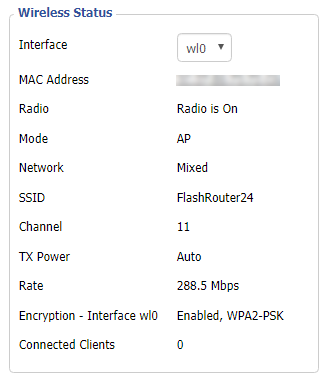
The readouts on this page can help tell if there are errors with the FlashRouter’s wireless. View our article on how to read the Wireless Status page for more information.

Wireless Repeater – WiFi as WAN on Roqos

Dave · Dec 16, 2021 ·

WiFi as WAN is a feature of the Roqos software which allows you to use an existing WiFi network as the Internet source for the Roqos router instead of an ethernet cable connection. This is a great solution for travelling users who do not have access to the modem/router in their hotel or AirBnB.

Login to Roqos Core UI web app in a browser on any computer or smart device.

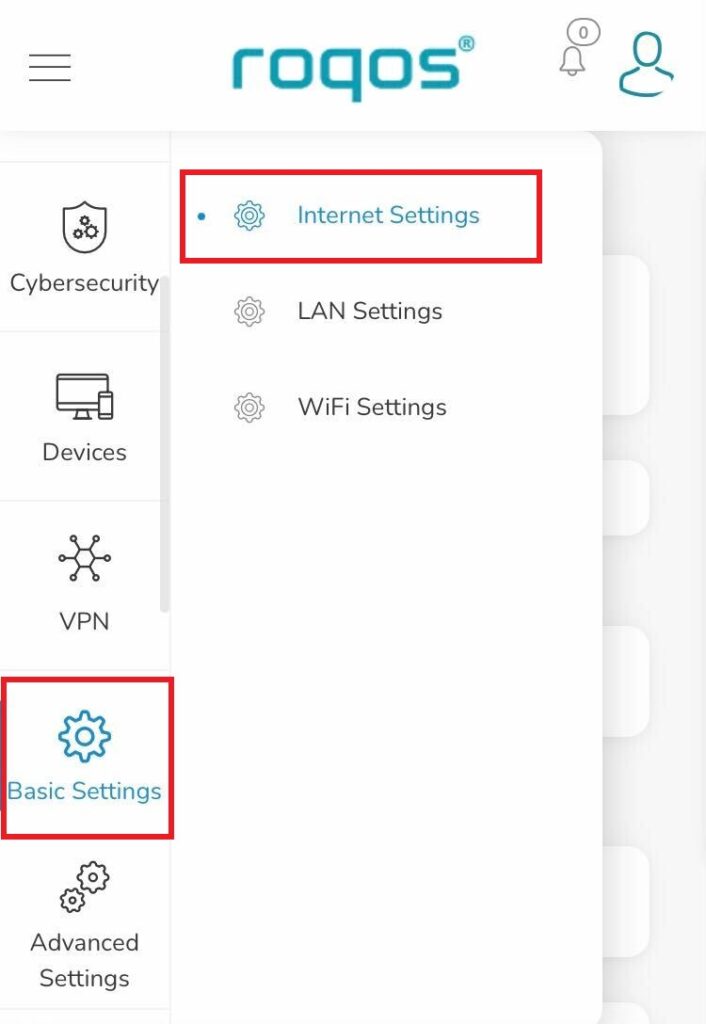
1. Click the navigation menu and select Basic Settings > Internet Settings.

Roqos Basic Settings - Internet Settings

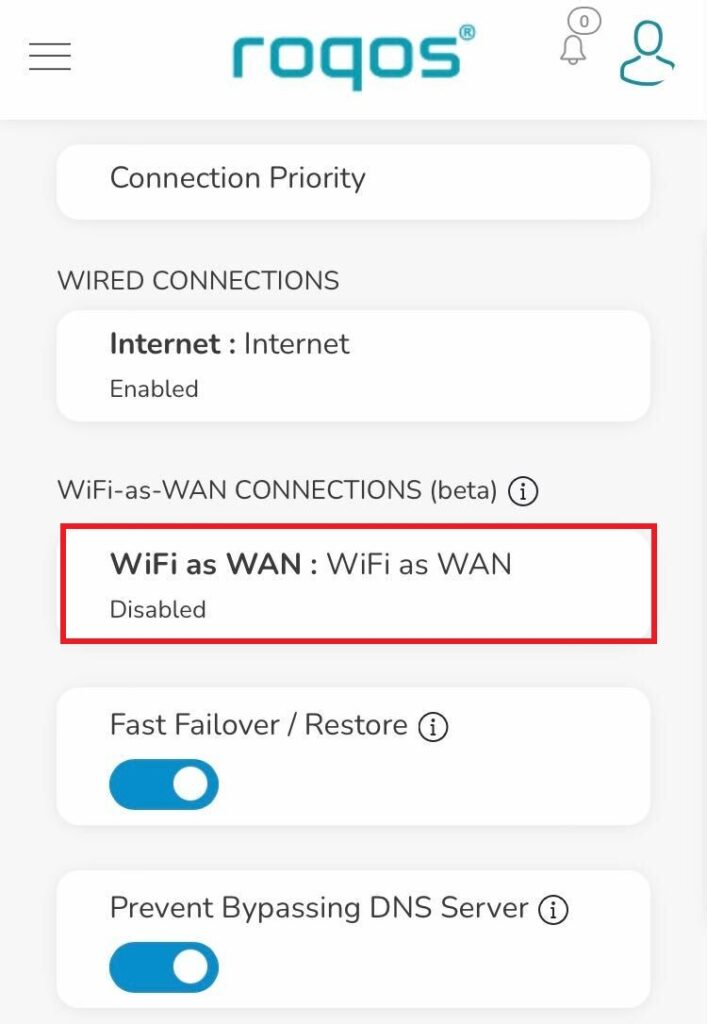
2. Click WiFi as WAN.

Roqos Internet Settings - WiFi as WAN

3. Scroll down and select the existing WiFi network you wish to use for WAN/Internet from the Nearby Wireless Networks list.

4. Enter the correct password for the existing WiFi network and click Connect.

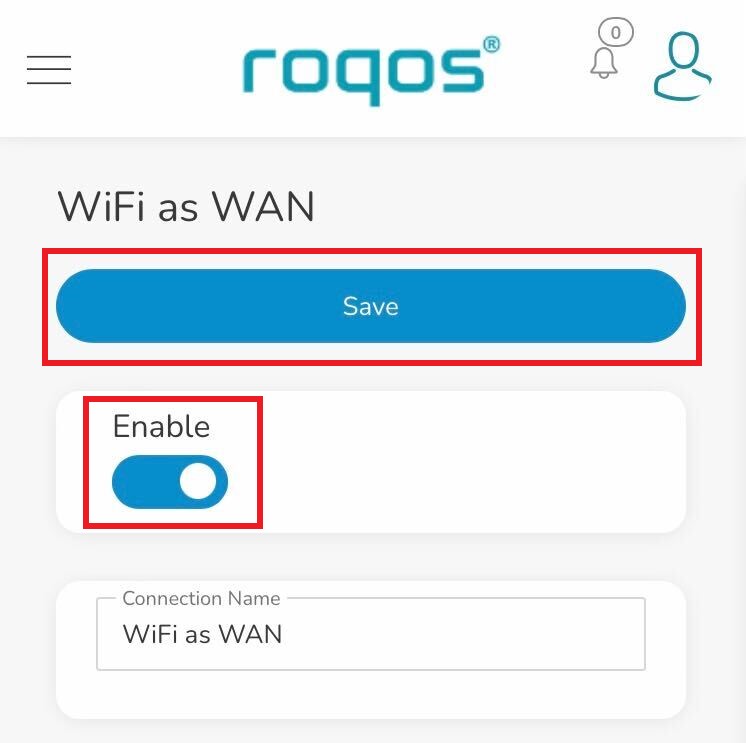
5. Toggle the Enable slide and click Save.

Roqos WiFi as WAN - Enable and Save

Be patient as the connection is made. It usually takes 30 seconds to a minute to connect. Then test that your Internet is working while connected to the Roqos network.

My 2.4GHz network is not showing up

TeamFlashRouters · May 2, 2019 ·

If you ever have an issue with WiFi, you can always wire directly into the FlashRouter to verify and/or update your current WiFi settings.

Enter the recommended wireless settings

Our team has tested the wireless functionality for each FlashRouter that we offer and shared our recommended wireless settings in our Wifi Setup area. Replicate the settings for your FlashRouter model found on that page if the 2.4GHz is not showing.

Change the wireless channel

Navigate to Wireless > Basic Settings

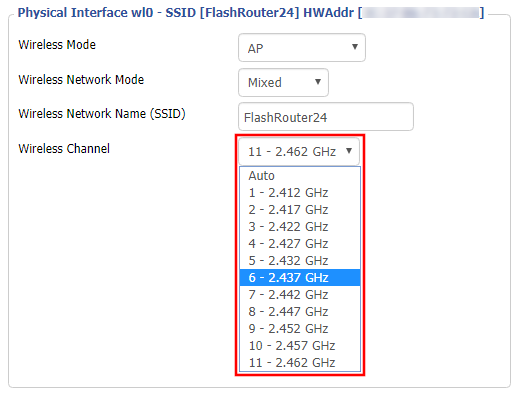
Change the wireless channel setting for the 2.4GHz band that is not appearing. The most broadly compatible channels are 6 and 11.

CLICK APPLY SETTINGS

Refresh your device's network adapter

In rare instances the wireless adapter for your device may stop picking up WiFi networks and must be reset. This will be different for each device, that is why the best way to refresh your wireless adapter is to simply reboot any device in question and see if the adapter now picks up your WiFi networks.

Review wireless Status

Navigate to Status > Wireless

The readouts on this page can help tell if there are errors with the FlashRouter’s wireless. View our article on how to read the Wireless Status page for more information.

Wireless Access Point Setup

TeamFlashRouters · Apr 23, 2019 ·

A Wireless Access Point is a setup that has the FlashRouter using an existing network’s DHCP instead of assigning its own. The FlashRouter’s WAN/Internet port should be not be connected to your modem or other router while performing this setup.

Preparing for Wireless Access Point Setup

Locate the Local IP Address of the existing wireless network

Locate the Local IP Address of the existing router that the FlashRouter will be bridged to.

DD-WRT Router Setup for Wireless Access Point

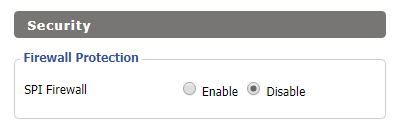
Disable Firewall

Navigate to Security > Firewall

Wireless Client Bridge Setup on FlashRouter DD-WRT - Disable Firewall
  1. Set SPI Firewall to Disable.
  2. Click Save.

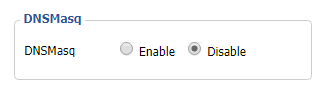
Disable DNSmasq

Navigate to Services > Services

Wireless Repeater Bridge Setup on FlashRouter DD-WRT - Disable DNSMasqButton
  1. Set DNSmasq to Disable.
  2. Click Save.

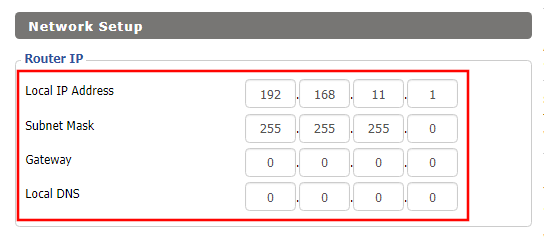
Change the FlashRouter's Local IP Address

Navigate to Setup > Basic Setup

Wireless Client Bridge Setup on FlashRouter DD-WRT - Set Local IP
  1. Set the Local IP Address to a different address on the same subnet as the existing network that you noted early. (example: if the existing network is 192.168.1.1 then set the Local IP Address to 192.168.1.2)
  2. Set the Gateway to the Local IP Address of the existing network. (example: 192.168.1.1)
  3. Set the Local DNS to the Local IP Address of the existing network. (example: 192.168.1.1)
  4. Click Save.

Change the FlashRouter's DHCP settings

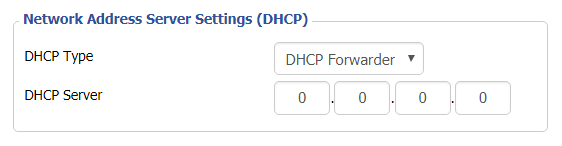
DHCP Forwarder Setup for DD-WRT
  1. Set the DHCP Type to DHCP Forwarder.
  2. Click Save.

Change the FlashRouter's Operating Mode

Navigate to Setup > Advanced Routing

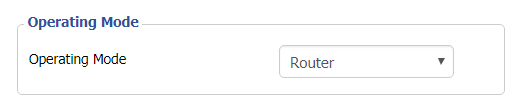
DHCP Forwarder Setup for DD-WRT
  1. Set the Operating Mode to Router.
  2. Click Apply Settings.

Reboot your FlashRouter

  • Power off the FlashRouter for 30 seconds and connect from the other router’s LAN port to one of the FlashRouter’s LAN port then power it back on.  When it boots back up you will be able to access the FlashRouter’s settings at the new Local IP Address that you set.

Back up your settings

Navigate to the Administration > Backup page.

  1. Click the Backup button.
  2. A file named nvrambak.bin will be saved to your computer.
  3. You can load nvrambak.bin to restore your settings in the event of a reset.

TROUBLESHOOTING

Still having issues? Visit our Troubleshooting section to diagnose common problems here.

Troubleshoot Here

Getflix SmartDNS Setup

TeamFlashRouters · Apr 4, 2019 ·

Getflix offers a SmartDNS service for unblocking geo-restricted content without the encryption of a VPN service. SmartDNS routes DNS servers to different regions which “tricks” the website to allow access to previously restricted content.

SmartDNS does not change your IP Address or provide the encryption that a VPN connection does. This can result in faster speeds and unblocked content.

SmartDNS and VPN should not both be configured at the same time. When using a SmartDNS connection make sure to disable your VPN connection on the FlashRouter.

Login to Getflix

If you are not already a Getflix user Sign Up Now.

New customer Signup for GetFlix SmartDNS Service

Login to Getflix’s website login page.

Visit Getflix’s DNS servers list page and note the DNS servers of the location you would like to access content from.

Getflix DNS Server Location Addresses for FlashRouter DD-WRT Settings

Enter Getflix SmartDNS servers on your FlashRouter

Navigate to Setup > Basic Setup

  1. Scroll down to Network Address Server Settings (DHCP).
  2. Enter in any combination of Getflix SmartDNS servers you noted into Static DNS fields 1 and 2.
  3. Click Apply Settings at the bottom of the page.
  4. Reboot the FlashRouter.

Register your IP Address

When the router is fully booted back up visit your Getflix user dashboard and make sure your IP Address is registered with Getflix. If it is not click Force IP Update.

Register IP Address for Getflix use on FlashRouter DD-WRT

Once you are successfully registered you can now access your desired regional content on any device that connects to the FlashRouter’s network.

IVPN WireGuard Setup

TeamFlashRouters · Oct 13, 2021 ·

Preparing for IVPN WireGuard Setup

Verify your IVPN login information

If you are not already a IVPN user Sign Up Now.

Log in to your account on the IVPN website.

IVPN website login

DD-WRT Router Setup for IVPN WireGuard

Navigate to Setup > Tunnels 

Enter IVPN WireGuard settings

1. Click Add Tunnel.

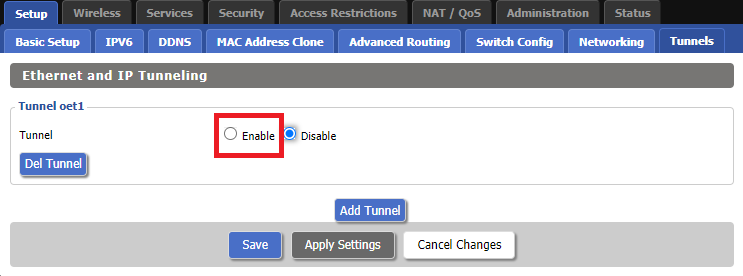
2. Set Tunnel to Enable.

Setup - Tunnel - Enable Tunnel

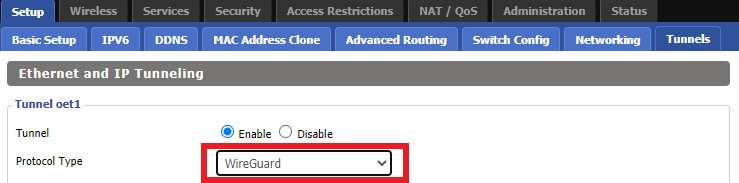
3. Select Wireguard from the dropdown.

Setup - Tunnel - Select Wireguard

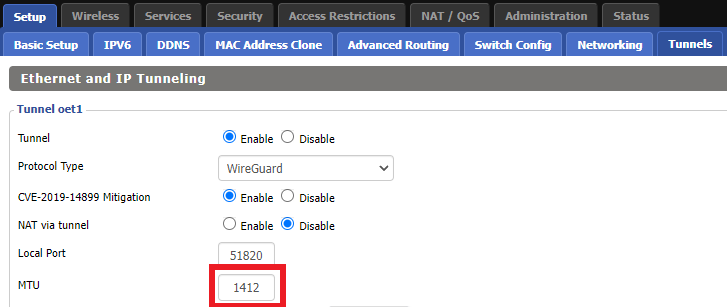
3. Set MTU to 1412.

IVPN Wireguard MTU setting

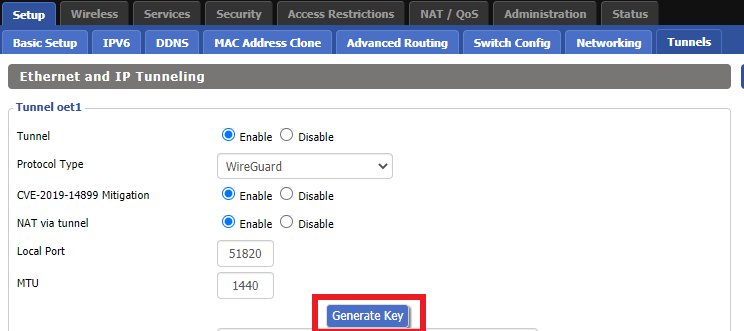
4. Click Generate Key.

Setup - Tunnel - Generate Key

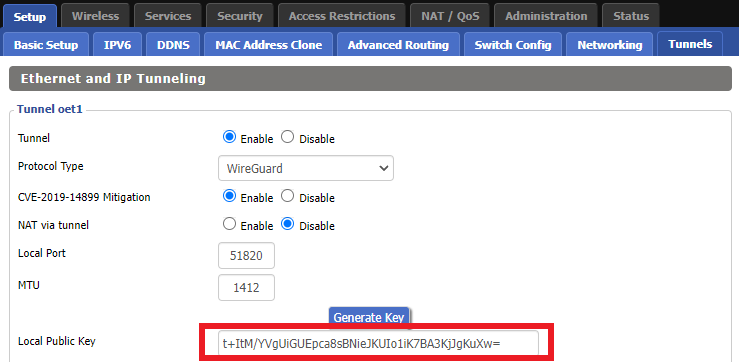
9. Copy the Local Public Key.

IVPN Wireguard Local Public Key

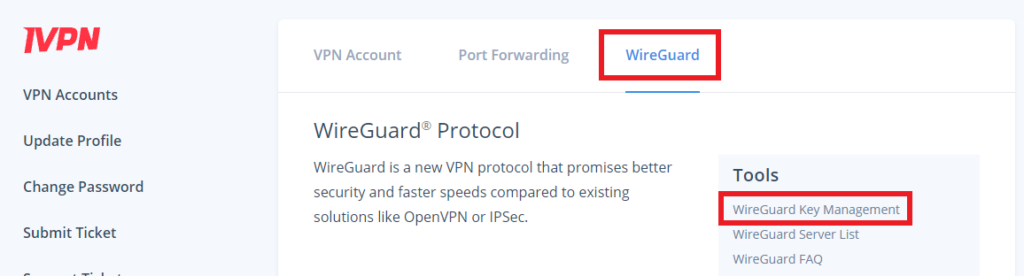
10. In a new tab (leave the DD-WRT settings opened), go to your IVPN Account and click WireGuard and then click WireGuard Key Management.

IVPN Wireguard Key Management

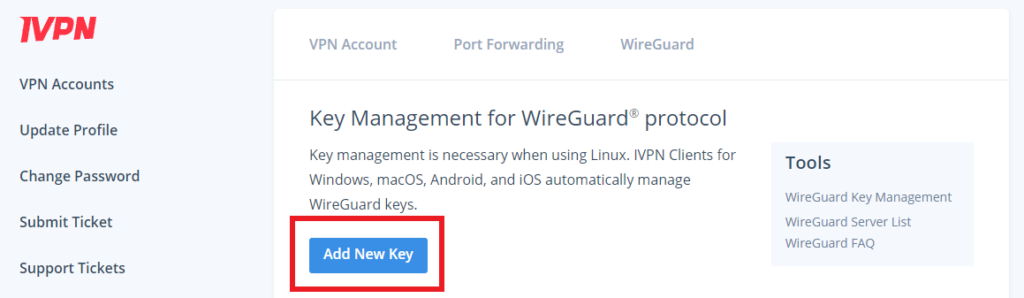
11. Click Add New Key.

IVPN Wireguard Add New Key

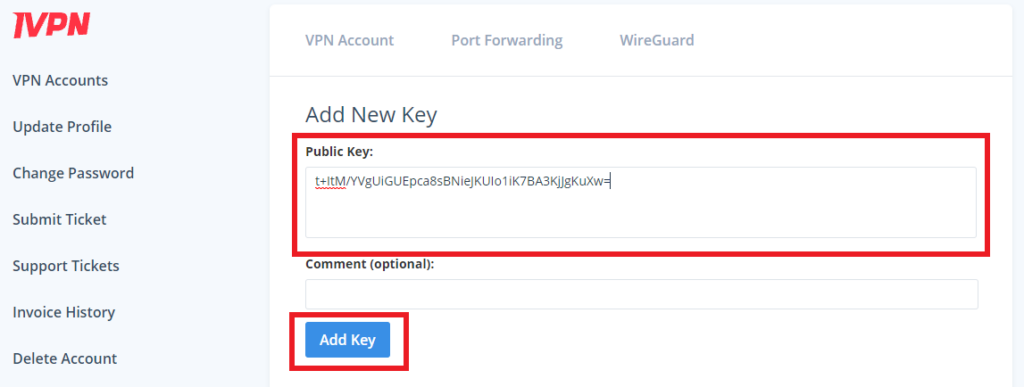
12. Paste the copied Local Public key to the Public Key field and click Add Key.

IVPN Wireguard Paste Public Key

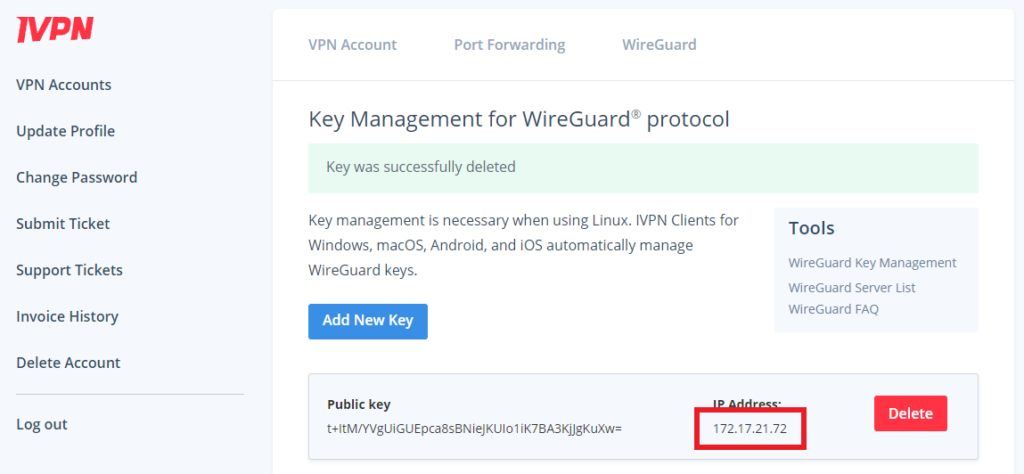
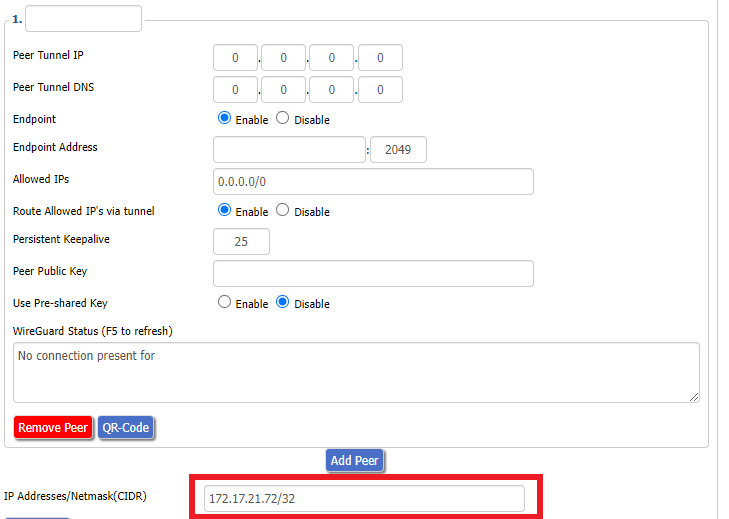
13.Copy the IP Address assigned to your public key and add it to the IP Addresses/Netmask(CIDR) field followed by a /32 subnet mask.

IVPN Wireguard copy IP Address
IVPN Wireguard paste IP Address

Certain DD-WRT builds will show two separate fields here: IP Address and Subnet Mask. If that is the case set the IP Address field to the Address without the /32 added and set the Subnet Mask to 255.255.255.255

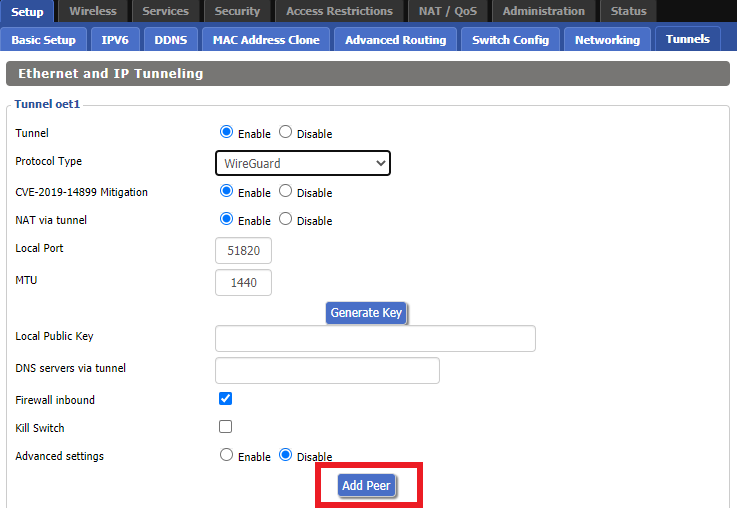
14. Click Add Peer.

Setup - Tunnel - Add Peer

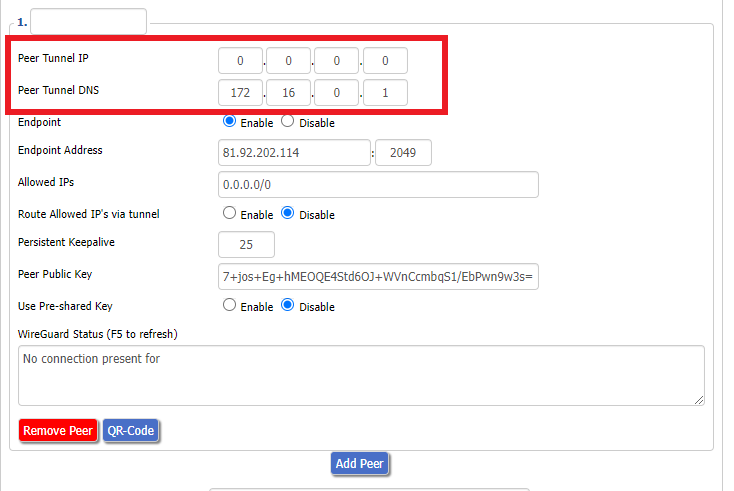
15. Set the Peer Tunnel IP to 0.0.0.0. Set Peer Tunnel DNS to 172.16.0.1

IVPN Wireguard Peer Tunnel IP and DNS

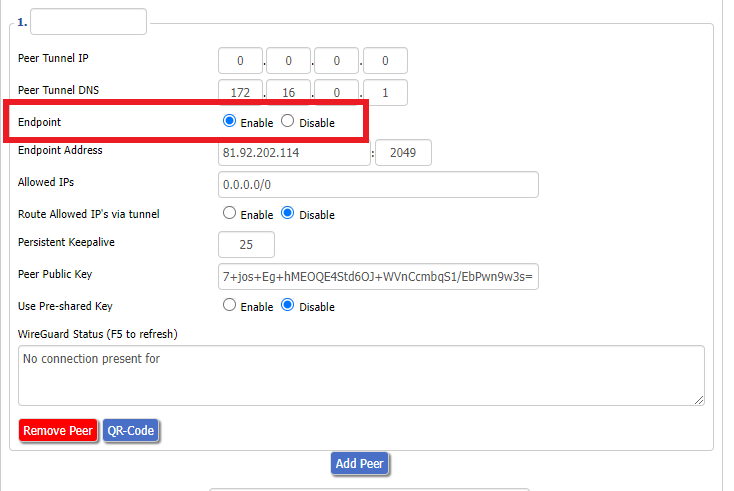
16. Set Endpoint to Enable.

IVPN Wireguard Enable Endpoint

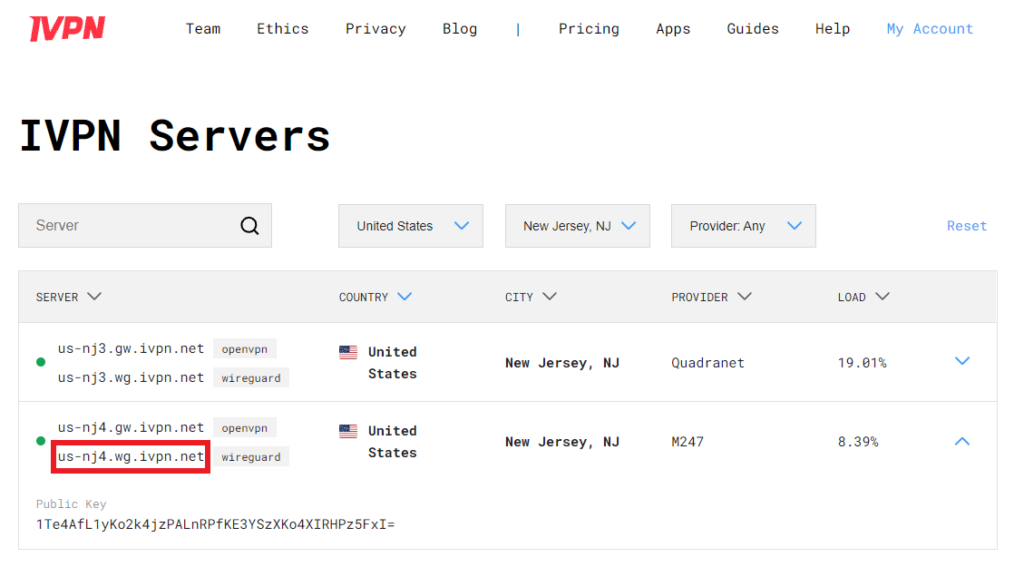
17. Go to the IVPN Server Status page and copy the server name for the WireGuard server location you want to connect to.

IVPN Wireguard Endpoint server

Be sure to copy the WireGuard server address and not the OpenVPN server address.

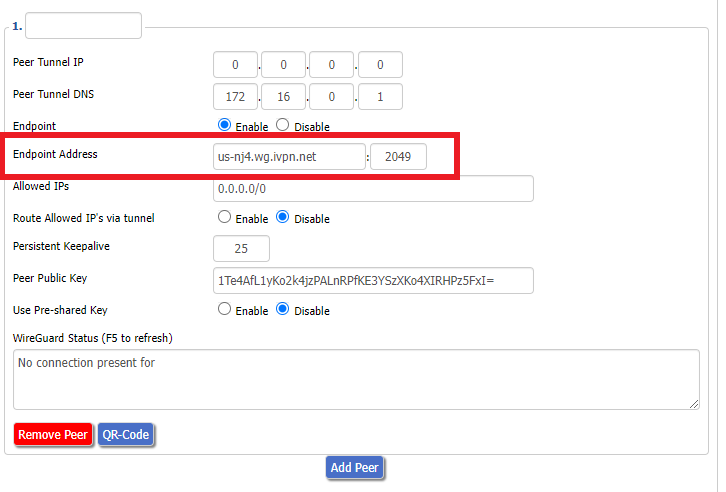
18. Paste the server name you copied into the Endpoint Address field and set the Port to 2049.

IVPN Wireguard Endpoint Address

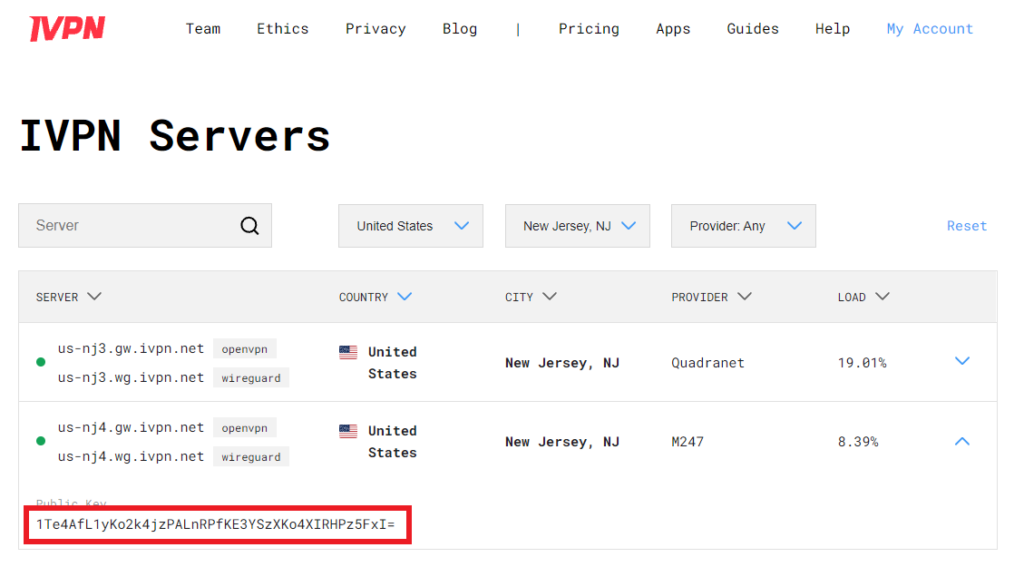
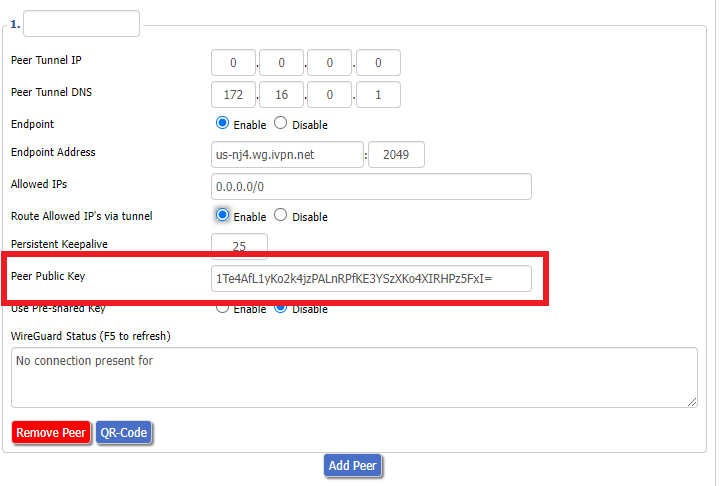
19. On the IVPN Server Status page copy the Public Key of the server location you entered. Paste the Public Key into the Peer Public Key field.

IVPN Wireguard copy server Public Key
IVPN Wireguard enter Peer Public Key

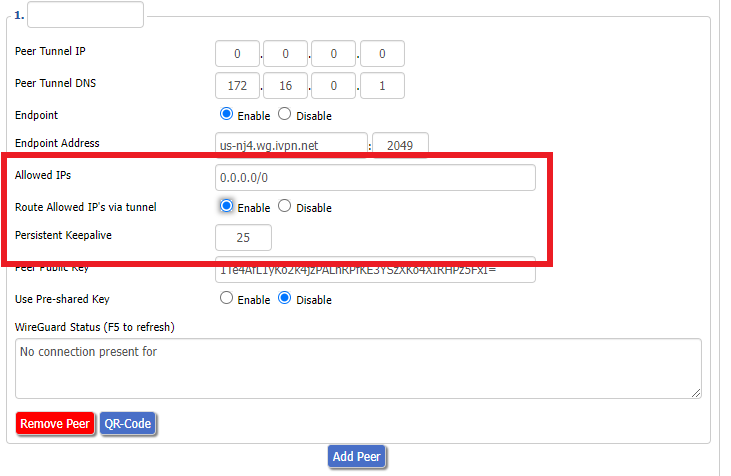
20. Leave Allowed IPs as 0.0.0.0/0. Set Router Allowed IP’s via tunnel to Enable. Set Persistent Keep Alive to 25.

IVPN Wireguard Peer settings

21. At the bottom of the page click Save and then click Apply Settings.

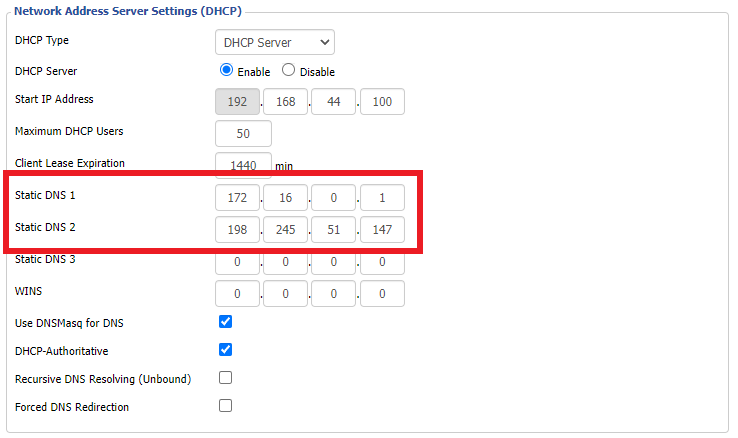
Set IVPN DNS servers

Navigate to Setup > Basic Setup

Set Static DNS 1 to 172.16.0.1

Set Static DNS 2 to 198.245.51.147

IVPN Wireguard Static DNS

Click Apply Settings.

Reboot the FlashRouter

Navigate to Administration > Management

Scroll to the bottom of the page and click the red Reboot Router button. Wait for the FlashRouter to reboot and then reconnect.

Verify a successful IVPN connection

Navigate to Setup > Tunnels

  1. You should Endpoint, Latest handshake, and Transfer in the WireGuard status area.
  2. Visit IVPN’s website to verify your status as using IVPN.

Back up your settings

Navigate to Administration > Backup

  1. Click the Backup button.
  2. A file named nvrambak.bin will be saved to your computer.
  3. You can load nvrambak.bin to restore your settings in the event of a reset.

TROUBLESHOOTING

Still having issues? Visit the VPN Troubleshooting section.

Troubleshoot Here

How do I change the DHCP range of my FlashRouter?

TeamFlashRouters · May 30, 2019 ·

Whenever a device joins the FlashRouter network via wired or WiFi connection the DHCP server on the router gives out a local IP address to each device so all these devices can interact on your local network.

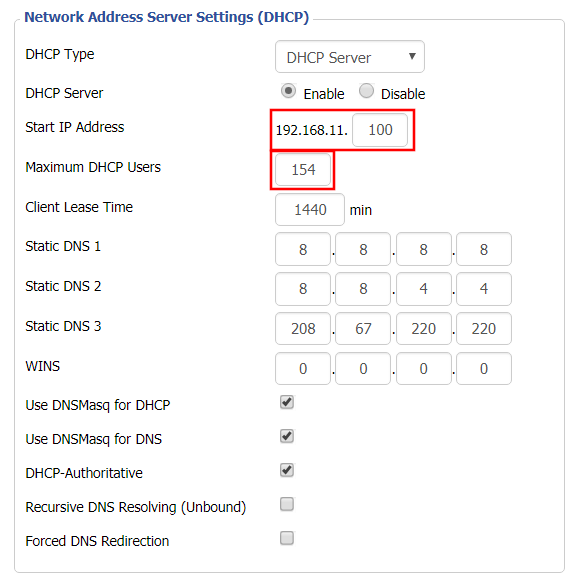
Increase the DHCP range to allow more users to automatically be assigned an IP address or decrease the DHCP range to limit the users that are automatically assigned an IP address.

Navigate to Setup > Basic Setup

Change DHCP Range in FlashRouter DD-WRT Settings
  1. Under Network Address Server Settings (DHCP) change the Maximum DHCP Users to your preferred value.
  2. You can edit the Start IP Address to 2 and Maximum DHCP Users to 254 for the most available slots.
  3. Click Apply Settings.

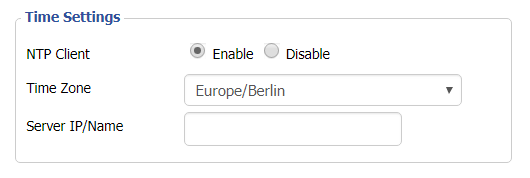
Why is my Time Zone set to Europe/Berlin?

TeamFlashRouters · May 30, 2019 ·

Europe/Berlin is the default Time Zone setting for DD-WRT firmware.

To change this to your location’s actual Time Zone do the following.

Navigate to Setup > Basic Setup

Select your actual Time Zone from the dropdown field. Leave the Server IP/Name field blank.

CLICK APPLY SETTINGS

The network may reboot for a moment. Simply reconnect when it is back up.

Disabling the NTP Client setting will result in the VPN connection not working so we ask that you please leave it enabled at all times.

Router FAQs

admin · Jan 29, 2019 ·

Router FAQs

What is an IP Address?

An IP (Internet Protocol) Address is a numerical assignment for each device (cell phone, iPad, laptop computer, printer etc) inside a network that uses the Internet Protocol for communication. Internet Protocol is responsible for routing information packets across network boundaries. It is the main protocol establishing the Internet.

An IP address serves two predominant functions. First is to host or network interface identification. Second, it provides location addressing. To put it bluntly, an IP address tells wherever you are connecting, to whom you are visiting, and where you are located.

What is DNS?

DNS (Domain Name System) is a protocol within the TCP/IP protocol that uses a set of standards for how computers exchange data on the Internet and on many private networks.

The basic job of DNS is to convert a user-friendly domain name into an IP address that computers use to identify one another. Think of DNS like your cellphone contact list; you tap the name and the phone contacts to a phone number.

It is easier to remember flashrouters.com, rather than its IP address. Imagine if you had to remember all of the IP addresses of your favorite websites!

What is DNSMasq?

DNSMasq is a local DNS server that speeds up host-name searches from your computer/Internet connection after pressing enter.

Basically, DNSMasq gives the router some advanced enterprise functionality – caching DNS records locally so you have a faster browsing experience. Your computer only has to go to the router instead of repeatedly scouring the web for a commonly visited site.

What is Throughput and How Do I Improve it?

Throughput is the average rate of successful delivery of messages through a network. Simply put, throughput measures the speed of message delivery inside a network. If you think about it in relationship to networks and Internet connections, throughput defines the user experience. The key to a pleasing user experience is uninterrupted service and smooth data transfer.

In order to improve throughput,  you should get a router with more memory. If you notice that your network is running slowly due to congestion, you could probably benefit by upgrading your router to one with more memory. FlashMemory and RAM on a router add more room to prevent network congestion and improve throughput.

Most of FlashRouters‘ high-end units come with at least 8 MB of Flash memory and 64 MB of RAM which should be more than capable for providing for the average home users’ or small business will need in the future.

What is PPPoE?

PPPoE stands for Point-to-Point Protocol over Ethernet, a network protocol for encapsulating Point-to-Point Protocol (PPP) frames inside Ethernet frames. It is used mainly with DSL services where individual users connect to a DSL modem over Ethernet.

With PPPoE, users virtually “dial” from one machine to another over an Ethernet network, establish a point-to-point connection and then data packets are securely transported through the connection.

PPPoE offers an Internet service provider (ISP) an easier way to track exactly how much bandwidth you are using in case they want to charge for it in the future.

What is the Difference Between VPN Encryption and Wireless Network Security?

VPN Encryption: If you are connected to the VPN on your home network, then any data that flows over the Internet is entirely encrypted whether you are connected to the Internet either wired or wirelessly. This means that if your Local ISP was trying to see what you are browsing or downloading, they would not be able to see your data.

Wireless Network Security: If you leave your wireless network open or insecure, it does not matter whether Internet traffic is encrypted, because someone can directly see what you are doing on your network, or even worse, can go in and put a wireless password on your network, locking you out. They may also be able to access folders and files on your computer without your control.

Best thing to do is protect your wireless network with a WPA secured password along with your VPN connection.

Are FlashRouters Affected By the Shellshock Bug?

No.

According to our in-house testing and multiple DD-WRT community reports, we have found that the Shellshock vulnerability will not work on with DD-WRT or TomatoUSB installed router. The vulnerability is based on a shell called BASH (Bourne Again Shell) but DD-WRT & Tomato firmware use BusyBox which is confirmed to not have this issue.

Please be advised that if you are using Optware on your DD-WRT router there is a chance that implementation is BASH based. Only used trusted optware on your router.

What is a DNS leak and how can I prevent a DNS leak in my router?

TeamFlashRouters · Jun 11, 2019 ·

What is a DNS leak?

A DNS Leak is an instance where your ISP receives DNS requests despite being connected to a VPN tunnel.

How do I check if my DNS is leaking?

  1. Perform the extended test on DNSLeakTest.com. Be sure to do so on multiple web browsers for best accuracy.
  2. Here you should only find one server and your ISP should not be listed as your actual ISP.
  3. If your actual ISP is not listed there is no DNS leak.

How can I prevent a DNS leak in DD-WRT?

Check your device's browser settings

Updates to web browsers have added DNS settings capabilities, while this often makes your browsing experience more secure it can also effect the results of a DNS leak test. You can go into your browser’s settings and search for “DNS” and disable the DNS of the browser for more accurate DNS leak test results.

A simple web search for “DNS settings [browser name]” should return helpful information for finding the setting in your browser.

Adjust DD-WRT settings

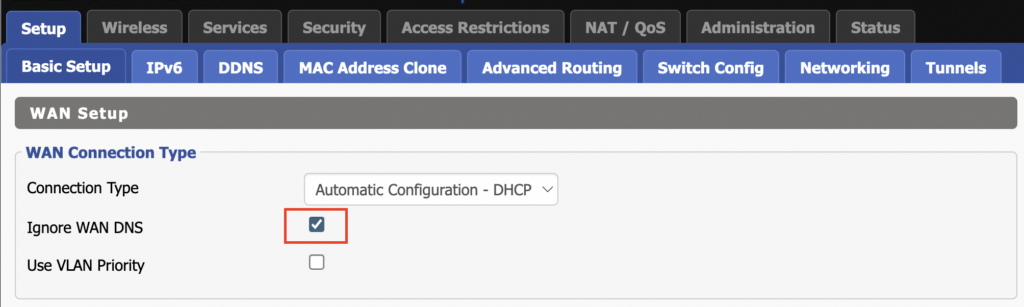
1. On the Setup > Basic Setup page of the DD-WRT settings check the Ignore WAN DNS box.

This setting may not appear in older DD-WRT firmware builds. If it is not appearing for you, upgrade your DD-WRT firmware.

DD-WRT Check Ignore WAN DNS

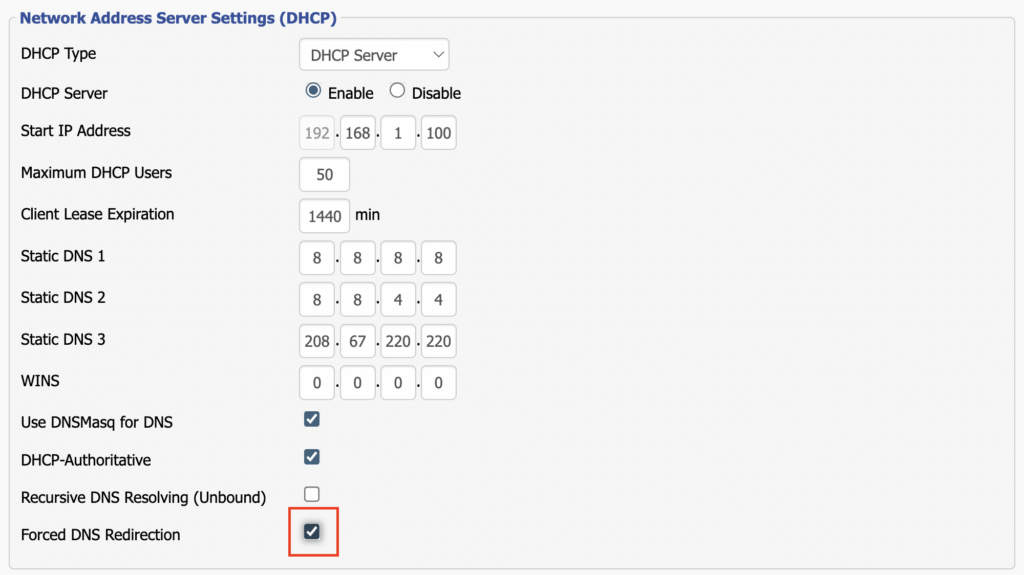
2. Lower on the same page check the Forced DNS Redirection box.

DD-WRT Check Forced DNS Redirection

3. Click Apply Settings at the bottom of the page and then wait a full minute and power the FlashRouter off and back on. Reconnect to the FlashRouter’s network once it boots back up and then make sure you are connected to VPN by going to https://whatismyipaddress.com then perform the DNS leak test again.

Adding your VPN provider’s DNS servers to the router’s configuration can be helpful as well. The DNS servers are typically found on the VPN provider’s website or you can reach out to their team for a recommendation of what DNS servers to enter.

Change WiFi name and password on Roqos

TeamFlashRouters · Nov 14, 2021 ·

Change your Roqos’ WiFi Network Name and Password to anything you like. Make sure it is not a duplicate of an existing WiFi name.
Login to Roqos Core UI web app in a browser on any computer or smart device.
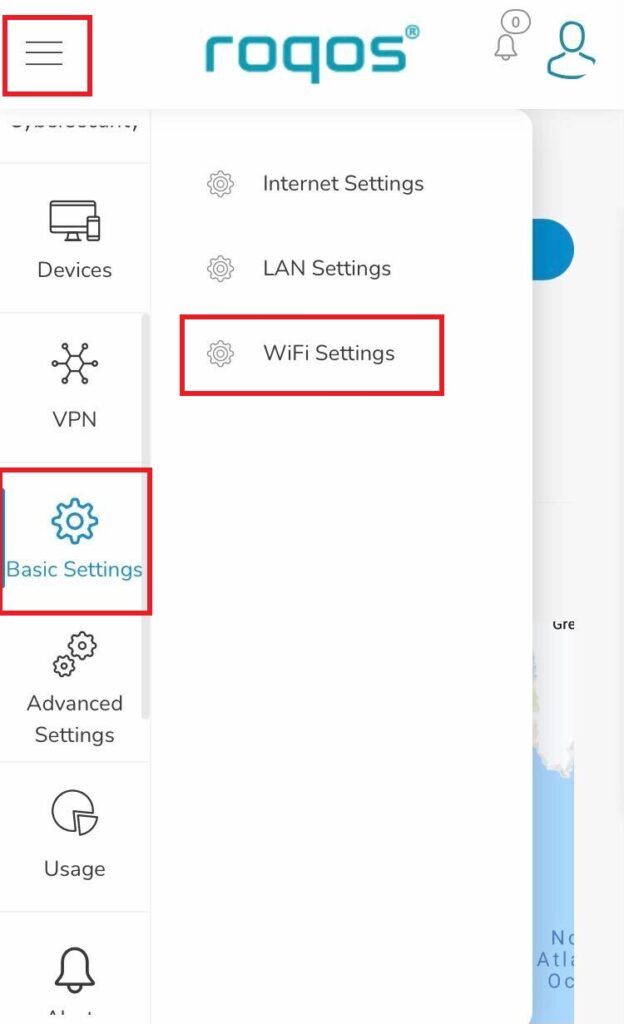
1. Click the navigation menu and select Basic Settings > WiFi Settings.
Roqos Basic Settings - WiFi Settings

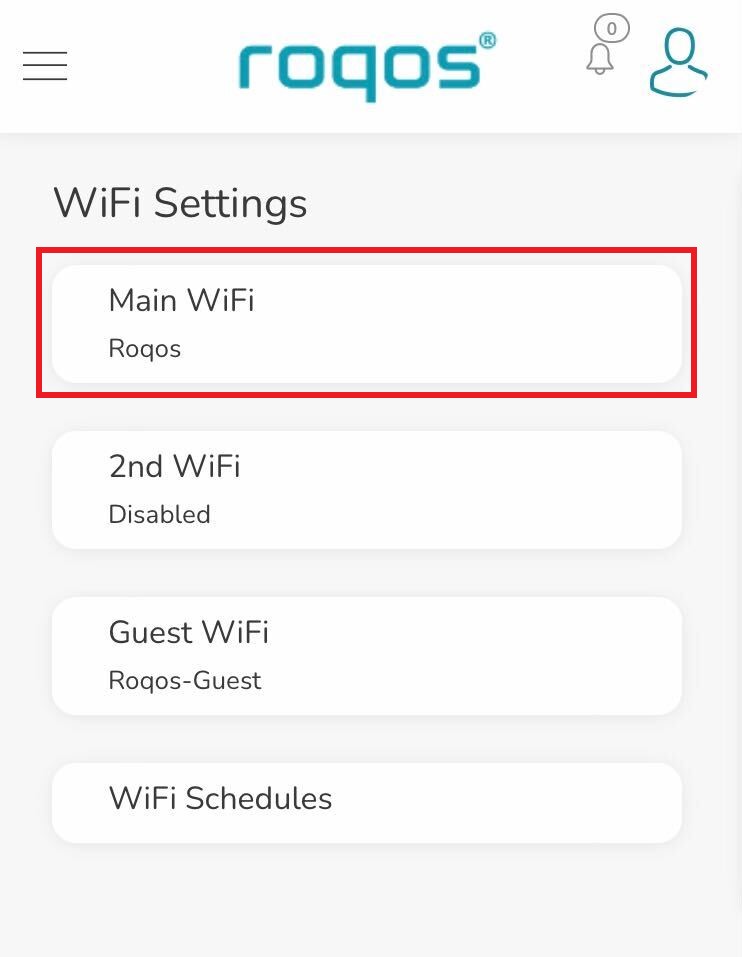
2. Click Main WiFi.

Roqos WiFi Settings - Main WiFi

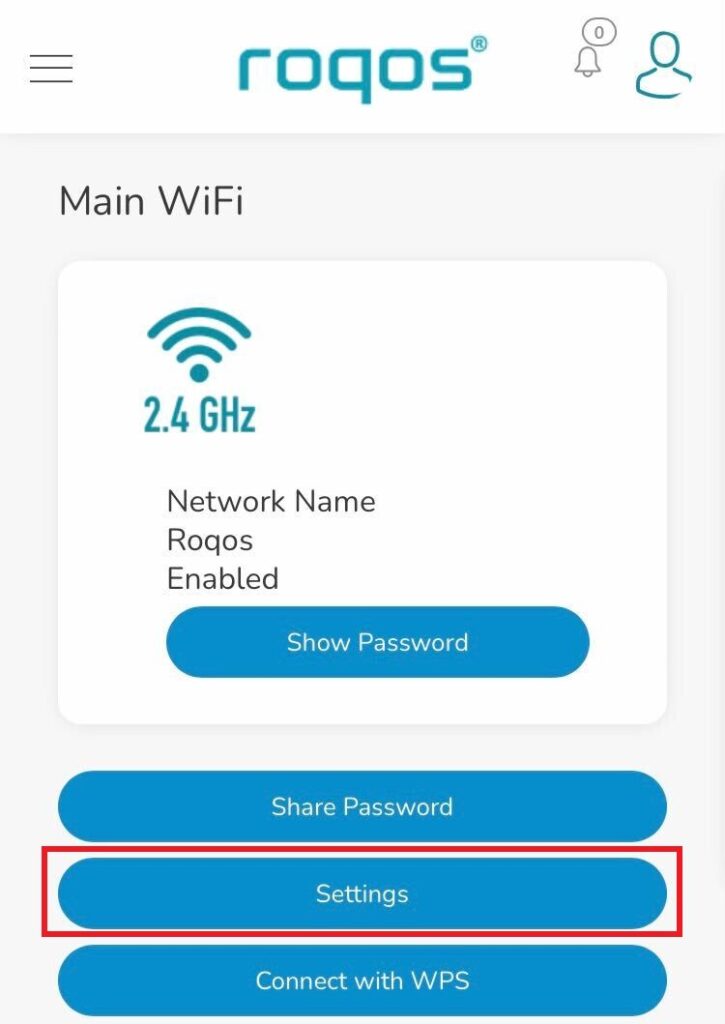
3. Click Settings.

Roqos WiFi Settings - Settings

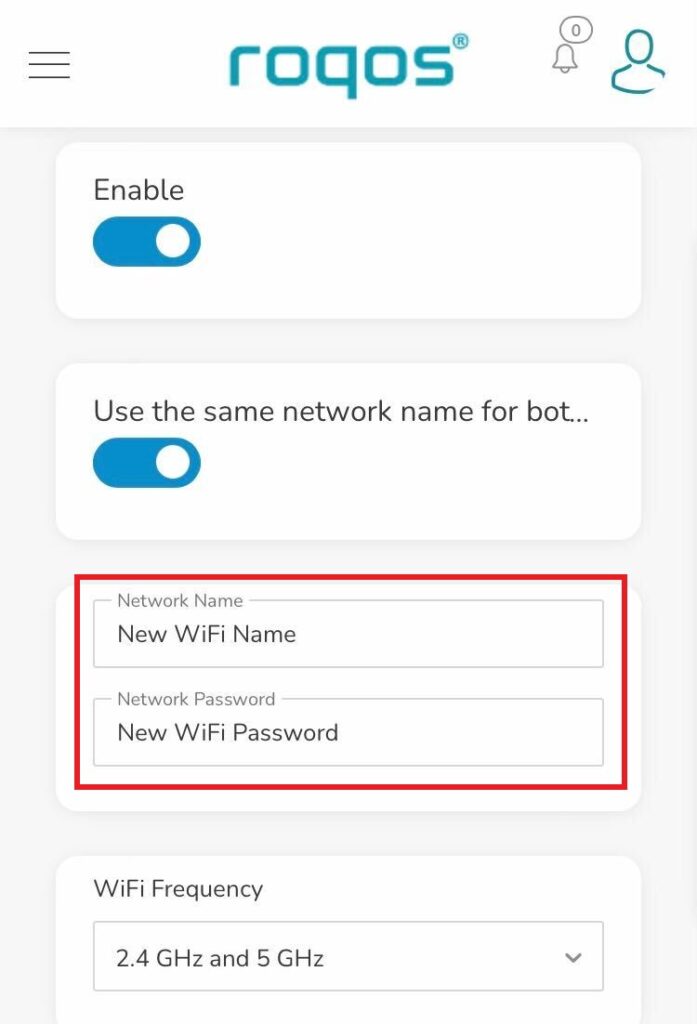
4. Enter the new Network Name and Network Password. Click Save.

Roqos WiFi Settings - Enter new name and password

5. Reconnect your WiFi devices to the new network with the password you just set.

Setting up a Guest WiFi Network on Roqos

TeamFlashRouters · Nov 14, 2021 ·

Create a Guest WiFi network on your Roqos to segment certain devices from the main network and set custom content filters as you see fit. Note that this is only for 2.4GHz wireless.

Login to Roqos Core UI web app in a browser on any computer or smart device.

1. Click the navigation menu and select Basic Settings > WiFi Settings.

Roqos Basic Settings - WiFi Settings

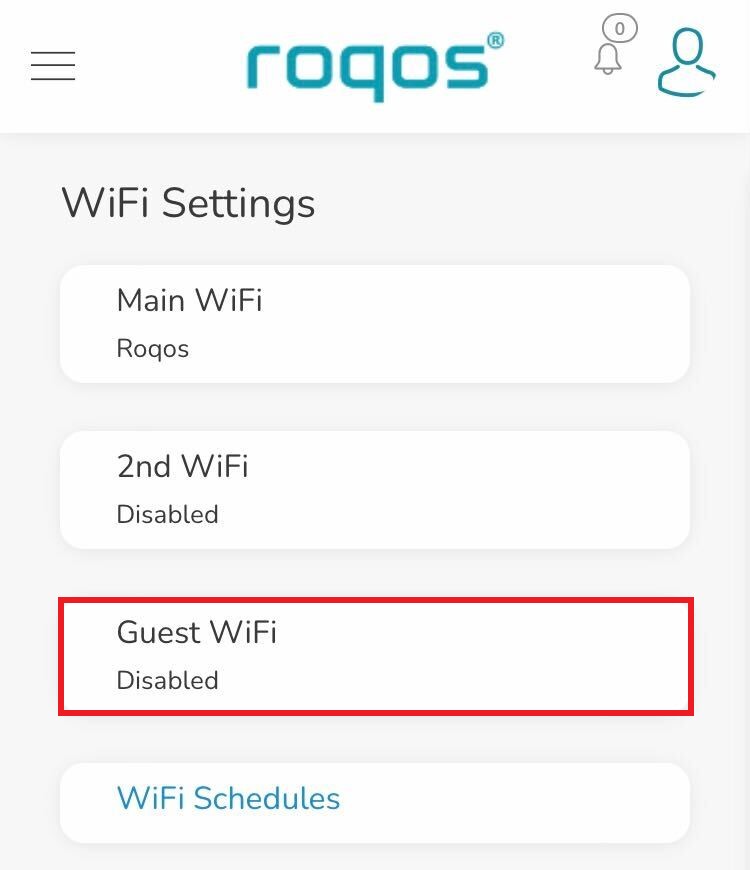
2. Click Guest WiFi.

Roqos WiFi Settings - Guest Wifi

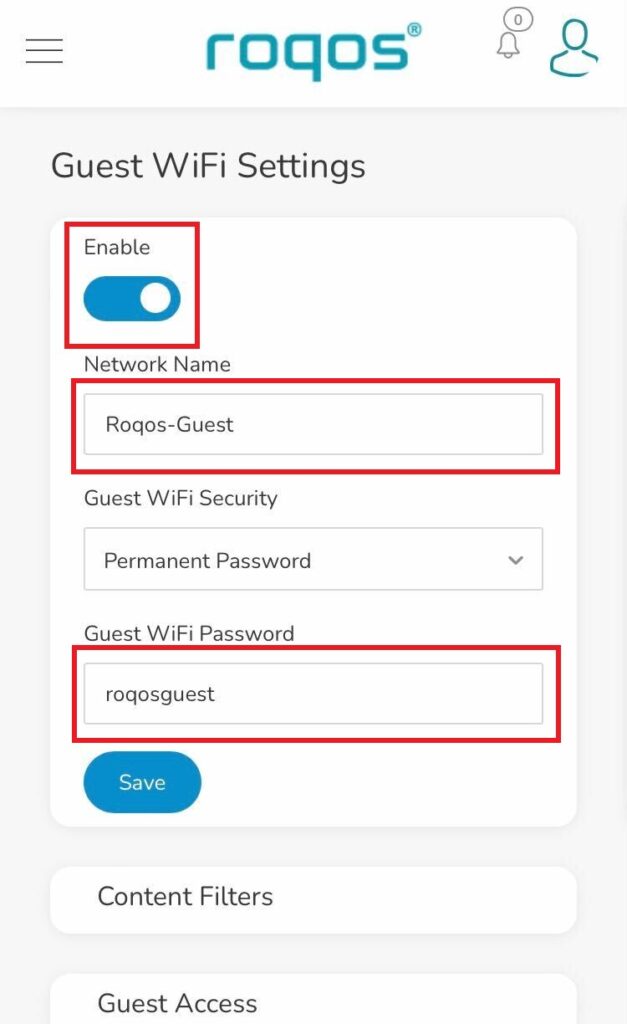
3. Toggle the Enable slider and set the Network Name and Guest WiFi Password. Click Save.

Roqos WiFi Settings - Guest Wifi name and password

4. Optional: If you wish to set specific Content Filters for the Guest Network and set the Filters that you see fit.

Wireless Guest Network Setup – Bridged (Advanced)

TeamFlashRouters · Jun 12, 2019 ·

If you would like to prevent visitors from connecting to your main WiFi network then you can create a Bridged Guest Network that will prevent access to the main router. This setup also allows you to create different rules for different WiFi SSID’s in your home ranging from QoS controls, access restrictions, VPN network segmentation, and more.

Preparing for Wireless Guest Network Setup

If you have a Dual-band or Tri-Band router you can setup a WiFi Guest Network, creating a separate VLAN (virtual local area network) for your visitors, or in order to segment your VPN networks on any band you like. We recommend using the 2.4GHz network for your DD-WRT Guest Wireless Network so it is compatible with the most possible WiFi devices. Setting up a guest network for visitors in your home allows you to keep them off of your main WiFi network.

We recommend performing this setup while connected to the FlashRouter via ethernet cable. If your computer does not have an ethernet port and you must proceed via wireless connection to the FlashRouter pay attention to the wireless connection as you may need to rejoin the FlashRouter’s network after making changes.

DD-WRT Router Setup for Wireless Guest Network

Enter Wireless settings

Navigate to Wireless > Basic Settings

Bridged Wireless Guest Network Setup on DD-WRT FlashRouter – Setting SSID for Guest Network
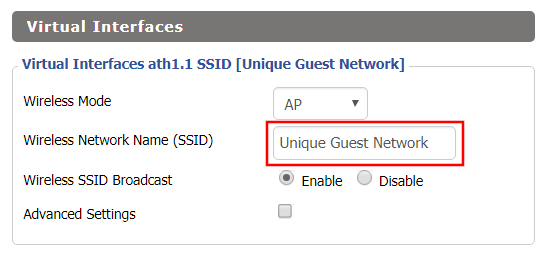
  1. Under the 2.4GHz or 5GHz Interface click the Add button.
  2. In the Wireless Network Name (SSID) field enter the unique network name of the guest network.
  3. Click Save.

Enter Wireless Security settings

Navigate to Wireless > Wireless Security

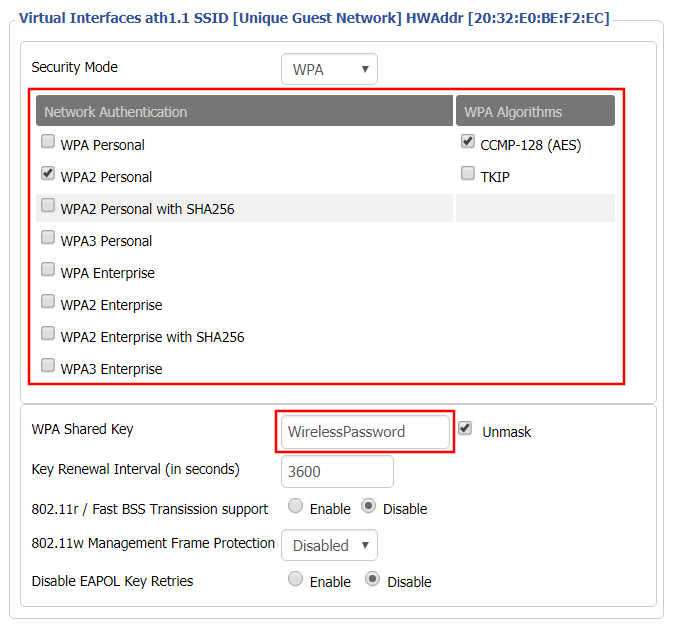
Bridged Wireless Guest Network Setup on DD-WRT FlashRouter – Setting Guest Network Wireless Password
  1. Duplicate the wireless security settings that are set for the other bands for the newly created virtual interface.
  2. Click Apply Settings.
  3. Reboot your router.

Create Bridge

Navigate to Setup > Networking

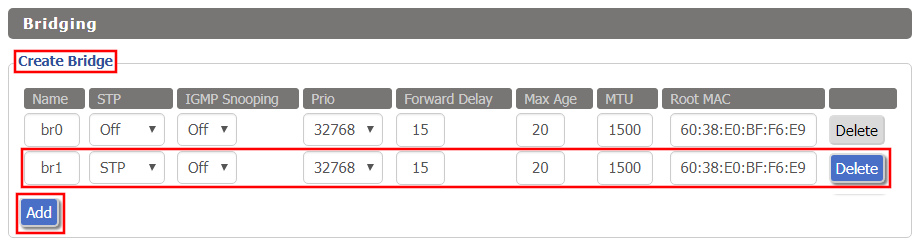
Bridged Wireless Guest Network Setup on DD-WRT FlashRouter – Create Bridge
  1. Under Create Bridge click Add. Name the newly created bridge br1.
  2. Click Apply Settings

Assign to Bridge

Bridged Wireless Guest Network Setup on DD-WRT FlashRouter – Assign Bridge
  1. Under Assign to Bridge select br1 from the Assignment dropdown. Select wl1.1 or ath1.1 depending on your router model.
  2. Click Apply Settings.

Depending on the router model and WiFi band you are using, the wireless interfaces will be labelled differently.

This setting can be labelled wl1.1, ath0.1, wl2.1, and so on. Make sure when you get up to the bridge assignment section that you are using the correct guest network Virtual Interface.

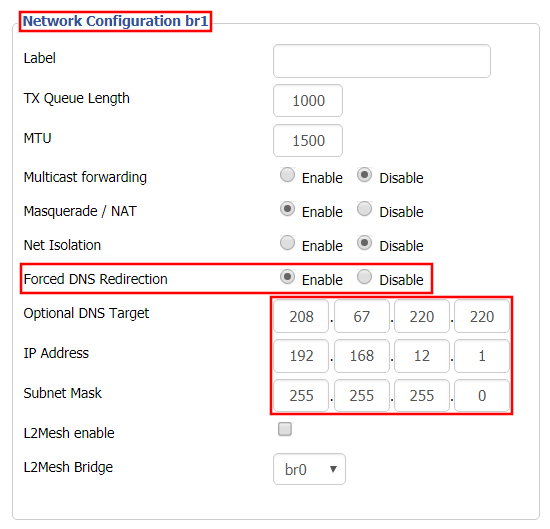
Network Configuration br1

Bridged Wireless Guest Network Setup on DD-WRT FlashRouter – Configure Bridge DNS Redirection
  1. Under Network Configuration br1 select Enable for Forced DNS Redirection.
  2. Set Optional DNS Target to 208.67.220.220
  3. Set IP Address to 192.168.12.1
  4. Set Subnet Mask to 255.255.255.0
  5. Click Apply Settings.

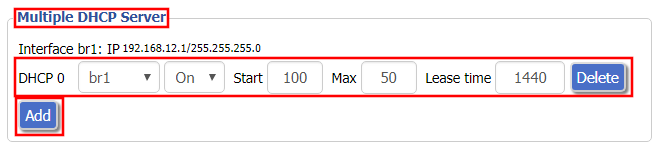
Multiple DHCP Server

Bridged Wireless Guest Network Setup on DD-WRT FlashRouter – Configure DHCP Server Settings
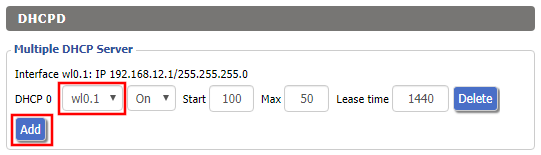
  1. Under Multiple DHCP Server click Add.
  2. Set the first dropdown to br1.
  3. Click Apply Settings.
  4. Reboot your router.

Firewall Rules

Navigate to Administration > Commands

  1. Copy the fire script from below and paste into the empty Commands shell
  2. Click Save Firewall.
  3. Wait one minute and then reboot your router.

iptables -I FORWARD -i br1 -o br0 -m state –state NEW -j DROP
iptables -I FORWARD -i br0 -o br1 -m state –state NEW -j DROP
iptables -I INPUT -i br1 -p tcp –dport telnet -j REJECT –reject-with tcp-reset
iptables -I INPUT -i br1 -p tcp –dport ssh -j REJECT –reject-with tcp-reset
iptables -I INPUT -i br1 -p tcp –dport www -j REJECT –reject-with tcp-reset
iptables -I INPUT -i br1 -p tcp –dport https -j REJECT –reject-with tcp-reset

You will now have a working Bridged Guest Network on the FlashRouter. By inputting the firewall rules, this will also prevent any guests on your network from gaining access to your router settings.

Back up your settings

Navigate to Administration > Backup

  1. Click the Backup button.
  2. A file named nvrambak.bin will be saved to your computer.
  3. You can load nvrambak.bin to restore your settings in the event of a reset.

TROUBLESHOOTING

Still having issues? Visit our Troubleshooting section to diagnose common problems here.

Troubleshoot Here

Wireless Guest Network Setup – Unbridged (Recommended)

TeamFlashRouters · Jun 12, 2019 ·

If you would like to prevent visitors from connecting to your main WiFi network then you can create a separate Guest Network that will prevent access to the main router. This setup also allows you to create different rules for different WiFi SSID’s in your home ranging from QoS controls, access restrictions, VPN network segmentation, and more.

Preparing for Wireless Guest Network Setup

If you have a Dual-band or Tri-Band router you can setup a WiFi Guest Network, creating a separate VLAN (virtual local area network) for your visitors, or in order to segment your VPN networks on any band you like. We recommend using the 2.4GHz network for your DD-WRT Guest Wireless Network so it is compatible with the most possible WiFi devices. Setting up a guest network for visitors in your home allows you to keep them off of your main WiFi network.

We recommend performing this setup while connected to the FlashRouter via ethernet cable. If your computer does not have an ethernet port and you must proceed via wireless connection to the FlashRouter. Be sure to pay attention to the wireless connection as you may need to rejoin the FlashRouter’s network after making changes.

DD-WRT Router Setup for Wireless Guest Network

Enter Wireless settings

Navigate to Wireless > Basic Settings

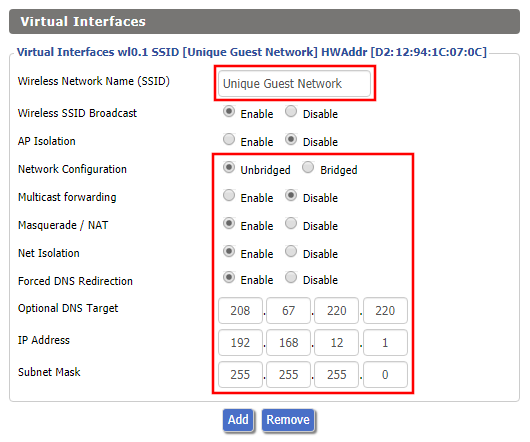
FlashRouter DD-WRT Wireless Guest Network Settings Unbridged

Under the 2.4GHz or 5GHz Interface click the Add button.

Wireless Network Name (SSID)

Enter the a unique network name for the guest network.

Network Configuration

Unbridged

Force DNS Redirection

Enable

Optional DNS Target

208.67.220.220

IP Address

192.168.12.1

Subnet Mask

255.255.255.0

CLICK SAVE

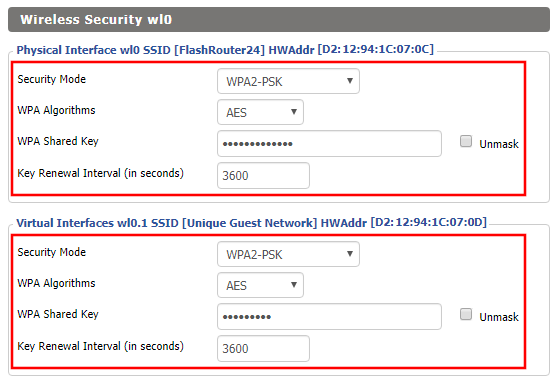
Enter Wireless Security settings

Navigate to Wireless > Wireless Security

Wireless Guest Network Setup on DD-WRT FlashRouter Unbridged
  1. Duplicate the wireless security settings that are set for the other bands for the newly created virtual interface.
  2. Click Apply Settings.
  3. Reboot your router.

Enable DHCP for Guest Network

Navigate to Setup > Networking

Wireless Guest Network Setup on DD-WRT FlashRouter Unbridged Setting DHCP Server
  1. Scroll to the very bottom of the page and under DHCPD click Add.
  2. Select wl0.1 or ath1.1 depending on your router model.
  3. Click Apply Settings.
  4. Reboot your router.

Depending on the router model and WiFi band you are using, the wireless interfaces will be labelled differently.

This setting can be labelled wl1.1, ath0.1, wl2.1, and so on. Make sure when you get up to the bridge assignment section that you are using the correct guest network Virtual Interface.

Back up your settings

Navigate to Administration > Backup

  1. Click the Backup button.
  2. A file named nvrambak.bin will be saved to your computer.
  3. You can load nvrambak.bin to restore your settings in the event of a reset.

TROUBLESHOOTING

Still having issues? Visit our Troubleshooting section to diagnose common problems here.

Troubleshoot Here

Set a Static IP for your connected devices on Roqos

TeamFlashRouters · Dec 21, 2021 ·

By assigning specific Static IP addresses to your devices you can better manage your network and make sure they connect with the same Local IP Address each time they connect to your Roqos.

Login to Roqos Core UI web app in a browser on any computer or smart device.

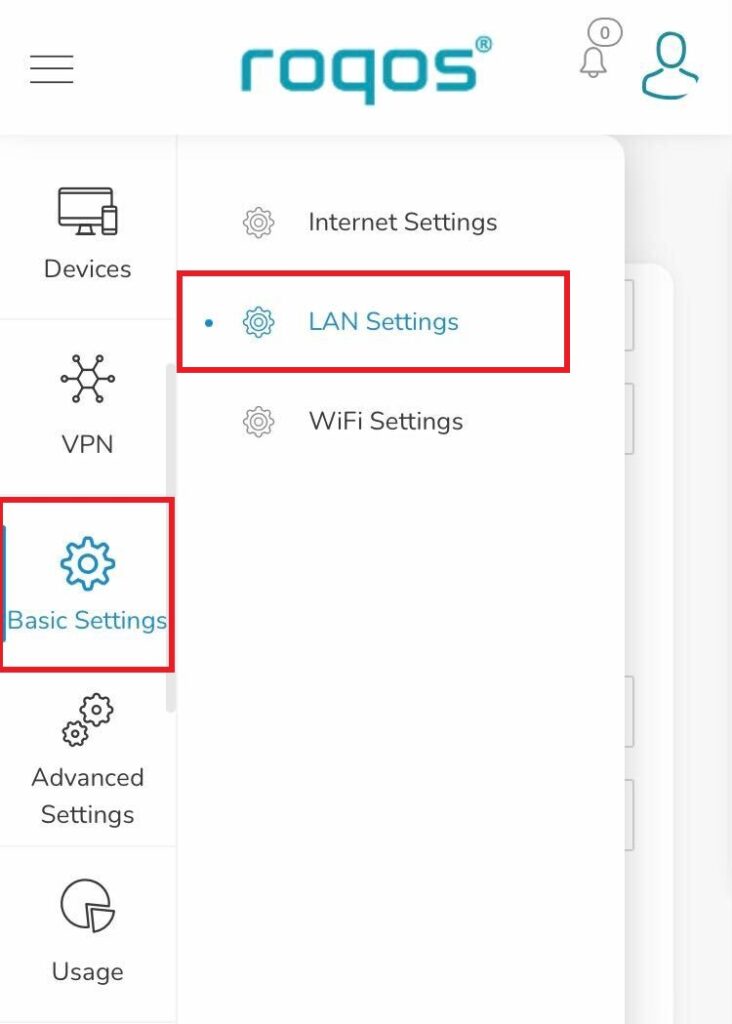
1. Click the navigation menu and select Basic Settings > LAN Settings.

Roqos Basic Settings - LAN settings

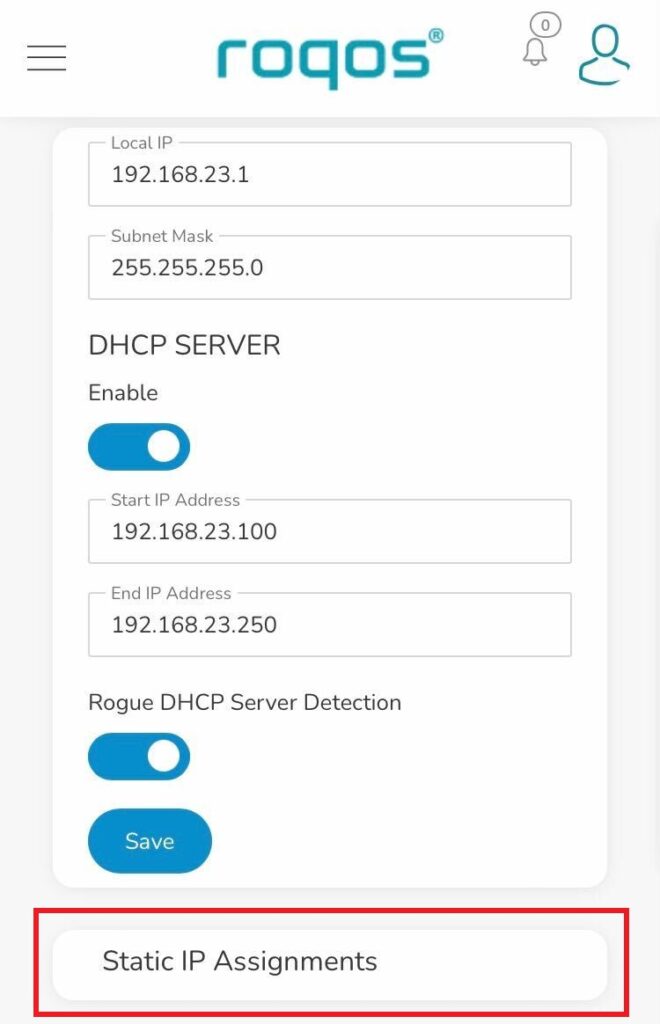
2. Click Static IP Assignments.

Roqos LAN settings - Static IP Assignments

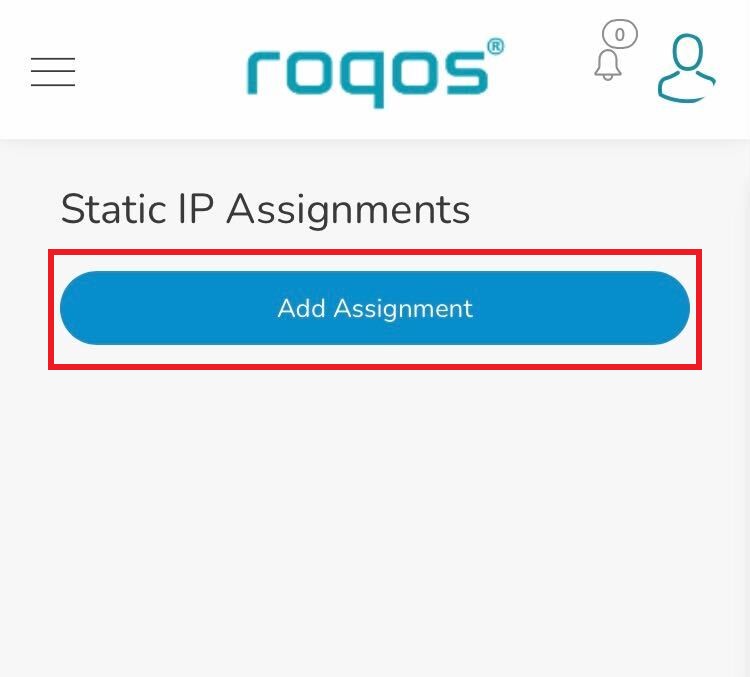
3. Click Add Assignment.

Roqos LAN settings - Add Assignment

4. Toggle the device hat you want to set a Static IP for and then enter 192.168.23.x with x being any number between 2 and 254. Click Save.

Now, every time the device connects to the Roqos network it will be assigned the same Static IP address on the Local network.

« Previous Page

Primary Sidebar

  • Troubleshooting
  • Router Access
  • Internet Connection Issues
  • WiFi Connectivity
  • General VPN Issues
  • TeamViewer Remote Support
  • DD-WRT Firmware
  • Facebook
  • Twitter
  • Instagram
  • Pinterest
  • YouTube

Footer