• Skip to primary navigation
  • Skip to main content
  • Skip to primary sidebar
  • Skip to footer

FlashRouters Support Portal

Prioritizing Privacy

  • SETUP GUIDES
    • Privacy Hero Router Setup Guide
    • ASUS-WRT Router Setup Guide
    • AsusWRT-Merlin Router Setup Guide
    • DD-WRT Router Setup Guide
    • ExpressVPN Router Setup Guide
    • GL.iNet Router Setup Guide
    • Roqos Core Router Setup Guide
  • TROUBLESHOOTING
    • Router Access
    • WiFi Connectivity
    • Internet Connection Issues
    • General VPN Issues
    • DD-WRT Firmware
    • TeamViewer Remote Support
  • FAQs
    • Router FAQs
    • VPN FAQs
    • Warranty and Returns FAQs
    • Sales FAQs
    • Shipping FAQs
    • Service Plan FAQs
  • Show Search
Hide Search

Search Results for: that for sure

Why is my router not connecting to internet?

Dave · May 2, 2019 ·

Router not connecting to the internet? Follow these simple steps!

  1. Make sure that you are not setting a WAN IP of 0.0.0.0 in the top right corner of your FlashRouter DD-WRT settings. If you do, then make sure your FlashRouter is wired correctly for Internet.
  2. Try power cycling your ISP modem, FlashRouter and any other router that may be in the setup. Power the modem back on first, wait for it to boot up fully, and then power the FlashRouter back on.
  3. Make sure you do not have Global Kill Switch enabled in the FlashRouters Privacy App and if you do make sure your VPN status is Connected.


Why can’t I access router settings?

Dave · May 3, 2019 ·

Be sure to first try the preset details to access your FlashRouter’s settings.

First time setup

Are you connected to the FlashRouter's network?

In order to access the FlashRouter’s settings you need to be connected to the FlashRouter’s network via ethernet or WiFi.

It is possible that if you are connected to the FlashRouter’s network you device might have static IP settings from a previous connection preventing it from being read correctly. Check your device’s static IP settings before proceeding.

Is your FlashRouter wired correctly?

Your FlashRouter should be wired as detailed in our Connect FlashRouter to the Internet setup.

A common mistake is to connect from your modem or other router to a LAN/numbered port of the FlashRouter instead of the WAN/Internet port of the FlashRouter as it should be. Doing so results in no access to the FlashRouter’s settings.

Lost access

How to find you FlashRouter's Local IP Address?

It is possible that your Local IP Address was changed at some point. Your Local IP Address is the address that you can access the FlashRouter’s settings with. We recommend finding the Local IP Address of the FlashRouter.

Was your FlashRouter reset?

If your FlashRouter is showing a local IP Address of 192.168.1.1 and you are seeing ‘dd-wrt’ as an available network in your wireless networks, your FlashRouter was reset. Reconfigure your FlashRouter.

Keep in mind that seeing a Local IP Address of 192.168.1.1 can also mean your are wired incorrectly and the router has not been reset. Be sure to check your wireless networks for ‘dd-wrt’. If the FlashRouter’s wireless network name appears as it was set then your FlashRouter was not reset and you should see the above section.

Tried updating firmware

Why can't I access my FlashRouter after a firmware upgrade?

When performing a firmware upgrade there is a dropdown that has Don’t Reset or Reset to Default settings as options.

If you accidentally selected Reset to Default settings you will need to reconfigure your FlashRouter.

If you had Don’t Reset selected and are still unable to connect to the FlashRouter’s network after a firmware upgrade, first make sure you are connected to the FlashRouter’s network as WiFi can disconnect during an upgrade, and then Reboot the FlashRouter.

How do I reset and reconfigure my ExpressVPN/Aircove FlashRouter?

TeamFlashRouters · Mar 16, 2022 ·

When is a router reset needed?

A reset of the FlashRouter should only be performed in the following instances:

  • You have exhausted all other troubleshooting methods and cannot access your router settings.
  • Password to access the FlashRouter’s settings are not working.
  • Power light on the router is blinking steadily.
  • Router is not accessible after upgrading the firmware

Reset Router

Asus FlashRouters:

  1. While the router is powered off press and hold the WPS button on the back or side of the router. Power up the router while continuing to hold the WPS. Continue to hold for 15 seconds as the router powers on (note this could be up to 45 seconds on some models before lights flash).
  2. You will see the lights on the router flashing steadily and this is how you know you have reset the router.
  3. Let the router sit for about a minute and then reboot the router.

Aircove, Linksys and Netgear FlashRouters:

  1. While the router is plugged in, find the reset button located on the back of the router. You will need a pin or pencil to hold down the button for 15 seconds.
  2. You will see the lights on the back of the router flash simultaneously and this is how you know you have reset the router.
  3. Let the router sit for about a minute and then reboot the router.

Access Router Settings

1. Connect to the FlashRouter’s network via ethernet cable or wireless.

The wireless network will appear as “Aircove”, “Linksys##”, “Netgear##”, or “Asus” and the password to join the network will be the default wireless password printed on the bottom of the router.

2. Open your web browser and enter expressvpnrouter.com or 192.168.132.1 in the URL.

ExpressVPNrouter.com
192.168.132.1

3. Click Get Started on the ExpressVPN page that is displayed.

ExpressVPN Get Started

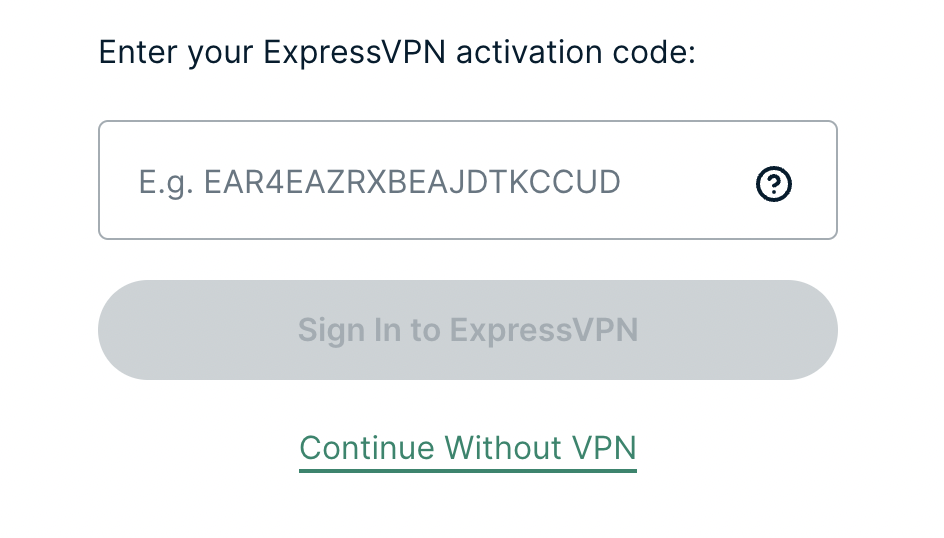
4a. If your FlashRouter is wired to the Internet correctly then you will be prompted to enter your ExpressVPN Activation Code found in your ExpressVPN account. Paste that in and click Sign in to ExpressVPN.

ExpressVPN Activation Code

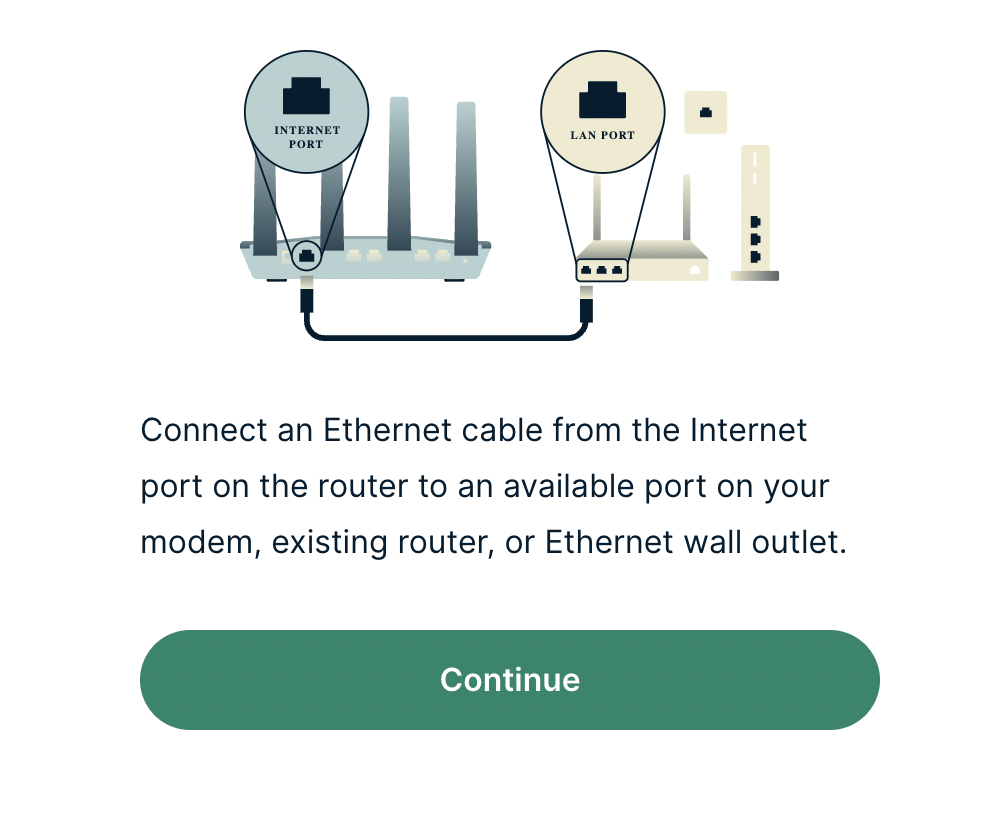
4b. If your FlashRouter is not wired correctly or is not receiving Internet properly make sure you are wired as detailed in the diagram that appears. If you are stuck at this screen we recommend powering off your ISP modem and any other router that the ExpressVPN FlashRouter is wired to and then powering them back up one by one.

Proceed with step “4a” above once the router is receiving Internet and you are prompted to enter the Activation Code.

ExpressVPN Wiring

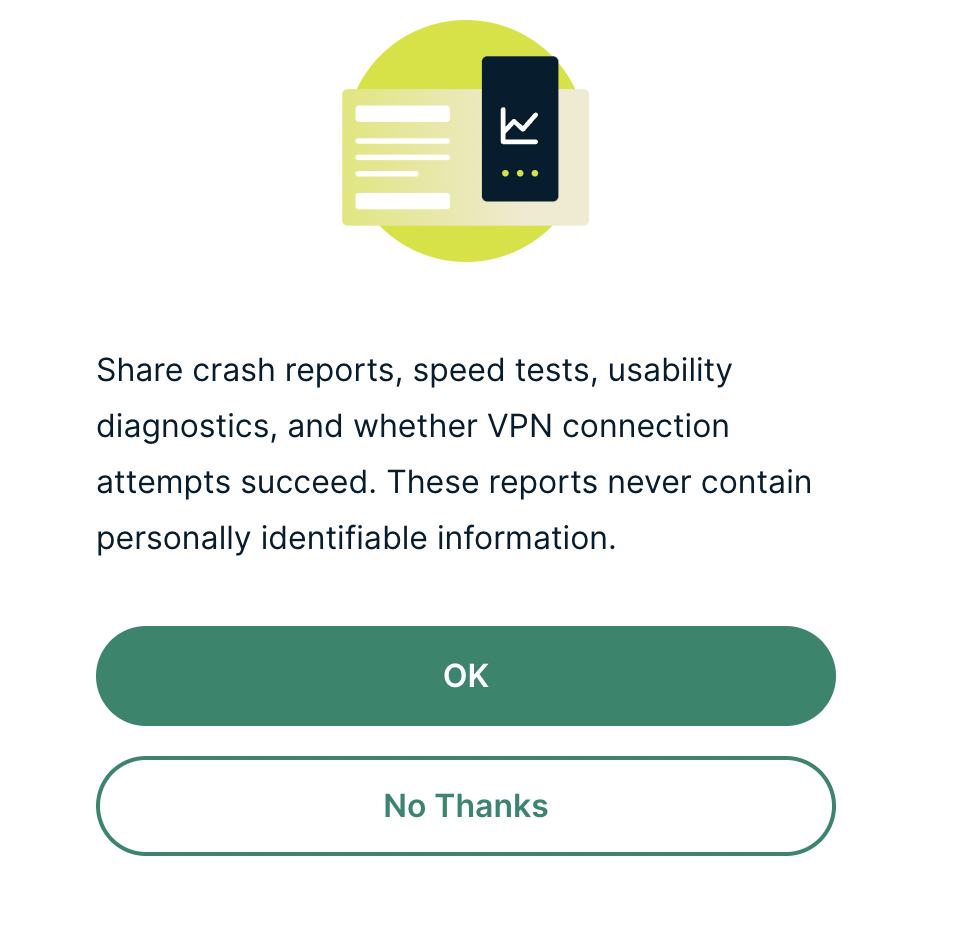
5. Select if you want to share anonymous crash report data with ExpressVPN to help them improve the firmware for future releases.

ExpressVPN Share Crash Report

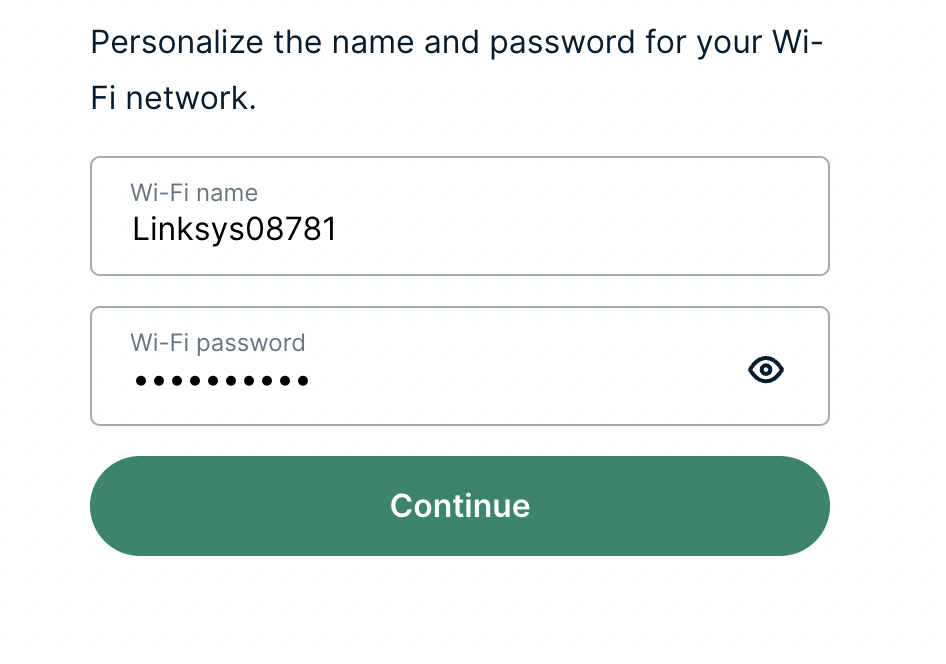
6. Set the WiFi name and password your wireless devices will use to connect to the FlashRouter’s network. Make sure the WiFi name is unique and not a duplicate of an existing WiFi name if you change it. You can also leave it as the default information if you like. Click Continue.

ExpressVPN Set WiFi Name and Password

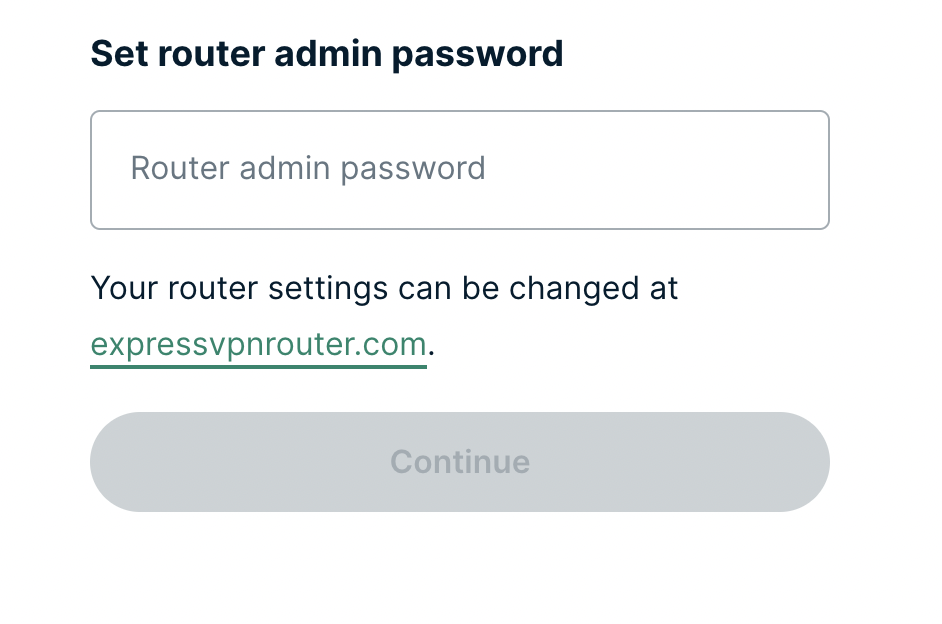
7. Enter the admin password you will use to access the ExpressVPN router settings. Be sure to TYPE CAREFULLY when setting the admin password as a typo will result in needing to reset the router again. Note this password in a secure location or commit it to memory.

ExpressVPN admin password

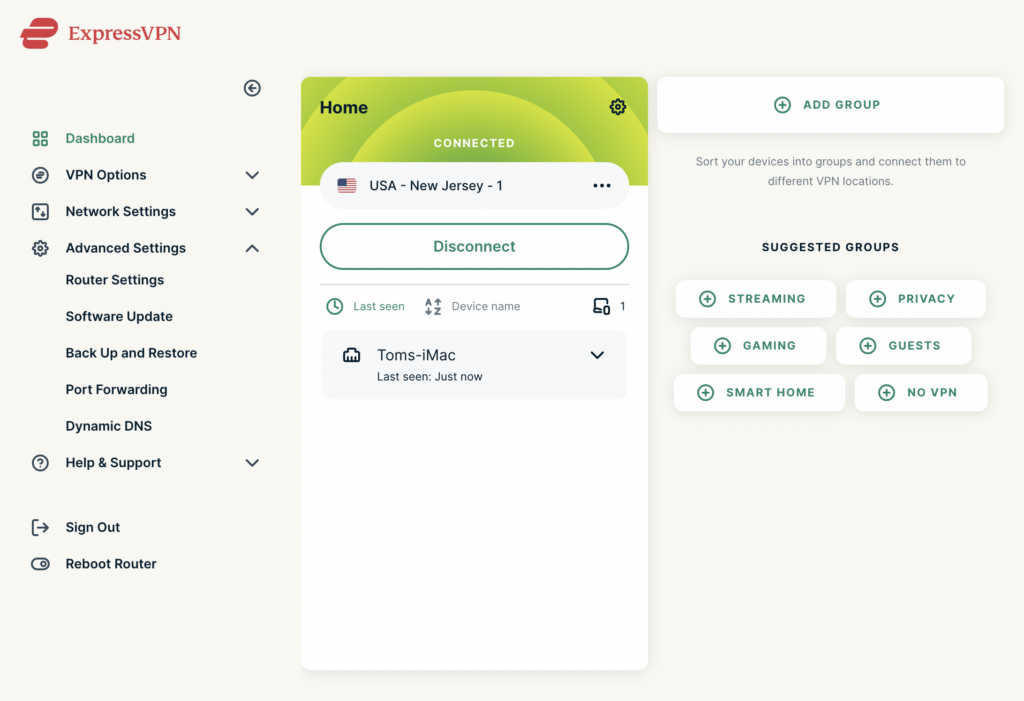
8. Your ExpressVPN FlashRouter is now fully setup!

ExpressVPN Connected

ExpressVPN/Aircove FlashRouter Internet Setup and Activation

TeamFlashRouters · Mar 16, 2022 ·

Follow this article when you receive your new ExpressVPN FlashRouter to connect your FlashRouter to the Internet via ExpressVPN and customize your network so it is ready to use.

Obtain your ExpressVPN Activation Code

If you are not already an ExpressVPN user Sign Up Now.

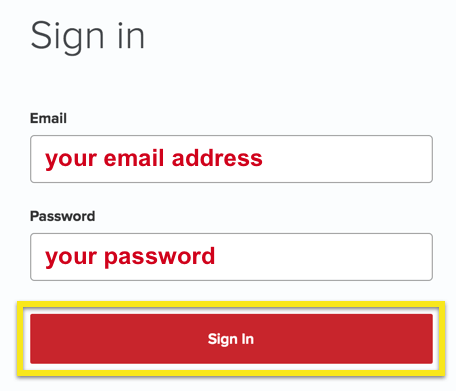
1. Visit ExpressVPN’s website login page.

ExpressVPN on FlashRouters Privacy App Setup - Sign Into ExpressVPN Dashboard

2. Copy your ExpressVPN Activation code and paste it into a document or leave this page open while you proceed with the instructions.

Access Router Settings

1. Connect to the FlashRouter’s network via ethernet cable or wireless.

The wireless network will appear as “Aircove”, “Linksys##”, “Netgear##”, or “Asus” and the password to join the network will be the default wireless password printed on the bottom of the router.

2. Open your web browser and enter expressvpnrouter.com or 192.168.132.1 in the URL.

ExpressVPNrouter.com
192.168.132.1

3. Click Get Started on the ExpressVPN page that is displayed.

ExpressVPN Get Started

4a. If your FlashRouter is wired to the Internet correctly then you will be prompted to enter your ExpressVPN Activation Code found in your ExpressVPN account. Paste that in and click Sign in to ExpressVPN.

ExpressVPN Activation Code

4b. If your FlashRouter is not wired correctly or is not receiving Internet properly make sure you are wired as detailed in the diagram that appears. If you are stuck at this screen we recommend powering off your ISP modem and any other router that the ExpressVPN FlashRouter is wired to and then powering them back up one by one.

Proceed with step “4a” above once the router is receiving Internet and you are prompted to enter the Activation Code.

ExpressVPN Wiring

5. Select if you want to share anonymous crash report data with ExpressVPN to help them improve the firmware for future releases.

ExpressVPN Share Crash Report

6. Set the WiFi name and password your wireless devices will use to connect to the FlashRouter’s network. Make sure the WiFi name is unique and not a duplicate of an existing WiFi name if you change it. You can also leave it as the default information if you like. Click Continue.

ExpressVPN Set WiFi Name and Password

7. Enter the admin password you will use to access the ExpressVPN router settings. Be sure to TYPE CAREFULLY when setting the admin password as a typo will result in needing to reset the router again. Note this password in a secure location or commit it to memory.

ExpressVPN admin password

8. Your ExpressVPN FlashRouter is now fully setup!

ExpressVPN Connected

Why are some of my devices not connecting to the internet?

Dave · May 2, 2019 ·

  1. Make sure you are not using any device VPN device application or proxy on devices that are connected to the FlashRouter’s network as this can cause a conflict. Make sure the FlashRouter’s VPN connection is the only active VPN connection in your network.
  2. Check that static settings are not configured on your device.
  3. Certain devices require port forwarding rules to be properly setup before full connectivity. This may apply to devices like VOIP or smart cameras. If this is the case you may need to contact the manufacturer for more specific information.
  4. Check that the FR Privacy App feature for a device specific Kill Switch is not set for the device, and if kill switch is setup, then make sure the VPN connection is active.

How to fix an Unidentified Network or Limited Connection.

Dave · May 2, 2019 ·

There are several common reasons that an Unidentified Network or Limited connection message may appear in your device’s network adapter.

  1. Wire the FlashRouter correctly for Internet access. Incorrect wiring is the most common cause of this issue. Make sure you are not wired into the FlashRouter WAN port for access, and make sure the FlashRouter is wired correctly to your main modem or router.
  2. Check that your connected device does not have static settings configured.
  3. Disable and reenable the wireless and/or ethernet adapter on your computer to refresh the network.
  4. Make sure you are not connected to multiple router networks at the same time, via WiFi and wired connection simultaneously.

How do I check for static network settings on my devices?

TeamFlashRouters · May 8, 2019 ·

Static network settings set on a device from a previous connection will interfere with the FlashRouter’s network. Typically the FlashRouter’s network performs best when connected devices are set to automatically use the FlashRouter’s IP Address and DNS.

Make sure you are connected to the FlashRouter’s network via ethernet or WiFi. Keep in mind these instructions may vary based on your current software version.

Check for Static IP Address in Windows

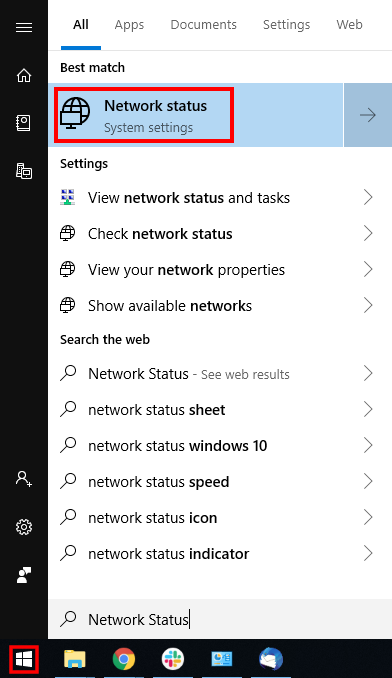
1.  Open the Window search box, and search “Network Status”

Find Static DNS settings for FlashRouter DD-WRT in Windows Computer

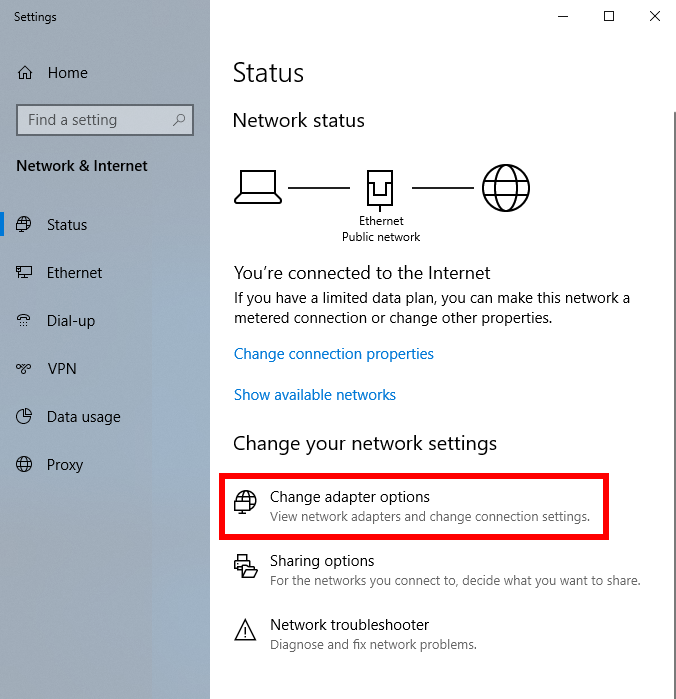
2. Select “Change adapter optons”

Find Static DNS settings for FlashRouter DD-WRT in Windows Computer 2

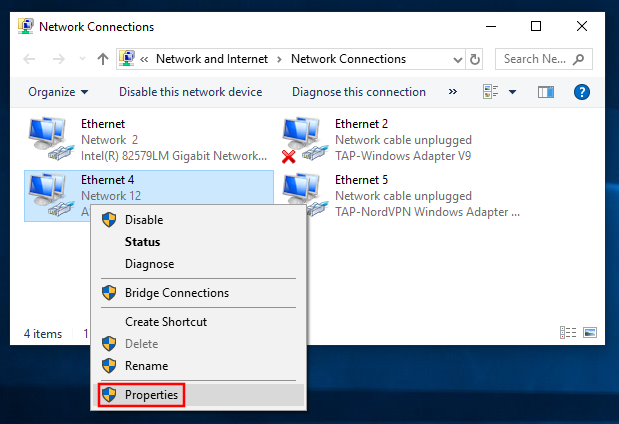
3. Right click on the WiFi and/or ethernet adapter and select Properties.

Find Static DNS settings for FlashRouter DD-WRT in Windows Computer 3

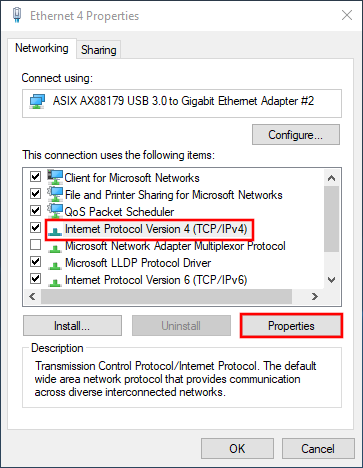
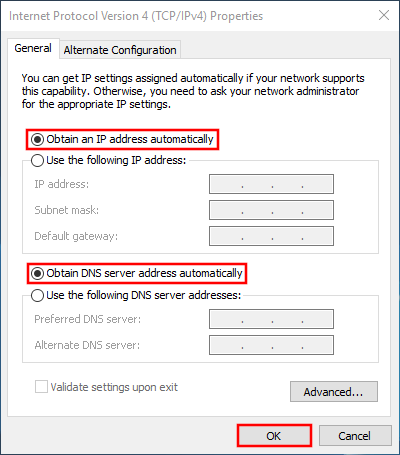
4. Highlight Internet Protocol Version 4 (TCP/IPv4) and click Properties.

5. Delete the values entered for IP address, Subnet mask, Default gateway, Preferred DNS server, and Alternate DNS server.

6. Select Obtain an IP address automatically and Obtain DNS server address automatically.

7. Click OK.

Find Static DNS settings for FlashRouter DD-WRT in Windows Computer 4

Check for Static IP Address in Apple / Mac

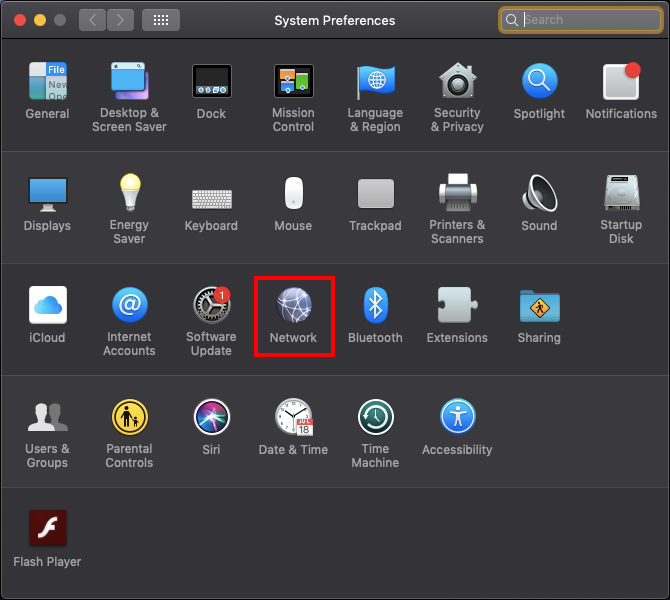
1. Open System Preferences, and select Network.

Find Static DNS settings for FlashRouter DD-WRT Using a MAC Computer

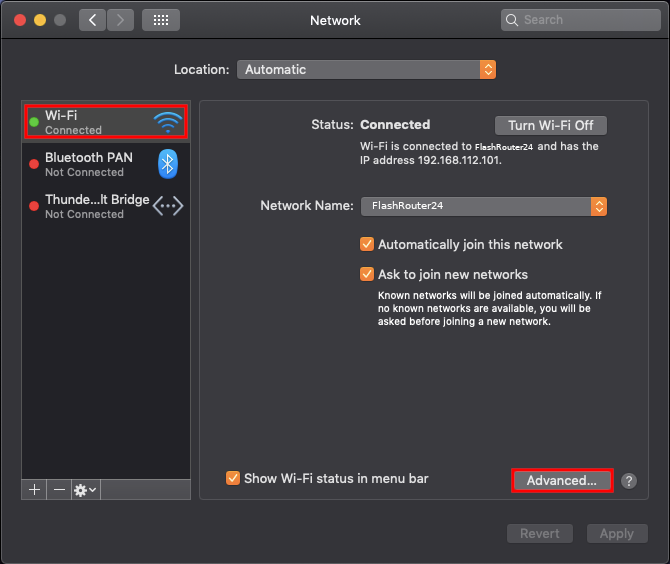
2. Select the adapter that is connected via ethernet or wireless. This will vary based on your current connection.

3. Select Advanced.

Find Static DNS settings for FlashRouter DD-WRT Using a MAC Computer 2

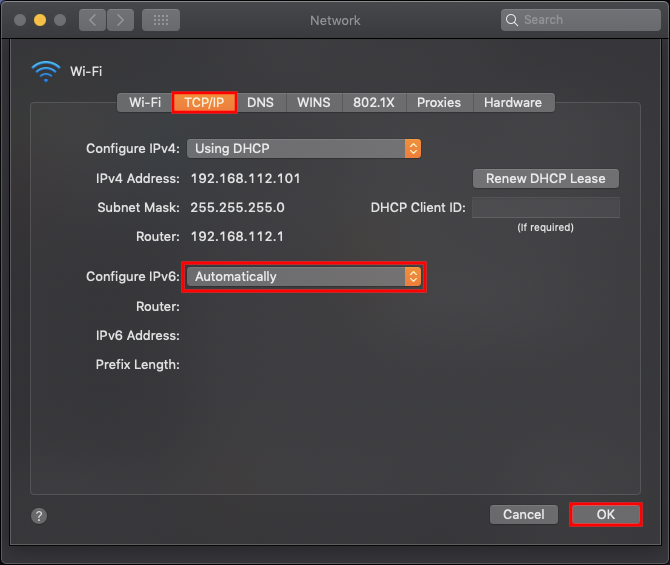
4. Select the TCP/IP tab.

5. Set Configure IPv4 to Automatically.

Find Static DNS settings for FlashRouter DD-WRT Using a MAC Computer 4

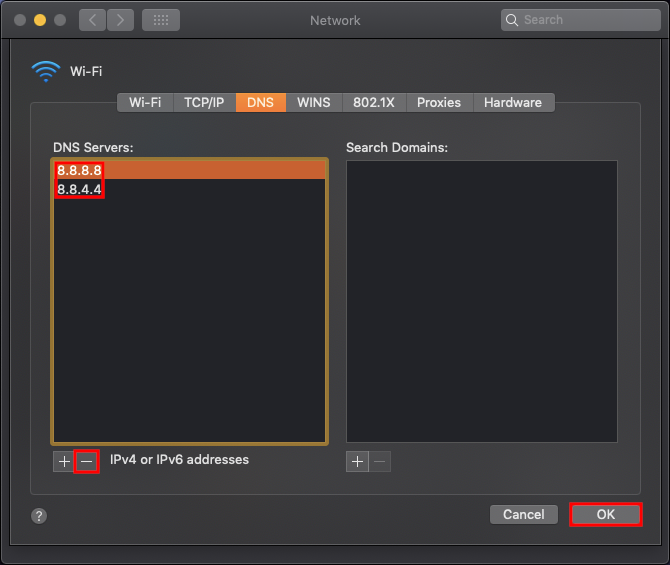
6. Select the DNS field and highlight any DNS servers you see there. If they can be removed you should click the minus symbol below.

Find Static DNS settings for FlashRouter DD-WRT Using a MAC Computer 5

7. Click OK.

8. Click Apply.

Check for Static IP Address in iOS

1.  Open Settings

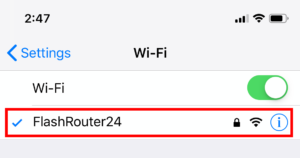
2. Select WiFi, and select the blue icon next to your current connection.

Select FlashRouters DD-WRT Wireless Network in order to Check Static IP Network Settings on iOS Mobile Device

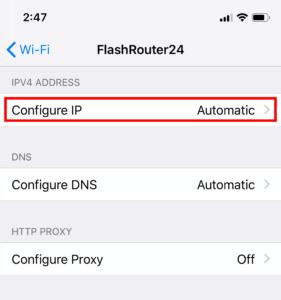
3. Make sure Configure IP is set to Automatically.

Check Static IP Network Settings on iOS Mobile Device and set Configure IP to Automatic

Check for Static IP Address in Android

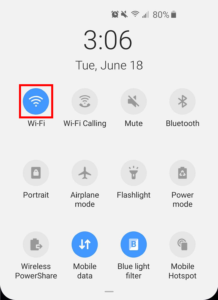
1. From the top of the screen, swipe down to display settings.

2. Select WiFi.

WiFi Icon and Settings in Android Mobile Device

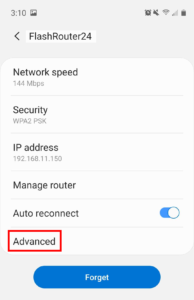
3. Select your current network.

4. Select Advanced.

Advanced Settings Button in Android Mobile Device

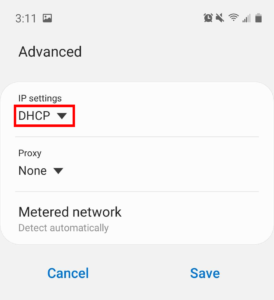
5. Make sure that IP settings is set to DHCP.

Check Static IP DHCP Network Settings in Android Mobile Device

AirVPN Manual OpenVPN Setup

TeamFlashRouters · Jun 11, 2019 ·

Preparing for Manual AirVPN Setup

Obtain your AirVPN OpenVPN Information

If you are not already a AirVPN user Sign Up Now.

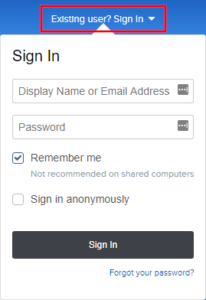
1. Log in to your account on the AirVPN website.

AIRVPN OpenVPN Client Login for FlashRouter DD-WRT VPN Configuration

2. Click on the Client Area tab.

AIRVPN OpenVPN Client Area for FlashRouter DD-WRT VPN Configuration

3. Click on the Config Generator subtab.

AIRVPN OpenVPN Configuration Generator for FlashRouter DD-WRT VPN Configuration

4. Click on the Router icon under Choose your Operating System.

AIRVPN OpenVPN FlashRouter DD-WRT VPN Configuration

5. Select a Protocol under the Protocols section. We recommend UDP.

Select AIRVPN OpenVPN Encryption Protocol for FlashRouter DD-WRT VPN Configuration

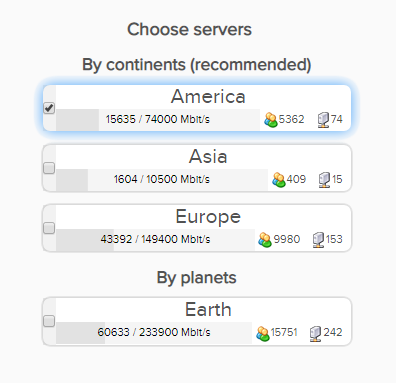
6. Select one option under the Choose Servers section. AirVPN sorts these servers by Planet, Continent, Country, and Single servers. Choose whichever best suits your needs.

Sort AIRVPN OpenVPN Specific Certificates for FlashRouter DD-WRT VPN Configuration

7. Scroll down towards the bottom of the page and click on Generate.

Generate AIRVPN OpenVPN Specific Certificates for FlashRouter DD-WRT VPN Configuration

Open the file that was downloaded with NotePad++ for Windows or TextEdit for Apple. You will be copying the Server IP/Name, client.crt and client.key from this file.

Please note, all VPN servers have different keys and certificates. If you wish to change servers in the future, you will have to go through steps 1-7 again.

DD-WRT Router Setup for AirVPN

Navigate to Services > VPN

Enter AirVPN settings

OpenVPN Client

Start OpenVPN Client

If you wish to disable your VPN connection simply set this to Disable at any time and click Apply Settings.

Server IP/Name

Copy and paste the server you selected in your account. Be sure there are no extra spaces or characters.

Port

443

Tunnel Device

TUN

Tunnel Protocol

UDP or TCP

Encryption cipher

AES-256-CBC

Hash Algorithm

SHA1

User Pass Authentication

Disable

Advanced Options

Enable

TLS Cipher

None

LZO Compression

No

NAT

Enable

Firewall Protection

Enable

nsCertType verification

Checked

Policy Based Routing

This field can be used for split VPN and Dual Gateway routing.

TLS Auth Key

—–BEGIN OpenVPN Static key V1—–
7bb7a23a0f5f28d01e792df68f1764ab
f2688719288808bf58e8a2d4f9354ecf
132625dfb895fc3f6330ae1e868e4dfa
c164c0931593d7f9a7da9595cf353433
8896e1d0a987a0d19838944af8fea4e5
215a3a0c76f4c67d5a4aee6a53be66a4
c88b84f850030840fb30f8550ed8068f
35c1ef34ee8f40a0ea5862dfb6f8d3c5
7ab5e27ac2799cf93e8765ff63cd8cd8
6b391b813925cd373bb202796f64d16f
003d042ca828d1b07f18ba1d0cb0323d
df3ee9287e9e084e655699efb3cffa92
3626946fa372e7beee245e7a95b4c1d8
7d16cae685218d4b8afc019b22e41083
476ee9883fe666d236301e55b2062551
4d91c8a69467a758293994df1e6fa7ae
—–END OpenVPN Static key V1—–

CA Cert

—–BEGIN CERTIFICATE—–
MIIGVDCCBDygAwIBAgIJAIzYQ+/kXyADMA0GCSqGSIb3DQEBBQUAMHkxCzAJBgNV
BAYTAklUMQswCQYDVQQIEwJJVDEQMA4GA1UEBxMHUGVydWdpYTETMBEGA1UEChMK
YWlydnBuLm9yZzEWMBQGA1UEAxMNYWlydnBuLm9yZyBDQTEeMBwGCSqGSIb3DQEJ
ARYPaW5mb0BhaXJ2cG4ub3JnMB4XDTE0MDQxMTEwMTU0NVoXDTI0MDQwODEwMTU0
NVoweTELMAkGA1UEBhMCSVQxCzAJBgNVBAgTAklUMRAwDgYDVQQHEwdQZXJ1Z2lh
MRMwEQYDVQQKEwphaXJ2cG4ub3JnMRYwFAYDVQQDEw1haXJ2cG4ub3JnIENBMR4w
HAYJKoZIhvcNAQkBFg9pbmZvQGFpcnZwbi5vcmcwggIiMA0GCSqGSIb3DQEBAQUA
A4ICDwAwggIKAoICAQDGG3ZrJbP61PNjGc4mjTx0TLkUjP7IXZ3wnpPjwF/lwK9n
HgRqoPL0KY/ABJuzMViD8ChtwthNfc7PuJ7vSPtN84lSJ4JGmTxvZkNeLQLZsu1F
f88OcSpjW5ErBM05iVBeF8/ljwaajgFfbgop9W/UK5yMji4qgq5KHxxXqsB8R4rC
eFpWHoNTwFjvXhtVyMgXiT9XAh/vBYim021m8onio4K48q7YRZ4qU8gvE79h5M0g
miIlt6v1vaZskw9cqIBbCYefGMsvBRk2x824ChPf6FazMwAnQHsuBHt6eXAARvfF
DBDanzPHlRSiCP6Je6Vod/MPyepiTZgjgk2VxYUc1ohNxEEGzPGTayeNzLJUldou
P4B+tjJ0Xly30+wvlahADlqjtz3CGQmKMj7btZjd+Uo61B7gau5YiXR/IO7ZpFAC
PCZJSbrwFs6rt9Kewqk8zslfVIro8oDndXRkVsa/c8Qmd6ZE7V+oMGl2OggdWOLl
mDEjkytzx+Bw2sSSalJRAQmOQO8V0anOI6jGYLuU2jnFDsnqSHuwIK11xb6iHmh7
ONsRLUtQ+d64TzB00w2M0fCvGqUIp0N+lf7nsZKsEcU08OoHQYUuwX75ZEOYNSZJ
rqAXohcXdVUHqgRlJRErfSkjcGMM0yqjHkvopcnBIRXKMYTDVXvzRJboyJiVpQID
AQABo4HeMIHbMB0GA1UdDgQWBBTlFdcTqJ4x49Ew1/Ef9OJj0lDIiDCBqwYDVR0j
BIGjMIGggBTlFdcTqJ4x49Ew1/Ef9OJj0lDIiKF9pHsweTELMAkGA1UEBhMCSVQx
CzAJBgNVBAgTAklUMRAwDgYDVQQHEwdQZXJ1Z2lhMRMwEQYDVQQKEwphaXJ2cG4u
b3JnMRYwFAYDVQQDEw1haXJ2cG4ub3JnIENBMR4wHAYJKoZIhvcNAQkBFg9pbmZv
QGFpcnZwbi5vcmeCCQCM2EPv5F8gAzAMBgNVHRMEBTADAQH/MA0GCSqGSIb3DQEB
BQUAA4ICAQCUVAQteCtgNQiZMXV0wCdqivlxlCCuj5sD+XvEuoDqb7dH70u1KQ90
OAbkeotHlIbqJU10xWtvHEjnXg8QG5VOzaWnWWev+ivdPCkGWe8E7C8shsr4WMlA
EF8PPRtzOwCKayxjR713x+Tc2Sb6/rDsXcY5LV6RNmE9HWBM6IoHdqruR8PHkYge
2CPXMuLByEADri6xmvussAjCWEDplJNY7tQsUGT7vjrwrNSNBx/SvxkXnWBj0wYa
EwNu43jrjcRfM/3eGcKDX3cQqTfRQd3j3OA7zmJOXPeExRUIWZTNCvQItGy1TJdw
JTphflw15Bui4l2mYfDqK08zm4aJODrCjoQnVVzM5uOzSTOjmneI6AHj3MjjL3A/
CFA5PCSquBhUycF4UEVf3aPGiV0vAthCBUqM4eKE+rbjWPSaxKghVdr/S82o7Wzz
9mGwnOZDqWk+8AWSsGBjamMk3mNMR45E9FRfPF/dyjOSbVyyTsd1VzlTFEJa0wjB
l3yq3r3iZAM3UtevocAyTEAu0vDYBbS6TgWmWEDOizybB0hNrTx5u/SEI0Kwcthc
rilYxD+n4kmV7TvIR0ZSaYpgYALWQV27zOqY51Ol4UT98WCOokge9HdoFcGJU2Uj
5VneGp14/Oklh7y6BxxxGC3zNGjKGNQYuHGTIgw1DoASmRUdkPkn/w==
—–END CERTIFICATE—–

Public Client Cert

Copy and paste all contents between <cert> and </cert> make sure to also include the following lines when copying and pasting:
—–BEGIN CERTIFICATE—–
…
—–END CERTIFICATE—–

Private Client Key

Copy and paste all contents between <key> and </key> make sure to also include the following lines when copying and pasting:
—–BEGIN PRIVATE KEY—–
…
—–END PRIVATE KEY—–

CLICK APPLY SETTINGS

Leave all settings not mentioned above as their default setting.

Verify a successful AirVPN connection

Navigate to Status > OpenVPN

  1. You should now see a CONNECTED SUCCESS message.
  2. Visit whatismyipaddress.com to verify your new IP address and virtual location.

In some cases you may notice that the location is not showing the same location as the server you have input in your router settings; this is because geo tracking tools are often tricked by VPN connections. As long as you see an IP address that is not the same as your normal Internet IP address then you are indeed connected to AirVPN.

Back up your settings

Navigate to Administration > Backup

  1. Click the Backup button.
  2. A file named nvrambak.bin will be saved to your computer.
  3. You can load nvrambak.bin to restore your settings in the event of a reset.

How to change the AirVPN server

  1. Follow the instructions for obtaining the OpenVPN information from above.
  2. Enter the new Server Address in the Server IP/Name field.
  3. Enter the new client.key and private.key
  4. Click Apply Settings.

TROUBLESHOOTING

Still having issues? Visit the VPN Troubleshooting section.

Troubleshoot Here

Connect FlashRouter to Internet

TeamFlashRouters · Mar 21, 2019 ·

All FlashRouters are compatible with all ISP service types such as fiber, cable, DSL, and satellite. As long as you have a modem, modem/router, or router capable of an ethernet connection your FlashRouter will have no problems connecting to the internet.

Internet Service Providers (ISP) include a modem or modem/router combo to connect your network devices to the internet. In some instances your ISP will provide a separate router as well as the modem. You can replace this router with a FlashRouter or use both in a dual router setup.

Single router setup

If you would like to replace your outdated router or avoid paying to rent a router from your ISP then you should use a FlashRouter as the only WiFi device in your network.

In a single router setup the FlashRouter will be wired directly to your modem via ethernet cable and will be the only router in the setup.

Connect to your ISP modem

Wire an ethernet cable from an open ethernet port on your modem to the WAN/internet port of the FlashRouter.

FlashRouters Single Router Setup

On Asus FlashRouters the WAN/internet port will be blue.

Asus Wifi Setup - back panel

On Linksys FlashRouters the WAN/internet port will be yellow.

Linksys Wifi Setup - back panel

On Netgear FlashRouters the WAN/internet port will be yellow.

Netgear Wifi Setup - back panel

Power cycle modem and router

Once you have properly connected an ethernet cable from your modem into the FlashRouter internet port you must power cycle your network devices to establish an internet connection.

  1. Power off your ISP modem and the FlashRouter.
  2. Power on the ISP modem and wait for it to fully boot up.
  3. Power on the FlashRouter.

Dual router setup

If you would like to keep your existing WiFi network in place, and simply want to add in a VPN WiFi network with a FlashRouter then you can do so using a dual router setup. No settings in your existing network router need to change to add a FlashRouter in a dual router setup. Since we preset all FlashRouters to a unique Local IP Address, there won’t be a conflict with your existing router.

In a dual router setup the FlashRouter is wired to your existing router via ethernet cable and you will have two completely segmented WiFi networks available.

Connect to your existing router

Remember if your existing router is connecting to the internet without issue already, make sure to keep the ethernet cable between your modem and existing router internet port in place.

Now connect another ethernet cable from a LAN/numbered port on your existing router to the WAN/internet port of the FlashRouter.

Reference the images above to see your WAN/internet port color.

FlashRouters Dual Router Setup

Power cycle all network devices

Once you have properly connected an ethernet cable from your existing router into the FlashRouter internet port you must power cycle your network devices to establish an internet connection.

  1. Power off your ISP modem, existing router, and the FlashRouter.
  2. Power on the ISP modem and wait for it to fully boot up.
  3. Power on the existing router and wait for it to fully boot up.
  4. Power on the FlashRouter.

Verify a successful internet connection

Once the power cycling steps are complete and the FlashRouter is powered up, start connecting your internet capable devices via ethernet or WiFi. Visit any website and make sure the page fully loads.

If you want to check your internet IP address that is visible to websites and services that you visit over the internet check out WhatIsMyIPAddress.com.

TROUBLESHOOTING

Still having issues? Visit our Troubleshooting section to diagnose common problems here.

Troubleshoot Here

GL.iNet Access Router Settings and Firmware Upgrade

TeamFlashRouters · Apr 3, 2023 ·

Follow this guide to upgrade the firmware of your GL.iNet FlashRouter.

1. Connect your computer, phone, or tablet to the GL.iNet router via wireless (FlashRouter24 / FlashRouter50) or via ethernet cable to one of the LAN ports on the router.

The FlashRouter WiFi password is printed on the sheet that came with the router and is set to Wireless#[First 5 characters of your router MAC]. The router MAC can be found on the bottom of your router if you cannot locate the sheet. For e.g. if your MAC is 9483C07E70A8 then your WiFi password is Wireless#9483C

Be sure to capitalize the W.

2. Once connected via wireless or ethernet on your device open your browser and go to 192.168.8.1

GL.iNet router access

3. Enter openwrt as the admin password to access the GL.iNet firmware settings. Newer devices may have a different admin password set as openwrt1 or glopenwrt1

GL.iNet admin password enter

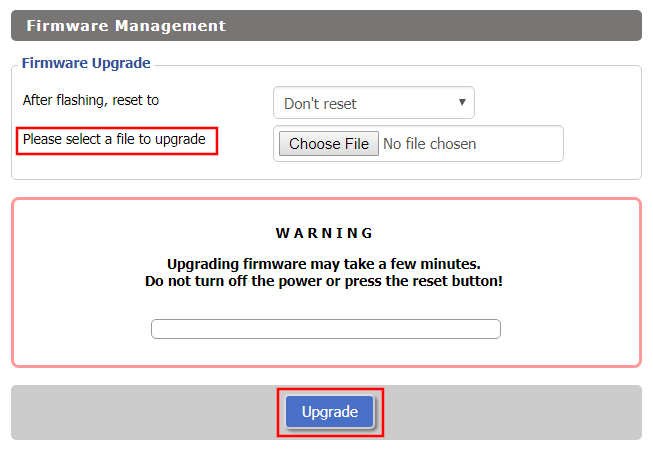
3. If a new firmware upgrade is available the router settings will either display a banner when you first access the router or a header. Click Install or the Upgrade arrow depending on which appears for you.

GL.iNet Firmware Upgrade Banner
GL.iNet Firmware Upgrade Header

4. Make sure the Keep Settings toggle is pushed to the right so your router does not get reset. Click the Install button to begin the firmware upgrade.

GL.iNet Install Firmware Upgrade

5. The firmware update should take about 2-3 minutes. You may need to reconnect your wireless devices after the network comes back up in your available networks.

TROUBLESHOOTING

Still having issues? Visit the VPN Troubleshooting section.

Troubleshoot Here

Flint/Slate GL.iNet Disable Wi-Fi

TeamFlashRouters · Apr 20, 2023 ·

Follow this guide to disable Wi-Fi network on your GL.iNet FlashRouter.

1. Connect your computer, phone, or tablet to the GL.iNet router via wireless (FlashRouter24 / FlashRouter50) or via ethernet cable to one of the LAN ports on the router.

The FlashRouter WiFi password is printed on the sheet that came with the router and is set to Wireless#[First 5 characters of your router MAC]. The router MAC can be found on the bottom of your router if you cannot locate the sheet. For e.g. if your MAC is 1459C07E70A8 then your WiFi password is Wireless#1459C

Be sure to capitalize the W.

2. Once connected via wireless or ethernet on your device open your browser and go to 192.168.8.1

GL.iNet router access

3. Enter openwrt as the admin password to access the GL.iNet firmware settings.

GL.iNet admin password enter

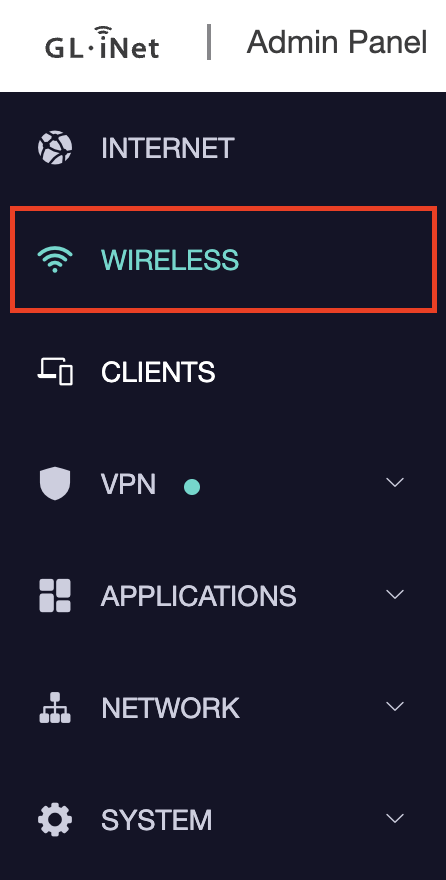
4. Click Wireless.

GL.iNet Click Wireless

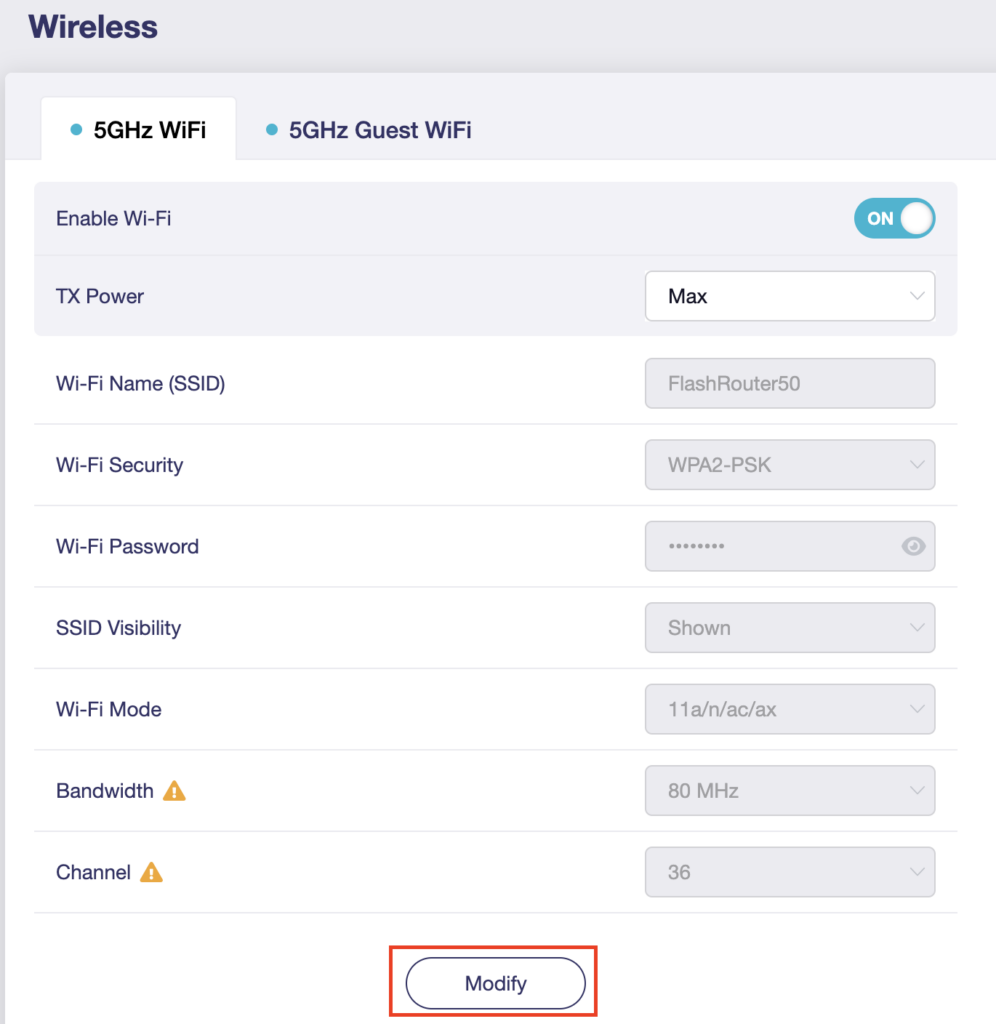
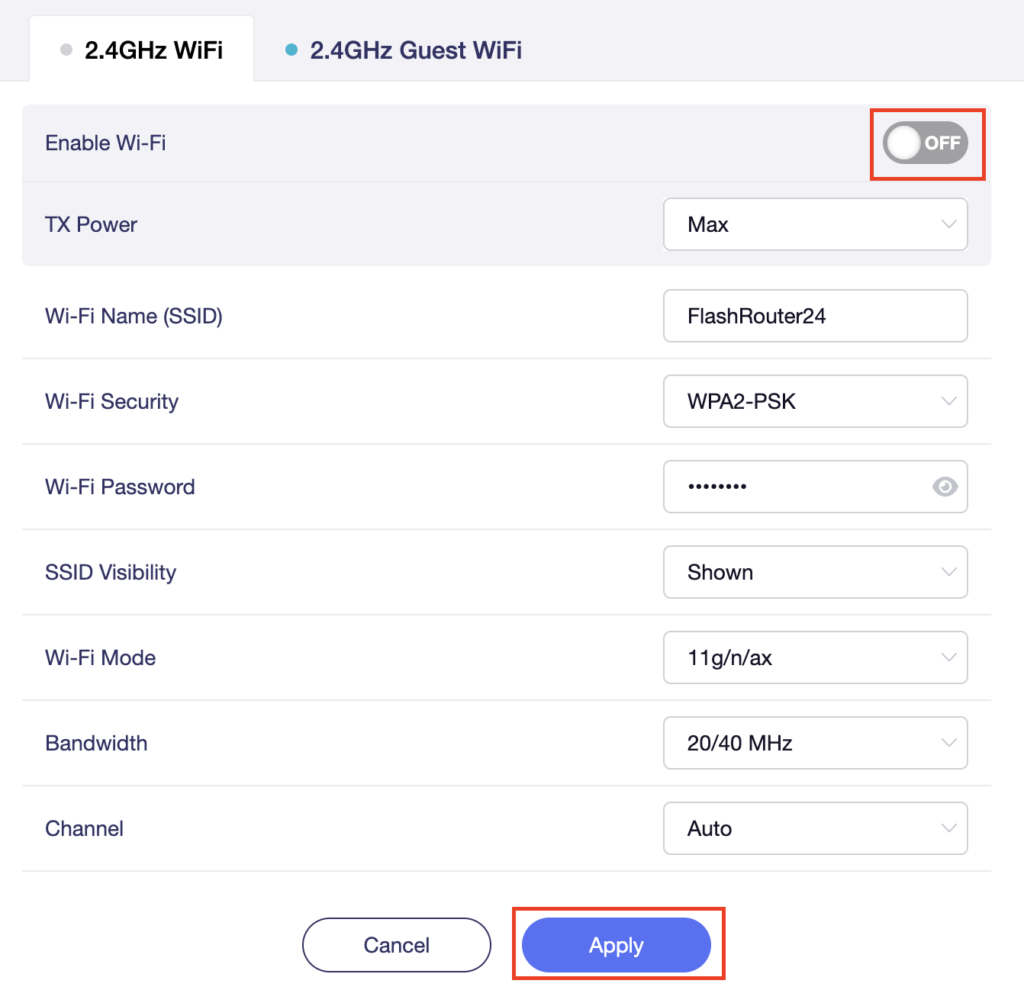
5. Click Modify under the 5GHz or 2.4GHz band.

GL.iNet Modify Wifi

The 5GHz and 2.4GHz bands must be disabled at separate times. Keep in mind that if you are connected to wireless when disabling one band you may need to reconnect with the other band to disable it. Also make sure you have a device that has ethernet capabilities so you can still access the settings with wireless disabled.

6. Set the Enable Wi-Fi toggle to the OFF position and click Apply.

GL.iNet Disable Wifi

TROUBLESHOOTING

Still having issues? Visit the VPN Troubleshooting section.

Troubleshoot Here

My WiFi password is not working

Dave · Apr 29, 2019 ·

Keep in mind that passwords are case sensitive.

The preset DD-WRT FlashRouter WiFi password is Wireless#[First 5 characters of your router MAC]. The router MAC can be found on the bottom of your router. For e.g. if your MAC is 1459C07E70A8 then your WiFi password is Wireless#1459C

Verify wireless password

Connect an ethernet cable from a numbered port on the FlashRouter to a computer and access the FlashRouter’s settings.

Navigate to Wireless > Wireless Security

Check the Unmask box and note the wireless password that is entered.

Verify the wireless settings

Make sure that you have WPA2 Personal / AES set as the security settings for all bands. For some router models make sure the CCMP-128 (AES) box is checked for all bands.

Forget network on your device

Wireless devices usually offer a “forget” network feature to remove a wireless network from the saved information of the wireless adapter. If you have updated your WiFi password and are trying to connect on a device that previously used the old WiFi password then removing the wireless network and then trying to connect fresh can help with this issue.

Why is my WiFi signal weak?

Dave · Apr 29, 2019 ·

If you find that wireless signal strength is weak while connected to the FlashRouter’s network we recommend that you do the following:

  1. Make sure that you have the external antennas fully connected to the FlashRouter.
  2. “Forget” the wireless network on the device and then rejoin with a fresh connection. This will be different for each device but can be effective.
  3. Make sure you are within an appropriate range for the network you are using. Keep in mind that a 2.4GHz network will always have better range than 5GHz networks. Devices further away from the router should use the 2.4GHz network.
  4. Interference from your wireless environment can also cause this issue. On the Wireless > Basic Settings adjust the Wireless Channel for the network you are experiencing the issue for. Channel interference is a likely cause for weak signal strength.

Wireless Repeater Bridge Setup

TeamFlashRouters · Apr 22, 2019 ·

If you need to extend your connection capabilities and you are not able to wire directly into your main router, you can setup a FlashRouter as a Wireless Repeater Bridge. In Wireless Repeater Bridge mode the FlashRouter connects to your main router on the same subnet via WiFi, and then transmits your internet signal via the FlashRouter for internet access anywhere in your home or office.

Preparing for Wireless Repeater Bridge Setup

Verify your wireless information

In order to setup your FlashRouter as a Wireless Repeater Bridge, you will need the exact SSID and password of your existing wireless network. Make sure you have this information before proceeding.

We recommend using a 2.4GHz network to repeat as this network will have more range. Be sure to click Add under the 2.4GHz settings and not the 5GHz settings.

Locate the Local IP Address of the existing wireless network

Locate the Local IP Address of the existing router that the FlashRouter will be bridged to.

DD-WRT Router Setup for Wireless Repeater Bridge

Disable Firewall

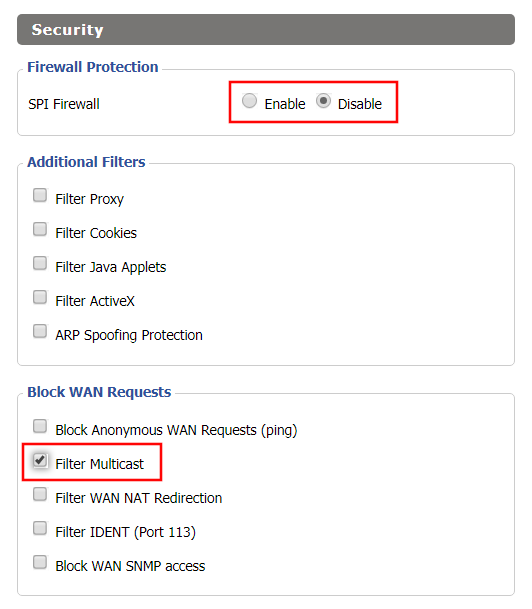
Navigate to Security > Firewall

Wireless Repeater Bridge Setup on FlashRouter DD-WRT - Disable Firewall and Enable Filter Multicast
  1. Set SPI Firewall to Disable.
  2. Uncheck all boxes except for Filter Multicast.
  3. Click Save.

Disable DNSmasq

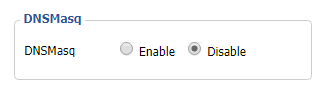
Navigate to Services > Services

Wireless Repeater Bridge Setup on FlashRouter DD-WRT - Disable DNSMasqButton
  1. Set DNSmasq to Disable.
  2. Click Save.

Enter Wireless settings

Navigate to Wireless > Basic Settings

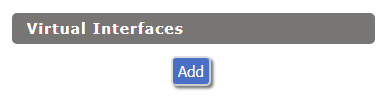
Select Add in the Virtual Interface area.

Wireless Repeater Setup on DD-WRT FlashRouter - Add Virtual Interface

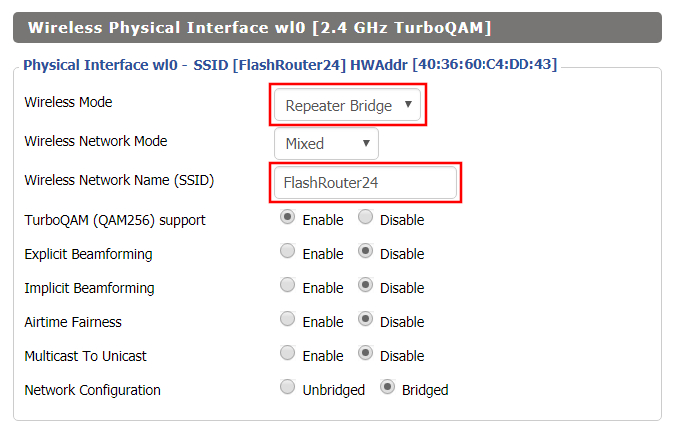
In the Wireless Physical Interface settings for the 2.4GHz network set the Wireless Mode to Repeater Bridge.

Change the Wireless Network Name (SSID) to match exactly with the Wireless Network Name of the network that you will bridge to.

Set Wireless Mode to Repeater Bridge in FlashRouter DD-WRT Basic Wireless Settings Page

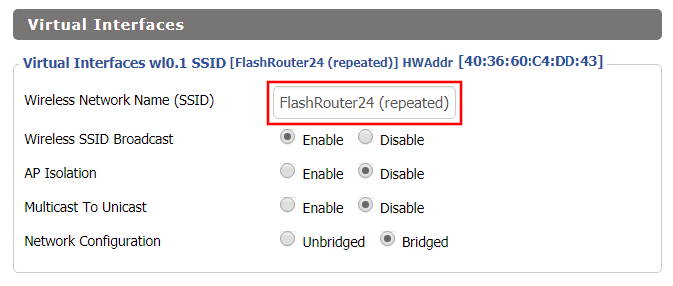
In the Virtual Interfaces settings change the Wireless Network Name (SSID) to FlashRouter24 or any other unique SSID.

Wireless Repeater Setup on DD-WRT FlashRouter - Set SSID for Repeated Band

CLICK SAVE

Enter Wireless Security settings

Navigate to Wireless > Wireless Security

Wireless Repeater Setup on DD-WRT FlashRouter - Set Wireless Password
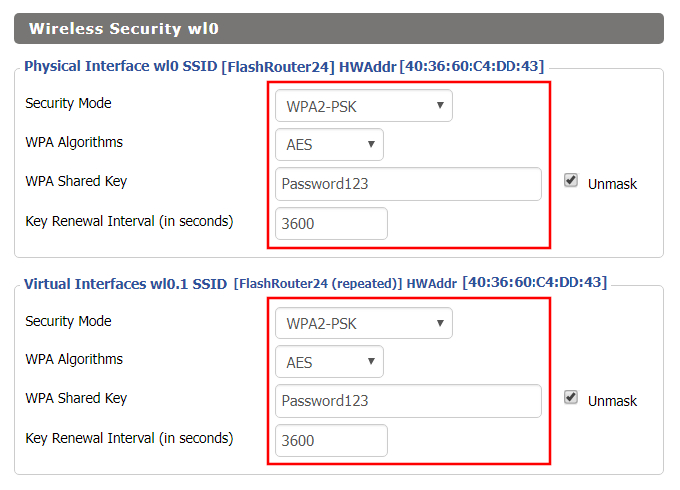
  1. Duplicate the wireless security settings that are set for the other bands for the newly created virtual interface.
  2. Change the WPA Shared Key to match exactly with the Wireless Password of the network that you will bridge to.
  3. Click Save.

Change the FlashRouter's Local IP Address

Navigate to Setup > Basic Setup

Wireless Repeater Bridge Setup on FlashRouter DD-WRT - Set Local Router IP, Gateway, Local DNS
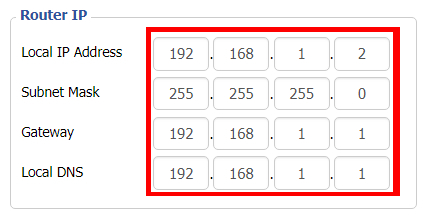
  1. Set the Local IP Address to a different address on the same subnet as the existing network that you noted early. (example: if the existing network is 192.168.1.1 then set the Local IP Address to 192.168.1.2)
  2. Set the Gateway to the Local IP Address of the existing network. (example: 192.168.1.1)
  3. Set the Local DNS to the Local IP Address of the existing network. (example: 192.168.1.1)
  4. Click Save.

Change the FlashRouter's Operating Mode

Navigate to Setup > Advanced Routing

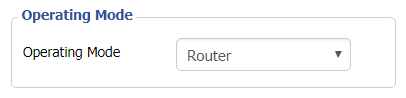
Set Operating Mode to Router in FlashRouter DD-WRT Basic Wireless Settings Page
  1. Set the Operating Mode to Router.
  2. Click Apply Settings.

Reboot your FlashRouter

Power off the FlashRouter for 30 seconds and then power it back on. When it boots back up you will be able to access the FlashRouter’s settings at the new Local IP Address that you set. Your existing network and the FlashRouter’s network will now be bridged wirelessly.

Back up your settings

Navigate to Administration > Backup

  1. Click the Backup button.
  2. A file named nvrambak.bin will be saved to your computer.
  3. You can load nvrambak.bin to restore your settings in the event of a reset.

TROUBLESHOOTING

Still having issues? Visit our Troubleshooting section to diagnose common problems here.

Troubleshoot Here

OverPlay Manual OpenVPN Setup

TeamFlashRouters · Apr 16, 2019 ·

Preparing for Manual OverPlay Setup

Verify your OverPlay login information

Log in to your account on the OverPlay website.

OverPlay Server Addresses

View a full list of OverPlay servers.

United States

Ashburn:
iad-a01.wlvpn.com

Atlanta:
atl-a01.wlvpn.com

Chicago
:
chi-a01.wlvpn.com

Dallas
:
dal-a02.wlvpn.com

Las Vegas
:
las-c11.wlvpn.com

Los Angeles
:
lax-a01.wlvpn.com

Miami
:
mia-a01.wlvpn.com

New York
:
nyc-a01.wlvpn.com

Phoenix
:
phx-a01.wlvpn.com

Salt Lake City
:
slc-c01.wlvpn.com

San Jose
:
sjc-a01.wlvpn.com

Seattle
:
sea-a01.wlvpn.com

DD-WRT Router Setup for OverPlay

Navigate to Services > VPN

Enter OverPlay settings

OpenVPN Client

Start OpenVPN Client

If you wish to disable your VPN connection simply set this to Disable at any time and click Apply Settings.

Server IP/Name

Copy and paste the server you would like to connect to from the server list above. Be sure there are no extra spaces or characters.

If you wish to change OverPlay connection locations, THIS IS THE ONLY FIELD YOU NEED TO CHANGE.

Port

1194 for UDP
443 for TCP

Tunnel Device

TUN

Tunnel Protocol

UDP or TCP

Encryption cipher

AES-256-CBC

Hash Algorithm

SHA256

User Pass Authentication

Enable

Username

Enter the username that you use to login to the OverPlay website.  Make sure to add @overplay after your username.

Hint:  For example, if your OverPlay username is “flashrouters” enter “flashrouters@overplay” as your username.

Password

Enter the Password you successfully logged in to your OverPlay account with.

Advanced Options

Enable

TLS Cipher

None

LZO Compression

Adaptive

NAT

Enable

Firewall Protection

Enable

Policy Based Routing

This field can be used for split VPN and Dual Gateway routing.

CA Cert

-----BEGIN CERTIFICATE-----
MIIESDCCAzCgAwIBAgIJAKSqvk2CSdJGMA0GCSqGSIb3DQEBBQUAMHUxCzAJBgNV
BAYTAlVTMQwwCgYDVQQIEwNWUE4xDDAKBgNVBAcTA1ZQTjEMMAoGA1UEChMDVlBO
MQwwCgYDVQQLEwNWUE4xDDAKBgNVBAMTA1ZQTjEMMAoGA1UEKRMDVlBOMRIwEAYJ
KoZIhvcNAQkBFgNWUE4wHhcNMTMwNDI1MDIzMjQ3WhcNMjMwNDI3MDIzMjQ3WjB1
MQswCQYDVQQGEwJVUzEMMAoGA1UECBMDVlBOMQwwCgYDVQQHEwNWUE4xDDAKBgNV
BAoTA1ZQTjEMMAoGA1UECxMDVlBOMQwwCgYDVQQDEwNWUE4xDDAKBgNVBCkTA1ZQ
TjESMBAGCSqGSIb3DQEJARYDVlBOMIIBIjANBgkqhkiG9w0BAQEFAAOCAQ8AMIIB
CgKCAQEAyUr2BAz2gHGaXri6rWMpKqcvVTX3IOSLEfBWf1fb2zCwx0+GFMG258Yk
OCiQho/YOX58bJpssGI42OzZitSisTVpXNIBelzGUPdKgx0qURGgDW+7eOySJYCn
1EUncElJCHt1so0SbfdQpxA88VZMH9fFOKtLY5qHHi0drXm/wZy+zW7TfV5Lce04
6vv2M9I5/Ko4zZ5Vh6jTo2VrCQRw8goXB5NAdU5D76lVhWK4Zzt4woI8nRW5Ev3A
WEw5oX85j5B0TY9nEi5j0vNYBuMxf/GiLO8M8LCHPX0HYBiLDjZesJCvuG3vfwnA
Y5CJQqNjufpmnF3ivsaF0dGeo54kWQIDAQABo4HaMIHXMB0GA1UdDgQWBBQXnwHk
vpHSf/lMacKoKshAcGM2qTCBpwYDVR0jBIGfMIGcgBQXnwHkvpHSf/lMacKoKshA
cGM2qaF5pHcwdTELMAkGA1UEBhMCVVMxDDAKBgNVBAgTA1ZQTjEMMAoGA1UEBxMD
VlBOMQwwCgYDVQQKEwNWUE4xDDAKBgNVBAsTA1ZQTjEMMAoGA1UEAxMDVlBOMQww
CgYDVQQpEwNWUE4xEjAQBgkqhkiG9w0BCQEWA1ZQToIJAKSqvk2CSdJGMAwGA1Ud
EwQFMAMBAf8wDQYJKoZIhvcNAQEFBQADggEBADAbNIIHF5vtCA+69/oipQ6niZit
Q+mnCNX5bxiF4xtw9qOQ90vLDc/ocbAGGP4Sub3hEkOoQlv9DHH56HVq1g9+L/Y7
RoneRykZ+GSPj2NlkobrPA7ZxAsLdFwM9Y+Fkql7cAHHLUCKh7H1IKidhTDHPCUj
hs4ZstNRckPd6wxlGGOP/Yf5sVse3pJwa0HyMYhI8pdTVJIHnFSy9vTPjVf3oWiz
Trci0+SkYKQE//5pE5wsYe0uB5wvQJslq/eEWfczg0l9biwJxG/qwxsVBkRgw5q6
defHWGj1eucVyy9fxKMcX89gjstQZDmsINNtG1C78/+nYS65rqaBaq+rqpA=
-----END CERTIFICATE-----

CLICK APPLY SETTINGS

Leave all settings not mentioned above as their default setting.

Verify a successful VPN connection

Navigate to Status > OpenVPN

  1. You should now see a CONNECTED SUCCESS message.
  2. Visit OverPlay’s website to verify your new IP address and virtual location.

In some cases you may notice that the location is not showing the same location as the server you have input in your router settings; this is because geo tracking tools are often tricked by VPN connections. As long as you see an IP address that is not the same as your normal Internet IP address then you are indeed connected to OverPlay.

Back up your settings

Navigate to Administration > Backup

  1. Click the Backup button.
  2. A file named nvrambak.bin will be saved to your computer.
  3. You can load nvrambak.bin to restore your settings in the event of a reset.

How to change the OverPlay server

  1. Copy the new OverPlay server address from the above server list.
  2. Paste the server into the Server IP/Name field.
  3. Click Apply Settings.

TROUBLESHOOTING

Still having issues? Visit the VPN Troubleshooting section.

Troubleshoot Here

Privacy Hero Activation and Setup

TeamFlashRouters · Feb 8, 2023 ·

Follow this article when you receive your new Privacy Hero router to create your Privacy Hero account, connect your Privacy Hero to the Internet, and customize your network so it is ready to use.

Your Privacy Hero router uses Cloud Based router management which means you can access the router settings from anywhere on any device that has an internet connection. You can follow these steps while connected to your phone or your other Wi-Fi network.

Create your Privacy Hero account

1. From any device that has a browser such as a computer, smartphone, or tablet visit app.privacyhero.com

App.PrivacyHero.com

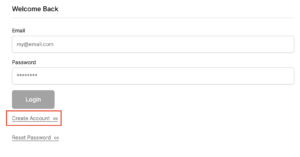
2. Select Create Account.

Privacy Hero create Account

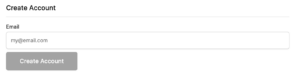
3. Enter the Email address you want to set for your Privacy Hero account. This will be your login to the Privacy Hero settings moving forward. Click Create Account.

Privacy Hero Enter account email

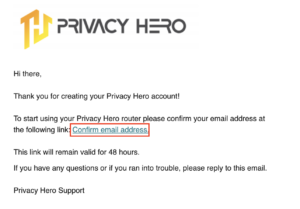
4. Go to your Email inbox and check for an email from Privacy Hero and click the Confirm email address link. This email may be in your Promotions or Spam inbox if it is not appearing in your main inbox.

Privacy Hero Confirm Email

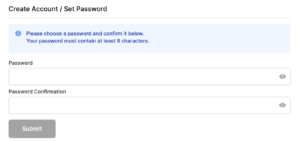
5. Enter the password that you want to use for your Privacy Hero account. Be sure to note this in a secure location so you do not forget. Click Submit.

Privacy Hero create password

6. You have now created your Privacy Hero account. You will use this login to access the Privacy Hero router settings.

Activate your Privacy Hero Internet and setup Wi-Fi

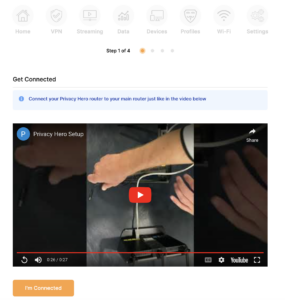
1. You will then be taken to the Router Activation steps. Connect the ethernet cable that the Privacy Hero came with from an open Ethernet port on your ISP modem or other router to the WAN/Internet (blue) port of the Privacy Hero.

Then power the Privacy Hero device on by connecting the power supply. This is shown in the video on the page as well. Wait about a minute or so for the Privacy Hero router to fully boot up and then click I’m Connected.
Wire Up Privacy Hero

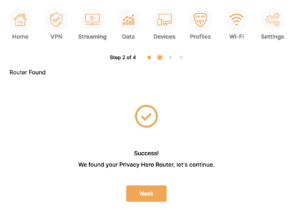
2. The next page may say Router Found or ask you to enter the Activation Code. If it asks for the Activation Code that will be the code printed on the bottom of the Privacy Hero. Enter this code and click Next.

Privacy Hero Router Found

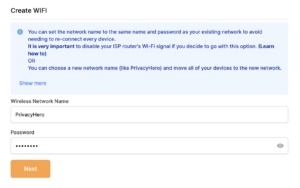
3. Set the Wi-Fi name and password for connecting your devices to the Privacy Hero network. Make sure it is not a duplicate name of an existing Wi-Fi network. Click Next.

Privacy Hero Set wifi name and password

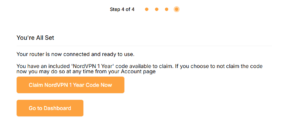
4. To activate your 1 Year NordVPN code:

Click on Claim NordVPN 1 Year Code Now

NordVPN Claim Code

Go to the Account section of your router settings.

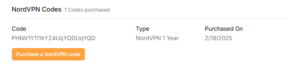
Copy the NordVPN code shown under Claim NordVPN 1 Year Code.

PH Nord Code

Go to the NordVPN activation page.

This code can be used with a new or existing NordVPN account.

NordVPN Activate Page

5. You are now all set to begin joining your devices to the new Privacy Hero network with the Wi-Fi name and password you entered and setting up some of the Privacy Hero features.

TROUBLESHOOTING

Still having issues? Visit the VPN Troubleshooting section.

Troubleshoot Here

VyprVPN Manual OpenVPN Setup

TeamFlashRouters · Apr 19, 2019 ·

Preparing for Manual VyprVPN Setup

Verify your VyprVPN login information

If you are not already a VyprVPN user Sign Up Now.

Log in to your account on the VyprVPN website.

VyprVPN - Website Login

VyprVPN Server Addresses

United States

Los Angeles, CA us1.vpn.goldenfrog.com
Washington, DC us2.vpn.goldenfrog.com
Austin, TX us3.vpn.goldenfrog.com
Miami, FL us4.vpn.goldenfrog.com
New York City, NY us5.vpn.goldenfrog.com
Chicago, IL us6.vpn.goldenfrog.com
San Francisco, CA us7.vpn.goldenfrog.com
Seattle, WA us8.vpn.goldenfrog.com

United Kingdom

 London uk1.vpn.goldenfrog.com

Canada

Toronto ca1.vpn.goldenfrog.com

Australia

Sydney au1.vpn.goldenfrog.com
Melbourne au2.vpn.goldenfrog.com
Perth au3.vpn.goldenfrog.com

Germany

Frankfurt de1.vpn.goldenfrog.com

Rest of the World

UAE – Dubai ae1.vpn.goldenfrog.com
Argentina – Buenos Aires ar1.vpn.goldenfrog.com
Austria – Vienna at1.vpn.goldenfrog.com
Belgium – Brussels be1.vpn.goldenfrog.com
Bulgaria – Sofia bg1.vpn.goldenfrog.com
Bahrain – Manama bh1.vpn.goldenfrog.com
Brazil – São Paulo br1.vpn.goldenfrog.com
Switzerland – Zurich ch1.vpn.goldenfrog.com
Colombia – Bogotá co1.vpn.goldenfrog.com
Costa Rica – San José cr1.vpn.goldenfrog.com
Czech Republic – Prague cz1.vpn.goldenfrog.com
Germany – Frankfurt de1.vpn.goldenfrog.com
Denmark – Copenhagen dk1.vpn.goldenfrog.com
Algeria – Algiers dz1.vpn.goldenfrog.com
Egypt – Cairo eg1.vpn.goldenfrog.com
Spain – Madrid es1.vpn.goldenfrog.com
Netherlands – Amsterdam eu1.vpn.goldenfrog.com
Finland – Helsinki fi1.vpn.goldenfrog.com
France – Paris fr1.vpn.goldenfrog.com
Greece – Athens gr1.vpn.goldenfrog.com
Hong Kong – Hong Kong hk1.vpn.goldenfrog.com
Indonesia – Jakarta id1.vpn.goldenfrog.com
Ireland – Dublin ie1.vpn.goldenfrog.com
Israel – Tel Aviv il1.vpn.goldenfrog.com
India – Mumbai in1.vpn.goldenfrog.com
Iceland – Reykjavík is1.vpn.goldenfrog.com
Italy – Rome it1.vpn.goldenfrog.com
Japan – Tokyo jp1.vpn.goldenfrog.com
South Korea – Seoul kr1.vpn.goldenfrog.com
Liechtenstein – Schaan li1.vpn.goldenfrog.com
Lithuania – Vilnius lt1.vpn.goldenfrog.com
Luxembourg – Luxembourg City lu1.vpn.goldenfrog.com
Latvia – Riga lv1.vpn.goldenfrog.com
Marshall Islands – Majuro mh1.vpn.goldenfrog.com
Macao – Macao mo1.vpn.goldenfrog.com
Maldives – Malé mv1.vpn.goldenfrog.com
Mexico – Mexico City mx1.vpn.goldenfrog.com
Malaysia – Kuala Lumpur my1.vpn.goldenfrog.com
Norway – Oslo no1.vpn.goldenfrog.com
New Zealand – Auckland nz1.vpn.goldenfrog.com
Panama – Panama City pa1.vpn.goldenfrog.com
Philippines – Manila ph1.vpn.goldenfrog.com
Pakistan – Karachi pk1.vpn.goldenfrog.com
Poland – Warsaw pl1.vpn.goldenfrog.com
Portugal – Lisbon pt1.vpn.goldenfrog.com
Qatar – Doha qa1.vpn.goldenfrog.com
Romania – Bucharest ro1.vpn.goldenfrog.com
Russia – Moscow ru1.vpn.goldenfrog.com
Saudi Arabia – Riyadh sa1.vpn.goldenfrog.com
Sweden – Stockholm se1.vpn.goldenfrog.com
Singapore – Singapore sg1.vpn.goldenfrog.com
Slovenia – Ljubljana si1.vpn.goldenfrog.com
Slovakia – Bratislava sk1.vpn.goldenfrog.com
El Salvador – San Salvador sv1.vpn.goldenfrog.com
Thailand – Bangkok th1.vpn.goldenfrog.com
Turkey – Istanbul tr1.vpn.goldenfrog.com
Taiwan – Taipei tw1.vpn.goldenfrog.com
Ukraine – Kiev ua1.vpn.goldenfrog.com
Uruguay – Montevideo uy1.vpn.goldenfrog.com
Vietnam – Hanoi vn1.vpn.goldenfrog.com

DD-WRT Router Setup for VyprVPN

Navigate to Services > VPN

VyprVPN offers two different Encryption levels:

Default Encryption (Blowfish-CBC)
typically provides faster speeds.

Strong Encryption (AES-256) provides stronger encryption.

Follow the table below of the one that fits your needs.

Enter VyprVPN settings (Default Encryption)

OpenVPN Client

Start OpenVPN Client

If you wish to disable your VPN connection simply set this to Disable at any time and click Apply Settings.

Server IP/Name

Copy and paste the server you would like to connect to from the server list above. Be sure there are no extra spaces or characters.

If you wish to change VyprVPN connection locations, THIS IS THE ONLY FIELD YOU NEED TO CHANGE.

Port

1194

Tunnel Device

TUN

Tunnel Protocol

UDP

Encryption cipher

Blowfish-CBC

Hash Algorithm

SHA1

User Pass Authentication

Enable

Username

Enter the Username you successfully logged in to your VyprVPN account with.

Password

Enter the Password you successfully logged in to your VyprVPN account with.

Advanced Options

Enable

TLS Cipher

None

LZO Compression

Adaptive

NAT

Enable

Firewall Protection

Enable

Additional Config

resolv-retry infinite
keepalive 10 60
persist-key
persist-tun
persist-remote-ip
nobind

Policy Based Routing

This field can be used for split VPN and Dual Gateway routing.

CA Cert

-----BEGIN CERTIFICATE-----
MIIGWjCCBEKgAwIBAgIJAJxUG61mxDS7MA0GCSqGSIb3DQEBDQUAMHsxCzAJBgNV
BAYTAlJPMRIwEAYDVQQHEwlCdWNoYXJlc3QxGDAWBgNVBAoTD0N5YmVyR2hvc3Qg
Uy5BLjEbMBkGA1UEAxMSQ3liZXJHaG9zdCBSb290IENBMSEwHwYJKoZIhvcNAQkB
FhJpbmZvQGN5YmVyZ2hvc3Qucm8wHhcNMTcwNjE5MDgxNzI1WhcNMzcwNjE0MDgx
NzI1WjB7MQswCQYDVQQGEwJSTzESMBAGA1UEBxMJQnVjaGFyZXN0MRgwFgYDVQQK
Ew9DeWJlckdob3N0IFMuQS4xGzAZBgNVBAMTEkN5YmVyR2hvc3QgUm9vdCBDQTEh
MB8GCSqGSIb3DQEJARYSaW5mb0BjeWJlcmdob3N0LnJvMIICIjANBgkqhkiG9w0B
AQEFAAOCAg8AMIICCgKCAgEA7O8+mji2FlQhJXn/G4VLrKPjGtxgQBAdjo0dZEQz
KX08q14dLkslmOLgShStWKrOiLXGAvB1rPvvk613jtA0KjQLpgyLy9lIWohQKYjj
5jrJYXMZMkbSHBYI9L8L7iezBEFYrjYKdDo51nq99wRFhKdbyKKjDh3e2L2SVEZL
T1ogkK5gWzjvH+mjjtjUUicK+YjGwWOz6I+KKaG4Ve/D/cE6nCLbhHIMMnargZEu
7sqA6BFeS4kEP/ZdCZoTSX2n43XV1q63nJt/v0KDetbZDciFVW9h9SVPG4qT44p0
550N+Mom7zTX7S/ID5T9dplgU8sRGtIMrG0cIMD9zmpFgUnMusCrR7jJFr0sMAve
TbgZg95LmstV6R6WKZkSFdUrE0DHl4dHoZvTFX+1LhwhHgjgDLaosX0vhG/C/7Lp
oVWimd6RRQT3M9o4Fa1TuhfvBzQ20QHrmRV/yKvGNK0xckZ6EZ/QY7Z55ORU15Tg
ab4ebnblYPWoEmn0mIYP3LFFeoR5OS1EX7+j4kPv+bwPGsmpHjxmZyq2Y7sJBpbO
CJgbkn52WZdPBIRDpPdIHQ8pAJC4T0iMK9xvAwWNl/V6EYYNpR97osyEDXn+BTdA
HlhJ5fck9KlwI9mb1Kg1bhbvbmaIAiOLenSULYf3j6rI1ygo3R2cCyybtuAq8M7z
0OECAwEAAaOB4DCB3TAdBgNVHQ4EFgQU6tdK1g/He5qzjeAoM5eHt4in9iUwga0G
A1UdIwSBpTCBooAU6tdK1g/He5qzjeAoM5eHt4in9iWhf6R9MHsxCzAJBgNVBAYT
AlJPMRIwEAYDVQQHEwlCdWNoYXJlc3QxGDAWBgNVBAoTD0N5YmVyR2hvc3QgUy5B
LjEbMBkGA1UEAxMSQ3liZXJHaG9zdCBSb290IENBMSEwHwYJKoZIhvcNAQkBFhJp
bmZvQGN5YmVyZ2hvc3Qucm+CCQCcVButZsQ0uzAMBgNVHRMEBTADAQH/MA0GCSqG
SIb3DQEBDQUAA4ICAQDNyQ92kj4qiNjnHk99qvnFw9qGfwB9ofaPL74zh0G5hEe3
Wgb2o4fqUGnvUNgOu53gJksz3DcPQ8t40wfmm9I1Z8tiM9qrqvkuQ+nKcLgdooXt
EsTybPIYDZ2cWR/5E0TKRvC7RFzKgQ4D77Vbi4TdaHiDV7ZNfU1iLCoBGcYm80hc
UHEs5KIVLwUmcSOTmbZBySJxcSD0yUpS7nlZGwLY6VQrU+JFwDSisbXT4DXf3iSz
p7FzW0/u/SFvWsPHrjE0hkPoZPalYvouaJEHKAhip0ZwSmitlxbBnmm8+K/3c9mL
A5/uXrirfpuhhs8V3lyV2mczVtSiTl6gpi88gc//JY80JeHdupjO25T3XEzY9cpx
ecmkWaUEjLMx4wVoXQuUiPonfILM6OLwi+zUS8gQErdFeGvcQXbncPa4SdJuHkF8
lgiX2i8S8fPGdXvU37E9bdAXwP5nZriYq1s0D59Qfvz+vLXVkmyZp6ztxjKjKole
mPMak0Y5c1Q4RjNF6tmQoFuy/ACSkWy14Tzu2dFp7UiVbGg1FOvKhfs48zC2/IUQ
v1arqmPT/9LVq3B2DVT9UKXRUXX/f/jSSsVjkz4uUe2jUyL+XHX1nSmROTPHSAJ+
oKf0BLnfqUxFkEUTwLnayssP2nwGgq35b7wEbTFIXdrjHGFUVQIDeERz8UThew==
-----END CERTIFICATE-----

CLICK APPLY SETTINGS

Leave all settings not mentioned above as their default setting.

Enter VyprVPN settings (Strong Encryption)

OpenVPN Client

Start OpenVPN Client

If you wish to disable your VPN connection simply set this to Disable at any time and click Apply Settings.

Server IP/Name

Copy and paste the server you would like to connect to from the server list above. Be sure there are no extra spaces or characters.

If you wish to change VyprVPN connection locations, THIS IS THE ONLY FIELD YOU NEED TO CHANGE.

Port

443

Tunnel Device

TUN

Tunnel Protocol

UDP

Encryption cipher

AES-256-CBC

Hash Algorithm

SHA256

User Pass Authentication

Enable

Username

Enter the Username you successfully logged in to your VyprVPN account with.

Password

Enter the Password you successfully logged in to your VyprVPN account with.

Advanced Options

Enable

TLS Cipher

None

LZO Compression

Adaptive

NAT

Enable

Firewall Protection

Enable

Additional Config

resolv-retry infinite
keepalive 10 60
persist-key
persist-tun
persist-remote-ip
nobind
tls-cipher TLS-DHE-RSA-WITH-AES-256-CBC-SHA

Policy Based Routing

This field can be used for split VPN and Dual Gateway routing. Learn more here.

CA Cert

-----BEGIN CERTIFICATE-----
MIIGWjCCBEKgAwIBAgIJAJxUG61mxDS7MA0GCSqGSIb3DQEBDQUAMHsxCzAJBgNV
BAYTAlJPMRIwEAYDVQQHEwlCdWNoYXJlc3QxGDAWBgNVBAoTD0N5YmVyR2hvc3Qg
Uy5BLjEbMBkGA1UEAxMSQ3liZXJHaG9zdCBSb290IENBMSEwHwYJKoZIhvcNAQkB
FhJpbmZvQGN5YmVyZ2hvc3Qucm8wHhcNMTcwNjE5MDgxNzI1WhcNMzcwNjE0MDgx
NzI1WjB7MQswCQYDVQQGEwJSTzESMBAGA1UEBxMJQnVjaGFyZXN0MRgwFgYDVQQK
Ew9DeWJlckdob3N0IFMuQS4xGzAZBgNVBAMTEkN5YmVyR2hvc3QgUm9vdCBDQTEh
MB8GCSqGSIb3DQEJARYSaW5mb0BjeWJlcmdob3N0LnJvMIICIjANBgkqhkiG9w0B
AQEFAAOCAg8AMIICCgKCAgEA7O8+mji2FlQhJXn/G4VLrKPjGtxgQBAdjo0dZEQz
KX08q14dLkslmOLgShStWKrOiLXGAvB1rPvvk613jtA0KjQLpgyLy9lIWohQKYjj
5jrJYXMZMkbSHBYI9L8L7iezBEFYrjYKdDo51nq99wRFhKdbyKKjDh3e2L2SVEZL
T1ogkK5gWzjvH+mjjtjUUicK+YjGwWOz6I+KKaG4Ve/D/cE6nCLbhHIMMnargZEu
7sqA6BFeS4kEP/ZdCZoTSX2n43XV1q63nJt/v0KDetbZDciFVW9h9SVPG4qT44p0
550N+Mom7zTX7S/ID5T9dplgU8sRGtIMrG0cIMD9zmpFgUnMusCrR7jJFr0sMAve
TbgZg95LmstV6R6WKZkSFdUrE0DHl4dHoZvTFX+1LhwhHgjgDLaosX0vhG/C/7Lp
oVWimd6RRQT3M9o4Fa1TuhfvBzQ20QHrmRV/yKvGNK0xckZ6EZ/QY7Z55ORU15Tg
ab4ebnblYPWoEmn0mIYP3LFFeoR5OS1EX7+j4kPv+bwPGsmpHjxmZyq2Y7sJBpbO
CJgbkn52WZdPBIRDpPdIHQ8pAJC4T0iMK9xvAwWNl/V6EYYNpR97osyEDXn+BTdA
HlhJ5fck9KlwI9mb1Kg1bhbvbmaIAiOLenSULYf3j6rI1ygo3R2cCyybtuAq8M7z
0OECAwEAAaOB4DCB3TAdBgNVHQ4EFgQU6tdK1g/He5qzjeAoM5eHt4in9iUwga0G
A1UdIwSBpTCBooAU6tdK1g/He5qzjeAoM5eHt4in9iWhf6R9MHsxCzAJBgNVBAYT
AlJPMRIwEAYDVQQHEwlCdWNoYXJlc3QxGDAWBgNVBAoTD0N5YmVyR2hvc3QgUy5B
LjEbMBkGA1UEAxMSQ3liZXJHaG9zdCBSb290IENBMSEwHwYJKoZIhvcNAQkBFhJp
bmZvQGN5YmVyZ2hvc3Qucm+CCQCcVButZsQ0uzAMBgNVHRMEBTADAQH/MA0GCSqG
SIb3DQEBDQUAA4ICAQDNyQ92kj4qiNjnHk99qvnFw9qGfwB9ofaPL74zh0G5hEe3
Wgb2o4fqUGnvUNgOu53gJksz3DcPQ8t40wfmm9I1Z8tiM9qrqvkuQ+nKcLgdooXt
EsTybPIYDZ2cWR/5E0TKRvC7RFzKgQ4D77Vbi4TdaHiDV7ZNfU1iLCoBGcYm80hc
UHEs5KIVLwUmcSOTmbZBySJxcSD0yUpS7nlZGwLY6VQrU+JFwDSisbXT4DXf3iSz
p7FzW0/u/SFvWsPHrjE0hkPoZPalYvouaJEHKAhip0ZwSmitlxbBnmm8+K/3c9mL
A5/uXrirfpuhhs8V3lyV2mczVtSiTl6gpi88gc//JY80JeHdupjO25T3XEzY9cpx
ecmkWaUEjLMx4wVoXQuUiPonfILM6OLwi+zUS8gQErdFeGvcQXbncPa4SdJuHkF8
lgiX2i8S8fPGdXvU37E9bdAXwP5nZriYq1s0D59Qfvz+vLXVkmyZp6ztxjKjKole
mPMak0Y5c1Q4RjNF6tmQoFuy/ACSkWy14Tzu2dFp7UiVbGg1FOvKhfs48zC2/IUQ
v1arqmPT/9LVq3B2DVT9UKXRUXX/f/jSSsVjkz4uUe2jUyL+XHX1nSmROTPHSAJ+
oKf0BLnfqUxFkEUTwLnayssP2nwGgq35b7wEbTFIXdrjHGFUVQIDeERz8UThew==
-----END CERTIFICATE-----

CLICK APPLY SETTINGS

Leave all settings not mentioned above as their default setting.

Verify a successful VyprVPN connection

Navigate to the Status > OpenVPN

  1. You should now see a CONNECTED SUCCESS message.
  2. Visit to WhatIsMyIPAddress to verify your new IP address and virtual location.

In some cases you may notice that the location is not showing the same location as the server you have input in your router settings; this is because geo tracking tools are often tricked by VPN connections. As long as you see an IP address that is not the same as your normal Internet IP address then you are indeed connected to VyprVPN.

Back up your settings

Navigate to Administration > Backup

  1. Click the Backup button.
  2. A file named nvrambak.bin will be saved to your computer.
  3. You can load nvrambak.bin to restore your settings in the event of a reset.

How to change the VyprVPN server

  1. Copy the new VyprVPN server address from the above server list.
  2. Paste the server into the Server IP/Name field and Click Apply Settings.

TROUBLESHOOTING

Still having issues? Visit the VPN Troubleshooting section.

Troubleshoot Here

My VPN stopped working on my FlashRouter.

TeamFlashRouters · Jun 4, 2019 ·

The VPN connection on the FlashRouter will not drop in most instances however if the VPN stopped working follow the steps below.

In order to use the FlashRouters Privacy App you need DD-WRT build 02/15/22 r48362 or 2/10/20 r42335.

Follow these instructions to upgrade the firmware to 02/15/22 r48362: How do I upgrade the DD-WRT firmware of my FlashRouter?

If you would like the fully featured FR Privacy App version with Simple Setup you must use firmware builds from 2/10/20 r42335.

FlashRouters Privacy App

Navigate to Status > MyPage

  1. If MyPage is not properly loading the FlashRouters Privacy App try reinstalling the FlashRouters Privacy App.
  2. With the Auto Connect to VPN box checked simply power off the FlashRouter and power it back on to connect back to VPN.
  3. Verify that you have the correct settings entered for your provider. A change in the user information used to authenticate the VPN connection will cause a disconnect.
  4. Try a different VPN server location.
  5. If applicable, switch from UDP to TCP or vice versa.
  6. Make sure that you have any VPN/proxy apps and extensions turned off on all devices connected to the FlashRouter.

DD-WRT Manual VPN

Navigate to Services > VPN

  1. Verify that you have the correct settings entered for your provider. A change in the user information used to authenticate the VPN connection will cause a disconnect.
  2. Scroll to the bottom of the page and click Apply Settings.
  3. Try a different VPN server location.
  4. If applicable, switch from UDP to TCP or vice versa. Check your VPN provider’s website to see if the port needs to change with the protocol.
  5. Make sure that you have any VPN/proxy apps and extensions turned off on all devices connected to the FlashRouter.

My 5.0GHz network is not showing up

TeamFlashRouters · May 2, 2019 ·

Verify the device supports 5GHz

5.0GHz networks are not compatible with all devices so first make sure that you device’s wireless adapter supports 5GHz wireless frequencies.

If you are not sure, find out if your device support 5 GHz via Google search or by looking in the wireless hardware details in the device’s network settings. If you see Wireless a/b/g/n support then you have a compatible device. If you are missing the Wireless a then this means there is no 5 GHz support.

Enter the recommended wireless settings

Our team has tested the wireless functionality for each FlashRouter that we offer and shared our recommended wireless settings in our Wifi Setup area. Replicate the settings for your FlashRouter model found on that page.

Lower the wireless channel

Some devices do support 5.0GHz connections but not the higher channels that DD-WRT firmware offers.

Navigate to Wireless > Basic Settings

Lower the wireless channel setting for the 5.0GHz band that is not showing. Based on our tests the most broadly compatible channels are 36, 48 and 161.

CLICK APPLY SETTINGS

Refresh your device's network adapter

The easiest way to accomplish this is by rebooting your device as the settings to reset your adapter may vary on all types of internet connected devices.

Review wireless Status

Navigate to Status > Wireless

The readouts on this page can help tell if there are errors with the FlashRouter’s wireless. View our article on how to read the Wireless Status page for more information.

Getflix SmartDNS Setup

TeamFlashRouters · Apr 4, 2019 ·

Getflix offers a SmartDNS service for unblocking geo-restricted content without the encryption of a VPN service. SmartDNS routes DNS servers to different regions which “tricks” the website to allow access to previously restricted content.

SmartDNS does not change your IP Address or provide the encryption that a VPN connection does. This can result in faster speeds and unblocked content.

SmartDNS and VPN should not both be configured at the same time. When using a SmartDNS connection make sure to disable your VPN connection on the FlashRouter.

Login to Getflix

If you are not already a Getflix user Sign Up Now.

New customer Signup for GetFlix SmartDNS Service

Login to Getflix’s website login page.

Visit Getflix’s DNS servers list page and note the DNS servers of the location you would like to access content from.

Getflix DNS Server Location Addresses for FlashRouter DD-WRT Settings

Enter Getflix SmartDNS servers on your FlashRouter

Navigate to Setup > Basic Setup

  1. Scroll down to Network Address Server Settings (DHCP).
  2. Enter in any combination of Getflix SmartDNS servers you noted into Static DNS fields 1 and 2.
  3. Click Apply Settings at the bottom of the page.
  4. Reboot the FlashRouter.

Register your IP Address

When the router is fully booted back up visit your Getflix user dashboard and make sure your IP Address is registered with Getflix. If it is not click Force IP Update.

Register IP Address for Getflix use on FlashRouter DD-WRT

Once you are successfully registered you can now access your desired regional content on any device that connects to the FlashRouter’s network.

PrivateInternetAccess (PIA) Manual OpenVPN Setup

TeamFlashRouters · Apr 5, 2019 ·

Preparing for Manual PIA Setup

Verify your PIA login information

If you are not already a PIA user Sign Up Now.

Log in to your account on the PIA website.

FlashRouters Privacy App - PIA Login

PIA Server Addresses

The below servers are the only servers compatible with PIA router connections. Dedicated IP Addresses are not able to connect via routers.

United States

us-california.privacy.network
us-newjersey.privacy.network
us-chicago.privacy.network
us-texas.privacy.network
us-florida.privacy.network
us-seattle.privacy.network
us3.privacy.network
us-siliconvalley.privacy.network
us-newyorkcity.privacy.network
us-washingtondc.privacy.network
us-atlanta.privacy.network
us-houston.privacy.network
us-denver.privacy.network

United Kingdom

uk-london.privacy.network
uk-manchester.privacy.network

Canada

ca-toronto.privacy.network
ca-montreal.privacy.network

Australia

au-sydney.privacy.network
aus-melbourne.privacy.network
aus-perth.privacy.network

Germany

de-berlin.privacy.network
de-frankfurt.privacy.network

Rest of the World

ae.privacy.network
austria.privacy.network
dz.privacy.network
ad.privacy.network
ar.privacy.network
yerevan.privacy.network
bahamas.privacy.network
bangladesh.privacy.network
brussels.privacy.network
sofia.privacy.network
cambodia.privacy.network
china.privacy.network
cyprus.privacy.network
czech.privacy.network
denmark.privacy.network
egypt.privacy.network
fi.privacy.network
france.privacy.network
georgia.privacy.network
greenland.privacy.network
hungary.privacy.network
is.privacy.network
in.privacy.network
iran.privacy.network
ireland.privacy.network
man.privacy.network
israel.privacy.network
italy.privacy.network
japan.privacy.network
kazakhstan.privacy.network
liechtenstein.privacy.network
lu.privacy.network
macau.privacy.network
malta.privacy.network
mexico.privacy.network
md.privacy.network
monaco.privacy.network
mongolia.privacy.network
montenegro.privacy.network
morocco.privacy.network
nl-amsterdam.privacy.network
nz.privacy.network
nigeria.privacy.network
no.privacy.network
panama.privacy.network
philippines.privacy.network
poland.privacy.network
qatar.privacy.network
ro.privacy.network
rs.privacy.network
saudiarabia.privacy.network
spain.privacy.network
srilanka.privacy.network
sweden.privacy.network
swiss.privacy.network
sg.privacy.network
tr.privacy.network
taiwan.privacy.network
ua.privacy.network
venezuela.privacy.network
vietnam.privacy.network
za.privacy.network

DD-WRT Router Setup for PIA

Navigate to Services > VPN

PIA offers two different Encryption levels.
Default Encryption (AES-128) typically provides faster speeds.
Strong Encryption (AES-256) provides stronger encryption.
Follow the table below of the one that fits your needs.

Enter PIA settings (Default Encryption)

OpenVPN Client

Start OpenVPN Client

If you wish to disable your VPN connection simply set this to Disable at any time and click Apply Settings.

Server IP/Name

Copy and paste the server you would like to connect to from the server list above. Be sure there are no extra spaces or characters.

If you wish to change PIA connection locations, THIS IS THE ONLY FIELD YOU NEED TO CHANGE.

Port

1198

Tunnel Device

TUN

Tunnel Protocol

UDP

Encryption cipher

AES-128-CBC

Hash Algorithm

SHA1

First Data Cipher

Not set

Second Data Cipher

Not set

Third Data Cipher

Not set

Userpass Authentication

Enable

Username

Enter the Username you successfully logged in to your PIA account with.

Password

Enter the Password you successfully logged in to your PIA account with.

Advanced Options

Enable

TLS Cipher

None

LZO Compression

Disabled

NAT

Enable

Firewall Protection

Enable

Additional Config

persist-key
persist-tun

Policy Based Routing

This field can be used for split VPN and Dual Gateway routing.

CA Cert

-----BEGIN CERTIFICATE-----
MIIFqzCCBJOgAwIBAgIJAKZ7D5Yv87qDMA0GCSqGSIb3DQEBDQUAMIHoMQswCQYD
VQQGEwJVUzELMAkGA1UECBMCQ0ExEzARBgNVBAcTCkxvc0FuZ2VsZXMxIDAeBgNV
BAoTF1ByaXZhdGUgSW50ZXJuZXQgQWNjZXNzMSAwHgYDVQQLExdQcml2YXRlIElu
dGVybmV0IEFjY2VzczEgMB4GA1UEAxMXUHJpdmF0ZSBJbnRlcm5ldCBBY2Nlc3Mx
IDAeBgNVBCkTF1ByaXZhdGUgSW50ZXJuZXQgQWNjZXNzMS8wLQYJKoZIhvcNAQkB
FiBzZWN1cmVAcHJpdmF0ZWludGVybmV0YWNjZXNzLmNvbTAeFw0xNDA0MTcxNzM1
MThaFw0zNDA0MTIxNzM1MThaMIHoMQswCQYDVQQGEwJVUzELMAkGA1UECBMCQ0Ex
EzARBgNVBAcTCkxvc0FuZ2VsZXMxIDAeBgNVBAoTF1ByaXZhdGUgSW50ZXJuZXQg
QWNjZXNzMSAwHgYDVQQLExdQcml2YXRlIEludGVybmV0IEFjY2VzczEgMB4GA1UE
AxMXUHJpdmF0ZSBJbnRlcm5ldCBBY2Nlc3MxIDAeBgNVBCkTF1ByaXZhdGUgSW50
ZXJuZXQgQWNjZXNzMS8wLQYJKoZIhvcNAQkBFiBzZWN1cmVAcHJpdmF0ZWludGVy
bmV0YWNjZXNzLmNvbTCCASIwDQYJKoZIhvcNAQEBBQADggEPADCCAQoCggEBAPXD
L1L9tX6DGf36liA7UBTy5I869z0UVo3lImfOs/GSiFKPtInlesP65577nd7UNzzX
lH/P/CnFPdBWlLp5ze3HRBCc/Avgr5CdMRkEsySL5GHBZsx6w2cayQ2EcRhVTwWp
cdldeNO+pPr9rIgPrtXqT4SWViTQRBeGM8CDxAyTopTsobjSiYZCF9Ta1gunl0G/
8Vfp+SXfYCC+ZzWvP+L1pFhPRqzQQ8k+wMZIovObK1s+nlwPaLyayzw9a8sUnvWB
/5rGPdIYnQWPgoNlLN9HpSmsAcw2z8DXI9pIxbr74cb3/HSfuYGOLkRqrOk6h4RC
OfuWoTrZup1uEOn+fw8CAwEAAaOCAVQwggFQMB0GA1UdDgQWBBQv63nQ/pJAt5tL
y8VJcbHe22ZOsjCCAR8GA1UdIwSCARYwggESgBQv63nQ/pJAt5tLy8VJcbHe22ZO
sqGB7qSB6zCB6DELMAkGA1UEBhMCVVMxCzAJBgNVBAgTAkNBMRMwEQYDVQQHEwpM
b3NBbmdlbGVzMSAwHgYDVQQKExdQcml2YXRlIEludGVybmV0IEFjY2VzczEgMB4G
A1UECxMXUHJpdmF0ZSBJbnRlcm5ldCBBY2Nlc3MxIDAeBgNVBAMTF1ByaXZhdGUg
SW50ZXJuZXQgQWNjZXNzMSAwHgYDVQQpExdQcml2YXRlIEludGVybmV0IEFjY2Vz
czEvMC0GCSqGSIb3DQEJARYgc2VjdXJlQHByaXZhdGVpbnRlcm5ldGFjY2Vzcy5j
b22CCQCmew+WL/O6gzAMBgNVHRMEBTADAQH/MA0GCSqGSIb3DQEBDQUAA4IBAQAn
a5PgrtxfwTumD4+3/SYvwoD66cB8IcK//h1mCzAduU8KgUXocLx7QgJWo9lnZ8xU
ryXvWab2usg4fqk7FPi00bED4f4qVQFVfGfPZIH9QQ7/48bPM9RyfzImZWUCenK3
7pdw4Bvgoys2rHLHbGen7f28knT2j/cbMxd78tQc20TIObGjo8+ISTRclSTRBtyC
GohseKYpTS9himFERpUgNtefvYHbn70mIOzfOJFTVqfrptf9jXa9N8Mpy3ayfodz
1wiqdteqFXkTYoSDctgKMiZ6GdocK9nMroQipIQtpnwd4yBDWIyC6Bvlkrq5TQUt
YDQ8z9v+DMO6iwyIDRiU
-----END CERTIFICATE-----

CLICK APPLY SETTINGS

Leave all settings not mentioned above as their default setting.

Enter PIA settings (Strong Encryption)

OpenVPN Client

Start OpenVPN Client

If you wish to disable your VPN connection simply set this to Disable at any time and click Apply Settings.

Server IP/Name

Copy and paste the server you would like to connect to from the server list above. Be sure there are no extra spaces or characters.

If you wish to change PIA connection locations, THIS IS THE ONLY FIELD YOU NEED TO CHANGE.

Port

1197

Tunnel Device

TUN

Tunnel Protocol

UDP

Encryption cipher

AES-256-CBC

Hash Algorithm

SHA256

First Data Cipher

Not set

Second Data Cipher

Not set

Third Data Cipher

Not set

Userpass Authentication

Enable

Username

Enter the Username you successfully logged in to your PIA account with.

Password

Enter the Password you successfully logged in to your PIA account with.

Advanced Options

Enable

TLS Cipher

None

LZO Compression

Adaptive

NAT

Enable

Firewall Protection

Enable

Additional Config

persist-key
persist-tun

Policy Based Routing

This field can be used for split VPN and Dual Gateway routing.

CA Cert

-----BEGIN CERTIFICATE-----
MIIHqzCCBZOgAwIBAgIJAJ0u+vODZJntMA0GCSqGSIb3DQEBDQUAMIHoMQswCQYD
VQQGEwJVUzELMAkGA1UECBMCQ0ExEzARBgNVBAcTCkxvc0FuZ2VsZXMxIDAeBgNV
BAoTF1ByaXZhdGUgSW50ZXJuZXQgQWNjZXNzMSAwHgYDVQQLExdQcml2YXRlIElu
dGVybmV0IEFjY2VzczEgMB4GA1UEAxMXUHJpdmF0ZSBJbnRlcm5ldCBBY2Nlc3Mx
IDAeBgNVBCkTF1ByaXZhdGUgSW50ZXJuZXQgQWNjZXNzMS8wLQYJKoZIhvcNAQkB
FiBzZWN1cmVAcHJpdmF0ZWludGVybmV0YWNjZXNzLmNvbTAeFw0xNDA0MTcxNzQw
MzNaFw0zNDA0MTIxNzQwMzNaMIHoMQswCQYDVQQGEwJVUzELMAkGA1UECBMCQ0Ex
EzARBgNVBAcTCkxvc0FuZ2VsZXMxIDAeBgNVBAoTF1ByaXZhdGUgSW50ZXJuZXQg
QWNjZXNzMSAwHgYDVQQLExdQcml2YXRlIEludGVybmV0IEFjY2VzczEgMB4GA1UE
AxMXUHJpdmF0ZSBJbnRlcm5ldCBBY2Nlc3MxIDAeBgNVBCkTF1ByaXZhdGUgSW50
ZXJuZXQgQWNjZXNzMS8wLQYJKoZIhvcNAQkBFiBzZWN1cmVAcHJpdmF0ZWludGVy
bmV0YWNjZXNzLmNvbTCCAiIwDQYJKoZIhvcNAQEBBQADggIPADCCAgoCggIBALVk
hjumaqBbL8aSgj6xbX1QPTfTd1qHsAZd2B97m8Vw31c/2yQgZNf5qZY0+jOIHULN
De4R9TIvyBEbvnAg/OkPw8n/+ScgYOeH876VUXzjLDBnDb8DLr/+w9oVsuDeFJ9K
V2UFM1OYX0SnkHnrYAN2QLF98ESK4NCSU01h5zkcgmQ+qKSfA9Ny0/UpsKPBFqsQ
25NvjDWFhCpeqCHKUJ4Be27CDbSl7lAkBuHMPHJs8f8xPgAbHRXZOxVCpayZ2SND
fCwsnGWpWFoMGvdMbygngCn6jA/W1VSFOlRlfLuuGe7QFfDwA0jaLCxuWt/BgZyl
p7tAzYKR8lnWmtUCPm4+BtjyVDYtDCiGBD9Z4P13RFWvJHw5aapx/5W/CuvVyI7p
Kwvc2IT+KPxCUhH1XI8ca5RN3C9NoPJJf6qpg4g0rJH3aaWkoMRrYvQ+5PXXYUzj
tRHImghRGd/ydERYoAZXuGSbPkm9Y/p2X8unLcW+F0xpJD98+ZI+tzSsI99Zs5wi
jSUGYr9/j18KHFTMQ8n+1jauc5bCCegN27dPeKXNSZ5riXFL2XX6BkY68y58UaNz
meGMiUL9BOV1iV+PMb7B7PYs7oFLjAhh0EdyvfHkrh/ZV9BEhtFa7yXp8XR0J6vz
1YV9R6DYJmLjOEbhU8N0gc3tZm4Qz39lIIG6w3FDAgMBAAGjggFUMIIBUDAdBgNV
HQ4EFgQUrsRtyWJftjpdRM0+925Y6Cl08SUwggEfBgNVHSMEggEWMIIBEoAUrsRt
yWJftjpdRM0+925Y6Cl08SWhge6kgeswgegxCzAJBgNVBAYTAlVTMQswCQYDVQQI
EwJDQTETMBEGA1UEBxMKTG9zQW5nZWxlczEgMB4GA1UEChMXUHJpdmF0ZSBJbnRl
cm5ldCBBY2Nlc3MxIDAeBgNVBAsTF1ByaXZhdGUgSW50ZXJuZXQgQWNjZXNzMSAw
HgYDVQQDExdQcml2YXRlIEludGVybmV0IEFjY2VzczEgMB4GA1UEKRMXUHJpdmF0
ZSBJbnRlcm5ldCBBY2Nlc3MxLzAtBgkqhkiG9w0BCQEWIHNlY3VyZUBwcml2YXRl
aW50ZXJuZXRhY2Nlc3MuY29tggkAnS7684Nkme0wDAYDVR0TBAUwAwEB/zANBgkq
hkiG9w0BAQ0FAAOCAgEAJsfhsPk3r8kLXLxY+v+vHzbr4ufNtqnL9/1Uuf8NrsCt
pXAoyZ0YqfbkWx3NHTZ7OE9ZRhdMP/RqHQE1p4N4Sa1nZKhTKasV6KhHDqSCt/dv
Em89xWm2MVA7nyzQxVlHa9AkcBaemcXEiyT19XdpiXOP4Vhs+J1R5m8zQOxZlV1G
tF9vsXmJqWZpOVPmZ8f35BCsYPvv4yMewnrtAC8PFEK/bOPeYcKN50bol22QYaZu
LfpkHfNiFTnfMh8sl/ablPyNY7DUNiP5DRcMdIwmfGQxR5WEQoHL3yPJ42LkB5zs
6jIm26DGNXfwura/mi105+ENH1CaROtRYwkiHb08U6qLXXJz80mWJkT90nr8Asj3
5xN2cUppg74nG3YVav/38P48T56hG1NHbYF5uOCske19F6wi9maUoto/3vEr0rnX
JUp2KODmKdvBI7co245lHBABWikk8VfejQSlCtDBXn644ZMtAdoxKNfR2WTFVEwJ
iyd1Fzx0yujuiXDROLhISLQDRjVVAvawrAtLZWYK31bY7KlezPlQnl/D9Asxe85l
8jO5+0LdJ6VyOs/Hd4w52alDW/MFySDZSfQHMTIc30hLBJ8OnCEIvluVQQ2UQvoW
+no177N9L2Y+M9TcTA62ZyMXShHQGeh20rb4kK8f+iFX8NxtdHVSkxMEFSfDDyQ=
-----END CERTIFICATE-----

CLICK APPLY SETTINGS

Leave all settings not mentioned above as their default setting.

Verify a successful PIA connection

Navigate to Status > OpenVPN

  1. You should now see a CONNECTED SUCCESS message.
  2. Visit PIA’s IP Check to verify your new IP address and virtual location.

In some cases you may notice that the location is not showing the same location as the server you have input in your router settings; this is because geo tracking tools are often tricked by VPN connections. As long as you see an IP address that is not the same as your normal Internet IP address then you are indeed connected to PIA.

Back up your settings

Navigate to Administration > Backup

  1. Click the Backup button.
  2. A file named nvrambak.bin will be saved to your computer.
  3. You can load nvrambak.bin to restore your settings in the event of a reset.

How to change the PIA server

  1. Copy the new PIA server address from the above server list.
  2. Paste the server into the Server IP/Name field.
  3. Click Apply Settings.

TROUBLESHOOTING

Still having issues? Visit the VPN Troubleshooting section.

Troubleshoot Here

How do I set a Static IP for my device in DD-WRT?

TeamFlashRouters · May 30, 2019 ·

It can be very useful to setup static local IP addresses for devices on your FlashRouter network. By assigning specific IP’s to specific devices you can better control and manage how your network and the internet interacts with each device.

Once you setup a static IP you can set access restrictions, monitor and control bandwidth, as well as bypass a router VPN connection or setup a device specific Kill Switch. Without a static IP assignment you may lose device specific settings when the DHCP lease to the router expires.

Navigate to Services > Services

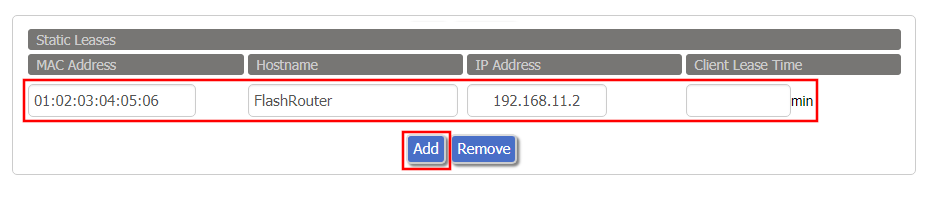
Set Static IP by Device MAC Address in FlashRouter DD-WRT Settings
  1. Under Static Leases click Add once.
  2. Fill in the newly appeared fields.
    • MAC Address: Enter the device’s MAC address which can be found on the device itself or on the Status > LAN page.
    • Hostame: Enter a name for the device. Make sure that there are no spaces.
    • IP Address: Enter the desired static IP Address of the device. It should be on the same subnet as the FlashRouter (192.168.11.x)
    • Client Lease Time: Leave this field blank.
  3. Click Apply Settings
  4. Repeat the steps above for each individual static IP address you would like to setup. If you click Add before clicking Apply Settings you will lose the configuration.

If a device has wireless and ethernet capabilities the MAC Addresses will be different for a wireless connection and an ethernet connection. Make sure to set a static IP for both MAC Addresses in this case.

What are some extra steps I can take to secure my network?

TeamFlashRouters · May 30, 2019 ·

DD-WRT open source firmware removes many firmware vulnerabilities and backdoor access issues that may cause problems in stock firmware. DD-WRT is also updated more frequently than stock firmware, so be sure to always check with the FlashRouter support team to see which DD-WRT build we recommend for the highest level of security for your router at any time.

Aside from avoiding common issues and flaws with stock firmware, DD-WRT give you more control over the firmware settings and allows you to take some extra steps to really lock down your network security. In this article we highlight additional options for WiFi network security and also preventative measures for remote execution attacks.

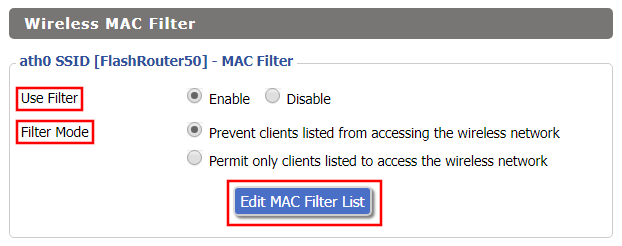
Wireless MAC Filtering

Navigate to Wireless > MAC Filter

Access FlashRouters DD-WRT Admin Enable MAC Filtering
  1. Set Use Filter to Enable.
  2. Select either Prevent or Permit
    • Choose Prevent to add MAC addresses that you don’t want to join your network.
    • Choose Permit to add MAC addresses that you do want to join your network, automatically blocking all others.
  3. Select Edit MAC Filter List.
  4. Add the MAC Address of the wireless devices you want to prevent or permit. Be sure to use the xx:xx:xx:xx:xx:xx format. Hint: You can see a list of connected devices MAC Address by clicking Wireless Client MAC List.
  5. Click Save.
  6. Replicate the steps above for each wireless band.
  7. Click Apply Settings.

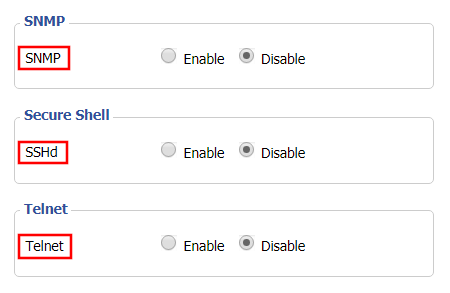
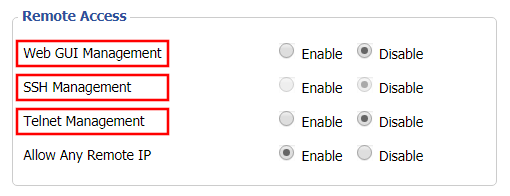
Disable Remote Access

Navigate to Services > Services

Access FlashRouters DD-WRT Admin Settings and Disable Remote Access
  1. Set SNMP to Disable – this setting disables Simple Network Management Protocol, which prevents software from polling your network for information about connected devices.
  2. Set SSHd to Disable – disabling the Secure Shell is a simple way to prevent root access and brute force attacks on your network.
  3. Set Telnet to Disable – Telnet is a less secure version of SSH to manage your local router network via command line.
  4. Click Apply Settings.

Navigate to Administration > Management

Access FlashRouters DD-WRT Admin Settings and Disable Remote Access 2
  1. Set Web GUI Management to Disable.
  2. Set SSH Management to Disable.
  3. Set Telnet Management to Disable.
  4. Set Allow Any Remote IP to Enable – Even though this setting is set to Enable there is no remote access because Web GUI Management is already set to Disable. 
  5. Click Apply Settings.

TP-Link Merge or Separate 2.4GHz and 5GHz Wi-Fi

TeamFlashRouters · Apr 17, 2024 ·

Your TP-Link router broadcasts a 2.4GHz and a 5GHz Wi-Fi network. These can be separated to allow you to assign your devices to the network that best suits them or merged into a single network so your devices automatically select the best band to use. Follow this guide to separate or merge your Wi-Fi bands.

1. Connect your computer, phone, or tablet to the TP-Link router via wireless (FlashRouter24 / FlashRouter50) or via ethernet cable to one of the LAN ports on the router.

The FlashRouter WiFi password is printed on the sheet that came with the router and is set to Wireless#[First 5 characters of your router MAC]. The router MAC can be found on the bottom of your router if you cannot locate the sheet. For e.g. if your MAC is 1459C07E70A8 then your WiFi password is Wireless#1459C

Be sure to capitalize the W.

2. Once connected via wireless or ethernet on your device open your browser and go to the TP-Link firmware settings.

TP-Link URL Access

3. Enter tp-link as the admin password to access the TP-Link firmware settings.

TP-Link admin password

4. Click Wireless.

TP-Link Wireless tab

5. Check the Smart Connect checkbox to merge the two Wi-Fi bands. Uncheck the Smart Connect checkbox to separate the two Wi-Fi bands. If you have the two Wi-Fi bands separated make sure the Network Name (SSID) fields have different names for 2.4GHz and 5GHz bands. Click Save.

TP-Link Merge Wifi
TP-Link Separate Wifi

6. Connect your devices to the new wireless network.

TROUBLESHOOTING

Still having issues? Visit the VPN Troubleshooting section.

Troubleshoot Here

VPN FAQs

admin · Jan 29, 2019 ·

VPN FAQs

General VPN FAQ Answers

What is a VPN?

VPN is an acronym for ‘Virtual Private Network’, historically used by private organizations to seamlessly link geographically diverse locations via the Internet. A VPN ‘tunnels’ traffic between two devices by transmitting it over a secure network. There are also clearly identifiable benefits to individual Internet users accessing a VPN.

  • A VPN provides you with top-level security and privacy for all your Internet downloading, streaming and browsing. As long as you are signed into your VPN account, all data you transmit over the Internet is encrypted.
  • A VPN encrypts your device by hiding the IP address assigned by your Internet Service Provider (ISP) and replacing it with the IP address of your choosing from the list of server locations belonging to your VPN provider. This masks your identity when visiting sites that geo-restricted content, and helps you avoid devious local Internet marketing and advertising schemes that track you through your IP address.

Will a FlashRouter with a built-in VPN client speed up my connection?

FlashRouters are relatively new models that may enhance data transfers across your home network or extend the range of your Wireless signal. However, the speed at which you download or stream content can not exceed the speed of the connection you pay for through your ISP. Purchasing a FlashRouter or signing up for VPN service WILL NOT transform your regular connection into a high-speed broadband connection.

At the same time, if you do have a broadband connection, a FlashRouter with a VPN connection may slow down your transfer speeds due to the processor encrypting all of your data. In certain cases a FlashRouter with a VPN can also prevent throttling by an ISP of specific service like Netflix or Amazon Video.

Which VPN provider should I use?

Our routers have been tested to perform with many of the most popular VPN providers such as ExpressVPN, NordVPN, IPVanish, PrivateInternetAccess & CyberGhost among 50+ VPN providers so that subscribers can get the maximum benefit from their VPN service. If you prefer another provider, that is not an issue at all. You can still use a DD-WRT VPN FlashRouter with any VPN provider that offers DD-WRT router integration support. Contact our team for further information about using our routers with your VPN service of choice or if you need a VPN provider recommendation based on your location.

Should my FlashRouter replace my old router?

A FlashRouter will work as a standalone router by connecting your modem to its Wide Area Network (WAN) port, or using it in a Dual Router Network by connecting it to your existing router through a Local Area Network (LAN)/Ethernet port. Either way a FlashRouter can be configured to tunnel all traffic through the VPN server of your choosing.

If you would like to set up your Home Network so that some devices are being tunneled through a VPN server, and others are connecting to your Internet Service Provider (ISP) within your home country, then using your FlashRouter as an auxiliary device is recommended.
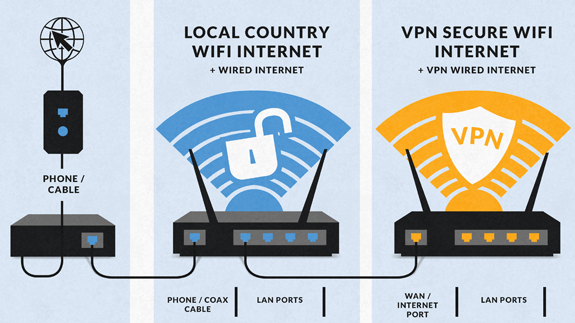
VPN Security FAQ Answers

Can I change my IP address to one in another country?

YES! The countries that you can change your IP address to depend on the offerings of your specific VPN providers. Prices and server locations vary across all VPN providers.

If you choose to purchase a FlashRouter then you will not have to install any VPN client software on your computer to change your IP address; the VPN will already be configured within the router. Therefore, any device you plug into this FlashRouter is automatically assigned the IP address of your selected VPN server.

When is my connection secure?

As long as the VPN account preset into your FlashRouter is active, any device that is connected to the Internet through this router has its network traffic encrypted, and IP address masked. With a FlashRouter you never have to physically login to your VPN account, as the settings have been stored in the router’s DD-WRT firmware.
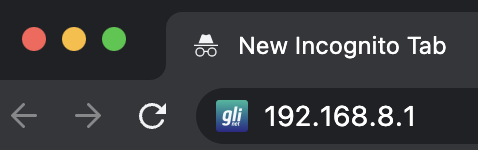
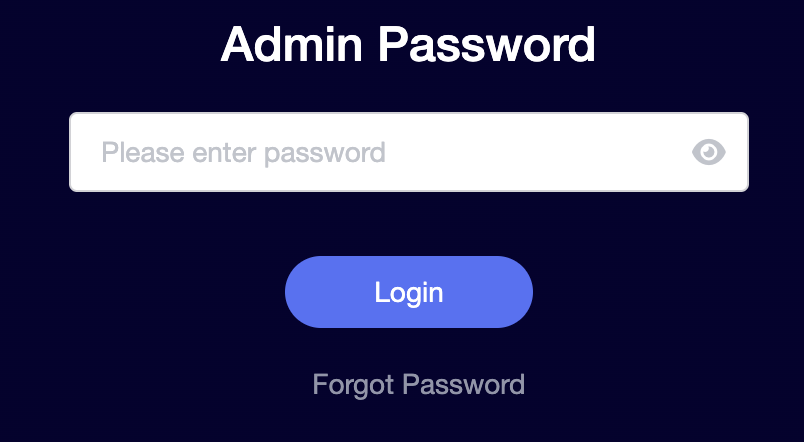
Don’t worry though! If you are not at home, and using Wi-Fi in a public location, you can still use your VPN account on a laptop or mobile device through various other methods.

How can I be sure my connection is safe and encrypted?

In order to make sure that the connection on your FlashRouter is being rerouted appropriately through your VPN service, visit What is my IP address and make sure the location listed is the one you have chosen in your VPN settings, NOT your actual location.

If you wish, there is an Internet Kill Switch available as well for your router which will block the internet whenever you disconnect from VPN.

What VPN connection standards are supported on a FlashRouter?

Currently we support the OpenVPN protocol for VPN client connections. PPTP VPN has been deemed as insecure by the privacy community and so we no longer offer support for PPTP VPN connections.

Technical VPN FAQ Answers

What operating systems do you support?

A FlashRouter can be used with any operating system, be it Windows, Mac OS or Linux. A FlashRouter can also be used as a wireless access point for iPhones, iPads, and Android devices.

Our routers also work in conjunction with any other brand of router of ADSL or DSL modem/router combo from ISPs across the world.

Can I set up a VPN on a PS4, Xbox One, Kindle Fire, Roku, AppleTV or other devices without native VPN support?

THAT’S WHAT WE ARE HERE FOR!

If you purchase one of our FlashRouters loaded with DD-WRT firmware, you can run the client VPN connection from your router. Once you do this every device connected to the router will tunnel through the VPN.

Now you can stream content like Netflix, BBC iPlayer, Pandora Hulu, or Amazon Instant to your TV through any of these devices, instead of being constrained to streaming content on your computer!

If you need a recommendation for a VPN service with a specific streaming platform do not hesitate to contact our support team.

What is a DNS leak and how can I prevent a DNS leak in my router?

TeamFlashRouters · Jun 11, 2019 ·

What is a DNS leak?

A DNS Leak is an instance where your ISP receives DNS requests despite being connected to a VPN tunnel.

How do I check if my DNS is leaking?

  1. Perform the extended test on DNSLeakTest.com. Be sure to do so on multiple web browsers for best accuracy.
  2. Here you should only find one server and your ISP should not be listed as your actual ISP.
  3. If your actual ISP is not listed there is no DNS leak.

How can I prevent a DNS leak in DD-WRT?

Check your device's browser settings

Updates to web browsers have added DNS settings capabilities, while this often makes your browsing experience more secure it can also effect the results of a DNS leak test. You can go into your browser’s settings and search for “DNS” and disable the DNS of the browser for more accurate DNS leak test results.

A simple web search for “DNS settings [browser name]” should return helpful information for finding the setting in your browser.

Adjust DD-WRT settings

1. On the Setup > Basic Setup page of the DD-WRT settings check the Ignore WAN DNS box.

This setting may not appear in older DD-WRT firmware builds. If it is not appearing for you, upgrade your DD-WRT firmware.

DD-WRT Check Ignore WAN DNS

2. Lower on the same page check the Forced DNS Redirection box.

DD-WRT Check Forced DNS Redirection

3. Click Apply Settings at the bottom of the page and then wait a full minute and power the FlashRouter off and back on. Reconnect to the FlashRouter’s network once it boots back up and then make sure you are connected to VPN by going to https://whatismyipaddress.com then perform the DNS leak test again.

Adding your VPN provider’s DNS servers to the router’s configuration can be helpful as well. The DNS servers are typically found on the VPN provider’s website or you can reach out to their team for a recommendation of what DNS servers to enter.

Wireless Guest Network Setup – Unbridged (Recommended)

TeamFlashRouters · Jun 12, 2019 ·

If you would like to prevent visitors from connecting to your main WiFi network then you can create a separate Guest Network that will prevent access to the main router. This setup also allows you to create different rules for different WiFi SSID’s in your home ranging from QoS controls, access restrictions, VPN network segmentation, and more.

Preparing for Wireless Guest Network Setup

If you have a Dual-band or Tri-Band router you can setup a WiFi Guest Network, creating a separate VLAN (virtual local area network) for your visitors, or in order to segment your VPN networks on any band you like. We recommend using the 2.4GHz network for your DD-WRT Guest Wireless Network so it is compatible with the most possible WiFi devices. Setting up a guest network for visitors in your home allows you to keep them off of your main WiFi network.

We recommend performing this setup while connected to the FlashRouter via ethernet cable. If your computer does not have an ethernet port and you must proceed via wireless connection to the FlashRouter. Be sure to pay attention to the wireless connection as you may need to rejoin the FlashRouter’s network after making changes.

DD-WRT Router Setup for Wireless Guest Network

Enter Wireless settings

Navigate to Wireless > Basic Settings

FlashRouter DD-WRT Wireless Guest Network Settings Unbridged

Under the 2.4GHz or 5GHz Interface click the Add button.

Wireless Network Name (SSID)

Enter the a unique network name for the guest network.

Network Configuration

Unbridged

Force DNS Redirection

Enable

Optional DNS Target

208.67.220.220

IP Address

192.168.12.1

Subnet Mask

255.255.255.0

CLICK SAVE

Enter Wireless Security settings

Navigate to Wireless > Wireless Security

Wireless Guest Network Setup on DD-WRT FlashRouter Unbridged
  1. Duplicate the wireless security settings that are set for the other bands for the newly created virtual interface.
  2. Click Apply Settings.
  3. Reboot your router.

Enable DHCP for Guest Network

Navigate to Setup > Networking

Wireless Guest Network Setup on DD-WRT FlashRouter Unbridged Setting DHCP Server
  1. Scroll to the very bottom of the page and under DHCPD click Add.
  2. Select wl0.1 or ath1.1 depending on your router model.
  3. Click Apply Settings.
  4. Reboot your router.

Depending on the router model and WiFi band you are using, the wireless interfaces will be labelled differently.

This setting can be labelled wl1.1, ath0.1, wl2.1, and so on. Make sure when you get up to the bridge assignment section that you are using the correct guest network Virtual Interface.

Back up your settings

Navigate to Administration > Backup

  1. Click the Backup button.
  2. A file named nvrambak.bin will be saved to your computer.
  3. You can load nvrambak.bin to restore your settings in the event of a reset.

TROUBLESHOOTING

Still having issues? Visit our Troubleshooting section to diagnose common problems here.

Troubleshoot Here

How do I read my Wireless status?

Dave · Apr 29, 2019 ·

The wireless status page is very helpful in diagnosing where a wireless issue stems from. Make sure the settings displayed on this page match the actual settings you have set in the DD-WRT Wireless settings. Review our recommended wireless settings for your FlashRouter if you are not getting accurate readouts.

Navigate to Status > Wireless

Interface

Select from the wireless interface that you want to view the readouts for.

MAC Address

Used to identify the wireless interface.

Chipset

Displays the wireless hardware that your FlashRouter uses.

Radio

Should always be set to Radio is On unless you have intentionally disabled the wireless on the FlashRouter. If this is displaying Radio is Off for certain wireless interfaces we recommend adjusting the Wireless Channel on the Wireless > Basic Settings page.

Mode

This should read as AP unless you are using an Advanced Wireless setup such as a Repeater, Client, or Repeater Bridge.

Network

Displays the wireless network mode that you have set for a specific wireless interface.

SSID

Displays the wireless network name that you have set for a specific wireless interface.

Channel

Displays the channel that you have set for a specific wireless interface. If this reads as Unknown it is best to select a new wireless channel or reboot the FlashRouter and check again.

TX Power

Displays the wireless transmit power that you have set for a specific wireless interface. If this reads as Unknown it is best reboot the FlashRouter and check again.

Rate

Displays an approximation of the max wireless speed available on a wireless band.

ACK Timing

Displays the ACK Timing that you have set for a specific wireless interface. If this reads as Unknown it is best reboot the FlashRouter and check again.

Encryption

Should always read as Enabled, WPA2 Personal.

Received (RX)

If this appears as 0% and there are no errors then it means that no devices have connected to the wireless interface yet. If this appears as 0% and the errors match the amount of OK packets you will need to adjust the wireless settings on the Wireless > Basic Settings page.

Transmitted (TX)

If this appears as 0% you will need to adjust the wireless settings on the Wireless > Basic Settings page.

How do I upgrade the Asus Merlin firmware of my FlashRouter?

TeamFlashRouters · Dec 8, 2021 ·

Download the latest AsusWRT Merlin firmware build for your specific FlashRouter model at the Asus Merlin download website. Contact support@flashrouters.com if you are uncertain about your router model or your router model is not available. Click your router model and then select the Release folder.

Make sure you are following the directions below to load the firmware file into the router settings and not trying to open the firmware file on its own.

Access the FlashRouter via wired connection. It is possible to upgrade firmware via WiFi, but this is not recommended unless you are unable to wire directly to the router.

Navigate to Administration > Firmware Upgrade

AsusWRT Merlin Firmware Upgrade

How do I upgrade the DD-WRT firmware of my FlashRouter?

TeamFlashRouters · May 30, 2019 ·

The following DD-WRT builds are from 11/24/2024 r58699. Keep in mind that these builds are for upgrading routers that already have DD-WRT firmware flashed. To flash a stock firmware router with DD-WRT firmware see our Flash My Router plan!

Download an updated DD-WRT firmware build for your specific FlashRouter model below. Contact support@flashrouters.com if you are uncertain about your router model or your router model is not available below.

  • Asus RT-AC5300
  • Asus RT-AC56U
  • Asus RT-AC66U
  • Asus RT-AC68U
  • Asus RT-AC87U
  • Linksys WRT1200AC
  • Linksys WRT1900AC
  • Linksys WRT1900ACv2
  • Linksys WRT1900ACS
  • Linksys WRT1900ACSv2
  • Linksys WRT3200ACM
  • Linksys WRT32X
  • Netgear R6300v2
  • Netgear R6400
  • Netgear R6400v2
  • Netgear R6700
  • Netgear R6700v2
  • Netgear R6700v3
  • Netgear R7000
  • Netgear R7000P
  • Netgear R7450
  • Netgear R7800
  • Netgear R8000
  • Netgear R8500
  • Netgear R9000

Please be aware that FlashRouters is not responsible for any DIY firmware flashing updates. If you have questions or concerns contact FlashRouters Support or check out the DD-WRT Community for additional helpful resources.

Make sure you are following the directions below to load the firmware file into the router settings and not trying to open the firmware file on its own.

Access the FlashRouter via wired connection. It is possible to upgrade firmware via WiFi, but this is not recommended unless you are unable to wire directly to the router.

Navigate to Administration > Firmware Upgrade

Firmware Upgrade page in FlashRouter DD-WRT settings
  1. Do NOT select Reset to Default Settings in the dropdown menu as this will erase all of your FlashRouter settings.
    NOTE: If you are updating from an older DD-WRT build you may be required to reset the router after a firmware update for new features and UI to properly load. You will then be required to setup the administration username and password along with your WiFi and VPN network settings.
  2. Click Choose File and select the file you have downloaded.
  3. Click Upgrade.
Next Page »

Primary Sidebar

  • Troubleshooting
  • Router Access
  • Internet Connection Issues
  • WiFi Connectivity
  • General VPN Issues
  • TeamViewer Remote Support
  • DD-WRT Firmware
  • Facebook
  • Twitter
  • Instagram
  • Pinterest
  • YouTube

Footer