• Skip to primary navigation
  • Skip to main content
  • Skip to primary sidebar
  • Skip to footer

FlashRouters Support Portal

Prioritizing Privacy

  • SETUP GUIDES
    • Privacy Hero Router Setup Guide
    • ASUS-WRT Router Setup Guide
    • AsusWRT-Merlin Router Setup Guide
    • DD-WRT Router Setup Guide
    • ExpressVPN Router Setup Guide
    • GL.iNet Router Setup Guide
    • Roqos Core Router Setup Guide
  • TROUBLESHOOTING
    • Router Access
    • WiFi Connectivity
    • Internet Connection Issues
    • General VPN Issues
    • DD-WRT Firmware
    • TeamViewer Remote Support
  • FAQs
    • Router FAQs
    • VPN FAQs
    • Warranty and Returns FAQs
    • Sales FAQs
    • Shipping FAQs
    • Service Plan FAQs
  • Show Search
Hide Search

Search Results for: ac 5300 wifi 6 router

Surfshark TP-Link WireGuard Setup

TeamFlashRouters · Apr 29, 2024 ·

Preparing for Surfshark TP-Link Setup

Download your Surfshark .conf file

If you are not already a Surfshark user Sign Up Now.

1. Log in to your account on the Surfshark website.

Surfshark Account Login

2. Click VPN Manual Setup.

Surfshark VPN Manual Setup

3. Select Router as the Setup method.
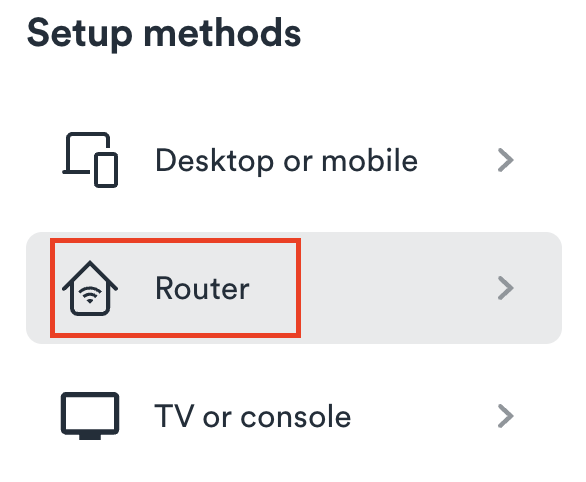
Surfshark setup method Router

4. Select WireGuard as the Protocol.

Surfshark select WireGuard

5. Select I don’t have a key pair.

Surfshark No Key Pair

6. Enter FlashRouter as the name of the connection and click Next.

Surfshark Connection Name

7. Click Generate a new key pair.

Surfshark Generate new Key Pair

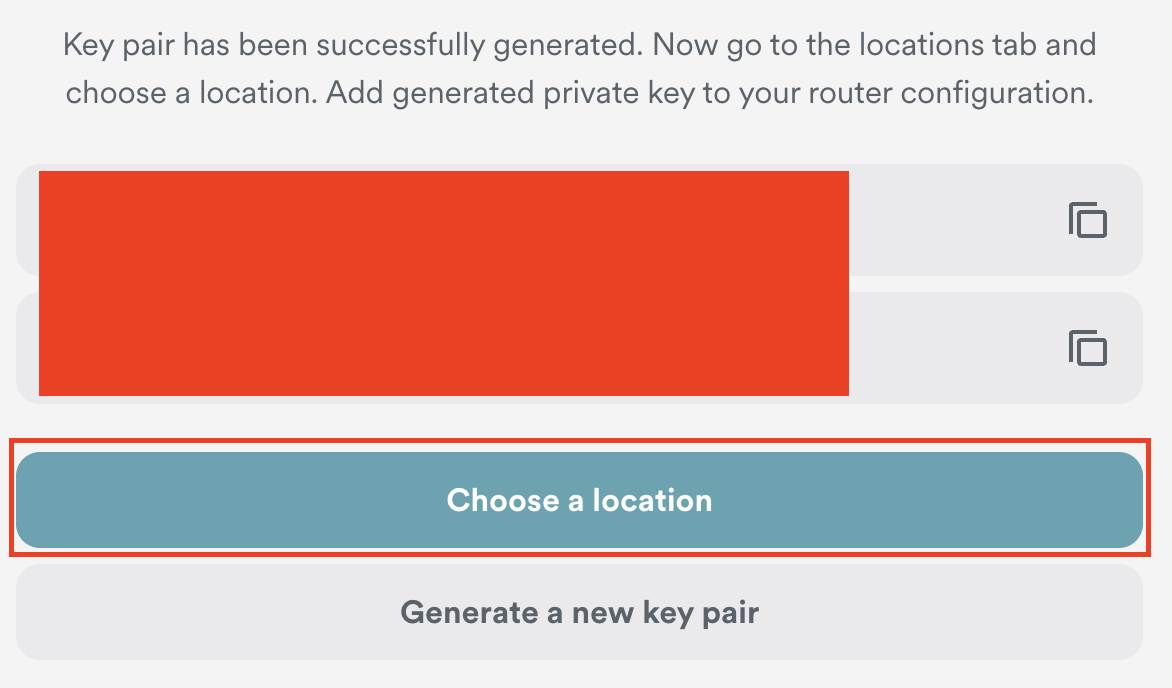
8. Click Choose a location.

Surfshark Choose a Location

9. Select the server location you want to connect to. Unless you need a specific location we recommend using Surfshark’s recommended Fastest server. Click Download to download the .conf file for this Surfshark server location.
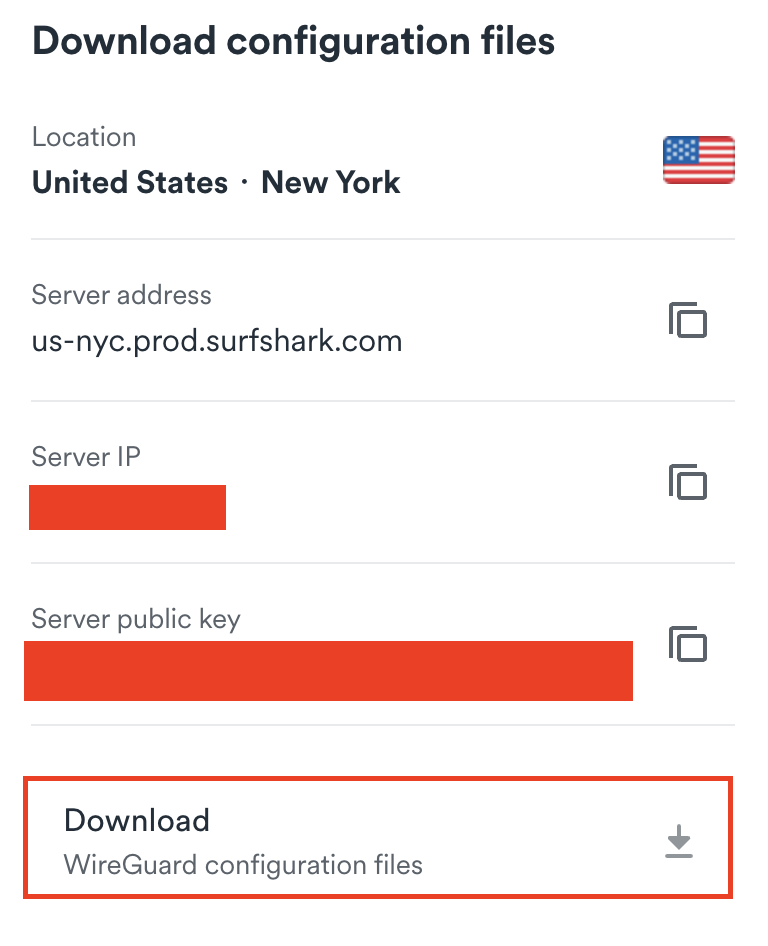
Surfshark download conf file

TP-Link Router Setup for Surfshark

Login to TP-Link firmware settings in a browser on any computer or smart device connected to the FlashRouter’s network.

1. Navigate to the Advanced tab.

TP-Link Advanced settings

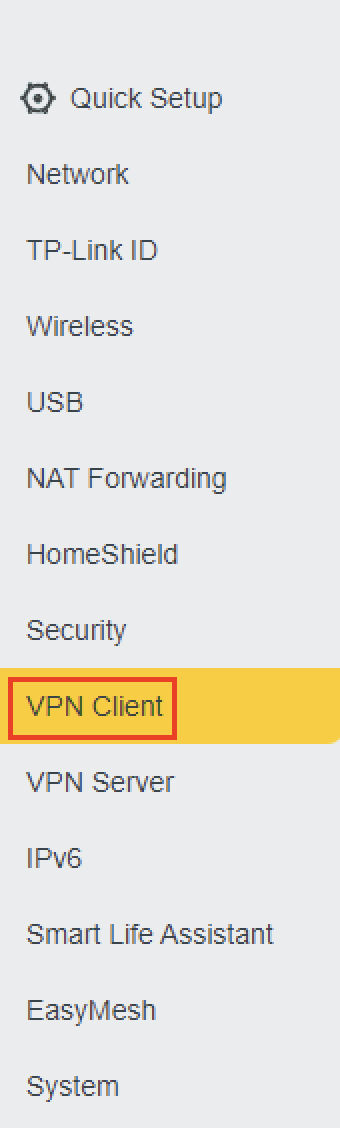
2. Navigate to the VPN Client tab.

TP-Link VPN Client

3. Check the Enable box next to VPN Client. Then click Save at the bottom of the page.
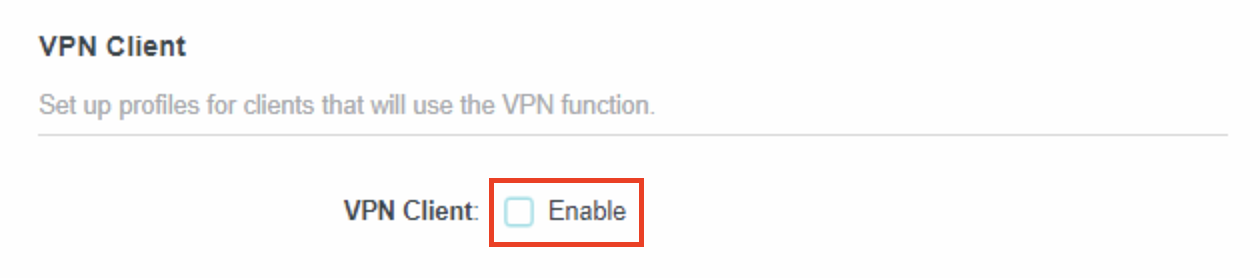
TP-Link VPN Client enable

4. Click the Add button in the Server List area.
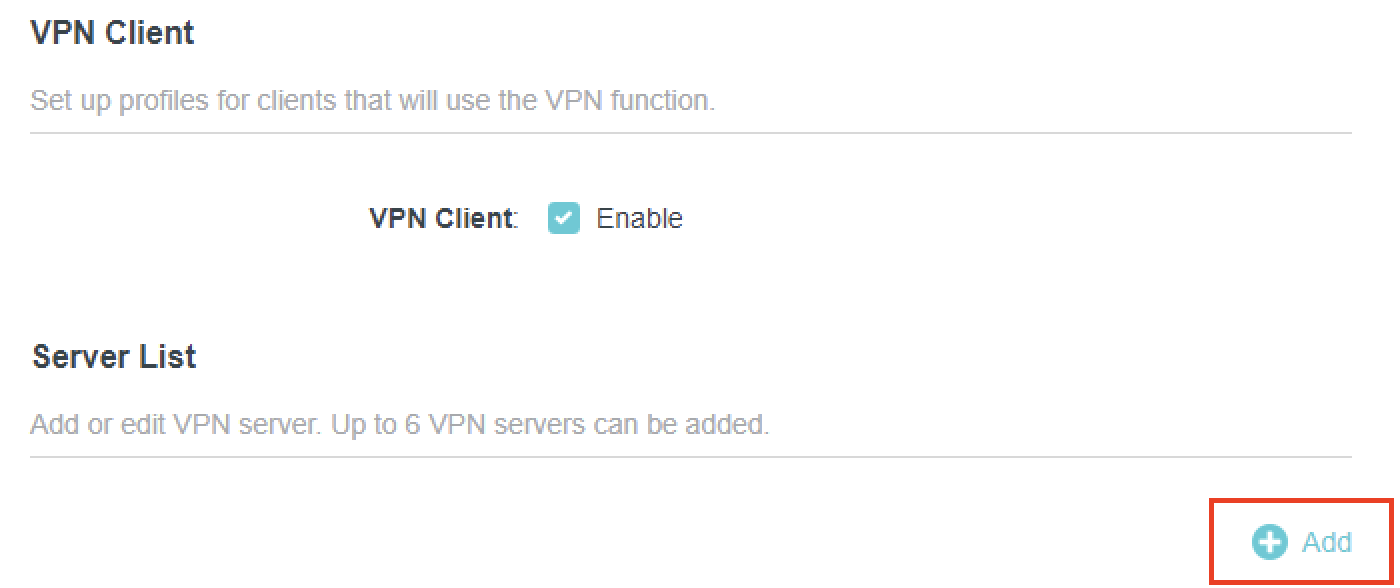
TP-Link Add server button

5. In the Description field enter in the name you’d like to use for this WireGuard Client profile. We typically advise entering in the location. Our example server was New York so I have entered in Surfshark New York.

Set the VPN Type to WireGuard.

Click Browse and select the .conf file you downloaded earlier. Then click Save.
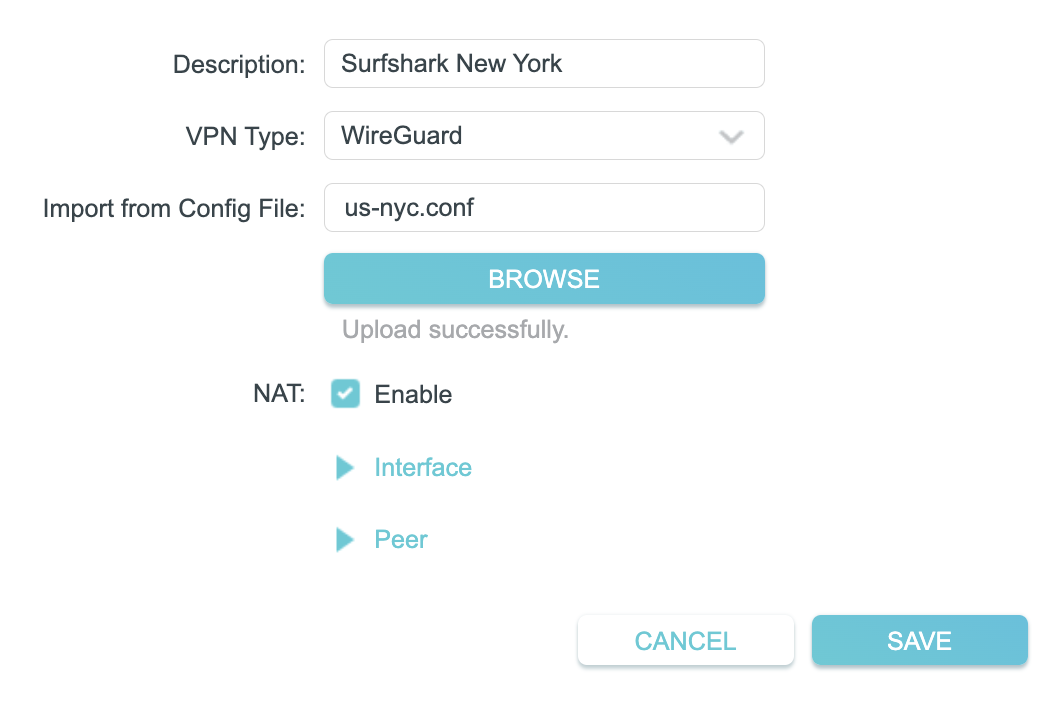
TP-Link Surfshark WireGuard

By default no devices will be assigned to the VPN Tunnel. With TP-Link firmware you must manually assign the devices that you want connected to the VPN tunnel. Proceed with the next steps to do so for all devices you want connected to VPN.

6. Click the Add button in the Device List area.

TP-Link add devices to VPN tunnel

7. A list of devices connected to the FlashRouter’s network will appear. Check the devices that you want to connect to VPN. Then click OK.
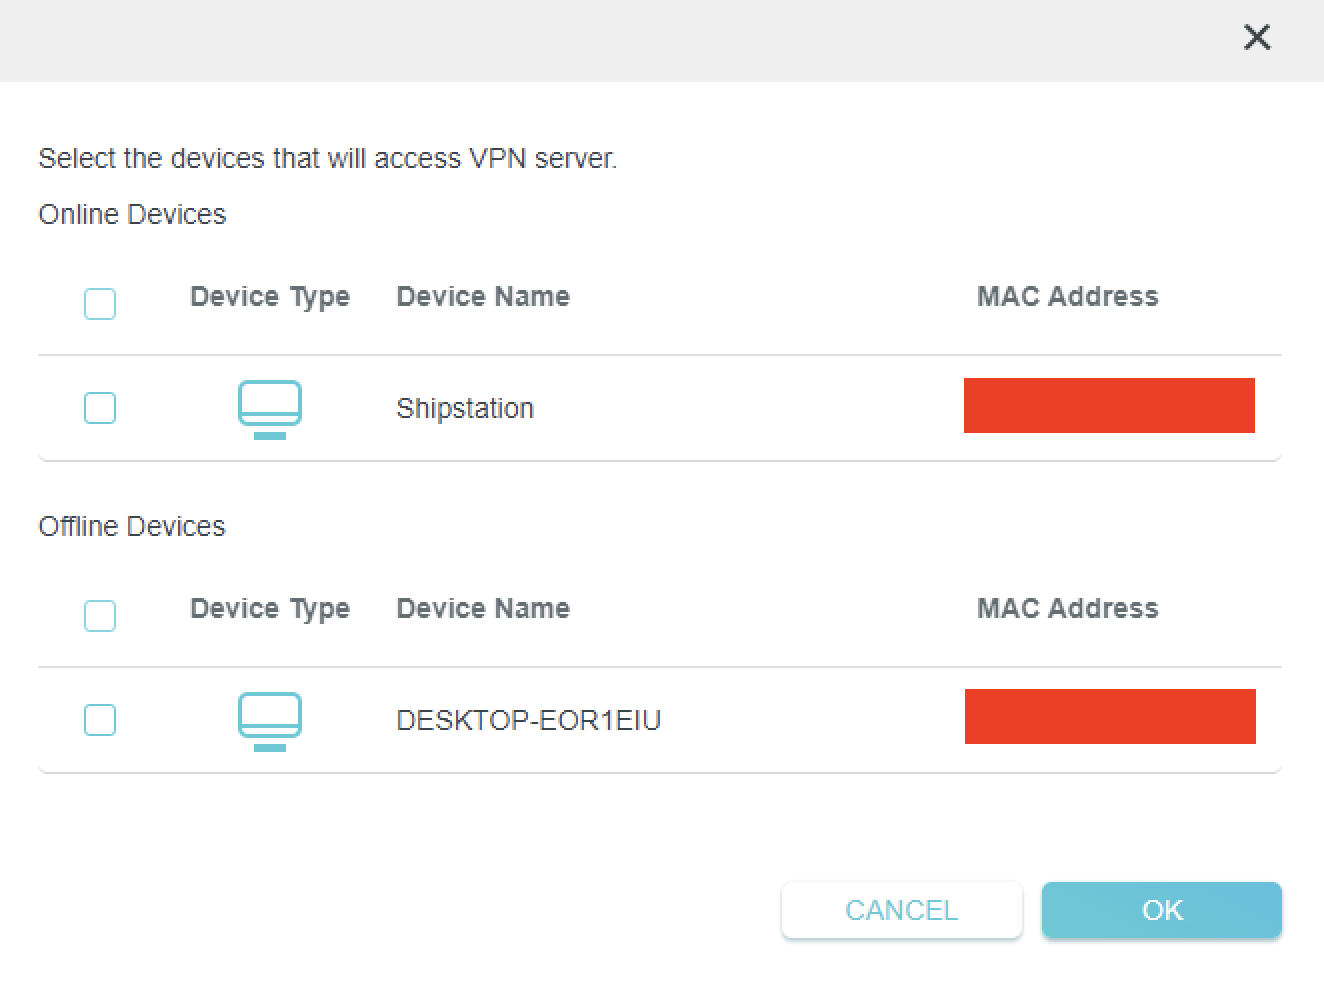
TP-Link select devices to add to VPN tunnel

8. Now that the devices have been assigned to the VPN connection click the Enable toggle in the Server List area.
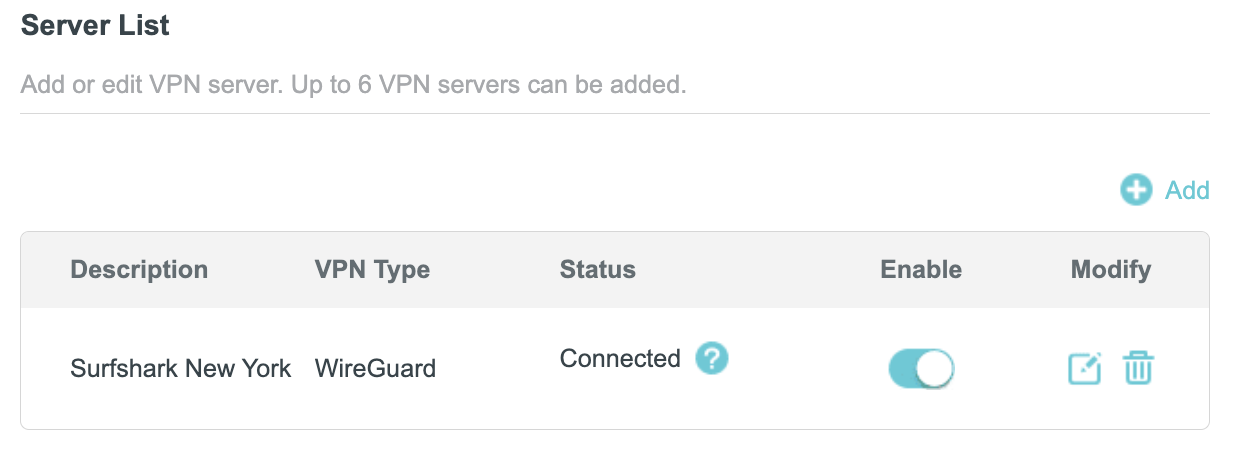
TP-Link Surfshark WireGuard Connected

Verify a successful Surfshark connection

  1. You should now see a CONNECTED message.
  2. Visit Surfshark’s IP Check to verify your new IP address and virtual location.

In some cases you may notice that the location is not showing the same location as the server you have input in your router settings; this is because geo tracking tools are often tricked by VPN connections. As long as you see an IP address that is not the same as your normal Internet IP address then you are indeed connected to Surfshark.

How to change the Surfshark server

  1. Follow the steps at the top of the page to obtain a new .conf file.
  2. Then proceed with the settings same as initial setup.
TROUBLESHOOTING

Still having issues? Visit the VPN Troubleshooting section.

Troubleshoot Here

ProtonVPN TP-Link WireGuard Setup

TeamFlashRouters · Apr 29, 2024 ·

Preparing for ProtonVPN TP-Link Setup

Download your ProtonVPN .conf file

If you are not already an ProtonVPN user Sign Up Now.

1. Log in to your account on the ProtonVPN website.

ProtonVPN Account Sign in

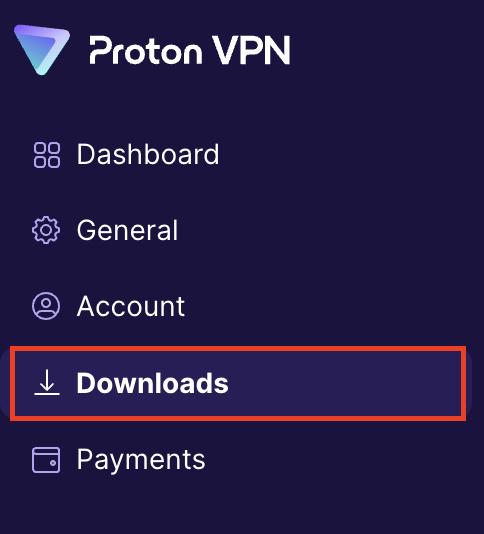
2. Click Downloads.

ProtonVPN Downloads

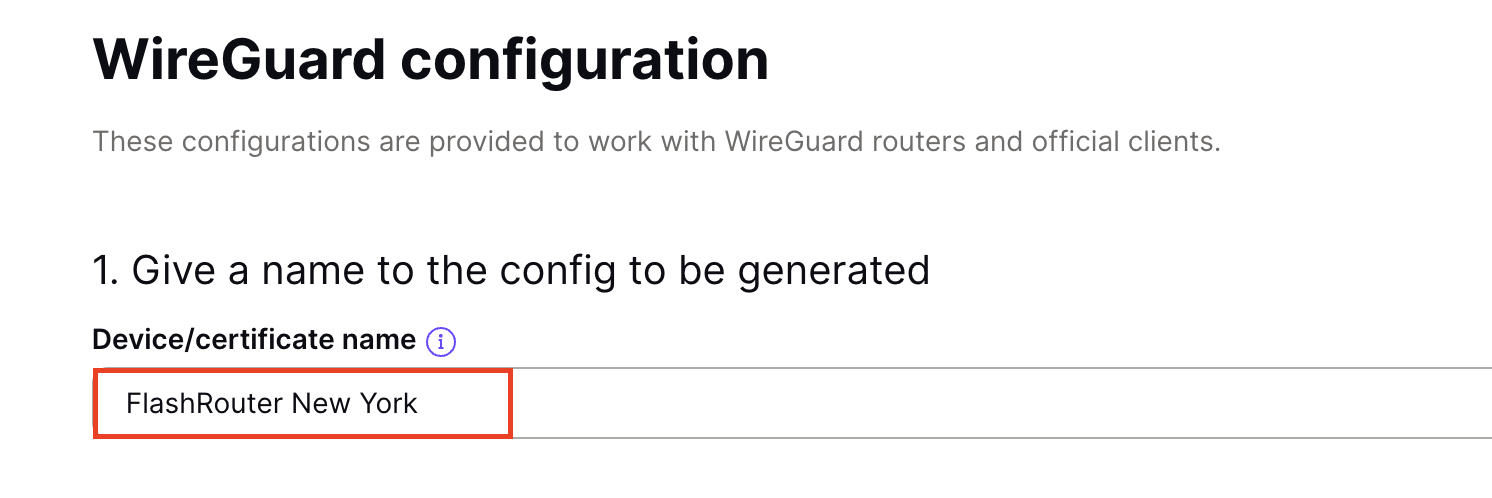
3. Scroll down to WireGuard configuration and name the device FlashRouter.

ProtonVPN WireGuard Configuration Name

4. Select Router as the platform.

ProtonVPN WireGuard select Platform

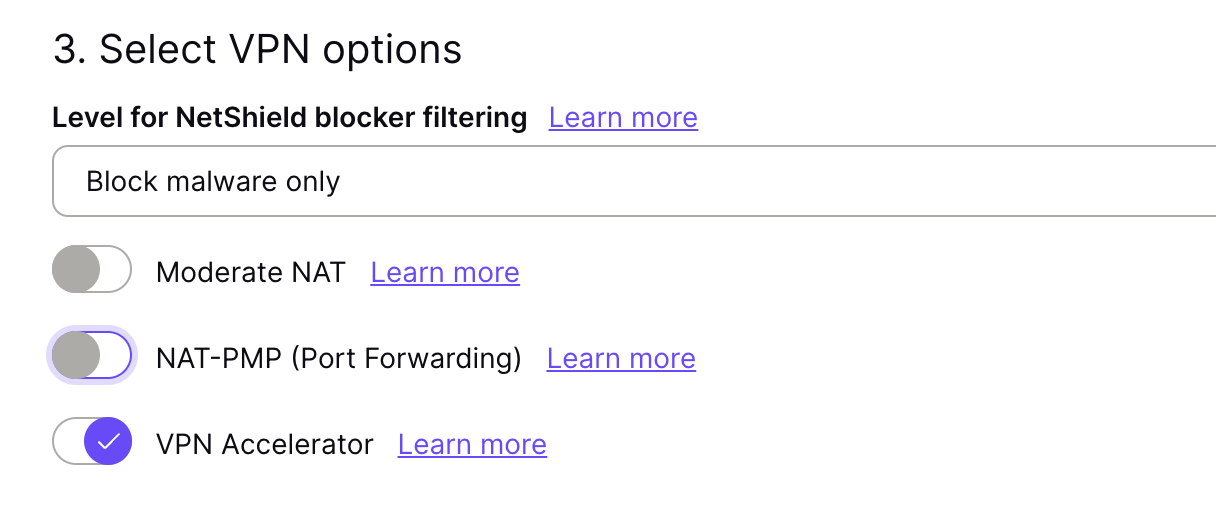
5. Select the VPN options that best fit your needs. We typically use the settings as seen in the screenshot here if you are unsure.

ProtonVPN WireGuard VPN options

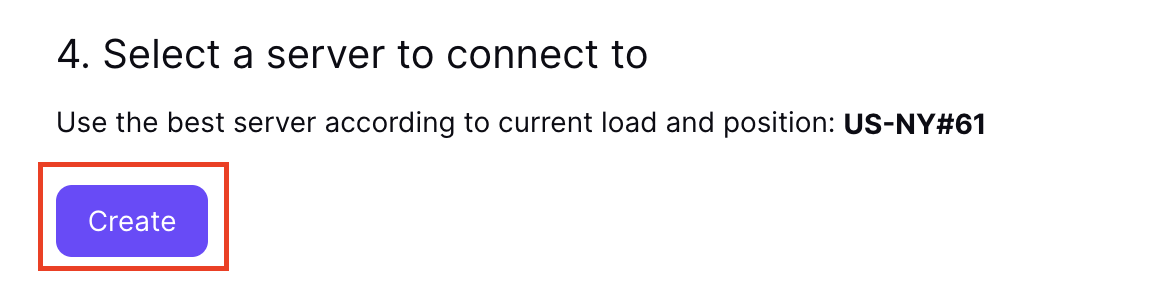
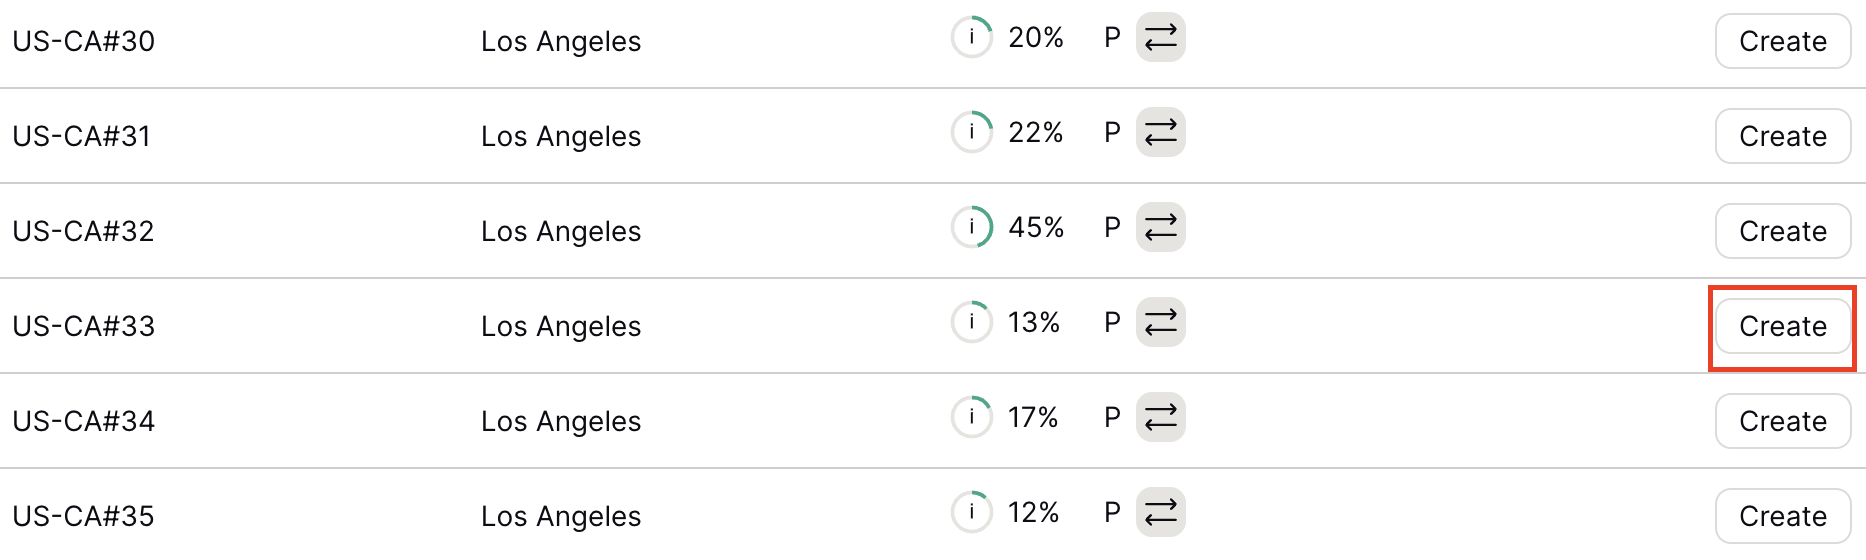
6. Next select the server that you would like to connect to and click Create. At the top of the page you’ll see ProtonVPN’s recommended server which we recommend using unless you need to connect to a specific location.

If you need a specific server location find it in the list and click Create.

ProtonVPN WireGuard recommended server
ProtonVPN WireGuard specific server

7. After clicking Create a new window will appear. Click Download to download the .conf file to your computer.

TP-Link Router Setup for ProtonVPN

Login to TP-Link firmware settings in a browser on any computer or smart device connected to the FlashRouter’s network.

1. Navigate to the Advanced tab.

TP-Link Advanced settings

2. Navigate to the VPN Client tab.

TP-Link VPN Client

3. Check the Enable box next to VPN Client. Then click Save at the bottom of the page.

TP-Link VPN Client enable

4. Click the Add button in the Server List area.

TP-Link Add server button

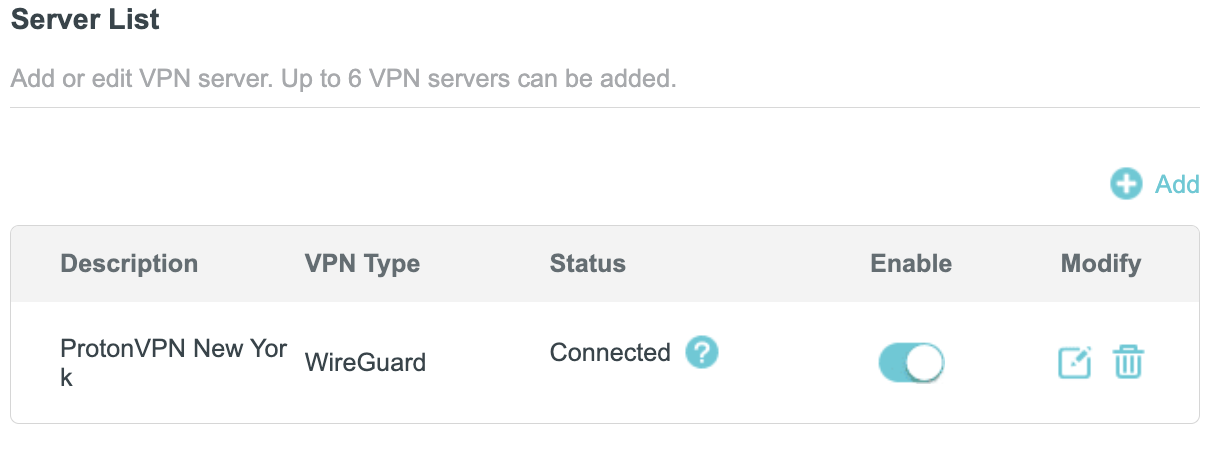
5. In the Description field enter in the name you’d like to use for this WireGuard Client profile. We typically advise entering in the location. Our example server was New York so I have entered in ProtonVPN New York.

Set the VPN Type to WireGuard.

Click Browse and select the .conf file you downloaded earlier. Then click Save.

TP-Link ProtonVPN WireGuard

By default no devices will be assigned to the VPN Tunnel. With TP-Link firmware you must manually assign the devices that you want connected to the VPN tunnel. Proceed with the next steps to do so for all devices you want connected to VPN.

6. Click the Add button in the Device List area.

TP-Link add devices to VPN tunnel

7. A list of devices connected to the FlashRouter’s network will appear. Check the devices that you want to connect to VPN. Then click OK.

TP-Link select devices to add to VPN tunnel

8. Now that the devices have been assigned to the VPN connection click the Enable toggle in the Server List area.

TP-Link ProtonVPN WireGuard connected

Verify a successful ProtonVPN connection

  1. You should now see a CONNECTED message.
  2. Visit ProtonVPN’s IP Check to verify your new IP address and virtual location.

In some cases you may notice that the location is not showing the same location as the server you have input in your router settings; this is because geo tracking tools are often tricked by VPN connections. As long as you see an IP address that is not the same as your normal Internet IP address then you are indeed connected to ProtonVPN.

How to change the ProtonVPN server

  1. Follow the steps at the top of the page to obtain a new .conf file.
  2. Then proceed with the settings same as initial setup.
TROUBLESHOOTING

Still having issues? Visit the VPN Troubleshooting section.

Troubleshoot Here

Change Wireless Channels on ExpressVPN/Aircove firmware

TeamFlashRouters · Mar 16, 2022 ·

Changing the wireless channel on your ExpressVPN FlashRouter can help with WiFi stability and allows you to use a wireless channel with less traffic in your local environment.

1. Connect to the FlashRouter’s network via ethernet cable or wireless.

2. Open your web browser and enter expressvpnrouter.com or 192.168.132.1 in the URL.

ExpressVPNrouter.com
192.168.132.1

3. Login with your ExpressVPN FlashRouter admin password.

ExpressVPN Router admin login

4. Select Network Settings on the left hand side of the menu.

ExpressVPN Network Settings

5. Select Wi-Fi Settings on the left hand side of the menu.

ExpressVPN WiFi Settings

6. Select Advanced Settings.

ExpressVPN WiFi Advanced Settings

7. Select the Channel Width and Main Channel you want your ExpressVPN FlashRouter to use. Note that higher 5GHz Wi-Fi channels will not be compatible with older devices. Click Save. Click Continue.

ExpressVPN WiFi Channels

DNS Setup for Asus Merlin

TeamFlashRouters · Jan 19, 2022 ·

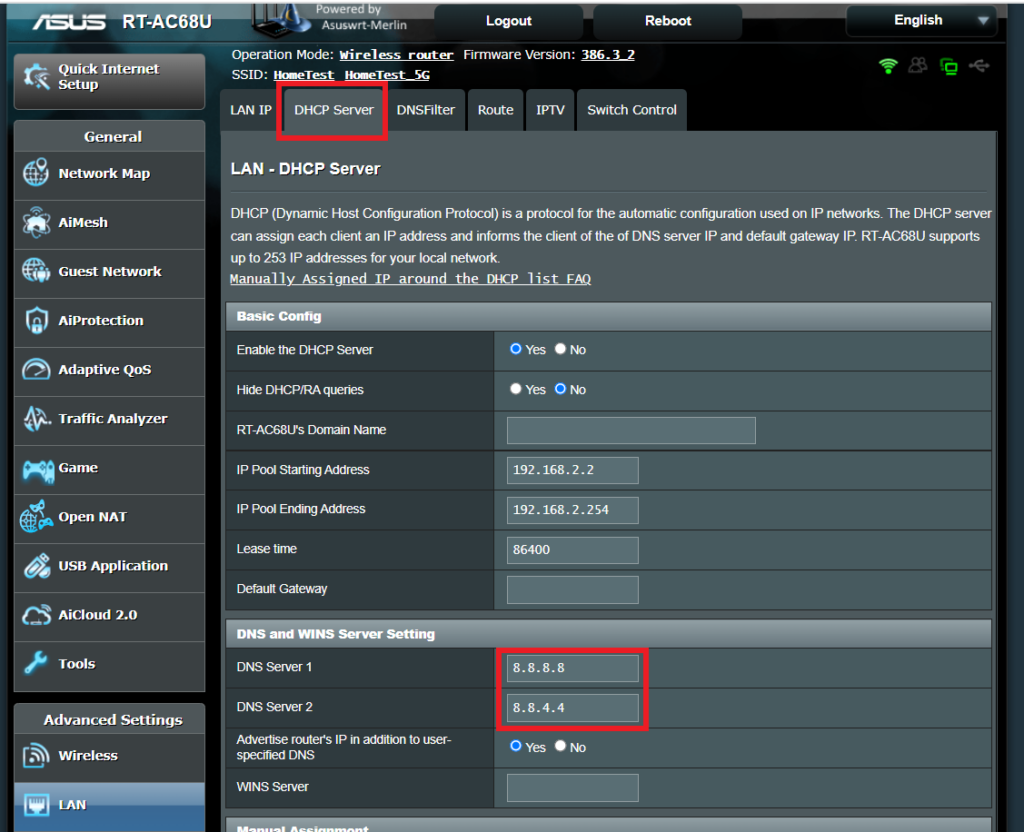
Enter custom DNS servers in your Asus Merlin firmware to avoid using your ISP DNS, which will steal and collect your browsing data.

Login to Asus Merlin firmware settings in a browser on any computer or smart device.

1. Under Advanced Settings select LAN.

2. Click the DHCP Server tab.

3. In the DNS Server 1 and DNS Server 2 fields enter the DNS server that you wish to use.

Merlin DNS Setup

4. Click Apply and then reboot the router and reconnect to the network.

VPN Killswitch for Asus Merlin

TeamFlashRouters · Jan 19, 2022 ·

Once you have OpenVPN connected on your Merlin FlashRouter you can enable the VPN Killswitch so that no internet traffic passes through your router that is not encrypted by the VPN tunnel.

Login to Asus Merlin firmware settings in a browser on any computer or smart device.

1. Under Advanced Settings select VPN.

2. Click the VPN Client tab.

3. Set Killswitch – Block routed clients if tunnel goes down to Yes.

Merlin Accept DNS configuration Redirect Internet and Kill Switch

4. Click Apply.

Roqos VPN Connected, but my device IP is unchanged

TeamFlashRouters · Mar 8, 2022 ·

If your VPN Out page in your Roqos settings is reporting that you are Connected to your VPN provider but your IP Address and location have not changed when you visit What is my IP address? follow the below checklist.

Double check that your device is connected to the Roqos network

Since the Roqos UI is being accessed securely via the cloud you can change the settings while your device is not connected to the Roqos network. This would result in your IP Address not updating when you connect to VPN.

Make sure that you are connected to your Roqos WiFi network or from an ethernet port on the back of the Roqos directly to your device and not another network.

Assign Devices To Connect To VPN in the Roqos

By default there are no devices assigned to the VPN tunnel. To assign devices to the Roqos’ VPN connection.

1. Login to your Roqos UI.

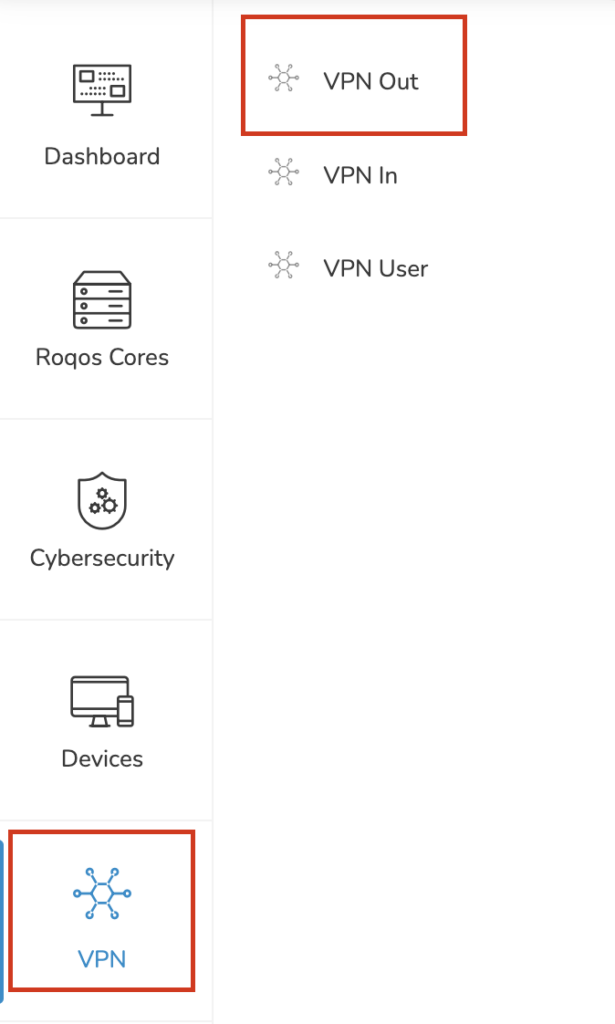
2. Select the VPN tab on the left hand menu and select VPN Out.

Roqos VPN Out

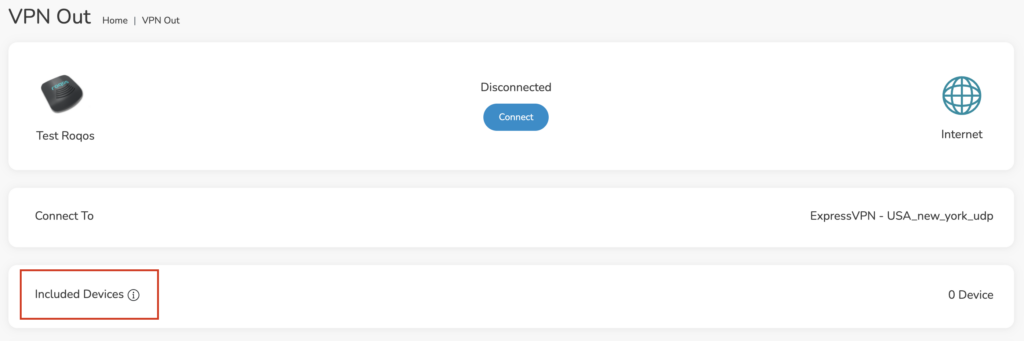
3. Click Included Devices. From this page you can choose if all devices should connect to VPN or only certain devices.

Roqos VPN Included Devices

4. From the dropdown select Include all devices if you want every device that connects to the Roqos to connect to VPN or if you only want specific devices to connect to VPN while others bypass the VPN connection select Include selected devices from the dropdown and then toggle the sliders for the devices you want connected to VPN. Click Save.

Turn off VPN device applications

Connecting to VPN via a device application or browser extension at the same time while connecting via your Roqos is not recommended. Doubling up on VPN connections can cause issues with speeds and stability.

When you are connected to the Roqos VPN network at home you should leave all VPN applications and extensions disconnected and unopened.

My 5.0GHz network is not showing up

TeamFlashRouters · May 2, 2019 ·

Verify the device supports 5GHz

5.0GHz networks are not compatible with all devices so first make sure that you device’s wireless adapter supports 5GHz wireless frequencies.

If you are not sure, find out if your device support 5 GHz via Google search or by looking in the wireless hardware details in the device’s network settings. If you see Wireless a/b/g/n support then you have a compatible device. If you are missing the Wireless a then this means there is no 5 GHz support.

Enter the recommended wireless settings

Our team has tested the wireless functionality for each FlashRouter that we offer and shared our recommended wireless settings in our Wifi Setup area. Replicate the settings for your FlashRouter model found on that page.

Lower the wireless channel

Some devices do support 5.0GHz connections but not the higher channels that DD-WRT firmware offers.

Navigate to Wireless > Basic Settings

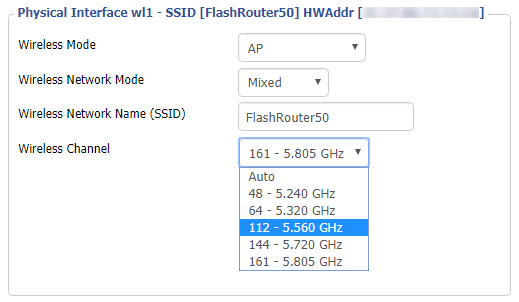
Lower the wireless channel setting for the 5.0GHz band that is not showing. Based on our tests the most broadly compatible channels are 36, 48 and 161.

CLICK APPLY SETTINGS

Refresh your device's network adapter

The easiest way to accomplish this is by rebooting your device as the settings to reset your adapter may vary on all types of internet connected devices.

Review wireless Status

Navigate to Status > Wireless

The readouts on this page can help tell if there are errors with the FlashRouter’s wireless. View our article on how to read the Wireless Status page for more information.

IPVanish AsusWRT OpenVPN Setup

TeamFlashRouters · Apr 29, 2024 ·

Preparing for IPVanish AsusWRT Setup

Download your IPVanish .ovpn file

If you are not already an IPVanish user Sign Up Now.

1. Log in to your account on the IPVanish website.

IPVanish login

2. Successfully log in with your account information then go to IPVanish .ovpn file page.

3. Click on the .ovpn file for the server location you want to use to dowloand the .ovpn file. Do not open this file.

IPVanish download ovpn

AsusWRT Router Setup for IPVanish

Login to AsusWRT firmware settings in a browser on any computer or smart device connected to the AsusWRT FlashRouter’s network.

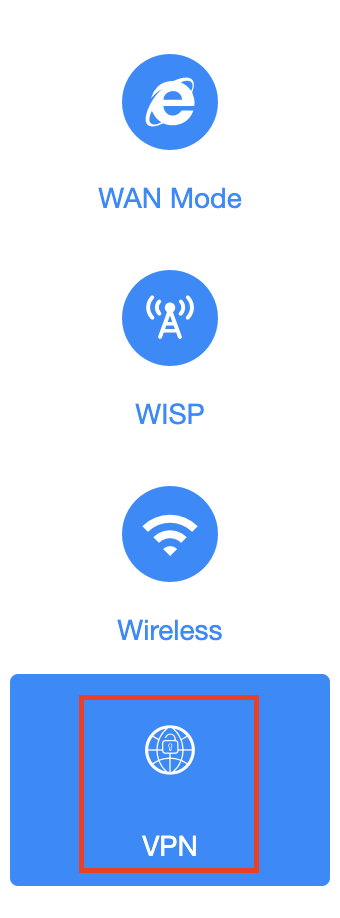
1. Navigate to the VPN tab.

Merlin VPN Tab

2. Navigate to the VPN Fusion tab.

Asus VPN Fusion

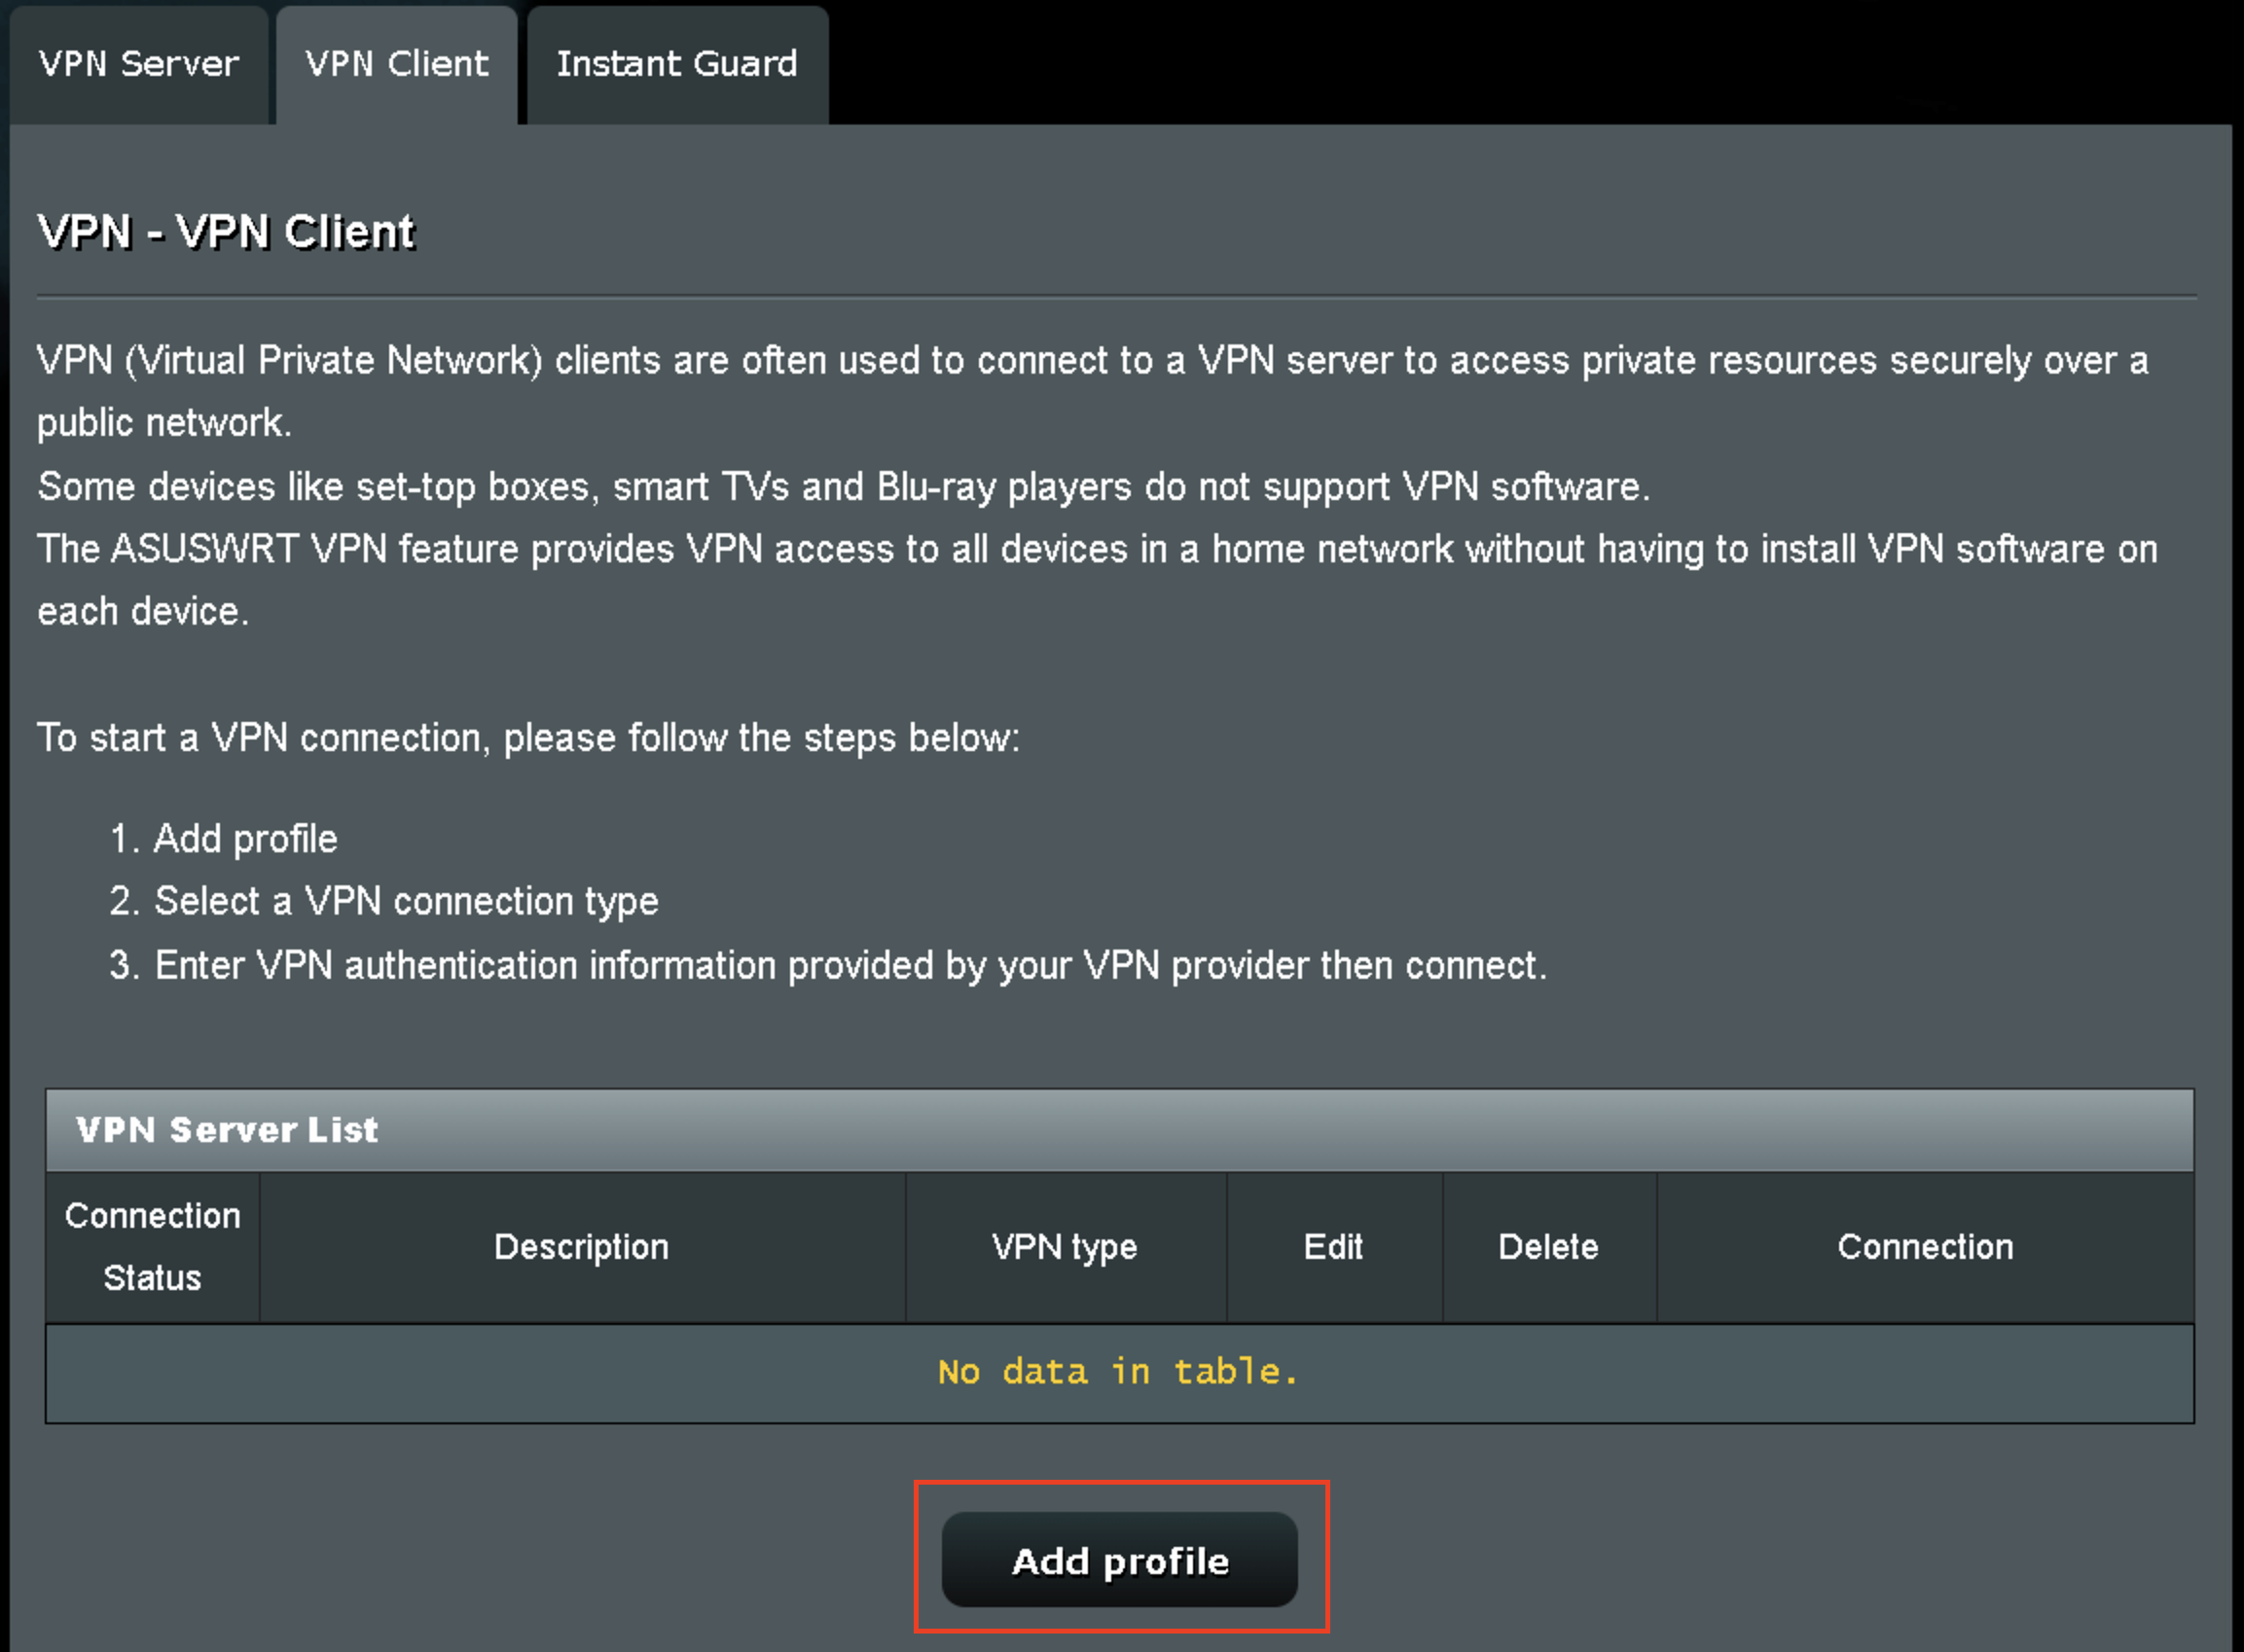
3. Click Add profile.

Asus Add profile

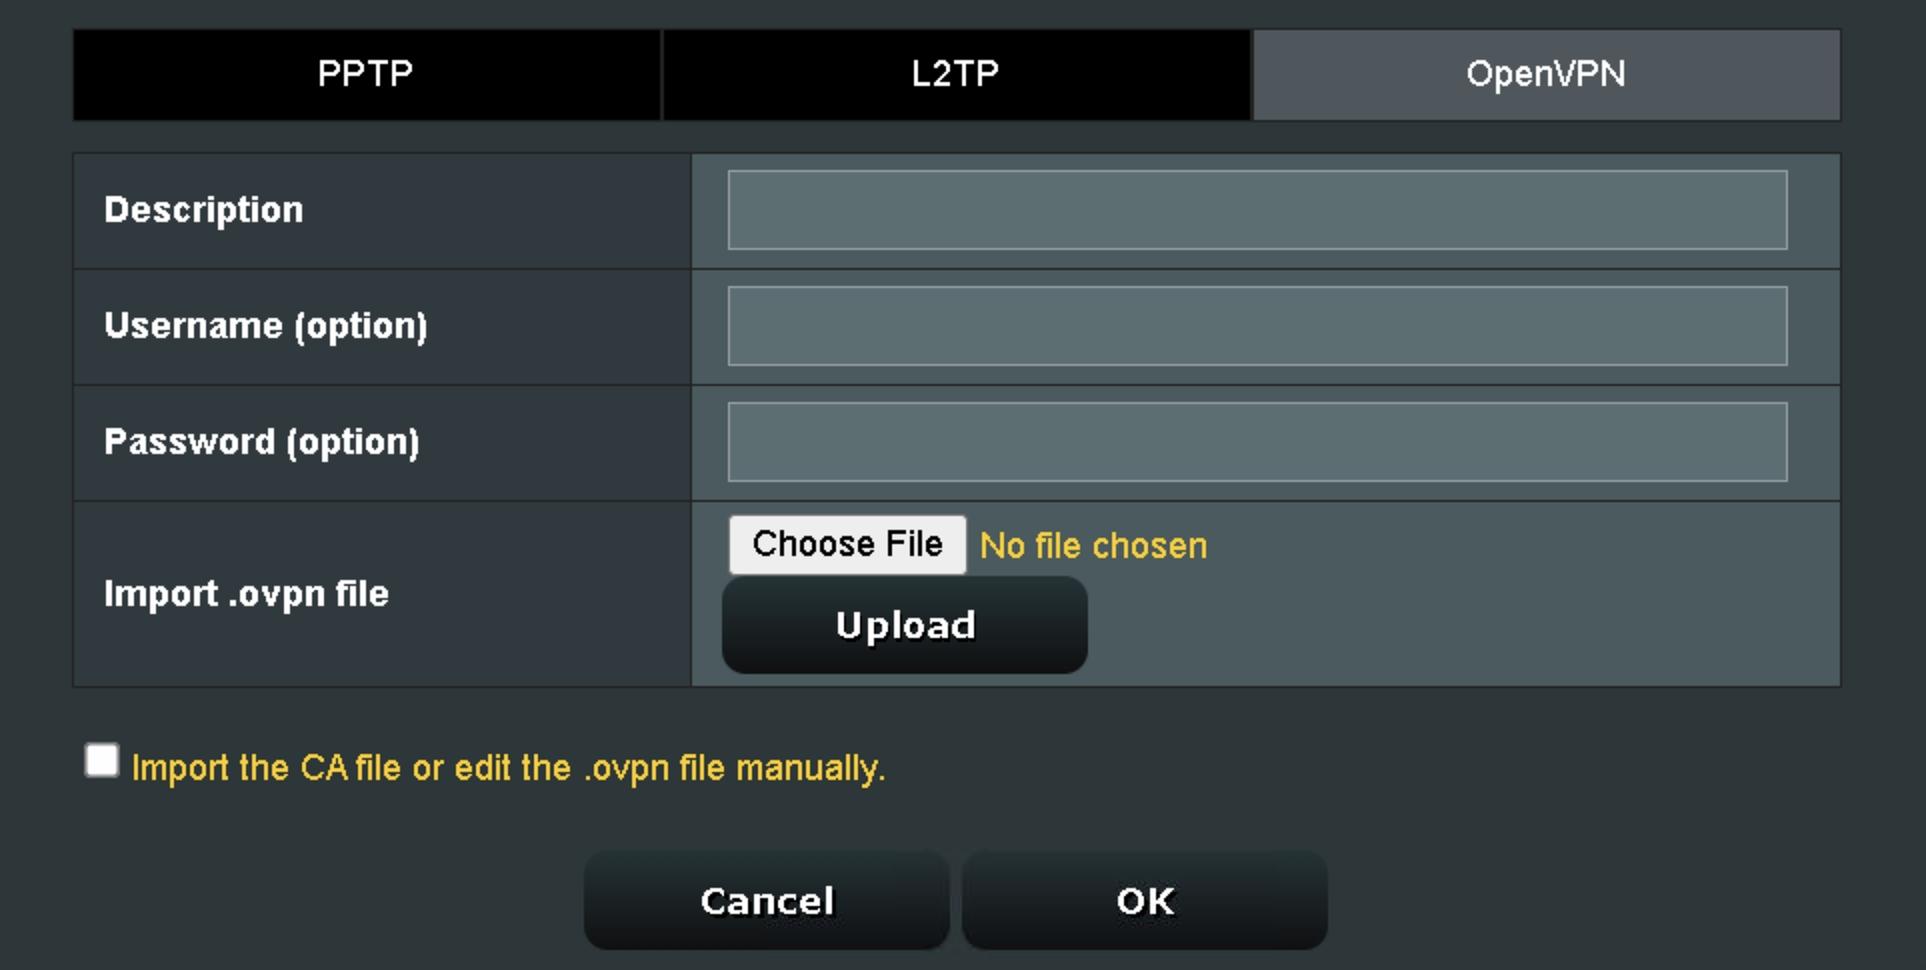
4. In the Connection Name field enter in the name you’d like to use for this OpenVPN Client profile. We typically advise entering in the location or server number here. Our example server was in New York so I have entered in IPVanish New York.

5. In the VPN Type dropdown select OpenVPN.

6. Click Import .ovpn file and select the .ovpn file you downloaded earlier. Then click Upload.

7. In the Username and Password fields paste in the IPVanish email and password you use to successfully login to your IPVanish website account.

8. Click Apply and Enable at the bottom of the page.

Asus IPVanish profile

If you only want certain devices to connect to the OpenVPN Client profile you are setting up instead of all the devices connected to the FlashRouter’s network click into the profile and disable Apply to all devices. Then click Devices and select the devices that you want to connect to VPN.

Asus VPN devices
Asus VPN select devices

9. At the top of the page set the Service State toggle to ON to activate the VPN connection.

Asus IPVanish Connected

Verify a successful IPVanish connection

  1. You should now see a CONNECTED message.
  2. Visit IPVanish’s IP Check to verify your new IP address and virtual location.

In some cases you may notice that the location is not showing the same location as the server you have input in your router settings; this is because geo tracking tools are often tricked by VPN connections. As long as you see an IP address that is not the same as your normal Internet IP address then you are indeed connected to IPVanish.

How to change the IPVanish server

  1. Follow the steps at the top of the page to obtain a new .ovpn file.
  2. Then proceed with the settings same as initial setup.
TROUBLESHOOTING

Still having issues? Visit the VPN Troubleshooting section.

Troubleshoot Here

HMA VPN Manual OpenVPN Setup

TeamFlashRouters · Apr 11, 2019 ·

Please note: HMA no longer allows router based integration, please visit our top recommended VPNs.

TROUBLESHOOTING

Still having issues? Visit the VPN Troubleshooting section.

Troubleshoot Here

CyberGhost AsusWRT OpenVPN Setup

TeamFlashRouters · Apr 29, 2024 ·

Preparing for CyberGhost Setup

Obtain your CyberGhost OpenVPN information

If you are not already a CyberGhost user Sign Up Now.

1. Log in to your account on the CyberGhost website.

CyberGhost Website Login

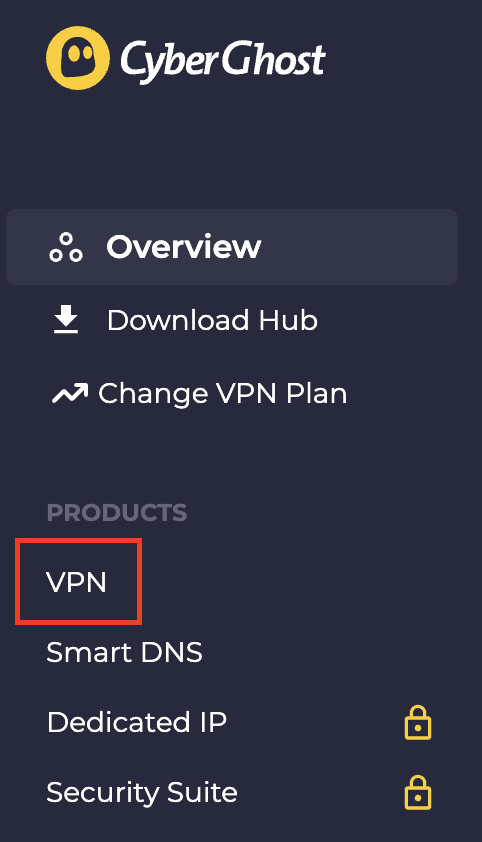
2. Select VPN.

CyberGhost VPN

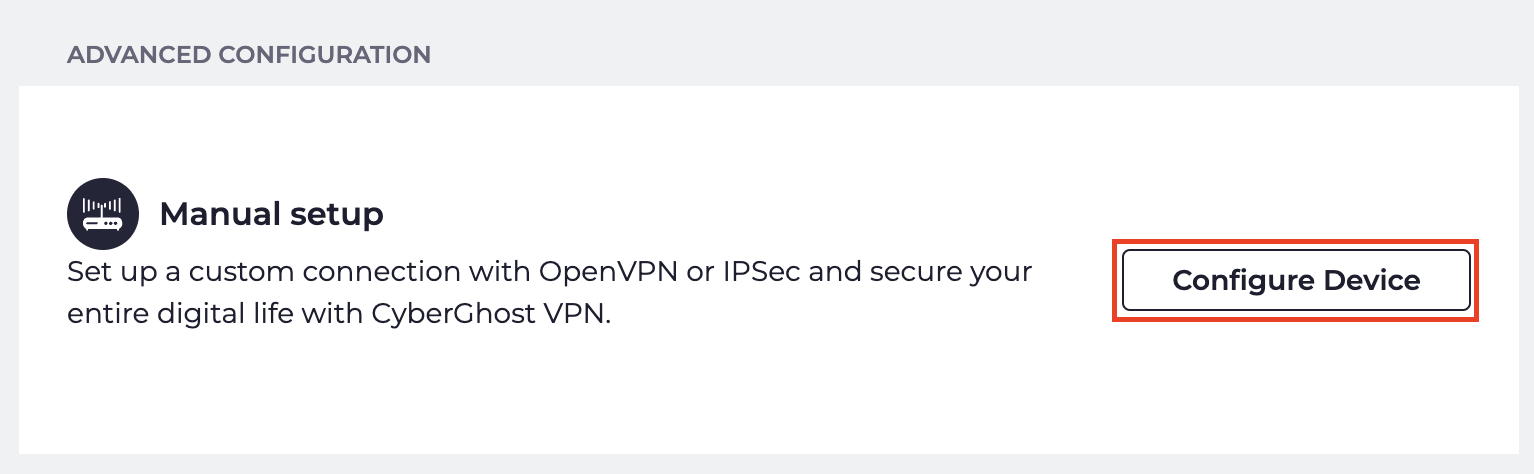
3. Click Configure New Device.

CyberGhost Configure Device

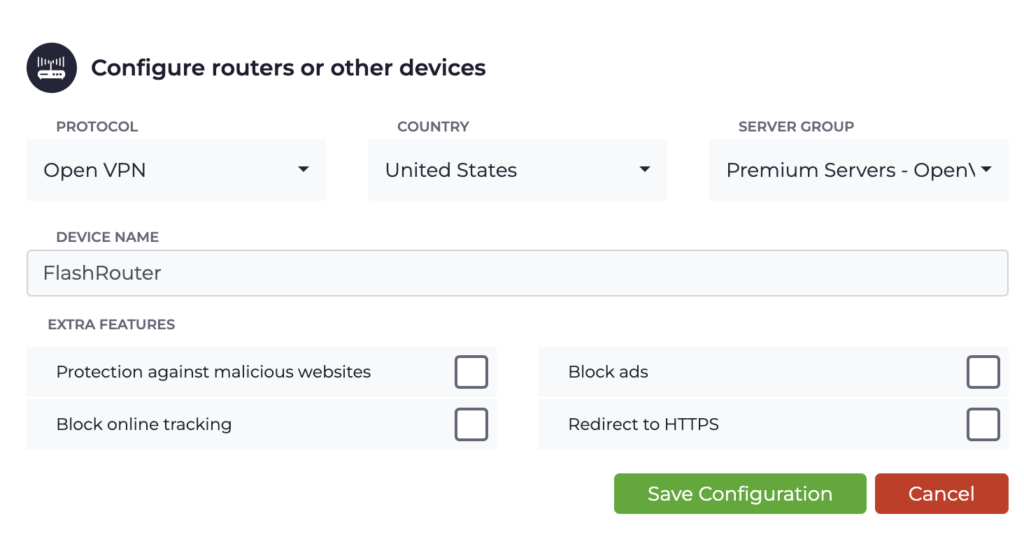
4. Set Protocol to OpenVPN. Select the Country you would like to connect to. Select the Server Group. Name the device in the Device Name field. Click Save Configuration.

CyberGhost protocol and location

5. Press View configuration.

CyberGhost view configuration

6. Copy the Username, and Password that appear to a notepad, since you will need this information later in the setup process. Click Download Configuration.

CyberGhost Website OpenVPN Configuration Files Generator 1

Open the folder that was downloaded. Then open the ca.crt the client.crt, and client.key files with NotePad++ for Windows or TextEdit for Apple. All CyberGhost servers have different keys and certificates.

AsusWRT Router Setup for CyberGhost

Login to AsusWRT firmware settings in a browser on any computer or smart device connected to the AsusWRT FlashRouter’s network.

1. Navigate to the VPN tab.

Merlin VPN Tab

2. Navigate to the VPN Fusion tab.

Asus VPN Fusion

3. Click Add profile.

Asus Add profile

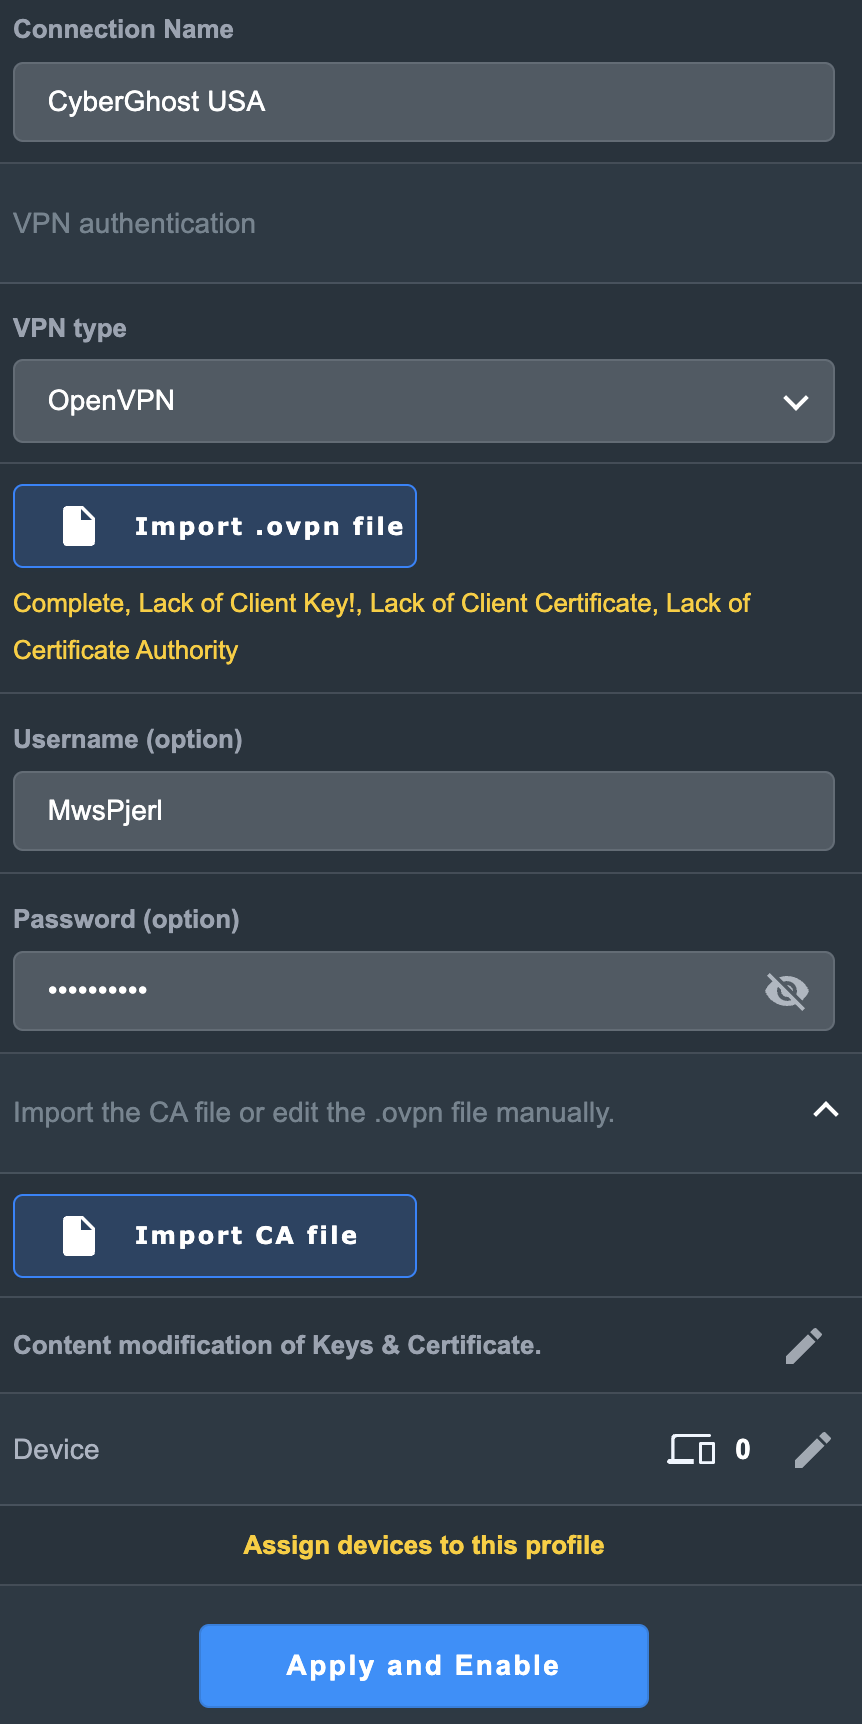
4. In the Connection Name field enter in the name you’d like to use for this OpenVPN Client profile. We typically advise entering in the location or server number here. Our example server was in USA so I have entered in CyberGhost USA.

5. In the VPN Type dropdown select OpenVPN.

6. Click Import .ovpn file and select the openvpn.ovpn file from the folder you downloaded earlier. Then click Upload.

7. In the Username and Password fields enter in the CyberGhost assigned username and password that you obtained earlier.

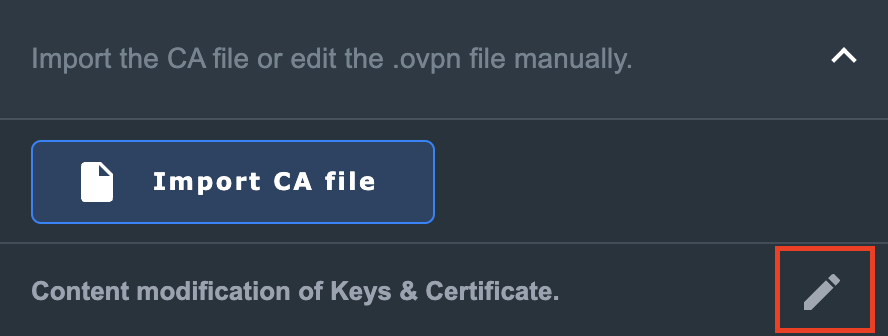
8. After uploading the openvpn.ovpn file you will get a message that says “Complete, Lack of Client Key!, Lack of Client Certificate, Lack of Certificate Authority”. For CyberGhost you need to enter in these details manually. Click Import the CA file or edit the .ovpn file manually and then click the edit icon next to Content modification of Keys and Certificate.

Asus CyberGhost import certs and keys

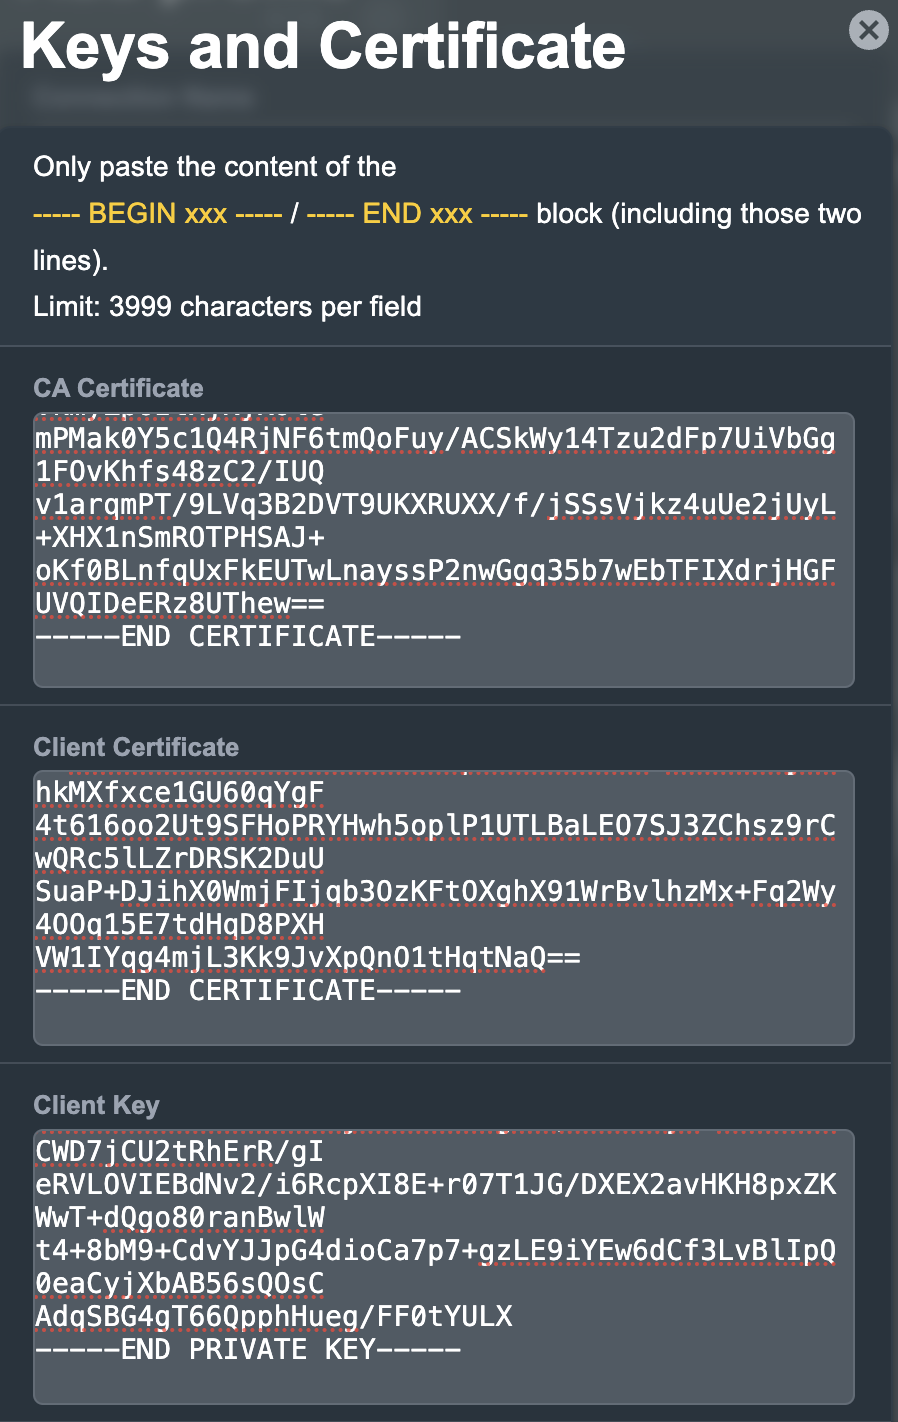
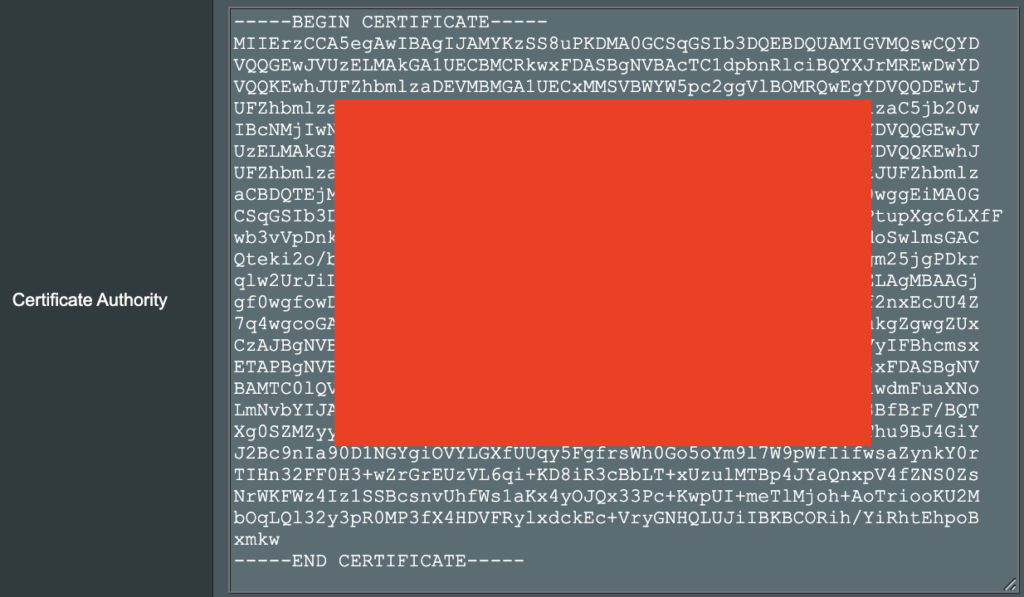
9. In the Certificate Authority field paste in the entire content of the ca.crt file.

—– BEGIN xxx —– / —– END xxx —– block (including those two lines).

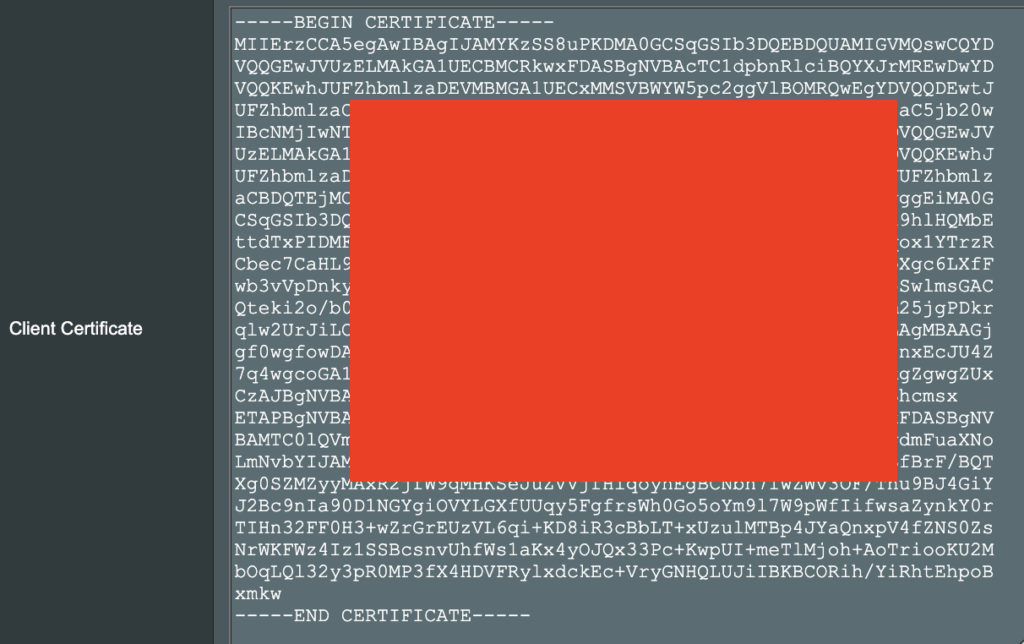
10. In the Client Certificate field paste in the entire content of the client.crt file.

—– BEGIN xxx —– / —– END xxx —– block (including those two lines).

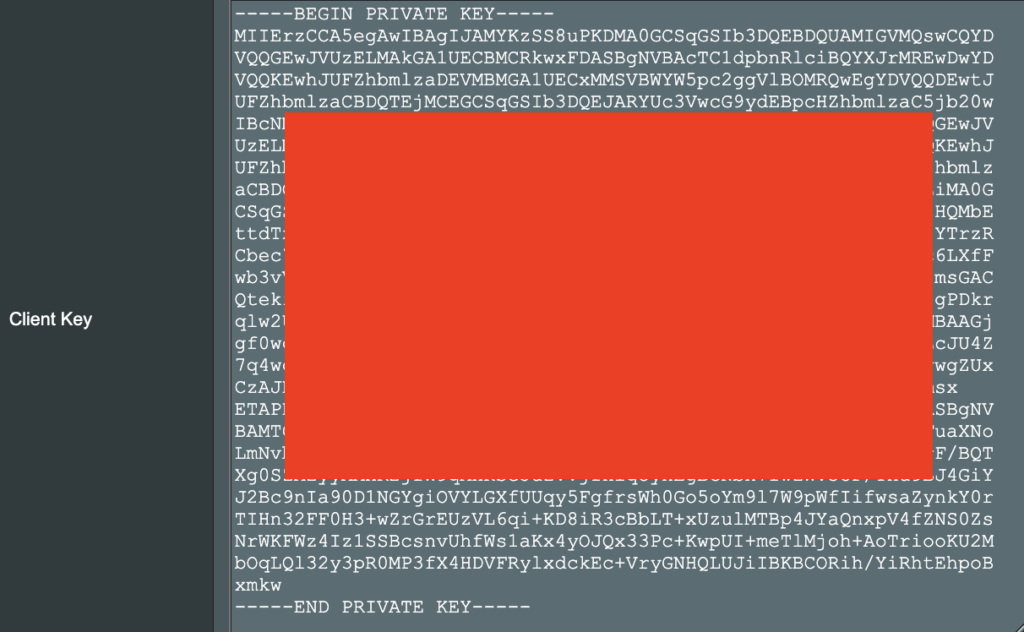
11. In the Client Key field paste in the entire content of the client.key file.

—– BEGIN xxx —– / —– END xxx —– block (including those two lines).

Then click OK.

Asus CyberGhost enter certs and keys

8. Click Apply and Enable at the bottom of the page.

Asus CyberGhost profile

If you only want certain devices to connect to the OpenVPN Client profile you are setting up instead of all the devices connected to the FlashRouter’s network click into the profile and disable Apply to all devices. Then click Devices and select the devices that you want to connect to VPN.

Asus VPN devices
Asus VPN select devices

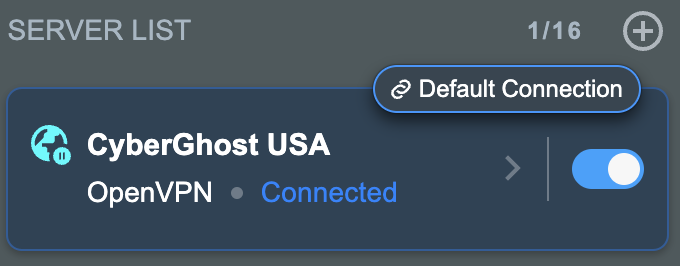
9. At the top of the page set the Service State toggle to ON to activate the VPN connection.

Asus CyberGhost connected

Verify a successful CyberGhost connection

  1. You should now see a CONNECTED message.
  2. Visit What is my IP Address from a private/incognito browser to verify your new IP address and virtual location.

In some cases you may notice that the location is not showing the same location as the server you have input in your router settings; this is because geo tracking tools are often tricked by VPN connections. As long as you see an IP address that is not the same as your normal Internet IP address then you are indeed connected to CyberGhost.

How to change the CyberGhost server

  1. Follow the steps at the top of the page to create a new CyberGhost location profile in your account.
  2. Then proceed with the settings same as initial setup.

TROUBLESHOOTING

Still having issues? Visit the VPN Troubleshooting section.

Troubleshoot Here

Getting Started With Your FlashRouter

Getting Started With Your FlashRouter

  1. Connect FlashRouter to Internet
  2. Access FlashRouter DD-WRT firmware settings
  3. Connect FlashRouter to VPN 
VIEW ALL SETUP GUIDES
TROUBLESHOOTING
FAQS

Setting Up Your VPN Service

Select your operating system below to setup the FlashRouters Privacy App on your router, the easiest way to connect to the best VPN services.  For ExpressVPN FlashRouter users, please view the following section for setting up the ExpressVPN app.

Windows

Mac

Android

iPhone

ExpressVPN NETGEAR ROUTERS
ExpressVPN LINKSYS ROUTERS

More Ways to Get Help

Can’t find the answer you are looking for? Open a support ticket and our support team will be there to assist you.

Obtain your NordVPN manual Username and Password for OpenVPN

TeamFlashRouters · Aug 14, 2024 ·

Obtain your NordVPN manual Username and Password

If you are not already an NordVPN user Sign Up Now.

1. Log in to your account on the NordVPN website.

NordVPN login

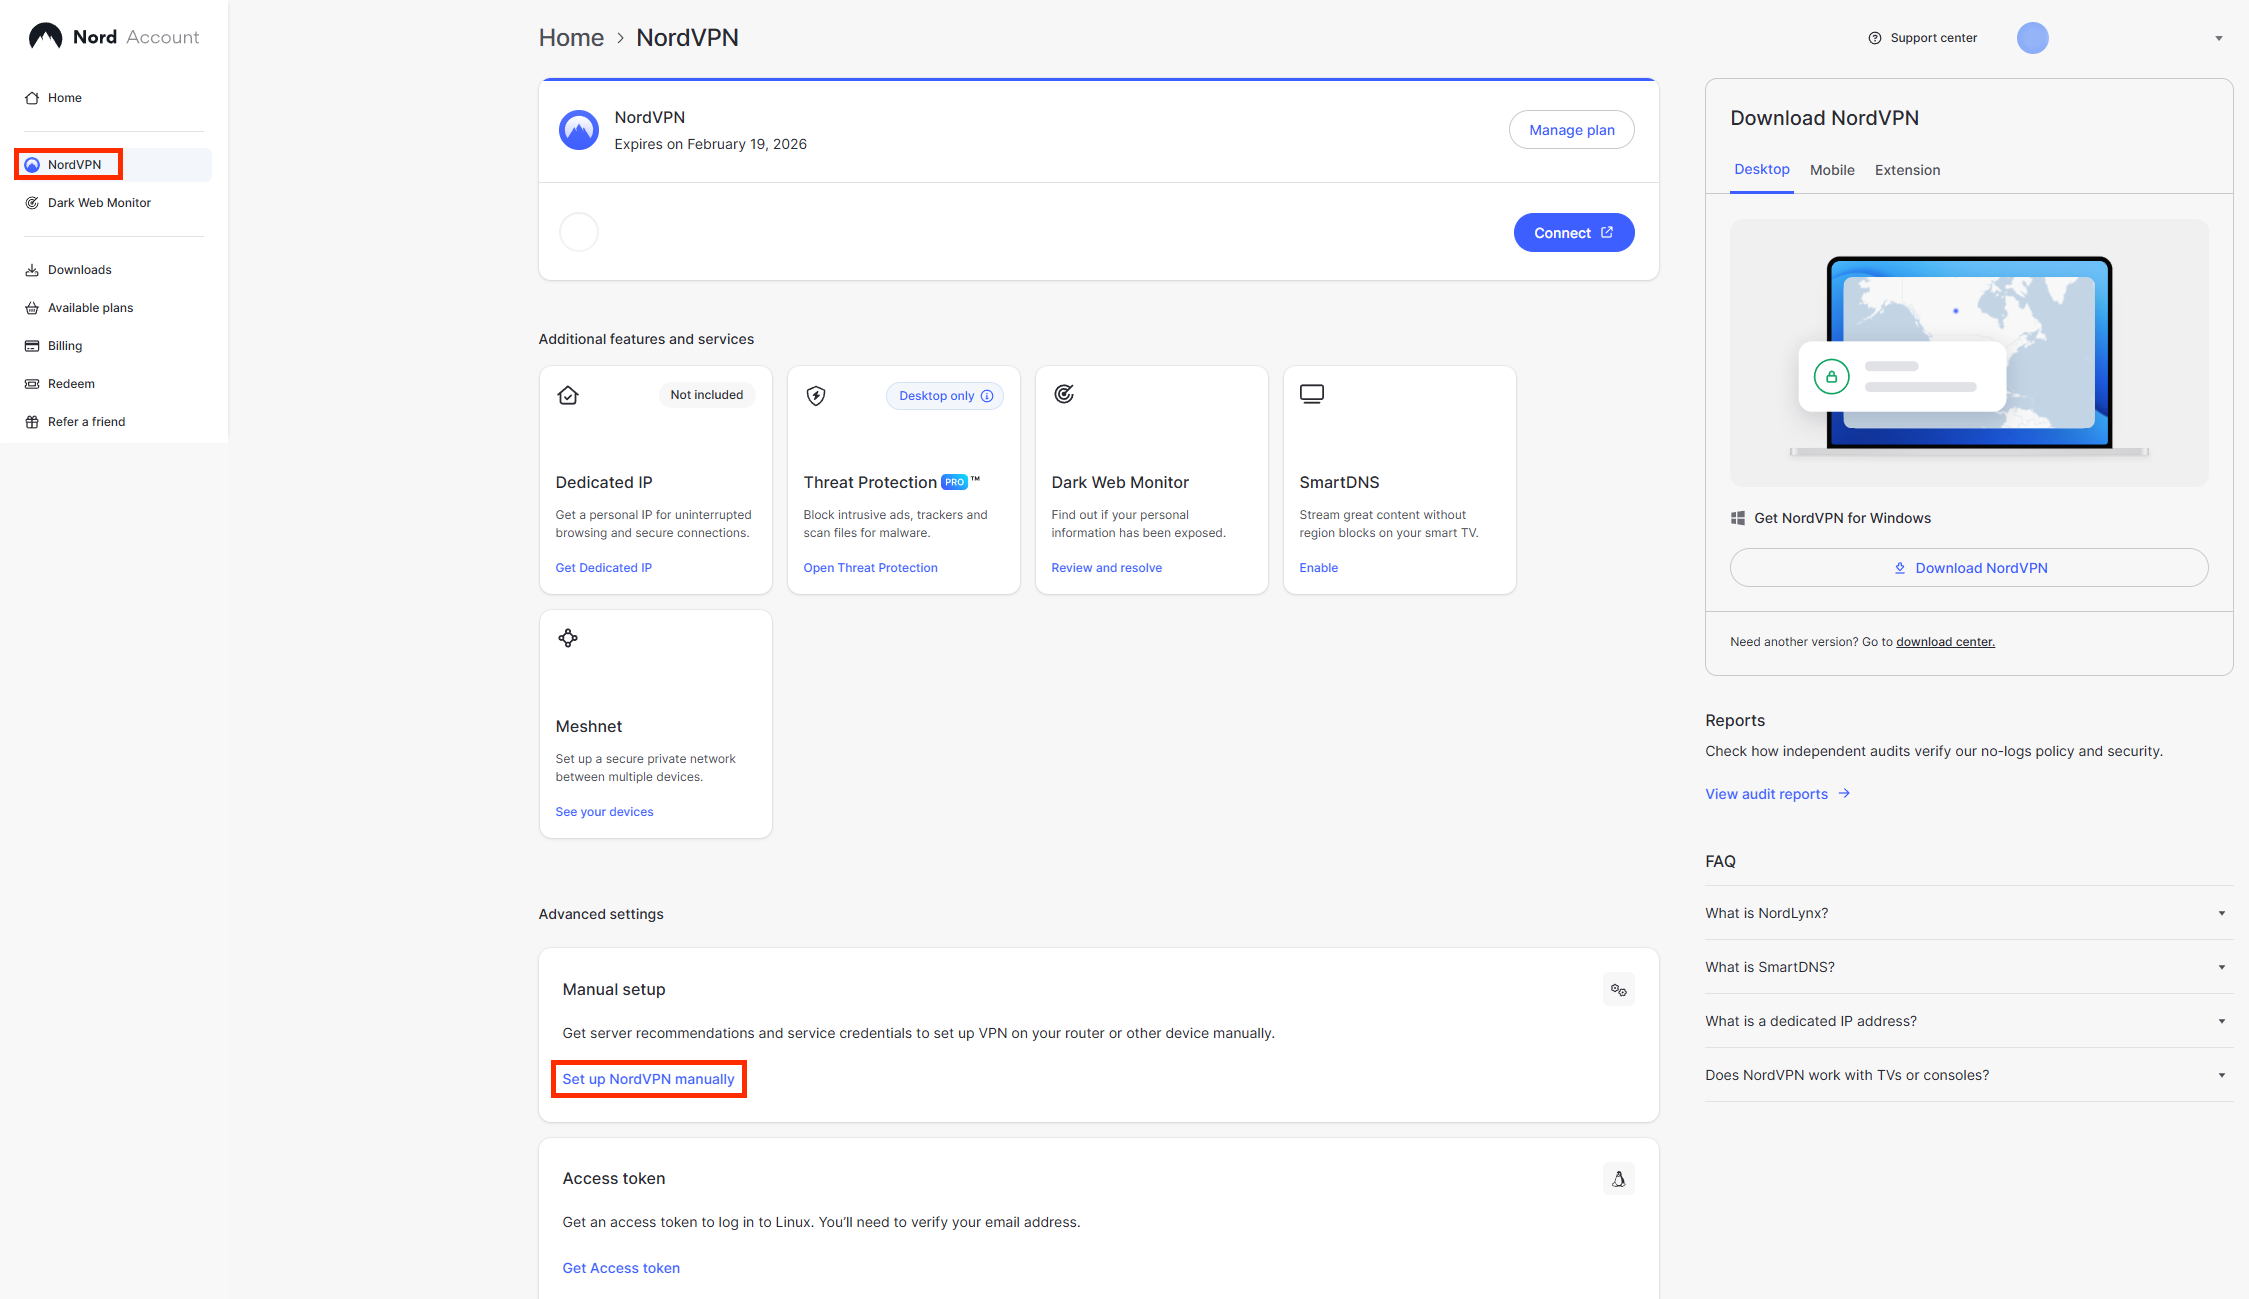
2. Click NordVPN on the left hand side and then click Setup NordVPN manually.

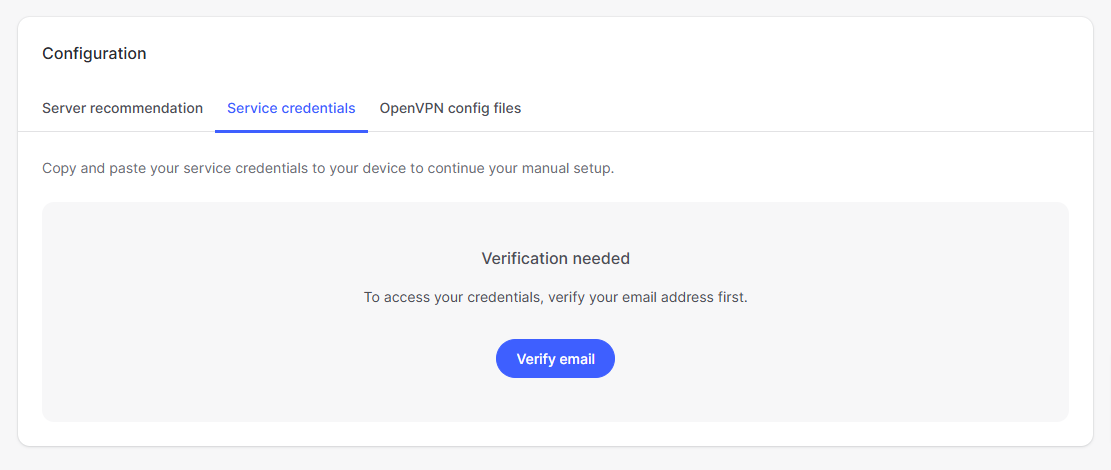
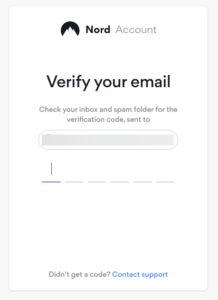
3. Go to the Service Credentials section and click Verify email. Enter in the verification code that was sent to your email.

Nord Email Verification
NordVPN verify code

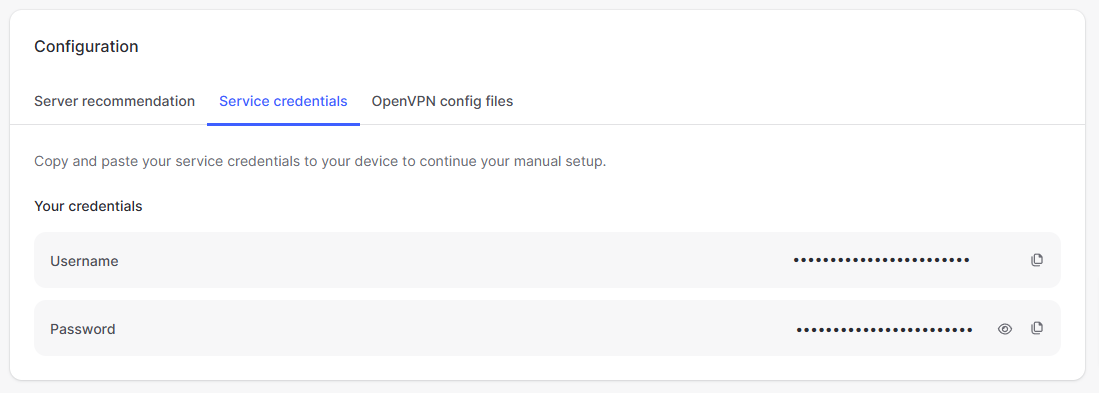
4. Copy and paste your NordVPN manual username and password to a secure location. This is the username and password you will enter into the router settings to connect to NordVPN OpenVPN.

NordVPN OpenVPN Credentials

TROUBLESHOOTING

Still having issues? Visit the VPN Troubleshooting section.

Troubleshoot Here

IVPN Manual OpenVPN Setup

TeamFlashRouters · Apr 16, 2019 ·

Preparing for Manual IVPN Setup

Verify your IVPN login information

If you are not already an IVPN user Sign Up Now.

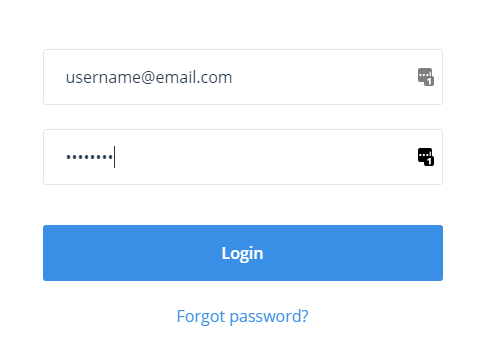
Log in to your account on the IVPN website.

FlashRouter Privacy App - IVPN Login

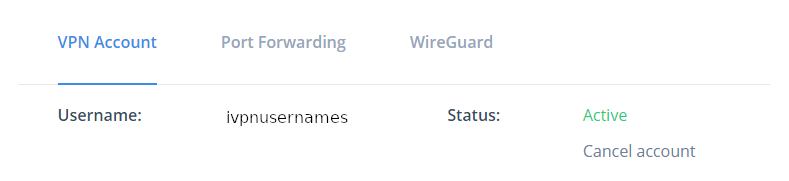
Locate and Copy the Username displayed on the VPN Accounts page.

FlashRouters DD-WRT Privacy APP IVPN OpenVPN Specific Username and Password

IVPN Server Addresses

View a full list of IVPN servers.

United States

Atlanta:
us-ga.gw.ivpn.net

Dallas:
us-tx.gw.ivpn.net

Los Angeles
:
us-ca.gw.ivpn.net

Miami
:
us-fl.gw.ivpn.net

New Jersey
:
us-nj.gw.ivpn.net

Salt Lake City
:
us-ut.gw.ivpn.net

DD-WRT Router Setup for IVPN

Navigate to Services > VPN

Enter IVPN settings

OpenVPN Client

Start OpenVPN Client

If you wish to disable your VPN connection simply set this to Disable at any time and click Apply Settings.

Server IP/Name

Copy and paste the server you would like to connect to from the server list above. Be sure there are no extra spaces or characters.

If you wish to change PureVPN connection locations, THIS IS THE ONLY FIELD YOU NEED TO CHANGE.

Port

443 for TCP
2049 for UDP

Tunnel Device

TUN

Tunnel Protocol

TCP or UDP

Encryption cipher

AES-256-CBC

Hash Algorithm

SHA1

User Pass Authentication

Enable

Username

Enter the Username you noted from the Home page above.
eg. ivpn1234567

Password

Enter the Password you successfully logged in to your IVPN account with.

Advanced Options

Enable

TLS Cipher

None

LZO Compression

Adaptive

NAT

Enable

Firewall Protection

Enable

TLS Auth Key

-----BEGIN OpenVPN Static key V1-----
ac470c93ff9f5602a8aab37dee84a528
14d10f20490ad23c47d5d82120c1bf85
9e93d0696b455d4a1b8d55d40c2685c4
1ca1d0aef29a3efd27274c4ef09020a3
978fe45784b335da6df2d12db97bbb83
8416515f2a96f04715fd28949c6fe296
a925cfada3f8b8928ed7fc963c156327
2f5cf46e5e1d9c845d7703ca881497b7
e6564a9d1dea9358adffd435295479f4
7d5298fabf5359613ff5992cb57ff081
a04dfb81a26513a6b44a9b5490ad265f
8a02384832a59cc3e075ad545461060b
7bcab49bac815163cb80983dd51d5b1f
d76170ffd904d8291071e96efc3fb777
856c717b148d08a510f5687b8a8285dc
ffe737b98916dd15ef6235dee4266d3b
-----END OpenVPN Static key V1-----

Additional Config

tls-client
tls-cipher TLS-DHE-RSA-WITH-AES-256-CBC-SHA
resolv-retry infinite
keepalive 10 60
nobind
persist-key
persist-tun
persist-remote-ip
verb 3

Policy Based Routing

This field can be used for split VPN and Dual Gateway routing.

CA Cert

-----BEGIN CERTIFICATE-----
MIIGoDCCBIigAwIBAgIJAJjvUclXmxtnMA0GCSqGSIb3DQEBCwUAMIGMMQswCQYD
VQQGEwJDSDEPMA0GA1UECAwGWnVyaWNoMQ8wDQYDVQQHDAZadXJpY2gxETAPBgNV
BAoMCElWUE4ubmV0MQ0wCwYDVQQLDARJVlBOMRgwFgYDVQQDDA9JVlBOIFJvb3Qg
Q0EgdjIxHzAdBgkqhkiG9w0BCQEWEHN1cHBvcnRAaXZwbi5uZXQwHhcNMjAwMjI2
MTA1MjI5WhcNNDAwMjIxMTA1MjI5WjCBjDELMAkGA1UEBhMCQ0gxDzANBgNVBAgM
Blp1cmljaDEPMA0GA1UEBwwGWnVyaWNoMREwDwYDVQQKDAhJVlBOLm5ldDENMAsG
A1UECwwESVZQTjEYMBYGA1UEAwwPSVZQTiBSb290IENBIHYyMR8wHQYJKoZIhvcN
AQkBFhBzdXBwb3J0QGl2cG4ubmV0MIICIjANBgkqhkiG9w0BAQEFAAOCAg8AMIIC
CgKCAgEAxHVeaQN3nYCLnGoEg6cY44AExbQ3W6XGKYwC9vI+HJbb1o0tAv56ryvc
6eS6BdG5q9M8fHaHEE/jw9rtznioiXPwIEmqMqFPA9k1oRIQTGX73m+zHGtRpt9P
4tGYhkvbqnN0OGI0H+j9R6cwKi7KpWIoTVibtyI7uuwgzC2nvDzVkLi63uvnCKRX
cGy3VWC06uWFbqI9+QDrHHgdJA1F0wRfg0Iac7TE75yXItBMvNLbdZpge9SmplYW
FQ2rVPG+n75KepJ+KW7PYfTP4Mh3R8A7h3/WRm03o3spf2aYw71t44voZ6agvslv
wqGyczDytsLUny0U2zR7/mfEAyVbL8jqcWr2Df0m3TA0WxwdWvA51/RflVk9G96L
ncUkoxuBT56QSMtdjbMSqRgLfz1iPsglQEaCzUSqHfQExvONhXtNgy+Pr2+wGrEu
SlLMee7aUEMTFEX/vHPZanCrUVYf5Vs8vDOirZjQSHJfgZfwj3nL5VLtIq6ekDhS
AdrqCTILP3V2HbgdZGWPVQxl4YmQPKo0IJpse5Kb6TF2o0i90KhORcKg7qZA40sE
bYLEwqTM7VBs1FahTXsOPAoMa7xZWV1TnigF5pdVS1l51dy5S8L4ErHFEnAp242B
DuTClSLVnWDdofW0EZ0OkK7V9zKyVl75dlBgxMIS0y5MsK7IWicCAwEAAaOCAQEw
gf4wHQYDVR0OBBYEFHUDcMOMo35yg2A/v0uYfkDE11CXMIHBBgNVHSMEgbkwgbaA
FHUDcMOMo35yg2A/v0uYfkDE11CXoYGSpIGPMIGMMQswCQYDVQQGEwJDSDEPMA0G
A1UECAwGWnVyaWNoMQ8wDQYDVQQHDAZadXJpY2gxETAPBgNVBAoMCElWUE4ubmV0
MQ0wCwYDVQQLDARJVlBOMRgwFgYDVQQDDA9JVlBOIFJvb3QgQ0EgdjIxHzAdBgkq
hkiG9w0BCQEWEHN1cHBvcnRAaXZwbi5uZXSCCQCY71HJV5sbZzAMBgNVHRMEBTAD
AQH/MAsGA1UdDwQEAwIBBjANBgkqhkiG9w0BAQsFAAOCAgEAABAjRMJy+mXFLezA
Z8iUgxOjNtSqkCv1aU78K1XkYUzbwNNrSIVGKfP9cqOEiComXY6nniws7QEV2IWi
lcdPKm0x57recrr9TExGGOTVGB/WdmsFfn0g/HgmxNvXypzG3qulBk4qQTymICds
l9vIPb1l9FSjKw1KgUVuCPaYq7xiXbZ/kZdZX49xeKtoDBrXKKhXVYoWus/S+k2I
S8iCxvcp599y7LQJg5DOGlbaxFhsW4R+kfGOaegyhPvpaznguv02i7NLd99XqJhp
v2jTUF5F3T23Z4KkL/wTo4zxz09DKOlELrE4ai++ilCt/mXWECXNOSNXzgszpe6W
As0h9R++sH+AzJyhBfIGgPUTxHHHvxBVLj3k6VCgF7mRP2Y+rTWa6d8AGI2+Raey
V9DVVH9UeSoU0Hv2JHiZL6dRERnyg8dyzKeTCke8poLIjXF+gyvI+22/xsL8jcNH
i9Kji3Vpc3i0Mxzx3gu2N+PL71CwJilgqBgxj0firr3k8sFcWVSGos6RJ3IvFvTh
xYx0p255WrWM01fR9TktPYEfjDT9qpIJ8OrGlNOhWhYj+a45qibXDpaDdb/uBEmf
2sSXNifjSeUyqu6cKfZvMqB7pS3l/AhuAOTT80E4sXLEoDxkFD4C78swZ8wyWRKw
sWGIGABGAHwXEAoDiZ/jjFrEZT0=
-----END CERTIFICATE-----

CLICK APPLY SETTINGS

Leave all settings not mentioned above as their default setting.

Verify a successful IVPN connection

Navigate to Status > OpenVPN

  1. You should now see a CONNECTED SUCCESS message.
  2. Visit WhatIsMyIPAddress to verify your new IP address, virtual location, and status as Protected at the top of the page.

In some cases you may notice that the location is not showing the same location as the server you have input in your router settings; this is because geo tracking tools are often tricked by VPN connections. As long as you see an IP address that is not the same as your normal Internet IP address then you are indeed connected to IVPN.

Back up your settings

Navigate to Administration > Backup

  1. Click the Backup button.
  2. A file named nvrambak.bin will be saved to your computer.
  3. You can load nvrambak.bin to restore your settings in the event of a reset.

How to change the IVPN server

  1. Copy the new IVPN server address from the above server list.
  2. Paste the server into the Server IP/Name field.
  3. Click Apply Settings.

TROUBLESHOOTING

Still having issues? Visit the VPN Troubleshooting section.

Troubleshoot Here

How do I connect a Wireless Extender to my FlashRouter network?

Dave · Apr 29, 2019 ·

The settings of your FlashRouter do not need to change to connect an extender to the FlashRouter’s network. Simply access the settings of the extender device and enter the FlashRouter’s wireless network name and the correct wireless password.

The extender will then connect via wireless to the FlashRouter and add wireless range to your network.

To use a DD-WRT router as an extender follow our Advanced Wireless Setup Guides.

It is also easy to setup a Mesh system like Orbi or Velop and send your entire Mesh network through the FlashRouter VPN Network, for a VPN connected Mesh Network.

Simply connect from an open LAN port on your FlashRouter to the WAN port on your Mesh base station and then use your Mesh smart apps to complete the setup from there.

What do the lights on my Roqos Core mean?

TeamFlashRouters · Mar 3, 2022 ·

  1. White (looks blueish white on Teal colored Roqos Cores): System startup
  2. Solid Red: System is up, but there is no internet connection. Roqos Core cannot detect a network link either.
  3. Flashing Red: System is up and there is an ethernet cable connected to Internet port, however Roqos Core is unable to reach the internet. Usually happens with bad ethernet cable, or cable modem/ISP modem not giving IP address to Roqos Core due to ISP provisioning issues, or some other type of network setting blocking Roqos Core’s access to the internet. First thing to try in this scenario is to reboot the ISP router/modem upstream of Roqos Core.
  4. Flashing Blue: Roqos Core is up and connected to the internet, but it is not yet activated. Brand new Roqos Cores, or Roqos Cores that are factory reset will show this behavior when they are ready to be activated again.
  5. Blue (deep blue color, different from #1): Roqos Core is up and activated, everything is normal.

SmartDNSProxy SmartDNS Setup

TeamFlashRouters · Jun 13, 2019 ·

SmartDNSProxy offers a SmartDNS service for unblocking geo-restricted content without the encryption of a VPN service. SmartDNS routes DNS servers to different regions which “tricks” the website to allow access to previously restricted content.

SmartDNS does not change your IP Address or provide the encryption that a VPN connection does. This can result in faster speeds and unblocked content.

SmartDNS and VPN should not be configured at the same time. When using a SmartDNS connection, make sure to disable your VPN connection on the FlashRouter.

Register your IP Address

If you are not already a SmartDNSProxy user Sign Up Now.

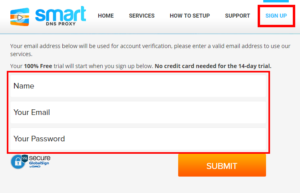
Click on Sign Up and fill in the requested information.

SmartDNSProxy SmartDNS Account Sign Up For DD-WRT FlashRouter

Access the e-mail you entered and Verify your new account.

SmartDNSProxy SmartDNS Activate DNS for DD-WRT FlashRouter

Your account will now be verified.

Activate SmartDNSProxy SmartDNS Service and Subscription

Login to SmartDNSProxy

SmartDNSProxy Server Location Addresses for FlashRouter DD-WRT Settings

Visit SmartDNSProxy’s DNS servers list and note the DNS servers of the location you would like to access content from.

Enter SmartDNSProxy SmartDNS servers on your FlashRouter

Navigate to Setup > Basic Setup

  1. Scroll down to Network Address Server Settings (DHCP).
  2. Enter in any combination of SmartDNSProxy SmartDNS servers you noted into Static DNS fields 1 and 2.
  3. Click Apply Settings at the bottom of the page.
  4. Reboot the FlashRouter.

Once the router is fully booted back up, you can access your desired regional content on any device that connects to the FlashRouter’s network.

ExpressVPN Asus AX1800S OpenVPN Setup

TeamFlashRouters · Feb 26, 2024 ·

Preparing for ExpressVPN Asus AX1800S Setup

Obtain your ExpressVPN OpenVPN Information

If you are not already an ExpressVPN user Sign Up Now.

1. Log in to your account on the ExpressVPN website.

ExpressVPN login page

2. Successfully log in with your account information. Select More.

3. Select Manual Configuration and copy the Username and Password that are displayed on the right hand side of the screen.

ExpressVPN Manual Configuration
ExpressVPN username and password

4. Click the Server Location that you want to connect to. This will download a .ovpn file to your computer that we will use later on. There is no need to open the file. For this example I have selected New York but feel free to select any server listed there.

ExpressVPN Download .ovpn file

Asus AX1800S Router Setup for ExpressVPN

Login to Asus firmware settings in a browser on any computer or smart device connected to the FlashRouter’s network.

1. Navigate to the VPN tab.

Merlin VPN Tab

2. Navigate to the VPN Client tab.

Asus AX1800S VPN Settings

3. Click Add Profile.

Asus AX1800S VPN Settings

4. Click Choose file and select the .ovpn file you downloaded earlier. Then click Upload.

Asus AX1800S OpenVPN upload

5. In the Description field enter in the name you’d like to use for this OpenVPN Client profile. We typically advise entering in the location or server number here.

6. Enter your ExpressVPN username and password that you obtained earlier in the Username and Password. Note that these are different from your ExpressVPN email login and password.

7. Click the Activate button.

Verify a successful ExpressVPN connection

  1. You should now see a check mark in the Connection Status area.
  2. Visit ExpressVPN’s IP Check to verify your new IP address and virtual location.

In some cases you may notice that the location is not showing the same location as the server you have input in your router settings; this is because geo tracking tools are often tricked by VPN connections. As long as you see an IP address that is not the same as your normal Internet IP address then you are indeed connected to ExpressVPN.

How to change the ExpressVPN server

  1. Follow the steps at the top of the page to obtain a new .ovpn file.
  2. Then proceed with the settings same as initial setup.
  3. Be sure to deactivate a previously active connection before activating the new one. You do not want to connect to two at the same time.

TROUBLESHOOTING

Still having issues? Visit the VPN Troubleshooting section.

Troubleshoot Here

Why are streaming services blocked while connected to VPN?

TeamFlashRouters · Jun 4, 2019 ·

Streaming services and VPN

Most popular streaming services such as Netflix, Hulu, and Amazon Prime block incoming VPN connections. This does not mean the VPN is not working, it simply means they have recognized you are connecting to a VPN server and filtered that server from being able to stream.

Below are several options for you to follow if you encounter this issue while connected to a VPN on your FlashRouter.

VPN provider server recommendation

Contact your VPN provider for a server recommendation that is not blocked by popular streaming services. Be sure to mention that you are connecting to VPN via a router instead of the computer client. If your VPN provider does not have a helpful suggestion or server recommendation please try the below options or contact us for a solution.

Bypass VPN by device

The FlashRouters Privacy App has a VPN bypass by device feature that can be used on devices dedicated to streaming.

Use SmartDNS

If access to streaming services not in your region is a higher priority for you then VPN encryption we recommend using a SmartDNS service on your FlashRouter to access the content you desire.

IPVanish Asus AX1800S OpenVPN Setup

TeamFlashRouters · Feb 26, 2024 ·

Preparing for IPVanish Asus AX1800S Setup

Download your IPVanish .ovpn file

If you are not already an IPVanish user Sign Up Now.

1. Log in to your account on the IPVanish website.

IPVanish login

2. Successfully log in with your account information then go to IPVanish .ovpn file page.

3. Click on the .ovpn file for the server location you want to use to dowloand the .ovpn file. Do not open this file.

IPVanish download ovpn

Asus AX1800S Router Setup for IPVanish

Login to Asus firmware settings in a browser on any computer or smart device connected to the FlashRouter’s network.

1. Navigate to the VPN tab.

Merlin VPN Tab

2. Navigate to the VPN Client tab.

Asus AX1800S VPN Settings

3. Click Add Profile.

Asus AX1800S VPN Settings

4. Click Choose file and select the .ovpn file you downloaded earlier. Then click Upload.

Asus AX1800S OpenVPN upload

5. In the Description field enter in the name you’d like to use for this OpenVPN Client profile. We typically advise entering in the location or server number here.

6. Enter your IPVanish account email/username and password.

7. Click the Activate button.

Verify a successful IPVanish connection

  1. You should now see a check mark in the Connection Status area.
  2. Visit IPVanish’s IP Check to verify your new IP address and virtual location.

In some cases you may notice that the location is not showing the same location as the server you have input in your router settings; this is because geo tracking tools are often tricked by VPN connections. As long as you see an IP address that is not the same as your normal Internet IP address then you are indeed connected to IPVanish.

How to change the IPVanish server

  1. Follow the steps at the top of the page to obtain a new .ovpn file.
  2. Then proceed with the settings same as initial setup.
  3. Be sure to deactivate a previously active connection before activating the new one. You do not want to connect to two at the same time.

TROUBLESHOOTING

Still having issues? Visit the VPN Troubleshooting section.

Troubleshoot Here

PrivateInternetAccess (PIA) Asus AX1800S OpenVPN Setup

TeamFlashRouters · Feb 26, 2024 ·

Preparing for PIA Asus AX1800S Setup

Download your PIA .ovpn file

If you are not already a PIA user Sign Up Now.

1. Log in to your account on the PIA website.

PIA login

2. Successfully log in with your account information then go to PIA’s OpenVPN Config Generator.

3. On the OpenVPN Configuration Generator select the following:

OpenVPN Version: OpenVPN 2.4 or newer

Select Platform: Linux

Select Region: Choose the server location you’d like to connect to

Select Port: Typically we recommend UDP/1198 RSA-2048 AES-128-CBC SHA1 for best speeds but feel free to select the one you want to use.

4. Click Generate to download the .ovpn file. Do not open this file once it is downloaded.

PIA Generate .ovpn file

Asus AX1800S Router Setup for PIA

Login to Asus firmware settings in a browser on any computer or smart device connected to the FlashRouter’s network.

1. Navigate to the VPN tab.

Merlin VPN Tab

2. Navigate to the VPN Client tab.

Asus AX1800S VPN Settings

3. Click Add Profile.

Asus AX1800S VPN Settings

4. Click Choose file and select the .ovpn file you downloaded earlier. Then click Upload.

Asus AX1800S OpenVPN upload

5. In the Description field enter in the name you’d like to use for this OpenVPN Client profile. We typically advise entering in the location here.

6. Enter your PIA account username and password.

7. Click the Activate button.

Verify a successful PIA connection

  1. You should now see a check mark in the Connection Status area.
  2. Visit PIA’s IP Check to verify your new IP address and virtual location.

In some cases you may notice that the location is not showing the same location as the server you have input in your router settings; this is because geo tracking tools are often tricked by VPN connections. As long as you see an IP address that is not the same as your normal Internet IP address then you are indeed connected to PIA.

How to change the PIA server

  1. Follow the steps at the top of the page to obtain a new .ovpn file.
  2. Then proceed with the settings same as initial setup.
  3. Be sure to deactivate a previously active connection before activating the new one. You do not want to connect to two at the same time.

TROUBLESHOOTING

Still having issues? Visit the VPN Troubleshooting section.

Troubleshoot Here

Should I be using my computer/phone/tablet VPN app while connected to the FlashRouter?

TeamFlashRouters · Jun 4, 2019 ·

  1. Do NOT connect to your VPN provider’s computer, phone, or tablet app while connected to the FlashRouter’s network. This may cause issues with access to your DD-WRT router settings as well as your internet connection.
  2. Connect any device in your home network to VPN by joining the FlashRouter’s network.

Flint/Slate GL.iNet ExpressVPN OpenVPN Setup

TeamFlashRouters · May 29, 2023 ·

Preparing for ExpressVPN GL.iNet Setup

Obtain your ExpressVPN OpenVPN Information

If you are not already an ExpressVPN user Sign Up Now.

1. Log in to your account on the ExpressVPN website.

ExpressVPN login page

2. Successfully log in with your account information. Select More.

3. Select Manual Configuration and copy the Username and Password that are displayed on the right hand side of the screen.

ExpressVPN Manual Configuration
ExpressVPN username and password

4. Click the Server Location(s) that you want to connect to. This will download a .ovpn file to your computer that we will use later on. There is no need to open the file. For this example I have selected New York but feel free to select any server listed there or multiple servers.

ExpressVPN Download .ovpn file

GL.iNet Router Setup for ExpressVPN

Login to GL.iNet firmware settings in a browser on any computer or smart device connected to the GL.iNet FlashRouter’s network. For more instructions on how to access the firmware settings view our guide here.

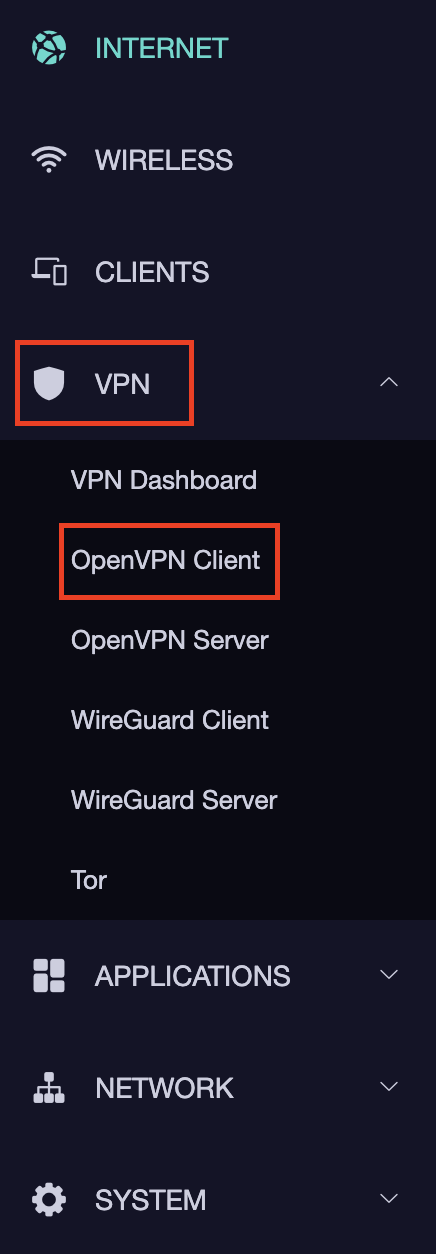
1. Navigate to the VPN tab and select OpenVPN Client.

GL.iNet VPN OpenVPN Client

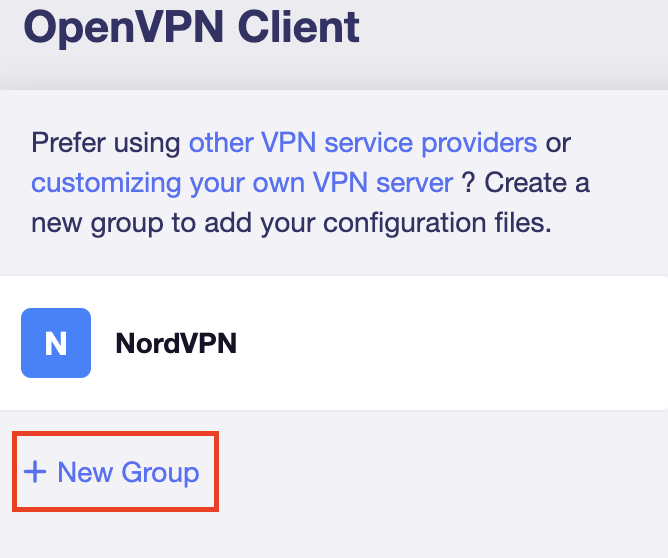
2. Click New Group.

GL.iNet New OpenVPN Client Group

3. Enter ExpressVPN and click the check mark.

GL.iNet ExpressVPN

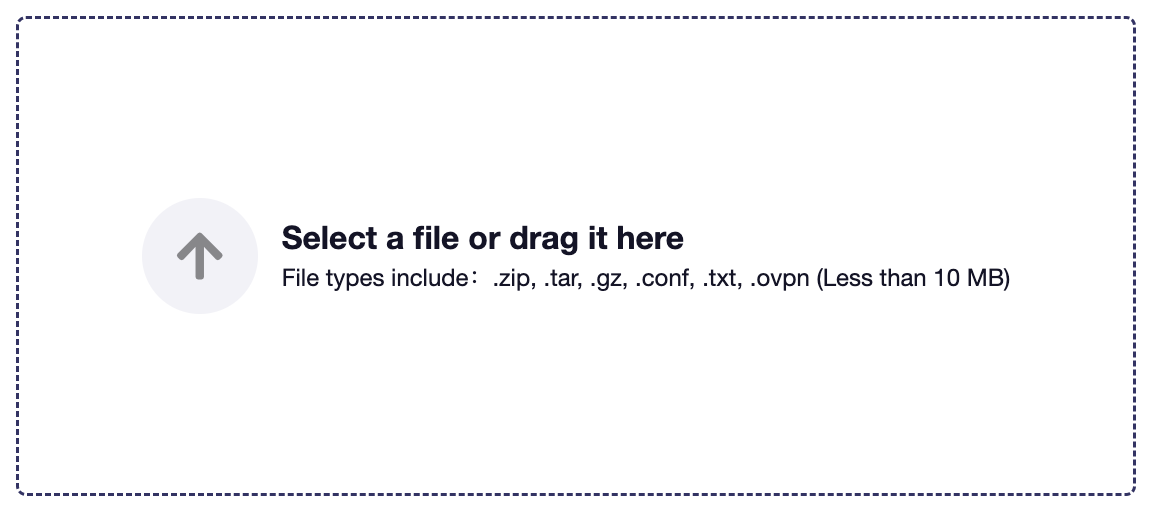
4. Select the .ovpn file(s) you downloaded earlier and upload them here.

GL.iNet VPN select file

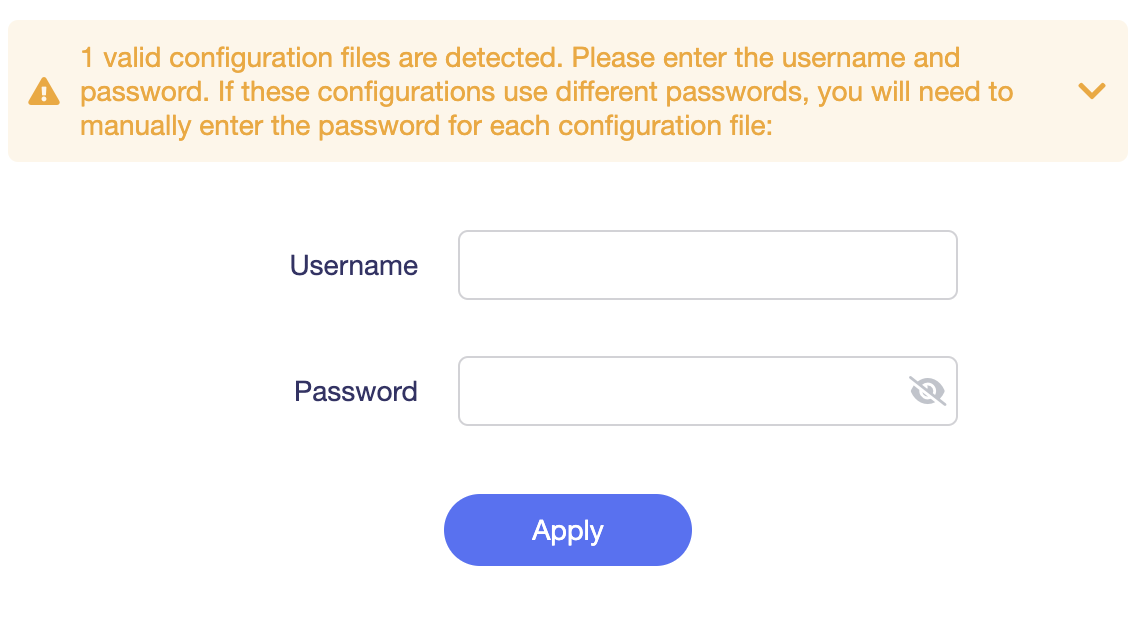
5. Enter in the ExpressVPN username and password that you obtained earlier. Do NOT enter your ExpressVPN account email and password login. Click Apply.

GL.iNet VPN username and password

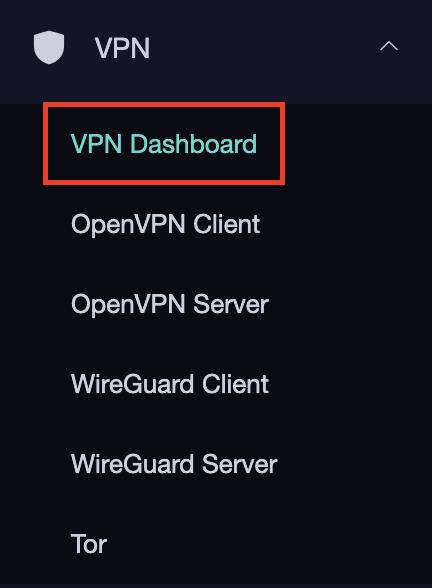
6. Select VPN Dashboard.

GL.iNet VPN Dashboard

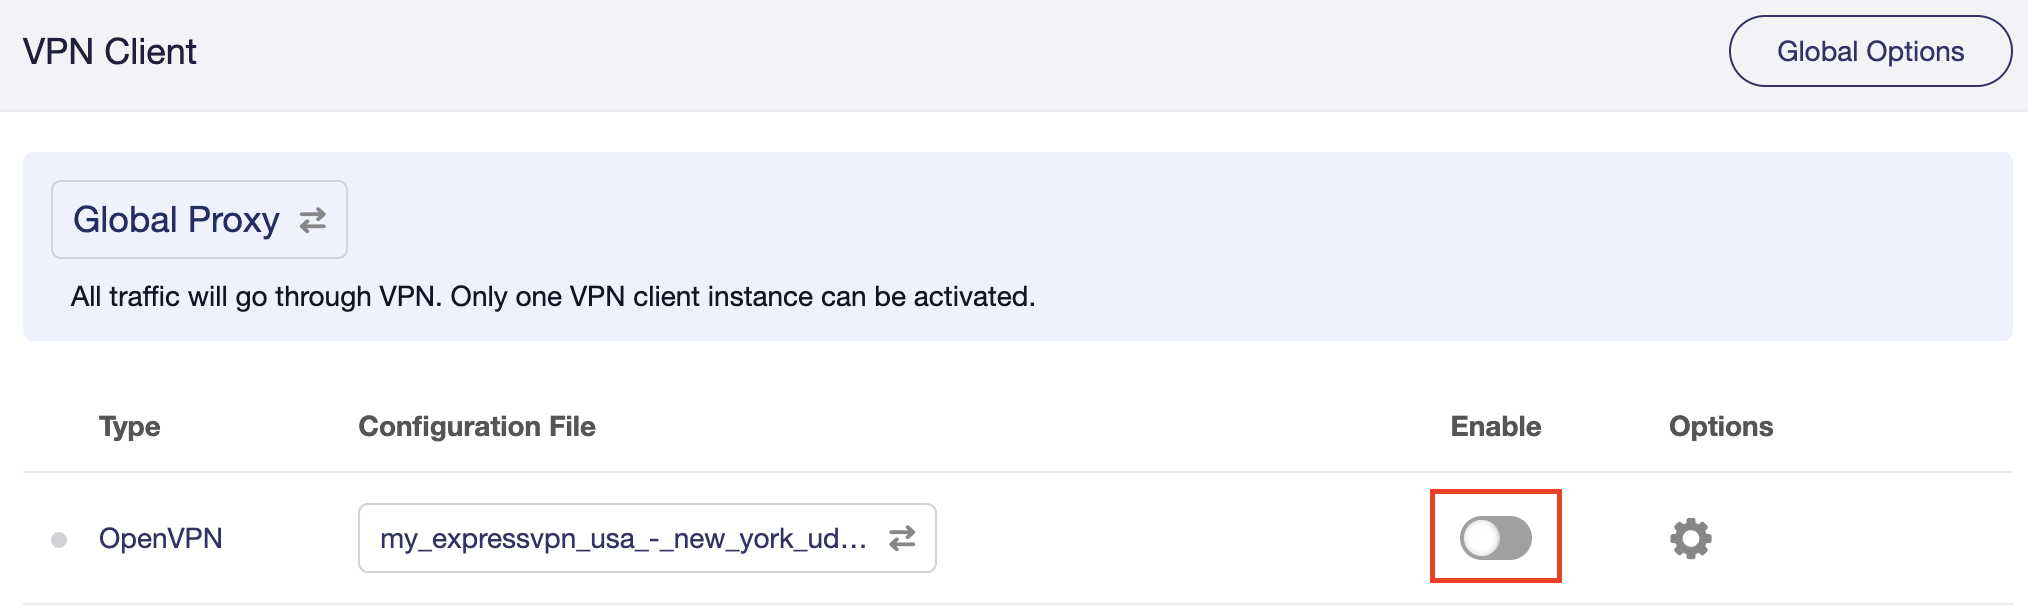
7. Set the Enable toggle to On to begin the ExpressVPN connection.

GL.iNet ExpressVPN enable switch

Verify a successful ExpressVPN connection

  1. You should now see information appear in the Server Address, Server Listen Port, Traffic Statistics, and Client Virtual IP areas.
  2. Visit ExpressVPN’s IP Check to verify your new IP address and virtual location.

In some cases you may notice that the location is not showing the same location as the server you have input in your router settings; this is because geo tracking tools are often tricked by VPN connections. As long as you see an IP address that is not the same as your normal Internet IP address then you are indeed connected to ExpressVPN.

How to change the ExpressVPN server

  1. Download a new .ovpn file location as detailed above.
  2. In the ExpressVPN Group on the OpenVPN Client area click Upload Configuration File and select the new .ovpn file.
  3. Click VPN Dashboard and then click the Configuration File area and select the new location that you added.
  4. Click Apply.

TROUBLESHOOTING

Still having issues? Visit the VPN Troubleshooting section.

Troubleshoot Here

Getflix SmartDNS Setup

TeamFlashRouters · Apr 4, 2019 ·

Getflix offers a SmartDNS service for unblocking geo-restricted content without the encryption of a VPN service. SmartDNS routes DNS servers to different regions which “tricks” the website to allow access to previously restricted content.

SmartDNS does not change your IP Address or provide the encryption that a VPN connection does. This can result in faster speeds and unblocked content.

SmartDNS and VPN should not both be configured at the same time. When using a SmartDNS connection make sure to disable your VPN connection on the FlashRouter.

Login to Getflix

If you are not already a Getflix user Sign Up Now.

New customer Signup for GetFlix SmartDNS Service

Login to Getflix’s website login page.

Visit Getflix’s DNS servers list page and note the DNS servers of the location you would like to access content from.

Getflix DNS Server Location Addresses for FlashRouter DD-WRT Settings

Enter Getflix SmartDNS servers on your FlashRouter

Navigate to Setup > Basic Setup

  1. Scroll down to Network Address Server Settings (DHCP).
  2. Enter in any combination of Getflix SmartDNS servers you noted into Static DNS fields 1 and 2.
  3. Click Apply Settings at the bottom of the page.
  4. Reboot the FlashRouter.

Register your IP Address

When the router is fully booted back up visit your Getflix user dashboard and make sure your IP Address is registered with Getflix. If it is not click Force IP Update.

Register IP Address for Getflix use on FlashRouter DD-WRT

Once you are successfully registered you can now access your desired regional content on any device that connects to the FlashRouter’s network.

Flint/Slate GL.iNet PureVPN WireGuard Setup

TeamFlashRouters · May 30, 2023 ·

Preparing for PureVPN GL.iNet Setup

Obtain PureVPN WireGuard file

If you are not already an PureVPN user Sign Up Now.

1. Log in to your account on the PureVPN website.

PureVPN Login

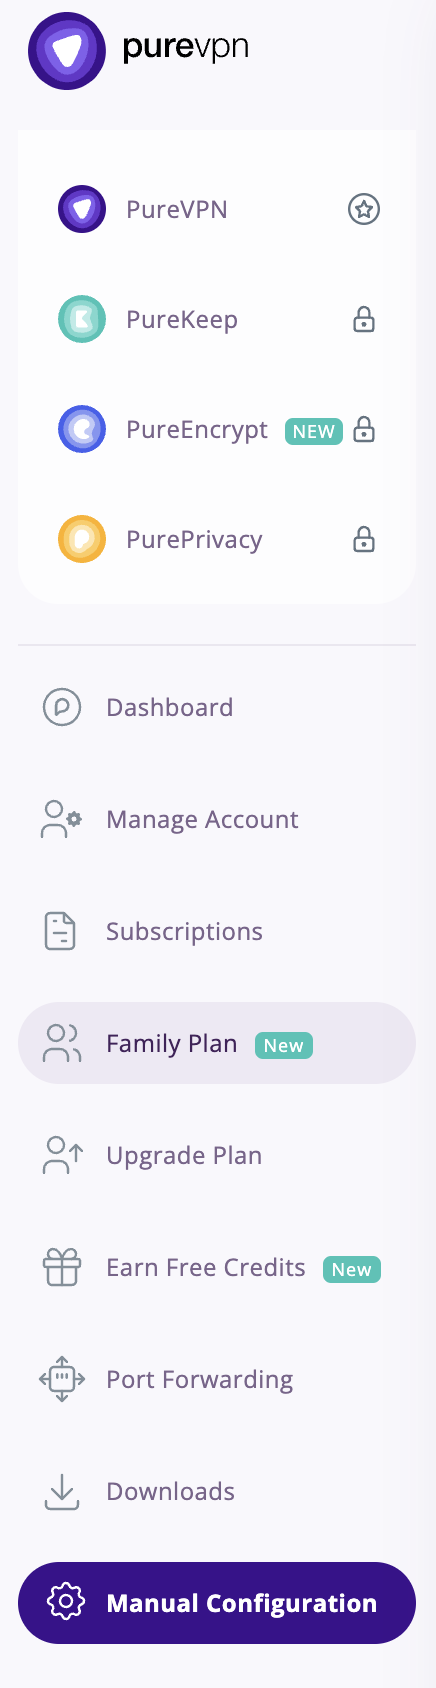
2. Select Manual Configuration.

PureVPN Manual Configuration

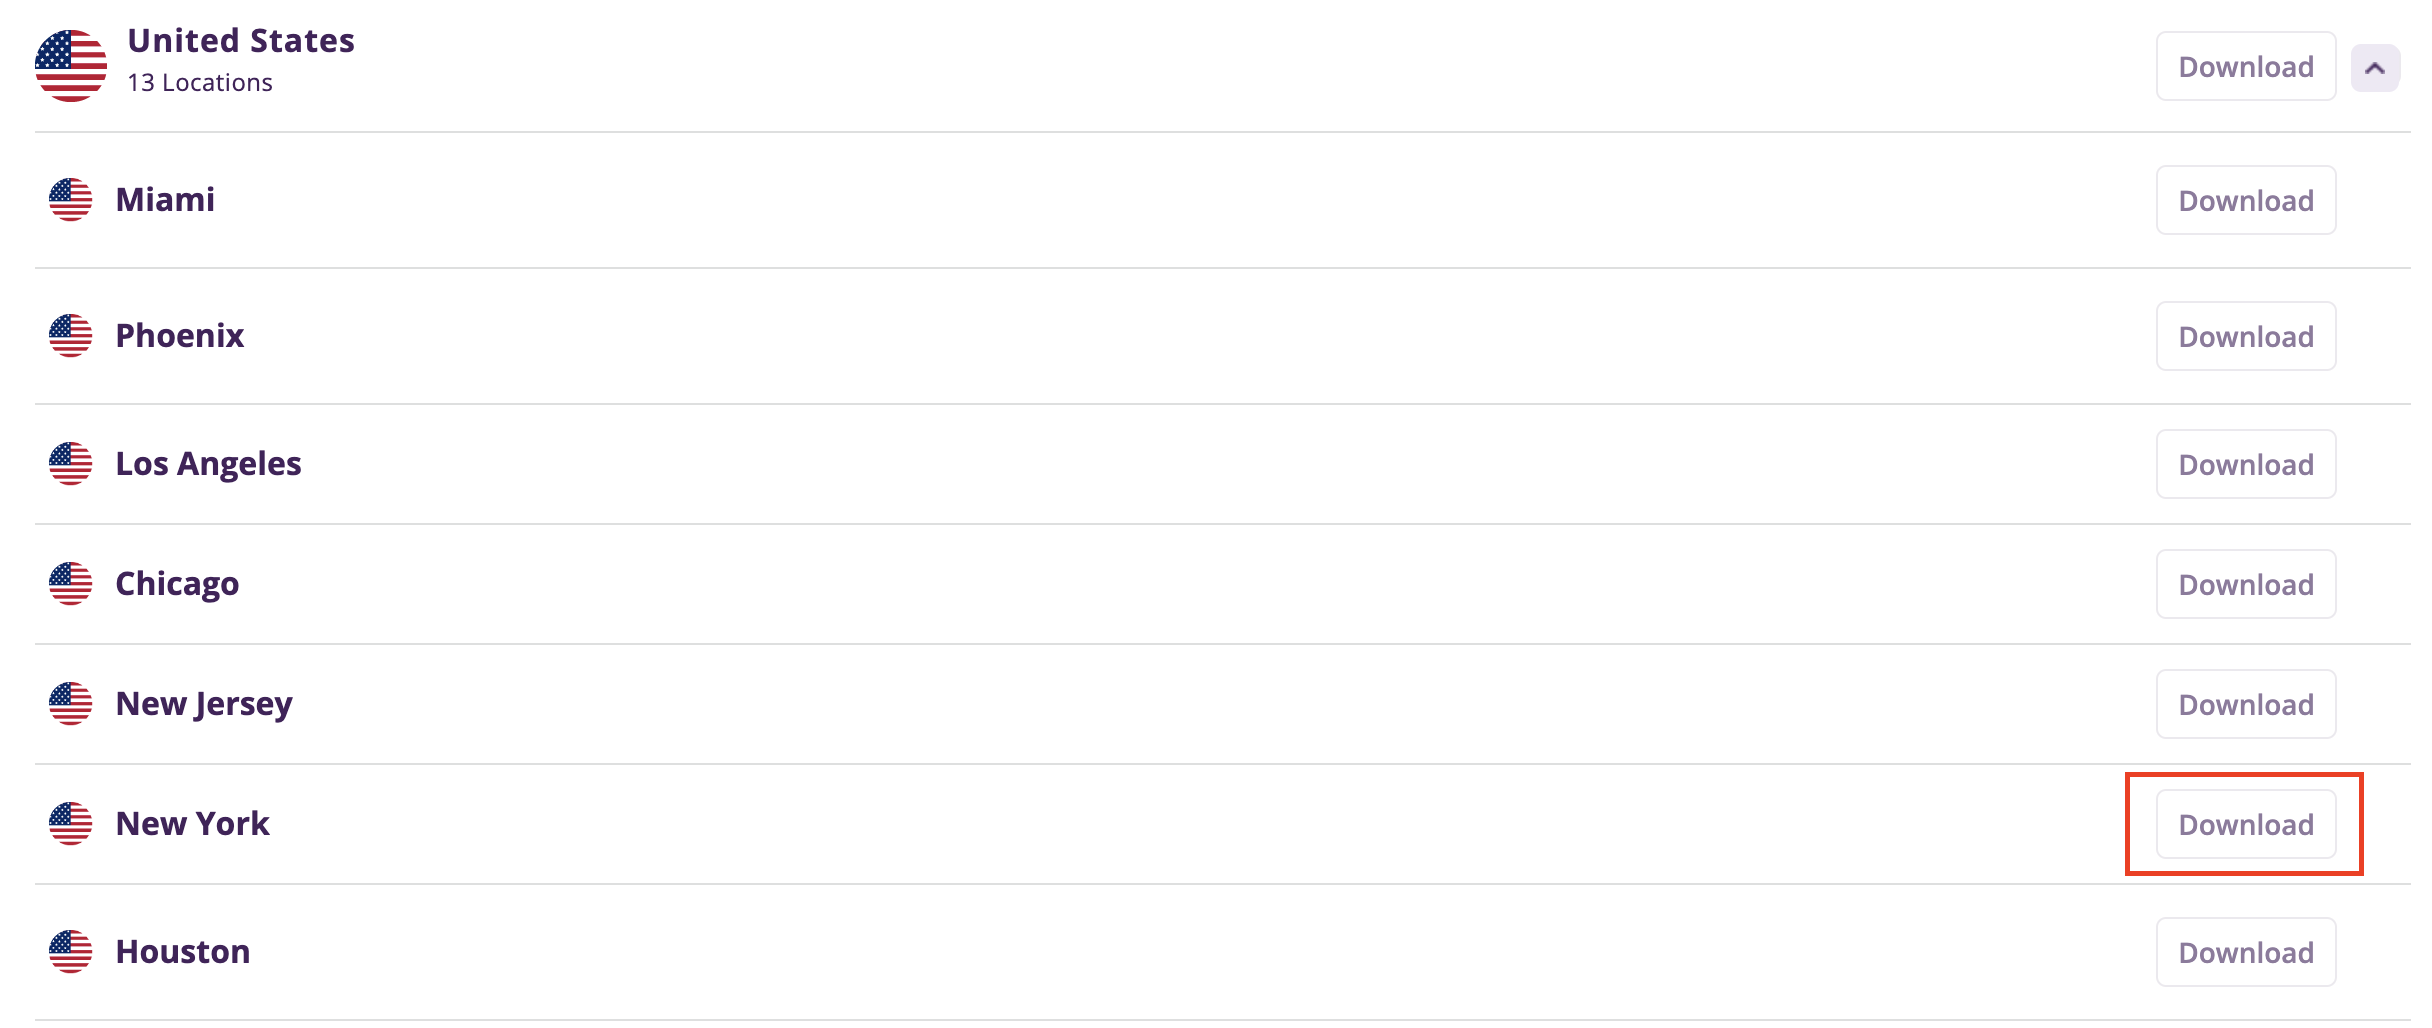
3. Select the Server Location you want to connect to and then click Download.

PureVPN select server location

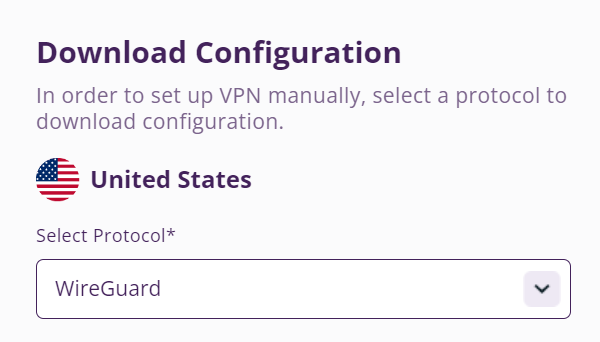
4. In the Select Protocol dropdown choose WireGuard.

PureVPN WireGuard

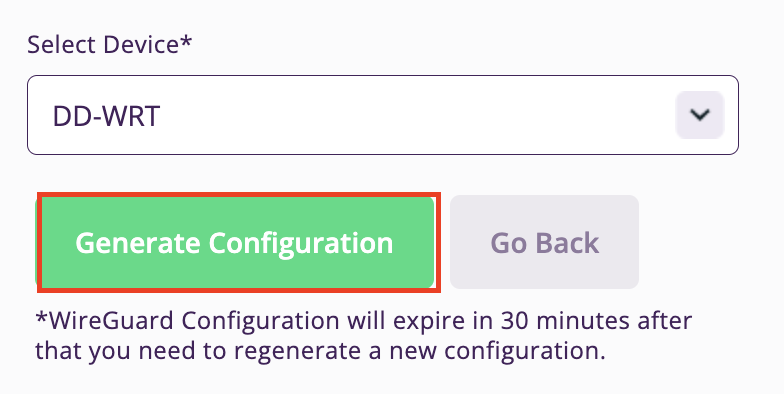
5. In the Select Device dropdown choose DD-WRT. Then click Generate Configuration. This will save a .conf file to your computer.

PureVPN Generate Config

GL.iNet Router Setup for PureVPN

Login to GL.iNet firmware settings in a browser on any computer or smart device connected to the GL.iNet FlashRouter’s network. For more instructions on how to access the firmware settings view our guide here.

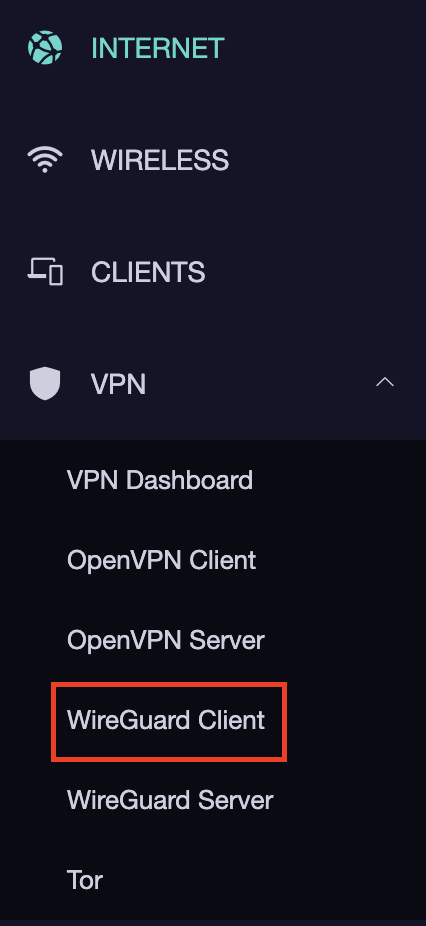
1. Navigate to the VPN tab and select WireGuard Client.

GL.iNet VPN WireGuard Client

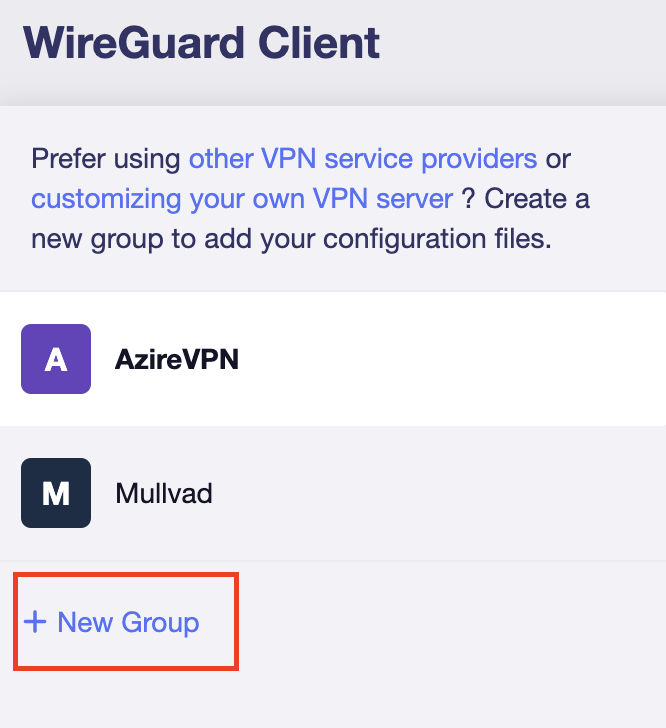
2. Click New Group.

GL.iNet WireGuard New Group

3. Enter PureVPN and click the check mark.

GL.iNet PureVPN group name

4. Select the .conf file you downloaded earlier and upload it here.

GL.iNet VPN select file

5. Click Apply.

6. Select VPN Dashboard.

GL.iNet VPN Dashboard

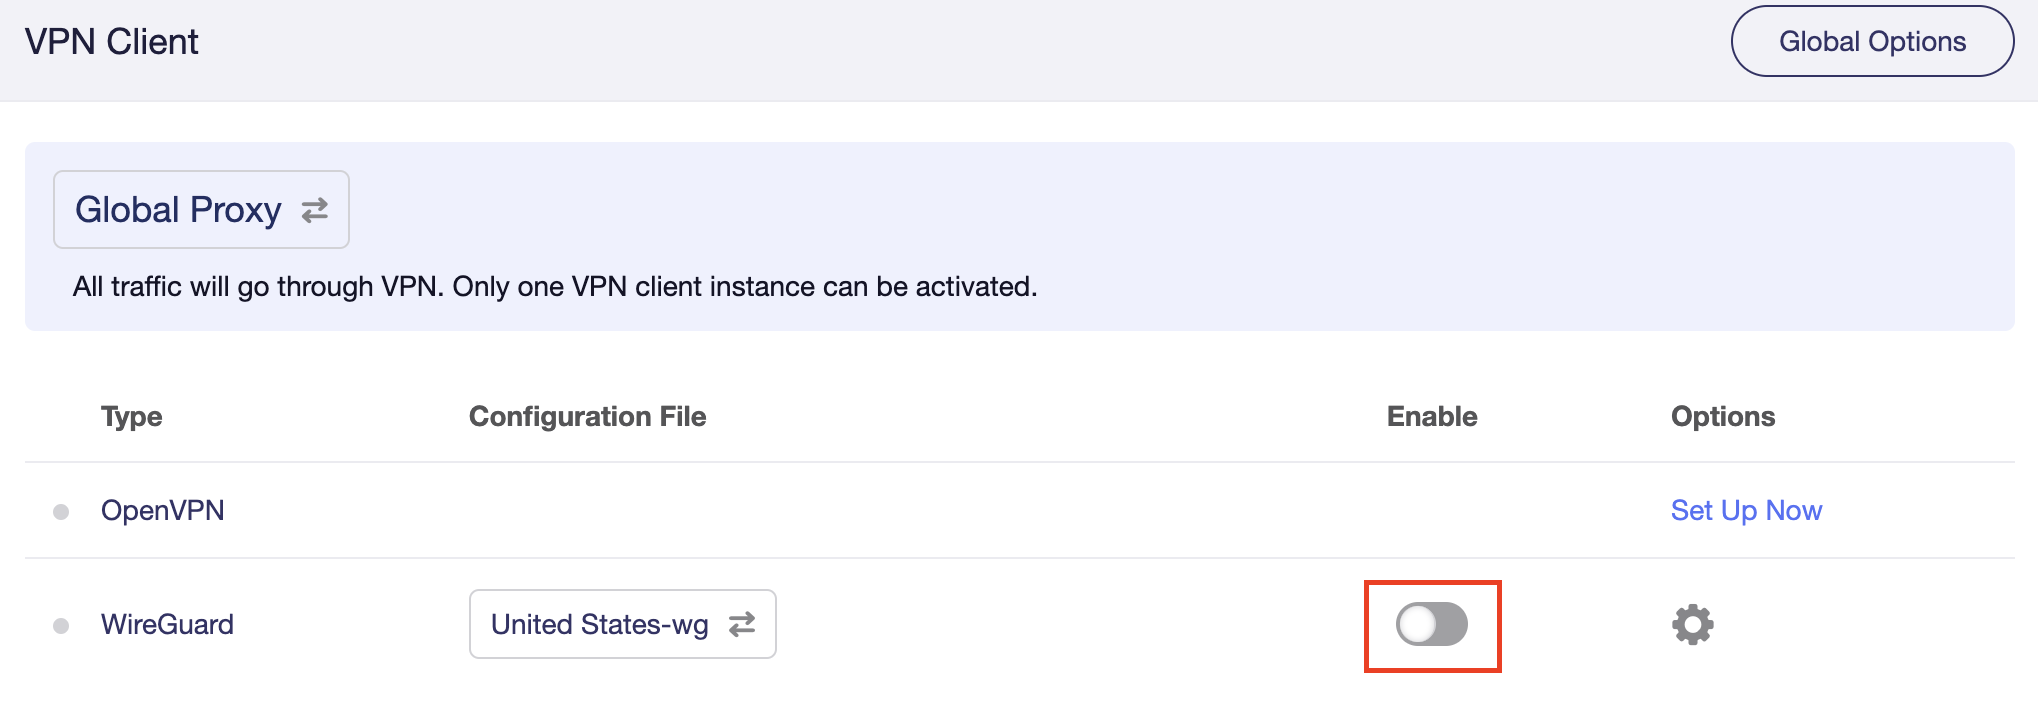
7. Set the Enable toggle to On to begin the PureVPN connection.

GL.iNet PureVPN WireGuard enable

Verify a successful PureVPN connection

  1. You should now see information appear in the Server Address, Server Listen Port, Traffic Statistics, and Client Virtual IP areas.
  2. Visit PureVPN’s IP Check to verify your new IP address and virtual location.

In some cases you may notice that the location is not showing the same location as the server you have input in your router settings; this is because geo tracking tools are often tricked by VPN connections. As long as you see an IP address that is not the same as your normal Internet IP address then you are indeed connected to PureVPN.

How to change the PureVPN server

Replicate the steps above with a new location.

TROUBLESHOOTING

Still having issues? Visit the VPN Troubleshooting section.

Troubleshoot Here

CyberGhost Merlin OpenVPN Setup

TeamFlashRouters · Mar 30, 2023 ·

Preparing for CyberGhost Setup

Obtain your CyberGhost OpenVPN information

If you are not already a CyberGhost user Sign Up Now.

1. Log in to your account on the CyberGhost website.

CyberGhost Website Login

2. Select VPN.

CyberGhost VPN

3. Click Configure New Device.

CyberGhost Configure Device

4. Set Protocol to OpenVPN. Select the Country you would like to connect to. Select the Server Group. Name the device in the Device Name field. Click Save Configuration.

CyberGhost protocol and location

5. Press View configuration.

CyberGhost view configuration

6. Copy the Username, and Password that appear to a notepad, since you will need this information later in the setup process. Click Download Configuration.

CyberGhost Website OpenVPN Configuration Files Generator 1

Open the folder that was downloaded. Then open the ca.crt the client.crt, and client.key files with NotePad++ for Windows or TextEdit for Apple. All CyberGhost servers have different keys and certificates.

Merlin Router Setup for CyberGhost

Login to Asus Merlin firmware settings in a browser on any computer or smart device connected to the Merlin FlashRouter’s network.

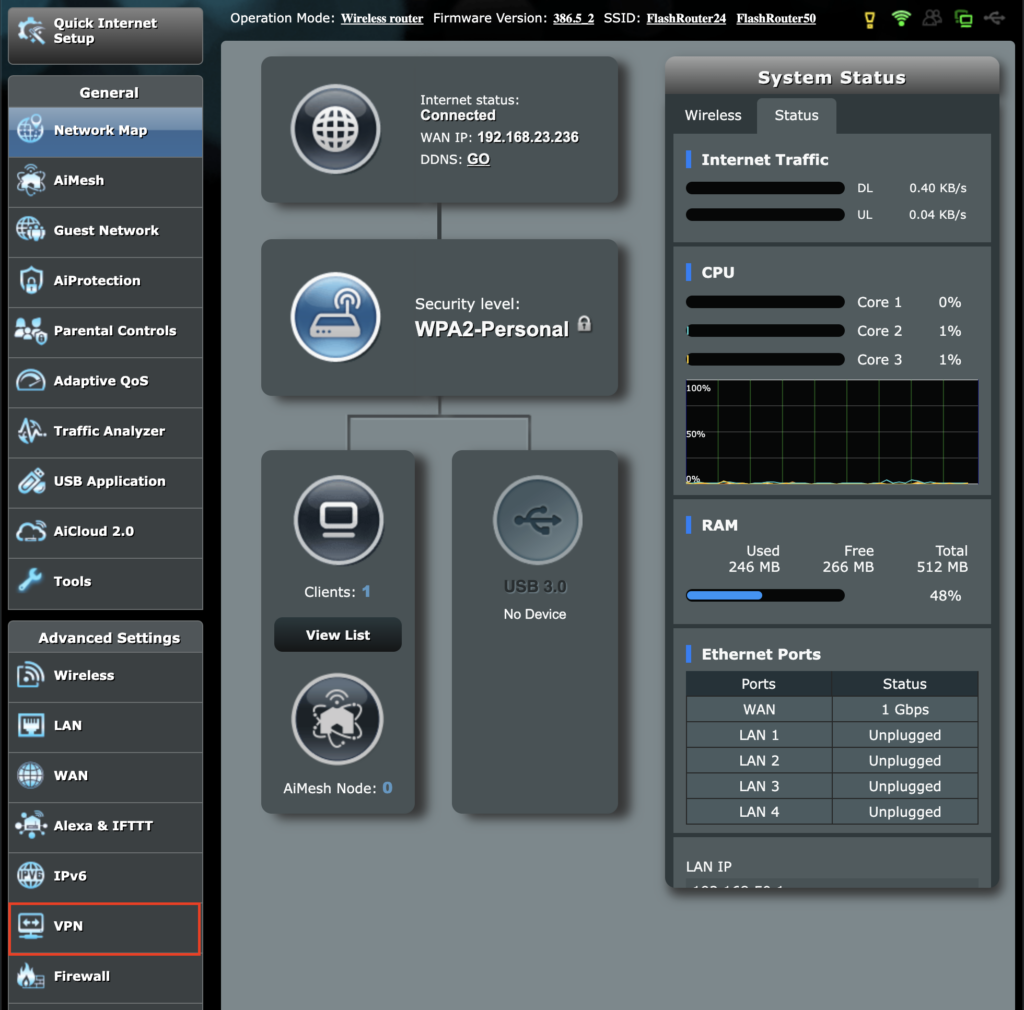
1. Navigate to the VPN tab.

Merlin VPN Tab

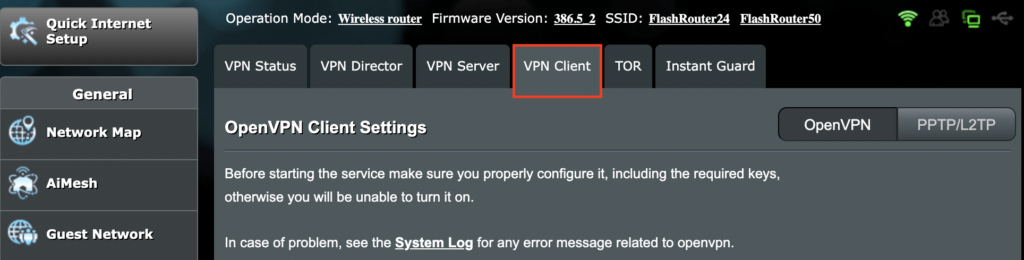
2. Navigate to the VPN Client tab.

Merlin VPN Client Tab

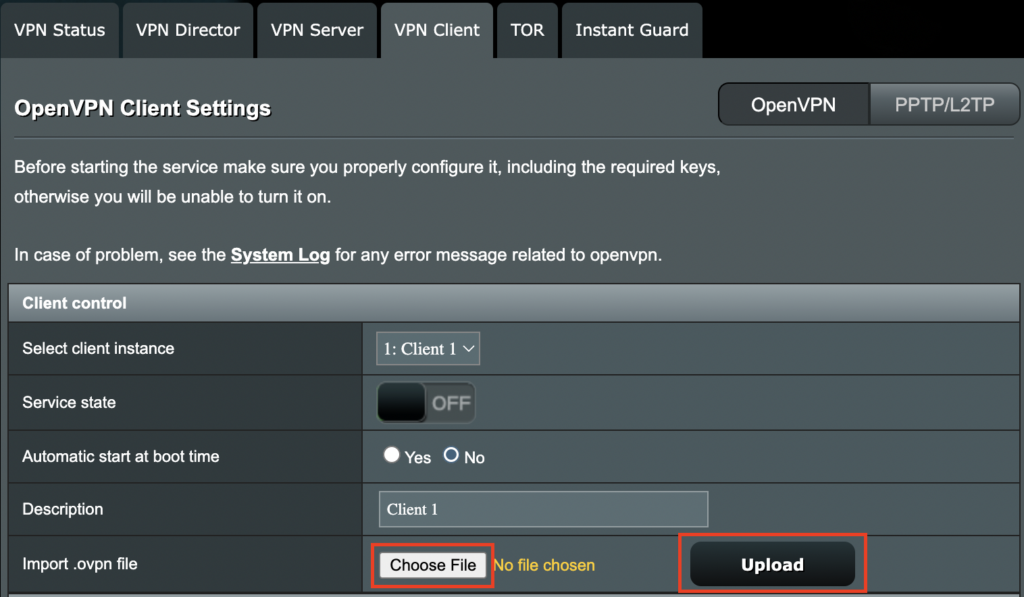
3. Click Choose file and select the .ovpn file from the folder you downloaded earlier. Then click Upload.

Merlin Choose File Upload

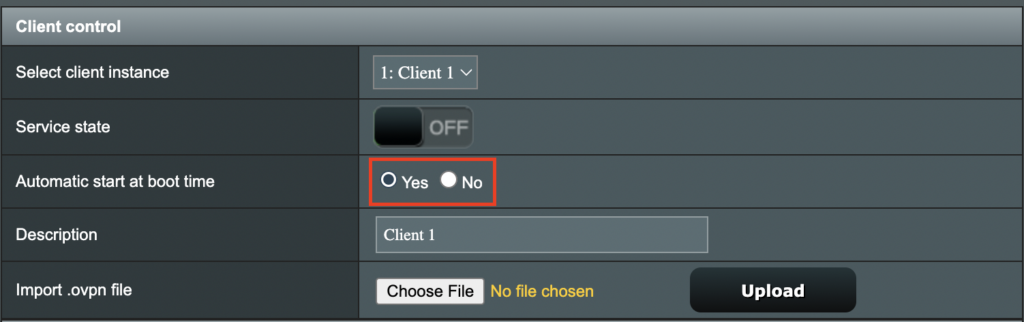
4. Set Automatic Start at boot time to Yes if you want the VPN connection to begin automatically when the router is powered off and back on.

Merlin Automatic Start at boot time

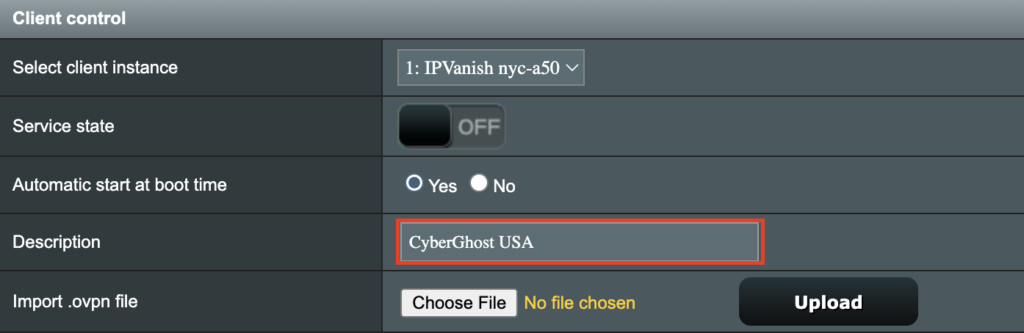
5. In the Description field enter in the name you’d like to use for this OpenVPN Client profile. We typically advise entering in the location here. Our example server was in USA so I have entered in CyberGhost USA.

Merlin CyberGhost Description field

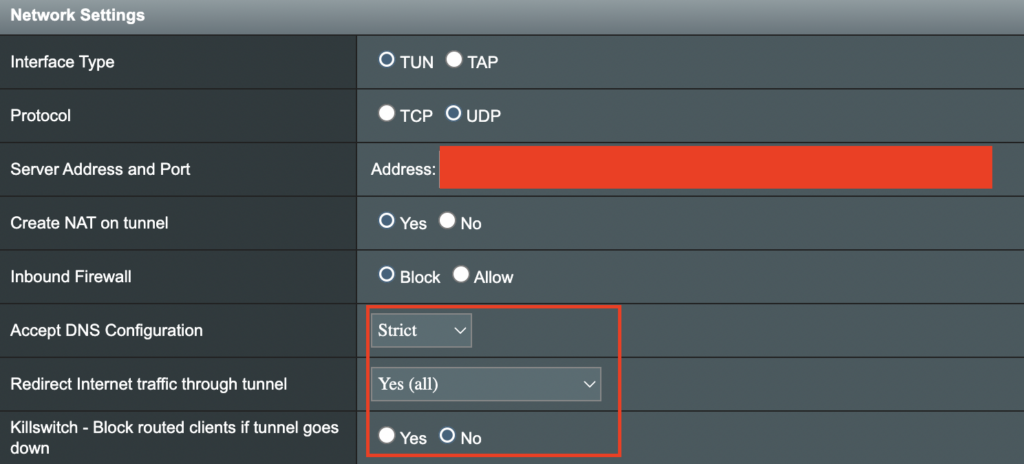
6. Set Accept DNS Configuration to Strict. Set Redirect Internet traffic through tunnel to Yes (all). Set Kill Switch to Yes or No depending on if you want the Internet to be killed if the VPN connection drops.

Merlin Accept DNS configuration Redirect Internet and Kill Switch

If you only want certain devices to connect to the OpenVPN Client profile you are setting up instead of all the devices connected to the FlashRouter’s network please set the Redirect Internet traffic through tunnel to VPN Director. Then complete the instructions on this page and then view our VPN Director guide.

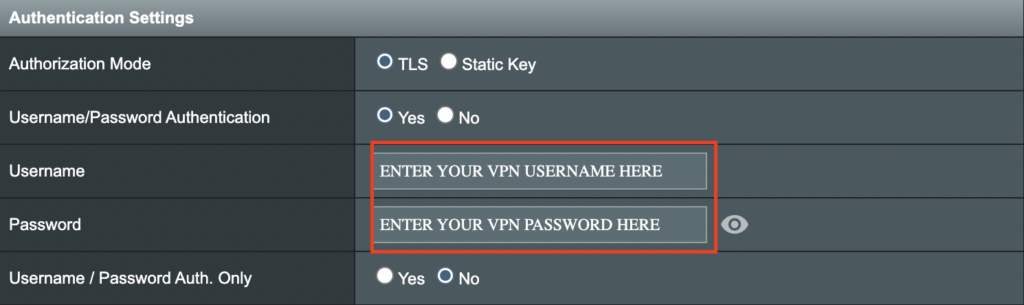
7. Enter your CyberGhost OpenVPN username and password that you obtained earlier. Do not enter your account login.

Merlin VPN Username and Password

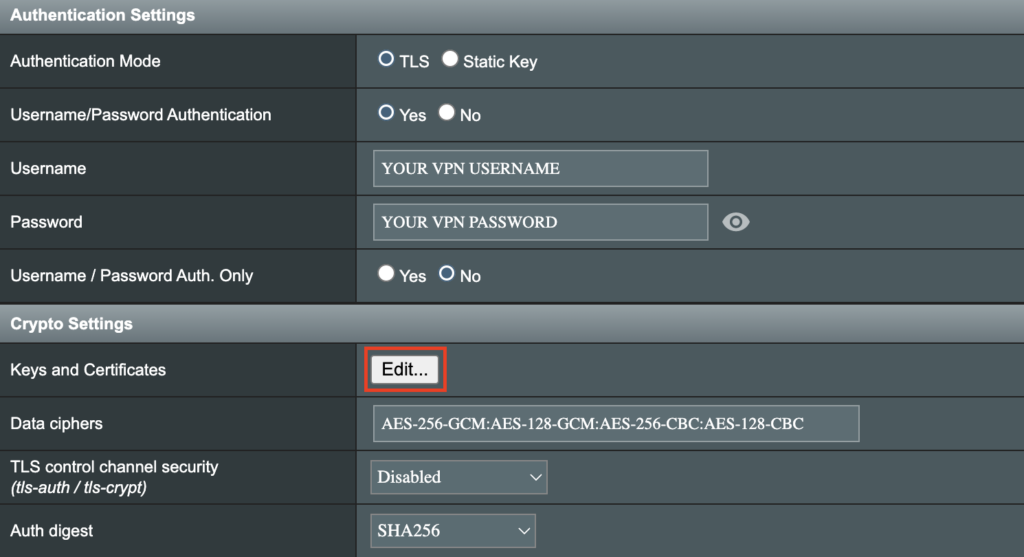
8. Click the Edit button in the Keys and Certificates area.

Merlin Keys and Certificates Edit button

9. In the Certificate Authority field paste in the entire content of the ca.crt file.

—– BEGIN xxx —– / —– END xxx —– block (including those two lines).

Merlin Certificate Authority

10. In the Client Certificate field paste in the entire content of the client.crt file.

—– BEGIN xxx —– / —– END xxx —– block (including those two lines).

Merlin Client Certificate

11. In the Client Key field paste in the entire content of the client.key file.

—– BEGIN xxx —– / —– END xxx —– block (including those two lines).

Merlin Client Key

12. Click Save at the bottom of that window.

13. Click Apply at the bottom of the page.

14. At the top of the page set the Service State toggle to ON to activate the VPN connection.

Merlin Service State All Providers

Verify a successful CyberGhost connection

  1. You should now see a CONNECTED message.
  2. Visit What is my IP Address from a private/incognito browser to verify your new IP address and virtual location.

TROUBLESHOOTING

Still having issues? Visit the FR Privacy App Troubleshooting section.

Troubleshoot Here

ExpressVPN Cudy OpenVPN Setup

TeamFlashRouters · Feb 29, 2024 ·

Preparing for ExpressVPN Cudy Setup

Obtain your ExpressVPN OpenVPN Information

If you are not already an ExpressVPN user Sign Up Now.

1. Log in to your account on the ExpressVPN website.

ExpressVPN login page

2. Successfully log in with your account information. Select More.

3. Select Manual Configuration and copy the Username and Password that are displayed on the right hand side of the screen.

ExpressVPN Manual Configuration
ExpressVPN username and password

4. Click the Server Location that you want to connect to. This will download a .ovpn file to your computer that we will use later on. There is no need to open the file. For this example I have selected New York but feel free to select any server listed there.

ExpressVPN Download .ovpn file

Cudy Router Setup for ExpressVPN

Login to Cudy firmware settings in a browser on any computer or smart device connected to the Cudy FlashRouter’s network.

1. Click General Settings.

Cudy General Settings

2. Click VPN.

Cudy VPN Tab

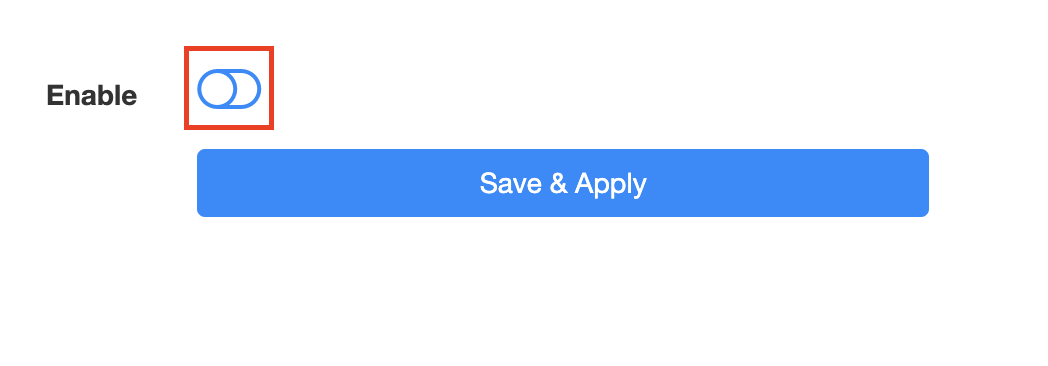
3. Toggle the Enable switch to On.

Cudy enable VPN

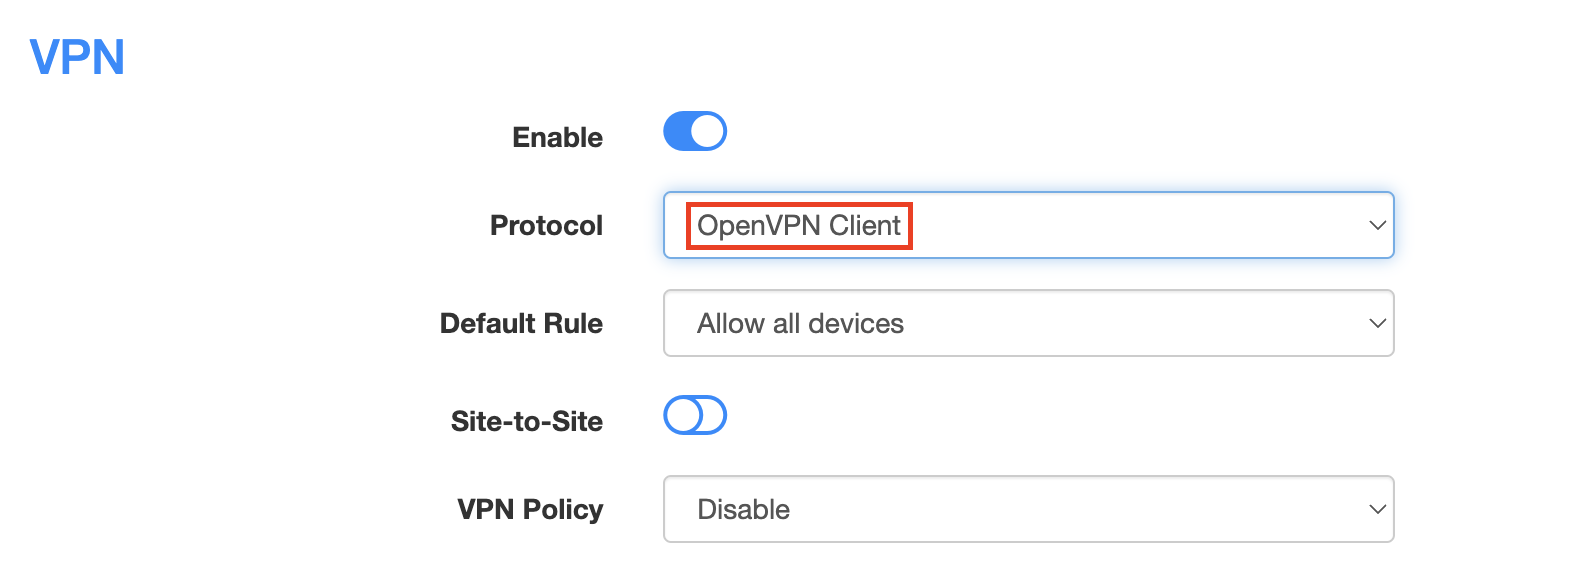
4. Select OpenVPN Client from the Protocol dropdown.

Cudy select OpenVPN Client

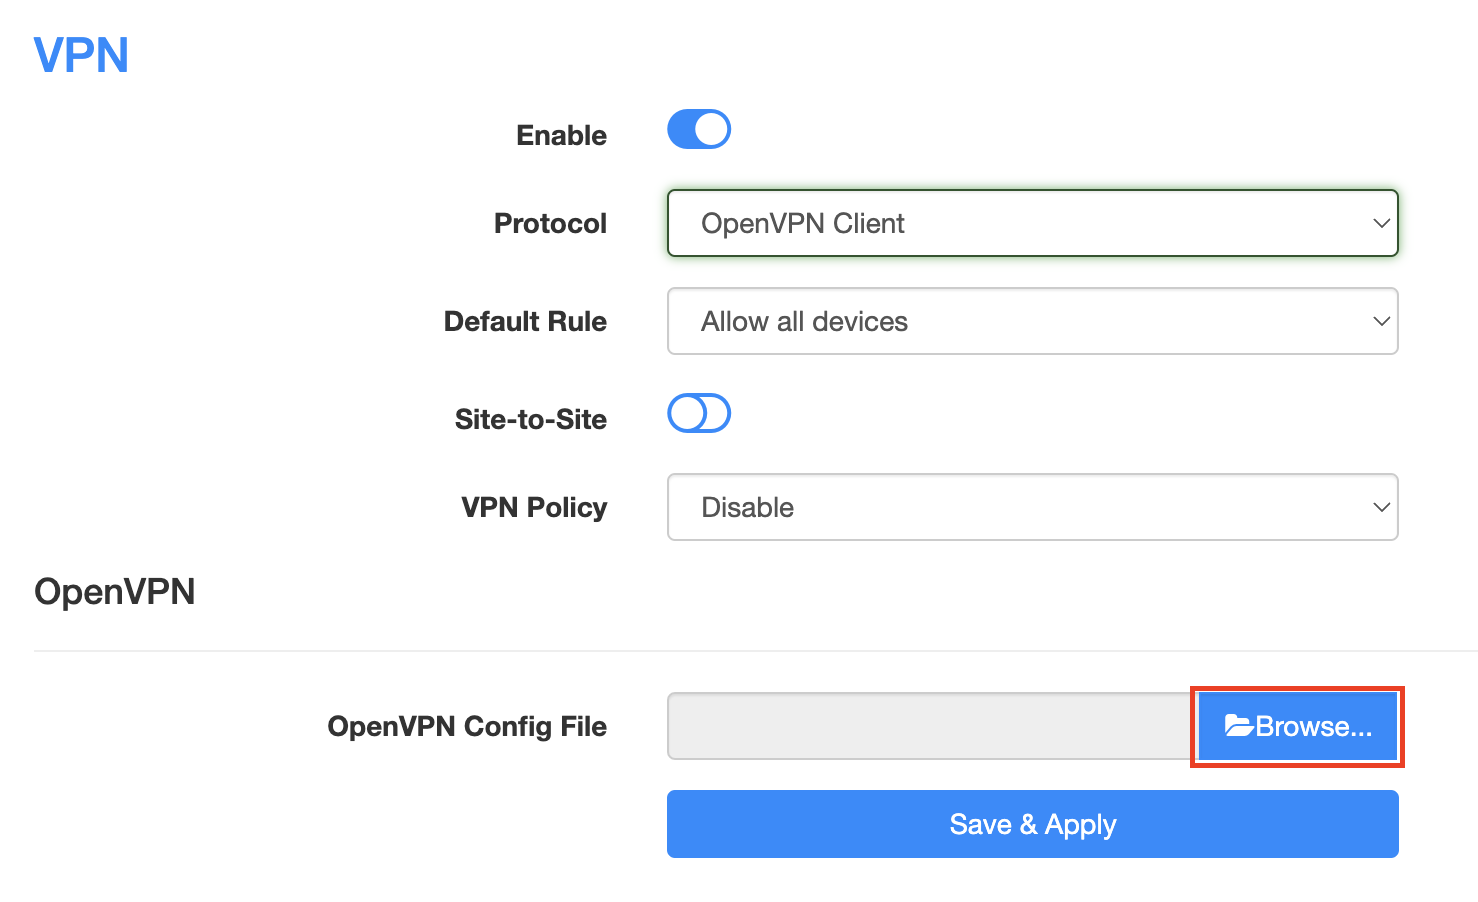
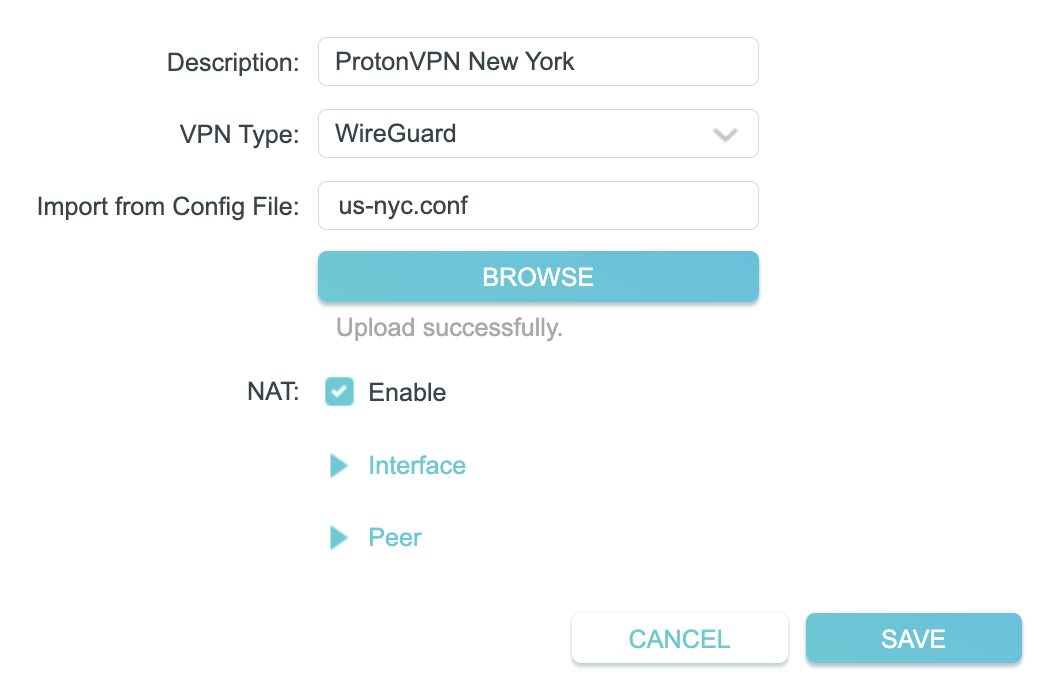
5. Click Browse and select the .ovpn file you downloaded earlier. You should see the server file name listed next to Current Config File after doing so.

Cudy OpenVPN Browse button

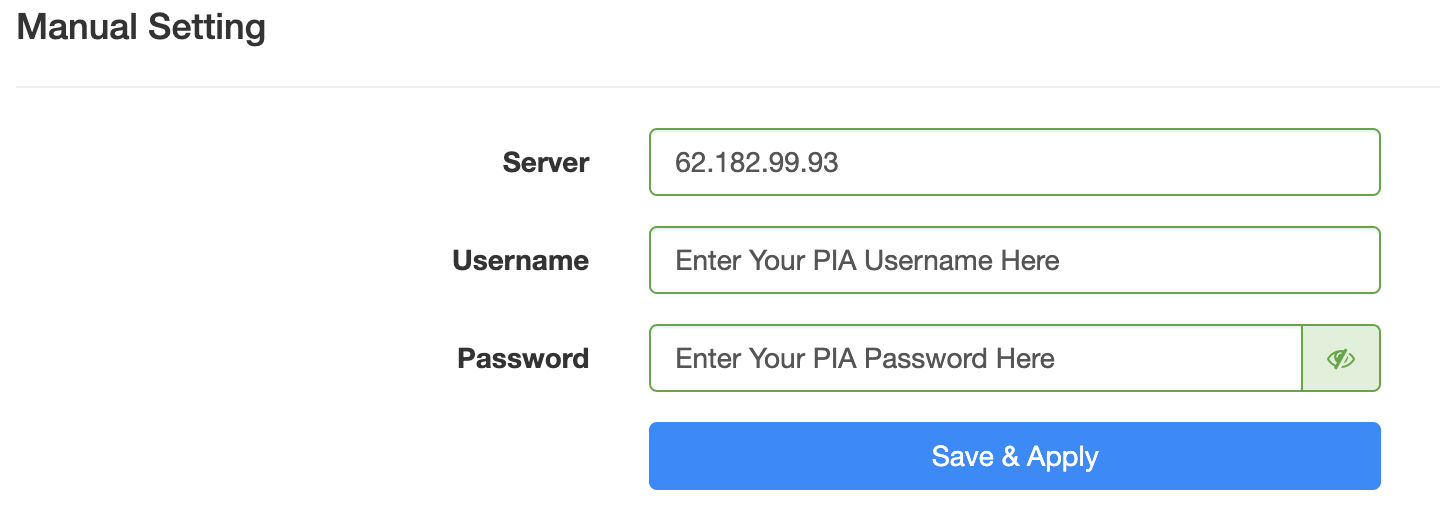
6. Enter your ExpressVPN username and password that you obtained earlier in the Username and Password. Note that these are different from your ExpressVPN email login and password.

Cudy ExpressVPN enter username and password

7. Click Save & Apply at the bottom of the page.

Verify a successful ExpressVPN connection

  1. You should now see a CONNECTED message.
  2. Visit ExpressVPN’s IP Check to verify your new IP address and virtual location.

In some cases you may notice that the location is not showing the same location as the server you have input in your router settings; this is because geo tracking tools are often tricked by VPN connections. As long as you see an IP address that is not the same as your normal Internet IP address then you are indeed connected to ExpressVPN.

How to change the ExpressVPN server

  1. Follow the steps at the top of the page to obtain a new .ovpn file.
  2. Then proceed with the settings same as initial setup.
TROUBLESHOOTING

Still having issues? Visit the VPN Troubleshooting section.

Troubleshoot Here

IPVanish Cudy OpenVPN Setup

TeamFlashRouters · Feb 29, 2024 ·

Preparing for IPVanish Cudy Setup

Download your IPVanish .ovpn file

If you are not already an IPVanish user Sign Up Now.

1. Log in to your account on the IPVanish website.

IPVanish login

2. Successfully log in with your account information then go to IPVanish .ovpn file page.

3. Click on the .ovpn file for the server location you want to use to dowloand the .ovpn file. Do not open this file.

IPVanish download ovpn

Cudy Router Setup for IPVanish

Login to Cudy firmware settings in a browser on any computer or smart device connected to the Cudy FlashRouter’s network.

1. Click General Settings.

Cudy General Settings

2. Click VPN.

Cudy VPN Tab

3. Toggle the Enable switch to On.

Cudy enable VPN

4. Select OpenVPN Client from the Protocol dropdown.

Cudy select OpenVPN Client

5. Click Browse and select the .ovpn file you downloaded earlier. You should see the server file name listed next to Current Config File after doing so.

Cudy OpenVPN Browse button

6. Enter your IPVanish account login email and password that you obtained earlier in the Username and Password.

Cudy IPVanish enter username and password

7. Click Save & Apply at the bottom of the page.

Verify a successful IPVanish connection

  1. You should now see a CONNECTED message.
  2. Visit IPVanish’s IP Check to verify your new IP address and virtual location.

In some cases you may notice that the location is not showing the same location as the server you have input in your router settings; this is because geo tracking tools are often tricked by VPN connections. As long as you see an IP address that is not the same as your normal Internet IP address then you are indeed connected to IPVanish.

How to change the IPVanish server

  1. Follow the steps at the top of the page to obtain a new .ovpn file.
  2. Then proceed with the settings same as initial setup.
TROUBLESHOOTING

Still having issues? Visit the VPN Troubleshooting section.

Troubleshoot Here

PrivateInternetAccess (PIA) Cudy OpenVPN Setup

TeamFlashRouters · Feb 29, 2024 ·

Preparing for PIA Cudy Setup

Download your PIA .ovpn file

If you are not already a PIA user Sign Up Now.

1. Log in to your account on the PIA website.

PIA login

2. Successfully log in with your account information then go to PIA’s OpenVPN Config Generator.

3. On the OpenVPN Configuration Generator select the following:

OpenVPN Version: OpenVPN 2.4 or newer

Select Platform: Linux

Select Region: Choose the server location you’d like to connect to

Select Port: Typically we recommend UDP/1198 RSA-2048 AES-128-CBC SHA1 for best speeds but feel free to select the one you want to use.

4. Click Generate to download the .ovpn file. Do not open this file once it is downloaded.

PIA Generate .ovpn file

Cudy Router Setup for PIA

Login to Cudy firmware settings in a browser on any computer or smart device connected to the Cudy FlashRouter’s network.

1. Click General Settings.

Cudy General Settings

2. Click VPN.

Cudy VPN Tab

3. Toggle the Enable switch to On.

Cudy enable VPN

4. Select OpenVPN Client from the Protocol dropdown.

Cudy select OpenVPN Client

5. Click Browse and select the .ovpn file you downloaded earlier. You should see the server file name listed next to Current Config File after doing so.

Cudy OpenVPN Browse button

6. Enter your PIA account login username and password in the Username and Password.

Cudy PIA enter username and password

7. Click Save & Apply at the bottom of the page.

Verify a successful PIA connection

  1. You should now see a CONNECTED message.
  2. Visit PIA’s IP Check to verify your new IP address and virtual location.

In some cases you may notice that the location is not showing the same location as the server you have input in your router settings; this is because geo tracking tools are often tricked by VPN connections. As long as you see an IP address that is not the same as your normal Internet IP address then you are indeed connected to PIA.

How to change the PIA server

  1. Follow the steps at the top of the page to obtain a new .ovpn file.
  2. Then proceed with the settings same as initial setup.

TROUBLESHOOTING

Still having issues? Visit the VPN Troubleshooting section.

Troubleshoot Here

ExpressVPN TP-Link OpenVPN Setup

TeamFlashRouters · Apr 8, 2024 ·

Preparing for ExpressVPN TP-Link Setup

Obtain your ExpressVPN OpenVPN Information

If you are not already an ExpressVPN user Sign Up Now.

1. Log in to your account on the ExpressVPN website.

ExpressVPN login page

2. Successfully log in with your account information. Select More.

3. Select Manual Configuration and copy the Username and Password that are displayed on the right hand side of the screen.

ExpressVPN Manual Configuration
ExpressVPN username and password

4. Click the Server Location that you want to connect to. This will download a .ovpn file to your computer that we will use later on. There is no need to open the file. For this example I have selected New York but feel free to select any server listed there.

ExpressVPN Download .ovpn file

TP-Link Router Setup for ExpressVPN

Login to TP-Link firmware settings in a browser on any computer or smart device connected to the FlashRouter’s network.

1. Navigate to the Advanced tab.

TP-Link Advanced settings

2. Navigate to the VPN Client tab.

TP-Link VPN Client

3. Check the Enable box next to VPN Client. Then click Save at the bottom of the page.

TP-Link VPN Client enable

4. Click the Add button in the Server List area.

TP-Link Add server button

5. In the Description field enter in the name you’d like to use for this OpenVPN Client profile. We typically advise entering in the location or server number here. Our example server was in New York so I have entered in ExpressVPN New York.

Set the VPN Type to OpenVPN.

In the Username and Password fields paste in the ExpressVPN username and password we obtained earlier.

Click Browse and select the .ovpn file you downloaded earlier. Then click Save.

TP-Link ExpressVPN setup

By default no devices will be assigned to the VPN Tunnel. With TP-Link firmware you must manually assign the devices that you want connected to the VPN tunnel. Proceed with the next steps to do so for all devices you want connected to VPN.

6. Click the Add button in the Device List area.

TP-Link add devices to VPN tunnel

7. A list of devices connected to the FlashRouter’s network will appear. Check the devices that you want to connect to VPN. Then click OK.

TP-Link select devices to add to VPN tunnel

8. Now that the devices have been assigned to the VPN connection click the Enable toggle in the Server List area.

TP-Link ExpressVPN toggle VPN on

Verify a successful ExpressVPN connection

  1. You should now see a CONNECTED message.
  2. Visit ExpressVPN’s IP Check to verify your new IP address and virtual location.

In some cases you may notice that the location is not showing the same location as the server you have input in your router settings; this is because geo tracking tools are often tricked by VPN connections. As long as you see an IP address that is not the same as your normal Internet IP address then you are indeed connected to ExpressVPN.

How to change the ExpressVPN server

  1. Follow the steps at the top of the page to obtain a new .ovpn file.
  2. Then proceed with the settings same as initial setup.

TROUBLESHOOTING

Still having issues? Visit the VPN Troubleshooting section.
Troubleshoot Here

Why is the power light on my FlashRouter blinking?

Dave · May 2, 2019 ·

A slowly blinking power light means that the FlashRouter was somehow put into Rescue/Restore/Recovery Mode. This usually happens if the reset button was held down for too long.

This may also happen if you have incorrectly tried to update the firmware on your FlashRouter. The first thing to try is a simple reboot of the router to see if it exits restore mode.

If a reboot does not clear up the issue then try to reset and reconfigure your FlashRouter.

« Previous Page
Next Page »

Primary Sidebar

  • Troubleshooting
  • Router Access
  • Internet Connection Issues
  • WiFi Connectivity
  • General VPN Issues
  • TeamViewer Remote Support
  • DD-WRT Firmware
  • Facebook
  • Twitter
  • Instagram
  • Pinterest
  • YouTube

Footer