• Skip to primary navigation
  • Skip to main content
  • Skip to primary sidebar
  • Skip to footer

FlashRouters Support Portal

Prioritizing Privacy

  • SETUP GUIDES
    • Privacy Hero Router Setup Guide
    • ASUS-WRT Router Setup Guide
    • AsusWRT-Merlin Router Setup Guide
    • DD-WRT Router Setup Guide
    • ExpressVPN Router Setup Guide
    • GL.iNet Router Setup Guide
    • Roqos Core Router Setup Guide
  • TROUBLESHOOTING
    • Router Access
    • WiFi Connectivity
    • Internet Connection Issues
    • General VPN Issues
    • DD-WRT Firmware
    • TeamViewer Remote Support
  • FAQs
    • Router FAQs
    • VPN FAQs
    • Warranty and Returns FAQs
    • Sales FAQs
    • Shipping FAQs
    • Service Plan FAQs
  • Show Search
Hide Search

Search Results for: time in new len

ExpressVPN TP-Link OpenVPN Setup

TeamFlashRouters · Apr 8, 2024 ·

Preparing for ExpressVPN TP-Link Setup

Obtain your ExpressVPN OpenVPN Information

If you are not already an ExpressVPN user Sign Up Now.

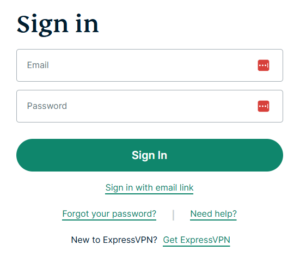
1. Log in to your account on the ExpressVPN website.

ExpressVPN login page

2. Successfully log in with your account information. Select More.

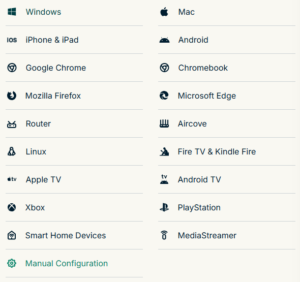
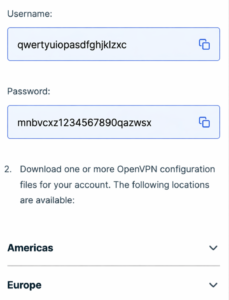
3. Select Manual Configuration and copy the Username and Password that are displayed on the right hand side of the screen.

ExpressVPN Manual Configuration
ExpressVPN username and password

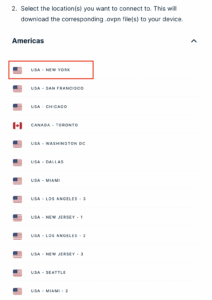
4. Click the Server Location that you want to connect to. This will download a .ovpn file to your computer that we will use later on. There is no need to open the file. For this example I have selected New York but feel free to select any server listed there.
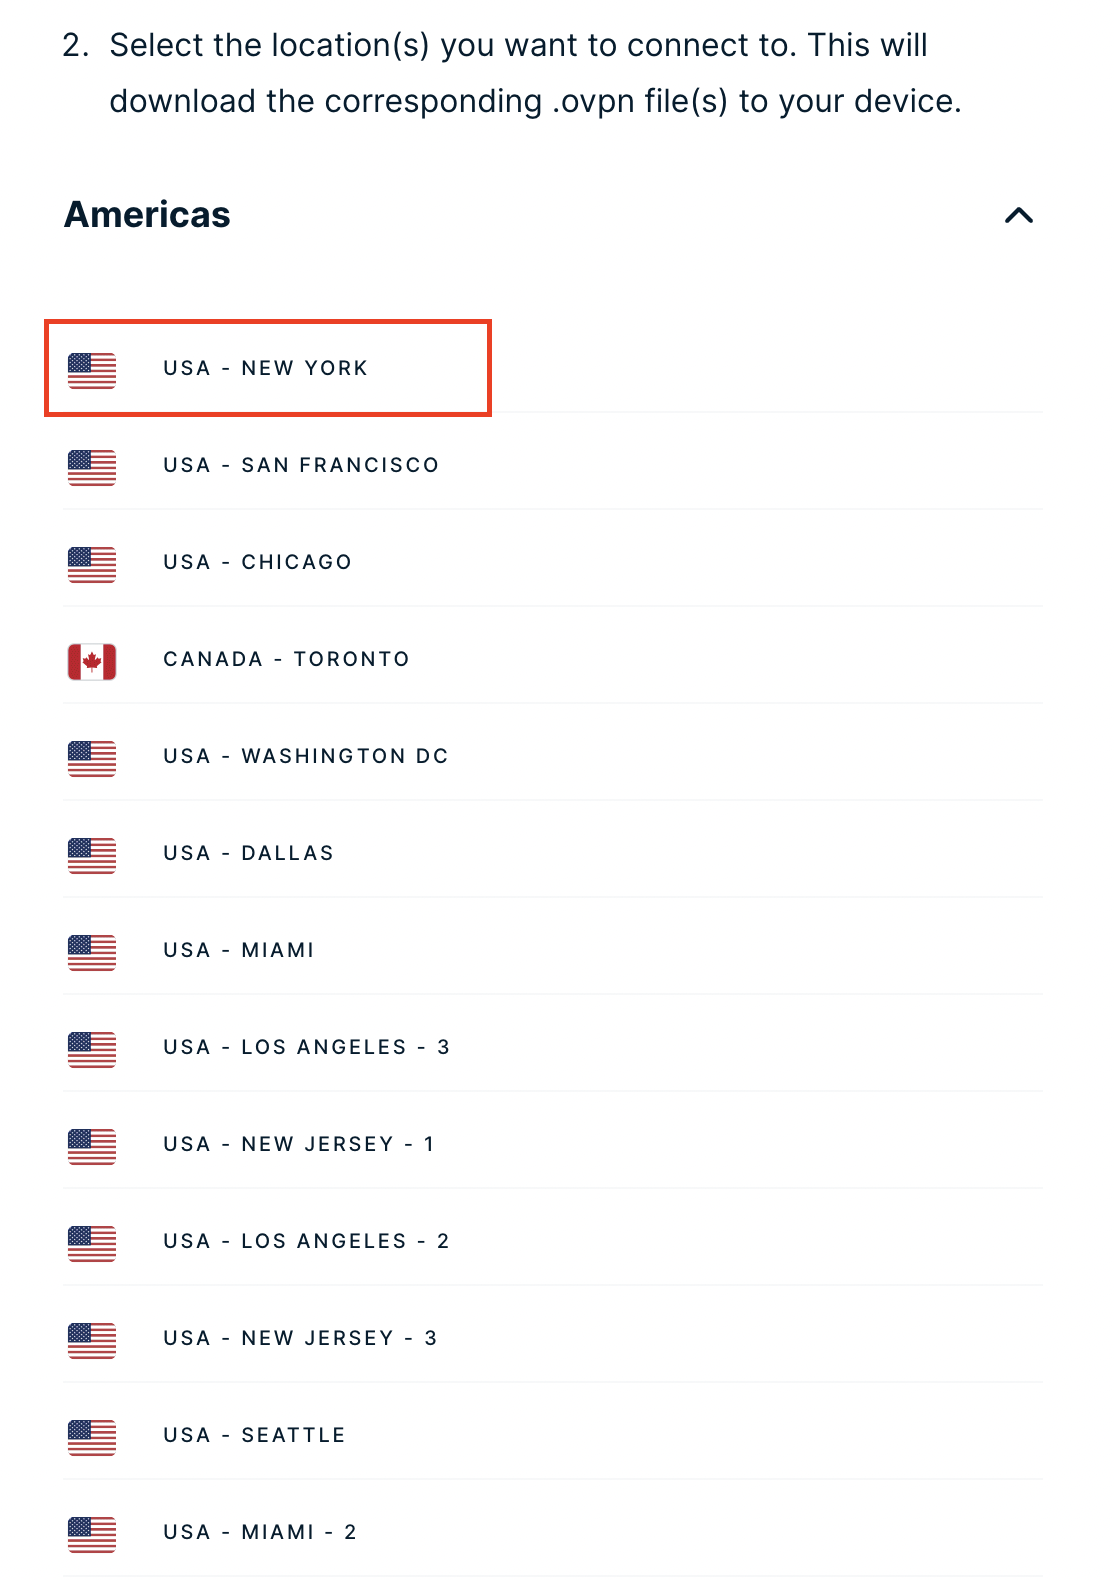
ExpressVPN Download .ovpn file

TP-Link Router Setup for ExpressVPN

Login to TP-Link firmware settings in a browser on any computer or smart device connected to the FlashRouter’s network.

1. Navigate to the Advanced tab.

TP-Link Advanced settings

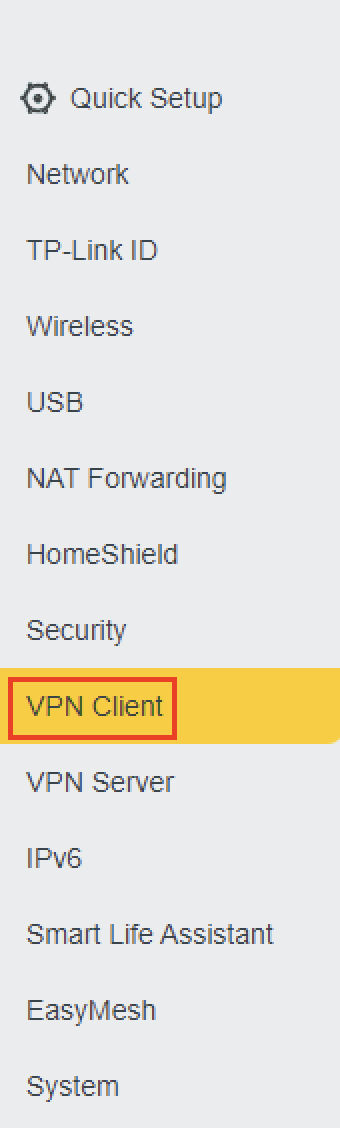
2. Navigate to the VPN Client tab.

TP-Link VPN Client

3. Check the Enable box next to VPN Client. Then click Save at the bottom of the page.
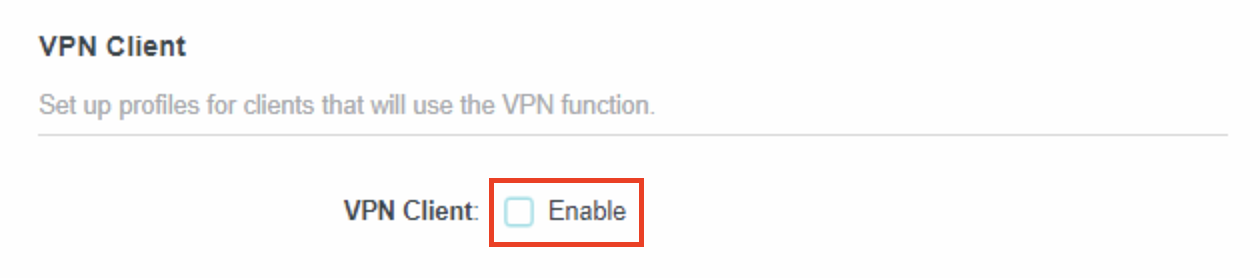
TP-Link VPN Client enable

4. Click the Add button in the Server List area.
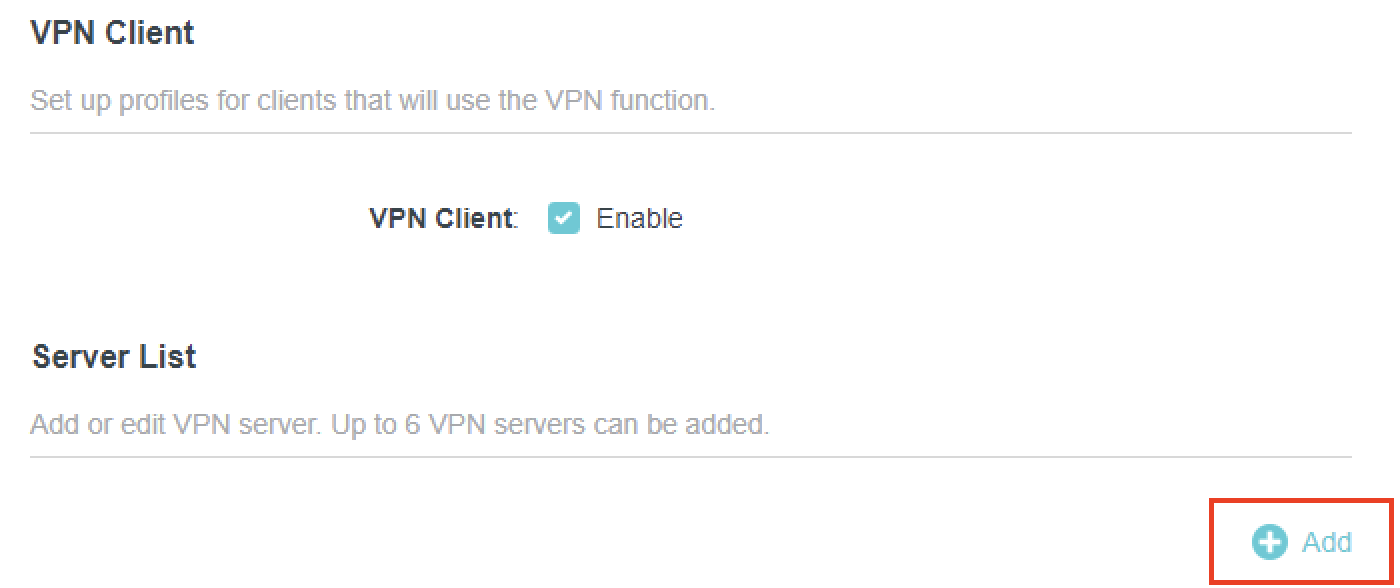
TP-Link Add server button

5. In the Description field enter in the name you’d like to use for this OpenVPN Client profile. We typically advise entering in the location or server number here. Our example server was in New York so I have entered in ExpressVPN New York.

Set the VPN Type to OpenVPN.

In the Username and Password fields paste in the ExpressVPN username and password we obtained earlier.

Click Browse and select the .ovpn file you downloaded earlier. Then click Save.

TP-Link ExpressVPN setup

By default no devices will be assigned to the VPN Tunnel. With TP-Link firmware you must manually assign the devices that you want connected to the VPN tunnel. Proceed with the next steps to do so for all devices you want connected to VPN.

6. Click the Add button in the Device List area.

TP-Link add devices to VPN tunnel

7. A list of devices connected to the FlashRouter’s network will appear. Check the devices that you want to connect to VPN. Then click OK.
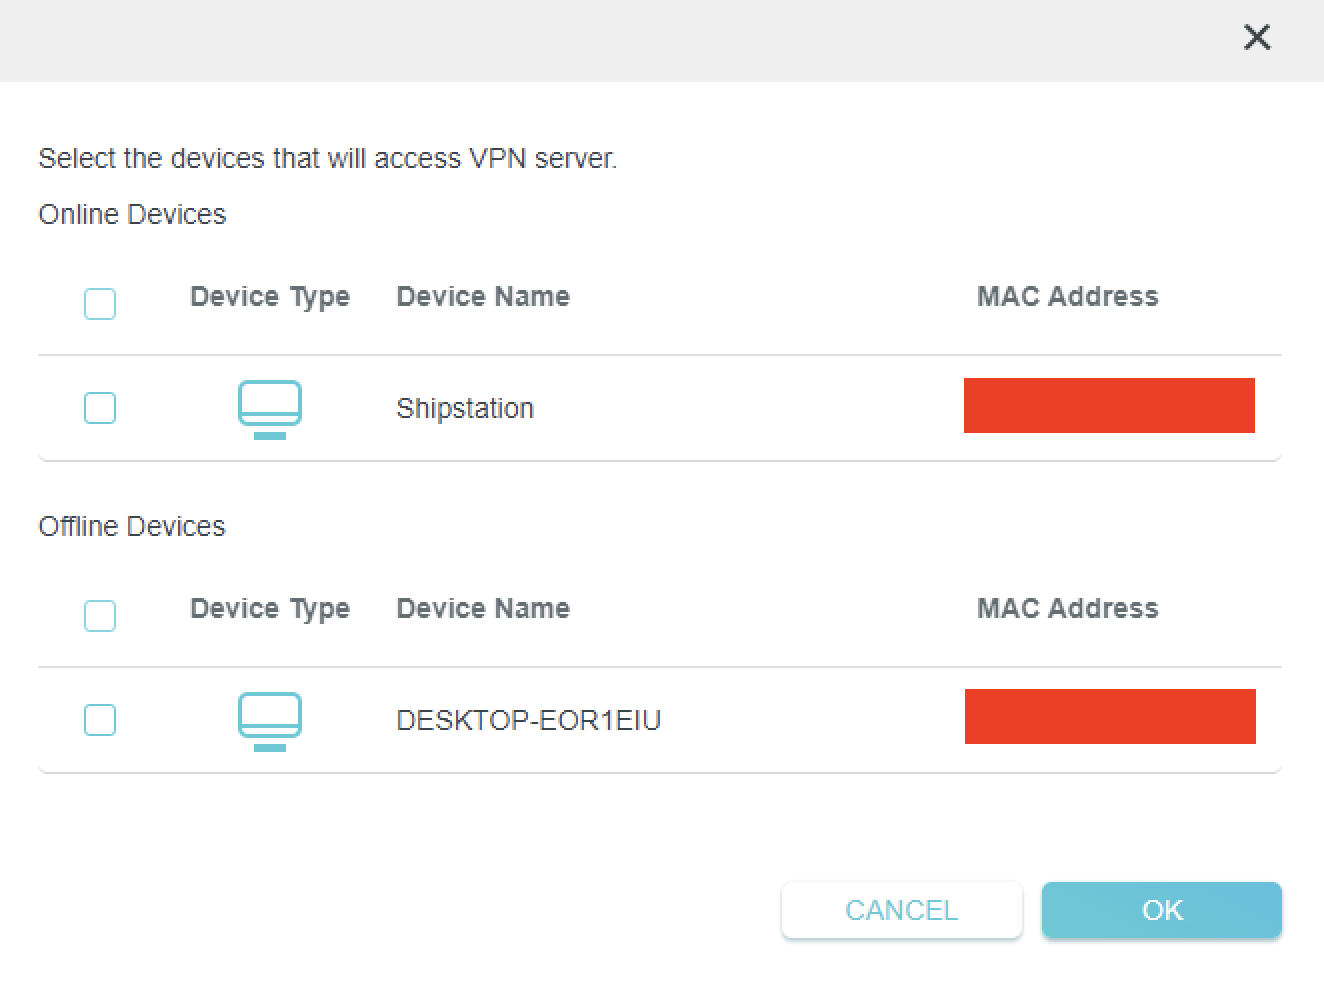
TP-Link select devices to add to VPN tunnel

8. Now that the devices have been assigned to the VPN connection click the Enable toggle in the Server List area.

TP-Link ExpressVPN toggle VPN on

Verify a successful ExpressVPN connection

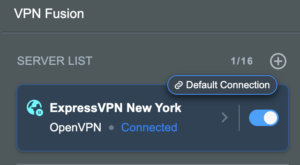
  1. You should now see a CONNECTED message.
  2. Visit ExpressVPN’s IP Check to verify your new IP address and virtual location.

In some cases you may notice that the location is not showing the same location as the server you have input in your router settings; this is because geo tracking tools are often tricked by VPN connections. As long as you see an IP address that is not the same as your normal Internet IP address then you are indeed connected to ExpressVPN.

How to change the ExpressVPN server

  1. Follow the steps at the top of the page to obtain a new .ovpn file.
  2. Then proceed with the settings same as initial setup.

TROUBLESHOOTING

Still having issues? Visit the VPN Troubleshooting section.

Troubleshoot Here

Shipping FAQs
admin · Jan 29, 2019 ·

Shipping FAQs
General Shipping FAQs
What company do you use for shipping?

For domestic shipping, we offer United State Postal Service (USPS), and a FedEx Expedited 2-3 Day delivery option.

For International shipments, we offer USPS and FedEx.

Where do you ship from?

We ship all packages from our New Jersey warehouse.

How much does shipping cost?

Domestic Customers:

  • Free Standard Shipping 3-10 day Delivery when you purchase a router with any Service Plan.
  • $20 Flat Rate FedEx 2-3 Day Express shipping

International Customers:

  • Pricing for USPS, and FedEx will vary by country. You can see rates on the Shipping Estimate tab on any FlashRouters product page. FlashRouters does not add any internal handling fees to international rates.
  • Note: Customers pay customs, duties, processing fees, and taxes (if applicable).

How fast do you ship?

We aim to ship your purchase within 1-2 business days from the original order date.

There may be a delay of up to 24 hours if our configuration team is unable to configure your router as requested. In these cases, our support team will reach out to you in an attempt to find a solution. If the team does not hear back from you within 24 hours they will ship out the unit to avoid further delays. Keep in mind  our support team will be available to assist if you have any setup issues once you receive your router.

Who pays for shipping?

Domestic customers can choose Free standard shipping. Customers pay shipping costs including customs, duties, processing fees, and taxes (if applicable) for all other options.

Can you ship to my country?

We ship to almost all countries around the world with some exclusions. If you would like to ship to any of these excluded countries, we recommend using PayPal and a Freight forwarding service such as Aramex, MyUS, or Shipito.

Another option if you are located in a country we do not ship to is to purchase a compatible router locally that we can flash remotely for you via our Flash My Router plan. A full list of compatible routers are listed there.

Known excluded countries are:
  • Afghanistan
  • Algeria
  • Angola
  • Bangladesh
  • Benin
  • Bhutan
  • Bosnia & Herzegovina
  • Botswana
  • Brazil
  • Burkina Faso
  • Burundi
  • Cape Verde
  • Central African Republic
  • Chad
  • Comoros
  • Congo – Brazzaville
  • Congo – Kinshasa
  • Cuba
  • Djibouti
  • Egypt
  • Eritrea
  • Eswatini
  • Ethiopia
  • Gabon
  • Gambia
  • Ghana
  • Guinea-Bissau
  • India
  • Indonesia
  • Iran
  • Iraq
  • Kenya
  • Kiribati
  • Kosovo
  • Laos
  • Lesotho
  • Liberia
  • Libya
  • Madagascar
  • Malawi
  • Malaysia
  • Mali
  • Mauritania
  • Mauritius
  • Mayotte
  • Mozambique
  • Myanmar (Burma)
  • Namibia
  • Nauru
  • Niger
  • Nigeria
  • Niue
  • North Korea
  • Palastinian Territories
  • Russia
  • Rwanda
  • Sao Tome & Principe
  • Senegal
  • Seychelles
  • Sierra Leone
  • Solomon Islands
  • Somalia
  • Sudan
  • Syria
  • Tajikistan
  • Tanzania
  • Togo
  • Tokelau
  • Tunisia
  • Turkmenistan
  • Tuvalu
  • Uganda
  • Wallis & Futuna
  • Western Sahara
  • Zambia
  • Zimbabwe

2025 - Postal Calendar

We will not be able to ship on the dates below. Your package will be shipped the following business day.

  • New Year’s Day: January-01
  • Martin Luther King Jr. Day: January-20
  • President’s Day: February-17
  • Memorial Day: May-26
  • Independence Day: July-04
  • Labor Day: September-01
  • Columbus Day: October-13
  • Veteran’s Day: November-11
  • Thanksgiving Day: November-27
  • Christmas Eve: December-24
  • New Year’s Eve: December-31


2025 Holiday Shipping Deadlines
In order to ensure timely delivery of your packages for the holiday season, please refer to the following shipping deadline dates for the following types of mail.

PLEASE NOTE: All deadlines are at 1PM EST of the designated.

US

  • USPS Priority 12/18
  • USPS APO/FPO/DPO 12/11
  • FedEx 12/21

International

International dates are for estimated delivery dates. However, customs can cause issues and may take longer.

  • Puerto Rico 12/21
  • Canada  12/21
  • Mexico 12/21
  • UK 12/20
  • Hong Kong 12/19
  • Australia 12/19
  • Middle East 12/19

Regardless of your carrier or country, we recommend that you place your holiday orders as soon as possible to ensure timely delivery.

Customs and Expenses

Will there be extra customs charges when my FlashRouter arrives?

There may be additional customs fees incurred based on the local importation laws of your country. You (the recipient) are responsible for all customs fees charged by your country’s customs agency.

Customs charges are NOT factored into the FlashRouters shipping cost.

All customs fees will be a separate charge and must be paid for by the recipient of the package.

We do our best to inform you of possible customs fees to the best of our ability, however we will not accept returns because of refusal to pay these fees.

If we receive a return due to failure to pay customs fees, you will be refunded but ONLY for the price of the FlashRouter. Original Shipping charges will NOT be refunded.

We do our best to make FlashRouters’ shipping quick and affordable but are unable to foresee all customs-related issues. Please be sure to check before ordering if you are concerned with local customs fees.

Do you charge sales tax?

We will charge sales tax in any state where we are required to do so. Currently that is within New Jersey, due to the fact that this is the physical location of our business and New York but that is subject to change as law dictates.

Any taxes or customs fees that are incurred to your country’s current policies are out of our hands. We do our best to make the router and the shipping quick and affordable.

Surfshark TP-Link WireGuard Setup

TeamFlashRouters · Apr 29, 2024 ·

Preparing for Surfshark TP-Link Setup

Download your Surfshark .conf file

If you are not already a Surfshark user Sign Up Now.

1. Log in to your account on the Surfshark website.

Surfshark Account Login

2. Click VPN Manual Setup.

Surfshark VPN Manual Setup

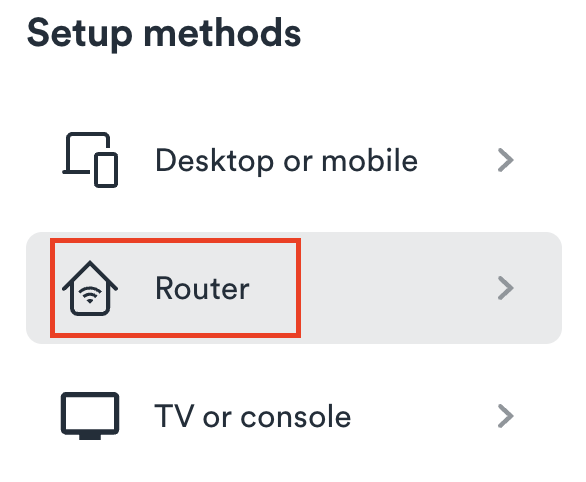
3. Select Router as the Setup method.

Surfshark setup method Router

4. Select WireGuard as the Protocol.

Surfshark select WireGuard

5. Select I don’t have a key pair.

Surfshark No Key Pair

6. Enter FlashRouter as the name of the connection and click Next.

Surfshark Connection Name

7. Click Generate a new key pair.

Surfshark Generate new Key Pair

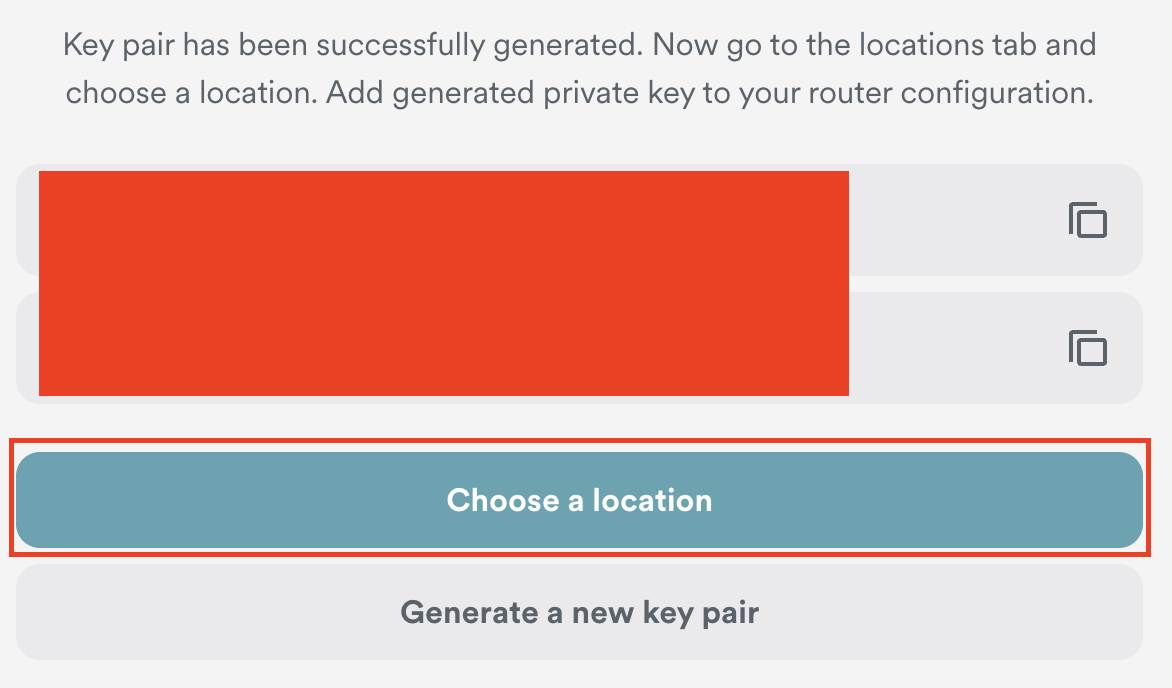
8. Click Choose a location.

Surfshark Choose a Location

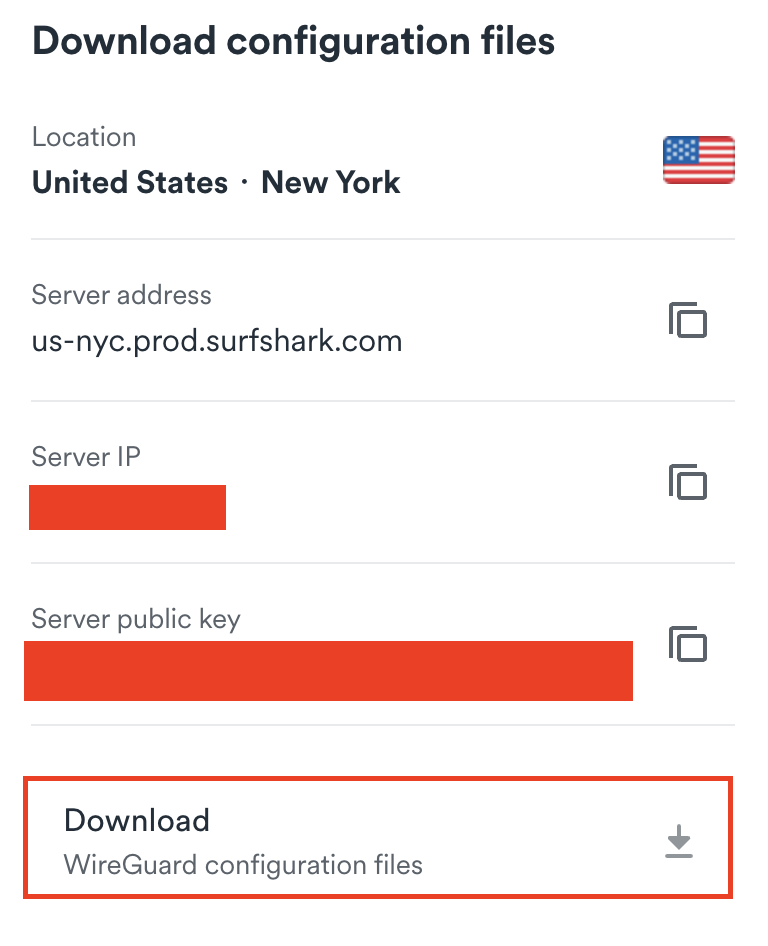
9. Select the server location you want to connect to. Unless you need a specific location we recommend using Surfshark’s recommended Fastest server. Click Download to download the .conf file for this Surfshark server location.

Surfshark download conf file

TP-Link Router Setup for Surfshark

Login to TP-Link firmware settings in a browser on any computer or smart device connected to the FlashRouter’s network.

1. Navigate to the Advanced tab.

TP-Link Advanced settings

2. Navigate to the VPN Client tab.

TP-Link VPN Client

3. Check the Enable box next to VPN Client. Then click Save at the bottom of the page.

TP-Link VPN Client enable

4. Click the Add button in the Server List area.

TP-Link Add server button

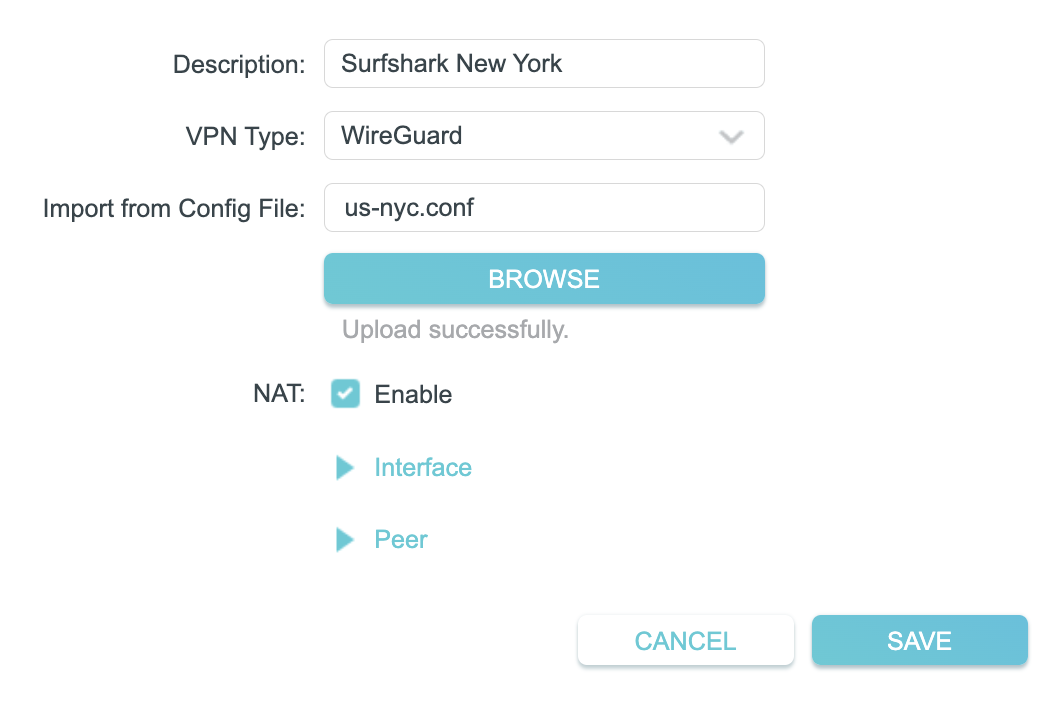
5. In the Description field enter in the name you’d like to use for this WireGuard Client profile. We typically advise entering in the location. Our example server was New York so I have entered in Surfshark New York.

Set the VPN Type to WireGuard.

Click Browse and select the .conf file you downloaded earlier. Then click Save.

TP-Link Surfshark WireGuard

By default no devices will be assigned to the VPN Tunnel. With TP-Link firmware you must manually assign the devices that you want connected to the VPN tunnel. Proceed with the next steps to do so for all devices you want connected to VPN.

6. Click the Add button in the Device List area.

TP-Link add devices to VPN tunnel

7. A list of devices connected to the FlashRouter’s network will appear. Check the devices that you want to connect to VPN. Then click OK.

TP-Link select devices to add to VPN tunnel

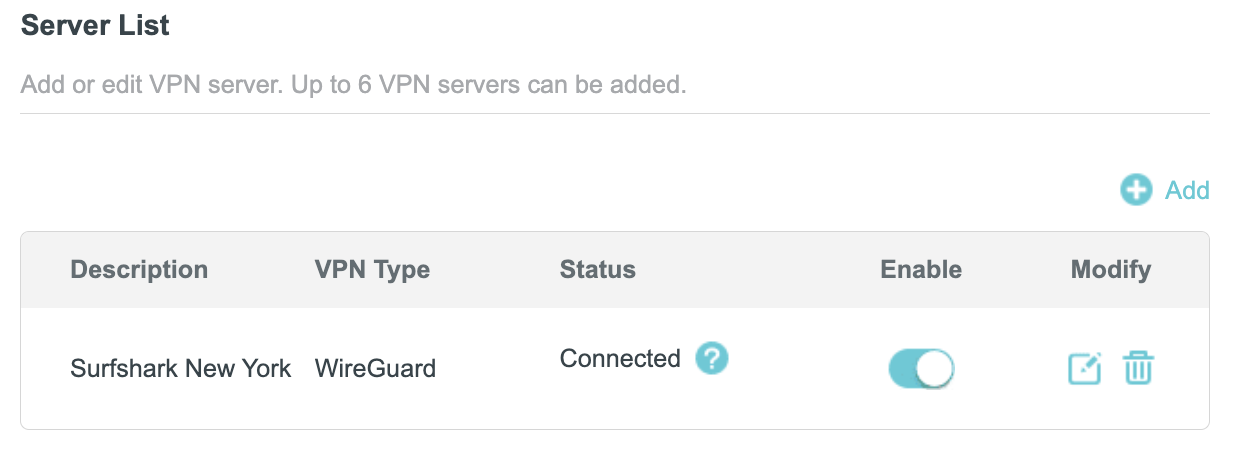
8. Now that the devices have been assigned to the VPN connection click the Enable toggle in the Server List area.

TP-Link Surfshark WireGuard Connected

Verify a successful Surfshark connection

  1. You should now see a CONNECTED message.
  2. Visit Surfshark’s IP Check to verify your new IP address and virtual location.

In some cases you may notice that the location is not showing the same location as the server you have input in your router settings; this is because geo tracking tools are often tricked by VPN connections. As long as you see an IP address that is not the same as your normal Internet IP address then you are indeed connected to Surfshark.

How to change the Surfshark server

  1. Follow the steps at the top of the page to obtain a new .conf file.
  2. Then proceed with the settings same as initial setup.

TROUBLESHOOTING

Still having issues? Visit the VPN Troubleshooting section.

Troubleshoot Here

ProtonVPN TP-Link WireGuard Setup

TeamFlashRouters · Apr 29, 2024 ·

Preparing for ProtonVPN TP-Link Setup

Download your ProtonVPN .conf file

If you are not already an ProtonVPN user Sign Up Now.

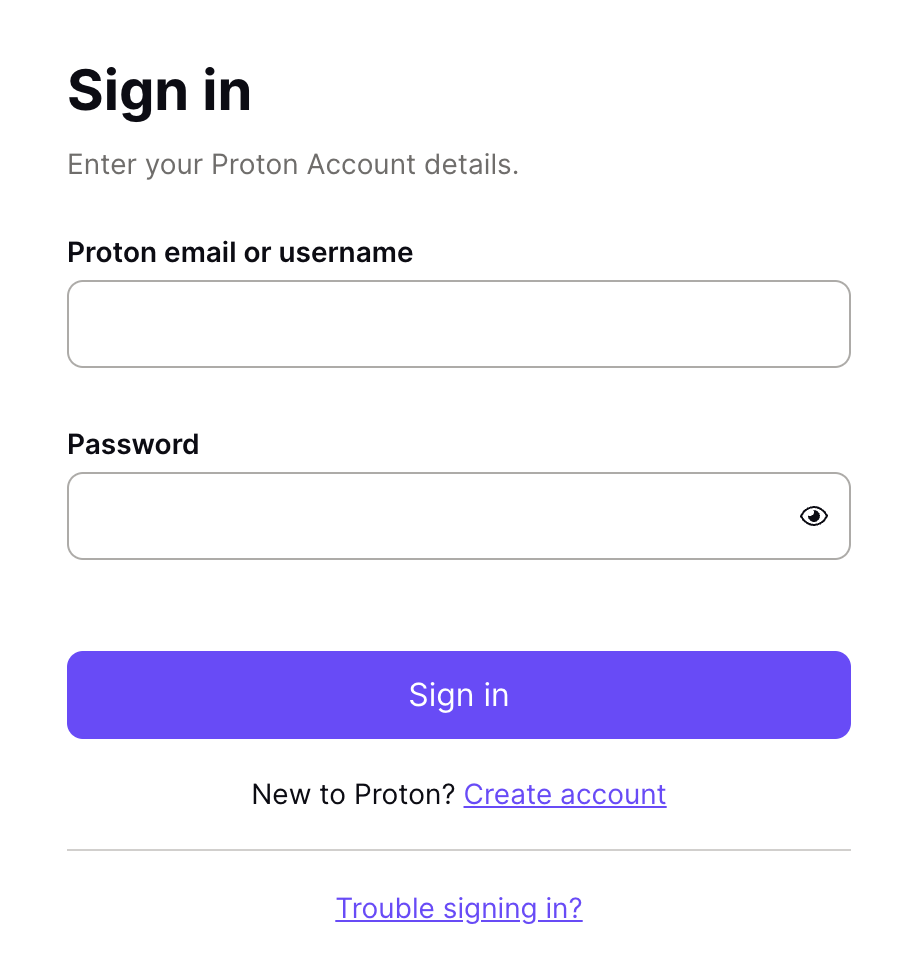
1. Log in to your account on the ProtonVPN website.

ProtonVPN Account Sign in

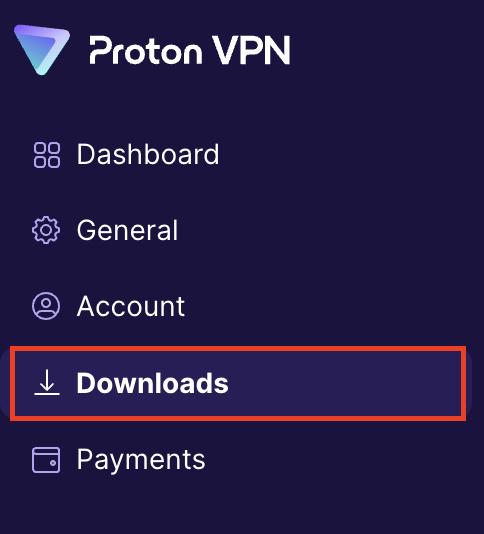
2. Click Downloads.

ProtonVPN Downloads

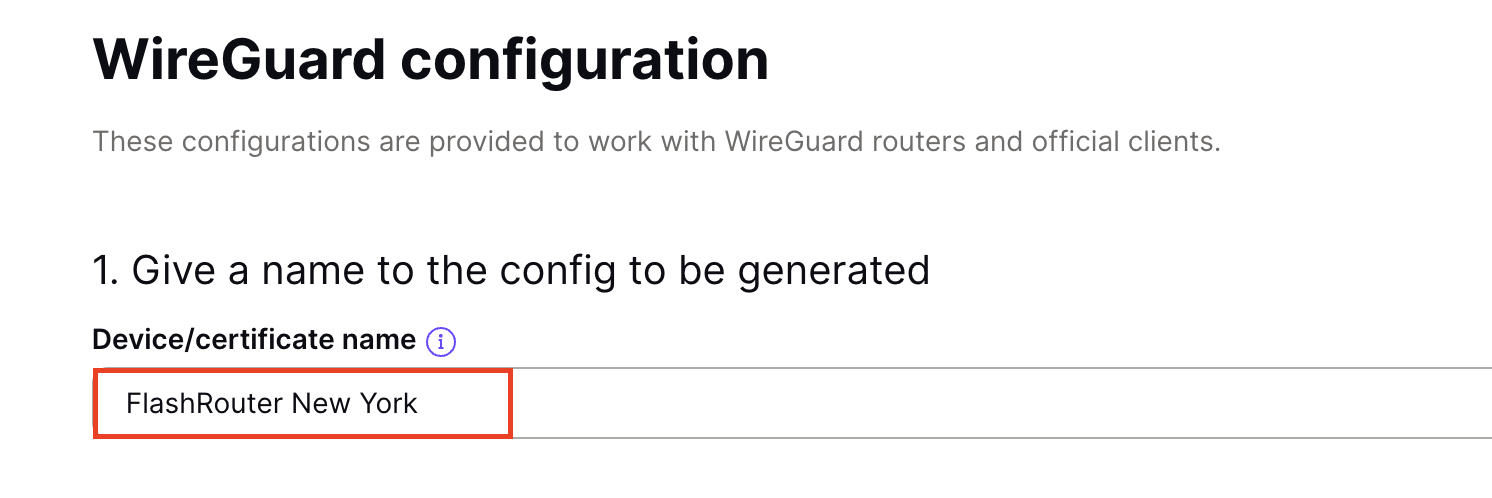
3. Scroll down to WireGuard configuration and name the device FlashRouter.

ProtonVPN WireGuard Configuration Name

4. Select Router as the platform.

ProtonVPN WireGuard select Platform

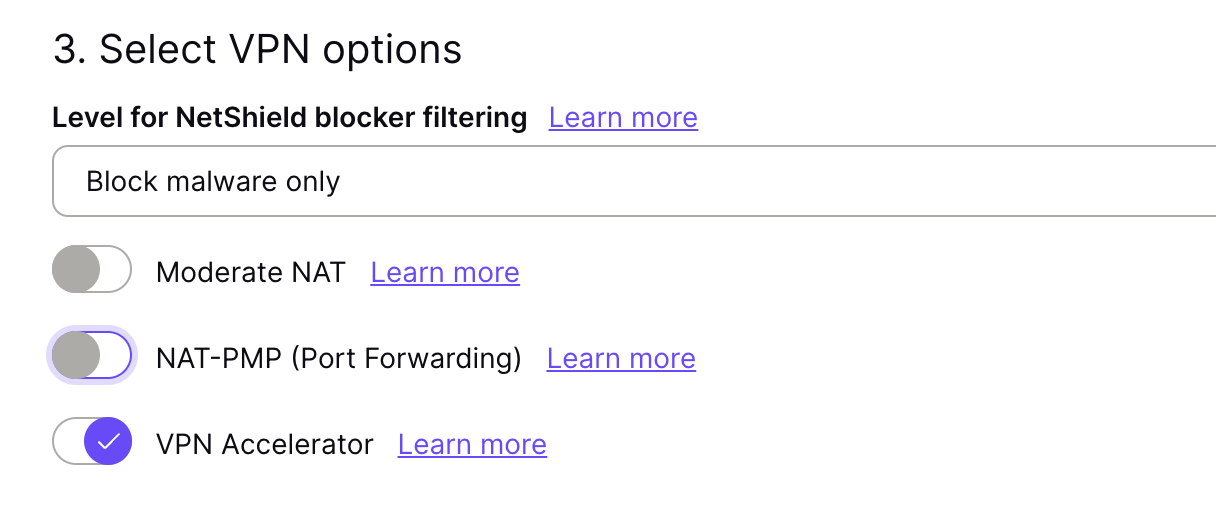
5. Select the VPN options that best fit your needs. We typically use the settings as seen in the screenshot here if you are unsure.

ProtonVPN WireGuard VPN options

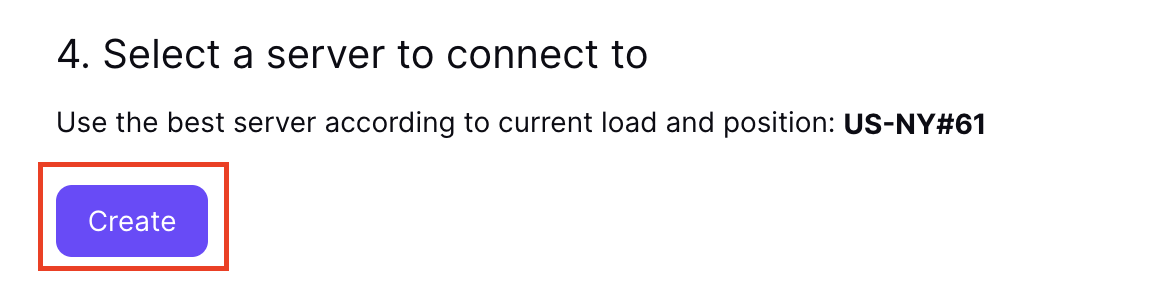
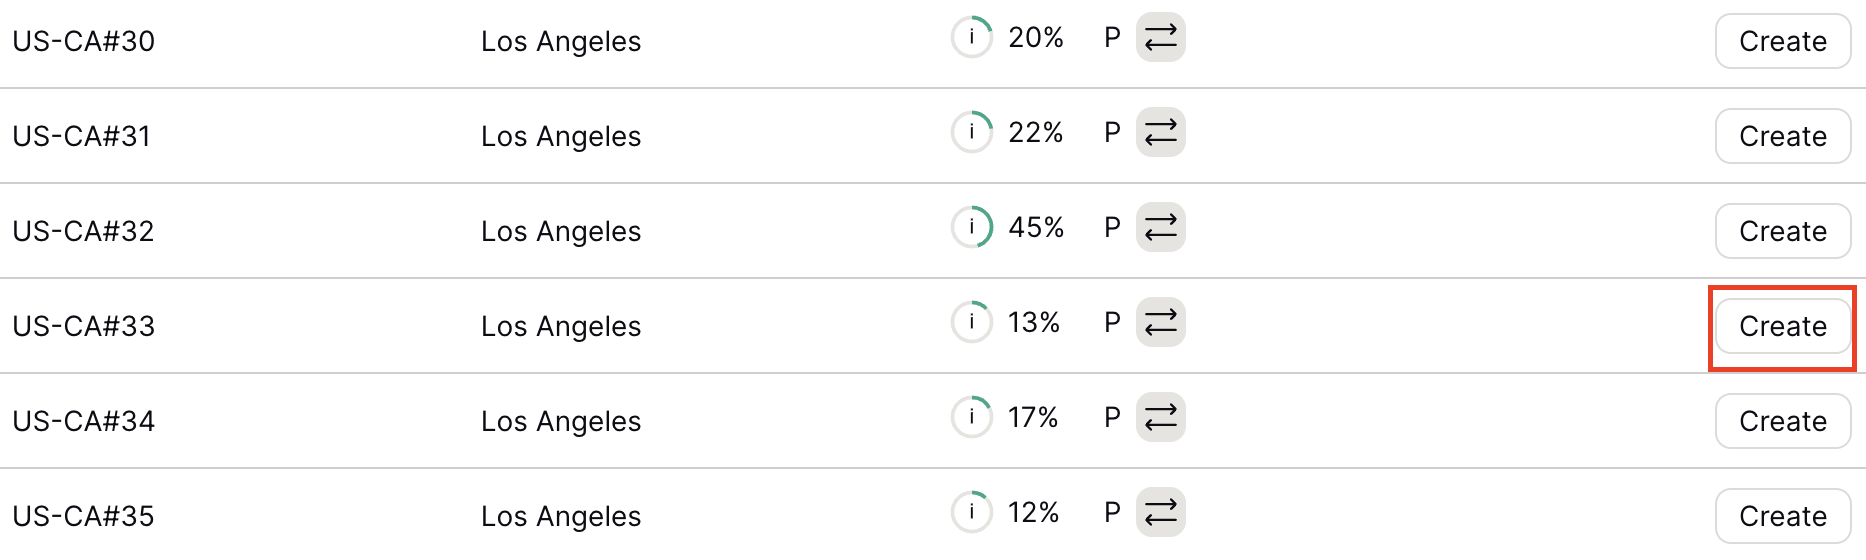
6. Next select the server that you would like to connect to and click Create. At the top of the page you’ll see ProtonVPN’s recommended server which we recommend using unless you need to connect to a specific location.

If you need a specific server location find it in the list and click Create.

ProtonVPN WireGuard recommended server
ProtonVPN WireGuard specific server

7. After clicking Create a new window will appear. Click Download to download the .conf file to your computer.

TP-Link Router Setup for ProtonVPN

Login to TP-Link firmware settings in a browser on any computer or smart device connected to the FlashRouter’s network.

1. Navigate to the Advanced tab.

TP-Link Advanced settings

2. Navigate to the VPN Client tab.

TP-Link VPN Client

3. Check the Enable box next to VPN Client. Then click Save at the bottom of the page.

TP-Link VPN Client enable

4. Click the Add button in the Server List area.

TP-Link Add server button

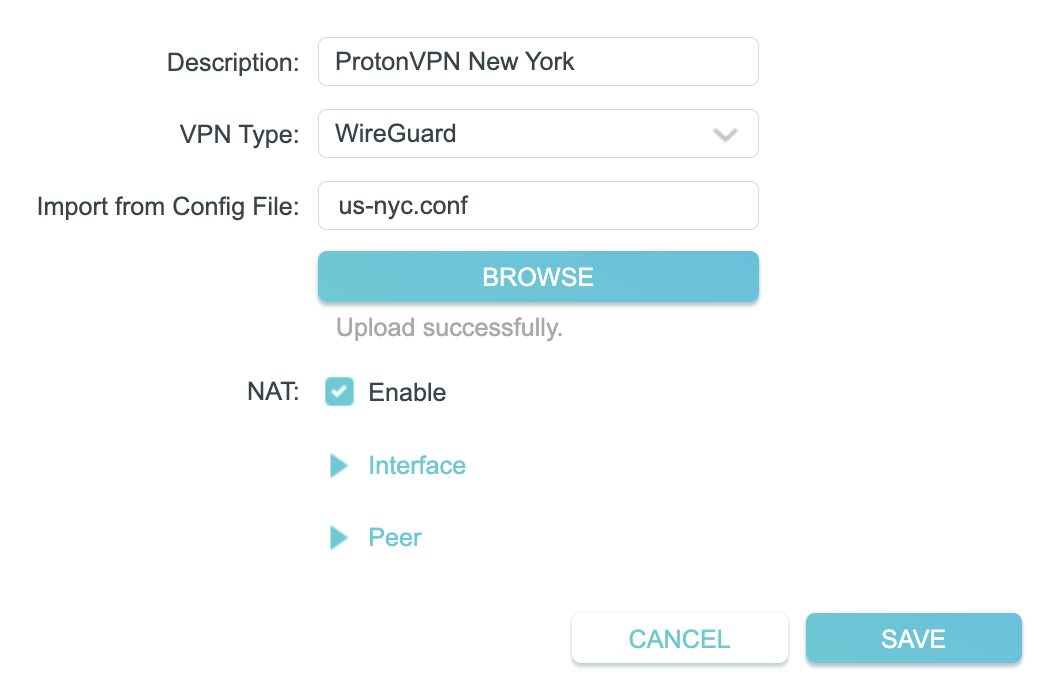
5. In the Description field enter in the name you’d like to use for this WireGuard Client profile. We typically advise entering in the location. Our example server was New York so I have entered in ProtonVPN New York.

Set the VPN Type to WireGuard.

Click Browse and select the .conf file you downloaded earlier. Then click Save.

TP-Link ProtonVPN WireGuard

By default no devices will be assigned to the VPN Tunnel. With TP-Link firmware you must manually assign the devices that you want connected to the VPN tunnel. Proceed with the next steps to do so for all devices you want connected to VPN.

6. Click the Add button in the Device List area.

TP-Link add devices to VPN tunnel

7. A list of devices connected to the FlashRouter’s network will appear. Check the devices that you want to connect to VPN. Then click OK.

TP-Link select devices to add to VPN tunnel

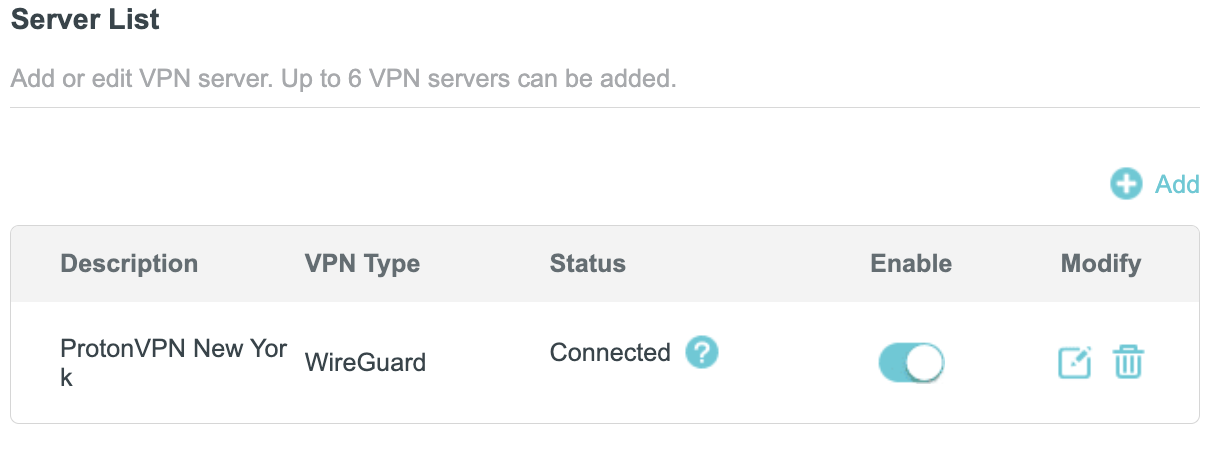
8. Now that the devices have been assigned to the VPN connection click the Enable toggle in the Server List area.

TP-Link ProtonVPN WireGuard connected

Verify a successful ProtonVPN connection

  1. You should now see a CONNECTED message.
  2. Visit ProtonVPN’s IP Check to verify your new IP address and virtual location.

In some cases you may notice that the location is not showing the same location as the server you have input in your router settings; this is because geo tracking tools are often tricked by VPN connections. As long as you see an IP address that is not the same as your normal Internet IP address then you are indeed connected to ProtonVPN.

How to change the ProtonVPN server

  1. Follow the steps at the top of the page to obtain a new .conf file.
  2. Then proceed with the settings same as initial setup.

TROUBLESHOOTING

Still having issues? Visit the VPN Troubleshooting section.

Troubleshoot Here

Roqos Core Internet Setup and Activation

TeamFlashRouters · Mar 15, 2022 ·

Follow this article when you receive your new Roqos Core router to create your Roqos account, connect your Roqos to the Internet, and customize your network so it is ready to use.

Create your Roqos account

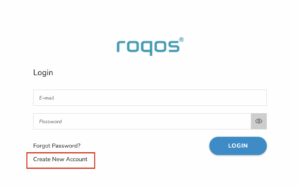
1. From any device that has a browser such as a computer, smartphone, or tablet visit login.roqos.com

Roqos Login URL

2. Select Create Account.

Roqos Create Account

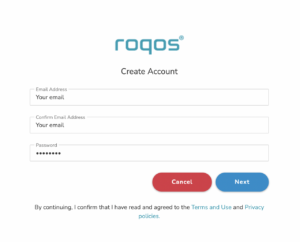
3. Enter the Email address and password you want to set for your Roqos account. This will be your login to the Roqos settings moving forward. Click Next.

Roqos Enter Email

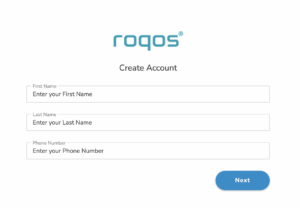
4. Enter the name and phone number you want associated with your Roqos. Click Next.

Roqos Enter Name and Number

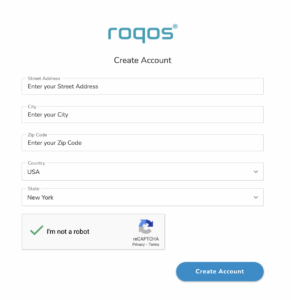
5. Enter the address where your Roqos is located. This section may require a CAPTCHA to be completed to authenticate you are human. Click Create Account.

Roqos Enter Address

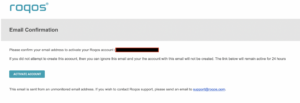
6. You have now created your Roqos account. In a new tab proceed to open the email from Roqos and click the Activate account button.

Roqos email activation

Activate your Roqos Internet

1. From the Account created page click Next to begin the Internet Setup of the Roqos.

Roqos Account Created

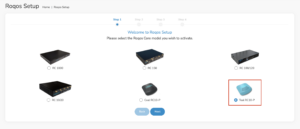
2. Select the Roqos model Teal RC10-P. Click Next.

Roqos Model

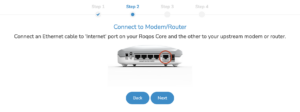
3. Connect the ethernet cable that came with your Roqos from the port labeled INTERNET on the back of your Roqos to an open ethernet port on your ISP Modem or other router in your network.

Roqos Wiring

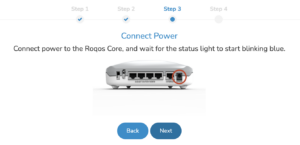
4. Then connect the power adapter that came with the Roqos to the back of the Roqos. Wait for the light on the Roqos to begin blinking blue. Once your see the blinking blue lights on the Roqos click Next.

Roqos Power On

If your Roqos lights does not begin blinking blue after a long while please see the steps in this article and contact us.

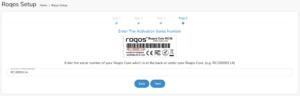
5. Enter in the Roqos serial number found on the bottom of the device exactly as it appears there. Click Next.

Roqos Activation Code

Setup your Roqos Network

1. Enter in a name that you would like to call the Roqos. This is just the Roqo’s device name and it is not the WiFi network name. Click Next.

Roqos Device Name

2. Select the Time Zone of your actual location from the dropdown. Click Next.

Roqos Time Zone

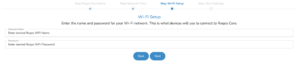
3. Set the WiFi name and password for the Roqos. The WiFi name should be unique and not a duplicate of an existing wireless network. This will be the name that appears in your wireless devices available network list and the password to join the devices to the network. Click Next.

Roqos Set WiFi Name and Password

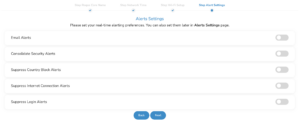
4. Select the custom alert settings as you best see fit using the toggle switches. We typically recommend having the first two toggles selected for Email Alerts and Consolidate Security Alerts. Click Next.

Begin connecting your devices to the Roqos network

You are now done setting up your Roqos to connect to the Internet and can begin joining your wireless devices to the Roqos network and exploring the Roqos Core Features.

Roqos Setup Done

TROUBLESHOOTING

Still having issues? Visit the VPN Troubleshooting section.

Troubleshoot Here

SaferVPN Manual OpenVPN Setup

TeamFlashRouters · Apr 15, 2019 ·

Preparing for Manual SaferVPN Setup

Verify your SaferVPN login information

If you are not already an SaferVPN user Sign Up Now.

Log in to your account on the SaferVPN website.

FlashRouters Privacy App - SaferVPN Login

SaferVPN Server Addresses

View a full list of SaferVPN servers.

America

East Coast:
us1.safervpn.net

West Coast:
us2.safervpn.net

United Kingdom

uk1.safervpn.net

DD-WRT Router Setup for SaferVPN

Navigate to Services > VPN

Enter SaferVPN settings

OpenVPN Client

Start OpenVPN Client

If you wish to disable your VPN connection simply set this to Disable at any time and click Apply Settings.

Server IP/Name

Copy and paste the server you would like to connect to from the server list above. Be sure there are no extra spaces or characters.

If you wish to change SaferVPN connection locations, THIS IS THE ONLY FIELD YOU NEED TO CHANGE.

Port

1194

Tunnel Device

TUN

Tunnel Protocol

UDP

Encryption cipher

AES-256-CBC

Hash Algorithm

SHA1

User Pass Authentication

Enable

Username

Enter the Username you successfully logged in to your SaferVPN account with.

Password

Enter the Password you successfully logged in to your SaferVPN account with.

Advanced Options

Enable

TLS Cipher

None

LZO Compression

Adaptive

NAT

Enable

Additional Config

persist-key
persist-tun
tun-mtu-extra 32
mssfix 1450

Policy Based Routing

This field can be used for split VPN and Dual Gateway routing.

CA Cert

-----BEGIN CERTIFICATE-----
MIIE1jCCA76gAwIBAgIJAOnRq4FWsZgYMA0GCSqGSIb3DQEBCwUAMIGiMQswCQYD
VQQGEwJVUzELMAkGA1UECBMCQ0ExFTATBgNVBAcTDFNhbkZyYW5jaXNjbzERMA8G
A1UEChMIU2FmZXJWUE4xETAPBgNVBAsTCFNhZmVyVlBOMREwDwYDVQQDEwhTYWZl
clZQTjERMA8GA1UEKRMIU2FmZXJWUE4xIzAhBgkqhkiG9w0BCQEWFHN1cHBvcnRA
c2FmZXJ2cG4uY29tMB4XDTE3MDgzMTA5NDEyM1oXDTI3MDgyOTA5NDEyM1owgaIx
CzAJBgNVBAYTAlVTMQswCQYDVQQIEwJDQTEVMBMGA1UEBxMMU2FuRnJhbmNpc2Nv
MREwDwYDVQQKEwhTYWZlclZQTjERMA8GA1UECxMIU2FmZXJWUE4xETAPBgNVBAMT
CFNhZmVyVlBOMREwDwYDVQQpEwhTYWZlclZQTjEjMCEGCSqGSIb3DQEJARYUc3Vw
cG9ydEBzYWZlcnZwbi5jb20wggEiMA0GCSqGSIb3DQEBAQUAA4IBDwAwggEKAoIB
AQCqNV7oJZrUqD/mBSWlKi/sGRE2y3Yphs5m/vmmS4GPrc8lyaI1idhv44MGZ0i1
XCkJFZmaVQk7NUz5npz9hcnxN3MiZd/5Kv8Vo4aQkL0xQ7euto71LIgTqbJvTJjW
kowsVVgartGK2ewfCd+KV6k5oBImlDdSnLW1pq82Kg+YcnXxdaFc8RpNWdBbdxBe
tb4k6JcoZHuk9Zq5gi5Nnhtjc6lheCRzTGZ2hslDfJ58yMpR0jTMC3Rd+G+sM0q3
/gEEEW34ckUgCb5j6Kq35LUlnuonnViBnEzFR/MTizMARFj7VYkzOpxSsxJ6Epan
JP8Zgbz81z4A822hosakl7kTAgMBAAGjggELMIIBBzAdBgNVHQ4EFgQUKSnUrJLQ
omrGvdncxKkKT7Rxrj8wgdcGA1UdIwSBzzCBzIAUKSnUrJLQomrGvdncxKkKT7Rx
rj+hgaikgaUwgaIxCzAJBgNVBAYTAlVTMQswCQYDVQQIEwJDQTEVMBMGA1UEBxMM
U2FuRnJhbmNpc2NvMREwDwYDVQQKEwhTYWZlclZQTjERMA8GA1UECxMIU2FmZXJW
UE4xETAPBgNVBAMTCFNhZmVyVlBOMREwDwYDVQQpEwhTYWZlclZQTjEjMCEGCSqG
SIb3DQEJARYUc3VwcG9ydEBzYWZlcnZwbi5jb22CCQDp0auBVrGYGDAMBgNVHRME
BTADAQH/MA0GCSqGSIb3DQEBCwUAA4IBAQB704c0nixfDuJ7OiFBUmkhmDUFEIhl
D35wxlthKYRs8tBzetZEipFGdyUOwuWiuwG/BuOwuP7fPS9uP4u4EPKjA5kL/Z/V
E743q50PS4L/kT3ZFyUrcisUKajAr5Gu+o6rzA6F4+QYu26iBbKewNrrb+riF1wR
GKthc6W++Awt+oVyKtVNyS2QokuBFcSu5IiVsfGqJ8TmffvFBqKUUjWopmP+qiYR
8+0qwHing/S/C9S72ZxhM9DF3et1dXFuHf/69YL8/u36tyKMqy/JVhByAlc87cRI
tcRGaviUttBeSw4j1Y6XrycVkhn4LzizWrqrmfCikhx26MrIeWK5JxYL
-----END CERTIFICATE-----

CLICK APPLY SETTINGS

Leave all settings not mentioned above as their default setting.

Verify a successful SaferVPN connection

Navigate to Status > OpenVPN

  1. You should now see a CONNECTED SUCCESS message.
  2. Visit SaferVPN’s IP Check to verify your new IP address and virtual location.

In some cases you may notice that the location is not showing the same location as the server you have input in your router settings; this is because geo tracking tools are often tricked by VPN connections. As long as you see an IP address that is not the same as your normal Internet IP address then you are indeed connected to SaferVPN.

Back up your settings

Navigate to Administration > Backup

  1. Click the Backup button.
  2. A file named nvrambak.bin will be saved to your computer.
  3. You can load nvrambak.bin to restore your settings in the event of a reset.

How to change the SaferVPN server

  1. Copy the new SaferVPN server address from the above server list.
  2. Paste the server into the Server IP/Name field.
  3. Click Apply Settings.

TROUBLESHOOTING

Still having issues? Visit the VPN Troubleshooting section.

Troubleshoot Here

VPN Unlimited Manual OpenVPN Setup

TeamFlashRouters · Apr 19, 2019 ·

Preparing for Manual VPN Unlimited Setup

Verify your VPN Unlimited login information

If you are not already a VPN Unlimited user Sign Up Now.

Log in to your account on the VPN Unlimited website.

VPN Unlimited Website Login

Generate your VPN Unlimited OVPN Configuration Files

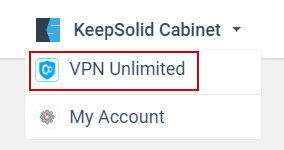
1. Navigate to the VPN Unlimited section in the dropdown on the top left.

VPN Unlimited Website Login

2. Set Device to “Manually create new device…”

3. Name your device.

4. Select Server.

5. Set Protocol to OpenVPN.

FlashRouters DD-WRT Privacy App - Create Open VPN Configuration files

6. Open the ‘.OVPN’ file in a word processing program.

NOTE: We highly recommend using Notepad++ for Windows or TextEdit for Apple to open these files in order to preserve text format.

DD-WRT Router Setup for VPN Unlimited

Navigate to the Services > VPN

Enter VPN Unlimited settings

OpenVPN Client

Start OpenVPN Client

If you wish to disable your VPN connection simply set this to Disable at any time and click Apply Settings.

Server IP/Name

At the bottom of the .ovpn file you downloaded above, you can find your server address, it should look something like us-la.vpnunlimitedapp.com

Port

1194 for Tunnel Protocol UDP
80 for Tunnel Protocol TCP

Tunnel Device

TUN

Tunnel Protocol

UDP or TCP

Encryption cipher

Blowfish-CBC

Hash Algorithm

SHA1

User Pass Authentication

Disabled

Advanced Options

Enable

TLS Cipher

None

LZO Compression

Adaptive

NAT

Enable

Firewall Protection

Enable

nsCertType verification

Checked

Additional Config

persist-key
persist-tun

Policy Based Routing

This field can be used for split VPN and Dual Gateway routing.

CA Cert

—–BEGIN CERTIFICATE—–
MIIEjjCCA/egAwIBAgIJAKsVbHBdakXuMA0GCSqGSIb3DQEBBQUAMIHgMQswCQYD
VQQGEwJVUzELMAkGA1UECBMCTlkxETAPBgNVBAcTCE5ldyBZb3JrMR8wHQYDVQQK
ExZTaW1wbGV4IFNvbHV0aW9ucyBJbmMuMRYwFAYDVQQLEw1WcG4gVW5saW1pdGVk
MSMwIQYDVQQDExpzZXJ2ZXIudnBudW5saW1pdGVkYXBwLmNvbTEjMCEGA1UEKRMa
c2VydmVyLnZwbnVubGltaXRlZGFwcC5jb20xLjAsBgkqhkiG9w0BCQEWH3N1cHBv
cnRAc2ltcGxleHNvbHV0aW9uc2luYy5jb20wHhcNMTMxMjE2MTM1OTQ0WhcNMjMx
MjE0MTM1OTQ0WjCB4DELMAkGA1UEBhMCVVMxCzAJBgNVBAgTAk5ZMREwDwYDVQQH
EwhOZXcgWW9yazEfMB0GA1UEChMWU2ltcGxleCBTb2x1dGlvbnMgSW5jLjEWMBQG
A1UECxMNVnBuIFVubGltaXRlZDEjMCEGA1UEAxMac2VydmVyLnZwbnVubGltaXRl
ZGFwcC5jb20xIzAhBgNVBCkTGnNlcnZlci52cG51bmxpbWl0ZWRhcHAuY29tMS4w
LAYJKoZIhvcNAQkBFh9zdXBwb3J0QHNpbXBsZXhzb2x1dGlvbnNpbmMuY29tMIGf
MA0GCSqGSIb3DQEBAQUAA4GNADCBiQKBgQDADUzS8QWGvdhLFKsEzAiq5+b0ukKj
Bza0k6/dmCeYTvCVqGKg/h1IAtQdVVLAkmEp0zvGH7PuOhXm7zZrCouBr/RiG4tE
coRHwc6AJmowkYERlY7+xGx3OuNrD00QceNTsan0bn78jwt0zhFNmHdoTtFjgK3o
qmQYSAtbEVWYgwIDAQABo4IBTDCCAUgwHQYDVR0OBBYEFKClmYP+tMNgWagUJCCH
jtaui2k+MIIBFwYDVR0jBIIBDjCCAQqAFKClmYP+tMNgWagUJCCHjtaui2k+oYHm
pIHjMIHgMQswCQYDVQQGEwJVUzELMAkGA1UECBMCTlkxETAPBgNVBAcTCE5ldyBZ
b3JrMR8wHQYDVQQKExZTaW1wbGV4IFNvbHV0aW9ucyBJbmMuMRYwFAYDVQQLEw1W
cG4gVW5saW1pdGVkMSMwIQYDVQQDExpzZXJ2ZXIudnBudW5saW1pdGVkYXBwLmNv
bTEjMCEGA1UEKRMac2VydmVyLnZwbnVubGltaXRlZGFwcC5jb20xLjAsBgkqhkiG
9w0BCQEWH3N1cHBvcnRAc2ltcGxleHNvbHV0aW9uc2luYy5jb22CCQCrFWxwXWpF
7jAMBgNVHRMEBTADAQH/MA0GCSqGSIb3DQEBBQUAA4GBALkWhfw7SSV7it+ZYZmT
+cQbExjlYgQ40zae2J2CqIYACRcfsDHvh7Q+fiwSocevv2NE0dWi6WB2H6SiudYj
vDvubAX/QbzfBxtbxCCoAIlfPCm8xOnWFN7TUJAzWwHJkKgEnu29GZHu2x8J+7Ve
DbKH5RTMHHe8FkSxh6Zz/BMN
—–END CERTIFICATE—–

Public Client Cert

Copy and Paste all contents in between the <cert> and </cert> lines from your .ovpn file starting and ending with:
—–BEGIN CERTIFICATE—–
…
—–END CERTIFICATE—–

Private Client Key

Copy and Paste all contents in between the <key> and </key> lines from your .ovpn file starting and ending with:
—–BEGIN RSA PRIVATE KEY—–
…
—–END RSA PRIVATE KEY—–

CLICK APPLY SETTINGS

Leave all settings not mentioned above as their default setting.

Verify a successful VPN Unlimited connection

Navigate to the Status > OpenVPN

  1. You should now see a CONNECTED SUCCESS message.
  2. Visit to WhatIsMyIPAddress to verify your new IP address and virtual location.

In some cases you may notice that the location is not showing the same location as the server you have input in your router settings; this is because geo tracking tools are often tricked by VPN connections. As long as you see an IP address that is not the same as your normal Internet IP address then you are indeed connected to VPN Unlimited.

Back up your settings

Navigate to the Administration > Backup

  1. Click the Backup button.
  2. A file named nvrambak.bin will be saved to your computer.
  3. You can load nvrambak.bin to restore your settings in the event of a reset.

How to change the VPN Unlimited server

  1. Follow Steps 1-6 to Generate an .OVPN file for the server you wish to connect to and open it a word processing program.
  2. Copy and paste the server IP Address into the Server IP/Name field.
  3. Copy and paste the <cert> into the Public Client Cert field.
  4. Copy and paste the <key> into the Private Client Key field.
  5. Click Apply Settings.

TROUBLESHOOTING

Still having issues? Visit the VPN Troubleshooting section.

Troubleshoot Here

NordVPN Merlin OpenVPN Setup

TeamFlashRouters · Jan 11, 2023 ·

Preparing for NordVPN Merlin Setup

Obtain your NordVPN manual Username and Password

If you are not already an NordVPN user Sign Up Now.

1. Log in to your account on the NordVPN website.

NordVPN login

2. Click NordVPN on the left hand side and then click Setup NordVPN manually.

NordVPN setup manually

3. Enter in the verification code that was sent to your email.

NordVPN verify code

4. Copy and paste your NordVPN manual username and password to a secure location. This is the username and password you will enter into the router settings to connect to NordVPN.

NordVPN credentials

Download your NordVPN .ovpn file

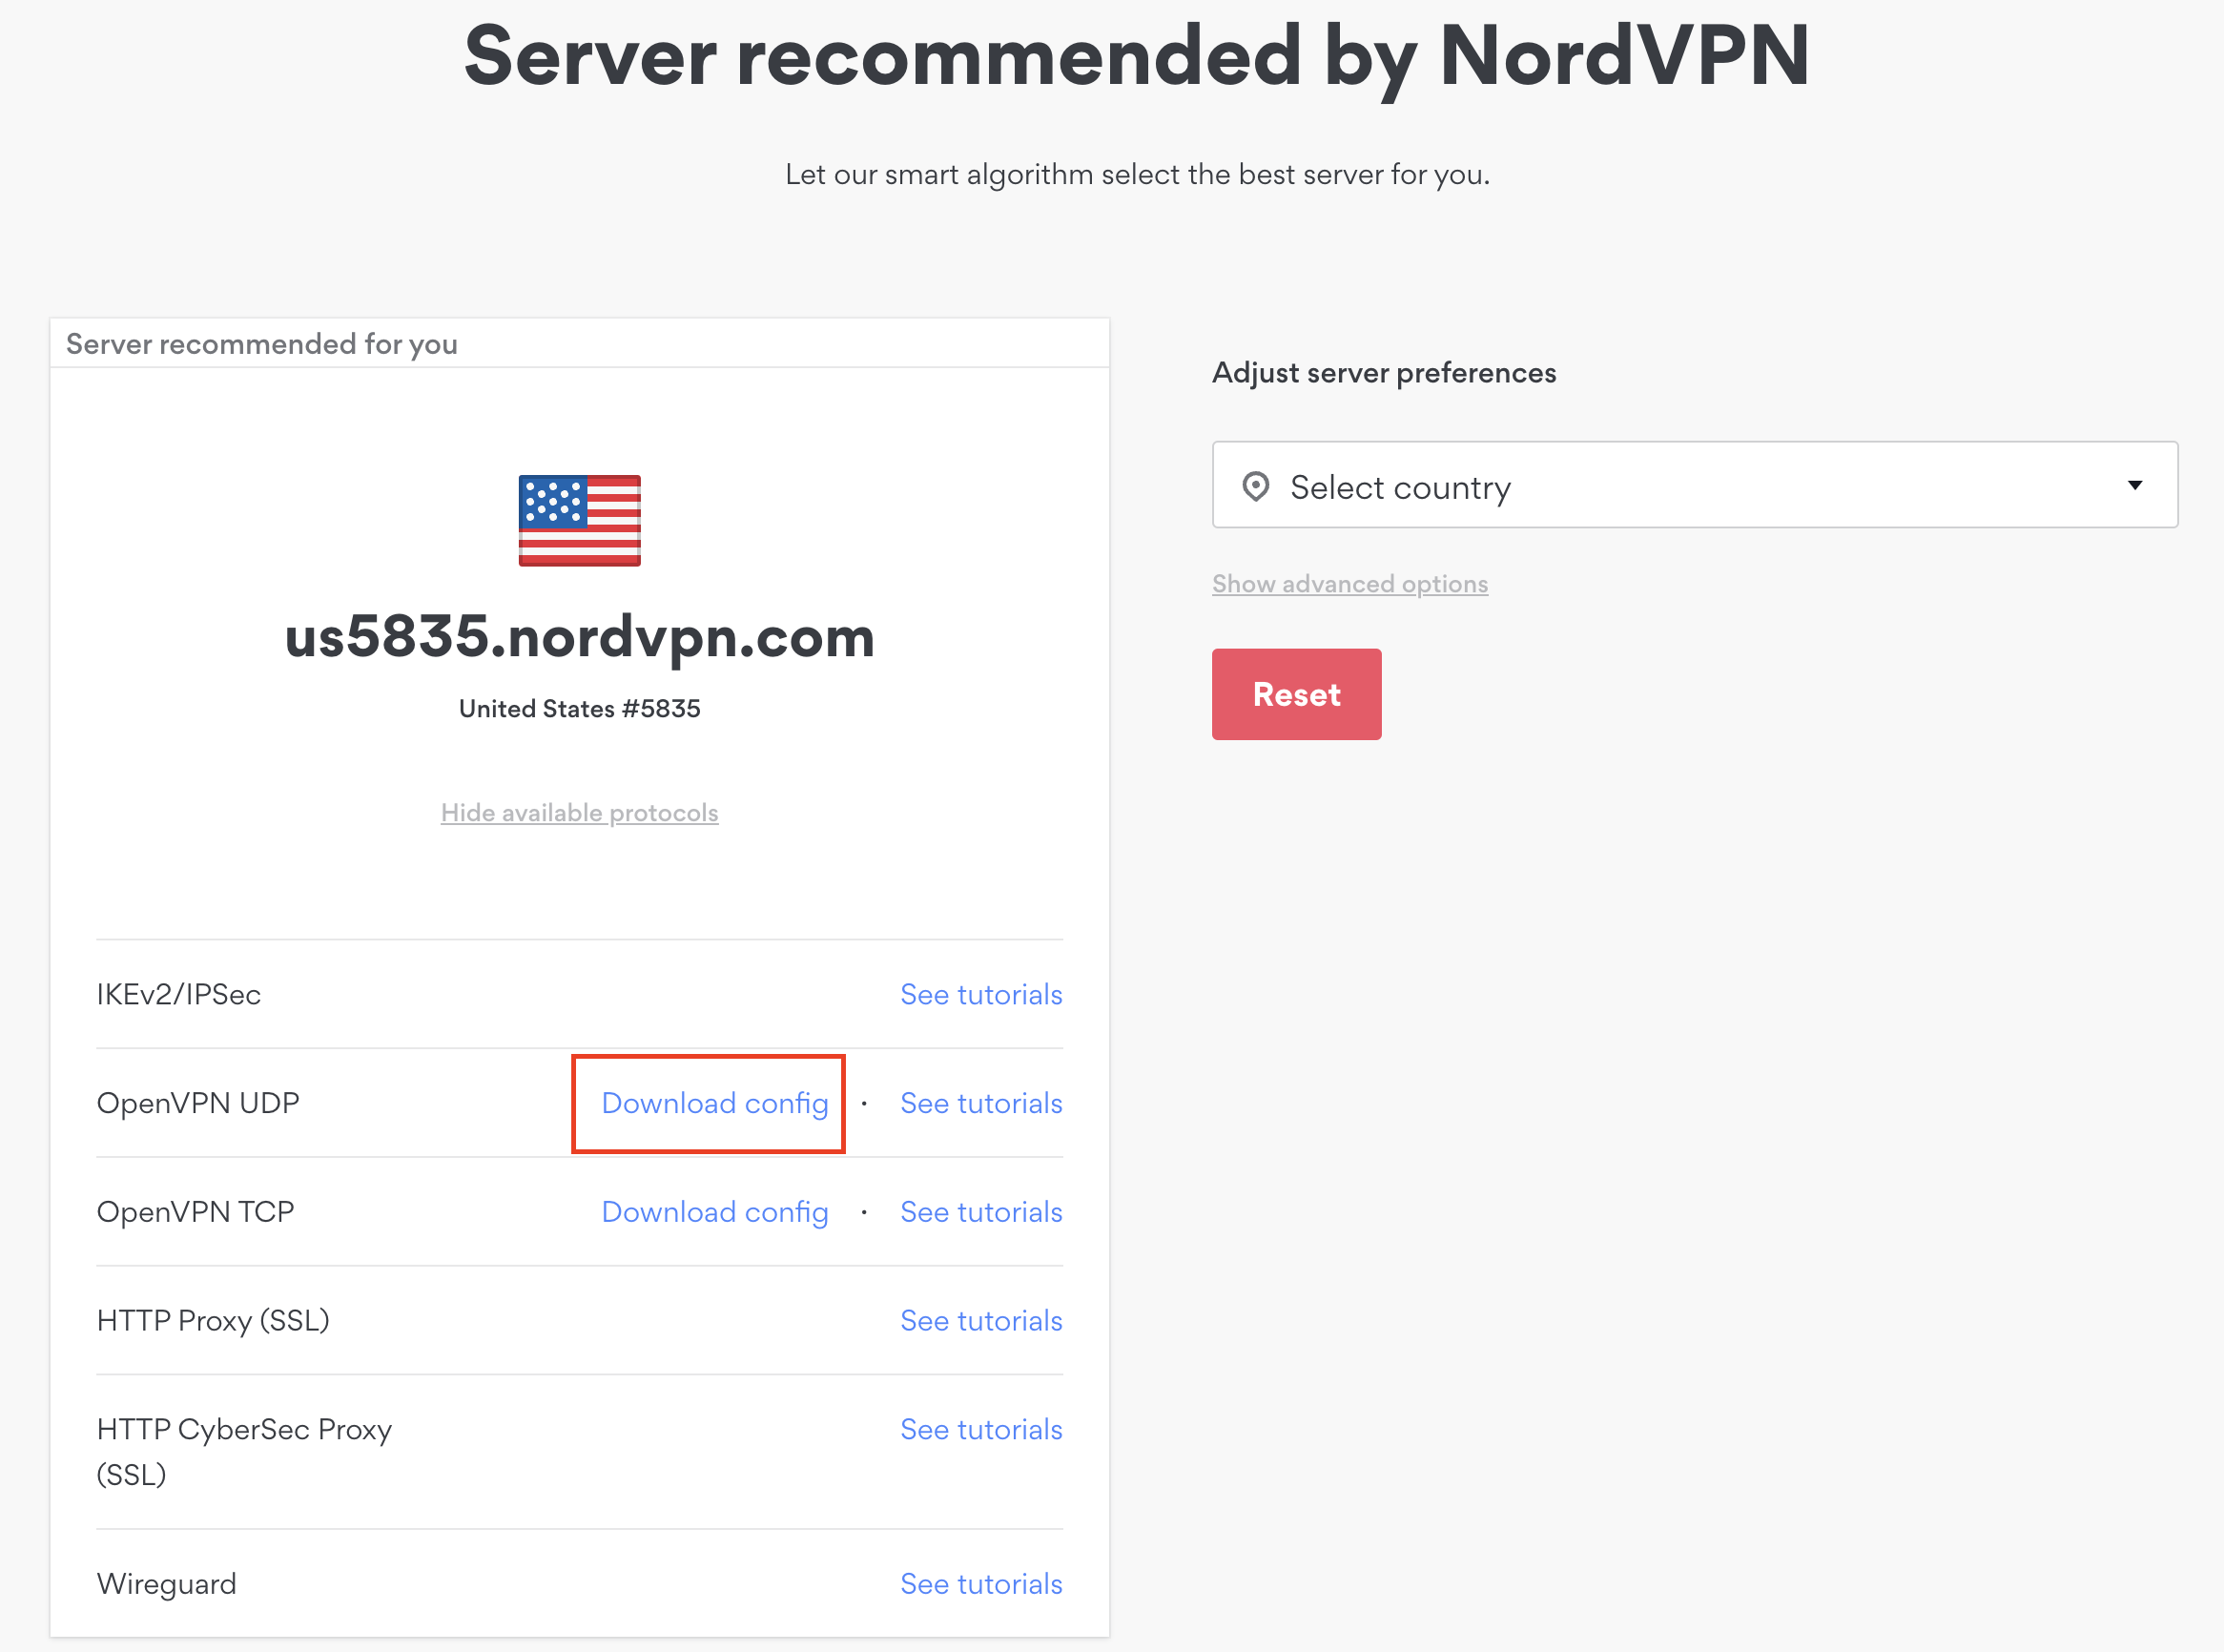
1. There are two options for obtaining the .ovpn file. The first and recommended is to navigate to NordVPN’s server recommendation page. Click Recommended Server to display the fastest server based on your actual location. You can adjust the country if you don’t want to connect to the recommended country.

Then click Show Available Protocols. Click Download Config next to OpenVPN UDP. This will download the .ovpn file to your computer for this server. Do not open this file.

NordVPN Recommended Server

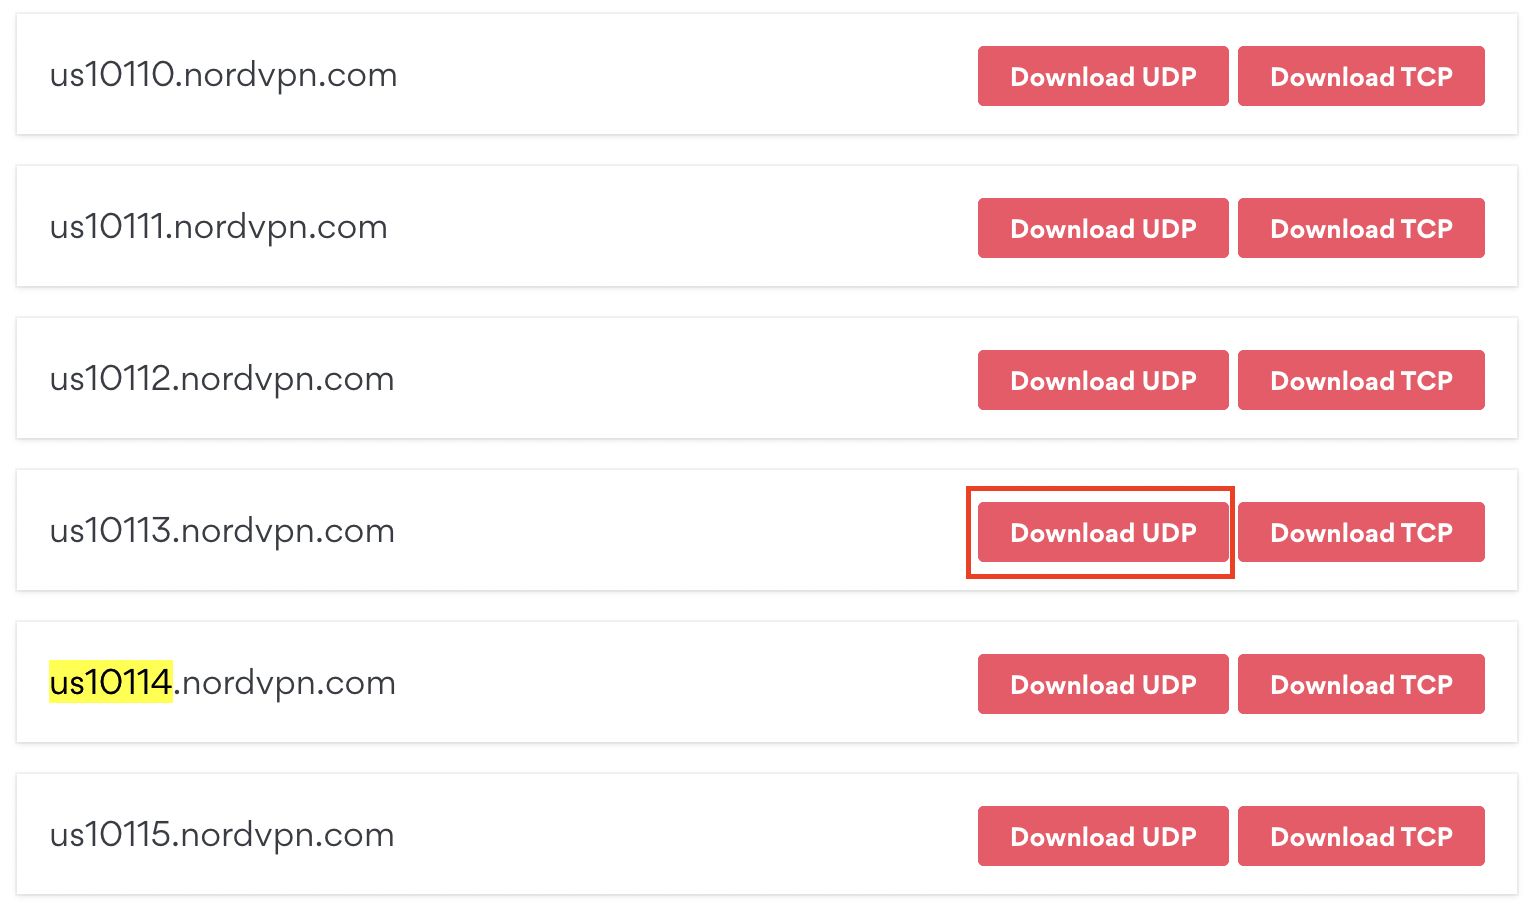
The second method to obtain a server is for connecting to a specific server number that you know you want to use. This applies to NordVPN Dedicated IP servers if you are signed up for that service. Go to NordVPN’s .ovpn file page. Then search for the server number that you want to use and click Download UDP.

NordVPN Download Specific Server

Merlin Router Setup for NordVPN

Login to Asus Merlin firmware settings in a browser on any computer or smart device connected to the Merlin FlashRouter’s network.

1. Navigate to the VPN tab.

Merlin VPN Tab

2. Navigate to the VPN Client tab.

Merlin VPN Client Tab

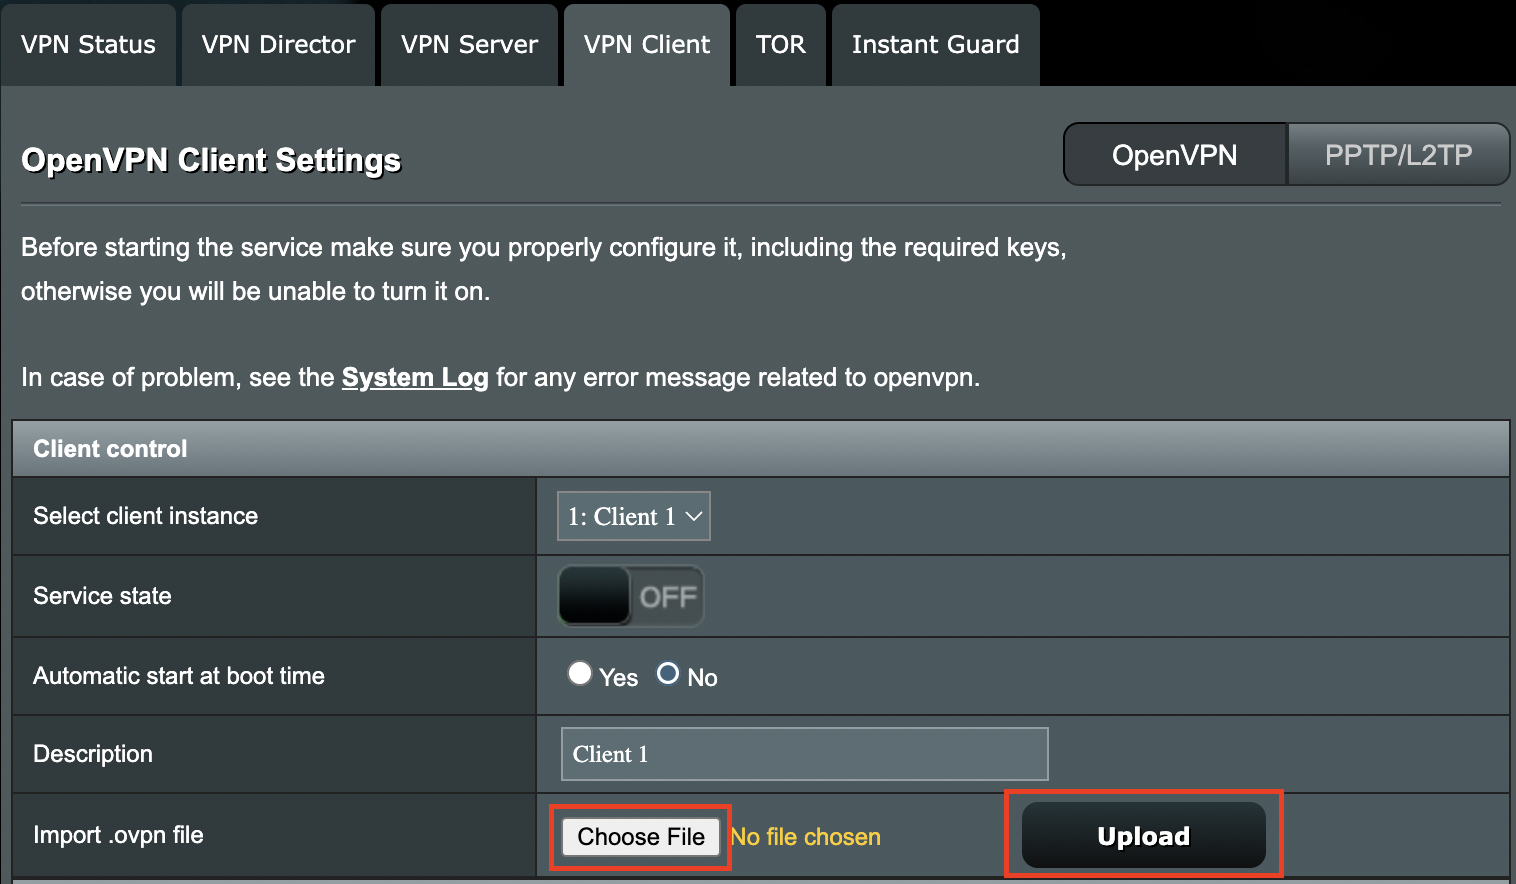
3. Click Choose file and select the .ovpn file you downloaded earlier. Then click Upload.

Merlin Choose File Upload

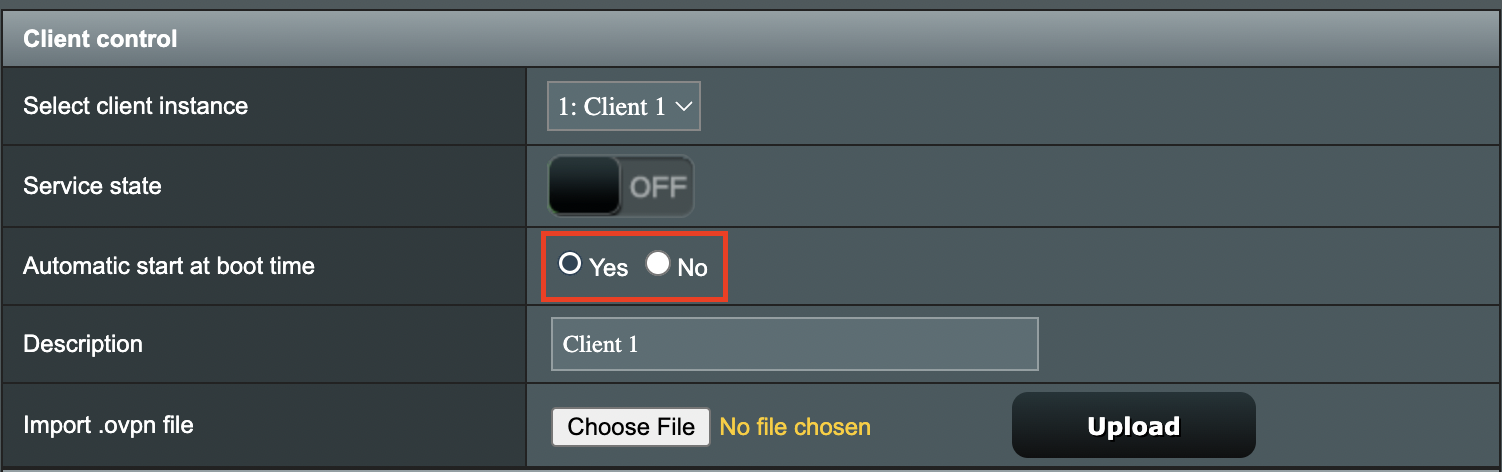
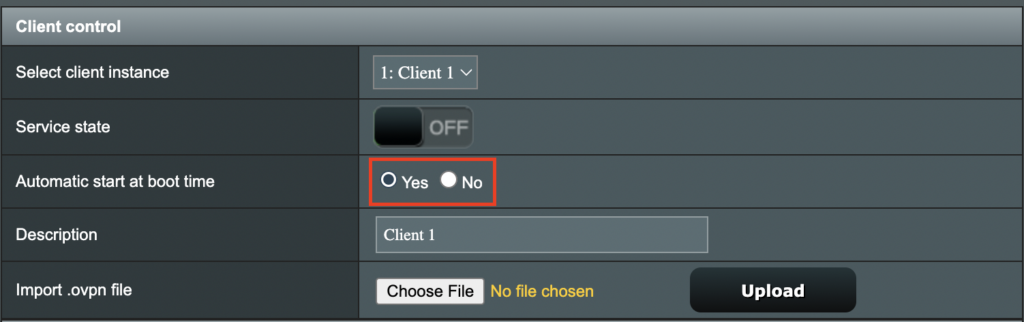
4. Set Automatic Start at boot time to Yes if you want the VPN connection to begin automatically when the router is powered off and back on.

Merlin Automatic Start at boot time

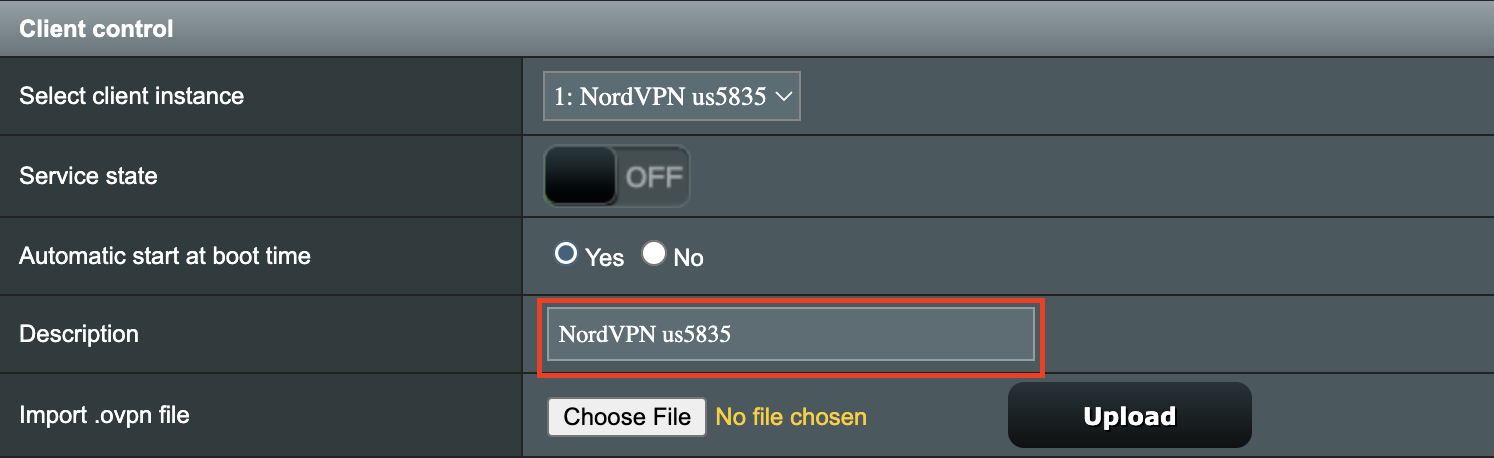
5. In the Description field enter in the name you’d like to use for this OpenVPN Client profile. We typically advise entering in the location or server number here. Our example server was in us5835.nordvpn.com so I have entered in NordVPN us5835.

Merlin NordVPN Description

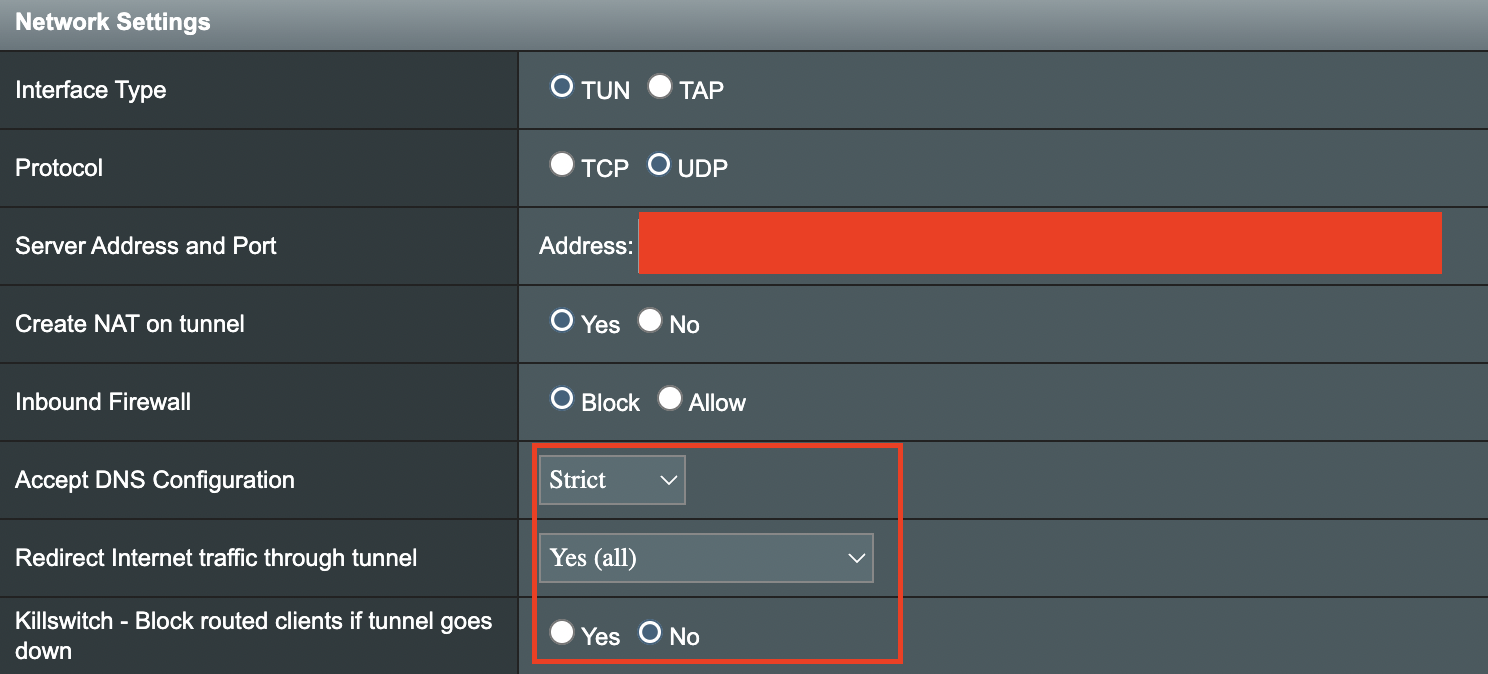
6. Set Accept DNS Configuration to Strict. Set Redirect Internet traffic through tunnel to Yes (all). Set Kill Switch to Yes or No depending on if you want the Internet to be killed if the VPN connection drops.

Merlin Accept DNS configuration Redirect Internet and Kill Switch

If you only want certain devices to connect to the OpenVPN Client profile you are setting up instead of all the devices connected to the FlashRouter’s network please set the Redirect Internet traffic through tunnel to VPN Director. Then complete the instructions on this page and then view our VPN Director guide.

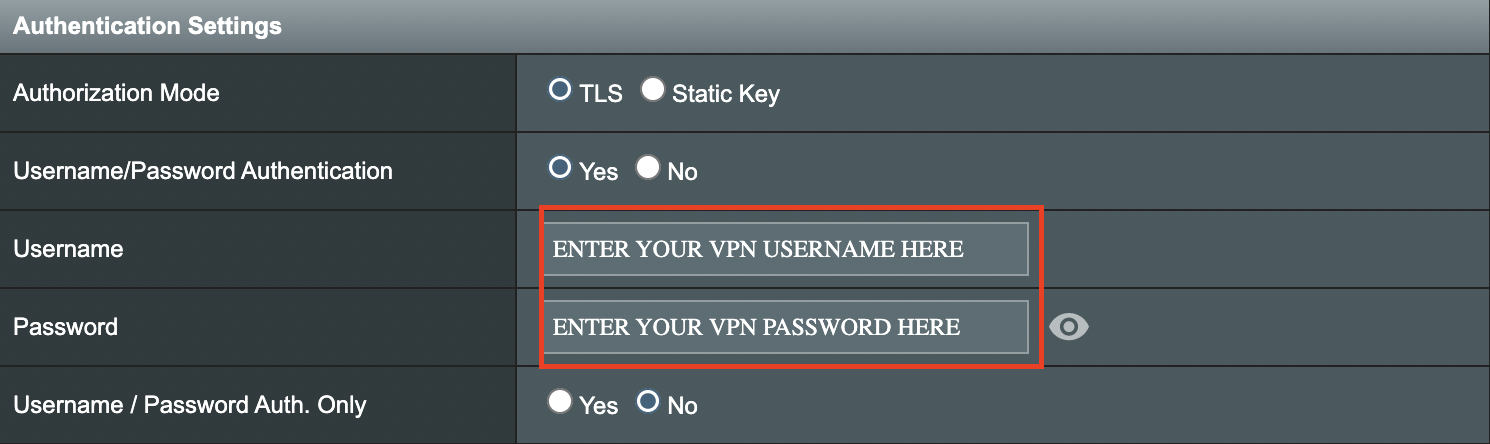
7. Enter your NordVPN username and password that you obtained earlier in the Username and Password. Note that these are different from your NordVPN email login and password.

Merlin VPN Username and Password

8. Click Apply at the bottom of the page.

9. At the top of the page set the Service State toggle to ON to activate the VPN connection.

Merlin Service State All Providers

Verify a successful NordVPN connection

  1. You should now see a CONNECTED message.
  2. Visit NordVPN’s IP Check to verify your new IP address and virtual location.

In some cases you may notice that the location is not showing the same location as the server you have input in your router settings; this is because geo tracking tools are often tricked by VPN connections. As long as you see an IP address that is not the same as your normal Internet IP address then you are indeed connected to NordVPN.

How to change the NordVPN server

  1. Follow the steps at the top of the page to obtain a new .ovpn file.
  2. Then proceed with the settings same as initial setup.

TROUBLESHOOTING

Still having issues? Visit the VPN Troubleshooting section.

Troubleshoot Here

PrivateInternetAccess (PIA) Merlin OpenVPN Setup

TeamFlashRouters · Jan 11, 2023 ·

Preparing for PIA Merlin Setup

Download your PIA .ovpn file

If you are not already a PIA user Sign Up Now.

1. Log in to your account on the PIA website.

PIA login

2. Successfully log in with your account information then go to PIA’s OpenVPN Config Generator.

3. On the OpenVPN Configuration Generator select the following:

OpenVPN Version: OpenVPN 2.4 or newer

Select Platform: Linux

Select Region: Choose the server location you’d like to connect to

Select Port: Typically we recommend UDP/1198 RSA-2048 AES-128-CBC SHA1 for best speeds but feel free to select the one you want to use.

4. Click Generate to download the .ovpn file. Do not open this file once it is downloaded.

PIA Generate .ovpn file

Merlin Router Setup for PIA

Login to Asus Merlin firmware settings in a browser on any computer or smart device connected to the Merlin FlashRouter’s network.

1. Navigate to the VPN tab.

Merlin VPN Tab

2. Navigate to the VPN Client tab.

Merlin VPN Client Tab

3. Click Choose file and select the .ovpn file you downloaded earlier. Then click Upload.

Merlin Choose File Upload

4. Set Automatic Start at boot time to Yes if you want the VPN connection to begin automatically when the router is powered off and back on.

Merlin Automatic Start at boot time

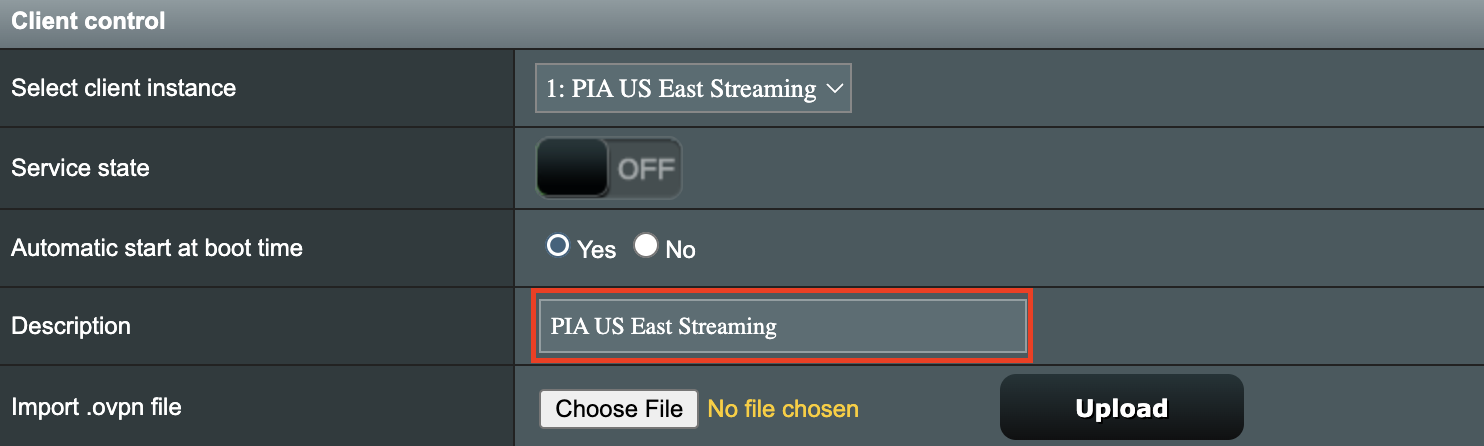
5. In the Description field enter in the name you’d like to use for this OpenVPN Client profile. We typically advise entering in the location here. Our example server was in US East Streaming so I have entered in PIA US East Streaming.

PIA Description

6. Set Accept DNS Configuration to Strict. Set Redirect Internet traffic through tunnel to Yes (all). Set Kill Switch to Yes or No depending on if you want the Internet to be killed if the VPN connection drops.

Merlin Accept DNS configuration Redirect Internet and Kill Switch

If you only want certain devices to connect to the OpenVPN Client profile you are setting up instead of all the devices connected to the FlashRouter’s network please set the Redirect Internet traffic through tunnel to VPN Director. Then complete the instructions on this page and then view our VPN Director guide.

7. Enter your PIA account username and password.

Merlin VPN Username and Password

8. Click Apply at the bottom of the page.

9. At the top of the page set the Service State toggle to ON to activate the VPN connection.

Merlin Service State All Providers

Verify a successful PIA connection

  1. You should now see a CONNECTED message.
  2. Visit PIA’s IP Check to verify your new IP address and virtual location.

In some cases you may notice that the location is not showing the same location as the server you have input in your router settings; this is because geo tracking tools are often tricked by VPN connections. As long as you see an IP address that is not the same as your normal Internet IP address then you are indeed connected to PIA.

How to change the PIA server

  1. Follow the steps at the top of the page to obtain a new .ovpn file.
  2. Then proceed with the settings same as initial setup.

TROUBLESHOOTING

Still having issues? Visit the VPN Troubleshooting section.

Troubleshoot Here

IPVanish Merlin OpenVPN Setup

TeamFlashRouters · Jan 11, 2023 ·

Preparing for IPVanish Merlin Setup

Download your IPVanish .ovpn file

If you are not already an IPVanish user Sign Up Now.

1. Log in to your account on the IPVanish website.

IPVanish login

2. Successfully log in with your account information then go to IPVanish .ovpn file page.

3. Click on the .ovpn file for the server location you want to use to dowloand the .ovpn file. Do not open this file.

IPVanish download ovpn

Merlin Router Setup for IPVanish

Login to Asus Merlin firmware settings in a browser on any computer or smart device connected to the Merlin FlashRouter’s network.

1. Navigate to the VPN tab.

Merlin VPN Tab

2. Navigate to the VPN Client tab.

Merlin VPN Client Tab

3. Click Choose file and select the .ovpn file you downloaded earlier. Then click Upload.

Merlin Choose File Upload

4. Set Automatic Start at boot time to Yes if you want the VPN connection to begin automatically when the router is powered off and back on.

Merlin Automatic Start at boot time

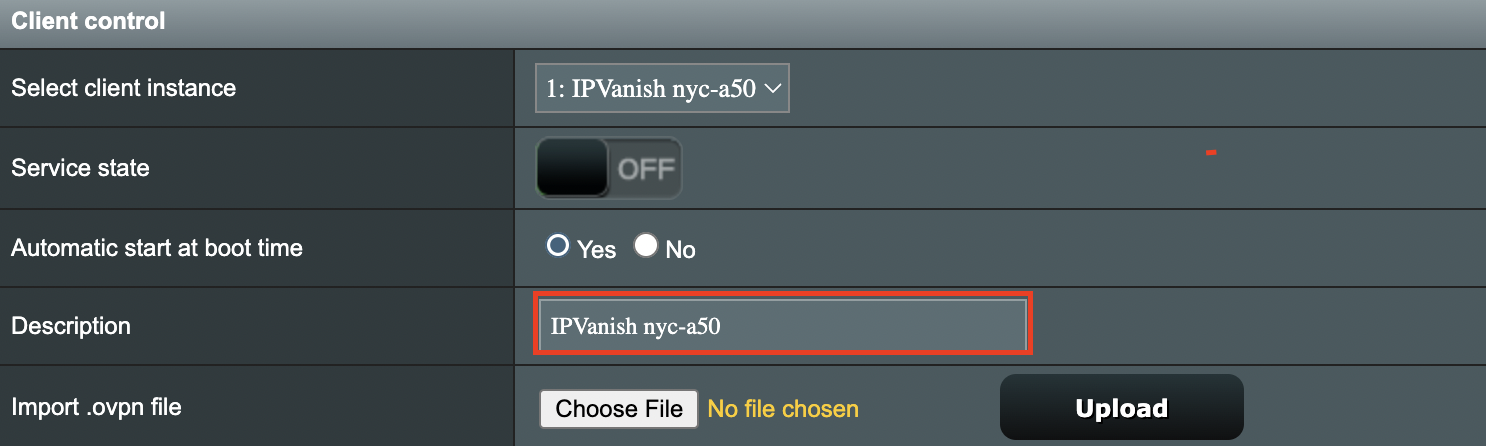
5. In the Description field enter in the name you’d like to use for this OpenVPN Client profile. We typically advise entering in the location here. Our example server was in nyc-a50 so I have entered in IPVanish a-50.

IPVanish Description

6. Set Accept DNS Configuration to Strict. Set Redirect Internet traffic through tunnel to Yes (all). Set Kill Switch to Yes or No depending on if you want the Internet to be killed if the VPN connection drops.

Merlin Accept DNS configuration Redirect Internet and Kill Switch

If you only want certain devices to connect to the OpenVPN Client profile you are setting up instead of all the devices connected to the FlashRouter’s network please set the Redirect Internet traffic through tunnel to VPN Director. Then complete the instructions on this page and then view our VPN Director guide.

7. Enter your IPVanish account email/username and password.

Merlin VPN Username and Password

8. Click Apply at the bottom of the page.

9. At the top of the page set the Service State toggle to ON to activate the VPN connection.

Merlin Service State All Providers

Verify a successful IPVanish connection

  1. You should now see a CONNECTED message.
  2. Visit IPVanish’s IP Check to verify your new IP address and virtual location.

In some cases you may notice that the location is not showing the same location as the server you have input in your router settings; this is because geo tracking tools are often tricked by VPN connections. As long as you see an IP address that is not the same as your normal Internet IP address then you are indeed connected to IPVanish.

How to change the IPVanish server

  1. Follow the steps at the top of the page to obtain a new .ovpn file.
  2. Then proceed with the settings same as initial setup.

TROUBLESHOOTING

Still having issues? Visit the VPN Troubleshooting section.

Troubleshoot Here

ProtonVPN Manual OpenVPN Setup

TeamFlashRouters · Apr 19, 2019 ·

Preparing for Manual ProtonVPN Setup

Verify your ProtonVPN login information

If you are not already an ProtonVPN user Sign Up Now.

1. Log in to your account on the ProtonVPN website.

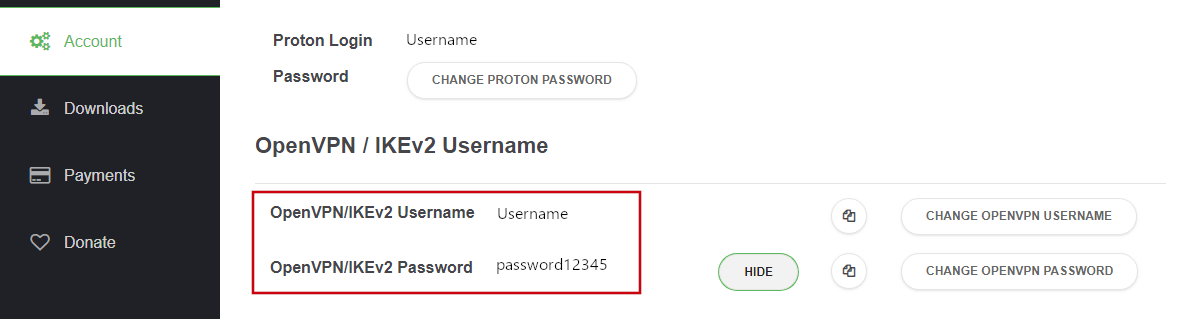
2. Navigate to the Account tab and note your OpenVPN specific Username and Password.

FlashRouters DD-WRT Privacy APP ProtonVPN OpenVPN Specific Username and Password

ProtonVPN Server Addresses

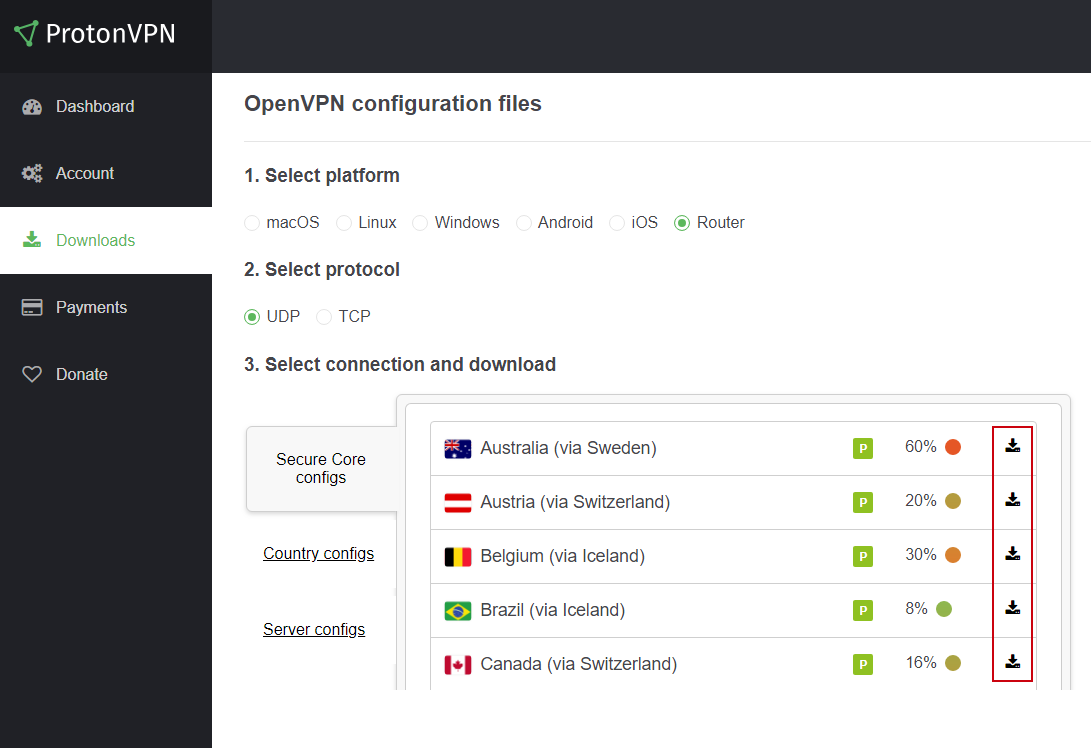
Click on the following link to Download the .ovpn file containing the Server IP Address you wish to connect to.

Open the .ovpn file that is downloaded to your computer with NotePad++ for Windows or TextEdit for Apple.

DD-WRT Router Setup for ProtonVPN

Navigate to Services > VPN

Enter ProtonVPN settings

OpenVPN Client

Start OpenVPN Client

If you wish to disable your VPN connection simply set this to Disable at any time and click Apply Settings.

Server IP/Name

At the top of the .ovpn file you downloaded above, there is a line e.g.:
remote 206.226.72.27 1194
206.226.72.27 is your ProtonVPN server IP address. Enter that IP Address in this field.

Port

1194

Tunnel Device

TUN

Tunnel Protocol

UDP

Encryption cipher

AES-256-CBC

Hash Algorithm

SHA512

Userpass Authentication

Enable

Username

Enter your OpenVPN specific Username.

Password

Enter your OpenVPN specific Password.

Advanced Options

Enable

TLS Cipher

None

LZO Compression

Adaptive

NAT

Enable

Firewall Protection

Enable

TLS Auth Key

-----BEGIN OpenVPN Static key V1-----
6acef03f62675b4b1bbd03e53b187727
423cea742242106cb2916a8a4c829756
3d22c7e5cef430b1103c6f66eb1fc5b3
75a672f158e2e2e936c3faa48b035a6d
e17beaac23b5f03b10b868d53d03521d
8ba115059da777a60cbfd7b2c9c57472
78a15b8f6e68a3ef7fd583ec9f398c8b
d4735dab40cbd1e3c62a822e97489186
c30a0b48c7c38ea32ceb056d3fa5a710
e10ccc7a0ddb363b08c3d2777a3395e1
0c0b6080f56309192ab5aacd4b45f55d
a61fc77af39bd81a19218a79762c3386
2df55785075f37d8c71dc8a42097ee43
344739a0dd48d03025b0450cf1fb5e8c
aeb893d9a96d1f15519bb3c4dcb40ee3
16672ea16c012664f8a9f11255518deb
-----END OpenVPN Static key V1-----

Additional Config

tun-mtu-extra 32
mssfix 1450
persist-key
persist-tun

Policy Based Routing

This field can be used for split VPN and Dual Gateway routing.

CA Cert

-----BEGIN CERTIFICATE-----
MIIFozCCA4ugAwIBAgIBATANBgkqhkiG9w0BAQ0FADBAMQswCQYDVQQGEwJDSDEV
MBMGA1UEChMMUHJvdG9uVlBOIEFHMRowGAYDVQQDExFQcm90b25WUE4gUm9vdCBD
QTAeFw0xNzAyMTUxNDM4MDBaFw0yNzAyMTUxNDM4MDBaMEAxCzAJBgNVBAYTAkNI
MRUwEwYDVQQKEwxQcm90b25WUE4gQUcxGjAYBgNVBAMTEVByb3RvblZQTiBSb290
IENBMIICIjANBgkqhkiG9w0BAQEFAAOCAg8AMIICCgKCAgEAt+BsSsZg7+AuqTq7
vDbPzfygtl9f8fLJqO4amsyOXlI7pquL5IsEZhpWyJIIvYybqS4s1/T7BbvHPLVE
wlrq8A5DBIXcfuXrBbKoYkmpICGc2u1KYVGOZ9A+PH9z4Tr6OXFfXRnsbZToie8t
2Xjv/dZDdUDAqeW89I/mXg3k5x08m2nfGCQDm4gCanN1r5MT7ge56z0MkY3FFGCO
qRwspIEUzu1ZqGSTkG1eQiOYIrdOF5cc7n2APyvBIcfvp/W3cpTOEmEBJ7/14RnX
nHo0fcx61Inx/6ZxzKkW8BMdGGQF3tF6u2M0FjVN0lLH9S0ul1TgoOS56yEJ34hr
JSRTqHuar3t/xdCbKFZjyXFZFNsXVvgJu34CNLrHHTGJj9jiUfFnxWQYMo9UNUd4
a3PPG1HnbG7LAjlvj5JlJ5aqO5gshdnqb9uIQeR2CdzcCJgklwRGCyDT1pm7eoiv
WV19YBd81vKulLzgPavu3kRRe83yl29It2hwQ9FMs5w6ZV/X6ciTKo3etkX9nBD9
ZzJPsGQsBUy7CzO1jK4W01+u3ItmQS+1s4xtcFxdFY8o/q1zoqBlxpe5MQIWN6Qa
lryiET74gMHE/S5WrPlsq/gehxsdgc6GDUXG4dk8vn6OUMa6wb5wRO3VXGEc67IY
m4mDFTYiPvLaFOxtndlUWuCruKcCAwEAAaOBpzCBpDAMBgNVHRMEBTADAQH/MB0G
A1UdDgQWBBSDkIaYhLVZTwyLNTetNB2qV0gkVDBoBgNVHSMEYTBfgBSDkIaYhLVZ
TwyLNTetNB2qV0gkVKFEpEIwQDELMAkGA1UEBhMCQ0gxFTATBgNVBAoTDFByb3Rv
blZQTiBBRzEaMBgGA1UEAxMRUHJvdG9uVlBOIFJvb3QgQ0GCAQEwCwYDVR0PBAQD
AgEGMA0GCSqGSIb3DQEBDQUAA4ICAQCYr7LpvnfZXBCxVIVc2ea1fjxQ6vkTj0zM
htFs3qfeXpMRf+g1NAh4vv1UIwLsczilMt87SjpJ25pZPyS3O+/VlI9ceZMvtGXd
MGfXhTDp//zRoL1cbzSHee9tQlmEm1tKFxB0wfWd/inGRjZxpJCTQh8oc7CTziHZ
ufS+Jkfpc4Rasr31fl7mHhJahF1j/ka/OOWmFbiHBNjzmNWPQInJm+0ygFqij5qs
51OEvubR8yh5Mdq4TNuWhFuTxpqoJ87VKaSOx/Aefca44Etwcj4gHb7LThidw/ky
zysZiWjyrbfX/31RX7QanKiMk2RDtgZaWi/lMfsl5O+6E2lJ1vo4xv9pW8225B5X
eAeXHCfjV/vrrCFqeCprNF6a3Tn/LX6VNy3jbeC+167QagBOaoDA01XPOx7Odhsb
Gd7cJ5VkgyycZgLnT9zrChgwjx59JQosFEG1DsaAgHfpEl/N3YPJh68N7fwN41Cj
zsk39v6iZdfuet/sP7oiP5/gLmA/CIPNhdIYxaojbLjFPkftVjVPn49RqwqzJJPR
N8BOyb94yhQ7KO4F3IcLT/y/dsWitY0ZH4lCnAVV/v2YjWAWS3OWyC8BFx/Jmc3W
DK/yPwECUcPgHIeXiRjHnJt0Zcm23O2Q3RphpU+1SO3XixsXpOVOYP6rJIXW9bMZ
A1gTTlpi7A==
-----END CERTIFICATE-----

CLICK APPLY SETTINGS

Leave all settings not mentioned above as their default setting.

Verify a successful ProtonVPN connection

Navigate to Status > OpenVPN

  1. You should now see a CONNECTED SUCCESS message.
  2. Visit WhatIsMyIPAddress to verify your new IP address, virtual location, and status as Protected at the top of the page.

In some cases you may notice that the location is not showing the same location as the server you have input in your router settings; this is because geo tracking tools are often tricked by VPN connections. As long as you see an IP address that is not the same as your normal Internet IP address then you are indeed connected to ProtonVPN.

Back up your settings

Navigate to Administration > Backup

  1. Click the Backup button.
  2. A file named nvrambak.bin will be saved to your computer.
  3. You can load nvrambak.bin to restore your settings in the event of a reset.

How to change the ProtonVPN server

  1. Download and open a new .ovpn file from ProtonVPN.
  2. Copy and paste the server IP Address into the Server IP/Name field.
  3. Click Apply Settings.

TROUBLESHOOTING

Still having issues? Visit the VPN Troubleshooting section.

Troubleshoot Here

Surfshark Manual OpenVPN Setup

TeamFlashRouters · Apr 24, 2019 ·

Preparing for Manual Surfshark Setup

Obtain your Surfshark OpenVPN information

If you are not already an Surfshark user Sign Up Now.

1. Log in to your account on the Surfshark website.

2. Successfully log in with your account information and Navigate to the Manual Connection Guide. Here you will find the OpenVPN Specific Username and Password required for manual configuration.

FlashRouters Privacy App - SurfShark OpenVPN Specific Username and Password

Surfshark Server Addresses

View a full list of Surfshark servers.

United States

Atlanta:
us-atl.prod.surfshark.com
Buffalo:
us-buf.prod.surfshark.com
Chicago:
us-chi.prod.surfshark.com
Dallas:
us-dal.prod.surfshark.com
Las Vegas:
us-las.prod.surfshark.com
Los Angeles:
us-lax.prod.surfshark.com
Miami:
us-mia.prod.surfshark.com
New York City:
us-nyc.prod.surfshark.com
Phoenix:
us-phx.prod.surfshark.com
San Fransisco:
us-sfo.prod.surfshark.com
Seattle:
us-sea.prod.surfshark.com

DD-WRT Router Setup for Surfshark

Navigate to Services > VPN

Enter Surfshark settings

OpenVPN Client

Start OpenVPN Client

If you wish to disable your VPN connection simply set this to Disable at any time and click Apply Settings.

Server IP/Name

Copy and paste the server you would like to connect to from the server list above. Be sure there are no extra spaces or characters.

If you wish to change Surfshark connection locations, THIS IS THE ONLY FIELD YOU NEED TO CHANGE.

Port

1194

Tunnel Device

TUN

Tunnel Protocol

UDP

Encryption cipher

None

Hash Algorithm

SHA512

Userpass Authentication

Enable

Username

Enter your OpenVPN specific Username.

Password

Enter your OpenVPN specific Password.

Advanced Options

Enable

TLS Cipher

None

LZO Compression

Disabled

NAT

Enable

Firewall Protection

Enable

TLS Auth Key

-----BEGIN OpenVPN Static key V1-----
b02cb1d7c6fee5d4f89b8de72b51a8d0
c7b282631d6fc19be1df6ebae9e2779e
6d9f097058a31c97f57f0c35526a44ae
09a01d1284b50b954d9246725a1ead1f
f224a102ed9ab3da0152a15525643b2e
ee226c37041dc55539d475183b889a10
e18bb94f079a4a49888da566b9978346
0ece01daaf93548beea6c827d9674897
e7279ff1a19cb092659e8c1860fbad0d
b4ad0ad5732f1af4655dbd66214e552f
04ed8fd0104e1d4bf99c249ac229ce16
9d9ba22068c6c0ab742424760911d463
6aafb4b85f0c952a9ce4275bc821391a
a65fcd0d2394f006e3fba0fd34c4bc4a
b260f4b45dec3285875589c97d3087c9
134d3a3aa2f904512e85aa2dc2202498
-----END OpenVPN Static key V1-----

Additional Config

remote-cert-tls server
remote-random
nobind
tun-mtu 1500
tun-mtu-extra 32
mssfix 1450
persist-key
persist-tun
ping-timer-rem
reneg-sec 0
cipher AES-256-GCM
log /tmp/vpn.log

Policy Based Routing

This field can be used for split VPN and Dual Gateway routing.

CA Cert

-----BEGIN CERTIFICATE-----
MIIFTTCCAzWgAwIBAgIJAMs9S3fqwv+mMA0GCSqGSIb3DQEBCwUAMD0xCzAJBgNV
BAYTAlZHMRIwEAYDVQQKDAlTdXJmc2hhcmsxGjAYBgNVBAMMEVN1cmZzaGFyayBS
b290IENBMB4XDTE4MDMxNDA4NTkyM1oXDTI4MDMxMTA4NTkyM1owPTELMAkGA1UE
BhMCVkcxEjAQBgNVBAoMCVN1cmZzaGFyazEaMBgGA1UEAwwRU3VyZnNoYXJrIFJv
b3QgQ0EwggIiMA0GCSqGSIb3DQEBAQUAA4ICDwAwggIKAoICAQDEGMNj0aisM63o
SkmVJyZPaYX7aPsZtzsxo6m6p5Wta3MGASoryRsBuRaH6VVa0fwbI1nw5ubyxkua
Na4v3zHVwuSq6F1p8S811+1YP1av+jqDcMyojH0ujZSHIcb/i5LtaHNXBQ3qN48C
c7sqBnTIIFpmb5HthQ/4pW+a82b1guM5dZHsh7q+LKQDIGmvtMtO1+NEnmj81BAp
FayiaD1ggvwDI4x7o/Y3ksfWSCHnqXGyqzSFLh8QuQrTmWUm84YHGFxoI1/8AKdI
yVoB6BjcaMKtKs/pbctk6vkzmYf0XmGovDKPQF6MwUekchLjB5gSBNnptSQ9kNgn
TLqi0OpSwI6ixX52Ksva6UM8P01ZIhWZ6ua/T/tArgODy5JZMW+pQ1A6L0b7egIe
ghpwKnPRG+5CzgO0J5UE6gv000mqbmC3CbiS8xi2xuNgruAyY2hUOoV9/BuBev8t
tE5ZCsJH3YlG6NtbZ9hPc61GiBSx8NJnX5QHyCnfic/X87eST/amZsZCAOJ5v4EP
SaKrItt+HrEFWZQIq4fJmHJNNbYvWzCE08AL+5/6Z+lxb/Bm3dapx2zdit3x2e+m
iGHekuiE8lQWD0rXD4+T+nDRi3X+kyt8Ex/8qRiUfrisrSHFzVMRungIMGdO9O/z
CINFrb7wahm4PqU2f12Z9TRCOTXciQIDAQABo1AwTjAdBgNVHQ4EFgQUYRpbQwyD
ahLMN3F2ony3+UqOYOgwHwYDVR0jBBgwFoAUYRpbQwyDahLMN3F2ony3+UqOYOgw
DAYDVR0TBAUwAwEB/zANBgkqhkiG9w0BAQsFAAOCAgEAn9zV7F/XVnFNZhHFrt0Z
S1Yqz+qM9CojLmiyblMFh0p7t+Hh+VKVgMwrz0LwDH4UsOosXA28eJPmech6/bjf
ymkoXISy/NUSTFpUChGO9RabGGxJsT4dugOw9MPaIVZffny4qYOc/rXDXDSfF2b+
303lLPI43y9qoe0oyZ1vtk/UKG75FkWfFUogGNbpOkuz+et5Y0aIEiyg0yh6/l5Q
5h8+yom0HZnREHhqieGbkaGKLkyu7zQ4D4tRK/mBhd8nv+09GtPEG+D5LPbabFVx
KjBMP4Vp24WuSUOqcGSsURHevawPVBfgmsxf1UCjelaIwngdh6WfNCRXa5QQPQTK
ubQvkvXONCDdhmdXQccnRX1nJWhPYi0onffvjsWUfztRypsKzX4dvM9k7xnIcGSG
EnCC4RCgt1UiZIj7frcCMssbA6vJ9naM0s7JF7N3VKeHJtqe1OCRHMYnWUZt9vrq
X6IoIHlZCoLlv39wFW9QNxelcAOCVbD+19MZ0ZXt7LitjIqe7yF5WxDQN4xru087
FzQ4Hfj7eH1SNLLyKZkA1eecjmRoi/OoqAt7afSnwtQLtMUc2bQDg6rHt5C0e4dC
LqP/9PGZTSJiwmtRHJ/N5qYWIh9ju83APvLm/AGBTR2pXmj9G3KdVOkpIC7L35dI
623cSEC3Q3UZutsEm/UplsM=
-----END CERTIFICATE-----

CLICK APPLY SETTINGS

Leave all settings not mentioned above as their default setting.

Verify a successful Surfshark connection

Navigate to Status > OpenVPN

  1. You should now see a CONNECTED SUCCESS message.
  2. Visit WhatIsMyIPAddress to verify your new IP address, virtual location, and status as Protected at the top of the page.

In some cases you may notice that the location is not showing the same location as the server you have input in your router settings; this is because geo tracking tools are often tricked by VPN connections. As long as you see an IP address that is not the same as your normal Internet IP address then you are indeed connected to Surfshark VPN.

Back up your settings

Navigate to Administration > Backup

  1. Click the Backup button.
  2. A file named nvrambak.bin will be saved to your computer.
  3. You can load nvrambak.bin to restore your settings in the event of a reset.

How to change the Surfshark server

  1. Visit the Surfshark Manual setup page and scroll down to Section 3.
  2. Copy and paste one of the server IP Address into the Server IP/Name field.
  3. Click Apply Settings.

TROUBLESHOOTING

Still having issues? Visit the VPN Troubleshooting section.

Troubleshoot Here

CyberGhost Merlin OpenVPN Setup

TeamFlashRouters · Mar 30, 2023 ·

Preparing for CyberGhost Setup

Obtain your CyberGhost OpenVPN information

If you are not already a CyberGhost user Sign Up Now.

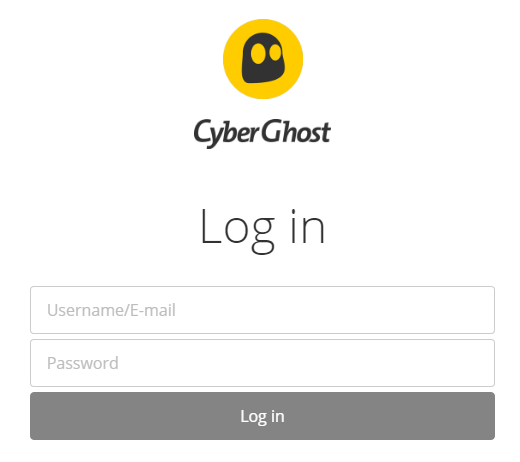
1. Log in to your account on the CyberGhost website.

CyberGhost Website Login

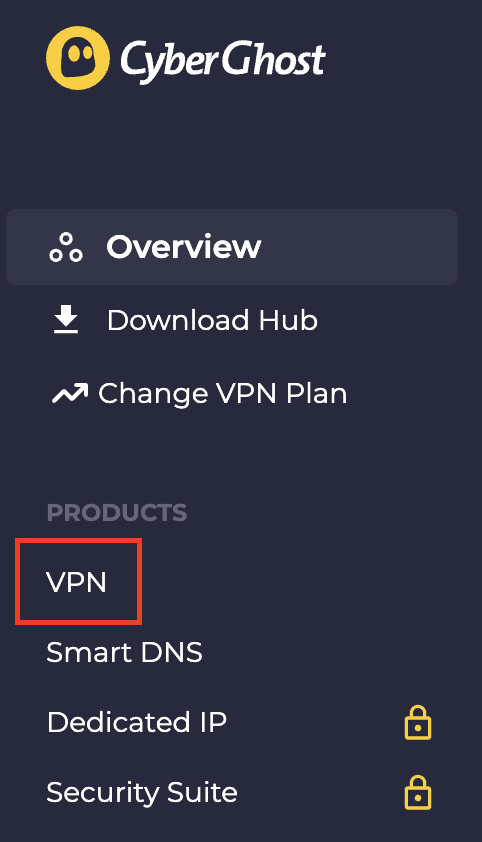
2. Select VPN.

CyberGhost VPN

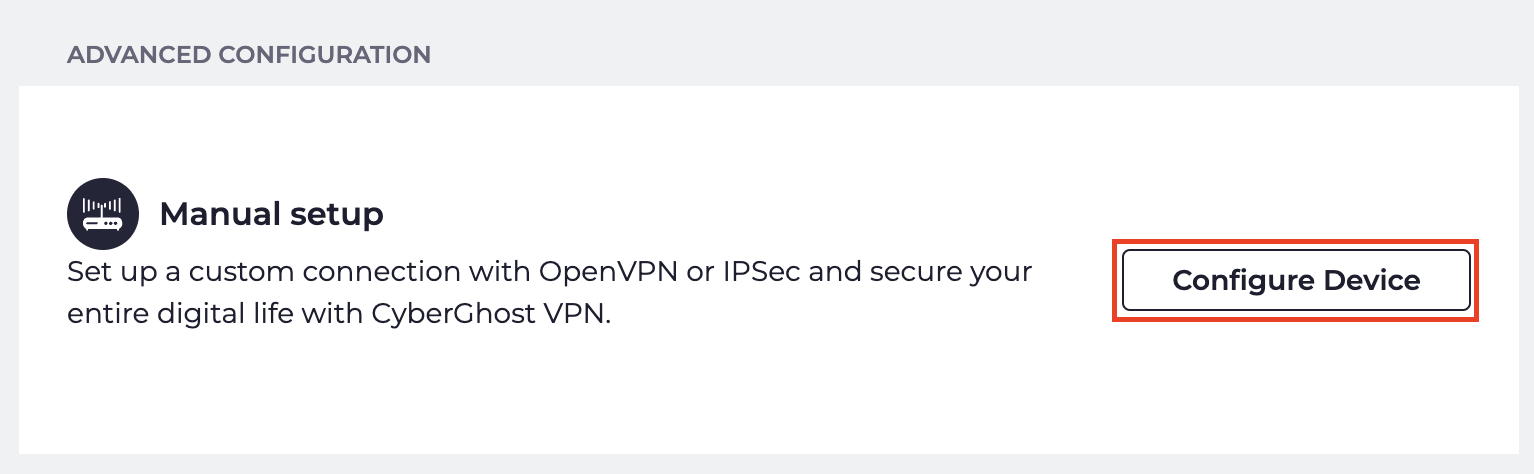
3. Click Configure New Device.

CyberGhost Configure Device

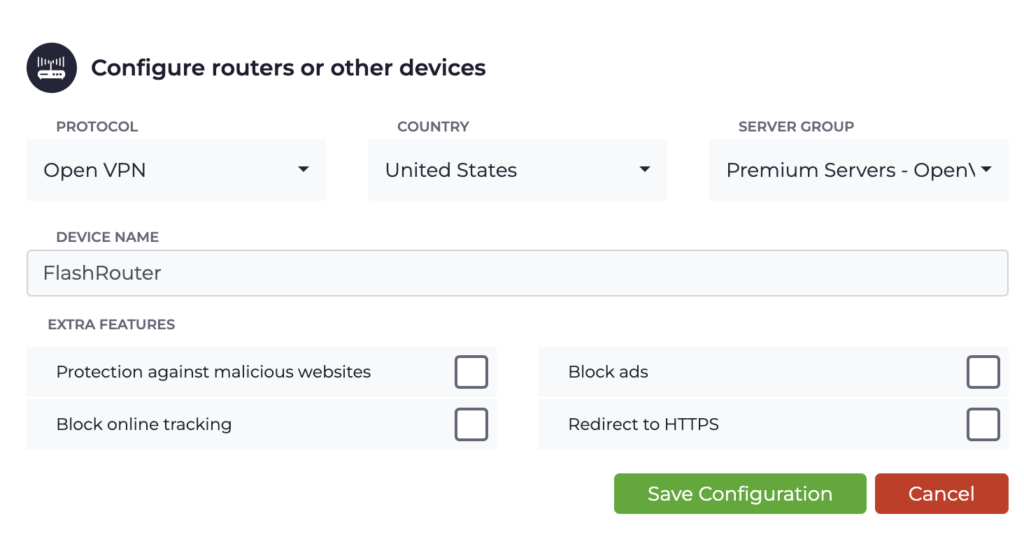
4. Set Protocol to OpenVPN. Select the Country you would like to connect to. Select the Server Group. Name the device in the Device Name field. Click Save Configuration.

CyberGhost protocol and location

5. Press View configuration.

CyberGhost view configuration

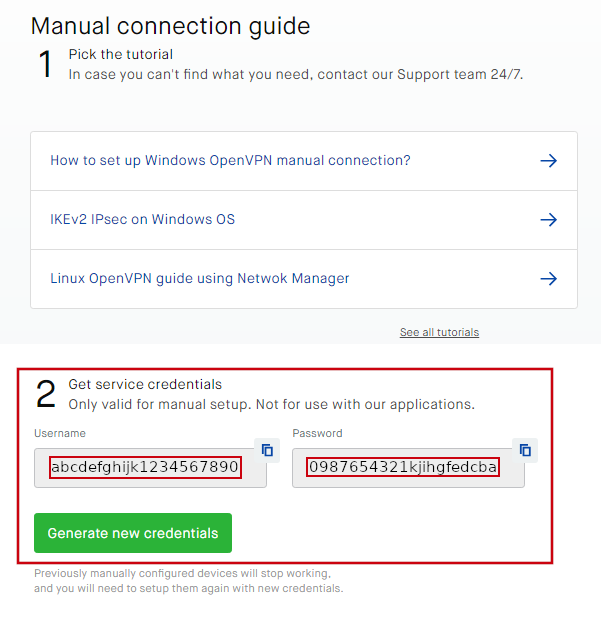
6. Copy the Username, and Password that appear to a notepad, since you will need this information later in the setup process. Click Download Configuration.

CyberGhost Website OpenVPN Configuration Files Generator 1

Open the folder that was downloaded. Then open the ca.crt the client.crt, and client.key files with NotePad++ for Windows or TextEdit for Apple. All CyberGhost servers have different keys and certificates.

Merlin Router Setup for CyberGhost

Login to Asus Merlin firmware settings in a browser on any computer or smart device connected to the Merlin FlashRouter’s network.

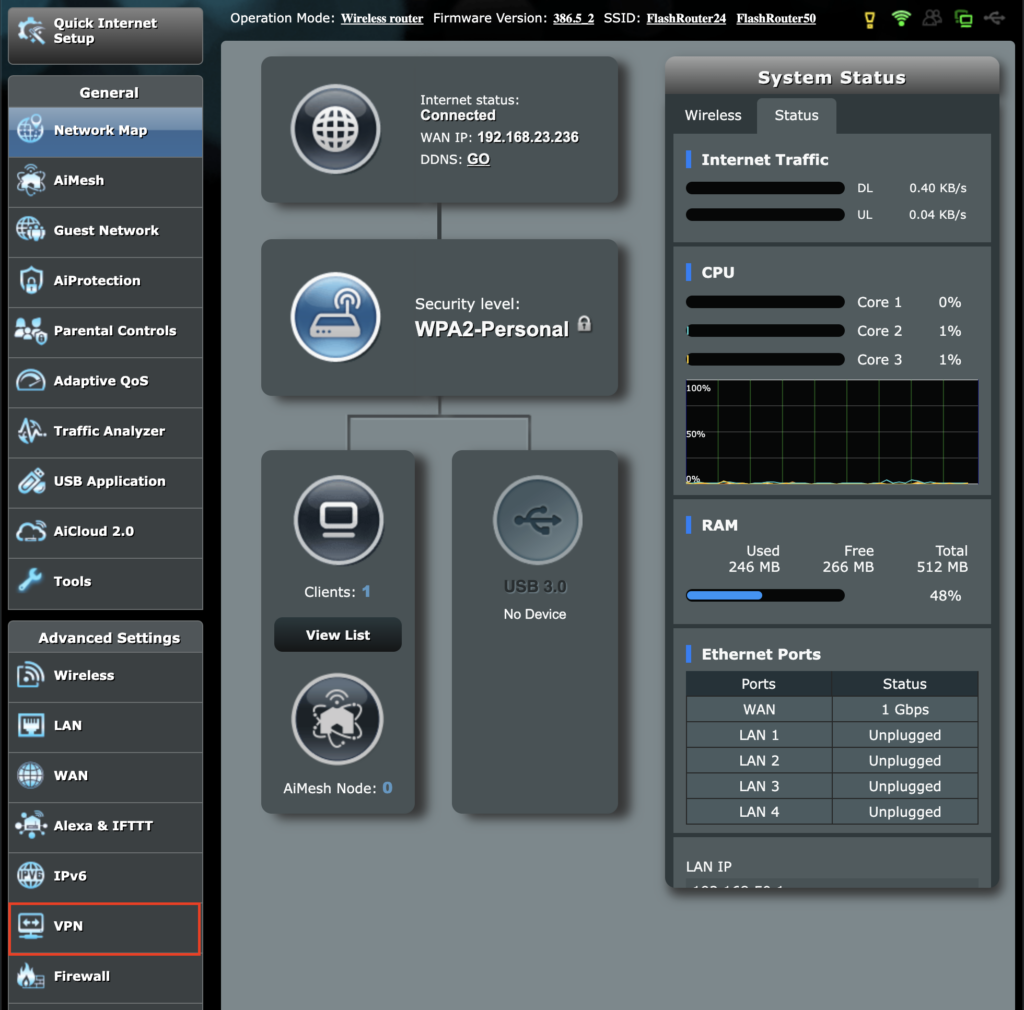
1. Navigate to the VPN tab.

Merlin VPN Tab

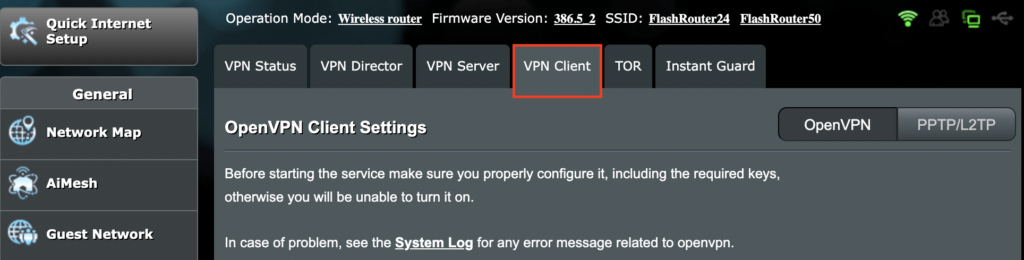
2. Navigate to the VPN Client tab.

Merlin VPN Client Tab

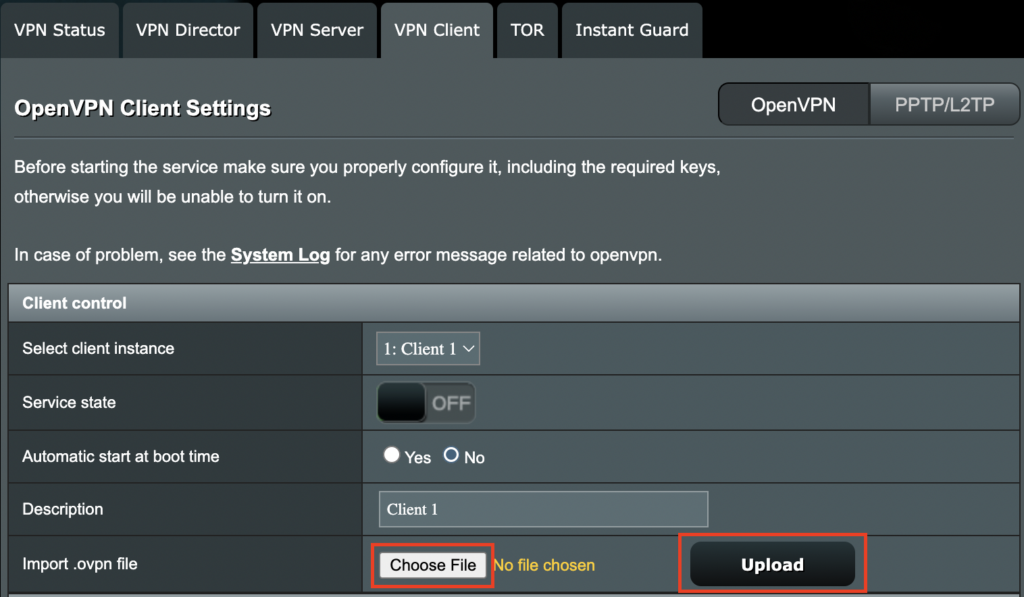
3. Click Choose file and select the .ovpn file from the folder you downloaded earlier. Then click Upload.

Merlin Choose File Upload

4. Set Automatic Start at boot time to Yes if you want the VPN connection to begin automatically when the router is powered off and back on.

Merlin Automatic Start at boot time

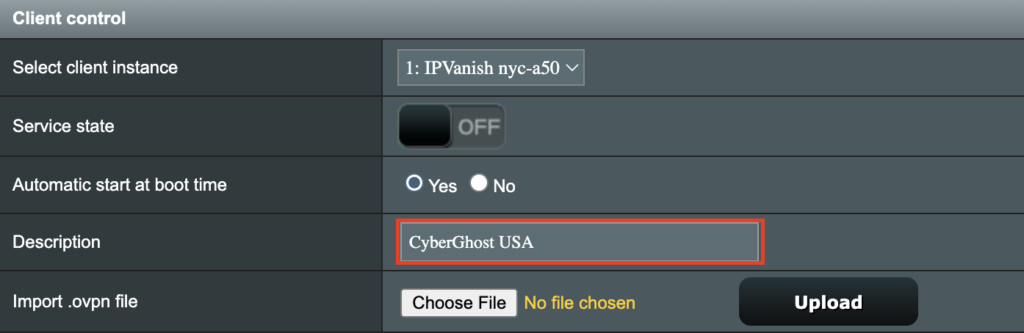
5. In the Description field enter in the name you’d like to use for this OpenVPN Client profile. We typically advise entering in the location here. Our example server was in USA so I have entered in CyberGhost USA.

Merlin CyberGhost Description field

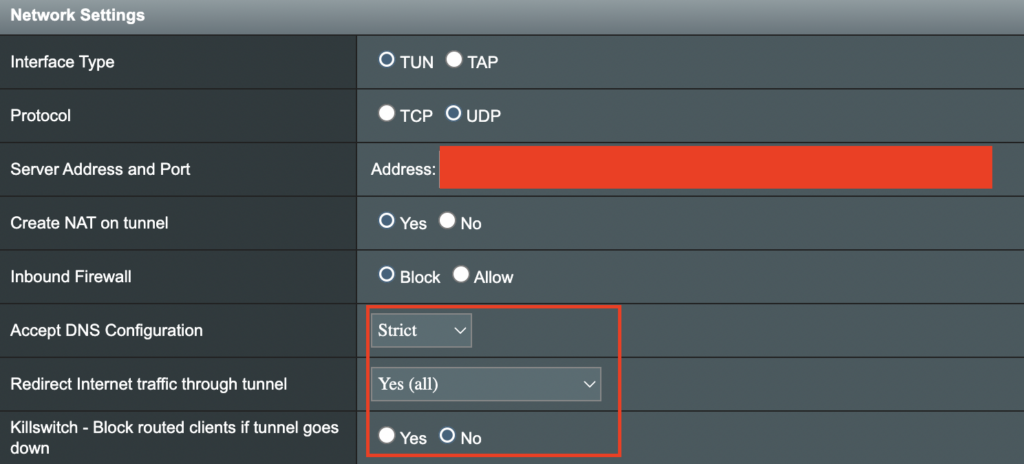
6. Set Accept DNS Configuration to Strict. Set Redirect Internet traffic through tunnel to Yes (all). Set Kill Switch to Yes or No depending on if you want the Internet to be killed if the VPN connection drops.

Merlin Accept DNS configuration Redirect Internet and Kill Switch

If you only want certain devices to connect to the OpenVPN Client profile you are setting up instead of all the devices connected to the FlashRouter’s network please set the Redirect Internet traffic through tunnel to VPN Director. Then complete the instructions on this page and then view our VPN Director guide.

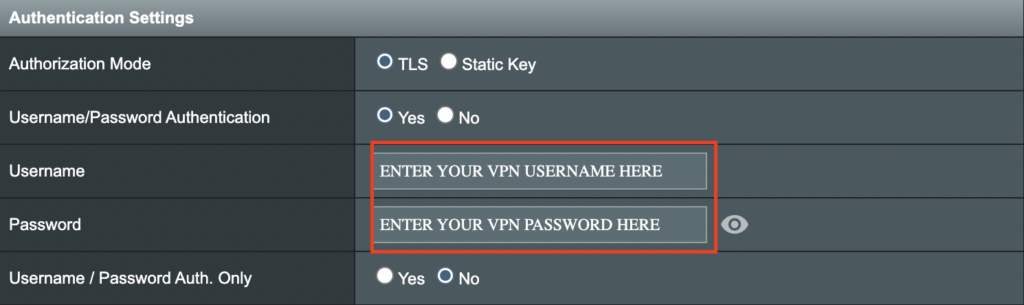
7. Enter your CyberGhost OpenVPN username and password that you obtained earlier. Do not enter your account login.

Merlin VPN Username and Password

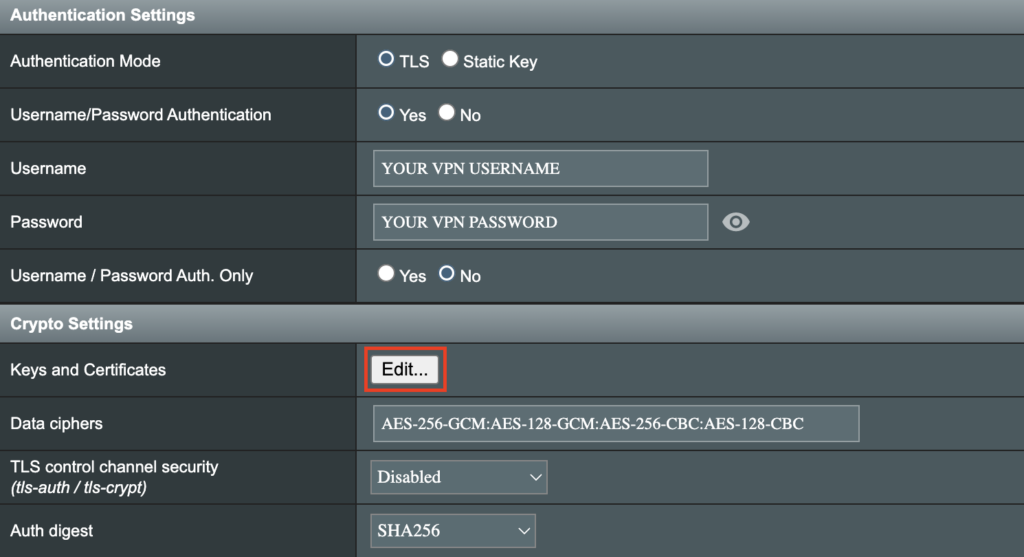
8. Click the Edit button in the Keys and Certificates area.

Merlin Keys and Certificates Edit button

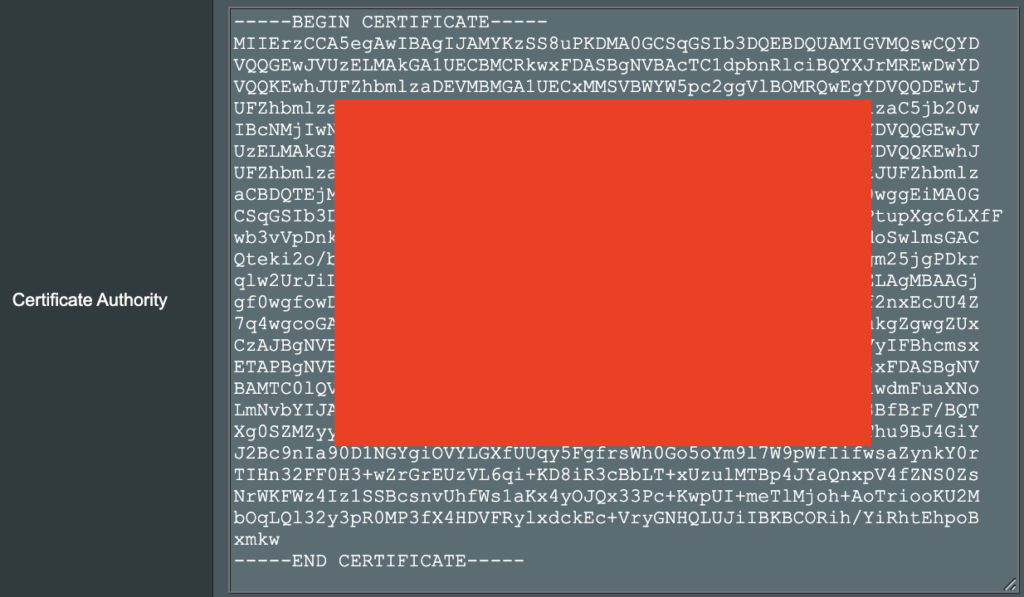
9. In the Certificate Authority field paste in the entire content of the ca.crt file.

—– BEGIN xxx —– / —– END xxx —– block (including those two lines).

Merlin Certificate Authority

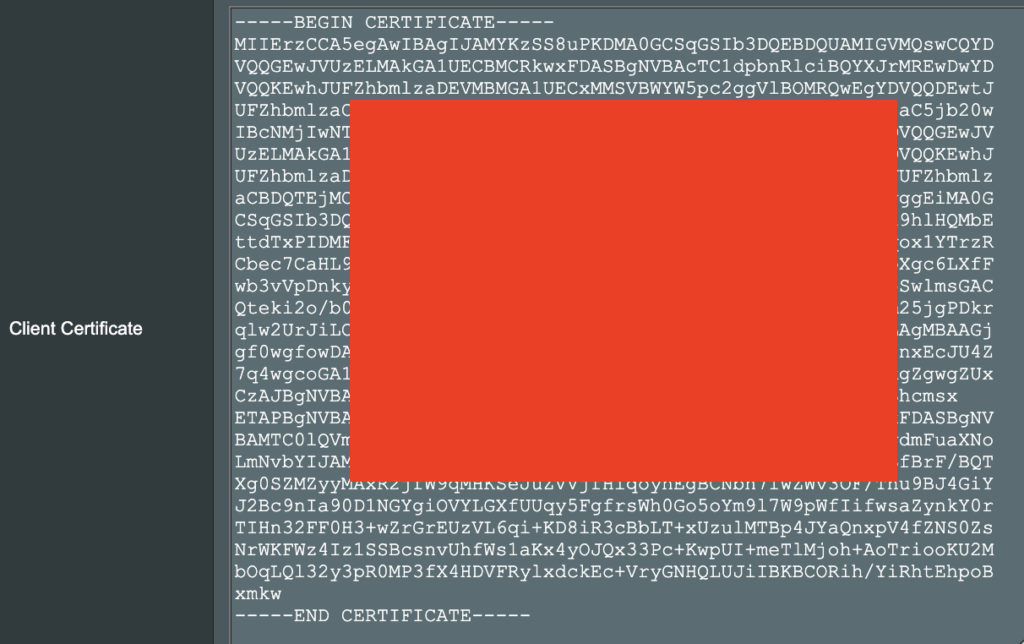
10. In the Client Certificate field paste in the entire content of the client.crt file.

—– BEGIN xxx —– / —– END xxx —– block (including those two lines).

Merlin Client Certificate

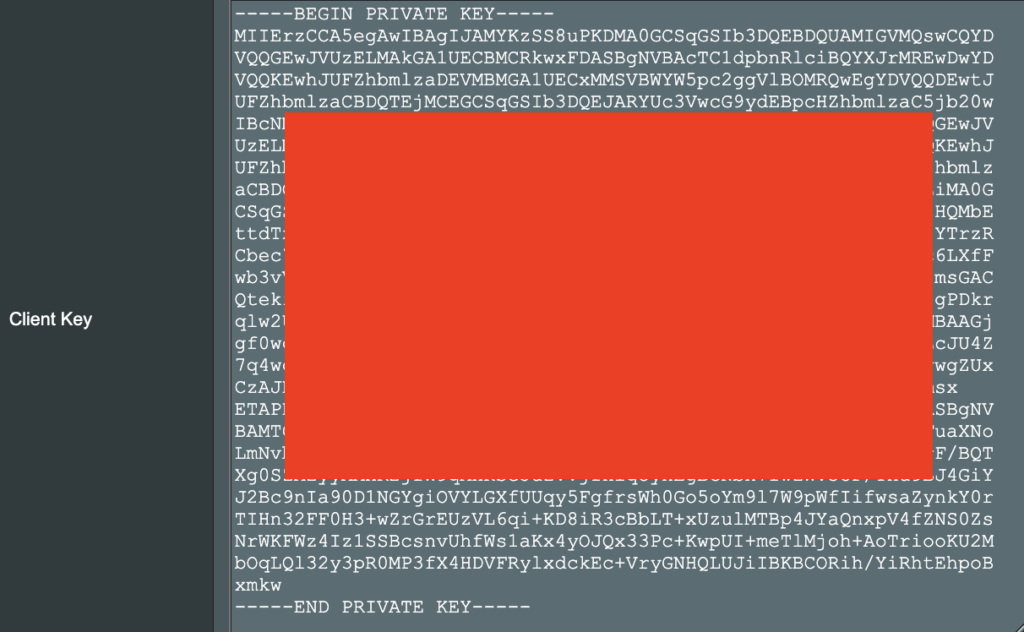
11. In the Client Key field paste in the entire content of the client.key file.

—– BEGIN xxx —– / —– END xxx —– block (including those two lines).

Merlin Client Key

12. Click Save at the bottom of that window.

13. Click Apply at the bottom of the page.

14. At the top of the page set the Service State toggle to ON to activate the VPN connection.

Merlin Service State All Providers

Verify a successful CyberGhost connection

  1. You should now see a CONNECTED message.
  2. Visit What is my IP Address from a private/incognito browser to verify your new IP address and virtual location.

TROUBLESHOOTING

Still having issues? Visit the FR Privacy App Troubleshooting section.

Troubleshoot Here

NordVPN Setup for AsusWRT Firmware Routers

TeamFlashRouters · Oct 15, 2025 ·

You can connect to NordVPN on your AsusWRT router using NordLynx, OpenVPN, or a Dedicated IP.

Quick Options

  • NordLynx: Choose your preferred country from NordVPN’s server list

  • OpenVPN: Choose your preferred city or country from NordVPN’s server list.

  • Dedicated IP (optional): Enter your unique configuration file if you’ve been assigned a static NordVPN IP.

:point_right: If you are not already a NordVPN user Sign Up Now.

NordVPN NordLynx Setup for AsusWRT

1. Get your NordVPN Access Token for NordLynx connections. Log in to your NordVPN account and select NordVPN from your list of Services.

NordVPN Services Section

2. At the bottom of the page click Get Access token and you will receive a code via email. Enter this code to proceed.

NordVPN Access Token

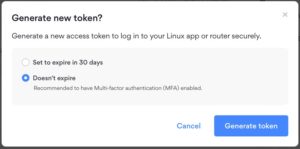
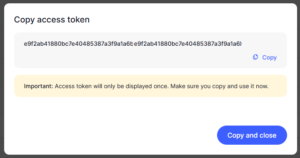
3. After you enter the email code select Generate new token and set it to Doesn’t expire. Copy this token.

NordVPN Generate new token
NordVPN Copy Token

4. Log in to the Asus settings page by connecting to the Asus router’s WiFi (or wired LAN) on your computer. Then, enter 192.168.50.1 or asusrouter.com in the browser.

View our guide for more instructions on how to access AsusWRT firmware settings.

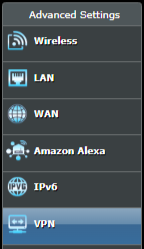
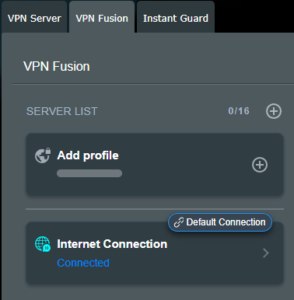
5. Navigate to the VPN tab and then select the VPN Fusion tab, then click Add profile.

Click the VPN Button
VPN Fusion Add Profile

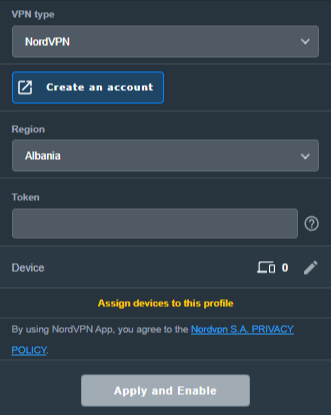
6. Fill in your NordVPN information, then click Apply and Enable.

  • Connection Name: Choose a name for your NordLynx connection.
  • VPN Type: Select NordVPN
  • Region: Choose your VPN server location
  • Token: Copy and paste your NordVPN token.
Apply NordLynx Settings

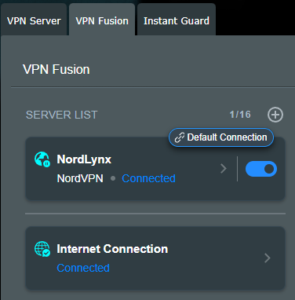
6. You should now see the Profile say Connected, indicating that the NordVPN server is successfully connected to your router!

VPN Fusion NordLynx Connected

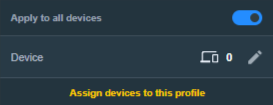
7. The VPN connection is automatically set to Apply to all devices.

If you only want certain devices to connect to the VPN, then turn off the VPN connection and switch off Apply to all devices.

Now click the pencil next to the Device section and select the devices (computer, phone, etc.) that you want to connect to VPN. Click OK and then click Apply all settings.

Apply VPN by Device

NordVPN OpenVPN Setup for AsusWRT

1. Get your NordVPN manual service credentials for OpenVPN connections. Log in to your NordVPN account and select NordVPN from your list of Services.

NordVPN Services Section

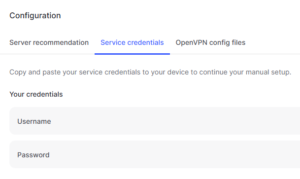
2. At the bottom of the page in the Manual Setup section click Setup NordVPN manually then under the Configuration section go to Service credentials. Click Verify email to receive a code via email and enter the code to view and copy your credentials.

NordVPN Manual OpenVPN
NordVPN Service Credentials

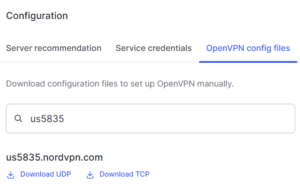
3. Click on OpenVPN config files. Search and download the server file for your preferred NordVPN location, UDP is recommended.

NordVPN OpenVPN Config Files

4. Log in to the Asus settings page by connecting to the Asus router’s WiFi (or wired LAN) on your computer. Then, enter 192.168.50.1 or asusrouter.com in the browser.

View our guide for more instructions on how to access AsusWRT firmware settings.

5. Navigate to the VPN tab and then click on the VPN Fusion tab, then click Add Profile.

Click the VPN Button
VPN Fusion Add Profile

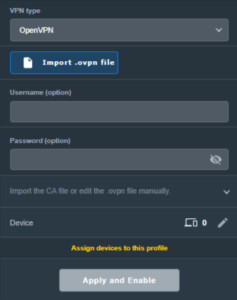
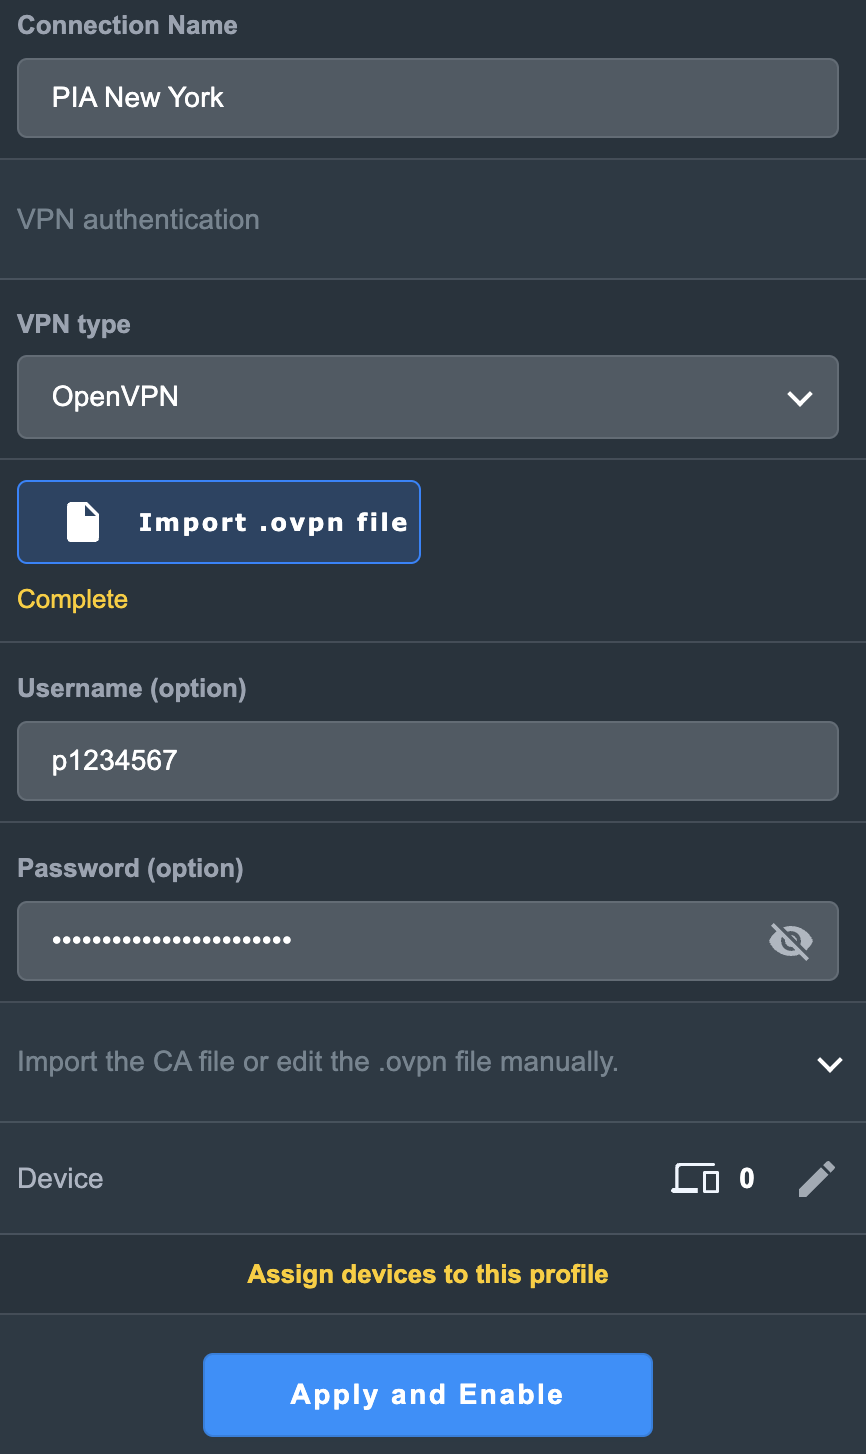
6. Fill in your NordVPN information then click Apply and Enable.

  • Connection Name: Choose a name for your NordVPN OpenVPN connection.
  • VPN Type: Select OpenVPN
  • Import .ovpn File: Upload the OpenVPN file that you downloaded.
  • Username and Password: Copy and paste your NordVPN manual service credentials.
AsusWRT OpenVPN Connection File Load

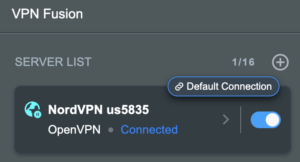
6. You should now see the Profile say Connected, indicating that the NordVPN server is successfully connected to your router!

Asus NordVPN Connected

7. The VPN connection is automatically set to Apply to all devices.

If you only want certain devices to connect to the VPN, then turn off the VPN connection and switch off Apply to all devices.

Now click the pencil next to the Device section and select the devices (computer, phone, etc.) that you want to connect to VPN. Click OK and then click Apply all settings.

Apply VPN by Device

NordVPN Dedicated IP Setup for AsusWRT

1. Get your NordVPN manual service credentials for OpenVPN connections. Log in to your NordVPN account and select NordVPN from your list of Services.

NordVPN Services Section

2. At the bottom of the page in the Manual Setup section click Setup NordVPN manually then under the Configuration section go to Service credentials. Click Verify email to receive a code via email and enter the code to view and copy your credentials.

NordVPN Manual OpenVPN
NordVPN Service Credentials

3. Now download your Dedicated IP configuration file from the NordVPN website.

4. Log in to the Asus settings page by connecting to the Asus router’s WiFi (or wired LAN) on your computer. Then, enter 192.168.50.1 or asusrouter.com in the browser.

View our guide for more instructions on how to access AsusWRT firmware settings.

5. Navigate to the VPN tab then click on the VPN Fusion tab, then click Add Profile.

Click the VPN Button
VPN Fusion Add Profile

6. Fill in your NordVPN information then click Apply and Enable.

  • Connection Name: Choose a name for your NordVPN Dedicated IP connection.
  • VPN Type: Select OpenVPN
  • Import .ovpn File: Upload the Dedicated IP OpenVPN file that you downloaded.
  • Username and Password: Copy and paste your NordVPN manual service credentials.
AsusWRT OpenVPN Connection File Load

6. You should now see the Profile say Connected, indicating that the NordVPN server is successfully connected to your router!

Asus NordVPN Connected

7. The VPN connection is automatically set to Apply to all devices.

If you only want certain devices to connect to the VPN, then turn off the VPN connection and switch off Apply to all devices.

Now click the pencil next to the Device section and select the devices (computer, phone, etc.) that you want to connect to VPN. Click OK and then click Apply all settings.

Apply VPN by Device
  1. Connect your devices to the Asus router network and visit the NordVPN website, at the top it should display Your Status: Protected.
  2. Visit NordVPN’s IP Check to verify your new IP address and virtual location.

🚫📱Do not run NordVPN apps on devices connected to your NordVPN router. Using the app at the same time as the router VPN may cause conflicts and connection issues.

Still having issues?

Feel free to submit a ticket and we will get back to you as soon as possible.

NordVPN Manual OpenVPN Setup

TeamFlashRouters · Apr 8, 2019 ·

Preparing for Manual NordVPN Setup

Verify your NordVPN login information

If you are not already an NordVPN user Sign Up Now.

Log in to your account on the NordVPN website.

NordVPN Server Addresses

For a NordVPN server recommendation visit their Recommend Server page.

Once you have selected the server you want to connect to, download the UDP .ovpn file containing the Server IP Address, TLS Auth Key, and CA Cert referenced below.

Open the .ovpn file that is downloaded to your computer with NotePad++ for Windows or TextEdit for Apple. You will only need the Server IP Address, TLS Auth Key, and CA Cert from this file. All NordVPN servers and .ovpn files have different IP Addresses, keys, and certificates.

DD-WRT Router Setup for NordVPN

Navigate to Services > VPN

Enter NordVPN settings

OpenVPN Client

Start OpenVPN Client

If you wish to disable your VPN connection simply set this to Disable at any time and click Apply Settings.

Server IP/Name

At the top of the .ovpn file you downloaded above, there is a line e.g.:
remote 206.226.72.27 1194
206.226.72.27 is your NordVPN server IP address. Enter the IP Address in this field.

Port

1194

Tunnel Device

TUN

Tunnel Protocol

UDP

Encryption cipher

AES-256-CBC

Hash Algorithm

SHA512

Userpass Authentication

Enable

Username

Enter the Username you successfully logged in to your NordVPN account with.

Password

Enter the Password you successfully logged in to your NordVPN account with.

Advanced Options

Enable

TLS Cipher

None

LZO Compression

Adaptive

NAT

Enable

Firewall Protection

Enable

TLS Auth Key

In the .ovpn file copy and paste all contents in between the <tls-auth> and </tls-auth> lines from your .ovpn file starting and ending with:
—–BEGIN OpenVPN Static key V1—–
…
—–END OpenVPN Static key V1—–

Additional Config

tun-mtu-extra 32
mssfix 1450
persist-key
persist-tun

Policy Based Routing

This field can be used for split VPN and Dual Gateway routing.

CA Cert

In the .ovpn file Copy and Paste all contents in between the <ca> and </ca> lines from your .ovpn file starting and ending with:
—–BEGIN CERTIFICATE—–
…
—–END CERTIFICATE—–

CLICK APPLY SETTINGS

Leave all settings not mentioned above as their default setting.

Verify a successful NordVPN connection

Navigate to Status > OpenVPN

  1. You should now see a CONNECTED SUCCESS message.
  2. Visit NordVPN’s website to verify your new IP address, virtual location, and status as Protected at the top of the page.

In some cases you may notice that the location is not showing the same location as the server you have input in your router settings; this is because geo tracking tools are often tricked by VPN connections. As long as you see an IP address that is not the same as your normal Internet IP address then you are indeed connected to NordVPN.

Back up your settings

Navigate to Administration > Backup

  1. Click the Backup button.
  2. A file named nvrambak.bin will be saved to your computer.
  3. You can load nvrambak.bin to restore your settings in the event of a reset.

How to change the NordVPN server

  1. Download and open a new .ovpn file from NordVPN.
  2. Copy and paste the server IP Address into the Server IP/Name field.
  3. Copy and paste the TLS Auth Key into the TLS Auth Key field.
  4. Copy and paste the CA Cert into the CA Cert field.
  5. Click Apply Settings.

TROUBLESHOOTING

Still having issues? Visit the VPN Troubleshooting section.

Troubleshoot Here

Change server locations on ExpressVPN/Aircove firmware

TeamFlashRouters · May 12, 2022 ·

You can change the ExpressVPN server location at any time so your Internet connection appears as originating from that location.

1. Connect to the FlashRouter’s network via ethernet cable or wireless.

2. Open your web browser and enter expressvpnrouter.com or 192.168.132.1 in the URL.

ExpressVPNrouter.com
192.168.132.1

3. Login with your ExpressVPN FlashRouter admin password.

ExpressVPN Router admin login

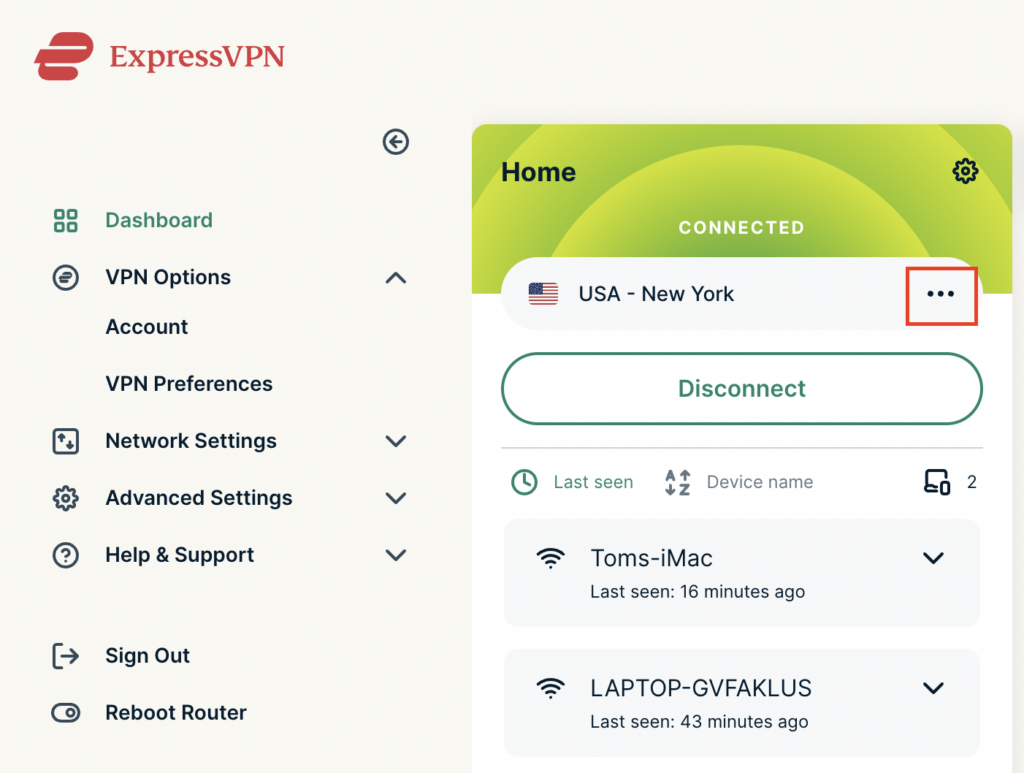
4. Click the three dots next to the server location.

ExpressVPN change server 1

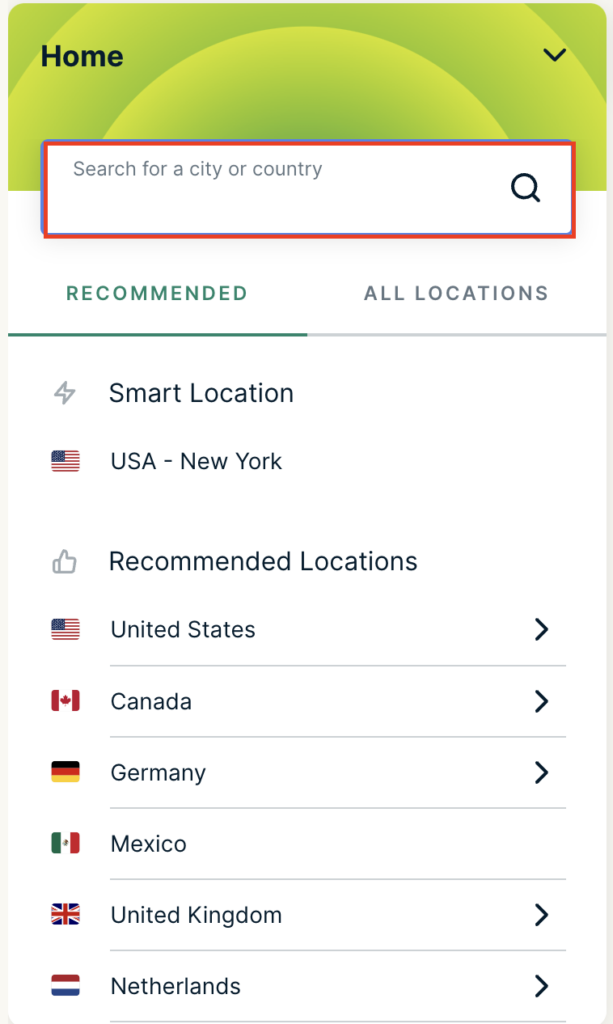
5. Type in the location you want to connect to. Click the new location to connect.

ExpressVPN change server 2

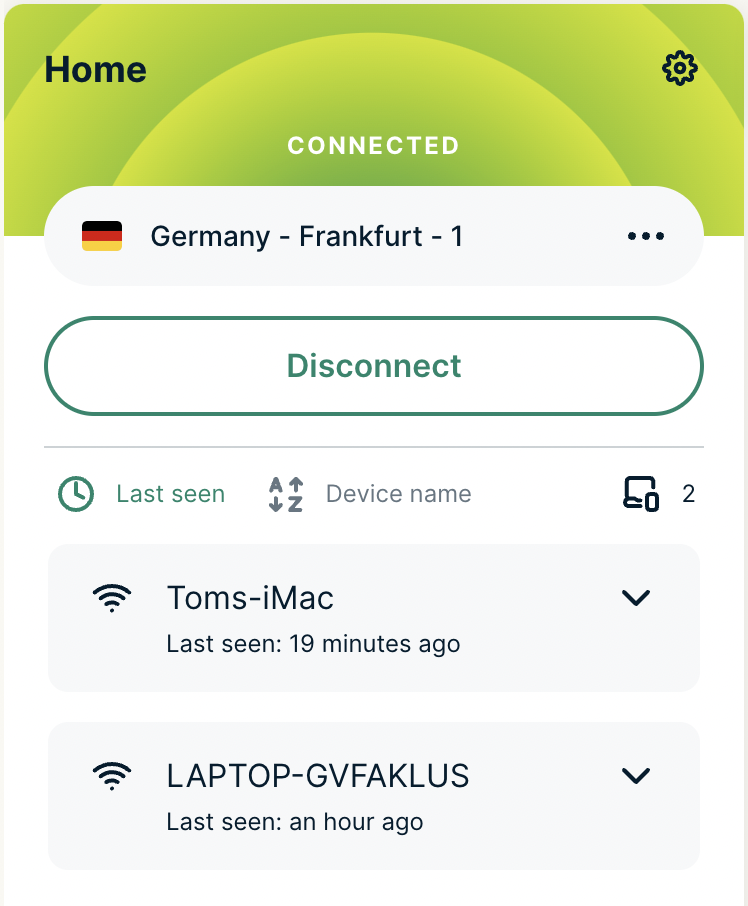
6. You are now connected to the new server location.

ExpressVPN change server 3

ExpressVPN offers servers in locations all over the world. Typically for speeds it is best to connect to the server closest to your actual location. Clicking a country instead of a city will connect you to the ideal city in that country.

IPVanish AsusWRT OpenVPN Setup

TeamFlashRouters · Apr 29, 2024 ·

Preparing for IPVanish AsusWRT Setup

Download your IPVanish .ovpn file

If you are not already an IPVanish user Sign Up Now.

1. Log in to your account on the IPVanish website.

IPVanish login

2. Successfully log in with your account information then go to IPVanish .ovpn file page.

3. Click on the .ovpn file for the server location you want to use to dowloand the .ovpn file. Do not open this file.

IPVanish download ovpn

AsusWRT Router Setup for IPVanish

Login to AsusWRT firmware settings in a browser on any computer or smart device connected to the AsusWRT FlashRouter’s network.

1. Navigate to the VPN tab.

Merlin VPN Tab

2. Navigate to the VPN Fusion tab.

Asus VPN Fusion

3. Click Add profile.

Asus Add profile

4. In the Connection Name field enter in the name you’d like to use for this OpenVPN Client profile. We typically advise entering in the location or server number here. Our example server was in New York so I have entered in IPVanish New York.

5. In the VPN Type dropdown select OpenVPN.

6. Click Import .ovpn file and select the .ovpn file you downloaded earlier. Then click Upload.

7. In the Username and Password fields paste in the IPVanish email and password you use to successfully login to your IPVanish website account.

8. Click Apply and Enable at the bottom of the page.

Asus IPVanish profile

If you only want certain devices to connect to the OpenVPN Client profile you are setting up instead of all the devices connected to the FlashRouter’s network click into the profile and disable Apply to all devices. Then click Devices and select the devices that you want to connect to VPN.

Asus VPN devices
Asus VPN select devices

9. At the top of the page set the Service State toggle to ON to activate the VPN connection.

Asus IPVanish Connected

Verify a successful IPVanish connection

  1. You should now see a CONNECTED message.
  2. Visit IPVanish’s IP Check to verify your new IP address and virtual location.

In some cases you may notice that the location is not showing the same location as the server you have input in your router settings; this is because geo tracking tools are often tricked by VPN connections. As long as you see an IP address that is not the same as your normal Internet IP address then you are indeed connected to IPVanish.

How to change the IPVanish server

  1. Follow the steps at the top of the page to obtain a new .ovpn file.
  2. Then proceed with the settings same as initial setup.

TROUBLESHOOTING

Still having issues? Visit the VPN Troubleshooting section.

Troubleshoot Here

Surfshark AsusWRT WireGuard Setup

TeamFlashRouters · Apr 29, 2024 ·

Preparing for Surfshark AsusWRT Setup

Copy your Surfshark Private Key

If you are not already a Surfshark user Sign Up Now.

1. Log in to your account on the Surfshark website.

Surfshark Account Login

2. Click VPN Manual Setup.

Surfshark VPN Manual Setup

3. Select Router as the Setup method.

Surfshark setup method Router

4. Select WireGuard as the Protocol.

Surfshark select WireGuard

5. Select I don’t have a key pair.

Surfshark No Key Pair

6. Enter FlashRouter as the name of the connection and click Next.

Surfshark Connection Name

7. Click Generate a new key pair.

Surfshark Generate new Key Pair

8. A Public Key and Private Key will then appear. Use the copy box to copy the Private Key. You will not need the public key.

Surfshark Private Key

AsusWRT Router Setup for Surfshark

Login to AsusWRT firmware settings in a browser on any computer or smart device connected to the AsusWRT FlashRouter’s network.

1. Navigate to the VPN tab.

Merlin VPN Tab

2. Navigate to the VPN Fusion tab.

Asus VPN Fusion

3. Click Add profile.

Asus Add profile

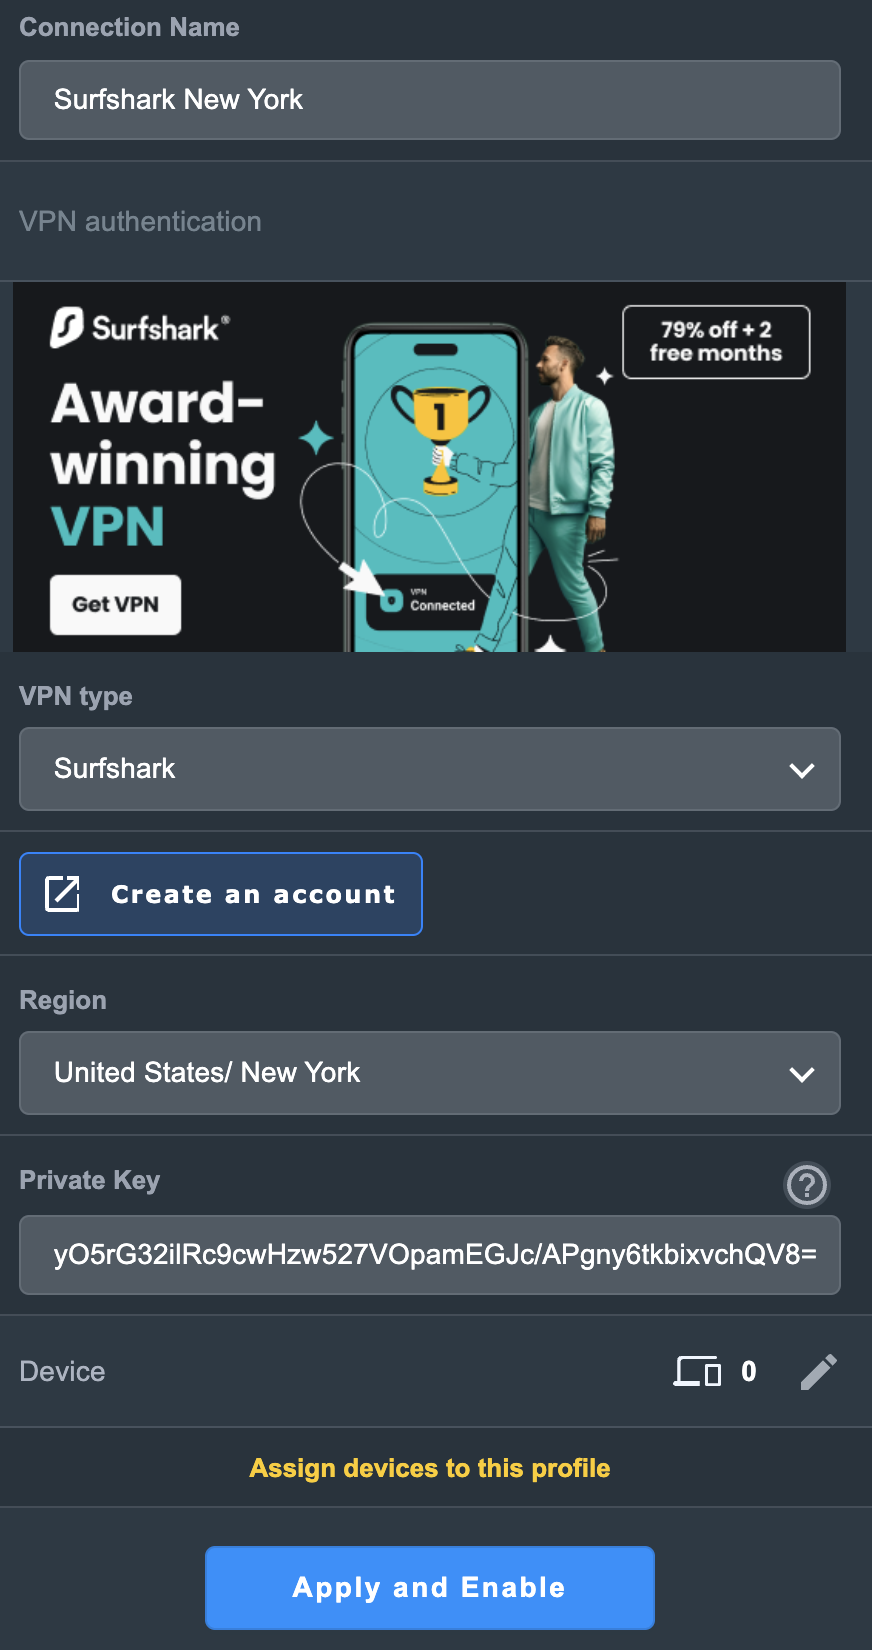
4. In the Connection Name field enter in Surfshark.

5. In the VPN Type dropdown select Surfshark.

6. In the Region dropdown select the Surfshark location you want to connect to.

7. In the Private Key field paste in the Surfshark Private Key obtained earlier.

8. Click Apply and Enable at the bottom of the page.

Asus Surfshark profile

If you only want certain devices to connect to the Surfshark profile you are setting up instead of all the devices connected to the FlashRouter’s network click into the profile and disable Apply to all devices. Then click Devices and select the devices that you want to connect to VPN.

Asus VPN devices
Asus VPN select devices

9. At the top of the page set the Service State toggle to ON to activate the VPN connection.

Asus Surfshark Connected

Verify a successful Surfshark connection

  1. You should now see a CONNECTED message.
  2. Visit Surfshark’s IP Check to verify your new IP address and virtual location.

In some cases you may notice that the location is not showing the same location as the server you have input in your router settings; this is because geo tracking tools are often tricked by VPN connections. As long as you see an IP address that is not the same as your normal Internet IP address then you are indeed connected to Surfshark.

How to change the Surfshark server

  1. Use the profile service state toggle to disconnect the currently connected location.
  2. Then click into the Surfshark profile in the router’s settings.
  3. Then adjust the Region dropdown to a new location.
  4. Click Apply all settings.
  5. Use the profile service state toggle to connect the new location.

TROUBLESHOOTING

Still having issues? Visit the VPN Troubleshooting section.

Troubleshoot Here

PrivateInternetAccess (PIA) TP-Link OpenVPN Setup

TeamFlashRouters · Apr 29, 2024 ·

Preparing for PIA TP-Link Setup

Download your PIA .ovpn file

If you are not already a PIA user Sign Up Now.

1. Log in to your account on the PIA website.

PIA login

2. Successfully log in with your account information then go to PIA’s OpenVPN Config Generator.

3. On the OpenVPN Configuration Generator select the following:

OpenVPN Version: OpenVPN 2.4 or newer

Select Platform: Linux

Select Region: Choose the server location you’d like to connect to

Select Port: Typically we recommend UDP/1198 RSA-2048 AES-128-CBC SHA1 for best speeds but feel free to select the one you want to use.

4. Click Generate to download the .ovpn file. Do not open this file once it is downloaded.

PIA Generate .ovpn file

TP-Link Router Setup for PIA

Login to TP-Link firmware settings in a browser on any computer or smart device connected to the FlashRouter’s network.

1. Navigate to the Advanced tab.

TP-Link Advanced settings

2. Navigate to the VPN Client tab.

TP-Link VPN Client

3. Check the Enable box next to VPN Client. Then click Save at the bottom of the page.

TP-Link VPN Client enable

4. Click the Add button in the Server List area.

TP-Link Add server button

5. In the Description field enter in the name you’d like to use for this OpenVPN Client profile. We typically advise entering in the location. Our example server was New York so I have entered in PIA New York.

Set the VPN Type to OpenVPN.

In the Username and Password fields paste in the PIA username and password you use to successfully login to your PIA website account.

Click Browse and select the .ovpn file you downloaded earlier. Then click Save.

TP-Link PIA

By default no devices will be assigned to the VPN Tunnel. With TP-Link firmware you must manually assign the devices that you want connected to the VPN tunnel. Proceed with the next steps to do so for all devices you want connected to VPN.

6. Click the Add button in the Device List area.

TP-Link add devices to VPN tunnel

7. A list of devices connected to the FlashRouter’s network will appear. Check the devices that you want to connect to VPN. Then click OK.

TP-Link select devices to add to VPN tunnel

8. Now that the devices have been assigned to the VPN connection click the Enable toggle in the Server List area.

TP-Link PIA Connected

Verify a successful PIA connection

  1. You should now see a CONNECTED message.
  2. Visit PIA’s IP Check to verify your new IP address and virtual location.

In some cases you may notice that the location is not showing the same location as the server you have input in your router settings; this is because geo tracking tools are often tricked by VPN connections. As long as you see an IP address that is not the same as your normal Internet IP address then you are indeed connected to PIA.

How to change the PIA server

  1. Follow the steps at the top of the page to obtain a new .ovpn file.
  2. Then proceed with the settings same as initial setup.

TROUBLESHOOTING

Still having issues? Visit the VPN Troubleshooting section.

Troubleshoot Here

IPVanish TP-Link OpenVPN Setup

TeamFlashRouters · Apr 29, 2024 ·

Preparing for IPVanish TP-Link Setup

Download your IPVanish .ovpn file

If you are not already an IPVanish user Sign Up Now.

1. Log in to your account on the IPVanish website.

IPVanish login

2. Successfully log in with your account information then go to IPVanish .ovpn file page.

3. Click on the .ovpn file for the server location you want to use to dowloand the .ovpn file. Do not open this file.

IPVanish download ovpn

TP-Link Router Setup for IPVanish

Login to TP-Link firmware settings in a browser on any computer or smart device connected to the FlashRouter’s network.

1. Navigate to the Advanced tab.

TP-Link Advanced settings

2. Navigate to the VPN Client tab.

TP-Link VPN Client

3. Check the Enable box next to VPN Client. Then click Save at the bottom of the page.

TP-Link VPN Client enable

4. Click the Add button in the Server List area.

TP-Link Add server button

5. In the Description field enter in the name you’d like to use for this OpenVPN Client profile. We typically advise entering in the location. Our example server was New York so I have entered in IPVanish New York.

Set the VPN Type to OpenVPN.

In the Username and Password fields paste in the IPVanish email and password you use to successfully login to your IPVanish website account.

Click Browse and select the .ovpn file you downloaded earlier. Then click Save.

TP-Link IPVanish

By default no devices will be assigned to the VPN Tunnel. With TP-Link firmware you must manually assign the devices that you want connected to the VPN tunnel. Proceed with the next steps to do so for all devices you want connected to VPN.

6. Click the Add button in the Device List area.

TP-Link add devices to VPN tunnel

7. A list of devices connected to the FlashRouter’s network will appear. Check the devices that you want to connect to VPN. Then click OK.

TP-Link select devices to add to VPN tunnel

8. Now that the devices have been assigned to the VPN connection click the Enable toggle in the Server List area.

TP-Link IPVanish Connected

Verify a successful IPVanish connection

  1. You should now see a CONNECTED message.
  2. Visit IPVanish’s IP Check to verify your new IP address and virtual location.

In some cases you may notice that the location is not showing the same location as the server you have input in your router settings; this is because geo tracking tools are often tricked by VPN connections. As long as you see an IP address that is not the same as your normal Internet IP address then you are indeed connected to IPVanish.

How to change the IPVanish server

  1. Follow the steps at the top of the page to obtain a new .ovpn file.
  2. Then proceed with the settings same as initial setup.

TROUBLESHOOTING

Still having issues? Visit the VPN Troubleshooting section.

Troubleshoot Here

Privacy Hero Creating User Profiles and Adding Devices to Profiles

TeamFlashRouters · Apr 3, 2023 ·

Your Privacy Hero router uses Cloud Based router management which means you can access the router settings from anywhere on any device that has an internet connection. You can follow these steps while connected to your phone, other Wi-Fi network, or the Privacy Hero network.

The Privacy Hero router allows for User Profile creation. Doing so allows you to group different user’s devices together to customize the following rules:

  • Internet access scheduler (Bedtime settings)
  • Internet Safe Search
  • Youtube Safe Search
  • Block Adult Content

This makes the Privacy Hero a great router option for families and internet addicts.

1. From any device that has a browser such as a computer, smartphone, or tablet visit app.privacyhero.com

App.PrivacyHero.com

2. Enter your Privacy Hero account email and password. Click Login.

Privacy Hero Access Settings

If you have not created your Privacy Hero account yet please follow these instructions.

3. Click the Profiles symbol.

Privacy Hero Profiles

4. Click Create New Profile.

Privacy Hero Create New Profile

5. Set the Profile Name, select the Profile Icon, and click Save.

Privacy Hero Set Profile Name

6. Click the name of the User Profile.

Privacy Hero Select Profile

7. Select Devices.

Privacy Hero Select Devices

8. Select Manage Devices.

Privacy Hero Select Manage Devices

9. If you have not already connected your devices to the Privacy Hero network via wireless or ethernet you can do so now. Refresh the page after connecting a new device and it will appear in the list where you can select Move to “Profile Name” to move the device to the appropriate profile. By default new devices are in the Shared profile.

Privacy Hero Move to User Profile

If your devices were already connected to the Privacy Hero network and you are having issues identifying them I would recommend the following steps:

  1. Click the Devices icon.
  2. Select the device in question.
  3. Click Nerd and note down the IP Address of the device.
  4. Go to the network settings of your device where it will display the local IP Address and match that to the IP Address noted in Privacy Hero.

This is how you can identify a device that is not properly named.

10. Now that your devices are assigned you can set the Bedtime Settings (Internet Scheduler) and Safe Surf settings for your new Profile.

TROUBLESHOOTING

Still having issues? Visit the VPN Troubleshooting section.

Troubleshoot Here

Surfshark TP-Link OpenVPN Setup

TeamFlashRouters · Apr 29, 2024 ·

Preparing for Surfshark TP-Link Setup

Download your Surfshark .ovpn file

If you are not already a Surfshark user Sign Up Now.

1. Log in to your account on the Surfshark website.

Surfshark Account Login

2. Click VPN Manual Setup.

Surfshark VPN Manual Setup

3. Select Router as the Setup method.

Surfshark setup method Router

4. Select OpenVPN as the Protocol.

Surfshark OpenVPN Protocol

5. Copy and paste your Surfshark manual username and password to a secure location. This is the username and password you will enter into the router settings to connect to Surfshark.

Surfshark OpenVPN credentials

6. Click Location and select the server location you want to connect to. Unless you need a specific location we recommend using Surfshark’s recommended Fastest server. Click Download to download the UDP .ovpn file for this Surfshark server location.

Surfshark download .ovpn file

TP-Link Router Setup for Surfshark

Login to TP-Link firmware settings in a browser on any computer or smart device connected to the FlashRouter’s network.

1. Navigate to the Advanced tab.

TP-Link Advanced settings

2. Navigate to the VPN Client tab.

TP-Link VPN Client

3. Check the Enable box next to VPN Client. Then click Save at the bottom of the page.

TP-Link VPN Client enable

4. Click the Add button in the Server List area.

TP-Link Add server button

5. In the Description field enter in the name you’d like to use for this OpenVPN Client profile. We typically advise entering in the location. Our example server was New York so I have entered in Surfshark New York.

Set the VPN Type to OpenVPN.

In the Username and Password fields paste in the Surfshark username and password we obtained earlier.

Click Browse and select the .ovpn file you downloaded earlier. Then click Save.

TP-Link Surfshark OpenVPN

By default no devices will be assigned to the VPN Tunnel. With TP-Link firmware you must manually assign the devices that you want connected to the VPN tunnel. Proceed with the next steps to do so for all devices you want connected to VPN.

6. Click the Add button in the Device List area.

TP-Link add devices to VPN tunnel

7. A list of devices connected to the FlashRouter’s network will appear. Check the devices that you want to connect to VPN. Then click OK.

TP-Link select devices to add to VPN tunnel

8. Now that the devices have been assigned to the VPN connection click the Enable toggle in the Server List area.

TP-Link Surfshark OpenVPN connected

Verify a successful Surfshark connection

  1. You should now see a CONNECTED message.
  2. Visit Surfshark’s IP Check to verify your new IP address and virtual location.

In some cases you may notice that the location is not showing the same location as the server you have input in your router settings; this is because geo tracking tools are often tricked by VPN connections. As long as you see an IP address that is not the same as your normal Internet IP address then you are indeed connected to Surfshark.

How to change the Surfshark server

  1. Follow the steps at the top of the page to obtain a new .ovpn file.
  2. Then proceed with the settings same as initial setup.

TROUBLESHOOTING

Still having issues? Visit the VPN Troubleshooting section.

Troubleshoot Here

PrivateInternetAccess (PIA) AsusWRT OpenVPN Setup

TeamFlashRouters · Apr 29, 2024 ·

Preparing for PIA AsusWRT Setup

Download your PIA .ovpn file

If you are not already a PIA user Sign Up Now.

1. Log in to your account on the PIA website.

PIA login

2. Successfully log in with your account information then go to PIA’s OpenVPN Config Generator.

3. On the OpenVPN Configuration Generator select the following:

OpenVPN Version: OpenVPN 2.4 or newer

Select Platform: Linux

Select Region: Choose the server location you’d like to connect to

Select Port: Typically we recommend UDP/1198 RSA-2048 AES-128-CBC SHA1 for best speeds but feel free to select the one you want to use.

4. Click Generate to download the .ovpn file. Do not open this file once it is downloaded.

PIA Generate .ovpn file

AsusWRT Router Setup for PIA

Login to AsusWRT firmware settings in a browser on any computer or smart device connected to the AsusWRT FlashRouter’s network.

1. Navigate to the VPN tab.

Merlin VPN Tab

2. Navigate to the VPN Fusion tab.

Asus VPN Fusion

3. Click Add profile.

Asus Add profile

4. In the Connection Name field enter in the name you’d like to use for this OpenVPN Client profile. We typically advise entering in the location or server number here. Our example server was in New York so I have entered in PIA New York.

5. In the VPN Type dropdown select OpenVPN.

6. Click Import .ovpn file and select the .ovpn file you downloaded earlier. Then click Upload.

7. In the Username and Password fields paste in the PIA username and password you use to successfully login to your PIA website account.

8. Click Apply and Enable at the bottom of the page.

Asus PIA profile

If you only want certain devices to connect to the OpenVPN Client profile you are setting up instead of all the devices connected to the FlashRouter’s network click into the profile and disable Apply to all devices. Then click Devices and select the devices that you want to connect to VPN.

Asus VPN devices
Asus VPN select devices

9. At the top of the page set the Service State toggle to ON to activate the VPN connection.

Asus PIA Connected

Verify a successful PIA connection

  1. You should now see a CONNECTED message.
  2. Visit PIA’s IP Check to verify your new IP address and virtual location.

In some cases you may notice that the location is not showing the same location as the server you have input in your router settings; this is because geo tracking tools are often tricked by VPN connections. As long as you see an IP address that is not the same as your normal Internet IP address then you are indeed connected to PIA.

How to change the PIA server

  1. Follow the steps at the top of the page to obtain a new .ovpn file.
  2. Then proceed with the settings same as initial setup.

TROUBLESHOOTING

Still having issues? Visit the VPN Troubleshooting section.

Troubleshoot Here

Privacy Hero Activation and Setup

TeamFlashRouters · Feb 8, 2023 ·

Follow this article when you receive your new Privacy Hero router to create your Privacy Hero account, connect your Privacy Hero to the Internet, and customize your network so it is ready to use.

Your Privacy Hero router uses Cloud Based router management which means you can access the router settings from anywhere on any device that has an internet connection. You can follow these steps while connected to your phone or your other Wi-Fi network.

Create your Privacy Hero account

1. From any device that has a browser such as a computer, smartphone, or tablet visit app.privacyhero.com

App.PrivacyHero.com

2. Select Create Account.

Privacy Hero create Account

3. Enter the Email address you want to set for your Privacy Hero account. This will be your login to the Privacy Hero settings moving forward. Click Create Account.

Privacy Hero Enter account email

4. Go to your Email inbox and check for an email from Privacy Hero and click the Confirm email address link. This email may be in your Promotions or Spam inbox if it is not appearing in your main inbox.

Privacy Hero Confirm Email

5. Enter the password that you want to use for your Privacy Hero account. Be sure to note this in a secure location so you do not forget. Click Submit.

Privacy Hero create password

6. You have now created your Privacy Hero account. You will use this login to access the Privacy Hero router settings.

Activate your Privacy Hero Internet and setup Wi-Fi

1. You will then be taken to the Router Activation steps. Connect the ethernet cable that the Privacy Hero came with from an open Ethernet port on your ISP modem or other router to the WAN/Internet (blue) port of the Privacy Hero.

Then power the Privacy Hero device on by connecting the power supply. This is shown in the video on the page as well. Wait about a minute or so for the Privacy Hero router to fully boot up and then click I’m Connected.

Wire Up Privacy Hero

2. The next page may say Router Found or ask you to enter the Activation Code. If it asks for the Activation Code that will be the code printed on the bottom of the Privacy Hero. Enter this code and click Next.

Privacy Hero Router Found

3. Set the Wi-Fi name and password for connecting your devices to the Privacy Hero network. Make sure it is not a duplicate name of an existing Wi-Fi network. Click Next.

Privacy Hero Set wifi name and password

4. To activate your 1 Year NordVPN code:

Click on Claim NordVPN 1 Year Code Now

NordVPN Claim Code

Go to the Account section of your router settings.

Copy the NordVPN code shown under Claim NordVPN 1 Year Code.

PH Nord Code

Go to the NordVPN activation page.

This code can be used with a new or existing NordVPN account.

NordVPN Activate Page

5. You are now all set to begin joining your devices to the new Privacy Hero network with the Wi-Fi name and password you entered and setting up some of the Privacy Hero features.

TROUBLESHOOTING

Still having issues? Visit the VPN Troubleshooting section.

Troubleshoot Here

How do I set a Static IP for my device in DD-WRT?

TeamFlashRouters · May 30, 2019 ·

It can be very useful to setup static local IP addresses for devices on your FlashRouter network. By assigning specific IP’s to specific devices you can better control and manage how your network and the internet interacts with each device.

Once you setup a static IP you can set access restrictions, monitor and control bandwidth, as well as bypass a router VPN connection or setup a device specific Kill Switch. Without a static IP assignment you may lose device specific settings when the DHCP lease to the router expires.

Navigate to Services > Services

Set Static IP by Device MAC Address in FlashRouter DD-WRT Settings
  1. Under Static Leases click Add once.
  2. Fill in the newly appeared fields.
    • MAC Address: Enter the device’s MAC address which can be found on the device itself or on the Status > LAN page.
    • Hostame: Enter a name for the device. Make sure that there are no spaces.
    • IP Address: Enter the desired static IP Address of the device. It should be on the same subnet as the FlashRouter (192.168.11.x)
    • Client Lease Time: Leave this field blank.
  3. Click Apply Settings
  4. Repeat the steps above for each individual static IP address you would like to setup. If you click Add before clicking Apply Settings you will lose the configuration.

If a device has wireless and ethernet capabilities the MAC Addresses will be different for a wireless connection and an ethernet connection. Make sure to set a static IP for both MAC Addresses in this case.

SmartDNSProxy SmartDNS Setup

TeamFlashRouters · Jun 13, 2019 ·

SmartDNSProxy offers a SmartDNS service for unblocking geo-restricted content without the encryption of a VPN service. SmartDNS routes DNS servers to different regions which “tricks” the website to allow access to previously restricted content.

SmartDNS does not change your IP Address or provide the encryption that a VPN connection does. This can result in faster speeds and unblocked content.

SmartDNS and VPN should not be configured at the same time. When using a SmartDNS connection, make sure to disable your VPN connection on the FlashRouter.

Register your IP Address

If you are not already a SmartDNSProxy user Sign Up Now.

Click on Sign Up and fill in the requested information.

SmartDNSProxy SmartDNS Account Sign Up For DD-WRT FlashRouter

Access the e-mail you entered and Verify your new account.

SmartDNSProxy SmartDNS Activate DNS for DD-WRT FlashRouter

Your account will now be verified.

Activate SmartDNSProxy SmartDNS Service and Subscription

Login to SmartDNSProxy

SmartDNSProxy Server Location Addresses for FlashRouter DD-WRT Settings

Visit SmartDNSProxy’s DNS servers list and note the DNS servers of the location you would like to access content from.

Enter SmartDNSProxy SmartDNS servers on your FlashRouter

Navigate to Setup > Basic Setup

  1. Scroll down to Network Address Server Settings (DHCP).
  2. Enter in any combination of SmartDNSProxy SmartDNS servers you noted into Static DNS fields 1 and 2.
  3. Click Apply Settings at the bottom of the page.
  4. Reboot the FlashRouter.

Once the router is fully booted back up, you can access your desired regional content on any device that connects to the FlashRouter’s network.

Windscribe Manual OpenVPN Setup

TeamFlashRouters · Apr 25, 2019 ·

Preparing for Manual Windscribe Setup

Verify your Windscribe login information

If you are not already an Windscribe user Sign Up Now.

1. Log in to your account on the Windscribe website.

2. Click on the Download link at the top of the page.

3. Scroll down to the Config Generators section and Click on the OpenVPN link.

Windscribe Website - Generate OpenVPN Configuration Files

4. Click on Get Credentials and copy the Username and Password. This information will be used later on in the configuration.

Windscribe Website OpenVPN Specific Username and Password

Windscribe Server Addresses

United States

US East:
us-east.windscribe.com
US West:
us-west.windscribe.com
US Windflix:
wf-us.windscribe.com

Canada

Canada:
ca.windscribe.com
Canada West:
ca-west.windscribe.com

Additional Servers

Australia:
au.windscribe.com
Austria:
at.windscribe.com
Belgium:
be.windscribe.com
Brazil:
br.windscribe.com
Bulgaria:
bg.windscribe.com
Czech Republic:
cz.windscribe.com
Denmark:
dk.windscribe.com
Egypt:
eg.windscribe.com
Finland:
fi.windscribe.com
France:
fr.windscribe.com
Germany:
de.windscribe.com
Hong Kong:
hk.windscribe.com
Hungary:
hu.windscribe.com
India:
in.windscribe.com
Ireland:
ie.windscribe.com
Italy:
it.windscribe.com
Japan:
jp.windscribe.com
Latvia:
lv.windscribe.com
Luxemburg:
lu.windscribe.com
Malaysia:
my.windscribe.com
Mexico:
mx.windscribe.com
Netherlands:
nl.windscribe.com
Norway:
no.windscribe.com
Poland:
pl.windscribe.com
Romania:
ro.windscribe.com
Russia:
ru.windscribe.com
Singapore:
ch.windscribe.com
South Africa:
za.windscribe.com
South Korea:
kr.windscribe.com
Spain:
es.windscribe.com
Sweden:
se.windscribe.com
Switzerland:
ch.windscribe.com
Taiwan:
tw.windscribe.com
Turkey:
tr.windscribe.com
Ukraine:
ua.windscribe.com
United Kingdom:
uk.windscribe.com

DD-WRT Router Setup for Windscribe

Navigate to Services > VPN

Enter Windscribe settings

OpenVPN Client

Start OpenVPN Client

If you wish to disable your VPN connection simply set this to Disable at any time and click Apply Settings.

Server IP/Name

Copy and Paste the server you would like to connect to from the server list above. Be sure there are no extra spaces or characters.

If you wish to change Windscribe connection locations, THIS IS THE ONLY FIELD YOU NEED TO CHANGE.

Port

443

Tunnel Device

TUN

Tunnel Protocol

UDP

Encryption cipher

AES-256-CBC

Hash Algorithm

SHA512

User Pass Authentication

Enable

Username

Enter your OpenVPN specific Username.

Password

Enter your OpenVPN specific Password.

Advanced Options

Enable

TLS Cipher

None

LZO Compression

Adaptive

NAT

Enable

Firewall Protection

Enable

TLS Auth Key

-----BEGIN OpenVPN Static key V1-----
5801926a57ac2ce27e3dfd1dd6ef8204
2d82bd4f3f0021296f57734f6f1ea714
a6623845541c4b0c3dea0a050fe6746c
b66dfab14cda27e5ae09d7c155aa554f
399fa4a863f0e8c1af787e5c602a801d
3a2ec41e395a978d56729457fe6102d7
d9e9119aa83643210b33c678f9d4109e
3154ac9c759e490cb309b319cf708cae
83ddadc3060a7a26564d1a24411cd552
fe6620ea16b755697a4fc5e6e9d0cfc0
c5c4a1874685429046a424c026db672e
4c2c492898052ba59128d46200b40f88
0027a8b6610a4d559bdc9346d33a0a6b
08e75c7fd43192b162bfd0aef0c716b3
1584827693f676f9a5047123466f0654
eade34972586b31c6ce7e395f4b478cb
-----END OpenVPN Static key V1-----

Additional Config

tun-mtu-extra 32
mssfix 1450
persist-key
persist-tun

Policy Based Routing

This field can be used for split VPN and Dual Gateway routing.

CA Cert

-----BEGIN CERTIFICATE-----
MIIFozCCA4ugAwIBAgIBATANBgkqhkiG9w0BAQ0FADBAMQswCQYDVQQGEwJDSDEV
MBMGA1UEChMMUHJvdG9uVlBOIEFHMRowGAYDVQQDExFQcm90b25WUE4gUm9vdCBD
QTAeFw0xNzAyMTUxNDM4MDBaFw0yNzAyMTUxNDM4MDBaMEAxCzAJBgNVBAYTAkNI
MRUwEwYDVQQKEwxQcm90b25WUE4gQUcxGjAYBgNVBAMTEVByb3RvblZQTiBSb290
IENBMIICIjANBgkqhkiG9w0BAQEFAAOCAg8AMIICCgKCAgEAt+BsSsZg7+AuqTq7
vDbPzfygtl9f8fLJqO4amsyOXlI7pquL5IsEZhpWyJIIvYybqS4s1/T7BbvHPLVE
wlrq8A5DBIXcfuXrBbKoYkmpICGc2u1KYVGOZ9A+PH9z4Tr6OXFfXRnsbZToie8t
2Xjv/dZDdUDAqeW89I/mXg3k5x08m2nfGCQDm4gCanN1r5MT7ge56z0MkY3FFGCO
qRwspIEUzu1ZqGSTkG1eQiOYIrdOF5cc7n2APyvBIcfvp/W3cpTOEmEBJ7/14RnX
nHo0fcx61Inx/6ZxzKkW8BMdGGQF3tF6u2M0FjVN0lLH9S0ul1TgoOS56yEJ34hr
JSRTqHuar3t/xdCbKFZjyXFZFNsXVvgJu34CNLrHHTGJj9jiUfFnxWQYMo9UNUd4
a3PPG1HnbG7LAjlvj5JlJ5aqO5gshdnqb9uIQeR2CdzcCJgklwRGCyDT1pm7eoiv
WV19YBd81vKulLzgPavu3kRRe83yl29It2hwQ9FMs5w6ZV/X6ciTKo3etkX9nBD9
ZzJPsGQsBUy7CzO1jK4W01+u3ItmQS+1s4xtcFxdFY8o/q1zoqBlxpe5MQIWN6Qa
lryiET74gMHE/S5WrPlsq/gehxsdgc6GDUXG4dk8vn6OUMa6wb5wRO3VXGEc67IY
m4mDFTYiPvLaFOxtndlUWuCruKcCAwEAAaOBpzCBpDAMBgNVHRMEBTADAQH/MB0G
A1UdDgQWBBSDkIaYhLVZTwyLNTetNB2qV0gkVDBoBgNVHSMEYTBfgBSDkIaYhLVZ
TwyLNTetNB2qV0gkVKFEpEIwQDELMAkGA1UEBhMCQ0gxFTATBgNVBAoTDFByb3Rv
blZQTiBBRzEaMBgGA1UEAxMRUHJvdG9uVlBOIFJvb3QgQ0GCAQEwCwYDVR0PBAQD
AgEGMA0GCSqGSIb3DQEBDQUAA4ICAQCYr7LpvnfZXBCxVIVc2ea1fjxQ6vkTj0zM
htFs3qfeXpMRf+g1NAh4vv1UIwLsczilMt87SjpJ25pZPyS3O+/VlI9ceZMvtGXd
MGfXhTDp//zRoL1cbzSHee9tQlmEm1tKFxB0wfWd/inGRjZxpJCTQh8oc7CTziHZ
ufS+Jkfpc4Rasr31fl7mHhJahF1j/ka/OOWmFbiHBNjzmNWPQInJm+0ygFqij5qs
51OEvubR8yh5Mdq4TNuWhFuTxpqoJ87VKaSOx/Aefca44Etwcj4gHb7LThidw/ky
zysZiWjyrbfX/31RX7QanKiMk2RDtgZaWi/lMfsl5O+6E2lJ1vo4xv9pW8225B5X
eAeXHCfjV/vrrCFqeCprNF6a3Tn/LX6VNy3jbeC+167QagBOaoDA01XPOx7Odhsb
Gd7cJ5VkgyycZgLnT9zrChgwjx59JQosFEG1DsaAgHfpEl/N3YPJh68N7fwN41Cj
zsk39v6iZdfuet/sP7oiP5/gLmA/CIPNhdIYxaojbLjFPkftVjVPn49RqwqzJJPR
N8BOyb94yhQ7KO4F3IcLT/y/dsWitY0ZH4lCnAVV/v2YjWAWS3OWyC8BFx/Jmc3W
DK/yPwECUcPgHIeXiRjHnJt0Zcm23O2Q3RphpU+1SO3XixsXpOVOYP6rJIXW9bMZ
A1gTTlpi7A==
-----END CERTIFICATE-----

CLICK APPLY SETTINGS

Leave all settings not mentioned above as their default setting.

Verify a successful VPN connection

Navigate to Status > OpenVPN

  1. You should now see a CONNECTED SUCCESS message.
  2. Visit WhatIsMyIPAddress to verify your new IP address, virtual location, and status as Protected at the top of the page.

In some cases you may notice that the location is not showing the same location as the server you have input in your router settings; this is because geo tracking tools are often tricked by VPN connections. As long as you see an IP address that is not the same as your normal Internet IP address then you are indeed connected to Windscribe VPN.

Back up your settings

Navigate to Administration > Backup

  1. Click the Backup button.
  2. A file named nvrambak.bin will be saved to your computer.
  3. You can load nvrambak.bin to restore your settings in the event of a reset.

How to change the Windscribe server

  1. Copy and paste the server IP Address from the server list above into the Server IP/Name field.
  2. Click Apply Settings.

TROUBLESHOOTING

Still having issues? Visit the VPN Troubleshooting section.

Troubleshoot Here

StrongVPN WireGuard Setup

TeamFlashRouters · Jan 8, 2021 ·

DD-WRT Router Setup for StrongVPN WireGuard

StrongVPN Wireguard DD-WRT setup is now officially supported by FlashRouters. Follow the steps below to gather all the required information to complete your Wireguard router setup.

Navigate to Security > Firewall

Set SPI Firewall to Disable.

Wireless Client Bridge Setup on FlashRouter DD-WRT - Disable Firewall

Click Save at the bottom of the page.

Select your actual time zone for you physical location from the dropdown and enter 1.pool.ntp.org in the Server IP/Name dropdown.

WireGuard for StrongVPN DD-WRT set Time Zone

Click Apply Settings at the bottom of the page.

Preparing for StrongVPN WireGuard Setup

Obtain your StrongVPN WireGuard Information

If you are not already a StrongVPN user Sign Up Now.

1. Log in to your account on the StrongVPN website.

WireGuard for StrongVPN account login

2. Select Router icon as the Platform

Select Router for StrongVPN WireGuard Platform

3. Select the Advanced Options dropdown and then check Exclude LAN Traffic and set any value between 52000 and 60000 in the Custom Port field.

WireGuard for StrongVPN set Custom Port

4. Select the Server Location from the dropdown that you would like to connect to.

Select the StrongVPN Wireguard server location

5. Select the Generate at the bottom of the page.

6. Click the DD-WRT installer script box to copy.

DD-WRT installer script WireGuard for StrongVPN

Enter StrongVPN WireGuard Script

Navigate to Administration > Commands

Paste the StrongVPN Script that was copied in the empty Commands Shell.

WireGuard for StrongVPN install script

Delete the very last line sleep 8 && reboot.

Click Save Custom (or Save Custom Script may appear depending on your firmware build, they are the same thing)

Copy the line below and paste into the empty Commands Shell.

WireGuard for StrongVPN script 2
sh /tmp/.rc_custom

Click Run Commands.

Wait two minutes and then power the FlashRouter off and back on. Reconnect to the FlashRouter’s network when it has booted back up.

Verify a successful StrongVPN WireGuard connection

Navigate to Setup > Tunnels

  1. You should now see that page filled in with WireGuard info.
  2. Visit StrongVPN’s IP Check to verify your new IP address and virtual location.

Back up your settings

Navigate to Administration > Backup

  1. Click the Backup button.
  2. A file named nvrambak.bin will be saved to your computer.
  3. You can load nvrambak.bin to restore your settings in the event of a reset.

TROUBLESHOOTING

Still having issues? Visit the VPN Troubleshooting section.

Troubleshoot Here

VPN FAQs

admin · Jan 29, 2019 ·

VPN FAQs
General VPN FAQ Answers
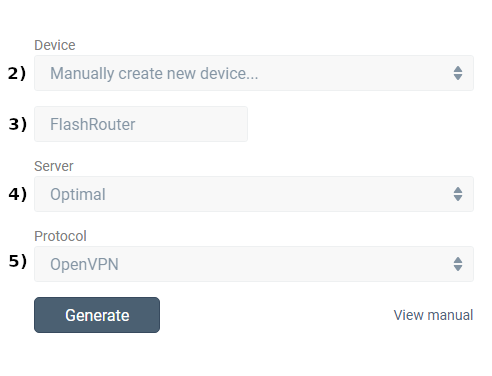
What is a VPN?
VPN is an acronym for ‘Virtual Private Network’, historically used by private organizations to seamlessly link geographically diverse locations via the Internet. A VPN ‘tunnels’ traffic between two devices by transmitting it over a secure network. There are also clearly identifiable benefits to individual Internet users accessing a VPN.

  • A VPN provides you with top-level security and privacy for all your Internet downloading, streaming and browsing. As long as you are signed into your VPN account, all data you transmit over the Internet is encrypted.
  • A VPN encrypts your device by hiding the IP address assigned by your Internet Service Provider (ISP) and replacing it with the IP address of your choosing from the list of server locations belonging to your VPN provider. This masks your identity when visiting sites that geo-restricted content, and helps you avoid devious local Internet marketing and advertising schemes that track you through your IP address.

Will a FlashRouter with a built-in VPN client speed up my connection?

FlashRouters are relatively new models that may enhance data transfers across your home network or extend the range of your Wireless signal. However, the speed at which you download or stream content can not exceed the speed of the connection you pay for through your ISP. Purchasing a FlashRouter or signing up for VPN service WILL NOT transform your regular connection into a high-speed broadband connection.

At the same time, if you do have a broadband connection, a FlashRouter with a VPN connection may slow down your transfer speeds due to the processor encrypting all of your data. In certain cases a FlashRouter with a VPN can also prevent throttling by an ISP of specific service like Netflix or Amazon Video.

Which VPN provider should I use?

Our routers have been tested to perform with many of the most popular VPN providers such as ExpressVPN, NordVPN, IPVanish, PrivateInternetAccess & CyberGhost among 50+ VPN providers so that subscribers can get the maximum benefit from their VPN service. If you prefer another provider, that is not an issue at all. You can still use a DD-WRT VPN FlashRouter with any VPN provider that offers DD-WRT router integration support. Contact our team for further information about using our routers with your VPN service of choice or if you need a VPN provider recommendation based on your location.

Should my FlashRouter replace my old router?

A FlashRouter will work as a standalone router by connecting your modem to its Wide Area Network (WAN) port, or using it in a Dual Router Network by connecting it to your existing router through a Local Area Network (LAN)/Ethernet port. Either way a FlashRouter can be configured to tunnel all traffic through the VPN server of your choosing.

If you would like to set up your Home Network so that some devices are being tunneled through a VPN server, and others are connecting to your Internet Service Provider (ISP) within your home country, then using your FlashRouter as an auxiliary device is recommended.

VPN Security FAQ Answers

Can I change my IP address to one in another country?

YES! The countries that you can change your IP address to depend on the offerings of your specific VPN providers. Prices and server locations vary across all VPN providers.

If you choose to purchase a FlashRouter then you will not have to install any VPN client software on your computer to change your IP address; the VPN will already be configured within the router. Therefore, any device you plug into this FlashRouter is automatically assigned the IP address of your selected VPN server.

When is my connection secure?

As long as the VPN account preset into your FlashRouter is active, any device that is connected to the Internet through this router has its network traffic encrypted, and IP address masked. With a FlashRouter you never have to physically login to your VPN account, as the settings have been stored in the router’s DD-WRT firmware.

Don’t worry though! If you are not at home, and using Wi-Fi in a public location, you can still use your VPN account on a laptop or mobile device through various other methods.

How can I be sure my connection is safe and encrypted?

In order to make sure that the connection on your FlashRouter is being rerouted appropriately through your VPN service, visit What is my IP address and make sure the location listed is the one you have chosen in your VPN settings, NOT your actual location.

If you wish, there is an Internet Kill Switch available as well for your router which will block the internet whenever you disconnect from VPN.

What VPN connection standards are supported on a FlashRouter?

Currently we support the OpenVPN protocol for VPN client connections. PPTP VPN has been deemed as insecure by the privacy community and so we no longer offer support for PPTP VPN connections.

Technical VPN FAQ Answers

What operating systems do you support?

A FlashRouter can be used with any operating system, be it Windows, Mac OS or Linux. A FlashRouter can also be used as a wireless access point for iPhones, iPads, and Android devices.

Our routers also work in conjunction with any other brand of router of ADSL or DSL modem/router combo from ISPs across the world.

Can I set up a VPN on a PS4, Xbox One, Kindle Fire, Roku, AppleTV or other devices without native VPN support?

THAT’S WHAT WE ARE HERE FOR!

If you purchase one of our FlashRouters loaded with DD-WRT firmware, you can run the client VPN connection from your router. Once you do this every device connected to the router will tunnel through the VPN.

Now you can stream content like Netflix, BBC iPlayer, Pandora Hulu, or Amazon Instant to your TV through any of these devices, instead of being constrained to streaming content on your computer!

If you need a recommendation for a VPN service with a specific streaming platform do not hesitate to contact our support team.

ExpressVPN Setup for AsusWRT Firmware Routers

TeamFlashRouters · Apr 29, 2024 ·

You can connect to ExpressVPN on your AsusWRT router using OpenVPN.

Quick Options

  • OpenVPN: Download your preferred server .ovpn configuration file from the ExpressVPN website.

:point_right: If you are not already a ExpressVPN user Sign Up Now.

EXPRESSVPN SETUP GUIDE FOR ASUSWRT

1. Log in to your account on the ExpressVPN website.

2. In the “Set up your devices” section, click More and select Manual Configuration from the menu options.

3. Copy the Username and Password that are displayed on the right

ExpressVPN Manual Service Credentials

4. Download a server file from any of the available regions shown in the ExpressVPN Manual Configuration section (Americas, Europe, Asia Pacific, etc)

ExpressVPN Download .ovpn file

5. Log in to the Asus settings page by connecting to the Asus router’s WiFi (or wired LAN) on your computer. Then, enter 192.168.50.1 or asusrouter.com in the browser.

View our guide for more instructions on how to access AsusWRT firmware settings.

6. Navigate to the VPN tab and then click on the VPN Fusion tab, then click Add Profile

Click the VPN Button
VPN Fusion Add Profile

7.  Fill in your NordVPN information then click Apply and Enable.

  • Connection Name: Choose a name for your ExpressVPN OpenVPN connection.
  • VPN Type: Select OpenVPN
  • Import .ovpn File: Upload the OpenVPN file that you downloaded.
  • Username and Password: Copy and paste your ExpressVPN manual service credentials from step 3.

8. You should now see the Profile say Connected, indicating that the NordVPN server is successfully connected to your router.

Asus ExpressVPN Connected

9. The VPN connection is automatically set to Apply to all devices.

If you only want certain devices to connect to the VPN, then turn off the VPN connection and switch off Apply to all devices.

Now click the pencil next to the Device section and select the devices (computer, phone, etc.) that you want to connect to VPN. Click OK and then click Apply all settings.

Apply VPN by Device
  1. Connect your devices to the Asus router network and visit the ExpressVPN website, at the top it should display Your Status: Protected.
  2. Visit ExpressVPN’s IP Check to verify your new IP address and virtual location.

🚫📱Do not run ExpressVPN apps on devices connected to your ExpressVPNrouter. Using the app at the same time as the router VPN may cause conflicts and connection issues.

TROUBLESHOOTING

Still having issues? Visit the VPN Troubleshooting section.

Troubleshoot Here
« Previous Page
Next Page »

Primary Sidebar

  • Troubleshooting
  • Router Access
  • Internet Connection Issues
  • WiFi Connectivity
  • General VPN Issues
  • TeamViewer Remote Support
  • DD-WRT Firmware
  • Facebook
  • Twitter
  • Instagram
  • Pinterest
  • YouTube

Footer