Quick Start Guide for Cudy FlashRouters
Find setup guides, FAQs and troubleshooting tips for Cudy configured FlashRouters.
Prioritizing Privacy
If you are not already an IPVanish user Sign Up Now.
Log in to your account on the IPVanish website.
View a full list of IPVanish servers.
Ashburn:
iad-a01.ipvanish.com
through
iad-a78.ipvanish.com
Atlanta:
atl-a01.ipvanish.com
through
atl-a88.ipvanish.com
Boston:
bos-c01.ipvanish.com
through
bos-c27.ipvanish.com
Chicago:
chi-a01.ipvanish.com
through
chi-a58.ivpanish.com
Cleveland:
cle-c01.ipvanish.com
through
cle-c20.ipvanish.com
Dallas:
dal-a01.ipvanish.com
through
dal-a79.ipvanish.com
Denver:
den-c01.ipvanish.com
through
den-c13.ipvanish.com
Jackson:
jan-c01.ipvanish.com
through
jan-c15.ipvanish.com
Las Vegas:
las-c11.ipvanish.com
through
las-c20.ipvanish.com
Los Angeles:
lax-a01.ipvanish.com
through
lax-a60.ipvanish.com
Miami:
mia-a01.ipvanish.com
through
mia-a34.ipvanish.com
Milwaukee:
mke-c01.ipvanish.com
through
mke-c19.ipvanish.com
New York:
nyc-a01.ipvanish.com
through
nyc-a51.ipvanish.com
Phoenix:
phx-a01.ipvanish.com
through
phx-a24.ipvanish.com
Salt Lake City:
slc-c01.ipvanish.com
through
slc-c12.ipvanish.com
San Jose:
sjc-a01.ipvanish.com
through
sjc-a27.ipvanish.com
Seattle:
sea-a01-ipvanish.com
through
sea-a41.ipvanish.com
St. Louis:
stl-c01.ipvanish.com
through
stl-c18.ipvanish.com
London:
lon-a01.ipvanish.com
through
lon-a69.ipvanish.com
lon-c01.ipvanish.com
through
lon-c58.ipvanish.com
Manchester:
man-c01.ipvanish.com
through
man-c09.ipvanish.com
Navigate to Services > VPN
Start OpenVPN Client
If you wish to disable your VPN connection simply set this to Disable at any time and click Apply Settings.
Server IP/Name
Copy and paste the server you would like to connect to from the server list above. Be sure there are no extra spaces or characters.
If you wish to change IPVanish connection locations, THIS IS THE ONLY FIELD YOU NEED TO CHANGE.
Port
443
Tunnel Device
TUN
Tunnel Protocol
UDP
Encryption cipher
AES-256-CBC
Hash Algorithm
SHA256
User Pass Authentication
Enable
Username
Enter the Username you successfully logged in to your IPVanish account with.
Password
Enter the Password you successfully logged in to your IPVanish account with.
Advanced Options
Enable
TLS Cipher
None
LZO Compression
Adaptive
NAT
Enable
Firewall Protection
Enable
Additional Config
persist-key
persist-tun
persist-remote-ip
keysize 256
Policy Based Routing
This field can be used for split VPN and Dual Gateway routing.
CA Cert
-----BEGIN CERTIFICATE-----
MIIErTCCA5WgAwIBAgIJAMYKzSS8uPKDMA0GCSqGSIb3DQEBDQUAMIGVMQswCQYD
VQQGEwJVUzELMAkGA1UECBMCRkwxFDASBgNVBAcTC1dpbnRlciBQYXJrMREwDwYD
VQQKEwhJUFZhbmlzaDEVMBMGA1UECxMMSVBWYW5pc2ggVlBOMRQwEgYDVQQDEwtJ
UFZhbmlzaCBDQTEjMCEGCSqGSIb3DQEJARYUc3VwcG9ydEBpcHZhbmlzaC5jb20w
HhcNMTIwMTExMTkzMjIwWhcNMjgxMTAyMTkzMjIwWjCBlTELMAkGA1UEBhMCVVMx
CzAJBgNVBAgTAkZMMRQwEgYDVQQHEwtXaW50ZXIgUGFyazERMA8GA1UEChMISVBW
YW5pc2gxFTATBgNVBAsTDElQVmFuaXNoIFZQTjEUMBIGA1UEAxMLSVBWYW5pc2gg
Q0ExIzAhBgkqhkiG9w0BCQEWFHN1cHBvcnRAaXB2YW5pc2guY29tMIIBIjANBgkq
hkiG9w0BAQEFAAOCAQ8AMIIBCgKCAQEAt9DBWNr/IKOuY3TmDP5x7vYZR0DGxLbX
U8TyAzBbjUtFFMbhxlHiXVQrZHmgzih94x7BgXM7tWpmMKYVb+gNaqMdWE680Qm3
nOwmhy/dulXDkEHAwD05i/iTx4ZaUdtV2vsKBxRg1vdC4AEiwD7bqV4HOi13xcG9
71aQ55Mj1KeCdA0aNvpat1LWx2jjWxsfI8s2Lv5Fkoi1HO1+vTnnaEsJZrBgAkLX
pItqP29Lik3/OBIvkBIxlKrhiVPixE5qNiD+eSPirsmROvsyIonoJtuY4Dw5K6pc
NlKyYiwo1IOFYU3YxffwFJk+bSW4WVBhsdf5dGxq/uOHmuz5gdwxCwIDAQABo4H9
MIH6MAwGA1UdEwQFMAMBAf8wHQYDVR0OBBYEFEv9FCWJHefBcIPX9p8RHCVOGe6u
MIHKBgNVHSMEgcIwgb+AFEv9FCWJHefBcIPX9p8RHCVOGe6uoYGbpIGYMIGVMQsw
CQYDVQQGEwJVUzELMAkGA1UECBMCRkwxFDASBgNVBAcTC1dpbnRlciBQYXJrMREw
DwYDVQQKEwhJUFZhbmlzaDEVMBMGA1UECxMMSVBWYW5pc2ggVlBOMRQwEgYDVQQD
EwtJUFZhbmlzaCBDQTEjMCEGCSqGSIb3DQEJARYUc3VwcG9ydEBpcHZhbmlzaC5j
b22CCQDGCs0kvLjygzANBgkqhkiG9w0BAQ0FAAOCAQEAI2dkh/43ksV2fdYpVGhY
aFZPVqCJoToCez0IvOmLeLGzow+EOSrY508oyjYeNP4VJEjApqo0NrMbKl8g/8bp
LBcotOCF1c1HZ+y9v7648uumh01SMjsbBeHOuQcLb+7gX6c0pEmxWv8qj5JiW3/1
L1bktnjW5Yp5oFkFSMXjOnIoYKHyKLjN2jtwH6XowUNYpg4qVtKU0CXPdOznWcd9
/zSfa393HwJPeeVLbKYaFMC4IEbIUmKYtWyoJ9pJ58smU3pWsHZUg9Zc0LZZNjkN
lBdQSLmUHAJ33Bd7pJS0JQeiWviC+4UTmzEWRKa7pDGnYRYNu2cUo0/voStphv8E
VA==
-----END CERTIFICATE-----
CLICK APPLY SETTINGS
Leave all settings not mentioned above as their default setting.
Navigate to Status > OpenVPN
In some cases you may notice that the location is not showing the same location as the server you have input in your router settings; this is because geo tracking tools are often tricked by VPN connections. As long as you see an IP address that is not the same as your normal Internet IP address then you are indeed connected to IPVanish.
Navigate to Administration > Backup.
If you are not already an ExpressVPN user Sign Up Now.
1. Log in to your account on the ExpressVPN website.

2. Successfully log in with your account information. Select More.

3. Select Manual Configuration and copy the Username and Password that are displayed on the right hand side of the screen.


4. Click the Server Location that you want to connect to. This will download a .ovpn file to your computer that we will use later on. There is no need to open the file. For this example I have selected New York but feel free to select any server listed there.
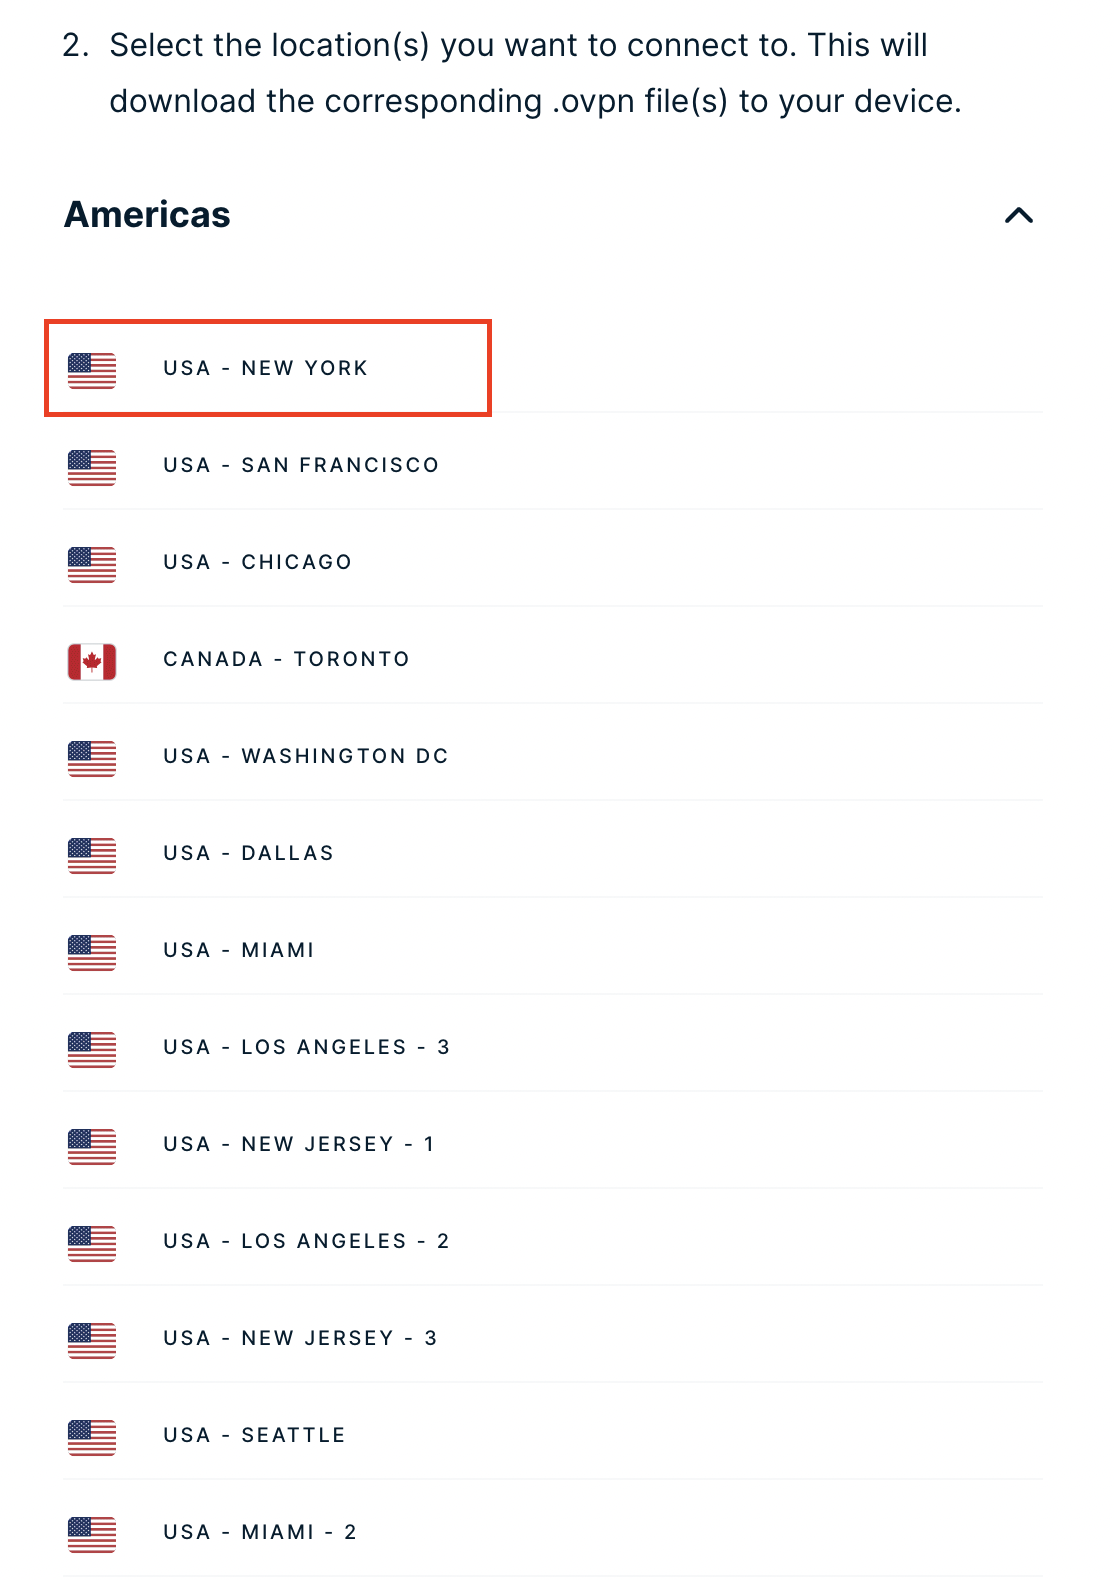
Login to TP-Link firmware settings in a browser on any computer or smart device connected to the FlashRouter’s network.
1. Navigate to the Advanced tab.

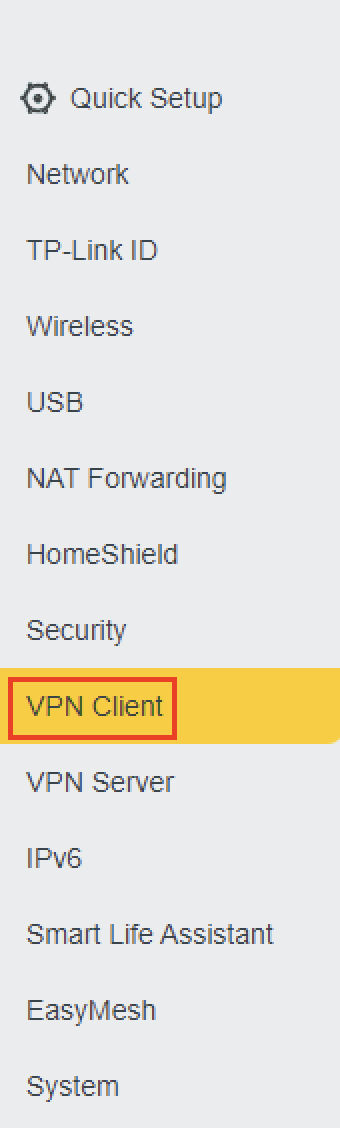
2. Navigate to the VPN Client tab.
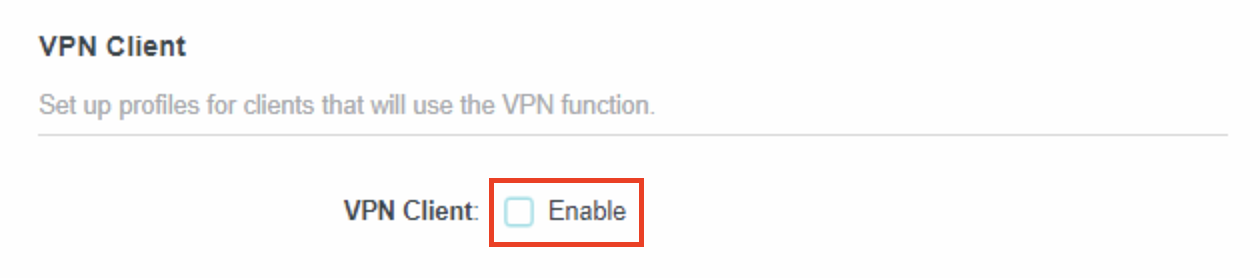
3. Check the Enable box next to VPN Client. Then click Save at the bottom of the page.
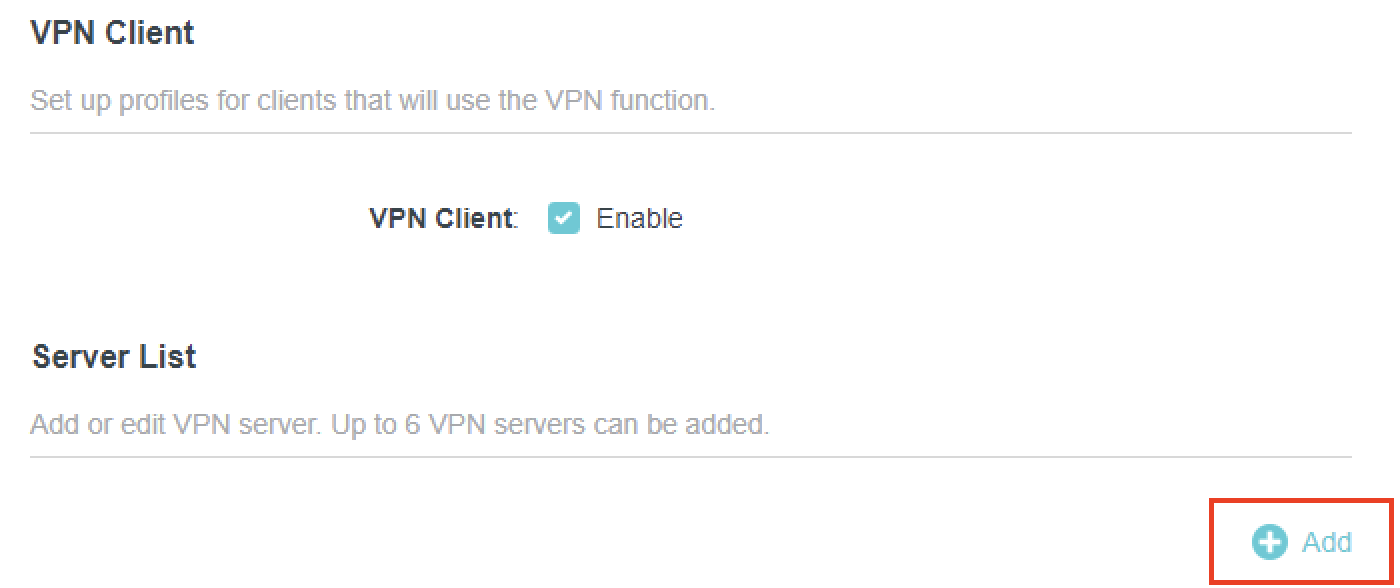
4. Click the Add button in the Server List area.
5. In the Description field enter in the name you’d like to use for this OpenVPN Client profile. We typically advise entering in the location or server number here. Our example server was in New York so I have entered in ExpressVPN New York.
Set the VPN Type to OpenVPN.
In the Username and Password fields paste in the ExpressVPN username and password we obtained earlier.
Click Browse and select the .ovpn file you downloaded earlier. Then click Save.

By default no devices will be assigned to the VPN Tunnel. With TP-Link firmware you must manually assign the devices that you want connected to the VPN tunnel. Proceed with the next steps to do so for all devices you want connected to VPN.
6. Click the Add button in the Device List area.

7. A list of devices connected to the FlashRouter’s network will appear. Check the devices that you want to connect to VPN. Then click OK.
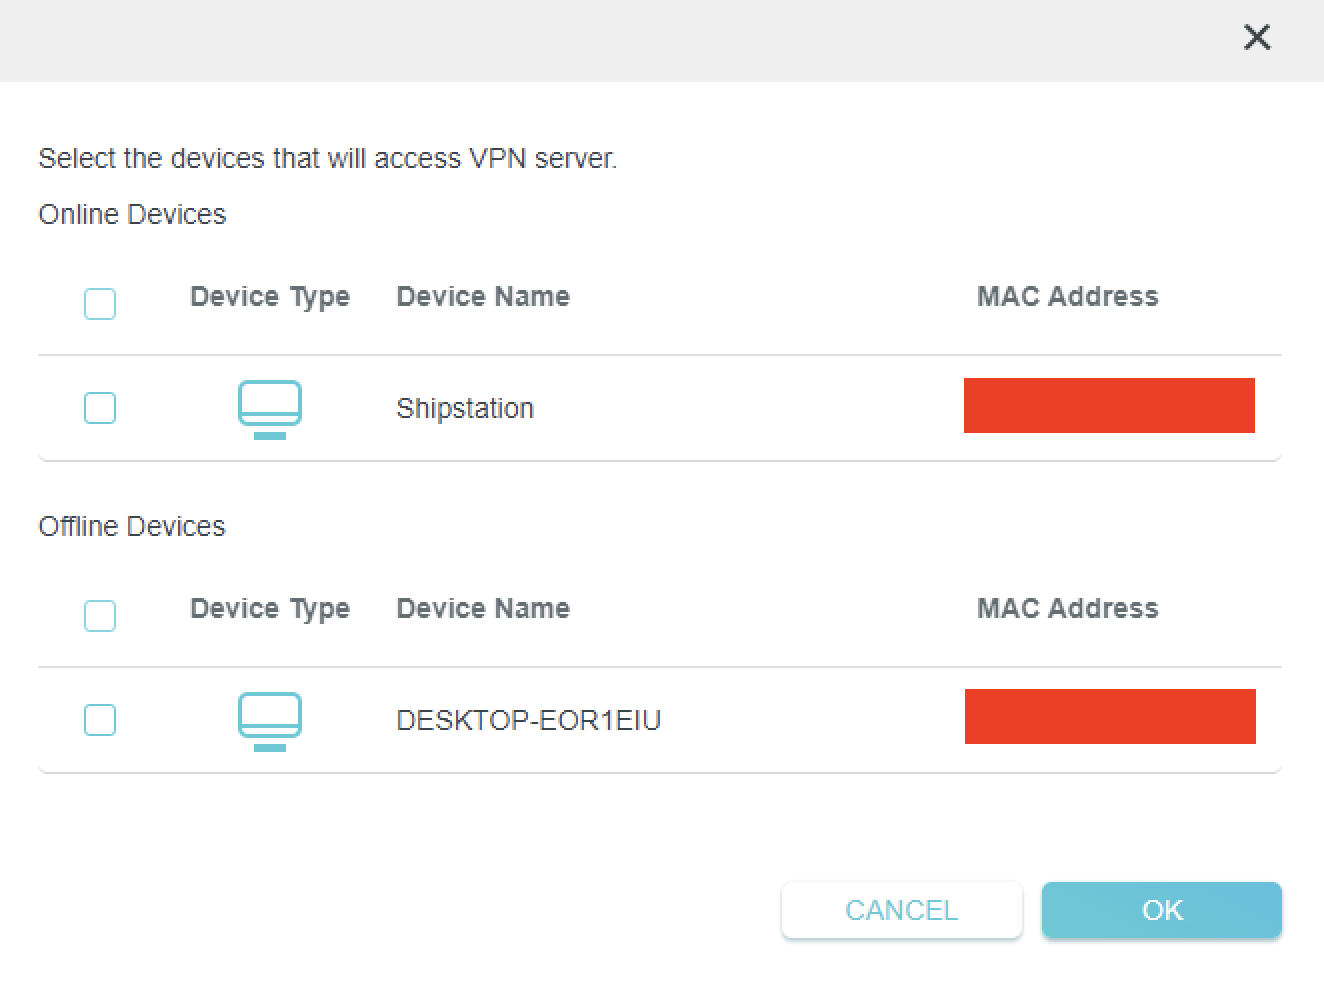
8. Now that the devices have been assigned to the VPN connection click the Enable toggle in the Server List area.

In some cases you may notice that the location is not showing the same location as the server you have input in your router settings; this is because geo tracking tools are often tricked by VPN connections. As long as you see an IP address that is not the same as your normal Internet IP address then you are indeed connected to ExpressVPN.
If you are not already a PIA user Sign Up Now.
Log in to your account on the PIA website.

The below servers are the only servers compatible with PIA router connections. Dedicated IP Addresses are not able to connect via routers.
us-california.privacy.network
us-newjersey.privacy.network
us-chicago.privacy.network
us-texas.privacy.network
us-florida.privacy.network
us-seattle.privacy.network
us3.privacy.network
us-siliconvalley.privacy.network
us-newyorkcity.privacy.network
us-washingtondc.privacy.network
us-atlanta.privacy.network
us-houston.privacy.network
us-denver.privacy.network
uk-london.privacy.network
uk-manchester.privacy.network
ca-toronto.privacy.network
ca-montreal.privacy.network
au-sydney.privacy.network
aus-melbourne.privacy.network
aus-perth.privacy.network
de-berlin.privacy.network
de-frankfurt.privacy.network
ae.privacy.network
austria.privacy.network
dz.privacy.network
ad.privacy.network
ar.privacy.network
yerevan.privacy.network
bahamas.privacy.network
bangladesh.privacy.network
brussels.privacy.network
sofia.privacy.network
cambodia.privacy.network
china.privacy.network
cyprus.privacy.network
czech.privacy.network
denmark.privacy.network
egypt.privacy.network
fi.privacy.network
france.privacy.network
georgia.privacy.network
greenland.privacy.network
hungary.privacy.network
is.privacy.network
in.privacy.network
iran.privacy.network
ireland.privacy.network
man.privacy.network
israel.privacy.network
italy.privacy.network
japan.privacy.network
kazakhstan.privacy.network
liechtenstein.privacy.network
lu.privacy.network
macau.privacy.network
malta.privacy.network
mexico.privacy.network
md.privacy.network
monaco.privacy.network
mongolia.privacy.network
montenegro.privacy.network
morocco.privacy.network
nl-amsterdam.privacy.network
nz.privacy.network
nigeria.privacy.network
no.privacy.network
panama.privacy.network
philippines.privacy.network
poland.privacy.network
qatar.privacy.network
ro.privacy.network
rs.privacy.network
saudiarabia.privacy.network
spain.privacy.network
srilanka.privacy.network
sweden.privacy.network
swiss.privacy.network
sg.privacy.network
tr.privacy.network
taiwan.privacy.network
ua.privacy.network
venezuela.privacy.network
vietnam.privacy.network
za.privacy.network
Navigate to Services > VPN
PIA offers two different Encryption levels.
Default Encryption (AES-128) typically provides faster speeds.
Strong Encryption (AES-256) provides stronger encryption.
Follow the table below of the one that fits your needs.
Start OpenVPN Client
If you wish to disable your VPN connection simply set this to Disable at any time and click Apply Settings.
Server IP/Name
Copy and paste the server you would like to connect to from the server list above. Be sure there are no extra spaces or characters.
If you wish to change PIA connection locations, THIS IS THE ONLY FIELD YOU NEED TO CHANGE.
Port
1198
Tunnel Device
TUN
Tunnel Protocol
UDP
Encryption cipher
AES-128-CBC
Hash Algorithm
SHA1
First Data Cipher
Not set
Second Data Cipher
Not set
Third Data Cipher
Not set
Userpass Authentication
Enable
Username
Enter the Username you successfully logged in to your PIA account with.
Password
Enter the Password you successfully logged in to your PIA account with.
Advanced Options
Enable
TLS Cipher
None
LZO Compression
Disabled
NAT
Enable
Firewall Protection
Enable
Additional Config
persist-key
persist-tun
Policy Based Routing
This field can be used for split VPN and Dual Gateway routing.
CA Cert
-----BEGIN CERTIFICATE-----
MIIFqzCCBJOgAwIBAgIJAKZ7D5Yv87qDMA0GCSqGSIb3DQEBDQUAMIHoMQswCQYD
VQQGEwJVUzELMAkGA1UECBMCQ0ExEzARBgNVBAcTCkxvc0FuZ2VsZXMxIDAeBgNV
BAoTF1ByaXZhdGUgSW50ZXJuZXQgQWNjZXNzMSAwHgYDVQQLExdQcml2YXRlIElu
dGVybmV0IEFjY2VzczEgMB4GA1UEAxMXUHJpdmF0ZSBJbnRlcm5ldCBBY2Nlc3Mx
IDAeBgNVBCkTF1ByaXZhdGUgSW50ZXJuZXQgQWNjZXNzMS8wLQYJKoZIhvcNAQkB
FiBzZWN1cmVAcHJpdmF0ZWludGVybmV0YWNjZXNzLmNvbTAeFw0xNDA0MTcxNzM1
MThaFw0zNDA0MTIxNzM1MThaMIHoMQswCQYDVQQGEwJVUzELMAkGA1UECBMCQ0Ex
EzARBgNVBAcTCkxvc0FuZ2VsZXMxIDAeBgNVBAoTF1ByaXZhdGUgSW50ZXJuZXQg
QWNjZXNzMSAwHgYDVQQLExdQcml2YXRlIEludGVybmV0IEFjY2VzczEgMB4GA1UE
AxMXUHJpdmF0ZSBJbnRlcm5ldCBBY2Nlc3MxIDAeBgNVBCkTF1ByaXZhdGUgSW50
ZXJuZXQgQWNjZXNzMS8wLQYJKoZIhvcNAQkBFiBzZWN1cmVAcHJpdmF0ZWludGVy
bmV0YWNjZXNzLmNvbTCCASIwDQYJKoZIhvcNAQEBBQADggEPADCCAQoCggEBAPXD
L1L9tX6DGf36liA7UBTy5I869z0UVo3lImfOs/GSiFKPtInlesP65577nd7UNzzX
lH/P/CnFPdBWlLp5ze3HRBCc/Avgr5CdMRkEsySL5GHBZsx6w2cayQ2EcRhVTwWp
cdldeNO+pPr9rIgPrtXqT4SWViTQRBeGM8CDxAyTopTsobjSiYZCF9Ta1gunl0G/
8Vfp+SXfYCC+ZzWvP+L1pFhPRqzQQ8k+wMZIovObK1s+nlwPaLyayzw9a8sUnvWB
/5rGPdIYnQWPgoNlLN9HpSmsAcw2z8DXI9pIxbr74cb3/HSfuYGOLkRqrOk6h4RC
OfuWoTrZup1uEOn+fw8CAwEAAaOCAVQwggFQMB0GA1UdDgQWBBQv63nQ/pJAt5tL
y8VJcbHe22ZOsjCCAR8GA1UdIwSCARYwggESgBQv63nQ/pJAt5tLy8VJcbHe22ZO
sqGB7qSB6zCB6DELMAkGA1UEBhMCVVMxCzAJBgNVBAgTAkNBMRMwEQYDVQQHEwpM
b3NBbmdlbGVzMSAwHgYDVQQKExdQcml2YXRlIEludGVybmV0IEFjY2VzczEgMB4G
A1UECxMXUHJpdmF0ZSBJbnRlcm5ldCBBY2Nlc3MxIDAeBgNVBAMTF1ByaXZhdGUg
SW50ZXJuZXQgQWNjZXNzMSAwHgYDVQQpExdQcml2YXRlIEludGVybmV0IEFjY2Vz
czEvMC0GCSqGSIb3DQEJARYgc2VjdXJlQHByaXZhdGVpbnRlcm5ldGFjY2Vzcy5j
b22CCQCmew+WL/O6gzAMBgNVHRMEBTADAQH/MA0GCSqGSIb3DQEBDQUAA4IBAQAn
a5PgrtxfwTumD4+3/SYvwoD66cB8IcK//h1mCzAduU8KgUXocLx7QgJWo9lnZ8xU
ryXvWab2usg4fqk7FPi00bED4f4qVQFVfGfPZIH9QQ7/48bPM9RyfzImZWUCenK3
7pdw4Bvgoys2rHLHbGen7f28knT2j/cbMxd78tQc20TIObGjo8+ISTRclSTRBtyC
GohseKYpTS9himFERpUgNtefvYHbn70mIOzfOJFTVqfrptf9jXa9N8Mpy3ayfodz
1wiqdteqFXkTYoSDctgKMiZ6GdocK9nMroQipIQtpnwd4yBDWIyC6Bvlkrq5TQUt
YDQ8z9v+DMO6iwyIDRiU
-----END CERTIFICATE-----
CLICK APPLY SETTINGS
Leave all settings not mentioned above as their default setting.
Start OpenVPN Client
If you wish to disable your VPN connection simply set this to Disable at any time and click Apply Settings.
Server IP/Name
Copy and paste the server you would like to connect to from the server list above. Be sure there are no extra spaces or characters.
If you wish to change PIA connection locations, THIS IS THE ONLY FIELD YOU NEED TO CHANGE.
Port
1197
Tunnel Device
TUN
Tunnel Protocol
UDP
Encryption cipher
AES-256-CBC
Hash Algorithm
SHA256
First Data Cipher
Not set
Second Data Cipher
Not set
Third Data Cipher
Not set
Userpass Authentication
Enable
Username
Enter the Username you successfully logged in to your PIA account with.
Password
Enter the Password you successfully logged in to your PIA account with.
Advanced Options
Enable
TLS Cipher
None
LZO Compression
Adaptive
NAT
Enable
Firewall Protection
Enable
Additional Config
persist-key
persist-tun
Policy Based Routing
This field can be used for split VPN and Dual Gateway routing.
CA Cert
-----BEGIN CERTIFICATE-----
MIIHqzCCBZOgAwIBAgIJAJ0u+vODZJntMA0GCSqGSIb3DQEBDQUAMIHoMQswCQYD
VQQGEwJVUzELMAkGA1UECBMCQ0ExEzARBgNVBAcTCkxvc0FuZ2VsZXMxIDAeBgNV
BAoTF1ByaXZhdGUgSW50ZXJuZXQgQWNjZXNzMSAwHgYDVQQLExdQcml2YXRlIElu
dGVybmV0IEFjY2VzczEgMB4GA1UEAxMXUHJpdmF0ZSBJbnRlcm5ldCBBY2Nlc3Mx
IDAeBgNVBCkTF1ByaXZhdGUgSW50ZXJuZXQgQWNjZXNzMS8wLQYJKoZIhvcNAQkB
FiBzZWN1cmVAcHJpdmF0ZWludGVybmV0YWNjZXNzLmNvbTAeFw0xNDA0MTcxNzQw
MzNaFw0zNDA0MTIxNzQwMzNaMIHoMQswCQYDVQQGEwJVUzELMAkGA1UECBMCQ0Ex
EzARBgNVBAcTCkxvc0FuZ2VsZXMxIDAeBgNVBAoTF1ByaXZhdGUgSW50ZXJuZXQg
QWNjZXNzMSAwHgYDVQQLExdQcml2YXRlIEludGVybmV0IEFjY2VzczEgMB4GA1UE
AxMXUHJpdmF0ZSBJbnRlcm5ldCBBY2Nlc3MxIDAeBgNVBCkTF1ByaXZhdGUgSW50
ZXJuZXQgQWNjZXNzMS8wLQYJKoZIhvcNAQkBFiBzZWN1cmVAcHJpdmF0ZWludGVy
bmV0YWNjZXNzLmNvbTCCAiIwDQYJKoZIhvcNAQEBBQADggIPADCCAgoCggIBALVk
hjumaqBbL8aSgj6xbX1QPTfTd1qHsAZd2B97m8Vw31c/2yQgZNf5qZY0+jOIHULN
De4R9TIvyBEbvnAg/OkPw8n/+ScgYOeH876VUXzjLDBnDb8DLr/+w9oVsuDeFJ9K
V2UFM1OYX0SnkHnrYAN2QLF98ESK4NCSU01h5zkcgmQ+qKSfA9Ny0/UpsKPBFqsQ
25NvjDWFhCpeqCHKUJ4Be27CDbSl7lAkBuHMPHJs8f8xPgAbHRXZOxVCpayZ2SND
fCwsnGWpWFoMGvdMbygngCn6jA/W1VSFOlRlfLuuGe7QFfDwA0jaLCxuWt/BgZyl
p7tAzYKR8lnWmtUCPm4+BtjyVDYtDCiGBD9Z4P13RFWvJHw5aapx/5W/CuvVyI7p
Kwvc2IT+KPxCUhH1XI8ca5RN3C9NoPJJf6qpg4g0rJH3aaWkoMRrYvQ+5PXXYUzj
tRHImghRGd/ydERYoAZXuGSbPkm9Y/p2X8unLcW+F0xpJD98+ZI+tzSsI99Zs5wi
jSUGYr9/j18KHFTMQ8n+1jauc5bCCegN27dPeKXNSZ5riXFL2XX6BkY68y58UaNz
meGMiUL9BOV1iV+PMb7B7PYs7oFLjAhh0EdyvfHkrh/ZV9BEhtFa7yXp8XR0J6vz
1YV9R6DYJmLjOEbhU8N0gc3tZm4Qz39lIIG6w3FDAgMBAAGjggFUMIIBUDAdBgNV
HQ4EFgQUrsRtyWJftjpdRM0+925Y6Cl08SUwggEfBgNVHSMEggEWMIIBEoAUrsRt
yWJftjpdRM0+925Y6Cl08SWhge6kgeswgegxCzAJBgNVBAYTAlVTMQswCQYDVQQI
EwJDQTETMBEGA1UEBxMKTG9zQW5nZWxlczEgMB4GA1UEChMXUHJpdmF0ZSBJbnRl
cm5ldCBBY2Nlc3MxIDAeBgNVBAsTF1ByaXZhdGUgSW50ZXJuZXQgQWNjZXNzMSAw
HgYDVQQDExdQcml2YXRlIEludGVybmV0IEFjY2VzczEgMB4GA1UEKRMXUHJpdmF0
ZSBJbnRlcm5ldCBBY2Nlc3MxLzAtBgkqhkiG9w0BCQEWIHNlY3VyZUBwcml2YXRl
aW50ZXJuZXRhY2Nlc3MuY29tggkAnS7684Nkme0wDAYDVR0TBAUwAwEB/zANBgkq
hkiG9w0BAQ0FAAOCAgEAJsfhsPk3r8kLXLxY+v+vHzbr4ufNtqnL9/1Uuf8NrsCt
pXAoyZ0YqfbkWx3NHTZ7OE9ZRhdMP/RqHQE1p4N4Sa1nZKhTKasV6KhHDqSCt/dv
Em89xWm2MVA7nyzQxVlHa9AkcBaemcXEiyT19XdpiXOP4Vhs+J1R5m8zQOxZlV1G
tF9vsXmJqWZpOVPmZ8f35BCsYPvv4yMewnrtAC8PFEK/bOPeYcKN50bol22QYaZu
LfpkHfNiFTnfMh8sl/ablPyNY7DUNiP5DRcMdIwmfGQxR5WEQoHL3yPJ42LkB5zs
6jIm26DGNXfwura/mi105+ENH1CaROtRYwkiHb08U6qLXXJz80mWJkT90nr8Asj3
5xN2cUppg74nG3YVav/38P48T56hG1NHbYF5uOCske19F6wi9maUoto/3vEr0rnX
JUp2KODmKdvBI7co245lHBABWikk8VfejQSlCtDBXn644ZMtAdoxKNfR2WTFVEwJ
iyd1Fzx0yujuiXDROLhISLQDRjVVAvawrAtLZWYK31bY7KlezPlQnl/D9Asxe85l
8jO5+0LdJ6VyOs/Hd4w52alDW/MFySDZSfQHMTIc30hLBJ8OnCEIvluVQQ2UQvoW
+no177N9L2Y+M9TcTA62ZyMXShHQGeh20rb4kK8f+iFX8NxtdHVSkxMEFSfDDyQ=
-----END CERTIFICATE-----
CLICK APPLY SETTINGS
Leave all settings not mentioned above as their default setting.
Navigate to Status > OpenVPN
In some cases you may notice that the location is not showing the same location as the server you have input in your router settings; this is because geo tracking tools are often tricked by VPN connections. As long as you see an IP address that is not the same as your normal Internet IP address then you are indeed connected to PIA.
Navigate to Administration > Backup
If you are not already a Surfshark user Sign Up Now.
1. Log in to your account on the Surfshark website.

2. Click VPN Manual Setup.

3. Select Router as the Setup Method.
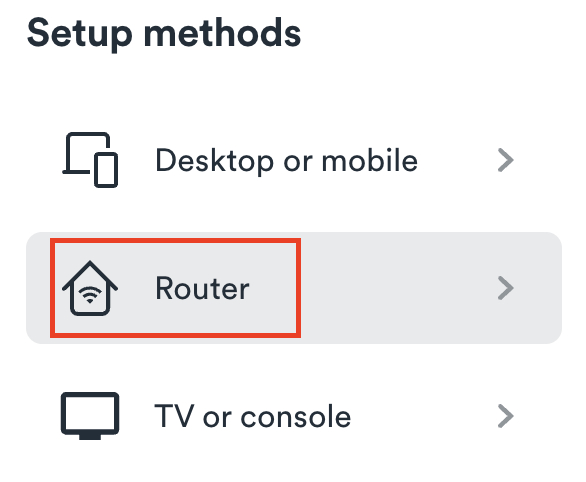
4. Select WireGuard as the Protocol.

5. Select I don’t have a key pair.

6. Enter FlashRouter as the name of the connection and click Next.

7. Click Generate a new key pair.

8. Click Choose a location.
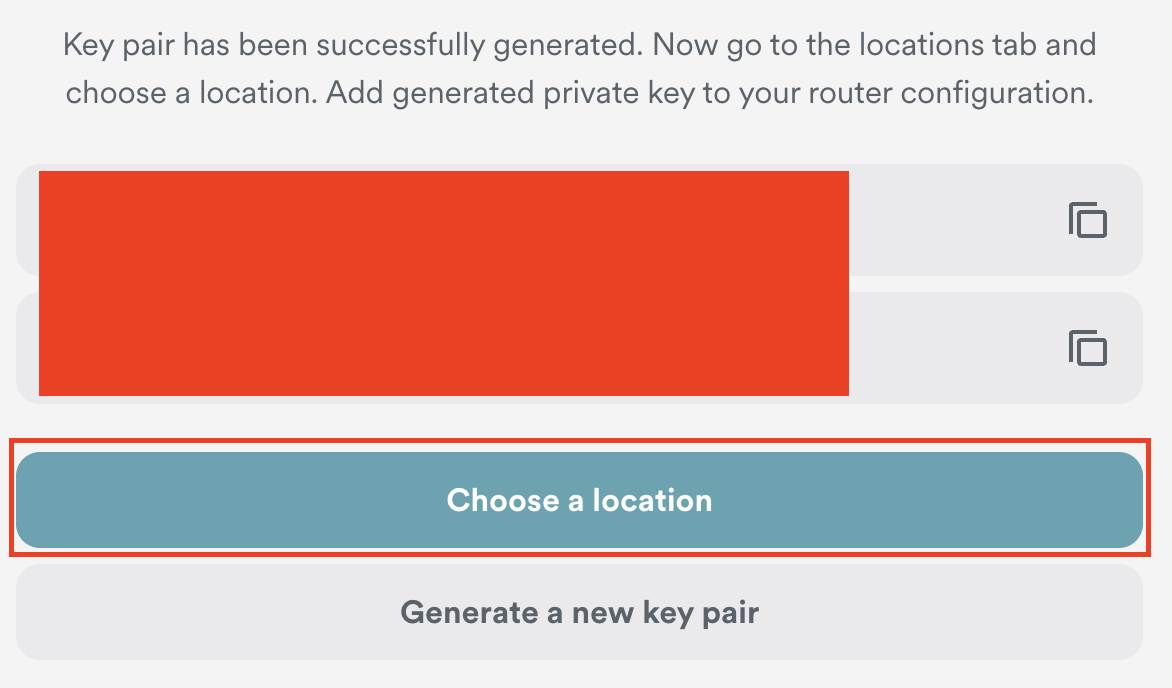
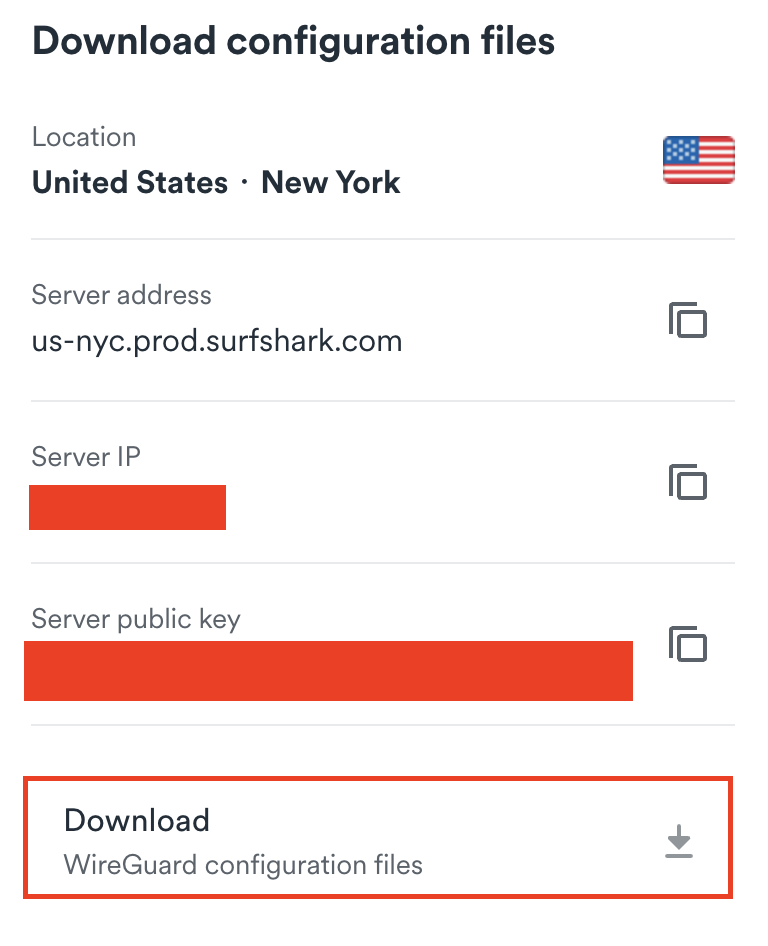
9. Select the server location you want to connect to. Unless you need a specific location we recommend using Surfshark’s recommended Fastest server. Click Download to download the .conf file for this Surfshark server location.
Login to Asus Merlin firmware settings in a browser on any computer or smart device connected to the Merlin FlashRouter’s network.
1. Navigate to the VPN tab.

2. Navigate to the VPN Client tab.

3. Select WireGuard as the VPN Protocol.

4. Click Choose file and select the .conf file you downloaded earlier. Then click Upload.
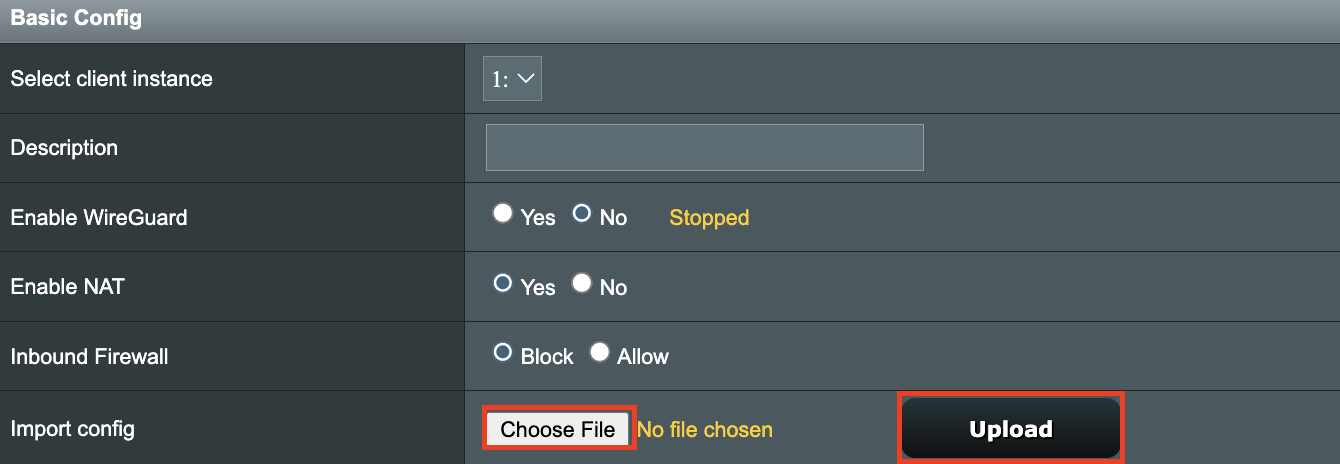
5. In the Description field enter in the name you’d like to use for this WireGuard Client profile. We typically advise entering in the location here. Our example server was in New York so I have entered in Surfshark New York.

6. Set Enable WireGuard to Yes.
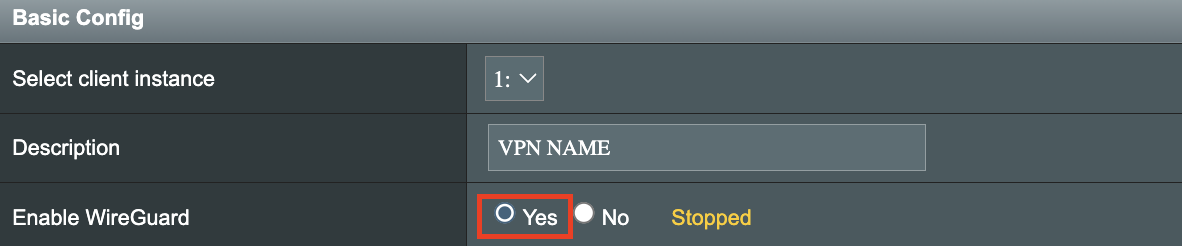
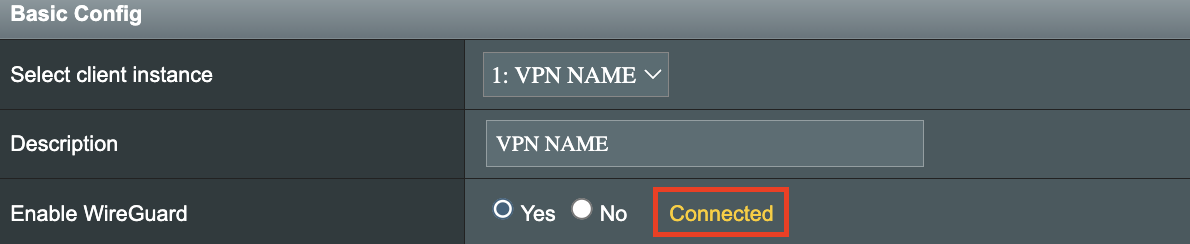
7. Click Apply at the bottom of the page and you should then see a Connected message appear.
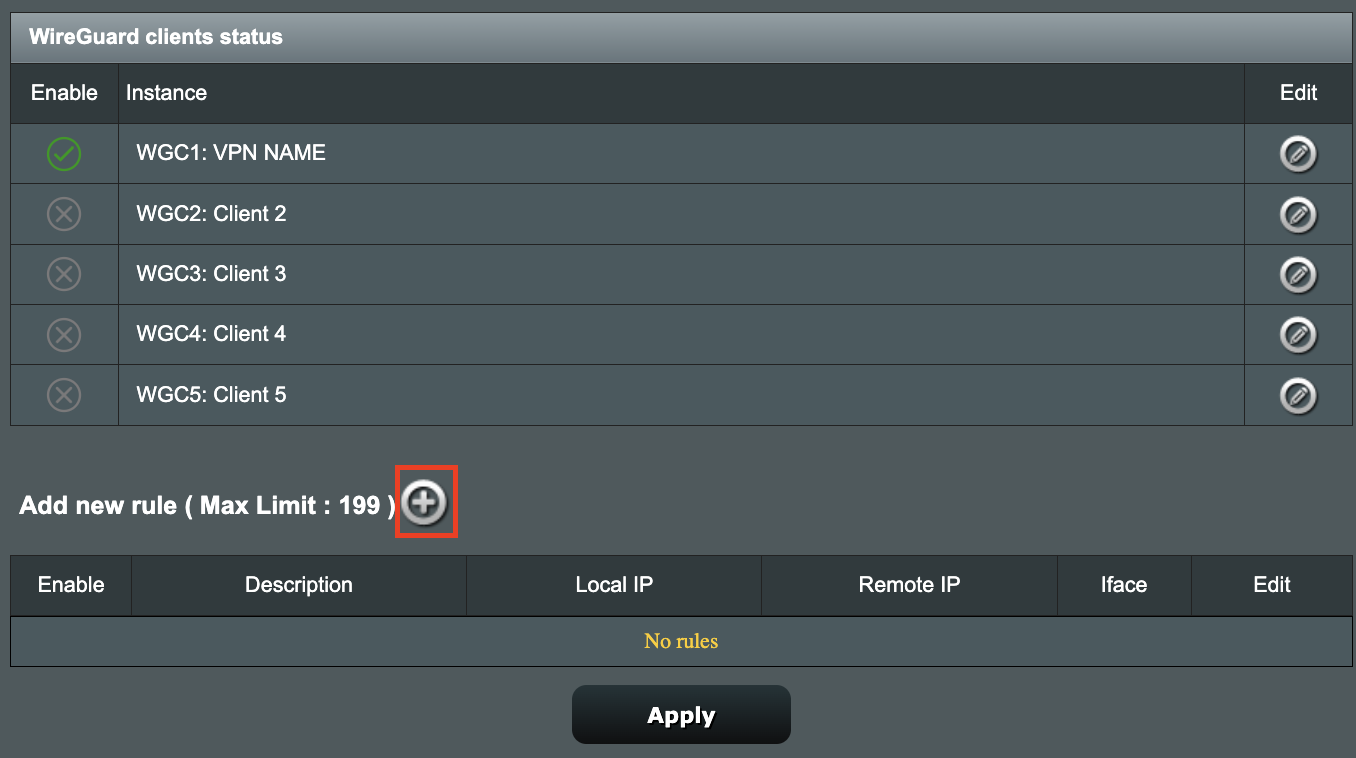
8. By default no devices are assigned to the new active WireGuard connection profile. Click the VPN Director tab to assign specific devices to the new WireGuard profile. Your IP will not be changed on your devices yet.

9. On the VPN Director page click the + symbol next to Add new rule.
10. Select the new WireGuard profile in the Interface dropdown.
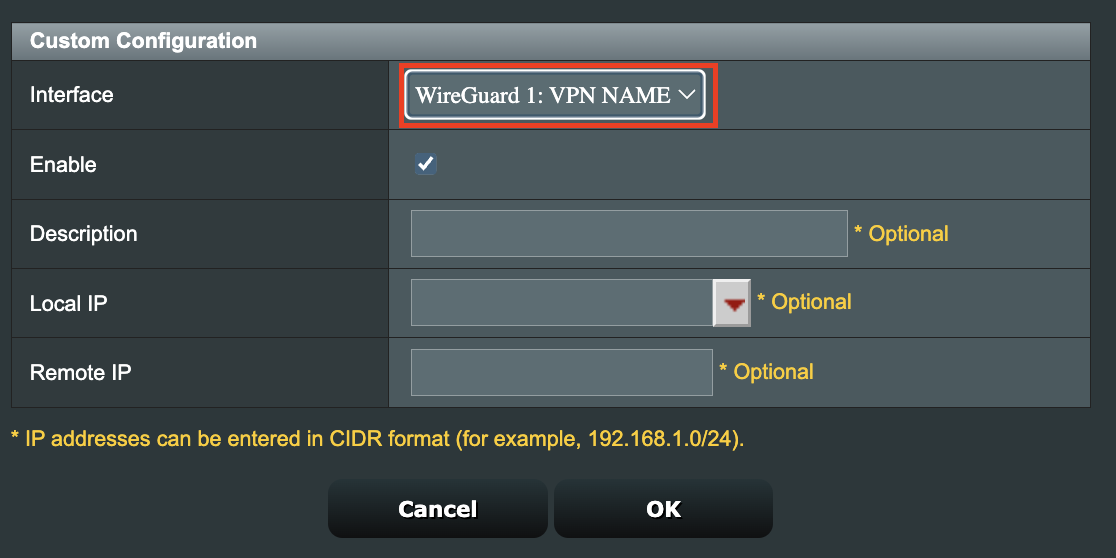
11. In the Local IP field enter in 192.168.50.0/24 if you want ALL devices connected to the FlashRouter’s network to use the WireGuard VPN connection. Click OK.
If you only want certain devices to connect to the WireGuard Client profile you have setting up instead of all the devices connected to the FlashRouter’s network please complete the instructions on our VPN Director guide.
12. Then click Apply at the bottom of the page.
Visit Surfshark’s IP Check from a private/incognito browsing window to verify your new IP address and virtual location.
In some cases you may notice that the location is not showing the same location as the server you have input in your router settings; this is because geo tracking tools are often tricked by VPN connections. As long as you see an IP address that is not the same as your normal Internet IP address then you are indeed connected to Surfshark.
If you are not already an ExpressVPN user Sign Up Now.
1. Log in to your account on the ExpressVPN website.
2. Successfully log in with your account information. Select More.
3. Select Manual Configuration and copy the Username and Password that are displayed on the right hand side of the screen.
usa-atlanta-ca-version-2.expressnetw.com
usa-boston-ca-version-2.expressnetw.com
usa-chicago-ca-version-2.expressnetw.com
usa-dallas-ca-version-2.expressnetw.com
usa-dallas-2-ca-version-2.expressnetw.com
usa-denver-ca-version-2.expressnetw.com
usa-kansascity-ca-version-2.expressnetw.com
usa-losangeles-ca-version-2.expressnetw.com
usa-losangeles-1-ca-version-2.expressnetw.com
usa-losangeles-2-ca-version-2.expressnetw.com
usa-losangeles-3-ca-version-2.expressnetw.com
usa-los-angeles-4-ca-version-2.expressnetw.com
usa-miami-ca-version-2.expressnetw.com
usa-miami-2-ca-version-2.expressnetw.com
usa-minneapolis-ca-version-2.expressnetw.com
usa-newjersey-1-ca-version-2.expressnetw.com
usa-newjersey-3-ca-version-2.expressnetw.com
usa-newyork-ca-version-2.expressnetw.com
us-new-york-2-ca-version-2.expressnetw.com
usa-phoenix-ca-version-2.expressnetw.com
usa-saltlakecity-ca-version-2.expressnetw.com
usa-sanfrancisco-ca-version-2.expressnetw.com
usa-sanjose-ca-version-2.expressnetw.com
usa-seattle-ca-version-2.expressnetw.com
usa-tampa-1-ca-version-2.expressnetw.com
usa-virginia-ca-version-2.expressnetw.com
usa-washingtondc-ca-version-2.expressnetw.com
usa-washingtondc-2-ca-version-2.expressnetw.com
canada-montreal-ca-version-2.expressnetw.com
canada-toronto-ca-version-2.expressnetw.com
canada-toronto-2-ca-version-2.expressnetw.com
canada-vancouver-ca-version-2.expressnetw.com
mexico-ca-version-2.expressnetw.com
argentina-ca-version-2.expressnetw.com
brazil-ca-version-2.expressnetw.com
brazil-2-ca-version-2.expressnetw.com
chile-ca-version-2.expressnetw.com
colombia-ca-version-2.expressnetw.com
costarica-ca-version-2.expressnetw.com
ecuador-ca-version-2.expressnetw.com
guatemala-ca-version-2.expressnetw.com
panama-ca-version-2.expressnetw.com
peru-ca-version-2.expressnetw.com
uruguay-ca-version-2.expressnetw.com
venezuela-ca-version-2.expressnetw.com
uk-berkshire-ca-version-2.expressnetw.com
uk-berkshire-2-ca-version-2.expressnetw.com
uk-docklands-ca-version-2.expressnetw.com
uk-east-london-ca-version-2.expressnetw.com
uk-kent-ca-version-2.expressnetw.com
uk-london-ca-version-2.expressnetw.com
france-paris-1-ca-version-2.expressnetw.com
france-paris-2-ca-version-2.expressnetw.com
france-strasbourg-ca-version-2.expressnetw.com
germany-darmstadt-ca-version-2.expressnetw.com
germany-frankfurt-1-ca-version-2.expressnetw.com
germany-frankfurt-2-ca-version-2.expressnetw.com
germany-nuremberg-ca-version-2.expressnetw.com
italy-cosenza-ca-version-2.expressnetw.com
italy-milan-ca-version-2.expressnetw.com
netherlands-amsterdam-ca-version-2.expressnetw.com
netherlands-rotterdam-ca-version-2.expressnetw.com
netherlands-thehague-ca-version-2.expressnetw.com
spain-barcelona-ca-version-2.expressnetw.com
spain-ca-version-2.expressnetw.com
sweden-ca-version-2.expressnetw.com
sweden-2-ca-version-2.expressnetw.com
switzerland-ca-version-2.expressnetw.com
switzerland-2-ca-version-2.expressnetw.com
albania-ca-version-2.expressnetw.com
andorra-ca-version-2.expressnetw.com
armenia-ca-version-2.expressnetw.com
austria-ca-version-2.expressnetw.com
azerbaijan-ca-version-2.expressnetw.com
belarus-ca-version-2.expressnetw.com
belgium-ca-version-2.expressnetw.com
bosniaandherzegovina-ca-version-2.expressnetw.com
bulgaria-ca-version-2.expressnetw.com
croatia-ca-version-2.expressnetw.com
cyprus-ca-version-2.expressnetw.com
czechrepublic-ca-version-2.expressnetw.com
denmark-ca-version-2.expressnetw.com
estonia-ca-version-2.expressnetw.com
finland-ca-version-2.expressnetw.com
georgia-ca-version-2.expressnetw.com
greece-ca-version-2.expressnetw.com
hungary-ca-version-2.expressnetw.com
iceland-ca-version-2.expressnetw.com
ireland-ca-version-2.expressnetw.com
isleofman-ca-version-2.expressnetw.com
jersey-ca-version-2.expressnetw.com
latvia-ca-version-2.expressnetw.com
liechtenstein-ca-version-2.expressnetw.com
lithuania-ca-version-2.expressnetw.com
luxembourg-ca-version-2.expressnetw.com
macedonia-ca-version-2.expressnetw.com
malta-ca-version-2.expressnetw.com
moldova-ca-version-2.expressnetw.com
monaco-ca-version-2.expressnetw.com
montenegro-ca-version-2.expressnetw.com
norway-ca-version-2.expressnetw.com
poland-ca-version-2.expressnetw.com
portugal-ca-version-2.expressnetw.com
romania-ca-version-2.expressnetw.com
serbia-ca-version-2.expressnetw.com
slovakia-ca-version-2.expressnetw.com
slovenia-ca-version-2.expressnetw.com
ukraine-ca-version-2.expressnetw.com
australia-brisbane-ca-version-2.expressnetw.com
australia-melbourne-ca-version-2.expressnetw.com
australia-perth-ca-version-2.expressnetw.com
australia-sydney-ca-version-2.expressnetw.com
australia-sydney-2-ca-version-2.expressnetw.com
australia-sydney-3-ca-version-2.expressnetw.com
hongkong-2-ca-version-2.expressnetw.com
hongkong4-ca-version-2.expressnetw.com
hongkong-1-ca-version-2.expressnetw.com
japan-tokyo-1-ca-version-2.expressnetw.com
japan-tokyo-2-ca-version-2.expressnetw.com
india-chennai-ca-version-2.expressnetw.com
india-mumbai-1-ca-version-2.expressnetw.com
singapore-cbd-ca-version-2.expressnetw.com
singapore-jurong-ca-version-2.expressnetw.com
southkorea-ca-version-2.expressnetw.com
southkorea2-ca-version-2.expressnetw.com
bangladesh-ca-version-2.expressnetw.com
bhutan-ca-version-2.expressnetw.com
brunei-ca-version-2.expressnetw.com
cambodia-ca-version-2.expressnetw.com
indonesia-ca-version-2.expressnetw.com
kazakhstan-ca-version-2.expressnetw.com
kyrgyzstan-ca-version-2.expressnetw.com
laos-ca-version-2.expressnetw.com
macau-ca-version-2.expressnetw.com
malaysia-ca-version-2.expressnetw.com
mongolia-ca-version-2.expressnetw.com
myanmar-ca-version-2.expressnetw.com
nepal-ca-version-2.expressnetw.com
newzealand-ca-version-2.expressnetw.com
pakistan-ca-version-2.expressnetw.com
ph-via-sing-ca-version-2.expressnetw.com
srilanka-ca-version-2.expressnetw.com
taiwan-3-ca-version-2.expressnetw.com
thailand-ca-version-2.expressnetw.com
vietnam-ca-version-2.expressnetw.com
algeria-ca-version-2.expressnetw.com
israel-ca-version-2.expressnetw.com
kenya-ca-version-2.expressnetw.com
southafrica-ca-version-2.expressnetw.com
Navigate to Services > VPN
Start OpenVPN Client
If you wish to disable your VPN connection simply set this to Disable at any time and click Apply Settings.
Server IP/Name
Copy and paste the server you would like to connect to from the server list above. Be sure there are no extra spaces or characters.
If you wish to change ExpressVPN connection locations, THE ONLY SETTING YOU NEED TO CHANGE IS THE EXPRESSVPN SERVER ADDRESS.*
Port
1195
Tunnel Device
TUN
Tunnel Protocol
UDP
Encryption cipher
AES-256-CBC
Hash Algorithm
SHA512
User Pass Authentication
Enable
Username
Enter the Username you found in the Manual Config section.
Password
Enter the Password you found in the Manual Config section.
Advanced Options
Enable
TLS Cipher
None
LZO Compression
Adaptive
NAT
Enable
Firewall Protection
Enable
nsCertType verification
Checked
TLS Auth Key
-----BEGIN OpenVPN Static key V1-----
48d9999bd71095b10649c7cb471c1051
b1afdece597cea06909b99303a18c674
01597b12c04a787e98cdb619ee960d90
a0165529dc650f3a5c6fbe77c91c137d
cf55d863fcbe314df5f0b45dbe974d9b
de33ef5b4803c3985531c6c23ca6906d
6cd028efc8585d1b9e71003566bd7891
b9cc9212bcba510109922eed87f5c8e6
6d8e59cbd82575261f02777372b2cd4c
a5214c4a6513ff26dd568f574fd40d6c
d450fc788160ff68434ce2bf6afb00e7
10a3198538f14c4d45d84ab42637872e
778a6b35a124e700920879f1d003ba93
dccdb953cdf32bea03f365760b0ed800
2098d4ce20d045b45a83a8432cc73767
7aed27125592a7148d25c87fdbe0a3f6
-----END OpenVPN Static key V1-----
Additional Config
persist-key
persist-tun
fragment 1300
mssfix 1450
keysize 256
Policy Based Routing
This field can be used for split VPN and Dual Gateway routing.
CA Cert
-----BEGIN CERTIFICATE-----
MIIF+DCCA+CgAwIBAgIBATANBgkqhkiG9w0BAQ0FADCBhDELMAkGA1UEBhMCVkcx
DDAKBgNVBAgMA0JWSTETMBEGA1UECgwKRXhwcmVzc1ZQTjETMBEGA1UECwwKRXhw
cmVzc1ZQTjEWMBQGA1UEAwwNRXhwcmVzc1ZQTiBDQTElMCMGCSqGSIb3DQEJARYW
c3VwcG9ydEBleHByZXNzdnBuLmNvbTAeFw0xNTEwMjEwMDAwMDBaFw0yNjA0MDEy
MTEyMDBaMIGEMQswCQYDVQQGEwJWRzEMMAoGA1UECAwDQlZJMRMwEQYDVQQKDApF
eHByZXNzVlBOMRMwEQYDVQQLDApFeHByZXNzVlBOMRYwFAYDVQQDDA1FeHByZXNz
VlBOIENBMSUwIwYJKoZIhvcNAQkBFhZzdXBwb3J0QGV4cHJlc3N2cG4uY29tMIIC
IjANBgkqhkiG9w0BAQEFAAOCAg8AMIICCgKCAgEAxzXvHZ25OsESKRMQFINHJNqE
9kVRLWJS50oVB2jxobudPhCsWvJSApvar8CB2RrqkVMhXu2HT3FBtDL91INg070q
AyjjRpzEbDPWqQ1+G0tk0sjiJt2mXPJK2IlNFnhe6rTs09Pkpcp8qRhfZay/dIlm
agohQAr4JvYL1Ajg9A3sLb8JkY03H6GhOF8EKYTqhrEppCcg4sQKQhNSytRoQAm8
Ta+tnTYIedwWpqjUXP9YXFOvljPaixfYug24eAkpTjeuWTcELSyfnuiBeK+z9+5O
YunhqFt2QZMq33kLFZGMN2gHRCzngxxphurypsPRo7jiFgQI1yLt8uZsEZ+otGEK
91jjKfOC+g9TBy2RUtxk1neWcQ6syXDuc3rBNrGA8iM0ZoEqQ1BC8xWr3NYlSjqN
+1mgpTAX3/Dxze4GzHd7AmYaYJV8xnKBVNphlMlg1giCAu5QXjMxPbfCgZiEFq/u
q0SOKQJeT3AI/uVPSvwCMWByjyMbDpKKAK8Hy3UT5m4bCNu8J7bxj+vdnq0A2HPw
tF0FwBl/TIM3zNsyFrZZ0j6jLRT50mFsgDBKcD4L/J5rjdCsKPu5rodhxe38rCx2
GknP1Zkov4yoVCcR48+CQwg3oBkq0/EflvWUvcYApzs9SomUM/g+8Q/V0WOfJmFW
uxN9YntZlnzHRSRjrvMCAwEAAaNzMHEwHQYDVR0OBBYEFIzmQGj8xS+0LLklwqHD
45VVOZRJMB8GA1UdIwQYMBaAFIzmQGj8xS+0LLklwqHD45VVOZRJMA8GA1UdEwEB
/wQFMAMBAf8wCwYDVR0PBAQDAgEGMBEGCWCGSAGG+EIBAQQEAwIBFjANBgkqhkiG
9w0BAQ0FAAOCAgEAbHfuMKtojm1NgX7qSU2Rm2B5L8G0FuFP0L40dj8O5WHt45j2
z8coMK90vrUnQEZNQmRzot7v3XjVzVlxBWYSsCEApTsSDNi/4BNFP8H/BUUtJuy2
GFTO4wDVJnqNkZOHBmyVD75s1Y+W8a+zB4jkMeDEhOHZdwQ0l1fJDDgXal5f1UT5
F5WH6/RwHmWTwX4GxuCiIVtx70CjkXqhM8yZtTp1UtHLRNYcNSIes0vrAPHPgoA5
z9B8UvsOjuP+mfcjzi0LGGrY+2pJu0BKO2dRnarIZZABETIisI3FokoTszx5jpRP
yxyUTuRDKWHrvi0PPtOmC8nFahfugWFUi6uBsqCaSeuex+ahnTPCq0b1l0Ozpg0Y
eE8CW1TL9Y92b01up2c+PP6wZOIm3JyTH+L5smDFbh80V42dKyGNdPXMg5IcJhj3
YfAy4k8h/qbWY57KFcIzKx40bFsoI7PeydbGtT/dIoFLSZRLW5bleXNgG9mXZp27
0UeEC6CpATCS6uVl8LVT1I02uulHUpFaRmTEOrmMxsXGt6UAwYTY55K/B8uuID34
1xKbeC0kzhuN2gsL5UJaocBHyWK/AqwbeBttdhOCLwoaj7+nSViPxICObKrg3qav
GNCvtwy/fEegK9X/wlp2e2CFlIhFbadeXOBr9Fn8ypYPP17mTqe98OJYM04=
-----END CERTIFICATE-----
Public Client Cert
-----BEGIN CERTIFICATE-----
MIIDTjCCAregAwIBAgIDKzZvMA0GCSqGSIb3DQEBCwUAMIGFMQswCQYDVQQGEwJV
UzELMAkGA1UECBMCQ0ExFTATBgNVBAcTDFNhbkZyYW5jaXNjbzEVMBMGA1UEChMM
Rm9ydC1GdW5zdG9uMRgwFgYDVQQDEw9Gb3J0LUZ1bnN0b24gQ0ExITAfBgkqhkiG
9w0BCQEWEm1lQG15aG9zdC5teWRvbWFpbjAgFw0xNjExMDMwMzA2MThaGA8yMDY2
MTEwMzAzMDYxOFowgYoxCzAJBgNVBAYTAlZHMQwwCgYDVQQIDANCVkkxEzARBgNV
BAoMCkV4cHJlc3NWUE4xEzARBgNVBAsMCkV4cHJlc3NWUE4xHDAaBgNVBAMME2V4
cHJlc3N2cG5fY3VzdG9tZXIxJTAjBgkqhkiG9w0BCQEWFnN1cHBvcnRAZXhwcmVz
c3Zwbi5jb20wggEiMA0GCSqGSIb3DQEBAQUAA4IBDwAwggEKAoIBAQCrOYt/KOi2
uMDGev3pXg8j1SO4J/4EVWDF7vJcKr2jrZlqD/zuAFx2W1YWvwumPO6PKH4PU962
1aNdiumaUkv/RplCfznnnxqobhJuTE2oA+rS1bOq+9OhHwF9jgNXNVk+XX4d0toS
T5uGE6Z3OdmPBur8o5AlCf78PDSAwpFOw5HrgLqOEU4hTweC1/czX2VsvsHv22HR
I6JMZgP8gGQii/p9iukqfaJvGdPciL5p1QRBUQIi8P8pNvEp1pVIpxYj7/LOUqb2
DxFvgmp2v1IQ0Yu88SWsFk84+xAYHzfkLyS31Sqj5uLRBnJqx3fIlOihQ50GI72f
wPMwo+OippvVAgMBAAGjPzA9MAwGA1UdEwEB/wQCMAAwDgYDVR0PAQH/BAQDAgSw
MB0GA1UdDgQWBBSkBM1TCX9kBgFsv2RmOzudMXa9njANBgkqhkiG9w0BAQsFAAOB
gQA+2e4b+33zFmA+1ZQ46kWkfiB+fEeDyMwMLeYYyDS2d8mZhNZKdOw7dy4Ifz9V
qzp4aKuQ6j61c6k1UaQQL0tskqWVzslSFvs9NZyUAJLLdGUc5TT2MiLwiXQwd4Uv
H6bGeePdhvB4+ZbW7VMD7TE8hZhjhAL4F6yAP1EQvg3LDA==
-----END CERTIFICATE-----
Private Client Key
-----BEGIN RSA PRIVATE KEY-----
MIIEpAIBAAKCAQEAqzmLfyjotrjAxnr96V4PI9UjuCf+BFVgxe7yXCq9o62Zag/8
7gBcdltWFr8Lpjzujyh+D1PettWjXYrpmlJL/0aZQn85558aqG4SbkxNqAPq0tWz
qvvToR8BfY4DVzVZPl1+HdLaEk+bhhOmdznZjwbq/KOQJQn+/Dw0gMKRTsOR64C6
jhFOIU8Hgtf3M19lbL7B79th0SOiTGYD/IBkIov6fYrpKn2ibxnT3Ii+adUEQVEC
IvD/KTbxKdaVSKcWI+/yzlKm9g8Rb4Jqdr9SENGLvPElrBZPOPsQGB835C8kt9Uq
o+bi0QZyasd3yJTooUOdBiO9n8DzMKPjoqab1QIDAQABAoIBAHgsekC0SKi+AOcN
OZqJ3pxqophE0V7fQX2KWGXhxZnUZMFxGTc936deMYzjZ1y0lUa6x8cgOUcfqHol
3hDmw9oWBckLHGv5Wi9umdb6DOLoZO62+FQATSdfaJ9jheq2Ub2YxsRN0apaXzB6
KDKz0oM0+sZ4Udn9Kw6DfuIELRIWwEx4w0v3gKW7YLC4Jkc4AwLkPK03xEA/qImf
kCmaMPLhrgVQt+IFfP8bXzL7CCC04rNU/IS8pyjex+iUolnQZlbXntF7Bm4V2mz0
827ZVqrgAb/hEQRlsTW3rRkVh+rrdoUE7BCZRTFmRCbLoShjN6XuSf4sAus8ch4U
EN12gN0CgYEA4o/tSvij1iPaXLmt4KOEuxqmSGB8MLKhFde8lBbNdrDgxiIH9bH7
khKx15XRTX0qLDbs8b2/UJygZG0Aa1kIBqZTXTgeMAuxPRTesALJPdqQ/ROnbJcd
FkI7gllrAG8VB0fH4wTRsRd0vWEB6YlCdE107u6LEsLAHxOj9Q5819cCgYEAwXjx
9RkQ2qITBx5Ewib8YsltA0n3cmRomPicLlsnKV5DfvyCLpFIsZ1h3f9dUpfxRLwz
p8wcoLiq9cCoOGdu1udw/yBTqmhaXWhUK/g77f9Ze2ZB1OEhuyKLYJ1vW/h/Z/a1
aPCMxZqsDTPCePsuO8Cez5gqs8LjM3W7EyzRxDMCgYEAvhHrDFt975fSiLoJgo0M
PIAGAnBXn+8sLwv3m/FpW+rWF8LTFK/Fku12H5wDpNOdvswxijkauIE+GiJMGMLv
dcyx4WHECaC1h73reJRNykOEIZ0Md5BrCZJ1JEzp9Mo8RQhWTEFtvfkkqgApP4g0
pSeaMx0StaGG1kt+4IbP+68CgYBrZdQKlquAck/Vt7u7eyDHRcE5/ilaWtqlb/xi
zz7h++3D5C/v4b5UumTFcyg+3RGVclPKZcfOgDSGzzeSd/hTW46iUTOgeOUQzQVM
kzPRXdoyYgVRQtgSpY5xR3O1vjAbahwx8LZ0SvQPMBhYSDbV/Isr+fBacWjl/Aip
EEwxeQKBgQDdrAEnVlOFoCLw4sUjsPoxkLjhTAgI7CYk5NNxX67Rnj0tp+Y49+sG
Uhl5sCGfMKkLShiON5P2oxZa+B0aPtQjsdnsFPa1uaZkK4c++SS6AetzYRpVDLmL
p7/1CulE0z3O0sBekpwiuaqLJ9ZccC81g4+2j8j6c50rIAct3hxIxw==
-----END RSA PRIVATE KEY-----
CLICK APPLY SETTINGS
Leave all settings not mentioned above as their default setting.
Navigate to Status > OpenVPN.
In some cases you may notice that the location is not showing the same location as the server you have input in your router settings; this is because geo tracking tools are often tricked by VPN connections. As long as you see an IP address that is not the same as your normal Internet IP address then you are indeed connected to ExpressVPN.
Navigate to Administration > Backup
Once you have OpenVPN connected on your Merlin FlashRouter you can enable the VPN Killswitch so that no internet traffic passes through your router that is not encrypted by the VPN tunnel.
Login to Asus Merlin firmware settings in a browser on any computer or smart device.
1. Under Advanced Settings select VPN.
2. Click the VPN Client tab.
3. Set Killswitch – Block routed clients if tunnel goes down to Yes.

4. Click Apply.
Once you have OpenVPN connected on your Merlin FlashRouter you can manage your VPN connections by device or by VPN servers or even VPN providers. This is a major advantage of Asus Merlin firmware as it allows up to 5 VPN connections at the same.
Login to Asus Merlin firmware settings in a browser on any computer or smart device.
1. Under Advanced Settings select VPN.
2. Click the VPN Client tab.
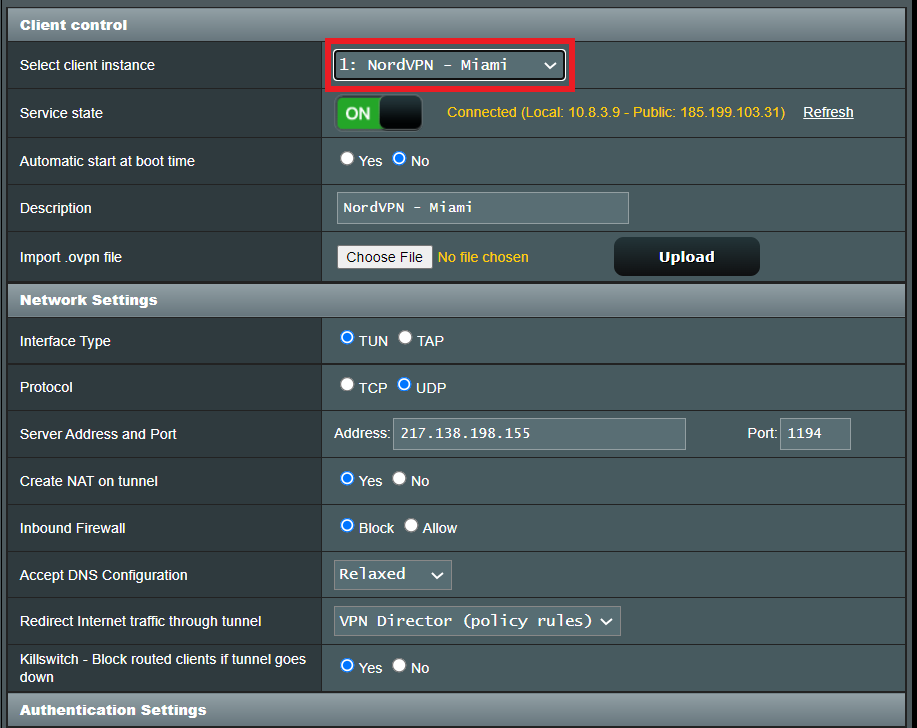
3. In the Select Client instance dropdown select a new client instance to setup and follow your VPN providers setup guide.
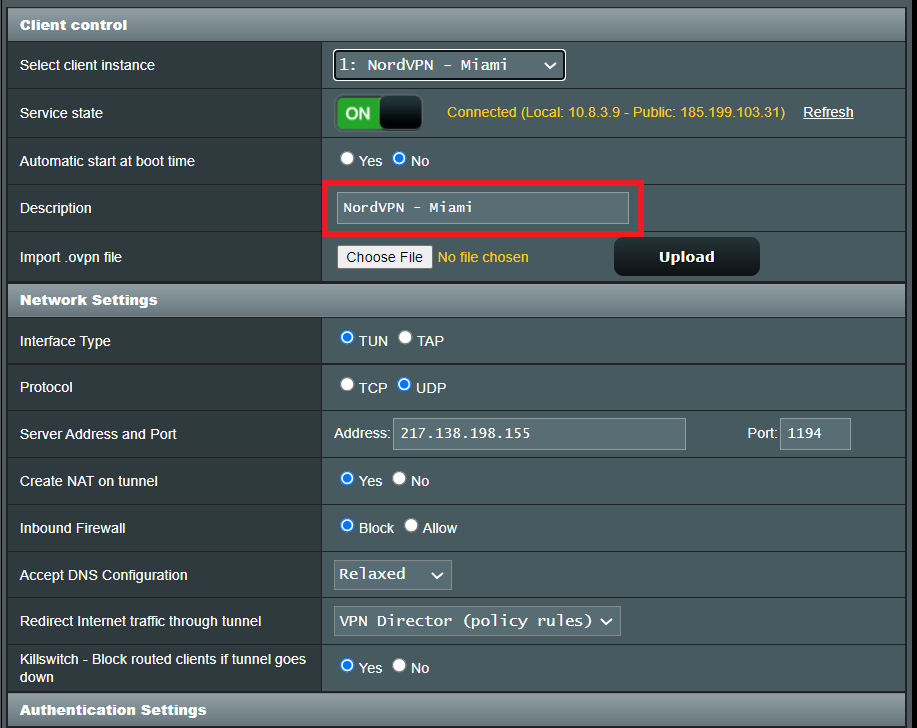
4. Name the client in the Description field for more clarity for which server or provider is being setup.
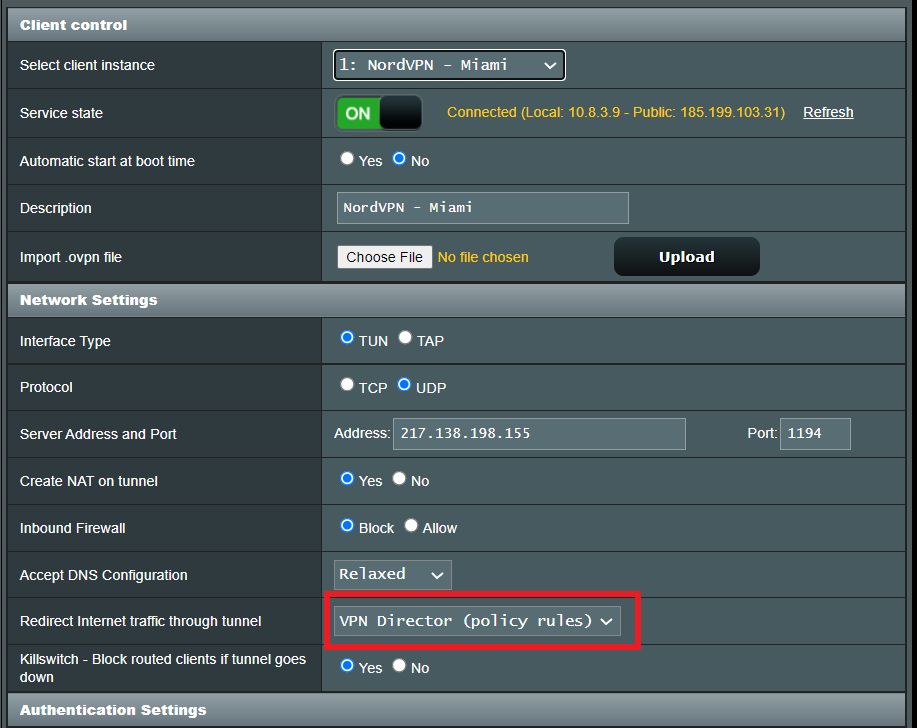
5. Set the Redirect Internet traffic through tunnel dropdown to VPN Director.
1. Under Advanced Settings select VPN.
2. Click the VPN Director tab.
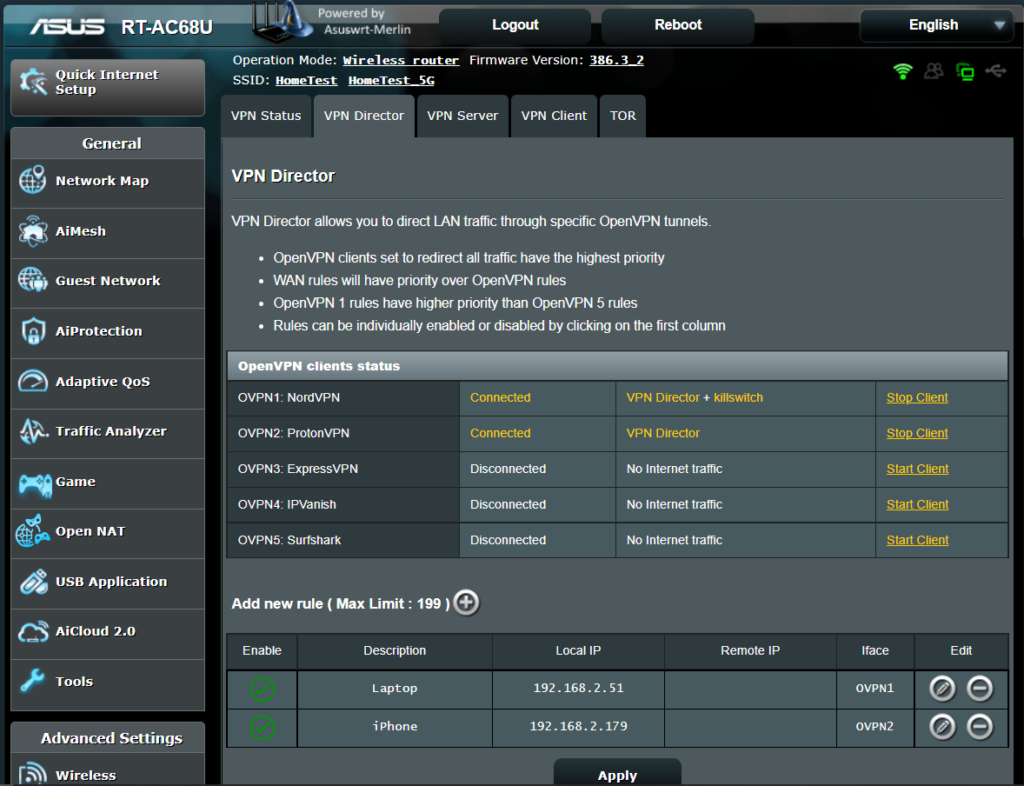
3. With multiple VPN clients connected you can start and stop them as needed from this page.
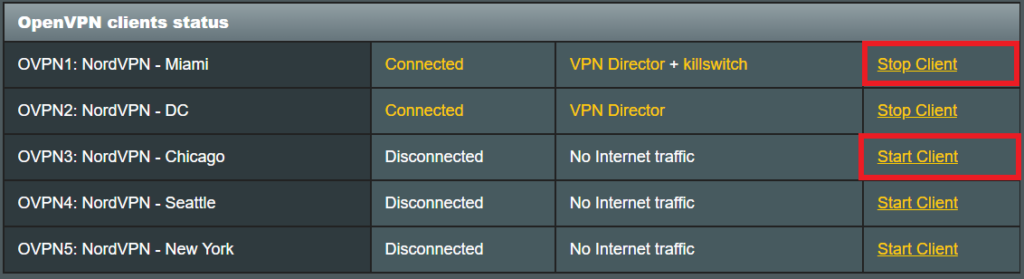
1. On the VPN Director page click the + symbol next to Add new rule.
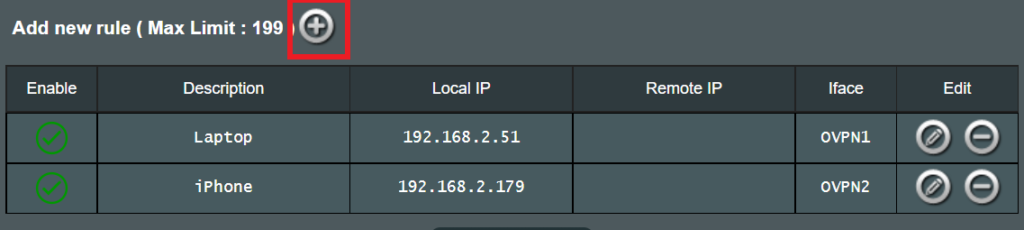
2. Select the Interface that you want to add the device to.
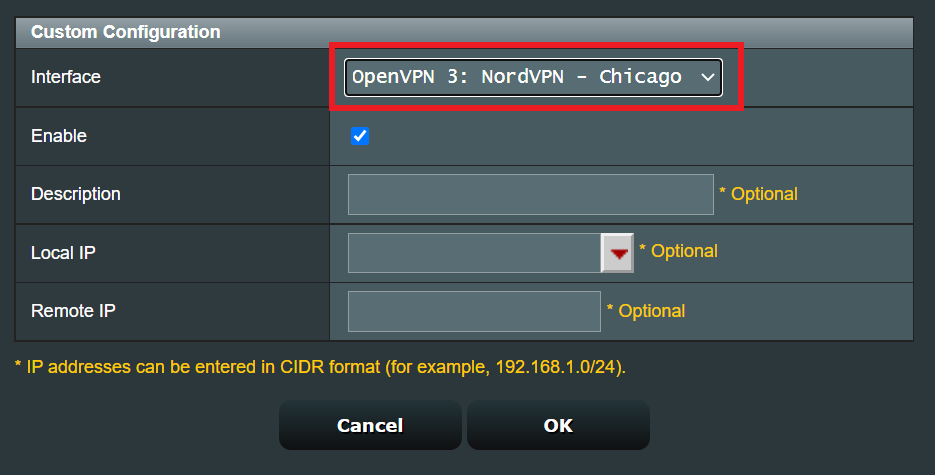
3. Click the Local IP dropdown and a full list of devices connected to the Merlin FlashRouter should appear. Select the device you want to assign to this VPN client.
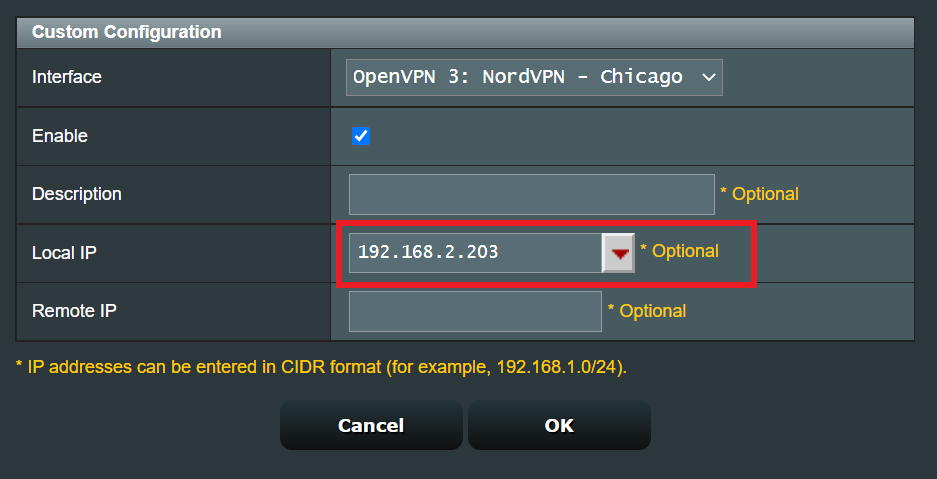
4. Click OK and click Apply.
Your Privacy Hero router uses Cloud Based router management which means you can access the router settings from anywhere on any device that has an internet connection. You can follow these steps while connected to your phone, other Wi-Fi network, or the Privacy Hero network.
Use these steps change your location for popular streaming services allowing you to access to regionally restricted content. Privacy Hero uses DNS routing to change your location which is a great way around VPN streaming blocks.
1. From any device that has a browser such as a computer, smartphone, or tablet visit app.privacyhero.com

2. Enter your Privacy Hero account email and password. Click Login.

3. Click the Streaming symbol.

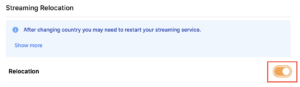
4. Set the Streaming Relocation toggle to On.
5. Click the flag of the country you would like the listed streaming service to use.
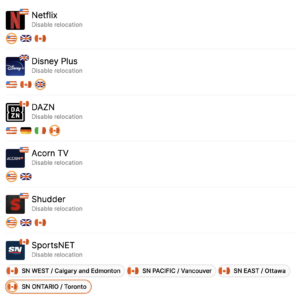
This streaming relocation feature will not change your IP address in the way that a VPN does. This is why it is not able to be blocked in the same way that a VPN connection can be.
The listed services on the streaming relocation page will not be connected to VPN even if the Privacy Hero has an active VPN connection. These services are set to bypass the router’s VPN tunnel to avoid streaming blocks.
Toggling the streaming relocation feature On will also relocate many other streaming services automatically. They will be automatically optimized for the best connection with no manual selection needed for:
ABC
Adult Swim
All 4
Apple TV Channels
BBC
Britbox
CBC Gem
CBS Sports
Crackle
DirecTV Stream
DSTV Now
Filmrise
Freeform
Freevee
Frndly TV
F1 TV
FX Now
ITV
MGM+
Molotov.TV
My 5
NBC
NBC Sports
Now E
Now TV
Pandora
Paramount+
PBS
Peacock
Philo
Pluto TV
Showmax
Sling
SonyLIV
S Sports Plus
Starz
Stirr
TBS
Tennis Channel
The CW
Tubi
TVPlayer
Vudu
Xumo
Zattoo
If you are not already an NordVPN user Sign Up Now.
Log in to your account on the NordVPN website.
For a NordVPN server recommendation visit their Recommend Server page.
Once you have selected the server you want to connect to, download the UDP .ovpn file containing the Server IP Address, TLS Auth Key, and CA Cert referenced below.

Open the .ovpn file that is downloaded to your computer with NotePad++ for Windows or TextEdit for Apple. You will only need the Server IP Address, TLS Auth Key, and CA Cert from this file. All NordVPN servers and .ovpn files have different IP Addresses, keys, and certificates.
Navigate to Services > VPN
Start OpenVPN Client
If you wish to disable your VPN connection simply set this to Disable at any time and click Apply Settings.
Server IP/Name
At the top of the .ovpn file you downloaded above, there is a line e.g.:
remote 206.226.72.27 1194
206.226.72.27 is your NordVPN server IP address. Enter the IP Address in this field.
Port
1194
Tunnel Device
TUN
Tunnel Protocol
UDP
Encryption cipher
AES-256-CBC
Hash Algorithm
SHA512
Userpass Authentication
Enable
Username
Enter the Username you successfully logged in to your NordVPN account with.
Password
Enter the Password you successfully logged in to your NordVPN account with.
Advanced Options
Enable
TLS Cipher
None
LZO Compression
Adaptive
NAT
Enable
Firewall Protection
Enable
TLS Auth Key
In the .ovpn file copy and paste all contents in between the <tls-auth> and </tls-auth> lines from your .ovpn file starting and ending with:
—–BEGIN OpenVPN Static key V1—–
…
—–END OpenVPN Static key V1—–
Additional Config
tun-mtu-extra 32
mssfix 1450
persist-key
persist-tun
Policy Based Routing
This field can be used for split VPN and Dual Gateway routing.
CA Cert
In the .ovpn file Copy and Paste all contents in between the <ca> and </ca> lines from your .ovpn file starting and ending with:
—–BEGIN CERTIFICATE—–
…
—–END CERTIFICATE—–
CLICK APPLY SETTINGS
Leave all settings not mentioned above as their default setting.
Navigate to Status > OpenVPN
In some cases you may notice that the location is not showing the same location as the server you have input in your router settings; this is because geo tracking tools are often tricked by VPN connections. As long as you see an IP address that is not the same as your normal Internet IP address then you are indeed connected to NordVPN.
Navigate to Administration > Backup
It can be very useful to setup static local IP addresses for devices on your FlashRouter network. By assigning specific IP’s to specific devices you can better control and manage how your network and the internet interacts with each device.
Once you setup a static IP you can set access restrictions, monitor and control bandwidth, as well as bypass a router VPN connection or setup a device specific Kill Switch. Without a static IP assignment you may lose device specific settings when the DHCP lease to the router expires.
Navigate to Services > Services
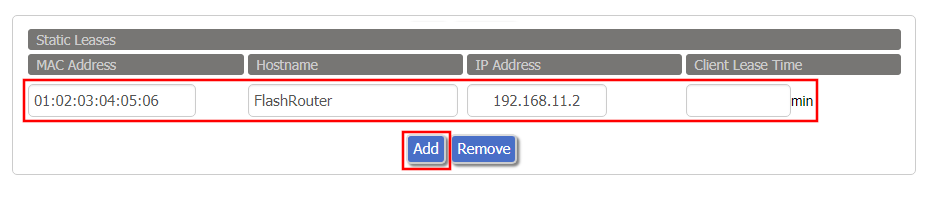
If a device has wireless and ethernet capabilities the MAC Addresses will be different for a wireless connection and an ethernet connection. Make sure to set a static IP for both MAC Addresses in this case.
Your Privacy Hero router uses Cloud Based router management which means you can access the router settings from anywhere on any device that has an internet connection. You can follow these steps while connected to your phone, other Wi-Fi network, or the Privacy Hero network.
Use these steps to connect to Privacy Hero’s own WireGuard VPN servers. You will automatically be connected to the ideal USA or Canada server based on your location.
1. From any device that has a browser such as a computer, smartphone, or tablet visit app.privacyhero.com
2. Enter your Privacy Hero account email and password. Click Login.
If you have not created your Privacy Hero account yet please follow these instructions.
3. Click the VPN symbol.

4. Set the VPN toggle to On.

5. Connect to the Privacy Hero’s via wireless or ethernet connection on your device and visit What is my IP Address from a private/incognito browser to verify your new IP address and virtual location.
Privacy Hero’s cloud based router settings access makes it so you can change settings while not connected to the Privacy Hero network so if your IP Address has not changed be sure to double check that you are indeed connected to the Privacy Hero network on the device you are checking your IP from.
Keep in mind that the VPN connection will not change the location of the streaming services listed in the Streaming Relocation area of the Privacy Hero settings.
If you are not already an NordVPN user Sign Up Now.
1. Log in to your account on the NordVPN website.

2. Click NordVPN on the left hand side and then click Setup NordVPN manually.

3. Enter in the verification code that was sent to your email.

4. Copy and paste your NordVPN manual username and password to a secure location. This is the username and password you will enter into the router settings to connect to NordVPN.

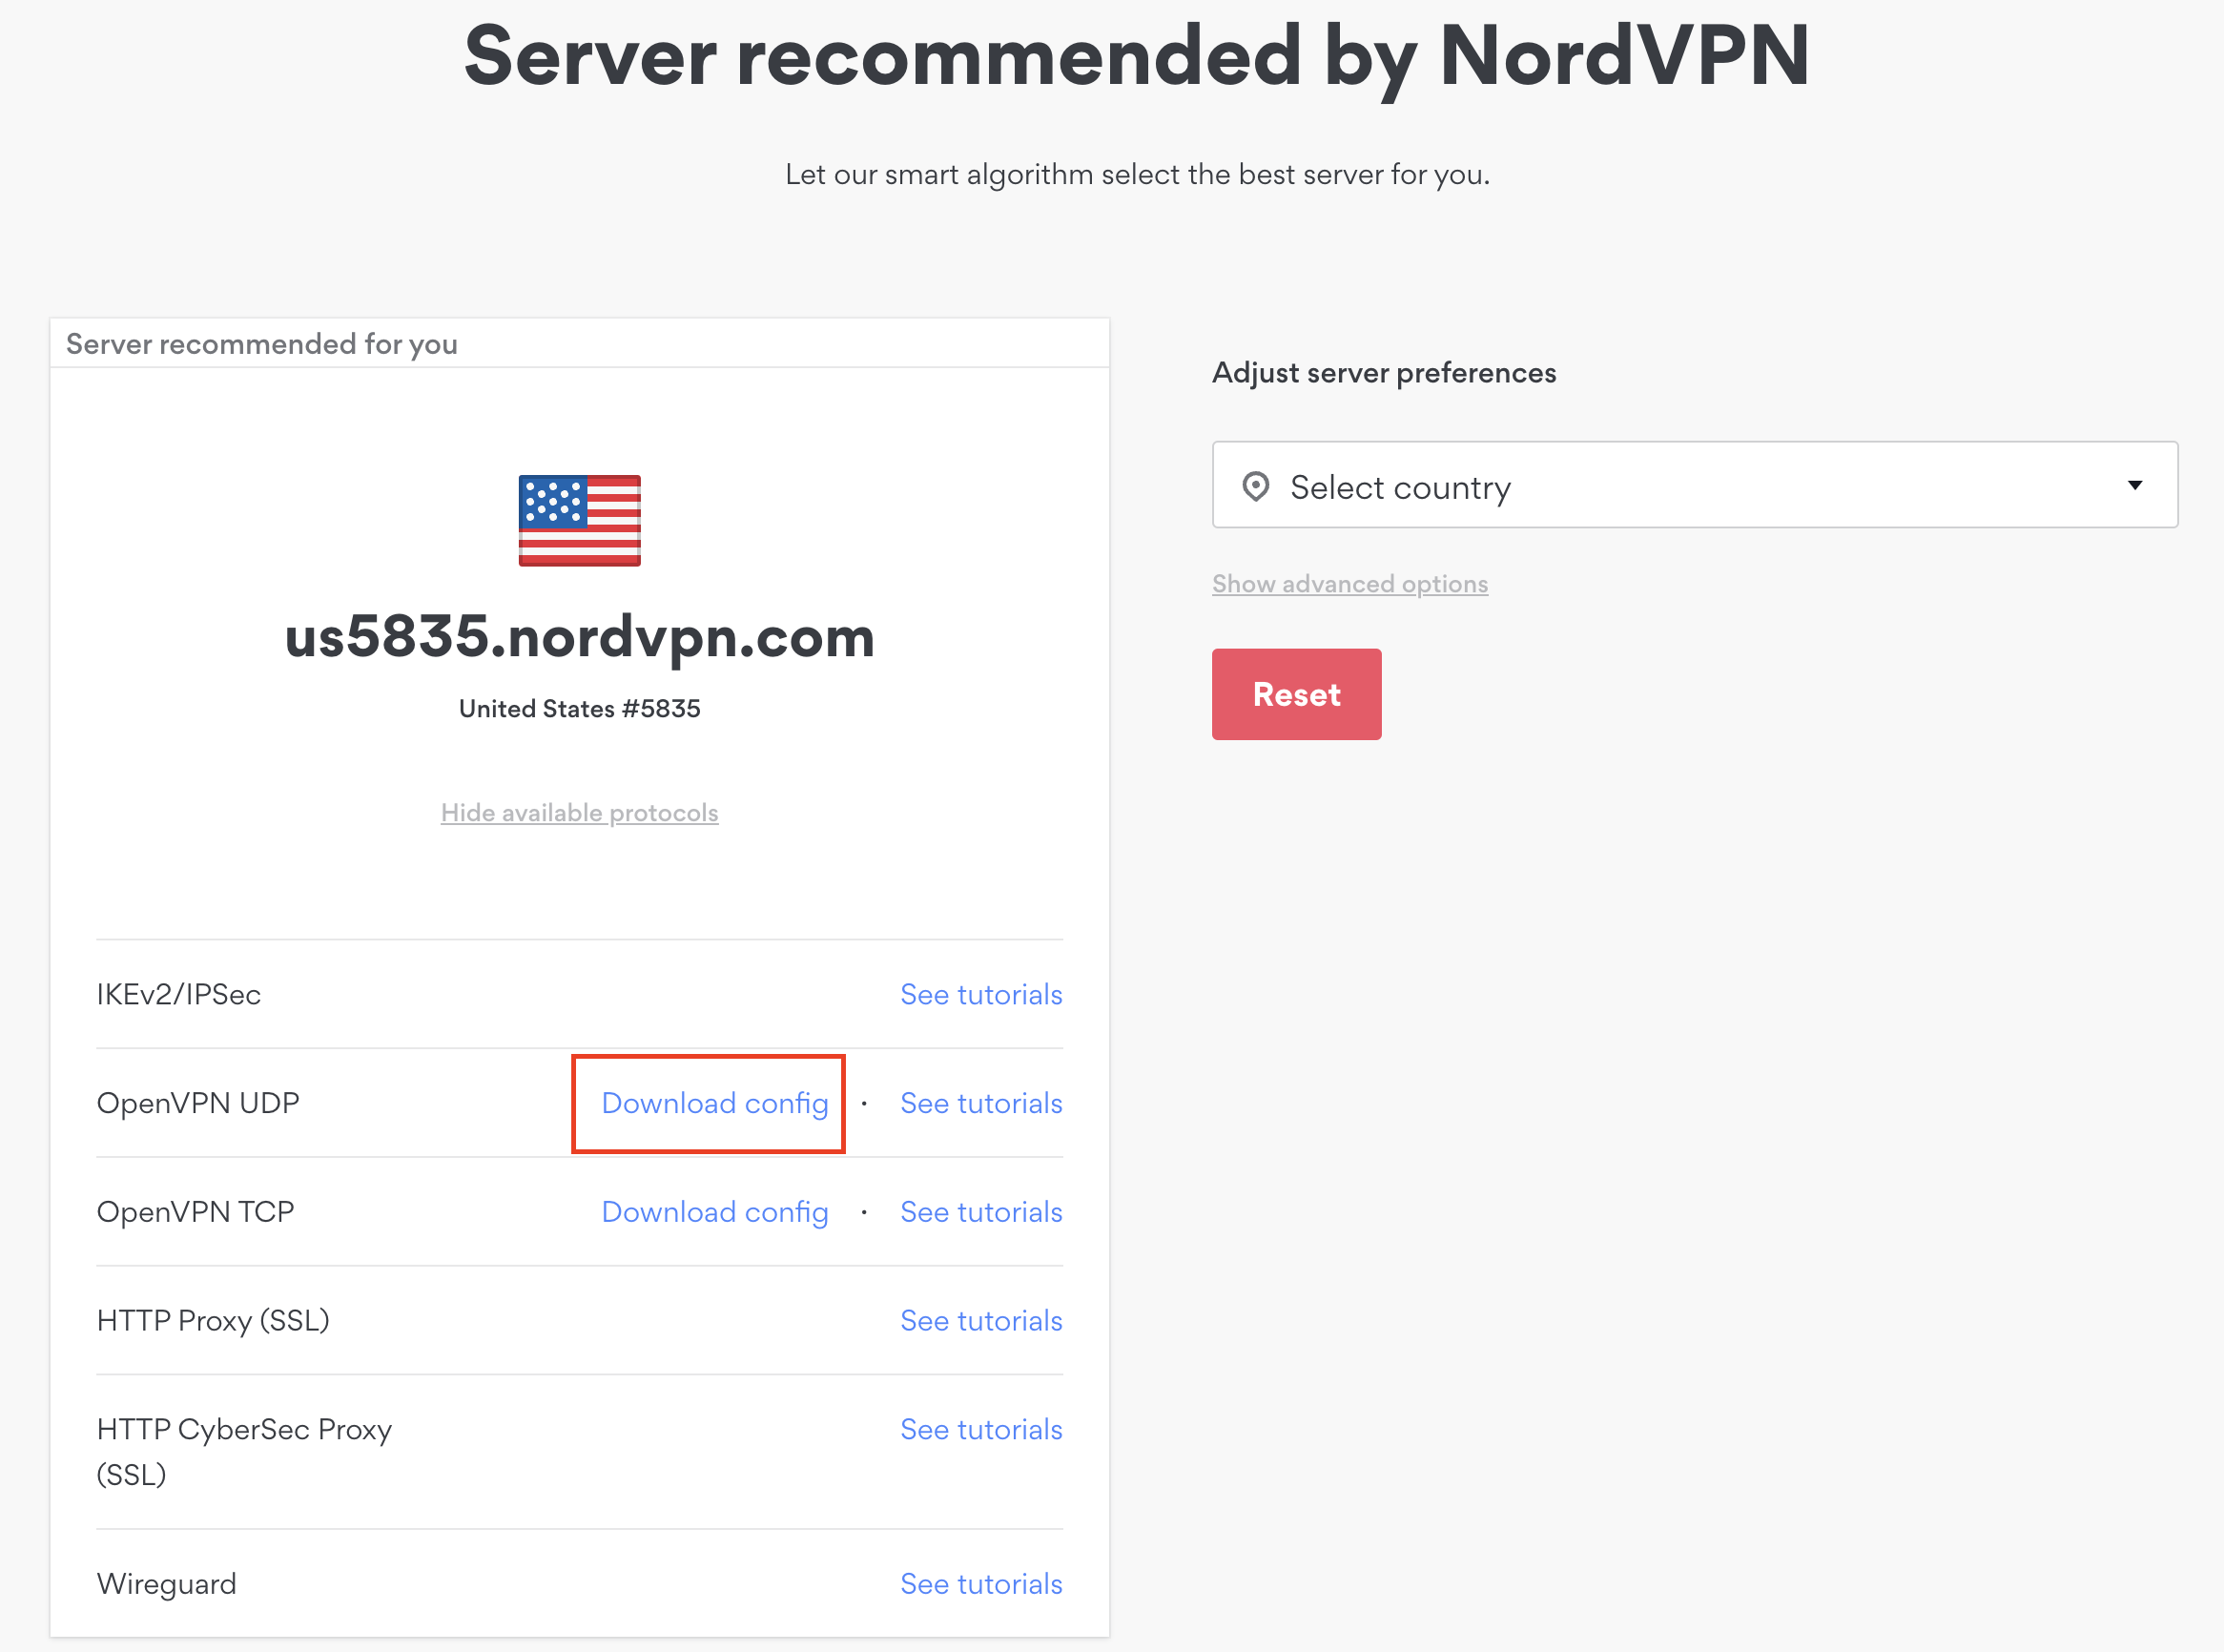
1. There are two options for obtaining the .ovpn file. The first and recommended is to navigate to NordVPN’s server recommendation page. Click Recommended Server to display the fastest server based on your actual location. You can adjust the country if you don’t want to connect to the recommended country.
Then click Show Available Protocols. Click Download Config next to OpenVPN UDP. This will download the .ovpn file to your computer for this server. Do not open this file.
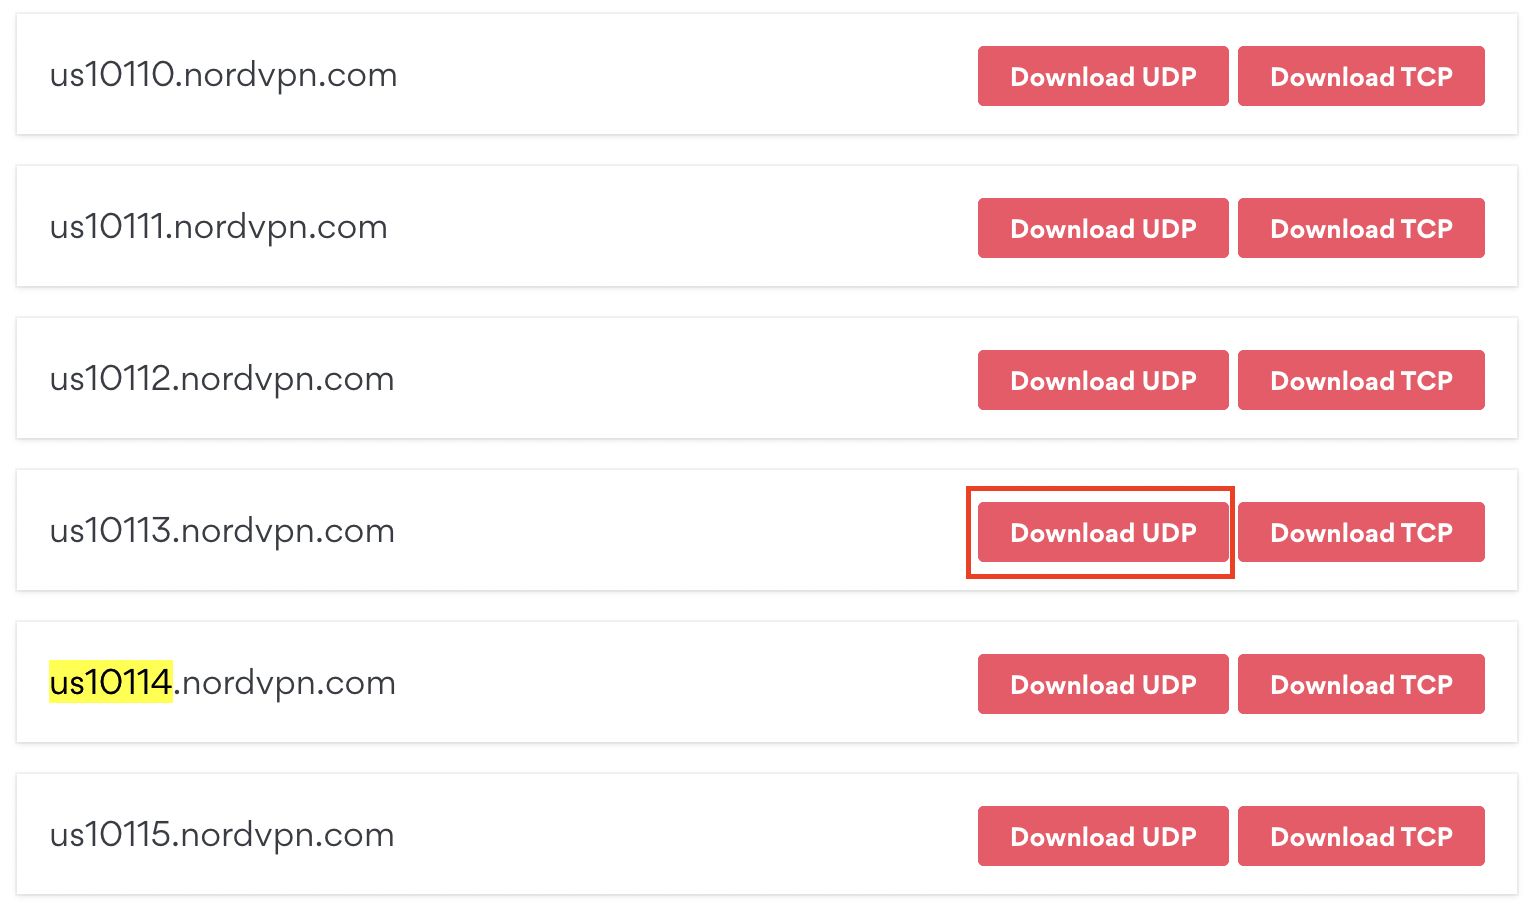
The second method to obtain a server is for connecting to a specific server number that you know you want to use. This applies to NordVPN Dedicated IP servers if you are signed up for that service. Go to NordVPN’s .ovpn file page. Then search for the server number that you want to use and click Download UDP.
Login to TP-Link firmware settings in a browser on any computer or smart device connected to the FlashRouter’s network.
1. Navigate to the Advanced tab.
2. Navigate to the VPN Client tab.
3. Check the Enable box next to VPN Client. Then click Save at the bottom of the page.
4. Click the Add button in the Server List area.
5. In the Description field enter in the name you’d like to use for this OpenVPN Client profile. We typically advise entering in the location or server number here. Our example server was us6821 so I have entered in NordVPN us6821.
Set the VPN Type to OpenVPN.
In the Username and Password fields paste in the NordVPN username and password we obtained earlier.
Click Browse and select the .ovpn file you downloaded earlier. Then click Save.
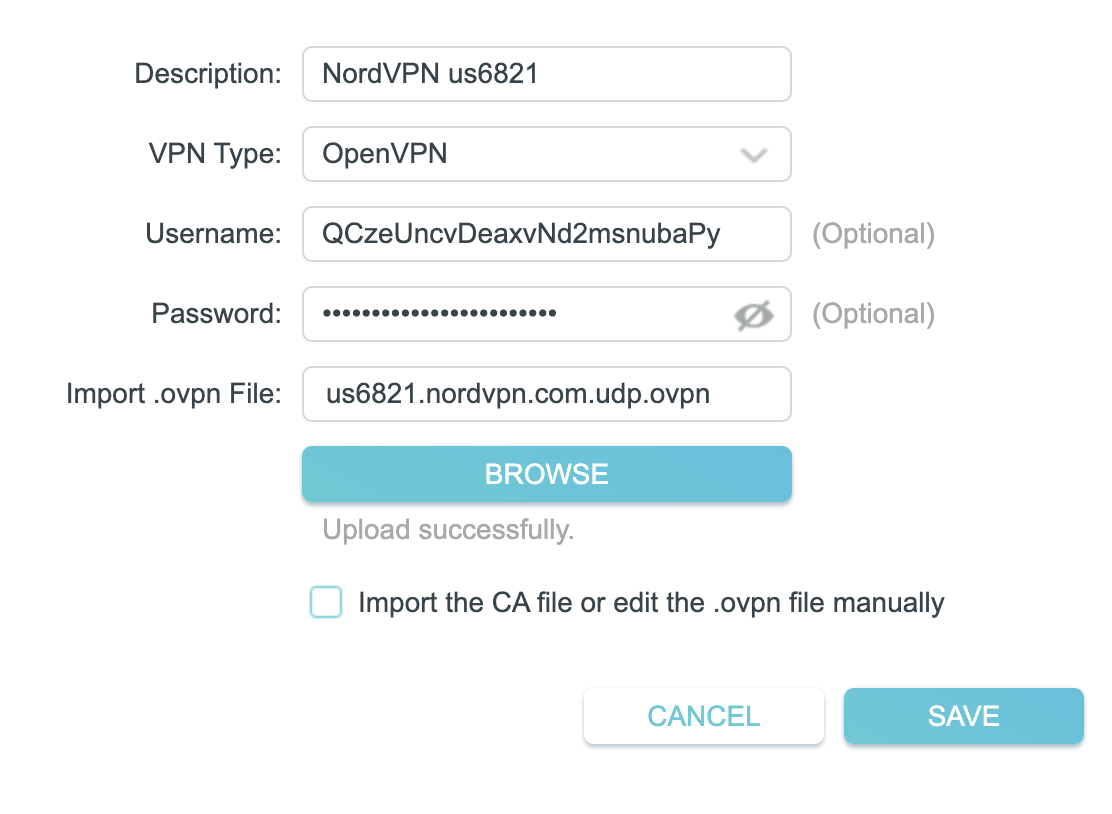
By default no devices will be assigned to the VPN Tunnel. With TP-Link firmware you must manually assign the devices that you want connected to the VPN tunnel. Proceed with the next steps to do so for all devices you want connected to VPN.
6. Click the Add button in the Device List area.
7. A list of devices connected to the FlashRouter’s network will appear. Check the devices that you want to connect to VPN. Then click OK.
8. Now that the devices have been assigned to the VPN connection click the Enable toggle in the Server List area.
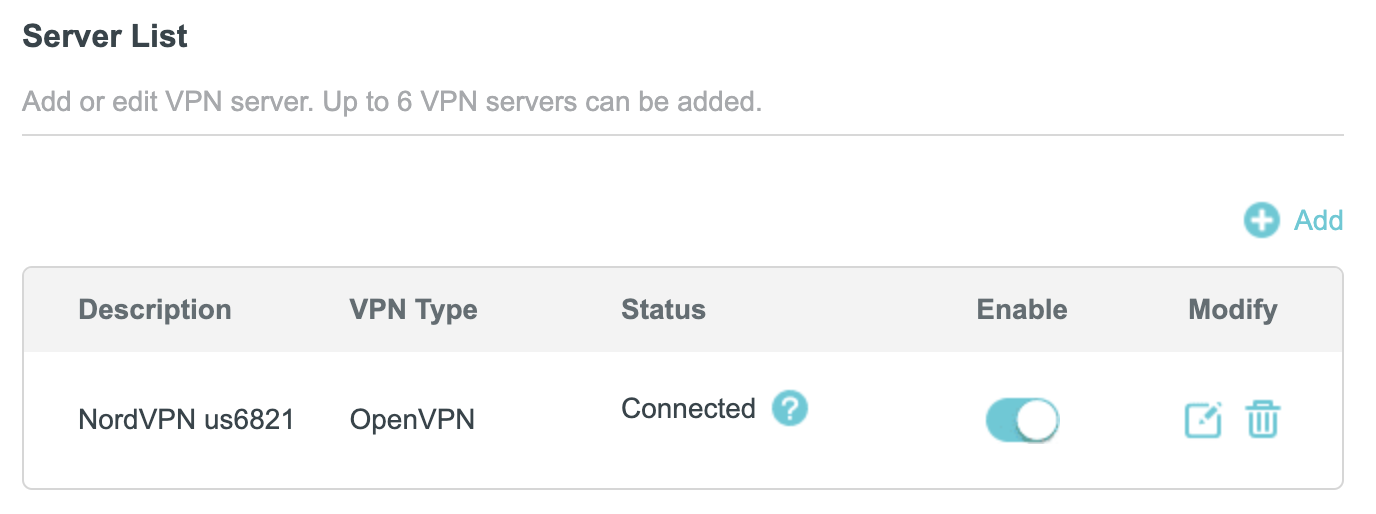
In some cases you may notice that the location is not showing the same location as the server you have input in your router settings; this is because geo tracking tools are often tricked by VPN connections. As long as you see an IP address that is not the same as your normal Internet IP address then you are indeed connected to NordVPN.
If you are not already an PureVPN user Sign Up Now.
1. Log in to your account on the PureVPN website.
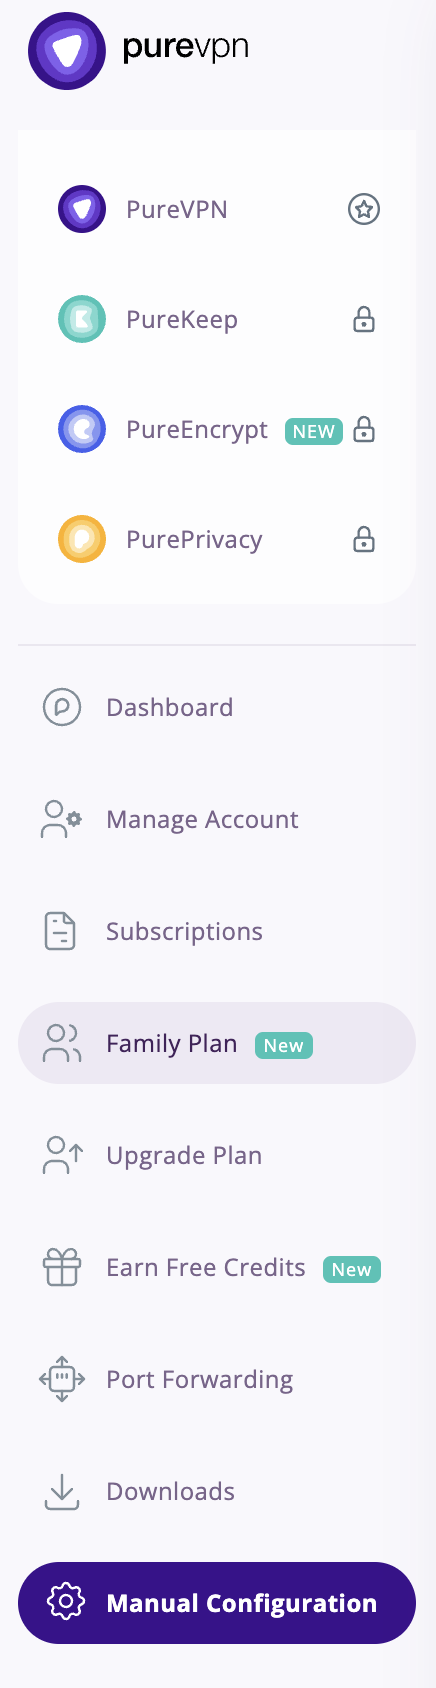
2. Select Manual Configuration.
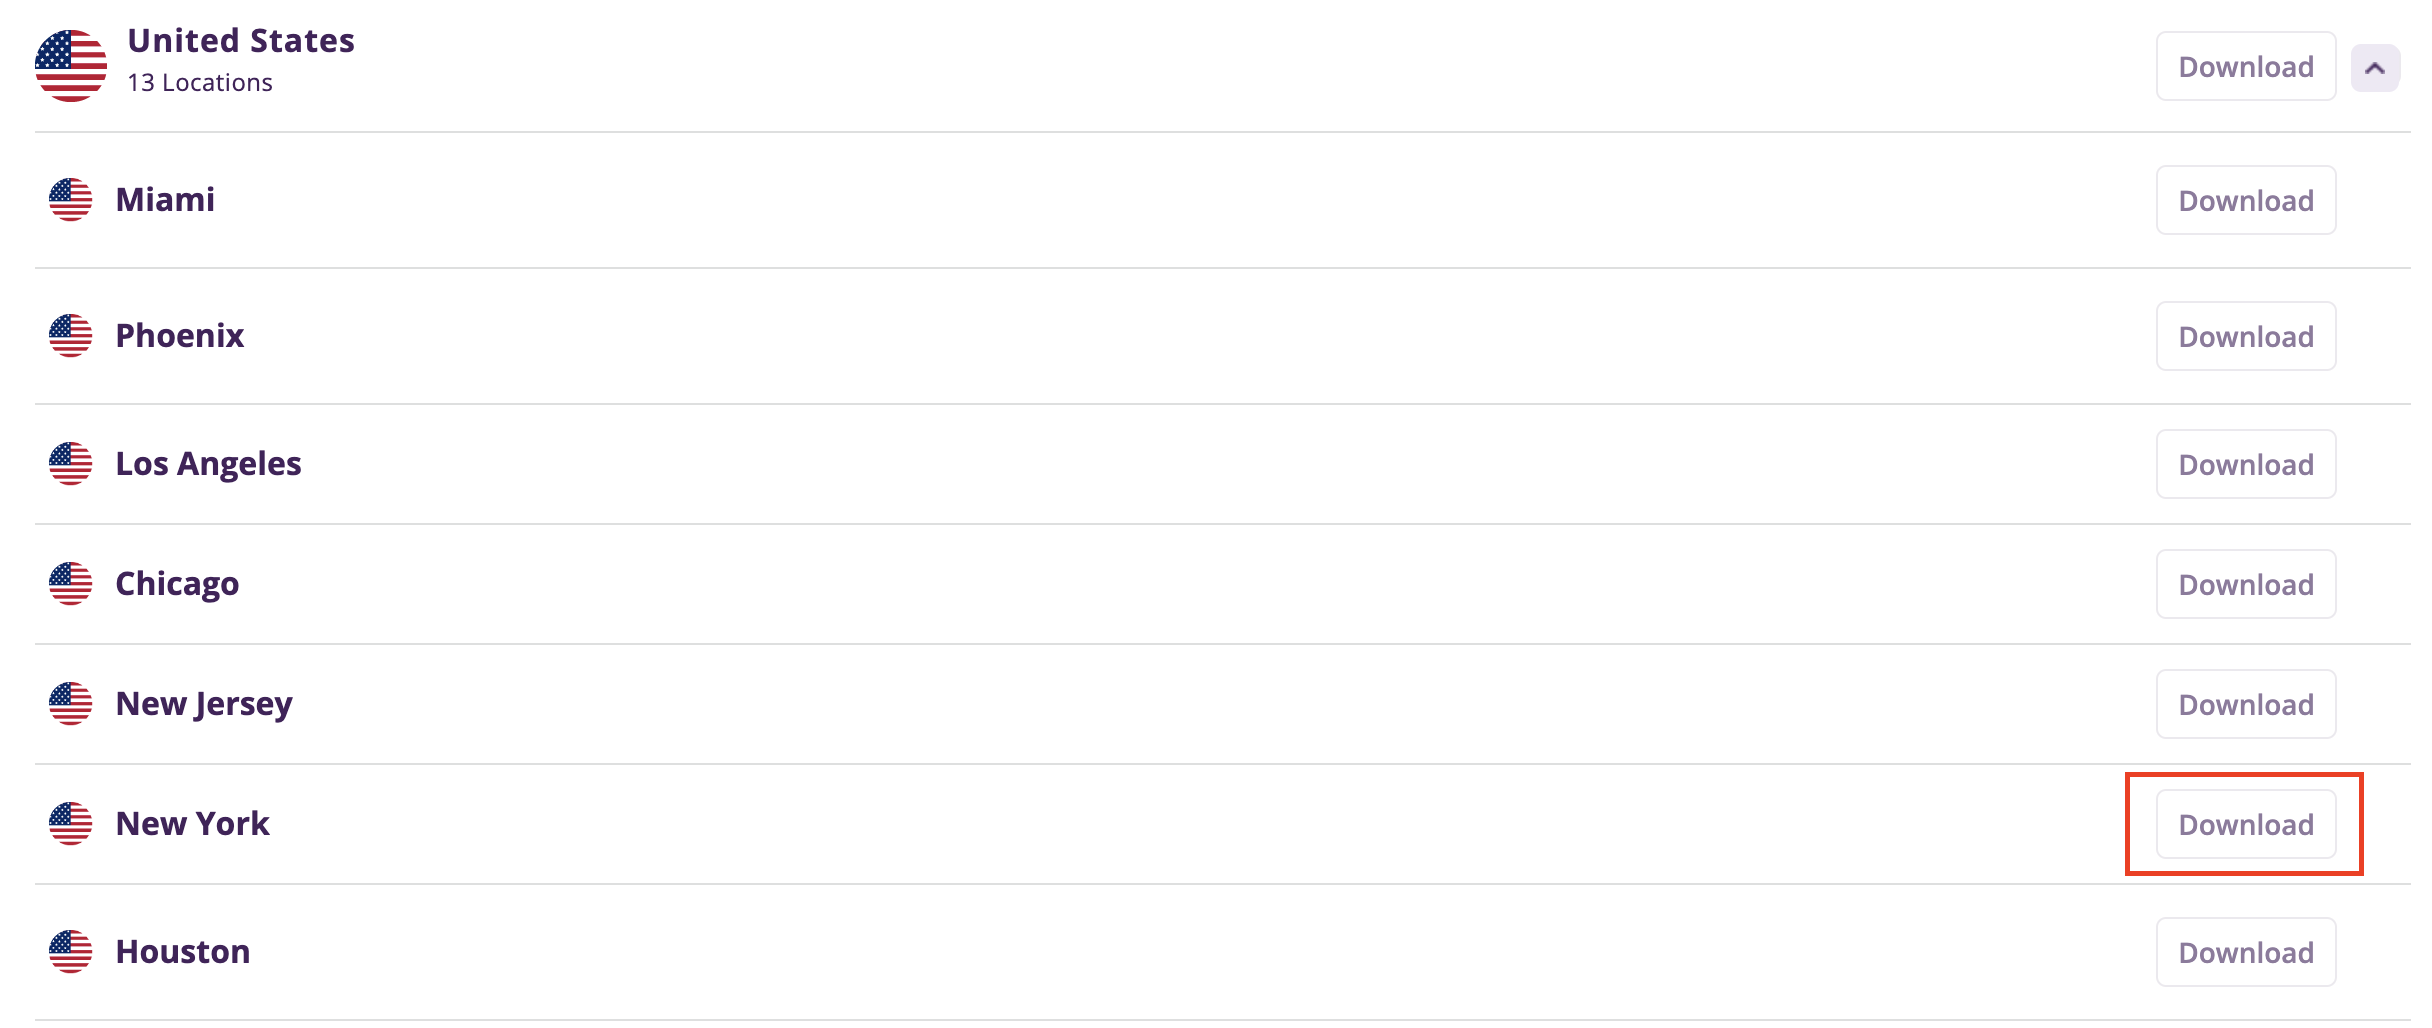
3. Select the Server Location you want to connect to and then click Download.
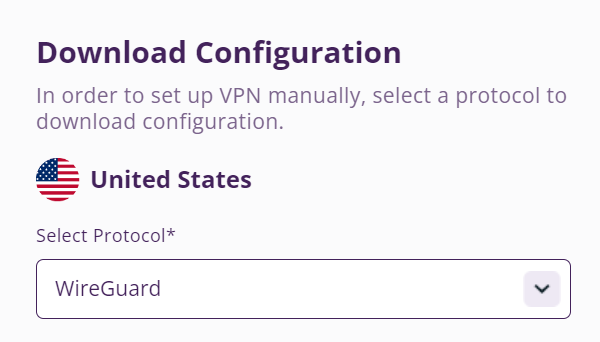
4. In the Select Protocol dropdown choose WireGuard.
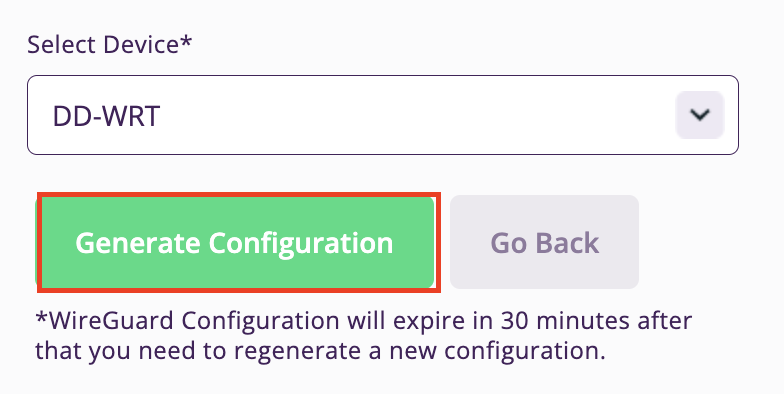
5. In the Select Device dropdown choose DD-WRT. Then click Generate Configuration. This will save a .conf file to your computer.
Login to Asus Merlin firmware settings in a browser on any computer or smart device connected to the Merlin FlashRouter’s network.
1. Navigate to the VPN tab.
2. Navigate to the VPN Client tab.
3. Select WireGuard as the VPN Protocol.
4. Click Choose file and select the .conf file you downloaded earlier. Then click Upload.
5. In the Description field enter in the name you’d like to use for this WireGuard Client profile. We typically advise entering in the location here.
6. Set Enable WireGuard to Yes.
7. Click Apply at the bottom of the page and you should then see a Connected message appear.
8. By default no devices are assigned to the new active WireGuard connection profile. Click the VPN Director tab to assign specific devices to the new WireGuard profile. Your IP will not be changed on your devices yet.
9. On the VPN Director page click the + symbol next to Add new rule.
10. Select the new WireGuard profile in the Interface dropdown.
11. In the Local IP field enter in 192.168.50.0/24 if you want ALL devices connected to the FlashRouter’s network to use the WireGuard VPN connection. Click OK.
If you only want certain devices to connect to the WireGuard Client profile you have setting up instead of all the devices connected to the FlashRouter’s network please complete the instructions on our VPN Director guide.
12. Then click Apply at the bottom of the page.
Visit PureVPN’s IP Check to verify your new IP address and virtual location.
In some cases you may notice that the location is not showing the same location as the server you have input in your router settings; this is because geo tracking tools are often tricked by VPN connections. As long as you see an IP address that is not the same as your normal Internet IP address then you are indeed connected to PureVPN.
Static network settings set on a device from a previous connection will interfere with the FlashRouter’s network. Typically the FlashRouter’s network performs best when connected devices are set to automatically use the FlashRouter’s IP Address and DNS.
Make sure you are connected to the FlashRouter’s network via ethernet or WiFi. Keep in mind these instructions may vary based on your current software version.
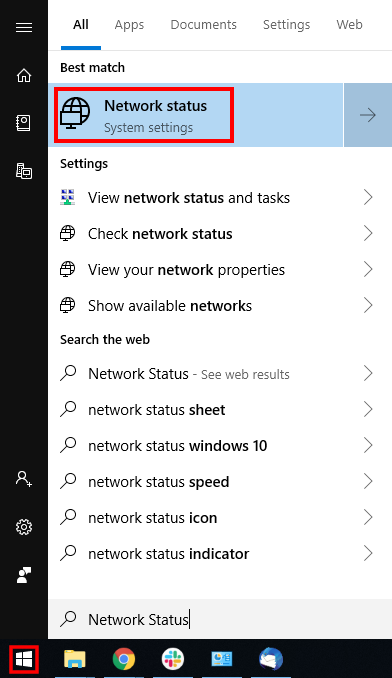
1. Open the Window search box, and search “Network Status”
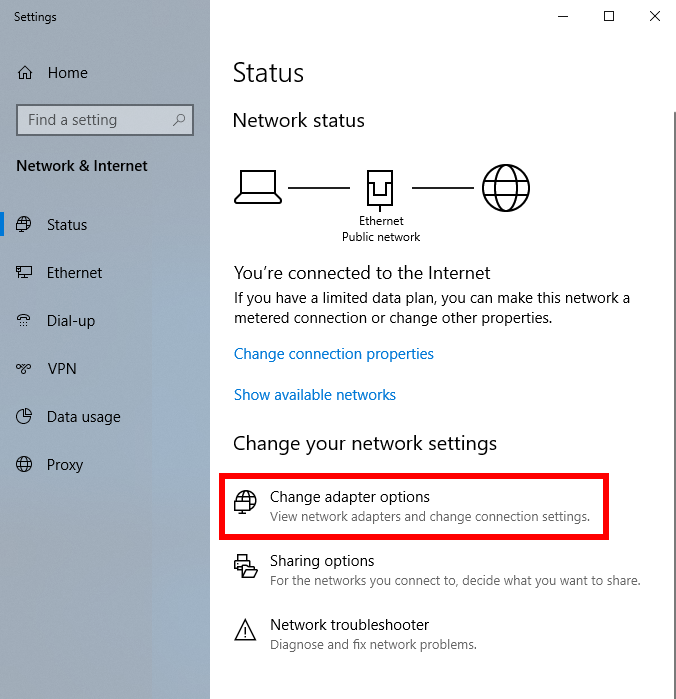
2. Select “Change adapter optons”
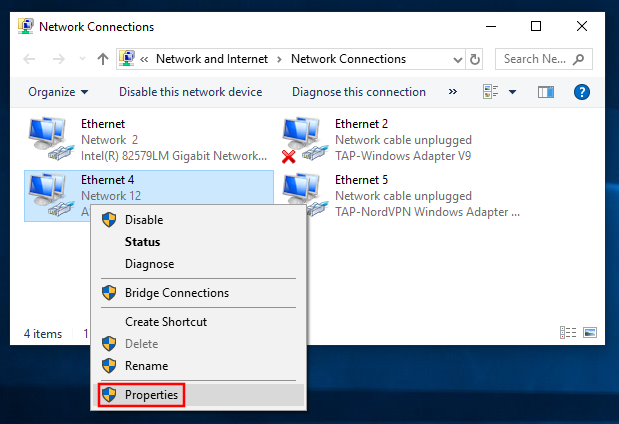
3. Right click on the WiFi and/or ethernet adapter and select Properties.
4. Highlight Internet Protocol Version 4 (TCP/IPv4) and click Properties.
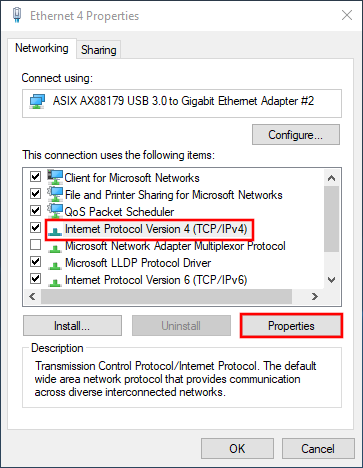
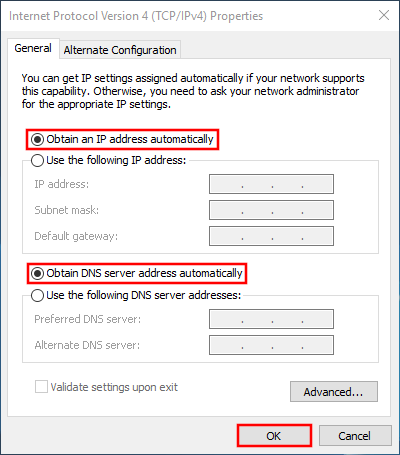
5. Delete the values entered for IP address, Subnet mask, Default gateway, Preferred DNS server, and Alternate DNS server.
6. Select Obtain an IP address automatically and Obtain DNS server address automatically.
7. Click OK.
1. Open System Preferences, and select Network.
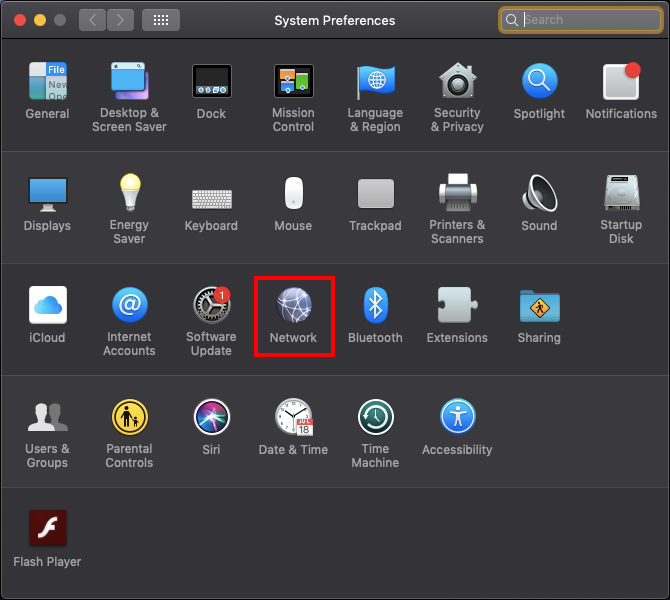
2. Select the adapter that is connected via ethernet or wireless. This will vary based on your current connection.
3. Select Advanced.
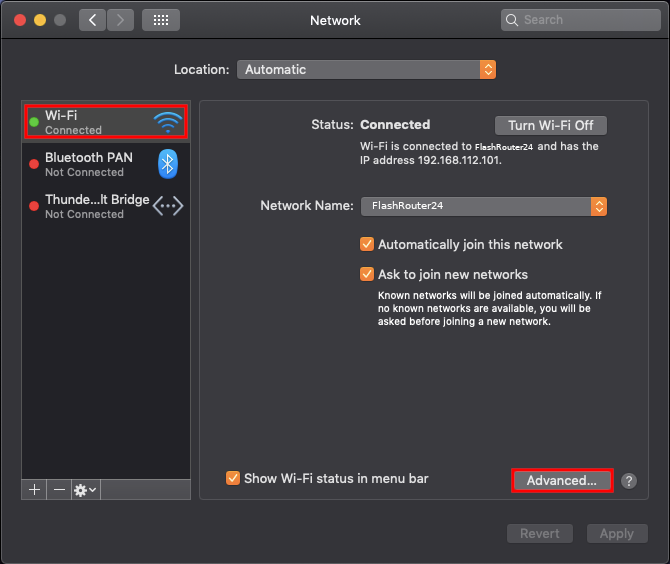
4. Select the TCP/IP tab.
5. Set Configure IPv4 to Automatically.
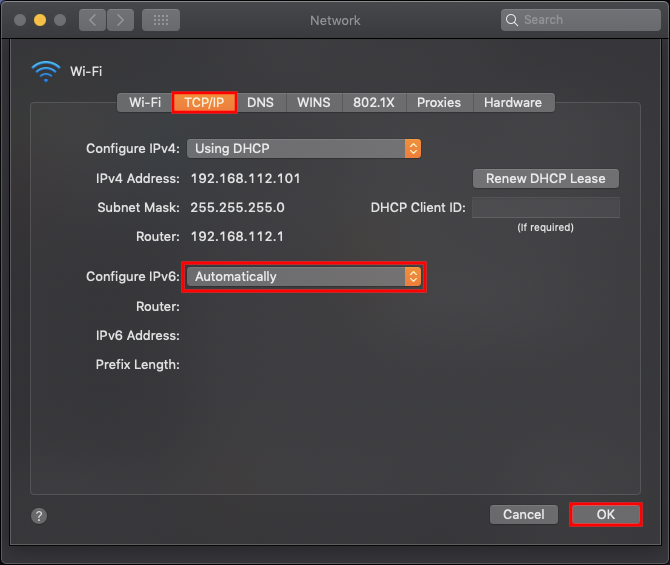
6. Select the DNS field and highlight any DNS servers you see there. If they can be removed you should click the minus symbol below.
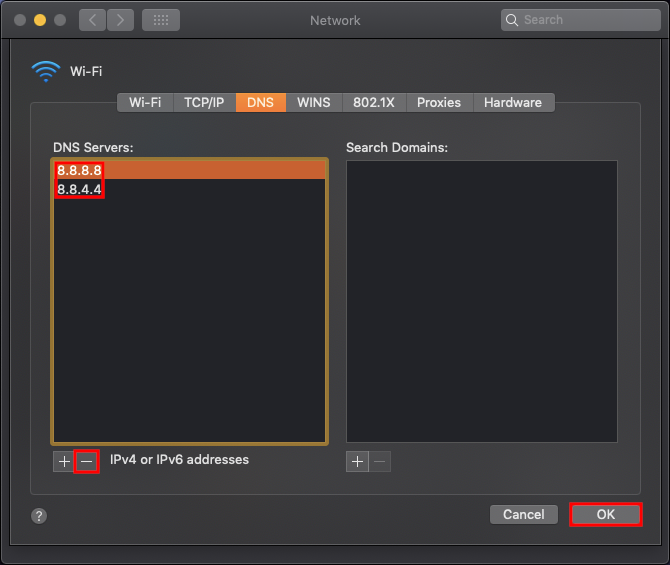
7. Click OK.
8. Click Apply.
1. Open Settings 
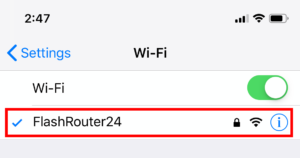
2. Select WiFi, and select the blue icon next to your current connection.
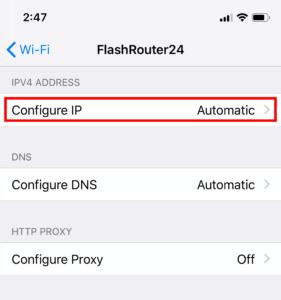
3. Make sure Configure IP is set to Automatically.
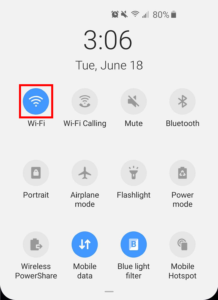
1. From the top of the screen, swipe down to display settings.
2. Select WiFi.
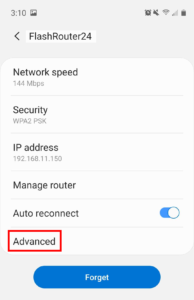
3. Select your current network.
4. Select Advanced.
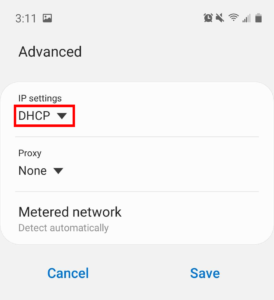
5. Make sure that IP settings is set to DHCP.
Your Privacy Hero NordVPN Router uses cloud-based management, which means you can securely access and adjust your router settings from anywhere, on any device with an internet connection. Whether you’re connected through your phone, another Wi-Fi network, or directly to the Privacy Hero network, setup and management are always within reach.
Follow the steps below to connect your Privacy Hero to NordVPN NordLynx or OpenVPN servers. By default, you’ll automatically connect to the fastest, most reliable server available based on your location. If you prefer, you can also select a specific country server and input it directly into your Privacy Hero for more control.
 Don’t have a Privacy Hero yet? Get your Privacy Hero NordVPN Router here
1. From any device that has a browser such as a computer, smartphone, or tablet visit app.privacyhero.com
2. Enter your Privacy Hero account email and password. Click Login.
3. Click the VPN symbol.
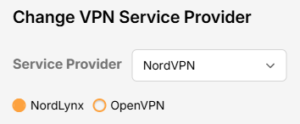
4. Click the Change button and select NordVPN from the dropdown.

5. Click the Change button and select NordVPN from the dropdown and choose the NordLynx option. Next you will need to obtain your Token.
6. In a new tab login to your NordVPN account and select NordVPN from your list of Services.
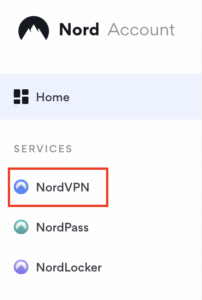
7. At the bottom of the page click Get Access token and you will receive a code via email. Enter this code to proceed.

8. After you enter the email code select Generate new token and set it to Doesn’t expire. Copy this token.
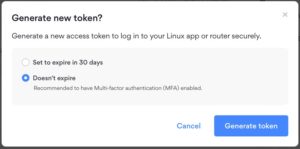
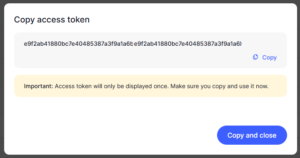
9. Paste the token and then Click Save to connect to the server address recommended by NordVPN within your country.
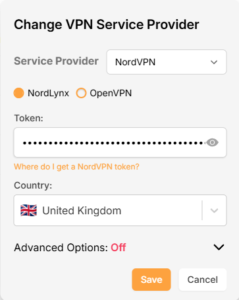
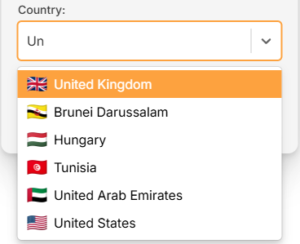
10. To connect to a specific location, click the Country dropdown menu and scroll or type to search from the available options. Choose your preferred country and you will automatically connect to the recommended server within that country at the time. Then click Save.
11. If you prefer to enter a specific server address number click Advanced Options and then type in the NordVPN server you would like to use as shown below e.g. uk1784.nordvpn.com. Then click Save.
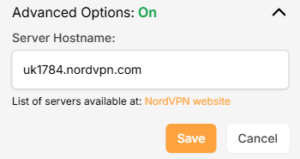
Use the NordVPN’s server recommendation tool to select a specific country and receive a recommendation for the fastest server based on your actual location. You can then enter that server in the Privacy Hero settings manually.
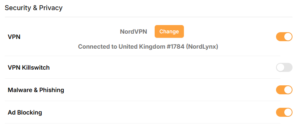
12. Your Privacy Hero settings should now show a Connected message, indicating you have successfully signed in to your NordVPN NordLynx VPN server!
1. From any device that has a browser such as a computer, smartphone, or tablet visit app.privacyhero.com
2. Enter your Privacy Hero account email and password. Click Login.
3. Click the VPN symbol.
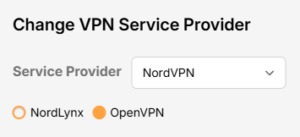
4. Click the Change button and select NordVPN from the dropdown.
5. Choose the OpenVPN option to connect to OpenVPN servers or to setup a NordVPN Dedicated IP address. Next you will need to obtain your Manual Service credentials.
6. In a new tab login to your NordVPN account and select NordVPN from your list of Services.
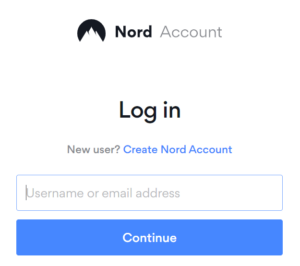
7. At the bottom of the page in the Manual Setup section click Setup NordVPN manually then under the Configuration section go to Service credentials. Click Verify email to receive a code via email and enter the code to view and copy your credentials.

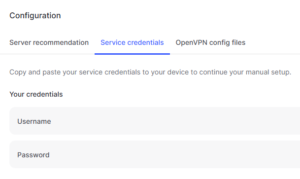
8. Enter these credentials into the OpenVPN Username and Password sections in your Privacy Hero and Click Save if you want to connect to the server address recommended by NordVPN within your country.
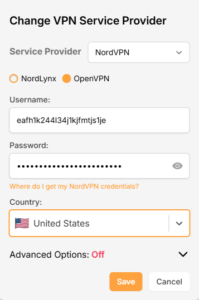
9. To connect to a specific location, click the Country dropdown menu and scroll or type to search from the available options. Choose your preferred country and you will automatically connect to the recommended server within that country at the time. Then click Save.
10. To connect with a NordVPN Dedicated IP Address or if you prefer to enter a specific server address number click Advanced Options and then type in the NordVPN server you would like to use as shown below e.g. uk1784.nordvpn.com. Then click Save.
Use the NordVPN’s server recommendation tool to select a specific country and receive a recommendation for the fastest server based on your actual location. You can then enter that server in the Privacy Hero settings manually.
11. Your Privacy Hero settings should now show a Connected message, indicating you have successfully signed in to your NordVPN Dedicated IP address or preferred OpenVPN server!
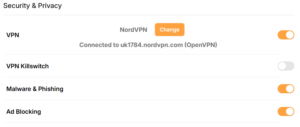
Privacy Hero’s cloud based router settings access makes it so you can change settings while not connected to the Privacy Hero network. Visit the NordVPN IP Check to verify your VPN IP address. If it has not changed be sure to double check that you are indeed connected to the Privacy Hero network.
Keep in mind that the VPN connection will not change the location of the streaming services listed in the Streaming Relocation area of the Privacy Hero settings if the Streaming Relocation feature is Enabled.
If you are not already a PIA user Sign Up Now.
1. Log in to your account on the PIA website.

2. Successfully log in with your account information then go to PIA’s OpenVPN Config Generator.
3. On the OpenVPN Configuration Generator select the following:
OpenVPN Version: OpenVPN 2.4 or newer
Select Platform: Linux
Select Region: Choose the server location you’d like to connect to
Select Port: Typically we recommend UDP/1198 RSA-2048 AES-128-CBC SHA1 for best speeds but feel free to select the one you want to use.
4. Click Generate to download the .ovpn file. Do not open this file once it is downloaded.

Login to TP-Link firmware settings in a browser on any computer or smart device connected to the FlashRouter’s network.
1. Navigate to the Advanced tab.
2. Navigate to the VPN Client tab.
3. Check the Enable box next to VPN Client. Then click Save at the bottom of the page.
4. Click the Add button in the Server List area.
5. In the Description field enter in the name you’d like to use for this OpenVPN Client profile. We typically advise entering in the location. Our example server was New York so I have entered in PIA New York.
Set the VPN Type to OpenVPN.
In the Username and Password fields paste in the PIA username and password you use to successfully login to your PIA website account.
Click Browse and select the .ovpn file you downloaded earlier. Then click Save.

By default no devices will be assigned to the VPN Tunnel. With TP-Link firmware you must manually assign the devices that you want connected to the VPN tunnel. Proceed with the next steps to do so for all devices you want connected to VPN.
6. Click the Add button in the Device List area.
7. A list of devices connected to the FlashRouter’s network will appear. Check the devices that you want to connect to VPN. Then click OK.
8. Now that the devices have been assigned to the VPN connection click the Enable toggle in the Server List area.

In some cases you may notice that the location is not showing the same location as the server you have input in your router settings; this is because geo tracking tools are often tricked by VPN connections. As long as you see an IP address that is not the same as your normal Internet IP address then you are indeed connected to PIA.
If you are not already a CyberGhost user Sign Up Now.
1. Log in to your account on the CyberGhost website.
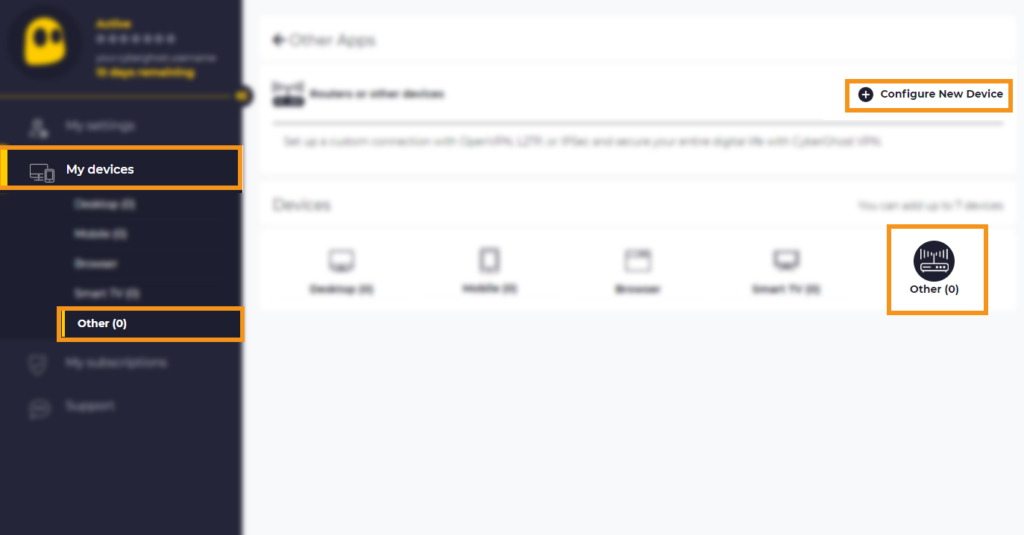
2. Select My Devices.
3. Select Other and then Configure New Device.
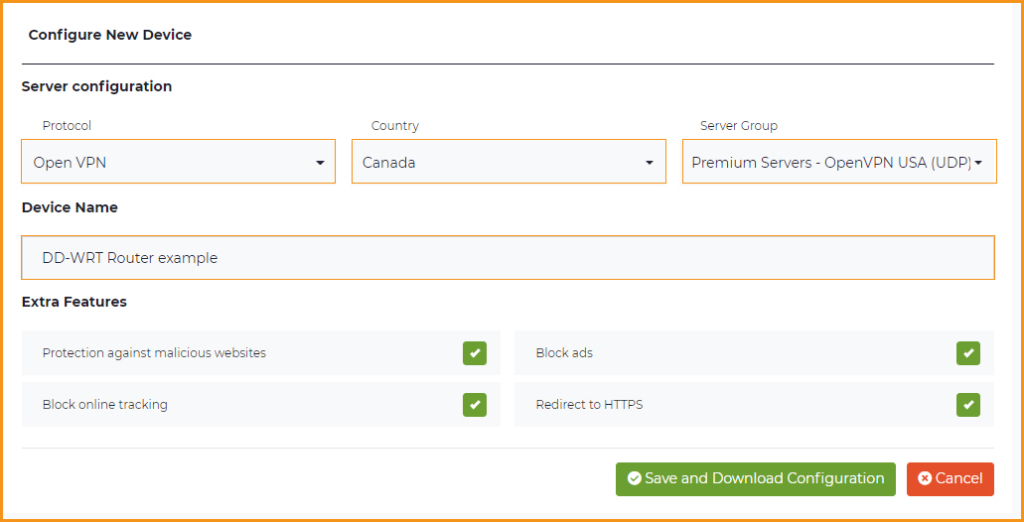
4. Set Protocol to OpenVPN. Select the Country you would like to connect to. Select the Server Group. Name the device in the Device Name field. Click Save Configuration.
5. Press View configuration.

6. Copy the Username, and Password that appear to a notepad, since you will need this information later in the setup process. Click Download Configuration.

Open the file that was downloaded with NotePad++ for Windows or TextEdit for Apple. You only need the ca.crt, client.crt, and client.key files. All CyberGhost servers have different keys and certificates.
Navigate to Services > VPN
Start OpenVPN Client
If you wish to disable your VPN connection simply set this to Disable at any time and click Apply Settings.
Server IP/Name
Copy and paste the server you selected in your account. Be sure there are no extra spaces or characters.
Port
443
Tunnel Device
TUN
Tunnel Protocol
UDP
Encryption cipher
AES-256-CBC
Hash Algorithm
SHA256
User Pass Authentication
Enable
Username
Enter the Username you obtained in your CyberGhost account.
Password
Enter the Password you obtained in your CyberGhost account.
Advanced Options
Enable
TLS Cipher
None
LZO Compression
Adaptive
NAT
Enable
Firewall Protection
Enable
Additional Config
tun-mtu 1500
fragment 1300
mssfix 1300
Policy Based Routing
This field can be used for split VPN and Dual Gateway routing.
CA Cert
—–BEGIN CERTIFICATE—–
MIIGWjCCBEKgAwIBAgIJAJxUG61mxDS7MA0GCSqGSIb3DQEBDQUAMHsxCzAJBgNV
BAYTAlJPMRIwEAYDVQQHEwlCdWNoYXJlc3QxGDAWBgNVBAoTD0N5YmVyR2hvc3Qg
Uy5BLjEbMBkGA1UEAxMSQ3liZXJHaG9zdCBSb290IENBMSEwHwYJKoZIhvcNAQkB
FhJpbmZvQGN5YmVyZ2hvc3Qucm8wHhcNMTcwNjE5MDgxNzI1WhcNMzcwNjE0MDgx
NzI1WjB7MQswCQYDVQQGEwJSTzESMBAGA1UEBxMJQnVjaGFyZXN0MRgwFgYDVQQK
Ew9DeWJlckdob3N0IFMuQS4xGzAZBgNVBAMTEkN5YmVyR2hvc3QgUm9vdCBDQTEh
MB8GCSqGSIb3DQEJARYSaW5mb0BjeWJlcmdob3N0LnJvMIICIjANBgkqhkiG9w0B
AQEFAAOCAg8AMIICCgKCAgEA7O8+mji2FlQhJXn/G4VLrKPjGtxgQBAdjo0dZEQz
KX08q14dLkslmOLgShStWKrOiLXGAvB1rPvvk613jtA0KjQLpgyLy9lIWohQKYjj
5jrJYXMZMkbSHBYI9L8L7iezBEFYrjYKdDo51nq99wRFhKdbyKKjDh3e2L2SVEZL
T1ogkK5gWzjvH+mjjtjUUicK+YjGwWOz6I+KKaG4Ve/D/cE6nCLbhHIMMnargZEu
7sqA6BFeS4kEP/ZdCZoTSX2n43XV1q63nJt/v0KDetbZDciFVW9h9SVPG4qT44p0
550N+Mom7zTX7S/ID5T9dplgU8sRGtIMrG0cIMD9zmpFgUnMusCrR7jJFr0sMAve
TbgZg95LmstV6R6WKZkSFdUrE0DHl4dHoZvTFX+1LhwhHgjgDLaosX0vhG/C/7Lp
oVWimd6RRQT3M9o4Fa1TuhfvBzQ20QHrmRV/yKvGNK0xckZ6EZ/QY7Z55ORU15Tg
ab4ebnblYPWoEmn0mIYP3LFFeoR5OS1EX7+j4kPv+bwPGsmpHjxmZyq2Y7sJBpbO
CJgbkn52WZdPBIRDpPdIHQ8pAJC4T0iMK9xvAwWNl/V6EYYNpR97osyEDXn+BTdA
HlhJ5fck9KlwI9mb1Kg1bhbvbmaIAiOLenSULYf3j6rI1ygo3R2cCyybtuAq8M7z
0OECAwEAAaOB4DCB3TAdBgNVHQ4EFgQU6tdK1g/He5qzjeAoM5eHt4in9iUwga0G
A1UdIwSBpTCBooAU6tdK1g/He5qzjeAoM5eHt4in9iWhf6R9MHsxCzAJBgNVBAYT
AlJPMRIwEAYDVQQHEwlCdWNoYXJlc3QxGDAWBgNVBAoTD0N5YmVyR2hvc3QgUy5B
LjEbMBkGA1UEAxMSQ3liZXJHaG9zdCBSb290IENBMSEwHwYJKoZIhvcNAQkBFhJp
bmZvQGN5YmVyZ2hvc3Qucm+CCQCcVButZsQ0uzAMBgNVHRMEBTADAQH/MA0GCSqG
SIb3DQEBDQUAA4ICAQDNyQ92kj4qiNjnHk99qvnFw9qGfwB9ofaPL74zh0G5hEe3
Wgb2o4fqUGnvUNgOu53gJksz3DcPQ8t40wfmm9I1Z8tiM9qrqvkuQ+nKcLgdooXt
EsTybPIYDZ2cWR/5E0TKRvC7RFzKgQ4D77Vbi4TdaHiDV7ZNfU1iLCoBGcYm80hc
UHEs5KIVLwUmcSOTmbZBySJxcSD0yUpS7nlZGwLY6VQrU+JFwDSisbXT4DXf3iSz
p7FzW0/u/SFvWsPHrjE0hkPoZPalYvouaJEHKAhip0ZwSmitlxbBnmm8+K/3c9mL
A5/uXrirfpuhhs8V3lyV2mczVtSiTl6gpi88gc//JY80JeHdupjO25T3XEzY9cpx
ecmkWaUEjLMx4wVoXQuUiPonfILM6OLwi+zUS8gQErdFeGvcQXbncPa4SdJuHkF8
lgiX2i8S8fPGdXvU37E9bdAXwP5nZriYq1s0D59Qfvz+vLXVkmyZp6ztxjKjKole
mPMak0Y5c1Q4RjNF6tmQoFuy/ACSkWy14Tzu2dFp7UiVbGg1FOvKhfs48zC2/IUQ
v1arqmPT/9LVq3B2DVT9UKXRUXX/f/jSSsVjkz4uUe2jUyL+XHX1nSmROTPHSAJ+
oKf0BLnfqUxFkEUTwLnayssP2nwGgq35b7wEbTFIXdrjHGFUVQIDeERz8UThew==
—–END CERTIFICATE—–
Public Client Cert
Copy and paste all contents of the client.crt file starting and ending with:
—–BEGIN CERTIFICATE—–
…
—–END CERTIFICATE—–
Private Client Key
Copy and paste all contents of the client.key file starting and ending with:
—–BEGIN PRIVATE KEY—–
…
—–END PRIVATE KEY—–
CLICK APPLY SETTINGS
Leave all settings not mentioned above as their default setting.
Navigate to Status > OpenVPN
In some cases you may notice that the location is not showing the same location as the server you have input in your router settings; this is because geo tracking tools are often tricked by VPN connections. As long as you see an IP address that is not the same as your normal Internet IP address then you are indeed connected to CyberGhost.
Navigate to Administration > Backup
Bypassing the ExpressVPN tunnel on certain devices allows you to have multiple IP Addresses while connected to the same router. This feature is very helpful with certain websites where VPN is blocked such as streaming services and banking information.
1. Connect to the FlashRouter’s network via ethernet cable or wireless.
2. Open your web browser and enter expressvpnrouter.com or 192.168.132.1 in the URL.


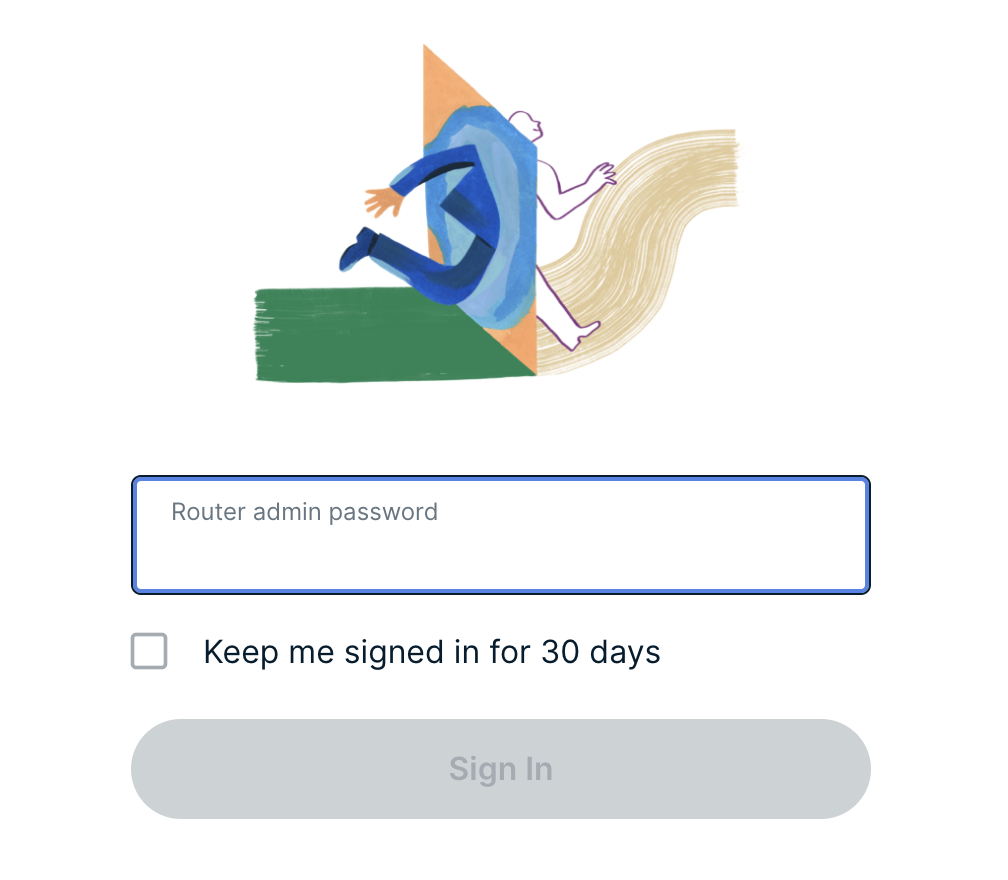
3. Login with your ExpressVPN FlashRouter admin password.
4. Select VPN Off on the right hand side of the menu.
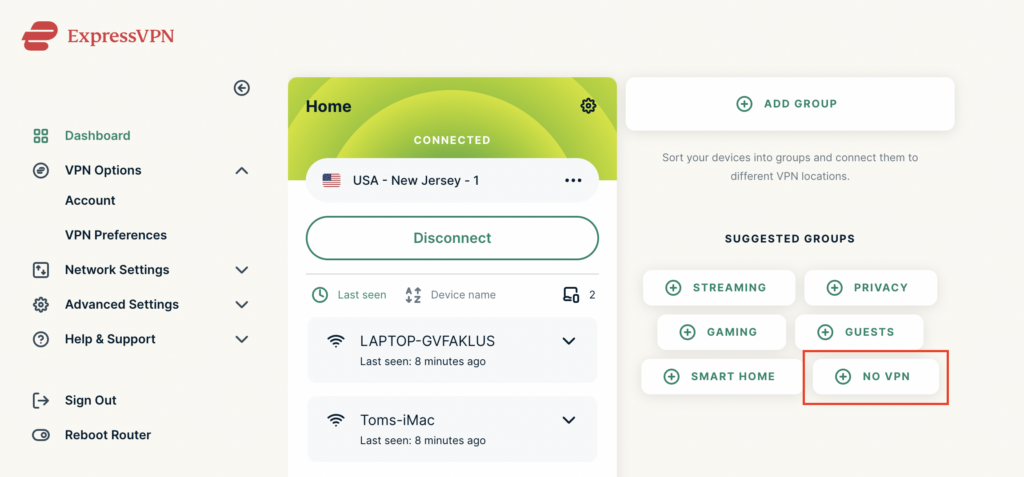
5. Click and drag the device that you want to bypass the VPN tunnel to the No VPN area.
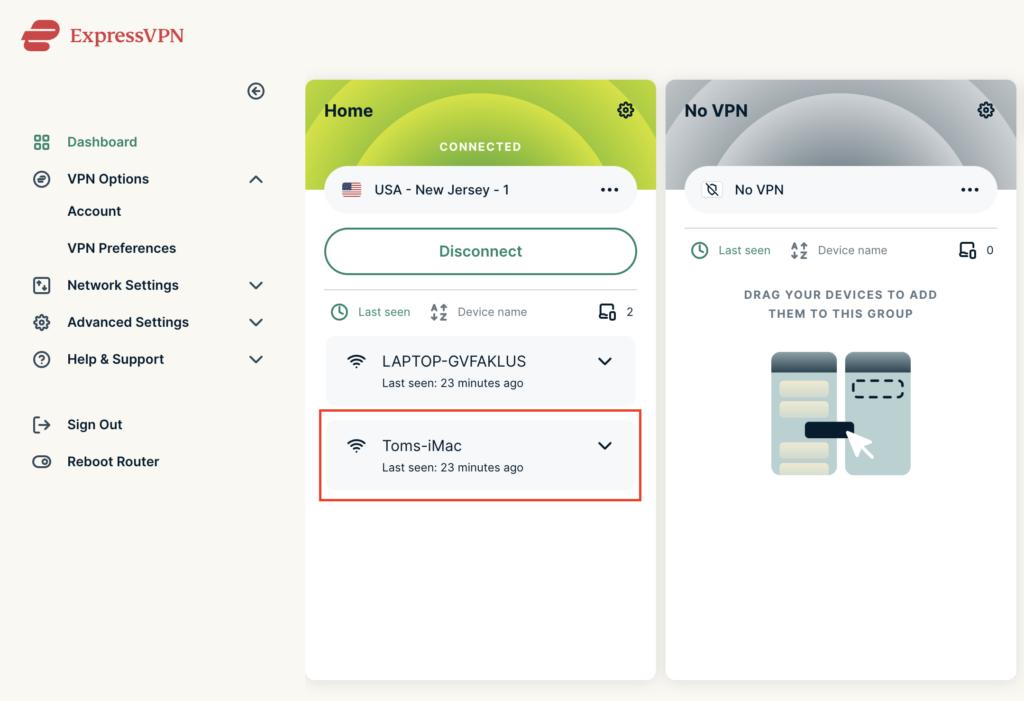
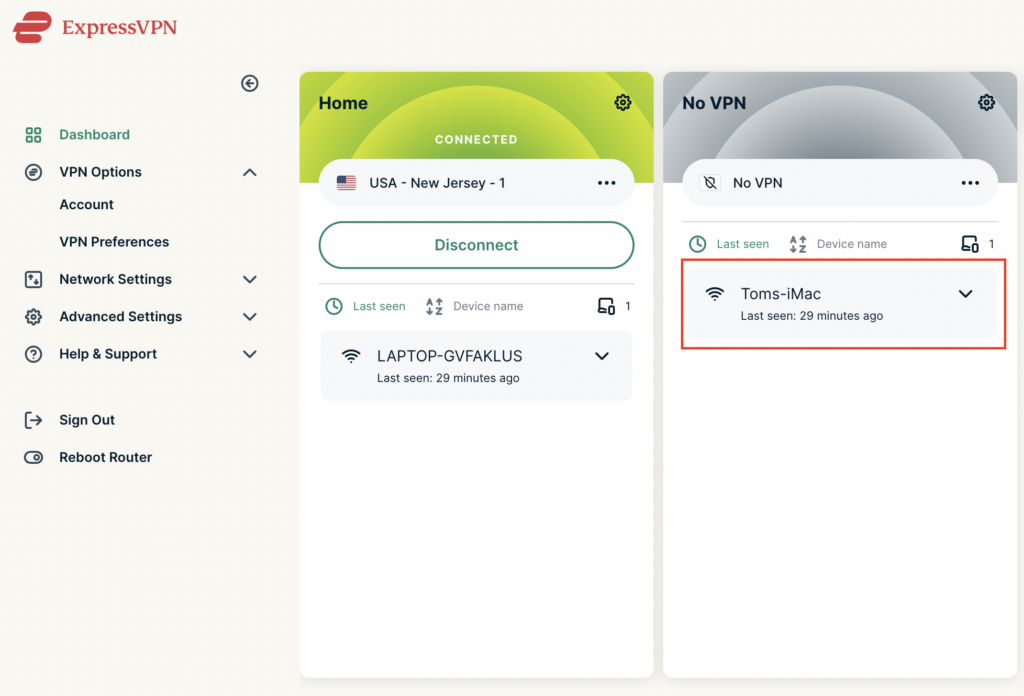
The devices assigned to No VPN will now correct directly to your ISP internet while the devices in the VPN group will remain connected to the VPN server.
 Warranty and Returns FAQs
At FlashRouters, we are confident that every router sold will function as advertised. We open, inspect, upgrade, configure, and then test all FlashRouters before they get shipped out. That is why we guarantee you will receive a working unit and offer our own 1-Year Hardware Warranty included with all New and Refurbished routers purchased from the FlashRouters website.
If you would like to extend the warranty coverage period to 2 years, the option is available during the FlashRouters checkout process.
Since we are so certain you will be happy with your upgraded and super secure network, all routers purchased from FlashRouters.com also come with a 30-day satisfaction guarantee.
Please read the warranty and return section in detail before placing an order or requesting an RMA. Our goal is to make the return process as smooth and transparent as possible for all customers. If the router you purchased does not work out for your needs we still want you to be satisfied with your purchasing experience.
Automated Return Merchant Authorization (RMA) requests are available from within your customer account panel. If you are eligible for a return then your RMA request will be approved. If your RMA request is not valid then it will be denied and you must e-mail FlashRouters Support for any additional information or actions. RMAs are valid for 7 days from the day they are issued.
The following are the available options when submitting an RMA request. Continue reading for more information on all available RMA options and conditions.
Please note we can only provide prepaid labels for approved Hardware Warranty returns within the USA. Prepaid labels are not available for international customers. All return shipping for 30 Day Satisfaction refunds is paid for by the customer.
In the rare case you receive a faulty router, you can open a ticket to contact FlashRouter Support for an RMA or request an RMA in your customer account panel and we will work to rectify the situation immediately. If it is determined that the power supply you received was faulty, and not the router itself, our team will immediately ship you out a tested power supply at no additional cost.
Rest assured that we individually test and inspect every FlashRouter with great detail before shipment. BUT… if router gremlins (yes they do exist) snuck into your router during the shipping process and it no longer powers on, our team will supply you with a prepaid shipping label to return the unit back to our offices. As soon as we receive verified tracking on your return shipment we will ship out another thoroughly tested unit to you at no additional cost.
You must contact us within 7 days from when you received your FlashRouter to be eligible for a Hardware Guarantee prepaid shipping label from FlashRouters.
If you are not satisfied with the performance of your router after trying it out for up to 30 days, you can open a ticket to contact FlashRouter Support for an RMA or request an RMA in your customer account panel. Once the RMA is approved, you will then have the option to ship the unit back to FlashRouters.
Once we receive the return, our team inspects and refunds accordingly based on the original purchase price of your FlashRouter. Please note there is a $25 restocking fee and refunds do not include any initial shipping costs associated with your order. All restocking fees are returned as Store Credit. This means if you make another purchase at FlashRouters then your fee is refunded.
The item must also be fully functional and have no signs of cosmetic damage for you to receive the maximum refund. If you do not include the original boxing, or any router accessories you may also be charged an additional fee as indicated.
Ethernet Cable: $5
Power Source: $10
Antennas: $5 per antenna
Router Stand: $10
Box: $10
Cosmetic Damage: Up to $25
What is covered under the 30-Day Satisfaction Guarantee?
If the VPN speeds or WiFi network speeds are not what you had hoped, if the setup is too complicated, or you just decided on another solution; these are all covered under the 30-Day Satisfaction Guarantee.
We will not accept any returns of working routers after 30 days from the date you received your router. After 30 days, router returns/replacements will only be processed under the Hardware Warranty.
Can I get the restocking fee waived?
If you place a new order for a different FlashRouter unit before returning your initial purchase, then we will waive the restocking fee. Otherwise the $25 restocking fee will be applied to your customer account as a store credit. You can then use this $25 store credit on any future FlashRouter purchase.
Rewards Points refunds
If you return your FlashRouter under the 30 day satisfaction guarantee then you will lose any reward points received for your initial purchase.
A 1-year Hardware Warranty is included with the purchase of all New and Refurbished FlashRouters. If your router suffers hardware failure within 365 days from the date you received the unit then we will replace your router with another fully tested unit. You must pay for return shipping of the faulty unit back to our offices located in New Jersey, USA and our team will ship out your replacement at no additional cost.
You must contact the FlashRouter support team for an RMA number or request an RMA from your customer account panel before returning a router for warranty replacement. If you do not receive approval for a return then you will not be eligible for a replacement unit.
There are 2 options for receiving a Hardware Warranty replacement unit:
Option #1: Process another order for immediate shipping and as soon as we receive the returned device back in our offices we will issue you a refund for the initial purchase.
Option #2: Ship your faulty router back to our office, and as soon as we receive the unit our returns department will have a replacement unit shipped out to you at no extra cost.
How long do I have before my RMA expires?
RMA’s are good for 7 days from the date they are issued.
What if I upgraded to a 2 year Hardware Warranty at checkout?
All refund, replacement, RMA details, and options covered by the 1-year Warranty apply in the exact same manner for 2 year warranties over each respective warranty coverage period.
If for any reason the router you purchased is no longer in stock or discontinued then you have the option to replace your router with one of equal value or receive a refund. Hardware warranties are only eligible for refunds if we are unable to provide a replacement unit for you.
What should I do if my router is out of warranty coverage?
If your FlashRouter is out of the warranty coverage period, we are first and foremost apologetic for the passing of your router. Be sure to contact our sales team though and you can receive a special coupon as a return customer for a shiny new wireless networking centerpiece.
What is not covered with a FlashRouter Warranty?
Items that have been clearly damaged either by the customer or during the return process are not eligible for a full refund. This includes routers that have visible dents, scratches, or moving parts inside the router.
Can I upgrade to a 2 year warranty after my FlashRouter purchase?
2 year warranty upgrades are only available at the time of your FlashRouter purchase. Upgrades are not available once a FlashRouter order has been shipped.
Can I get a Warranty on my router if I purchased a “Flash My Router” plan from FlashRouters?
Routers that have been “flashed” and configured by our support specialists for anyone who has purchased a Flash My Router Plan are not eligible for warranty coverage from FlashRouters. Only routers purchased through the FlashRouters.com website are eligible for warranty replacements or refunds.
FlashRouters is proud to offer a free repair and upgrade service for anyone with an active Silver or Gold Service Plan subscription. Any and all shipment costs associated with FlashRouter repairs or upgrade requests are the burden of the customer and will not be paid for by FlashRouters. However, the repair and upgrade service itself is FREE.
If you do choose to ship your router back to our office for repair, then you should include a prepaid shipping label in your package back to your home or office, so our team can send the router back to you whether we are able to repair the unit or not. Router accessories like power supplies, ethernet cable, or antennas do not need to be included when shipping back a unit for repair.
If our team is not able to resurrect your router from a power failure, faulty firmware upgrade, or any other reason then we can return the faulty unit back to you using the return shipping label included with your return package. Alternatively, we can destroy the unit and refund the return shipping costs if that is your preference.
What is an Open Box Router?
Open Box routers are fully functional units that have cosmetic flaws and are sold at heavy discounts. These units come with the same Support Plan options as New or RM units, which means you get the same support service with extremely discounted hardware.
Open Box routers are covered under the FlashRouter 30-Day Satisfaction Guarantee BUT come with no Hardware Warranty. We take every measure possible to ensure complete functionality and our team fully load tests these devices before shipment, but you should be very aware that you buy these discounted “open box” devices at your own risk without any Hardware Warranty.
What is the Open Box Router return policy?
Open Box Routers can only be returned within 30 days from the date you received your router. Returns will not be accepted on open box routers after 30-Day Satisfaction Guarantee window has expired. Please note that Open Box Router return shipping costs are not covered by FlashRouters and initial shipping costs are not included in any refunds.
All Accessories come with manufacturer warranties as listed on the respective product pages.
FlashRouters will accept returns for refund or replacement of accessories only within 30 days from the date you received your order. After 30 days you must contact the manufacturer for any warranty replacements.
Accessories must be returned with all original packaging and with no cosmetic damage to receive a full refund. A missing box or damage to an item will result in a restocking fee per our discretion.
The “Flash My Router” product offered by FlashRouters is a virtual service provided by the FlashRouters support team. This product includes a remote support session where our support team will flash your router and then complete your internet, WiFi, and VPN setup, and in certain cases support additional router features.
Once your remote support session is completed there are absolutely no refunds on “Flash My Router” purchases. In the case we are unable to successfully flash your router we will offer a full refund for your “Flash My Router” purchase. “Flash My Router” purchases are fully refundable if you decide you would no longer like to use the service after your purchase is completed.
All FlashRouter router purchases include a recurring FlashRouters Service Plan subscription. There are 3 levels of support to choose from as either a quarterly or yearly recurring billing plan.
If you choose to return your FlashRouter under the 30-Day Satisfaction Guarantee, then you are eligible for a full refund on any Service Plan purchased with your FlashRouter.
You may cancel your recurring billing at any time and you will not be charged again. Please note you will not be refunded for unused time from the initial billing/service period of your support plan subscription.
If you choose to cancel your 3 month FlashRouter support plan then you will retain support until the end of the 3 month period. If you choose to cancel your 1 year FlashRouter support plan then you will retain support until the end of the 1 year period. You will not lose time from your existing service plan if you cancel when a plan is active.
There is a 7-day grace period after Service Plan renewals have been charged, where you may request an immediate cancellation and full refund.
How do I Upgrade my Service Plan?
You can upgrade a Service Plan at any time during a billing cycle. You must e-mail or live chat our support team and request an upgrade. Our team will then issue you store credit for any unused time on your existing Service Plan, which will then be immediately applied to your new upgraded Service Plan purchase. Your recurring billing will then continue at the new Service Plan level. Your 3 months or 1 year of upgrade service will start again from the date of the upgrade purchase.
How do I switch from a Quarterly to a Yearly Service Plan?
If you would like to switch to a Yearly plan from a Quarterly plan of the same service level, then you must e-mail or live chat our support team and request an upgrade. Our team will then issue you store credit for any unused time on your existing Quarterly Service Plan, which will then be immediately applied to your new Yearly Service Plan purchase. Your recurring billing will then continue at the Yearly Service Plan level. Your 1 year of service will start again from the date of the upgrade purchase.
How do I Downgrade my Service Plan?
If you are subscribed a Service Plan, but would like to switch to a lower level Service Plan then you can request that our support team cancel your recurring billing at any time. As soon your existing Service Plan is expired you can make a new purchase for the new Service Plan of your choice.
How do I switch from a Yearly to a Quarterly Service Plan?
If you would like to change the billing cycle from yearly to quarterly, you may cancel your existing subscription plan and then once your year of service has expired, you may purchase a Quarterly Service Plan instead.
If you just purchased a FlashRouter, there is a 7-day grace period from when you receive your unit if you would like an immediate change from Yearly to a Quarterly Service Plan.
You may request a Service Plan subscription cancellation by e-mailing support@flashrouters.com or from within your customer account panel at any time. You will be notified of a successful cancellation and your payment method will not be billed again.
Please note there are no refunds when cancelling your subscription. Cancellation means you will not be billed again for your Service Plan, there are no partial refunds for cancelled Service Plans.
If you are not already a AirVPN user Sign Up Now.
1. Log in to your account on the AirVPN website.
2. Click on the Client Area tab.

3. Click on the Config Generator subtab.
4. Click on the Router icon under Choose your Operating System.
5. Select a Protocol under the Protocols section. We recommend UDP.

6. Select one option under the Choose Servers section. AirVPN sorts these servers by Planet, Continent, Country, and Single servers. Choose whichever best suits your needs.
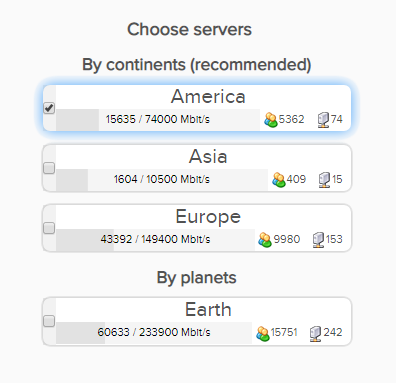
7. Scroll down towards the bottom of the page and click on Generate.
Open the file that was downloaded with NotePad++ for Windows or TextEdit for Apple. You will be copying the Server IP/Name, client.crt and client.key from this file.
Please note, all VPN servers have different keys and certificates. If you wish to change servers in the future, you will have to go through steps 1-7 again.
Navigate to Services > VPN
Start OpenVPN Client
If you wish to disable your VPN connection simply set this to Disable at any time and click Apply Settings.
Server IP/Name
Copy and paste the server you selected in your account. Be sure there are no extra spaces or characters.
Port
443
Tunnel Device
TUN
Tunnel Protocol
UDP or TCP
Encryption cipher
AES-256-CBC
Hash Algorithm
SHA1
User Pass Authentication
Disable
Advanced Options
Enable
TLS Cipher
None
LZO Compression
No
NAT
Enable
Firewall Protection
Enable
nsCertType verification
Checked
Policy Based Routing
This field can be used for split VPN and Dual Gateway routing.
TLS Auth Key
—–BEGIN OpenVPN Static key V1—–
7bb7a23a0f5f28d01e792df68f1764ab
f2688719288808bf58e8a2d4f9354ecf
132625dfb895fc3f6330ae1e868e4dfa
c164c0931593d7f9a7da9595cf353433
8896e1d0a987a0d19838944af8fea4e5
215a3a0c76f4c67d5a4aee6a53be66a4
c88b84f850030840fb30f8550ed8068f
35c1ef34ee8f40a0ea5862dfb6f8d3c5
7ab5e27ac2799cf93e8765ff63cd8cd8
6b391b813925cd373bb202796f64d16f
003d042ca828d1b07f18ba1d0cb0323d
df3ee9287e9e084e655699efb3cffa92
3626946fa372e7beee245e7a95b4c1d8
7d16cae685218d4b8afc019b22e41083
476ee9883fe666d236301e55b2062551
4d91c8a69467a758293994df1e6fa7ae
—–END OpenVPN Static key V1—–
CA Cert
—–BEGIN CERTIFICATE—–
MIIGVDCCBDygAwIBAgIJAIzYQ+/kXyADMA0GCSqGSIb3DQEBBQUAMHkxCzAJBgNV
BAYTAklUMQswCQYDVQQIEwJJVDEQMA4GA1UEBxMHUGVydWdpYTETMBEGA1UEChMK
YWlydnBuLm9yZzEWMBQGA1UEAxMNYWlydnBuLm9yZyBDQTEeMBwGCSqGSIb3DQEJ
ARYPaW5mb0BhaXJ2cG4ub3JnMB4XDTE0MDQxMTEwMTU0NVoXDTI0MDQwODEwMTU0
NVoweTELMAkGA1UEBhMCSVQxCzAJBgNVBAgTAklUMRAwDgYDVQQHEwdQZXJ1Z2lh
MRMwEQYDVQQKEwphaXJ2cG4ub3JnMRYwFAYDVQQDEw1haXJ2cG4ub3JnIENBMR4w
HAYJKoZIhvcNAQkBFg9pbmZvQGFpcnZwbi5vcmcwggIiMA0GCSqGSIb3DQEBAQUA
A4ICDwAwggIKAoICAQDGG3ZrJbP61PNjGc4mjTx0TLkUjP7IXZ3wnpPjwF/lwK9n
HgRqoPL0KY/ABJuzMViD8ChtwthNfc7PuJ7vSPtN84lSJ4JGmTxvZkNeLQLZsu1F
f88OcSpjW5ErBM05iVBeF8/ljwaajgFfbgop9W/UK5yMji4qgq5KHxxXqsB8R4rC
eFpWHoNTwFjvXhtVyMgXiT9XAh/vBYim021m8onio4K48q7YRZ4qU8gvE79h5M0g
miIlt6v1vaZskw9cqIBbCYefGMsvBRk2x824ChPf6FazMwAnQHsuBHt6eXAARvfF
DBDanzPHlRSiCP6Je6Vod/MPyepiTZgjgk2VxYUc1ohNxEEGzPGTayeNzLJUldou
P4B+tjJ0Xly30+wvlahADlqjtz3CGQmKMj7btZjd+Uo61B7gau5YiXR/IO7ZpFAC
PCZJSbrwFs6rt9Kewqk8zslfVIro8oDndXRkVsa/c8Qmd6ZE7V+oMGl2OggdWOLl
mDEjkytzx+Bw2sSSalJRAQmOQO8V0anOI6jGYLuU2jnFDsnqSHuwIK11xb6iHmh7
ONsRLUtQ+d64TzB00w2M0fCvGqUIp0N+lf7nsZKsEcU08OoHQYUuwX75ZEOYNSZJ
rqAXohcXdVUHqgRlJRErfSkjcGMM0yqjHkvopcnBIRXKMYTDVXvzRJboyJiVpQID
AQABo4HeMIHbMB0GA1UdDgQWBBTlFdcTqJ4x49Ew1/Ef9OJj0lDIiDCBqwYDVR0j
BIGjMIGggBTlFdcTqJ4x49Ew1/Ef9OJj0lDIiKF9pHsweTELMAkGA1UEBhMCSVQx
CzAJBgNVBAgTAklUMRAwDgYDVQQHEwdQZXJ1Z2lhMRMwEQYDVQQKEwphaXJ2cG4u
b3JnMRYwFAYDVQQDEw1haXJ2cG4ub3JnIENBMR4wHAYJKoZIhvcNAQkBFg9pbmZv
QGFpcnZwbi5vcmeCCQCM2EPv5F8gAzAMBgNVHRMEBTADAQH/MA0GCSqGSIb3DQEB
BQUAA4ICAQCUVAQteCtgNQiZMXV0wCdqivlxlCCuj5sD+XvEuoDqb7dH70u1KQ90
OAbkeotHlIbqJU10xWtvHEjnXg8QG5VOzaWnWWev+ivdPCkGWe8E7C8shsr4WMlA
EF8PPRtzOwCKayxjR713x+Tc2Sb6/rDsXcY5LV6RNmE9HWBM6IoHdqruR8PHkYge
2CPXMuLByEADri6xmvussAjCWEDplJNY7tQsUGT7vjrwrNSNBx/SvxkXnWBj0wYa
EwNu43jrjcRfM/3eGcKDX3cQqTfRQd3j3OA7zmJOXPeExRUIWZTNCvQItGy1TJdw
JTphflw15Bui4l2mYfDqK08zm4aJODrCjoQnVVzM5uOzSTOjmneI6AHj3MjjL3A/
CFA5PCSquBhUycF4UEVf3aPGiV0vAthCBUqM4eKE+rbjWPSaxKghVdr/S82o7Wzz
9mGwnOZDqWk+8AWSsGBjamMk3mNMR45E9FRfPF/dyjOSbVyyTsd1VzlTFEJa0wjB
l3yq3r3iZAM3UtevocAyTEAu0vDYBbS6TgWmWEDOizybB0hNrTx5u/SEI0Kwcthc
rilYxD+n4kmV7TvIR0ZSaYpgYALWQV27zOqY51Ol4UT98WCOokge9HdoFcGJU2Uj
5VneGp14/Oklh7y6BxxxGC3zNGjKGNQYuHGTIgw1DoASmRUdkPkn/w==
—–END CERTIFICATE—–
Public Client Cert
Copy and paste all contents between <cert> and </cert> make sure to also include the following lines when copying and pasting:
—–BEGIN CERTIFICATE—–
…
—–END CERTIFICATE—–
Private Client Key
Copy and paste all contents between <key> and </key> make sure to also include the following lines when copying and pasting:
—–BEGIN PRIVATE KEY—–
…
—–END PRIVATE KEY—–
CLICK APPLY SETTINGS
Leave all settings not mentioned above as their default setting.
Navigate to Status > OpenVPN
In some cases you may notice that the location is not showing the same location as the server you have input in your router settings; this is because geo tracking tools are often tricked by VPN connections. As long as you see an IP address that is not the same as your normal Internet IP address then you are indeed connected to AirVPN.
Navigate to Administration > Backup
Your Privacy Hero router uses Cloud Based router management which means you can access the router settings from anywhere on any device that has an internet connection. You can follow these steps while connected to your phone, other Wi-Fi network, or the Privacy Hero network.
Use these steps to enable Privacy Hero’s adblocking, malware, and phishing prevention settings to add extra security to your network.
1. From any device that has a browser such as a computer, smartphone, or tablet visit app.privacyhero.com

2. Enter your Privacy Hero account email and password. Click Login.

If you have not created your Privacy Hero account yet please follow these instructions.
3. Click the VPN symbol.

4. Toggle the Adblocking and Malware & Phishing switches to On.

If you are not already an IPVanish user Sign Up Now.
1. Log in to your account on the IPVanish website.

2. Successfully log in with your account information then go to IPVanish .ovpn file page.
3. Click on the .ovpn file for the server location you want to use to dowloand the .ovpn file. Do not open this file.

Login to TP-Link firmware settings in a browser on any computer or smart device connected to the FlashRouter’s network.
1. Navigate to the Advanced tab.
2. Navigate to the VPN Client tab.
3. Check the Enable box next to VPN Client. Then click Save at the bottom of the page.
4. Click the Add button in the Server List area.
5. In the Description field enter in the name you’d like to use for this OpenVPN Client profile. We typically advise entering in the location. Our example server was New York so I have entered in IPVanish New York.
Set the VPN Type to OpenVPN.
In the Username and Password fields paste in the IPVanish email and password you use to successfully login to your IPVanish website account.
Click Browse and select the .ovpn file you downloaded earlier. Then click Save.

By default no devices will be assigned to the VPN Tunnel. With TP-Link firmware you must manually assign the devices that you want connected to the VPN tunnel. Proceed with the next steps to do so for all devices you want connected to VPN.
6. Click the Add button in the Device List area.
7. A list of devices connected to the FlashRouter’s network will appear. Check the devices that you want to connect to VPN. Then click OK.
8. Now that the devices have been assigned to the VPN connection click the Enable toggle in the Server List area.

In some cases you may notice that the location is not showing the same location as the server you have input in your router settings; this is because geo tracking tools are often tricked by VPN connections. As long as you see an IP address that is not the same as your normal Internet IP address then you are indeed connected to IPVanish.
Your Privacy Hero router uses Cloud Based router management which means you can access the router settings from anywhere on any device that has an internet connection. You can follow these steps while connected to your phone, other Wi-Fi network, or the Privacy Hero network.
Use these steps to enable Privacy Hero’s VPN Kill Switch to make sure that no traffic goes through your router unless it is connected to VPN.
1. From any device that has a browser such as a computer, smartphone, or tablet visit app.privacyhero.com
2. Enter your Privacy Hero account email and password. Click Login.
If you have not created your Privacy Hero account yet please follow these instructions.
3. Click the VPN symbol.
4. Toggle the VPN Kill Switch setting to On.
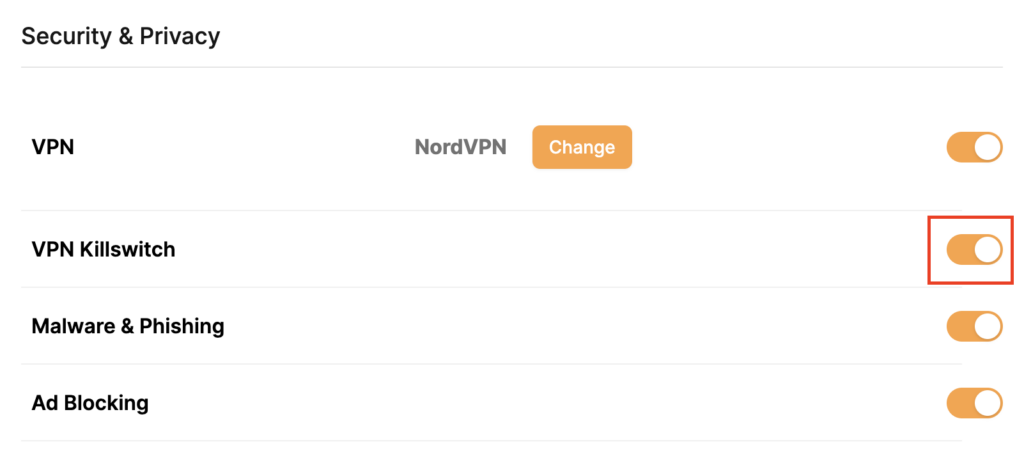
Your Privacy Hero router uses Cloud Based router management which means you can access the router settings from anywhere on any device that has an internet connection. You can follow these steps while connected to your phone, other Wi-Fi network, or the Privacy Hero network.
Use these steps to connect to ExpressVPN OpenVPN servers. First you will need to gather your unique OpenVPN login credentials and download the correct .ovpn file from the ExpressVPN website.
1. From any device that has a browser such as a computer, smartphone, or tablet visit app.privacyhero.com
2. Enter your Privacy Hero account email and password. Click Login.
3. Click the VPN symbol.
4. Click the Change button and select Custom from the dropdown.
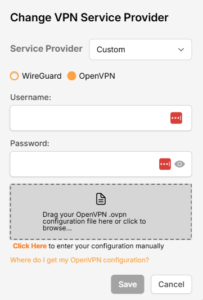
5. In a new tab login to your ExpressVPN account.
6. Select Manual Configuration from the menu options.
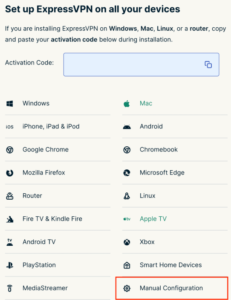
7. Copy and paste the username and password from the blue boxes into the Custom box on your Privacy Hero settings page.
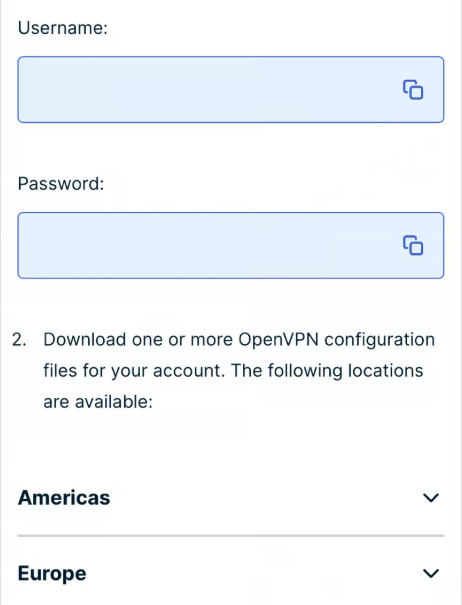
8. Download a server file from any of the available regions shown in the ExpressVPN Manual Configuration section (Americas, Europe, Asia Pacific, etc)
9. Drag and drop or click to Upload the server file into the Custom box on your Privacy Hero settings page and then you will need to add one line to the top of the configuration.
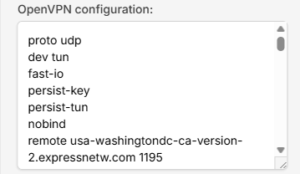
10. At the top of your OpenVPN configuration add in the following line as shown in the picture above
proto udp
Now click the Save button.
11. Your Privacy Hero settings should now show a Connected message, indicating you have successfully signed in to your ExpressVPN server.

12. Connect to the Privacy Hero via WiFi or ethernet connection on your device and visit an IP checker from a private/incognito browser to verify your new IP address and virtual location.
Privacy Hero’s cloud based router settings access makes it so you can change settings while not connected to the Privacy Hero network so if your IP Address has not changed be sure to double check that you are indeed connected to the Privacy Hero network on the device you are checking your IP from.
Keep in mind that the VPN connection will not change the location of the streaming services listed in the Streaming Relocation area of the Privacy Hero settings if the Streaming Relocation feature is Enabled.
If you are not already a Surfshark user Sign Up Now.
1. Log in to your account on the Surfshark website.
2. Click VPN Manual Setup.
3. Select Router as the Setup method.
4. Select WireGuard as the Protocol.
5. Select I don’t have a key pair.
6. Enter FlashRouter as the name of the connection and click Next.
7. Click Generate a new key pair.
8. Click Choose a location.
9. Select the server location you want to connect to. Unless you need a specific location we recommend using Surfshark’s recommended Fastest server. Click Download to download the .conf file for this Surfshark server location.
Login to TP-Link firmware settings in a browser on any computer or smart device connected to the FlashRouter’s network.
1. Navigate to the Advanced tab.
2. Navigate to the VPN Client tab.
3. Check the Enable box next to VPN Client. Then click Save at the bottom of the page.
4. Click the Add button in the Server List area.
5. In the Description field enter in the name you’d like to use for this WireGuard Client profile. We typically advise entering in the location. Our example server was New York so I have entered in Surfshark New York.
Set the VPN Type to WireGuard.
Click Browse and select the .conf file you downloaded earlier. Then click Save.
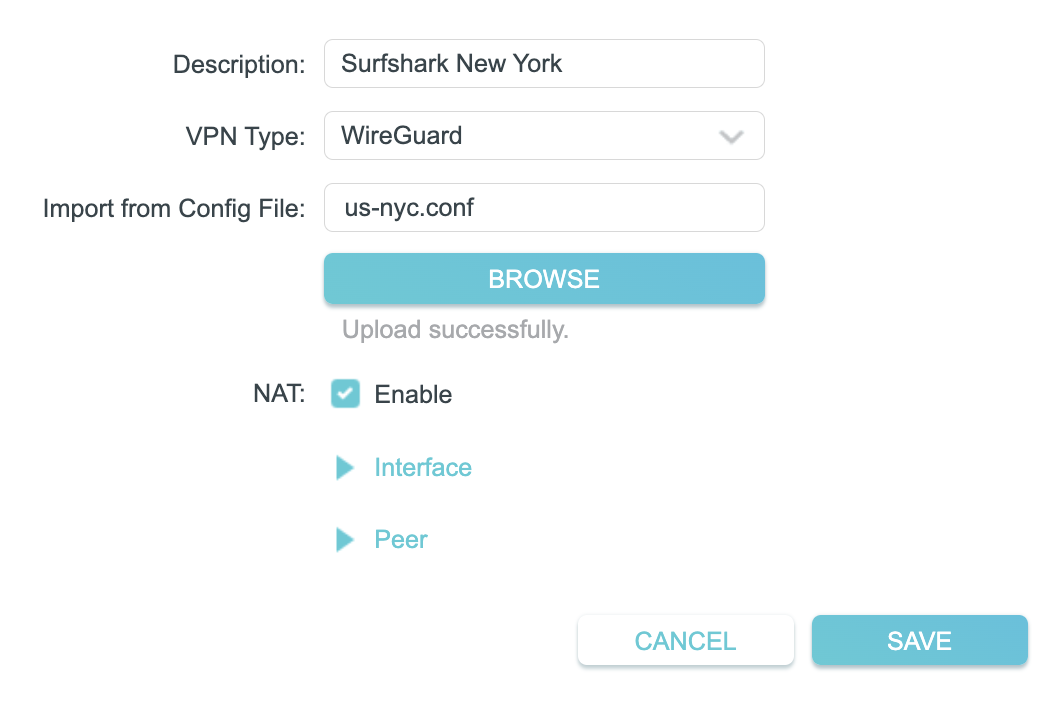
By default no devices will be assigned to the VPN Tunnel. With TP-Link firmware you must manually assign the devices that you want connected to the VPN tunnel. Proceed with the next steps to do so for all devices you want connected to VPN.
6. Click the Add button in the Device List area.
7. A list of devices connected to the FlashRouter’s network will appear. Check the devices that you want to connect to VPN. Then click OK.
8. Now that the devices have been assigned to the VPN connection click the Enable toggle in the Server List area.
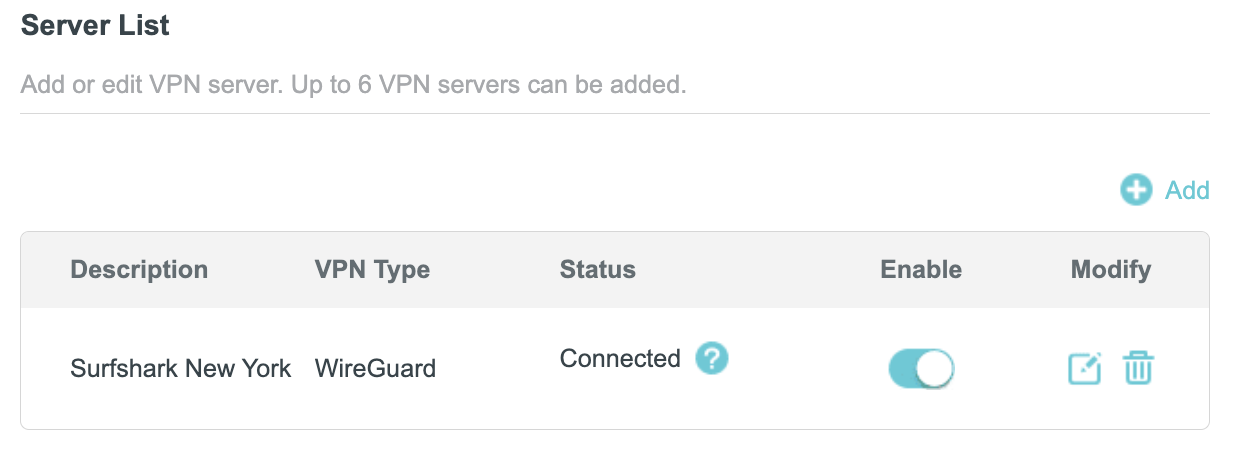
In some cases you may notice that the location is not showing the same location as the server you have input in your router settings; this is because geo tracking tools are often tricked by VPN connections. As long as you see an IP address that is not the same as your normal Internet IP address then you are indeed connected to Surfshark.
You can change the ExpressVPN server location at any time so your Internet connection appears as originating from that location.
1. Connect to the FlashRouter’s network via ethernet cable or wireless.
2. Open your web browser and enter expressvpnrouter.com or 192.168.132.1 in the URL.
3. Login with your ExpressVPN FlashRouter admin password.
4. Click the three dots next to the server location.
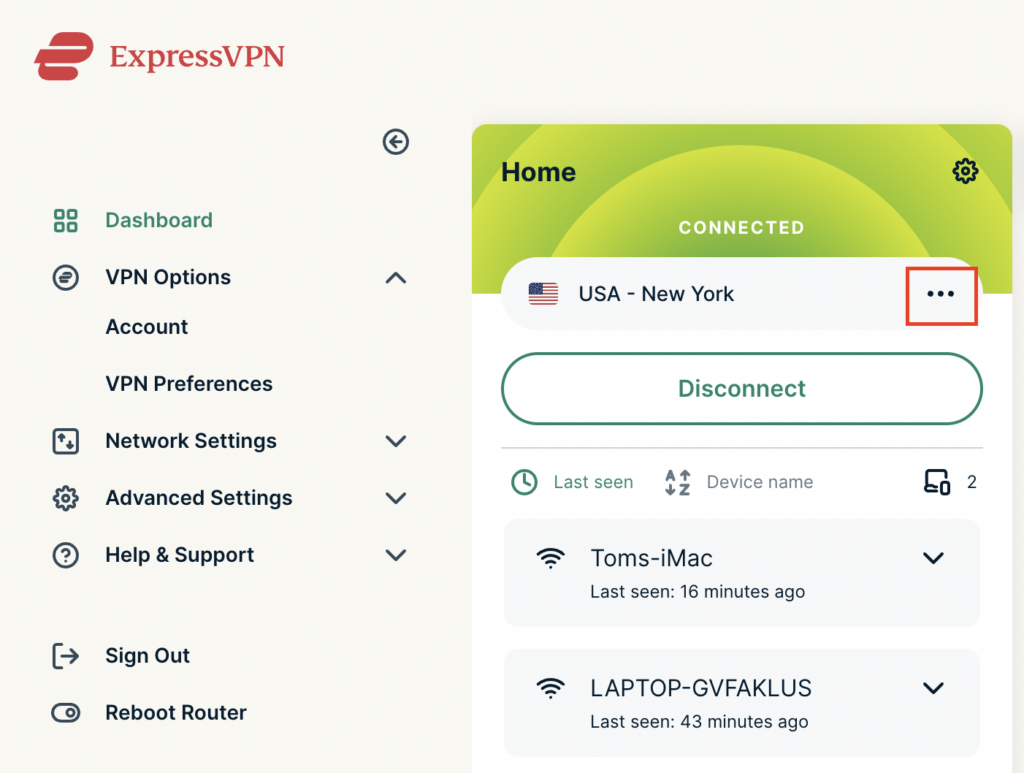
5. Type in the location you want to connect to. Click the new location to connect.
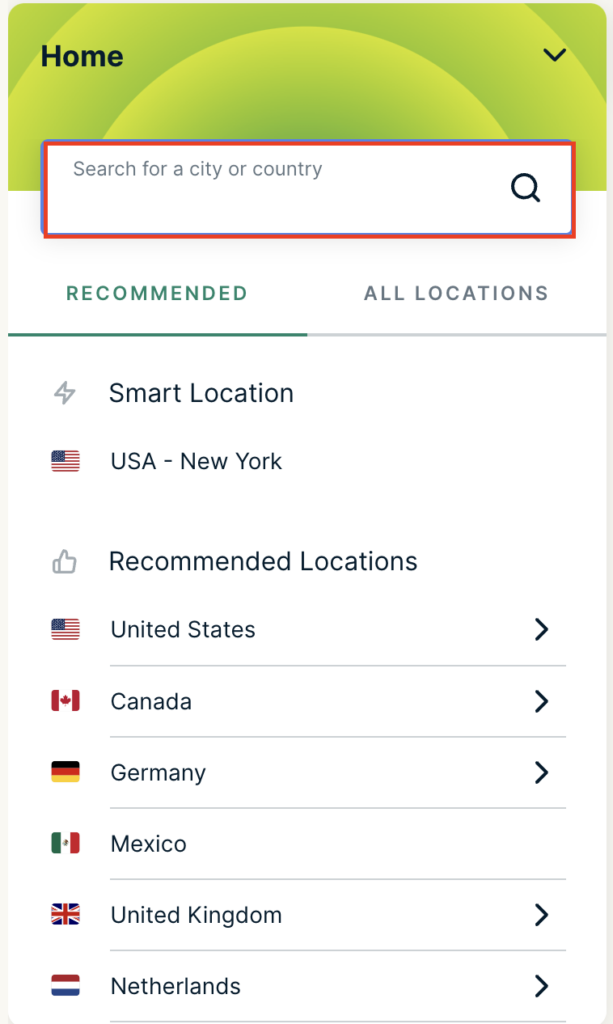
6. You are now connected to the new server location.
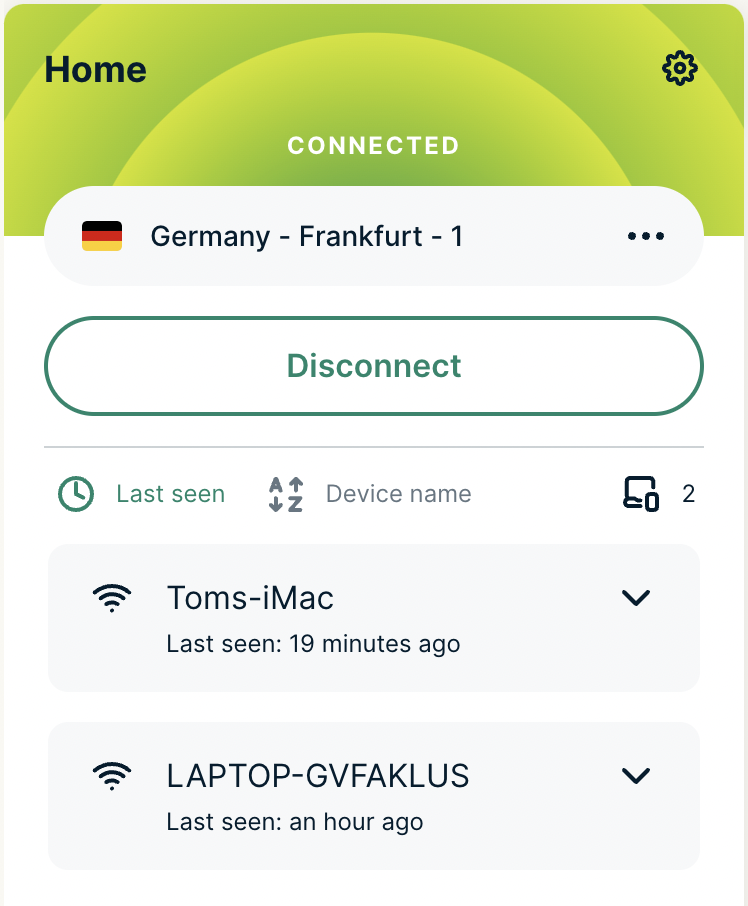
ExpressVPN offers servers in locations all over the world. Typically for speeds it is best to connect to the server closest to your actual location. Clicking a country instead of a city will connect you to the ideal city in that country.
Your Privacy Hero router uses Cloud Based router management which means you can access the router settings from anywhere on any device that has an internet connection. You can follow these steps while connected to your phone, other Wi-Fi network, or the Privacy Hero network.
Each Privacy Hero router comes with a year free of Privacy Hero WireGuard VPN and can be setup for NordVPN and Surfshark users as well. Use these steps to change between the VPN providers to find the best connection for your needs.
1. From any device that has a browser such as a computer, smartphone, or tablet visit app.privacyhero.com
2. Enter your Privacy Hero account email and password. Click Login.
If you have not created your Privacy Hero account yet please follow these instructions.
3. Click the VPN symbol.
4. Click the Change button and select the VPN provider that you want to use.

If you are not already a Surfshark user Sign Up Now.
1. Log in to your account on the Surfshark website.
2. Click VPN Manual Setup.
3. Select Router as the Setup method.
4. Select OpenVPN as the Protocol.

5. Copy and paste your Surfshark manual username and password to a secure location. This is the username and password you will enter into the router settings to connect to Surfshark.

6. Click Location and select the server location you want to connect to. Unless you need a specific location we recommend using Surfshark’s recommended Fastest server. Click Download to download the UDP .ovpn file for this Surfshark server location.

Login to TP-Link firmware settings in a browser on any computer or smart device connected to the FlashRouter’s network.
1. Navigate to the Advanced tab.
2. Navigate to the VPN Client tab.
3. Check the Enable box next to VPN Client. Then click Save at the bottom of the page.
4. Click the Add button in the Server List area.
5. In the Description field enter in the name you’d like to use for this OpenVPN Client profile. We typically advise entering in the location. Our example server was New York so I have entered in Surfshark New York.
Set the VPN Type to OpenVPN.
In the Username and Password fields paste in the Surfshark username and password we obtained earlier.
Click Browse and select the .ovpn file you downloaded earlier. Then click Save.

By default no devices will be assigned to the VPN Tunnel. With TP-Link firmware you must manually assign the devices that you want connected to the VPN tunnel. Proceed with the next steps to do so for all devices you want connected to VPN.
6. Click the Add button in the Device List area.
7. A list of devices connected to the FlashRouter’s network will appear. Check the devices that you want to connect to VPN. Then click OK.
8. Now that the devices have been assigned to the VPN connection click the Enable toggle in the Server List area.

In some cases you may notice that the location is not showing the same location as the server you have input in your router settings; this is because geo tracking tools are often tricked by VPN connections. As long as you see an IP address that is not the same as your normal Internet IP address then you are indeed connected to Surfshark.
Your Privacy Hero router uses Cloud Based router management which means you can access the router settings from anywhere on any device that has an internet connection. You can follow these steps while connected to your phone, other Wi-Fi network, or the Privacy Hero network.
1. From any device that has a browser such as a computer, smartphone, or tablet visit app.privacyhero.com.
2. Enter your Privacy Hero account email and password. Click Login.
3. Click the VPN symbol.
4. Click the Change button and select Custom from the dropdown and choose the Wireguard option.

5. In a new tab login to your ProtonVPN account.

6. Go to the Downloads section of your ProtonVPN account page.
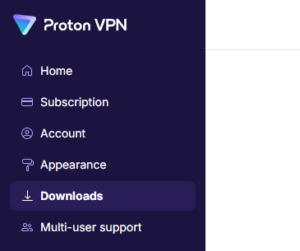
7. Scroll down to find the WireGuard configuration section. Name your configuration and then select Router as the platform, and select Standard server configs.

8. Click on the country name that you want to choose, and Download any of the available server files from the list.

9. Drag and drop or click to Upload the server file into the Custom box on your Privacy Hero settings page. Then press Save.
10. Your Privacy Hero settings should now show a Connected message, indicating you have successfully signed in to your ProtonVPN server!

1. From any device that has a browser such as a computer, smartphone, or tablet visit app.privacyhero.com.
2. Enter your Privacy Hero account email and password. Click Login.
3. Click the VPN symbol.
4. Click the Change button and select Custom from the dropdown and choose the OpenVPN option.
5. In a new tab login to your ProtonVPN account.
6. Navigate to the Account tab and find your OpenVPN specific Username and Password.
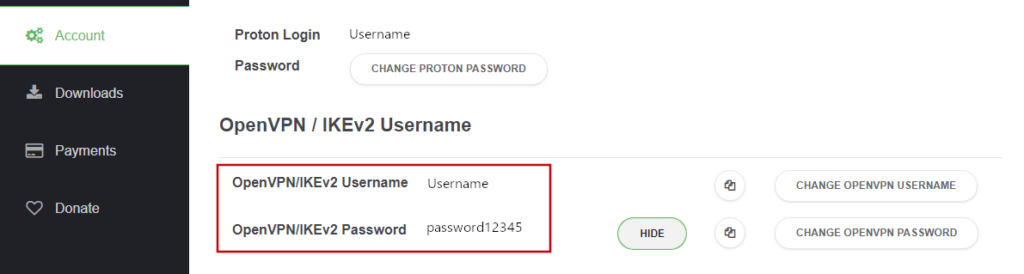
7. Copy and paste the username and password from previous step into the Custom box on your Privacy Hero settings page.
8. Go to the Downloads section of your ProtonVPN account page.
9. Scroll down to find the OpenVPN Configuration Files section. Then select “Router” as the platform, and select “Standard Server Configs.”

10. Click on the country name that you want to choose, and Download any of the available server files from the list.
11. Drag and drop or click to Upload the server file into the Custom box on your Privacy Hero settings page. Then press Save.
12. Your Privacy Hero settings should now show a Connected message, indicating you have successfully signed in to your ProtonVPN server!

Privacy Hero’s cloud based router settings access makes it so you can change settings while not connected to the Privacy Hero network. Visit the ProtonVPN IP Check to verify your VPN IP address. If it has not changed be sure to double check that you are indeed connected to the Privacy Hero network.
Keep in mind that the VPN connection will not change the location of the streaming services listed in the Streaming Relocation area of the Privacy Hero settings if the Streaming Relocation feature is Enabled.