• Skip to primary navigation
  • Skip to main content
  • Skip to primary sidebar
  • Skip to footer

FlashRouters Support Portal

Prioritizing Privacy

  • SETUP GUIDES
    • Privacy Hero Router Setup Guide
    • ASUS-WRT Router Setup Guide
    • AsusWRT-Merlin Router Setup Guide
    • DD-WRT Router Setup Guide
    • ExpressVPN Router Setup Guide
    • GL.iNet Router Setup Guide
    • Roqos Core Router Setup Guide
  • TROUBLESHOOTING
    • Router Access
    • WiFi Connectivity
    • Internet Connection Issues
    • General VPN Issues
    • DD-WRT Firmware
    • TeamViewer Remote Support
  • FAQs
    • Router FAQs
    • VPN FAQs
    • Warranty and Returns FAQs
    • Sales FAQs
    • Shipping FAQs
    • Service Plan FAQs
  • Show Search
Hide Search

Search Results for: connection dd-w

NordVPN Setup for AsusWRT Firmware Routers

TeamFlashRouters · Oct 15, 2025 ·

You can connect to NordVPN on your AsusWRT router using NordLynx, OpenVPN, or a Dedicated IP.

Quick Options

  • NordLynx: Choose your preferred country from NordVPN’s server list

  • OpenVPN: Choose your preferred city or country from NordVPN’s server list.

  • Dedicated IP (optional): Enter your unique configuration file if you’ve been assigned a static NordVPN IP.

:point_right: If you are not already a NordVPN user Sign Up Now.

NordVPN NordLynx Setup for AsusWRT

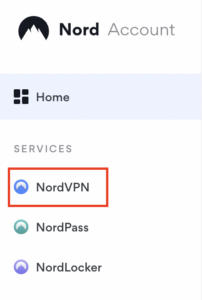
1. Get your NordVPN Access Token for NordLynx connections. Log in to your NordVPN account and select NordVPN from your list of Services.
NordVPN Services Section

2. At the bottom of the page click Get Access token and you will receive a code via email. Enter this code to proceed.

NordVPN Access Token

3. After you enter the email code select Generate new token and set it to Doesn’t expire. Copy this token.
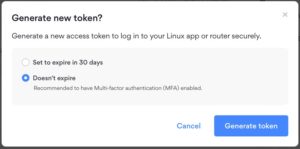
NordVPN Generate new token
NordVPN Copy Token

4. Log in to the Asus settings page by connecting to the Asus router’s WiFi (or wired LAN) on your computer. Then, enter 192.168.50.1 or asusrouter.com in the browser.

View our guide for more instructions on how to access AsusWRT firmware settings.

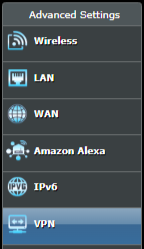
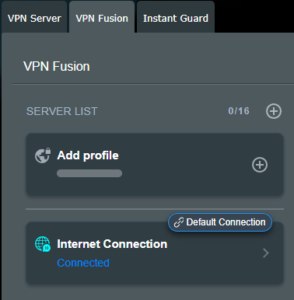
5. Navigate to the VPN tab and then select the VPN Fusion tab, then click Add profile.

Click the VPN Button
VPN Fusion Add Profile

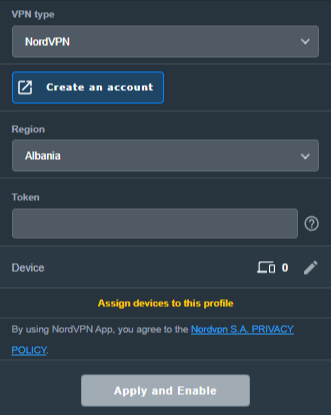
6. Fill in your NordVPN information, then click Apply and Enable.

  • Connection Name: Choose a name for your NordLynx connection.
  • VPN Type: Select NordVPN
  • Region: Choose your VPN server location
  • Token: Copy and paste your NordVPN token.
Apply NordLynx Settings

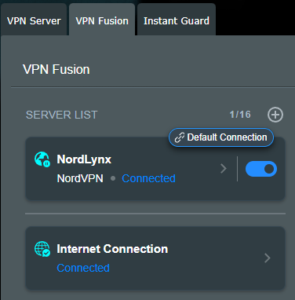
6. You should now see the Profile say Connected, indicating that the NordVPN server is successfully connected to your router!

VPN Fusion NordLynx Connected

7. The VPN connection is automatically set to Apply to all devices.

If you only want certain devices to connect to the VPN, then turn off the VPN connection and switch off Apply to all devices.

Now click the pencil next to the Device section and select the devices (computer, phone, etc.) that you want to connect to VPN. Click OK and then click Apply all settings.

Apply VPN by Device

NordVPN OpenVPN Setup for AsusWRT

1. Get your NordVPN manual service credentials for OpenVPN connections. Log in to your NordVPN account and select NordVPN from your list of Services.

NordVPN Services Section

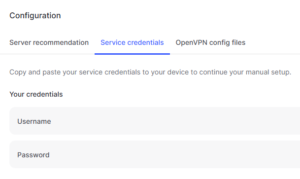
2. At the bottom of the page in the Manual Setup section click Setup NordVPN manually then under the Configuration section go to Service credentials. Click Verify email to receive a code via email and enter the code to view and copy your credentials.

NordVPN Manual OpenVPN
NordVPN Service Credentials

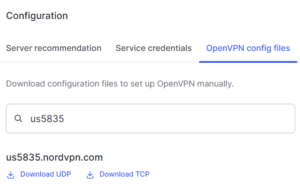
3. Click on OpenVPN config files. Search and download the server file for your preferred NordVPN location, UDP is recommended.

NordVPN OpenVPN Config Files

4. Log in to the Asus settings page by connecting to the Asus router’s WiFi (or wired LAN) on your computer. Then, enter 192.168.50.1 or asusrouter.com in the browser.

View our guide for more instructions on how to access AsusWRT firmware settings.

5. Navigate to the VPN tab and then click on the VPN Fusion tab, then click Add Profile.

Click the VPN Button
VPN Fusion Add Profile

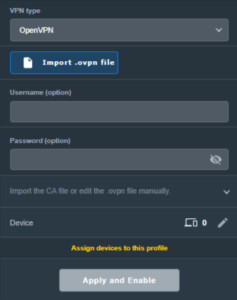
6. Fill in your NordVPN information then click Apply and Enable.

  • Connection Name: Choose a name for your NordVPN OpenVPN connection.
  • VPN Type: Select OpenVPN
  • Import .ovpn File: Upload the OpenVPN file that you downloaded.
  • Username and Password: Copy and paste your NordVPN manual service credentials.
AsusWRT OpenVPN Connection File Load

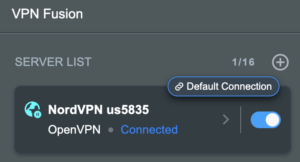
6. You should now see the Profile say Connected, indicating that the NordVPN server is successfully connected to your router!

Asus NordVPN Connected

7. The VPN connection is automatically set to Apply to all devices.

If you only want certain devices to connect to the VPN, then turn off the VPN connection and switch off Apply to all devices.

Now click the pencil next to the Device section and select the devices (computer, phone, etc.) that you want to connect to VPN. Click OK and then click Apply all settings.

Apply VPN by Device

NordVPN Dedicated IP Setup for AsusWRT

1. Get your NordVPN manual service credentials for OpenVPN connections. Log in to your NordVPN account and select NordVPN from your list of Services.

NordVPN Services Section

2. At the bottom of the page in the Manual Setup section click Setup NordVPN manually then under the Configuration section go to Service credentials. Click Verify email to receive a code via email and enter the code to view and copy your credentials.

NordVPN Manual OpenVPN
NordVPN Service Credentials

3. Now download your Dedicated IP configuration file from the NordVPN website.

4. Log in to the Asus settings page by connecting to the Asus router’s WiFi (or wired LAN) on your computer. Then, enter 192.168.50.1 or asusrouter.com in the browser.

View our guide for more instructions on how to access AsusWRT firmware settings.

5. Navigate to the VPN tab then click on the VPN Fusion tab, then click Add Profile.

Click the VPN Button
VPN Fusion Add Profile

6. Fill in your NordVPN information then click Apply and Enable.

  • Connection Name: Choose a name for your NordVPN Dedicated IP connection.
  • VPN Type: Select OpenVPN
  • Import .ovpn File: Upload the Dedicated IP OpenVPN file that you downloaded.
  • Username and Password: Copy and paste your NordVPN manual service credentials.
AsusWRT OpenVPN Connection File Load

6. You should now see the Profile say Connected, indicating that the NordVPN server is successfully connected to your router!

Asus NordVPN Connected

7. The VPN connection is automatically set to Apply to all devices.

If you only want certain devices to connect to the VPN, then turn off the VPN connection and switch off Apply to all devices.

Now click the pencil next to the Device section and select the devices (computer, phone, etc.) that you want to connect to VPN. Click OK and then click Apply all settings.

Apply VPN by Device
  1. Connect your devices to the Asus router network and visit the NordVPN website, at the top it should display Your Status: Protected.
  2. Visit NordVPN’s IP Check to verify your new IP address and virtual location.

🚫📱Do not run NordVPN apps on devices connected to your NordVPN router. Using the app at the same time as the router VPN may cause conflicts and connection issues.

Still having issues?

Feel free to submit a ticket and we will get back to you as soon as possible.

Why is my connection speed slower?

TeamFlashRouters · Jun 4, 2019 ·

The encryption provided by a VPN connection almost always results in slower connection speed. In some cases you may have noticed that your computer or tablet was working faster when running a VPN client application or program, that is because a computer has a processor that is normally about 4-6x times as strong as a the processor on a router, and that is for managing a single VPN connection. A router has a smaller processor and is managing an entire network of devices. Encrypting an entire network does take considerable processing power.

Speed test results while connected to VPN are never going to be accurate. A speed test measures the rate at which a data packet travels from one server to another, however when you are connecting to VPN the data packets travel to an extra server where they are encrypted and then sent back into the route. We strongly recommend disabling the FlashRouter’s VPN connection when testing speeds to make sure there isn’t and issue with the router.

Connection Types

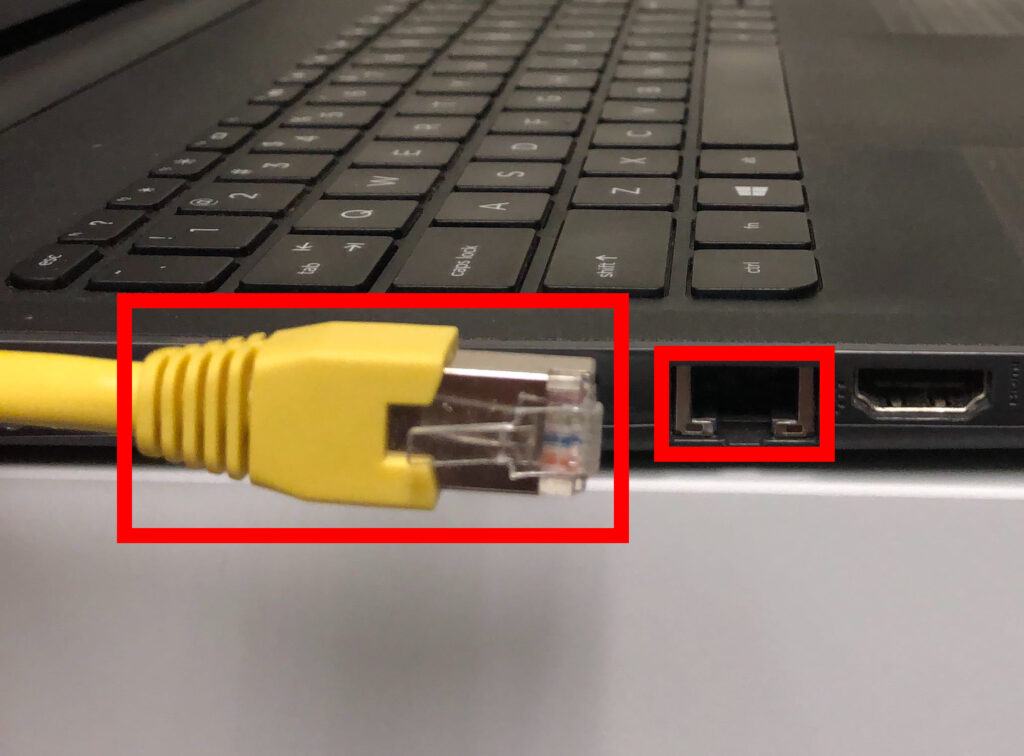
Ethernet: Wired ethernet connections will almost always be the most stable and reliable connection. To speed up your internet connection, use an ethernet cable to wire your devices to the FlashRouter.

Wireless (5.0GHz): The 5.0GHz WiFi frequency has less range than the standard 2.4GHz WiFi, but also transmits your internet connection at a significantly faster speed. If you were previously using the 2.4GHz network and experiencing slow speeds please connect to the 5GHz wireless network which should improve your speed.

Connect to the closest VPN server

Our supported VPN providers offer many servers in different countries and regions. If a server has slower connection speed we recommend connecting to the server closest to your actual location.

The process for changing servers is detailed in your provider’s setup instructions.

FlashRouters Privacy App

DD-WRT Manual VPN Configuration

Select a UDP server

UDP servers do not authenticate every data packets the way TCP servers do which results in faster connection speeds.

VPN provider server recommendation

Contact your VPN provider for a server recommendation that should provide the fastest speeds for you.

VPN FAQs

admin · Jan 29, 2019 ·

VPN FAQs

General VPN FAQ Answers

What is a VPN?

VPN is an acronym for ‘Virtual Private Network’, historically used by private organizations to seamlessly link geographically diverse locations via the Internet. A VPN ‘tunnels’ traffic between two devices by transmitting it over a secure network. There are also clearly identifiable benefits to individual Internet users accessing a VPN.

  • A VPN provides you with top-level security and privacy for all your Internet downloading, streaming and browsing. As long as you are signed into your VPN account, all data you transmit over the Internet is encrypted.
  • A VPN encrypts your device by hiding the IP address assigned by your Internet Service Provider (ISP) and replacing it with the IP address of your choosing from the list of server locations belonging to your VPN provider. This masks your identity when visiting sites that geo-restricted content, and helps you avoid devious local Internet marketing and advertising schemes that track you through your IP address.

Will a FlashRouter with a built-in VPN client speed up my connection?

FlashRouters are relatively new models that may enhance data transfers across your home network or extend the range of your Wireless signal. However, the speed at which you download or stream content can not exceed the speed of the connection you pay for through your ISP. Purchasing a FlashRouter or signing up for VPN service WILL NOT transform your regular connection into a high-speed broadband connection.

At the same time, if you do have a broadband connection, a FlashRouter with a VPN connection may slow down your transfer speeds due to the processor encrypting all of your data. In certain cases a FlashRouter with a VPN can also prevent throttling by an ISP of specific service like Netflix or Amazon Video.

Which VPN provider should I use?

Our routers have been tested to perform with many of the most popular VPN providers such as ExpressVPN, NordVPN, IPVanish, PrivateInternetAccess & CyberGhost among 50+ VPN providers so that subscribers can get the maximum benefit from their VPN service. If you prefer another provider, that is not an issue at all. You can still use a DD-WRT VPN FlashRouter with any VPN provider that offers DD-WRT router integration support. Contact our team for further information about using our routers with your VPN service of choice or if you need a VPN provider recommendation based on your location.

Should my FlashRouter replace my old router?

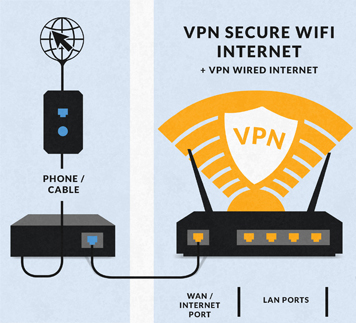
A FlashRouter will work as a standalone router by connecting your modem to its Wide Area Network (WAN) port, or using it in a Dual Router Network by connecting it to your existing router through a Local Area Network (LAN)/Ethernet port. Either way a FlashRouter can be configured to tunnel all traffic through the VPN server of your choosing.

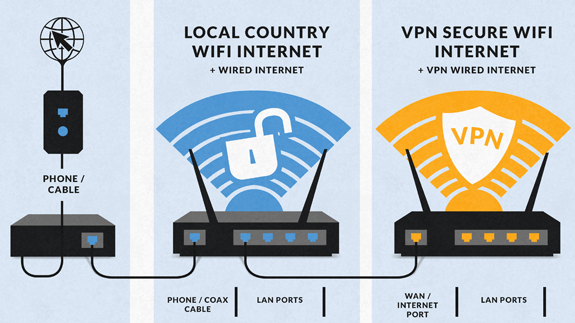
If you would like to set up your Home Network so that some devices are being tunneled through a VPN server, and others are connecting to your Internet Service Provider (ISP) within your home country, then using your FlashRouter as an auxiliary device is recommended.

VPN Security FAQ Answers

Can I change my IP address to one in another country?

YES! The countries that you can change your IP address to depend on the offerings of your specific VPN providers. Prices and server locations vary across all VPN providers.

If you choose to purchase a FlashRouter then you will not have to install any VPN client software on your computer to change your IP address; the VPN will already be configured within the router. Therefore, any device you plug into this FlashRouter is automatically assigned the IP address of your selected VPN server.

When is my connection secure?

As long as the VPN account preset into your FlashRouter is active, any device that is connected to the Internet through this router has its network traffic encrypted, and IP address masked. With a FlashRouter you never have to physically login to your VPN account, as the settings have been stored in the router’s DD-WRT firmware.

Don’t worry though! If you are not at home, and using Wi-Fi in a public location, you can still use your VPN account on a laptop or mobile device through various other methods.

How can I be sure my connection is safe and encrypted?

In order to make sure that the connection on your FlashRouter is being rerouted appropriately through your VPN service, visit What is my IP address and make sure the location listed is the one you have chosen in your VPN settings, NOT your actual location.

If you wish, there is an Internet Kill Switch available as well for your router which will block the internet whenever you disconnect from VPN.

What VPN connection standards are supported on a FlashRouter?

Currently we support the OpenVPN protocol for VPN client connections. PPTP VPN has been deemed as insecure by the privacy community and so we no longer offer support for PPTP VPN connections.

Technical VPN FAQ Answers

What operating systems do you support?

A FlashRouter can be used with any operating system, be it Windows, Mac OS or Linux. A FlashRouter can also be used as a wireless access point for iPhones, iPads, and Android devices.

Our routers also work in conjunction with any other brand of router of ADSL or DSL modem/router combo from ISPs across the world.

Can I set up a VPN on a PS4, Xbox One, Kindle Fire, Roku, AppleTV or other devices without native VPN support?

THAT’S WHAT WE ARE HERE FOR!

If you purchase one of our FlashRouters loaded with DD-WRT firmware, you can run the client VPN connection from your router. Once you do this every device connected to the router will tunnel through the VPN.

Now you can stream content like Netflix, BBC iPlayer, Pandora Hulu, or Amazon Instant to your TV through any of these devices, instead of being constrained to streaming content on your computer!

If you need a recommendation for a VPN service with a specific streaming platform do not hesitate to contact our support team.

Which DD-WRT wireless extender setup should I be using?

TeamFlashRouters · Jun 11, 2019 ·

FlashRouters supports four unique DD-WRT wireless extender setups – options similar to an open source Mesh network. Each different wireless extender configuration serves a different purpose. Read below to see which guide fits your configuration requirements!

Wireless Repeater

Why should I choose Wireless Repeater Setup?

  1. If you have a MiFi wireless only internet connection or other type of WiFi internet where there is no access to any ethernet port for a wired internet connection, then you can setup a wireless repeater network to both extend WiFi and add wired connection capabilities.
  2. If you have a large home or office area that requires additional WiFi coverage can use a wireless repeater setup to extend the existing network.
  3. If you want to create a separate VPN WiFi network in your home without placing the FlashRouter in the same room as your primary router you can use wireless repeater to establish a WiFi internet connection and then connect to VPN on your WiFi repeater network.
  4. If you want a wireless Dual Router setup option where you can have local ISP IP address through your main router WiFi network and your VPN IP address through your FlashRouter Wireless Repeater WiFi network, both available for you to connect at all times. Each network is on a unique subnet.

View the FlashRouter Wireless Repeater Setup Guide.

Wireless Repeater Bridge

Use Cases

Wireless Repeater Bridge Setup

  1. Anyone that needs all their devices connected to the same local network.
  2. Anyone with a MiFi internet connection that does not have an ethernet port and has no need for VPN.
  3. Anyone with a large wireless area that requires additional coverage.

Wireless Client Bridge

Use Cases

Wireless Client Bridge Setup

  1. Anyone with a MiFi internet connection that needs wired access.
  2. Anyone that needs additional wired ports instead of using a switch.
  3. Anyone with wired only devices in their home that are too far from your main router.

Wireless Access Point DHCP Forwarder

Use Cases

Wireless Access Point DHCP Forwarder Setup

  1. Anyone that needs their devices connected to the same local network and wants lossless LAN to LAN speeds via wireless and ethernet connection.
  2. Anyone that wants to use their main router to provide DHCP to their router instead of having an additional DHCP server.

Sales FAQs

admin · Jan 29, 2019 ·

Sales FAQs

Can My Router Be Preconfigured With My VPN Information?

Plug and Play VPN Support

Yes you can!

To receive a plug and play with VPN device, you will need to provide our team with the credentials from your VPN provider subscription.

IMPORTANT NOTE: This is not required but recommended for users who wish to have the simplest, most seamless experience when the FlashRouter arrives. You can always change the password when the device arrives if you wish as well.


To have your router VPN preconfigured:

  1. Check the “Connect To VPN For Me” box under VPN – Preconfiguration on the Product Page during check out.
  2. Select your VPN provider. If you don’t see your VPN listed select “Other” and you will see an additional field to input who your provider is.
  3. You’ll receive an email after purchase with detailed instructions. If you have any questions our team is happy to help!
Please note:  If you do give a server location, we will automatically start the device with the closest/optimal server for the location we are shipping the device by default. A location has to be added to the initial configuration for plug and play encryption security to occur on the device.


Privacy Hero 2 Only:

While our team isn’t able to pre-configure the Privacy Hero 2 VPN Router before shipping it out since you’ll have to make a Privacy Hero user account and register your router, we can assist you with the VPN set up process once you receive the router and create your Privacy Hero user account via 1-on-1 remote session, email, or live chat on our site.

You can also use our step-by-step Privacy Hero VPN Router Setup Guide to complete the process.

Can I Use My Dedicated IP Address With A FlashRouter?

Dedicated IP Addresses from NordVPN, SurfShark, & TorGuard are supported on almost all of our FlashRouter options.

Check out our Dedicated IP Addresses Blog Post for more details!

Can I Use A FlashRouter With My Current Mesh System?

Yes!

You will be able to connect the FlashRouter of your choosing to your current mesh router via ethernet port as shown below:

ISP Modem/Router —- FlashRouter (VPN) —- Main Mesh Router (VPN from FlashRouter) 

This setup will allow you to keep your mesh network with added VPN protection, as well as add the FlashRouter wireless network for your devices.

You can disable the wifi on the FlashRouter also if you only wanted to use the mesh network for wifi.

Can You Flash My Router and Connect me to VPN?

At FlashRouters, we offer expert router flashing and VPN configuration services through our Flash My Router plans. Whether your router needs custom firmware flashing or just a VPN configuration, we ensure it’s set up for maximum security, privacy, and streaming performance with your chosen VPN provider.

The appointment will take place via remote software. During the appointment, our team will also answer any questions you may have about using the VPN on the router. Flashing is done out of the East Coast of the United States – we will do our best to accommodate your time zone difference if you are located in another part of the United States or another country.

👉 Explore our Flash My Router plans:
🔗 Flash My Router Plans


🔹 How It Works

✅ Flashing vs. Configuration: Some routers require custom firmware (flashing) to enable VPN, while others can be configured without flashing.
✅ Fully Optimized: Our team ensures your router is ready to securely connect to your VPN, block ISP tracking, and enhance your streaming experience.
✅ Remote Assistance Available: Get expert help setting up your VPN connection remotely if needed.


Flashing vs. Configuration: Router Compatibility

At FlashRouters, we handle VPN setup differently based on your router brand and model. Some routers require flashing custom firmware (like DD-WRT or AsusWRT-Merlin), while others can be configured without flashing.

🛠 Router Setup Types by Brand

🔹 Flashing Required (Custom Firmware Installation)

These routers require firmware flashing (DD-WRT or AsusWRT-Merlin) to enable VPN compatibility.

  • Asus – Flashed with AsusWRT-Merlin or updated to the latest AsusWRT build. Some models only require configuration.
  • Linksys – Flashed with DD-WRT firmware.
  • Netgear – Flashed with DD-WRT firmware.

🔹 Configuration Only (No Flashing Required)

These routers have built-in VPN support and only require proper setup.

  • TP-Link – Configured without flashing.
  • GL.iNet – Configured without flashing.
  • Cudy – Configured without flashing.

📌 Other brands are not supported at this time. If you have a different router, we recommend checking out our pre-flashed router options.


✅ Supported VPN Providers

We work with a wide range of VPN providers, including:

  • NordVPN
  • ExpressVPN
  • Surfshark
  • CyberGhost
  • IPVanish
  • Private Internet Access (PIA)
  • VyprVPN
  • ProtonVPN
  • PureVPN
  • Windscribe
  • IVPN
  • Mullvad
  • StrongVPN
  • AzireVPN
  • AstrillVPN
  • HotspotShield VPN

(If your provider isn’t listed, reach out – we may still be able to support it!)


🔗 Get Started Today!

👉 Explore our Flash My Router plans:
🔗 Flash My Router Plans

🔹 Need help selecting the right option? Contact our support team! We’re happy to assist.

How Can I Add The 1 Year NordVPN Service From My FlashRouters.com Order To My Current NordVPN Account?

You can easily combine the free 1 year of NordVPN included with your FlashRouter purchase once you receive the NordVPN Activation Code Email from FlashRouters.com. The email is typically received within 24 hours of order completion and will contain a link as well as an activation code.

This code can be entered at nordvpn.com/activate with the email address associated with your current NordVPN account to add the 1 year of free service to your existing service.


Privacy Hero 2 Only:

You can easily combine the free 1 year of NordVPN included with the Privacy Hero 2 VPN Router during the router activation process.

After activating the router, you’ll receive a NordVPN activation code within your privacy hero account dashboard. This code can be entered at nordvpn.com/activate with the email address associated with your current NordVPN account to add the 1 year of free service to your existing service.

What Are the Differences Between New, Recertified, And Open Box FlashRouters?

New

  • Direct from manufacturer, in new box.
  • Custom flashed on demand at time of the order.
  • 30 Day Satisfaction Guarantee / 1 Year Warranty.

Recertified (RM)

  • Direct from manufacturer/reseller, may be reboxed.
  • Custom flashed on demand at time of the order.
  • Specialists tested to guarantee same functionality as NEW routers.
  • 30 Day Satisfaction Guarantee / 1 Year Warranty.

Open Box

  • Limited quantity, discount items reboxed that may have cosmetic imperfections.
  • Same testing and functionality level and New and RM.
  • 30 Day Satisfaction Guarantee / No Warranty.

Will a FlashRouter Work With My Internet Service Provider?

US Customers (Single Router Solution):

Almost all Internet Service Providers(ISPs) require a modem in place to establish a connection to their service, however a modem by itself doesn’t provide the wifi connectivity needed in the home or office. A FlashRouter can connect directly to all known modems provided by major ISPs to create a wireless network so long as there is an Ethernet port on the modem to connect to the FlashRouter Internet port. 

US Customers (Dual Router Solution): 

Yes, FlashRouters are compatible with your ISP in what is called a Dual Router Set Up.

For this type of setup, you would use your current router or modem router to connect to your local ISP while using a FlashRouter to connect to your VPN. This is recommended as you will not overhaul your network with a new router, and you will be able to use your selected VPN service on the devices you wish to use it with.

This set up would result in the creation of two networks, which can be seen as the “Local Network” and the “FlashRouter Network”. All devices connected to the FlashRouter Network will go through the VPN service. 

For any device you would prefer to use without a VPN, you can connect to the local network. The chain of devices would be connected from LAN ton your modem or modem/router to WAN on the FlashRouter, with your current router connected to the FlashRouter via Ethernet cable. 


International Customers (Single Router Solution):

Almost all Internet Service Providers (ISPs) require a modem in place to establish a connection to their service, however a modem by itself doesn’t provide the wifi connectivity needed in the home or office. A FlashRouter can connect directly to all known modems provided by major ISPs to create a wireless network so long as there is an Ethernet port on the modem to connect to the FlashRouter Internet port. 

International Customers (Dual Router Solution):

ISPs should all be compatible. Some providers require VLAN tagging/VID settings when wiring directly from modem to FlashRouter. 

For this type of setup, you would use your current router or modem router to connect to your local ISP while using a FlashRouter to connect to your VPN. This is recommended as you will not overhaul your network with a new router, and you will be able to use your selected VPN service on the devices you wish to use it with.

This set up would result in the creation of two networks, which can be seen as the “Local Network” and the “FlashRouter Network”. All devices connected to the FlashRouter Network will go through the VPN service. 

For any device you would prefer to use without a VPN, you can connect to the local network. The chain of devices would be connected from LAN ton your modem or modem/router to WAN on the FlashRouter, with your current router connected to the FlashRouter via Ethernet cable. 

What Stock Firmware Features Will I Lose If I Flash My Router

Open Source firmware like DD-WRT or Assu Merlin has many features equivalent to what stock firmware has, in addition to adding new features to a router. However, some features are lost from the stock firmware when a router is flashed.

These are typically features that are put into the stock firmware by the manufacturers themselves. Things like the Linksys App and the NetGear Genie are examples of what would not be available or compatible on the router after flashing.

Most routers also have a WPS button. By default, the WPS button’s functionality is disabled when a router is flashed as it can be vulnerable and a security risk. It can be re-enabled by following this guide but we do not recommend it.

Does a FlashRouter or Service Plan Purchase Include a VPN Subscription?

A subscription to a VPN does not come with a FlashRouter or Service plan. If you are planning to use a VPN, you would need to sign up for one separately, directly from a provider.

Need assistance in finding a VPN Provider? Please visit our recent VPN Provider Best Seller List.

Plug and Play VPN Support

Unlike other VPN Router providers, FlashRouters is proud to offer free VPN service integration with any purchase.

To receive a plug and play with VPN device, you will need to provide our team with the credentials from your VPN provider subscription.

IMPORTANT NOTE: This is not required but recommended for users who wish to have the simplest, most seamless experience when the FlashRouter arrives. You can always change the password when the device arrives if you wish as well.

Shows what to look for when you want to preconfigure your router.

To have your router VPN pre-configured:

  1. Select Yes from the “Want Your Router Preconfigured?” on the Payment Page during checkout.
  2. Select your VPN provider. If you don’t see your VPN listed select “Other” and you will see an additional field to input who your provider is.
  3. Enter your your VPN username and password
  4. For ExpressVPN Firmware Routers there will be an additional box for your activation code.

Please note:  If you do not enter a server location request in “Order Comments”, we will automatically start the device with the closest/optimal server for the location we are shipping the device by default. A location has to be added to the initial configuration for plug and play encryption security to occur on the device.

Can I Use A FlashRouter To Work From Home?

Yes! A large number of our customers use their FlashRouters to “work from home” no matter where your travels take you. Check out our Working Remotely Blog Post for more details.

What is the Difference Between Business VPNs and VPN Services?

Location: VPN Services offer many server locations to encrypt your traffic through. They are located in several countries worldwide for creating a private VPN tunnel for your online activities. A business VPN connects to specific central servers for data or directly to your office, creating a direct tunnel for accessing sensitive work documents and information.

Logging: Most VPN services offer log-free connections for total anonymity and security when connected (it is important to check out their terms of service and privacy policy for full details). A business VPN is monitored and maintained by employers such as corporations, hospitals or universities.

Protection: VPN services secure your family’s personal data while using computers, SmartTVs and various Internet of Things devices. Business VPNs protect the data of the company while you are tunneling into work.

Are There VPN Service Providers That Offer VPN for Business?

There are in fact several trusted VPN providers that have services specially tailored for business use. NordVPN Teams and VyprVPN for Business offer a full suite of solutions like user management tools, dedicated IPs, personal product managers, global server access, business pricing, and more.

These solutions allow you to quickly deploy a safe and secure corporate network without building and maintaining your own servers. If you are a small business looking to quickly secure remote workers as they shift to work from home, and you do not have an in-house IT expert, then you should consider NordVPN Teams or VyprVPN for Business.

Even better, when choosing a business VPN provider like NordVPN or VyprVPN, employees can use routers with direct NordVPN and VyprVPN integration already included through the FR Privacy App. Meaning that a full network kill switch, routing by device, automatic connections, and more are all included as features with your business VPN connection.

Can I use a VPN on a FlashRouter With My Work/Corporate VPN?

Many of our customers have found that they can connect to both their corporate and personal VPN, however due to the variables beyond our control, we cannot guarantee this for every unique situation.

Using two VPNs at once can lead to unpredictable results. Bouncing your network traffic to multiple servers before finally arriving at it’s intended destination can sometimes introduce speed and connection issues.

Please consider that some employers and agencies are more vigilant regarding third party VPN use than others. There are tools readily available that detect the use of VPN services.

While these tools cannot decrypt and view your network traffic, they can tell your employer that you are potentially using a VPN, which can be against company policy.

If your corporate and personal VPN do not work together, then you can always set the computer using your work VPN to bypass the FlashRouter’s VPN tunnel by accessing the router admin panel for your device.

This way, your computer would only use the work VPN. Keep in mind however, your location would appear as your actual location to your work.

Every FlashRouter also comes with a 30 Day Satisfaction Guarantee.

If in the event you determine the FlashRouter is not working out for you, you can return the device within the first 30 Days. A $25 restocking fee does apply.

Can I Use a FlashRouter to Connect to a Dedicated Business VPN Network?

Of course! If you have an OpenVPN server running on a local machine or hosted on a cloud provider like Amazon Web Services (AWS), FlashRouters can create a custom router client configuration to connect the entire router and all connected devices to your OpenVPN server. Instead of employees connecting device-by-device, a router-based VPN connection allows for always-on secure VPN tunneling.

Our service team is here to work with you to test and ensure compatibility before purchasing. Interested in a router based custom client VPN solution for your remote workers? Please do not hesitate to contact us.

And, if you’re looking for a specific router, take a look at some of our most popular options!

How can I Reset the Password for My FlashRouters.com Customer Account?

To reset your password, you’ll want to click the “Account” icon in the upper right hand corner on our main website (Flashrouters.com). Once clicked, a menu will open where you can enter your login information, or select the “Forgot Password” button to trigger a reset email.

If you’re still having issues accessing your FlashRouters.com customer account after attempting a password reset, please reach out to us at support@flashrouters.com for further assistance.

What Payment Methods does FlashRouters Accept?

We accept Apple Pay, Google Pay, and all major cred/debit card providers on our payment method options page during checkout.


If you’d like to complete a purchase using PayPal as a payment method, please contact our team at support@flashrouters.com to request an invoice.

Can I Make Change/Update/Cancel My Order?

We strive to process and ship all orders within one business day. If you wish to make changes or cancellations, please contact us within 24 hours of placing your order at support@flashrouters.com with your order number and the changes you’d like to make.

While we will do our best to accommodate your request, please note that we cannot guarantee changes or cancellations.

Please note that if you need to update the shipping address, the order will require reapproval through our fraud prevention system with the new address.

Trouble Checking Out

Some customers have found that trying the methods below have helped solve any checkout errors they may have encountered:

⚡️Clearing cache
⚡️Refreshing web page
⚡️Switching web browsers
⚡️Using an incognito/private window
⚡️Confirming all billing information is accurate
⚡️Disable VPN if one is enabled
⚡️Disable Ad & Script Blockers if enabled
⚡️If you’re using a mobile device, switching to a computer or laptop would be ideal.

How to fix an Unidentified Network or Limited Connection.

Dave · May 2, 2019 ·

There are several common reasons that an Unidentified Network or Limited connection message may appear in your device’s network adapter.

  1. Wire the FlashRouter correctly for Internet access. Incorrect wiring is the most common cause of this issue. Make sure you are not wired into the FlashRouter WAN port for access, and make sure the FlashRouter is wired correctly to your main modem or router.
  2. Check that your connected device does not have static settings configured.
  3. Disable and reenable the wireless and/or ethernet adapter on your computer to refresh the network.
  4. Make sure you are not connected to multiple router networks at the same time, via WiFi and wired connection simultaneously.

Connect FlashRouter to Internet

TeamFlashRouters · Mar 21, 2019 ·

All FlashRouters are compatible with all ISP service types such as fiber, cable, DSL, and satellite. As long as you have a modem, modem/router, or router capable of an ethernet connection your FlashRouter will have no problems connecting to the internet.

Internet Service Providers (ISP) include a modem or modem/router combo to connect your network devices to the internet. In some instances your ISP will provide a separate router as well as the modem. You can replace this router with a FlashRouter or use both in a dual router setup.

Single router setup

If you would like to replace your outdated router or avoid paying to rent a router from your ISP then you should use a FlashRouter as the only WiFi device in your network.

In a single router setup the FlashRouter will be wired directly to your modem via ethernet cable and will be the only router in the setup.

Connect to your ISP modem

Wire an ethernet cable from an open ethernet port on your modem to the WAN/internet port of the FlashRouter.

FlashRouters Single Router Setup

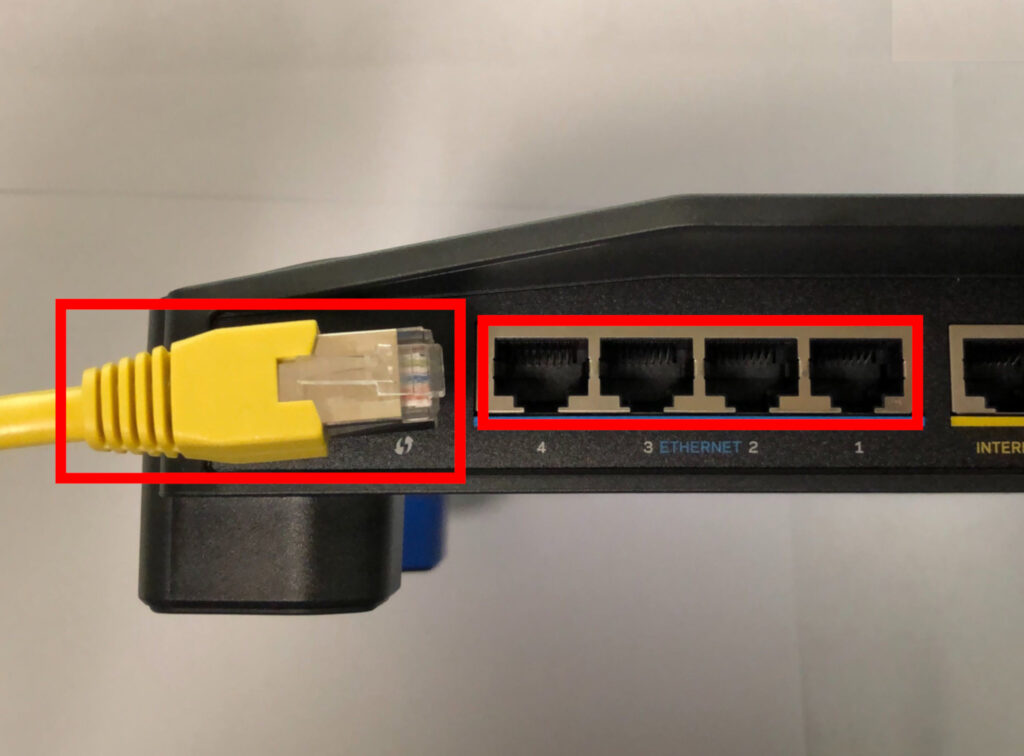
On Asus FlashRouters the WAN/internet port will be blue.

Asus Wifi Setup - back panel

On Linksys FlashRouters the WAN/internet port will be yellow.

Linksys Wifi Setup - back panel

On Netgear FlashRouters the WAN/internet port will be yellow.

Netgear Wifi Setup - back panel

Power cycle modem and router

Once you have properly connected an ethernet cable from your modem into the FlashRouter internet port you must power cycle your network devices to establish an internet connection.

  1. Power off your ISP modem and the FlashRouter.
  2. Power on the ISP modem and wait for it to fully boot up.
  3. Power on the FlashRouter.

Dual router setup

If you would like to keep your existing WiFi network in place, and simply want to add in a VPN WiFi network with a FlashRouter then you can do so using a dual router setup. No settings in your existing network router need to change to add a FlashRouter in a dual router setup. Since we preset all FlashRouters to a unique Local IP Address, there won’t be a conflict with your existing router.

In a dual router setup the FlashRouter is wired to your existing router via ethernet cable and you will have two completely segmented WiFi networks available.

Connect to your existing router

Remember if your existing router is connecting to the internet without issue already, make sure to keep the ethernet cable between your modem and existing router internet port in place.

Now connect another ethernet cable from a LAN/numbered port on your existing router to the WAN/internet port of the FlashRouter.

Reference the images above to see your WAN/internet port color.

FlashRouters Dual Router Setup

Power cycle all network devices

Once you have properly connected an ethernet cable from your existing router into the FlashRouter internet port you must power cycle your network devices to establish an internet connection.

  1. Power off your ISP modem, existing router, and the FlashRouter.
  2. Power on the ISP modem and wait for it to fully boot up.
  3. Power on the existing router and wait for it to fully boot up.
  4. Power on the FlashRouter.

Verify a successful internet connection

Once the power cycling steps are complete and the FlashRouter is powered up, start connecting your internet capable devices via ethernet or WiFi. Visit any website and make sure the page fully loads.

If you want to check your internet IP address that is visible to websites and services that you visit over the internet check out WhatIsMyIPAddress.com.

TROUBLESHOOTING

Still having issues? Visit our Troubleshooting section to diagnose common problems here.

Troubleshoot Here

ProtonVPN Setup Guide for GL.iNet Routers

Dave · Mar 23, 2026 ·

You can connect to ProtonVPN on your GL.iNet router using Wireguard or OpenVPN.

Quick Options

  • Wireguard: Download your preferred server .conf configuration file from the ProtonVPN website.

  • OpenVPN: Download your preferred server .ovpn configuration file from the ProtonVPN website.

:point_right: If you are not already a ProtonVPN user Sign Up Now.

ProtonVPN Wireguard Setup for GLiNet (Recommended)

1. Login to your ProtonVPN account and go to the Downloads section of your ProtonVPN account page

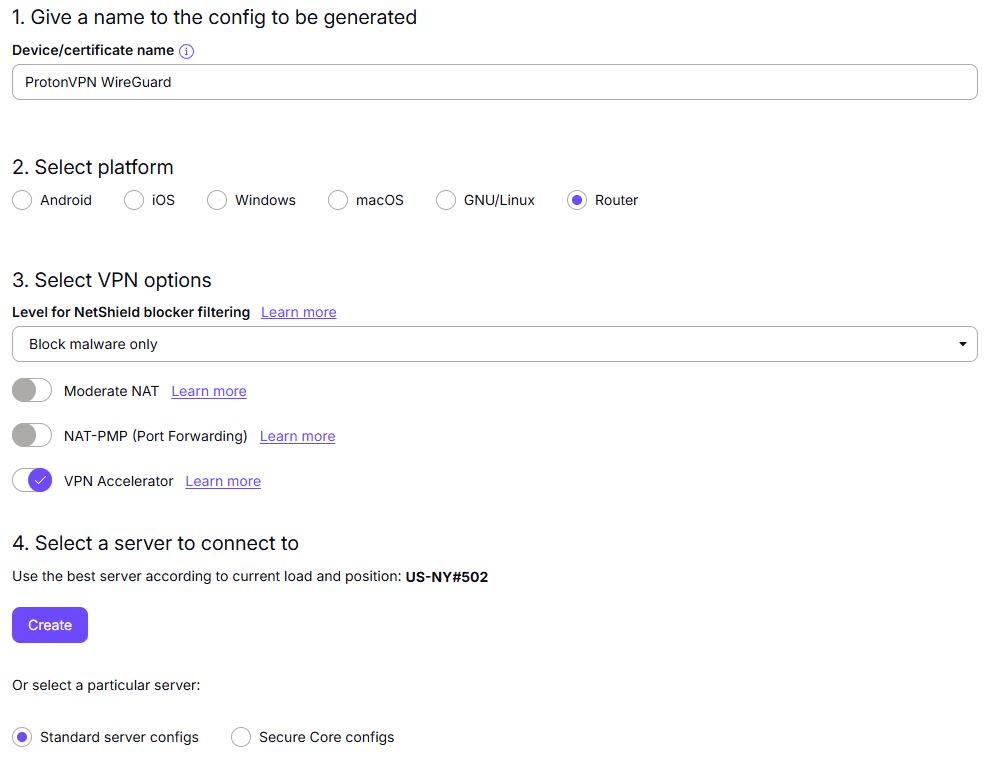
2. Scroll down to find the WireGuard configuration section. Name your configuration and then select Router as the platform, and select Standard server configs.

3. Click Create button to choose the recommended server or scroll down to choose and Download any of the available server files from the list.

4.  Login to GL.iNet firmware settings (usually 192.168.8.1) in a browser on any computer or smart device connected to the GL.iNet FlashRouter’s network.

View our guide for more instructions on how to access GL.iNet firmware settings.

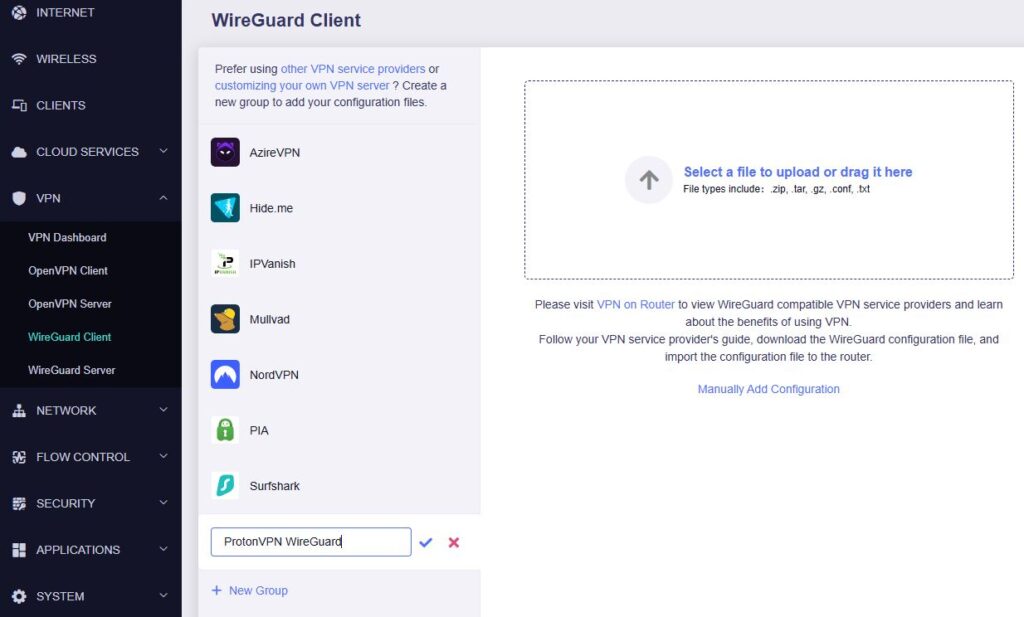
5. Navigate to the VPN tab and select WireGuard Client then click + New Group and name your connection and click the check to save.

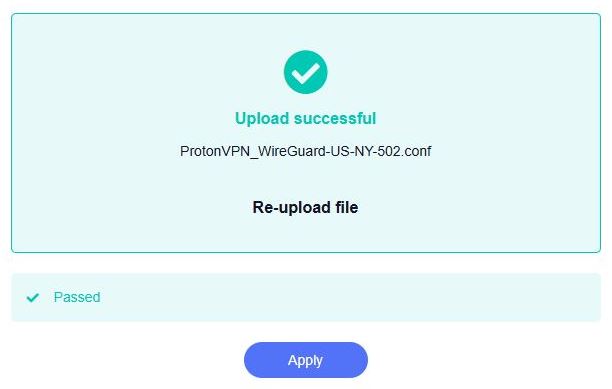
6. Upload the configuration file and click Apply.

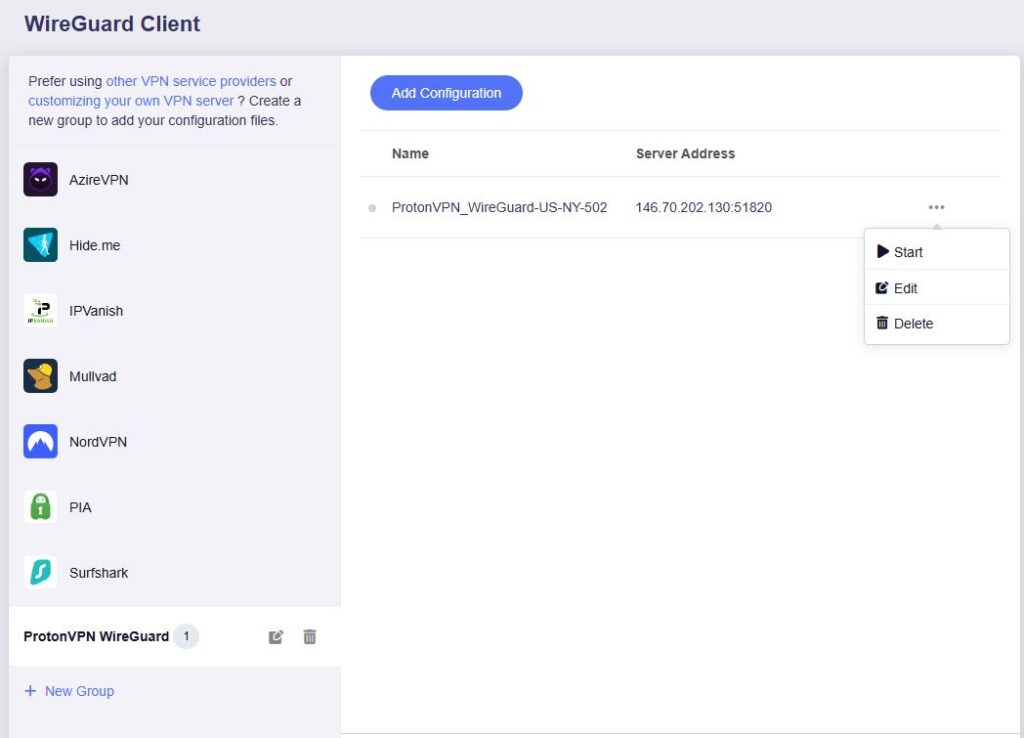
7. Start a connection by clicking the 3 dots (…) > Start next to your chosen server.

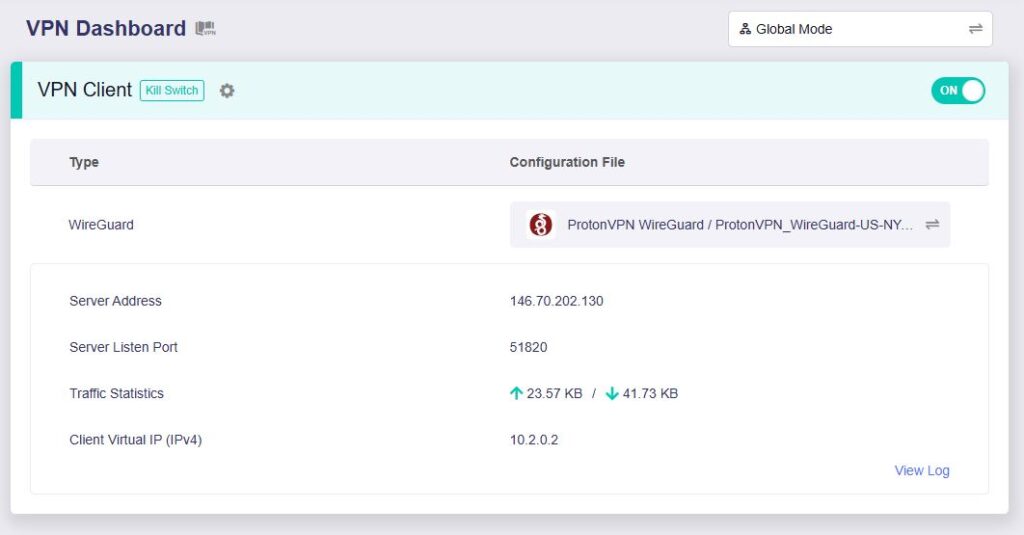
8. A green dot confirms success. You can also switch between Global Mode or Policy Mode for routing in the VPN Dashboard.

ProtonVPN OpenVPN Setup for GLiNet

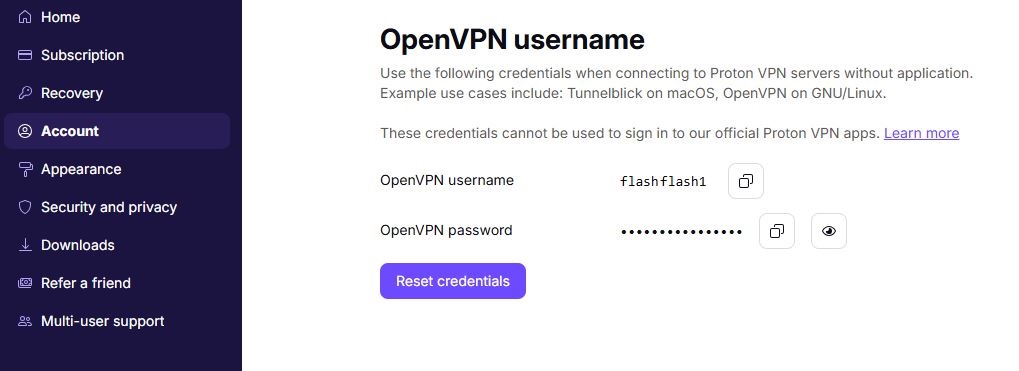
1. Log in to your ProtonVPN account and navigate to the Account tab. Scroll down to find your OpenVPN specific Username and Password.

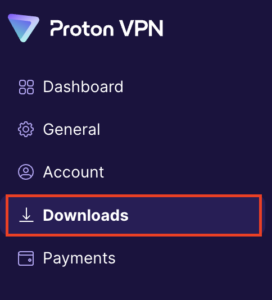
2. Go to the Downloads section of your ProtonVPN account page

ProtonVPN Downloads

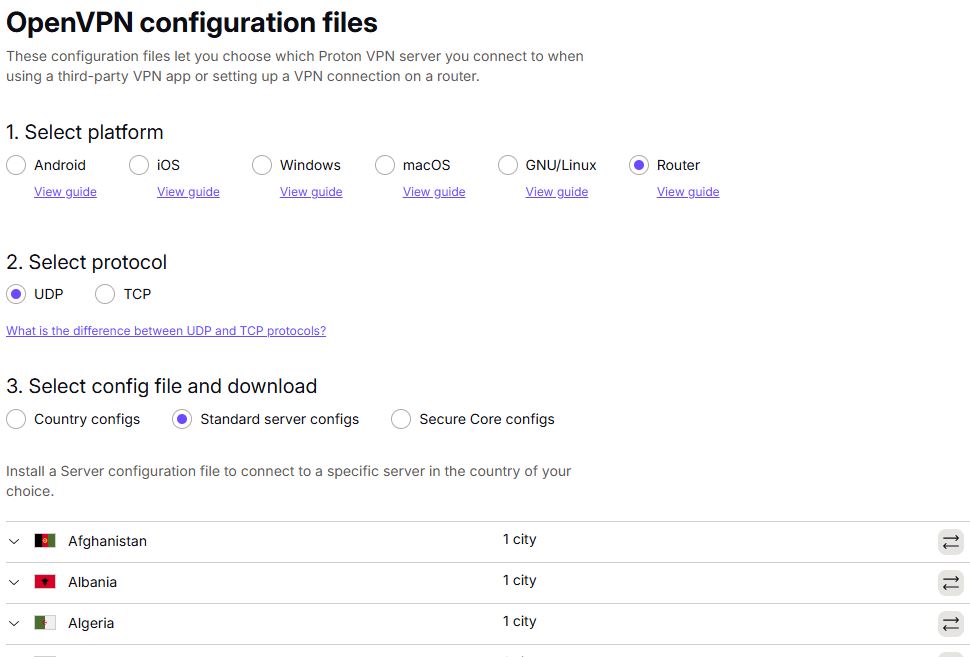
3. Scroll down to find the OpenVPN configuration Files. Select Router as the platform, UDP as the protocol, and select Standard server configs. Choose your preferred country and download the configuration file.

4. Login to GL.iNet firmware settings (usually 192.168.8.1) in a browser on any computer or smart device connected to the GL.iNet FlashRouter’s network.

View our guide for more instructions on how to access GL.iNet firmware settings.

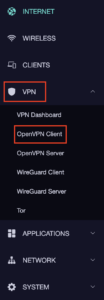
5. Navigate to the VPN tab and select OpenVPN Client.

GL.iNet VPN OpenVPN Client

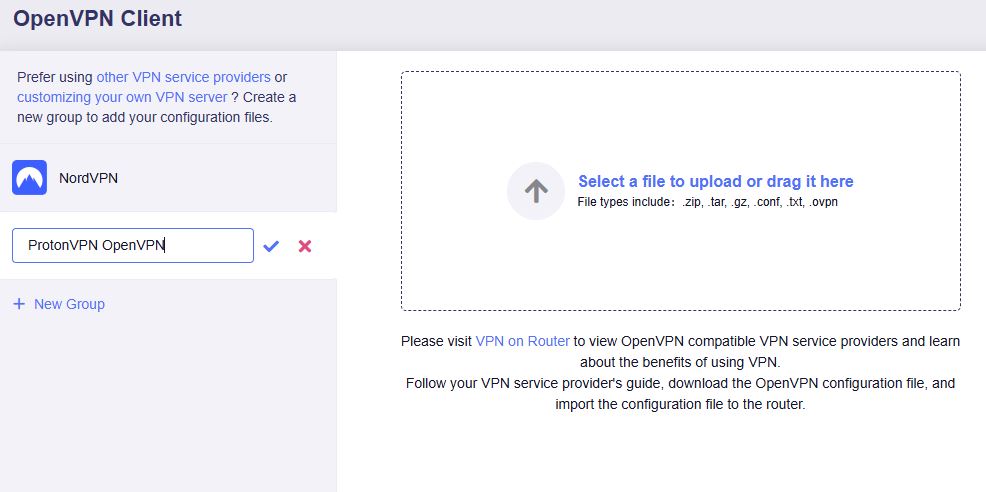
6. Select Add Manually then click + New Group and name your connection and click the check to save.

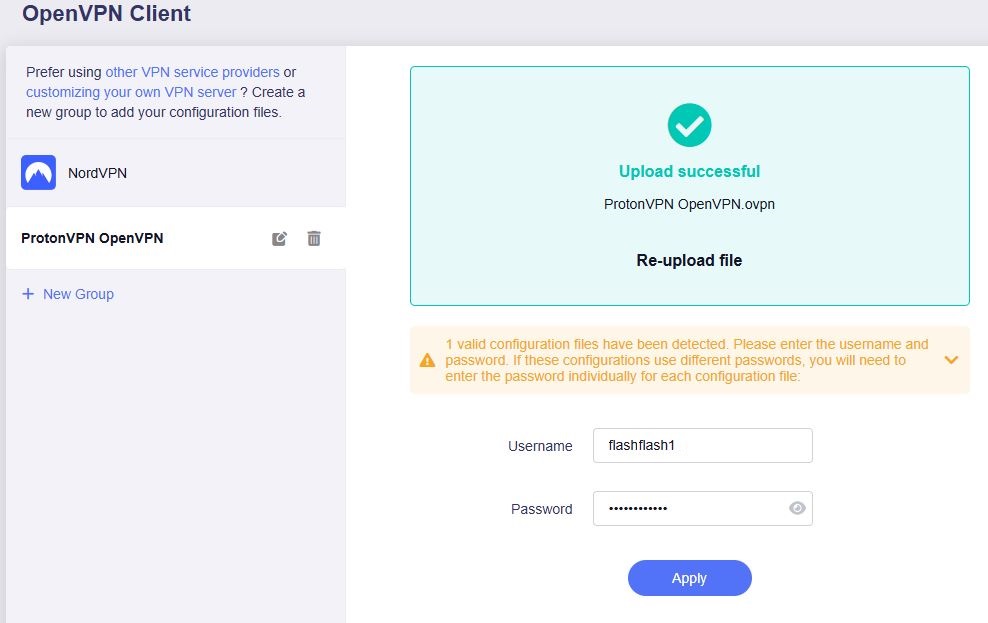
7. Upload the configuration file and input your username and password, click Apply.

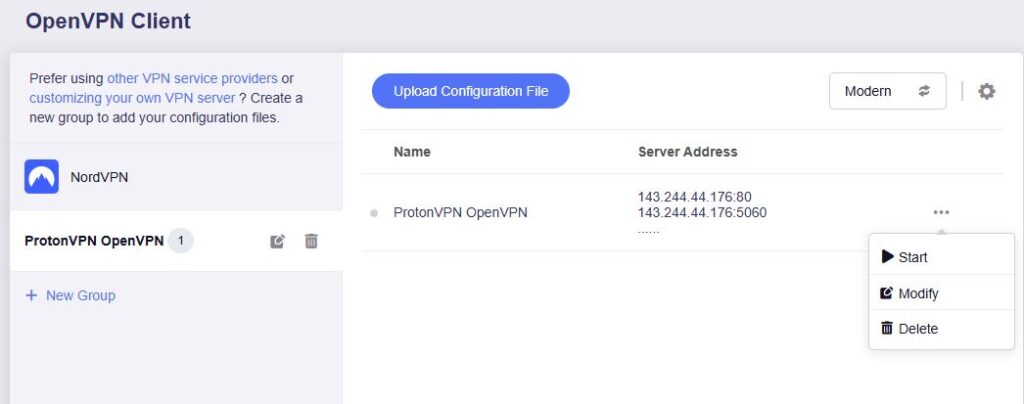
8. Start a connection by clicking the 3 dots (…) > Start next to your chosen server.

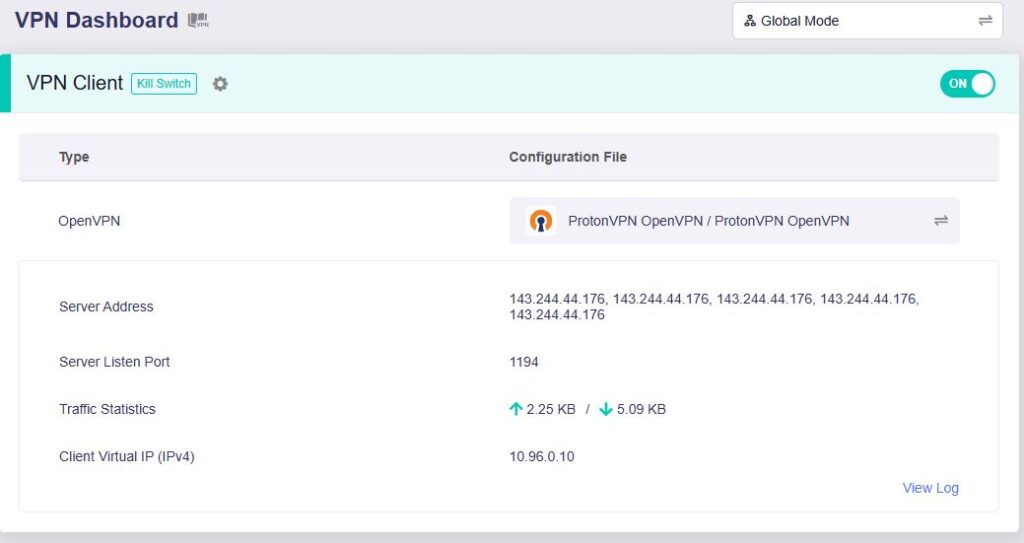
9. A green dot confirms success. You can also switch between Global Mode or Policy Mode for routing in the VPN Dashboard.

  1. You should now see information appear in the Server Address, Server Listen Port, Traffic Statistics, and Client Virtual IP areas.
  2. Visit ProtonVPN’s IP Check to verify your new IP address and virtual location.

In some cases you may notice that the location is not showing the same location as the server you have input in your router settings; this is because geo tracking tools are often tricked by VPN connections. As long as you see an IP address that is not the same as your normal Internet IP address then you are indeed connected to ProtonVPN.

🚫📱Do not run ProtonVPN apps on devices connected to your ProtonVPN router. Using the app at the same time as the router VPN may cause conflicts and connection issues.

Still having issues?

Feel free to submit a ticket and we will get back to you as soon as possible.

VyprVPN Manual OpenVPN Setup

TeamFlashRouters · Apr 19, 2019 ·

Preparing for Manual VyprVPN Setup

Verify your VyprVPN login information

If you are not already a VyprVPN user Sign Up Now.

Log in to your account on the VyprVPN website.

VyprVPN - Website Login

VyprVPN Server Addresses

United States

Los Angeles, CA us1.vpn.goldenfrog.com
Washington, DC us2.vpn.goldenfrog.com
Austin, TX us3.vpn.goldenfrog.com
Miami, FL us4.vpn.goldenfrog.com
New York City, NY us5.vpn.goldenfrog.com
Chicago, IL us6.vpn.goldenfrog.com
San Francisco, CA us7.vpn.goldenfrog.com
Seattle, WA us8.vpn.goldenfrog.com

United Kingdom

 London uk1.vpn.goldenfrog.com

Canada

Toronto ca1.vpn.goldenfrog.com

Australia

Sydney au1.vpn.goldenfrog.com
Melbourne au2.vpn.goldenfrog.com
Perth au3.vpn.goldenfrog.com

Germany

Frankfurt de1.vpn.goldenfrog.com

Rest of the World

UAE – Dubai ae1.vpn.goldenfrog.com
Argentina – Buenos Aires ar1.vpn.goldenfrog.com
Austria – Vienna at1.vpn.goldenfrog.com
Belgium – Brussels be1.vpn.goldenfrog.com
Bulgaria – Sofia bg1.vpn.goldenfrog.com
Bahrain – Manama bh1.vpn.goldenfrog.com
Brazil – São Paulo br1.vpn.goldenfrog.com
Switzerland – Zurich ch1.vpn.goldenfrog.com
Colombia – Bogotá co1.vpn.goldenfrog.com
Costa Rica – San José cr1.vpn.goldenfrog.com
Czech Republic – Prague cz1.vpn.goldenfrog.com
Germany – Frankfurt de1.vpn.goldenfrog.com
Denmark – Copenhagen dk1.vpn.goldenfrog.com
Algeria – Algiers dz1.vpn.goldenfrog.com
Egypt – Cairo eg1.vpn.goldenfrog.com
Spain – Madrid es1.vpn.goldenfrog.com
Netherlands – Amsterdam eu1.vpn.goldenfrog.com
Finland – Helsinki fi1.vpn.goldenfrog.com
France – Paris fr1.vpn.goldenfrog.com
Greece – Athens gr1.vpn.goldenfrog.com
Hong Kong – Hong Kong hk1.vpn.goldenfrog.com
Indonesia – Jakarta id1.vpn.goldenfrog.com
Ireland – Dublin ie1.vpn.goldenfrog.com
Israel – Tel Aviv il1.vpn.goldenfrog.com
India – Mumbai in1.vpn.goldenfrog.com
Iceland – Reykjavík is1.vpn.goldenfrog.com
Italy – Rome it1.vpn.goldenfrog.com
Japan – Tokyo jp1.vpn.goldenfrog.com
South Korea – Seoul kr1.vpn.goldenfrog.com
Liechtenstein – Schaan li1.vpn.goldenfrog.com
Lithuania – Vilnius lt1.vpn.goldenfrog.com
Luxembourg – Luxembourg City lu1.vpn.goldenfrog.com
Latvia – Riga lv1.vpn.goldenfrog.com
Marshall Islands – Majuro mh1.vpn.goldenfrog.com
Macao – Macao mo1.vpn.goldenfrog.com
Maldives – Malé mv1.vpn.goldenfrog.com
Mexico – Mexico City mx1.vpn.goldenfrog.com
Malaysia – Kuala Lumpur my1.vpn.goldenfrog.com
Norway – Oslo no1.vpn.goldenfrog.com
New Zealand – Auckland nz1.vpn.goldenfrog.com
Panama – Panama City pa1.vpn.goldenfrog.com
Philippines – Manila ph1.vpn.goldenfrog.com
Pakistan – Karachi pk1.vpn.goldenfrog.com
Poland – Warsaw pl1.vpn.goldenfrog.com
Portugal – Lisbon pt1.vpn.goldenfrog.com
Qatar – Doha qa1.vpn.goldenfrog.com
Romania – Bucharest ro1.vpn.goldenfrog.com
Russia – Moscow ru1.vpn.goldenfrog.com
Saudi Arabia – Riyadh sa1.vpn.goldenfrog.com
Sweden – Stockholm se1.vpn.goldenfrog.com
Singapore – Singapore sg1.vpn.goldenfrog.com
Slovenia – Ljubljana si1.vpn.goldenfrog.com
Slovakia – Bratislava sk1.vpn.goldenfrog.com
El Salvador – San Salvador sv1.vpn.goldenfrog.com
Thailand – Bangkok th1.vpn.goldenfrog.com
Turkey – Istanbul tr1.vpn.goldenfrog.com
Taiwan – Taipei tw1.vpn.goldenfrog.com
Ukraine – Kiev ua1.vpn.goldenfrog.com
Uruguay – Montevideo uy1.vpn.goldenfrog.com
Vietnam – Hanoi vn1.vpn.goldenfrog.com

DD-WRT Router Setup for VyprVPN

Navigate to Services > VPN

VyprVPN offers two different Encryption levels:

Default Encryption (Blowfish-CBC)
typically provides faster speeds.

Strong Encryption (AES-256) provides stronger encryption.

Follow the table below of the one that fits your needs.

Enter VyprVPN settings (Default Encryption)

OpenVPN Client

Start OpenVPN Client

If you wish to disable your VPN connection simply set this to Disable at any time and click Apply Settings.

Server IP/Name

Copy and paste the server you would like to connect to from the server list above. Be sure there are no extra spaces or characters.

If you wish to change VyprVPN connection locations, THIS IS THE ONLY FIELD YOU NEED TO CHANGE.

Port

1194

Tunnel Device

TUN

Tunnel Protocol

UDP

Encryption cipher

Blowfish-CBC

Hash Algorithm

SHA1

User Pass Authentication

Enable

Username

Enter the Username you successfully logged in to your VyprVPN account with.

Password

Enter the Password you successfully logged in to your VyprVPN account with.

Advanced Options

Enable

TLS Cipher

None

LZO Compression

Adaptive

NAT

Enable

Firewall Protection

Enable

Additional Config

resolv-retry infinite
keepalive 10 60
persist-key
persist-tun
persist-remote-ip
nobind

Policy Based Routing

This field can be used for split VPN and Dual Gateway routing.

CA Cert

-----BEGIN CERTIFICATE-----
MIIGWjCCBEKgAwIBAgIJAJxUG61mxDS7MA0GCSqGSIb3DQEBDQUAMHsxCzAJBgNV
BAYTAlJPMRIwEAYDVQQHEwlCdWNoYXJlc3QxGDAWBgNVBAoTD0N5YmVyR2hvc3Qg
Uy5BLjEbMBkGA1UEAxMSQ3liZXJHaG9zdCBSb290IENBMSEwHwYJKoZIhvcNAQkB
FhJpbmZvQGN5YmVyZ2hvc3Qucm8wHhcNMTcwNjE5MDgxNzI1WhcNMzcwNjE0MDgx
NzI1WjB7MQswCQYDVQQGEwJSTzESMBAGA1UEBxMJQnVjaGFyZXN0MRgwFgYDVQQK
Ew9DeWJlckdob3N0IFMuQS4xGzAZBgNVBAMTEkN5YmVyR2hvc3QgUm9vdCBDQTEh
MB8GCSqGSIb3DQEJARYSaW5mb0BjeWJlcmdob3N0LnJvMIICIjANBgkqhkiG9w0B
AQEFAAOCAg8AMIICCgKCAgEA7O8+mji2FlQhJXn/G4VLrKPjGtxgQBAdjo0dZEQz
KX08q14dLkslmOLgShStWKrOiLXGAvB1rPvvk613jtA0KjQLpgyLy9lIWohQKYjj
5jrJYXMZMkbSHBYI9L8L7iezBEFYrjYKdDo51nq99wRFhKdbyKKjDh3e2L2SVEZL
T1ogkK5gWzjvH+mjjtjUUicK+YjGwWOz6I+KKaG4Ve/D/cE6nCLbhHIMMnargZEu
7sqA6BFeS4kEP/ZdCZoTSX2n43XV1q63nJt/v0KDetbZDciFVW9h9SVPG4qT44p0
550N+Mom7zTX7S/ID5T9dplgU8sRGtIMrG0cIMD9zmpFgUnMusCrR7jJFr0sMAve
TbgZg95LmstV6R6WKZkSFdUrE0DHl4dHoZvTFX+1LhwhHgjgDLaosX0vhG/C/7Lp
oVWimd6RRQT3M9o4Fa1TuhfvBzQ20QHrmRV/yKvGNK0xckZ6EZ/QY7Z55ORU15Tg
ab4ebnblYPWoEmn0mIYP3LFFeoR5OS1EX7+j4kPv+bwPGsmpHjxmZyq2Y7sJBpbO
CJgbkn52WZdPBIRDpPdIHQ8pAJC4T0iMK9xvAwWNl/V6EYYNpR97osyEDXn+BTdA
HlhJ5fck9KlwI9mb1Kg1bhbvbmaIAiOLenSULYf3j6rI1ygo3R2cCyybtuAq8M7z
0OECAwEAAaOB4DCB3TAdBgNVHQ4EFgQU6tdK1g/He5qzjeAoM5eHt4in9iUwga0G
A1UdIwSBpTCBooAU6tdK1g/He5qzjeAoM5eHt4in9iWhf6R9MHsxCzAJBgNVBAYT
AlJPMRIwEAYDVQQHEwlCdWNoYXJlc3QxGDAWBgNVBAoTD0N5YmVyR2hvc3QgUy5B
LjEbMBkGA1UEAxMSQ3liZXJHaG9zdCBSb290IENBMSEwHwYJKoZIhvcNAQkBFhJp
bmZvQGN5YmVyZ2hvc3Qucm+CCQCcVButZsQ0uzAMBgNVHRMEBTADAQH/MA0GCSqG
SIb3DQEBDQUAA4ICAQDNyQ92kj4qiNjnHk99qvnFw9qGfwB9ofaPL74zh0G5hEe3
Wgb2o4fqUGnvUNgOu53gJksz3DcPQ8t40wfmm9I1Z8tiM9qrqvkuQ+nKcLgdooXt
EsTybPIYDZ2cWR/5E0TKRvC7RFzKgQ4D77Vbi4TdaHiDV7ZNfU1iLCoBGcYm80hc
UHEs5KIVLwUmcSOTmbZBySJxcSD0yUpS7nlZGwLY6VQrU+JFwDSisbXT4DXf3iSz
p7FzW0/u/SFvWsPHrjE0hkPoZPalYvouaJEHKAhip0ZwSmitlxbBnmm8+K/3c9mL
A5/uXrirfpuhhs8V3lyV2mczVtSiTl6gpi88gc//JY80JeHdupjO25T3XEzY9cpx
ecmkWaUEjLMx4wVoXQuUiPonfILM6OLwi+zUS8gQErdFeGvcQXbncPa4SdJuHkF8
lgiX2i8S8fPGdXvU37E9bdAXwP5nZriYq1s0D59Qfvz+vLXVkmyZp6ztxjKjKole
mPMak0Y5c1Q4RjNF6tmQoFuy/ACSkWy14Tzu2dFp7UiVbGg1FOvKhfs48zC2/IUQ
v1arqmPT/9LVq3B2DVT9UKXRUXX/f/jSSsVjkz4uUe2jUyL+XHX1nSmROTPHSAJ+
oKf0BLnfqUxFkEUTwLnayssP2nwGgq35b7wEbTFIXdrjHGFUVQIDeERz8UThew==
-----END CERTIFICATE-----

CLICK APPLY SETTINGS

Leave all settings not mentioned above as their default setting.

Enter VyprVPN settings (Strong Encryption)

OpenVPN Client

Start OpenVPN Client

If you wish to disable your VPN connection simply set this to Disable at any time and click Apply Settings.

Server IP/Name

Copy and paste the server you would like to connect to from the server list above. Be sure there are no extra spaces or characters.

If you wish to change VyprVPN connection locations, THIS IS THE ONLY FIELD YOU NEED TO CHANGE.

Port

443

Tunnel Device

TUN

Tunnel Protocol

UDP

Encryption cipher

AES-256-CBC

Hash Algorithm

SHA256

User Pass Authentication

Enable

Username

Enter the Username you successfully logged in to your VyprVPN account with.

Password

Enter the Password you successfully logged in to your VyprVPN account with.

Advanced Options

Enable

TLS Cipher

None

LZO Compression

Adaptive

NAT

Enable

Firewall Protection

Enable

Additional Config

resolv-retry infinite
keepalive 10 60
persist-key
persist-tun
persist-remote-ip
nobind
tls-cipher TLS-DHE-RSA-WITH-AES-256-CBC-SHA

Policy Based Routing

This field can be used for split VPN and Dual Gateway routing. Learn more here.

CA Cert

-----BEGIN CERTIFICATE-----
MIIGWjCCBEKgAwIBAgIJAJxUG61mxDS7MA0GCSqGSIb3DQEBDQUAMHsxCzAJBgNV
BAYTAlJPMRIwEAYDVQQHEwlCdWNoYXJlc3QxGDAWBgNVBAoTD0N5YmVyR2hvc3Qg
Uy5BLjEbMBkGA1UEAxMSQ3liZXJHaG9zdCBSb290IENBMSEwHwYJKoZIhvcNAQkB
FhJpbmZvQGN5YmVyZ2hvc3Qucm8wHhcNMTcwNjE5MDgxNzI1WhcNMzcwNjE0MDgx
NzI1WjB7MQswCQYDVQQGEwJSTzESMBAGA1UEBxMJQnVjaGFyZXN0MRgwFgYDVQQK
Ew9DeWJlckdob3N0IFMuQS4xGzAZBgNVBAMTEkN5YmVyR2hvc3QgUm9vdCBDQTEh
MB8GCSqGSIb3DQEJARYSaW5mb0BjeWJlcmdob3N0LnJvMIICIjANBgkqhkiG9w0B
AQEFAAOCAg8AMIICCgKCAgEA7O8+mji2FlQhJXn/G4VLrKPjGtxgQBAdjo0dZEQz
KX08q14dLkslmOLgShStWKrOiLXGAvB1rPvvk613jtA0KjQLpgyLy9lIWohQKYjj
5jrJYXMZMkbSHBYI9L8L7iezBEFYrjYKdDo51nq99wRFhKdbyKKjDh3e2L2SVEZL
T1ogkK5gWzjvH+mjjtjUUicK+YjGwWOz6I+KKaG4Ve/D/cE6nCLbhHIMMnargZEu
7sqA6BFeS4kEP/ZdCZoTSX2n43XV1q63nJt/v0KDetbZDciFVW9h9SVPG4qT44p0
550N+Mom7zTX7S/ID5T9dplgU8sRGtIMrG0cIMD9zmpFgUnMusCrR7jJFr0sMAve
TbgZg95LmstV6R6WKZkSFdUrE0DHl4dHoZvTFX+1LhwhHgjgDLaosX0vhG/C/7Lp
oVWimd6RRQT3M9o4Fa1TuhfvBzQ20QHrmRV/yKvGNK0xckZ6EZ/QY7Z55ORU15Tg
ab4ebnblYPWoEmn0mIYP3LFFeoR5OS1EX7+j4kPv+bwPGsmpHjxmZyq2Y7sJBpbO
CJgbkn52WZdPBIRDpPdIHQ8pAJC4T0iMK9xvAwWNl/V6EYYNpR97osyEDXn+BTdA
HlhJ5fck9KlwI9mb1Kg1bhbvbmaIAiOLenSULYf3j6rI1ygo3R2cCyybtuAq8M7z
0OECAwEAAaOB4DCB3TAdBgNVHQ4EFgQU6tdK1g/He5qzjeAoM5eHt4in9iUwga0G
A1UdIwSBpTCBooAU6tdK1g/He5qzjeAoM5eHt4in9iWhf6R9MHsxCzAJBgNVBAYT
AlJPMRIwEAYDVQQHEwlCdWNoYXJlc3QxGDAWBgNVBAoTD0N5YmVyR2hvc3QgUy5B
LjEbMBkGA1UEAxMSQ3liZXJHaG9zdCBSb290IENBMSEwHwYJKoZIhvcNAQkBFhJp
bmZvQGN5YmVyZ2hvc3Qucm+CCQCcVButZsQ0uzAMBgNVHRMEBTADAQH/MA0GCSqG
SIb3DQEBDQUAA4ICAQDNyQ92kj4qiNjnHk99qvnFw9qGfwB9ofaPL74zh0G5hEe3
Wgb2o4fqUGnvUNgOu53gJksz3DcPQ8t40wfmm9I1Z8tiM9qrqvkuQ+nKcLgdooXt
EsTybPIYDZ2cWR/5E0TKRvC7RFzKgQ4D77Vbi4TdaHiDV7ZNfU1iLCoBGcYm80hc
UHEs5KIVLwUmcSOTmbZBySJxcSD0yUpS7nlZGwLY6VQrU+JFwDSisbXT4DXf3iSz
p7FzW0/u/SFvWsPHrjE0hkPoZPalYvouaJEHKAhip0ZwSmitlxbBnmm8+K/3c9mL
A5/uXrirfpuhhs8V3lyV2mczVtSiTl6gpi88gc//JY80JeHdupjO25T3XEzY9cpx
ecmkWaUEjLMx4wVoXQuUiPonfILM6OLwi+zUS8gQErdFeGvcQXbncPa4SdJuHkF8
lgiX2i8S8fPGdXvU37E9bdAXwP5nZriYq1s0D59Qfvz+vLXVkmyZp6ztxjKjKole
mPMak0Y5c1Q4RjNF6tmQoFuy/ACSkWy14Tzu2dFp7UiVbGg1FOvKhfs48zC2/IUQ
v1arqmPT/9LVq3B2DVT9UKXRUXX/f/jSSsVjkz4uUe2jUyL+XHX1nSmROTPHSAJ+
oKf0BLnfqUxFkEUTwLnayssP2nwGgq35b7wEbTFIXdrjHGFUVQIDeERz8UThew==
-----END CERTIFICATE-----

CLICK APPLY SETTINGS

Leave all settings not mentioned above as their default setting.

Verify a successful VyprVPN connection

Navigate to the Status > OpenVPN

  1. You should now see a CONNECTED SUCCESS message.
  2. Visit to WhatIsMyIPAddress to verify your new IP address and virtual location.

In some cases you may notice that the location is not showing the same location as the server you have input in your router settings; this is because geo tracking tools are often tricked by VPN connections. As long as you see an IP address that is not the same as your normal Internet IP address then you are indeed connected to VyprVPN.

Back up your settings

Navigate to Administration > Backup

  1. Click the Backup button.
  2. A file named nvrambak.bin will be saved to your computer.
  3. You can load nvrambak.bin to restore your settings in the event of a reset.

How to change the VyprVPN server

  1. Copy the new VyprVPN server address from the above server list.
  2. Paste the server into the Server IP/Name field and Click Apply Settings.

TROUBLESHOOTING

Still having issues? Visit the VPN Troubleshooting section.

Troubleshoot Here

NordVPN Setup for GL.iNet Routers

TeamFlashRouters · May 29, 2023 ·

You can connect to NordVPN on your GL.iNet router using NordLynx, OpenVPN, or a Dedicated IP.

Quick Options

  • NordLynx: Choose your preferred city or country from NordVPN’s server list

  • OpenVPN: Choose your preferred city or country from NordVPN’s server list.

  • Dedicated IP (optional): Enter your unique configuration file if you’ve been assigned a static NordVPN IP.

:point_right: If you are not already a NordVPN user Sign Up Now.

NordVPN NordLynx Setup for GLiNet

1. Get your NordVPN Access Token for NordLynx connections. Log in to your NordVPN account and select NordVPN from your list of Services.

NordVPN Services Section

2. At the bottom of the page click Get Access token and you will receive a code via email. Enter this code to proceed.

NordVPN Access Token

3. After you enter the email code select Generate new token and set it to Doesn’t expire. Copy this token.
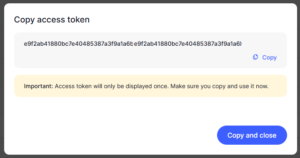
NordVPN Generate new token
NordVPN Copy Token

4. Login to GL.iNet firmware settings (usually 192.168.8.1) in a browser on any computer or smart device connected to the GL.iNet FlashRouter’s network.

View our guide for more instructions on how to access GL.iNet firmware settings.

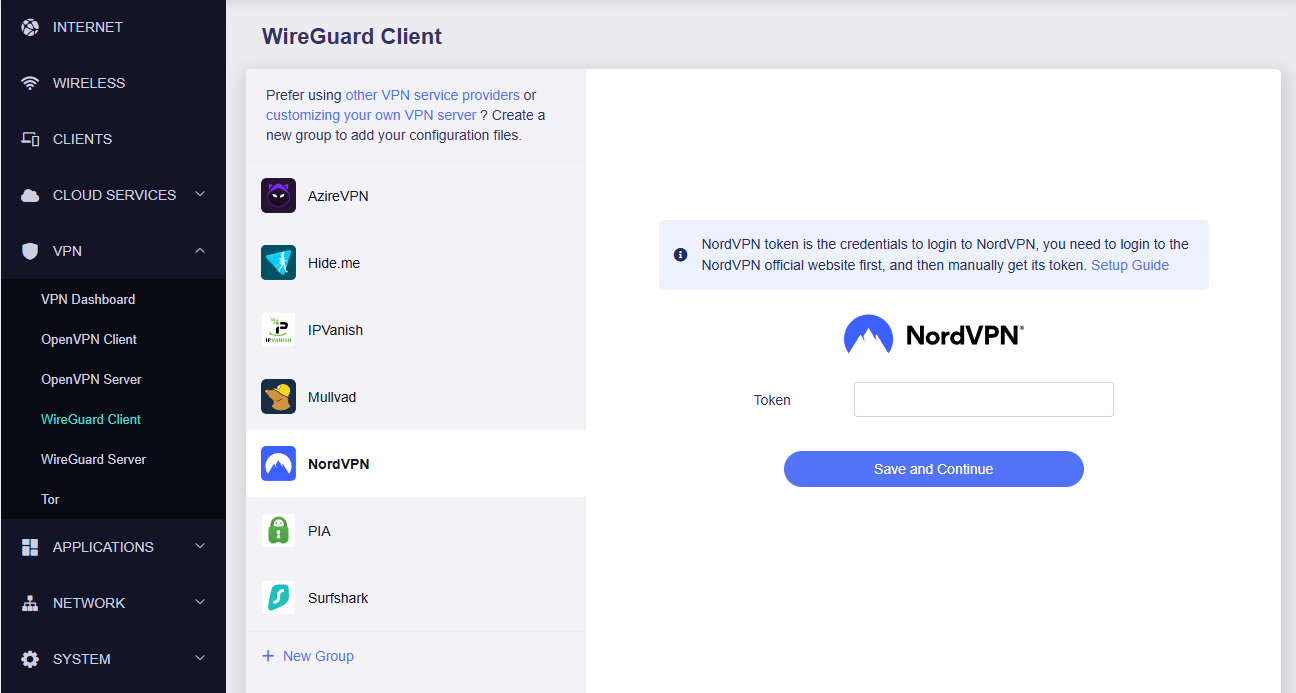
5. Navigate to the VPN tab and select Wireguard Client then choose NordVPN. Enter your Token then click Save and Continue

GLiNet NordVPN Wireguard

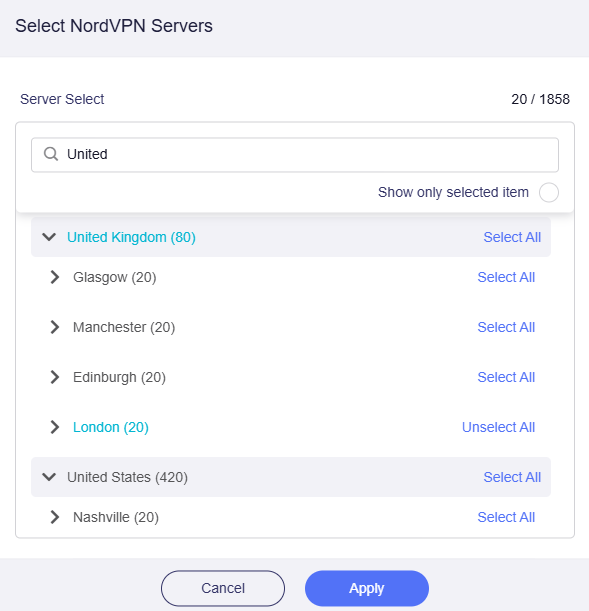
6. Select your preferred server locations, and click Apply.

GLiNet Select NordLynx Servers

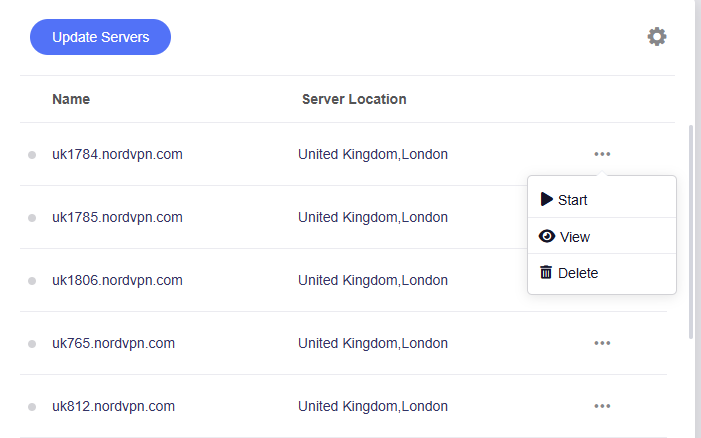
7. Start a connection by clicking the 3 dots (…) > Start next to your chosen server.

GLiNet NordLynx Start

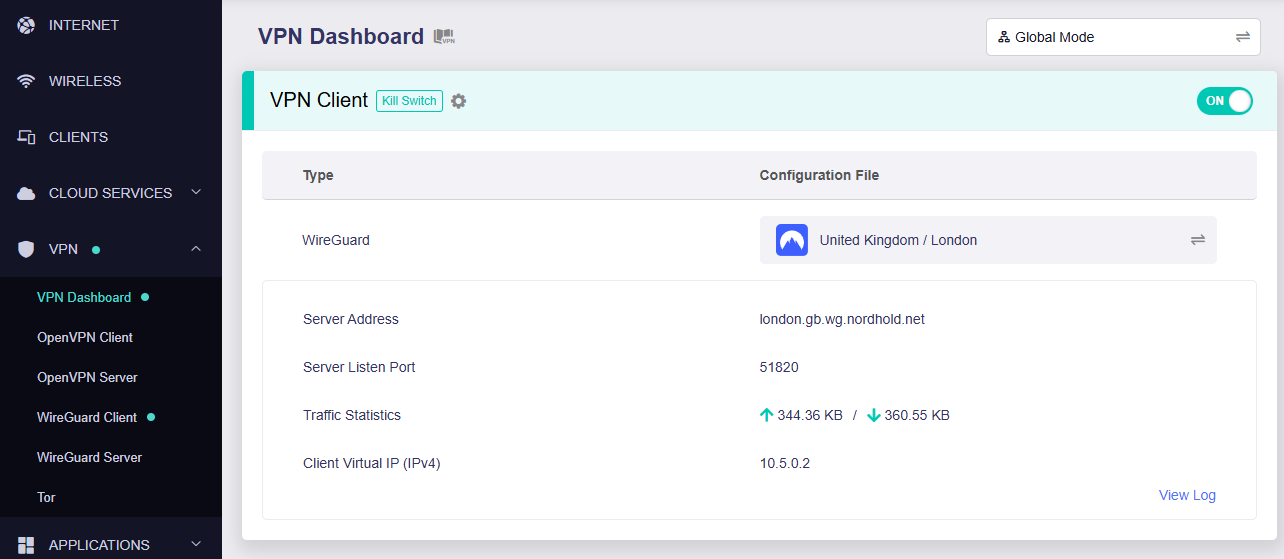
8. A green dot confirms success. You can also switch between Global Mode or Policy Mode for routing in the VPN Dashboard.

GLiNet NordLynx Connected

NordVPN OpenVPN Setup for GLiNet

1. Get your NordVPN manual service credentials for OpenVPN connections. Log in to your NordVPN account and select NordVPN from your list of Services.

NordVPN Service

2. At the bottom of the page in the Manual Setup section click Setup NordVPN manually then under the Configuration section go to Service credentials. Click Verify email to receive a code via email and enter the code to view and copy your credentials.

NordVPN Manual OpenVPN
NordVPN Service Credentials

3. Login to GL.iNet firmware settings (usually 192.168.8.1) in a browser on any computer or smart device connected to the GL.iNet FlashRouter’s network.

View our guide for more instructions on how to access GL.iNet firmware settings.

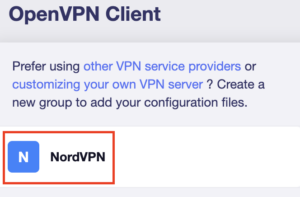
4. Navigate to the VPN tab and select OpenVPN Client.

GL.iNet VPN OpenVPN Client

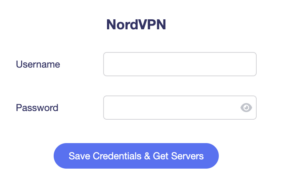
5. Select the NordVPN group, enter your manual credentials, then click Save Credentials & Get Servers.

GL.iNet NordVPN Group
GL.iNet NordVPN Login

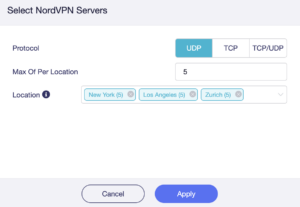
6. Choose UDP (recommended), select your preferred server locations, and click Apply.

GL.iNet NordVPN select servers

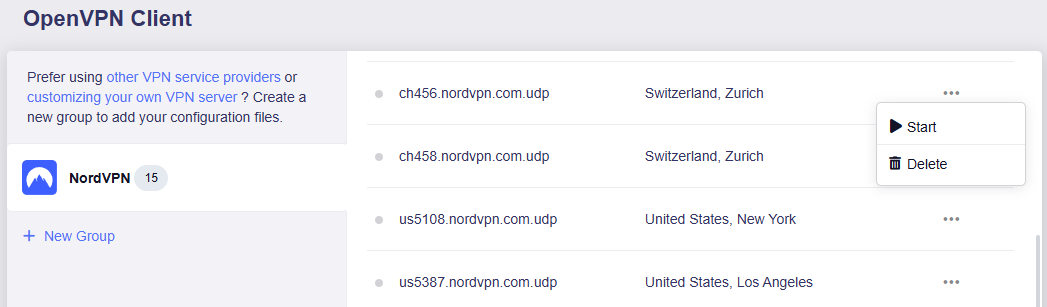
7. Start a connection by clicking the 3 dots (…) > Start next to your chosen server.

NordVPN GLiNet OpenVPN Start

8. A green dot confirms success. You can also switch between Global Mode or Policy Mode for routing in the VPN Dashboard.

GLiNet VPN Dashboard

NordVPN Dedicated IP Setup for GLiNet

1. Get your NordVPN manual service credentials for OpenVPN connections. Log in to your NordVPN account and select NordVPN from your list of Services.

NordVPN Service

2. At the bottom of the page in the Manual Setup section click Setup NordVPN manually then under the Configuration section go to Service credentials. Click Verify email to receive a code via email and enter the code to view and copy your credentials.

NordVPN Manual OpenVPN
NordVPN Service Credentials

3. Login to GL.iNet firmware settings (usually 192.168.8.1) in a browser on any computer or smart device connected to the GL.iNet FlashRouter’s network.

View our guide for more instructions on how to access GL.iNet firmware settings.

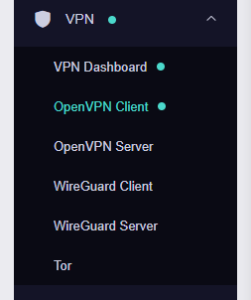
4. Navigate to the VPN tab and select OpenVPN Client.

GLiNet VPN Dashboard

5. Download your Dedicated IP configuration file from the NordVPN website.

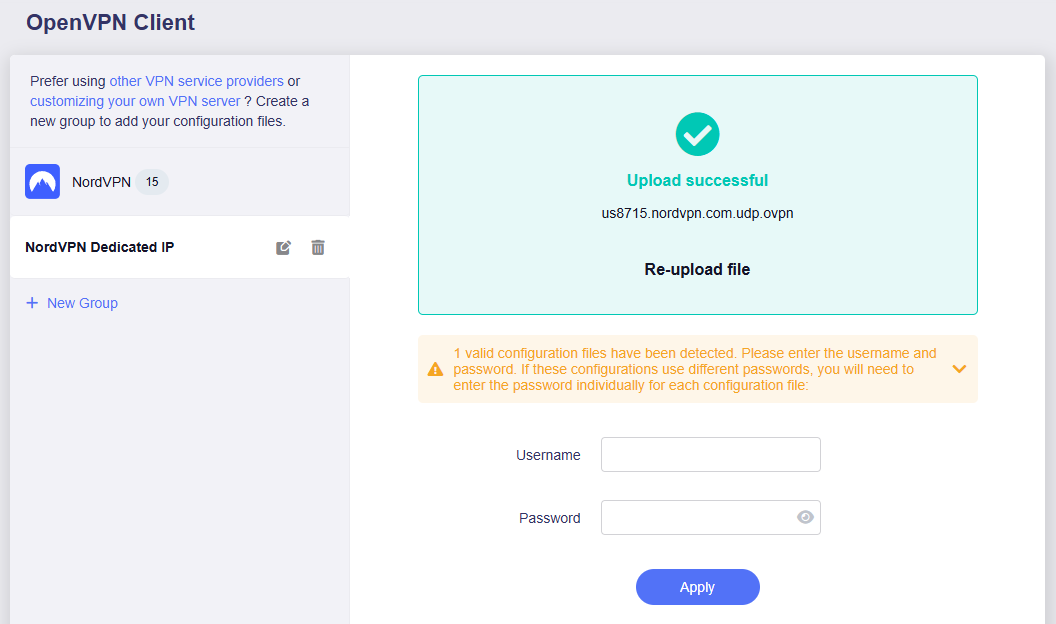
6. Click +New Group and name your NordVPN Dedicated IP connection, then upload the configuration file, enter your manual service credentials and click Apply.

GLiNet Dedicated IP Address Load

7. Start a connection by clicking the 3 dots (…) > Start next to your chosen server.

GLiNet Dedicated IP

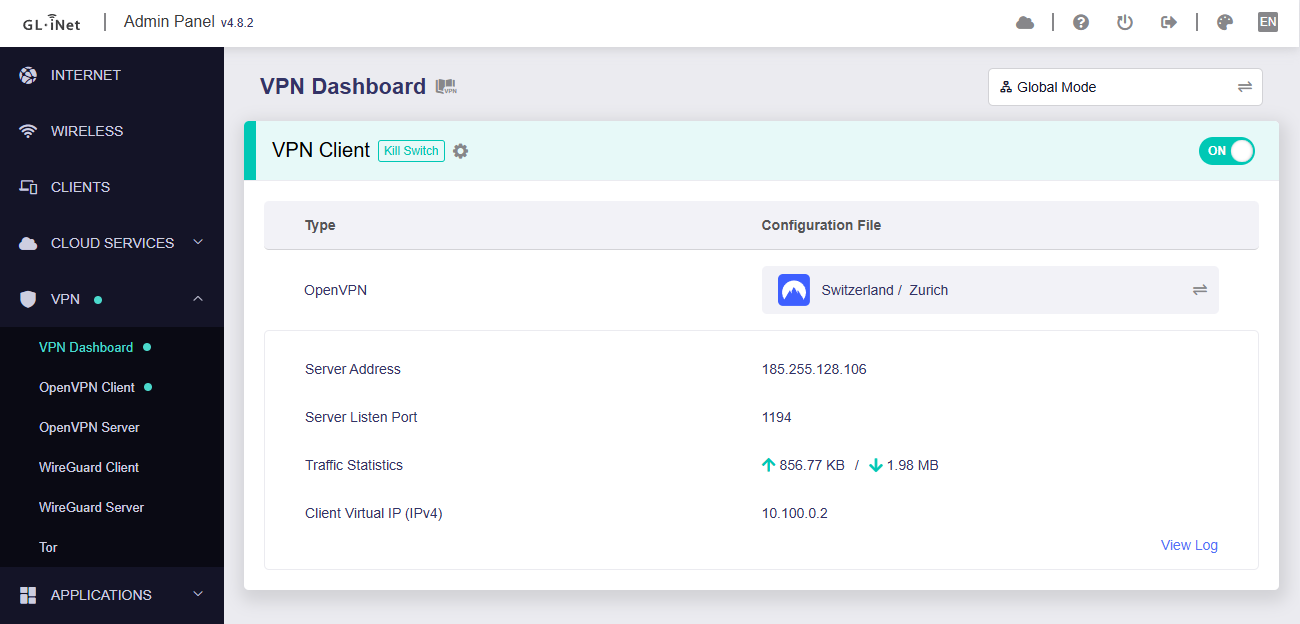
8. A green dot confirms success. You can also switch between Global Mode or Policy Mode for routing in the VPN Dashboard.

GLiNet Dedicated IP Dashboard
  1. You should now see information appear in the Server Address, Server Listen Port, Traffic Statistics, and Client Virtual IP areas.
  2. Visit NordVPN’s IP Check to verify your new IP address and virtual location.

In some cases you may notice that the location is not showing the same location as the server you have input in your router settings; this is because geo tracking tools are often tricked by VPN connections. As long as you see an IP address that is not the same as your normal Internet IP address then you are indeed connected to NordVPN.

🚫📱Do not run NordVPN apps on devices connected to your NordVPN router. Using the app at the same time as the router VPN may cause conflicts and connection issues.

Still having issues?

Feel free to submit a ticket and we will get back to you as soon as possible.

ExpressVPN Setup for AsusWRT Firmware Routers

TeamFlashRouters · Apr 29, 2024 ·

You can connect to ExpressVPN on your AsusWRT router using OpenVPN.

Quick Options

  • OpenVPN: Download your preferred server .ovpn configuration file from the ExpressVPN website.

:point_right: If you are not already a ExpressVPN user Sign Up Now.

EXPRESSVPN SETUP GUIDE FOR ASUSWRT

1. Log in to your account on the ExpressVPN website.

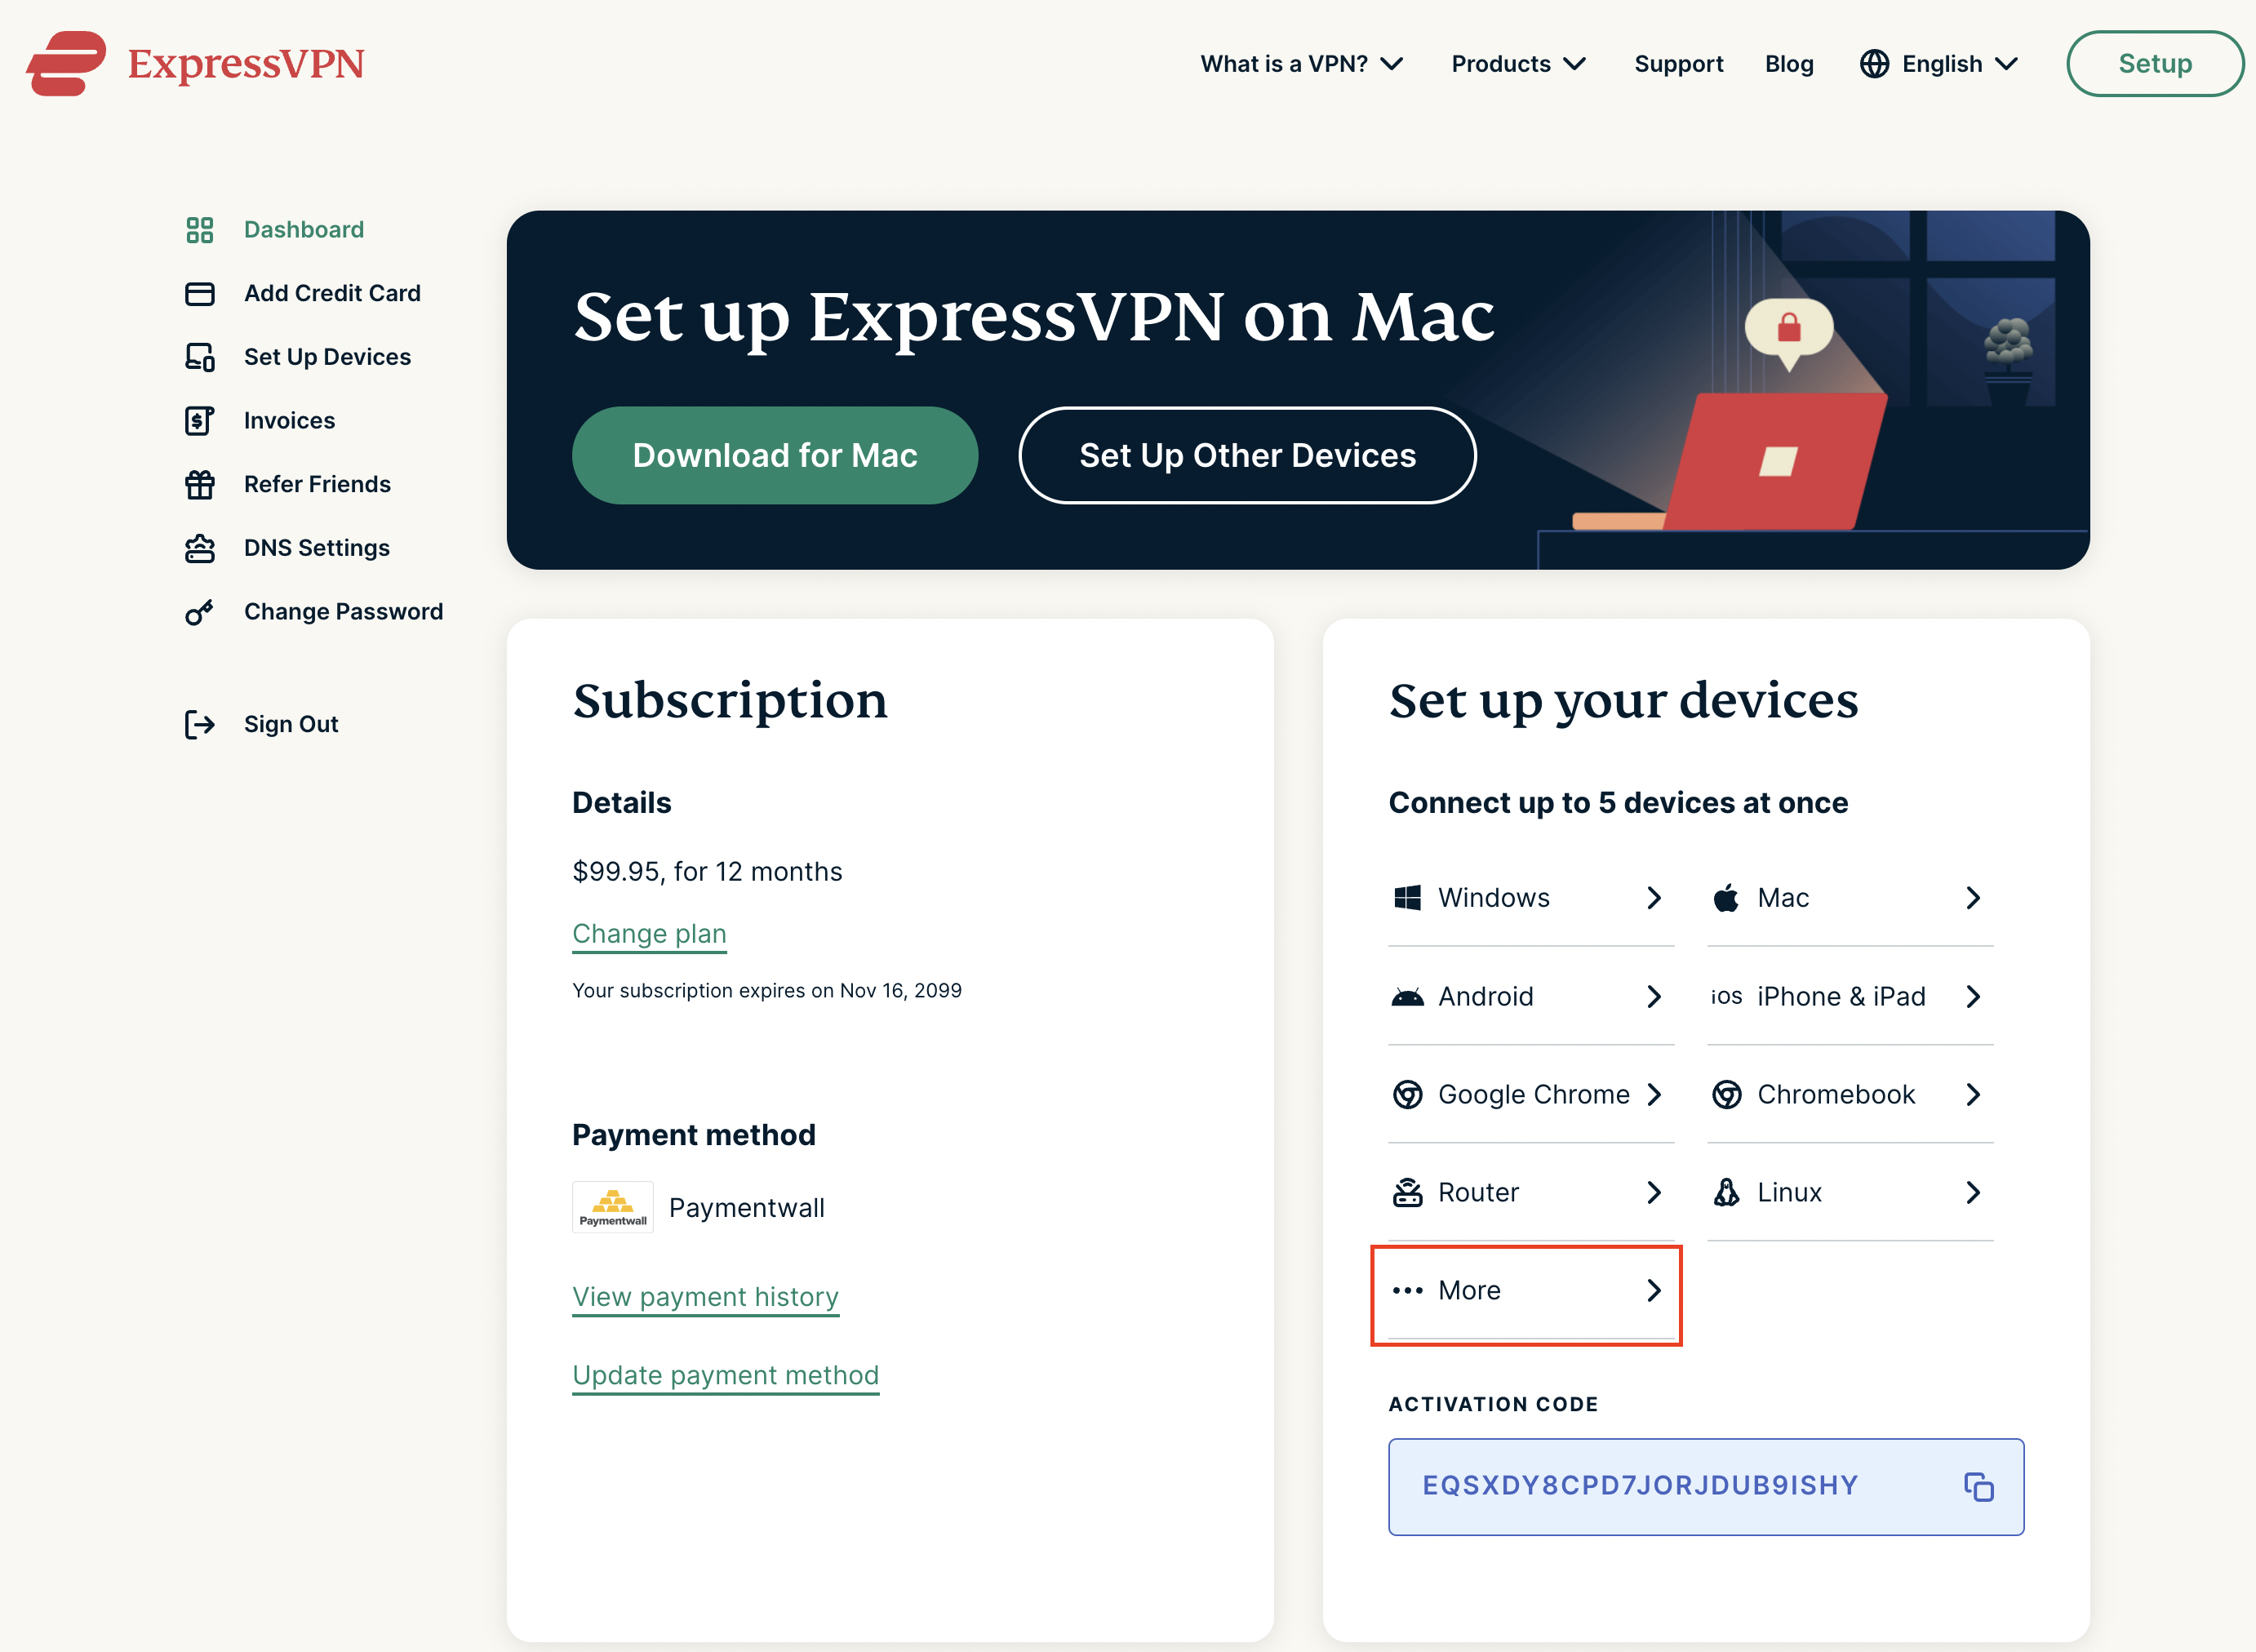
2. In the “Set up your devices” section, click More and select Manual Configuration from the menu options.

3. Copy the Username and Password that are displayed on the right

ExpressVPN Manual Service Credentials

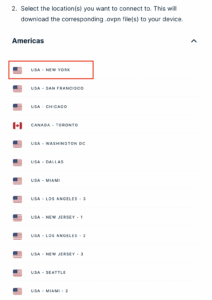
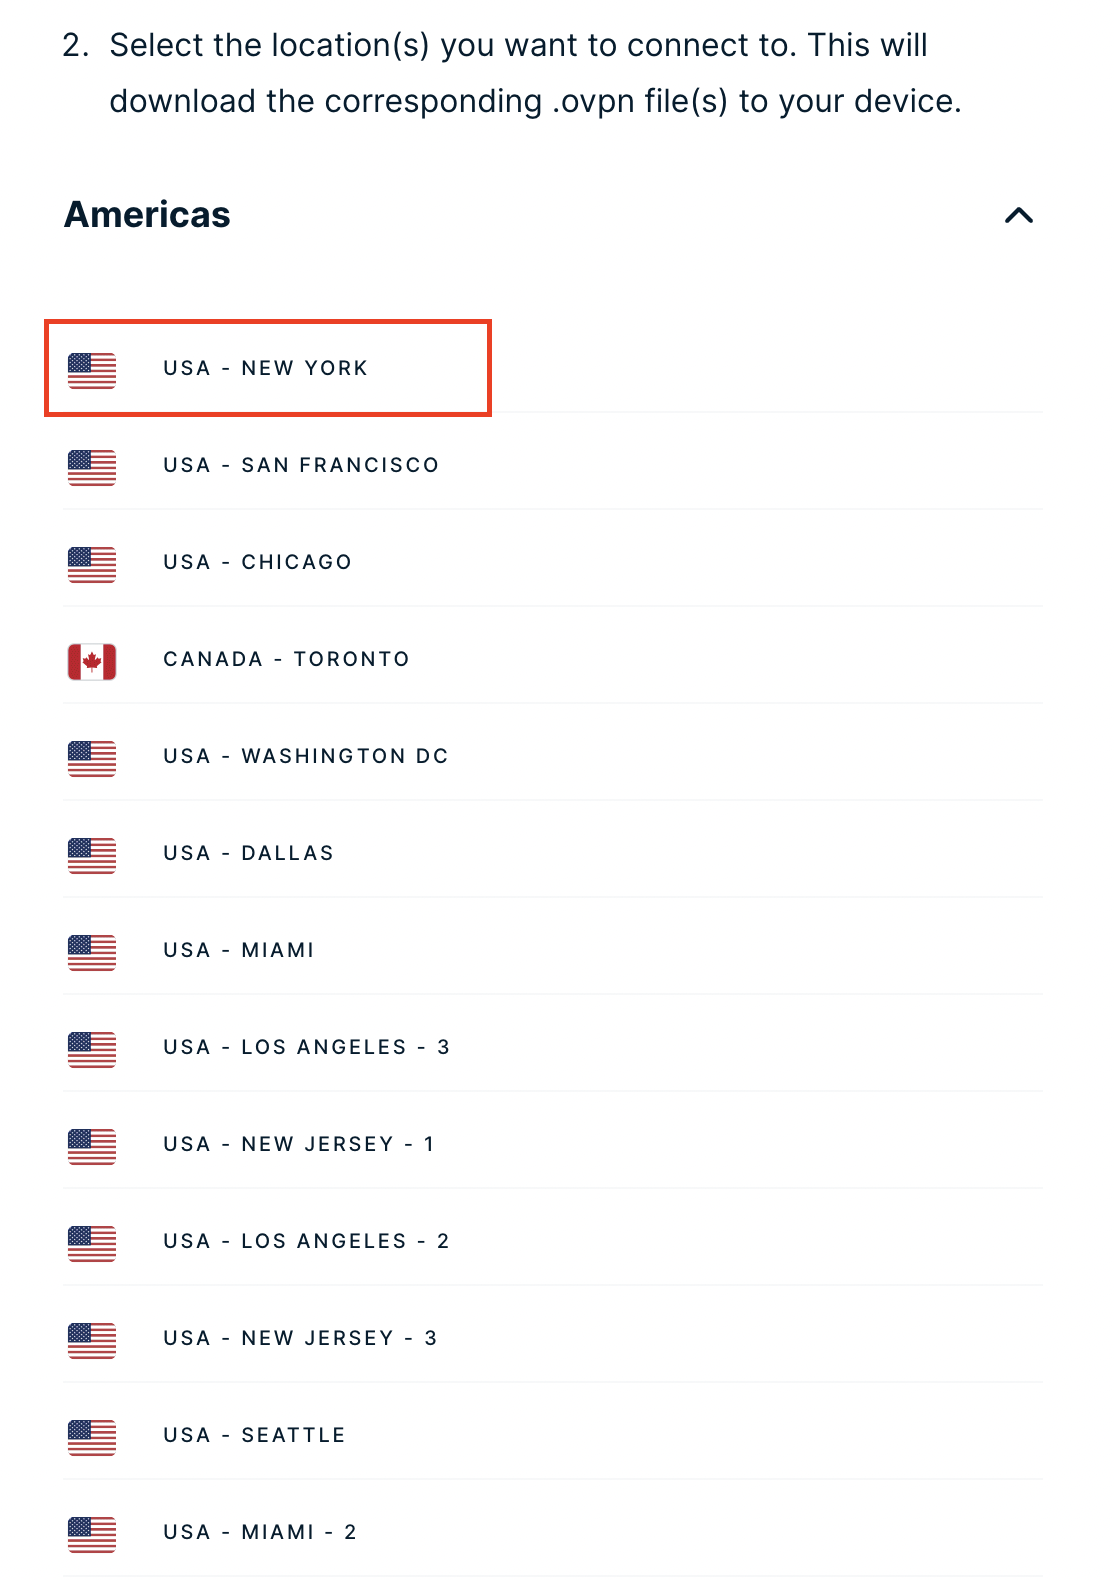
4. Download a server file from any of the available regions shown in the ExpressVPN Manual Configuration section (Americas, Europe, Asia Pacific, etc)

ExpressVPN Download .ovpn file

5. Log in to the Asus settings page by connecting to the Asus router’s WiFi (or wired LAN) on your computer. Then, enter 192.168.50.1 or asusrouter.com in the browser.

View our guide for more instructions on how to access AsusWRT firmware settings.

6. Navigate to the VPN tab and then click on the VPN Fusion tab, then click Add Profile

Click the VPN Button
VPN Fusion Add Profile

7.  Fill in your NordVPN information then click Apply and Enable.

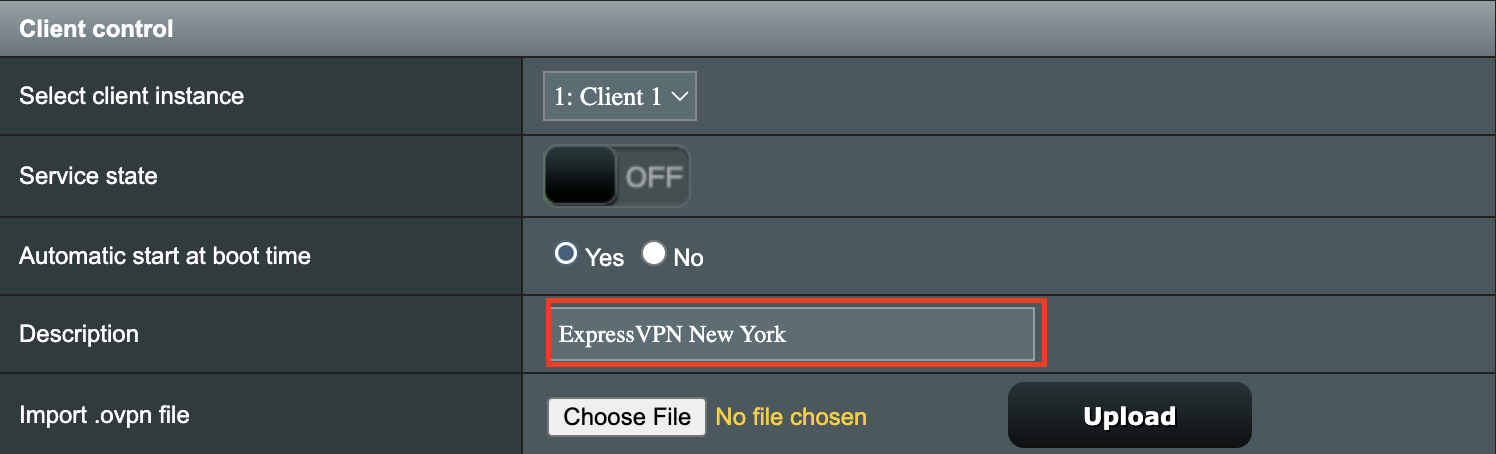
  • Connection Name: Choose a name for your ExpressVPN OpenVPN connection.
  • VPN Type: Select OpenVPN
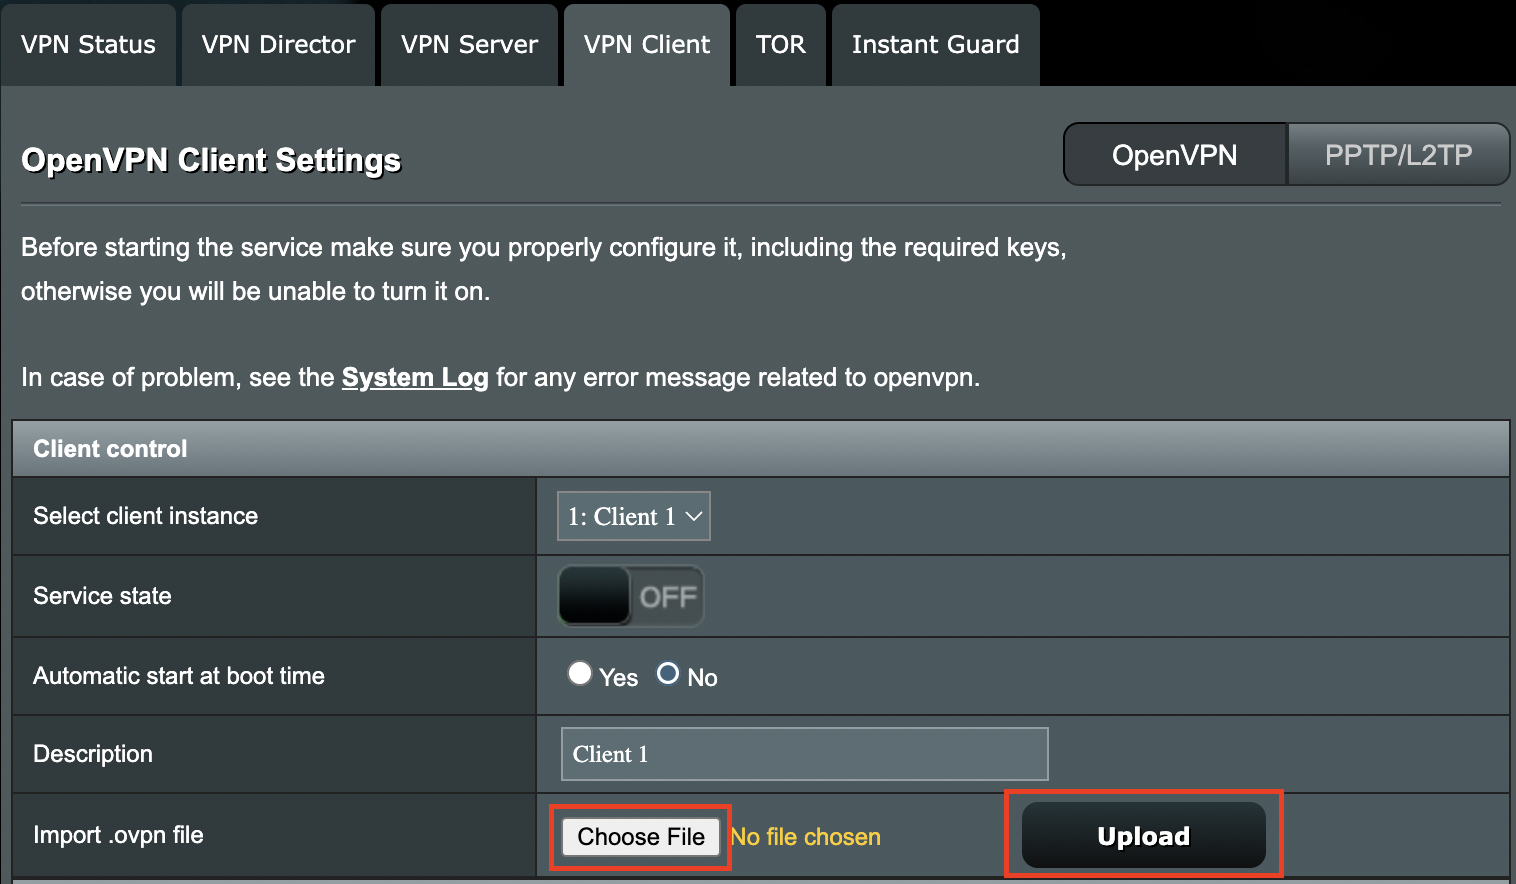
  • Import .ovpn File: Upload the OpenVPN file that you downloaded.
  • Username and Password: Copy and paste your ExpressVPN manual service credentials from step 3.

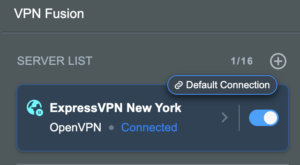
8. You should now see the Profile say Connected, indicating that the NordVPN server is successfully connected to your router.

Asus ExpressVPN Connected

9. The VPN connection is automatically set to Apply to all devices.

If you only want certain devices to connect to the VPN, then turn off the VPN connection and switch off Apply to all devices.

Now click the pencil next to the Device section and select the devices (computer, phone, etc.) that you want to connect to VPN. Click OK and then click Apply all settings.
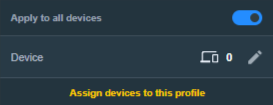
Apply VPN by Device
  1. Connect your devices to the Asus router network and visit the ExpressVPN website, at the top it should display Your Status: Protected.
  2. Visit ExpressVPN’s IP Check to verify your new IP address and virtual location.

🚫📱Do not run ExpressVPN apps on devices connected to your ExpressVPNrouter. Using the app at the same time as the router VPN may cause conflicts and connection issues.

TROUBLESHOOTING

Still having issues? Visit the VPN Troubleshooting section.

Troubleshoot Here

Surfshark Manual OpenVPN Setup

TeamFlashRouters · Apr 24, 2019 ·

Preparing for Manual Surfshark Setup

Obtain your Surfshark OpenVPN information

If you are not already an Surfshark user Sign Up Now.

1. Log in to your account on the Surfshark website.

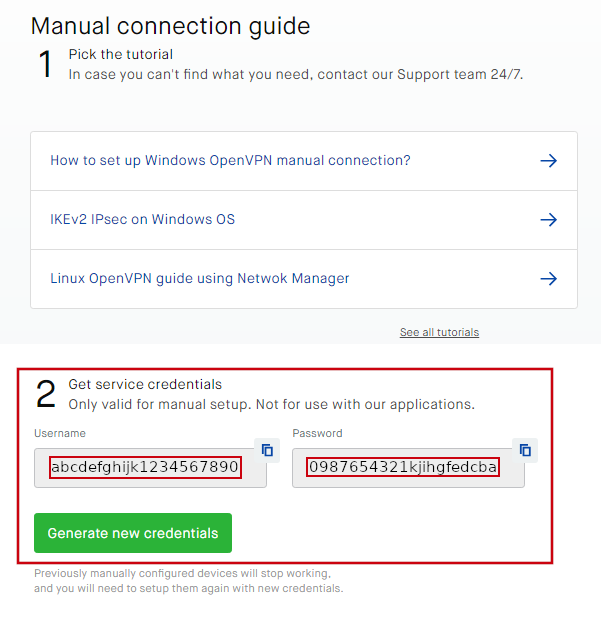
2. Successfully log in with your account information and Navigate to the Manual Connection Guide. Here you will find the OpenVPN Specific Username and Password required for manual configuration.

FlashRouters Privacy App - SurfShark OpenVPN Specific Username and Password

Surfshark Server Addresses

View a full list of Surfshark servers.

United States

Atlanta:
us-atl.prod.surfshark.com
Buffalo:
us-buf.prod.surfshark.com
Chicago:
us-chi.prod.surfshark.com
Dallas:
us-dal.prod.surfshark.com
Las Vegas:
us-las.prod.surfshark.com
Los Angeles:
us-lax.prod.surfshark.com
Miami:
us-mia.prod.surfshark.com
New York City:
us-nyc.prod.surfshark.com
Phoenix:
us-phx.prod.surfshark.com
San Fransisco:
us-sfo.prod.surfshark.com
Seattle:
us-sea.prod.surfshark.com

DD-WRT Router Setup for Surfshark

Navigate to Services > VPN

Enter Surfshark settings

OpenVPN Client

Start OpenVPN Client

If you wish to disable your VPN connection simply set this to Disable at any time and click Apply Settings.

Server IP/Name

Copy and paste the server you would like to connect to from the server list above. Be sure there are no extra spaces or characters.

If you wish to change Surfshark connection locations, THIS IS THE ONLY FIELD YOU NEED TO CHANGE.

Port

1194

Tunnel Device

TUN

Tunnel Protocol

UDP

Encryption cipher

None

Hash Algorithm

SHA512

Userpass Authentication

Enable

Username

Enter your OpenVPN specific Username.

Password

Enter your OpenVPN specific Password.

Advanced Options

Enable

TLS Cipher

None

LZO Compression

Disabled

NAT

Enable

Firewall Protection

Enable

TLS Auth Key

-----BEGIN OpenVPN Static key V1-----
b02cb1d7c6fee5d4f89b8de72b51a8d0
c7b282631d6fc19be1df6ebae9e2779e
6d9f097058a31c97f57f0c35526a44ae
09a01d1284b50b954d9246725a1ead1f
f224a102ed9ab3da0152a15525643b2e
ee226c37041dc55539d475183b889a10
e18bb94f079a4a49888da566b9978346
0ece01daaf93548beea6c827d9674897
e7279ff1a19cb092659e8c1860fbad0d
b4ad0ad5732f1af4655dbd66214e552f
04ed8fd0104e1d4bf99c249ac229ce16
9d9ba22068c6c0ab742424760911d463
6aafb4b85f0c952a9ce4275bc821391a
a65fcd0d2394f006e3fba0fd34c4bc4a
b260f4b45dec3285875589c97d3087c9
134d3a3aa2f904512e85aa2dc2202498
-----END OpenVPN Static key V1-----

Additional Config

remote-cert-tls server
remote-random
nobind
tun-mtu 1500
tun-mtu-extra 32
mssfix 1450
persist-key
persist-tun
ping-timer-rem
reneg-sec 0
cipher AES-256-GCM
log /tmp/vpn.log

Policy Based Routing

This field can be used for split VPN and Dual Gateway routing.

CA Cert

-----BEGIN CERTIFICATE-----
MIIFTTCCAzWgAwIBAgIJAMs9S3fqwv+mMA0GCSqGSIb3DQEBCwUAMD0xCzAJBgNV
BAYTAlZHMRIwEAYDVQQKDAlTdXJmc2hhcmsxGjAYBgNVBAMMEVN1cmZzaGFyayBS
b290IENBMB4XDTE4MDMxNDA4NTkyM1oXDTI4MDMxMTA4NTkyM1owPTELMAkGA1UE
BhMCVkcxEjAQBgNVBAoMCVN1cmZzaGFyazEaMBgGA1UEAwwRU3VyZnNoYXJrIFJv
b3QgQ0EwggIiMA0GCSqGSIb3DQEBAQUAA4ICDwAwggIKAoICAQDEGMNj0aisM63o
SkmVJyZPaYX7aPsZtzsxo6m6p5Wta3MGASoryRsBuRaH6VVa0fwbI1nw5ubyxkua
Na4v3zHVwuSq6F1p8S811+1YP1av+jqDcMyojH0ujZSHIcb/i5LtaHNXBQ3qN48C
c7sqBnTIIFpmb5HthQ/4pW+a82b1guM5dZHsh7q+LKQDIGmvtMtO1+NEnmj81BAp
FayiaD1ggvwDI4x7o/Y3ksfWSCHnqXGyqzSFLh8QuQrTmWUm84YHGFxoI1/8AKdI
yVoB6BjcaMKtKs/pbctk6vkzmYf0XmGovDKPQF6MwUekchLjB5gSBNnptSQ9kNgn
TLqi0OpSwI6ixX52Ksva6UM8P01ZIhWZ6ua/T/tArgODy5JZMW+pQ1A6L0b7egIe
ghpwKnPRG+5CzgO0J5UE6gv000mqbmC3CbiS8xi2xuNgruAyY2hUOoV9/BuBev8t
tE5ZCsJH3YlG6NtbZ9hPc61GiBSx8NJnX5QHyCnfic/X87eST/amZsZCAOJ5v4EP
SaKrItt+HrEFWZQIq4fJmHJNNbYvWzCE08AL+5/6Z+lxb/Bm3dapx2zdit3x2e+m
iGHekuiE8lQWD0rXD4+T+nDRi3X+kyt8Ex/8qRiUfrisrSHFzVMRungIMGdO9O/z
CINFrb7wahm4PqU2f12Z9TRCOTXciQIDAQABo1AwTjAdBgNVHQ4EFgQUYRpbQwyD
ahLMN3F2ony3+UqOYOgwHwYDVR0jBBgwFoAUYRpbQwyDahLMN3F2ony3+UqOYOgw
DAYDVR0TBAUwAwEB/zANBgkqhkiG9w0BAQsFAAOCAgEAn9zV7F/XVnFNZhHFrt0Z
S1Yqz+qM9CojLmiyblMFh0p7t+Hh+VKVgMwrz0LwDH4UsOosXA28eJPmech6/bjf
ymkoXISy/NUSTFpUChGO9RabGGxJsT4dugOw9MPaIVZffny4qYOc/rXDXDSfF2b+
303lLPI43y9qoe0oyZ1vtk/UKG75FkWfFUogGNbpOkuz+et5Y0aIEiyg0yh6/l5Q
5h8+yom0HZnREHhqieGbkaGKLkyu7zQ4D4tRK/mBhd8nv+09GtPEG+D5LPbabFVx
KjBMP4Vp24WuSUOqcGSsURHevawPVBfgmsxf1UCjelaIwngdh6WfNCRXa5QQPQTK
ubQvkvXONCDdhmdXQccnRX1nJWhPYi0onffvjsWUfztRypsKzX4dvM9k7xnIcGSG
EnCC4RCgt1UiZIj7frcCMssbA6vJ9naM0s7JF7N3VKeHJtqe1OCRHMYnWUZt9vrq
X6IoIHlZCoLlv39wFW9QNxelcAOCVbD+19MZ0ZXt7LitjIqe7yF5WxDQN4xru087
FzQ4Hfj7eH1SNLLyKZkA1eecjmRoi/OoqAt7afSnwtQLtMUc2bQDg6rHt5C0e4dC
LqP/9PGZTSJiwmtRHJ/N5qYWIh9ju83APvLm/AGBTR2pXmj9G3KdVOkpIC7L35dI
623cSEC3Q3UZutsEm/UplsM=
-----END CERTIFICATE-----

CLICK APPLY SETTINGS

Leave all settings not mentioned above as their default setting.

Verify a successful Surfshark connection

Navigate to Status > OpenVPN

  1. You should now see a CONNECTED SUCCESS message.
  2. Visit WhatIsMyIPAddress to verify your new IP address, virtual location, and status as Protected at the top of the page.

In some cases you may notice that the location is not showing the same location as the server you have input in your router settings; this is because geo tracking tools are often tricked by VPN connections. As long as you see an IP address that is not the same as your normal Internet IP address then you are indeed connected to Surfshark VPN.

Back up your settings

Navigate to Administration > Backup

  1. Click the Backup button.
  2. A file named nvrambak.bin will be saved to your computer.
  3. You can load nvrambak.bin to restore your settings in the event of a reset.

How to change the Surfshark server

  1. Visit the Surfshark Manual setup page and scroll down to Section 3.
  2. Copy and paste one of the server IP Address into the Server IP/Name field.
  3. Click Apply Settings.

TROUBLESHOOTING

Still having issues? Visit the VPN Troubleshooting section.

Troubleshoot Here

PrivateInternetAccess (PIA) Manual OpenVPN Setup

TeamFlashRouters · Apr 5, 2019 ·

Preparing for Manual PIA Setup

Verify your PIA login information

If you are not already a PIA user Sign Up Now.

Log in to your account on the PIA website.

FlashRouters Privacy App - PIA Login

PIA Server Addresses

The below servers are the only servers compatible with PIA router connections. Dedicated IP Addresses are not able to connect via routers.

United States

us-california.privacy.network
us-newjersey.privacy.network
us-chicago.privacy.network
us-texas.privacy.network
us-florida.privacy.network
us-seattle.privacy.network
us3.privacy.network
us-siliconvalley.privacy.network
us-newyorkcity.privacy.network
us-washingtondc.privacy.network
us-atlanta.privacy.network
us-houston.privacy.network
us-denver.privacy.network

United Kingdom

uk-london.privacy.network
uk-manchester.privacy.network

Canada

ca-toronto.privacy.network
ca-montreal.privacy.network

Australia

au-sydney.privacy.network
aus-melbourne.privacy.network
aus-perth.privacy.network

Germany

de-berlin.privacy.network
de-frankfurt.privacy.network

Rest of the World

ae.privacy.network
austria.privacy.network
dz.privacy.network
ad.privacy.network
ar.privacy.network
yerevan.privacy.network
bahamas.privacy.network
bangladesh.privacy.network
brussels.privacy.network
sofia.privacy.network
cambodia.privacy.network
china.privacy.network
cyprus.privacy.network
czech.privacy.network
denmark.privacy.network
egypt.privacy.network
fi.privacy.network
france.privacy.network
georgia.privacy.network
greenland.privacy.network
hungary.privacy.network
is.privacy.network
in.privacy.network
iran.privacy.network
ireland.privacy.network
man.privacy.network
israel.privacy.network
italy.privacy.network
japan.privacy.network
kazakhstan.privacy.network
liechtenstein.privacy.network
lu.privacy.network
macau.privacy.network
malta.privacy.network
mexico.privacy.network
md.privacy.network
monaco.privacy.network
mongolia.privacy.network
montenegro.privacy.network
morocco.privacy.network
nl-amsterdam.privacy.network
nz.privacy.network
nigeria.privacy.network
no.privacy.network
panama.privacy.network
philippines.privacy.network
poland.privacy.network
qatar.privacy.network
ro.privacy.network
rs.privacy.network
saudiarabia.privacy.network
spain.privacy.network
srilanka.privacy.network
sweden.privacy.network
swiss.privacy.network
sg.privacy.network
tr.privacy.network
taiwan.privacy.network
ua.privacy.network
venezuela.privacy.network
vietnam.privacy.network
za.privacy.network

DD-WRT Router Setup for PIA

Navigate to Services > VPN

PIA offers two different Encryption levels.
Default Encryption (AES-128) typically provides faster speeds.
Strong Encryption (AES-256) provides stronger encryption.
Follow the table below of the one that fits your needs.

Enter PIA settings (Default Encryption)

OpenVPN Client

Start OpenVPN Client

If you wish to disable your VPN connection simply set this to Disable at any time and click Apply Settings.

Server IP/Name

Copy and paste the server you would like to connect to from the server list above. Be sure there are no extra spaces or characters.

If you wish to change PIA connection locations, THIS IS THE ONLY FIELD YOU NEED TO CHANGE.

Port

1198

Tunnel Device

TUN

Tunnel Protocol

UDP

Encryption cipher

AES-128-CBC

Hash Algorithm

SHA1

First Data Cipher

Not set

Second Data Cipher

Not set

Third Data Cipher

Not set

Userpass Authentication

Enable

Username

Enter the Username you successfully logged in to your PIA account with.

Password

Enter the Password you successfully logged in to your PIA account with.

Advanced Options

Enable

TLS Cipher

None

LZO Compression

Disabled

NAT

Enable

Firewall Protection

Enable

Additional Config

persist-key
persist-tun

Policy Based Routing

This field can be used for split VPN and Dual Gateway routing.

CA Cert

-----BEGIN CERTIFICATE-----
MIIFqzCCBJOgAwIBAgIJAKZ7D5Yv87qDMA0GCSqGSIb3DQEBDQUAMIHoMQswCQYD
VQQGEwJVUzELMAkGA1UECBMCQ0ExEzARBgNVBAcTCkxvc0FuZ2VsZXMxIDAeBgNV
BAoTF1ByaXZhdGUgSW50ZXJuZXQgQWNjZXNzMSAwHgYDVQQLExdQcml2YXRlIElu
dGVybmV0IEFjY2VzczEgMB4GA1UEAxMXUHJpdmF0ZSBJbnRlcm5ldCBBY2Nlc3Mx
IDAeBgNVBCkTF1ByaXZhdGUgSW50ZXJuZXQgQWNjZXNzMS8wLQYJKoZIhvcNAQkB
FiBzZWN1cmVAcHJpdmF0ZWludGVybmV0YWNjZXNzLmNvbTAeFw0xNDA0MTcxNzM1
MThaFw0zNDA0MTIxNzM1MThaMIHoMQswCQYDVQQGEwJVUzELMAkGA1UECBMCQ0Ex
EzARBgNVBAcTCkxvc0FuZ2VsZXMxIDAeBgNVBAoTF1ByaXZhdGUgSW50ZXJuZXQg
QWNjZXNzMSAwHgYDVQQLExdQcml2YXRlIEludGVybmV0IEFjY2VzczEgMB4GA1UE
AxMXUHJpdmF0ZSBJbnRlcm5ldCBBY2Nlc3MxIDAeBgNVBCkTF1ByaXZhdGUgSW50
ZXJuZXQgQWNjZXNzMS8wLQYJKoZIhvcNAQkBFiBzZWN1cmVAcHJpdmF0ZWludGVy
bmV0YWNjZXNzLmNvbTCCASIwDQYJKoZIhvcNAQEBBQADggEPADCCAQoCggEBAPXD
L1L9tX6DGf36liA7UBTy5I869z0UVo3lImfOs/GSiFKPtInlesP65577nd7UNzzX
lH/P/CnFPdBWlLp5ze3HRBCc/Avgr5CdMRkEsySL5GHBZsx6w2cayQ2EcRhVTwWp
cdldeNO+pPr9rIgPrtXqT4SWViTQRBeGM8CDxAyTopTsobjSiYZCF9Ta1gunl0G/
8Vfp+SXfYCC+ZzWvP+L1pFhPRqzQQ8k+wMZIovObK1s+nlwPaLyayzw9a8sUnvWB
/5rGPdIYnQWPgoNlLN9HpSmsAcw2z8DXI9pIxbr74cb3/HSfuYGOLkRqrOk6h4RC
OfuWoTrZup1uEOn+fw8CAwEAAaOCAVQwggFQMB0GA1UdDgQWBBQv63nQ/pJAt5tL
y8VJcbHe22ZOsjCCAR8GA1UdIwSCARYwggESgBQv63nQ/pJAt5tLy8VJcbHe22ZO
sqGB7qSB6zCB6DELMAkGA1UEBhMCVVMxCzAJBgNVBAgTAkNBMRMwEQYDVQQHEwpM
b3NBbmdlbGVzMSAwHgYDVQQKExdQcml2YXRlIEludGVybmV0IEFjY2VzczEgMB4G
A1UECxMXUHJpdmF0ZSBJbnRlcm5ldCBBY2Nlc3MxIDAeBgNVBAMTF1ByaXZhdGUg
SW50ZXJuZXQgQWNjZXNzMSAwHgYDVQQpExdQcml2YXRlIEludGVybmV0IEFjY2Vz
czEvMC0GCSqGSIb3DQEJARYgc2VjdXJlQHByaXZhdGVpbnRlcm5ldGFjY2Vzcy5j
b22CCQCmew+WL/O6gzAMBgNVHRMEBTADAQH/MA0GCSqGSIb3DQEBDQUAA4IBAQAn
a5PgrtxfwTumD4+3/SYvwoD66cB8IcK//h1mCzAduU8KgUXocLx7QgJWo9lnZ8xU
ryXvWab2usg4fqk7FPi00bED4f4qVQFVfGfPZIH9QQ7/48bPM9RyfzImZWUCenK3
7pdw4Bvgoys2rHLHbGen7f28knT2j/cbMxd78tQc20TIObGjo8+ISTRclSTRBtyC
GohseKYpTS9himFERpUgNtefvYHbn70mIOzfOJFTVqfrptf9jXa9N8Mpy3ayfodz
1wiqdteqFXkTYoSDctgKMiZ6GdocK9nMroQipIQtpnwd4yBDWIyC6Bvlkrq5TQUt
YDQ8z9v+DMO6iwyIDRiU
-----END CERTIFICATE-----

CLICK APPLY SETTINGS

Leave all settings not mentioned above as their default setting.

Enter PIA settings (Strong Encryption)

OpenVPN Client

Start OpenVPN Client

If you wish to disable your VPN connection simply set this to Disable at any time and click Apply Settings.

Server IP/Name

Copy and paste the server you would like to connect to from the server list above. Be sure there are no extra spaces or characters.

If you wish to change PIA connection locations, THIS IS THE ONLY FIELD YOU NEED TO CHANGE.

Port

1197

Tunnel Device

TUN

Tunnel Protocol

UDP

Encryption cipher

AES-256-CBC

Hash Algorithm

SHA256

First Data Cipher

Not set

Second Data Cipher

Not set

Third Data Cipher

Not set

Userpass Authentication

Enable

Username

Enter the Username you successfully logged in to your PIA account with.

Password

Enter the Password you successfully logged in to your PIA account with.

Advanced Options

Enable

TLS Cipher

None

LZO Compression

Adaptive

NAT

Enable

Firewall Protection

Enable

Additional Config

persist-key
persist-tun

Policy Based Routing

This field can be used for split VPN and Dual Gateway routing.

CA Cert

-----BEGIN CERTIFICATE-----
MIIHqzCCBZOgAwIBAgIJAJ0u+vODZJntMA0GCSqGSIb3DQEBDQUAMIHoMQswCQYD
VQQGEwJVUzELMAkGA1UECBMCQ0ExEzARBgNVBAcTCkxvc0FuZ2VsZXMxIDAeBgNV
BAoTF1ByaXZhdGUgSW50ZXJuZXQgQWNjZXNzMSAwHgYDVQQLExdQcml2YXRlIElu
dGVybmV0IEFjY2VzczEgMB4GA1UEAxMXUHJpdmF0ZSBJbnRlcm5ldCBBY2Nlc3Mx
IDAeBgNVBCkTF1ByaXZhdGUgSW50ZXJuZXQgQWNjZXNzMS8wLQYJKoZIhvcNAQkB
FiBzZWN1cmVAcHJpdmF0ZWludGVybmV0YWNjZXNzLmNvbTAeFw0xNDA0MTcxNzQw
MzNaFw0zNDA0MTIxNzQwMzNaMIHoMQswCQYDVQQGEwJVUzELMAkGA1UECBMCQ0Ex
EzARBgNVBAcTCkxvc0FuZ2VsZXMxIDAeBgNVBAoTF1ByaXZhdGUgSW50ZXJuZXQg
QWNjZXNzMSAwHgYDVQQLExdQcml2YXRlIEludGVybmV0IEFjY2VzczEgMB4GA1UE
AxMXUHJpdmF0ZSBJbnRlcm5ldCBBY2Nlc3MxIDAeBgNVBCkTF1ByaXZhdGUgSW50
ZXJuZXQgQWNjZXNzMS8wLQYJKoZIhvcNAQkBFiBzZWN1cmVAcHJpdmF0ZWludGVy
bmV0YWNjZXNzLmNvbTCCAiIwDQYJKoZIhvcNAQEBBQADggIPADCCAgoCggIBALVk
hjumaqBbL8aSgj6xbX1QPTfTd1qHsAZd2B97m8Vw31c/2yQgZNf5qZY0+jOIHULN
De4R9TIvyBEbvnAg/OkPw8n/+ScgYOeH876VUXzjLDBnDb8DLr/+w9oVsuDeFJ9K
V2UFM1OYX0SnkHnrYAN2QLF98ESK4NCSU01h5zkcgmQ+qKSfA9Ny0/UpsKPBFqsQ
25NvjDWFhCpeqCHKUJ4Be27CDbSl7lAkBuHMPHJs8f8xPgAbHRXZOxVCpayZ2SND
fCwsnGWpWFoMGvdMbygngCn6jA/W1VSFOlRlfLuuGe7QFfDwA0jaLCxuWt/BgZyl
p7tAzYKR8lnWmtUCPm4+BtjyVDYtDCiGBD9Z4P13RFWvJHw5aapx/5W/CuvVyI7p
Kwvc2IT+KPxCUhH1XI8ca5RN3C9NoPJJf6qpg4g0rJH3aaWkoMRrYvQ+5PXXYUzj
tRHImghRGd/ydERYoAZXuGSbPkm9Y/p2X8unLcW+F0xpJD98+ZI+tzSsI99Zs5wi
jSUGYr9/j18KHFTMQ8n+1jauc5bCCegN27dPeKXNSZ5riXFL2XX6BkY68y58UaNz
meGMiUL9BOV1iV+PMb7B7PYs7oFLjAhh0EdyvfHkrh/ZV9BEhtFa7yXp8XR0J6vz
1YV9R6DYJmLjOEbhU8N0gc3tZm4Qz39lIIG6w3FDAgMBAAGjggFUMIIBUDAdBgNV
HQ4EFgQUrsRtyWJftjpdRM0+925Y6Cl08SUwggEfBgNVHSMEggEWMIIBEoAUrsRt
yWJftjpdRM0+925Y6Cl08SWhge6kgeswgegxCzAJBgNVBAYTAlVTMQswCQYDVQQI
EwJDQTETMBEGA1UEBxMKTG9zQW5nZWxlczEgMB4GA1UEChMXUHJpdmF0ZSBJbnRl
cm5ldCBBY2Nlc3MxIDAeBgNVBAsTF1ByaXZhdGUgSW50ZXJuZXQgQWNjZXNzMSAw
HgYDVQQDExdQcml2YXRlIEludGVybmV0IEFjY2VzczEgMB4GA1UEKRMXUHJpdmF0
ZSBJbnRlcm5ldCBBY2Nlc3MxLzAtBgkqhkiG9w0BCQEWIHNlY3VyZUBwcml2YXRl
aW50ZXJuZXRhY2Nlc3MuY29tggkAnS7684Nkme0wDAYDVR0TBAUwAwEB/zANBgkq
hkiG9w0BAQ0FAAOCAgEAJsfhsPk3r8kLXLxY+v+vHzbr4ufNtqnL9/1Uuf8NrsCt
pXAoyZ0YqfbkWx3NHTZ7OE9ZRhdMP/RqHQE1p4N4Sa1nZKhTKasV6KhHDqSCt/dv
Em89xWm2MVA7nyzQxVlHa9AkcBaemcXEiyT19XdpiXOP4Vhs+J1R5m8zQOxZlV1G
tF9vsXmJqWZpOVPmZ8f35BCsYPvv4yMewnrtAC8PFEK/bOPeYcKN50bol22QYaZu
LfpkHfNiFTnfMh8sl/ablPyNY7DUNiP5DRcMdIwmfGQxR5WEQoHL3yPJ42LkB5zs
6jIm26DGNXfwura/mi105+ENH1CaROtRYwkiHb08U6qLXXJz80mWJkT90nr8Asj3
5xN2cUppg74nG3YVav/38P48T56hG1NHbYF5uOCske19F6wi9maUoto/3vEr0rnX
JUp2KODmKdvBI7co245lHBABWikk8VfejQSlCtDBXn644ZMtAdoxKNfR2WTFVEwJ
iyd1Fzx0yujuiXDROLhISLQDRjVVAvawrAtLZWYK31bY7KlezPlQnl/D9Asxe85l
8jO5+0LdJ6VyOs/Hd4w52alDW/MFySDZSfQHMTIc30hLBJ8OnCEIvluVQQ2UQvoW
+no177N9L2Y+M9TcTA62ZyMXShHQGeh20rb4kK8f+iFX8NxtdHVSkxMEFSfDDyQ=
-----END CERTIFICATE-----

CLICK APPLY SETTINGS

Leave all settings not mentioned above as their default setting.

Verify a successful PIA connection

Navigate to Status > OpenVPN

  1. You should now see a CONNECTED SUCCESS message.
  2. Visit PIA’s IP Check to verify your new IP address and virtual location.

In some cases you may notice that the location is not showing the same location as the server you have input in your router settings; this is because geo tracking tools are often tricked by VPN connections. As long as you see an IP address that is not the same as your normal Internet IP address then you are indeed connected to PIA.

Back up your settings

Navigate to Administration > Backup

  1. Click the Backup button.
  2. A file named nvrambak.bin will be saved to your computer.
  3. You can load nvrambak.bin to restore your settings in the event of a reset.

How to change the PIA server

  1. Copy the new PIA server address from the above server list.
  2. Paste the server into the Server IP/Name field.
  3. Click Apply Settings.

TROUBLESHOOTING

Still having issues? Visit the VPN Troubleshooting section.

Troubleshoot Here

Privacy Hero Streaming Relocation

TeamFlashRouters · Apr 3, 2023 ·

Your Privacy Hero router uses Cloud Based router management which means you can access the router settings from anywhere on any device that has an internet connection. You can follow these steps while connected to your phone, other Wi-Fi network, or the Privacy Hero network.

Use these steps change your location for popular streaming services allowing you to access to regionally restricted content. Privacy Hero uses DNS routing to change your location which is a great way around VPN streaming blocks.

1. From any device that has a browser such as a computer, smartphone, or tablet visit app.privacyhero.com

App.PrivacyHero.com

2. Enter your Privacy Hero account email and password. Click Login.

Privacy Hero Access Settings

3. Click the Streaming symbol.

Privacy Hero Streaming

4. Set the Streaming Relocation toggle to On.

Privacy Hero enable Streaming Relocation

5. Click the flag of the country you would like the listed streaming service to use.

Privacy Hero select Region

This streaming relocation feature will not change your IP address in the way that a VPN does. This is why it is not able to be blocked in the same way that a VPN connection can be.

The listed services on the streaming relocation page will not be connected to VPN even if the Privacy Hero has an active VPN connection. These services are set to bypass the router’s VPN tunnel to avoid streaming blocks.

Toggling the streaming relocation feature On will also relocate many other streaming services automatically. They will be automatically optimized for the best connection with no manual selection needed for:
ABC
Adult Swim
All 4
Apple TV Channels
BBC
Britbox
CBC Gem
CBS Sports
Crackle
DirecTV Stream
DSTV Now
Filmrise
Freeform
Freevee
Frndly TV
F1 TV
FX Now
ITV
MGM+
Molotov.TV
My 5
NBC
NBC Sports
Now E
Now TV
Pandora
Paramount+
PBS
Peacock
Philo
Pluto TV
Showmax
Sling
SonyLIV
S Sports Plus
Starz
Stirr
TBS
Tennis Channel
The CW
Tubi
TVPlayer
Vudu
Xumo
Zattoo

TROUBLESHOOTING

Still having issues? Visit the VPN Troubleshooting section.

Troubleshoot Here

Router FAQs
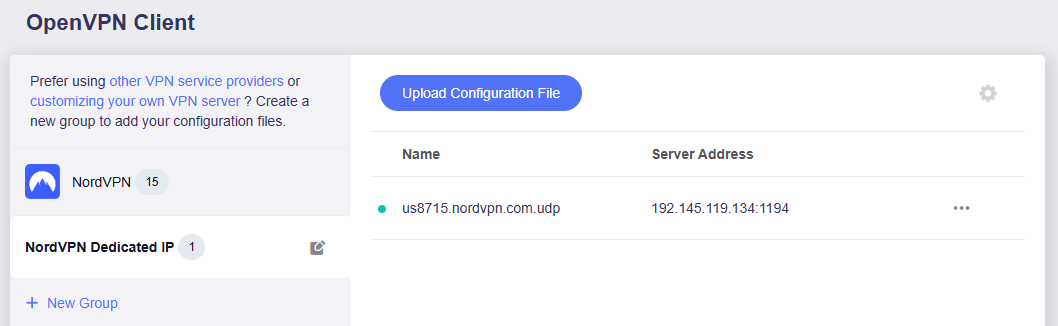
admin · Jan 29, 2019 ·

Router FAQs
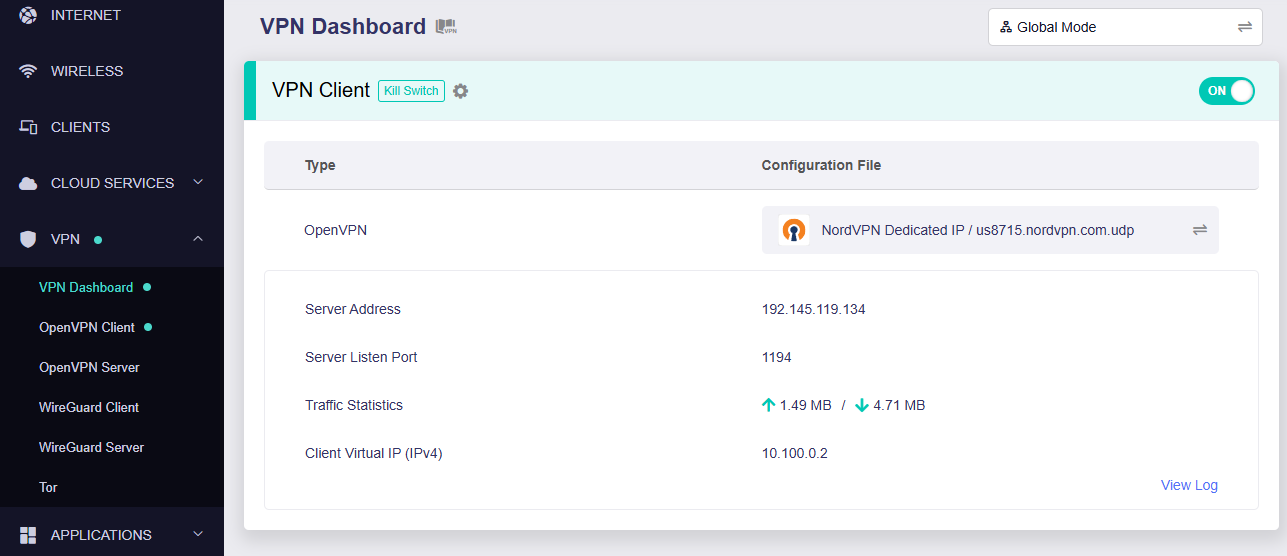
What is an IP Address?
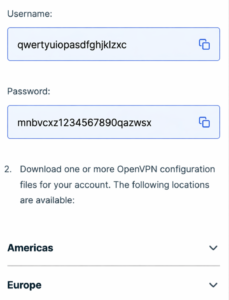
An IP (Internet Protocol) Address is a numerical assignment for each device (cell phone, iPad, laptop computer, printer etc) inside a network that uses the Internet Protocol for communication. Internet Protocol is responsible for routing information packets across network boundaries. It is the main protocol establishing the Internet.

An IP address serves two predominant functions. First is to host or network interface identification. Second, it provides location addressing. To put it bluntly, an IP address tells wherever you are connecting, to whom you are visiting, and where you are located.

What is DNS?

DNS (Domain Name System) is a protocol within the TCP/IP protocol that uses a set of standards for how computers exchange data on the Internet and on many private networks.

The basic job of DNS is to convert a user-friendly domain name into an IP address that computers use to identify one another. Think of DNS like your cellphone contact list; you tap the name and the phone contacts to a phone number.

It is easier to remember flashrouters.com, rather than its IP address. Imagine if you had to remember all of the IP addresses of your favorite websites!

What is DNSMasq?

DNSMasq is a local DNS server that speeds up host-name searches from your computer/Internet connection after pressing enter.

Basically, DNSMasq gives the router some advanced enterprise functionality – caching DNS records locally so you have a faster browsing experience. Your computer only has to go to the router instead of repeatedly scouring the web for a commonly visited site.

What is Throughput and How Do I Improve it?

Throughput is the average rate of successful delivery of messages through a network. Simply put, throughput measures the speed of message delivery inside a network. If you think about it in relationship to networks and Internet connections, throughput defines the user experience. The key to a pleasing user experience is uninterrupted service and smooth data transfer.

In order to improve throughput,  you should get a router with more memory. If you notice that your network is running slowly due to congestion, you could probably benefit by upgrading your router to one with more memory. FlashMemory and RAM on a router add more room to prevent network congestion and improve throughput.

Most of FlashRouters‘ high-end units come with at least 8 MB of Flash memory and 64 MB of RAM which should be more than capable for providing for the average home users’ or small business will need in the future.

What is PPPoE?

PPPoE stands for Point-to-Point Protocol over Ethernet, a network protocol for encapsulating Point-to-Point Protocol (PPP) frames inside Ethernet frames. It is used mainly with DSL services where individual users connect to a DSL modem over Ethernet.

With PPPoE, users virtually “dial” from one machine to another over an Ethernet network, establish a point-to-point connection and then data packets are securely transported through the connection.

PPPoE offers an Internet service provider (ISP) an easier way to track exactly how much bandwidth you are using in case they want to charge for it in the future.

What is the Difference Between VPN Encryption and Wireless Network Security?

VPN Encryption: If you are connected to the VPN on your home network, then any data that flows over the Internet is entirely encrypted whether you are connected to the Internet either wired or wirelessly. This means that if your Local ISP was trying to see what you are browsing or downloading, they would not be able to see your data.

Wireless Network Security: If you leave your wireless network open or insecure, it does not matter whether Internet traffic is encrypted, because someone can directly see what you are doing on your network, or even worse, can go in and put a wireless password on your network, locking you out. They may also be able to access folders and files on your computer without your control.

Best thing to do is protect your wireless network with a WPA secured password along with your VPN connection.

Are FlashRouters Affected By the Shellshock Bug?

No.

According to our in-house testing and multiple DD-WRT community reports, we have found that the Shellshock vulnerability will not work on with DD-WRT or TomatoUSB installed router. The vulnerability is based on a shell called BASH (Bourne Again Shell) but DD-WRT & Tomato firmware use BusyBox which is confirmed to not have this issue.

Please be advised that if you are using Optware on your DD-WRT router there is a chance that implementation is BASH based. Only used trusted optware on your router.

Access FlashRouter DD-WRT firmware settings

TeamFlashRouters · Mar 22, 2019 ·

You must be connected to the FlashRouter network via ethernet or WiFi connection on your device in order to be able to access the FlashRouter’s firmware settings.

Why do I need to access my FlashRouter's settings?

It is important to understand how to access your router if you want to:
  • Change WiFi or admin passwords
  • Switch VPN server locations
  • Attempt custom setups
  • Troubleshoot your network

Connect your device to the FlashRouter network

We recommend using a computer, tablet, or phone to access your FlashRouter firmware settings. You can connect your device to the FlashRouter via Ethernet Cable or Wireless connection.

Please note, you will NOT be able access the firmware settings unless you connect your device to the FlashRouter Network.

via Ethernet

Connect an Ethernet cable to your device’s Ethernet port.

Access FlashRouters DD-WRT Admin Settings via Ethernet Connection 1

Connect the other end of that Ethernet cable to a FlashRouter LAN/numbered port.

Access FlashRouters DD-WRT Admin Settings via Ethernet Connection 2

Be sure NOT to connect your device to the WAN/internet port of the FlashRouter. Please use the LAN/numbered ports to connect your devices.

via Wireless

Navigate to the available wireless networks in your device network settings and join any of the available FlashRouter networks – FlashRouter24, FlashRouter50, or FlashRouter80 (if you have a tri-band router).

Access the FlashRouter settings

We recommend using a Google Chrome or Mozilla Firefox incognito/private browsing window to access the FlashRouter firmware settings. You can access the main DD-WRT firmware GUI or you can go directly into the FlashRouters Privacy App settings to manage your basic router settings and VPN connection settings right away.

Please note, after accessing the FlashRouter Settings at the Local IP Address, you will be prompted to enter an admin username and password. You can find this information in the subsections below.

DD-WRT - Firmware GUI

Local IP Address: 192.168.11.1

Username: flashrouter

Password: ddwrt

Keep in mind that if you enable HTTPS and disable HTTP access you will need to add https:// in front of the Local IP Address to access your FlashRouter’s firmware settings.

If your router has been reset for any reason then you can access the router at a local IP address of 192.168.1.1.

Please note you will be required to set the administration username and password as well as your WiFi and VPN network settings after a reset.

TROUBLESHOOTING

Still having issues? Visit our Troubleshooting section to diagnose common problems here.

Troubleshoot Here

My VPN stopped working on my FlashRouter.

TeamFlashRouters · Jun 4, 2019 ·

The VPN connection on the FlashRouter will not drop in most instances however if the VPN stopped working follow the steps below.

In order to use the FlashRouters Privacy App you need DD-WRT build 02/15/22 r48362 or 2/10/20 r42335.

Follow these instructions to upgrade the firmware to 02/15/22 r48362: How do I upgrade the DD-WRT firmware of my FlashRouter?

If you would like the fully featured FR Privacy App version with Simple Setup you must use firmware builds from 2/10/20 r42335.

FlashRouters Privacy App

Navigate to Status > MyPage

  1. If MyPage is not properly loading the FlashRouters Privacy App try reinstalling the FlashRouters Privacy App.
  2. With the Auto Connect to VPN box checked simply power off the FlashRouter and power it back on to connect back to VPN.
  3. Verify that you have the correct settings entered for your provider. A change in the user information used to authenticate the VPN connection will cause a disconnect.
  4. Try a different VPN server location.
  5. If applicable, switch from UDP to TCP or vice versa.
  6. Make sure that you have any VPN/proxy apps and extensions turned off on all devices connected to the FlashRouter.

DD-WRT Manual VPN

Navigate to Services > VPN

  1. Verify that you have the correct settings entered for your provider. A change in the user information used to authenticate the VPN connection will cause a disconnect.
  2. Scroll to the bottom of the page and click Apply Settings.
  3. Try a different VPN server location.
  4. If applicable, switch from UDP to TCP or vice versa. Check your VPN provider’s website to see if the port needs to change with the protocol.
  5. Make sure that you have any VPN/proxy apps and extensions turned off on all devices connected to the FlashRouter.

Surfshark AsusWRT WireGuard Setup

TeamFlashRouters · Apr 29, 2024 ·

Preparing for Surfshark AsusWRT Setup

Copy your Surfshark Private Key

If you are not already a Surfshark user Sign Up Now.

1. Log in to your account on the Surfshark website.

Surfshark Account Login

2. Click VPN Manual Setup.

Surfshark VPN Manual Setup

3. Select Router as the Setup method.

Surfshark setup method Router

4. Select WireGuard as the Protocol.

Surfshark select WireGuard

5. Select I don’t have a key pair.

Surfshark No Key Pair

6. Enter FlashRouter as the name of the connection and click Next.

Surfshark Connection Name

7. Click Generate a new key pair.

Surfshark Generate new Key Pair

8. A Public Key and Private Key will then appear. Use the copy box to copy the Private Key. You will not need the public key.

Surfshark Private Key

AsusWRT Router Setup for Surfshark

Login to AsusWRT firmware settings in a browser on any computer or smart device connected to the AsusWRT FlashRouter’s network.

1. Navigate to the VPN tab.

Merlin VPN Tab

2. Navigate to the VPN Fusion tab.

Asus VPN Fusion

3. Click Add profile.

Asus Add profile

4. In the Connection Name field enter in Surfshark.

5. In the VPN Type dropdown select Surfshark.

6. In the Region dropdown select the Surfshark location you want to connect to.

7. In the Private Key field paste in the Surfshark Private Key obtained earlier.

8. Click Apply and Enable at the bottom of the page.

Asus Surfshark profile

If you only want certain devices to connect to the Surfshark profile you are setting up instead of all the devices connected to the FlashRouter’s network click into the profile and disable Apply to all devices. Then click Devices and select the devices that you want to connect to VPN.

Asus VPN devices
Asus VPN select devices

9. At the top of the page set the Service State toggle to ON to activate the VPN connection.

Asus Surfshark Connected

Verify a successful Surfshark connection

  1. You should now see a CONNECTED message.
  2. Visit Surfshark’s IP Check to verify your new IP address and virtual location.

In some cases you may notice that the location is not showing the same location as the server you have input in your router settings; this is because geo tracking tools are often tricked by VPN connections. As long as you see an IP address that is not the same as your normal Internet IP address then you are indeed connected to Surfshark.

How to change the Surfshark server

  1. Use the profile service state toggle to disconnect the currently connected location.
  2. Then click into the Surfshark profile in the router’s settings.
  3. Then adjust the Region dropdown to a new location.
  4. Click Apply all settings.
  5. Use the profile service state toggle to connect the new location.

TROUBLESHOOTING

Still having issues? Visit the VPN Troubleshooting section.

Troubleshoot Here

ExpressVPN Merlin OpenVPN Setup

TeamFlashRouters · Jan 11, 2023 ·

Preparing for ExpressVPN Merlin Setup

Obtain your ExpressVPN OpenVPN Information

If you are not already an ExpressVPN user Sign Up Now.

1. Log in to your account on the ExpressVPN website.

ExpressVPN login page

2. Successfully log in with your account information. Select More.

3. Select Manual Configuration and copy the Username and Password that are displayed on the right hand side of the screen.

ExpressVPN Manual Configuration
ExpressVPN username and password

4. Click the Server Location that you want to connect to. This will download a .ovpn file to your computer that we will use later on. There is no need to open the file. For this example I have selected New York but feel free to select any server listed there.

ExpressVPN Download .ovpn file

Merlin Router Setup for ExpressVPN

Login to Asus Merlin firmware settings in a browser on any computer or smart device connected to the Merlin FlashRouter’s network.

1. Navigate to the VPN tab.

Merlin VPN Tab

2. Navigate to the VPN Client tab.

Merlin VPN Client Tab

3. Click Choose file and select the .ovpn file you downloaded earlier. Then click Upload.

Merlin Choose File Upload

4. Set Automatic Start at boot time to Yes if you want the VPN connection to begin automatically when the router is powered off and back on.

Merlin Automatic Start at boot time

5. In the Description field enter in the name you’d like to use for this OpenVPN Client profile. We typically advise entering in the location or server number here. Our example server was in New York so I have entered in ExpressVPN New York.

Merlin ExpressVPN Description

6. Set Accept DNS Configuration to Strict. Set Redirect Internet traffic through tunnel to Yes (all). Set Kill Switch to Yes or No depending on if you want the Internet to be killed if the VPN connection drops.

Merlin Accept DNS configuration Redirect Internet and Kill Switch

If you only want certain devices to connect to the OpenVPN Client profile you are setting up instead of all the devices connected to the FlashRouter’s network please set the Redirect Internet traffic through tunnel to VPN Director. Then complete the instructions on this page and then view our VPN Director guide.

7. Enter your ExpressVPN username and password that you obtained earlier in the Username and Password. Note that these are different from your ExpressVPN email login and password.

Merlin VPN Username and Password

8. Click Apply at the bottom of the page.

9. At the top of the page set the Service State toggle to ON to activate the VPN connection.

Merlin Service State

Verify a successful ExpressVPN connection

  1. You should now see a CONNECTED message.
  2. Visit ExpressVPN’s IP Check to verify your new IP address and virtual location.

In some cases you may notice that the location is not showing the same location as the server you have input in your router settings; this is because geo tracking tools are often tricked by VPN connections. As long as you see an IP address that is not the same as your normal Internet IP address then you are indeed connected to ExpressVPN.

How to change the ExpressVPN server

  1. Copy the new ExpressVPN server address from the below server list.
  2. Paste the server into the Server Address field.
  3. Click Apply at the bottom of the page.

ExpressVPN Server Addresses

Americas

usa-atlanta-ca-version-2.expressnetw.com
usa-boston-ca-version-2.expressnetw.com
usa-chicago-ca-version-2.expressnetw.com
usa-dallas-ca-version-2.expressnetw.com
usa-dallas-2-ca-version-2.expressnetw.com
usa-denver-ca-version-2.expressnetw.com
usa-kansascity-ca-version-2.expressnetw.com
usa-losangeles-ca-version-2.expressnetw.com
usa-losangeles-1-ca-version-2.expressnetw.com
usa-losangeles-2-ca-version-2.expressnetw.com
usa-losangeles-3-ca-version-2.expressnetw.com
usa-los-angeles-4-ca-version-2.expressnetw.com
usa-miami-ca-version-2.expressnetw.com
usa-miami-2-ca-version-2.expressnetw.com
usa-minneapolis-ca-version-2.expressnetw.com
usa-newjersey-1-ca-version-2.expressnetw.com
usa-newjersey-3-ca-version-2.expressnetw.com
usa-newyork-ca-version-2.expressnetw.com
us-new-york-2-ca-version-2.expressnetw.com
usa-phoenix-ca-version-2.expressnetw.com
usa-saltlakecity-ca-version-2.expressnetw.com
usa-sanfrancisco-ca-version-2.expressnetw.com
usa-sanjose-ca-version-2.expressnetw.com
usa-seattle-ca-version-2.expressnetw.com
usa-tampa-1-ca-version-2.expressnetw.com
usa-virginia-ca-version-2.expressnetw.com
usa-washingtondc-ca-version-2.expressnetw.com
usa-washingtondc-2-ca-version-2.expressnetw.com
canada-montreal-ca-version-2.expressnetw.com
canada-toronto-ca-version-2.expressnetw.com
canada-toronto-2-ca-version-2.expressnetw.com
canada-vancouver-ca-version-2.expressnetw.com
mexico-ca-version-2.expressnetw.com
argentina-ca-version-2.expressnetw.com
brazil-ca-version-2.expressnetw.com
brazil-2-ca-version-2.expressnetw.com
chile-ca-version-2.expressnetw.com
colombia-ca-version-2.expressnetw.com
costarica-ca-version-2.expressnetw.com
ecuador-ca-version-2.expressnetw.com
guatemala-ca-version-2.expressnetw.com
panama-ca-version-2.expressnetw.com
peru-ca-version-2.expressnetw.com
uruguay-ca-version-2.expressnetw.com
venezuela-ca-version-2.expressnetw.com

Europe

uk-berkshire-ca-version-2.expressnetw.com
uk-berkshire-2-ca-version-2.expressnetw.com
uk-docklands-ca-version-2.expressnetw.com
uk-east-london-ca-version-2.expressnetw.com
uk-kent-ca-version-2.expressnetw.com
uk-london-ca-version-2.expressnetw.com
france-paris-1-ca-version-2.expressnetw.com
france-paris-2-ca-version-2.expressnetw.com
france-strasbourg-ca-version-2.expressnetw.com
germany-darmstadt-ca-version-2.expressnetw.com
germany-frankfurt-1-ca-version-2.expressnetw.com
germany-frankfurt-2-ca-version-2.expressnetw.com
germany-nuremberg-ca-version-2.expressnetw.com
italy-cosenza-ca-version-2.expressnetw.com
italy-milan-ca-version-2.expressnetw.com
netherlands-amsterdam-ca-version-2.expressnetw.com
netherlands-rotterdam-ca-version-2.expressnetw.com
netherlands-thehague-ca-version-2.expressnetw.com
spain-barcelona-ca-version-2.expressnetw.com
spain-ca-version-2.expressnetw.com
sweden-ca-version-2.expressnetw.com
sweden-2-ca-version-2.expressnetw.com
switzerland-ca-version-2.expressnetw.com
switzerland-2-ca-version-2.expressnetw.com
albania-ca-version-2.expressnetw.com
andorra-ca-version-2.expressnetw.com
armenia-ca-version-2.expressnetw.com
austria-ca-version-2.expressnetw.com
azerbaijan-ca-version-2.expressnetw.com
belarus-ca-version-2.expressnetw.com
belgium-ca-version-2.expressnetw.com
bosniaandherzegovina-ca-version-2.expressnetw.com
bulgaria-ca-version-2.expressnetw.com
croatia-ca-version-2.expressnetw.com
cyprus-ca-version-2.expressnetw.com
czechrepublic-ca-version-2.expressnetw.com
denmark-ca-version-2.expressnetw.com
estonia-ca-version-2.expressnetw.com
finland-ca-version-2.expressnetw.com
georgia-ca-version-2.expressnetw.com
greece-ca-version-2.expressnetw.com
hungary-ca-version-2.expressnetw.com
iceland-ca-version-2.expressnetw.com
ireland-ca-version-2.expressnetw.com
isleofman-ca-version-2.expressnetw.com
jersey-ca-version-2.expressnetw.com
latvia-ca-version-2.expressnetw.com
liechtenstein-ca-version-2.expressnetw.com
lithuania-ca-version-2.expressnetw.com
luxembourg-ca-version-2.expressnetw.com
macedonia-ca-version-2.expressnetw.com
malta-ca-version-2.expressnetw.com
moldova-ca-version-2.expressnetw.com
monaco-ca-version-2.expressnetw.com
montenegro-ca-version-2.expressnetw.com
norway-ca-version-2.expressnetw.com
poland-ca-version-2.expressnetw.com
portugal-ca-version-2.expressnetw.com
romania-ca-version-2.expressnetw.com
serbia-ca-version-2.expressnetw.com
slovakia-ca-version-2.expressnetw.com
slovenia-ca-version-2.expressnetw.com
ukraine-ca-version-2.expressnetw.com

Asia Pacific

australia-brisbane-ca-version-2.expressnetw.com
australia-melbourne-ca-version-2.expressnetw.com
australia-perth-ca-version-2.expressnetw.com
australia-sydney-ca-version-2.expressnetw.com
australia-sydney-2-ca-version-2.expressnetw.com
australia-sydney-3-ca-version-2.expressnetw.com
hongkong-2-ca-version-2.expressnetw.com
hongkong4-ca-version-2.expressnetw.com
hongkong-1-ca-version-2.expressnetw.com
japan-tokyo-1-ca-version-2.expressnetw.com
japan-tokyo-2-ca-version-2.expressnetw.com
india-chennai-ca-version-2.expressnetw.com
india-mumbai-1-ca-version-2.expressnetw.com
singapore-cbd-ca-version-2.expressnetw.com
singapore-jurong-ca-version-2.expressnetw.com
southkorea-ca-version-2.expressnetw.com
southkorea2-ca-version-2.expressnetw.com
bangladesh-ca-version-2.expressnetw.com
bhutan-ca-version-2.expressnetw.com
brunei-ca-version-2.expressnetw.com
cambodia-ca-version-2.expressnetw.com
indonesia-ca-version-2.expressnetw.com
kazakhstan-ca-version-2.expressnetw.com
kyrgyzstan-ca-version-2.expressnetw.com
laos-ca-version-2.expressnetw.com
macau-ca-version-2.expressnetw.com
malaysia-ca-version-2.expressnetw.com
mongolia-ca-version-2.expressnetw.com
myanmar-ca-version-2.expressnetw.com
nepal-ca-version-2.expressnetw.com
newzealand-ca-version-2.expressnetw.com
pakistan-ca-version-2.expressnetw.com
ph-via-sing-ca-version-2.expressnetw.com
srilanka-ca-version-2.expressnetw.com
taiwan-3-ca-version-2.expressnetw.com
thailand-ca-version-2.expressnetw.com
vietnam-ca-version-2.expressnetw.com

Middle East and Africa

algeria-ca-version-2.expressnetw.com
israel-ca-version-2.expressnetw.com
kenya-ca-version-2.expressnetw.com
southafrica-ca-version-2.expressnetw.com

Merlin ExpressVPN change server location

TROUBLESHOOTING

Still having issues? Visit the VPN Troubleshooting section.

Troubleshoot Here

SaferVPN Manual OpenVPN Setup

TeamFlashRouters · Apr 15, 2019 ·

Preparing for Manual SaferVPN Setup

Verify your SaferVPN login information

If you are not already an SaferVPN user Sign Up Now.

Log in to your account on the SaferVPN website.

FlashRouters Privacy App - SaferVPN Login

SaferVPN Server Addresses

View a full list of SaferVPN servers.

America

East Coast:
us1.safervpn.net

West Coast:
us2.safervpn.net

United Kingdom

uk1.safervpn.net

DD-WRT Router Setup for SaferVPN

Navigate to Services > VPN

Enter SaferVPN settings

OpenVPN Client

Start OpenVPN Client

If you wish to disable your VPN connection simply set this to Disable at any time and click Apply Settings.

Server IP/Name

Copy and paste the server you would like to connect to from the server list above. Be sure there are no extra spaces or characters.

If you wish to change SaferVPN connection locations, THIS IS THE ONLY FIELD YOU NEED TO CHANGE.

Port

1194

Tunnel Device

TUN

Tunnel Protocol

UDP

Encryption cipher

AES-256-CBC

Hash Algorithm

SHA1

User Pass Authentication

Enable

Username

Enter the Username you successfully logged in to your SaferVPN account with.

Password

Enter the Password you successfully logged in to your SaferVPN account with.

Advanced Options

Enable

TLS Cipher

None

LZO Compression

Adaptive

NAT

Enable

Additional Config

persist-key
persist-tun
tun-mtu-extra 32
mssfix 1450

Policy Based Routing

This field can be used for split VPN and Dual Gateway routing.

CA Cert

-----BEGIN CERTIFICATE-----
MIIE1jCCA76gAwIBAgIJAOnRq4FWsZgYMA0GCSqGSIb3DQEBCwUAMIGiMQswCQYD
VQQGEwJVUzELMAkGA1UECBMCQ0ExFTATBgNVBAcTDFNhbkZyYW5jaXNjbzERMA8G
A1UEChMIU2FmZXJWUE4xETAPBgNVBAsTCFNhZmVyVlBOMREwDwYDVQQDEwhTYWZl
clZQTjERMA8GA1UEKRMIU2FmZXJWUE4xIzAhBgkqhkiG9w0BCQEWFHN1cHBvcnRA
c2FmZXJ2cG4uY29tMB4XDTE3MDgzMTA5NDEyM1oXDTI3MDgyOTA5NDEyM1owgaIx
CzAJBgNVBAYTAlVTMQswCQYDVQQIEwJDQTEVMBMGA1UEBxMMU2FuRnJhbmNpc2Nv
MREwDwYDVQQKEwhTYWZlclZQTjERMA8GA1UECxMIU2FmZXJWUE4xETAPBgNVBAMT
CFNhZmVyVlBOMREwDwYDVQQpEwhTYWZlclZQTjEjMCEGCSqGSIb3DQEJARYUc3Vw
cG9ydEBzYWZlcnZwbi5jb20wggEiMA0GCSqGSIb3DQEBAQUAA4IBDwAwggEKAoIB
AQCqNV7oJZrUqD/mBSWlKi/sGRE2y3Yphs5m/vmmS4GPrc8lyaI1idhv44MGZ0i1
XCkJFZmaVQk7NUz5npz9hcnxN3MiZd/5Kv8Vo4aQkL0xQ7euto71LIgTqbJvTJjW
kowsVVgartGK2ewfCd+KV6k5oBImlDdSnLW1pq82Kg+YcnXxdaFc8RpNWdBbdxBe
tb4k6JcoZHuk9Zq5gi5Nnhtjc6lheCRzTGZ2hslDfJ58yMpR0jTMC3Rd+G+sM0q3
/gEEEW34ckUgCb5j6Kq35LUlnuonnViBnEzFR/MTizMARFj7VYkzOpxSsxJ6Epan
JP8Zgbz81z4A822hosakl7kTAgMBAAGjggELMIIBBzAdBgNVHQ4EFgQUKSnUrJLQ
omrGvdncxKkKT7Rxrj8wgdcGA1UdIwSBzzCBzIAUKSnUrJLQomrGvdncxKkKT7Rx
rj+hgaikgaUwgaIxCzAJBgNVBAYTAlVTMQswCQYDVQQIEwJDQTEVMBMGA1UEBxMM
U2FuRnJhbmNpc2NvMREwDwYDVQQKEwhTYWZlclZQTjERMA8GA1UECxMIU2FmZXJW
UE4xETAPBgNVBAMTCFNhZmVyVlBOMREwDwYDVQQpEwhTYWZlclZQTjEjMCEGCSqG
SIb3DQEJARYUc3VwcG9ydEBzYWZlcnZwbi5jb22CCQDp0auBVrGYGDAMBgNVHRME
BTADAQH/MA0GCSqGSIb3DQEBCwUAA4IBAQB704c0nixfDuJ7OiFBUmkhmDUFEIhl
D35wxlthKYRs8tBzetZEipFGdyUOwuWiuwG/BuOwuP7fPS9uP4u4EPKjA5kL/Z/V
E743q50PS4L/kT3ZFyUrcisUKajAr5Gu+o6rzA6F4+QYu26iBbKewNrrb+riF1wR
GKthc6W++Awt+oVyKtVNyS2QokuBFcSu5IiVsfGqJ8TmffvFBqKUUjWopmP+qiYR
8+0qwHing/S/C9S72ZxhM9DF3et1dXFuHf/69YL8/u36tyKMqy/JVhByAlc87cRI
tcRGaviUttBeSw4j1Y6XrycVkhn4LzizWrqrmfCikhx26MrIeWK5JxYL
-----END CERTIFICATE-----

CLICK APPLY SETTINGS

Leave all settings not mentioned above as their default setting.

Verify a successful SaferVPN connection

Navigate to Status > OpenVPN

  1. You should now see a CONNECTED SUCCESS message.
  2. Visit SaferVPN’s IP Check to verify your new IP address and virtual location.

In some cases you may notice that the location is not showing the same location as the server you have input in your router settings; this is because geo tracking tools are often tricked by VPN connections. As long as you see an IP address that is not the same as your normal Internet IP address then you are indeed connected to SaferVPN.

Back up your settings

Navigate to Administration > Backup

  1. Click the Backup button.
  2. A file named nvrambak.bin will be saved to your computer.
  3. You can load nvrambak.bin to restore your settings in the event of a reset.

How to change the SaferVPN server

  1. Copy the new SaferVPN server address from the above server list.
  2. Paste the server into the Server IP/Name field.
  3. Click Apply Settings.

TROUBLESHOOTING

Still having issues? Visit the VPN Troubleshooting section.

Troubleshoot Here

PPPoE Internet Setup

TeamFlashRouters · Mar 21, 2019 ·

Most ISPs do not require PPPoE credentials. If you are certain this is an ISP requirement in your setup, we kindly ask that you get in touch with your ISP to verify that they do in fact require PPPoE authentication and to provide you with the correct credentials to enter into your FlashRouter.

Before you enter your PPPoE credentials, you should have already setup your FlashRouter in a Single Router Setup with correct wiring. Once you enter PPPoE credentials you should then be able to connect to the internet.

If you are using a Dual Router Setup there is no need to enter PPPoE credentials if they are already entered in the existing router. You can disregard this article.

Enter your PPPoE credentials

DD-WRT Firmware

Navigate to Setup > Basic Setup

Access FlashRouters DD-WRT Admin Settings - Enter PPPOE Username and Password
  1. Set the Connection Type dropdown to PPPoE.
  2. Enter your ISP assigned PPPoE username and password.
  3. Click Apply Settings.

Power cycle your network devices

  1. Power off your ISP modem and the FlashRouter.
  2. Power on the ISP modem and wait for it to fully boot up.
  3. Power on the FlashRouter.

Verify a successful Internet connection

Once the FlashRouter is booted up connect one of your devices to the FlashRouter via Ethernet or Wireless.

Visit any website and make sure the page fully loads. Once you have verified a successful Internet connection, begin connecting your network devices to the FlashRouter via wired or WiFi.

Please be aware that our support is not able to replicate PPPoE issues on our end, which makes them challenging to troubleshoot. In the event of an issue we recommend using a Dual Router Setup.

PureVPN Manual OpenVPN Setup

TeamFlashRouters · Apr 16, 2019 ·

Preparing for Manual PureVPN Setup

Verify your PureVPN login information

If you are not already an PureVPN user Sign Up Now.

Log in to your account on the PureVPN website.

PureVPN Website Login

Navigate to the Home page and note the VPN username on this page. You will need this specific username later on in the configuration process.
Ex: purevpn0s1234567

PureVPN Server Addresses

View a full list of PureVPN servers.

United States

Miami:
usfl1-ovpn-udp.pointtoserver.com

Seattle:
ussa-ovpn-udp.pointtoserver.com

Houston
:
ustx1-ovpn-tcp.pointtoserver.com

Georgia
:
usga1-ovpn-udp.pointtoserver.com

New Jersey
:
usnj1-ovpn-udp.pointtoserver.com

Washington
:
uswdc1-ovpn-udp.pointtoserver.com

Chicago
:
usil1-ovpn-udp.pointtoserver.com

Phoenix
:
usphx1-ovpn-udp.pointtoserver.com

Los Angeles
:
usla1-ovpn-udp.pointtoserver.com

Virginia
:
vlbr-usvc1-ovpn-udp.pointtoserver.com

San Francisco
:
vlsa-ussf1-ovpn-udp.pointtoserver.com

New York
:
usny1-ovpn-udp.pointtoserver.com

Ohio
:
vleu-usoh1-ovpn-udp.pointtoserver.com

United Kingdom

London:
ukl1-ovpn-udp.pointtoserver.com

Gosport:
ukg1-ovpn-udp.pointtoserver.com

Maidenhead:
ukm1-ovpn-udp.pointtoserver.com

Manchester
:
vlus-uk-man1-ovpn-udp.pointtoserver.com

Leicester
:
vlap-ukle1-ovpn-udp.pointtoserver.com

DD-WRT Router Setup for PureVPN

Navigate to Services > VPN

Enter PureVPN settings

OpenVPN Client

Start OpenVPN Client

If you wish to disable your VPN connection simply set this to Disable at any time and click Apply Settings.

Server IP/Name

Copy and paste the server you would like to connect to from the server list above. Be sure there are no extra spaces or characters.

If you wish to change PureVPN connection locations, THIS IS THE ONLY FIELD YOU NEED TO CHANGE.

Port

53

Tunnel Device

TUN

Tunnel Protocol

UDP

Encryption cipher

AES-256-CBC

Hash Algorithm

SHA1

Userpass Authentication

Enable

Username

Enter the Username you noted from the Home page above.
Ex: purevpn0s1234567

Password

Enter the Password you successfully logged in to your PureVPN account with.

Advanced Options

Enable

TLS Cipher

None

LZO Compression

Adaptive

NAT

Enable

Firewall Protection

Enable

TLS Auth Key

-----BEGIN OpenVPN Static key V1-----
e30af995f56d07426d9ba1f824730521
d4283db4b4d0cdda9c6e8759a3799dcb
7939b6a5989160c9660de0f6125cbb1f
585b41c074b2fe88ecfcf17eab9a33be
1352379cdf74952b588fb161a93e13df
9135b2b29038231e02d657a6225705e6
868ccb0c384ed11614690a1894bfbeb2
74cebf1fe9c2329bdd5c8a40fe882062
4d2ea7540cd79ab76892db51fc371a3a
c5fc9573afecb3fffe3281e61d72e915
79d9b03d8cbf7909b3aebf4d90850321
ee6b7d0a7846d15c27d8290e031e951e
19438a4654663cad975e138f5bc5af89
c737ad822f27e19057731f41e1e254cc
9c95b7175c622422cde9f1f2cfd3510a
dd94498b4d7133d3729dd214a16b27fb
-----END OpenVPN Static key V1-----

Additional Config

tls-cipher “DEFAULT:@SECLEVEL=0”

Policy Based Routing

This field can be used for split VPN and Dual Gateway routing.

CA Cert

-----BEGIN CERTIFICATE-----
MIIEoTCCA4mgAwIBAgIJANysBdFD6U2oMA0GCSqGSIb3DQEBBQUAMIGRMQswCQYD
VQQGEwJISzELMAkGA1UECBMCSEsxETAPBgNVBAcTCEhvbmdLb25nMRAwDgYDVQQK
EwdQdXJlVlBOMQswCQYDVQQLEwJJVDEQMA4GA1UEAxMHUHVyZVZQTjEQMA4GA1UE
KRMHUHVyZVZQTjEfMB0GCSqGSIb3DQEJARYQbWFpbEBob3N0LmRvbWFpbjAeFw0x
NDA0MTAwNzI5NDlaFw0yNDA0MDcwNzI5NDlaMIGRMQswCQYDVQQGEwJISzELMAkG
A1UECBMCSEsxETAPBgNVBAcTCEhvbmdLb25nMRAwDgYDVQQKEwdQdXJlVlBOMQsw
CQYDVQQLEwJJVDEQMA4GA1UEAxMHUHVyZVZQTjEQMA4GA1UEKRMHUHVyZVZQTjEf
MB0GCSqGSIb3DQEJARYQbWFpbEBob3N0LmRvbWFpbjCCASIwDQYJKoZIhvcNAQEB
BQADggEPADCCAQoCggEBAJYqtUkQTlf/pHcGXuuII8S3pfI0fwFbs7l/1RP3nX3n
v1vyuvLi7h0jWsgJU0XM7LJywiRFJ8zsMLH7KZnIg7bscb50GY75WIq7C2NnWnnS
7zzyCCm2XD/2xZPym2lVRytpnWJbpemSS6Hdz7xI3q2FmixuBa1t5FeKsXfeaGGg
+ohwLvamnGHJYUYu3Nu0EWVzzy5wgT0c2C5jleGxl3kxRimD8FpnlAVdqyt0ib/f
f9XanaotSopIHUZmpYjT+udRC2+harlNKvOXYgDRl1mpimCvlzEWpZAo8dyBCxWl
xlBIT8OA8rimGi1XviknuOlWu2cGi13Ug8mCG0MjOQ0CAwEAAaOB+TCB9jAdBgNV
HQ4EFgQUt+1vJ2X2ho12PUDhdo2CsSHYXbYwgcYGA1UdIwSBvjCBu4AUt+1vJ2X2
ho12PUDhdo2CsSHYXbahgZekgZQwgZExCzAJBgNVBAYTAkhLMQswCQYDVQQIEwJI
SzERMA8GA1UEBxMISG9uZ0tvbmcxEDAOBgNVBAoTB1B1cmVWUE4xCzAJBgNVBAsT
AklUMRAwDgYDVQQDEwdQdXJlVlBOMRAwDgYDVQQpEwdQdXJlVlBOMR8wHQYJKoZI
hvcNAQkBFhBtYWlsQGhvc3QuZG9tYWluggkA3KwF0UPpTagwDAYDVR0TBAUwAwEB
/zANBgkqhkiG9w0BAQUFAAOCAQEAAhLQQmkKWJdyGqgMSKOWXSKN2WXTDjIdb9bK
Q8uHeq0LYCcPoRh8VYJg2X4UWR/KO9pKaG+iZJw4Jqz4GQJjjJLKHfsWwj790ay0
7U5KT08qmxFaxZUYn663H9b0+Zud1spTsTJjVe1eoRk6IDbbB4OMUzN9zyWEn6er
xi6llIAjQX1qtlBQasmTAbRtbSsCsZAxL2kXysULIdLrQP0iTgMQqqkv5zvpdEKN
3ciKCd8OHEhHOlAwA0/DNy3dg3Et0F2hNMDJhqMpxXsbKtGJ/rzGXQF2geEVzLZA
o42I1wBOSZLTX1fO1gl3gAGS9aYg5o31rrpBKzQewitJgIuc+Q==
-----END CERTIFICATE-----

CLICK APPLY SETTINGS

Leave all settings not mentioned above as their default setting.

Verify a successful PureVPN connection

Navigate to Status > OpenVPN

  1. You should now see a CONNECTED SUCCESS message.
  2. Visit PureVPN’s website to verify your new IP address, virtual location, and status as Protected at the top of the page.

In some cases you may notice that the location is not showing the same location as the server you have input in your router settings; this is because geo tracking tools are often tricked by VPN connections. As long as you see an IP address that is not the same as your normal Internet IP address then you are indeed connected to PureVPN.

Back up your settings

Navigate to Administration > Backup

  1. Click the Backup button.
  2. A file named nvrambak.bin will be saved to your computer.
  3. You can load nvrambak.bin to restore your settings in the event of a reset.

How to change the PureVPN server

  1. Copy the new PureVPN server address from the above server list.
  2. Paste the server into the Server IP/Name field.
  3. Click Apply Settings.

TROUBLESHOOTING

Still having issues? Visit the VPN Troubleshooting section.

Troubleshoot Here

Wireless Repeater Setup

TeamFlashRouters · Apr 16, 2019 ·

If you need to extend your wireless and wired connection capabilities, you can setup a FlashRouter as a Wireless Repeater. In Wireless Repeater mode the FlashRouter connects to your main router via WiFi and then creates a completely separate network segment for you. This new “repeater” network then transmits your internet signal via FlashRouter LAN ports for wired internet access while also creating a new Wireless Extender network that will expand your wireless network range throughout your home or office just like a mesh network.

Preparing for Wireless Repeater Setup

Verify your wireless information

To connect your FlashRouter wirelessly to your existing wireless network you will need the Wireless Network Name (SSID) and Wireless Password of the existing wireless network that you will repeat. Verify and note this information.

We recommend using a 2.4GHz network to repeat as this network will have more range. Be sure to click Add under the 2.4GHz settings and not the 5GHz settings.

DD-WRT Router Setup for Wireless Repeater

Disable Firewall

Navigate to Security > Firewall

Wireless Repeater Setup on DD-WRT FlashRouter - Disable SPI Firewall
  1. Set SPI Firewall to Disable.
  2. Click Save.

Enter Wireless settings

Navigate to Wireless > Basic Settings

Select Add in the Virtual Interface area.

Wireless Repeater Setup on DD-WRT FlashRouter - Add Virtual Interface

In the Wireless Physical Interface settings for the 2.4GHz network set the Wireless Mode to Repeater.

FlashRouters with a Broadcom chipset will have Repeater as an option in the dropdown but FlashRouters with an Atheroes chipset will not. Select Client or Client (Routed) if Repeater is not listed for your FlashRouter.

Change the Wireless Network Name (SSID) to match exactly with the Wireless Network Name of the network that you will repeat.

Wireless Repeater Setup on DD-WRT FlashRouter - Set Wireless Mode to Repeater

In the Virtual Interfaces settings change the Wireless Network Name (SSID) to FlashRouter24 or any other unique SSID.

Wireless Repeater Setup on DD-WRT FlashRouter - Set SSID for Repeated Band

CLICK SAVE

Enter Wireless Security settings

Navigate to Wireless > Wireless Security

Wireless Repeater Setup on DD-WRT FlashRouter - Set Wireless Password
  1. Duplicate the wireless security settings that are set for the other bands for the newly created virtual interface.
  2. Change the WPA Shared Key to match exactly with the Wireless Password of the network that you will repeat.
  3. Click Apply Settings.

Verify the Internet Connection

In the top right hand corner of the DD-WRT you should see the WAN IP change from 0.0.0.0 to an actual IP Address. Once this changes navigate to any website to test your Internet connection.

Wireless Repeater Setup on DD-WRT FlashRouter - Verify WAN Connection

Back up your settings

Navigate to the Administration > Backup page.

  1. Click the Backup button.
  2. A file named nvrambak.bin will be saved to your computer.
  3. You can load nvrambak.bin to restore your settings in the event of a reset.

TROUBLESHOOTING

Still having issues? Visit our Troubleshooting section to diagnose common problems here.

Troubleshoot Here

NordVPN Merlin OpenVPN Setup

TeamFlashRouters · Jan 11, 2023 ·

Preparing for NordVPN Merlin Setup

Obtain your NordVPN manual Username and Password

If you are not already an NordVPN user Sign Up Now.

1. Log in to your account on the NordVPN website.

NordVPN login

2. Click NordVPN on the left hand side and then click Setup NordVPN manually.

NordVPN setup manually

3. Enter in the verification code that was sent to your email.

NordVPN verify code

4. Copy and paste your NordVPN manual username and password to a secure location. This is the username and password you will enter into the router settings to connect to NordVPN.

NordVPN credentials

Download your NordVPN .ovpn file

1. There are two options for obtaining the .ovpn file. The first and recommended is to navigate to NordVPN’s server recommendation page. Click Recommended Server to display the fastest server based on your actual location. You can adjust the country if you don’t want to connect to the recommended country.

Then click Show Available Protocols. Click Download Config next to OpenVPN UDP. This will download the .ovpn file to your computer for this server. Do not open this file.

NordVPN Recommended Server

The second method to obtain a server is for connecting to a specific server number that you know you want to use. This applies to NordVPN Dedicated IP servers if you are signed up for that service. Go to NordVPN’s .ovpn file page. Then search for the server number that you want to use and click Download UDP.

NordVPN Download Specific Server

Merlin Router Setup for NordVPN

Login to Asus Merlin firmware settings in a browser on any computer or smart device connected to the Merlin FlashRouter’s network.

1. Navigate to the VPN tab.

Merlin VPN Tab

2. Navigate to the VPN Client tab.

Merlin VPN Client Tab

3. Click Choose file and select the .ovpn file you downloaded earlier. Then click Upload.

Merlin Choose File Upload

4. Set Automatic Start at boot time to Yes if you want the VPN connection to begin automatically when the router is powered off and back on.

Merlin Automatic Start at boot time

5. In the Description field enter in the name you’d like to use for this OpenVPN Client profile. We typically advise entering in the location or server number here. Our example server was in us5835.nordvpn.com so I have entered in NordVPN us5835.

Merlin NordVPN Description

6. Set Accept DNS Configuration to Strict. Set Redirect Internet traffic through tunnel to Yes (all). Set Kill Switch to Yes or No depending on if you want the Internet to be killed if the VPN connection drops.

Merlin Accept DNS configuration Redirect Internet and Kill Switch

If you only want certain devices to connect to the OpenVPN Client profile you are setting up instead of all the devices connected to the FlashRouter’s network please set the Redirect Internet traffic through tunnel to VPN Director. Then complete the instructions on this page and then view our VPN Director guide.

7. Enter your NordVPN username and password that you obtained earlier in the Username and Password. Note that these are different from your NordVPN email login and password.

Merlin VPN Username and Password

8. Click Apply at the bottom of the page.

9. At the top of the page set the Service State toggle to ON to activate the VPN connection.

Merlin Service State All Providers

Verify a successful NordVPN connection

  1. You should now see a CONNECTED message.
  2. Visit NordVPN’s IP Check to verify your new IP address and virtual location.

In some cases you may notice that the location is not showing the same location as the server you have input in your router settings; this is because geo tracking tools are often tricked by VPN connections. As long as you see an IP address that is not the same as your normal Internet IP address then you are indeed connected to NordVPN.

How to change the NordVPN server

  1. Follow the steps at the top of the page to obtain a new .ovpn file.
  2. Then proceed with the settings same as initial setup.

TROUBLESHOOTING

Still having issues? Visit the VPN Troubleshooting section.

Troubleshoot Here

OverPlay Manual OpenVPN Setup

TeamFlashRouters · Apr 16, 2019 ·

Preparing for Manual OverPlay Setup

Verify your OverPlay login information

Log in to your account on the OverPlay website.

OverPlay Server Addresses

View a full list of OverPlay servers.

United States

Ashburn:
iad-a01.wlvpn.com

Atlanta:
atl-a01.wlvpn.com

Chicago
:
chi-a01.wlvpn.com

Dallas
:
dal-a02.wlvpn.com

Las Vegas
:
las-c11.wlvpn.com

Los Angeles
:
lax-a01.wlvpn.com

Miami
:
mia-a01.wlvpn.com

New York
:
nyc-a01.wlvpn.com

Phoenix
:
phx-a01.wlvpn.com

Salt Lake City
:
slc-c01.wlvpn.com

San Jose
:
sjc-a01.wlvpn.com

Seattle
:
sea-a01.wlvpn.com

DD-WRT Router Setup for OverPlay

Navigate to Services > VPN

Enter OverPlay settings

OpenVPN Client

Start OpenVPN Client

If you wish to disable your VPN connection simply set this to Disable at any time and click Apply Settings.

Server IP/Name

Copy and paste the server you would like to connect to from the server list above. Be sure there are no extra spaces or characters.

If you wish to change OverPlay connection locations, THIS IS THE ONLY FIELD YOU NEED TO CHANGE.

Port

1194 for UDP
443 for TCP

Tunnel Device

TUN

Tunnel Protocol

UDP or TCP

Encryption cipher

AES-256-CBC

Hash Algorithm

SHA256

User Pass Authentication

Enable

Username

Enter the username that you use to login to the OverPlay website.  Make sure to add @overplay after your username.

Hint:  For example, if your OverPlay username is “flashrouters” enter “flashrouters@overplay” as your username.

Password

Enter the Password you successfully logged in to your OverPlay account with.

Advanced Options

Enable

TLS Cipher

None

LZO Compression

Adaptive

NAT

Enable

Firewall Protection

Enable

Policy Based Routing

This field can be used for split VPN and Dual Gateway routing.

CA Cert

-----BEGIN CERTIFICATE-----
MIIESDCCAzCgAwIBAgIJAKSqvk2CSdJGMA0GCSqGSIb3DQEBBQUAMHUxCzAJBgNV
BAYTAlVTMQwwCgYDVQQIEwNWUE4xDDAKBgNVBAcTA1ZQTjEMMAoGA1UEChMDVlBO
MQwwCgYDVQQLEwNWUE4xDDAKBgNVBAMTA1ZQTjEMMAoGA1UEKRMDVlBOMRIwEAYJ
KoZIhvcNAQkBFgNWUE4wHhcNMTMwNDI1MDIzMjQ3WhcNMjMwNDI3MDIzMjQ3WjB1
MQswCQYDVQQGEwJVUzEMMAoGA1UECBMDVlBOMQwwCgYDVQQHEwNWUE4xDDAKBgNV
BAoTA1ZQTjEMMAoGA1UECxMDVlBOMQwwCgYDVQQDEwNWUE4xDDAKBgNVBCkTA1ZQ
TjESMBAGCSqGSIb3DQEJARYDVlBOMIIBIjANBgkqhkiG9w0BAQEFAAOCAQ8AMIIB
CgKCAQEAyUr2BAz2gHGaXri6rWMpKqcvVTX3IOSLEfBWf1fb2zCwx0+GFMG258Yk
OCiQho/YOX58bJpssGI42OzZitSisTVpXNIBelzGUPdKgx0qURGgDW+7eOySJYCn
1EUncElJCHt1so0SbfdQpxA88VZMH9fFOKtLY5qHHi0drXm/wZy+zW7TfV5Lce04
6vv2M9I5/Ko4zZ5Vh6jTo2VrCQRw8goXB5NAdU5D76lVhWK4Zzt4woI8nRW5Ev3A
WEw5oX85j5B0TY9nEi5j0vNYBuMxf/GiLO8M8LCHPX0HYBiLDjZesJCvuG3vfwnA
Y5CJQqNjufpmnF3ivsaF0dGeo54kWQIDAQABo4HaMIHXMB0GA1UdDgQWBBQXnwHk
vpHSf/lMacKoKshAcGM2qTCBpwYDVR0jBIGfMIGcgBQXnwHkvpHSf/lMacKoKshA
cGM2qaF5pHcwdTELMAkGA1UEBhMCVVMxDDAKBgNVBAgTA1ZQTjEMMAoGA1UEBxMD
VlBOMQwwCgYDVQQKEwNWUE4xDDAKBgNVBAsTA1ZQTjEMMAoGA1UEAxMDVlBOMQww
CgYDVQQpEwNWUE4xEjAQBgkqhkiG9w0BCQEWA1ZQToIJAKSqvk2CSdJGMAwGA1Ud
EwQFMAMBAf8wDQYJKoZIhvcNAQEFBQADggEBADAbNIIHF5vtCA+69/oipQ6niZit
Q+mnCNX5bxiF4xtw9qOQ90vLDc/ocbAGGP4Sub3hEkOoQlv9DHH56HVq1g9+L/Y7
RoneRykZ+GSPj2NlkobrPA7ZxAsLdFwM9Y+Fkql7cAHHLUCKh7H1IKidhTDHPCUj
hs4ZstNRckPd6wxlGGOP/Yf5sVse3pJwa0HyMYhI8pdTVJIHnFSy9vTPjVf3oWiz
Trci0+SkYKQE//5pE5wsYe0uB5wvQJslq/eEWfczg0l9biwJxG/qwxsVBkRgw5q6
defHWGj1eucVyy9fxKMcX89gjstQZDmsINNtG1C78/+nYS65rqaBaq+rqpA=
-----END CERTIFICATE-----

CLICK APPLY SETTINGS

Leave all settings not mentioned above as their default setting.

Verify a successful VPN connection

Navigate to Status > OpenVPN

  1. You should now see a CONNECTED SUCCESS message.
  2. Visit OverPlay’s website to verify your new IP address and virtual location.

In some cases you may notice that the location is not showing the same location as the server you have input in your router settings; this is because geo tracking tools are often tricked by VPN connections. As long as you see an IP address that is not the same as your normal Internet IP address then you are indeed connected to OverPlay.

Back up your settings

Navigate to Administration > Backup

  1. Click the Backup button.
  2. A file named nvrambak.bin will be saved to your computer.
  3. You can load nvrambak.bin to restore your settings in the event of a reset.

How to change the OverPlay server

  1. Copy the new OverPlay server address from the above server list.
  2. Paste the server into the Server IP/Name field.
  3. Click Apply Settings.

TROUBLESHOOTING

Still having issues? Visit the VPN Troubleshooting section.

Troubleshoot Here

PrivateInternetAccess (PIA) Merlin OpenVPN Setup

TeamFlashRouters · Jan 11, 2023 ·

Preparing for PIA Merlin Setup

Download your PIA .ovpn file

If you are not already a PIA user Sign Up Now.

1. Log in to your account on the PIA website.

PIA login

2. Successfully log in with your account information then go to PIA’s OpenVPN Config Generator.

3. On the OpenVPN Configuration Generator select the following:

OpenVPN Version: OpenVPN 2.4 or newer

Select Platform: Linux

Select Region: Choose the server location you’d like to connect to

Select Port: Typically we recommend UDP/1198 RSA-2048 AES-128-CBC SHA1 for best speeds but feel free to select the one you want to use.

4. Click Generate to download the .ovpn file. Do not open this file once it is downloaded.

PIA Generate .ovpn file

Merlin Router Setup for PIA

Login to Asus Merlin firmware settings in a browser on any computer or smart device connected to the Merlin FlashRouter’s network.

1. Navigate to the VPN tab.

Merlin VPN Tab

2. Navigate to the VPN Client tab.

Merlin VPN Client Tab

3. Click Choose file and select the .ovpn file you downloaded earlier. Then click Upload.

Merlin Choose File Upload

4. Set Automatic Start at boot time to Yes if you want the VPN connection to begin automatically when the router is powered off and back on.

Merlin Automatic Start at boot time

5. In the Description field enter in the name you’d like to use for this OpenVPN Client profile. We typically advise entering in the location here. Our example server was in US East Streaming so I have entered in PIA US East Streaming.

PIA Description

6. Set Accept DNS Configuration to Strict. Set Redirect Internet traffic through tunnel to Yes (all). Set Kill Switch to Yes or No depending on if you want the Internet to be killed if the VPN connection drops.

Merlin Accept DNS configuration Redirect Internet and Kill Switch

If you only want certain devices to connect to the OpenVPN Client profile you are setting up instead of all the devices connected to the FlashRouter’s network please set the Redirect Internet traffic through tunnel to VPN Director. Then complete the instructions on this page and then view our VPN Director guide.

7. Enter your PIA account username and password.

Merlin VPN Username and Password

8. Click Apply at the bottom of the page.

9. At the top of the page set the Service State toggle to ON to activate the VPN connection.

Merlin Service State All Providers

Verify a successful PIA connection

  1. You should now see a CONNECTED message.
  2. Visit PIA’s IP Check to verify your new IP address and virtual location.

In some cases you may notice that the location is not showing the same location as the server you have input in your router settings; this is because geo tracking tools are often tricked by VPN connections. As long as you see an IP address that is not the same as your normal Internet IP address then you are indeed connected to PIA.

How to change the PIA server

  1. Follow the steps at the top of the page to obtain a new .ovpn file.
  2. Then proceed with the settings same as initial setup.

TROUBLESHOOTING

Still having issues? Visit the VPN Troubleshooting section.

Troubleshoot Here

IPVanish Merlin OpenVPN Setup

TeamFlashRouters · Jan 11, 2023 ·

Preparing for IPVanish Merlin Setup

Download your IPVanish .ovpn file

If you are not already an IPVanish user Sign Up Now.

1. Log in to your account on the IPVanish website.

IPVanish login

2. Successfully log in with your account information then go to IPVanish .ovpn file page.

3. Click on the .ovpn file for the server location you want to use to dowloand the .ovpn file. Do not open this file.

IPVanish download ovpn

Merlin Router Setup for IPVanish

Login to Asus Merlin firmware settings in a browser on any computer or smart device connected to the Merlin FlashRouter’s network.

1. Navigate to the VPN tab.

Merlin VPN Tab

2. Navigate to the VPN Client tab.

Merlin VPN Client Tab

3. Click Choose file and select the .ovpn file you downloaded earlier. Then click Upload.

Merlin Choose File Upload

4. Set Automatic Start at boot time to Yes if you want the VPN connection to begin automatically when the router is powered off and back on.

Merlin Automatic Start at boot time

5. In the Description field enter in the name you’d like to use for this OpenVPN Client profile. We typically advise entering in the location here. Our example server was in nyc-a50 so I have entered in IPVanish a-50.

IPVanish Description

6. Set Accept DNS Configuration to Strict. Set Redirect Internet traffic through tunnel to Yes (all). Set Kill Switch to Yes or No depending on if you want the Internet to be killed if the VPN connection drops.

Merlin Accept DNS configuration Redirect Internet and Kill Switch

If you only want certain devices to connect to the OpenVPN Client profile you are setting up instead of all the devices connected to the FlashRouter’s network please set the Redirect Internet traffic through tunnel to VPN Director. Then complete the instructions on this page and then view our VPN Director guide.

7. Enter your IPVanish account email/username and password.

Merlin VPN Username and Password

8. Click Apply at the bottom of the page.

9. At the top of the page set the Service State toggle to ON to activate the VPN connection.

Merlin Service State All Providers

Verify a successful IPVanish connection

  1. You should now see a CONNECTED message.
  2. Visit IPVanish’s IP Check to verify your new IP address and virtual location.

In some cases you may notice that the location is not showing the same location as the server you have input in your router settings; this is because geo tracking tools are often tricked by VPN connections. As long as you see an IP address that is not the same as your normal Internet IP address then you are indeed connected to IPVanish.

How to change the IPVanish server

  1. Follow the steps at the top of the page to obtain a new .ovpn file.
  2. Then proceed with the settings same as initial setup.

TROUBLESHOOTING

Still having issues? Visit the VPN Troubleshooting section.

Troubleshoot Here

ExpressVPN Setup on Roqos

Dave · Dec 16, 2021 ·

Preparing for ExpressVPN Setup

Obtain your ExpressVPN login information

If you are not already an ExpressVPN user Sign Up Now.

1. Visit ExpressVPN’s website login page.

ExpressVPN login page

2. Successfully log in with your account information. Select More.

ExpressVPN account page

3. Select Manual Configuration and copy the Username and Password that are displayed on the right hand side of the screen.

ExpressVPN Manual Configuration
ExpressVPN username and password

Connecting to ExpressVPN in the Roqos Core

Access the Roqos Core UI

1. Login to the Roqos Core web app in a browser on any computer or smart device.

2. Click VPN from the navigation menu and then click VPN OUT.

Roqos VPN Out

3. Click the Connect to box.

Roqos VPN Connect to

4. In the Connect dropdown choose 3rd Party VPN Providers and for the VPN Provider dropdown choose ExpressVPN.

Roqos ExpressVPN select provider

Enter your ExpressVPN information

In the Username and Password field enter the ExpressVPN OpenVPN Username and Password that you obtained.

ExpressVPN on FlashRouters Privacy App Setup - OpenVPN Specific Username and Password
Roqos VPN ExpressVPN enter username and password

Select an ExpressVPN server

Click the Server dropdown and type in or scroll to your preferred server location.

Roqos VPN ExpressVPN select server

Click the Save button.

Roqos VPN Save Settings

Connect to ExpressVPN

Once you click Save you will be returned to the VPN OUT menu.

Click the Connect button to start your ExpressVPN connection. Please be patient as the router connects your entire network through VPN.

Roqos VPN Connect

Assign devices to connect to VPN

By default there are no devices assigned to the VPN tunnel. Click Included Devices. From this page you can choose if all devices should connect to ExpressVPN or only certain devices.

Roqos VPN Included Devices

From the dropdown select Include all devices if you want every device that connects to the Roqos to connect to ExpressVPN. Then click Save.

Roqos VPN Include All Devices

If you only want specific devices to connect to ExpressVPN while others bypass the VPN connection select Include selected devices from the dropdown and then toggle the sliders for the devices you want connected to VPN. Click Save.

Roqos VPN Include Selected devices

Verify a successful ExpressVPN connection

Make sure you are connected to the Roqos network via WiFi or ethernet connection on your device.

Visit ExpressVPN’s IP Check to verify your new IP Address and virtual location.

You should see Connected at the top of the page underneath ExpressVPN.

Connect to a different ExpressVPN server

To change your server click Disconnect on the VPN OUT page then return to the Connect To section to select a new server from the Server dropdown and click Save. Now click Connect once again on the VPN Out page.

Disconnect from ExpressVPN

To disconnect from ExpressVPN click the Disconnect button.

TROUBLESHOOTING

Still having issues? Visit the FR Privacy App Troubleshooting section.

Troubleshoot Here

SmartDNSProxy SmartDNS Setup

TeamFlashRouters · Jun 13, 2019 ·

SmartDNSProxy offers a SmartDNS service for unblocking geo-restricted content without the encryption of a VPN service. SmartDNS routes DNS servers to different regions which “tricks” the website to allow access to previously restricted content.

SmartDNS does not change your IP Address or provide the encryption that a VPN connection does. This can result in faster speeds and unblocked content.

SmartDNS and VPN should not be configured at the same time. When using a SmartDNS connection, make sure to disable your VPN connection on the FlashRouter.

Register your IP Address

If you are not already a SmartDNSProxy user Sign Up Now.

Click on Sign Up and fill in the requested information.

SmartDNSProxy SmartDNS Account Sign Up For DD-WRT FlashRouter

Access the e-mail you entered and Verify your new account.

SmartDNSProxy SmartDNS Activate DNS for DD-WRT FlashRouter

Your account will now be verified.

Activate SmartDNSProxy SmartDNS Service and Subscription

Login to SmartDNSProxy

SmartDNSProxy Server Location Addresses for FlashRouter DD-WRT Settings

Visit SmartDNSProxy’s DNS servers list and note the DNS servers of the location you would like to access content from.

Enter SmartDNSProxy SmartDNS servers on your FlashRouter

Navigate to Setup > Basic Setup

  1. Scroll down to Network Address Server Settings (DHCP).
  2. Enter in any combination of SmartDNSProxy SmartDNS servers you noted into Static DNS fields 1 and 2.
  3. Click Apply Settings at the bottom of the page.
  4. Reboot the FlashRouter.

Once the router is fully booted back up, you can access your desired regional content on any device that connects to the FlashRouter’s network.

ExpressVPN MediaStreamer SmartDNS Setup

TeamFlashRouters · Jun 13, 2019 ·

ExpressVPN offers a SmartDNS service known as MediaStreamer for unblocking geo-restricted content without the encryption of a VPN service. SmartDNS routes DNS servers to different regions which “tricks” the website to allow access to previously restricted content.

SmartDNS does not change your IP Address or provide the encryption that a VPN connection does. This can result in faster speeds and unblocked content.

SmartDNS and VPN should not both be configured at the same time. When using a SmartDNS connection make sure to disable your VPN connection on the FlashRouter.

Login to ExpressVPN

If you are not already a ExpressVPN user Sign Up Now.

Visit ExpressVPN website login page and successfully login.

Register your IP with ExpressVPN

Navigate to the DNS Settings tab on top right of the ExpressVPN Dashboard.

ExpressVPN MediaStreamer DNS Settings

Click on Register my IP address.

Register IP for ExpressVPN MediaStreamer use on FlashRouter DD-WRT

Navigate to the ExpressVPN Dashboard.

Finding ExpressVPN MediaStreamer Specific DNS Servers in ExpressVPN Dashboard

Click on Set Up on More Devices.

Finding ExpressVPN MediaStreamer Specific DNS Servers

Scroll down and click on MediaStreamer and note the DNS servers that appear on the right side of the page.

ExpressVPN MediaStreamer Specific DNS servers

Enter MediaStreamer SmartDNS servers on your FlashRouter

Navigate to Setup > Basic Setup

  1. Scroll down to Network Address Server Settings (DHCP).
  2. Enter in the MediaStreamer SmartDNS servers you noted into Static DNS fields 1 and 2.
  3. Click Apply Settings at the bottom of the page.
  4. Reboot the FlashRouter.

Once the FlashRouter has fully rebooted, you can now access your desired regional content on any device that connects to the FlashRouter’s network.

Next Page »

Primary Sidebar

  • Troubleshooting
  • Router Access
  • Internet Connection Issues
  • WiFi Connectivity
  • General VPN Issues
  • TeamViewer Remote Support
  • DD-WRT Firmware
  • Facebook
  • Twitter
  • Instagram
  • Pinterest
  • YouTube

Footer