• Skip to primary navigation
  • Skip to main content
  • Skip to primary sidebar
  • Skip to footer

FlashRouters Support Portal

Prioritizing Privacy

  • SETUP GUIDES
    • DD-WRT Router Setup Guide
    • AsusWRT-Merlin Router Setup Guide
    • ExpressVPN Router Setup Guide
    • GL.iNet Router Setup Guide
    • Privacy Hero Router Setup Guide
    • Roqos Core Router Setup Guide
  • TROUBLESHOOTING
    • Router Access
    • WiFi Connectivity
    • Internet Connection Issues
    • General VPN Issues
    • FR Privacy App
    • DD-WRT Firmware
    • TeamViewer Remote Support
  • FAQs
    • Router FAQs
    • VPN FAQs
    • Warranty and Returns FAQs
    • Sales FAQs
    • Shipping FAQs
    • Service Plan FAQs
  • Show Search
Hide Search

expressvpn

Change server locations on ExpressVPN/Aircove firmware

TeamFlashRouters · May 12, 2022 ·

You can change the ExpressVPN server location at any time so your Internet connection appears as originating from that location.

1. Connect to the FlashRouter’s network via ethernet cable or wireless.

2. Open your web browser and enter expressvpnrouter.com or 192.168.132.1 in the URL.

ExpressVPNrouter.com
192.168.132.1

3. Login with your ExpressVPN FlashRouter admin password.

ExpressVPN Router admin login

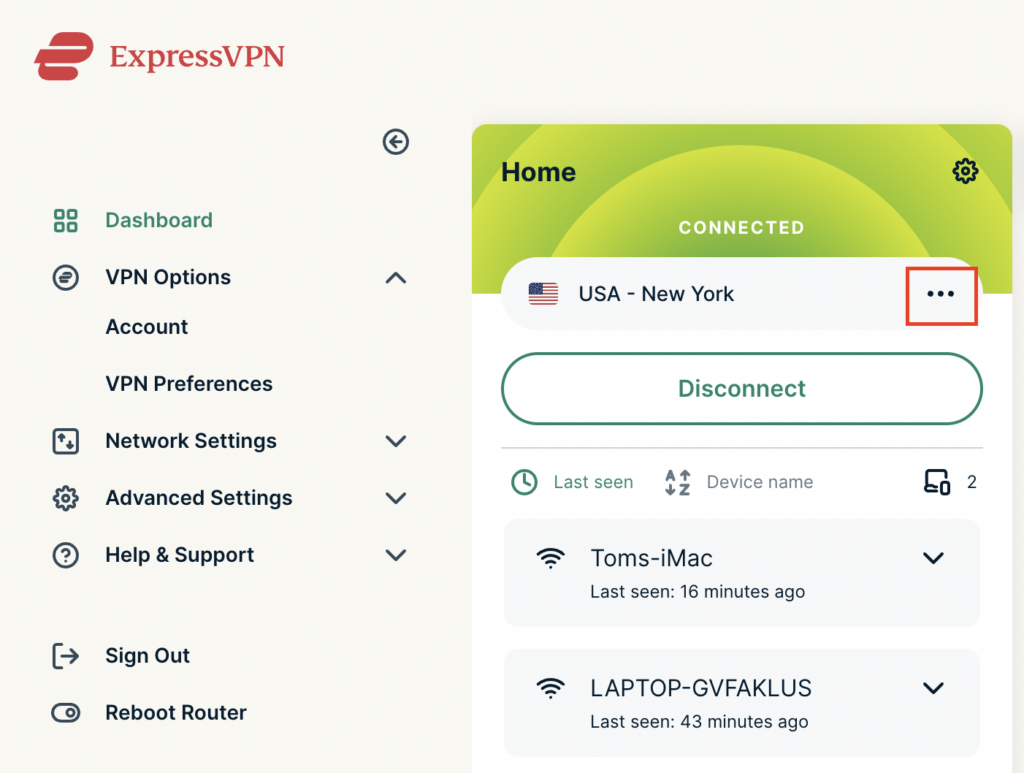
4. Click the three dots next to the server location.

ExpressVPN change server 1

5. Type in the location you want to connect to. Click the new location to connect.

ExpressVPN change server 2

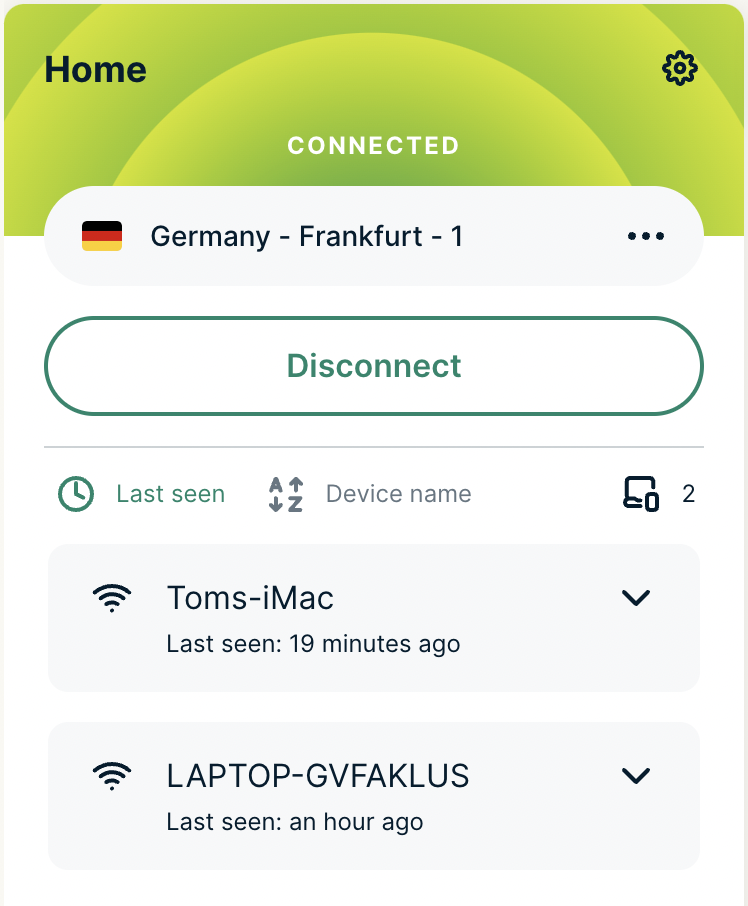
6. You are now connected to the new server location.

ExpressVPN change server 3

ExpressVPN offers servers in locations all over the world. Typically for speeds it is best to connect to the server closest to your actual location. Clicking a country instead of a city will connect you to the ideal city in that country.

Using Device Groups to connect to multiple VPN locations on ExpressVPN/Aircove firmware

TeamFlashRouters · May 12, 2022 ·

ExpressVPN offers a great feature of connecting the FlashRouter to multiple ExpressVPN servers at the same time. You can then assign your devices to the location that you wish.

1. Connect to the FlashRouter’s network via ethernet cable or wireless.

2. Open your web browser and enter expressvpnrouter.com or 192.168.132.1 in the URL.

ExpressVPNrouter.com
192.168.132.1

3. Login with your ExpressVPN FlashRouter admin password.
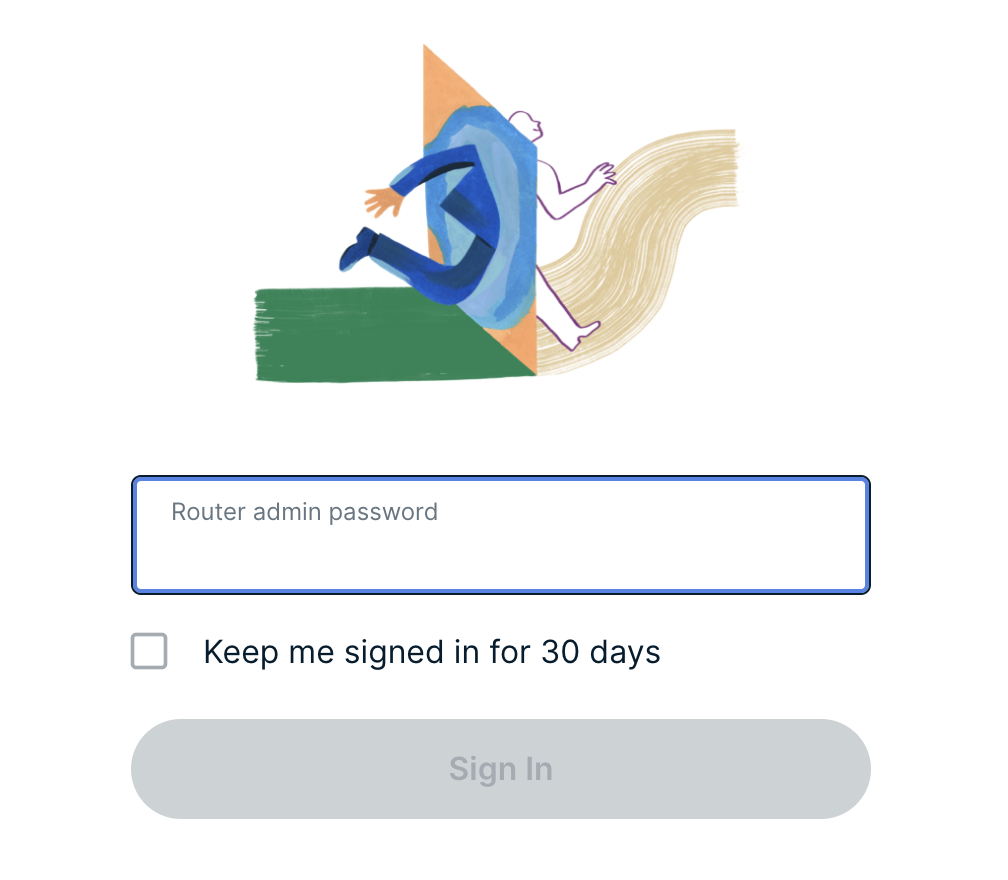
ExpressVPN Router admin login

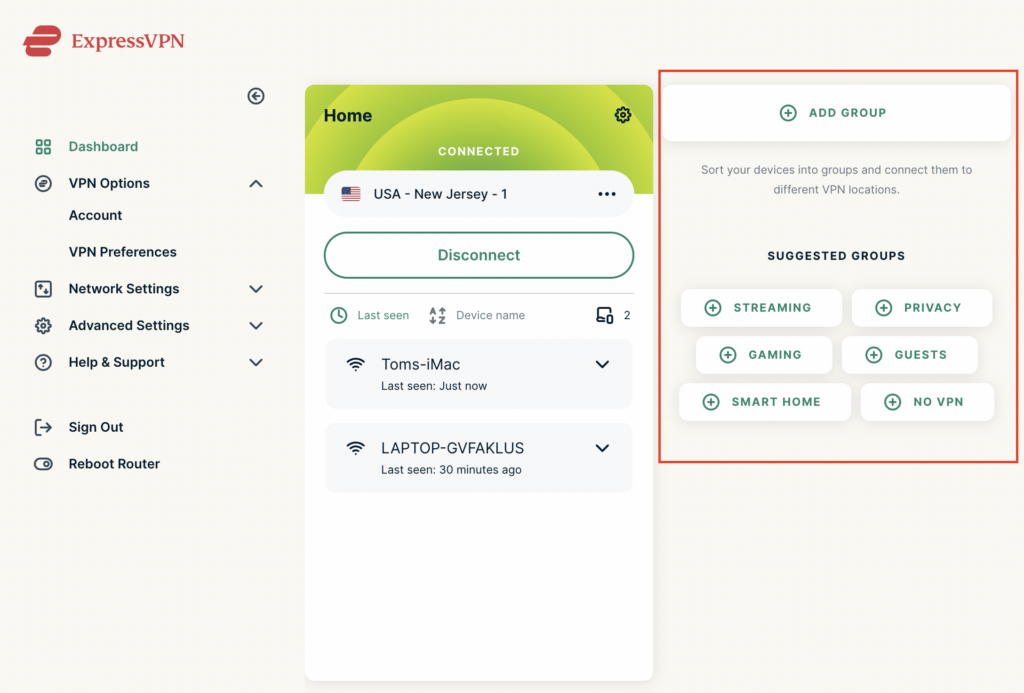
4. Select Add Group and name the new group or select one of the pre-named groups below.

ExpressVPN Add Group

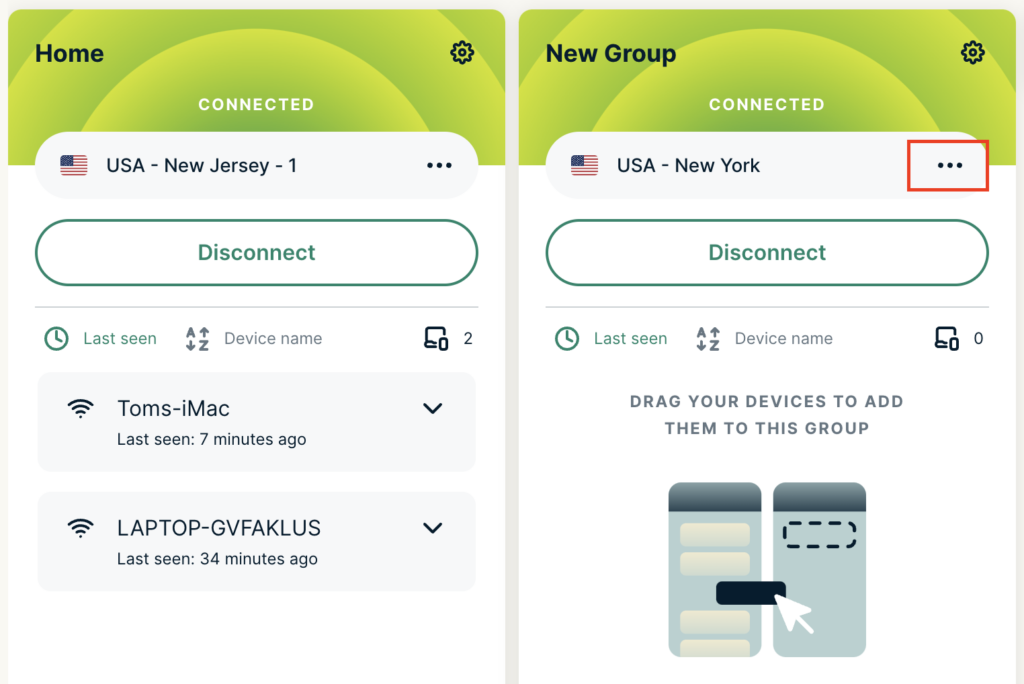
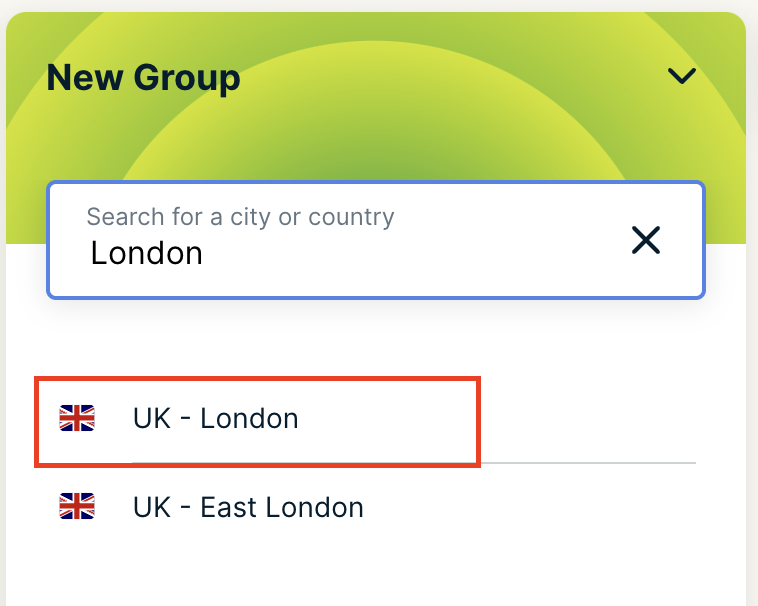
5. Click the three dots next to the new server location and type in the location you want to connect to. Click the new location to connect.
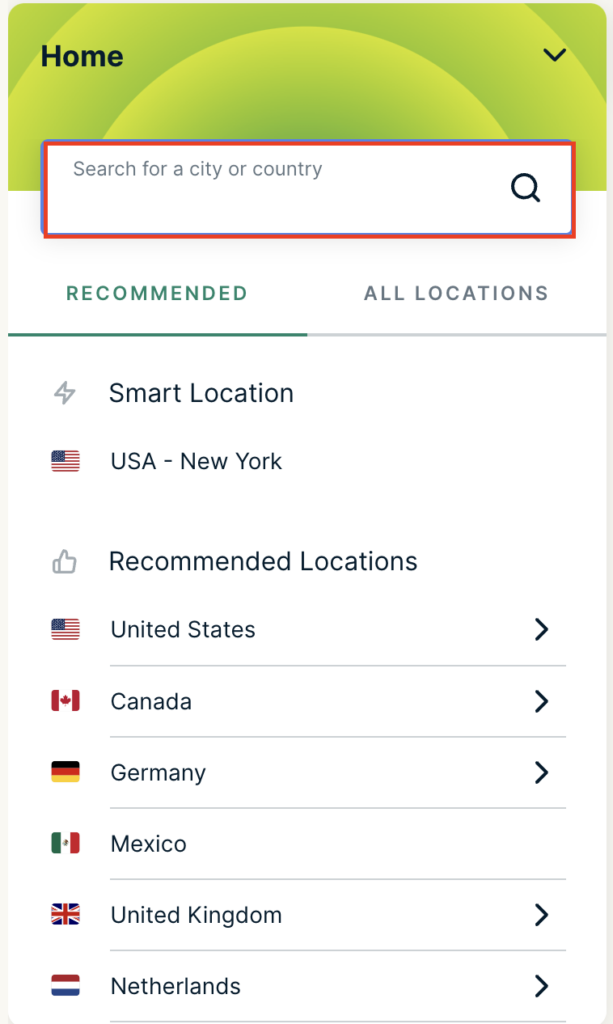
ExpressVPN Change server
ExpressVPN select new server

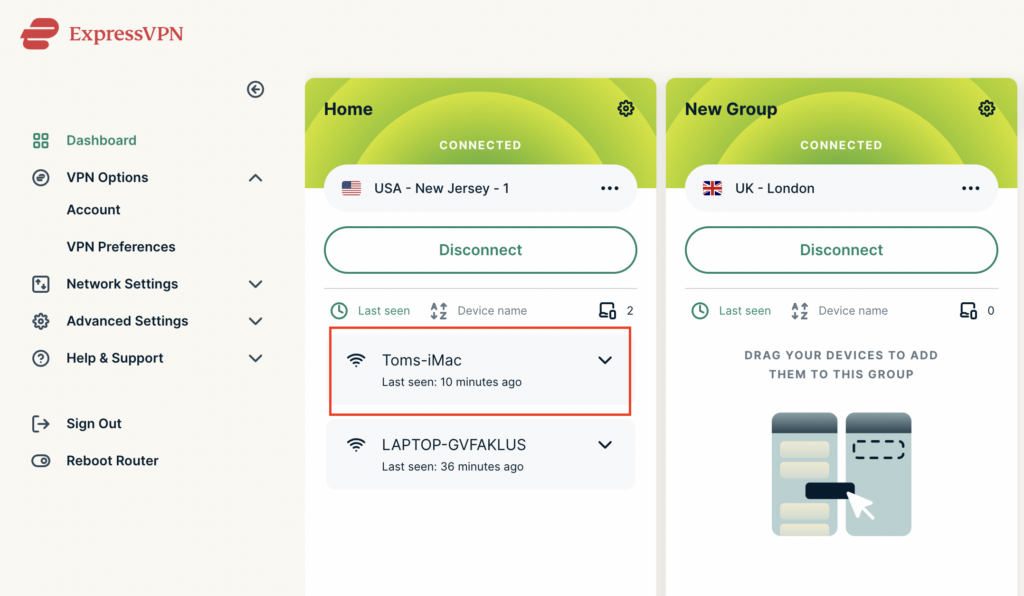
5. Click and drag the device that you want assigned to the VPN New Group.

ExpressVPN select device
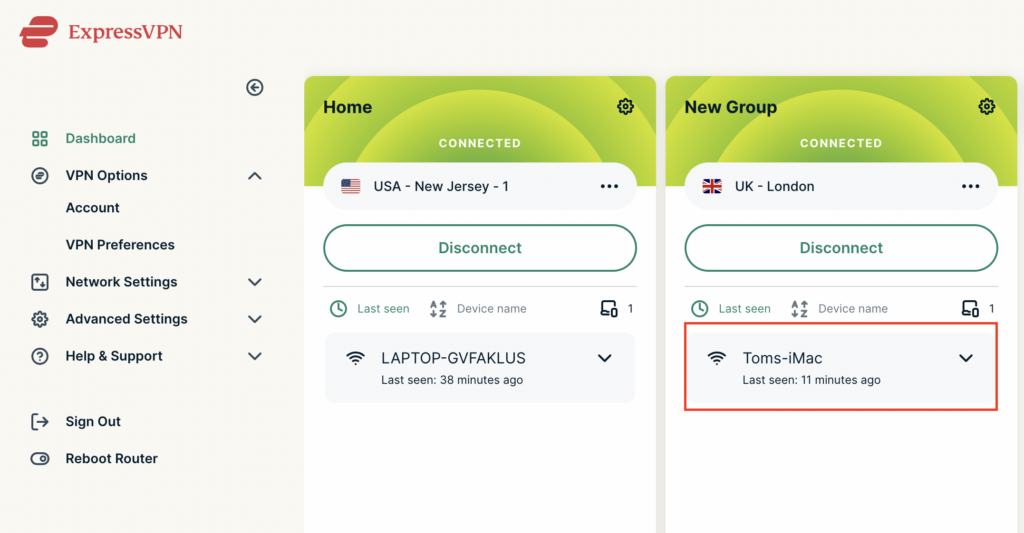
ExpressVPN device assigned

The devices assigned to new group will now connect to that location while the devices in the first VPN group will remain connected to the VPN server selected in that area.

Using Device Groups to bypass VPN on ExpressVPN/Aircove firmware

TeamFlashRouters · May 12, 2022 ·

Bypassing the ExpressVPN tunnel on certain devices allows you to have multiple IP Addresses while connected to the same router. This feature is very helpful with certain websites where VPN is blocked such as streaming services and banking information.

1. Connect to the FlashRouter’s network via ethernet cable or wireless.

2. Open your web browser and enter expressvpnrouter.com or 192.168.132.1 in the URL.

ExpressVPNrouter.com
192.168.132.1

3. Login with your ExpressVPN FlashRouter admin password.

ExpressVPN Router admin login

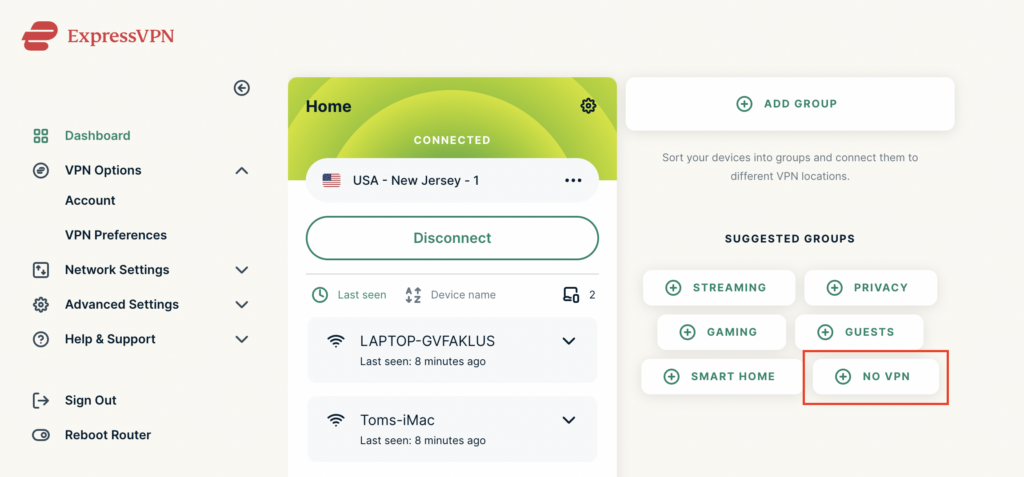
4. Select VPN Off on the right hand side of the menu.

ExpressVPN select No VPN

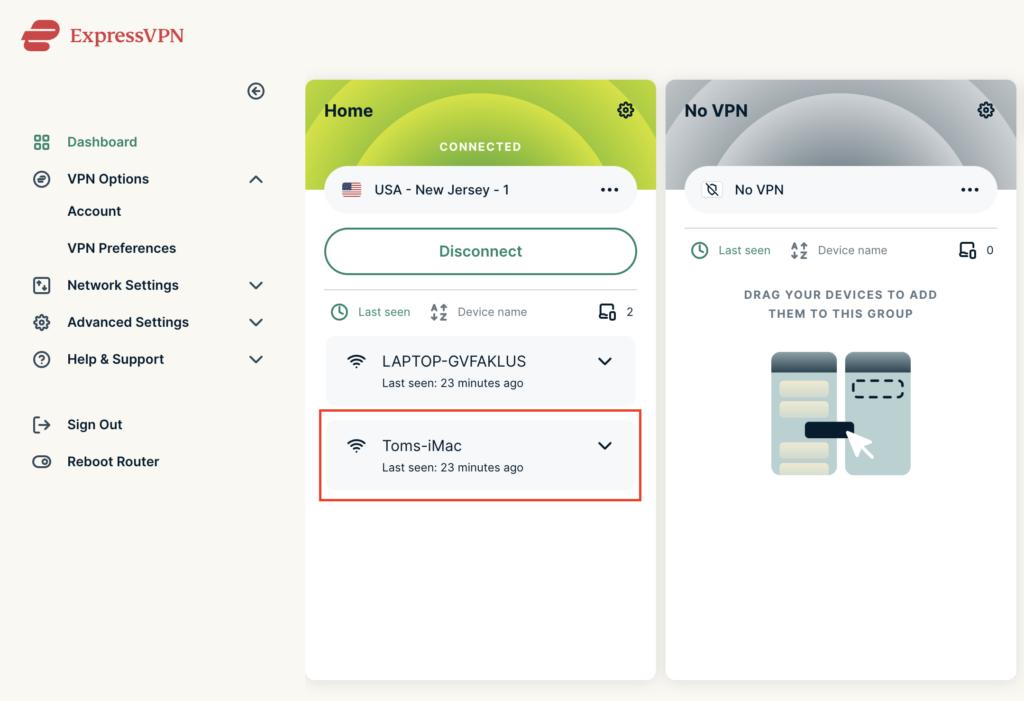
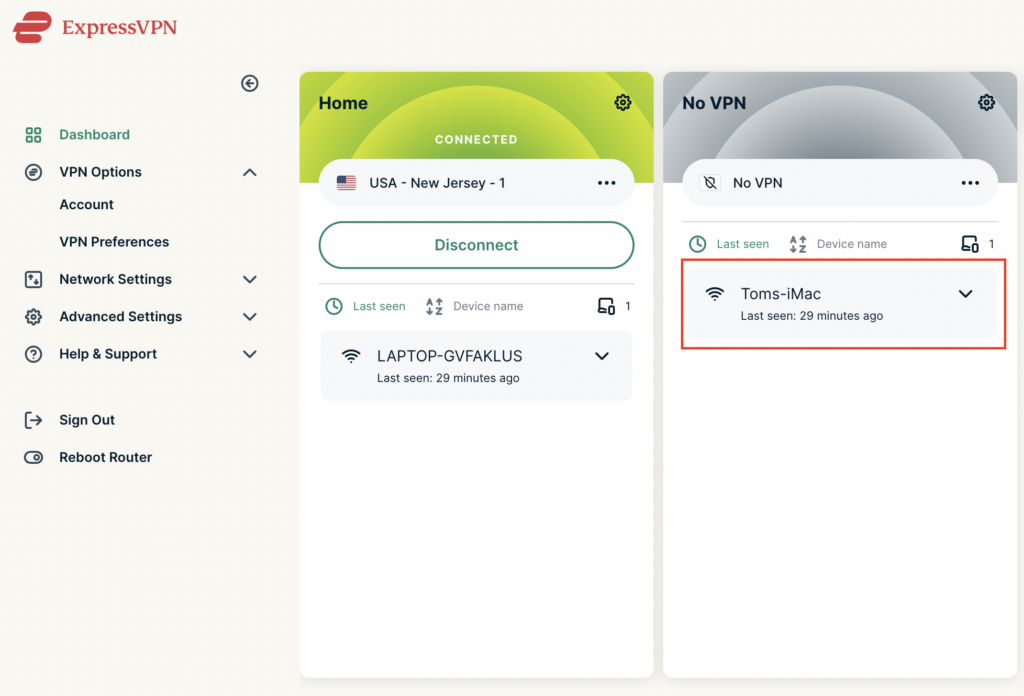
5. Click and drag the device that you want to bypass the VPN tunnel to the No VPN area.

ExpressVPN No VPN select device
ExpressVPN No VPN select device 2

The devices assigned to No VPN will now correct directly to your ISP internet while the devices in the VPN group will remain connected to the VPN server.

Separate 2.4GHz and 5GHz Wi-Fi bands on ExpressVPN/Aircove firmware

TeamFlashRouters · Mar 16, 2022 ·

By default ExpressVPN firmware bonds the 2.4GHz and 5GHz wireless networks to a single wireless network name. Your device will automatically choose which one will provide the best connection. You can separate these networks to have unique Wi-Fi names so you can control which network your devices will use.

1. Connect to the FlashRouter’s network via ethernet cable or wireless.

2. Open your web browser and enter expressvpnrouter.com or 192.168.132.1 in the URL.

ExpressVPNrouter.com
192.168.132.1

3. Login with your ExpressVPN FlashRouter admin password.

ExpressVPN Router admin login

4. Select Network Settings on the left hand side of the menu.

ExpressVPN Network Settings

5. Select Wi-Fi Settings on the left hand side of the menu.

ExpressVPN WiFi Settings

6. Click the toggle for Separate 2.4GHz and 5GHz Wi-Fi.

ExpressVPN Separate 2.4GHz and 5GHz

7. Separate Wi-Fi details for the 5GHz band will now display. You can change the name and password if you so choose or leave it with the default name and password with “-5GHz” added to the name. Click Save. Click Continue.

ExpressVPN 5GHz added

Change Wireless Channels on ExpressVPN/Aircove firmware

TeamFlashRouters · Mar 16, 2022 ·

Changing the wireless channel on your ExpressVPN FlashRouter can help with WiFi stability and allows you to use a wireless channel with less traffic in your local environment.

1. Connect to the FlashRouter’s network via ethernet cable or wireless.

2. Open your web browser and enter expressvpnrouter.com or 192.168.132.1 in the URL.

ExpressVPNrouter.com
192.168.132.1

3. Login with your ExpressVPN FlashRouter admin password.

ExpressVPN Router admin login

4. Select Network Settings on the left hand side of the menu.

ExpressVPN Network Settings

5. Select Wi-Fi Settings on the left hand side of the menu.

ExpressVPN WiFi Settings

6. Select Advanced Settings.

ExpressVPN WiFi Advanced Settings

7. Select the Channel Width and Main Channel you want your ExpressVPN FlashRouter to use. Note that higher 5GHz Wi-Fi channels will not be compatible with older devices. Click Save. Click Continue.

ExpressVPN WiFi Channels

Change VPN Protocols on ExpressVPN/Aircove firmware

TeamFlashRouters · Mar 16, 2022 ·

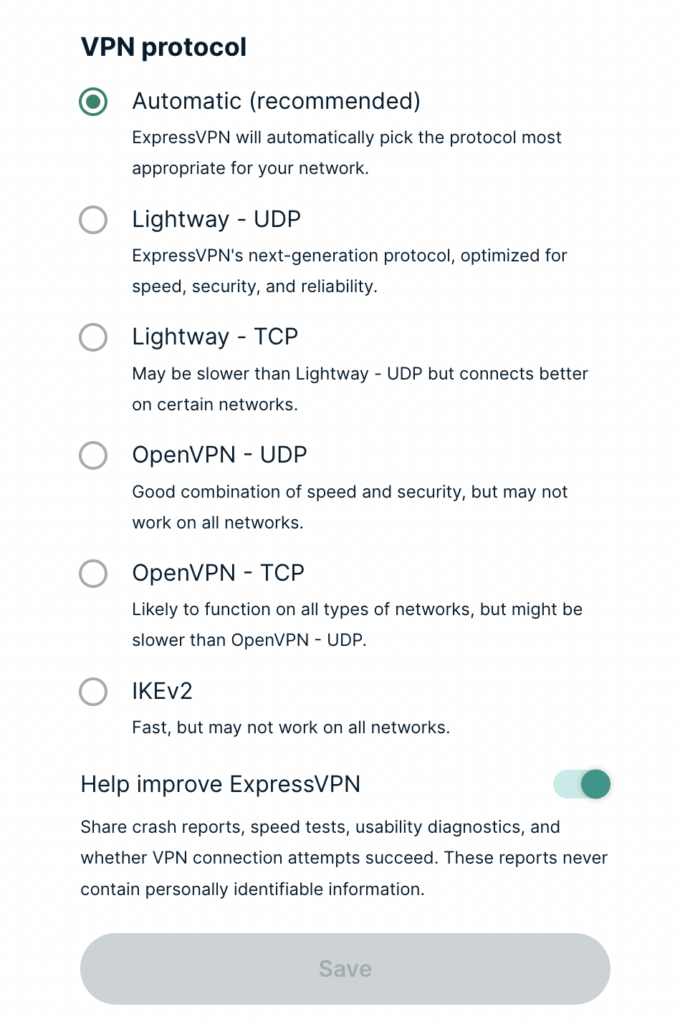
Changing the VPN protocol your ExpressVPN FlashRouter is using can help with obtaining faster speeds while connected to VPN and connectivity issues in some regions of the world. A great advantage of using ExpressVPN firmware is the ability to use multiple protocols such as OpenVPN, IKEv2, and ExpressVPN’s own protocol Lightway.

1. Connect to the FlashRouter’s network via ethernet cable or wireless.

2. Open your web browser and enter expressvpnrouter.com or 192.168.132.1 in the URL.

ExpressVPNrouter.com
192.168.132.1

3. Login with your ExpressVPN FlashRouter admin password.

ExpressVPN Router admin login

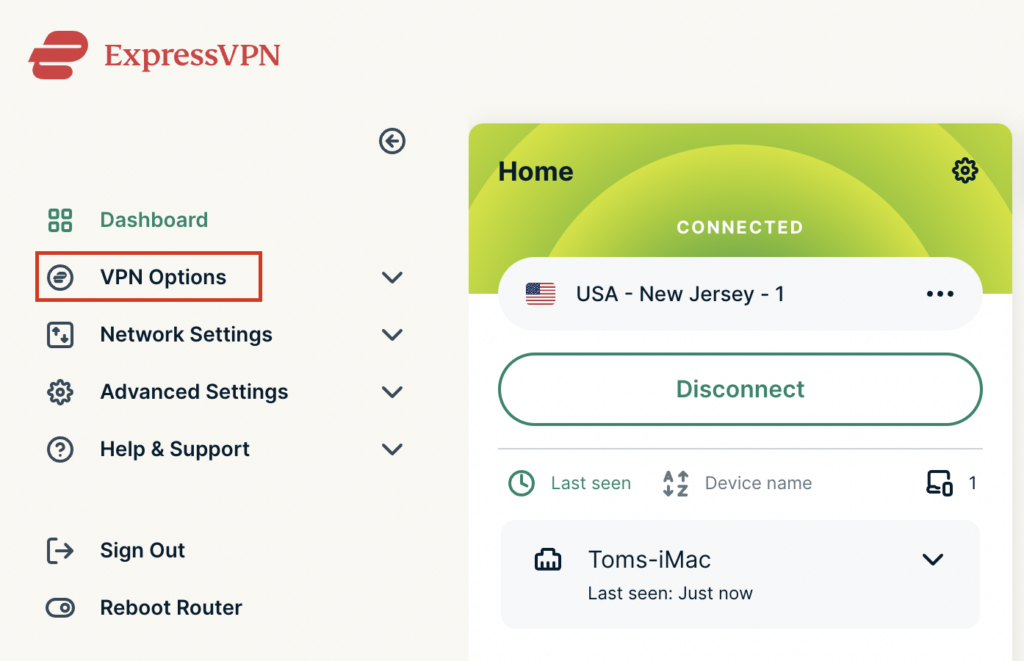
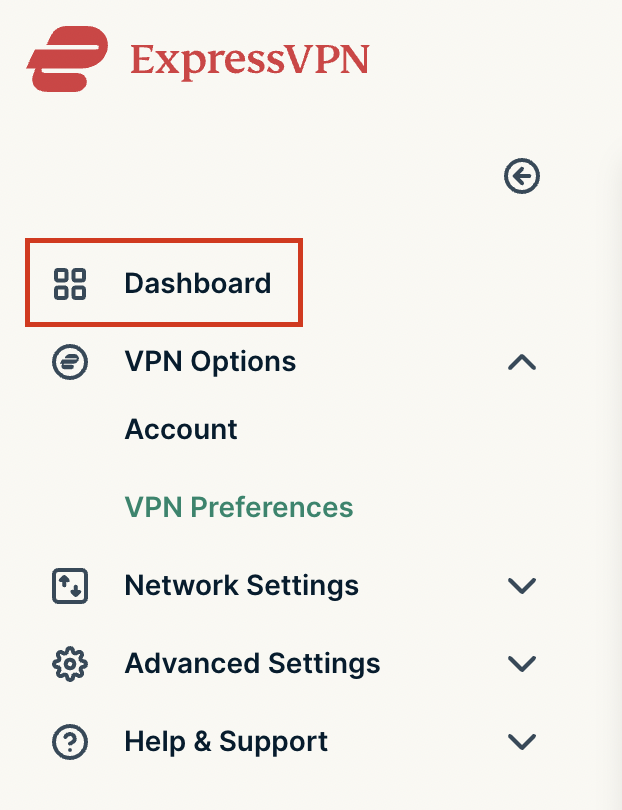
4. Select VPN Options on the left hand side of the menu.

ExpressVPN VPN Options

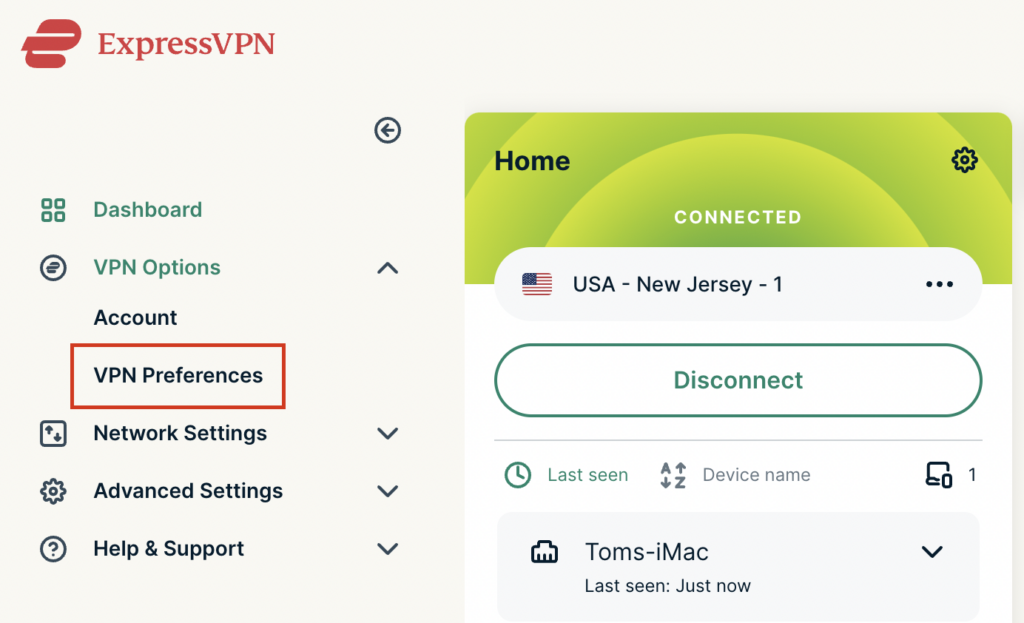
5. Select VPN Preferences on the left hand side of the menu.

ExpressVPN VPN Preferences

6. Choose the VPN protocol that best suits your needs. We typically see the fastest speeds while using the Lightway – UDP or IKEv2 protocols. Click Save.

ExpressVPN Protocols

7. Click OK and then select Dashboard.

ExpressVPN Dashboard

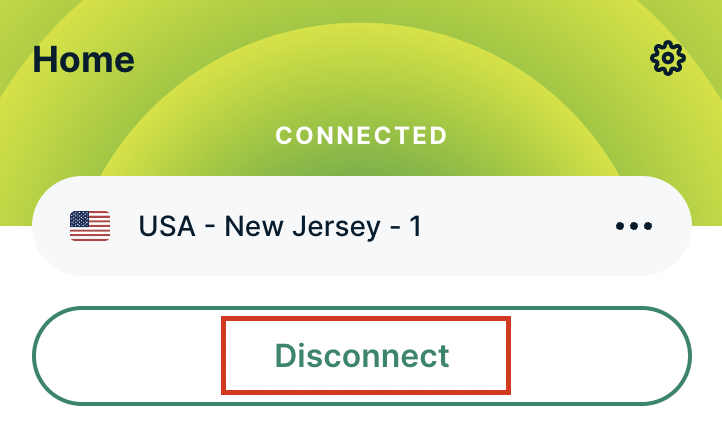
8. Click Disconnect to turn the VPN connection off.

ExpressVPN Disconnect

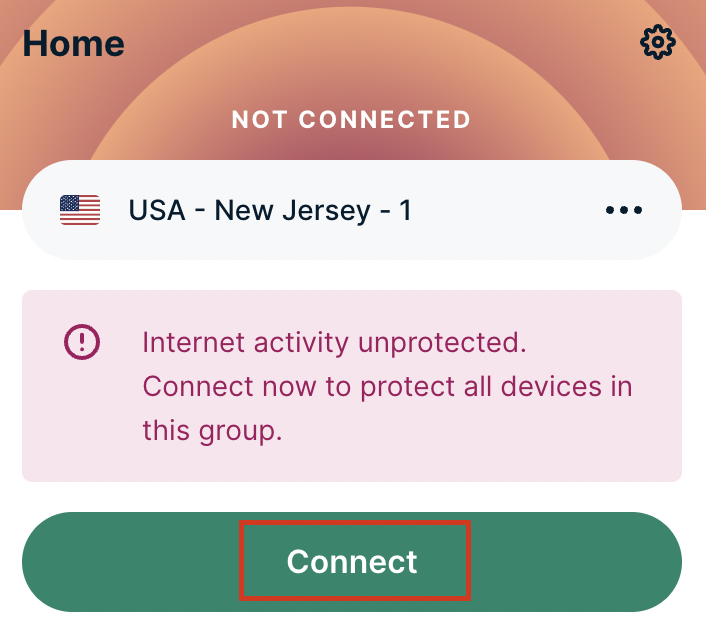
9. Click Connect to turn the VPN connection back on so it is using the new Protocol you selected.

ExpressVPN Connect

ExpressVPN/Aircove FlashRouter Internet Setup and Activation

TeamFlashRouters · Mar 16, 2022 ·

Follow this article when you receive your new ExpressVPN FlashRouter to connect your FlashRouter to the Internet via ExpressVPN and customize your network so it is ready to use.

Obtain your ExpressVPN Activation Code

If you are not already an ExpressVPN user Sign Up Now.

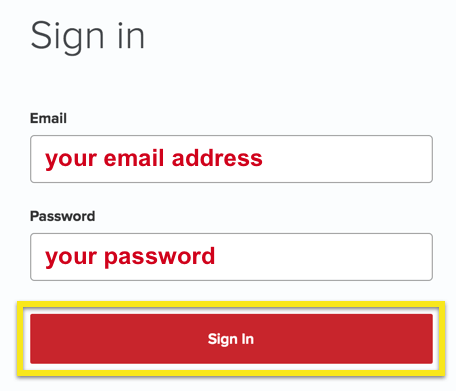
1. Visit ExpressVPN’s website login page.

ExpressVPN on FlashRouters Privacy App Setup - Sign Into ExpressVPN Dashboard

2. Copy your ExpressVPN Activation code and paste it into a document or leave this page open while you proceed with the instructions.

Access Router Settings

1. Connect to the FlashRouter’s network via ethernet cable or wireless.

The wireless network will appear as “Aircove”, “Linksys##”, “Netgear##”, or “Asus” and the password to join the network will be the default wireless password printed on the bottom of the router.

2. Open your web browser and enter expressvpnrouter.com or 192.168.132.1 in the URL.

ExpressVPNrouter.com
192.168.132.1

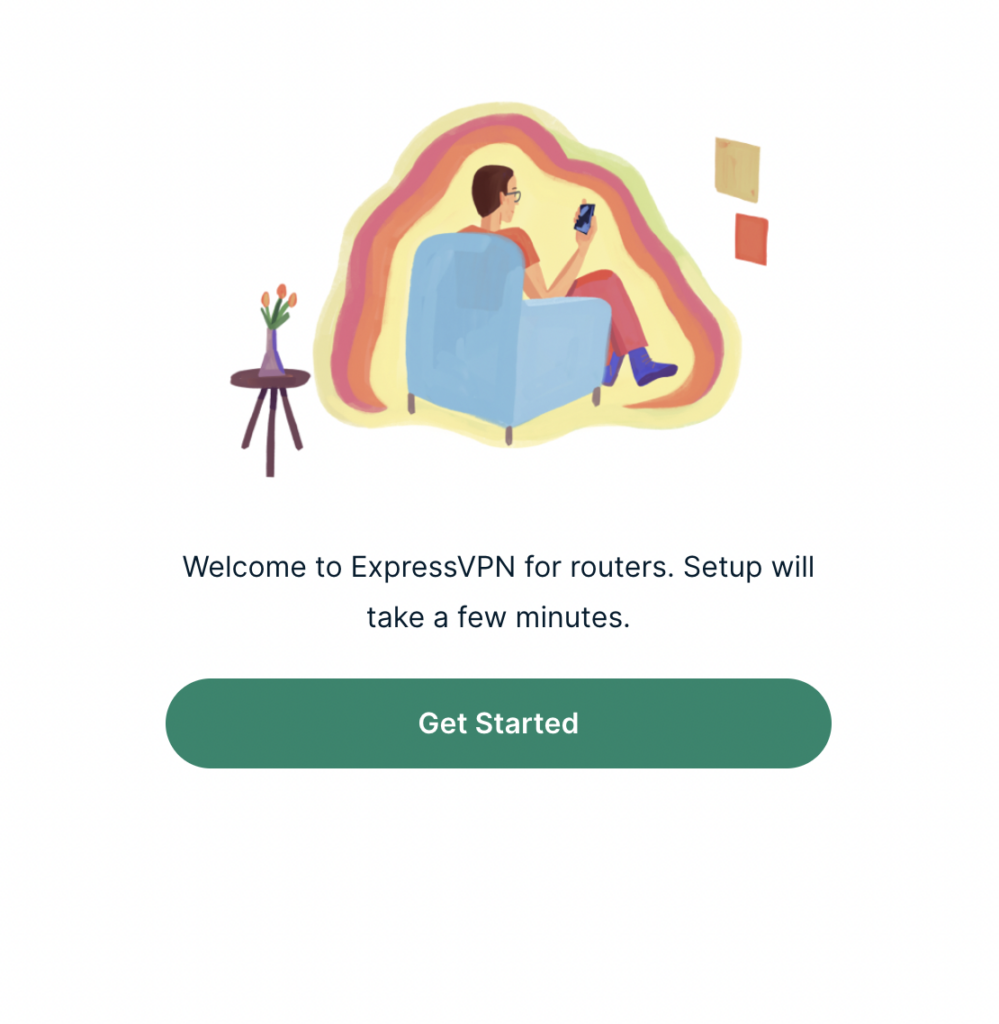
3. Click Get Started on the ExpressVPN page that is displayed.

ExpressVPN Get Started

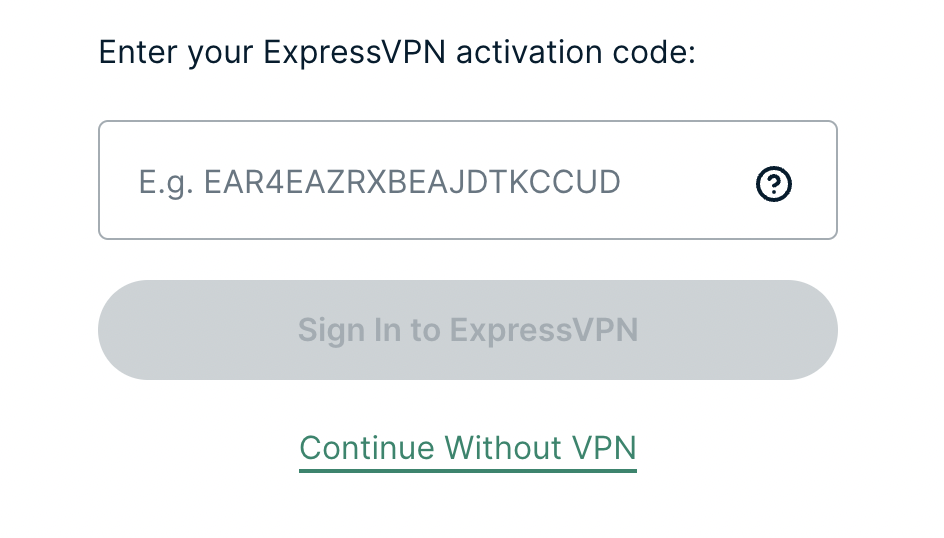
4a. If your FlashRouter is wired to the Internet correctly then you will be prompted to enter your ExpressVPN Activation Code found in your ExpressVPN account. Paste that in and click Sign in to ExpressVPN.

ExpressVPN Activation Code

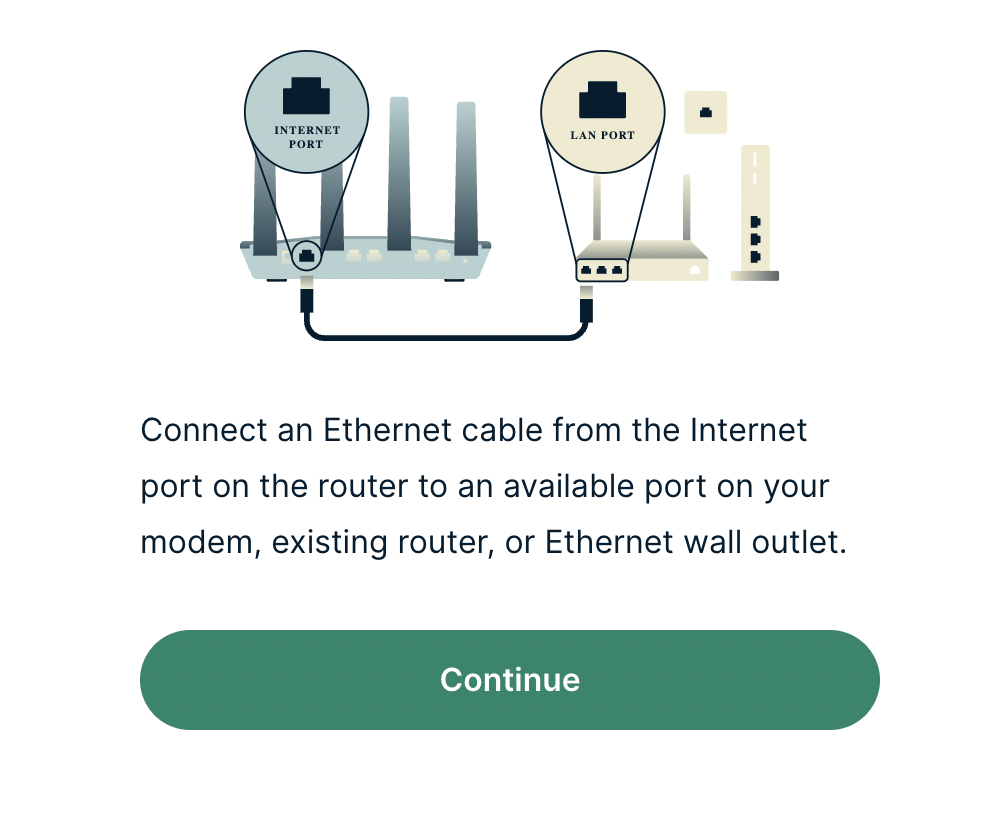
4b. If your FlashRouter is not wired correctly or is not receiving Internet properly make sure you are wired as detailed in the diagram that appears. If you are stuck at this screen we recommend powering off your ISP modem and any other router that the ExpressVPN FlashRouter is wired to and then powering them back up one by one.

Proceed with step “4a” above once the router is receiving Internet and you are prompted to enter the Activation Code.

ExpressVPN Wiring

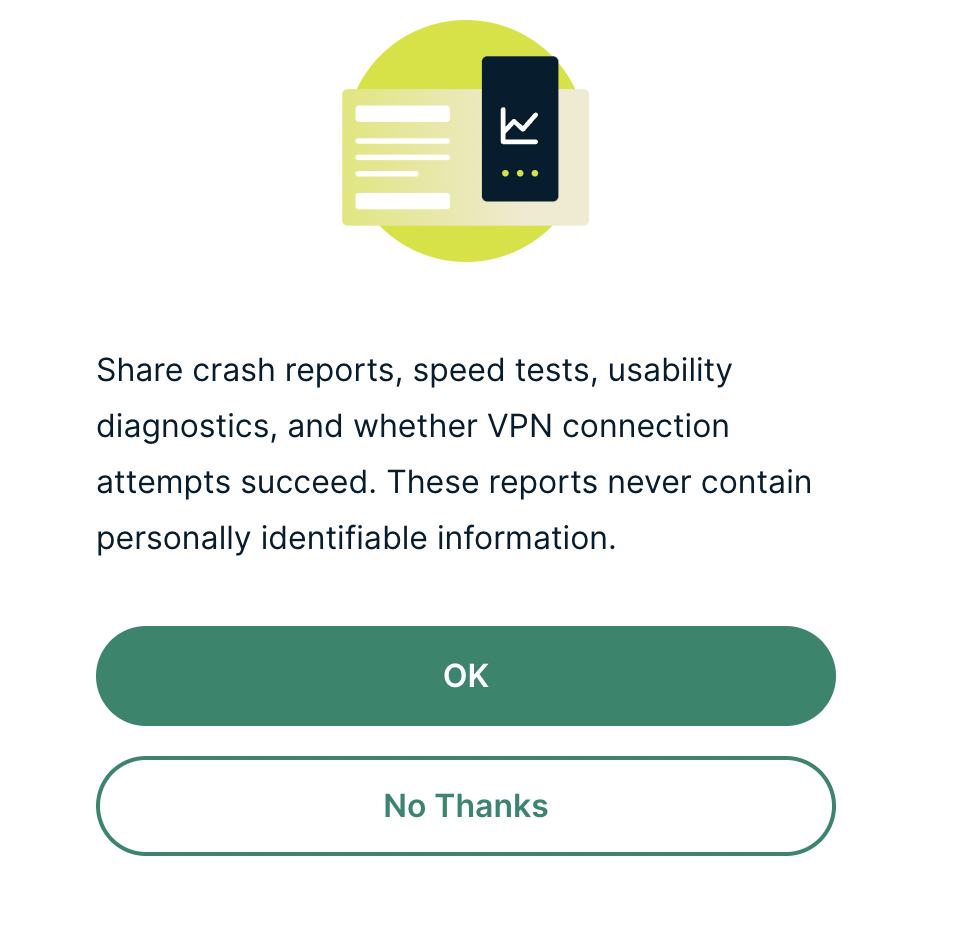
5. Select if you want to share anonymous crash report data with ExpressVPN to help them improve the firmware for future releases.

ExpressVPN Share Crash Report

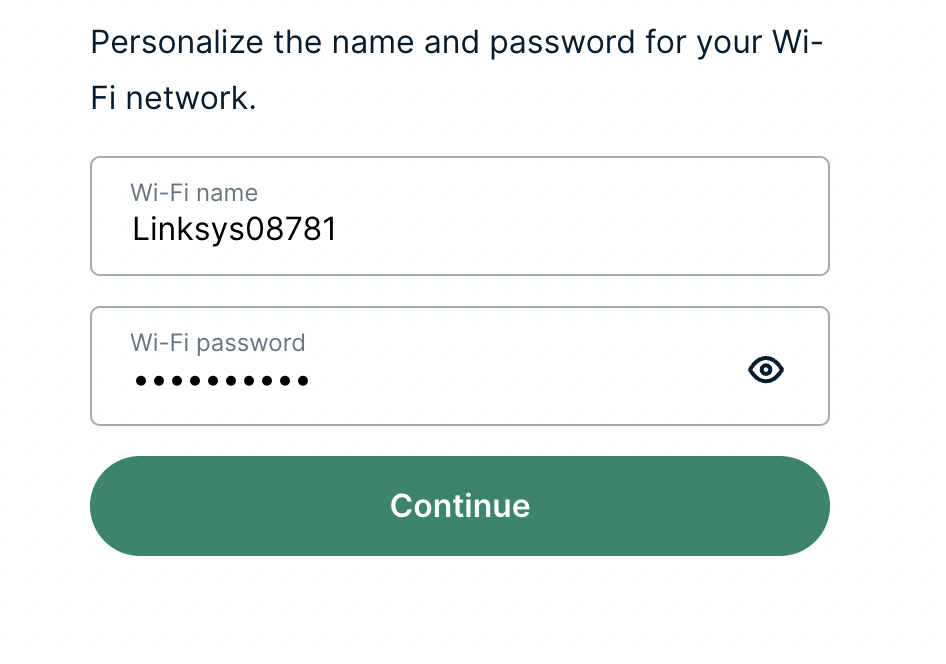
6. Set the WiFi name and password your wireless devices will use to connect to the FlashRouter’s network. Make sure the WiFi name is unique and not a duplicate of an existing WiFi name if you change it. You can also leave it as the default information if you like. Click Continue.

ExpressVPN Set WiFi Name and Password

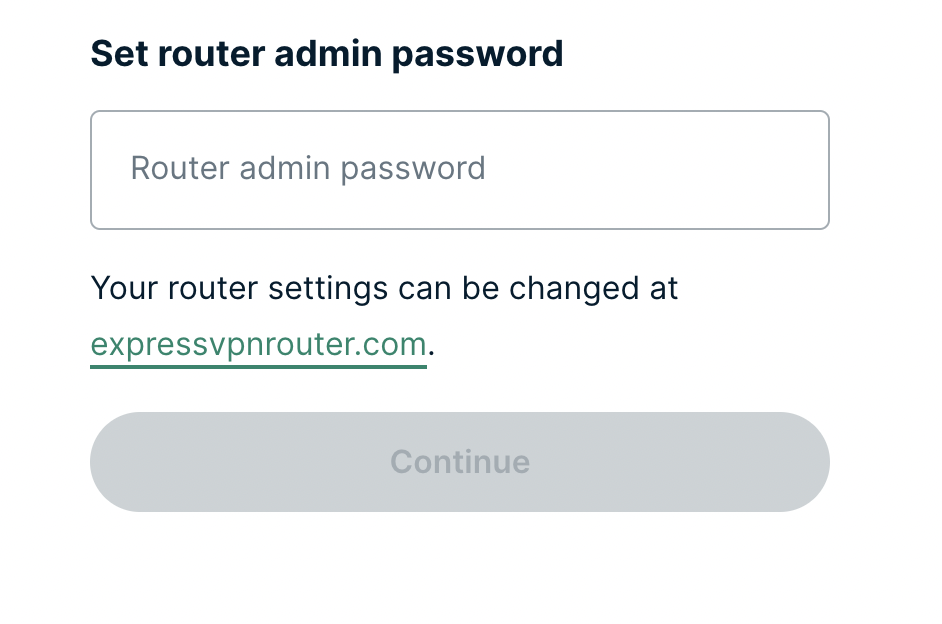
7. Enter the admin password you will use to access the ExpressVPN router settings. Be sure to TYPE CAREFULLY when setting the admin password as a typo will result in needing to reset the router again. Note this password in a secure location or commit it to memory.

ExpressVPN admin password

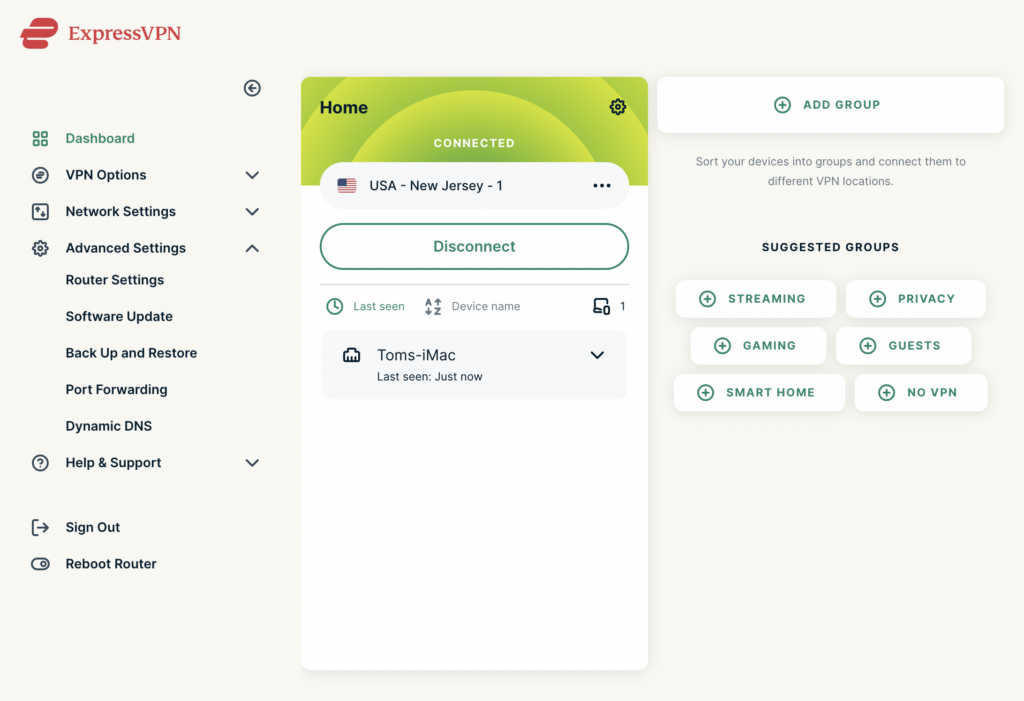
8. Your ExpressVPN FlashRouter is now fully setup!

ExpressVPN Connected

How do I reset and reconfigure my ExpressVPN/Aircove FlashRouter?

TeamFlashRouters · Mar 16, 2022 ·

When is a router reset needed?

A reset of the FlashRouter should only be performed in the following instances:

  • You have exhausted all other troubleshooting methods and cannot access your router settings.
  • Password to access the FlashRouter’s settings are not working.
  • Power light on the router is blinking steadily.
  • Router is not accessible after upgrading the firmware

Reset Router

Asus FlashRouters:

  1. While the router is powered off press and hold the WPS button on the back or side of the router. Power up the router while continuing to hold the WPS. Continue to hold for 15 seconds as the router powers on (note this could be up to 45 seconds on some models before lights flash).
  2. You will see the lights on the router flashing steadily and this is how you know you have reset the router.
  3. Let the router sit for about a minute and then reboot the router.

Aircove, Linksys and Netgear FlashRouters:

  1. While the router is plugged in, find the reset button located on the back of the router. You will need a pin or pencil to hold down the button for 15 seconds.
  2. You will see the lights on the back of the router flash simultaneously and this is how you know you have reset the router.
  3. Let the router sit for about a minute and then reboot the router.

Access Router Settings

1. Connect to the FlashRouter’s network via ethernet cable or wireless.

The wireless network will appear as “Aircove”, “Linksys##”, “Netgear##”, or “Asus” and the password to join the network will be the default wireless password printed on the bottom of the router.

2. Open your web browser and enter expressvpnrouter.com or 192.168.132.1 in the URL.

ExpressVPNrouter.com
192.168.132.1

3. Click Get Started on the ExpressVPN page that is displayed.

ExpressVPN Get Started

4a. If your FlashRouter is wired to the Internet correctly then you will be prompted to enter your ExpressVPN Activation Code found in your ExpressVPN account. Paste that in and click Sign in to ExpressVPN.

ExpressVPN Activation Code

4b. If your FlashRouter is not wired correctly or is not receiving Internet properly make sure you are wired as detailed in the diagram that appears. If you are stuck at this screen we recommend powering off your ISP modem and any other router that the ExpressVPN FlashRouter is wired to and then powering them back up one by one.

Proceed with step “4a” above once the router is receiving Internet and you are prompted to enter the Activation Code.

ExpressVPN Wiring

5. Select if you want to share anonymous crash report data with ExpressVPN to help them improve the firmware for future releases.

ExpressVPN Share Crash Report

6. Set the WiFi name and password your wireless devices will use to connect to the FlashRouter’s network. Make sure the WiFi name is unique and not a duplicate of an existing WiFi name if you change it. You can also leave it as the default information if you like. Click Continue.

ExpressVPN Set WiFi Name and Password

7. Enter the admin password you will use to access the ExpressVPN router settings. Be sure to TYPE CAREFULLY when setting the admin password as a typo will result in needing to reset the router again. Note this password in a secure location or commit it to memory.

ExpressVPN admin password

8. Your ExpressVPN FlashRouter is now fully setup!

ExpressVPN Connected

Primary Sidebar

  • Facebook
  • Twitter
  • Instagram
  • Pinterest
  • YouTube

Footer