• Skip to primary navigation
  • Skip to main content
  • Skip to primary sidebar
  • Skip to footer

FlashRouters Support Portal

Prioritizing Privacy

  • SETUP GUIDES
    • Privacy Hero Router Setup Guide
    • ASUS-WRT Router Setup Guide
    • AsusWRT-Merlin Router Setup Guide
    • DD-WRT Router Setup Guide
    • ExpressVPN Router Setup Guide
    • GL.iNet Router Setup Guide
    • Roqos Core Router Setup Guide
  • TROUBLESHOOTING
    • Router Access
    • WiFi Connectivity
    • Internet Connection Issues
    • General VPN Issues
    • DD-WRT Firmware
    • TeamViewer Remote Support
  • FAQs
    • Router FAQs
    • VPN FAQs
    • Warranty and Returns FAQs
    • Sales FAQs
    • Shipping FAQs
    • Service Plan FAQs
  • Show Search
Hide Search

Search Results for: show me the mon

Surfshark VPN Setup Guide for Privacy Hero

TeamFlashRouters · Sep 23, 2025 ·

Your Privacy Hero NordVPN Router uses cloud-based management, which means you can securely access and adjust your router settings from anywhere, on any device with an internet connection. Whether you’re connected through your phone, another Wi-Fi network, or directly to the Privacy Hero network, setup and management are always within reach.

Follow the steps below to connect your Privacy Hero to Surfshark WireGuard® or OpenVPN servers.

:point_right: Don’t have a Privacy Hero yet? Get your Privacy Hero Router for Surfshark here

Surfshark Wireguard Setup for Privacy Hero (recommended)

1. From any device that has a browser such as a computer, smartphone, or tablet visit app.privacyhero.com.

App.PrivacyHero.com

2. Enter your Privacy Hero account email and password. Click Login.

Privacy Hero Access Settings

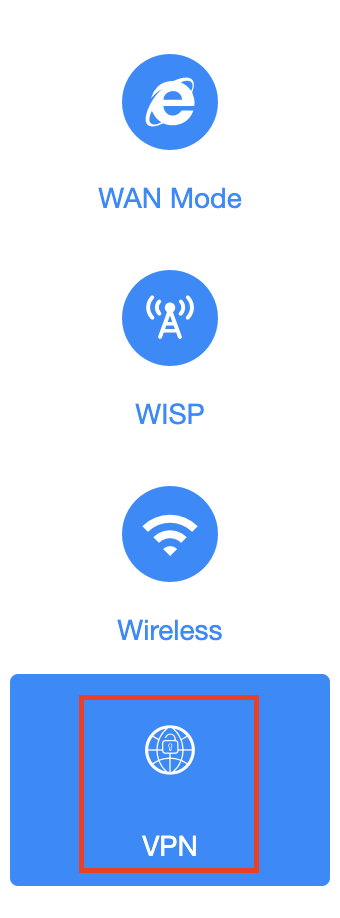
3. Click the VPN symbol.

Privacy Hero Setup VPN

4. Click the Change button and select Custom from the dropdown and choose the Wireguard option.

Privacy Hero Change VPN Providers

5. In a new tab login to your Surfshark account.

6. Navigate to the VPN > Manual Setup tab.

7. Now choose Wireguard and go to the Router section.

8. Now go to Locations, and click on the server location you wish to use. Then, download the server file.

9. Drag and drop or click to Upload the server file into the Custom box on your Privacy Hero settings page. Then press Save.

10. Your Privacy Hero settings should now show a Connected message, indicating you have successfully signed in to your Surfshark VPN server!

Surfshark OpenVPN Setup for Privacy Hero

1. From any device that has a browser such as a computer, smartphone, or tablet visit app.privacyhero.com.

App.PrivacyHero.com

2. Enter your Privacy Hero account email and password. Click Login.

Privacy Hero Access Settings

3. Click the VPN symbol.

Privacy Hero Setup VPN

4. Click the Change button and select Custom from the dropdown and choose the OpenVPN option.

Privacy Hero Change VPN Providers

5. In a new tab login to your Surfshark account.

6. Navigate to the VPN > Manual Setup tab.

7. Now choose OpenVPN and go to the Router section.

8. Now go to Credentials and find your OpenVPN specific Username and Password.

9. Copy and paste the username and password from previous step into the Custom box on your Privacy Hero settings page.

10. Now go back to the Surfshark account page, and press Locations. 

11. Click on the country name that you want to choose, and Download any of the available server files from the list. (We recommend download the UDP version of the server file).

12. Drag and drop or click to Upload the server file into the Custom box on your Privacy Hero settings page. Then press Save.

13. Your Privacy Hero settings should now show a Connected message, indicating you have successfully signed in to your Surfshark VPN server!

Privacy Hero’s cloud based router settings access makes it so you can change settings while not connected to the Privacy Hero network. Visit the Surfshark IP Check to verify your VPN IP address. If it has not changed be sure to double check that you are indeed connected to the Privacy Hero network.

Keep in mind that the VPN connection will not change the location of the streaming services listed in the Streaming Relocation area of the Privacy Hero settings if the Streaming Relocation feature is Enabled.

TROUBLESHOOTING

Still having issues? Visit the VPN Troubleshooting section.

Troubleshoot Here

IPVanish VPN Setup Guide for Privacy Hero

TeamFlashRouters · Sep 23, 2025 ·

Your Privacy Hero router uses Cloud Based router management which means you can access the router settings from anywhere on any device that has an internet connection. You can follow these steps while connected to your phone, other Wi-Fi network, or the Privacy Hero network.

IPVanish Wireguard Setup for Privacy Hero (recommended)

1. From any device that has a browser such as a computer, smartphone, or tablet visit app.privacyhero.com.

App.PrivacyHero.com

2. Enter your Privacy Hero account email and password. Click Login.

Privacy Hero Access Settings

3. Click the VPN symbol.

Privacy Hero Setup VPN

4. Click the Change button and select Custom from the dropdown and choose the Wireguard option.

Privacy Hero Change VPN Providers

5. In a new tab login to your IPVanish account.

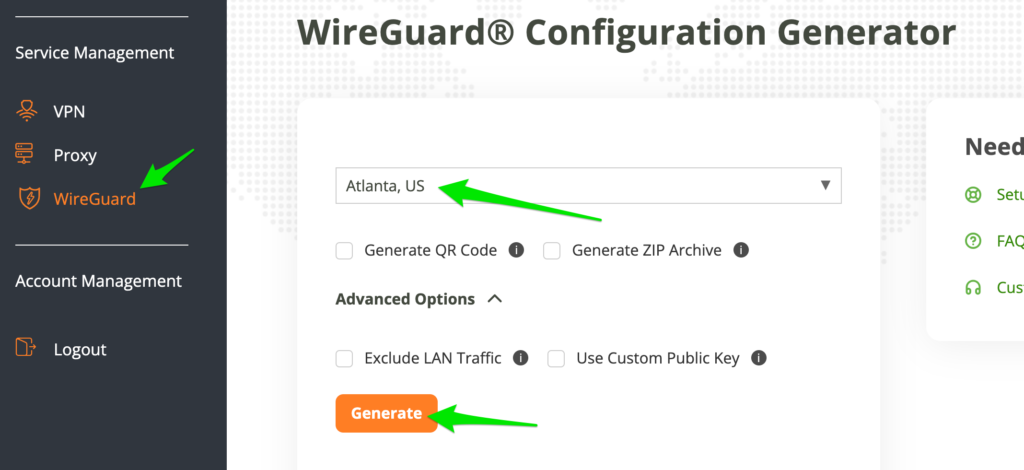
6. Click WireGuard on the left menu to access the WireGuard Configuration Generator.

Then select the server location and click Generate to download the WireGuard configuration file.

7. Drag and drop or click to Upload the server file into the Custom box on your Privacy Hero settings page. Then press Save.

8. Your Privacy Hero settings should now show a Connected message, indicating you have successfully signed in to your IPVanish VPN server!

IPVanish OpenVPN Setup for Privacy Hero

1. From any device that has a browser such as a computer, smartphone, or tablet visit app.privacyhero.com.

App.PrivacyHero.com

2. Enter your Privacy Hero account email and password. Click Login.

Privacy Hero Access Settings

3. Click the VPN symbol.

Privacy Hero Setup VPN

4. Click the Change button and select Custom from the dropdown and choose the OpenVPN option.
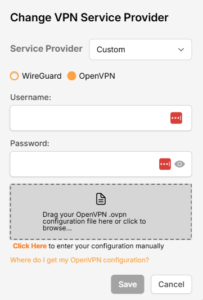
Privacy Hero Change VPN Providers

5. Download an .ovpn file from the IPVanish server list.

6. Drag and drop or click to Upload the server file into the Custom box on your Privacy Hero settings page.

7. Enter your IPVanish account login as the Username and Password. Then press Save.

8. Your Privacy Hero settings should now show a Connected message, indicating you have successfully signed in to your IPVanish VPN server!

Privacy Hero’s cloud based router settings access makes it so you can change settings while not connected to the Privacy Hero network. Visit the IPVanish IP Check to verify your VPN IP address. If it has not changed be sure to double check that you are indeed connected to the Privacy Hero network.

Keep in mind that the VPN connection will not change the location of the streaming services listed in the Streaming Relocation area of the Privacy Hero settings if the Streaming Relocation feature is Enabled.

TROUBLESHOOTING

Still having issues? Visit the VPN Troubleshooting section.

Troubleshoot Here

NordVPN Setup Guide for Privacy Hero

TeamFlashRouters · Apr 3, 2023 ·

Your Privacy Hero NordVPN Router uses cloud-based management, which means you can securely access and adjust your router settings from anywhere, on any device with an internet connection. Whether you’re connected through your phone, another Wi-Fi network, or directly to the Privacy Hero network, setup and management are always within reach.

Follow the steps below to connect your Privacy Hero to NordVPN NordLynx or OpenVPN servers. By default, you’ll automatically connect to the fastest, most reliable server available based on your location. If you prefer, you can also select a specific country server and input it directly into your Privacy Hero for more control.

:point_right: Don’t have a Privacy Hero yet? Get your Privacy Hero NordVPN Router here

NordVPN Nordlynx Setup for Privacy Hero

1. From any device that has a browser such as a computer, smartphone, or tablet visit app.privacyhero.com

App.PrivacyHero.com

2. Enter your Privacy Hero account email and password. Click Login.

Privacy Hero Access Settings

3. Click the VPN symbol.

Privacy Hero Setup VPN

4. Click the Change button and select NordVPN from the dropdown.

Privacy Hero Change VPN Providers

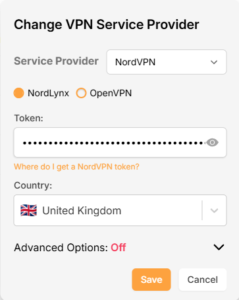
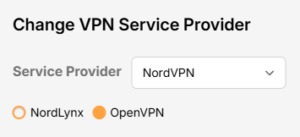
5. Click the Change button and select NordVPN from the dropdown and choose the NordLynx option. Next you will need to obtain your Token.

NordVPN Protocol Privacy Hero

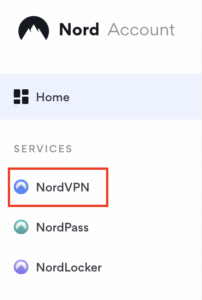
6. In a new tab login to your NordVPN account and select NordVPN from your list of Services.

NordVPN account

7. At the bottom of the page click Get Access token and you will receive a code via email. Enter this code to proceed.

NordVPN Access Token

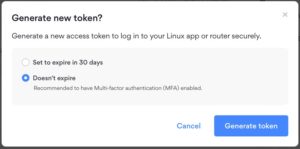
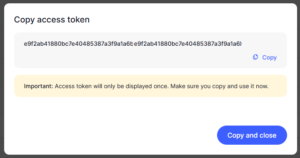
8. After you enter the email code select Generate new token and set it to Doesn’t expire. Copy this token.

NordVPN Generate new token
NordVPN Copy Token

9. Paste the token and then Click Save to connect to the server address recommended by NordVPN within your country.

NordVPN Protocols Privacy Hero

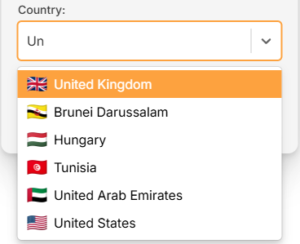
10. To connect to a specific location, click the Country dropdown menu and scroll or type to search from the available options. Choose your preferred country and you will automatically connect to the recommended server within that country at the time. Then click Save.

Nordlynx VPN Country Selection Privacy Hero

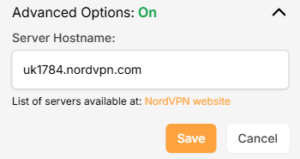
11. If you prefer to enter a specific server address number click Advanced Options and then type in the NordVPN server you would like to use as shown below e.g. uk1784.nordvpn.com. Then click Save.

Nordlynx Advanced Privacy Hero

Use the NordVPN’s server recommendation tool to select a specific country and receive a recommendation for the fastest server based on your actual location. You can then enter that server in the Privacy Hero settings manually.

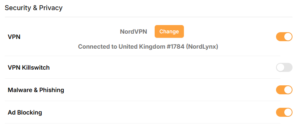
12. Your Privacy Hero settings should now show a Connected message, indicating you have successfully signed in to your NordVPN NordLynx VPN server!

Privacy Hero Nordlynx Connected

NordVPN OpenVPN Setup for Privacy Hero

1. From any device that has a browser such as a computer, smartphone, or tablet visit app.privacyhero.com

App.PrivacyHero.com

2. Enter your Privacy Hero account email and password. Click Login.

Privacy Hero Access Settings

3. Click the VPN symbol.

Privacy Hero Setup VPN

4. Click the Change button and select NordVPN from the dropdown.

Privacy Hero Change VPN Providers

5. Choose the OpenVPN option to connect to OpenVPN servers or to setup a NordVPN Dedicated IP address. Next you will need to obtain your Manual Service credentials.

NordVPN Protocol Privacy Hero

6. In a new tab login to your NordVPN account and select NordVPN from your list of Services.

NordVPN login
NordVPN account

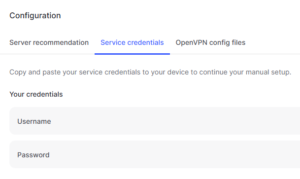
7. At the bottom of the page in the Manual Setup section click Setup NordVPN manually then under the Configuration section go to Service credentials. Click Verify email to receive a code via email and enter the code to view and copy your credentials.

NordVPN Manual OpenVPN
NordVPN Service Credentials

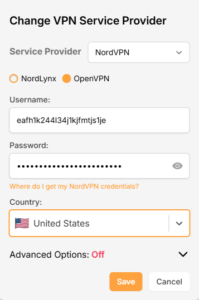
8. Enter these credentials into the OpenVPN Username and Password sections in your Privacy Hero and Click Save if you want to connect to the server address recommended by NordVPN within your country.

NordVPN OpenVPN Privacy Hero

9. To connect to a specific location, click the Country dropdown menu and scroll or type to search from the available options. Choose your preferred country and you will automatically connect to the recommended server within that country at the time. Then click Save.

Nordlynx VPN Country Selection Privacy Hero

10. To connect with a NordVPN Dedicated IP Address or if you prefer to enter a specific server address number click Advanced Options and then type in the NordVPN server you would like to use as shown below e.g. uk1784.nordvpn.com. Then click Save.

Nordlynx Advanced Privacy Hero

Use the NordVPN’s server recommendation tool to select a specific country and receive a recommendation for the fastest server based on your actual location. You can then enter that server in the Privacy Hero settings manually.

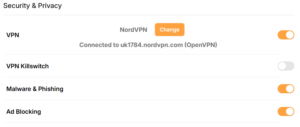
11. Your Privacy Hero settings should now show a Connected message, indicating you have successfully signed in to your NordVPN Dedicated IP address or preferred OpenVPN server!

NordVPN OpenVPN Connected Privacy Hero

Privacy Hero’s cloud based router settings access makes it so you can change settings while not connected to the Privacy Hero network. Visit the NordVPN IP Check to verify your VPN IP address. If it has not changed be sure to double check that you are indeed connected to the Privacy Hero network.

Keep in mind that the VPN connection will not change the location of the streaming services listed in the Streaming Relocation area of the Privacy Hero settings if the Streaming Relocation feature is Enabled.

Still having issues?

Feel free to submit a ticket and we will get back to you as soon as possible.

Private Internet Access VPN Setup Guide for Privacy Hero

TeamFlashRouters · Apr 3, 2023 ·

Your Privacy Hero router uses Cloud Based router management which means you can access the router settings from anywhere on any device that has an internet connection. You can follow these steps while connected to your phone, other Wi-Fi network, or the Privacy Hero network

Private Internet Access (PIA) Wireguard Setup for Privacy Hero (recommended)

1. From any device that has a browser such as a computer, smartphone, or tablet visit app.privacyhero.com.

App.PrivacyHero.com

2. Enter your Privacy Hero account email and password. Click Login.

Privacy Hero Access Settings

3. Click the VPN symbol.

Privacy Hero Setup VPN

4. Click the Change button and select Private Internet Access from the dropdown.

Privacy Hero Change VPN Providers

5. Enter your correct PIA account login username and password and click Save.

Privacy Hero select Private Internet Access
Privacy Hero Private Internet Access enter login

6. Click Save if you want to automatically connect to the ideal server location as recommended by Private Internet Access.

Or, connect to a specific server location click Advanced Options and then type in the PIA server name you would like to use. (All server names are noted below).

Then click Save.

Privacy Hero Private Internet Access enter VPN location

North America

bahamas.privacy.network
ca-ontario.privacy.network
ca-toronto.privacy.network
ca-vancouver.privacy.network
ca-montreal.privacy.network
greenland.privacy.network
gt-guatemala-pf.privacy.network
mexico.privacy.network
panama.privacy.network
sanjose.privacy.network
us-alabama-pf.privacy.network
us-alaska-pf.privacy.network
us-arkansas-pf.privacy.network
us-atlanta.privacy.network
us-california.privacy.network
us-chicago.privacy.network
us-connecticut-pf.privacy.network
us-denver.privacy.network
us-florida.privacy.network
us-houston.privacy.network
us-idaho-pf.privacy.network
us-indiana-pf.privacy.network
us-iowa-pf.privacy.network
us-kansas-pf.privacy.network
us-kentucky-pf.privacy.network
us-lasvegas.privacy.network
us-louisiana-pf.privacy.network
us-maine-pf.privacy.network
us-massachusetts-pf.privacy.network
us-michigan-pf.privacy.network
us-minnesota-pf.privacy.network
us-mississippi-pf.privacy.network
us-missouri-pf.privacy.network
us-montana-pf.privacy.network
us-nebraska-pf.privacy.network
us-new-hampshire-pf.privacy.network
us-new-mexico-pf.privacy.network
us-newyorkcity.privacy.network
us-north-carolina-pf.privacy.network
us-north-dakota-pf.privacy.network
us-ohio-pf.privacy.network
us-oklahoma-pf.privacy.network
us-oregon-pf.privacy.network
us-pennsylvania-pf.privacy.network
us-rhode-island-pf.privacy.network
us-seattle.privacy.network
us-siliconvalley.privacy.network
us-south-carolina-pf.privacy.network
us-south-dakota-pf.privacy.network
us-texas.privacy.network
us-tennessee-pf.privacy.network
us-vermont-pf.privacy.network
us-virginia-pf.privacy.network
us-washingtondc.privacy.network
us-west-virginia-pf.privacy.network
us-wisconsin-pf.privacy.network
us-wyoming-pf.privacy.network
us3.privacy.network
us-baltimore.privacy.network
us-honolulu.privacy.network
us-newjersey.privacy.network
us-saltlakecity.privacy.network
us-streaming-2.privacy.network
us-streaming.privacy.network
us-wilmington.privacy.network

South America

ar.privacy.network
bo-bolivia-pf.privacy.network
bogota.privacy.network
br.privacy.network
ec-ecuador-pf.privacy.network
pe-peru-pf.privacy.network
santiago.privacy.network
uy-uruguay-pf.privacy.network
venezuela.privacy.network

Europe

al.privacy.network
ad.privacy.network
austria.privacy.network
brussels.privacy.network
ba.privacy.network
sofia.privacy.network
zagreb.privacy.network
czech.privacy.network
de-berlin.privacy.network
de-frankfurt.privacy.network
denmark.privacy.network
denmark-2.privacy.network
spain.privacy.network
es-valencia.privacy.network
ee.privacy.network
fi.privacy.network
fi-2.privacy.network
france.privacy.network
gr.privacy.network
hungary.privacy.network
italy.privacy.network
italy-2.privacy.network
is.privacy.network
ireland.privacy.network
man.privacy.network
lv.privacy.network
liechtenstein.privacy.network
lt.privacy.network
lu.privacy.network
malta.privacy.network
md.privacy.network
monaco.privacy.network
montenegro.privacy.network
nl-amsterdam.privacy.network
mk.privacy.network
no.privacy.network
poland.privacy.network
pt.privacy.network
ro.privacy.network
sweden.privacy.network
sweden-2.privacy.network
rs.privacy.network
sk.privacy.network
slovenia.privacy.network
swiss.privacy.network
tr.privacy.network
uk-london.privacy.network
uk-manchester.privacy.network
uk-southampton.privacy.network
uk-2.privacy.network
ua.privacy.network

Asia

ae.privacy.network
bangladesh.privacy.network
cambodia.privacy.network
china.privacy.network
cyprus.privacy.network
georgia.privacy.network
hk.privacy.network
in.privacy.network
israel.privacy.network
jakarta.privacy.network
japan.privacy.network
japan-2.privacy.network
kazakhstan.privacy.network
kr-south-korea-pf.privacy.network
kualalumpur.privacy.network
macau.privacy.network
mongolia.privacy.network
np-nepal-pf.privacy.network
philippines.privacy.network
qatar.privacy.network
saudiarabia.privacy.network
sg.privacy.network
srilanka.privacy.network
taiwan.privacy.network
vietnam.privacy.network
yerevan.privacy.network

Oceania

au-adelaide-pf.privacy.network
au-australia-so.privacy.network
au-brisbane-pf.privacy.network
aus-melbourne.privacy.network
aus-perth.privacy.network
au-sydney.privacy.network
nz.privacy.network

Africa

dz.privacy.network
egypt.privacy.network
morocco.privacy.network
nigeria.privacy.network
za.privacy.network

8. Your Privacy Hero settings should now show a Connected message, indicating you have successfully signed in to your PIA VPN server!

Private Internet Access (PIA) OpenVPN Setup for Privacy Hero

1. From any device that has a browser such as a computer, smartphone, or tablet visit app.privacyhero.com.

App.PrivacyHero.com

2. Enter your Privacy Hero account email and password. Click Login.

Privacy Hero Access Settings

3. Click the VPN symbol.

Privacy Hero Setup VPN

4. Click the Change button and select Custom from the dropdown and choose the OpenVPN option.

5. Enter your PIA Account login as the Username and Password.

6. Now log in to your PIA Account page.

7. Go to the Downloads section.

8. Scroll down to the bottom of the page, and go to OpenVPN Configuration Generator.

9. Choose OpenVPN 2.4 or newer and Linux.

10. From the Select Port section, choose UDP/1198 AES-128-CBC for a faster connection or choose UDP/1197 AES-256-CBC for stronger security as shown in the image below then Click Generate to download the server configuration file.

11. Drag and drop or click to Upload the server file into the Custom box on your Privacy Hero settings page then click Save.

12. Your Privacy Hero settings should now show a Connected message, indicating you have successfully signed in to your PIA VPN server!

Privacy Hero’s cloud based router settings access makes it so you can change settings while not connected to the Privacy Hero network. Visit the Private Internet Access IP Check to verify your VPN IP address. If it has not changed be sure to double check that you are indeed connected to the Privacy Hero network.

Keep in mind that the VPN connection will not change the location of the streaming services listed in the Streaming Relocation area of the Privacy Hero settings.

TROUBLESHOOTING

Still having issues? Visit the VPN Troubleshooting section.

Troubleshoot Here

ProtonVPN Setup Guide for Privacy Hero

TeamFlashRouters · Sep 17, 2025 ·

Your Privacy Hero router uses Cloud Based router management which means you can access the router settings from anywhere on any device that has an internet connection. You can follow these steps while connected to your phone, other Wi-Fi network, or the Privacy Hero network.

ProtonVPN Wireguard Setup for Privacy Hero (recommended)

1. From any device that has a browser such as a computer, smartphone, or tablet visit app.privacyhero.com.

App.PrivacyHero.com

2. Enter your Privacy Hero account email and password. Click Login.

Privacy Hero Access Settings

3. Click the VPN symbol.

Privacy Hero Setup VPN

4. Click the Change button and select Custom from the dropdown and choose the Wireguard option.

Privacy Hero Change VPN Providers

5. In a new tab login to your ProtonVPN account.

6. Go to the Downloads section of your ProtonVPN account page.

7. Scroll down to find the WireGuard configuration section. Name your configuration and then select Router as the platform, and select Standard server configs.

8. Click on the country name that you want to choose, and Download any of the available server files from the list.

9. Drag and drop or click to Upload the server file into the Custom box on your Privacy Hero settings page. Then press Save.

10. Your Privacy Hero settings should now show a Connected message, indicating you have successfully signed in to your ProtonVPN server!

Wireguard connection

ProtonVPN OpenVPN Setup for Privacy Hero

1. From any device that has a browser such as a computer, smartphone, or tablet visit app.privacyhero.com.

App.PrivacyHero.com

2. Enter your Privacy Hero account email and password. Click Login.

Privacy Hero Access Settings

3. Click the VPN symbol.

Privacy Hero Setup VPN

4. Click the Change button and select Custom from the dropdown and choose the OpenVPN option.

Privacy Hero Change VPN Providers

5. In a new tab login to your ProtonVPN account.

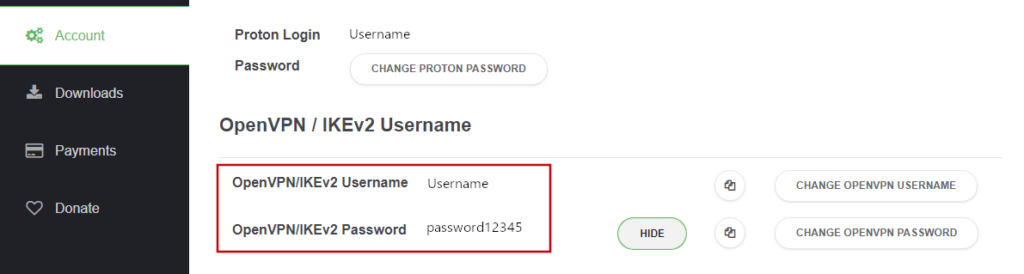
6. Navigate to the Account tab and find your OpenVPN specific Username and Password.
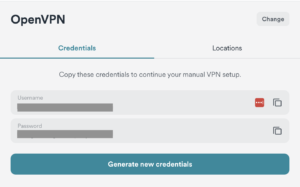
FlashRouters DD-WRT Privacy APP ProtonVPN OpenVPN Specific Username and Password

7. Copy and paste the username and password from previous step into the Custom box on your Privacy Hero settings page.

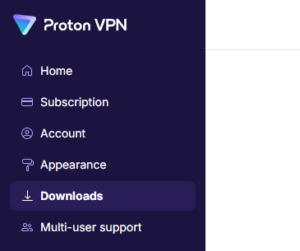
8. Go to the Downloads section of your ProtonVPN account page.

9. Scroll down to find the OpenVPN Configuration Files section. Then select “Router” as the platform, and select “Standard Server Configs.”

10. Click on the country name that you want to choose, and Download any of the available server files from the list.

11. Drag and drop or click to Upload the server file into the Custom box on your Privacy Hero settings page. Then press Save.

12. Your Privacy Hero settings should now show a Connected message, indicating you have successfully signed in to your ProtonVPN server!

Privacy Hero’s cloud based router settings access makes it so you can change settings while not connected to the Privacy Hero network. Visit the ProtonVPN IP Check to verify your VPN IP address. If it has not changed be sure to double check that you are indeed connected to the Privacy Hero network.

Keep in mind that the VPN connection will not change the location of the streaming services listed in the Streaming Relocation area of the Privacy Hero settings if the Streaming Relocation feature is Enabled.
TROUBLESHOOTING

Still having issues? Contact our Support Team.

Troubleshoot Here

NordVPN Merlin OpenVPN Setup

TeamFlashRouters · Jan 11, 2023 ·

Preparing for NordVPN Merlin Setup

Obtain your NordVPN manual Username and Password

If you are not already an NordVPN user Sign Up Now.

1. Log in to your account on the NordVPN website.

NordVPN login

2. Click NordVPN on the left hand side and then click Setup NordVPN manually.

NordVPN setup manually

3. Enter in the verification code that was sent to your email.

NordVPN verify code

4. Copy and paste your NordVPN manual username and password to a secure location. This is the username and password you will enter into the router settings to connect to NordVPN.

NordVPN credentials

Download your NordVPN .ovpn file

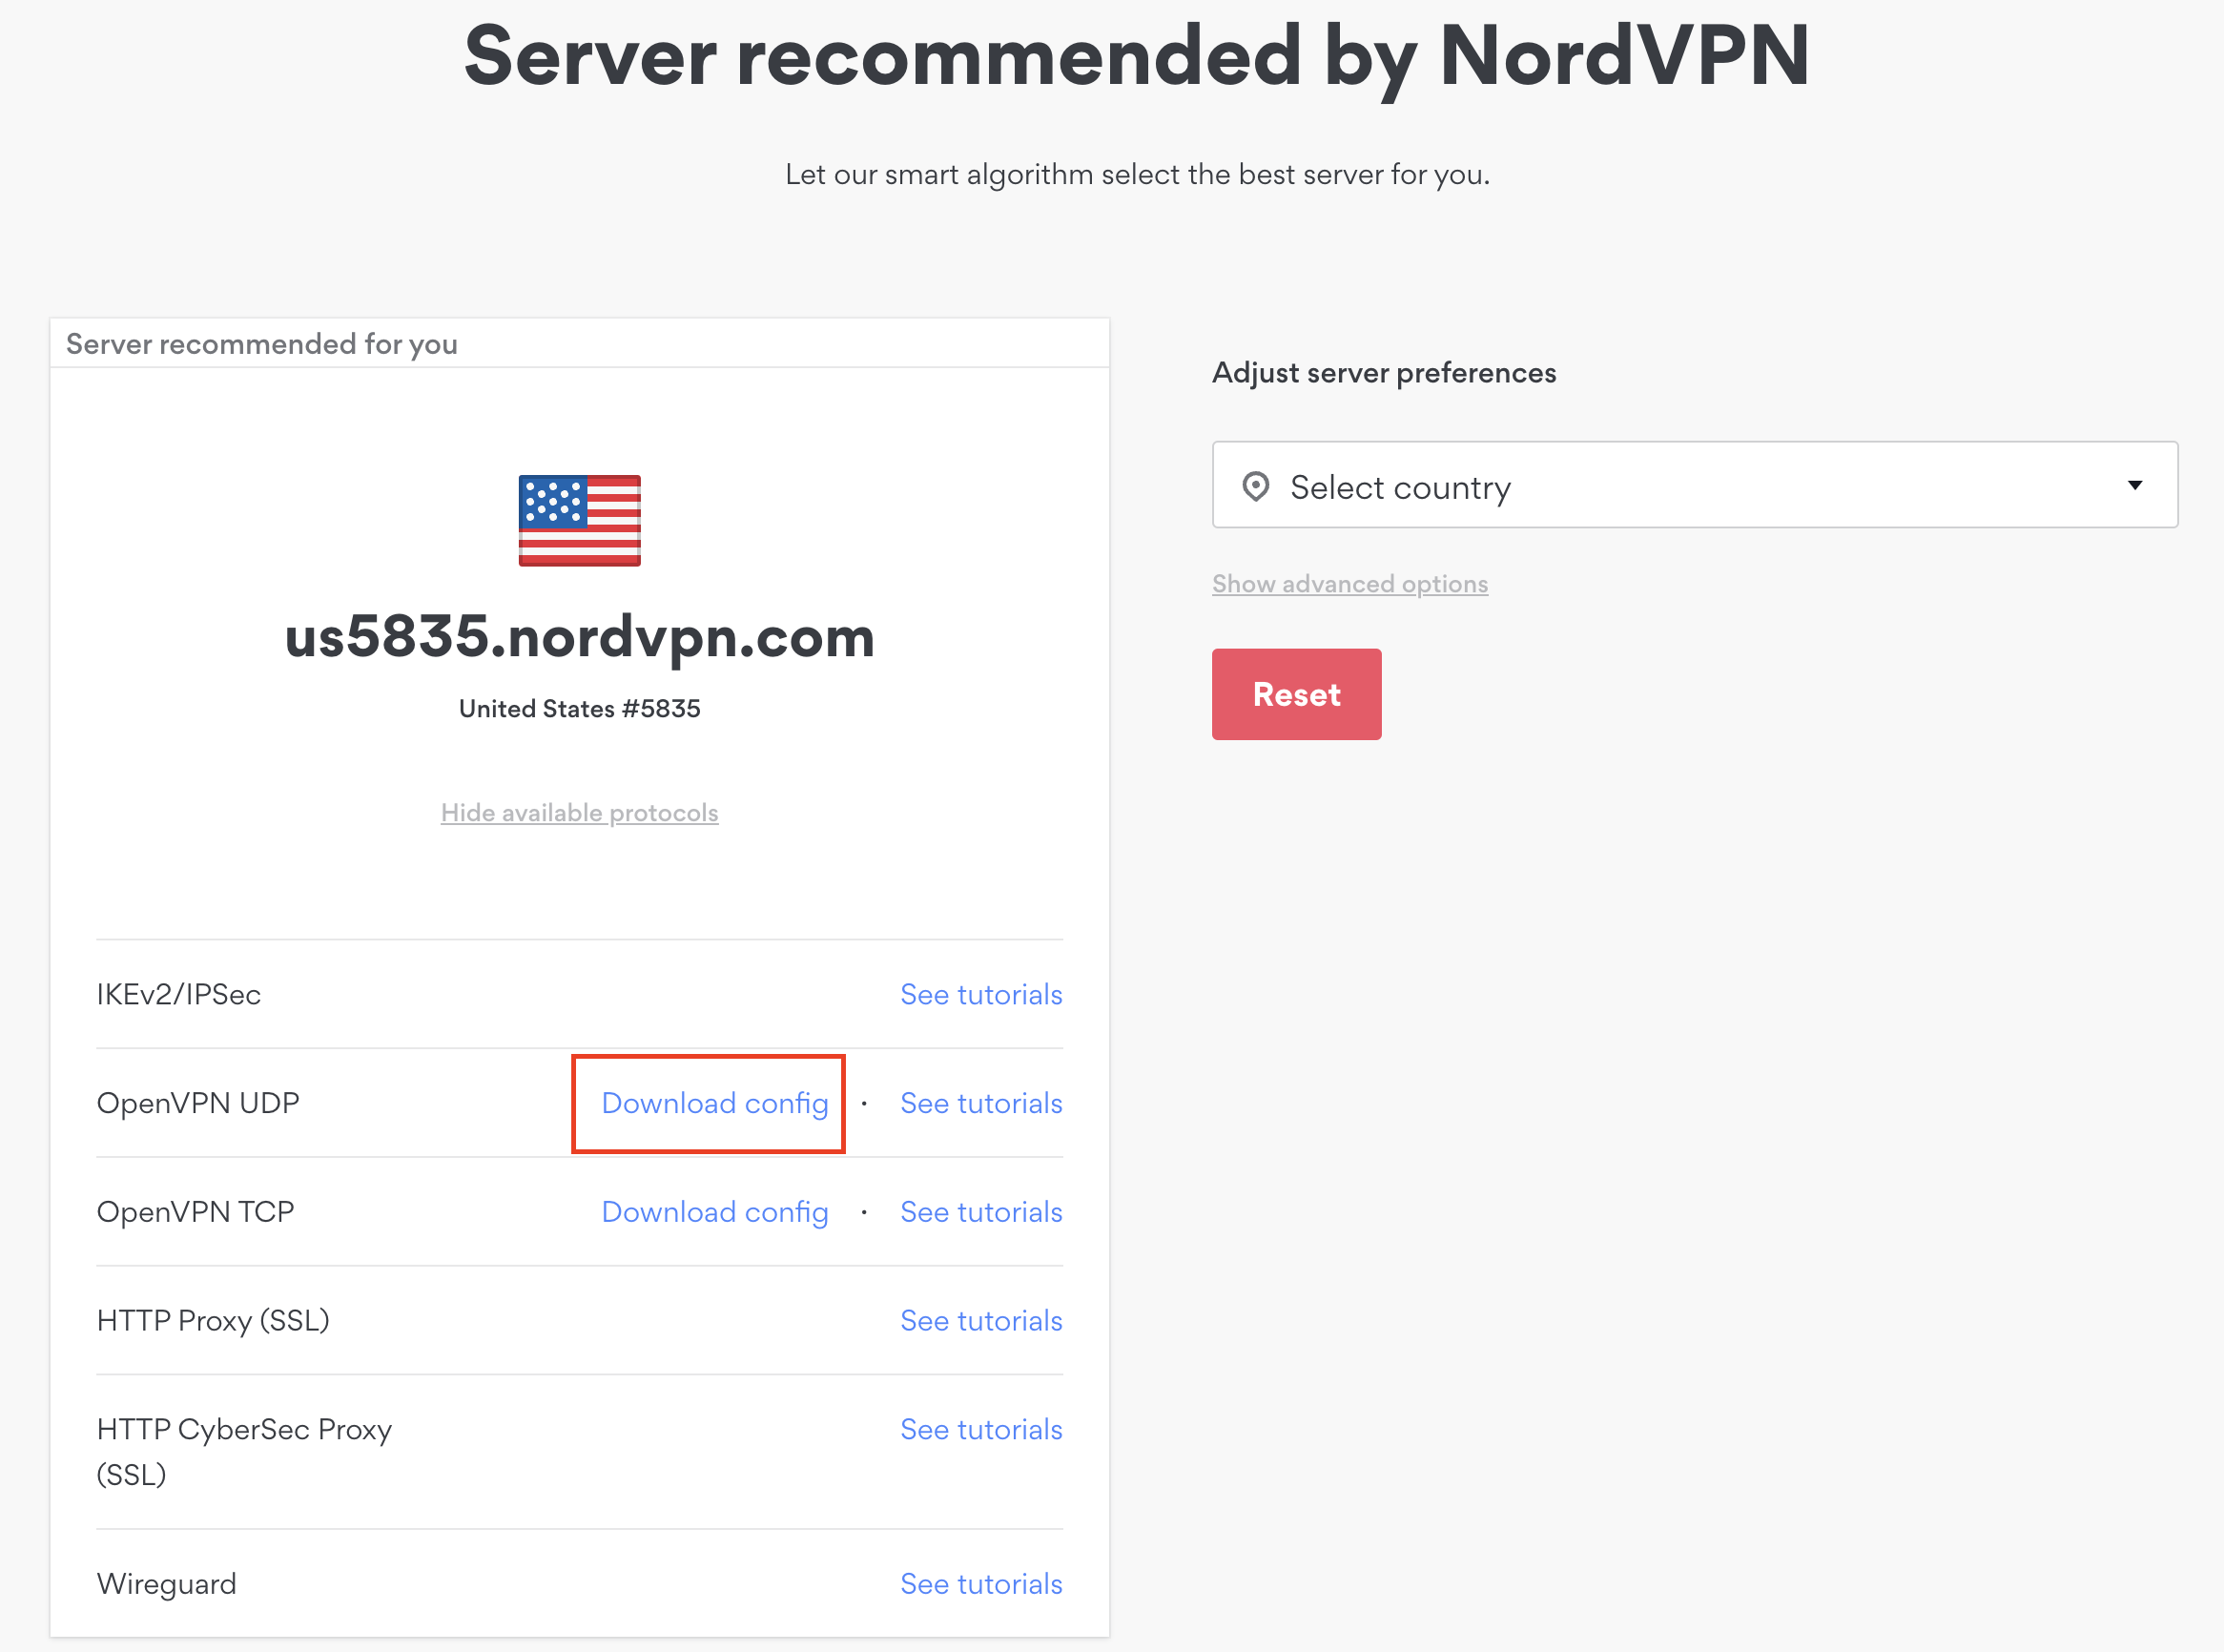
1. There are two options for obtaining the .ovpn file. The first and recommended is to navigate to NordVPN’s server recommendation page. Click Recommended Server to display the fastest server based on your actual location. You can adjust the country if you don’t want to connect to the recommended country.

Then click Show Available Protocols. Click Download Config next to OpenVPN UDP. This will download the .ovpn file to your computer for this server. Do not open this file.

NordVPN Recommended Server

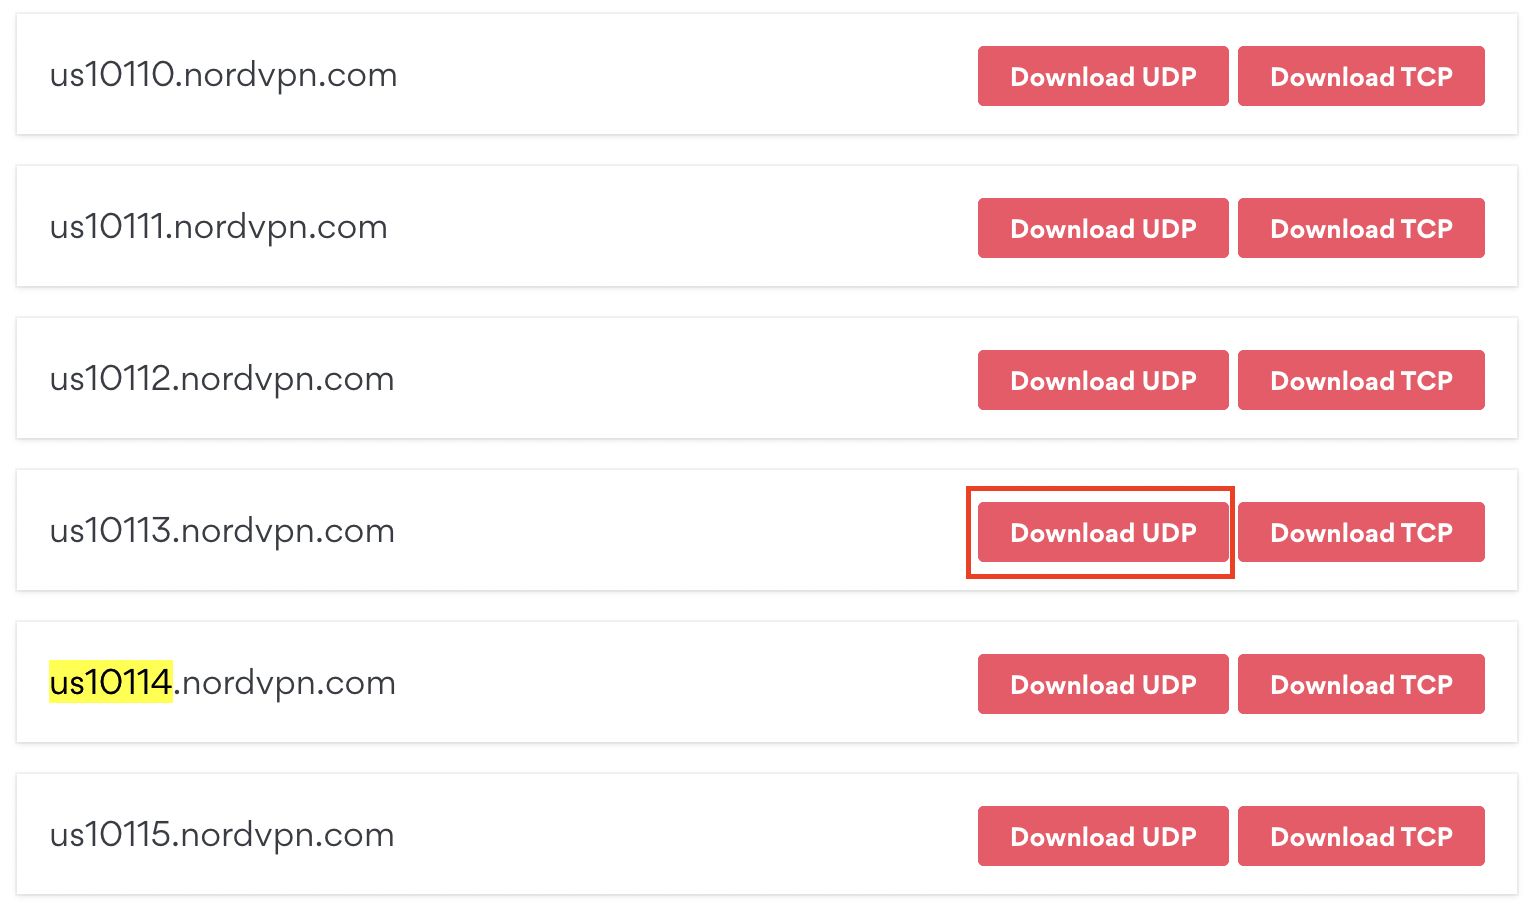
The second method to obtain a server is for connecting to a specific server number that you know you want to use. This applies to NordVPN Dedicated IP servers if you are signed up for that service. Go to NordVPN’s .ovpn file page. Then search for the server number that you want to use and click Download UDP.

NordVPN Download Specific Server

Merlin Router Setup for NordVPN

Login to Asus Merlin firmware settings in a browser on any computer or smart device connected to the Merlin FlashRouter’s network.

1. Navigate to the VPN tab.

Merlin VPN Tab

2. Navigate to the VPN Client tab.

Merlin VPN Client Tab

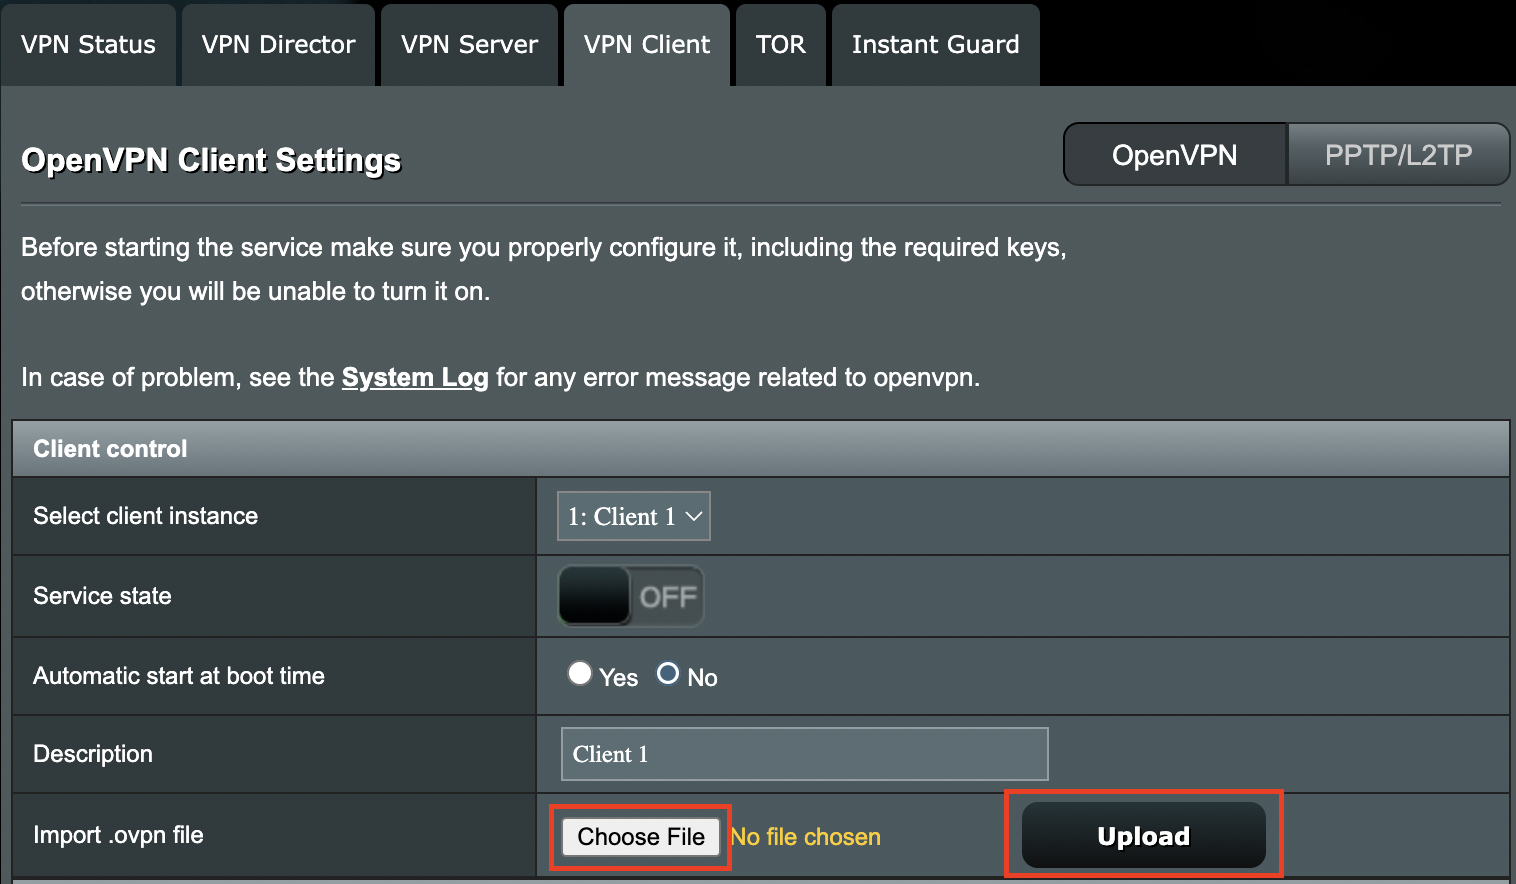
3. Click Choose file and select the .ovpn file you downloaded earlier. Then click Upload.

Merlin Choose File Upload

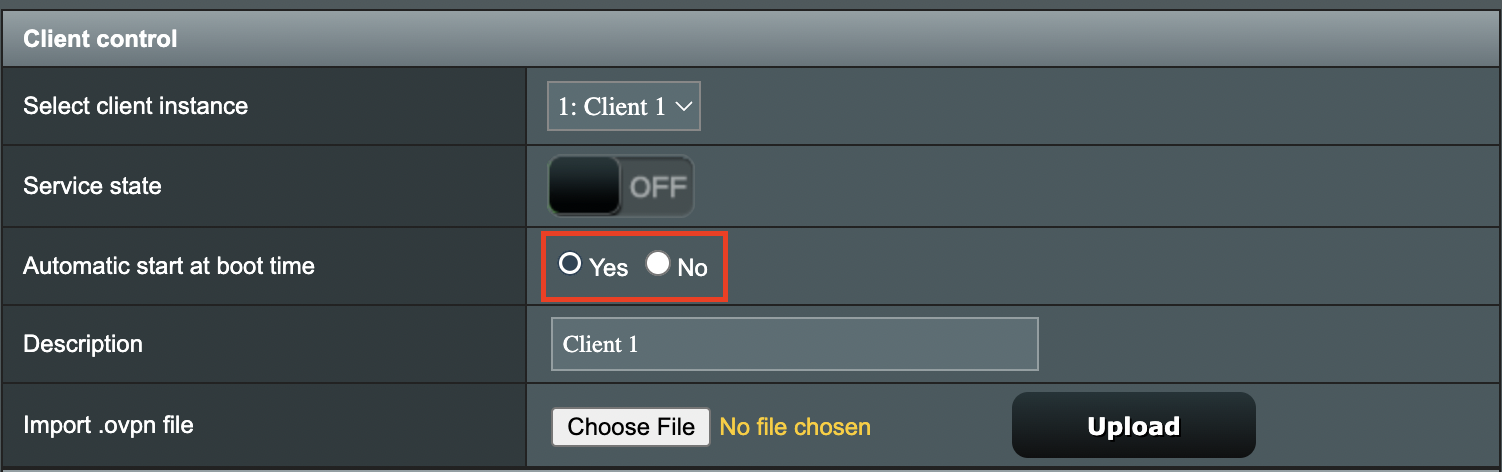
4. Set Automatic Start at boot time to Yes if you want the VPN connection to begin automatically when the router is powered off and back on.

Merlin Automatic Start at boot time

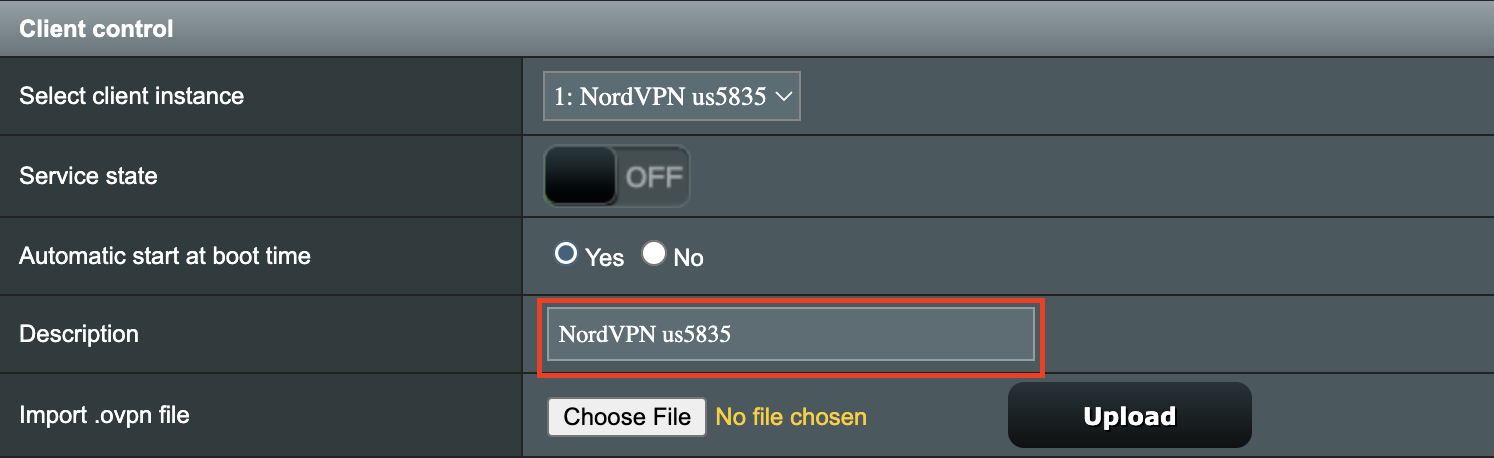
5. In the Description field enter in the name you’d like to use for this OpenVPN Client profile. We typically advise entering in the location or server number here. Our example server was in us5835.nordvpn.com so I have entered in NordVPN us5835.

Merlin NordVPN Description

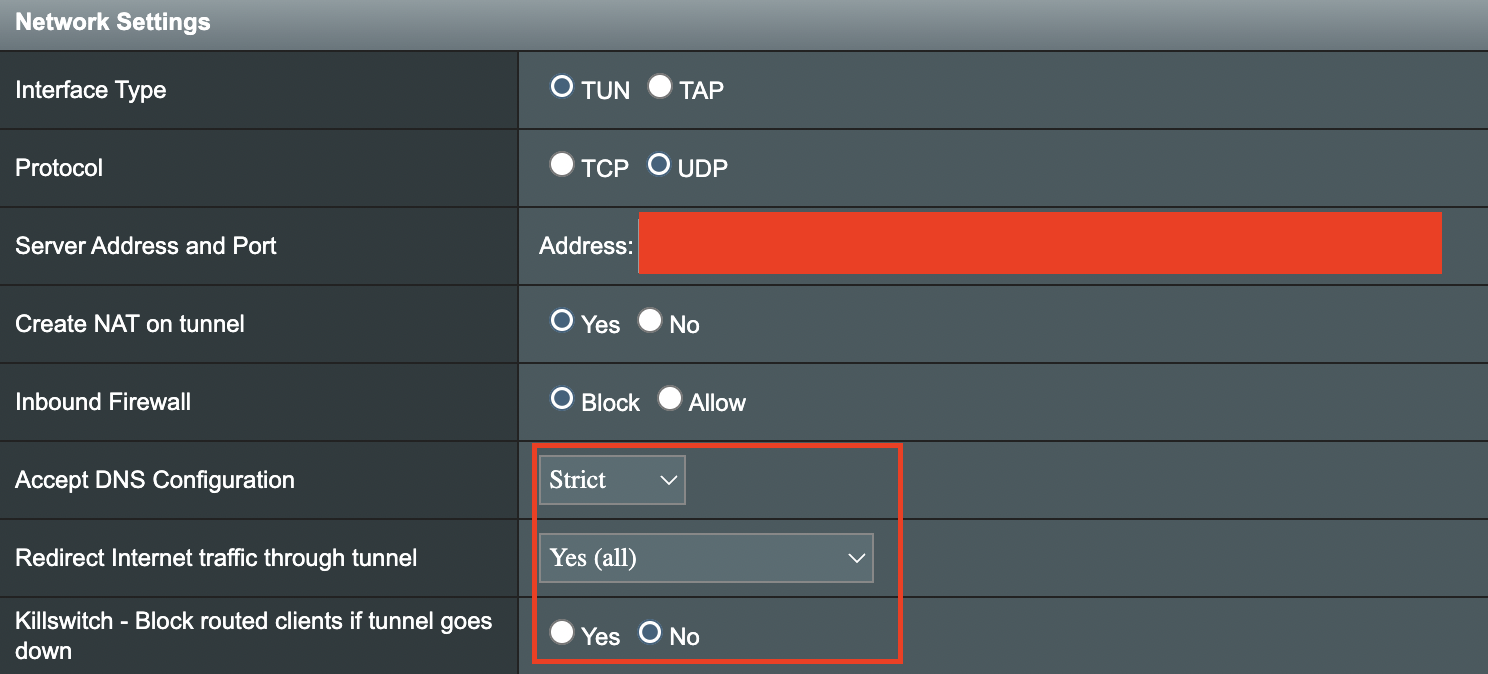
6. Set Accept DNS Configuration to Strict. Set Redirect Internet traffic through tunnel to Yes (all). Set Kill Switch to Yes or No depending on if you want the Internet to be killed if the VPN connection drops.

Merlin Accept DNS configuration Redirect Internet and Kill Switch

If you only want certain devices to connect to the OpenVPN Client profile you are setting up instead of all the devices connected to the FlashRouter’s network please set the Redirect Internet traffic through tunnel to VPN Director. Then complete the instructions on this page and then view our VPN Director guide.

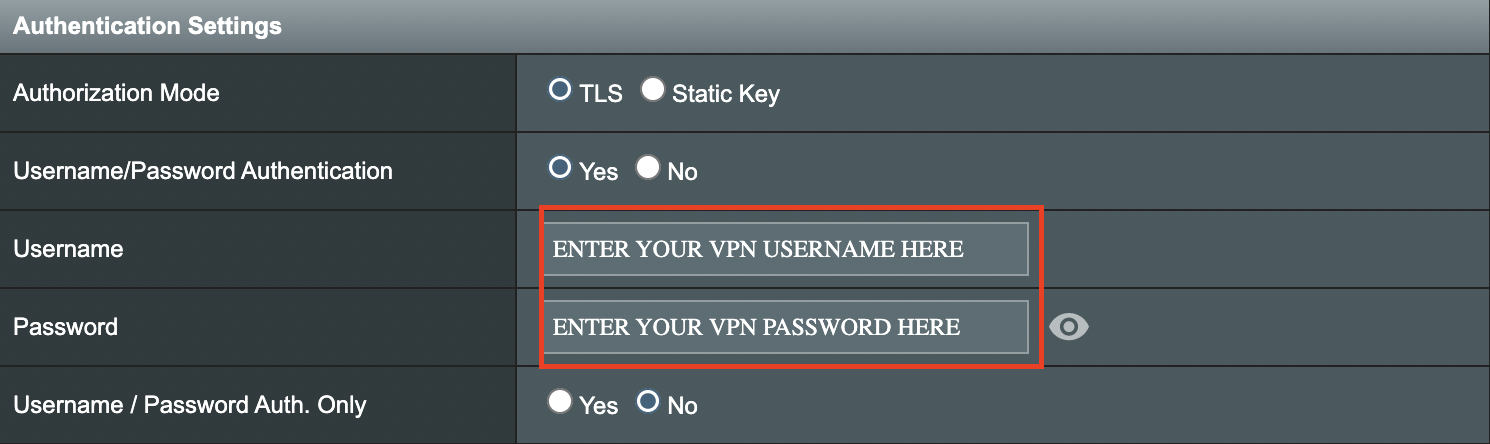
7. Enter your NordVPN username and password that you obtained earlier in the Username and Password. Note that these are different from your NordVPN email login and password.

Merlin VPN Username and Password

8. Click Apply at the bottom of the page.

9. At the top of the page set the Service State toggle to ON to activate the VPN connection.

Merlin Service State All Providers

Verify a successful NordVPN connection

  1. You should now see a CONNECTED message.
  2. Visit NordVPN’s IP Check to verify your new IP address and virtual location.

In some cases you may notice that the location is not showing the same location as the server you have input in your router settings; this is because geo tracking tools are often tricked by VPN connections. As long as you see an IP address that is not the same as your normal Internet IP address then you are indeed connected to NordVPN.

How to change the NordVPN server

  1. Follow the steps at the top of the page to obtain a new .ovpn file.
  2. Then proceed with the settings same as initial setup.

TROUBLESHOOTING

Still having issues? Visit the VPN Troubleshooting section.

Troubleshoot Here

What do the lights on my Roqos Core mean?

TeamFlashRouters · Mar 3, 2022 ·

  1. White (looks blueish white on Teal colored Roqos Cores): System startup
  2. Solid Red: System is up, but there is no internet connection. Roqos Core cannot detect a network link either.
  3. Flashing Red: System is up and there is an ethernet cable connected to Internet port, however Roqos Core is unable to reach the internet. Usually happens with bad ethernet cable, or cable modem/ISP modem not giving IP address to Roqos Core due to ISP provisioning issues, or some other type of network setting blocking Roqos Core’s access to the internet. First thing to try in this scenario is to reboot the ISP router/modem upstream of Roqos Core.
  4. Flashing Blue: Roqos Core is up and connected to the internet, but it is not yet activated. Brand new Roqos Cores, or Roqos Cores that are factory reset will show this behavior when they are ready to be activated again.
  5. Blue (deep blue color, different from #1): Roqos Core is up and activated, everything is normal.

NordVPN Asus AX1800S OpenVPN Setup

TeamFlashRouters · Feb 26, 2024 ·

Preparing for NordVPN Asus AX1800S Setup

Obtain your NordVPN manual Username and Password

If you are not already an NordVPN user Sign Up Now.

1. Log in to your account on the NordVPN website.

NordVPN login

2. Click NordVPN on the left hand side and then click Setup NordVPN manually.

NordVPN setup manually

3. Enter in the verification code that was sent to your email.

NordVPN verify code

4. Copy and paste your NordVPN manual username and password to a secure location. This is the username and password you will enter into the router settings to connect to NordVPN.

NordVPN credentials

Download your NordVPN .ovpn file

1. There are two options for obtaining the .ovpn file. The first and recommended is to navigate to NordVPN’s server recommendation page. Click Recommended Server to display the fastest server based on your actual location. You can adjust the country if you don’t want to connect to the recommended country.

Then click Show Available Protocols. Click Download Config next to OpenVPN UDP. This will download the .ovpn file to your computer for this server. Do not open this file.

NordVPN Recommended Server

The second method to obtain a server is for connecting to a specific server number that you know you want to use. This applies to NordVPN Dedicated IP servers if you are signed up for that service. Go to NordVPN’s .ovpn file page. Then search for the server number that you want to use and click Download UDP.

NordVPN Download Specific Server

Asus AX1800S Router Setup for NordVPN

Login to Asus firmware settings in a browser on any computer or smart device connected to the FlashRouter’s network.

1. Navigate to the VPN tab.

Merlin VPN Tab

2. Navigate to the VPN Client tab.

Asus AX1800S VPN Settings

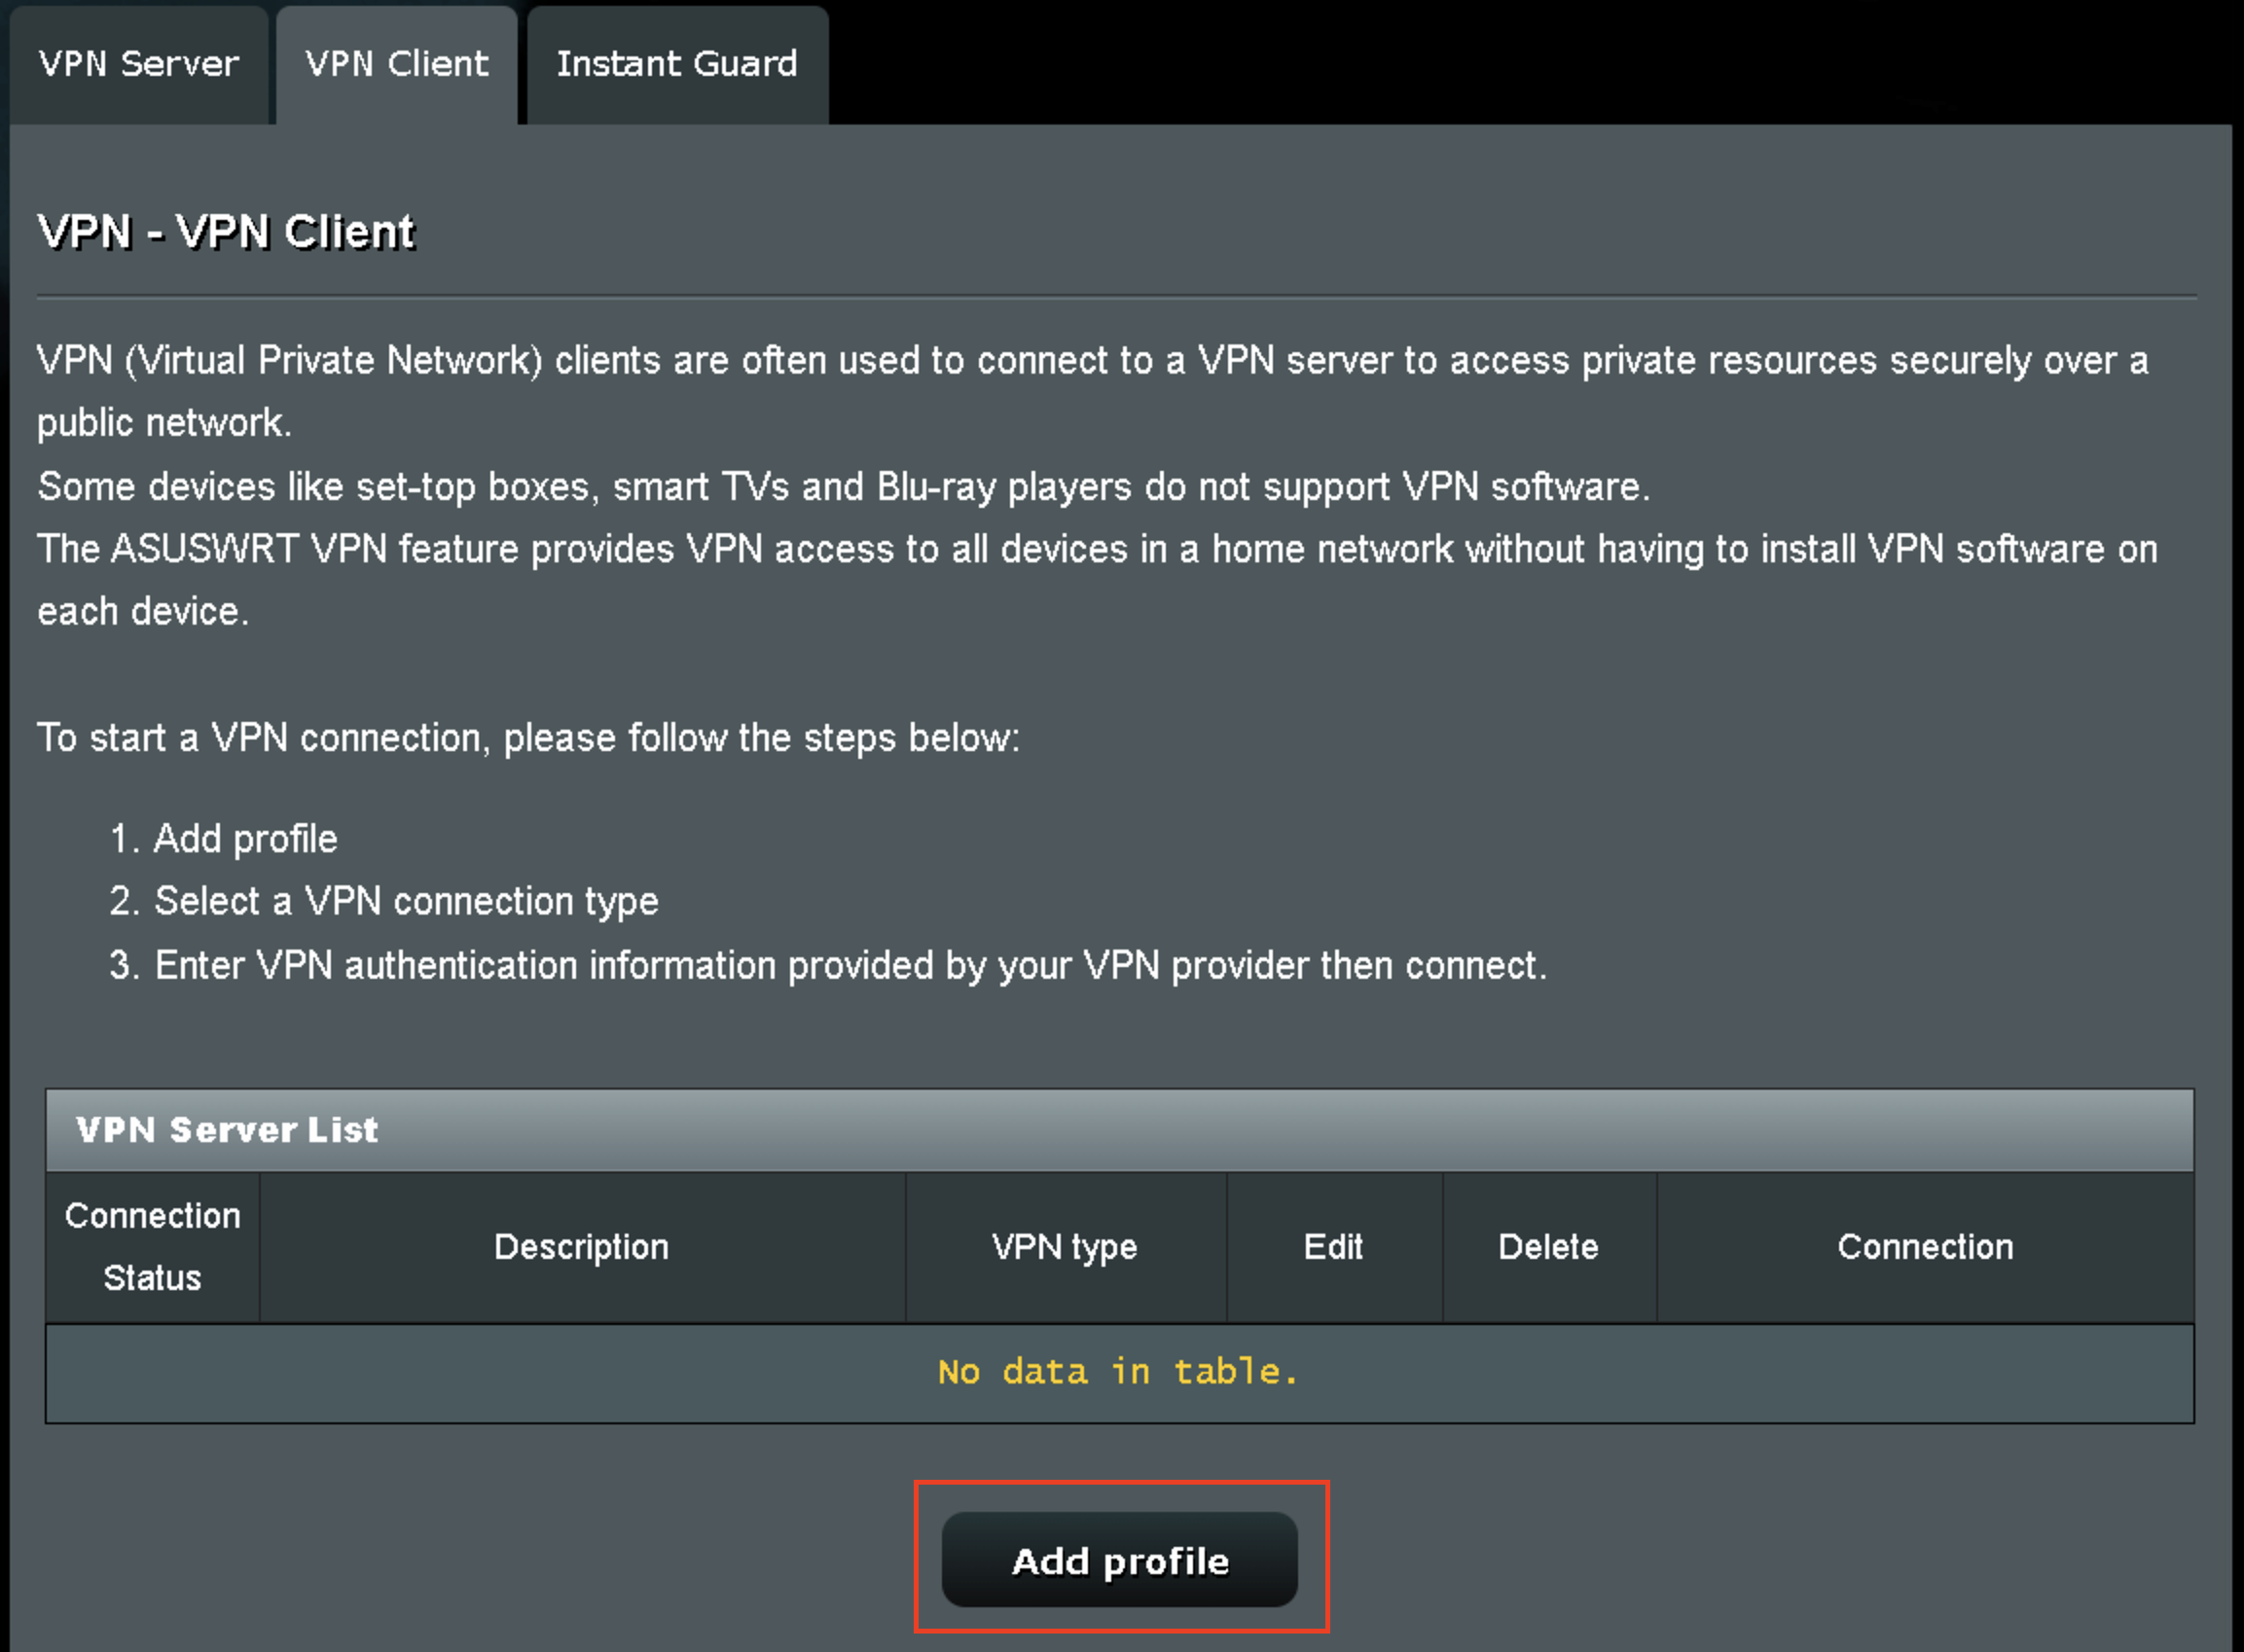
3. Click Add Profile.

Asus AX1800S VPN Settings

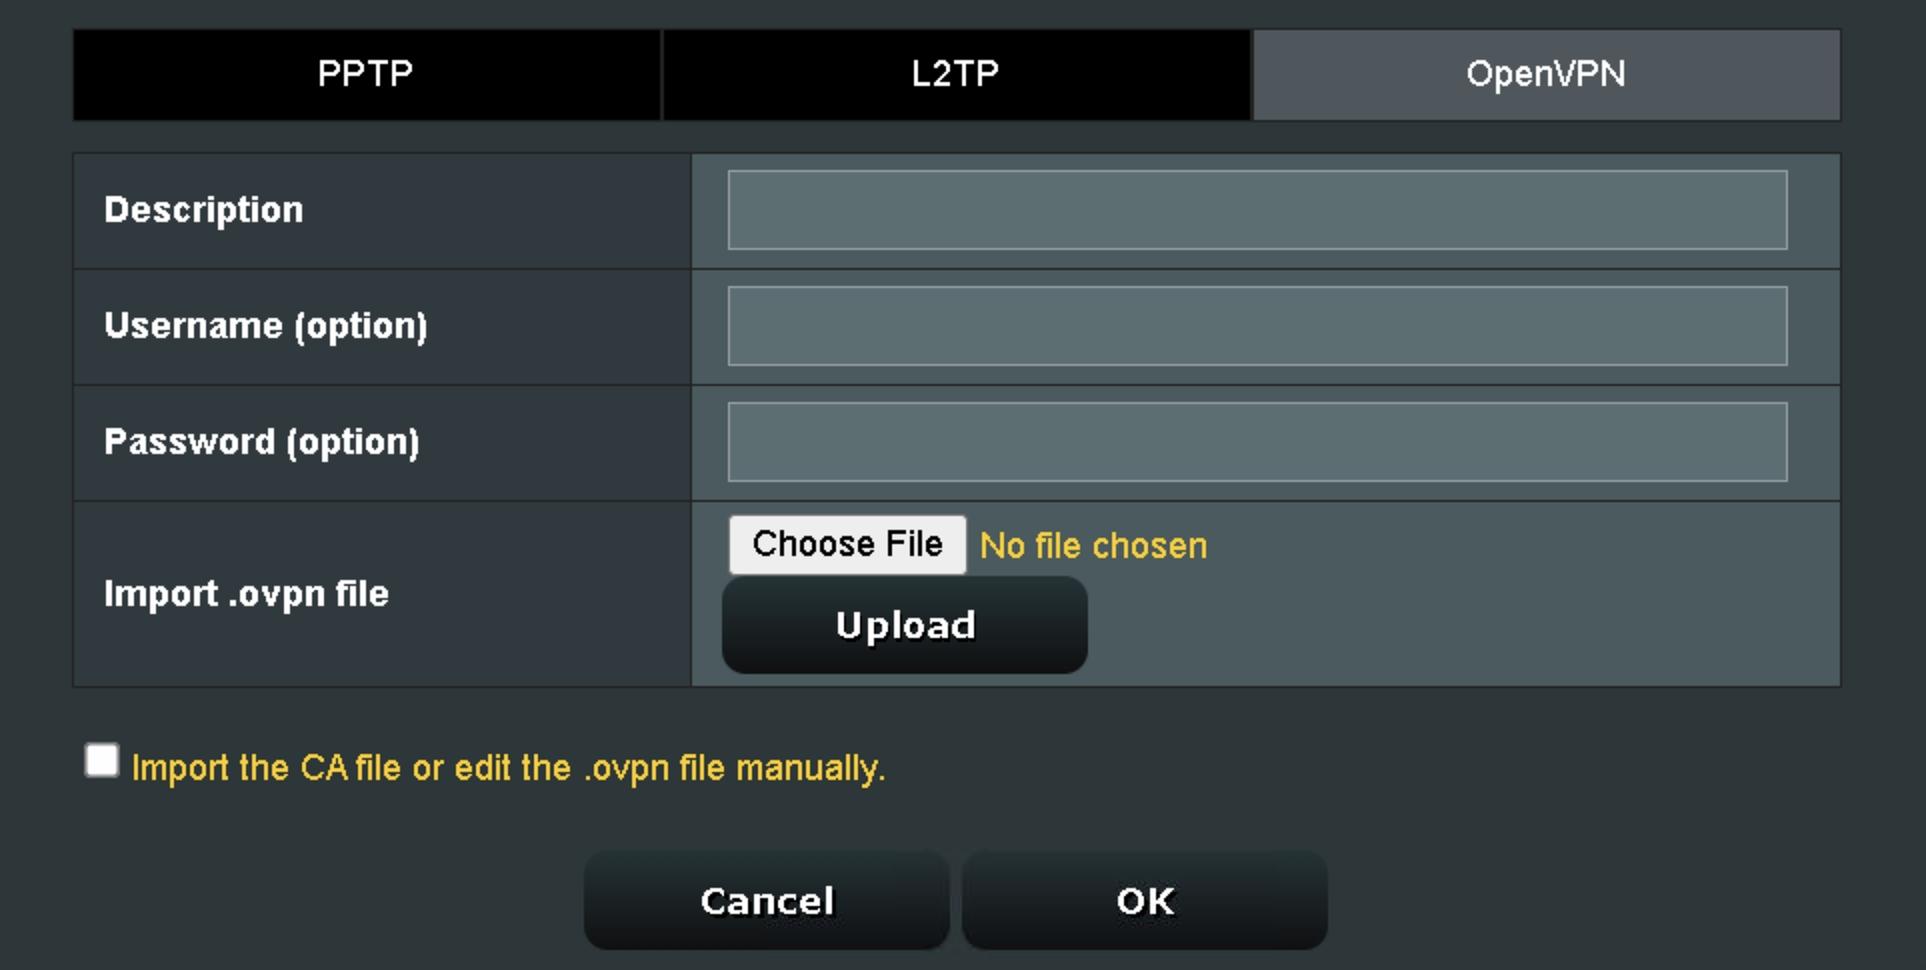
4. Click Choose file and select the .ovpn file you downloaded earlier. Then click Upload.

Asus AX1800S OpenVPN upload

5. In the Description field enter in the name you’d like to use for this OpenVPN Client profile. We typically advise entering in the location or server number here.

6. Enter your NordVPN username and password that you obtained earlier in the Username and Password. Note that these are different from your NordVPN email login and password. Click OK.

7. Click the Activate button.

Verify a successful NordVPN connection

  1. You should now see a check mark in the Connection Status area.
  2. Visit NordVPN’s IP Check to verify your new IP address and virtual location.

In some cases you may notice that the location is not showing the same location as the server you have input in your router settings; this is because geo tracking tools are often tricked by VPN connections. As long as you see an IP address that is not the same as your normal Internet IP address then you are indeed connected to NordVPN.

How to change the NordVPN server

  1. Follow the steps at the top of the page to obtain a new .ovpn file.
  2. Then proceed with the settings same as initial setup.
  3. Be sure to deactivate a previously active connection before activating the new one. You do not want to connect to two at the same time.

TROUBLESHOOTING

Still having issues? Visit the VPN Troubleshooting section.

Troubleshoot Here

Mullvad WireGuard Setup

TeamFlashRouters · Aug 19, 2021 ·

Preparing for Mullvad WireGuard Setup

Verify your Mullvad login information

If you are not already a Mullvad user Sign Up Now.

Log in to your account on the Mullvad website.

Mullvad Login

Select Manage ports and WireGuard Keys displayed on the account page.

Mullvad Manage ports and WireGuard Keys

DD-WRT Router Setup for Mullvad WireGuard

Navigate to Setup > Tunnels 

Enter Mullvad WireGuard settings

1. Click Add Tunnel.

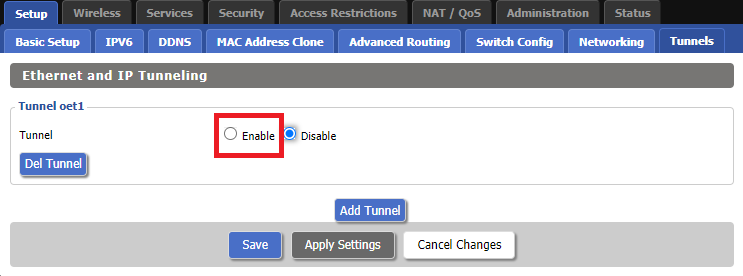
2. Set Tunnel to Enable.

Setup - Tunnel - Enable Tunnel

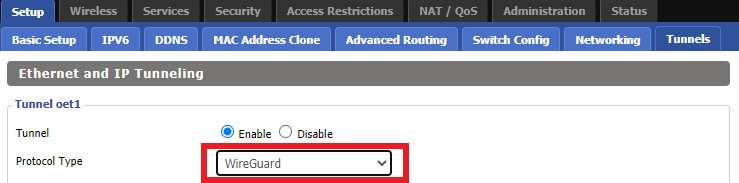
3. Select Wireguard from the dropdown.

Setup - Tunnel - Select Wireguard

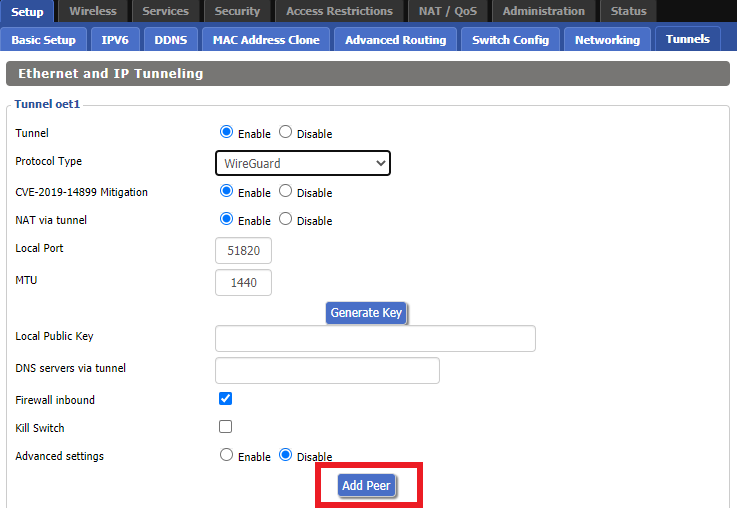
4. Click Add Peer.

Setup - Tunnel - Add Peer

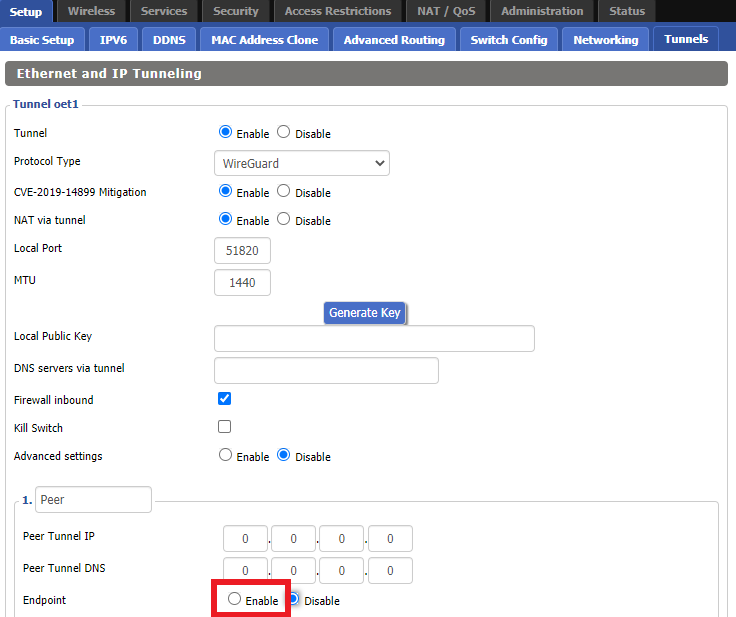
5. Set Endpoint to Enable.

Setup - Tunnel - Enable Endpoint

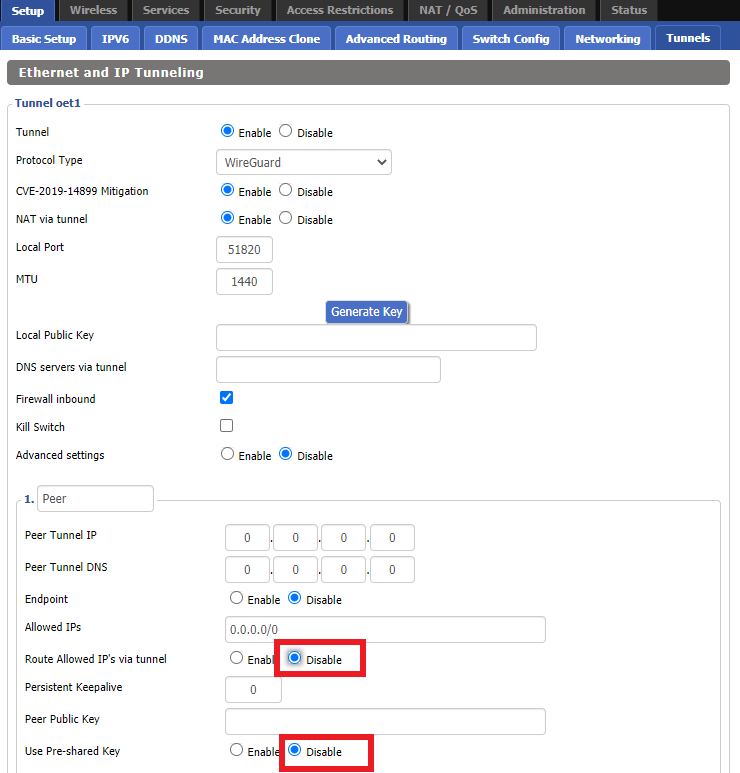
6. Set Router Allowed IP’s via tunnel and Use Pre-shared Key to Disable.

Setup - Tunnel - Disable Preshare Key and Allow IP

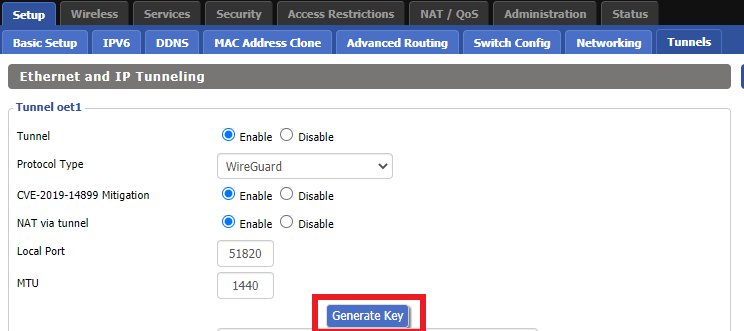
7. Click Generate Key.

Setup - Tunnel - Generate Key

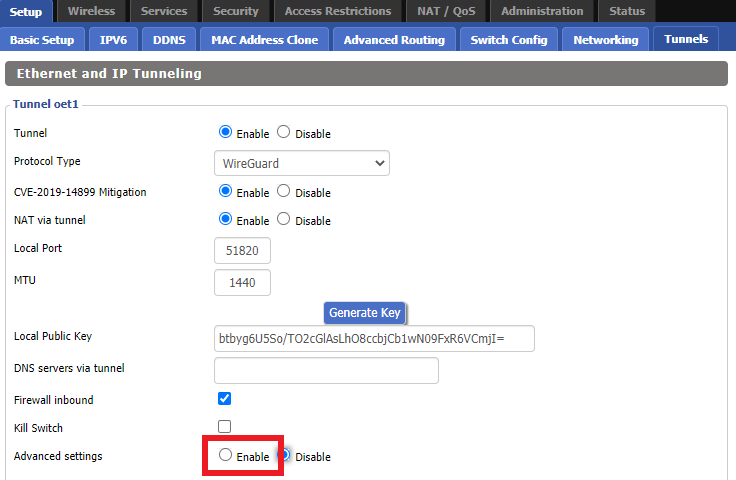
8. Set Advanced Settings to Enable.

Setup - Tunnel - Enable Advanced Settings

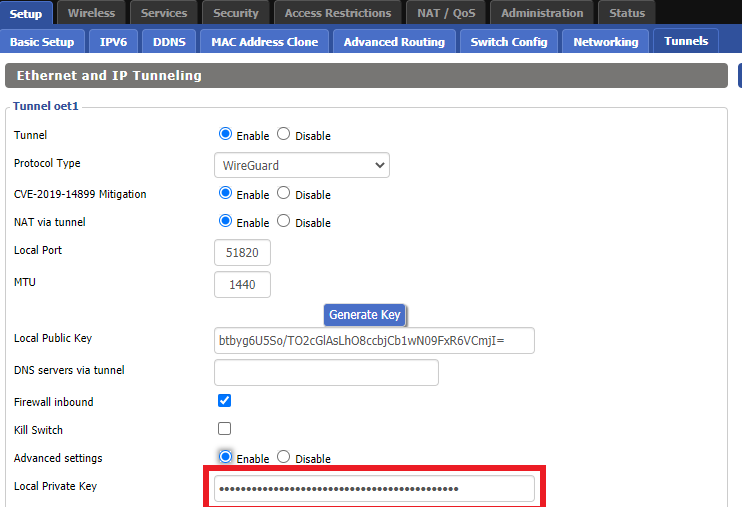
9. Copy the Local Private Key.

Setup - Tunnel - Copy Local Private Key

10. In a new tab (leave the DD-WRT settings opened), go to your Mullvad Account and click Manage Ports and WireGuard Keys.

Mullvad Account - Manage ports and Wireguard Keys

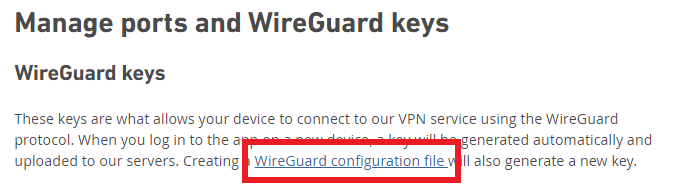
11. Click WireGuard configuration file.

Mullvad - Wireguard configuration file

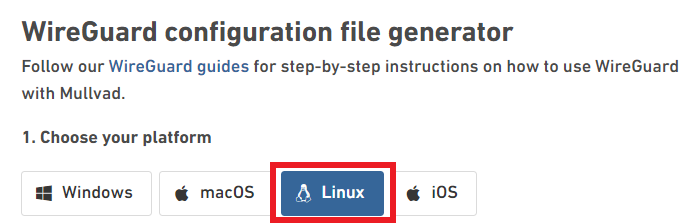
12. Select Linux as your Platform.

Mullvad - Select Linux

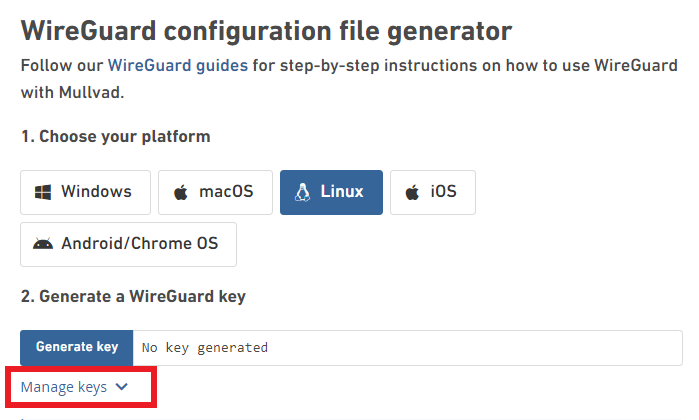
13. Click Manage Keys.

Mullvad - Manage Keys

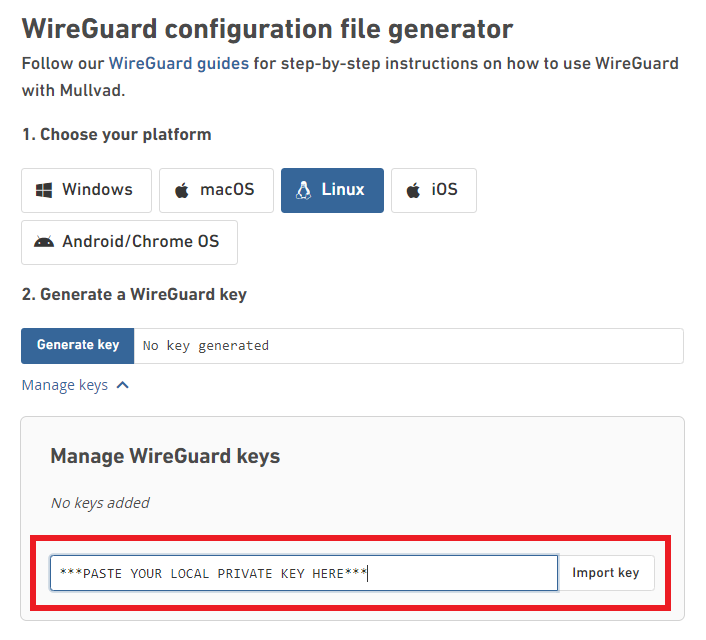
14. Paste the copied Local Private key to the Manage WireGuard Keys field and click Import Keys.

Mullvad - Import Key

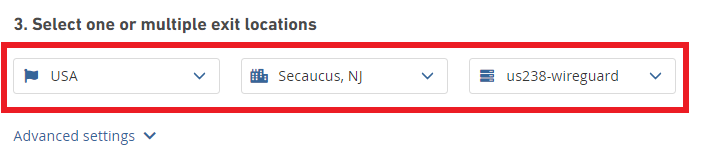
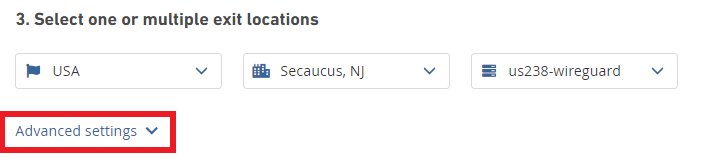
15. Select your Country, City, and Server number that you want to connect to.

Mullvad - Select Location

16. Click Advanced Settings.

Mullvad - Advanced Settings

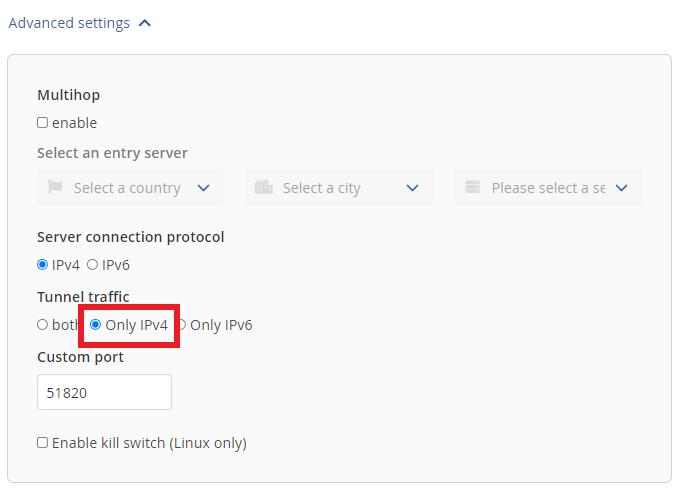
17. Set the Tunnel Traffic to Only IPv4.

Mullvad - Only IPv4

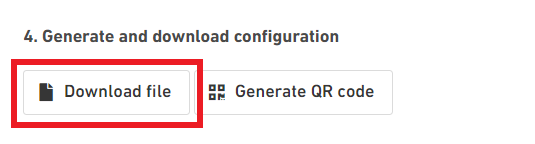
18. Click Download File.

Mullvad - Download Config

19. Open the config file that was downloaded to your computer with NotePad or Notepad++ for Windows or TextEdit for Mac.

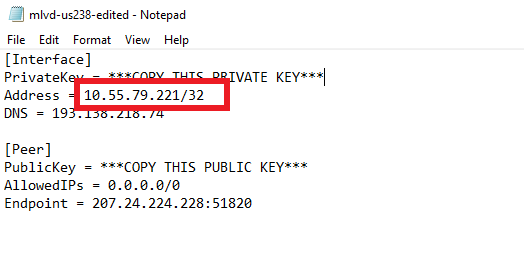
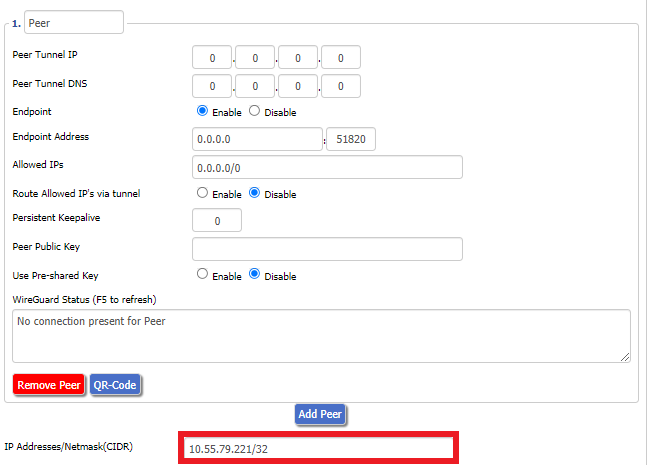
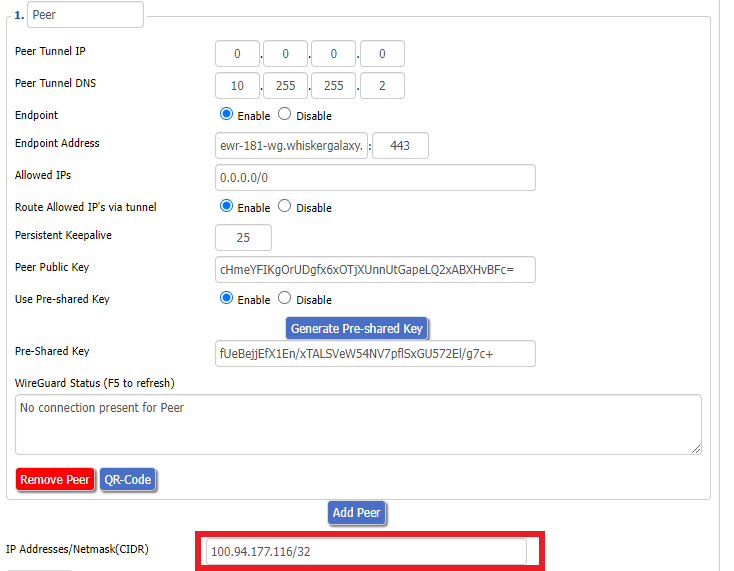
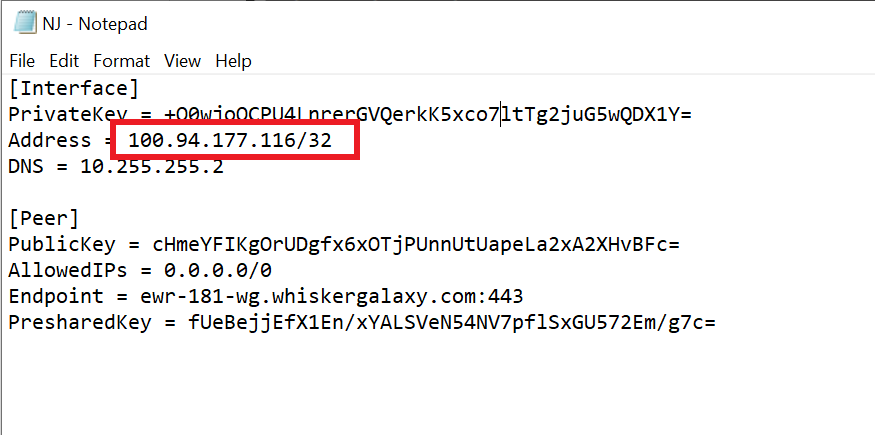
20. In the downloaded config file under [Interface] enter the Address into the IP Addresses/Netmask(CIDR) field in the DD-WRT settings.

Config File - Copy IP Address
Setup - Tunnel - IP Address Netmask Note

Certain DD-WRT builds will show two separate fields here: IP Address and Subnet Mask. If that is the case set the IP Address field to the Address without the /32 added and set the Subnet Mask to 255.255.255.255

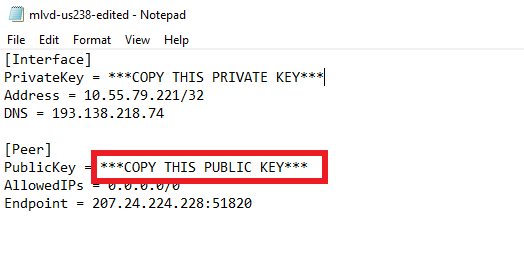
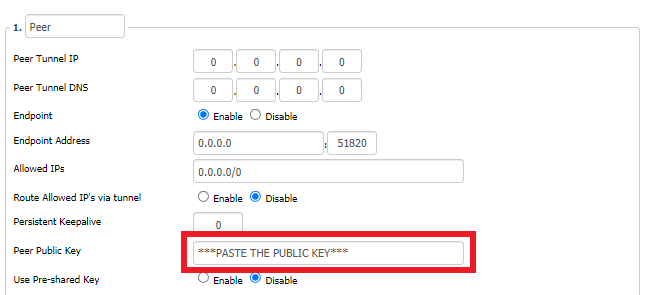
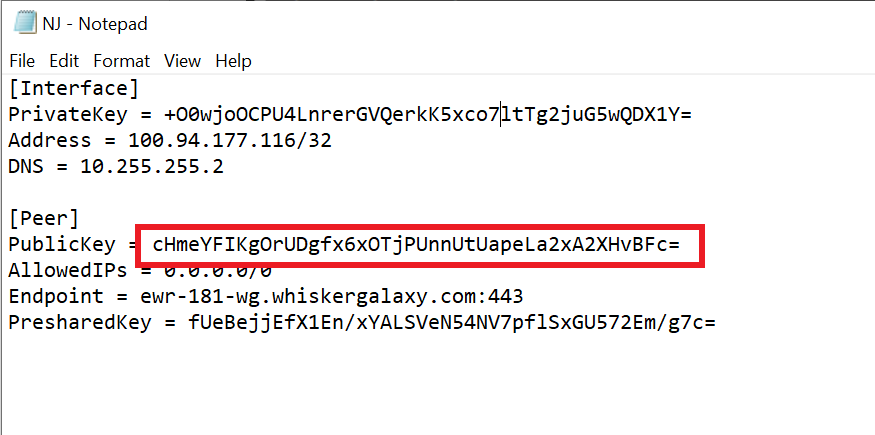
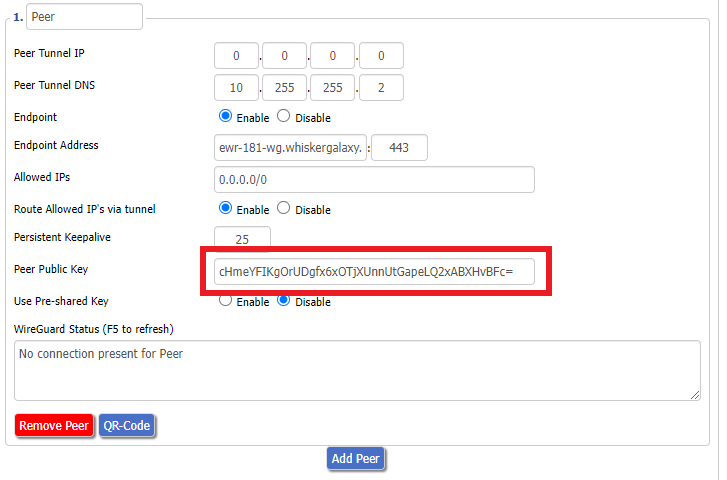
21. In the config file under [Peer] copy the PublicKey and paste it into the Peer Public Key field in the DD-WRT Settings.

Config File - Copy PublicKey
Setup - Tunnel - Paste Public Key

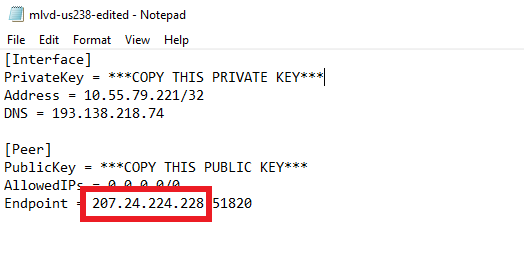
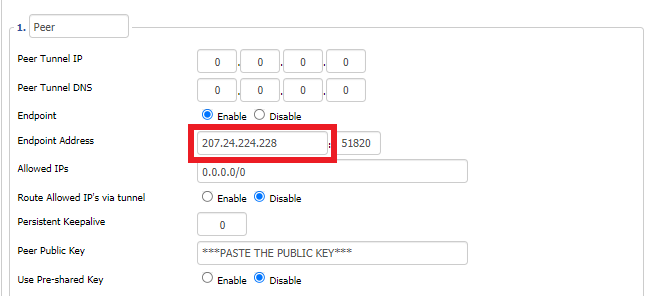
22. In the config file under [Peer] copy the Endpoint and paste it into the Endpoint Address field.

Config File - Endpoint
Setup - Tunnel - Endpoint Address

23. At the bottom of the page click Save and then click Apply Settings.

Enter Mullvad WireGuard Commands

Navigate to Administration > Commands

1. Copy and paste the text below and click Save Startup.

sleep 30
echo "Update route table on startup..."
WGSERVER=$(/usr/sbin/nvram get oet1_rem0)
WANGW=$(/usr/sbin/nvram get wan_gateway)
WANIF=$(/usr/sbin/nvram get wan_iface)
route add -host $WGSERVER gw $WANGW dev $WANIF
route del default
route add default dev oet1
ip route flush cache
mkdir -p /tmp/etc/config
ln -s /tmp/custom.sh /tmp/etc/config/wg-route-fix.wanup
echo "... Done route table update."

2. Copy and paste the text below and click Save Custom.

#!/bin/sh
sleep 5
echo "Update route table on wanup ..."
WGSERVER=$(/usr/sbin/nvram get oet1_rem0)
WANGW=$(/usr/sbin/nvram get wan_gateway)
WANIF=$(/usr/sbin/nvram get wan_iface)
route add -host $WGSERVER gw $WANGW dev $WANIF
route del default
route add default dev oet1
ip route flush cache
echo "... Done route table update."

3. Copy and paste the text below and click Save Firewall.

WANIF=$(/usr/sbin/nvram get wan_iface)
iptables -t nat -I POSTROUTING -o oet1 -j MASQUERADE
iptables -I FORWARD -i br0 -o $WANIF -m state –state NEW -j REJECT –reject-with icmp-host-prohibited
iptables -I FORWARD -i br0 -p tcp -o $WANIF -m state –state NEW -j REJECT –reject-with tcp-reset

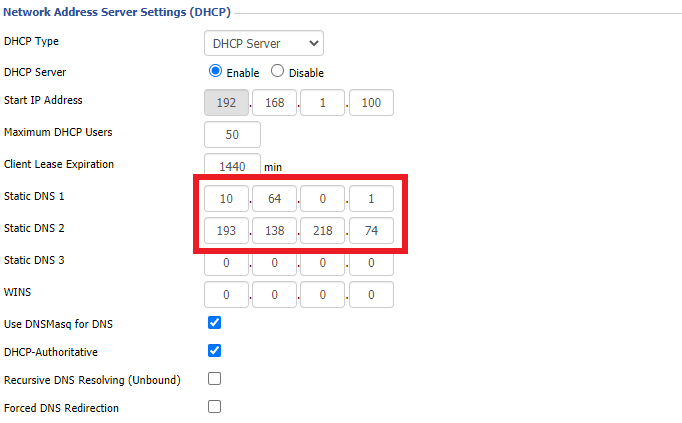
Set Mullvad DNS servers

Navigate to Setup > Basic Setup

Set Static DNS 1 to 10.64.0.1

Set Static DNS 2 to 193.138.218.74

Setup - Basic Setup - Mullvad DNS

Click Apply Settings.

Reboot the FlashRouter

Navigate to Administration > Management

Scroll to the bottom of the page and click the red Reboot Router button. Wait for the FlashRouter to reboot and then reconnect.

Verify a successful Mullvad connection

Navigate to Setup > Tunnels

  1. You should see Endpoint, Latest handshake, and Transfer in the WireGuard status area.
  2. Visit Mullvad’s IP Check to verify your status as using Mullvad.

Back up your settings

Navigate to Administration > Backup

  1. Click the Backup button.
  2. A file named nvrambak.bin will be saved to your computer.
  3. You can load nvrambak.bin to restore your settings in the event of a reset.

TROUBLESHOOTING

Still having issues? Visit the VPN Troubleshooting section.

Troubleshoot Here

NordVPN Cudy OpenVPN Setup

TeamFlashRouters · Feb 29, 2024 ·

Preparing for NordVPN Cudy Setup

Obtain your NordVPN manual Username and Password

If you are not already an NordVPN user Sign Up Now.

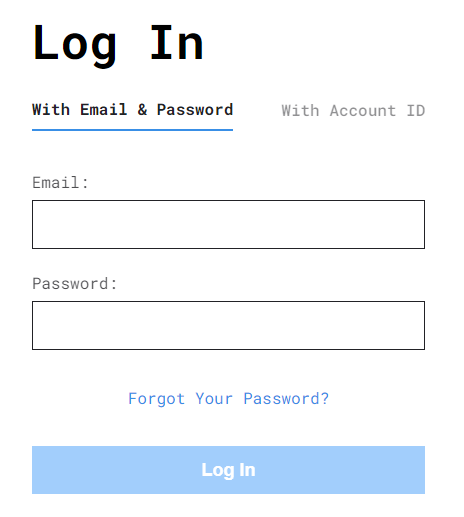
1. Log in to your account on the NordVPN website.

NordVPN login

2. Click NordVPN on the left hand side and then click Setup NordVPN manually.

NordVPN setup manually

3. Enter in the verification code that was sent to your email.

NordVPN verify code

4. Copy and paste your NordVPN manual username and password to a secure location. This is the username and password you will enter into the router settings to connect to NordVPN.

NordVPN credentials

Download your NordVPN .ovpn file

1. There are two options for obtaining the .ovpn file. The first and recommended is to navigate to NordVPN’s server recommendation page. Click Recommended Server to display the fastest server based on your actual location. You can adjust the country if you don’t want to connect to the recommended country.

Then click Show Available Protocols. Click Download Config next to OpenVPN UDP. This will download the .ovpn file to your computer for this server. Do not open this file.

NordVPN Recommended Server

The second method to obtain a server is for connecting to a specific server number that you know you want to use. This applies to NordVPN Dedicated IP servers if you are signed up for that service. Go to NordVPN’s .ovpn file page. Then search for the server number that you want to use and click Download UDP.

NordVPN Download Specific Server

Cudy Router Setup for NordVPN

Login to Cudy firmware settings in a browser on any computer or smart device connected to the Cudy FlashRouter’s network.

1. Click General Settings.

Cudy General Settings

2. Click VPN.

Cudy VPN Tab

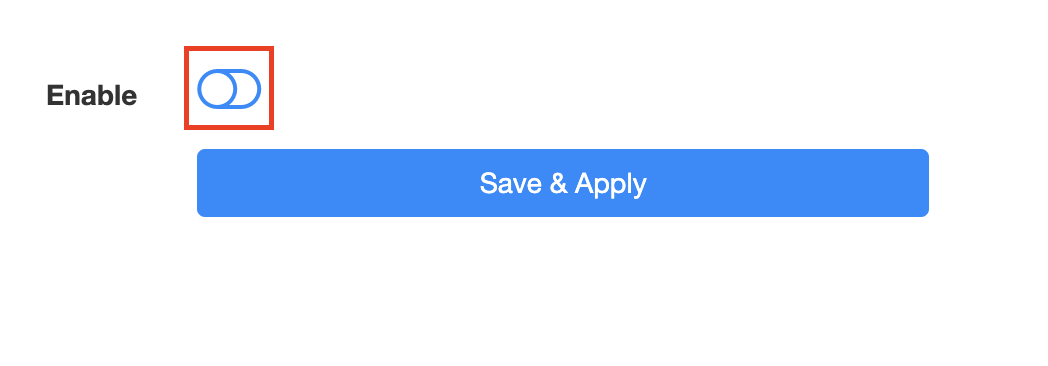
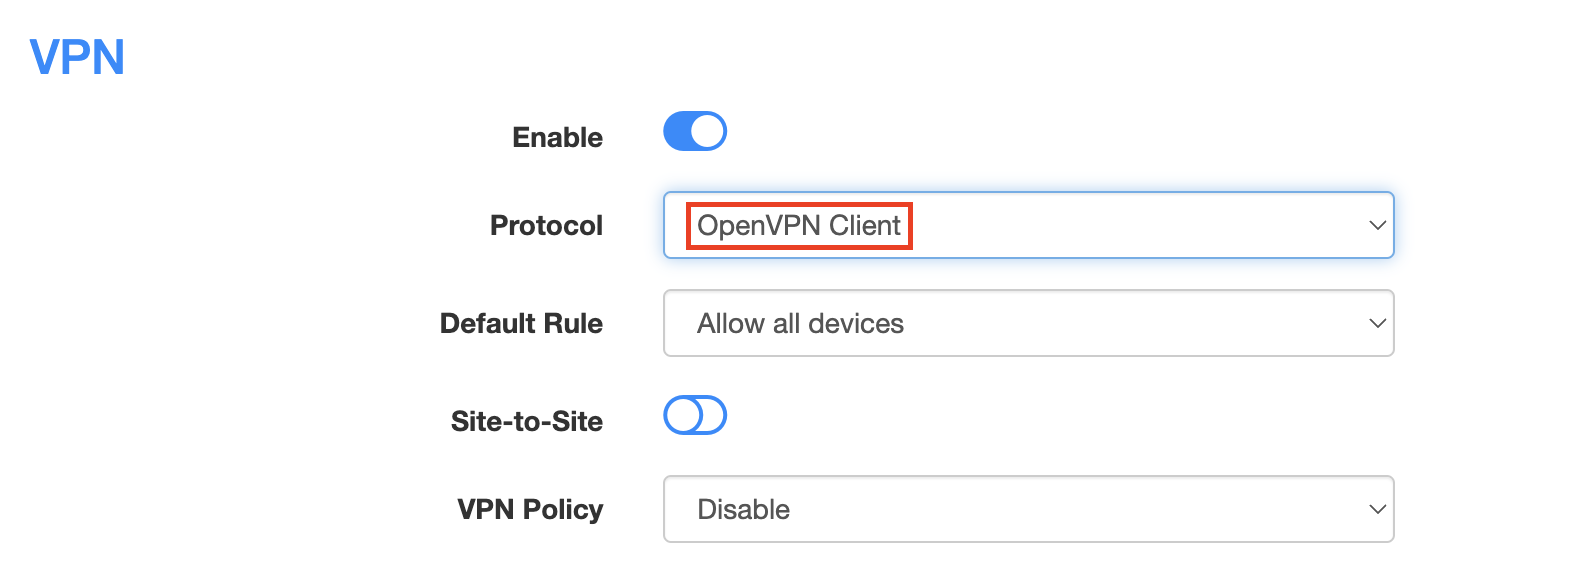
3. Toggle the Enable switch to On.

Cudy enable VPN

4. Select OpenVPN Client from the Protocol dropdown.

Cudy select OpenVPN Client

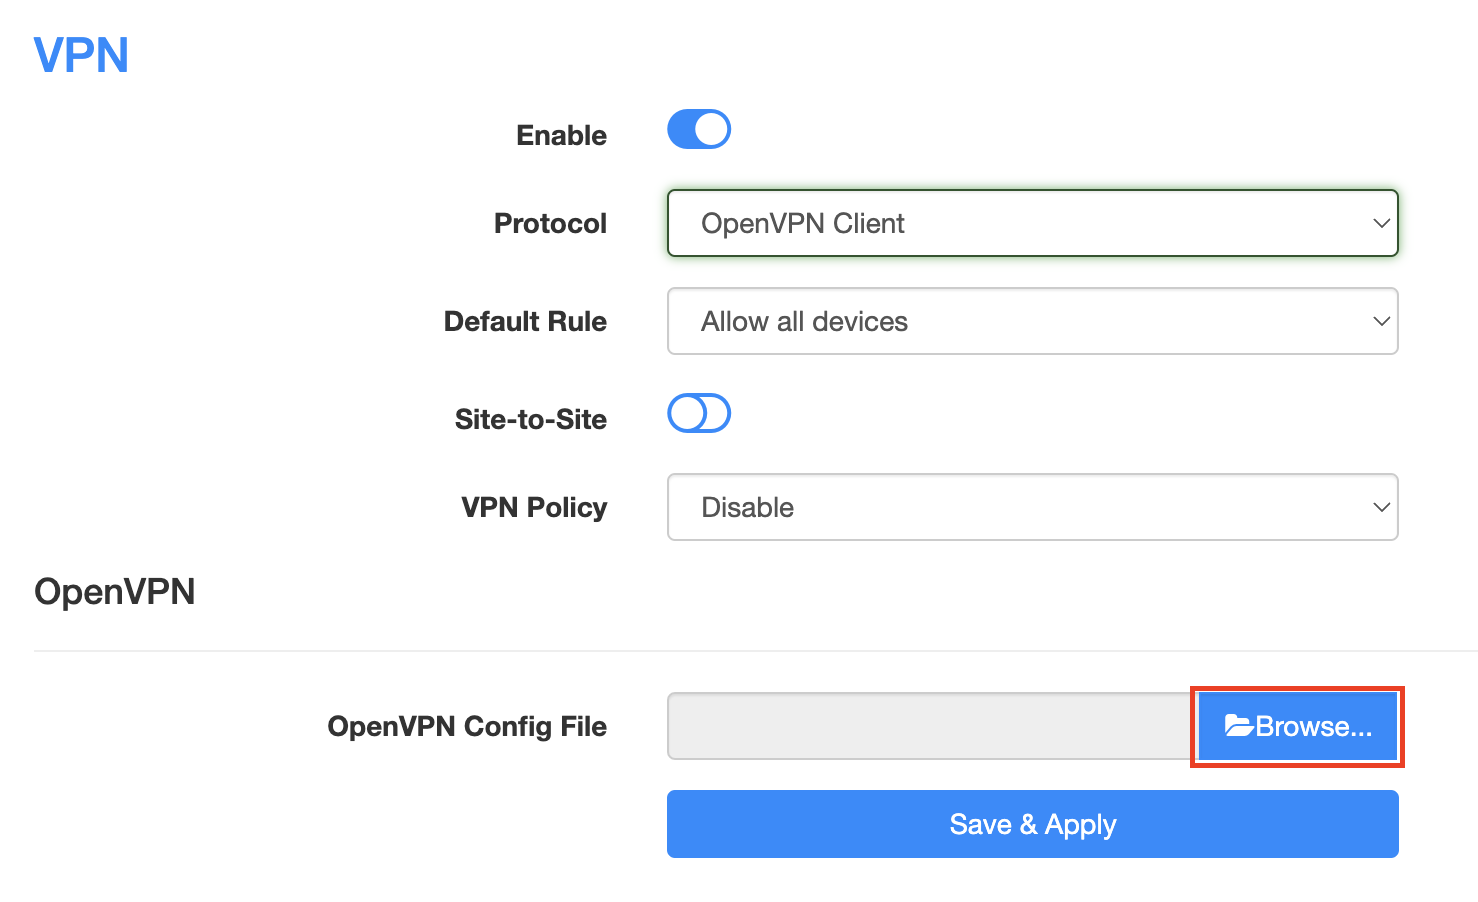
5. Click Browse and select the .ovpn file you downloaded earlier. You should see the server file name listed next to Current Config File after doing so.

Cudy OpenVPN Browse button

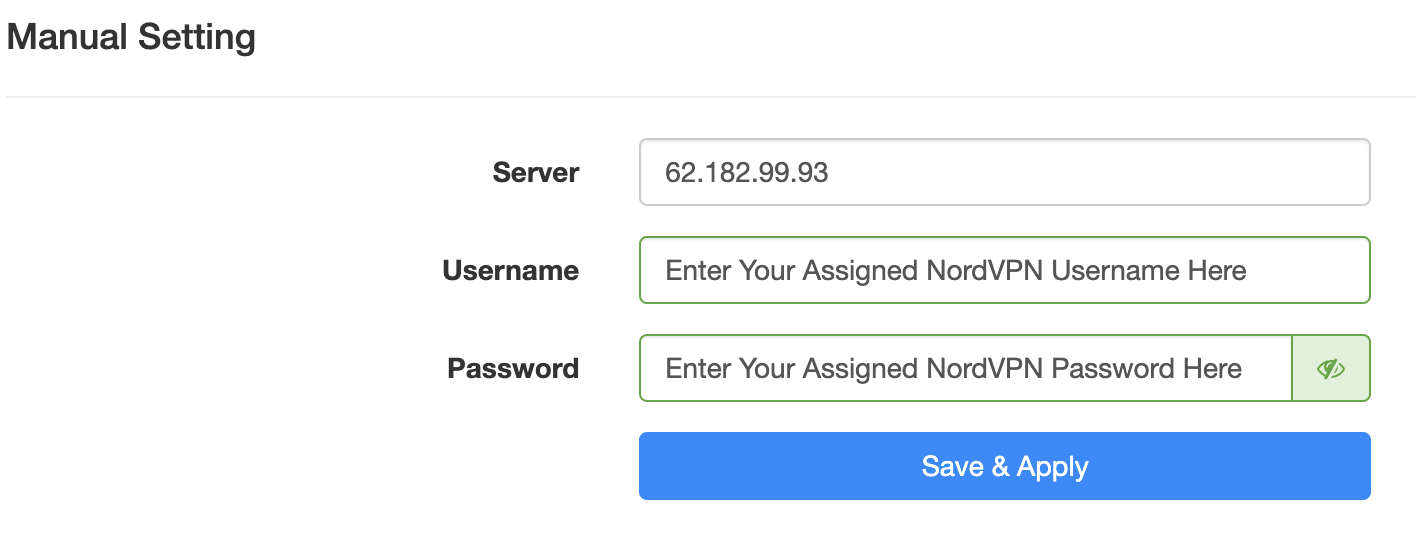
6. Enter your NordVPN username and password that you obtained earlier in the Username and Password. Note that these are different from your NordVPN email login and password.

Cudy NordVPN enter username and password

7. Click Save & Apply at the bottom of the page.

Verify a successful NordVPN connection

  1. You should now see a CONNECTED message.
  2. Visit NordVPN’s IP Check to verify your new IP address and virtual location.

In some cases you may notice that the location is not showing the same location as the server you have input in your router settings; this is because geo tracking tools are often tricked by VPN connections. As long as you see an IP address that is not the same as your normal Internet IP address then you are indeed connected to NordVPN.

How to change the NordVPN server

  1. Follow the steps at the top of the page to obtain a new .ovpn file.
  2. Then proceed with the settings same as initial setup.

TROUBLESHOOTING

Still having issues? Visit the VPN Troubleshooting section.

Troubleshoot Here

IVPN WireGuard Setup

TeamFlashRouters · Oct 13, 2021 ·

Preparing for IVPN WireGuard Setup

Verify your IVPN login information

If you are not already a IVPN user Sign Up Now.

Log in to your account on the IVPN website.

IVPN website login

DD-WRT Router Setup for IVPN WireGuard

Navigate to Setup > Tunnels 

Enter IVPN WireGuard settings

1. Click Add Tunnel.

2. Set Tunnel to Enable.

Setup - Tunnel - Enable Tunnel

3. Select Wireguard from the dropdown.

Setup - Tunnel - Select Wireguard

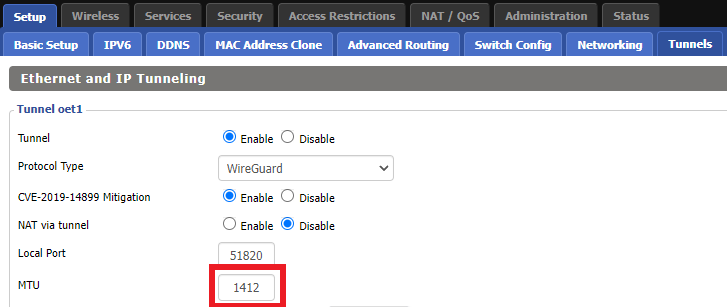
3. Set MTU to 1412.

IVPN Wireguard MTU setting

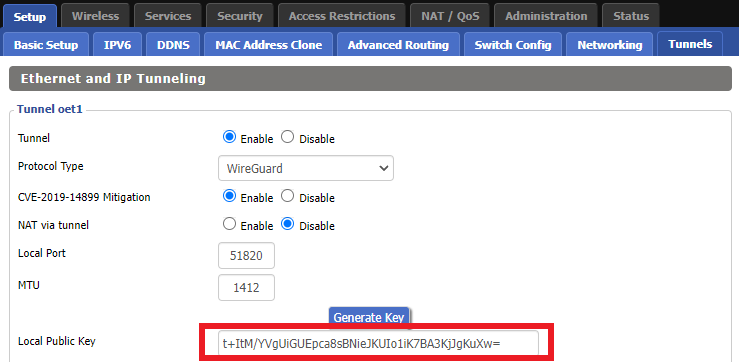
4. Click Generate Key.

Setup - Tunnel - Generate Key

9. Copy the Local Public Key.

IVPN Wireguard Local Public Key

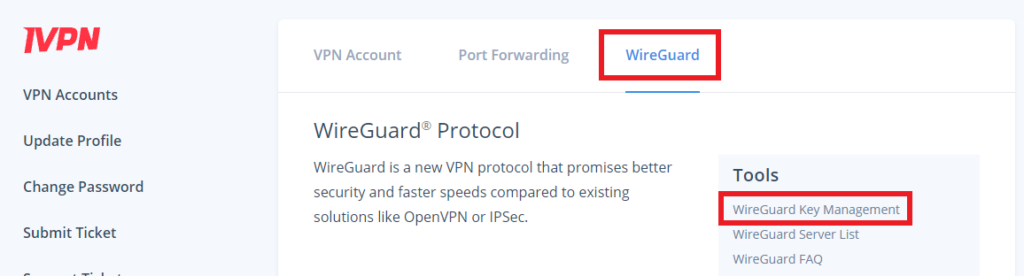
10. In a new tab (leave the DD-WRT settings opened), go to your IVPN Account and click WireGuard and then click WireGuard Key Management.

IVPN Wireguard Key Management

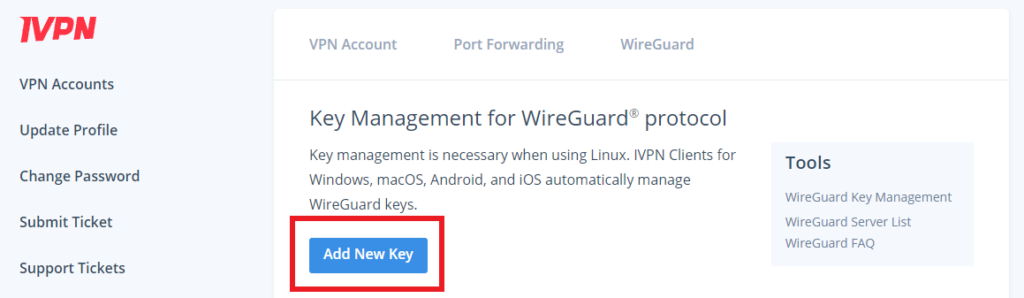
11. Click Add New Key.

IVPN Wireguard Add New Key

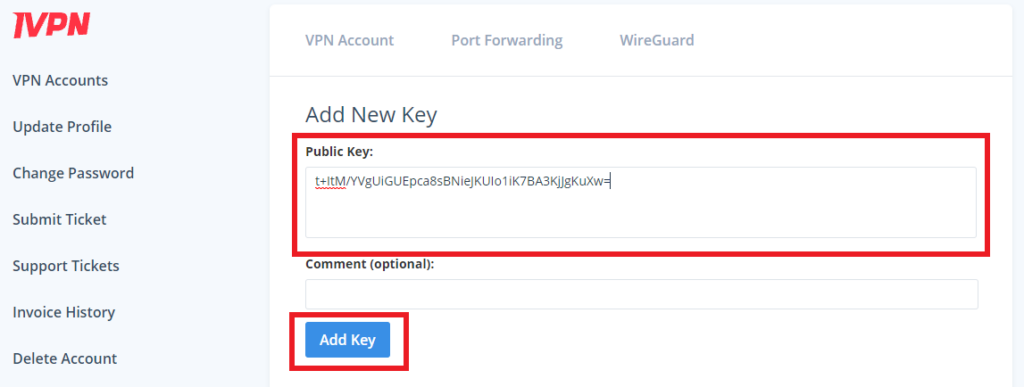
12. Paste the copied Local Public key to the Public Key field and click Add Key.

IVPN Wireguard Paste Public Key

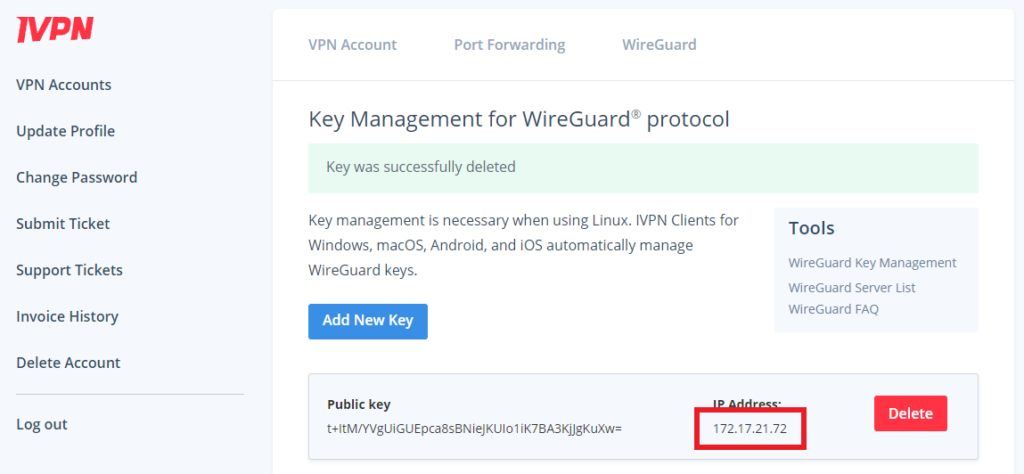
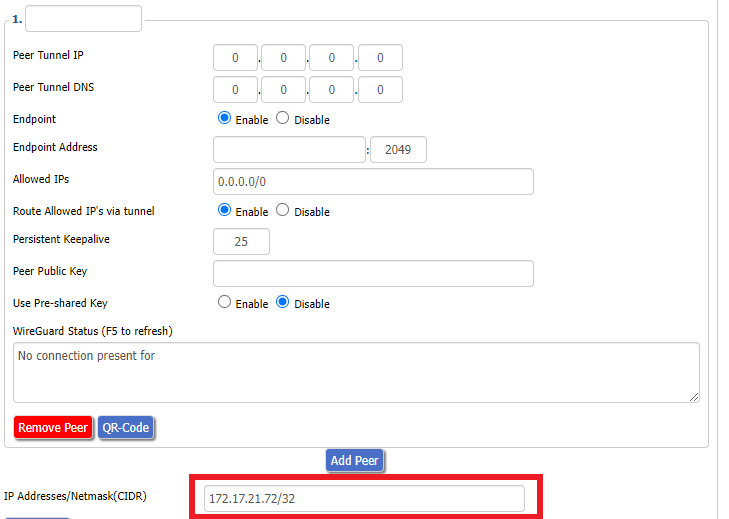
13.Copy the IP Address assigned to your public key and add it to the IP Addresses/Netmask(CIDR) field followed by a /32 subnet mask.

IVPN Wireguard copy IP Address
IVPN Wireguard paste IP Address

Certain DD-WRT builds will show two separate fields here: IP Address and Subnet Mask. If that is the case set the IP Address field to the Address without the /32 added and set the Subnet Mask to 255.255.255.255

14. Click Add Peer.

Setup - Tunnel - Add Peer

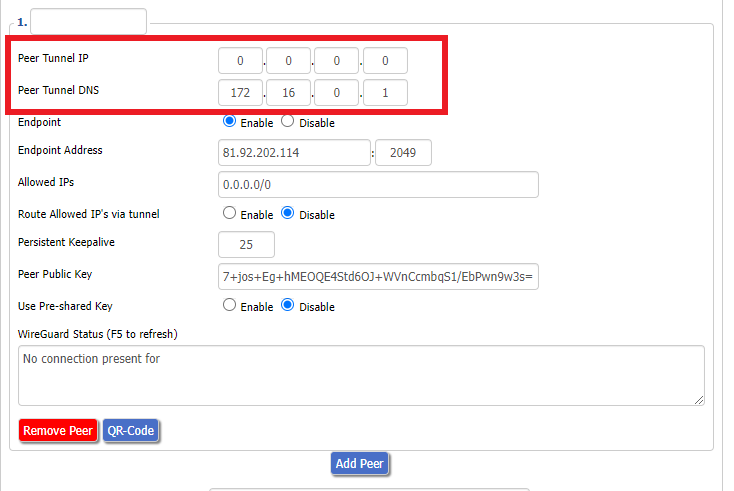
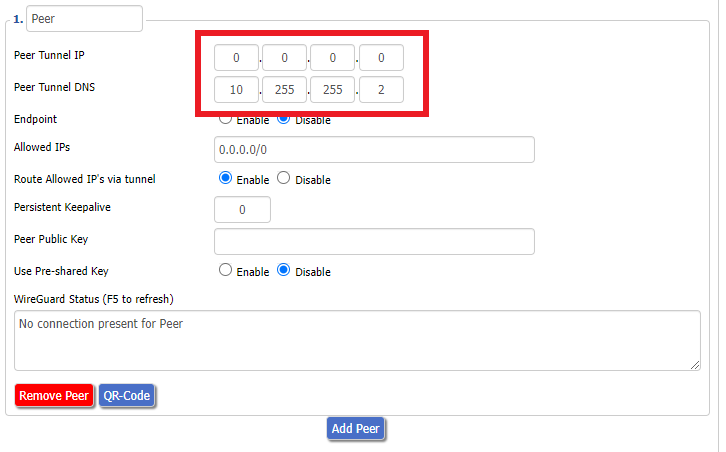
15. Set the Peer Tunnel IP to 0.0.0.0. Set Peer Tunnel DNS to 172.16.0.1

IVPN Wireguard Peer Tunnel IP and DNS

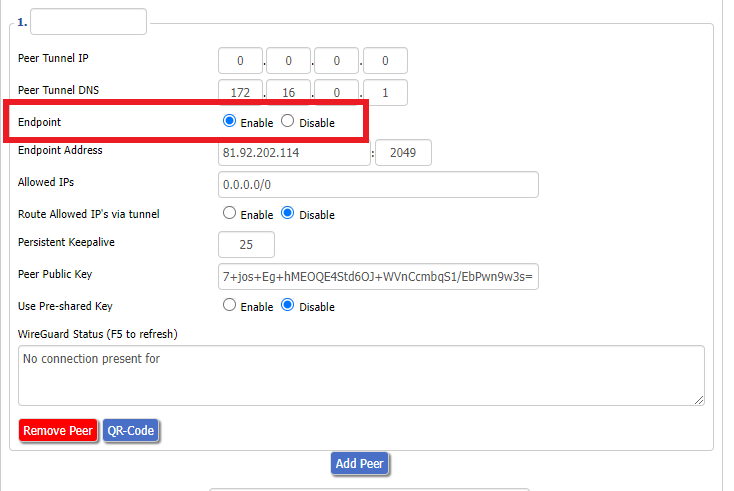
16. Set Endpoint to Enable.

IVPN Wireguard Enable Endpoint

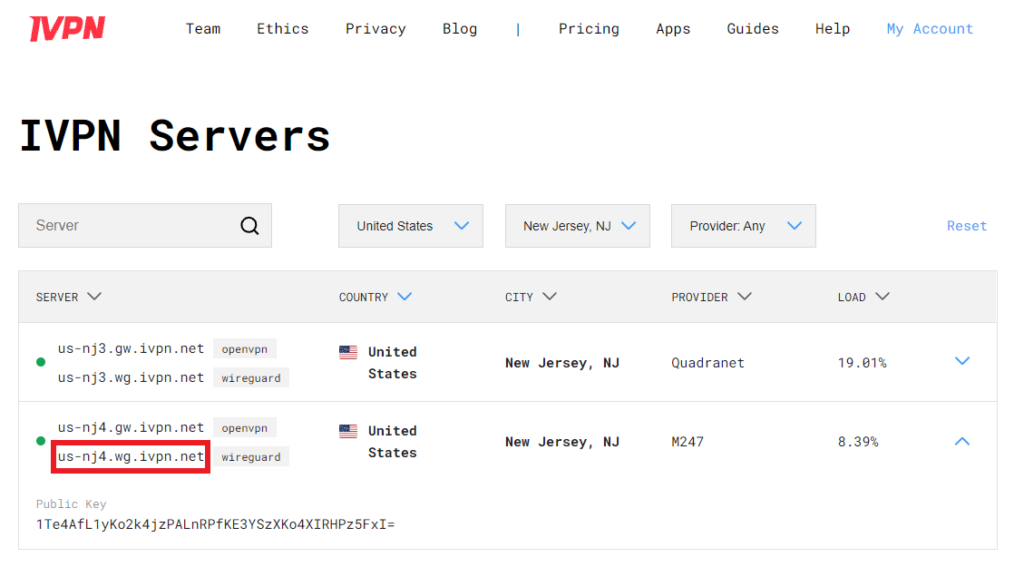
17. Go to the IVPN Server Status page and copy the server name for the WireGuard server location you want to connect to.

IVPN Wireguard Endpoint server

Be sure to copy the WireGuard server address and not the OpenVPN server address.

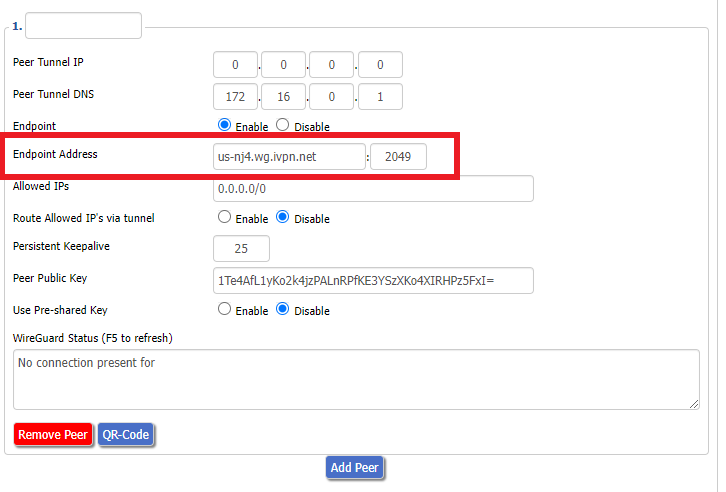
18. Paste the server name you copied into the Endpoint Address field and set the Port to 2049.

IVPN Wireguard Endpoint Address

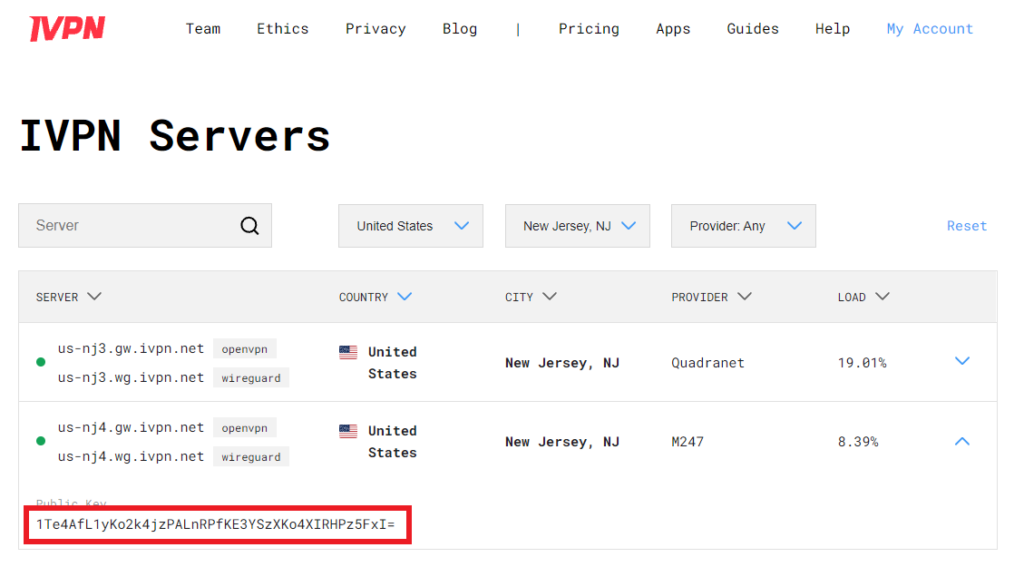
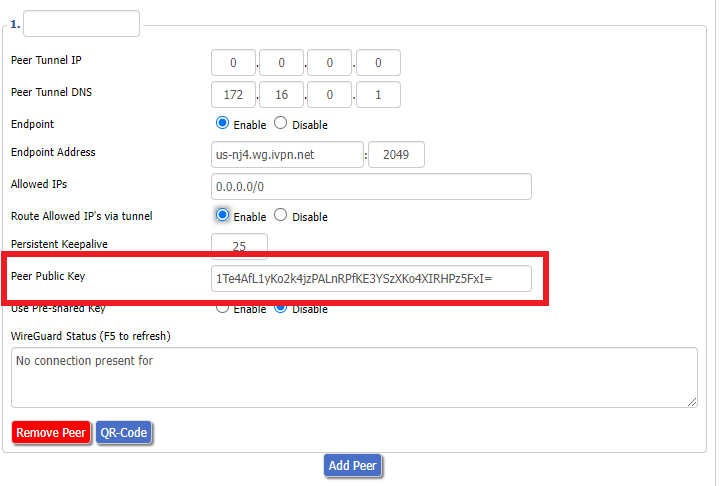
19. On the IVPN Server Status page copy the Public Key of the server location you entered. Paste the Public Key into the Peer Public Key field.

IVPN Wireguard copy server Public Key
IVPN Wireguard enter Peer Public Key

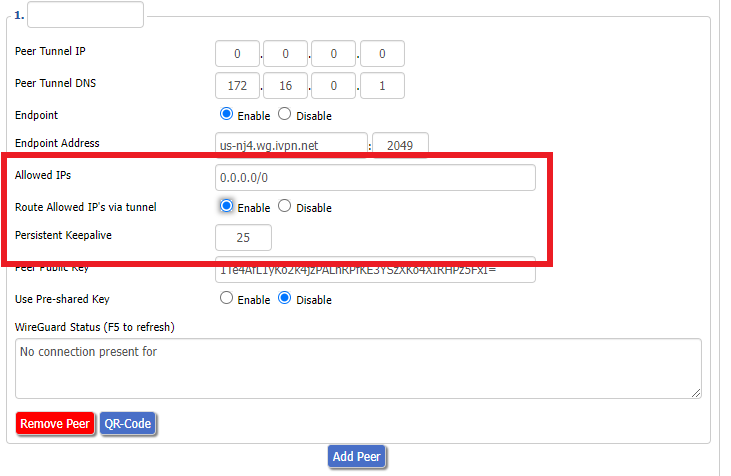
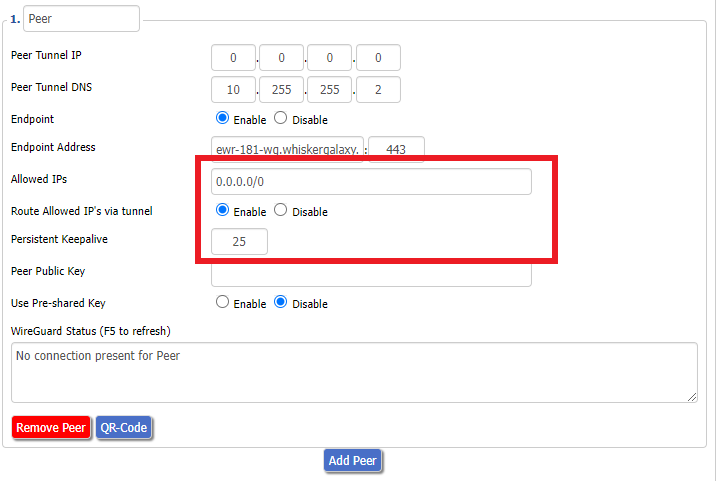
20. Leave Allowed IPs as 0.0.0.0/0. Set Router Allowed IP’s via tunnel to Enable. Set Persistent Keep Alive to 25.

IVPN Wireguard Peer settings

21. At the bottom of the page click Save and then click Apply Settings.

Set IVPN DNS servers

Navigate to Setup > Basic Setup

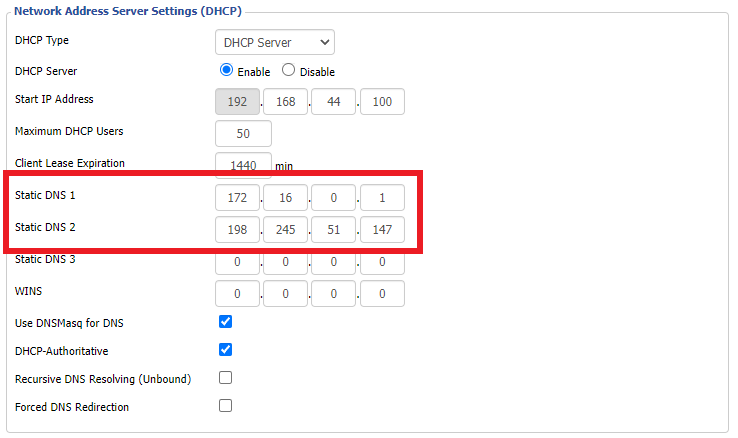
Set Static DNS 1 to 172.16.0.1

Set Static DNS 2 to 198.245.51.147

IVPN Wireguard Static DNS

Click Apply Settings.

Reboot the FlashRouter

Navigate to Administration > Management

Scroll to the bottom of the page and click the red Reboot Router button. Wait for the FlashRouter to reboot and then reconnect.

Verify a successful IVPN connection

Navigate to Setup > Tunnels

  1. You should Endpoint, Latest handshake, and Transfer in the WireGuard status area.
  2. Visit IVPN’s website to verify your status as using IVPN.

Back up your settings

Navigate to Administration > Backup

  1. Click the Backup button.
  2. A file named nvrambak.bin will be saved to your computer.
  3. You can load nvrambak.bin to restore your settings in the event of a reset.

TROUBLESHOOTING

Still having issues? Visit the VPN Troubleshooting section.

Troubleshoot Here

NordVPN TP-Link OpenVPN Setup

TeamFlashRouters · Apr 16, 2024 ·

Preparing for NordVPN TP-Link Setup

Obtain your NordVPN manual Username and Password

If you are not already an NordVPN user Sign Up Now.

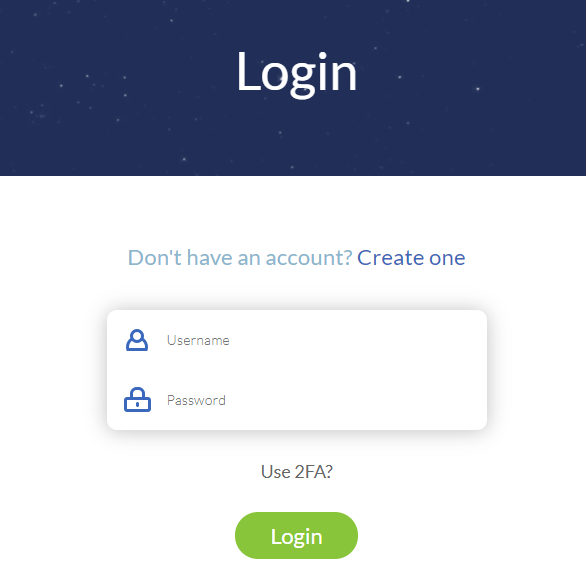
1. Log in to your account on the NordVPN website.

NordVPN login

2. Click NordVPN on the left hand side and then click Setup NordVPN manually.

NordVPN setup manually

3. Enter in the verification code that was sent to your email.

NordVPN verify code

4. Copy and paste your NordVPN manual username and password to a secure location. This is the username and password you will enter into the router settings to connect to NordVPN.

NordVPN credentials

Download your NordVPN .ovpn file

1. There are two options for obtaining the .ovpn file. The first and recommended is to navigate to NordVPN’s server recommendation page. Click Recommended Server to display the fastest server based on your actual location. You can adjust the country if you don’t want to connect to the recommended country.

Then click Show Available Protocols. Click Download Config next to OpenVPN UDP. This will download the .ovpn file to your computer for this server. Do not open this file.

NordVPN Recommended Server

The second method to obtain a server is for connecting to a specific server number that you know you want to use. This applies to NordVPN Dedicated IP servers if you are signed up for that service. Go to NordVPN’s .ovpn file page. Then search for the server number that you want to use and click Download UDP.

NordVPN Download Specific Server

TP-Link Router Setup for NordVPN

Login to TP-Link firmware settings in a browser on any computer or smart device connected to the FlashRouter’s network.

1. Navigate to the Advanced tab.

TP-Link Advanced settings

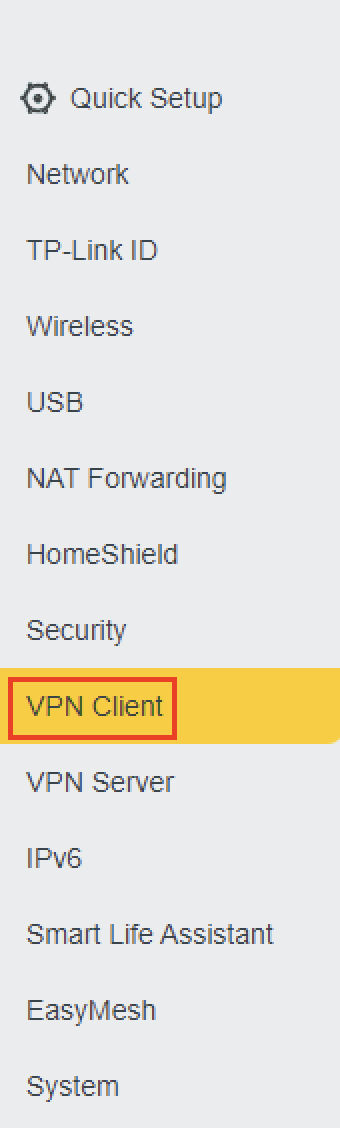
2. Navigate to the VPN Client tab.

TP-Link VPN Client

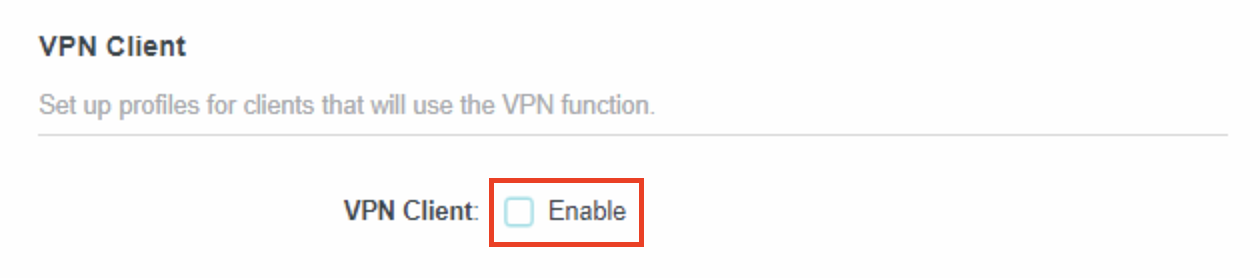
3. Check the Enable box next to VPN Client. Then click Save at the bottom of the page.

TP-Link VPN Client enable

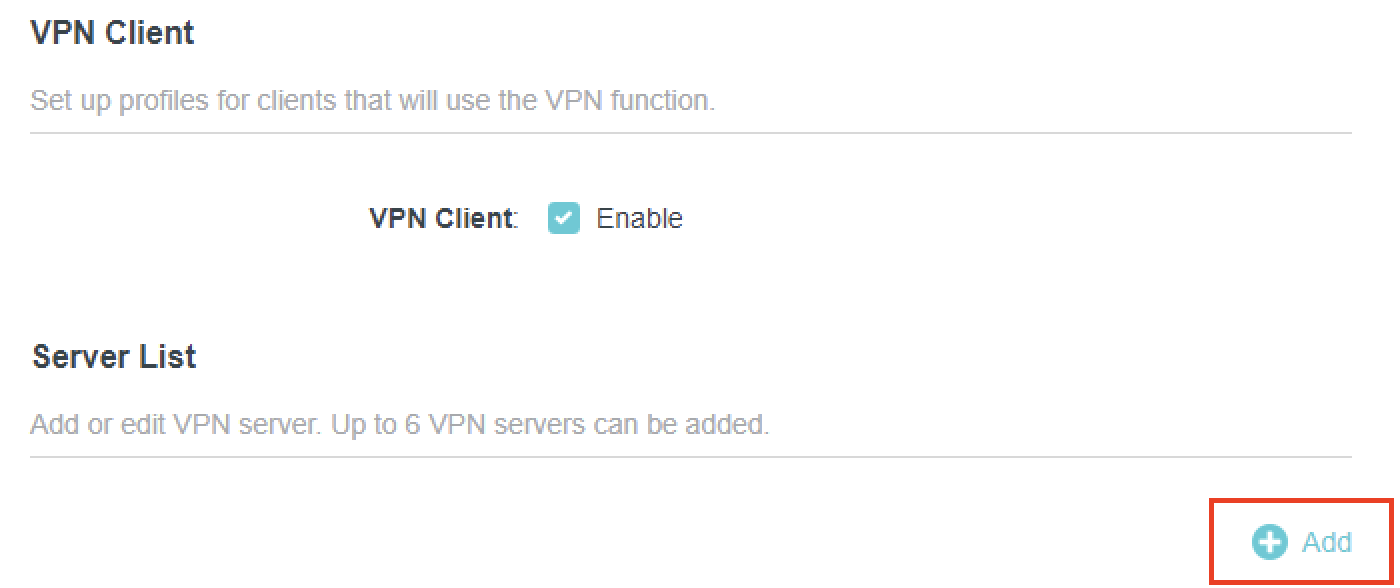
4. Click the Add button in the Server List area.

TP-Link Add server button

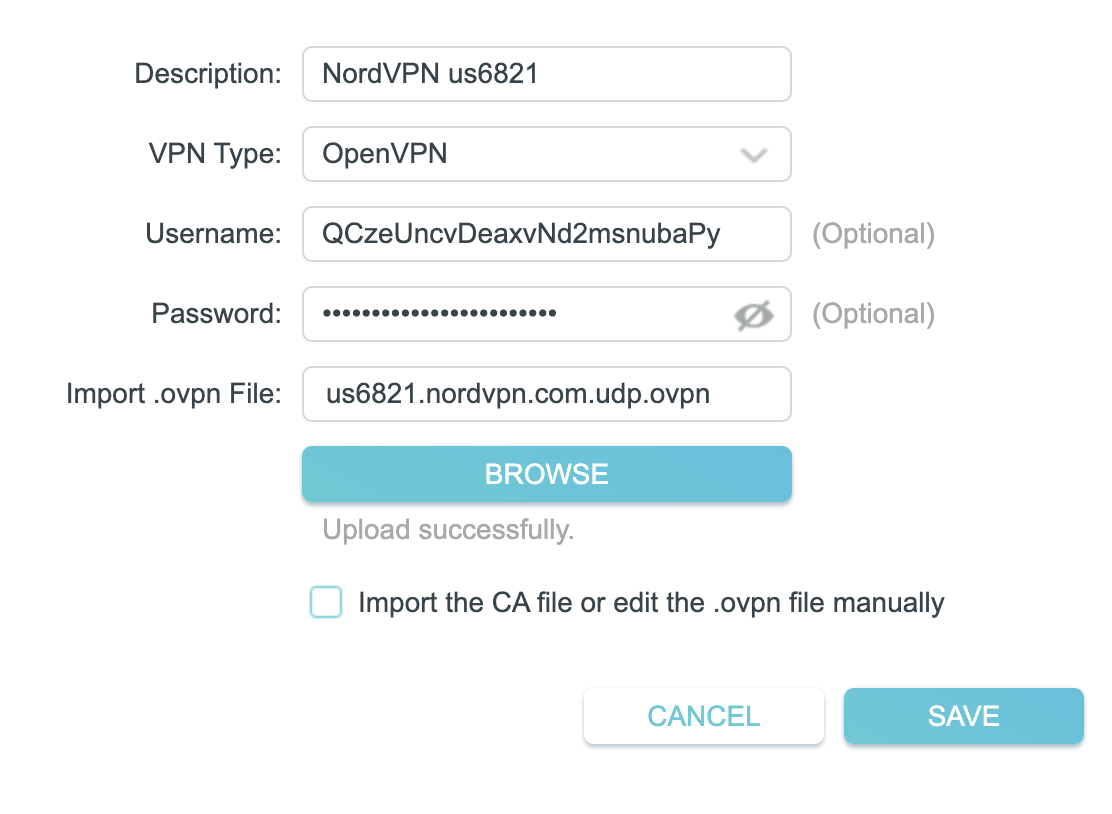
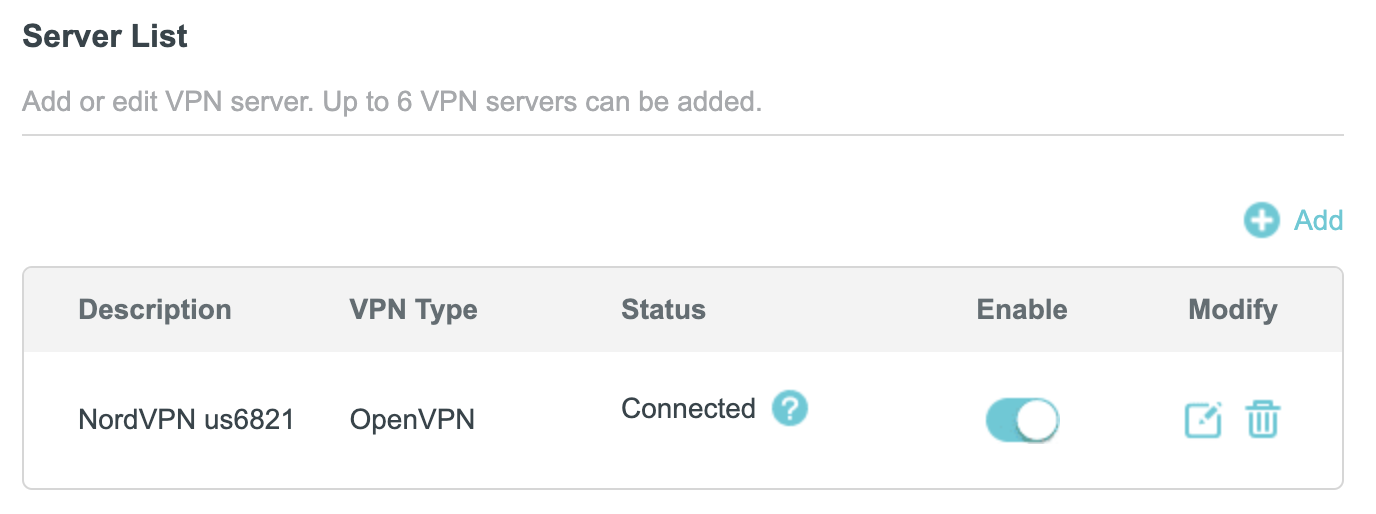
5. In the Description field enter in the name you’d like to use for this OpenVPN Client profile. We typically advise entering in the location or server number here. Our example server was us6821 so I have entered in NordVPN us6821.

Set the VPN Type to OpenVPN.

In the Username and Password fields paste in the NordVPN username and password we obtained earlier.

Click Browse and select the .ovpn file you downloaded earlier. Then click Save.

TP-Link NordVPN

By default no devices will be assigned to the VPN Tunnel. With TP-Link firmware you must manually assign the devices that you want connected to the VPN tunnel. Proceed with the next steps to do so for all devices you want connected to VPN.

6. Click the Add button in the Device List area.

TP-Link add devices to VPN tunnel

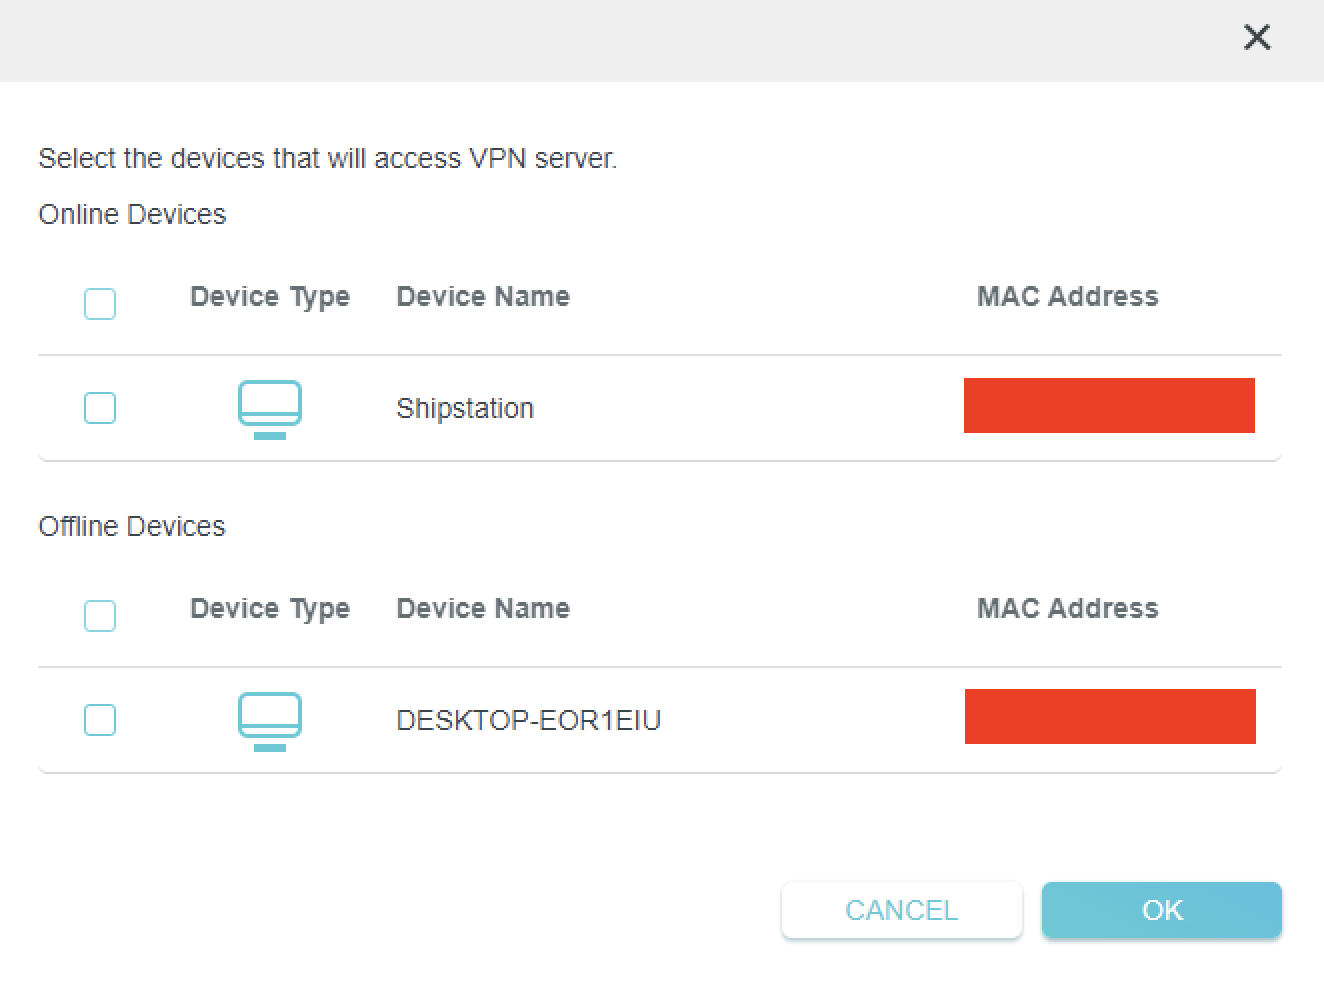
7. A list of devices connected to the FlashRouter’s network will appear. Check the devices that you want to connect to VPN. Then click OK.

TP-Link select devices to add to VPN tunnel

8. Now that the devices have been assigned to the VPN connection click the Enable toggle in the Server List area.

TP-Link NordVPN connected

Verify a successful NordVPN connection

  1. You should now see a CONNECTED message.
  2. Visit NordVPN’s IP Check to verify your new IP address and virtual location.

In some cases you may notice that the location is not showing the same location as the server you have input in your router settings; this is because geo tracking tools are often tricked by VPN connections. As long as you see an IP address that is not the same as your normal Internet IP address then you are indeed connected to NordVPN.

How to change the NordVPN server

  1. Follow the steps at the top of the page to obtain a new .ovpn file.
  2. Then proceed with the settings same as initial setup.

TROUBLESHOOTING

Still having issues? Visit the VPN Troubleshooting section.

Troubleshoot Here

Windscribe WireGuard Setup

TeamFlashRouters · Oct 13, 2021 ·

Preparing for Windscribe WireGuard Setup

Verify your Windscribe login information

If you are not already a Windscribe user Sign Up Now.

Log in to your account on the Windscribe website.

Windscribe Login

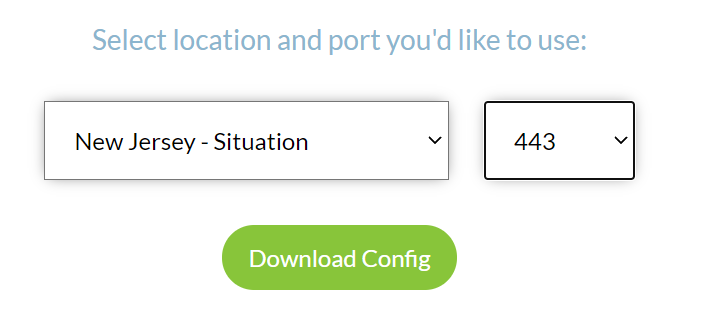
Go to the Windscribe WireGuard config generator page and select the Server location and Port you would like to use. Click Download Config.

Windscribe Wireguard select server location

Open the .conf file that is downloaded using Notepad in Windows or TextEdit in Mac.

DD-WRT Router Setup for Windscribe WireGuard

Navigate to Setup > Tunnels 

Enter Winscribe WireGuard settings

1. Click Add Tunnel.

2. Set Tunnel to Enable.

Setup - Tunnel - Enable Tunnel

3. Select Wireguard from the dropdown.

Setup - Tunnel - Select Wireguard

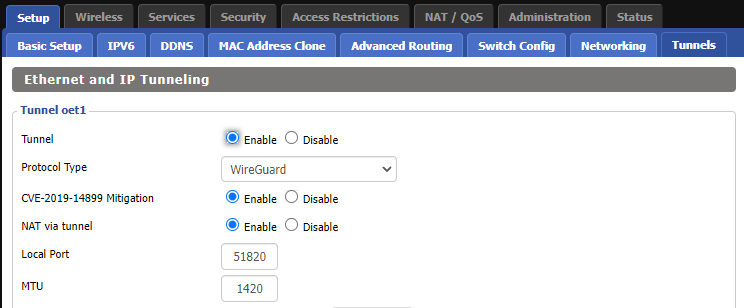
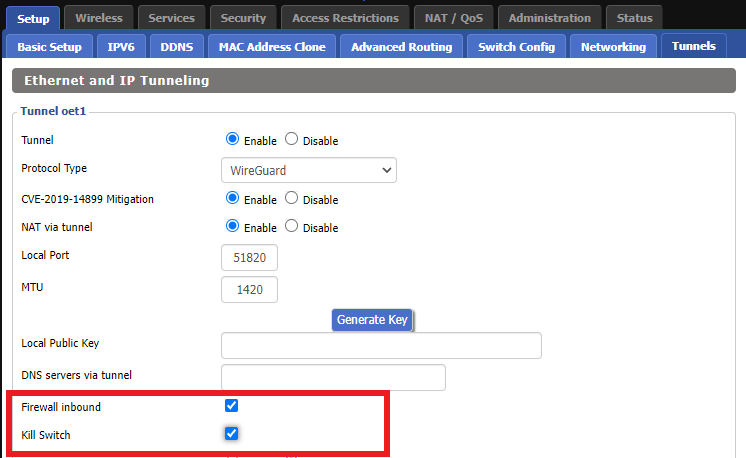
3. Set CVE-2019-14899 Mitigation to Enable. Set NAT via Tunnel to Enable. Set Local Port to 51820. Set MTU to 1420.

Windscribe Wireguard Basic Settings

4. Check Firewall inbound and Kill Switch.

Windscribe Wireguard enable Firewall and Kill Switch

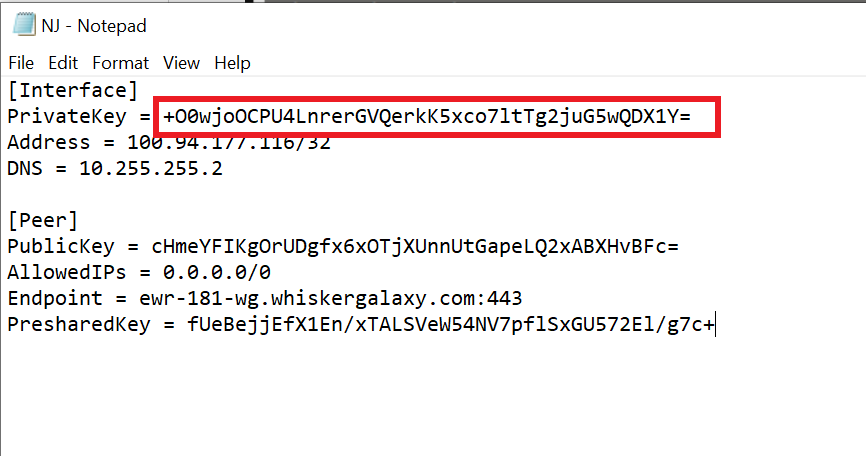
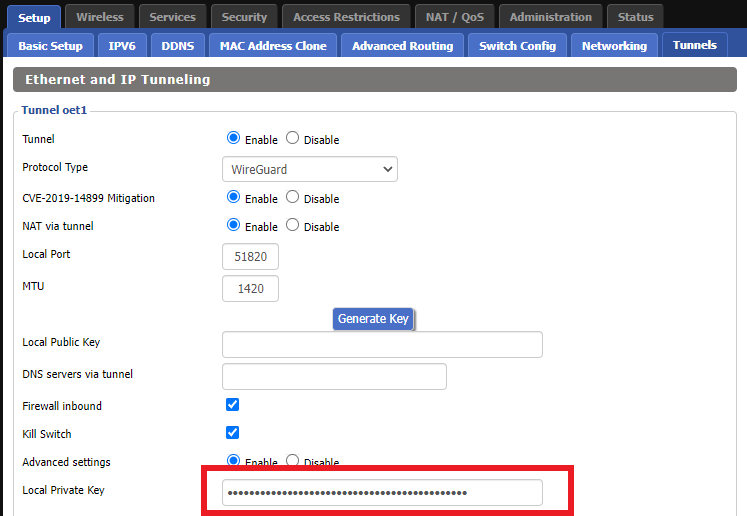
5. Set Advanced Settings to Enable and copy the PrivateKey from the .conf file and paste it into the Local Private Key field.

Windscribe Wireguard conf file PrivateKey
Windscribe Wireguard Local Private Key

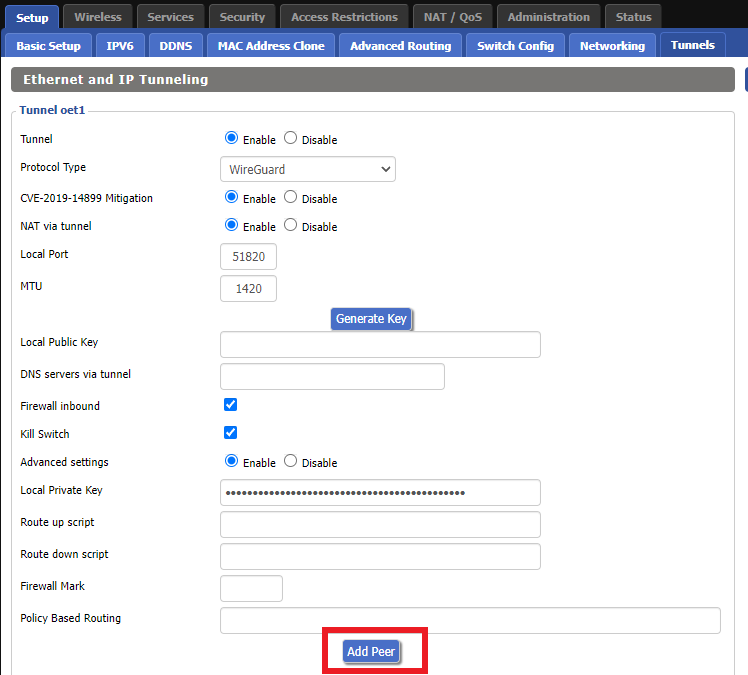
6. Click Add Peer.

Windscribe Wireguard Add Peer

7. Set Peer Tunnel IP to 0.0.0.0. Set Peer Tunnel DNS to the DNS found in the .conf file.

Windscribe Wireguard Peer Tunnel IP and DNS

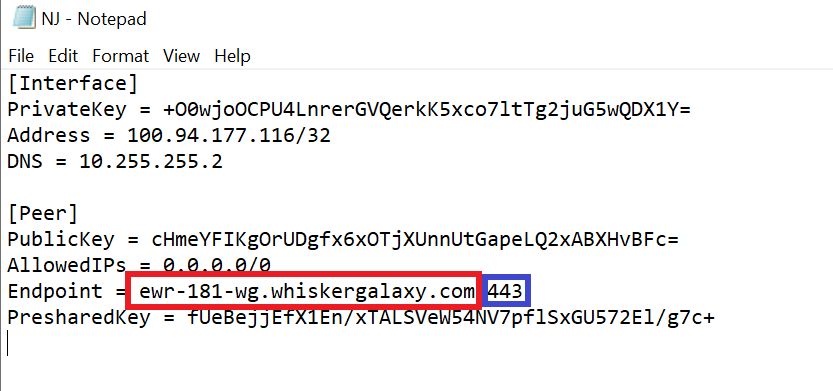
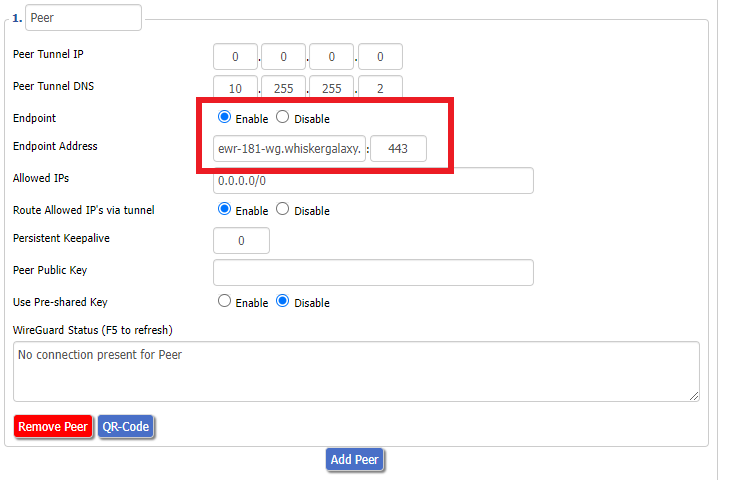
8. Set Endpoint to Enable. Copy and Paste the Endpoint from the .conf file and paste it into the Endpoint Address field. Enter the same Port that appears next to the Endpoint.

Windscribe Wireguard conf file Endpoint
Windscribe Wireguard paste Endpoint

9. Leave Allowed IPs as 0.0.0.0/0. Set Router Allowed IP’s via tunnel to Enable. Set Persistent Keep Alive to 25.

Windscribe Wireguard settings

10. Copy and Paste the PublicKey from the .conf file and paste it into the Peer Public Key field.

Windscribe Wireguard conf file PublicKey
Windscribe Wireguard Peer Public Key

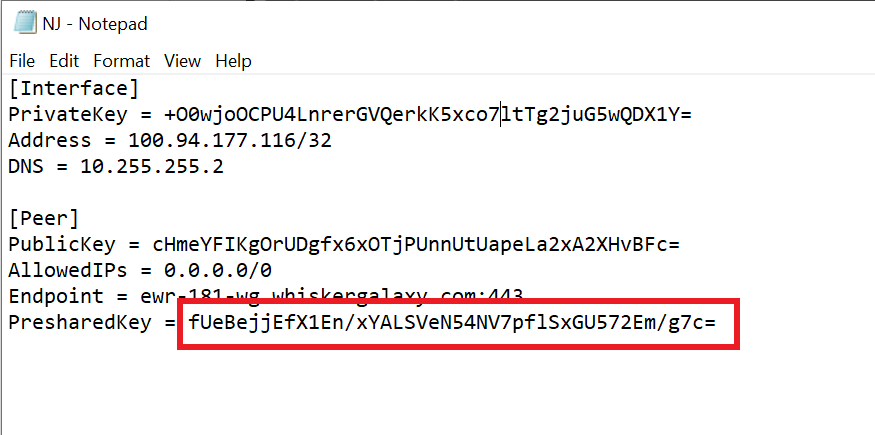
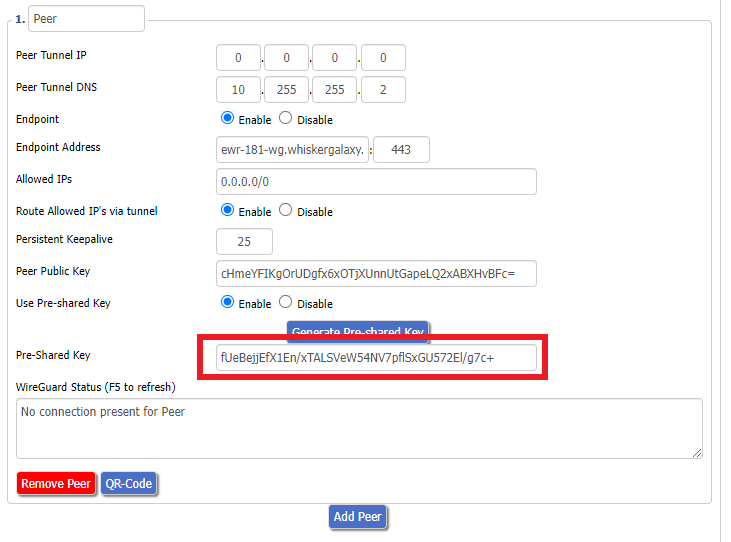
11. Set Use Pre-shared Key to Enable. Copy and Paste the Presharedkey from the .conf file and paste it into the Pre-Shared Key field.

Windscribe Wireguard conf file PresharedKey
Windscribe Wireguard Pre-shared Key

12. Copy the Address from the .conf file and paste it into the IP Addresses/Netmask(CIDR) field.

Windscribe Wireguard IP Address
Windscribe Wireguard conf file Address

Certain DD-WRT builds will show two separate fields here: IP Address and Subnet Mask. If that is the case set the IP Address field to the Address without the /32 added and set the Subnet Mask to 255.255.255.255

21. At the bottom of the page click Save and then click Apply Settings.

Verify a successful Winscribe connection

Navigate to Setup > Tunnels

  1. You should Endpoint, Latest handshake, and Transfer in the WireGuard status area.
  2. Visit whatismyipaddress.com to verify your status as using Winscribe.

Back up your settings

Navigate to Administration > Backup

  1. Click the Backup button.
  2. A file named nvrambak.bin will be saved to your computer.
  3. You can load nvrambak.bin to restore your settings in the event of a reset.

TROUBLESHOOTING

Still having issues? Visit the VPN Troubleshooting section.

Troubleshoot Here

ExpressVPN Setup Guide for Privacy Hero

TeamFlashRouters · Aug 14, 2025 ·

Your Privacy Hero router uses Cloud Based router management which means you can access the router settings from anywhere on any device that has an internet connection. You can follow these steps while connected to your phone, other Wi-Fi network, or the Privacy Hero network.

Use these steps to connect to ExpressVPN OpenVPN servers. First you will need to gather your unique OpenVPN login credentials and download the correct .ovpn file from the ExpressVPN website.

1. From any device that has a browser such as a computer, smartphone, or tablet visit app.privacyhero.com

App.PrivacyHero.com

2. Enter your Privacy Hero account email and password. Click Login.

Privacy Hero Access Settings

3. Click the VPN symbol.

Privacy Hero Setup VPN

4. Click the Change button and select Custom from the dropdown.

Privacy Hero Change VPN Providers

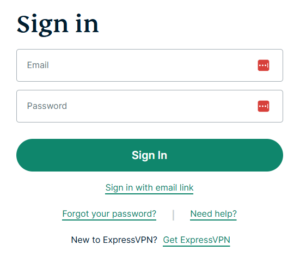
5. In a new tab login to your ExpressVPN account.

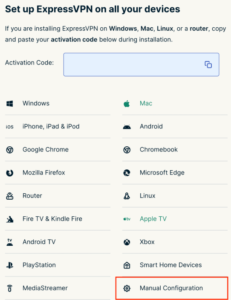
6. Select Manual Configuration from the menu options.

7. Copy and paste the username and password from the blue boxes into the Custom box on your Privacy Hero settings page.

8. Download a server file from any of the available regions shown in the ExpressVPN Manual Configuration section (Americas, Europe, Asia Pacific, etc)

9. Drag and drop or click to Upload the server file into the Custom box on your Privacy Hero settings page and then you will need to add one line to the top of the configuration.

10. At the top of your OpenVPN configuration add in the following line as shown in the picture above
proto udp
Now click the Save button.

11. Your Privacy Hero settings should now show a Connected message, indicating you have successfully signed in to your ExpressVPN server.

12. Connect to the Privacy Hero via WiFi or ethernet connection on your device and visit an IP checker from a private/incognito browser to verify your new IP address and virtual location.

Privacy Hero’s cloud based router settings access makes it so you can change settings while not connected to the Privacy Hero network so if your IP Address has not changed be sure to double check that you are indeed connected to the Privacy Hero network on the device you are checking your IP from.

Keep in mind that the VPN connection will not change the location of the streaming services listed in the Streaming Relocation area of the Privacy Hero settings if the Streaming Relocation feature is Enabled.
TROUBLESHOOTING

Still having issues? Visit the VPN Troubleshooting section.
Troubleshoot Here

Primary Sidebar

  • Troubleshooting
  • Router Access
  • Internet Connection Issues
  • WiFi Connectivity
  • General VPN Issues
  • TeamViewer Remote Support
  • DD-WRT Firmware
  • Facebook
  • Twitter
  • Instagram
  • Pinterest
  • YouTube

Footer