• Skip to primary navigation
  • Skip to main content
  • Skip to primary sidebar
  • Skip to footer

FlashRouters Support Portal

Prioritizing Privacy

  • SETUP GUIDES
    • Privacy Hero Router Setup Guide
    • ASUS-WRT Router Setup Guide
    • AsusWRT-Merlin Router Setup Guide
    • DD-WRT Router Setup Guide
    • ExpressVPN Router Setup Guide
    • GL.iNet Router Setup Guide
    • Roqos Core Router Setup Guide
  • TROUBLESHOOTING
    • Router Access
    • WiFi Connectivity
    • Internet Connection Issues
    • General VPN Issues
    • DD-WRT Firmware
    • TeamViewer Remote Support
  • FAQs
    • Router FAQs
    • VPN FAQs
    • Warranty and Returns FAQs
    • Sales FAQs
    • Shipping FAQs
    • Service Plan FAQs
  • Show Search
Hide Search

Search Results for: fonts in use pi

PPPoE Internet Setup

TeamFlashRouters · Mar 21, 2019 ·

Most ISPs do not require PPPoE credentials. If you are certain this is an ISP requirement in your setup, we kindly ask that you get in touch with your ISP to verify that they do in fact require PPPoE authentication and to provide you with the correct credentials to enter into your FlashRouter.

Before you enter your PPPoE credentials, you should have already setup your FlashRouter in a Single Router Setup with correct wiring. Once you enter PPPoE credentials you should then be able to connect to the internet.

If you are using a Dual Router Setup there is no need to enter PPPoE credentials if they are already entered in the existing router. You can disregard this article.

Enter your PPPoE credentials

DD-WRT Firmware

Navigate to Setup > Basic Setup
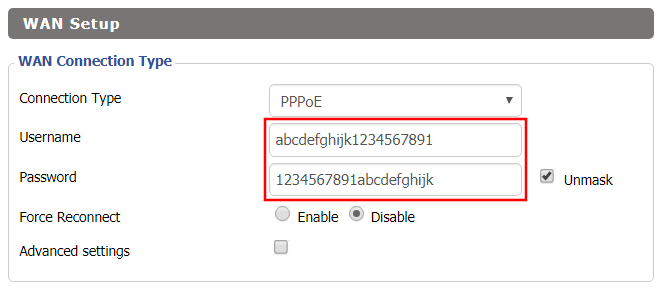
Access FlashRouters DD-WRT Admin Settings - Enter PPPOE Username and Password
  1. Set the Connection Type dropdown to PPPoE.
  2. Enter your ISP assigned PPPoE username and password.
  3. Click Apply Settings.

Power cycle your network devices

  1. Power off your ISP modem and the FlashRouter.
  2. Power on the ISP modem and wait for it to fully boot up.
  3. Power on the FlashRouter.

Verify a successful Internet connection

Once the FlashRouter is booted up connect one of your devices to the FlashRouter via Ethernet or Wireless.

Visit any website and make sure the page fully loads. Once you have verified a successful Internet connection, begin connecting your network devices to the FlashRouter via wired or WiFi.

Please be aware that our support is not able to replicate PPPoE issues on our end, which makes them challenging to troubleshoot. In the event of an issue we recommend using a Dual Router Setup.
SmartDNSProxy SmartDNS Setup

TeamFlashRouters · Jun 13, 2019 ·

SmartDNSProxy offers a SmartDNS service for unblocking geo-restricted content without the encryption of a VPN service. SmartDNS routes DNS servers to different regions which “tricks” the website to allow access to previously restricted content.

SmartDNS does not change your IP Address or provide the encryption that a VPN connection does. This can result in faster speeds and unblocked content.

SmartDNS and VPN should not be configured at the same time. When using a SmartDNS connection, make sure to disable your VPN connection on the FlashRouter.

Register your IP Address

If you are not already a SmartDNSProxy user Sign Up Now.

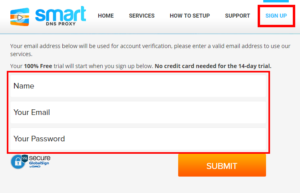
Click on Sign Up and fill in the requested information.

SmartDNSProxy SmartDNS Account Sign Up For DD-WRT FlashRouter

Access the e-mail you entered and Verify your new account.

SmartDNSProxy SmartDNS Activate DNS for DD-WRT FlashRouter

Your account will now be verified.

Activate SmartDNSProxy SmartDNS Service and Subscription

Login to SmartDNSProxy

SmartDNSProxy Server Location Addresses for FlashRouter DD-WRT Settings

Visit SmartDNSProxy’s DNS servers list and note the DNS servers of the location you would like to access content from.

Enter SmartDNSProxy SmartDNS servers on your FlashRouter

Navigate to Setup > Basic Setup

  1. Scroll down to Network Address Server Settings (DHCP).
  2. Enter in any combination of SmartDNSProxy SmartDNS servers you noted into Static DNS fields 1 and 2.
  3. Click Apply Settings at the bottom of the page.
  4. Reboot the FlashRouter.

Once the router is fully booted back up, you can access your desired regional content on any device that connects to the FlashRouter’s network.

Getflix SmartDNS Setup

TeamFlashRouters · Apr 4, 2019 ·

Getflix offers a SmartDNS service for unblocking geo-restricted content without the encryption of a VPN service. SmartDNS routes DNS servers to different regions which “tricks” the website to allow access to previously restricted content.

SmartDNS does not change your IP Address or provide the encryption that a VPN connection does. This can result in faster speeds and unblocked content.

SmartDNS and VPN should not both be configured at the same time. When using a SmartDNS connection make sure to disable your VPN connection on the FlashRouter.

Login to Getflix

If you are not already a Getflix user Sign Up Now.

New customer Signup for GetFlix SmartDNS Service

Login to Getflix’s website login page.

Visit Getflix’s DNS servers list page and note the DNS servers of the location you would like to access content from.

Getflix DNS Server Location Addresses for FlashRouter DD-WRT Settings

Enter Getflix SmartDNS servers on your FlashRouter

Navigate to Setup > Basic Setup

  1. Scroll down to Network Address Server Settings (DHCP).
  2. Enter in any combination of Getflix SmartDNS servers you noted into Static DNS fields 1 and 2.
  3. Click Apply Settings at the bottom of the page.
  4. Reboot the FlashRouter.

Register your IP Address

When the router is fully booted back up visit your Getflix user dashboard and make sure your IP Address is registered with Getflix. If it is not click Force IP Update.

Register IP Address for Getflix use on FlashRouter DD-WRT

Once you are successfully registered you can now access your desired regional content on any device that connects to the FlashRouter’s network.

How do I boost my Wireless Transmission power?

Dave · Apr 29, 2019 ·

Boost the wireless transmission power if you need to increase the wireless range of the FlashRouter.

Important Information

We recommend reading the entry in the DD-WRT Wiki to familiarize yourself with what TX Power values represent.

Broadcom routers

  • Netgear R8500
  • Netgear R7000
  • Netgear R6400 V2
  • Netgear R6300 V2
  • Asus RT-AC5300
  • Asus RT-AC66U
  • Asus RT-AC56U

Navigate to Wireless > WL# or ath# Advanced

  1. Set the TX Power to the desired value.
  2. Click Apply Settings.
Boost TX Power in DD-WRT Advanced Wireless Settings page to Increase Wireless Transmission

Atheros routers

  • Netgear R9000
  • Netgear R7800
  • Linksys WRT3200ACM
  • LinksysWRT32X
  • Linksys WRT1900AC/v2/ACS
  • LinksysWRT1200AC

Navigate to Wireless > Basic Settings

  1. Check Advanced Settings under the wireless interface you would like to boost.
  2. Set the TX Power to the desired value.
  3. Click Apply Settings.
Boost TX Power in DD-WRT Advanced Wireless Settings page to Increase Wireless Transmission

We advise to proceed with caution when setting the TX Power. This has been known to negatively effect the hardware if set too high.

IPv6 Internet Setup

TeamFlashRouters · Apr 3, 2019 ·

Most ISPs only support IPv4. Unless your ISP supports IPv6 then enabling it on the FlashRouter will not enable it across your network.

For most VPN users IPv6 should remain disabled as the VPN connection was designed to operate under IPv4 addresses only. Enabling IPv6 in this instance may compromise the security of the VPN tunnel.

We typically only recommend enabling IPv6 if you are not using VPN or if your VPN provider requires that IPv6 be enabled.

Enable IPv6

Navigate to Setup > IPv6

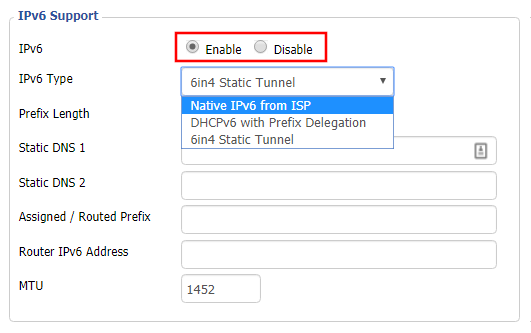
Access FlashRouters DD-WRT Admin Settings and Disable Remote Access
  1. Set IPv6 to Enable.
  2. Select Native IPv6 from ISP in the dropdown.
  3. If you have specific IPv6 DNS servers you would like to add you can add them in the Static DNS fields or leave those fields blank.
  4. Click Apply Settings.

Power cycle your FlashRouter

Power your FlashRouter off and then power it back on by unplugging and then plugging it back in or using the button on the back of the FlashRouter.

Verify a successful IPv6 connection

Once the FlashRouter is finished powering back up, connect one of your devices to the FlashRouter via Ethernet or Wireless.

Visit  http://ipv6-test.com/ where you should see Supported under IPv6 connectivity if your ISP supports IPv6 and your modem is setup to passthrough IPv6.

Please be aware that we can not replicate ISP specific IPv6 issues, which makes them challenging to troubleshoot. We recommend contacting your ISP as the first step of troubleshooting.

What are some extra steps I can take to secure my network?

TeamFlashRouters · May 30, 2019 ·

DD-WRT open source firmware removes many firmware vulnerabilities and backdoor access issues that may cause problems in stock firmware. DD-WRT is also updated more frequently than stock firmware, so be sure to always check with the FlashRouter support team to see which DD-WRT build we recommend for the highest level of security for your router at any time.

Aside from avoiding common issues and flaws with stock firmware, DD-WRT give you more control over the firmware settings and allows you to take some extra steps to really lock down your network security. In this article we highlight additional options for WiFi network security and also preventative measures for remote execution attacks.

Wireless MAC Filtering

Navigate to Wireless > MAC Filter

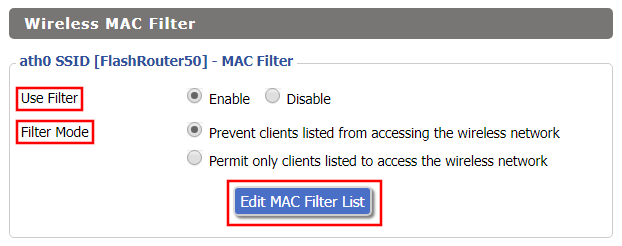
Access FlashRouters DD-WRT Admin Enable MAC Filtering
  1. Set Use Filter to Enable.
  2. Select either Prevent or Permit
    • Choose Prevent to add MAC addresses that you don’t want to join your network.
    • Choose Permit to add MAC addresses that you do want to join your network, automatically blocking all others.
  3. Select Edit MAC Filter List.
  4. Add the MAC Address of the wireless devices you want to prevent or permit. Be sure to use the xx:xx:xx:xx:xx:xx format. Hint: You can see a list of connected devices MAC Address by clicking Wireless Client MAC List.
  5. Click Save.
  6. Replicate the steps above for each wireless band.
  7. Click Apply Settings.

Disable Remote Access

Navigate to Services > Services

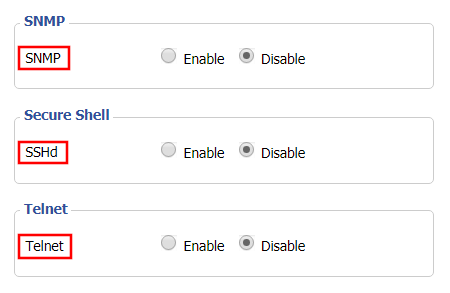
Access FlashRouters DD-WRT Admin Settings and Disable Remote Access
  1. Set SNMP to Disable – this setting disables Simple Network Management Protocol, which prevents software from polling your network for information about connected devices.
  2. Set SSHd to Disable – disabling the Secure Shell is a simple way to prevent root access and brute force attacks on your network.
  3. Set Telnet to Disable – Telnet is a less secure version of SSH to manage your local router network via command line.
  4. Click Apply Settings.

Navigate to Administration > Management

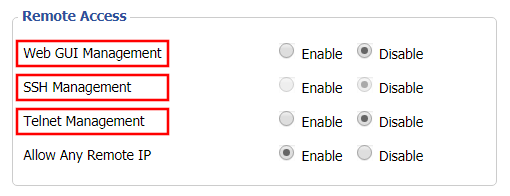
Access FlashRouters DD-WRT Admin Settings and Disable Remote Access 2
  1. Set Web GUI Management to Disable.
  2. Set SSH Management to Disable.
  3. Set Telnet Management to Disable.
  4. Set Allow Any Remote IP to Enable – Even though this setting is set to Enable there is no remote access because Web GUI Management is already set to Disable. 
  5. Click Apply Settings.
« Previous Page

Primary Sidebar

  • Troubleshooting
  • Router Access
  • Internet Connection Issues
  • WiFi Connectivity
  • General VPN Issues
  • TeamViewer Remote Support
  • DD-WRT Firmware
  • Facebook
  • Twitter
  • Instagram
  • Pinterest
  • YouTube

Footer