• Skip to primary navigation
  • Skip to main content
  • Skip to primary sidebar
  • Skip to footer

FlashRouters Support Portal

Prioritizing Privacy

  • SETUP GUIDES
    • Privacy Hero Router Setup Guide
    • ASUS-WRT Router Setup Guide
    • AsusWRT-Merlin Router Setup Guide
    • DD-WRT Router Setup Guide
    • ExpressVPN Router Setup Guide
    • GL.iNet Router Setup Guide
    • Roqos Core Router Setup Guide
  • TROUBLESHOOTING
    • Router Access
    • WiFi Connectivity
    • Internet Connection Issues
    • General VPN Issues
    • DD-WRT Firmware
    • TeamViewer Remote Support
  • FAQs
    • Router FAQs
    • VPN FAQs
    • Warranty and Returns FAQs
    • Sales FAQs
    • Shipping FAQs
    • Service Plan FAQs
  • Show Search
Hide Search

Search Results for: class of ip add

Surfshark Merlin WireGuard Setup

TeamFlashRouters · Mar 30, 2023 ·

Preparing for Surfshark Merlin Setup

Download your Surfshark .conf file

If you are not already a Surfshark user Sign Up Now.

1. Log in to your account on the Surfshark website.

Surfshark Account Login

2. Click VPN Manual Setup.

Surfshark VPN Manual Setup

3. Select Router as the Setup Method.
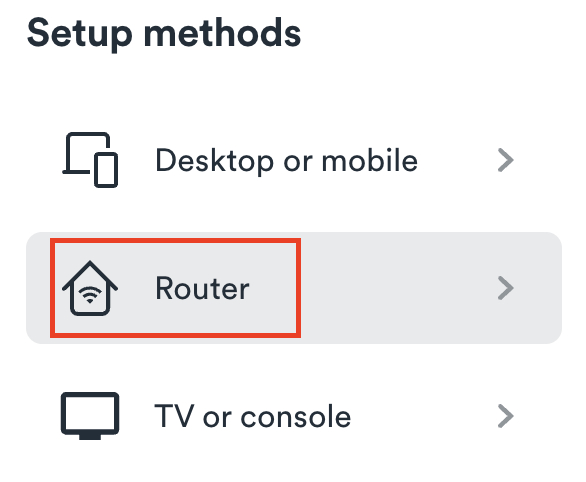
Surfshark setup method Router

4. Select WireGuard as the Protocol.

Surfshark select WireGuard

5. Select I don’t have a key pair.

Surfshark No Key Pair

6. Enter FlashRouter as the name of the connection and click Next.

Surfshark Connection Name

7. Click Generate a new key pair.

Surfshark Generate new Key Pair

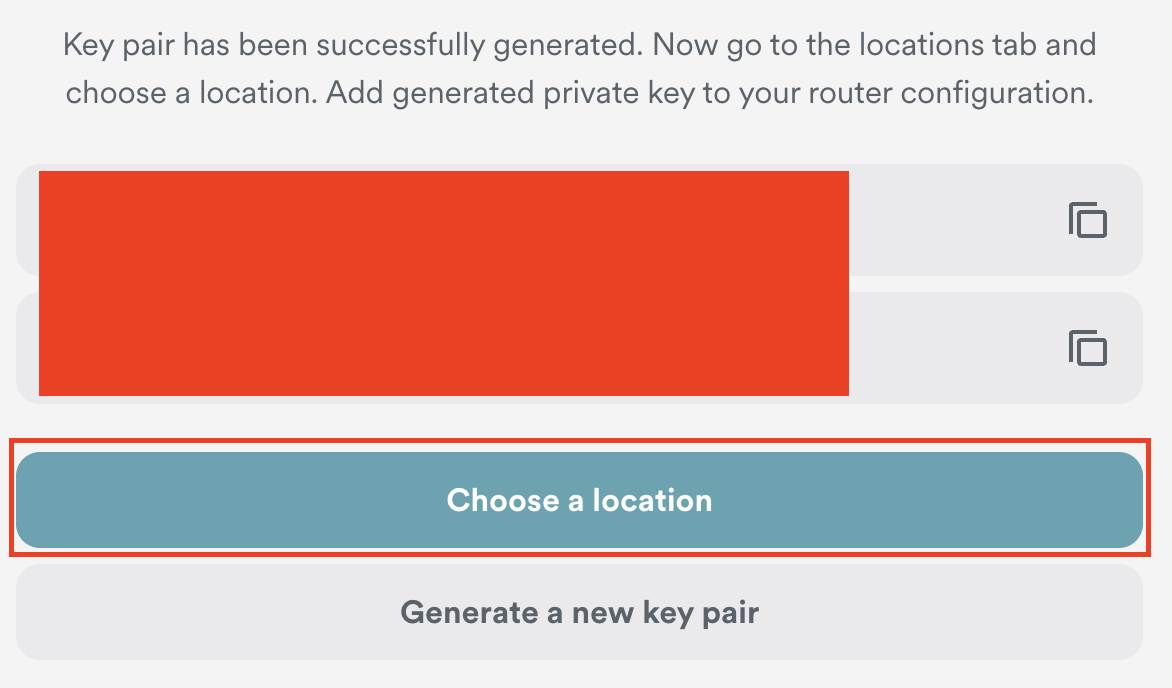
8. Click Choose a location.

Surfshark Choose a Location

9. Select the server location you want to connect to. Unless you need a specific location we recommend using Surfshark’s recommended Fastest server. Click Download to download the .conf file for this Surfshark server location.
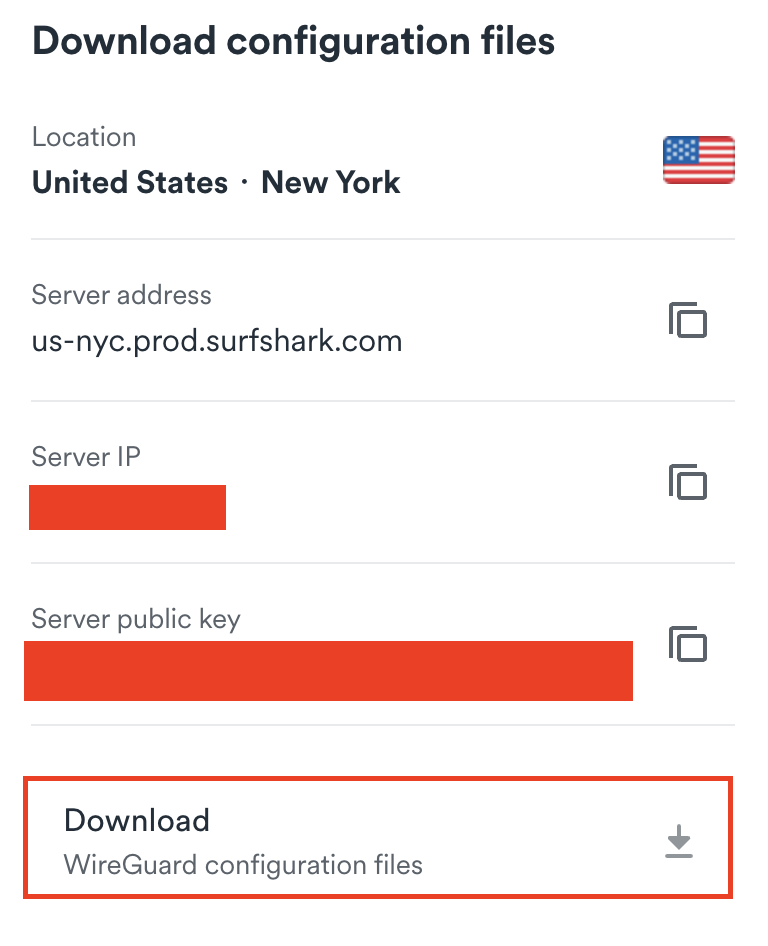
Surfshark download conf file

Merlin Router Setup for Surfshark

Login to Asus Merlin firmware settings in a browser on any computer or smart device connected to the Merlin FlashRouter’s network.

1. Navigate to the VPN tab.

Merlin VPN Tab

2. Navigate to the VPN Client tab.

Merlin VPN Client Tab

3. Select WireGuard as the VPN Protocol.

Merlin VPN Client WireGuard

4. Click Choose file and select the .conf file you downloaded earlier. Then click Upload.
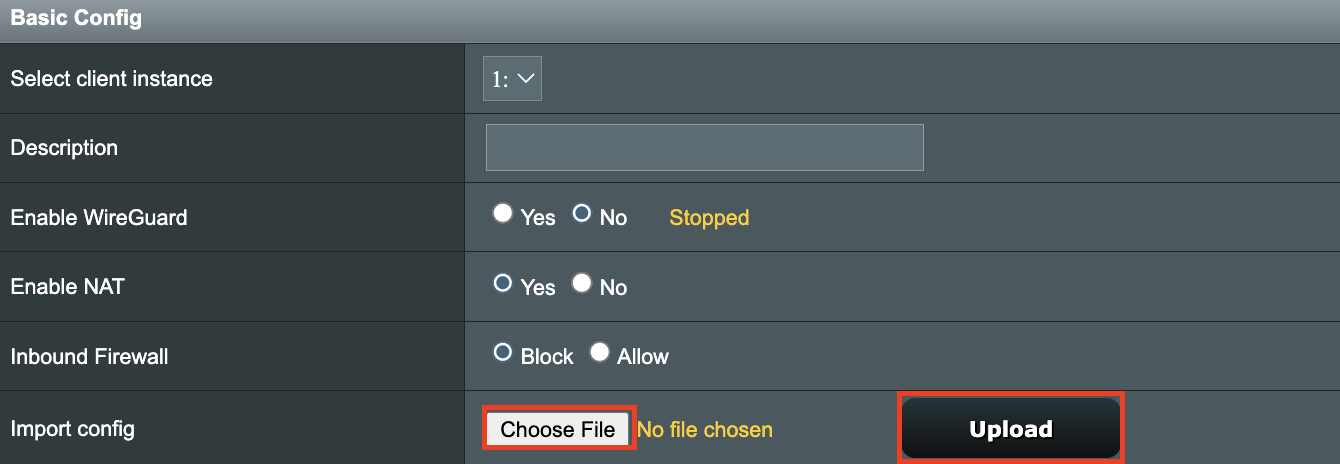
Merlin WireGuard Choose File Upload

5. In the Description field enter in the name you’d like to use for this WireGuard Client profile. We typically advise entering in the location here. Our example server was in New York so I have entered in Surfshark New York.

Merlin WireGuard ProtonVPN Description

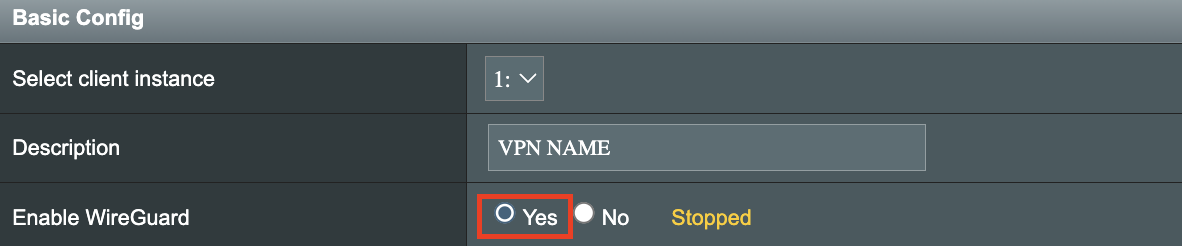
6. Set Enable WireGuard to Yes.

Merlin Enable WireGuard

7. Click Apply at the bottom of the page and you should then see a Connected message appear.
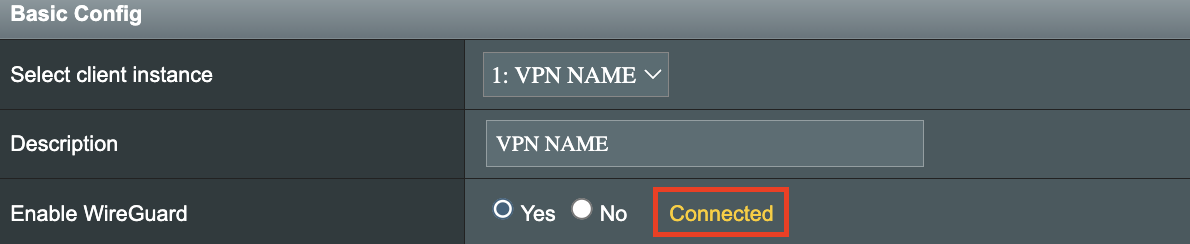
Merlin WireGuard Connected

8. By default no devices are assigned to the new active WireGuard connection profile. Click the VPN Director tab to assign specific devices to the new WireGuard profile. Your IP will not be changed on your devices yet.

WireGuard select VPN Director

9. On the VPN Director page click the + symbol next to Add new rule.
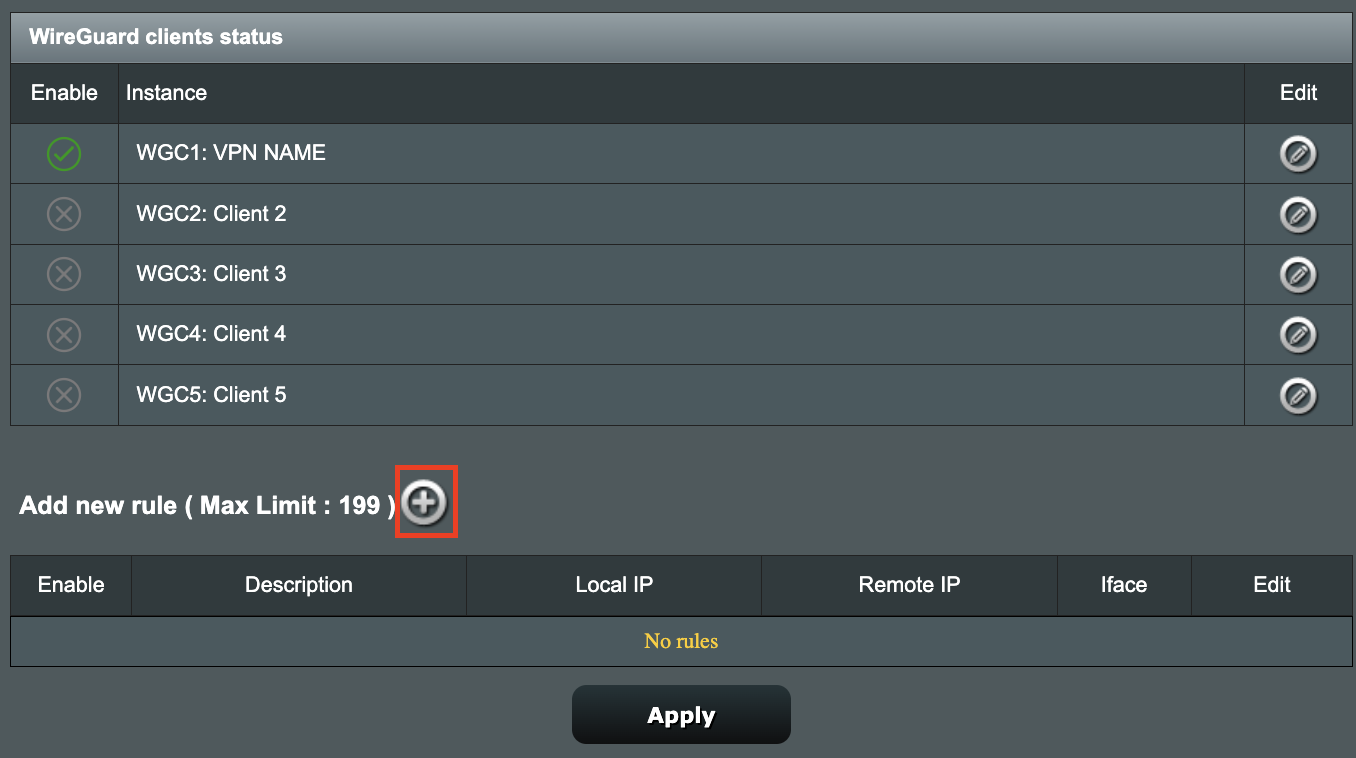
WireGuard VPN Director Add new rule

10. Select the new WireGuard profile in the Interface dropdown.
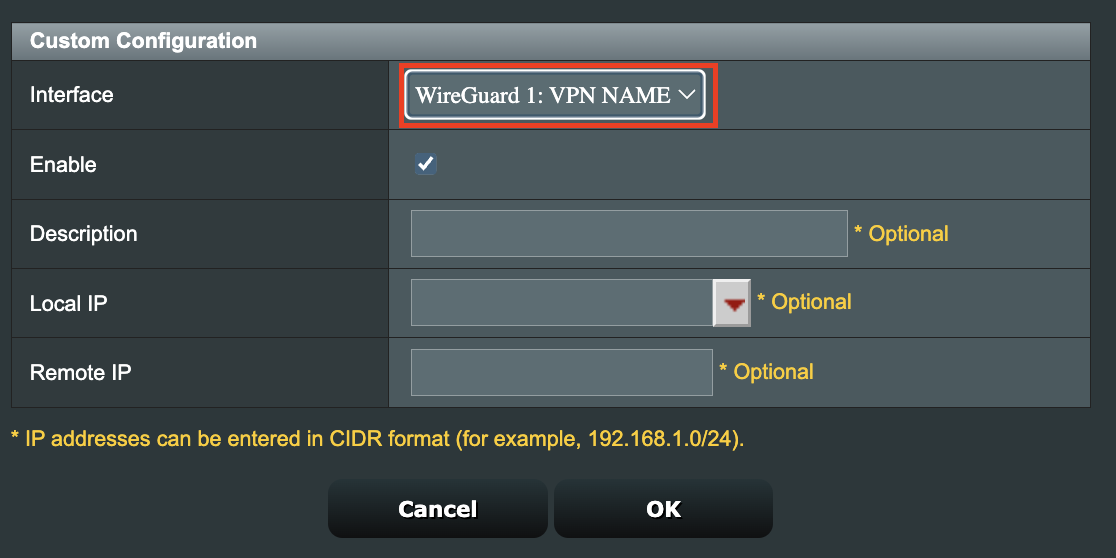
WireGuard VPN Director select Interface

11. In the Local IP field enter in 192.168.50.0/24 if you want ALL devices connected to the FlashRouter’s network to use the WireGuard VPN connection. Click OK.

If you only want certain devices to connect to the WireGuard Client profile you have setting up instead of all the devices connected to the FlashRouter’s network please complete the instructions on our VPN Director guide.

12. Then click Apply at the bottom of the page.

Verify a successful Surfshark connection

Visit Surfshark’s IP Check from a private/incognito browsing window to verify your new IP address and virtual location.

In some cases you may notice that the location is not showing the same location as the server you have input in your router settings; this is because geo tracking tools are often tricked by VPN connections. As long as you see an IP address that is not the same as your normal Internet IP address then you are indeed connected to Surfshark.

How to change the Surfshark server

  1. Follow the steps at the top of the page to obtain a new .conf file.
  2. Then proceed with the settings same as initial setup.
TROUBLESHOOTING

Still having issues? Visit the VPN Troubleshooting section.

Troubleshoot Here

PureVPN Merlin WireGuard Setup

TeamFlashRouters · Jul 20, 2023 ·

Preparing for PureVPN Merlin Setup

Download your PureVPN .conf file

If you are not already an PureVPN user Sign Up Now.

1. Log in to your account on the PureVPN website.

PureVPN Login

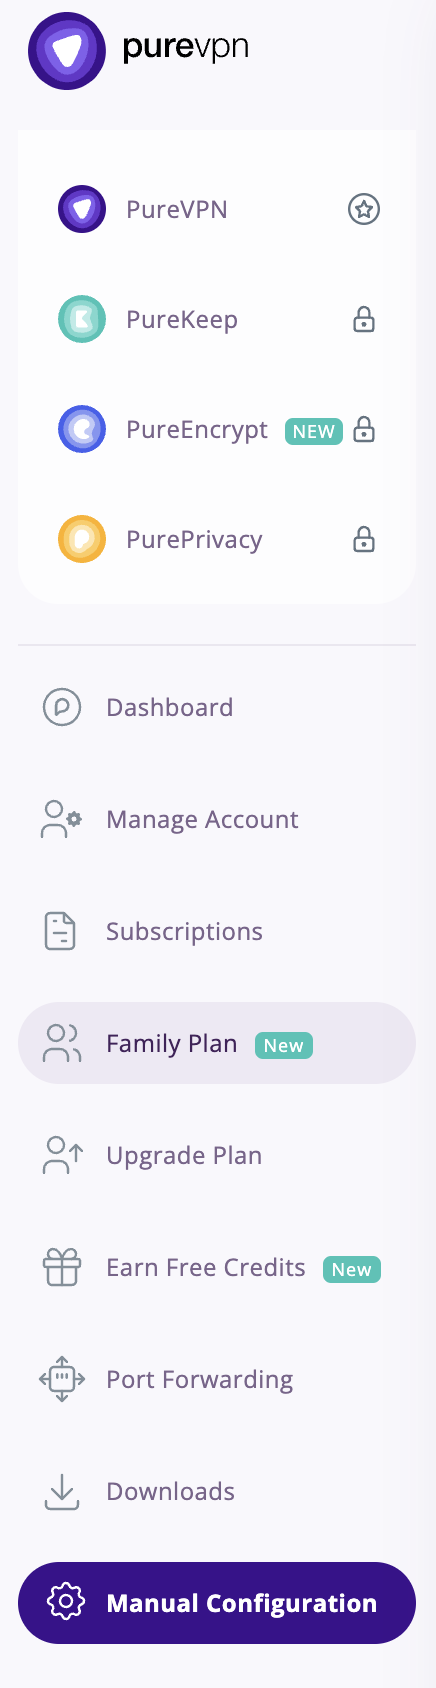
2. Select Manual Configuration.

PureVPN Manual Configuration

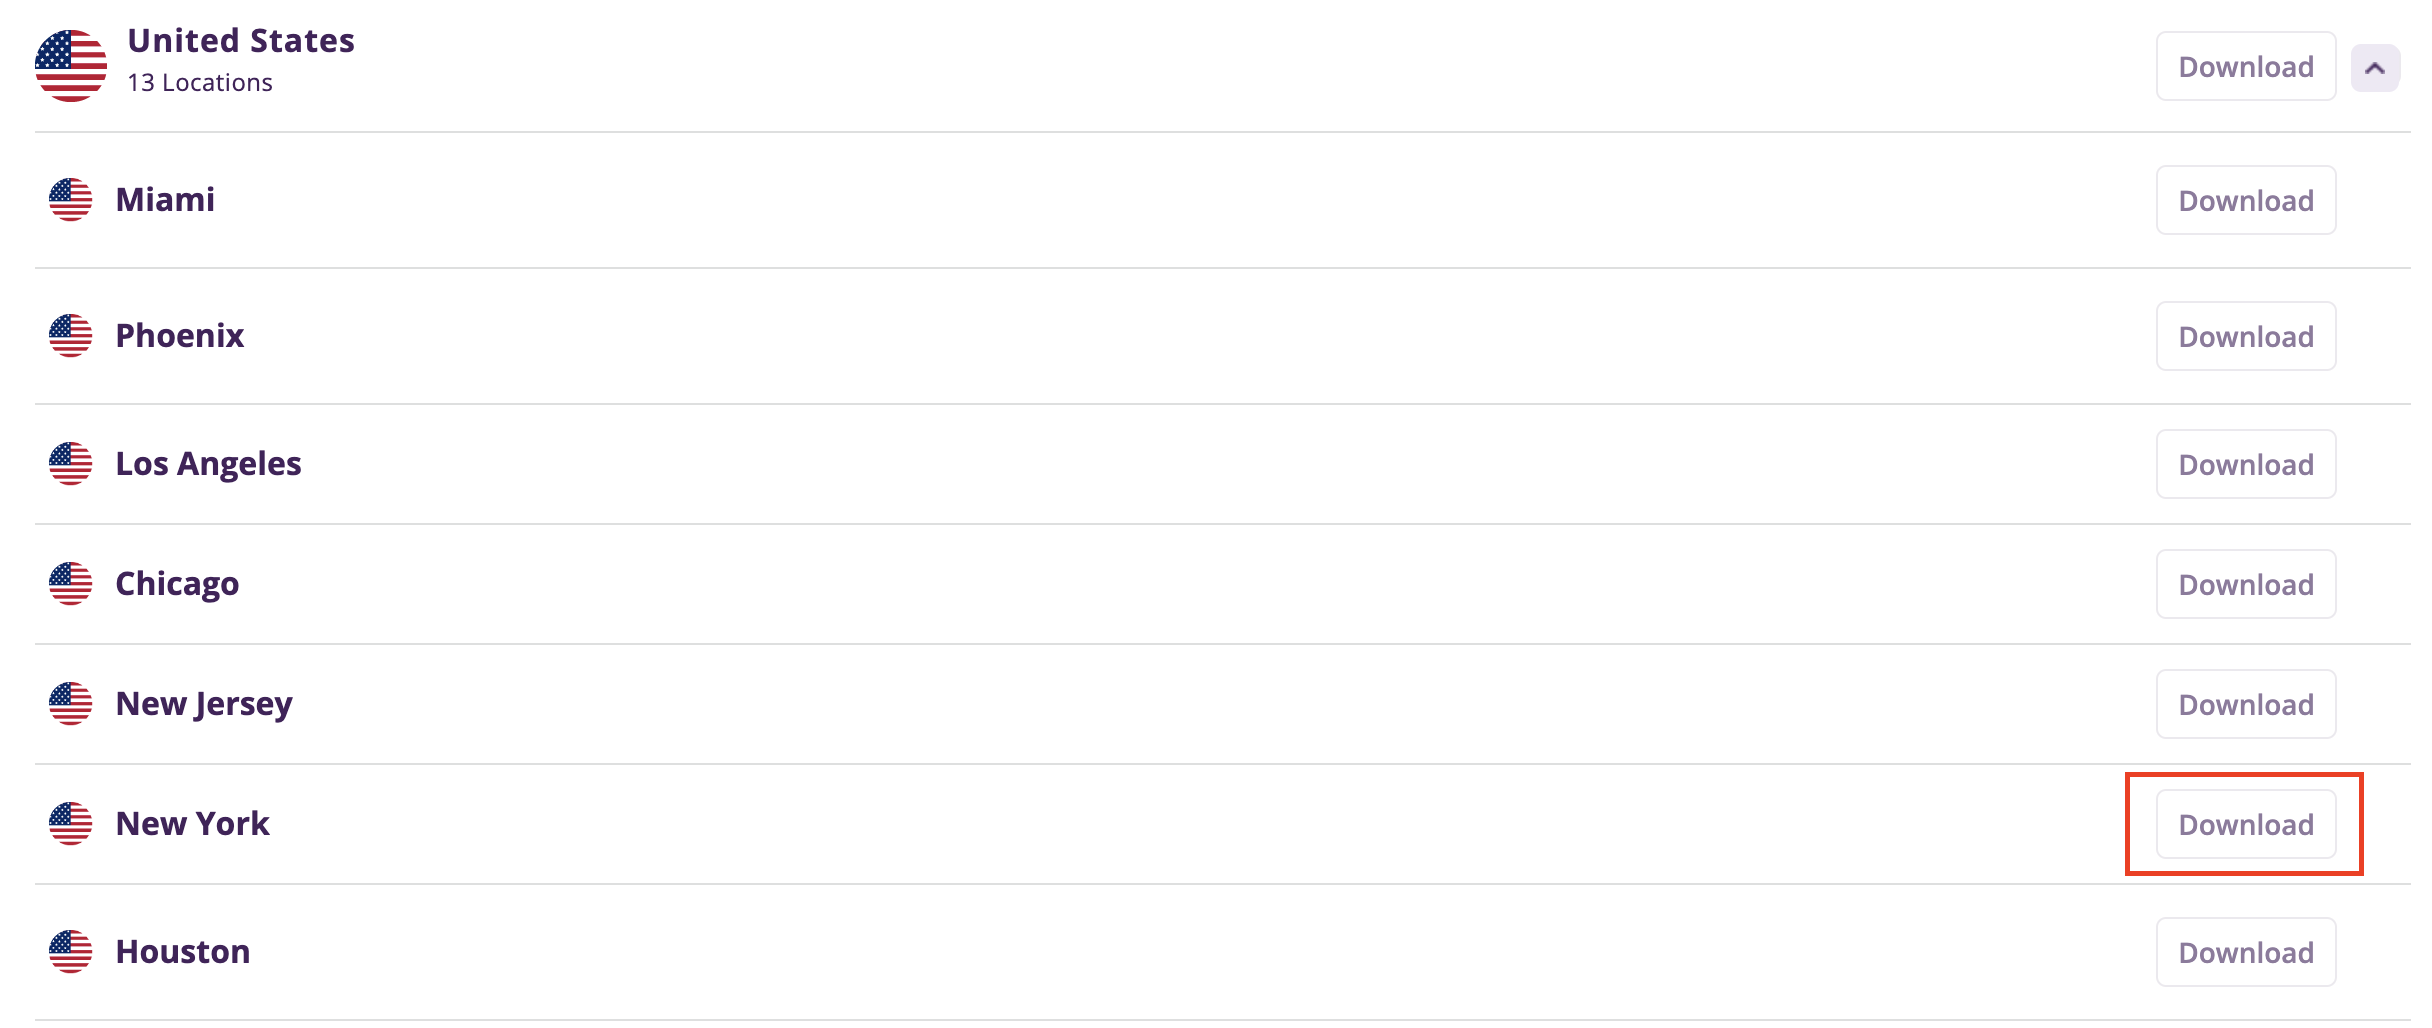
3. Select the Server Location you want to connect to and then click Download.

PureVPN select server location

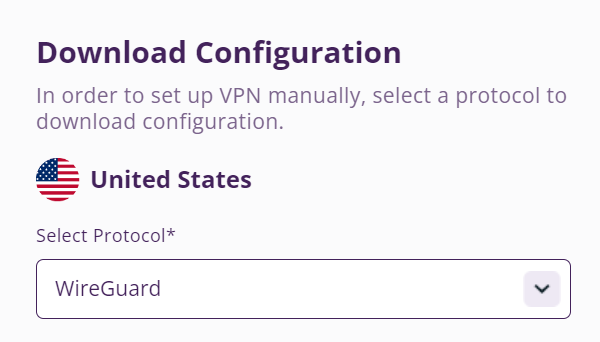
4. In the Select Protocol dropdown choose WireGuard.

PureVPN WireGuard

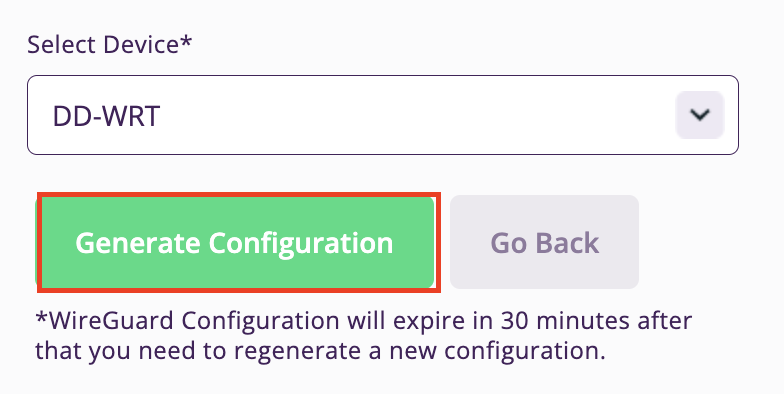
5. In the Select Device dropdown choose DD-WRT. Then click Generate Configuration. This will save a .conf file to your computer.

PureVPN Generate Config

Merlin Router Setup for PureVPN

Login to Asus Merlin firmware settings in a browser on any computer or smart device connected to the Merlin FlashRouter’s network.

1. Navigate to the VPN tab.

Merlin VPN Tab

2. Navigate to the VPN Client tab.

Merlin VPN Client Tab

3. Select WireGuard as the VPN Protocol.

Merlin VPN Client WireGuard

4. Click Choose file and select the .conf file you downloaded earlier. Then click Upload.

Merlin WireGuard Choose File Upload

5. In the Description field enter in the name you’d like to use for this WireGuard Client profile. We typically advise entering in the location here.

Merlin WireGuard ProtonVPN Description

6. Set Enable WireGuard to Yes.

Merlin Enable WireGuard

7. Click Apply at the bottom of the page and you should then see a Connected message appear.

Merlin WireGuard Connected

8. By default no devices are assigned to the new active WireGuard connection profile. Click the VPN Director tab to assign specific devices to the new WireGuard profile. Your IP will not be changed on your devices yet.

WireGuard select VPN Director

9. On the VPN Director page click the + symbol next to Add new rule.

WireGuard VPN Director Add new rule

10. Select the new WireGuard profile in the Interface dropdown.

WireGuard VPN Director select Interface

11. In the Local IP field enter in 192.168.50.0/24 if you want ALL devices connected to the FlashRouter’s network to use the WireGuard VPN connection. Click OK.

If you only want certain devices to connect to the WireGuard Client profile you have setting up instead of all the devices connected to the FlashRouter’s network please complete the instructions on our VPN Director guide.

12. Then click Apply at the bottom of the page.

Verify a successful PureVPN connection

Visit PureVPN’s IP Check to verify your new IP address and virtual location.

In some cases you may notice that the location is not showing the same location as the server you have input in your router settings; this is because geo tracking tools are often tricked by VPN connections. As long as you see an IP address that is not the same as your normal Internet IP address then you are indeed connected to PureVPN.

How to change the PureVPN server

  1. Follow the steps at the top of the page to obtain a new .conf file.
  2. Then proceed with the settings same as initial setup.
TROUBLESHOOTING

Still having issues? Visit the VPN Troubleshooting section.

Troubleshoot Here

Router FAQs

admin · Jan 29, 2019 ·

Router FAQs

What is an IP Address?

An IP (Internet Protocol) Address is a numerical assignment for each device (cell phone, iPad, laptop computer, printer etc) inside a network that uses the Internet Protocol for communication. Internet Protocol is responsible for routing information packets across network boundaries. It is the main protocol establishing the Internet.

An IP address serves two predominant functions. First is to host or network interface identification. Second, it provides location addressing. To put it bluntly, an IP address tells wherever you are connecting, to whom you are visiting, and where you are located.

What is DNS?

DNS (Domain Name System) is a protocol within the TCP/IP protocol that uses a set of standards for how computers exchange data on the Internet and on many private networks.

The basic job of DNS is to convert a user-friendly domain name into an IP address that computers use to identify one another. Think of DNS like your cellphone contact list; you tap the name and the phone contacts to a phone number.

It is easier to remember flashrouters.com, rather than its IP address. Imagine if you had to remember all of the IP addresses of your favorite websites!

What is DNSMasq?

DNSMasq is a local DNS server that speeds up host-name searches from your computer/Internet connection after pressing enter.

Basically, DNSMasq gives the router some advanced enterprise functionality – caching DNS records locally so you have a faster browsing experience. Your computer only has to go to the router instead of repeatedly scouring the web for a commonly visited site.

What is Throughput and How Do I Improve it?

Throughput is the average rate of successful delivery of messages through a network. Simply put, throughput measures the speed of message delivery inside a network. If you think about it in relationship to networks and Internet connections, throughput defines the user experience. The key to a pleasing user experience is uninterrupted service and smooth data transfer.

In order to improve throughput,  you should get a router with more memory. If you notice that your network is running slowly due to congestion, you could probably benefit by upgrading your router to one with more memory. FlashMemory and RAM on a router add more room to prevent network congestion and improve throughput.

Most of FlashRouters‘ high-end units come with at least 8 MB of Flash memory and 64 MB of RAM which should be more than capable for providing for the average home users’ or small business will need in the future.

What is PPPoE?

PPPoE stands for Point-to-Point Protocol over Ethernet, a network protocol for encapsulating Point-to-Point Protocol (PPP) frames inside Ethernet frames. It is used mainly with DSL services where individual users connect to a DSL modem over Ethernet.

With PPPoE, users virtually “dial” from one machine to another over an Ethernet network, establish a point-to-point connection and then data packets are securely transported through the connection.

PPPoE offers an Internet service provider (ISP) an easier way to track exactly how much bandwidth you are using in case they want to charge for it in the future.

What is the Difference Between VPN Encryption and Wireless Network Security?

VPN Encryption: If you are connected to the VPN on your home network, then any data that flows over the Internet is entirely encrypted whether you are connected to the Internet either wired or wirelessly. This means that if your Local ISP was trying to see what you are browsing or downloading, they would not be able to see your data.

Wireless Network Security: If you leave your wireless network open or insecure, it does not matter whether Internet traffic is encrypted, because someone can directly see what you are doing on your network, or even worse, can go in and put a wireless password on your network, locking you out. They may also be able to access folders and files on your computer without your control.

Best thing to do is protect your wireless network with a WPA secured password along with your VPN connection.

Are FlashRouters Affected By the Shellshock Bug?

No.

According to our in-house testing and multiple DD-WRT community reports, we have found that the Shellshock vulnerability will not work on with DD-WRT or TomatoUSB installed router. The vulnerability is based on a shell called BASH (Bourne Again Shell) but DD-WRT & Tomato firmware use BusyBox which is confirmed to not have this issue.

Please be advised that if you are using Optware on your DD-WRT router there is a chance that implementation is BASH based. Only used trusted optware on your router.

Shipping FAQs

admin · Jan 29, 2019 ·

Shipping FAQs

General Shipping FAQs

What company do you use for shipping?

For domestic shipping, we offer United State Postal Service (USPS), and a FedEx Expedited 2-3 Day delivery option.

For International shipments, we offer USPS and FedEx.

Where do you ship from?

We ship all packages from our New Jersey warehouse.

How much does shipping cost?

Domestic Customers:

  • Free Standard Shipping 3-10 day Delivery when you purchase a router with any Service Plan.
  • $20 Flat Rate FedEx 2-3 Day Express shipping

International Customers:

  • Pricing for USPS, and FedEx will vary by country. You can see rates on the Shipping Estimate tab on any FlashRouters product page. FlashRouters does not add any internal handling fees to international rates.
  • Note: Customers pay customs, duties, processing fees, and taxes (if applicable).

How fast do you ship?

We aim to ship your purchase within 1-2 business days from the original order date.

There may be a delay of up to 24 hours if our configuration team is unable to configure your router as requested. In these cases, our support team will reach out to you in an attempt to find a solution. If the team does not hear back from you within 24 hours they will ship out the unit to avoid further delays. Keep in mind  our support team will be available to assist if you have any setup issues once you receive your router.

Who pays for shipping?

Domestic customers can choose Free standard shipping. Customers pay shipping costs including customs, duties, processing fees, and taxes (if applicable) for all other options.

Can you ship to my country?

We ship to almost all countries around the world with some exclusions. If you would like to ship to any of these excluded countries, we recommend using PayPal and a Freight forwarding service such as Aramex, MyUS, or Shipito.

Another option if you are located in a country we do not ship to is to purchase a compatible router locally that we can flash remotely for you via our Flash My Router plan. A full list of compatible routers are listed there.

Known excluded countries are:
  • Afghanistan
  • Algeria
  • Angola
  • Bangladesh
  • Benin
  • Bhutan
  • Bosnia & Herzegovina
  • Botswana
  • Brazil
  • Burkina Faso
  • Burundi
  • Cape Verde
  • Central African Republic
  • Chad
  • Comoros
  • Congo – Brazzaville
  • Congo – Kinshasa
  • Cuba
  • Djibouti
  • Egypt
  • Eritrea
  • Eswatini
  • Ethiopia
  • Gabon
  • Gambia
  • Ghana
  • Guinea-Bissau
  • India
  • Indonesia
  • Iran
  • Iraq
  • Kenya
  • Kiribati
  • Kosovo
  • Laos
  • Lesotho
  • Liberia
  • Libya
  • Madagascar
  • Malawi
  • Malaysia
  • Mali
  • Mauritania
  • Mauritius
  • Mayotte
  • Mozambique
  • Myanmar (Burma)
  • Namibia
  • Nauru
  • Niger
  • Nigeria
  • Niue
  • North Korea
  • Palastinian Territories
  • Russia
  • Rwanda
  • Sao Tome & Principe
  • Senegal
  • Seychelles
  • Sierra Leone
  • Solomon Islands
  • Somalia
  • Sudan
  • Syria
  • Tajikistan
  • Tanzania
  • Togo
  • Tokelau
  • Tunisia
  • Turkmenistan
  • Tuvalu
  • Uganda
  • Wallis & Futuna
  • Western Sahara
  • Zambia
  • Zimbabwe

2025 - Postal Calendar

We will not be able to ship on the dates below. Your package will be shipped the following business day.

  • New Year’s Day: January-01
  • Martin Luther King Jr. Day: January-20
  • President’s Day: February-17
  • Memorial Day: May-26
  • Independence Day: July-04
  • Labor Day: September-01
  • Columbus Day: October-13
  • Veteran’s Day: November-11
  • Thanksgiving Day: November-27
  • Christmas Eve: December-24
  • New Year’s Eve: December-31


2025 Holiday Shipping Deadlines
In order to ensure timely delivery of your packages for the holiday season, please refer to the following shipping deadline dates for the following types of mail.

PLEASE NOTE: All deadlines are at 1PM EST of the designated.

US

  • USPS Priority 12/18
  • USPS APO/FPO/DPO 12/11
  • FedEx 12/21

International

International dates are for estimated delivery dates. However, customs can cause issues and may take longer.

  • Puerto Rico 12/21
  • Canada  12/21
  • Mexico 12/21
  • UK 12/20
  • Hong Kong 12/19
  • Australia 12/19
  • Middle East 12/19

Regardless of your carrier or country, we recommend that you place your holiday orders as soon as possible to ensure timely delivery.

Customs and Expenses

Will there be extra customs charges when my FlashRouter arrives?

There may be additional customs fees incurred based on the local importation laws of your country. You (the recipient) are responsible for all customs fees charged by your country’s customs agency.

Customs charges are NOT factored into the FlashRouters shipping cost.

All customs fees will be a separate charge and must be paid for by the recipient of the package.

We do our best to inform you of possible customs fees to the best of our ability, however we will not accept returns because of refusal to pay these fees.

If we receive a return due to failure to pay customs fees, you will be refunded but ONLY for the price of the FlashRouter. Original Shipping charges will NOT be refunded.

We do our best to make FlashRouters’ shipping quick and affordable but are unable to foresee all customs-related issues. Please be sure to check before ordering if you are concerned with local customs fees.

Do you charge sales tax?

We will charge sales tax in any state where we are required to do so. Currently that is within New Jersey, due to the fact that this is the physical location of our business and New York but that is subject to change as law dictates.

Any taxes or customs fees that are incurred to your country’s current policies are out of our hands. We do our best to make the router and the shipping quick and affordable.

Privacy Hero Adblocking Malware and Phishing Prevention Setup

TeamFlashRouters · Apr 3, 2023 ·

Your Privacy Hero router uses Cloud Based router management which means you can access the router settings from anywhere on any device that has an internet connection. You can follow these steps while connected to your phone, other Wi-Fi network, or the Privacy Hero network.

Use these steps to enable Privacy Hero’s adblocking, malware, and phishing prevention settings to add extra security to your network.

1. From any device that has a browser such as a computer, smartphone, or tablet visit app.privacyhero.com

App.PrivacyHero.com

2. Enter your Privacy Hero account email and password. Click Login.

Privacy Hero Access Settings

If you have not created your Privacy Hero account yet please follow these instructions.

3. Click the VPN symbol.

Privacy Hero Setup VPN

4. Toggle the Adblocking and Malware & Phishing switches to On.

Privacy Hero Adblocking Malware and Phishing

TROUBLESHOOTING

Still having issues? Visit the VPN Troubleshooting section.

Troubleshoot Here

Using Device Groups to connect to multiple VPN locations on ExpressVPN/Aircove firmware

TeamFlashRouters · May 12, 2022 ·

ExpressVPN offers a great feature of connecting the FlashRouter to multiple ExpressVPN servers at the same time. You can then assign your devices to the location that you wish.

1. Connect to the FlashRouter’s network via ethernet cable or wireless.

2. Open your web browser and enter expressvpnrouter.com or 192.168.132.1 in the URL.

ExpressVPNrouter.com
192.168.132.1

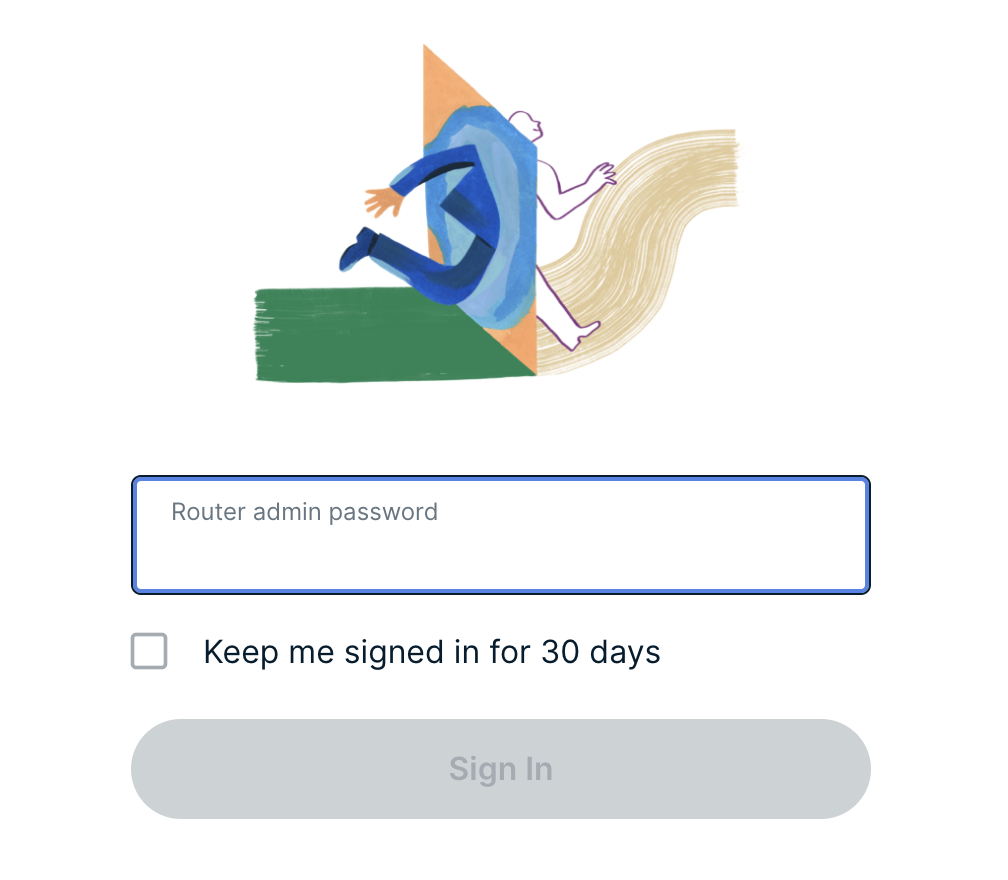
3. Login with your ExpressVPN FlashRouter admin password.

ExpressVPN Router admin login

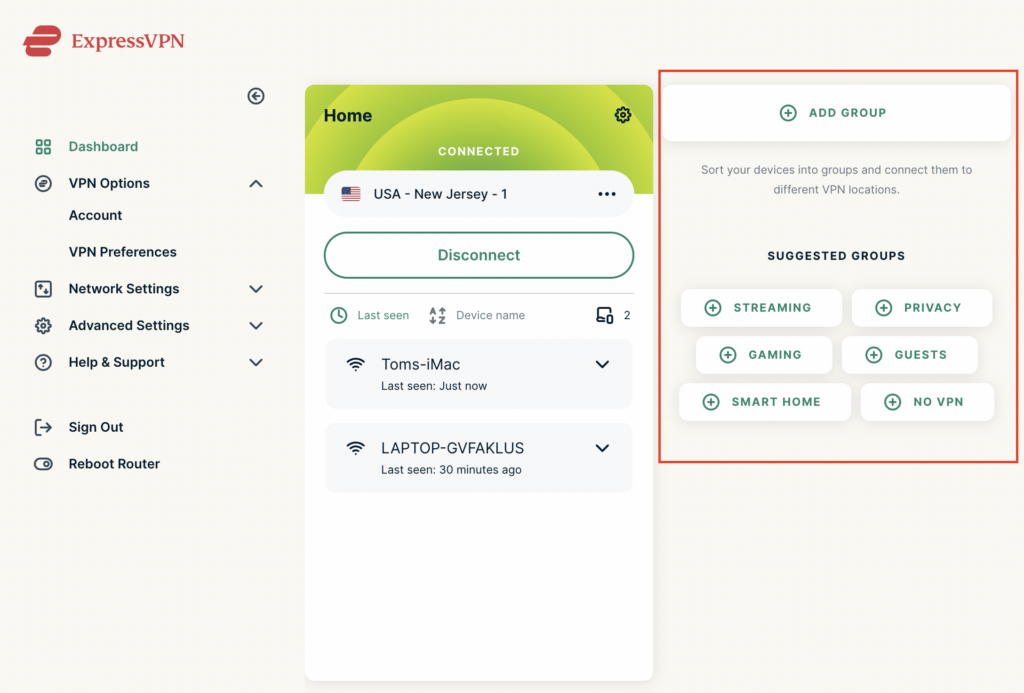
4. Select Add Group and name the new group or select one of the pre-named groups below.

ExpressVPN Add Group

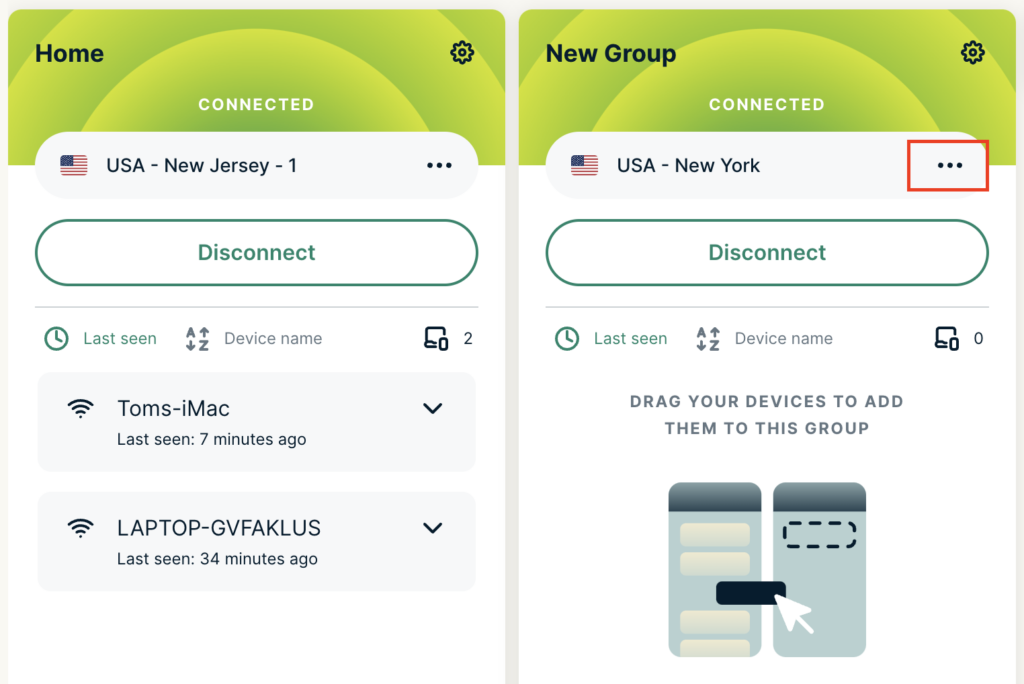
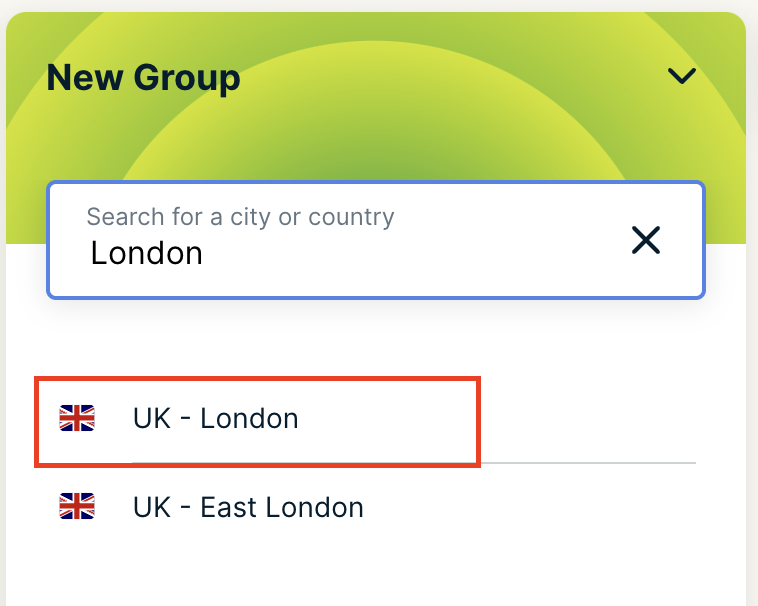
5. Click the three dots next to the new server location and type in the location you want to connect to. Click the new location to connect.

ExpressVPN Change server
ExpressVPN select new server

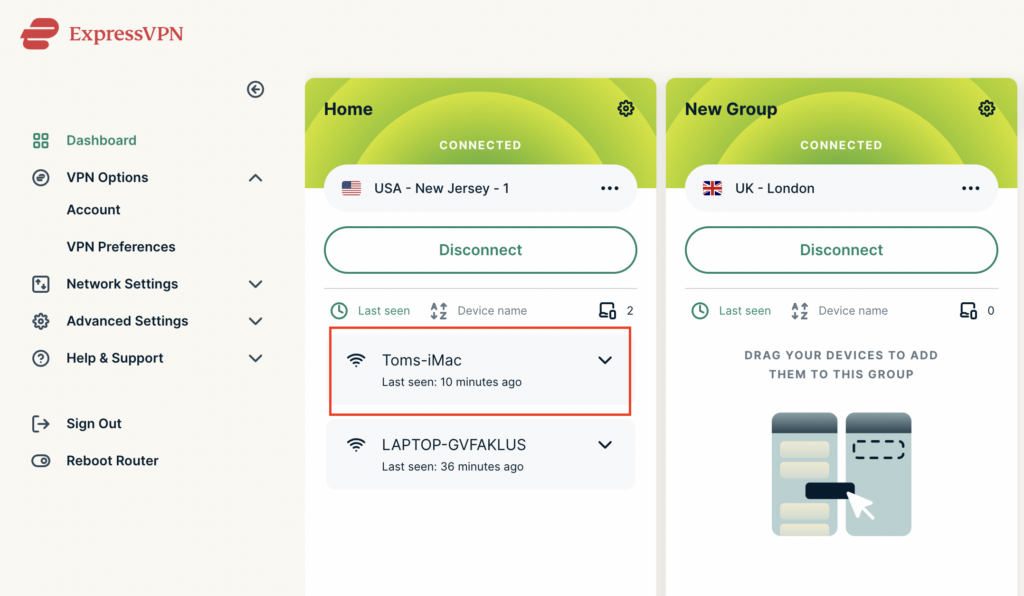
5. Click and drag the device that you want assigned to the VPN New Group.

ExpressVPN select device
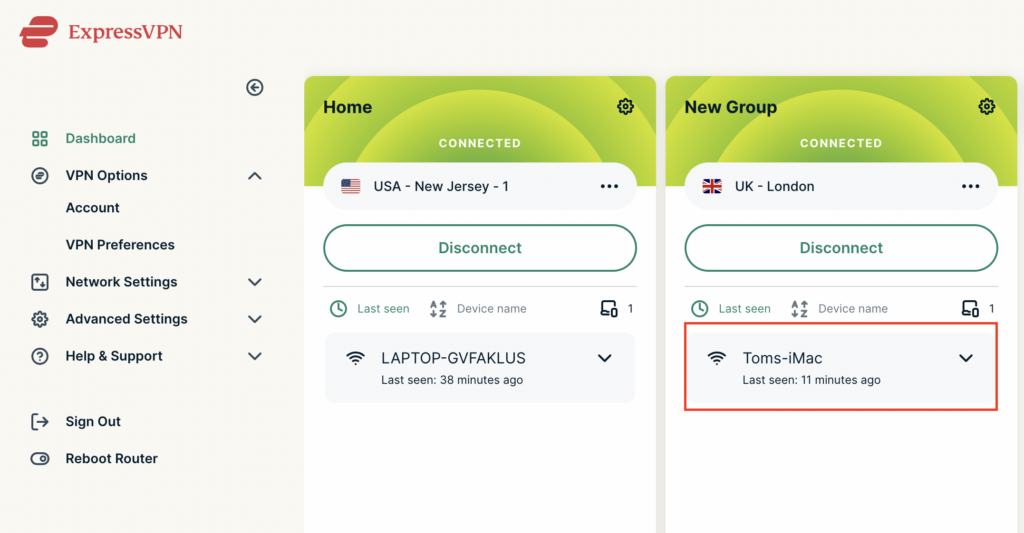
ExpressVPN device assigned

The devices assigned to new group will now connect to that location while the devices in the first VPN group will remain connected to the VPN server selected in that area.

Which DD-WRT wireless extender setup should I be using?

TeamFlashRouters · Jun 11, 2019 ·

FlashRouters supports four unique DD-WRT wireless extender setups – options similar to an open source Mesh network. Each different wireless extender configuration serves a different purpose. Read below to see which guide fits your configuration requirements!

Wireless Repeater

Why should I choose Wireless Repeater Setup?

  1. If you have a MiFi wireless only internet connection or other type of WiFi internet where there is no access to any ethernet port for a wired internet connection, then you can setup a wireless repeater network to both extend WiFi and add wired connection capabilities.
  2. If you have a large home or office area that requires additional WiFi coverage can use a wireless repeater setup to extend the existing network.
  3. If you want to create a separate VPN WiFi network in your home without placing the FlashRouter in the same room as your primary router you can use wireless repeater to establish a WiFi internet connection and then connect to VPN on your WiFi repeater network.
  4. If you want a wireless Dual Router setup option where you can have local ISP IP address through your main router WiFi network and your VPN IP address through your FlashRouter Wireless Repeater WiFi network, both available for you to connect at all times. Each network is on a unique subnet.

View the FlashRouter Wireless Repeater Setup Guide.

Wireless Repeater Bridge

Use Cases

Wireless Repeater Bridge Setup

  1. Anyone that needs all their devices connected to the same local network.
  2. Anyone with a MiFi internet connection that does not have an ethernet port and has no need for VPN.
  3. Anyone with a large wireless area that requires additional coverage.

Wireless Client Bridge

Use Cases

Wireless Client Bridge Setup

  1. Anyone with a MiFi internet connection that needs wired access.
  2. Anyone that needs additional wired ports instead of using a switch.
  3. Anyone with wired only devices in their home that are too far from your main router.

Wireless Access Point DHCP Forwarder

Use Cases

Wireless Access Point DHCP Forwarder Setup

  1. Anyone that needs their devices connected to the same local network and wants lossless LAN to LAN speeds via wireless and ethernet connection.
  2. Anyone that wants to use their main router to provide DHCP to their router instead of having an additional DHCP server.

ExpressVPN Setup for AsusWRT Firmware Routers

TeamFlashRouters · Apr 29, 2024 ·

You can connect to ExpressVPN on your AsusWRT router using OpenVPN.

Quick Options

  • OpenVPN: Download your preferred server .ovpn configuration file from the ExpressVPN website.

:point_right: If you are not already a ExpressVPN user Sign Up Now.

EXPRESSVPN SETUP GUIDE FOR ASUSWRT

1. Log in to your account on the ExpressVPN website.

2. In the “Set up your devices” section, click More and select Manual Configuration from the menu options.

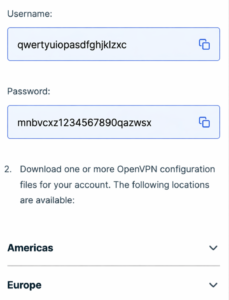
3. Copy the Username and Password that are displayed on the right

ExpressVPN Manual Service Credentials

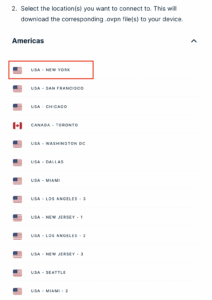
4. Download a server file from any of the available regions shown in the ExpressVPN Manual Configuration section (Americas, Europe, Asia Pacific, etc)

ExpressVPN Download .ovpn file

5. Log in to the Asus settings page by connecting to the Asus router’s WiFi (or wired LAN) on your computer. Then, enter 192.168.50.1 or asusrouter.com in the browser.

View our guide for more instructions on how to access AsusWRT firmware settings.

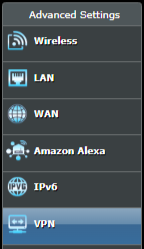
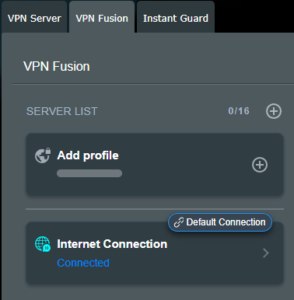
6. Navigate to the VPN tab and then click on the VPN Fusion tab, then click Add Profile

Click the VPN Button
VPN Fusion Add Profile

7.  Fill in your NordVPN information then click Apply and Enable.

  • Connection Name: Choose a name for your ExpressVPN OpenVPN connection.
  • VPN Type: Select OpenVPN
  • Import .ovpn File: Upload the OpenVPN file that you downloaded.
  • Username and Password: Copy and paste your ExpressVPN manual service credentials from step 3.

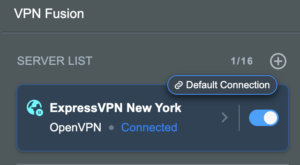
8. You should now see the Profile say Connected, indicating that the NordVPN server is successfully connected to your router.

Asus ExpressVPN Connected

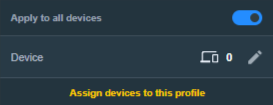
9. The VPN connection is automatically set to Apply to all devices.

If you only want certain devices to connect to the VPN, then turn off the VPN connection and switch off Apply to all devices.

Now click the pencil next to the Device section and select the devices (computer, phone, etc.) that you want to connect to VPN. Click OK and then click Apply all settings.

Apply VPN by Device
  1. Connect your devices to the Asus router network and visit the ExpressVPN website, at the top it should display Your Status: Protected.
  2. Visit ExpressVPN’s IP Check to verify your new IP address and virtual location.

🚫📱Do not run ExpressVPN apps on devices connected to your ExpressVPNrouter. Using the app at the same time as the router VPN may cause conflicts and connection issues.

TROUBLESHOOTING

Still having issues? Visit the VPN Troubleshooting section.

Troubleshoot Here

Set a Static IP for your connected devices on Roqos

TeamFlashRouters · Dec 21, 2021 ·

By assigning specific Static IP addresses to your devices you can better manage your network and make sure they connect with the same Local IP Address each time they connect to your Roqos.

Login to Roqos Core UI web app in a browser on any computer or smart device.

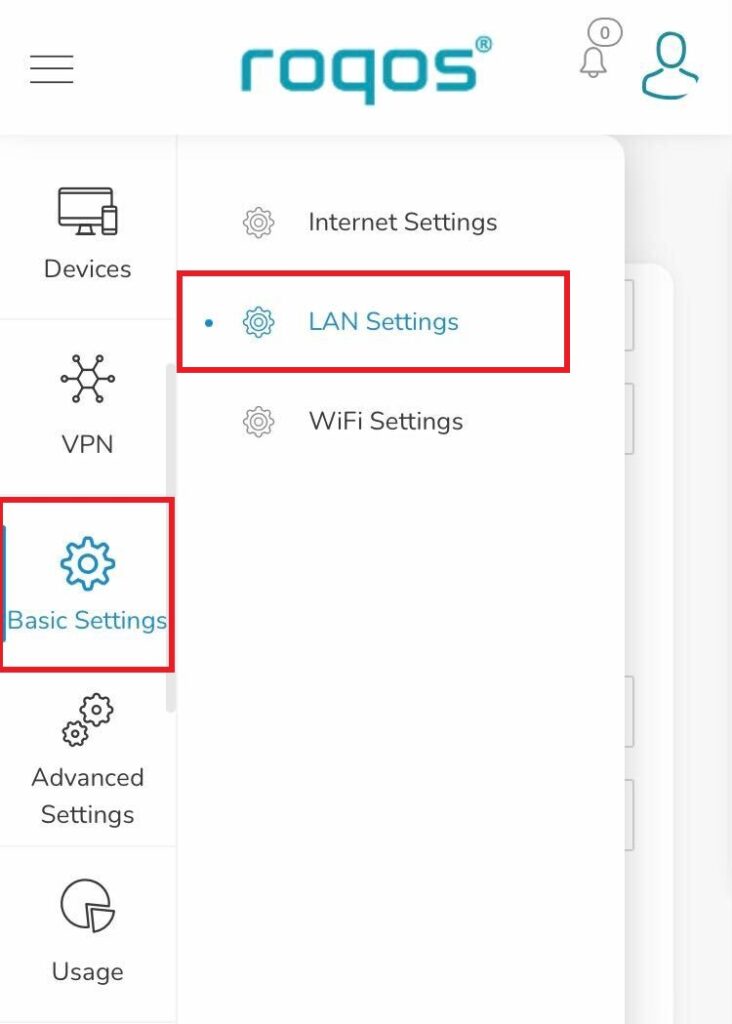
1. Click the navigation menu and select Basic Settings > LAN Settings.

Roqos Basic Settings - LAN settings

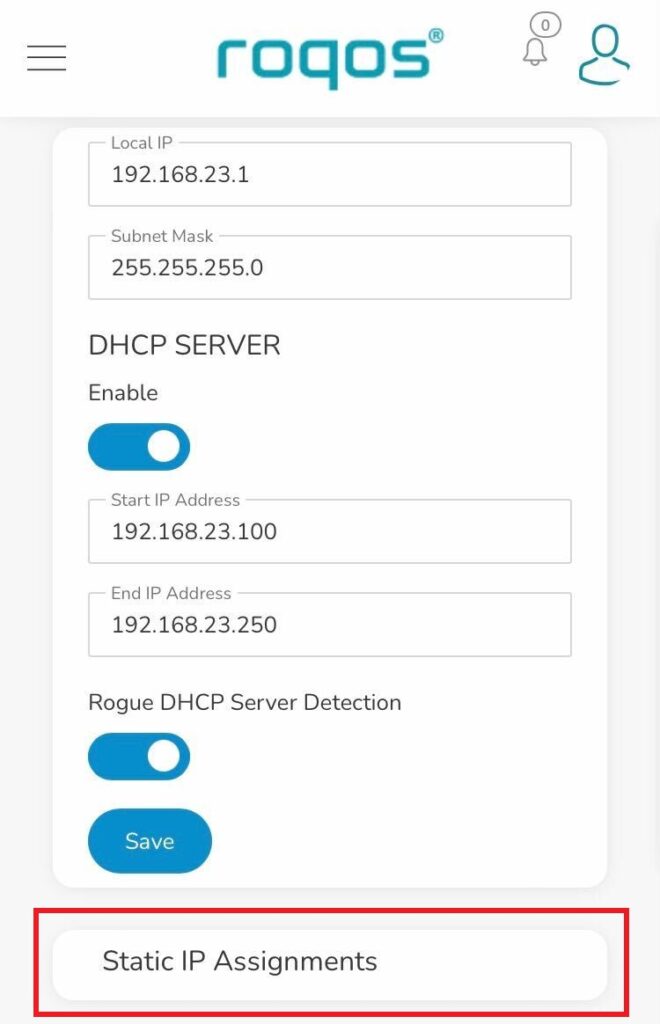
2. Click Static IP Assignments.

Roqos LAN settings - Static IP Assignments

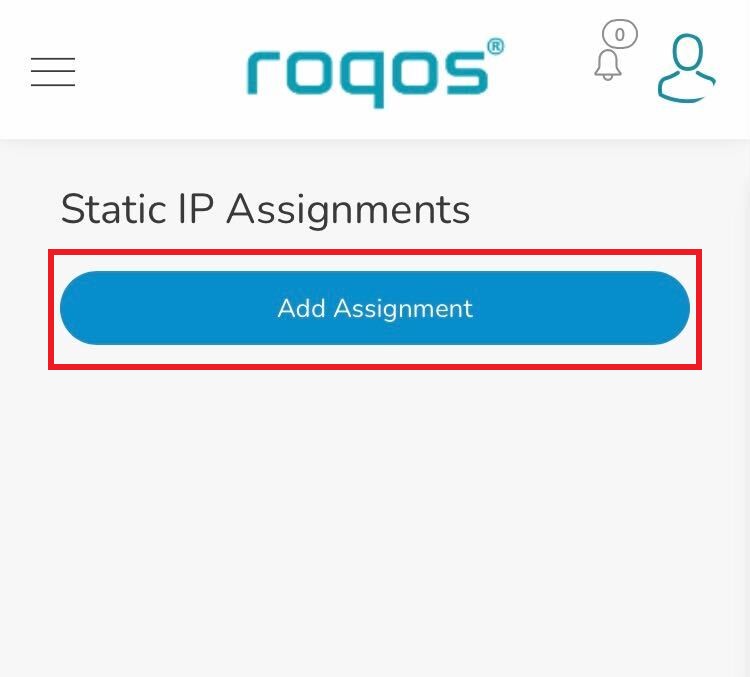
3. Click Add Assignment.

Roqos LAN settings - Add Assignment

4. Toggle the device hat you want to set a Static IP for and then enter 192.168.23.x with x being any number between 2 and 254. Click Save.

Now, every time the device connects to the Roqos network it will be assigned the same Static IP address on the Local network.

PrivateInternetAccess (PIA) AsusWRT OpenVPN Setup

TeamFlashRouters · Apr 29, 2024 ·

Preparing for PIA AsusWRT Setup

Download your PIA .ovpn file

If you are not already a PIA user Sign Up Now.

1. Log in to your account on the PIA website.

PIA login

2. Successfully log in with your account information then go to PIA’s OpenVPN Config Generator.

3. On the OpenVPN Configuration Generator select the following:

OpenVPN Version: OpenVPN 2.4 or newer

Select Platform: Linux

Select Region: Choose the server location you’d like to connect to

Select Port: Typically we recommend UDP/1198 RSA-2048 AES-128-CBC SHA1 for best speeds but feel free to select the one you want to use.

4. Click Generate to download the .ovpn file. Do not open this file once it is downloaded.

PIA Generate .ovpn file

AsusWRT Router Setup for PIA

Login to AsusWRT firmware settings in a browser on any computer or smart device connected to the AsusWRT FlashRouter’s network.

1. Navigate to the VPN tab.

Merlin VPN Tab

2. Navigate to the VPN Fusion tab.

Asus VPN Fusion

3. Click Add profile.

Asus Add profile

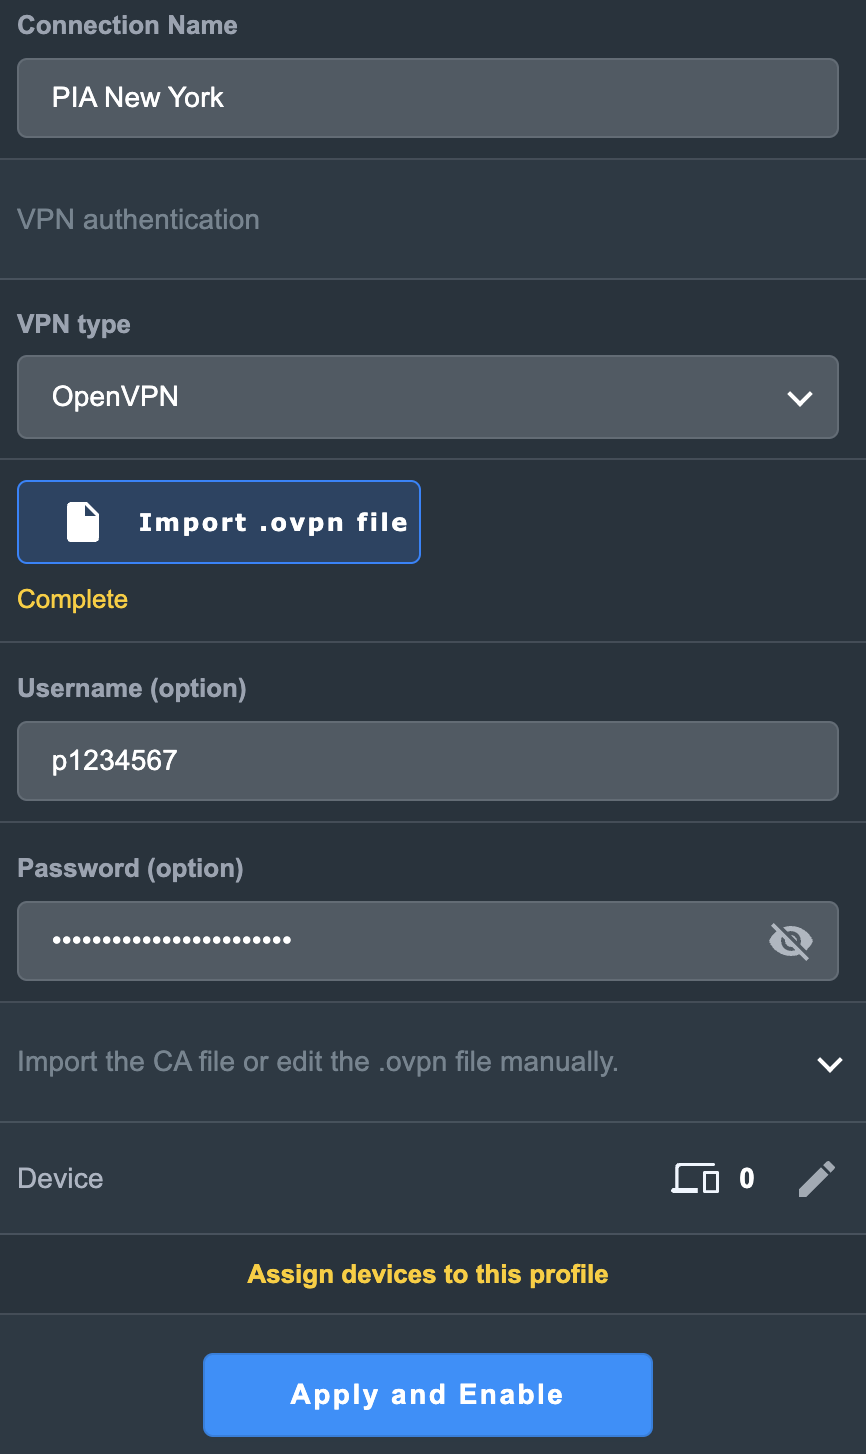
4. In the Connection Name field enter in the name you’d like to use for this OpenVPN Client profile. We typically advise entering in the location or server number here. Our example server was in New York so I have entered in PIA New York.

5. In the VPN Type dropdown select OpenVPN.

6. Click Import .ovpn file and select the .ovpn file you downloaded earlier. Then click Upload.

7. In the Username and Password fields paste in the PIA username and password you use to successfully login to your PIA website account.

8. Click Apply and Enable at the bottom of the page.

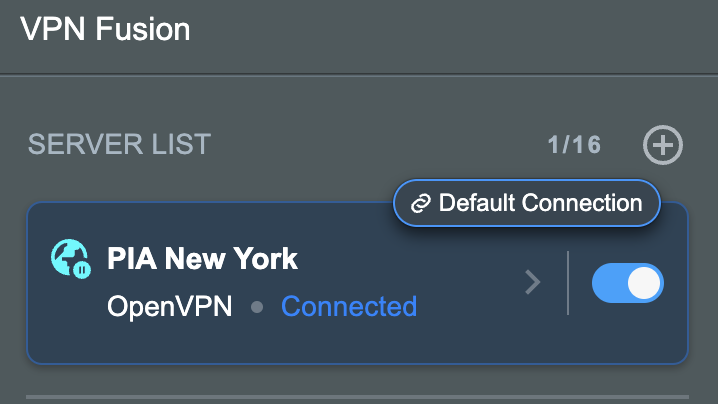
Asus PIA profile

If you only want certain devices to connect to the OpenVPN Client profile you are setting up instead of all the devices connected to the FlashRouter’s network click into the profile and disable Apply to all devices. Then click Devices and select the devices that you want to connect to VPN.

Asus VPN devices
Asus VPN select devices

9. At the top of the page set the Service State toggle to ON to activate the VPN connection.

Asus PIA Connected

Verify a successful PIA connection

  1. You should now see a CONNECTED message.
  2. Visit PIA’s IP Check to verify your new IP address and virtual location.

In some cases you may notice that the location is not showing the same location as the server you have input in your router settings; this is because geo tracking tools are often tricked by VPN connections. As long as you see an IP address that is not the same as your normal Internet IP address then you are indeed connected to PIA.

How to change the PIA server

  1. Follow the steps at the top of the page to obtain a new .ovpn file.
  2. Then proceed with the settings same as initial setup.
TROUBLESHOOTING

Still having issues? Visit the VPN Troubleshooting section.

Troubleshoot Here

Privacy Hero Creating User Profiles and Adding Devices to Profiles

TeamFlashRouters · Apr 3, 2023 ·

Your Privacy Hero router uses Cloud Based router management which means you can access the router settings from anywhere on any device that has an internet connection. You can follow these steps while connected to your phone, other Wi-Fi network, or the Privacy Hero network.

The Privacy Hero router allows for User Profile creation. Doing so allows you to group different user’s devices together to customize the following rules:

  • Internet access scheduler (Bedtime settings)
  • Internet Safe Search
  • Youtube Safe Search
  • Block Adult Content

This makes the Privacy Hero a great router option for families and internet addicts.

1. From any device that has a browser such as a computer, smartphone, or tablet visit app.privacyhero.com

App.PrivacyHero.com

2. Enter your Privacy Hero account email and password. Click Login.

Privacy Hero Access Settings

If you have not created your Privacy Hero account yet please follow these instructions.

3. Click the Profiles symbol.

Privacy Hero Profiles

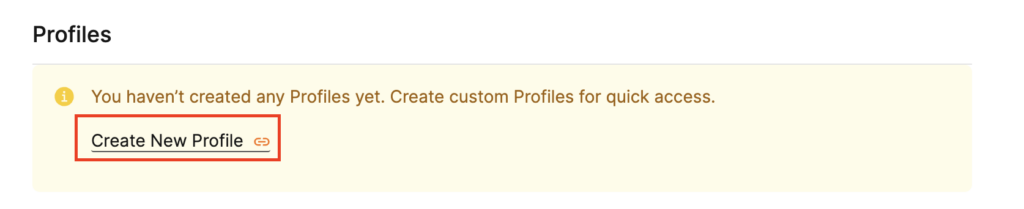
4. Click Create New Profile.

Privacy Hero Create New Profile

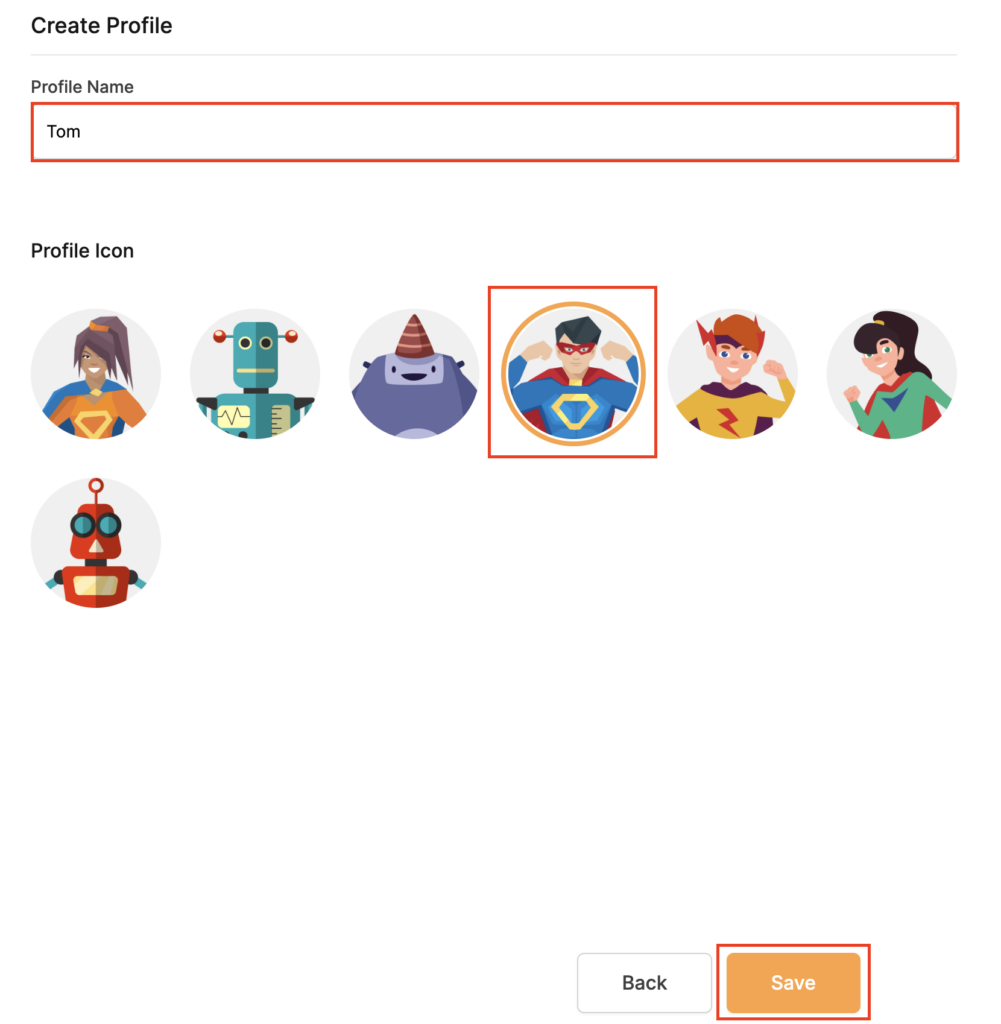
5. Set the Profile Name, select the Profile Icon, and click Save.

Privacy Hero Set Profile Name

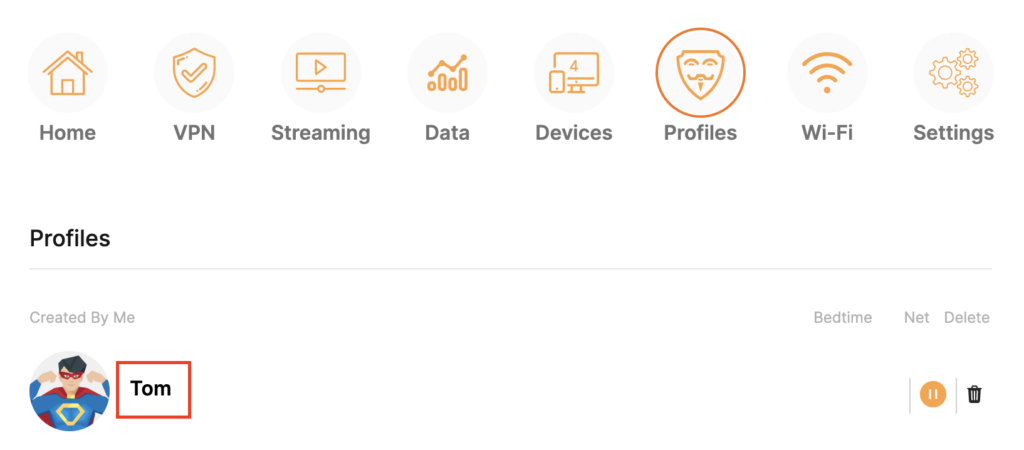
6. Click the name of the User Profile.

Privacy Hero Select Profile

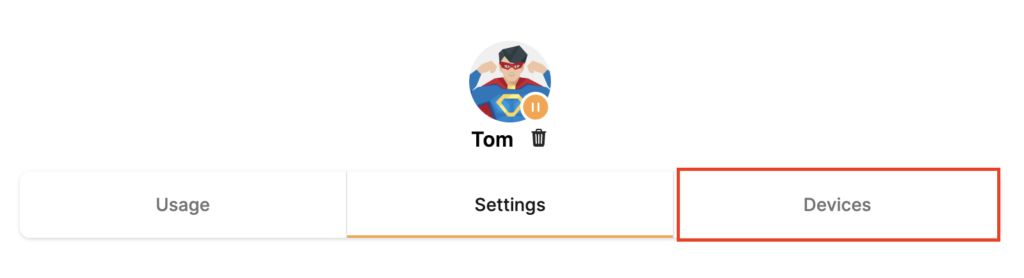
7. Select Devices.

Privacy Hero Select Devices

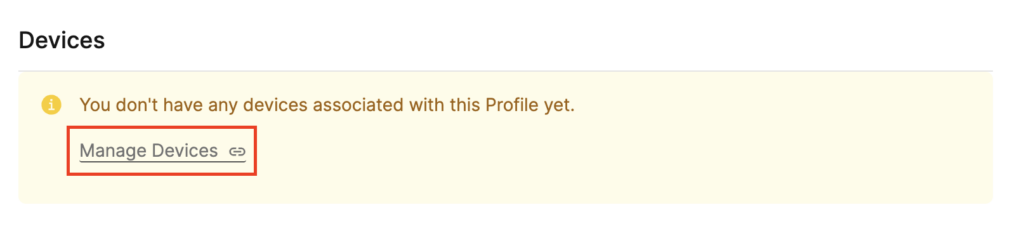
8. Select Manage Devices.

Privacy Hero Select Manage Devices

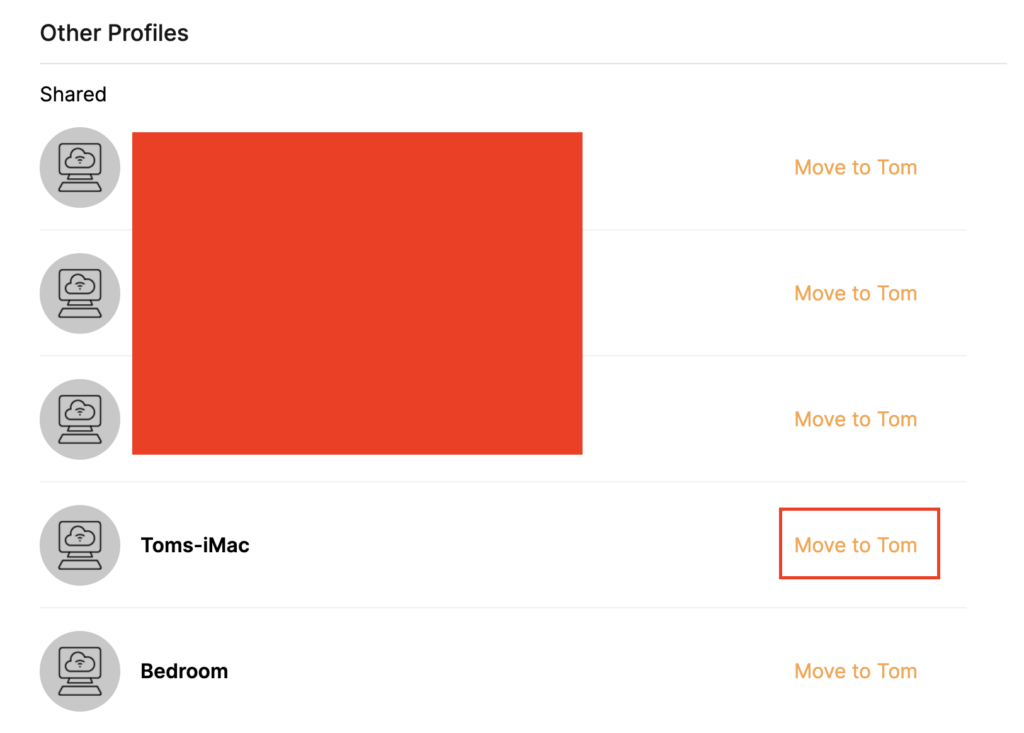
9. If you have not already connected your devices to the Privacy Hero network via wireless or ethernet you can do so now. Refresh the page after connecting a new device and it will appear in the list where you can select Move to “Profile Name” to move the device to the appropriate profile. By default new devices are in the Shared profile.

Privacy Hero Move to User Profile

If your devices were already connected to the Privacy Hero network and you are having issues identifying them I would recommend the following steps:

  1. Click the Devices icon.
  2. Select the device in question.
  3. Click Nerd and note down the IP Address of the device.
  4. Go to the network settings of your device where it will display the local IP Address and match that to the IP Address noted in Privacy Hero.

This is how you can identify a device that is not properly named.

10. Now that your devices are assigned you can set the Bedtime Settings (Internet Scheduler) and Safe Surf settings for your new Profile.

TROUBLESHOOTING

Still having issues? Visit the VPN Troubleshooting section.

Troubleshoot Here
« Previous Page

Primary Sidebar

  • Troubleshooting
  • Router Access
  • Internet Connection Issues
  • WiFi Connectivity
  • General VPN Issues
  • TeamViewer Remote Support
  • DD-WRT Firmware
  • Facebook
  • Twitter
  • Instagram
  • Pinterest
  • YouTube

Footer