• Skip to primary navigation
  • Skip to main content
  • Skip to primary sidebar
  • Skip to footer

FlashRouters Support Portal

Prioritizing Privacy

  • SETUP GUIDES
    • Privacy Hero Router Setup Guide
    • ASUS-WRT Router Setup Guide
    • AsusWRT-Merlin Router Setup Guide
    • DD-WRT Router Setup Guide
    • ExpressVPN Router Setup Guide
    • GL.iNet Router Setup Guide
    • Roqos Core Router Setup Guide
  • TROUBLESHOOTING
    • Router Access
    • WiFi Connectivity
    • Internet Connection Issues
    • General VPN Issues
    • DD-WRT Firmware
    • TeamViewer Remote Support
  • FAQs
    • Router FAQs
    • VPN FAQs
    • Warranty and Returns FAQs
    • Sales FAQs
    • Shipping FAQs
    • Service Plan FAQs
  • Show Search
Hide Search

Search Results for: like a pea in a

Router FAQs

admin · Jan 29, 2019 ·

Router FAQs

What is an IP Address?

An IP (Internet Protocol) Address is a numerical assignment for each device (cell phone, iPad, laptop computer, printer etc) inside a network that uses the Internet Protocol for communication. Internet Protocol is responsible for routing information packets across network boundaries. It is the main protocol establishing the Internet.

An IP address serves two predominant functions. First is to host or network interface identification. Second, it provides location addressing. To put it bluntly, an IP address tells wherever you are connecting, to whom you are visiting, and where you are located.

What is DNS?

DNS (Domain Name System) is a protocol within the TCP/IP protocol that uses a set of standards for how computers exchange data on the Internet and on many private networks.

The basic job of DNS is to convert a user-friendly domain name into an IP address that computers use to identify one another. Think of DNS like your cellphone contact list; you tap the name and the phone contacts to a phone number.

It is easier to remember flashrouters.com, rather than its IP address. Imagine if you had to remember all of the IP addresses of your favorite websites!

What is DNSMasq?

DNSMasq is a local DNS server that speeds up host-name searches from your computer/Internet connection after pressing enter.

Basically, DNSMasq gives the router some advanced enterprise functionality – caching DNS records locally so you have a faster browsing experience. Your computer only has to go to the router instead of repeatedly scouring the web for a commonly visited site.

What is Throughput and How Do I Improve it?

Throughput is the average rate of successful delivery of messages through a network. Simply put, throughput measures the speed of message delivery inside a network. If you think about it in relationship to networks and Internet connections, throughput defines the user experience. The key to a pleasing user experience is uninterrupted service and smooth data transfer.

In order to improve throughput,  you should get a router with more memory. If you notice that your network is running slowly due to congestion, you could probably benefit by upgrading your router to one with more memory. FlashMemory and RAM on a router add more room to prevent network congestion and improve throughput.

Most of FlashRouters‘ high-end units come with at least 8 MB of Flash memory and 64 MB of RAM which should be more than capable for providing for the average home users’ or small business will need in the future.

What is PPPoE?

PPPoE stands for Point-to-Point Protocol over Ethernet, a network protocol for encapsulating Point-to-Point Protocol (PPP) frames inside Ethernet frames. It is used mainly with DSL services where individual users connect to a DSL modem over Ethernet.

With PPPoE, users virtually “dial” from one machine to another over an Ethernet network, establish a point-to-point connection and then data packets are securely transported through the connection.

PPPoE offers an Internet service provider (ISP) an easier way to track exactly how much bandwidth you are using in case they want to charge for it in the future.

What is the Difference Between VPN Encryption and Wireless Network Security?

VPN Encryption: If you are connected to the VPN on your home network, then any data that flows over the Internet is entirely encrypted whether you are connected to the Internet either wired or wirelessly. This means that if your Local ISP was trying to see what you are browsing or downloading, they would not be able to see your data.

Wireless Network Security: If you leave your wireless network open or insecure, it does not matter whether Internet traffic is encrypted, because someone can directly see what you are doing on your network, or even worse, can go in and put a wireless password on your network, locking you out. They may also be able to access folders and files on your computer without your control.

Best thing to do is protect your wireless network with a WPA secured password along with your VPN connection.

Are FlashRouters Affected By the Shellshock Bug?

No.

According to our in-house testing and multiple DD-WRT community reports, we have found that the Shellshock vulnerability will not work on with DD-WRT or TomatoUSB installed router. The vulnerability is based on a shell called BASH (Bourne Again Shell) but DD-WRT & Tomato firmware use BusyBox which is confirmed to not have this issue.

Please be advised that if you are using Optware on your DD-WRT router there is a chance that implementation is BASH based. Only used trusted optware on your router.


Private Internet Access VPN Setup Guide for Privacy Hero

TeamFlashRouters · Apr 3, 2023 ·

Your Privacy Hero router uses Cloud Based router management which means you can access the router settings from anywhere on any device that has an internet connection. You can follow these steps while connected to your phone, other Wi-Fi network, or the Privacy Hero network

Private Internet Access (PIA) Wireguard Setup for Privacy Hero (recommended)

1. From any device that has a browser such as a computer, smartphone, or tablet visit app.privacyhero.com.

App.PrivacyHero.com

2. Enter your Privacy Hero account email and password. Click Login.

Privacy Hero Access Settings

3. Click the VPN symbol.

Privacy Hero Setup VPN

4. Click the Change button and select Private Internet Access from the dropdown.

Privacy Hero Change VPN Providers

5. Enter your correct PIA account login username and password and click Save.

Privacy Hero select Private Internet Access
Privacy Hero Private Internet Access enter login

6. Click Save if you want to automatically connect to the ideal server location as recommended by Private Internet Access.

Or, connect to a specific server location click Advanced Options and then type in the PIA server name you would like to use. (All server names are noted below).

Then click Save.

Privacy Hero Private Internet Access enter VPN location

North America

bahamas.privacy.network
ca-ontario.privacy.network
ca-toronto.privacy.network
ca-vancouver.privacy.network
ca-montreal.privacy.network
greenland.privacy.network
gt-guatemala-pf.privacy.network
mexico.privacy.network
panama.privacy.network
sanjose.privacy.network
us-alabama-pf.privacy.network
us-alaska-pf.privacy.network
us-arkansas-pf.privacy.network
us-atlanta.privacy.network
us-california.privacy.network
us-chicago.privacy.network
us-connecticut-pf.privacy.network
us-denver.privacy.network
us-florida.privacy.network
us-houston.privacy.network
us-idaho-pf.privacy.network
us-indiana-pf.privacy.network
us-iowa-pf.privacy.network
us-kansas-pf.privacy.network
us-kentucky-pf.privacy.network
us-lasvegas.privacy.network
us-louisiana-pf.privacy.network
us-maine-pf.privacy.network
us-massachusetts-pf.privacy.network
us-michigan-pf.privacy.network
us-minnesota-pf.privacy.network
us-mississippi-pf.privacy.network
us-missouri-pf.privacy.network
us-montana-pf.privacy.network
us-nebraska-pf.privacy.network
us-new-hampshire-pf.privacy.network
us-new-mexico-pf.privacy.network
us-newyorkcity.privacy.network
us-north-carolina-pf.privacy.network
us-north-dakota-pf.privacy.network
us-ohio-pf.privacy.network
us-oklahoma-pf.privacy.network
us-oregon-pf.privacy.network
us-pennsylvania-pf.privacy.network
us-rhode-island-pf.privacy.network
us-seattle.privacy.network
us-siliconvalley.privacy.network
us-south-carolina-pf.privacy.network
us-south-dakota-pf.privacy.network
us-texas.privacy.network
us-tennessee-pf.privacy.network
us-vermont-pf.privacy.network
us-virginia-pf.privacy.network
us-washingtondc.privacy.network
us-west-virginia-pf.privacy.network
us-wisconsin-pf.privacy.network
us-wyoming-pf.privacy.network
us3.privacy.network
us-baltimore.privacy.network
us-honolulu.privacy.network
us-newjersey.privacy.network
us-saltlakecity.privacy.network
us-streaming-2.privacy.network
us-streaming.privacy.network
us-wilmington.privacy.network

South America

ar.privacy.network
bo-bolivia-pf.privacy.network
bogota.privacy.network
br.privacy.network
ec-ecuador-pf.privacy.network
pe-peru-pf.privacy.network
santiago.privacy.network
uy-uruguay-pf.privacy.network
venezuela.privacy.network

Europe

al.privacy.network
ad.privacy.network
austria.privacy.network
brussels.privacy.network
ba.privacy.network
sofia.privacy.network
zagreb.privacy.network
czech.privacy.network
de-berlin.privacy.network
de-frankfurt.privacy.network
denmark.privacy.network
denmark-2.privacy.network
spain.privacy.network
es-valencia.privacy.network
ee.privacy.network
fi.privacy.network
fi-2.privacy.network
france.privacy.network
gr.privacy.network
hungary.privacy.network
italy.privacy.network
italy-2.privacy.network
is.privacy.network
ireland.privacy.network
man.privacy.network
lv.privacy.network
liechtenstein.privacy.network
lt.privacy.network
lu.privacy.network
malta.privacy.network
md.privacy.network
monaco.privacy.network
montenegro.privacy.network
nl-amsterdam.privacy.network
mk.privacy.network
no.privacy.network
poland.privacy.network
pt.privacy.network
ro.privacy.network
sweden.privacy.network
sweden-2.privacy.network
rs.privacy.network
sk.privacy.network
slovenia.privacy.network
swiss.privacy.network
tr.privacy.network
uk-london.privacy.network
uk-manchester.privacy.network
uk-southampton.privacy.network
uk-2.privacy.network
ua.privacy.network

Asia

ae.privacy.network
bangladesh.privacy.network
cambodia.privacy.network
china.privacy.network
cyprus.privacy.network
georgia.privacy.network
hk.privacy.network
in.privacy.network
israel.privacy.network
jakarta.privacy.network
japan.privacy.network
japan-2.privacy.network
kazakhstan.privacy.network
kr-south-korea-pf.privacy.network
kualalumpur.privacy.network
macau.privacy.network
mongolia.privacy.network
np-nepal-pf.privacy.network
philippines.privacy.network
qatar.privacy.network
saudiarabia.privacy.network
sg.privacy.network
srilanka.privacy.network
taiwan.privacy.network
vietnam.privacy.network
yerevan.privacy.network

Oceania

au-adelaide-pf.privacy.network
au-australia-so.privacy.network
au-brisbane-pf.privacy.network
aus-melbourne.privacy.network
aus-perth.privacy.network
au-sydney.privacy.network
nz.privacy.network

Africa

dz.privacy.network
egypt.privacy.network
morocco.privacy.network
nigeria.privacy.network
za.privacy.network

8. Your Privacy Hero settings should now show a Connected message, indicating you have successfully signed in to your PIA VPN server!

Private Internet Access (PIA) OpenVPN Setup for Privacy Hero

1. From any device that has a browser such as a computer, smartphone, or tablet visit app.privacyhero.com.

App.PrivacyHero.com

2. Enter your Privacy Hero account email and password. Click Login.

Privacy Hero Access Settings

3. Click the VPN symbol.

Privacy Hero Setup VPN

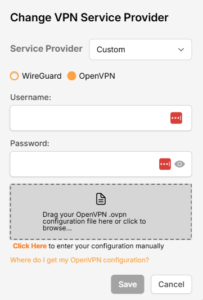
4. Click the Change button and select Custom from the dropdown and choose the OpenVPN option.

5. Enter your PIA Account login as the Username and Password.

6. Now log in to your PIA Account page.

7. Go to the Downloads section.

8. Scroll down to the bottom of the page, and go to OpenVPN Configuration Generator.

9. Choose OpenVPN 2.4 or newer and Linux.

10. From the Select Port section, choose UDP/1198 AES-128-CBC for a faster connection or choose UDP/1197 AES-256-CBC for stronger security as shown in the image below then Click Generate to download the server configuration file.

11. Drag and drop or click to Upload the server file into the Custom box on your Privacy Hero settings page then click Save.

12. Your Privacy Hero settings should now show a Connected message, indicating you have successfully signed in to your PIA VPN server!

Privacy Hero’s cloud based router settings access makes it so you can change settings while not connected to the Privacy Hero network. Visit the Private Internet Access IP Check to verify your VPN IP address. If it has not changed be sure to double check that you are indeed connected to the Privacy Hero network.

Keep in mind that the VPN connection will not change the location of the streaming services listed in the Streaming Relocation area of the Privacy Hero settings.

TROUBLESHOOTING

Still having issues? Visit the VPN Troubleshooting section.

Troubleshoot Here

Windscribe WireGuard Setup

TeamFlashRouters · Oct 13, 2021 ·

Preparing for Windscribe WireGuard Setup

Verify your Windscribe login information

If you are not already a Windscribe user Sign Up Now.

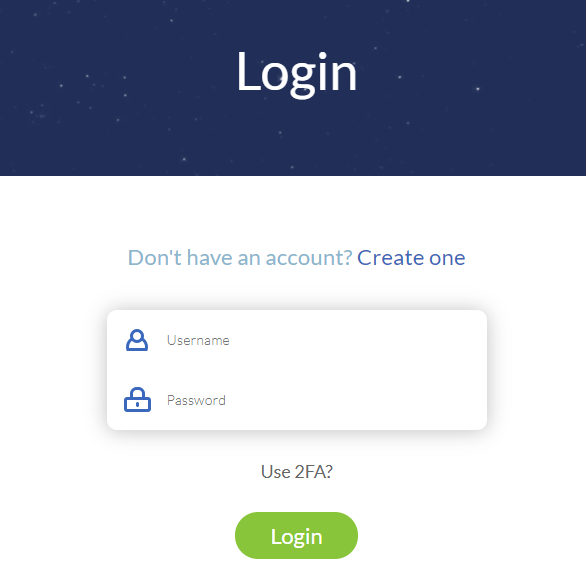
Log in to your account on the Windscribe website.

Windscribe Login

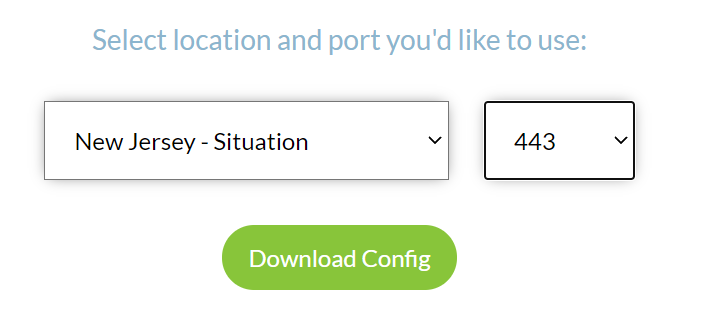
Go to the Windscribe WireGuard config generator page and select the Server location and Port you would like to use. Click Download Config.

Windscribe Wireguard select server location

Open the .conf file that is downloaded using Notepad in Windows or TextEdit in Mac.

DD-WRT Router Setup for Windscribe WireGuard

Navigate to Setup > Tunnels 

Enter Winscribe WireGuard settings

1. Click Add Tunnel.

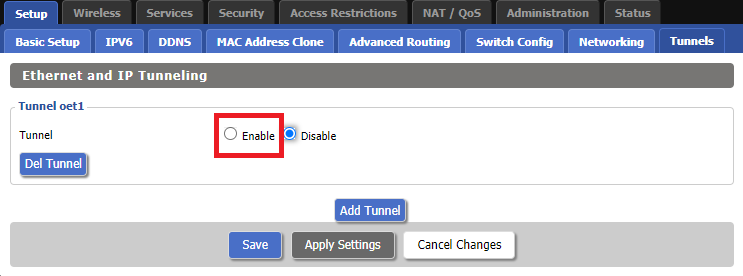
2. Set Tunnel to Enable.

Setup - Tunnel - Enable Tunnel

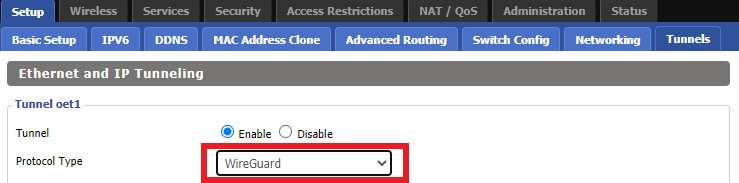
3. Select Wireguard from the dropdown.

Setup - Tunnel - Select Wireguard

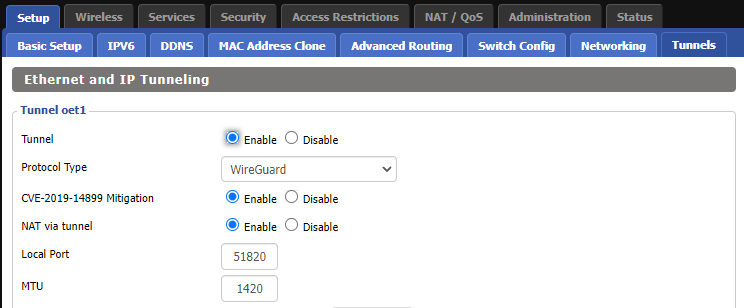
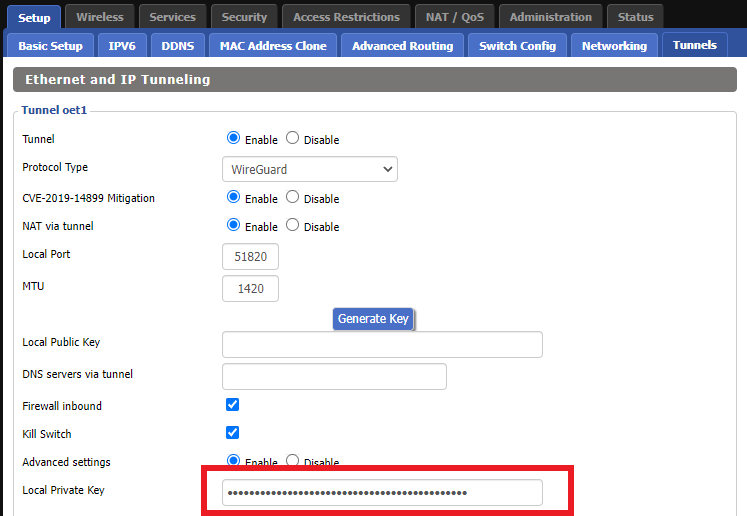
3. Set CVE-2019-14899 Mitigation to Enable. Set NAT via Tunnel to Enable. Set Local Port to 51820. Set MTU to 1420.

Windscribe Wireguard Basic Settings

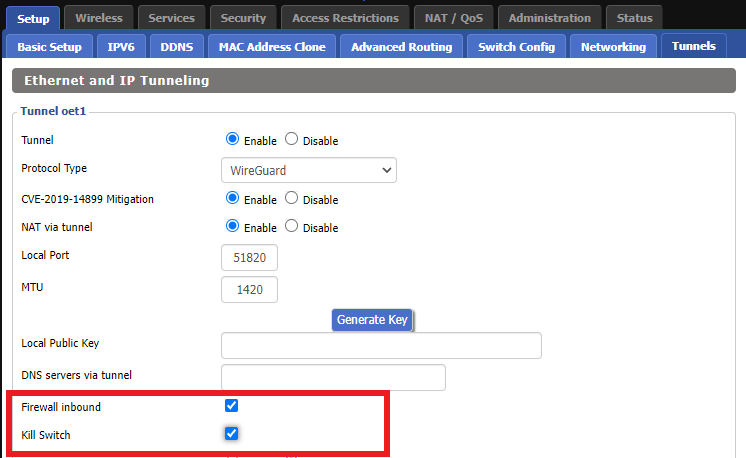
4. Check Firewall inbound and Kill Switch.

Windscribe Wireguard enable Firewall and Kill Switch

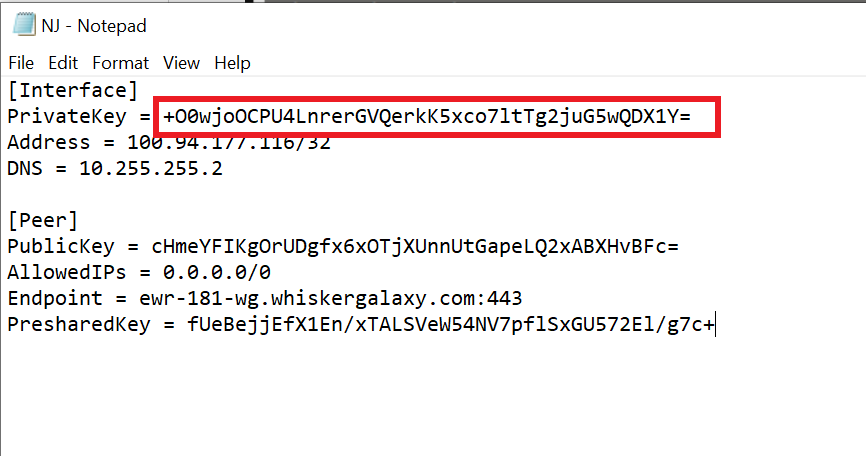
5. Set Advanced Settings to Enable and copy the PrivateKey from the .conf file and paste it into the Local Private Key field.

Windscribe Wireguard conf file PrivateKey
Windscribe Wireguard Local Private Key

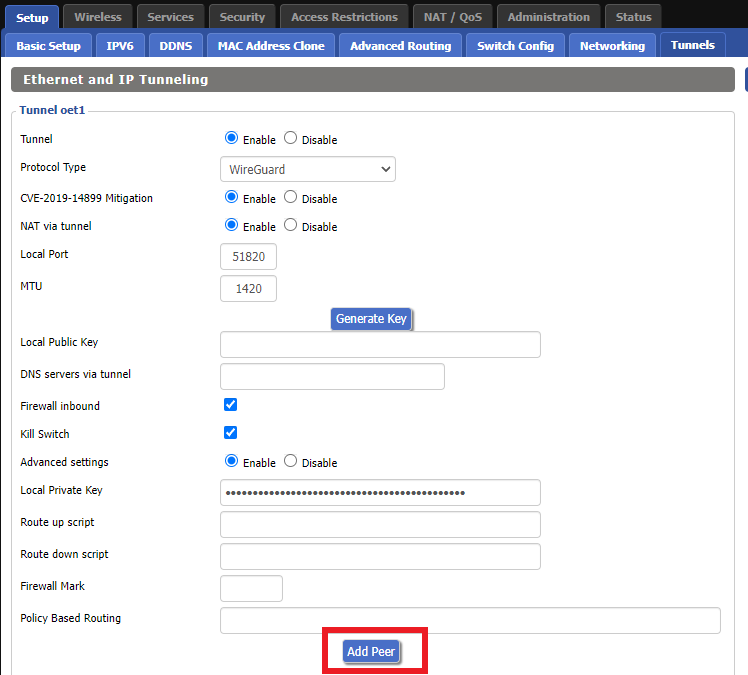
6. Click Add Peer.

Windscribe Wireguard Add Peer

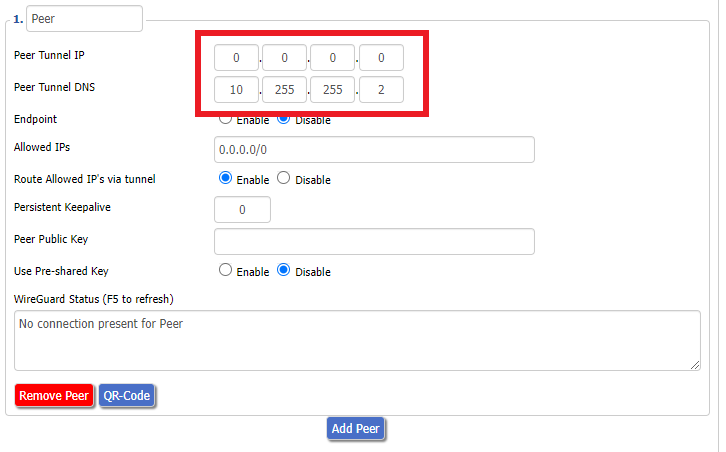
7. Set Peer Tunnel IP to 0.0.0.0. Set Peer Tunnel DNS to the DNS found in the .conf file.

Windscribe Wireguard Peer Tunnel IP and DNS

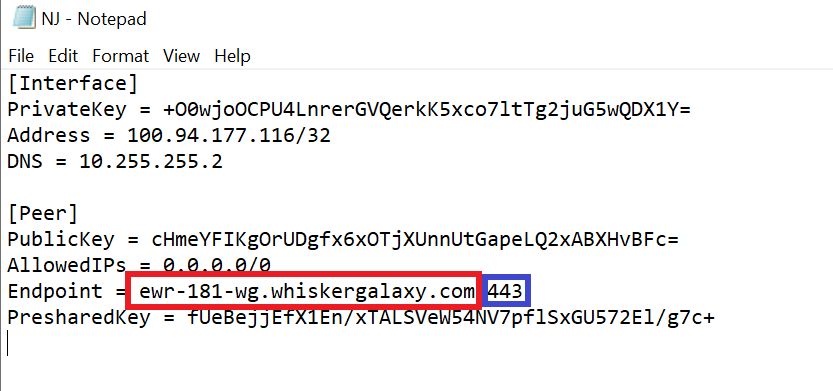
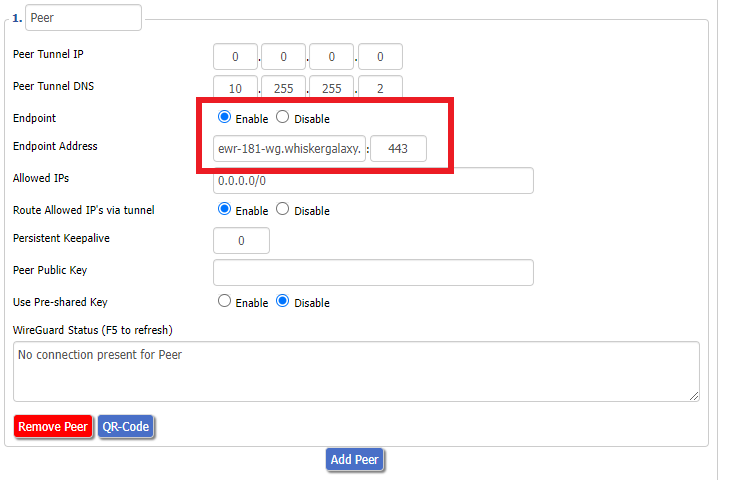
8. Set Endpoint to Enable. Copy and Paste the Endpoint from the .conf file and paste it into the Endpoint Address field. Enter the same Port that appears next to the Endpoint.

Windscribe Wireguard conf file Endpoint
Windscribe Wireguard paste Endpoint

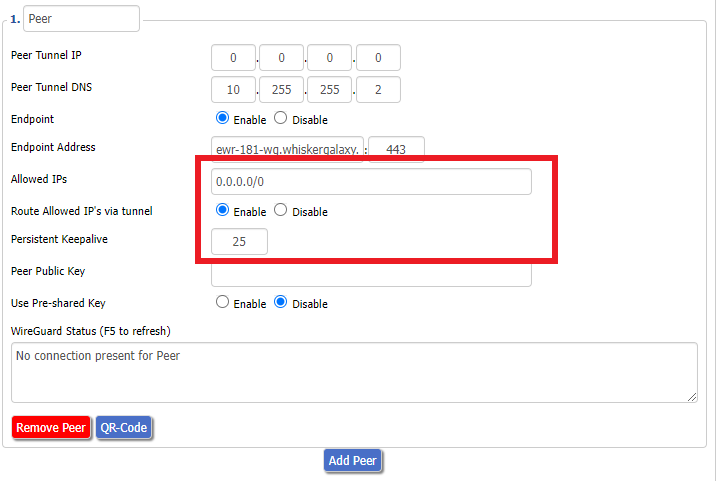
9. Leave Allowed IPs as 0.0.0.0/0. Set Router Allowed IP’s via tunnel to Enable. Set Persistent Keep Alive to 25.

Windscribe Wireguard settings

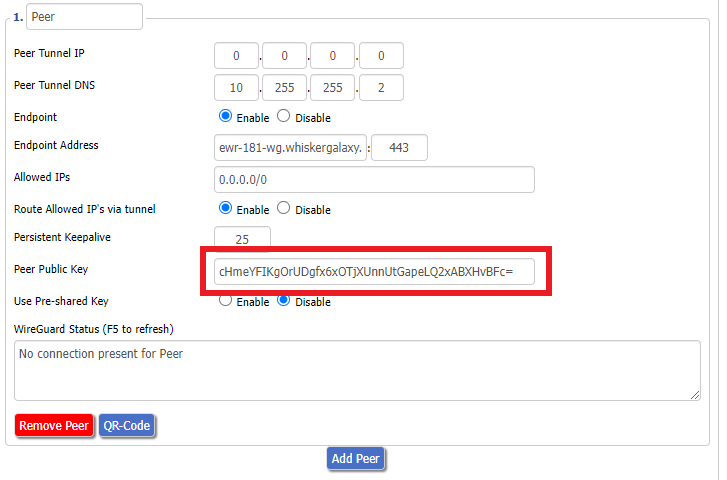
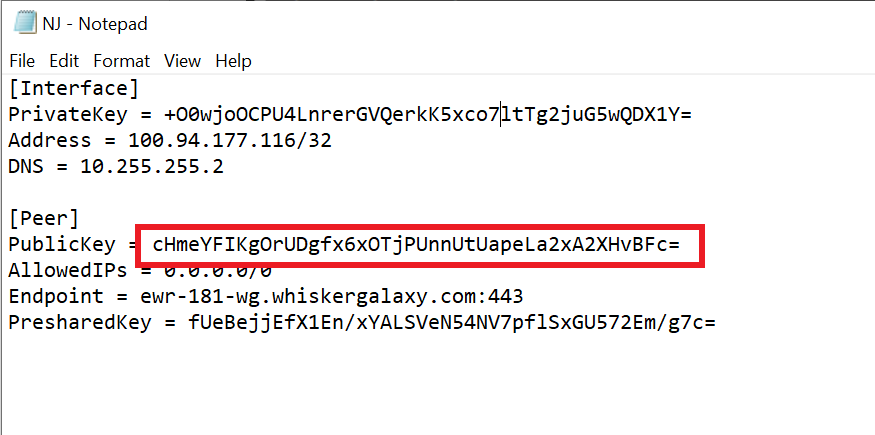
10. Copy and Paste the PublicKey from the .conf file and paste it into the Peer Public Key field.

Windscribe Wireguard conf file PublicKey
Windscribe Wireguard Peer Public Key

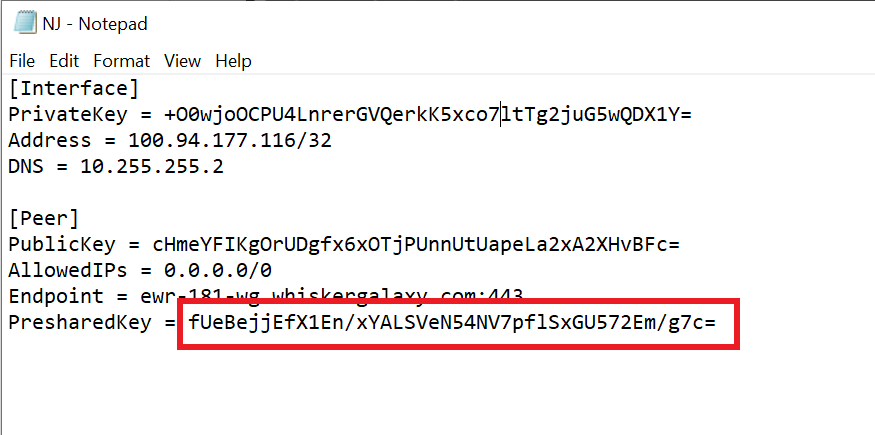
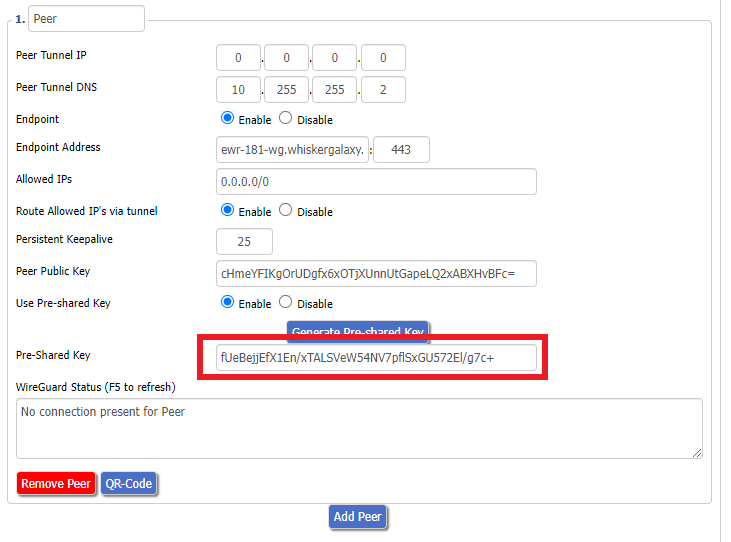
11. Set Use Pre-shared Key to Enable. Copy and Paste the Presharedkey from the .conf file and paste it into the Pre-Shared Key field.

Windscribe Wireguard conf file PresharedKey
Windscribe Wireguard Pre-shared Key

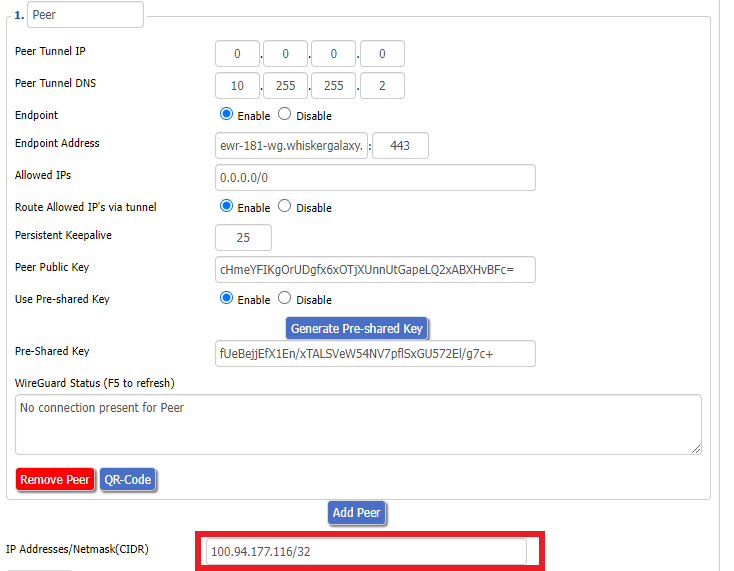
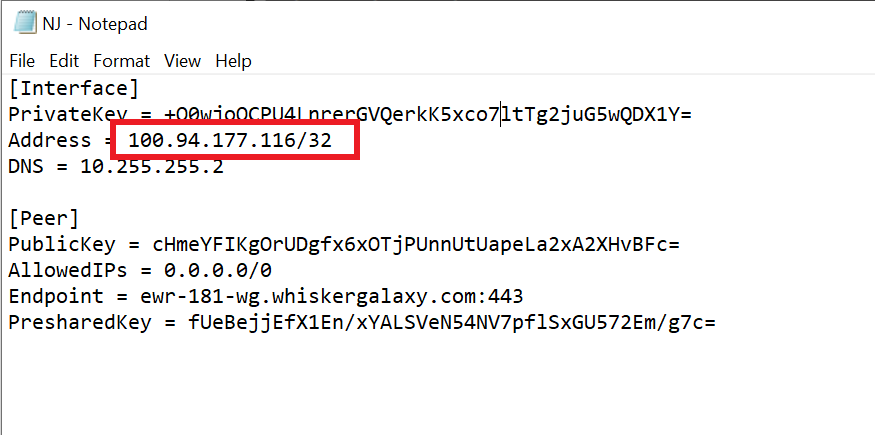
12. Copy the Address from the .conf file and paste it into the IP Addresses/Netmask(CIDR) field.

Windscribe Wireguard IP Address
Windscribe Wireguard conf file Address

Certain DD-WRT builds will show two separate fields here: IP Address and Subnet Mask. If that is the case set the IP Address field to the Address without the /32 added and set the Subnet Mask to 255.255.255.255

21. At the bottom of the page click Save and then click Apply Settings.

Verify a successful Winscribe connection

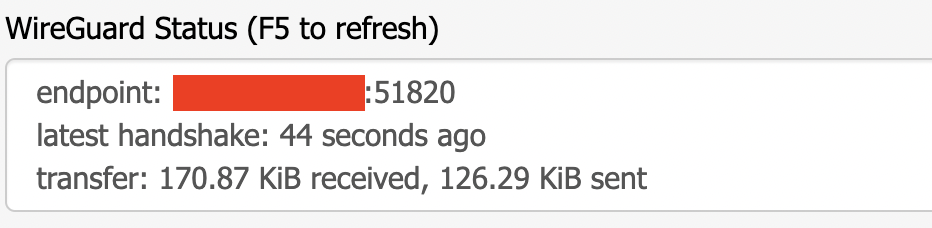
Navigate to Setup > Tunnels

  1. You should Endpoint, Latest handshake, and Transfer in the WireGuard status area.
  2. Visit whatismyipaddress.com to verify your status as using Winscribe.

Back up your settings

Navigate to Administration > Backup

  1. Click the Backup button.
  2. A file named nvrambak.bin will be saved to your computer.
  3. You can load nvrambak.bin to restore your settings in the event of a reset.

TROUBLESHOOTING

Still having issues? Visit the VPN Troubleshooting section.

Troubleshoot Here

Shipping FAQs

admin · Jan 29, 2019 ·

Shipping FAQs

General Shipping FAQs

What company do you use for shipping?

For domestic shipping, we offer United State Postal Service (USPS), and a FedEx Expedited 2-3 Day delivery option.

For International shipments, we offer USPS and FedEx.

Where do you ship from?

We ship all packages from our New Jersey warehouse.

How much does shipping cost?

Domestic Customers:

  • Free Standard Shipping 3-10 day Delivery when you purchase a router with any Service Plan.
  • $20 Flat Rate FedEx 2-3 Day Express shipping

International Customers:

  • Pricing for USPS, and FedEx will vary by country. You can see rates on the Shipping Estimate tab on any FlashRouters product page. FlashRouters does not add any internal handling fees to international rates.
  • Note: Customers pay customs, duties, processing fees, and taxes (if applicable).

How fast do you ship?

We aim to ship your purchase within 1-2 business days from the original order date.

There may be a delay of up to 24 hours if our configuration team is unable to configure your router as requested. In these cases, our support team will reach out to you in an attempt to find a solution. If the team does not hear back from you within 24 hours they will ship out the unit to avoid further delays. Keep in mind  our support team will be available to assist if you have any setup issues once you receive your router.
Who pays for shipping?
Domestic customers can choose Free standard shipping. Customers pay shipping costs including customs, duties, processing fees, and taxes (if applicable) for all other options.

Can you ship to my country?

We ship to almost all countries around the world with some exclusions. If you would like to ship to any of these excluded countries, we recommend using PayPal and a Freight forwarding service such as Aramex, MyUS, or Shipito.

Another option if you are located in a country we do not ship to is to purchase a compatible router locally that we can flash remotely for you via our Flash My Router plan. A full list of compatible routers are listed there.

Known excluded countries are:
  • Afghanistan
  • Algeria
  • Angola
  • Bangladesh
  • Benin
  • Bhutan
  • Bosnia & Herzegovina
  • Botswana
  • Brazil
  • Burkina Faso
  • Burundi
  • Cape Verde
  • Central African Republic
  • Chad
  • Comoros
  • Congo – Brazzaville
  • Congo – Kinshasa
  • Cuba
  • Djibouti
  • Egypt
  • Eritrea
  • Eswatini
  • Ethiopia
  • Gabon
  • Gambia
  • Ghana
  • Guinea-Bissau
  • India
  • Indonesia
  • Iran
  • Iraq
  • Kenya
  • Kiribati
  • Kosovo
  • Laos
  • Lesotho
  • Liberia
  • Libya
  • Madagascar
  • Malawi
  • Malaysia
  • Mali
  • Mauritania
  • Mauritius
  • Mayotte
  • Mozambique
  • Myanmar (Burma)
  • Namibia
  • Nauru
  • Niger
  • Nigeria
  • Niue
  • North Korea
  • Palastinian Territories
  • Russia
  • Rwanda
  • Sao Tome & Principe
  • Senegal
  • Seychelles
  • Sierra Leone
  • Solomon Islands
  • Somalia
  • Sudan
  • Syria
  • Tajikistan
  • Tanzania
  • Togo
  • Tokelau
  • Tunisia
  • Turkmenistan
  • Tuvalu
  • Uganda
  • Wallis & Futuna
  • Western Sahara
  • Zambia
  • Zimbabwe

2025 - Postal Calendar

We will not be able to ship on the dates below. Your package will be shipped the following business day.

  • New Year’s Day: January-01
  • Martin Luther King Jr. Day: January-20
  • President’s Day: February-17
  • Memorial Day: May-26
  • Independence Day: July-04
  • Labor Day: September-01
  • Columbus Day: October-13
  • Veteran’s Day: November-11
  • Thanksgiving Day: November-27
  • Christmas Eve: December-24
  • New Year’s Eve: December-31


2025 Holiday Shipping Deadlines
In order to ensure timely delivery of your packages for the holiday season, please refer to the following shipping deadline dates for the following types of mail.

PLEASE NOTE: All deadlines are at 1PM EST of the designated.

US

  • USPS Priority 12/18
  • USPS APO/FPO/DPO 12/11
  • FedEx 12/21

International

International dates are for estimated delivery dates. However, customs can cause issues and may take longer.

  • Puerto Rico 12/21
  • Canada  12/21
  • Mexico 12/21
  • UK 12/20
  • Hong Kong 12/19
  • Australia 12/19
  • Middle East 12/19

Regardless of your carrier or country, we recommend that you place your holiday orders as soon as possible to ensure timely delivery.

Customs and Expenses

Will there be extra customs charges when my FlashRouter arrives?

There may be additional customs fees incurred based on the local importation laws of your country. You (the recipient) are responsible for all customs fees charged by your country’s customs agency.

Customs charges are NOT factored into the FlashRouters shipping cost.

All customs fees will be a separate charge and must be paid for by the recipient of the package.

We do our best to inform you of possible customs fees to the best of our ability, however we will not accept returns because of refusal to pay these fees.

If we receive a return due to failure to pay customs fees, you will be refunded but ONLY for the price of the FlashRouter. Original Shipping charges will NOT be refunded.

We do our best to make FlashRouters’ shipping quick and affordable but are unable to foresee all customs-related issues. Please be sure to check before ordering if you are concerned with local customs fees.

Do you charge sales tax?

We will charge sales tax in any state where we are required to do so. Currently that is within New Jersey, due to the fact that this is the physical location of our business and New York but that is subject to change as law dictates.

Any taxes or customs fees that are incurred to your country’s current policies are out of our hands. We do our best to make the router and the shipping quick and affordable.

CyberGhost Manual OpenVPN Setup

TeamFlashRouters · Apr 9, 2019 ·

Preparing for Manual CyberGhost Setup

Obtain your CyberGhost OpenVPN Information

If you are not already a CyberGhost user Sign Up Now.

1. Log in to your account on the CyberGhost website.

CyberGhost Website Login

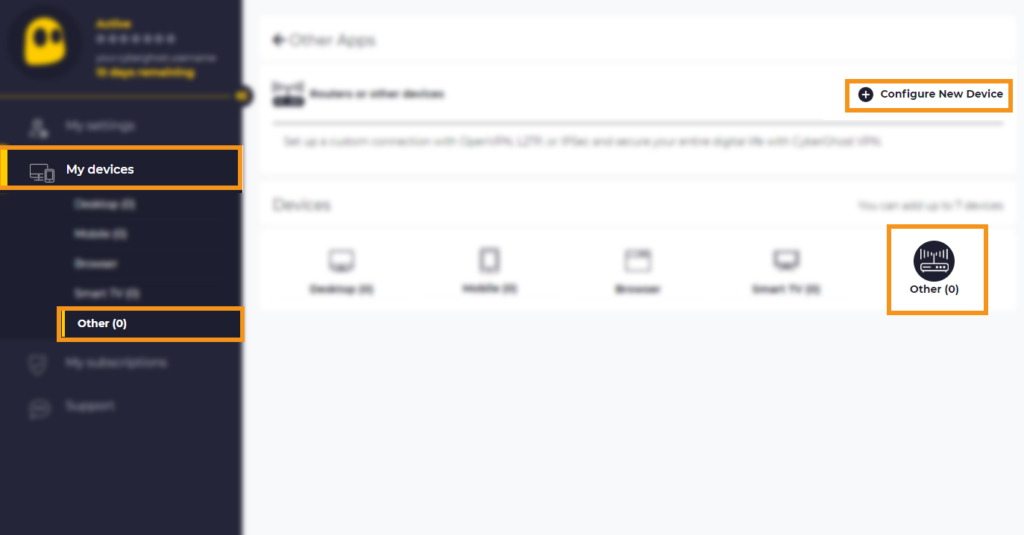
2. Select My Devices.

3. Select Other and then Configure New Device.

CyberGhost Website OpenVPN Configuration Files Generator Cyberghost - Website Screen CyberGhost Website OpenVPN Configuration Files Generator

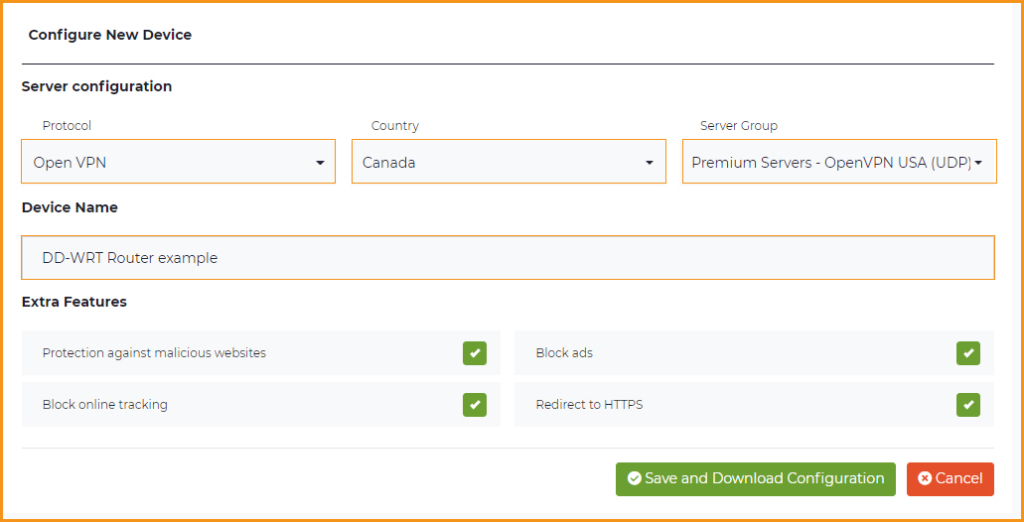
4. Set Protocol to OpenVPN. Select the Country you would like to connect to. Select the Server Group. Name the device in the Device Name field. Click Save Configuration.

CyberGhost Website OpenVPN Configuration Files Generator 3

5. Press View configuration.

CyberGhost Website OpenVPN Configuration Files Generator 2

6. Copy the Username, and Password that appear to a notepad, since you will need this information later in the setup process. Click Download Configuration.

CyberGhost Website OpenVPN Configuration Files Generator 1

Open the file that was downloaded with NotePad++ for Windows or TextEdit for Apple. You only need the ca.crt, client.crt, and client.key files. All CyberGhost servers have different keys and certificates.

DD-WRT Router Setup for CyberGhost

Navigate to Services > VPN

Enter CyberGhost settings

OpenVPN Client

Start OpenVPN Client

If you wish to disable your VPN connection simply set this to Disable at any time and click Apply Settings.

Server IP/Name

Copy and paste the server you selected in your account. Be sure there are no extra spaces or characters.

Port

443

Tunnel Device

TUN

Tunnel Protocol

UDP

Encryption cipher

AES-256-CBC

Hash Algorithm

SHA256

User Pass Authentication

Enable

Username

Enter the Username you obtained in your CyberGhost account.

Password

Enter the Password you obtained in your CyberGhost account.

Advanced Options

Enable

TLS Cipher

None

LZO Compression

Adaptive

NAT

Enable

Firewall Protection

Enable

Additional Config

tun-mtu 1500
fragment 1300
mssfix 1300

Policy Based Routing

This field can be used for split VPN and Dual Gateway routing.

CA Cert

—–BEGIN CERTIFICATE—–
MIIGWjCCBEKgAwIBAgIJAJxUG61mxDS7MA0GCSqGSIb3DQEBDQUAMHsxCzAJBgNV
BAYTAlJPMRIwEAYDVQQHEwlCdWNoYXJlc3QxGDAWBgNVBAoTD0N5YmVyR2hvc3Qg
Uy5BLjEbMBkGA1UEAxMSQ3liZXJHaG9zdCBSb290IENBMSEwHwYJKoZIhvcNAQkB
FhJpbmZvQGN5YmVyZ2hvc3Qucm8wHhcNMTcwNjE5MDgxNzI1WhcNMzcwNjE0MDgx
NzI1WjB7MQswCQYDVQQGEwJSTzESMBAGA1UEBxMJQnVjaGFyZXN0MRgwFgYDVQQK
Ew9DeWJlckdob3N0IFMuQS4xGzAZBgNVBAMTEkN5YmVyR2hvc3QgUm9vdCBDQTEh
MB8GCSqGSIb3DQEJARYSaW5mb0BjeWJlcmdob3N0LnJvMIICIjANBgkqhkiG9w0B
AQEFAAOCAg8AMIICCgKCAgEA7O8+mji2FlQhJXn/G4VLrKPjGtxgQBAdjo0dZEQz
KX08q14dLkslmOLgShStWKrOiLXGAvB1rPvvk613jtA0KjQLpgyLy9lIWohQKYjj
5jrJYXMZMkbSHBYI9L8L7iezBEFYrjYKdDo51nq99wRFhKdbyKKjDh3e2L2SVEZL
T1ogkK5gWzjvH+mjjtjUUicK+YjGwWOz6I+KKaG4Ve/D/cE6nCLbhHIMMnargZEu
7sqA6BFeS4kEP/ZdCZoTSX2n43XV1q63nJt/v0KDetbZDciFVW9h9SVPG4qT44p0
550N+Mom7zTX7S/ID5T9dplgU8sRGtIMrG0cIMD9zmpFgUnMusCrR7jJFr0sMAve
TbgZg95LmstV6R6WKZkSFdUrE0DHl4dHoZvTFX+1LhwhHgjgDLaosX0vhG/C/7Lp
oVWimd6RRQT3M9o4Fa1TuhfvBzQ20QHrmRV/yKvGNK0xckZ6EZ/QY7Z55ORU15Tg
ab4ebnblYPWoEmn0mIYP3LFFeoR5OS1EX7+j4kPv+bwPGsmpHjxmZyq2Y7sJBpbO
CJgbkn52WZdPBIRDpPdIHQ8pAJC4T0iMK9xvAwWNl/V6EYYNpR97osyEDXn+BTdA
HlhJ5fck9KlwI9mb1Kg1bhbvbmaIAiOLenSULYf3j6rI1ygo3R2cCyybtuAq8M7z
0OECAwEAAaOB4DCB3TAdBgNVHQ4EFgQU6tdK1g/He5qzjeAoM5eHt4in9iUwga0G
A1UdIwSBpTCBooAU6tdK1g/He5qzjeAoM5eHt4in9iWhf6R9MHsxCzAJBgNVBAYT
AlJPMRIwEAYDVQQHEwlCdWNoYXJlc3QxGDAWBgNVBAoTD0N5YmVyR2hvc3QgUy5B
LjEbMBkGA1UEAxMSQ3liZXJHaG9zdCBSb290IENBMSEwHwYJKoZIhvcNAQkBFhJp
bmZvQGN5YmVyZ2hvc3Qucm+CCQCcVButZsQ0uzAMBgNVHRMEBTADAQH/MA0GCSqG
SIb3DQEBDQUAA4ICAQDNyQ92kj4qiNjnHk99qvnFw9qGfwB9ofaPL74zh0G5hEe3
Wgb2o4fqUGnvUNgOu53gJksz3DcPQ8t40wfmm9I1Z8tiM9qrqvkuQ+nKcLgdooXt
EsTybPIYDZ2cWR/5E0TKRvC7RFzKgQ4D77Vbi4TdaHiDV7ZNfU1iLCoBGcYm80hc
UHEs5KIVLwUmcSOTmbZBySJxcSD0yUpS7nlZGwLY6VQrU+JFwDSisbXT4DXf3iSz
p7FzW0/u/SFvWsPHrjE0hkPoZPalYvouaJEHKAhip0ZwSmitlxbBnmm8+K/3c9mL
A5/uXrirfpuhhs8V3lyV2mczVtSiTl6gpi88gc//JY80JeHdupjO25T3XEzY9cpx
ecmkWaUEjLMx4wVoXQuUiPonfILM6OLwi+zUS8gQErdFeGvcQXbncPa4SdJuHkF8
lgiX2i8S8fPGdXvU37E9bdAXwP5nZriYq1s0D59Qfvz+vLXVkmyZp6ztxjKjKole
mPMak0Y5c1Q4RjNF6tmQoFuy/ACSkWy14Tzu2dFp7UiVbGg1FOvKhfs48zC2/IUQ
v1arqmPT/9LVq3B2DVT9UKXRUXX/f/jSSsVjkz4uUe2jUyL+XHX1nSmROTPHSAJ+
oKf0BLnfqUxFkEUTwLnayssP2nwGgq35b7wEbTFIXdrjHGFUVQIDeERz8UThew==
—–END CERTIFICATE—–

Public Client Cert

Copy and paste all contents of the client.crt file starting and ending with:
—–BEGIN CERTIFICATE—–
…
—–END CERTIFICATE—–

Private Client Key

Copy and paste all contents of the client.key file starting and ending with:
—–BEGIN PRIVATE KEY—–
…
—–END PRIVATE KEY—–

CLICK APPLY SETTINGS

Leave all settings not mentioned above as their default setting.

Verify a successful CyberGhost connection

Navigate to Status > OpenVPN

  1. You should now see a CONNECTED SUCCESS message.
  2. Visit CyberGhost’s website to verify your new IP address and virtual location.

In some cases you may notice that the location is not showing the same location as the server you have input in your router settings; this is because geo tracking tools are often tricked by VPN connections. As long as you see an IP address that is not the same as your normal Internet IP address then you are indeed connected to CyberGhost.

Back up your settings

Navigate to Administration > Backup

  1. Click the Backup button.
  2. A file named nvrambak.bin will be saved to your computer.
  3. You can load nvrambak.bin to restore your settings in the event of a reset.

How to change the CyberGhost server

  1. Follow the instructions for obtaining the OpenVPN information from above.
  2. Enter the new Server Address in the Server IP/Name field.
  3. Enter the new Username and Password.
  4. Enter the new ca.crt, client.crt, and client.key
  5. Click Apply Settings.

TROUBLESHOOTING

Still having issues? Visit the VPN Troubleshooting section.

Troubleshoot Here

IPVanish TP-Link OpenVPN Setup

TeamFlashRouters · Apr 29, 2024 ·

Preparing for IPVanish TP-Link Setup

Download your IPVanish .ovpn file

If you are not already an IPVanish user Sign Up Now.

1. Log in to your account on the IPVanish website.

IPVanish login

2. Successfully log in with your account information then go to IPVanish .ovpn file page.

3. Click on the .ovpn file for the server location you want to use to dowloand the .ovpn file. Do not open this file.

IPVanish download ovpn

TP-Link Router Setup for IPVanish

Login to TP-Link firmware settings in a browser on any computer or smart device connected to the FlashRouter’s network.

1. Navigate to the Advanced tab.

TP-Link Advanced settings

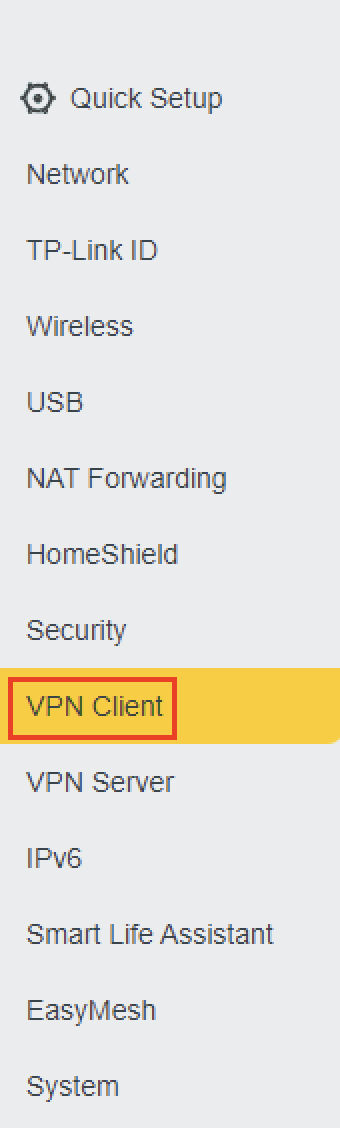
2. Navigate to the VPN Client tab.

TP-Link VPN Client

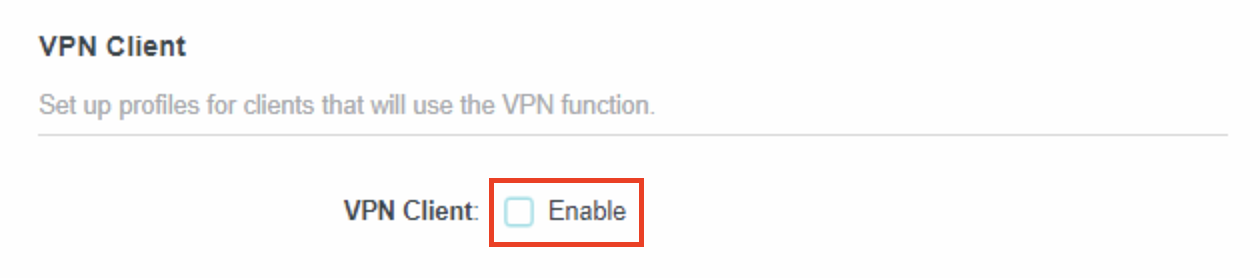
3. Check the Enable box next to VPN Client. Then click Save at the bottom of the page.

TP-Link VPN Client enable

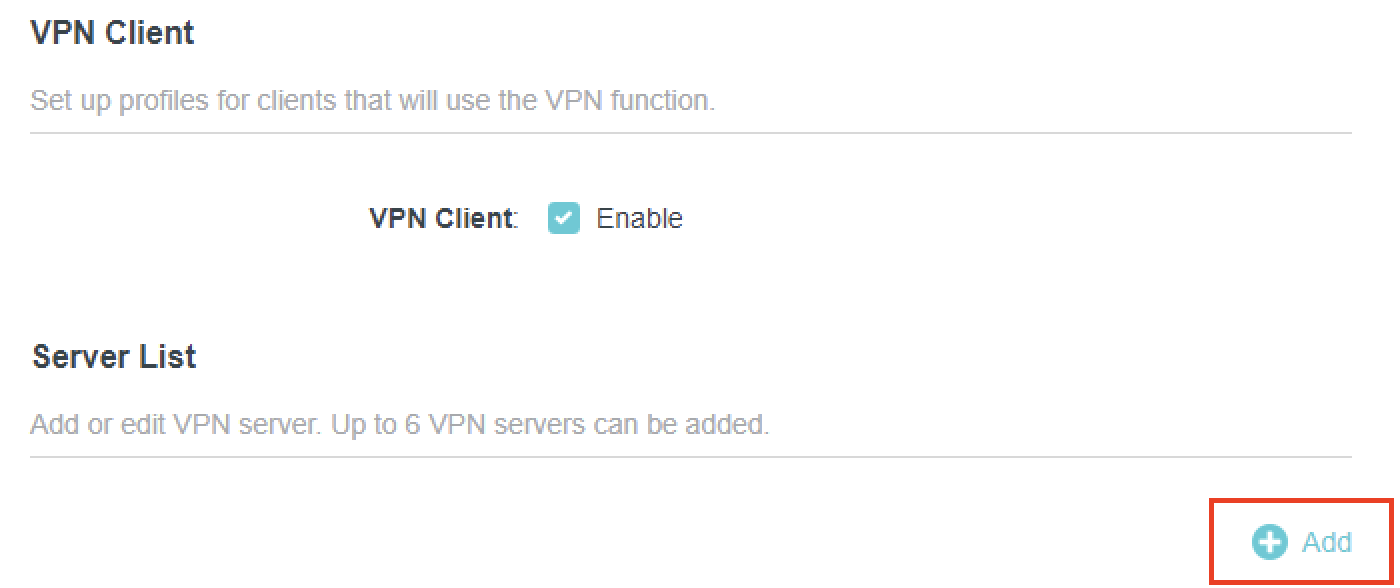
4. Click the Add button in the Server List area.

TP-Link Add server button

5. In the Description field enter in the name you’d like to use for this OpenVPN Client profile. We typically advise entering in the location. Our example server was New York so I have entered in IPVanish New York.

Set the VPN Type to OpenVPN.

In the Username and Password fields paste in the IPVanish email and password you use to successfully login to your IPVanish website account.

Click Browse and select the .ovpn file you downloaded earlier. Then click Save.

TP-Link IPVanish

By default no devices will be assigned to the VPN Tunnel. With TP-Link firmware you must manually assign the devices that you want connected to the VPN tunnel. Proceed with the next steps to do so for all devices you want connected to VPN.

6. Click the Add button in the Device List area.

TP-Link add devices to VPN tunnel

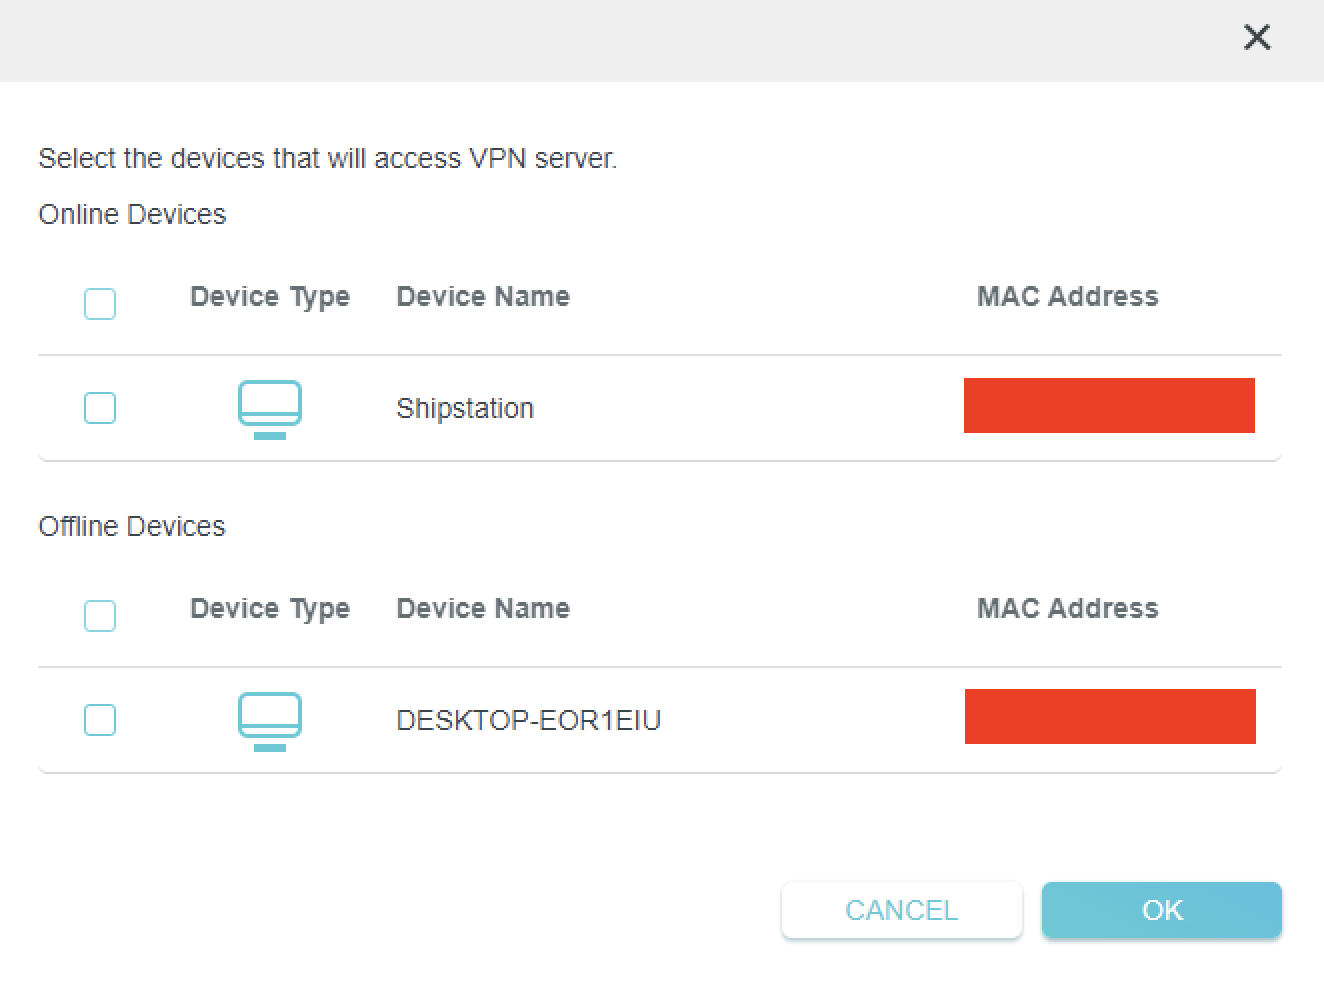
7. A list of devices connected to the FlashRouter’s network will appear. Check the devices that you want to connect to VPN. Then click OK.

TP-Link select devices to add to VPN tunnel

8. Now that the devices have been assigned to the VPN connection click the Enable toggle in the Server List area.

TP-Link IPVanish Connected

Verify a successful IPVanish connection

  1. You should now see a CONNECTED message.
  2. Visit IPVanish’s IP Check to verify your new IP address and virtual location.

In some cases you may notice that the location is not showing the same location as the server you have input in your router settings; this is because geo tracking tools are often tricked by VPN connections. As long as you see an IP address that is not the same as your normal Internet IP address then you are indeed connected to IPVanish.

How to change the IPVanish server

  1. Follow the steps at the top of the page to obtain a new .ovpn file.
  2. Then proceed with the settings same as initial setup.

TROUBLESHOOTING

Still having issues? Visit the VPN Troubleshooting section.

Troubleshoot Here

Surfshark TP-Link WireGuard Setup

TeamFlashRouters · Apr 29, 2024 ·

Preparing for Surfshark TP-Link Setup

Download your Surfshark .conf file

If you are not already a Surfshark user Sign Up Now.

1. Log in to your account on the Surfshark website.

Surfshark Account Login

2. Click VPN Manual Setup.

Surfshark VPN Manual Setup

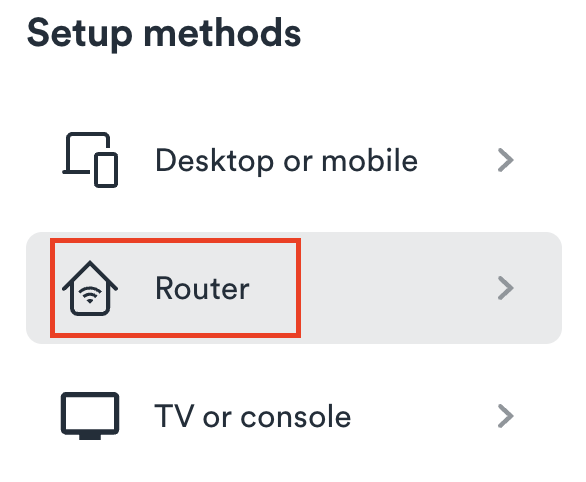
3. Select Router as the Setup method.

Surfshark setup method Router

4. Select WireGuard as the Protocol.

Surfshark select WireGuard

5. Select I don’t have a key pair.

Surfshark No Key Pair

6. Enter FlashRouter as the name of the connection and click Next.

Surfshark Connection Name

7. Click Generate a new key pair.

Surfshark Generate new Key Pair

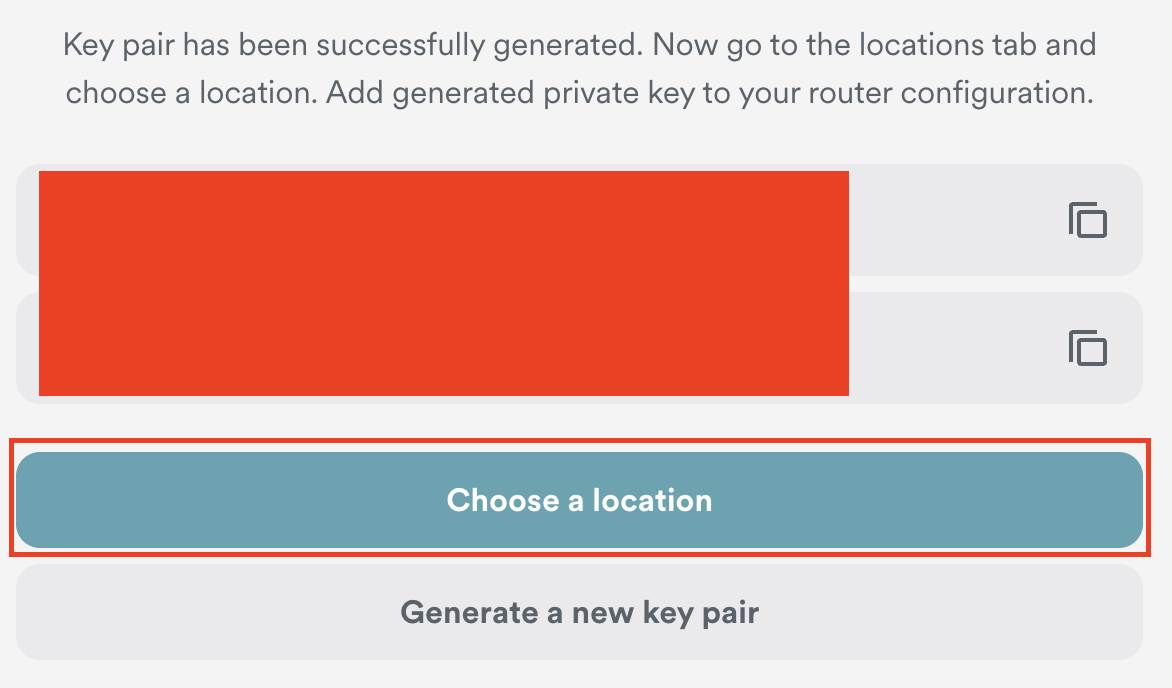
8. Click Choose a location.

Surfshark Choose a Location

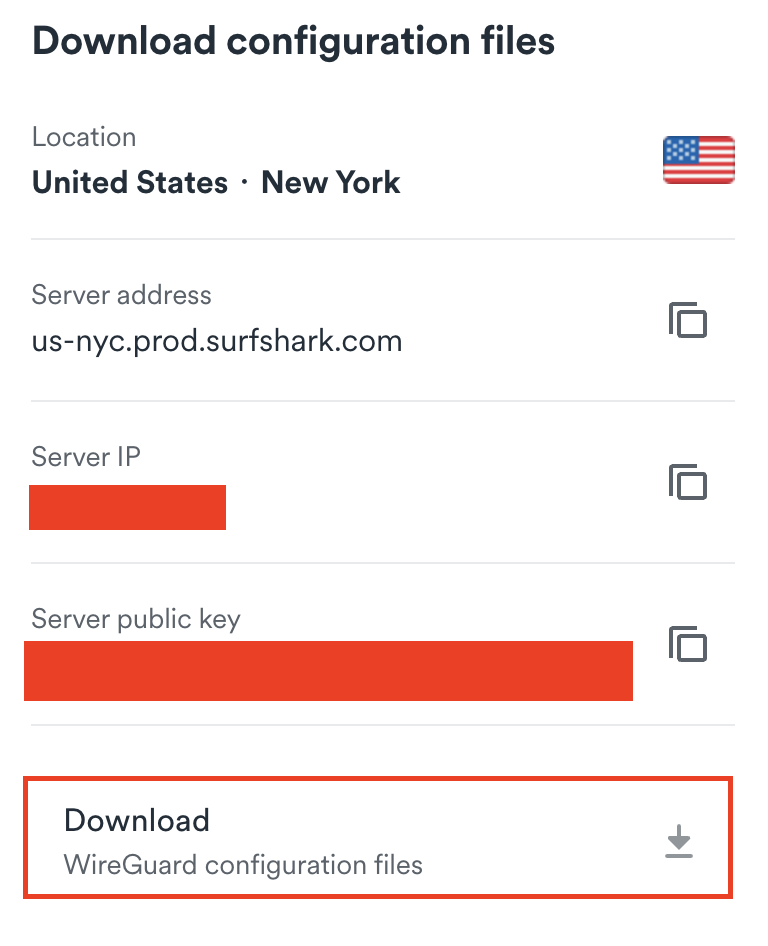
9. Select the server location you want to connect to. Unless you need a specific location we recommend using Surfshark’s recommended Fastest server. Click Download to download the .conf file for this Surfshark server location.

Surfshark download conf file

TP-Link Router Setup for Surfshark

Login to TP-Link firmware settings in a browser on any computer or smart device connected to the FlashRouter’s network.

1. Navigate to the Advanced tab.

TP-Link Advanced settings

2. Navigate to the VPN Client tab.

TP-Link VPN Client

3. Check the Enable box next to VPN Client. Then click Save at the bottom of the page.

TP-Link VPN Client enable

4. Click the Add button in the Server List area.

TP-Link Add server button

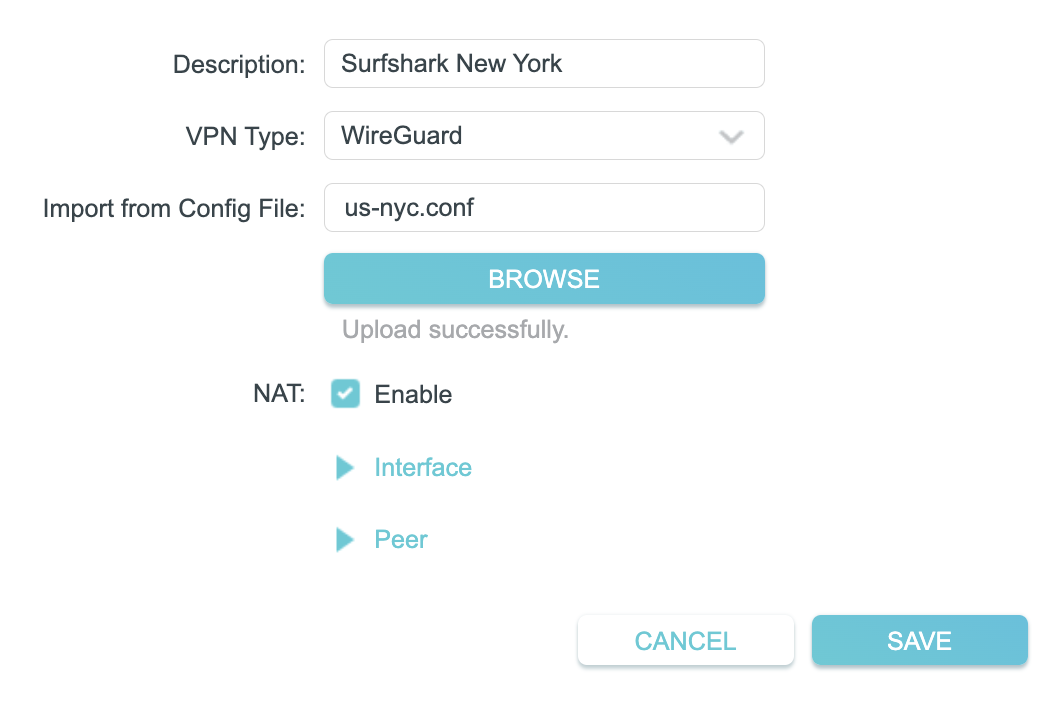
5. In the Description field enter in the name you’d like to use for this WireGuard Client profile. We typically advise entering in the location. Our example server was New York so I have entered in Surfshark New York.

Set the VPN Type to WireGuard.

Click Browse and select the .conf file you downloaded earlier. Then click Save.

TP-Link Surfshark WireGuard

By default no devices will be assigned to the VPN Tunnel. With TP-Link firmware you must manually assign the devices that you want connected to the VPN tunnel. Proceed with the next steps to do so for all devices you want connected to VPN.

6. Click the Add button in the Device List area.

TP-Link add devices to VPN tunnel

7. A list of devices connected to the FlashRouter’s network will appear. Check the devices that you want to connect to VPN. Then click OK.

TP-Link select devices to add to VPN tunnel

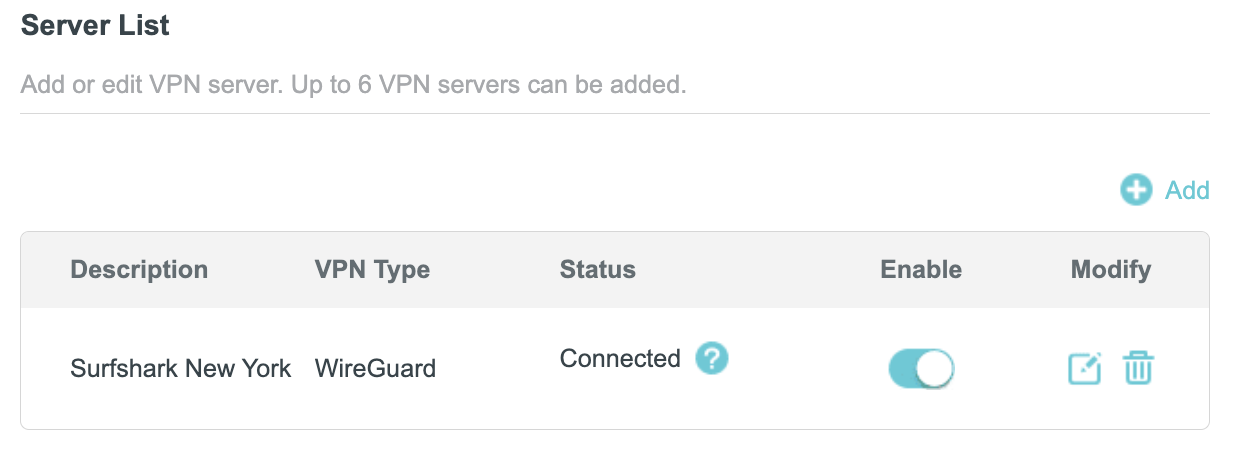
8. Now that the devices have been assigned to the VPN connection click the Enable toggle in the Server List area.

TP-Link Surfshark WireGuard Connected

Verify a successful Surfshark connection

  1. You should now see a CONNECTED message.
  2. Visit Surfshark’s IP Check to verify your new IP address and virtual location.

In some cases you may notice that the location is not showing the same location as the server you have input in your router settings; this is because geo tracking tools are often tricked by VPN connections. As long as you see an IP address that is not the same as your normal Internet IP address then you are indeed connected to Surfshark.

How to change the Surfshark server

  1. Follow the steps at the top of the page to obtain a new .conf file.
  2. Then proceed with the settings same as initial setup.

TROUBLESHOOTING

Still having issues? Visit the VPN Troubleshooting section.

Troubleshoot Here

Surfshark TP-Link OpenVPN Setup

TeamFlashRouters · Apr 29, 2024 ·

Preparing for Surfshark TP-Link Setup

Download your Surfshark .ovpn file

If you are not already a Surfshark user Sign Up Now.

1. Log in to your account on the Surfshark website.

Surfshark Account Login

2. Click VPN Manual Setup.

Surfshark VPN Manual Setup

3. Select Router as the Setup method.

Surfshark setup method Router

4. Select OpenVPN as the Protocol.

Surfshark OpenVPN Protocol

5. Copy and paste your Surfshark manual username and password to a secure location. This is the username and password you will enter into the router settings to connect to Surfshark.

Surfshark OpenVPN credentials

6. Click Location and select the server location you want to connect to. Unless you need a specific location we recommend using Surfshark’s recommended Fastest server. Click Download to download the UDP .ovpn file for this Surfshark server location.

Surfshark download .ovpn file

TP-Link Router Setup for Surfshark

Login to TP-Link firmware settings in a browser on any computer or smart device connected to the FlashRouter’s network.

1. Navigate to the Advanced tab.

TP-Link Advanced settings

2. Navigate to the VPN Client tab.

TP-Link VPN Client

3. Check the Enable box next to VPN Client. Then click Save at the bottom of the page.

TP-Link VPN Client enable

4. Click the Add button in the Server List area.

TP-Link Add server button

5. In the Description field enter in the name you’d like to use for this OpenVPN Client profile. We typically advise entering in the location. Our example server was New York so I have entered in Surfshark New York.

Set the VPN Type to OpenVPN.

In the Username and Password fields paste in the Surfshark username and password we obtained earlier.

Click Browse and select the .ovpn file you downloaded earlier. Then click Save.

TP-Link Surfshark OpenVPN

By default no devices will be assigned to the VPN Tunnel. With TP-Link firmware you must manually assign the devices that you want connected to the VPN tunnel. Proceed with the next steps to do so for all devices you want connected to VPN.

6. Click the Add button in the Device List area.

TP-Link add devices to VPN tunnel

7. A list of devices connected to the FlashRouter’s network will appear. Check the devices that you want to connect to VPN. Then click OK.

TP-Link select devices to add to VPN tunnel

8. Now that the devices have been assigned to the VPN connection click the Enable toggle in the Server List area.

TP-Link Surfshark OpenVPN connected

Verify a successful Surfshark connection

  1. You should now see a CONNECTED message.
  2. Visit Surfshark’s IP Check to verify your new IP address and virtual location.

In some cases you may notice that the location is not showing the same location as the server you have input in your router settings; this is because geo tracking tools are often tricked by VPN connections. As long as you see an IP address that is not the same as your normal Internet IP address then you are indeed connected to Surfshark.

How to change the Surfshark server

  1. Follow the steps at the top of the page to obtain a new .ovpn file.
  2. Then proceed with the settings same as initial setup.

TROUBLESHOOTING

Still having issues? Visit the VPN Troubleshooting section.

Troubleshoot Here

Change WiFi name and password on Roqos

TeamFlashRouters · Nov 14, 2021 ·

Change your Roqos’ WiFi Network Name and Password to anything you like. Make sure it is not a duplicate of an existing WiFi name.

Login to Roqos Core UI web app in a browser on any computer or smart device.

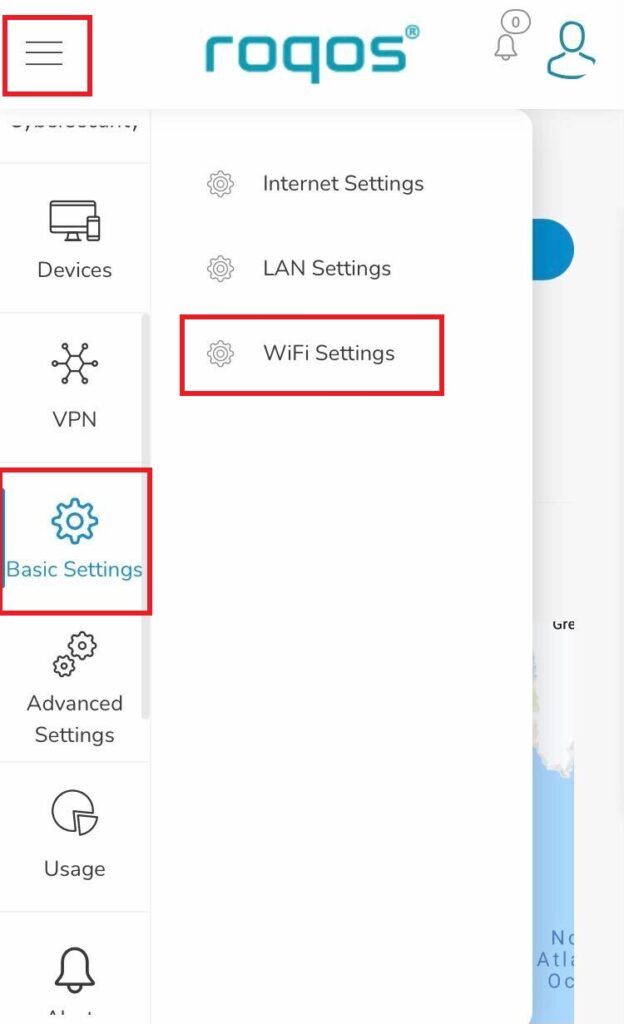
1. Click the navigation menu and select Basic Settings > WiFi Settings.

Roqos Basic Settings - WiFi Settings

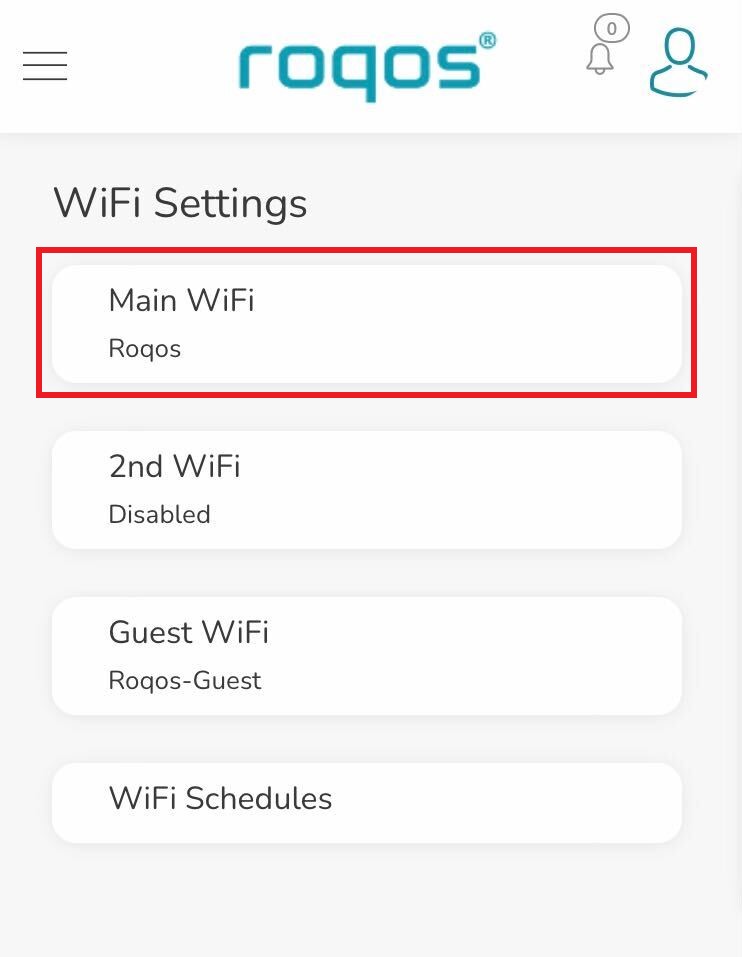
2. Click Main WiFi.

Roqos WiFi Settings - Main WiFi

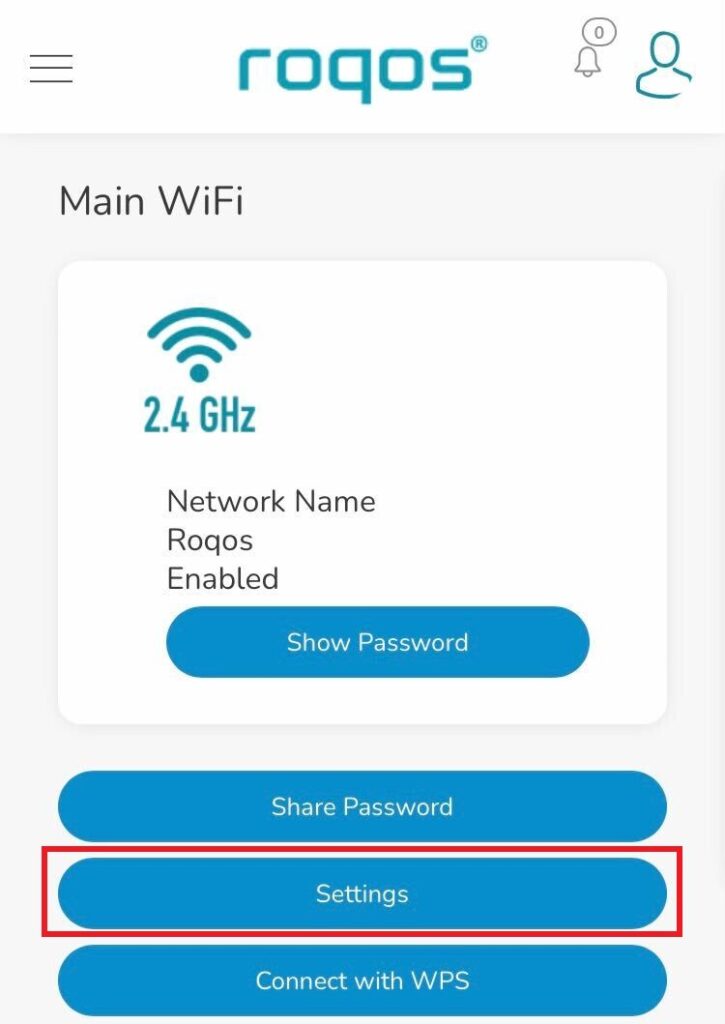
3. Click Settings.

Roqos WiFi Settings - Settings

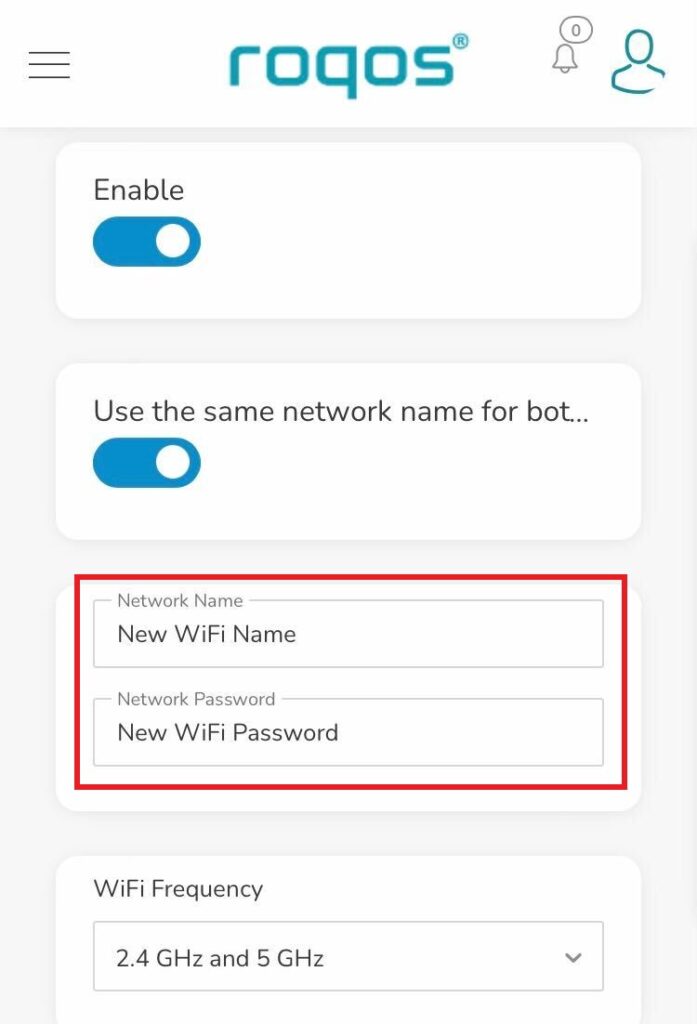
4. Enter the new Network Name and Network Password. Click Save.

Roqos WiFi Settings - Enter new name and password

5. Reconnect your WiFi devices to the new network with the password you just set.

How to Access Your AsusWRT FlashRouter Settings

TeamFlashRouters · Oct 16, 2025 ·

This quick guide will walk you through connecting to your AsusWRT FlashRouter and logging into the admin settings page. You’ll use either WiFi or an Ethernet cable, then access the router dashboard through your browser.

Step 1. Connect Your Device to the Router

You can connect by WiFi or Ethernet:

  • WiFi: Look for a network name like FlashRouter24 or FlashRouter50.
    • The WiFi password is set to: Wireless#[First 5 characters of your router’s MAC]
    • Example: If your MAC is CC28A07E70A8, your WiFi password is Wireless#CC28A.
    • ⚠️ Be sure to capitalize the “W” in Wireless.
  • Ethernet: Plug an Ethernet cable from your computer into one of the router’s LAN ports (usually marked or color-coded differently from the WAN port).

👉 Pro tip: Disconnect from any other WiFi networks during setup.

Step 2. Open the Router Login Page

  1. Open a web browser (Chrome, Safari, Firefox, Edge).
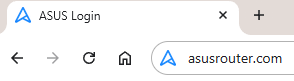
  2. In the address bar, type: 192.168.50.1 or go to asusrouter.com
  3. Press Enter.
Access Asus Router

This is the local router dashboard address (not a public website). If the page doesn’t load:

  • Try a different browser.
  • Clear your cache.
  • Ensure your device is connected to the FlashRouter network.

Step 3. Log In to the Router Settings

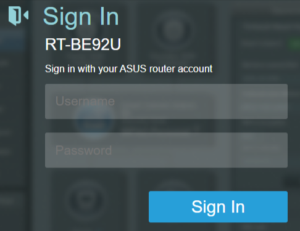
  • Default username: flashrouter
  • Default password: asuswrt-admin1
  • Some older devices may use: asuswrt1 or asuswrt
  • This is the factory default for AsusWRT routers shipped by FlashRouters.
Asus Router Login

💡 Once you’re in, you can update your admin password in the settings for extra security.

Next Steps

Now that you’ve accessed your AsusWRT FlashRouter, you can:

  • Set up your VPN service
  • Customize your WiFi name and password
  • Adjust device controls and security settings

Check our support library for your specific VPN setup guide.

ProtonVPN WireGuard Setup

TeamFlashRouters · Jun 15, 2022 ·

Preparing for ProtonVPN WireGuard Setup

Verify your ProtonVPN login information

If you are not already a ProtonVPN user Sign Up Now.

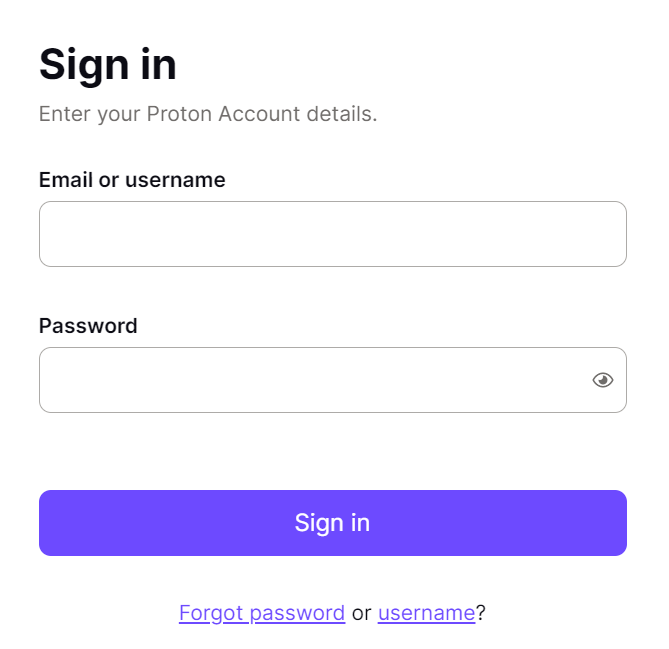
Log in to your account on the ProtonVPN website.

ProtonVPN Account login

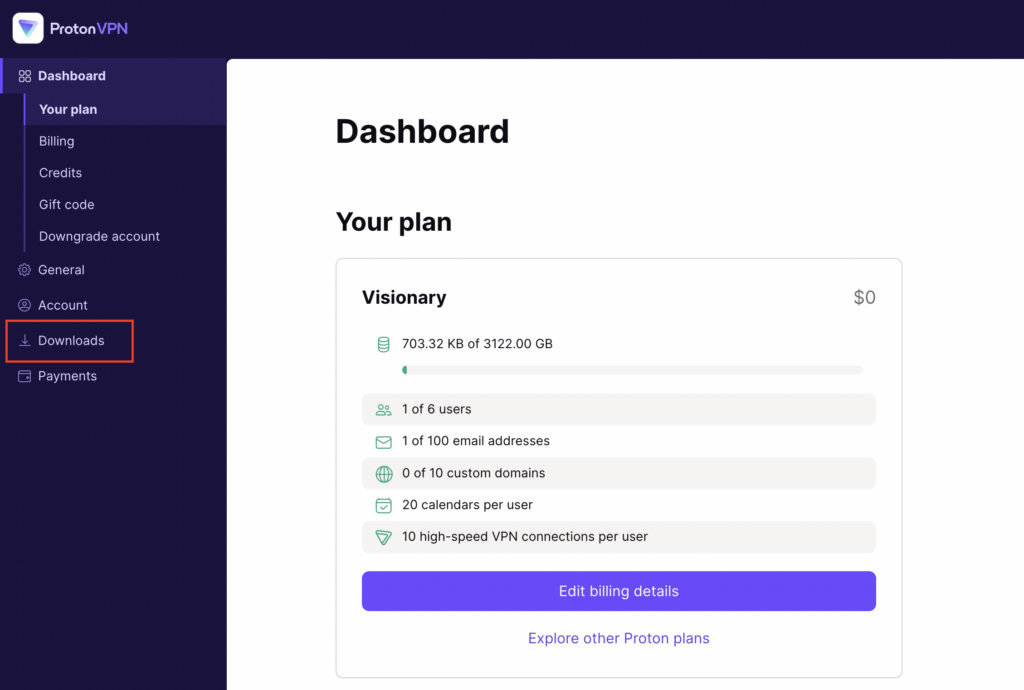
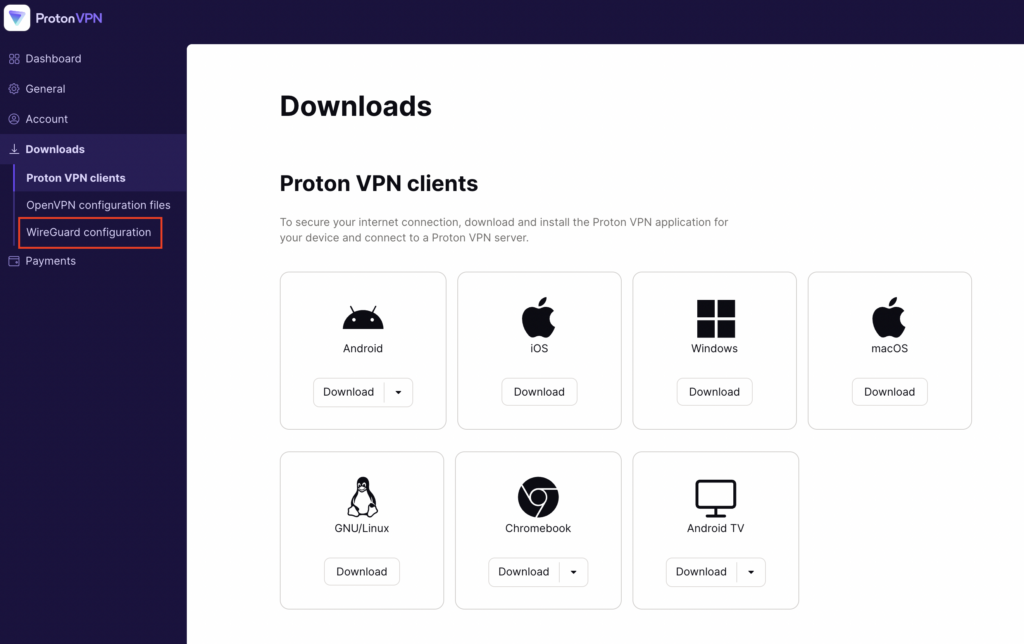
1. On the left hand side select Downloads.

ProtonVPN Downloads

2. Then select WireGuard Configuration.

ProtonVPN WireGuard Configuration

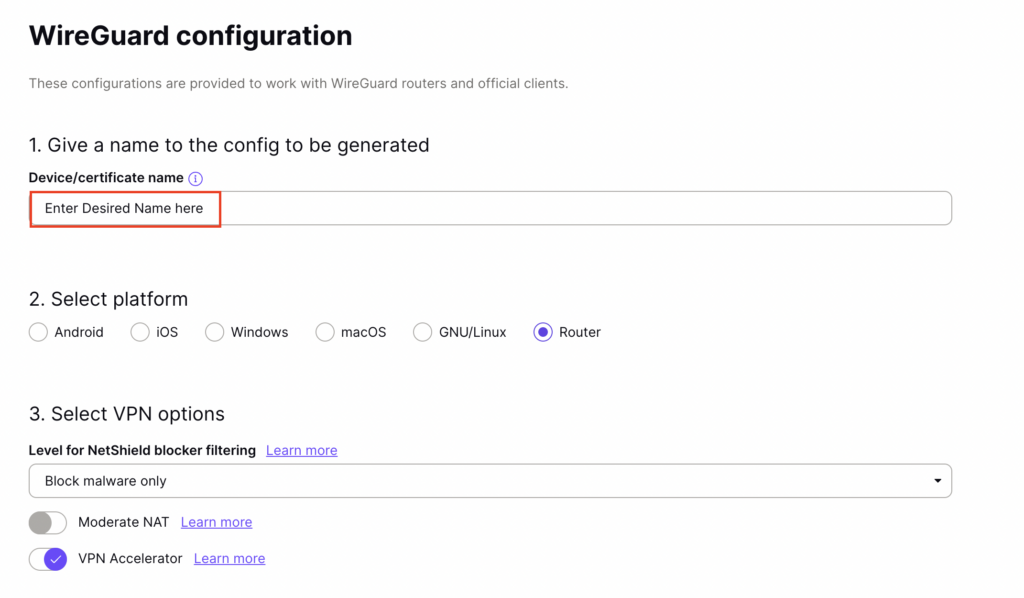
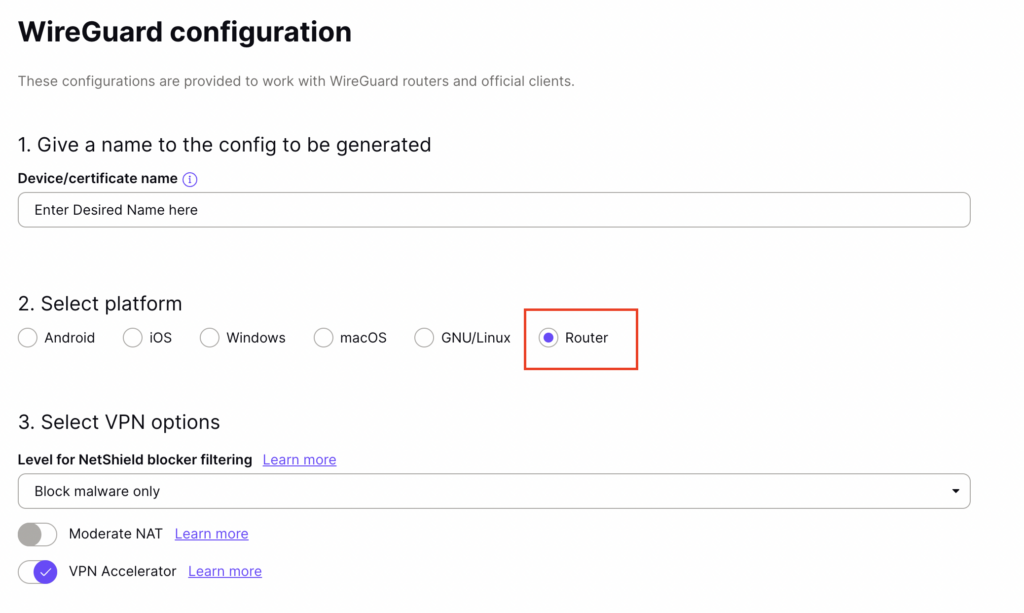
3. Enter the Device Name to assign the FlashRouter to identify it among your ProtonVPN connections.

ProtonVPN WireGuard Desired Name

4. Set the Device platform as Router.

ProtonVPN WireGuard select Router

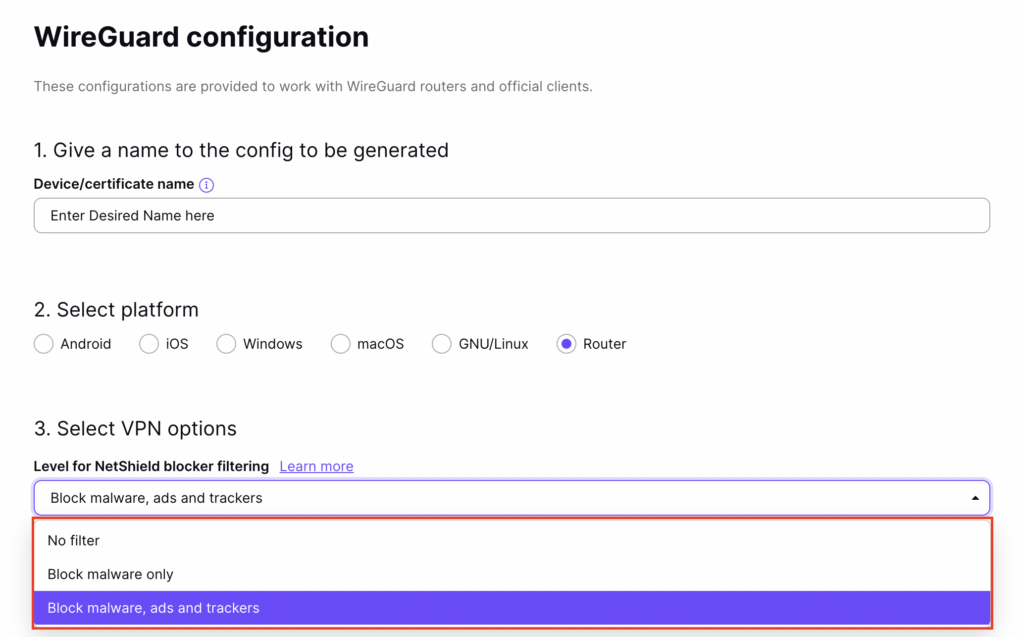
5. Select the VPN Options that you would like to connect with.

ProtonVPN WireGuard VPN Options

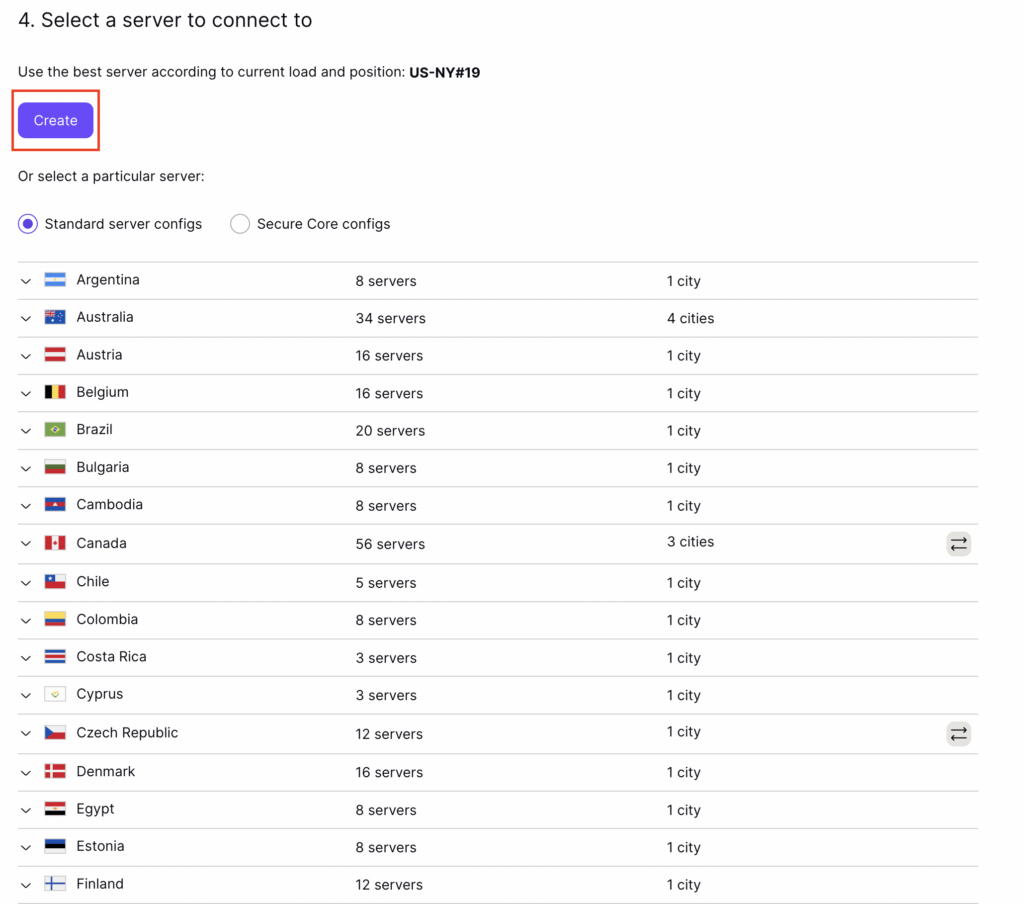
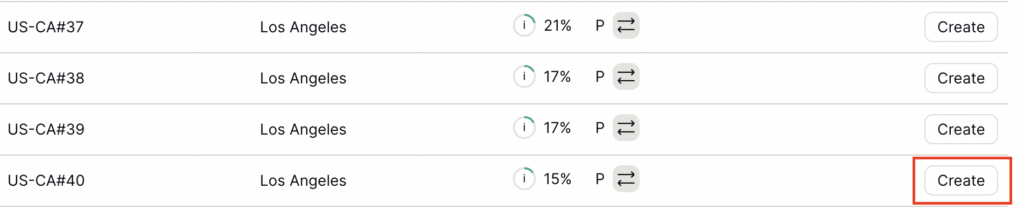
6. ProtonVPN will recommend the ideal server for you to connect to based on your location. Click Create or scroll down and select the server you wish to connect to and click Create next to the server number.

ProtonVPN WireGuard select server
ProtonVPN WireGuard select servers

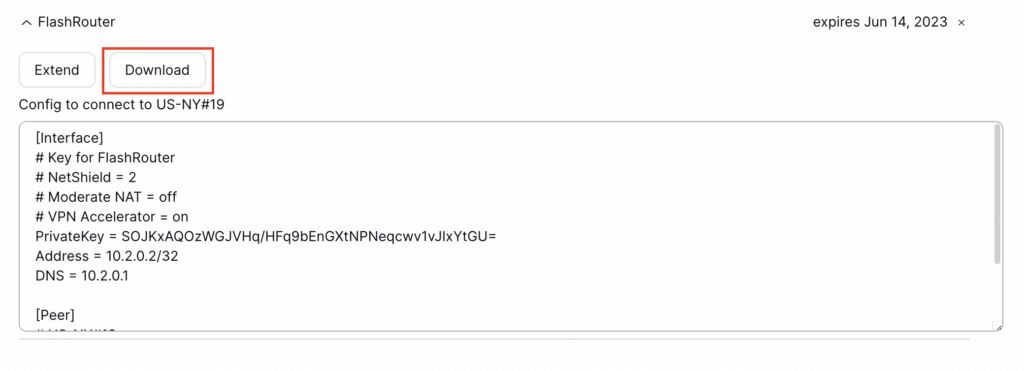
7. Click Download to download the .conf file of the server you selected.

ProtonVPN WireGuard download configuration

DD-WRT Router Setup for ProtonVPN WireGuard

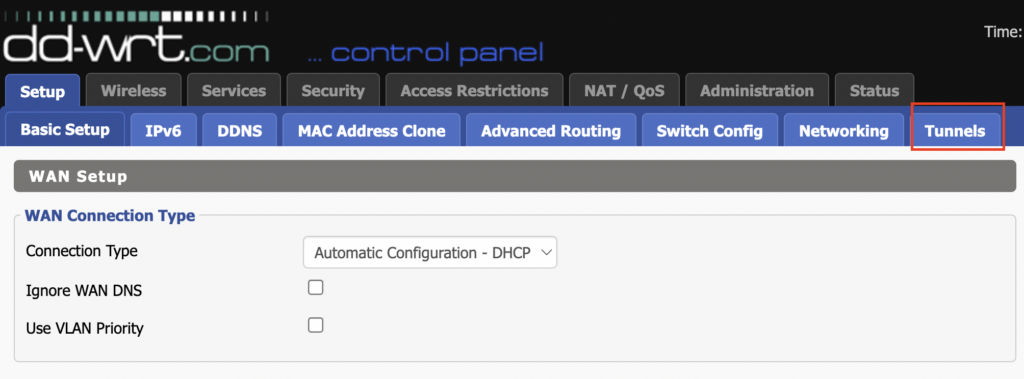
Navigate to Setup > Tunnels 

ProtonVPN WireGuard DD-WRT Tunnels

Enter ProtonVPN WireGuard settings

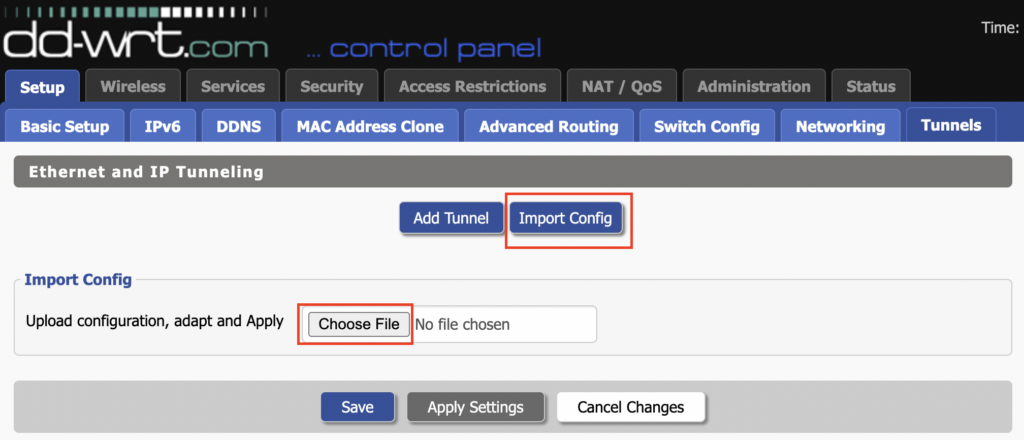
1. Click Import Config and then select Choose file. Select the .conf file that was downloaded earlier.

ProtonVPN WireGuard Import Config and Choose File

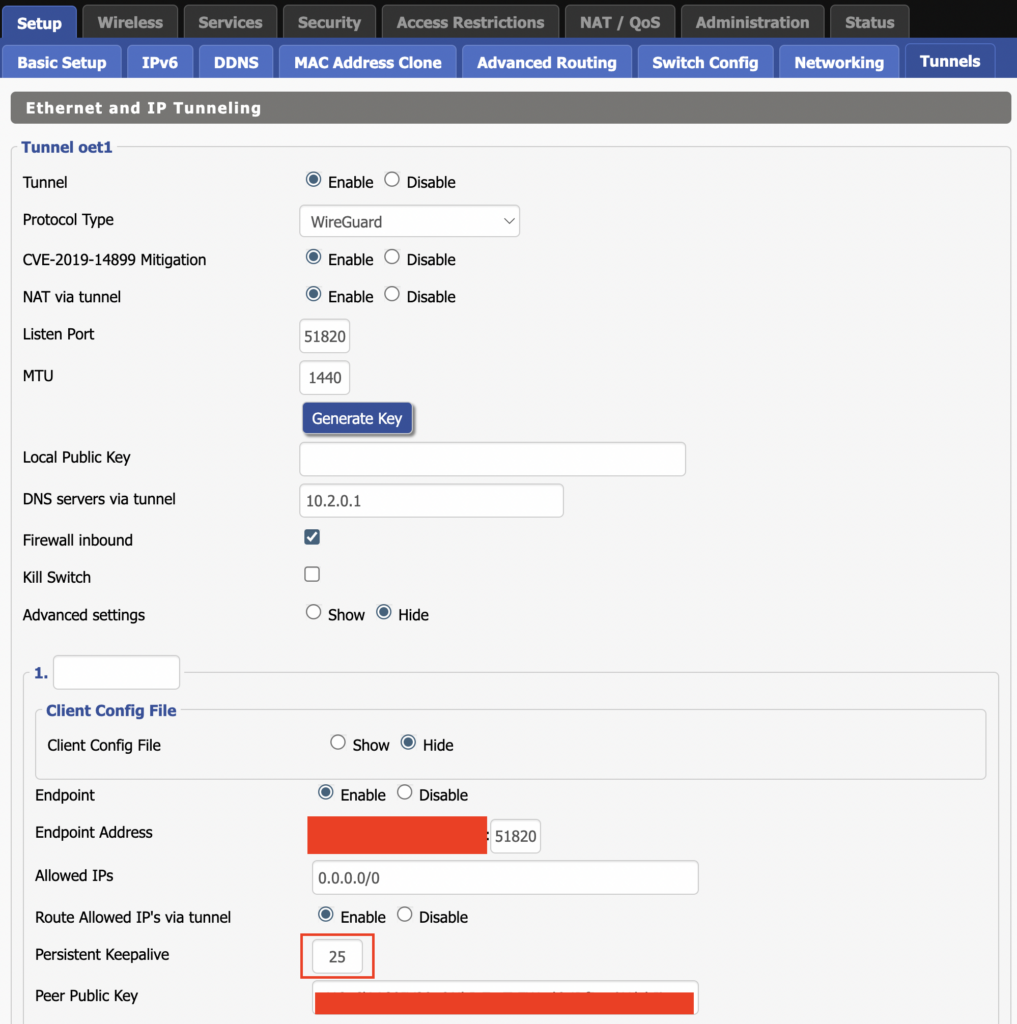
2. All settings will be loaded into the DD-WRT firmware the only field that needs to be adjusted is setting Persistent Keepalive to 25.

ProtonVPN WireGuard Persistent Keep Alive

3. Click Apply Settings at the bottom of the page.

4. After 30 seconds or so refresh the page until you see the WireGuard Status on the page is populated as seen below.

ProtonVPN WireGuard Status

Verify a successful ProtonVPN connection

Navigate to Setup > Tunnels

  1. You should Endpoint, Latest handshake, and Transfer in the WireGuard status area.
  2. Visit whatismyipaddress.com to verify your status as using ProtonVPN.

Back up your settings

Navigate to Administration > Backup

  1. Click the Backup button.
  2. A file named nvrambak.bin will be saved to your computer.
  3. You can load nvrambak.bin to restore your settings in the event of a reset.

TROUBLESHOOTING

Still having issues? Visit the VPN Troubleshooting section.

Troubleshoot Here
« Previous Page

Primary Sidebar

  • Troubleshooting
  • Router Access
  • Internet Connection Issues
  • WiFi Connectivity
  • General VPN Issues
  • TeamViewer Remote Support
  • DD-WRT Firmware
  • Facebook
  • Twitter
  • Instagram
  • Pinterest
  • YouTube

Footer