• Skip to primary navigation
  • Skip to main content
  • Skip to primary sidebar
  • Skip to footer

FlashRouters Support Portal

Prioritizing Privacy

  • SETUP GUIDES
    • Privacy Hero Router Setup Guide
    • ASUS-WRT Router Setup Guide
    • AsusWRT-Merlin Router Setup Guide
    • DD-WRT Router Setup Guide
    • ExpressVPN Router Setup Guide
    • GL.iNet Router Setup Guide
    • Roqos Core Router Setup Guide
  • TROUBLESHOOTING
    • Router Access
    • WiFi Connectivity
    • Internet Connection Issues
    • General VPN Issues
    • DD-WRT Firmware
    • TeamViewer Remote Support
  • FAQs
    • Router FAQs
    • VPN FAQs
    • Warranty and Returns FAQs
    • Sales FAQs
    • Shipping FAQs
    • Service Plan FAQs
  • Show Search
Hide Search

Search Results for: lock that can b

Managing User Profiles on Roqos

Dave · Dec 16, 2021 ·

User Profiles allow you to organize your devices connected to the Roqos Core. This allow you to see a user profile’s usage history, set a schedule when devices are allowed to connect to the Internet, and filter out specific content such as explicit websites and games.

Login to Roqos Core UI web app in a browser on any computer or smart device.

Adding new User Profile

1. Click the navigation menu and select Users.

2. To add a new User Profile click Add User.

3. In the Name field enter the name for the User Profile. You can add an image for the User Profile here as well.

4. You will see a list of devices connected to the Roqos Core at the bottom of the page. Check the box of the devices that you would like to add to this User Profile. Then click Save.

Tracking Usage History

1. Click the User Profile that you want to review.

2. Select Usage History.

3. On the new page you can view usage by Top Visited, All Activity, and Activity Graph.

Schedule Pauses

1. Click the User Profile that you want to review.

2. Select Scheduled Pauses.

3. Click Add Schedule.

4. From here you can set the name of the schedule, the days that the schedule will be in effect, and if the schedule should be applied all day or during specific hours. Click Save.

Filters

1. Click the User Profile that you want to review.

2. Select Filters.

3. From here you can use the toggle to Block explicit websites and Block explicit search results.

4. In the Safe Youtube dropdown you can select None, Moderate, or Strict.

5. The Blocked Content area allows you to block specific services such as Games and Social Media.

6. Add specific websites to the Block Sites list if the above policies did not cover them.

7. Add specific websites to the Allowed Sites list if you want to block all websites except for a few.
What are some extra steps I can take to secure my network?

TeamFlashRouters · May 30, 2019 ·

DD-WRT open source firmware removes many firmware vulnerabilities and backdoor access issues that may cause problems in stock firmware. DD-WRT is also updated more frequently than stock firmware, so be sure to always check with the FlashRouter support team to see which DD-WRT build we recommend for the highest level of security for your router at any time.

Aside from avoiding common issues and flaws with stock firmware, DD-WRT give you more control over the firmware settings and allows you to take some extra steps to really lock down your network security. In this article we highlight additional options for WiFi network security and also preventative measures for remote execution attacks.

Wireless MAC Filtering

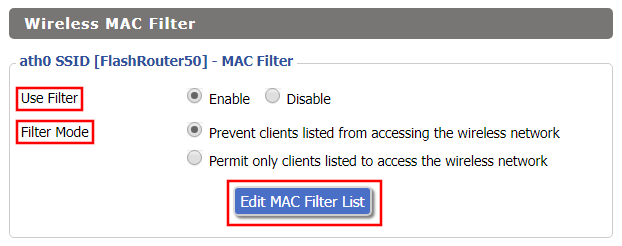
Navigate to Wireless > MAC Filter

Access FlashRouters DD-WRT Admin Enable MAC Filtering
  1. Set Use Filter to Enable.
  2. Select either Prevent or Permit
    • Choose Prevent to add MAC addresses that you don’t want to join your network.
    • Choose Permit to add MAC addresses that you do want to join your network, automatically blocking all others.
  3. Select Edit MAC Filter List.
  4. Add the MAC Address of the wireless devices you want to prevent or permit. Be sure to use the xx:xx:xx:xx:xx:xx format. Hint: You can see a list of connected devices MAC Address by clicking Wireless Client MAC List.
  5. Click Save.
  6. Replicate the steps above for each wireless band.
  7. Click Apply Settings.

Disable Remote Access

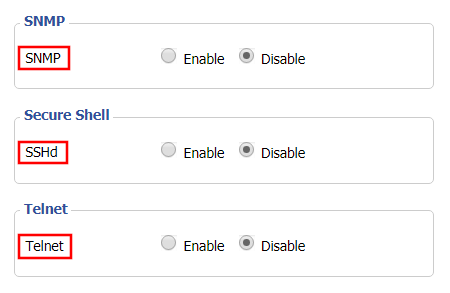
Navigate to Services > Services

Access FlashRouters DD-WRT Admin Settings and Disable Remote Access
  1. Set SNMP to Disable – this setting disables Simple Network Management Protocol, which prevents software from polling your network for information about connected devices.
  2. Set SSHd to Disable – disabling the Secure Shell is a simple way to prevent root access and brute force attacks on your network.
  3. Set Telnet to Disable – Telnet is a less secure version of SSH to manage your local router network via command line.
  4. Click Apply Settings.

Navigate to Administration > Management

Access FlashRouters DD-WRT Admin Settings and Disable Remote Access 2
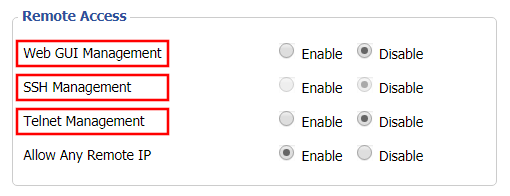
  1. Set Web GUI Management to Disable.
  2. Set SSH Management to Disable.
  3. Set Telnet Management to Disable.
  4. Set Allow Any Remote IP to Enable – Even though this setting is set to Enable there is no remote access because Web GUI Management is already set to Disable. 
  5. Click Apply Settings.

Primary Sidebar

  • Troubleshooting
  • Router Access
  • Internet Connection Issues
  • WiFi Connectivity
  • General VPN Issues
  • TeamViewer Remote Support
  • DD-WRT Firmware
  • Facebook
  • Twitter
  • Instagram
  • Pinterest
  • YouTube

Footer