If you need to extend your connection capabilities and you are not able to wire directly into your main router, you can setup a FlashRouter as a Wireless Repeater Bridge. In Wireless Repeater Bridge mode the FlashRouter connects to your main router on the same subnet via WiFi, and then transmits your internet signal via the FlashRouter for internet access anywhere in your home or office.
Preparing for Wireless Repeater Bridge Setup
Verify your wireless information
In order to setup your FlashRouter as a Wireless Repeater Bridge, you will need the exact SSID and password of your existing wireless network. Make sure you have this information before proceeding.
We recommend using a 2.4GHz network to repeat as this network will have more range. Be sure to click Add under the 2.4GHz settings and not the 5GHz settings.
Locate the Local IP Address of the existing wireless network
Locate the Local IP Address of the existing router that the FlashRouter will be bridged to.
DD-WRT Router Setup for Wireless Repeater Bridge
Disable Firewall
Navigate to Security > Firewall
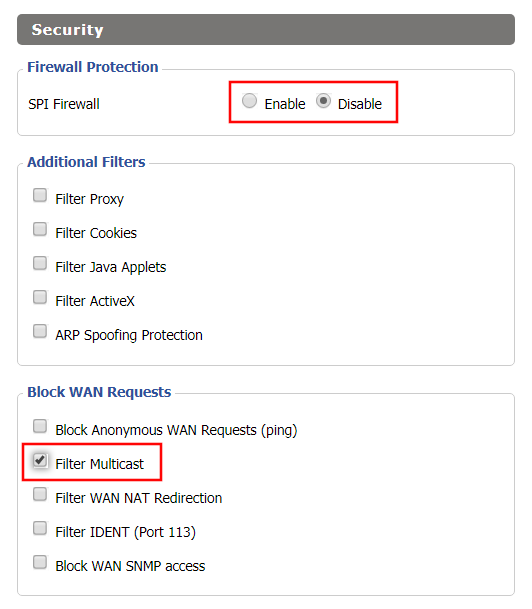
- Set SPI Firewall to Disable.
- Uncheck all boxes except for Filter Multicast.
- Click Save.
Disable DNSmasq
Navigate to Services > Services

- Set DNSmasq to Disable.
- Click Save.
Enter Wireless settings
Navigate to Wireless > Basic Settings
Select Add in the Virtual Interface area.

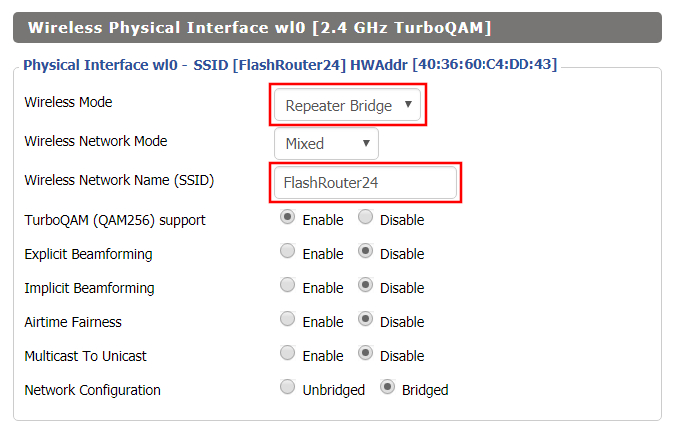
In the Wireless Physical Interface settings for the 2.4GHz network set the Wireless Mode to Repeater Bridge.
Change the Wireless Network Name (SSID) to match exactly with the Wireless Network Name of the network that you will bridge to.
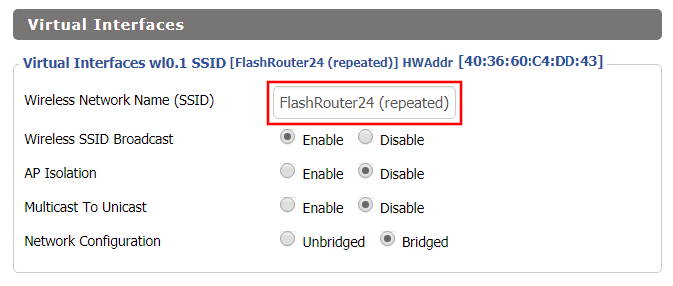
In the Virtual Interfaces settings change the Wireless Network Name (SSID) to FlashRouter24 or any other unique SSID.
CLICK SAVE
Enter Wireless Security settings
Navigate to Wireless > Wireless Security
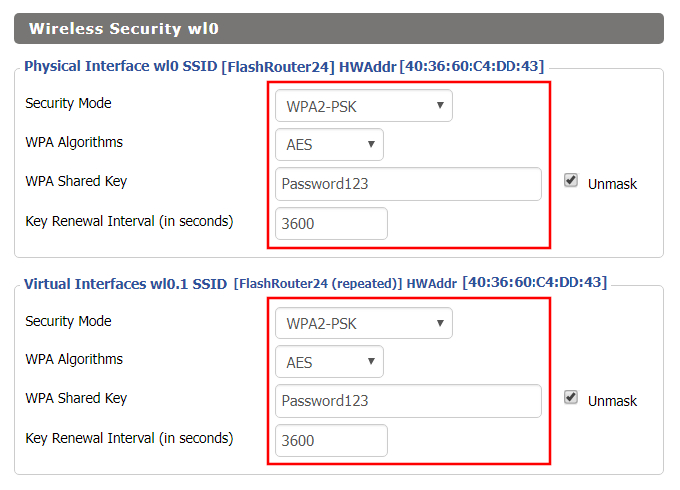
- Duplicate the wireless security settings that are set for the other bands for the newly created virtual interface.
- Change the WPA Shared Key to match exactly with the Wireless Password of the network that you will bridge to.
- Click Save.
Change the FlashRouter's Local IP Address
Navigate to Setup > Basic Setup
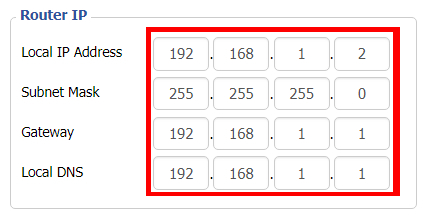
- Set the Local IP Address to a different address on the same subnet as the existing network that you noted early. (example: if the existing network is 192.168.1.1 then set the Local IP Address to 192.168.1.2)
- Set the Gateway to the Local IP Address of the existing network. (example: 192.168.1.1)
- Set the Local DNS to the Local IP Address of the existing network. (example: 192.168.1.1)
- Click Save.
Change the FlashRouter's Operating Mode
Navigate to Setup > Advanced Routing

- Set the Operating Mode to Router.
- Click Apply Settings.
Reboot your FlashRouter
Power off the FlashRouter for 30 seconds and then power it back on. When it boots back up you will be able to access the FlashRouter’s settings at the new Local IP Address that you set. Your existing network and the FlashRouter’s network will now be bridged wirelessly.
Back up your settings
Navigate to Administration > Backup
- Click the Backup button.
- A file named nvrambak.bin will be saved to your computer.
- You can load nvrambak.bin to restore your settings in the event of a reset.